Archive for November, 2008
Stuff yourself silly- Saturday Sketch
Nov 22, 2008 Author: mytime | Filed under: Home decor/3-D items, My Timeless Templates, Saturday SketchI can’t believe I got this post done EARLY! I have been so busy and slacking on the Saturday stuff!
Well its Saturday. My most LOVED day of the week 😀 Thanks for stopping by to join me in celebrating today. Well I guess technically we should really celebrate everyday we wake up, shouldn’t we? There is something good in every day. So think about what is in your own life that is good.
Hopefully my post will be one of those good things that get you inspired to get stamping 😀
Now every Saturday I host a sketch challenge here on my blog. This week I decided that we would use one of My Timeless Templates © for the sketch instead!
Today’s “sketch” will use Stocking Stuffer © Keyword will be mytimesstuffer if you upload to a online gallery.
UPDATE: I am happy to also update you and say that with all future template downloads we will include a general guide for instructions of how to put it together. We don’t want the instructions to limit you and prevent you from using creative liberty, or whatever works for you personally when assembling, just to be used as a general guide for some whom may need it :F
Many of you aren’t too into 3D projects, or are afraid to even try. This template makes everything so much easier. Just print, cut, score and go! It’s free and you have nothing to lose. You may get hooked 😀
Now this isn’t a template you have to PURCHASE, it was part of the Freebie downloads, so there are NO excuses 😀 If you have been putting off trying the templates, or already downloaded, but procrastinated making something, then KNOCK IT OFF! LOL! Procrastination is a BAD thing. Get crackin.
If you haven’t downloaded YET please read the INSTRUCTIONS!!!
You also want to make sure that your Page Scaling section when printing is set to NONE.
You may also check the Q & A section I have HERE.
Now don’t feel limited by the “stocking stuffer” name. You will receive an Idea Catalog when you download , with 5 exclusive ideas (non-holiday :D) to use this template for. So get creative. That should get the ideas flowing. You can also view all my own template creations HERE.
Now for the FUN part! My sample for this week 😀
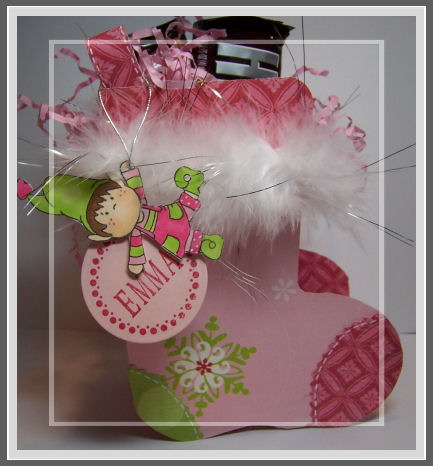
Stuffed with goodies-For Emma
Is this not adorable? When I saw the position of the lil elf in SugarPlums North Pole set I thought how cute would that be hanging from MY stocking template?! So I jotted down my idea in my creative notebook to pull out when I had more time or needed a great gift idea. You never want to forget a good idea when it hits. I have lots of that stuff jotted down in hopes to get to it, someday!
NOW is that time
I know I said to NOT get limited by a Christmas stocking but I have gifts to make for the holidays and this is doing double duty for me 😀 Maybe you too? If you have a secret sanata gift or a holiday swap ANYTHING is appealing when wrapped in the right package 😀
I loved that holiday paper by SEI. Its so pretty, and it is double sided, so perfect for my template 😀 It also inspired my colors.
Now Amber is in Ballet class, and the girls swap a gift with a classmate. It just so happens she got her little BFF Emma! (I wonder if that was rigged by the dance teacher? :D) Now the monetary limit is $5 per girl and it is important that be stuck to. Don’t want anyone feeling awkward. I don’t know about you, but gift packaging where I am ALONE can cost that! Well I decided I would make the most of it, and create an UBER cute Stocking Stuffer © package, and STUFF it to the tipity top with fun stuff from the Target $1 spot. Then how fun to personalize it too 😀 Gotta love being a stamper.
Emma Tag
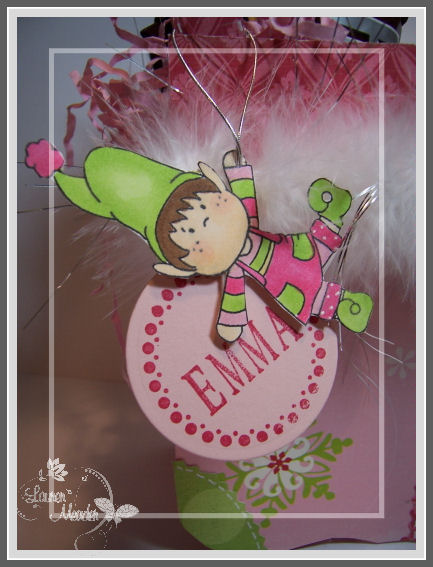
I used my JustRite Stampers circle border and alpha from the Two Monogram Stamper Kits (Normally not sold together but) I about fell over when I saw the deal…………………….
Now how cool is this-upon linking I found this:
JustRite Stampers is having a Thanksgiving Buy one Get one FREE! Sale!!! Details HERE! Sale ENDS on the 30th!
OK you so need to RUN to get in on that! OMG! If I didn’t own it all already I know I would. (Yes I have a shopping problem, I know about it already, no lecture needed)
Back to the template details- I printed my template and for the heel and toe patches I used pinking sheers to trim down the design a bit on the heel. That is what I mean by taking creative liberty. Don’t be afraid to change something up to suit your design. White gel pen used for faux stitching. I also rounded the top corners of the stocking cuff. After it was all assembled I added some furry white trim stuff I got at Michaels for that little extra holiday UMPH! Loving that stuff too.
I hope she likes it.
I know Amber was mad I put Emma’s name on it because SHE wanted to keep it for herself 😀 That made mommy feel so good. Plus getting a huge leap on these Holiday TO DO’s is always nice too. Never too early. I hate running like a mad woman close to Christmas. It takes away all the JOY of the season.
So that is all for me today. I have many more things to follow, so stay tuned.
Be sure to check in on my Sketch Team to see what they have created with the Stocking Stuffer Template.
Now it’s YOUR turn! Send us a link here, to wherever your fabulous creation is posted, so we can all check and see what you did.
Till tomorrow.
The only kinds of critters I like…..
Nov 21, 2008 Author: mytime | Filed under: Cards, Home decor/3-D itemsI did Noah’s party Smilebox. That is why this is SO late!!!
Now let me tell you that I am NOT a fan of any kind of bug, unless it is a butterfly or in stamp form! LOL! I also HATE rodents (all forms) and REPTILES of all kinds. Especially snakes. Alexa seems to either share my feelings, or feed off my insanity. You will see in the photos!
So WHY have a critter party?
I don’t know! LOL! The things we do for our children I guess.
When Noah had his party I let him pick any animal that could be TOUCHED! Every thing the woman from Critters n Creatures brought was touched by each child! That rule also eliminated spiders (thank god) and snakes). We learned some really cool stuff about the animals too. Anyway, they brought out the legless lizard I was NOT planning on it being JUST like a real SNAKE! I literally screeched and had to leave the room so I didn’t upset the kids. It was pretty bad. It was squiggling HARD to get out of her hands. I would DIE if that creepy thing got loose.
I felt the same way about the Skink. It was FAST, and tried to run away.
OMG! That would have been quite the site to see if it did! I’d climb up the wall myself. I was shocked that I was so freaked out by most of the little critters! ICK!
I have to say the party was well worth EVERY penny, and Jay who scoffed at my brilliant party idea had MORE fun than the kids! LOL! It was definitely a very cool party.
 |
| Make a Smilebox photobook |
I didn’t include the individual photos of the kids in attendance since they aren’t my children, and some people don’t want their kids all over the Internet, so I kept it mainly our family.
Looking back at the baby photos got me in a real frenzy. Im an emotional mess this week! LOL! My kids are just growing so fast, and before you know it won’t even believe in Santa! That will be a sad day. Soon they won’t want to do craft time with me either. I will be embarrassing to them, and will only be good to play TAXI to take their friends all over.
I took Noah for his 6 year check up. He has always been on the 110% percentile curve for his height. His doctor said by the time he is 12 he will look me in the eye! I am 5’11!!! Where did my little colicky baby go? Yes, as an infant he was a true nightmare! I would have given him away to a stranger (that sounds horrible and cruel if you never had a baby with colic, but if you have, you totally get it) but by 4 months old he was the sweetest boy. That smile always melts my heart.
Anyway Noah has turned into an amazing BIG boy. He is a mini Jason, which will be fabulous for some girl someday. He is very handsome (looks just like daddy) sensitive (like dad), and caring (maybe both of us?). He is outgoing (like me), smart (like dad), responsible (like us), creative (more me!) and has my OCD! LOL! That isn’t always a bad thing. I am so proud of him. He is an excellent brother to his sister’s (like his dad). He is the little caretaker of the family. He looks out for everyone. He has lots of friends and is just my great little helper. He makes me laugh and want to cry all in the same day! He’s the kid who will make you pull out your hair, but then say the sweetest thing you ever heard, all in the same breath. Im so happy God blessed me with him-he is the best “accident” that ever happened to me!
Anyway I figured I would share what we did do for the favors! Maybe give you a few ideas.
First up Party Cubes!
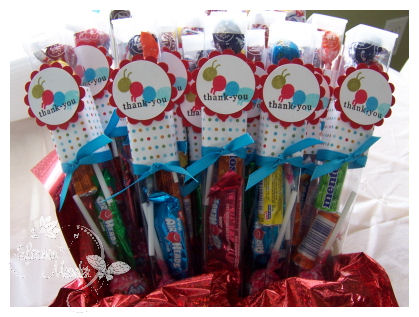
We made 20 cubes full of candy!
Now before I get hundreds of emails about the SQUARE test tubes I will tell you SOON who is carrying them 😀 You will be pretty happy when I share. Yes, that IS a huge hint!! It also holds a great amount of stuff-as you can see.
So I filled them all to the tipity top, and decorated the tubes with some old SU! paper I had to match my candy, and party theme colors.
The best part was I bought ONE bag of “Halloween” candy, and because the BAG was Halloween decor I got all this candy for 0.94 CENTS!!!!!!!!!!! BARGAIN!!
It has gum, mentos, air heads, and tootsie pops! I divided them all out so each cube has the same amount.
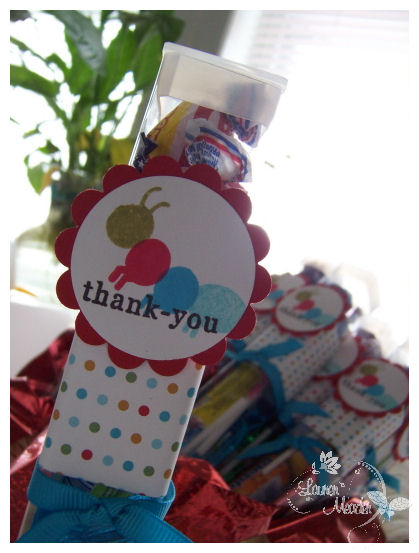
I used the Pond Life set to make my caterpillar, in colors to match. Cute huh? The “thank-you” is from Limiteless labels. That set went perfect with out theme for the party.
These came together in NO TIME at all.
Having house guests (aka my brother and his girlfriend living with us) paid off in the party planning aspect! We had them help decorate, and Valerie had to do all the grunt work for the favors. In other words if I hated doing it (like cutting and tying a million ribbons, and punching cardstock) SHE got to do it! LOL! I was quite thankful for her help actually, because my mass producing time was cut in HALF! Plus she did a good job listening to my directions. Im pretty anal so that says alot!
Close up of the froggy game toy.
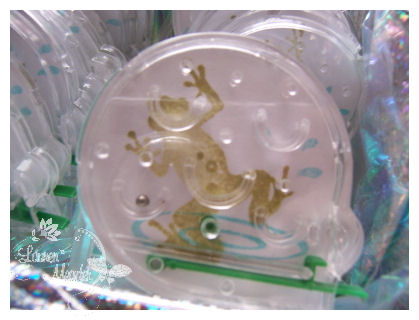
These are super cool! I just got some mini pinball games from Oriental Traders, popped out the back, and used it as a template to make my own party themed favor! Now you can make your own!
We just cut the back pieces, stamped with the frog image from Pond Life, and popped it back on! Pretty cool huh?
Here is the basket of them.
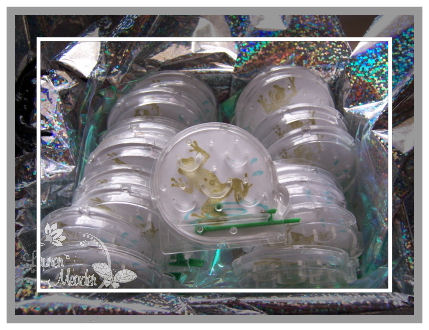
Are they not SO COOL?! Seriously!
We also had some gummy spider webs and a slimy spider too! They were Halloween sale items so for less than $1 I gave those out to the guests too.
I can’t tell you how fun this party was. I hope Noah remembers it for the rest of his life!
SO that is all for me for today. Time is ticking and I have a full day ahead (and I have to work out before Alexa gets off the bus!) Thanks for stopping by!
Tomorrow is the Saturday Sketch, and you will NOT want to miss it!!
Till then
 |
| Make a Smilebox slideshow |
OH my word is this ever LATE! We are a month and a half past this party, and I am just now posting this! AND Im only posting it since I want to post Noah’s birthday Smilebox, and I will feel extremely guilty if I do that one before this one! YIKES! Oh motherhood. Gotta love the daily dose of guilt. Weather its because you yelled at them for the 60th time to not yell at their sibling (I know it makes no sense but I know “I” do it! Not good), or had to take something they love away because they didn’t listen, then YOU feel bad………ugh! This is the stuff they don’t put in books, and most of the books that are written for parenting, I believe is by the CHILDLESS! Its so much easier to say WHAT you should and shouldn’t do when you don’t have them! LOL! Before I was a mom I always said ” I will never do X.” 9 Years and 3 kids later………..here I am, often doing X.
I am now going to run and edit the photos so Amber & Alexa can make their TY notes. See, really late on those too. I still have TY’s to get done from a gift Alexa got from my PSF’s in MAY! See people I really don’t get it all done! I do procrastinate :C Boy do we have a bunch of TO DO’s for afternoon craft time this week.
Now Im in utter panic! These are ALL so late :C
Not good. Why did I even begin this task today? I guess to get it done.
Anyway details of Amber’s 4th birthday party, if you weren’t around then.
We had her party at Empire Beauty School. Each girl got nails painted, hair & make-up done! They had a blast.
In the photos you will see Amber held up her nails ALL day, because they told her to make sure they didn’t get ruined while being wet. I don’t think she hardly put them down. As for the make-up she was like a PRO!
All I could think the ENTIRE party was looking back on this day, the day she gets married! Time will just fly by. That is what that whole thing felt like to me. How am I suppose to entrust MY BABY to some guy someday?! I know crazy. She may decide to NOT ever get married, but still we all think it. Then I think she better get married, I want grandchildren! What if she doesn’t want children?! What then?! Crazy. I often get ahead of myself.
I just told myself-enjoy this time while she is little because before you know it she will be in the world, all grown up. I get weepy just THINKING about it. I know it sounds CRAZY since she is ONLY 4 but seeing my oldest- Alexa be 9 is a killer! Where has the time gone? Seems like just yesterday SHE was 4. You have no idea how fast it goes past us. I realized how quickly during Alexa’s 2 1/2 years of chemo, thankfully it went by in a flash.
I think because Amber is my “baby” and like my little sidekick, its a real killer for me to see her grow so fast. Being the 3rd child she seems to advance so much quicker. Much more independent and “old” for her age. Im sure our life circumstances only pushed that even more so.
I dont say that because I love her more or less than the other 2. I think anyone who has more than 1 child knows you develop different relationships with each child. You love them the same, but each one has that special something that the others don’t. Thats what makes THAT person as special as they are. OK I hope that makes sense to you like it does to me, and if it doesn’t thats OK. Im just blabbering on about my thoughts
Time to get going on those TY’s.
I have Noah’s Smilebox and stuff to do, as well as LOTS of eye candy. Having said that, I have 500 photos to go through and edit to get to that point so stay tuned.
OH gosh, now I really wish I didn’t think about it all.
“Rock” a bye baby
Nov 19, 2008 Author: mytime | Filed under: CardsWell I don’t know about YOU, but I know I LOVE to maximize the use of any of my stamp sets. In other words images that can be versatile. Especially the holiday sets.
When I say Christines set SugarPlum North Pole– I immediately saw a baby card!
Not just ANY baby card either! An interactive baby card 😀 Read on.
EDITING TO ADD: If you would like to see other versions I have created, as well as my instructions READ HERE
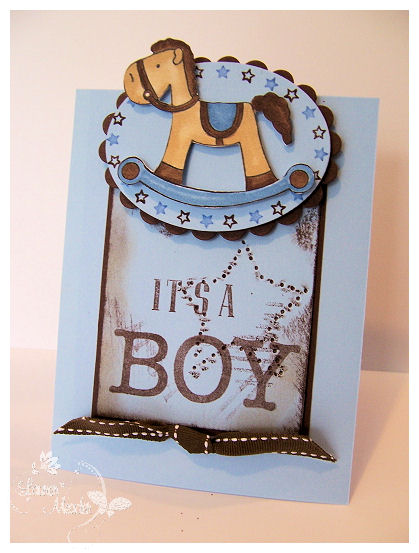
Rock a bye boy.
This little horse image is just SO cute. I fell in love with it instantly. I knew I wanted to do a baby boy card so that was my starting point.
I used the Harmony Classic Oval IIfor my oval star border, colored with markers. Thye fit perfectly in the oval nestabilities.
The horse was colored with Copic markers, then cut out.
I had to make it all rugged and boyish!
To announce “It’s A” I used myJustRite Brayton Font. I received MANY emails about these font’s and which to pick. Well I definitely think everyone NEEDS at least ONE! LOL! As far as what to pick, its really about personal style. Its cool because you get 3 sizes of alpha’s with ONE purchase, and stores EASY! No big bulky stuff from woodblocks. Speaking of woodblocks, I do use the Harmony block to assemble my verbiage. I then took the block (it has lines on it ti fit your leeters into) and inked it up a bit and randomly stamped it on my card. Like I said, make it a little rugged.
The “BOY” is from theClear Uppercase Typewritter Letters, and I used dark chocolate ink. I got that set on a whim and liked it. Especially for my kids to use 😀 Its really helped them with the ABC’s.
I used mycuttlebug stars (on sale 25% off!! Noticed when I linked) embossing folder, and added ink into it prior to embossing, for the inked debossed star that looks pierced! I always think BOY when I see stars! Not sure why.
Now comes the interactive part. Last month I was on a “cards that move” kick, and this was the first of the bunch! It really sparked all my other movable creations.
So tilt the card to one side and the horse “rocks” back and forth!
I know not a huge epiphany since it is a “rocking horse” but I was happy all the same.
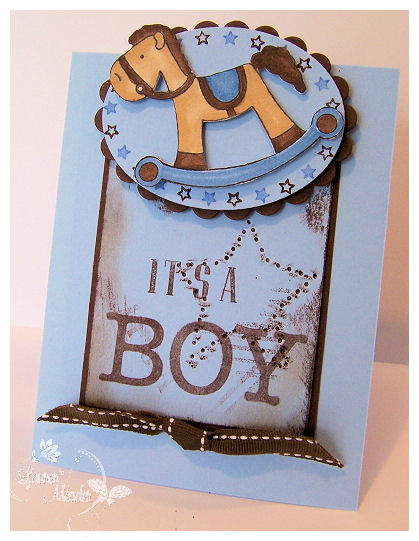
I manually turned it for photo purposes, but its a really sweet baby card idea from that image.

See the rocking motion. I think its so cute.
I have many a friend who are expecting boys! So this will come in handy.
I have much to do, so I hope you get inspired to give this a whirl. I have done similar cards in the past. They are so fun.
OK I’m off. Till tomorrow, when I HOPE to share Noah & Amber’s birthday party Smileboxes. Its been a while. I still have their TY’s to do! But I need photo paper , so that is the excuse Im sticking with, for now. Sometimes I feel like the kid who didn’t do their homework! Heck I even have excuses for that from time to time.
New Year resolution
#2-No more EXCUSES!
Awe! Stamping world, you made me feel so glad that I actually DID share my outpouring of thoughts, truths and struggles in my weight-loss post! I feel so happy about it now. I realize MANY of you DO know how hard that was to put myself out there (especially the photos! EEK!) and to hear so many of you get inspired for TODAY (making TODAY be your tomorrow-not next week , or next year……….) seriously made me so proud of YOU. I have gotten so many amazing stories and emails from many as well and I want to thank you each for putting yourself out there too, and sharing.
Now I took a day off from posting yesterday, as I had Noah’s birthday party Sunday. He really loved when I read him all your wishes and thoughts on his project using All Boxed Up!! I also had some deadlines to meet. AGAIN limited time. I have to stamp to actually be able to share stuff right? This is a hectic time of year for everyone.
So let me share a holiday tradition in my house.
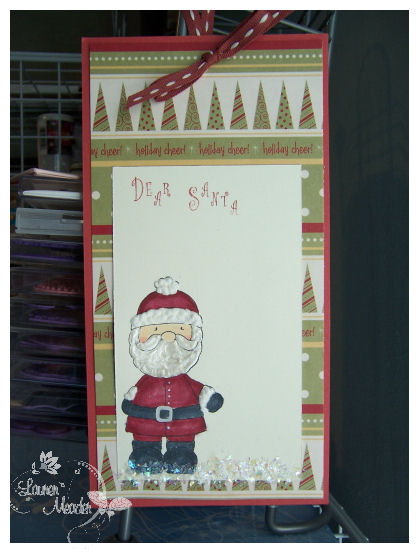
I’m sure if any of you do the “Santa” thing, that having your children write a letter to Santa every year may be something YOU do too. So here is my letter idea for this year.
Dear Santa letters, to be filled out.
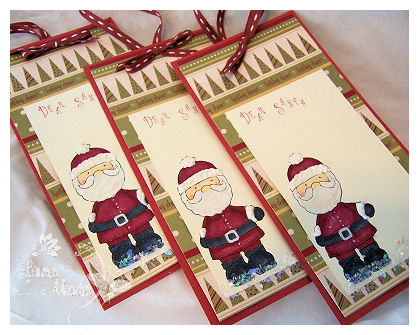
Each child gets their own.
They use to cut/paste photos from magazines, now they are older so I try to get them to WRITE the letters. I didn’t want to do that BEFORE I shared the project though 😀
TIP: You can let your child ACTUALLY go to the post office and MAIL it! Just put Santa’s address on the envelope, and your return address label in the upper left corner! The post office will send it back to you. Then you can get it back, hide it, and save it for years to come 😀 Just make sure your kids don’t check the mail the next day! I also like to put a current photo with the year, and child’s age on it, for future reference.
Anyway, the letters to Santa is a real BIG deal in my house. I always try to get the kids to pick their favorite things to ask for BY Thanksgiving. Santa shops on Black Friday, so he needs their lists early! LOL! Speaking of which Thanksgiving is NEXT WEEK! WHAT!!! UGH!! I better get crackin. They also get to pick what Toy for a Tot that will be put in the box, OR we take a Wish Card off the tree at Walmart. My kids have so much stuff, the LEAST I can do is give a gift from each of my children to someone else. I am seriously cutting back this year. They don’t need so much stuff. We are trying to focus on thankfulness and the things that matter, like health and love of family stuff. We are waiting to hear back about when we will be volunteering this holiday at the hospital 😀 Its a way my family can give back while the kids are on vacation. Jason saves some vacation days for the week of Christmas, so he has extra time off. I think it will really fill us with the real spirit of the holidays. I always swore once Alexa was healthy enough we would do our part to make a difference. I can’t wait.
OK back the the letters!
When I saw the latest release by C.C. Designs called SugarPlum North Pole ,I knew it was perfect for this years Letters to Santa! So I got to work.
I wanted the heading to read ” Dear Santa”, and have a neat, yet hand written look to it, so I used my Curlz Font from JustRite Stampers, and purposely made my letters off set using the Harmony rectangle wood block. I think its cute.
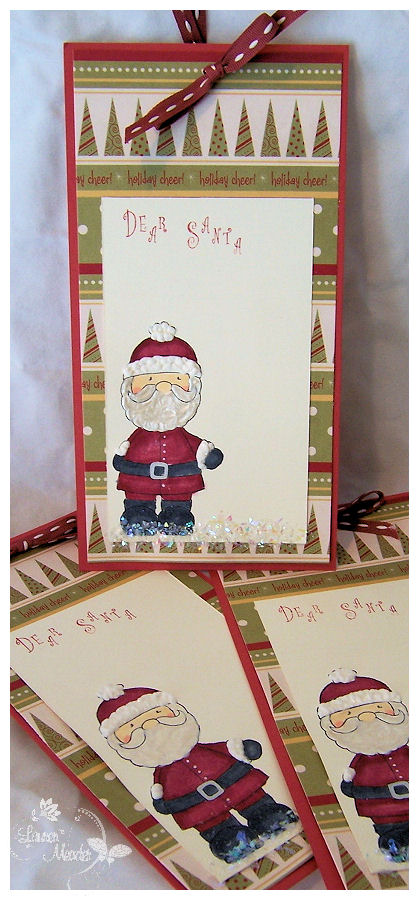
I used the Pretty Papers in Winter Wonderland by Lizzie Anne Designs as my inspiration. The colors also matched the old red SU! use to carry (sorry the name escapes me. but it doesn’t matter since its retired)
These can HANG on the Christmas tree too.
I usually do that until the week of Christmas. I tell my kids the elves have to make the toys first so there is plenty of time to mail them.
Now for the “details”.

So, I colored him with Copic markers. Silver pen for the buckle.
I used Liquid Applique on the hat puff, rim and coat cuffs. For his beard I chose a white liquid pearls, for a nice look.
The “snow” is that chunky cheap glitter I bought at Michaels and have been using on EVERY winter card I have made this season! It sells for $2.99 for a large jar. Its near the kids crafting section, and way cheap!! I am in love with it. Its perfect holiday snow.
These 3 letters took a whopping 20 minutes to make. Not bad. I *may* remake them and let the kids decorate them as THEY want. We will see! LOL! Sounds like another great afternoon time craft 😀
Well I am off to do my exercise video. I hope you squeeze SOMETHING in today too. No more putting it off. Oh and get some stamp time in as well 😀 That is when crock pot meals come in handy 😀
Till tomorrow.
My Time to share my weightloss stuff BEFORE & AFTER
Nov 16, 2008 Author: mytime | Filed under: About MeOK I am all stamped out. So Im finally going to share some things many of you seem to want to know. I know this is primarily a stamping blog but I also share everything else! Basically if its on my mind, something going on in my life, the world knows about it. Why not share a huge part of something I have struggled with?
You all are just so sweet for all the lovely comments regarding my latest new photo! I am eatting healthy, exercising DAILY, and drinking lots of water. I really feel amazing about myself, and am proud I have accomplished what I set out to do. I changed my life for ME. No one else.
I didn’t think anyone would care to read the times I’ve posted aobut my struggles or my exercise stuff and whatnot but MANY have, as it is part of your struggles too.
Now this is LONG so you can stop. No guilt 😀
I have to say spilling all this for the world is NOT easy! Especially sharing my awful photo of a day I felt my worst. The words weren’t as bad as sharing the PHOTOS!! I know this all just rolls out on my blog but I almost deleted it like 20 times. No lie. Its a truly sole baring post. I felt if I can write all this to share and help then I better suck it up and SHOW you that it all works.
Reality of it is, I have been thin my whole life. Never struggled with my weight. Never worked out. I was just thin and had NO interest in being in SHAPE. Well then I get pregnant with Alexa. It was a stressful pregnancy and it was the start of what I call “stress eatting”. I began eatting to fill my worries and fears. Not sure if it helped, but it did allow me to gain 72lbs! Nice huh? I felt so defeated after giving birth, thinking it would just FALL off over the next few months. NOPE! Only lost like 25lbs, kept the rest. Anyway I really thought I’d NEVER be thing again. Well, I worked it off and got in shape after my divorce. I never felt better.
So began the rollercoaster of weight issues.
I went on to have Noah, lost the weight. Then I had Amber, lost the weight. Every time with exercise.
So there I was thinking I didn’t really have an issue since it only came with pregnancies.
Then Alexa got Cancer. My problem came back! Having NO activity LIVING in the hospital for about a year, my best friends were cream cheese brownies, lots of sugar and coffee and whatever other bad thing I could possibly get my hands on at 2am, to help me not deal with my emotions. Over the last 2 1/2 years I see photos of myself where I got to my FINAL weight point, would work it off, then slowly climb back up during another cancer crisis. I would eat my worries away. If I did eat something bad, I would “punish” myself for it, by then eatting something else. Not good. Also the never ending fad diet, not easy to stick with forever!
So I decided for a healthier eatting LIFESTYLE change. Thats why I LOVE Dr. Phil!! He is so realistic about it all. Diets don’t last forever. You need to change the way you LIVE.
I don’t care how thin you are, or your gene pool, if you eat really bad it will catch up with. Once you have those fat cells, they are ALWAYS there, waiting to fill up!
Now I can think of a MILLION excuses as to why I could stay unhappy with myself, WHY I would wait to start-tomorrow, then tomorrow turns into weeks. Why I have NO TIME to exercise, but do have time for other stuff. There are NO MORE excuses. NOW is the time. I put my TODAY outlook on so many other aspects of my life, to finally use it work on this issue now.
I know not EVERYONE is interested in this, but many are, so I’m here to share. If it helps ONE of you, then fabulous. As women I think most of us can say we battle with our weight and what we *think* we should look like.
Now keep in mind I’m not a doctor, or dietican. I am a stay at home mom, to 3 kids, with an INSANE life and a BUSY daily schedule. Just like many of you. I’m just happy to share things that have worked for me and that is basically HARD WORK, with a concious effort to eat healthier. I take food ONE obstacle at a time, and relish in my defeating each as it comes, not looking forward. If I have something I shouldn’t I have it in moderation, and make a better meal choice for my next meal. All about balance.
I have no magic pill or wand that can make anyone healthier or an easy fix to get into shape. Getting out of shape is EASY, getting IN shape is hard work. If it were easy everyone would be models 😀 I had a goal and then worked my hiney off (literally) to reach that goal. The biggest hurdle we all have is our MIND set.
I am happy that weight LOSS won’t need to be a part of my New Years resolution! I can focus on maintaining a healthy lifestyle, and work on other goals instead. I’m not where I ultimately want to be yet, but I know I am not far. I am determined to get through the holidays not a pound heavier. My goal is MODERATION! I don’t need a whole pumpkin pie to make me happy. Only a sliver.
I’m not on a diet, just changed my eatting HABITS, so its not a constant deprivation.
I have received MANY inquiries as to what I have been doing to exercise, and eat to lose weight.
I can’t even believe I am going to say this, but over 12 weeks I have lost 35lbs! I didn’t realize I had 35lbs to lose! LOL! OK well I wanted to lose it, but didn’t REALLY think it would actually happen.
My “OK I am so done with this” moment came on my 30th birthday in May. I was turning the BIG 30, and wasn’t happy. I wanted to be a HOT 30. I wanted people to say “What! You had 3 kids?!” not ‘Well, you have had 3 kids”.
Here is my AWFUL photo that I didn’t even want to look back on
My birthday May 3rd.
I HATE it. This was me. Its also the ONLY photo I let anyone take of me for MONTHS!
Now here was one from Alexa’s birthday Sept 29. Feeling and looking like myslef.
Now I didn’t actually DO something about it until the first week of September. I know! I told you, always “tomorrow”.
Now after losing another 17lbs-this is on the 7th of November

See the difference?
I don’t believe in scales. They make you CRAZY! So I don’t own one. Since Alexa has monthly doctor appointments I began weighing myself there ONCE a month. For ME,that was a good thing. Right before I started in August, then the following month September lost like 18lbs, then again last month (which I had hit a plateau so that wasn’t a fun scale day :C) lost 4 lbs, now this month lost another 13lbs . Boy was I super duper happy when I saw the numbers on the scale this past Wednesday! It was MORE than I thought it would have been.
I started a work out that had me take my MEASUREMENTS the day before I started the workout program. So I figured watching those measurement , and my CLOTHING was most important.
I also marked the WEEKS on my calendar on the fridge, to keep me on track, and knwoing where I was in the programs.
I never leave the house to get in a amazing workout, and I do it in my living room! LOL! In between all my daily things with the kids 😀 I have an elliptical machine, which was what I started with (had it for like 4 years) but I mainly use DVD’s. Many of these videos also have QUICK workouts for your SUPER busy days. I try to keep mixing it up so I don’t get bored and I work different muscles.
IMPORTANT NOTE! Im not affiliated with ANY of these programs. I just feel like I could be on their advertisements though !LOL! They truly helped me get to my goals.
So here is what I do
I do my best to work out EVERY DAY! Now that may seem excessive, but not when you start to enjoy it, and look forward to that time. Even if its 10-20 minutes. We ALL can find 10 minutes in the day. SOMETHING is better than NOTHING! Its now a part of my daily routine, and if I don’t get to it then I feel tired, blah and CRABBY!! I love having it be part of my day now. Its like my coffee use to be.
NOTE: the first 2 to 3 weeks of this lifestyle I was not overly thrilled with the working out and change in eatting habits!
Now when I eat I use a KIDS plate, or just dish out HALF of what I would normally have on my plate. PORTION control! It is RARE I am still hungry after I eat the smaller portions. I think we get use to eatting MORE, so we THINK we need more, or are still hungry because we are mindlessly eatting all the food on our plate.
Once I got over the CRAVINGS it was smooth sailing. It also takes about 2-3 weeks to have your first real “WOW! Are you losing weight? You look great” compliment, so that helps!!
I chose the Mitch Gaylord Melt it off program. This is THE one that actually got me motivated to START! I found it motivating and helpful. It was the commercial that made me take that first step back to health.
This one was the real start of everything for me. Yes, it was from an infomercial and it works!! I love it. It uses a 2lb “G Ball”. At first I couldn’t do MOST of it, but within 3 weeks I was seeing great results. My brother is in tip top AMAZING shape. He is a professional arm wrestler and he would make fun of the workout. Well I made him do it with me, and I kicked his butt with this video! I felt great! LOL! He was definitely impressed and surprised. Granted I STILL can’t do some of it, but that gives me goals to meet.
This is the one when you start, where you take your measurements. There is nothing like doing the MATH when you are LOSING weight.
I have gone down 3 pant sizes. I now weigh what I did in highschool ![]() only I am actually toned! LOL!
only I am actually toned! LOL!
I have lost 7 inches from my chest (OK honestly not THAT happy about that-but oh well! LOL!) 6 3/4 inches from my waist, and 6 3/4 inches from my hips!
Now some other DVD favorites of mine:
The Biggest Loser-Cardio Max- Purchased at Target.
There is NOTHING like wanting to QUIT your workout, when you have people far larger than you KICKING your butt, doing the SAME workout! You can customize this and it too have various levels to work up to. If you have seen the TV show you know these are people JUST like YOU. So get moving 😀 Its really amazing.
Jillian Michaels- 30 Day Shred-another Target find. This is my current “go to” workout.
She is the insane one from the Biggest Loser. She works them super hard. So when I saw this video I knew I needed it! LOL! She has a series of 4 levels. 20 minute ONLY- kick your butt (in one exercise quite literally), I think Im going to throw up, amazing workout. This helped me get off that Plateau. In 3 days of her workout I lost ANOTHER 1/2 inch from the measurements! I DO recommend getting in decent shape before beginning this one 😀 That is just MY opinion. But you are guaranteed results in a 20 minute workout, and its so true. I feel I sweat even more in this one, than some of the hour workouts I do.
I also use Turbo Jam. Another infomerical.
I love this one. It combines boxing exercises to kick your but with an aerobic like workout. At first you need to get use to the moves, but once you do you have fun. I used this once after I had Amber and needed to get back into shape for when Jay & I got married.
Pick Your Spot Pilates-Yes another Target one. This is full of 10 minute segments that really work you! Who can’t find 10 minutes? IF you are reading this post, then you certainly can fidn that 😀 AFTER you read my blog! LOL! This one was perfect after I had Noah. Having a colicky baby and little time I got back to pre-pregnancy weight in no time.
If you don’t know what is Pilates-this type of exercise is PERFECT for those of you with back, and joint issues, or who don’t want to jump around to break a sweat. You don’t need to be like a human GUMBY doll to do these, like you do in yoga.
I like this stuff when Im tired, or just want to work on strength. You do get a good workout. I’m still into the cardio/weight training stuff at this point, but still use this one several times a month.
Honestly if you aren’t doing this for YOU, then it won’t work. I reached my limit. My “it” moment when I had enough of failing at the “diet” and saying TOMORROW. Enough of NOT wanting to be in photos or feeling icky about myself. Enough of buying clothes that make me LOOK thinner, when I want to just BE thinner! Now I go in the store and get something OFF THE RACK!
First thing is first. Be realistic. Be honest with yourself. Write your goals down.
Some of this is from the Mitch Gaylord journal and it truly helped me. I also put a photo of me that I LOVE in plain view for me to see when I am working out to remind myself of WHERE I wanted to be! Next to it was my WORST photo, so I had a visual of WHY I was really doing this. Now that BAD photo is gone, but my old one is still there to keep me going.
So now ask yourself-
Why are you doing this?
What is your purpose or desire for changing yourself?
What is your ideal vision of yourself?
What past limiting beliefs have stood in your way?
What are you committed to doing to relieve those beliefs?
What was your defining moment of needing a change?
Then get that photo and start that journal
The important thing to remember is in the beginning ALL of it is difficult. Its alife change. There may even be some excising you just can’t do! Try to modify them if you can, and try to keep up as much as you can. Before you know it, you will be a PRO! Just keep with it. Keep moving.
Next people asked what KEEPS me motivated.
I purposely buy clothes that are a LITTLE tight, or the next size down. I work to make them then fit! I wait a week or 2, then slide them on! That is the BEST feeling. I am also refusing to GO UP a size. If things get snug, I now know to kick it up a notch and not let 10lbs creep back on. THROW AWAY those bigger clothes. Then you have NO safety net! LOL! I mean it!
So that is it. Now for the FOOD stuff.
I MAKE myself eat breakfast! Its the most important thing you can do to get your metabolism going. I read NO CARBS in the morning. It makes you MORE hungry through the day, so I have yogurt, cottage cheese, fruit or something like that. Don’t get me wrong me wrong I still eat the occasional waffle! LOL! Just not so much syrup and butter. I aslo LOVE Quacker Oatmeal (weight-loss one) in banana bread! So filling and really yummy.
I cut out my coffee, and if I do drink it I use fat free cream and Slenda (that was the hardest part)
I drink TONS of water! Usually a full glass before meals. And I LOVE the Crystal Light packets. The water alone helps. The packets spice it up so it doesn’t get BORING!
No more SODA! I use to love diet Pepsi. Now it makes me SICK!
Have healthy snacks on hand. Readily available. I love granola bars, nutragrain bars, and stuff like that. They are tastey. and low cal. There are SO many 100 cal packets of things you can buy there are NO excuses for KILLING your healthy eatting with a SNACK! Also only eat ONE!
Make sure I stay on TOP of my hunger. If I feel hungry I eat something healthy before it turns into a handful of chips or cookies. Usually 2-3pm is my point of real hunger!
I take green tea pills. I heard they help metabolisim. Not sure if its true but oh well.
I cut my portions in HALF!
I LOVE SmartOne frozen meals! They really good, are quick too. Part of my problem would be skipping lunch cause I don’t eat what the kids do. They are really yummy, and are along line with Weght Watchers. They even have desserts! Also yummy. I like the points system so you can whatever you want. I think that “diet” works for so many because you can eat whatever you like, but it teaches moderation! I just try to live in moderation mode.
Going out to eat. Well like my meals I don’t clean my plate! I also try to go for something “healthier” than I would normally eat. Im not talking salad, Im just saying instead of FRIED chicken I may look for GRILLED! LOL!
I don’t snack after 7 pm!
If I want something bad I ask my self 100 times if it is really worth eatting! Often just by checking the calories I don’t want it bad enough. Then if I did. I usually feel sick after from all the sugar, or I can’t even finish it! NOT a bad thing 😀
Don’t go to the food store HUNGRY! NO! NO! NO! That is when the worst decisions are made.
Most importantly I have recruited my husband as reenforcement! Before we go somewhere that I KNOW may be full of temptation I ask him to keep me in check. By this I mean, I run by him what I am thinking of eatting, he will then say Are you really sure you want to do that. What about having X instead?
Now he isn’t doing this on his own and to be annoying. I ASK for it! It saved me many times from regretful eatting.
Lastly in recipes substitute LOW fat or NO fat items. We always did this so that wasn’t a hard transition for me. I think it adds up though.
So I think that covers it. I hope I helped someone in some way by sharing my own issues, and helping you see I am a TYPICAL person just like YOU! Same struggles. Im not famous, I don’t have a chef, a personal trainer, or any of that fancy stuff that movie stars have. I am a daily work in progress, but I am doing it. I feel so much better that I did 12 weeks ago! THAT makes it all worth it.
Better yet since its a way of living, I don’t feel deprived! I CAN have something. I just don’t have as much.
Start now and by the holidays you could seriously be transforming yourself too.
I hope this didn’t seem like a big ole lecture. Someone on your back doesn’t help you to want to get healthy. I just felt I would openly share what so many have contacted me about.
Now that Im done Im back to thinking I should delete this! LOL!
Oh well. I am leaving. I have Noah’s Party to get ready for.
I will leave you with this quote I always tell myself:
Let TODAY be your TOMORROW!
A cool contest I found.
Nov 15, 2008 Author: mytime | Filed under: UncategorizedCONTEST INFO:
Just go to www.PictureItPostage.com and click ‘try it now’ to get started making your own postage stamps if you want.PIP is seeking the best of the worst photos through our “Get Real” Photo Contest. Pretty much, if you have a really embarrassing or unflattering holiday photos (the pictures that will absolutely never be on a greeting card), they want to see them and let thousands of people vote on them. They’re looking for the absolute worst and most hilarious. RULES Between October 31, 2008 and November 19, 2008, people can visit www.PictureItPostage.com, click on the “Get Real” contest button and upload their favorite real life photos. On December 1, consumer voting will begin and visitors to the “Get Real” contest website will have a chance to vote for their favorite photos. Winners will be announced December 11. THE PRIZES
Two grand prizewinners, one from each category, will receive a new Canon Digital SLR Camera along with five sets of 20 PictureItPostage Stamps™. In addition, eight first prizewinners, four from each category, will each receive one set of 20 PictureItPostage Stamps™.
Im going to try the postage, but I honeslty don’t think I have any really bod photos. Just in case YOU do-you may want to give it a try. I wish I did have soem doozies because them I could win the camera! LOL!
Good Luck
Papertrey Ink November Release-and Saturday Sketch!
Nov 15, 2008 Author: mytime | Filed under: Cards, My Timeless Templates, Papertrey Newsletter, Saturday SketchWOW! How can it be the MIDDLE of November ALREADY? Jay’s grandmother already called with confirmation of Thanksgiving Dinner plans! CRAZY!
Tomorrow is my son Noah’s birthday party so Im going to be working like a mad woman to get his party things done today. I am NEVER a last minute type of person so this is a KILLER for my OCD! We have about 18 kids total! Should be a total blast.
I hope you all enjoyed thePapertrey Ink release with all the countdown’s and design team samples. I really hope you are also loving the latest My Timeless Templates ©. I also hope if you have not already, that you try the 2 FREE templates we have for you! There is NO EXCUSE not to TRY one! You can’t get any better than FREE 😀
I have to say a huge THANK YOU to all of you who get so excited right along with me, and enjoy this new venture of gift crafting 😀 Preparing for that each month keeps me REALLY busy. I LOVE it. I really put in a lot of time to think of great ways to present these templates to you. Now while you are all downloading the newest of templates, I am getting started on next months! LOL! I know I find these templates REALLY useful, especially with the holidays approaching, and I hope that I have helped some of you save some $, creative time, and ideas this holiday season, making home-made holiday gift giving that much easier.
Now speaking of templates, I was holding out ONE more sample for you, just for today! It is my favorite project for this release!
I would LOVE to hear YOUR feedback on what you enjoyed here, and why. Im always amazed at what I love vs what YOU love 😀
OK the projects-
Teacher’s Apple- LOVE this set.
This uses the All Boxed Up © template in a fun and new way! It also uses Teacher’s Apple which I am TOTALLY in LOVE with! LOVE! You have no idea. For those of you wanting to mix up teacher gifts this year, you may just fall in love with this idea 😀
I mentioned before that the pretty pockets make a great base to many gifts on their own! So here is another example of that .
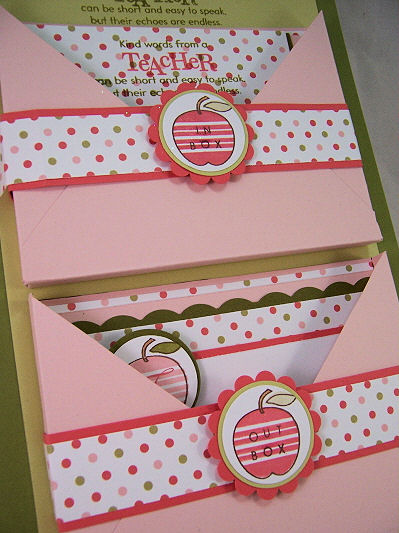
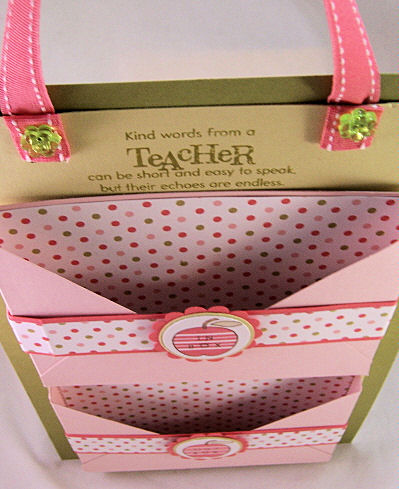
In & Out Hanging Mailbox

This holder hangs in the classroom, either by the desk, or by the door. You can even put it ON the door knob. It helps the teacher keep organized with letters IN, that need to be read, and letters OUT, that need to go home! This isn’t just stylish but its also practical.
I think its a super cute gift idea useful for ANYONE, not just teachers! Alter the design to suit receiver’s favorite colors or decor.
stamps-Teacher’s Apple, Simple Alphabet
paper-Polka Dot Parade, Olive, Spring Moss, Sweet Blush, Berry Sorbet, white
ink-Spring Moss, Sweet Blush, Berry Sorbet, Ripe Avocado
other-Spring Moss Stitched ribbon, making memories flower brads, making memories ribbon slot, circle punches, corner rounder
Now insert your Teacher appreciation card into the INBOX, and some monogram notecards, as a gift for her to send out, and place them in the OUT box.
View from the side-cards IN
View from the other side-no cards. I like to line the inside of my pockets. It makes it look a little more finished, don’t you think? It’s the littlest details that make you say WOW!
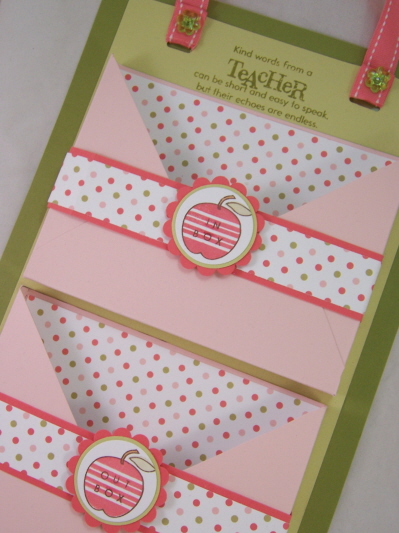
This is the view from the top
Now for the gift to go with the In & Out box
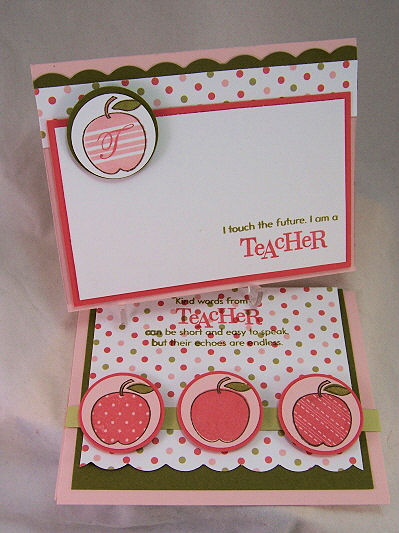
Well upon presenting this gift, I think a nice Teacher Appreciation card is in order!

This is the card that I created to write my appreciation to the teacher. I love the layout, and message it reads. I created some monogrammed note cards, to include as a gift, with a SIMILAR layout to match.

For Ms. Trefrey
This note set is for Noah’s new reading teacher! She is over the top AMAZING! I called the Principal just to tell him how much Noah has enjoyed his reading program with her. She has gotten him excited about reading in a way I could not. How can you thank someone for that? I hope this gift set will cover it 😀 Alexa is my “reader” and Noah is my Math wiz, but now I have hope 😀
I think a NICE set of monogrammed notecards would be PERFECT for the teacher! I have this simple design, PERFECT for nice notes home to parents, and I would put a set of 8 (with envy’s) in the Out Box, for the teacher to be able to send out notes 😀
Isn’t that so cute?
PS-Don’t forget when you purchase ANY of our My Timeless Templates ©, that you get an idea catalog of 5 EXCLUSIVE (full color photo) project ideas with step by step instructions, and supplies.
Before I begin the rest of the peeks, let’s share today’s Saturday Sketch, and my 2 designs for that! (using new release stuff)

Saturday Sketch
KEYWORD mytimess12
I love this sketch 😀 I interpreted it in 2 ways.
I am TRYING to spend more time getting creative with my photos. it is the part I loathe about this whole stamping thing. I think it makes a difference though. I take the time to MAKE the project, may as well make it LOOK as good on screen right? I think Santa needs to bring me a new camera! I think I could even have him write it off as a business expense 😀 Oh Santa…………if you read this, I need a new camera 😀
So here we have a card titled Every Happiness.
It used the New! Heartfelt Basics, and an older set-Flower Garden. I LOVE that sentiment set. I am a sentiment JUNKY, and this set is ROCKIN my world.
I love the colors, and the way the sketch worked for this design. The tag is such a cute touch. Not sure you can clearly se the vellum butterfly, but its a pretty, subtle touch.
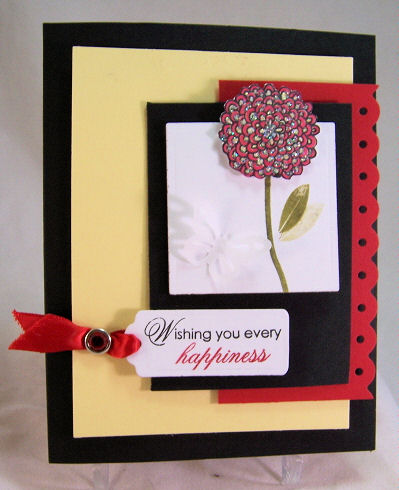
Close up of Every Happiness

Stamps- Heartfelt Basics, Flower Garden
Cardstock- lemon tart, pure poppy, black, vellum cardstock
Ink- black, ripe avocado, pure poppy, lemon tart, red marker
other- poppy satin ribbon, nestabilities square & tag punch, Martha Stewart butterfly punch, treading water punch by Fiskars
Now I have card #2 with the sketch! (I know Im over achieving this weekend! LOL!)
Ships Ahoy-
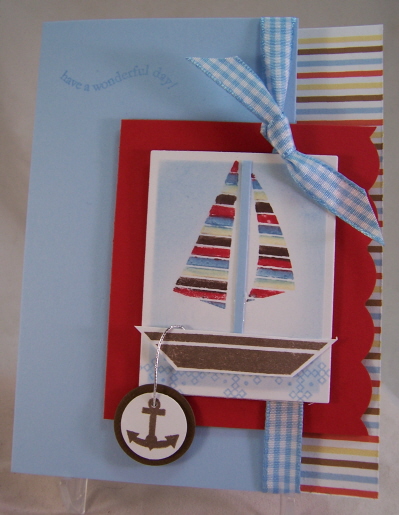
I love this little boat! Men of Life is awesome. Its great for those masculine cards, boy cards, or baby cards. I used my patterned paper as my inspiration for my sails. I didn’t follow my sketch EXACT, but this creation was certainly inspired by it. I’m loving the little anchor!
Here is yet another view of the details

The sentiment is from the Out of the Box sentiment.
Stamps- Men of Life, Out of the box (snetiment)
cardstock- white, pure poppy, dark chocolate, bashful blue, Ship to Shore stripe
Ink-markers from SU!
gingham from PTI, corner rounder, silver cord
I made the “ocean waves” use a stitched square image in the set. LOVING the colors and desings of the new patterned paper. LOVE!
Be sure to check out the Sketch Team for their samples with the Sketch!
Background Basics Stars set:
I love the bkgd set. I am a HUGE fan of Polka Dot basics, and this is another great set. I really wanted to use it as a MAIN focus on my creation here, and rather than seeing STARS, I saw posie’s!
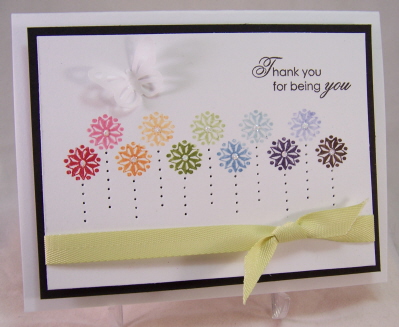
Pretty lil posie stitched stems
I think this was my favorite card! I love the black & white, with the contrast of a rainbow of colors from my “star” flowers. The spring moss ribbon is my “grass”.This is one of those under 10 min. cards. By simply piercing the “stems” you get a whole new look.
I also see PINWHEELS! Really cute.
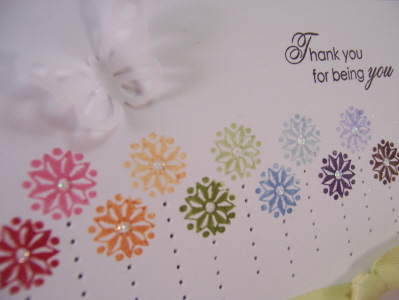
Stamps- Background Basics, Heartfelt Basic
Ink-black, various markers for direct coloring on stamp
cardstock- vellum, white, and black
Other- Spring moss twill ribbon, butterfly punch by martha stewart, paper piercer for stems
You know me & my butterflies! This is the latest punch from Martha Stewart. Its perfect!
I used my glue pen to add some glitter to my flower centers.
I also used Heartfelt Basics. Let me tell you that set is a MUST OWN!!!!!!!
Next up we have Lisa’s set Out of the Box.
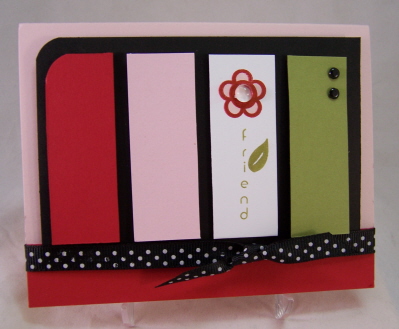
Stem of Friendship
Stamps- out of the box
Cardstock-sweet blush, pure poppy, ripe avocado, black, white
ink-sweet blush, pure poppy, ripe avocado
other-black brads, corner rounder, polka dot ribbon, clear bead
What stood out to me was the single flowers (of course) and vertical sentiments. I decided to create a simple color blocked style card, that really stuck out to me due to the colors I chose.
The little Robin’s Nest bauble was a nice little touch to the flower center.
I like making smaller images the main focus of a design. I had fun working with all the images (more to come!).
Well I am truly wiped now. I always have my Papertrey Ink “hangover” as I call it. I go into creative overload for like 3 days. This month I can’t afford that! I have Noah’s party to get things done for.
So there you have it for me.
Scroll down to the other posts through the last few days if you missed some stuff.
Thank you all again for taking time to check in! I appreciate being one of your “stops” on a busy weekend!
Enjoy.
My Timeless Template © Talk/Help!!
Nov 14, 2008 Author: mytime | Filed under: My Timeless TemplatesHi everyone-this is going to be a chat for the My Timeless Templates © be it thoughts, comments or questions.
I hear many of you have tried the free download -Stocking Stuffer, as well as purchased the templates. SO exciting-thank you for giving it a try!!!
I am flooded with emails (thank you for the support :D) and some are with questions.
I would like to ask if we can TRY to keep the questions/answers here so if someone else has the same one Im not sending 5o emails (no joke) with the same info. I’m not saying don’t feel like you can’t contact me! Of course you can, and I love hearing from you (that is why I allow my email to be public :D) but am just getting some of the same ?’s so lets keep it all in one place if we can!
I will update here with more Q & A as I get them.
If you find something helpful PLEASE share 😀 and I ask that people read your fellow stampers comments as they may help you!
This process actually IS simple, but it being the new thing for everyone, Im certain we are all unsure we are doing everything right! When treading in new waters there are always questions.
We provided the WORLD with a free template to not only see the value of what you get for your money but so that you can get all the kinks worked out, and get printing up some fabulous creations. I am sure once you get going you will see that this is a real time saver, the fun this has to bring, and how easy it is.
OK now we will start with the basics!
PLEASE keep in mind since this is the first time PTI and myself are doing this sort of thing we had no idea what was to come as far as questions as whatnot. We did out best to cover basic questions re: downloads and whatnot as well.
DIRECTIONS FOR YOU DOWNLOAD FOUND HERE! Many of you said “Hey Lauren I don’t speak french! Can you explain that better to me?”
Well I can try my best! LOL! I don’t understand “directions” well either. Im a hands on kind girl.
OK now “I” am very computer challenged, and am not the technical person here. I just create the basic template and description write ups and the rest is out of my hands. All the fabulous graphics and template stuff was all the fabulous work of Nichole & the people at Papertrey Ink.
BUT I will do my very best to answer the questions YOU have in the easiest way possible!!!
DOWNLOADING YOUR TEMPLATE
Downloading-we will take the FREE template as an example since EVERYONE can get that FREE!!
When you “buy” your template, you open the WinRAR file. Once the file loads you will see a box with the files in it. At the top of this box are some ICONS.
Hit the EXTRACT TO ( file folder looking button) option.
When you do that it brings you to your OWN computer files, and you them need to choose WHERE you want the file kept for future downloads!
Example-I created a file for myself under Lauren’s Card Stuff, in that file I have a category that says My Timeless Templates. I go through, and select that. Once I hit the OK button, it saves the files, where I told it to put them.
Then you are done.
Question:I printed up my Music Makeover and the calendar is missing a few months in the file.
Answer: See this tread here
Question: I have Windows Vista. I can download the stocking on the computer that runs Windows XP, but I cannot get it to download on my laptop that runs Windows Vista. I am not a computer expert, so it could be me, but I just cannot figure it out. What am I missing? TIA!
Then later her ANSWER: There is no Extract Files option provided on my computer (which really makes no sense, but its not there). So, DH downloaded a 45 day free trial of WinZip (an extractor program) https://www.winzip.com and now I have the files. I did find that I could not get them from the download now ‘button’ on the page with all the templates. I had to click on the pic/icon to go into the description and click on the download ‘button’ there. I first saved the files and then went into my documents file and attempted to open them from there. When I clicked on them, winzip automatically opened and I went through that (just before it actually unzips them, it tries to put them in some bizare location on my computer, so I clicked browse, and selected the desktop as a location for them to unzip to and later put them in the file I want them stay in), and several clicks later, I had all of the files for both templates!
Thank you to Karen (aka TiikkiStars on the PTI forum)
RETRIEVING YOUR DOWNLAOD
Now I want to play! So I would go find Lauren’s Card Stuff, and open it. Then I find my category “My Timeless Templates”. I open that file and I should be able to find THREE files.
Stocking Stuffer is a 2 page print out so you have your stocking on one, then the additional box & elements on another. Don’t forget EVERY My Timeless Template © also comes with a Project Idea Pamphlet, with full color photos, supply list and instructions for 5 exclusive projects!!
Basically just like you see with your Stocking Stuffer download, that is what you can expect with the for purchase templates as well, every month.
These are all listed in your file separately. So you have to find each file and download.
Another example is the Music Makeover, that is only ONE page for the printer, then you have your Project Idea Pamphlet.
PRINTING YOUR DOWNLOAD
Lots of questions for this part! LOL!
First and foremost-PRINTER SETTINGS!!! This can really impact your template! So here is what you need to do to make sure you are getting the accurate printout-very easy!
Question-I printed my Music Makeover template, and it doesn’t fit my CD case! What am I doing wrong?
Answer: When you go to PRINT your template, most printers automatically set the page scaling to ” FIT TO PRINTABLE AREA”. You DO NOT want that setting! Simply click your selection box, and make sure PAGE SCALING is set to NONE! This way say your Music Makeover box, will print to appropriate size.
Your lines for this template go to the end of the cardstock.
Question: No you are doing everything fine. The templates will not print to the edge-hence the “arrows” telling you to go to the edge. THat is part of the software we use to create the templates.
Answer: No you are doing everything fine. The templates will not print to the
edge-hence the “arrows” telling you to go to the edge. That is part of the
software we use to create the templates.
Question:My cardstock won’t go through my printer! Help!
Answer:This is where you PRINTER MANUAL comes in handy! Or your hubby! My printer is pretty cheap-its a Canon (something or other! LOL!) and it takes PTI cardstock like a DREAM!!
What I learned from this whole printable template thing is that SOME printers need to be put on a setting if you are using something thicker than Copy paper! So check your settings, and then you should be good to go!
What if it REALLY isn’t going to go through?
Well as I saw suggested (by Debbie Stampin CPA-thank you!!) before Print your template onto your copy paper. Apply the template over your cardstock with REMOVABLE adhesive tape. Then cut, and score JUST the copy paper that is ON your cardstock, as directed. When done with all the steps remove the copy paper, and you have the same exact thing!
Each time you want to make another print another template. It is virtually the same thing since you would always be printing a new one on your cardstock!
TIPS:
Print on the BACK of your cardstock!
If you have a pattern or a stamped piece, you want to print on what you want the INSIDE to be! So patterns go FACE DOWN!!
PUTTING TEMPLATE TOGETHER
Question : How do I know where to cut, and where to score?
Answer: The SOLID lines arr for cutting, and —– are for scoring.
TIP:
On some of the templates, like for KEEP{sake} it will say “Print two” that means you need to printouts to put your box together!
OTHER
Question: CAN WE HAVE A KEYWORD FOR THE TEMPLATES?
Answer: Great Idea How about MyTT(insert template name here) Stands for My Timeless Template Example: for the Keep{sake}
MyTTForKeep{sake}
Sound OK?
Comment: I hope you will share a ton of ideas for these templates with all of us every month! I need ideas.
Reply:Well as stated above there will ALWAYS be a EXCLUSIVE Project Idea Pamphlet with 5 projects with the SALE of every template! Those will NOT be shared anywhere else.
I of course will be sharing peeks here on my blog up to the countdown, and ideas with you.
This next comment I thought about not addressing, since it is a personal choice, but if several hundred people really want to ask, then here is my OPINION
Generalized Comment: Can you convince me WHY I should buy your template, when I can try to make these myself?
Reply: I don’t think I should have to convince anyone. Thats not what its about. I helped create a product line that I would love to have, and use. I thought it would be so helpful to many other people 😀 Sharing what I love, and making it faster and easier.
I think the idea book alone is worth the $5! LOL! However, to each person what you want to spend your money on is a personal choice. I am just here to provide you with a TIME SAVING option!
I know I PERSONALLY have spent $8 on ONE plastic traceable template for ONE project! No ideas, nothing, just the plastic piece! By the time I trace it all (and the score lines) you are done printing, and cutting, maybe even scoring your My Timeless Template!
I also have spent $12 on a package of pre-die cut boxes, that I didn’t use too many of since I was limited to the colors it came in :C
To me proudcts that make my crafting faser, easier, and better are priceless.
I take the work and guess work out of you having to get the PERFECT template! Over time you will see the diverse templates I have created. Really it doesn’t get any easier than what we have for you here. I MAKE these templates from scratch, ALL the time, and I am finding the printable versions FABULOUS, and for me, so much easier. That is my opinion and this project is like my baby! It is like asking McDonald’s why you should eat there! LOL!
Bottom line- I love this product and I believe in it 100%. I poured every ounce of my being into it. You also get my PERSONAL support to help with anything you may need for the templates as well. Here I am answering questions and emails and giving a ton of ideas to get you started 😀
Making sure something is perfect can take HOURS. Now you don’t have to bother, unless you really want to. You get to do what you love- and the rest is taken care of. The choice of purchasing it is your own. Another reason we are providing you with a FREE template. Try it out.
Those of you who do workshops, now don’t have to bother with coming up with cool ideas. You can whip up an EASY project with EVERYONE in minutes! No fuss. Then you are focusing on the stamping, and making them feel like THEY CAN DO IT TOO!! There really isn’t a ton of prep work either! If you are a demo you know what I am talking about. I was a demo for several years and would have KILLED to have my ideas to print! I use to go through the hassle of making all my customers make it with me step my step! When you have a room full of 20 people, that is not an easy takes to keep everyone doing the same thing at the same time!!
Also to put it into perspective, think of the things you have TRULY wasted $5 on! That drive thru lunch-one value meal costs over a $1 more than my templates, that you can use OVER AND OVER with not guess work.
How about that specialty coffee? One or two of those adds up to cost my template.
Just some thoughts of mine on that question. If you like a template you saw, then you may want to purchase it. Maybe one month you won’t like something, maybe every month you will.
No matter what your opinion, I truly want to thank everyone for their love & support. Im still recovering from all the excitement here, and HOPE I have helped you with any questions you have! This has been quite the journey.
Please feel free to comment and ask more questions if they arise, or let us know if this Q & A helped answer a issue for you!
I am here for you, so whatever you need I will do my best to help you to the best of my ability. If I don’t know Ill try to find out!
THANK YOU AGAIN!! Enjoy the templates! Can’t wait to see what you do.
Tomorrow I will have a actual project to share 😀
Box of Beauty Purse-onality Clutch
Nov 13, 2008 Author: mytime | Filed under: Home decor/3-D items, My Timeless TemplatesThis is POST #2 for today! Make sure you view the other one.
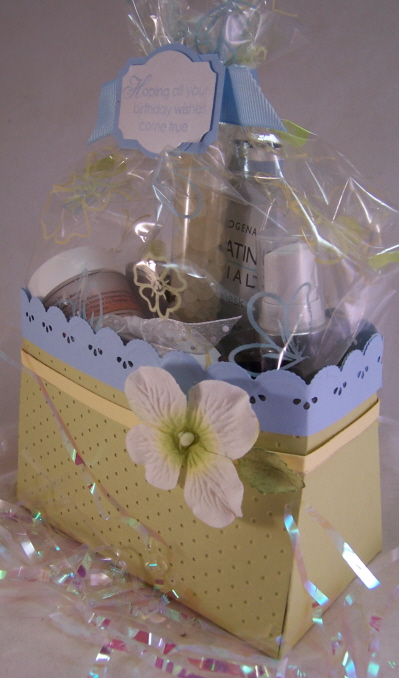
Here we have a Box of Beauty! Made in MINUTES!
I made this cute little gift item using my NEW! My Timeless Templates ©(available HERE on the 15th-release party tonight! 9pm EST HERE! ) Purse-onality Clutch template 😀 Just omit the top flap closure and you have a really pretty and practical gift box!
I hope you get a good feel for the angle of this box by the top photo.
This is filled with some wonderful bath products I received from my PSF Sonia! I have become addicted to her bath product line. She has an Etsy Shop called Essential Goodies. I am in LOVE (in case you want to know what I recommend :D) with her whipped body butter in fresh pear, love spell, and clean cotton!! LOVE!! I also enjoy the body oils.

Peeky Peeky inside
BEFORE putting your clutch together, just stamp your cellophane and use my Poppin Acetate technique. I used my Flower Garden set for my cellophane (which can be found in most gift wrapping sections on a roll) with green, yellow, blue and apricot colored shimmery pastels for this creation. Then adhere your stamped cellophane to the inside of the top front & back panels (leaving some excess to wrap around sides of assembled clutch), then tie closed! My tag was created using the Heartfelt Basics, also being released on the 15th.
Anyway, while preparing this for my post sample :D, I thought this little Purse-onality Clutch of bath essentials would be a GREAT idea for a new mom/mom to be :D. You should NEVER forget the new MOM!!! The only thing not from her was the face mask by Neutrogena. You can get several gifts from one box of face masks! Again-think Christmas/ Holiday/Teacher………anyone really! Who doesn’t LOVE pampering?
Front view
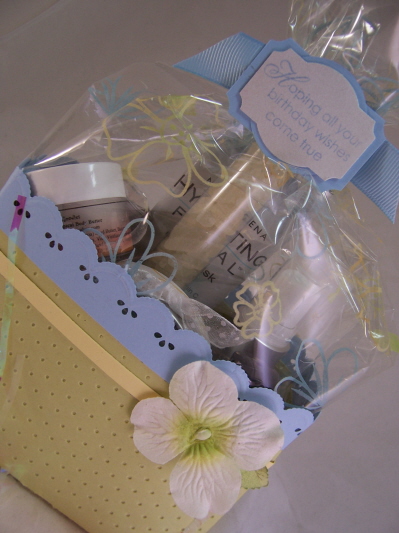
So if you are wondering………….I printed my Purse-onality clutch on spring moss cardstock. I then ran the front & back panel through my swiss dots cuttlebug folder (I wanted the dots debossed (pushed IN), not puffed out. I embellished it simply with a Martha Stewart border punch of blue, and a simple Hygrangea flower. I think the colors are SO calming! Perfect for my theme of beauty & relaxation.
So there you have yet ANOTHER idea for what can be done with this template! Don’t forget that you also get an idea book with 5 exclusive (full color photo) projects, with instructions and supplies with every template purchase 😀
I hope to see you at the release party!
Id love to hear your thoughts on the peeks shared so far 😀 and anything you may want to see in the future 😀 You never know……………
See you tonight!
My Etsy

Who I Designed For
Blogroll
- Alicia
- Alli Miles
- Ally Blankenship
- Amber
- Andi @ crafts on a whim
- Angel R
- Angie Z
- Anne Kranitz
- Becky O
- Bee
- Beth Silaka
- Bethany Paull
- Beverly Nash
- Bobbie
- Cambria
- Cammie
- Card of the Week
- Card Positioning System (CPS)
- Cards for Cancer
- Catherine Doucette
- Charmaine
- Cheryl Sims
- Chriss Rollins
- Christina
- Christine Ewing
- Christine Wooden
- Colleen Schaan
- Craft Critique
- Craft Gossip
- Crystal
- Dawn Easton
- Emily Giovanni
- Geny
- Holly
- Igne Groot
- Inspirational Craft Blogs
- Irene
- Jami Sibley
- Jeanne Streiff
- Jen del Muro
- Jeni Bond
- JenMarie
- Jenn Balcer
- Jenn Diercks
- Jenn O
- Jennifer E
- Jennifer Mick
- Jennifer Pereda
- Jennifer-Sweet Treat
- Joanne Basile
- Jodi Collins
- Julia Stainton
- Julie Masse
- Karen
- Kathryn Berthiaume
- Katie Cotton
- Kelley Holland
- Kendra
- Kim Scholfield
- Kris’s Color Stripes! Get inspired here
- Kristen Dubosque
- Kristin Eberline
- Kristine
- Laura @ Sunshine Stamper
- Laura Turnmire
- Laurie Schmidlin
- Lesa Rapp
- Linda Duke
- Linda-LSN
- Lindsey Botkin
- Lisa (lakind scs)
- Lisa Kind
- Lori Craig
- Maggie
- Mara Campbell
- Maria
- Maria Levine
- Mary
- MaryJo
- Melanie M
- Monique Hansen
- Moxie Fab World
- Pam Imholz
- PaperCrafts Connection
- Peppers and Pollywogs Kids party site
- Rebecca Grohall
- Rita
- Robyn
- Rose Ann
- Sarah Vrolyk
- Sharon Harnist
- Sharon Johnson
- Sharon Rivera (a chemisrty with paper)
- Sherrie
- Sophia Landry
- Storage Units, Ink, & More Blog
- Sue Berker
- Susan (Rainy)
- Tangii Crane
- Tracy
- Tricia Traxler
- Trudee
- Velta
- VivLyn
- Zena
MTME Pretty Palette Color Team
MTME Pretty Patterns Sketch Team
My Time Made Easy TM LLC
Shop till you drop!
Lauren Meader
About Me
Copyrighted material
Subscribe To My Blog
Pages
- About me
- Alexa’s Story!
- My Crafty Corner!
- My Time Made Easy™ LLC
- Our Make A Wish Trip to Disney!
- Resume/Publication List
Calendar
Archives
- August 2013
- July 2013
- June 2013
- May 2013
- April 2013
- March 2013
- February 2013
- January 2013
- December 2012
- November 2012
- October 2012
- September 2012
- August 2012
- July 2012
- June 2012
- May 2012
- April 2012
- March 2012
- February 2012
- January 2012
- December 2011
- November 2011
- October 2011
- September 2011
- August 2011
- July 2011
- June 2011
- May 2011
- April 2011
- March 2011
- February 2011
- January 2011
- December 2010
- November 2010
- October 2010
- September 2010
- August 2010
- July 2010
- June 2010
- May 2010
- April 2010
- March 2010
- February 2010
- January 2010
- December 2009
- November 2009
- October 2009
- September 2009
- August 2009
- July 2009
- June 2009
- May 2009
- April 2009
- March 2009
- February 2009
- January 2009
- December 2008
- November 2008
- October 2008
- September 2008
- August 2008
- July 2008
- June 2008
- May 2008
- April 2008
- March 2008
- February 2008
- January 2008
- December 2007
- November 2007
- October 2007
- September 2007
- August 2007
- July 2007
- June 2007
- May 2007
- April 2007
- March 2007
- January 2007
Categories
- About Me
- All That Scraps
- blogger challenge
- camera/photo play
- Cards
- Contests
- family stuff
- FOR SALE
- Home decor/3-D items
- How to FAKE it!
- Introduction
- JUGS Challenge
- JustRite Stampers
- Lizzie Anne Designs
- My family stuff
- My Stamping Space
- My Time Made Easy
- My Time To Color Challenge
- My Time to Create Challenge
- My Timeless Template Challenge
- My Timeless Templates
- Mytime Mail
- MYTIME MOVIE/VIDEOs
- Papertrey Newsletter
- Pink Cat Studio
- Pretty Palette Challenge
- Pretty Patterns Sketch
- Product Opinions and Must haves
- Recipe's
- Saturday Sketch
- Smilebox Creations
- Stampavie
- Tutorials
- Uncategorized
- videos
Most Popular
- Create your own Onesie Card Tutorial-and important NOTE! PLEASE READ (2529)
- Saturday Sketch-Boxed bag holder (2333)
- Going GREEN! Fancy Flower Flourish-Closure Video (1478)
- Fabulous Favorite - Giveaway! (1336)
- a Prayer Request (1232)
- QUICK-Easter Baskets from Nestabilities-PTI style-and blog challenge (1063)
- Teaser Sketch (999)
- February Release Giveway! (and a little peek) (996)
- Group Post and Rambling Rose Video Tutorial (985)
- GIVEAWAY! Who wants it all?! (895)
Recent Comments (RSS)
- 첫충사이트: 완전히 흥미로운 블로그 게시입니다. 저는
- sarah: Wow, Lauren, what a stunning
- hedie: خرید راهبند
- 야동: Love to read it,Waiting For
- 야동: This seller is in a
- 바카라사이트: 여기 처음 왔어요. 나는이 게시판을
- 야동티비: I was surfing the Internet
- 바카라사이트: 비슷한 주제에 대한 흥미로운 정보를
- 바카라사이트: "여기에 제공해 주신 귀중한 정보와
- 온라인홀덤: 유익한 웹 사이트를 게시하는 데
Copyright © 2007 - My Time, My Creations, My Stampendence - is proudly powered by WordPress
This blog has been Tweaked and Designed by Sara Williams