Archive for November, 2009
In a pinch….and some sale info!
Nov 27, 2009 Author: mytime | Filed under: All That Scraps, Home decor/3-D itemsHope you all had a wonderful Thanksgiving.
It was nice to see Jay’s family. It’s been a while.
Poor Alexa ended up with a tummy bug right after lunch, so we cut the family festivities SHORT! Now we are home and she is not looking so fab. Poor thing. My grandpa is recovering, but has been VERY confused. That is another story. Please keep them both in prayers for a speedy recovery.
With all the family”drama”, for the first time in a DECADE, I didn’t venture out for Black Friday. I may have serious shopping withdrawals! We planned on later going to FINALLY see the 3D version of A Christmas Carol at the IMAX theater, but it seems to not be our destiny! Last time I was sick and now Alexa is. Oh well! HOME IT IS!
Well I have been quite consumed with my family these days, and this bit has just slipped right past me (where did November even go?!)………you may already know that All That Scraps has begun their countdown for the newset release. The release will actually take place on Monday November 30th!! You can see the last few days of peeksHERE on THE BLOG!
In honor of Black Friday TODAY there is 25% OFF STOREWIDE!!! A great time to stock up 😀
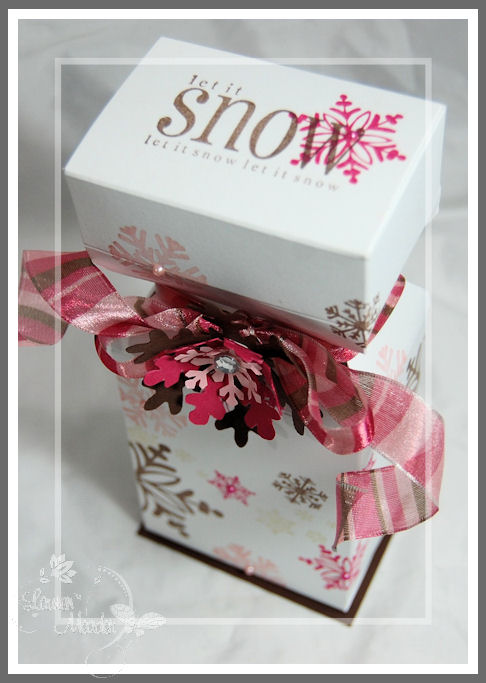
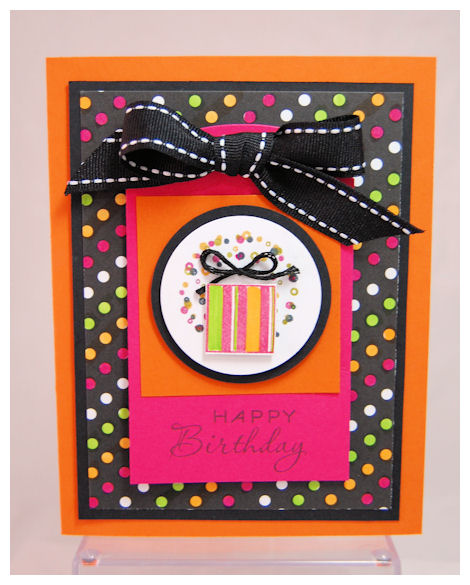
OK now on to MY project for today’s peek using AmyR’s Snowflakes Sentiment set
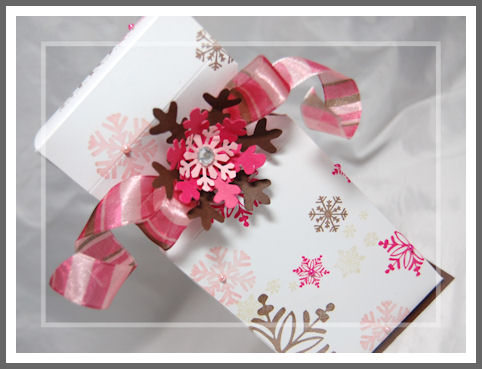
I went with Chocolate, pink and (that new SU! pink…..melon mambo???I can never recall) I just made this from white cardstock, and stamped away! I’m in LOVE with these snowflakes! So pretty. Well done Amy!
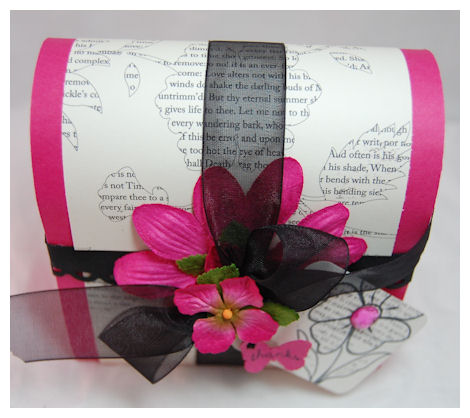
I created this box I like to call “In a Pinch” ©
I actually created the “template” version some time ago, but finally decided to create a sample! I have been sitting on SO many box ideas for so long, it feels good to just put one together “just because”.
I saw a box about a year ago, in a local department store, around the holidays, with rolled socks in it. They were red & white “candy” stripped socks. Think peppermint candy!
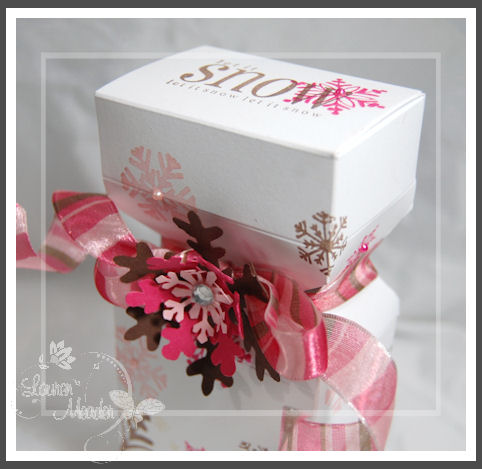
Sentiment reads ” Let it snow, let it snow, let it snow ”
It was pretty clever as the long box lay on its side with 2 “pinched” (in my own words) in ends that appeared to look like a wrapped candy, only in box form. Their box was all acetate, to mimic the “candy wrapper”. I was in AWE!
I LOVE the “pinched in” angles this has! It took me quite a bit of tweaking to get it to be like my sketch and recall HOW it looked based on memory but I’m over the moon for the end result!
For the LIFE of me I can’t find the sock set again anywhere (I’d love to have had a photo), but I did picked up the box and studied it (the sock set was $34!! Otherwise I would have bought them, they were SOOOOOO cute!) so I could TRY to figure it out myself. I jotted down a quickie sketch in my notebook that I always have in my purse to later recreate my own version.
SO the “In a Pinch” © was created.
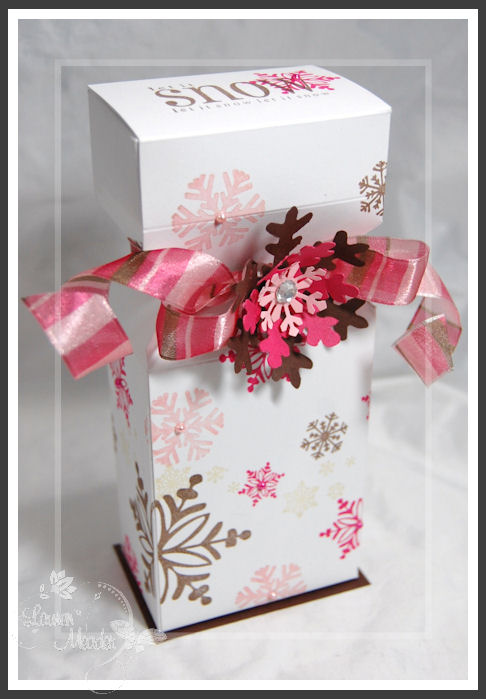
My ribbon is wired, and from Michael’s. The snowflakes are from my Slice Fa La La La cartridge.
Now mine doesn’t have 2 “pinched” in ends, as I wanted to be a little different, and enable my box to stand upright, but it could easily be done. I also wanted my box to be as large as possible!! Their box was a lot smaller.
This is 3 inches wide, 2 inches deep and 7 inches tall! PERFECT for SOOOO many gift ideas 😀 It was also pretty easy to put together 😀
Well that will do it for me today.
OH! Before I go! One more sale to check out! JustRite Stampers is having……
20% OFF EVERY ITEM IN OUR COLLECTION, except for our latest November release.
Visit the Super Sale Section and receive an additional 20% off our current sale price for this 5 day Promotion.
Complete Kits
1 3/16″ Sets1 5/8″ Sets2″ Round2 3/8″ 3 ¼”Small OvalLarge OvalFont SetsSuper Sale Thank you for stopping by! I hope you enjoyed today’s sample.
Now I need to get back to the family 😀 Have a fab weekend.
What you can do with a ribbon spool…..
Nov 25, 2009 Author: mytime | Filed under: Home decor/3-D items, JustRite StampersI have to start off this post with a family update! If that isn’t your thing, then feel free to scroll down 😀 Past the RED Dotted line!
I am happy to report that my grandpa made it out of surgery, and is doing well! The first 48 hours are critical, but so far so good! They took him off life support yesterday, and pulled out the breathing tube. No sooner was that out he was asking for coffee!! (See the coffee love runs deep through the family tree :D) So they entertained the idea, and after a few sips he couldn’t really tolerate much more. I’m sure his throat is SO SORE after having that tube in. I know I only had a breathing tube in for like 40 minutes for my surgery and I could barely talk for 3 days. For ME that is an ETERNITY!!!
He was sitting up in bed, and joking with all the nurses (sounds familiar doesn’t it! LOL!!). He is such a sweet man I’m sure he is one of the best patients. They are very impressed with his progress. I am so thankful that he is doing so well. I am also thankful that we live close enough to one of the best hospitals in the world! I really want to thank you all for the thoughts and prayers 😀 My family appreciates that very much.
Now I am TRYING to convince him that once he is fully recovered he should take some of his savings and take that life long dream trip to Las Vegas! WHY save it for his family or anyone else to use after he is gone?! He worked hard his entire life! He should live it to the fullest!! He would have so much fun. He deserves to reap what he has sewn. I really hope he seriously considers it.
—————————————————————————————————————————–
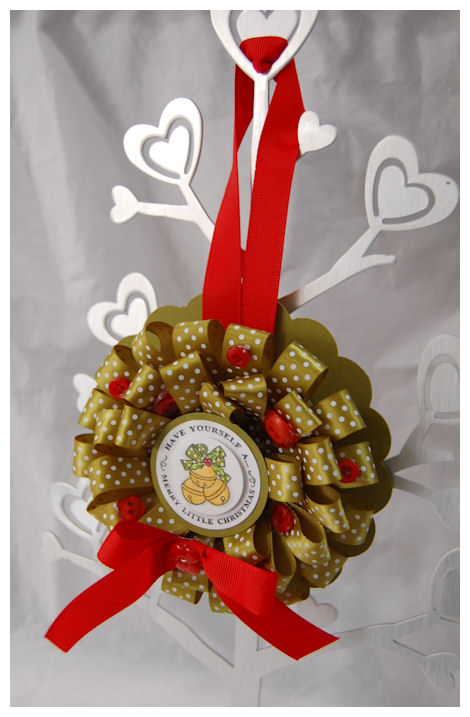
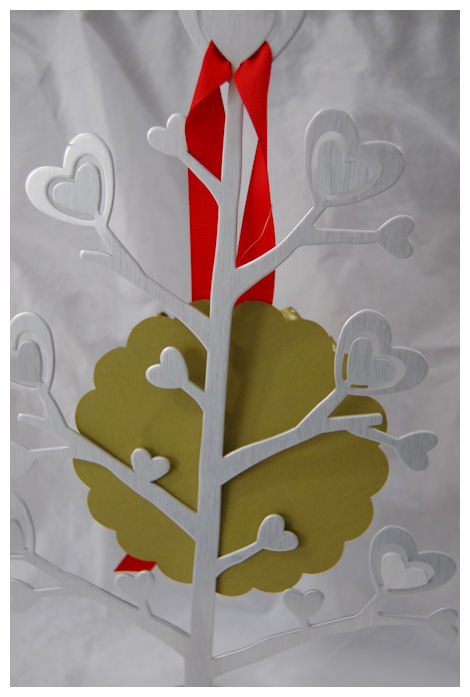
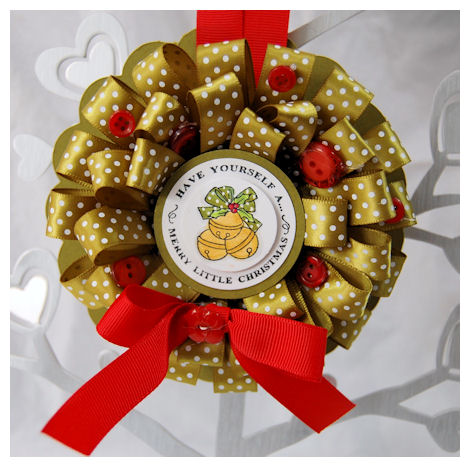
Merry Little Wreath
There has been so much going on here, I can never claim to lead a boring life! I have been busy (as you all know for VERY good reasons :D) and sadly my actual stamping time (and projects I can share) has been limited, leading to my lack of posting. Trust me though, after the holidays I will be sharing so many great projects! To hold you over for another day or two, I did get to go GREEN!!
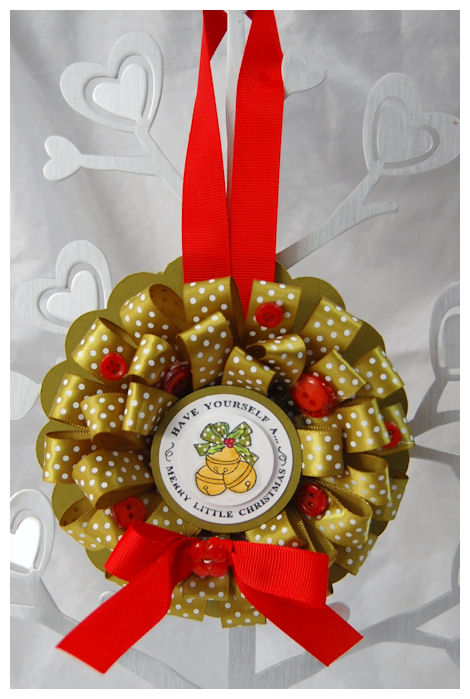
Now what do you think this hanging wreath ornament was designed from?
I love recycling items! As papercrafters we get some really cool, USEFUL stuff with the items we spend our money on. Sometimes it is just a matter of seeing the POSSIBILITIES of saving something for another use….even if it is for “someday”. You will soon realize that hoarding those items that you KNOW someday MAY be of use isn’t really all that bad! Well, not bad for the project, maybe bad for SPACE issues! LOL!
I have seen across so many message boards people asking “Any ideas for what I can do with my empty ribbon spools?” or “I have so many little pieces of ribbon I don’t want to throw away! HELP!”
Well as you can see this is the PERFECT project for just that!
I made this wreath just in time for the holidays! You could take various scrap ribbons and make a really fun shabby chic kind of decoration for ALL year through too.
This is also a GREAT project for the kids (minus the HOT GLUE GUN!)
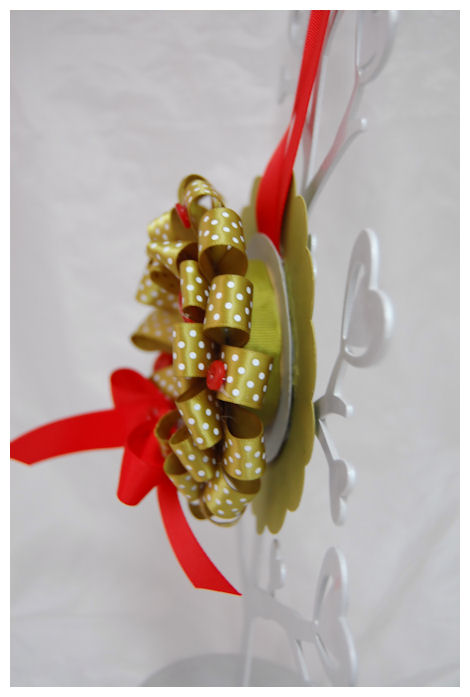
All you need is a empty ribbon spool. My sizes may vary depending on YOUR spool size, but this is a standard size spool.
A stamp set for the center of your wreath. I chose to use Merry Little Christmas Borders & Centers Round 1-5/8” . I thought it was perfect for my wreath center. Plus JustRite Stampers is having a 20% OFF Sale —–>HERE!
Hot glue gun (For kids I recommend creating a double sided adhesive circle the size of your project, or have then use glue dots or some other non harmful adhesive that they can do them-self! Its not fun doing a project if you mom has to help you do MOST of it!)
A large scallop circle. This project used my Cricut Expression Home Decor Cartridge-5 inch scallop.
3 inch pieces of ribbon/scrap. (My complete project used 36 pieces) You could also do this with scrap patterned paper 😀
Some buttons (or other embellishment of choice) for your holly berries
Then, your hanging ribbon color of choice.
DIRECTIONS:
First thing you need to do is wrap some of your ribbon around the empty spool (where your ribbon would have been wrapped around). This will hide the plain, empty cardboard roll.
Make your hanging loop, and glue it to the BACK of the ribbon spool.
Glue the large 5 inch scallop circle to the back of the ribbon spool. This makes the back side finished, and hides the ribbon hanger! You can also add a family photo, or a message to the back!
Now you are ready to build your wreath!
Starting at the TOP you will work from the outside-in. By having your back piece on you will have a guide as to how far in to place your ribbon pieces. Your ribbons will get folded in half, so this will help you judged placement! You can even take a pencil and draw a quick guide onto your ribbon spool for a PERFECT wreath.
Now, take your 3 inch ribbon scrap, and put a dab of hot glue on the ribbon spool, and attach ribbon end. Fold in half, then glue that end to spool as well. Work around the spool until the outer row is complete. About 16 ribbons will fit around the outside edge.
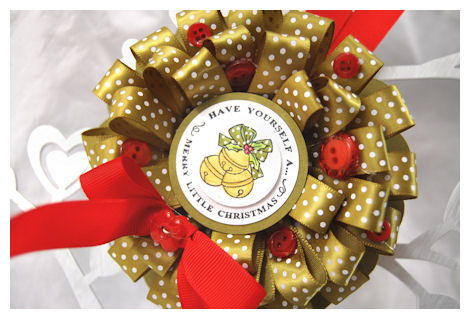
Now begin your second row. You will want to make sure this layer of ribbons is in between each of the ribbons around the outer edge.
Repeat for 3rd row.
Now to HIDE the ribbon ends, and the OPEN hole in the ribbon spool center you will want to add a nice sentiment!
How sweet will this look on a tree or on a door?! Love it.
As I said above I chose to use Merry Little Christmas Borders & Centers Round 1-5/8”. The bells have a Sakura glitter pen on them, and I used a white singlo gel pen to create dots on my olive ribbon on my image, just like the ribbon on my wreath. The bell image is popped out of the center sentiment using dimensionals. I wanted some extra pop.
I then hot glued my buttons on as well! Trust me this thing is stuck together for LIFE! LOL!
I sang “Have yourself a Merry Little Christmas” the entire time I made this! I love that song 😀 I love ALL the Christmas songs that come on the radio this time of year, along with the specials on TV. I usually have so many great memories associated with each one.
I really enjoy this season. The world seems so much more full of kindness, love and good will. Despite the economy people are always more compelled to help others, reach out, be kinder, and seem to be more cheery! Well, unless you go shopping on Black Friday! OH BOY! People can be NASTY that day. Which I personally don’t get. I always go shopping on black Friday, and my opinion is IF you are going you NEED to be in a good mood, and KNOW you ARE going to stand in line for a very LONG time, and you are not likely to get EVERYTHING on your MUST HAVE gift list! If you can’t be patient or aren’t prepared for that, then please don’t show up! LOL! OH! and you can’t complain about the lines either. Its part of the day. Grab a coffee and just stand in line with a smile. Also the more cheery you are to the poor retail people working, the more apt you are to get their help!
Sorry! Not sure WHY I went there! LOL!
Anyway, I am not sure if I will check in tomorrow or not, as I am cooking cookies and stuff with the kids, but if I don’t please have yourself a WONDERFUL and SAFE Thanksgiving.
I hope you are able to really take a moment of pause to reflect on all you have in your life to be thankful for. Remember that even during tough times there is usually something to be thankful for. The hard times won’t last forever. I always look back on the past year, and at my family and friends. I truly feel like I’m one of the most blessed people in the world 😀 I am ever grateful for each and every second I have with my family. I have been so blessed by so many, including all of you! I get so much joy from sharing with you all and the interaction I have from each of you as well. I have gained many amazing friends from my love of sharing this craft with the world.
So thank you for giving me another thing to be grateful for!
I’d love to end this post by YOU sharing something you are thankful for with all of us here. It will feel so good to reflect on that.
Happy Thanksgiving.
Tree of Cheer
Nov 23, 2009 Author: mytime | Filed under: Home decor/3-D itemsHi everyone!
I’m starting today’s post on a personal note.
Today my grandfather is having a very high risk open heart surgery . I am leaving my house at 3am to go be with him in Boston Ma. If you believe in prayer, and could spare a moment, please pray he makes it through this surgery. There are 3 parts to his procedure that we are told high risk for him to NOT make it through. Today I will literally be holding my mother up as he undergoes the 6 hour surgery. My grandfather has always been like my father growing up. I cannot bear the thought of anything happening to him. That being said, I know God has a plan for him and I have faith things will be OK. I will say I have much peace about this, now I just need to try to give a piece of that feeling to my mom.
On another personal note….thank you all SOOOOOOO much for sharing my excitement for my NEW! venture My Time Made Easy © LLC! It made me so happy to know you are all as excited as I am. I am beyond excited to get everything started, and I will keep you ALL posted on our progress! I’ve been working SO hard to make everything AMAZING! I’ll be sending out our first email soon, as our first template and SAMPLE of Digi paper will be ready to go (SOON!!).
I have MANY emails to sort through, but as you can see my family has needed me that last few days. So if it needed a reply I’ll be in touch soon! Thank you all again for the support as I make my dreams a reality!
OK now on a “eye-candy” note……I am the guest designer today at Say it with Letters! I love their stuff, and have made several creations in the past.
I really enjoy cardmaking but my real passion lies with coordinating cards, gift packaging, and altered items! I get so much joy in personalizing just about ANYTHING I can get my hands on. To be able to dress up the SIMPLEST of gifts, and making them a WOW! My family and friends can’t believe everything I make starts with some cardstock!!
I found Say it with letters after attending a Stampin Around Event in March this past year. We created an altered Chick that was designed by Julie Massee. I immediately went home and placed a order!! HOW FUN!
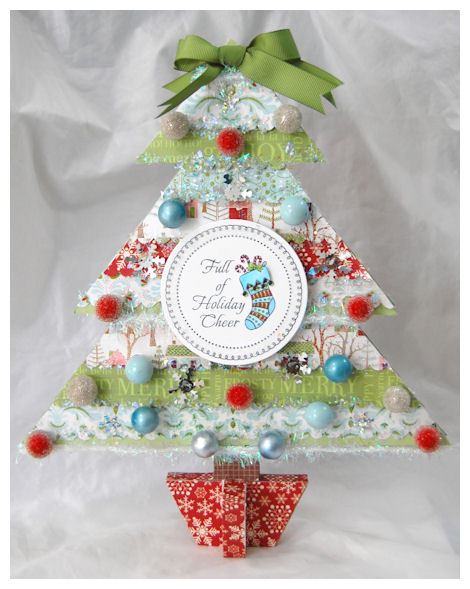
Now just in time for the holidays I have a FABULOUS tree for you that is SO easy, but will definitely be the talk of the holiday decor! There are so many possibilities, but with Christmas around the corner I wanted something SPECIAL!
I hope you like my project. This took about 25 minutes to make. Definitely a great project to create for so many!
You can view the step by step directions on the —> Say it with Letters Blog
I had a BLAST, and I hope it inspires you this holiday season. This is by far the most wonderful time of year! Most people are more giving and willing open their hearts to others.
Tree of Cheer
You can find the TREE shape—>HERE!
This is the front. All decked out for the holidays!
I used some various papers from a couple different companies, one being Cosmo Cricket (I believe! EEK! I should have kept track! Sorry! I just got carried away!
I found some various holly berry branches at the craft store, I cut off the “berries” and hot glued them on with a hot glue gun.
Each paper layer is scalloped, and on dimensionals in the center for some POP. There is also some glitter, and silver snowflakes.
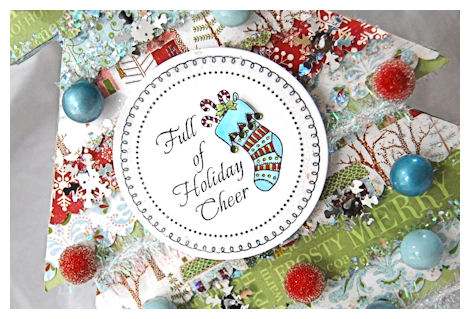
I added a stamped centerpiece using Old Fashioned Christmas Borders & Centers Round It was the perfect accent to my project! The cuff is 3D. The frame is glittered, and there are of course, glittered tassels. Christmas trees, and stockings are a perfect combination!! The stamp set has several great center options.
View from the top
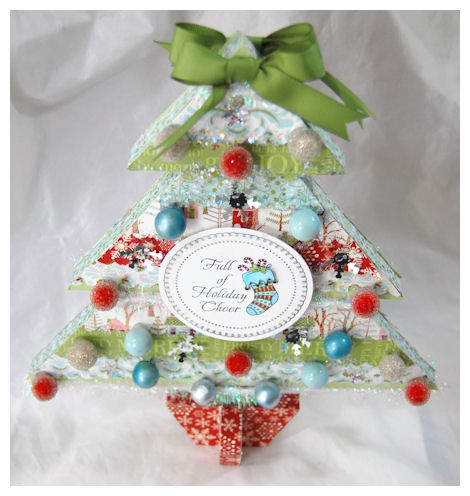
Hopefully you can see how glittery, and dimensional this is.
This is just a stunning centerpiece or holiday decoration!
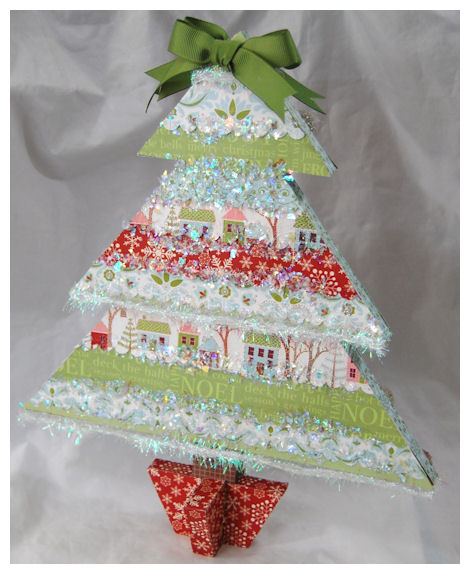
Now this is the back of the tree. You could decorate it the same as the front.
I felt that maybe whomever purchases it (it will be going in my Etsy shop soon) will be able to personalize it.
Well I want to thank Deb for having me as a guest! I enjoyed creating once again with my Say it with Letters shapes!
Well I have a long day ahead of me.
Hug your loved ones and don’t wait for the holidays to get together with friends, family and others you love. Try to reach out and donate your time to a cause you belive in too! It will help someone else and make you feel amazing inside. Whatever is dear to your heart!
I could go on and on, but need to get a move on.
Thanks for stopping by
HUGE ANNOUNCEMENT!! PLEASE READ!
Nov 19, 2009 Author: mytime | Filed under: About Me, My Time Made Easy
One thing I have learned is that time waits for no one. Do not put your dreams off until tomorrow. Live your life today, to the fullest. Have no regrets. One of the worst things you can do, is to NOT do anything! To say someday “I should have”, when you didn’t. I don’t ever want to be that person, wondering “what if”.
I am always re-evaluating my life, and setting new goals for myself. As the new year approaches, like always, I started to reflect on where I have been, where I am, and where I want to be. With that reflection, it has come time for me to make some major life changes.
Like the caterpillar who morphs into the butterfly, the change isn’t quick, nor is it easy, but it is necessary, because the caterpillar is meant to be a butterfly, and in the end, the result is beautiful.
It is now my time for change. To make my dreams take flight.
That dream was having my own store for all my template creations, with coordinating stamps and digital papers!
I wanted to continue my passion for sharing what I love with the world, and make it easy and affordable!
While the idea of going on my own is scary, it is the next logical step for me. I have been doing this for some time, and I feel very ready to take the next step in my journey.
I am excited to announce that I am now opening my own online store called My Time Made Easy © LLC <—CLICK IT!!!
![]()
My Time Made Easy © LLC is going to provide you with the basics for creating your own coordinating handmade cards, tags, and gift packaging in no time. It is fun, affordable, and we made it easier than ever! I have always said that it really is all about the TOTAL package. Now you can afford to create and dress up the simplest of gifts on your own, and make them appear to be that much more special. Nothing says love like something handmade.
I am now able to offer all the things I have always dreamed of as a customer, and share them with the world!
Our goal is coordinating products with some instant gratification! No more drooling for days over projects you have to wait to buy supplies for! You can purchase our products upon first glance, with all the eye candy to follow.
Here is what we will offer:
* Easy to assemble templates for all your gift giving needs!
My ultimate dream come true!
All my NEW! My Time Made Easy © templates will be offered in the following formats:
* PDF – for those of you with home printers! An easy option for everyone!!
* .SVG files– compatible with Provocraft Cricut Personal, Cricut Expression & Cricut Create
*The Cricut series cannot cut 3rd party shapes unless extra software is purchased. To enable the ability to cut 3rd party shapes, you must buy and install Craft Edge’s Sure Cuts A Lot (SCAL) software. This will allow the Cricut to cut files in the SVG format. This software dramatically changes the utility of the Cricut machines. It should be the first addition to anyone’s Cricut machine!
* .GSD file– compatible with Xyron Wishblade, Quickutz Shilouette, Graphtec CraftROBO (although due to size restrictions of this machine some templates may be smaller than other actual versions)
Graphtec CraftROBO. This machine is also sold as the following: Xyron Wishblade and the Quickutz Silhouette. These machines natively use the GSD format but can easily import the DXF format. No additional software is required.
* .DXF file– Pazzles Creative Cutter Inspiration, Klic N Kut Element , Groove and Maxx
These machines can cut both the PDF and DXF formats. Their native format is a proprietary format called KNK To summarize: Here are the most common home cutting machines and the suggested format to cut My Time Made Easy templates: Cricut machines: (Must buy SCAL software): SVGCraftROBO machines (including Wishblade and Silhouette): GSDKlic N Kut Series: DXF
Pazzles: DXF
These are an instant download, so you can start creating in minutes!
For ONE low price you can make so many gifts for everyone on your list!
Our template files are priced at only $5. You get UNLIMITED use from the template download.
Each file includes step by step, detailed photo instructions.
On the day of our product release, our design team will instantly provide 7 sample ideas using the template with a coordinating card/gift item. You will be able to instantly view these projects in our gallery upon the product release. In the days following our release, more project ideas will follow (about 2 a day for the following week), leading to a minimum of 21 different ideas!
For those of you with personal cutters the My Time Made Easy © templates could NOT be any easier!
* Top quality photopolymer (clear) stamps!
Yes! I finally took the plunge and designed some images I think you will adore! I am always open to suggestions too (wink). The idea is to have images that coordinate with our gift packaging templates, but are also versatile for cards, tags, embellishing gift items, and scrapbook pages!
My ultimate dream has been to offer this option!
I am so proud to announce that we went to the BEST for producing our images! This company is used by all the top companies, and now we are part of that lineup! You can have the best quality images for an affordable price!
Our images are ready to use! They are packaged on 4 X 6 acrylic sheets, with the images/stamp set name printed onto the acetate sheets you store them on.
They arrive in a 4 X 8 clear bag, with a hanger tag. This allows you to store it using the hanger, or you can sort into a box of your choice ( I use pretty shoe-boxes :D), Clip it up! or whatever other option that you prefer. By keeping our cost down we keep your cost down! Plus with the many methods of storing stamps, the choice is all yours. I will have actual photos of our packaging soon!
I will be shipping our stamps all over the world, and for an affordable price! No more high shipping. You pay whatever it costs us to ship to you!
*Coordinating digital papers!
Another instant download!
All our patterned paper is 300 ppi and delivered in a zip file so you can download it and print it right from home.
Each digital page is saved as a jpeg which allows you to easily resize it for your cardstock size!Now printing 6 X 6, 8 X 8, 8 1/2 X 11 or 12 X 12-is NO problem! Now you can have patterns in your favorite sizes for any project.
All our patterned paper is designed to coordinate with our stamp images. This makes creating even easier.
We are also offering a collection with each download called the “Color Me” collection. These are patterns designed with the idea that you can use them as is, or get out those Copics (or other coloring medium of choice) and custom color them to fit your project!
Use our black and white patterns to print on ANY color cardstock you have on hand for instant easy patterned paper in a rainbow of possibilities!
You can make your own double sided patterned paper, and of course use it for our My Time Made Easy © templates!
Now you get and endless supply of pretty patterned paper for ONE low price!
No more running out of a pattern, or feeling like you have to hoard your favorite pieces!
Our pricing will be at only 0.50 cents a sheet! UNLIMITED USE!! That is a fab deal. So our collection costs will range according to the number of designs offered. VERY affordable.
We have worked hard to ensure the colors in our collection of digital papers come close to those you may already have in your ever building collection of cardstock, and ink. That will make matching up easy.
OUR GOAL:
Our goal is not to overwhelm you, or your wallet each month! I really want to keep our focus on affordability, ease, and coordination! So each month we will be releasing an amazing template, one stamp set (sometimes a coordinating sentiment additions set), and of course our coordinating digital paper.
I invite you to check out my new site My Time Made Easy© and look around! Check out our ABOUT (<–click)pages too!!
While we remain “under construction” until our official first release, you are able to sign up for our newsletter! This will allow you to stay up to date on what is happening, and be with us when everything is ready to go! Also sometime in December I will be posting a FREE template (or tow :D). You will definitely want to know when that happens.
The official opening is anticipated for January 1, 2010! A great way to ring in the new year! I also want to ensure everything is PERFECT!!
Many of you have been wondering WHY I have been so consumed by “other” things the last couple of months. Well, as you can see I have had so much going on to get this all started. I did my best to keep up with everything else in my life, but beginning a company is no easy feat. It was far more involved than I even anticipated, but well worth every obstacle.
As you can imagine this is a very exciting time in my life! This is the first step, in a journey to accomplishing my biggest dream! I will continue to give 200% of myself to this venture, and make this company one to be proud of. Thank you for allowing me to share my excitement for such an event. I don’t really think there are words that can truly convey how I feel inside. I want you all to know that the excitement, inspiration and support you have offered me at many points in my life, have meant the world to me, and I hope to offer you the same in return.
Thank you for letting me share yet another piece of my life, and dreams with the world.
Now in order for me to make this dream a reality I have resigned from my position at Papertrey Ink. This is effective today. The very talented Betsy Veldman will be stepping up, in my place. She is an amazing talent and a perfect fit for Senior team! I wish her the very best!
Now you may ask yourself “What does this mean for the My Timeless Templates ©?” . With my resignation also comes the dissolution of the release of any further My Timeless Templates ©. To my knowledge, the current My Timeless Templates © will remain for sale at Papertrey Ink. For any further questions I would direct you to ask the owners of Papertrey Ink.
I have grown and changed so much since my beginning there. As I leave, I am thankful, and proud to have been a part of their growth in this industry.
All those moments, have now lead me to this moment. The moment where it is time for me to do what I have always dreamed of doing!
Lets Do Lunch
Nov 19, 2009 Author: mytime | Filed under: Home decor/3-D items, My Timeless Templates, Papertrey NewsletterHi everyone.
Well today will be a CRAZY running around day. I know many of you are wondering what is up with me these days. Well tonight at midnight (if you are up then) or tomorrow, I will explain myself. I have some changes that I made recently and it is time to inform you of those. With all those changes I’ve had to switch some of my focus. Trust me it will all make sense in a few hours.
So, for today I’m just popping in quick with a little eye candy, and to send you a link to a article that was written about the My Timeless Templates © Katie Berberich is a fellow stamper/crafter who works for the Craft Journal. She chose to review the My Timeless Templates for her debut!
Thanks so much Katie, and basically to every single person who has given them a try! I swear each month it just gets better and better!! This is my thanks to everyone for their support and sharing how much you too love these templates, with the world! Of course I love them, but when you read how much others do too I think you all believe it more! LOL!
So after receiving the link to that article I figured I better share a sample with you too!! An oldie but goodie……
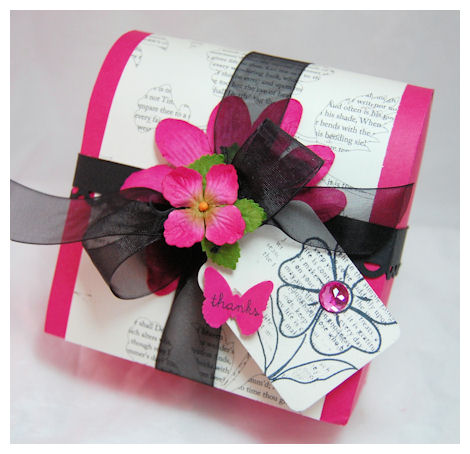
Now I decided I would revamp this template a bit! Many of you think SCHOOL when you see it! Ot that it HAS to have a handle!! But it doesn’t have to be that way. It can also be used for a elegant gift holder! How sweet would this look on a desk, holding some stationary? Maybe have some bath products?

I had this text within flowers paper (I believe it is by Making Memories) and I decided to create my own text within a flower. I used the Remember set and Background Basics Text Style for the tag
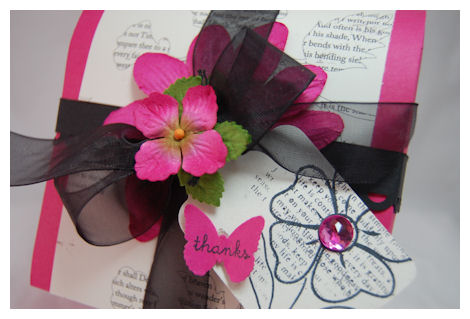
Some masking made it all possible. I love the look! VERY simple.
I then tied some ribbon around the top, and embellished with some Prima flowers.
I think it looks fabulous. Someone may not even care if there is anything inside! But all they have to do is slide off the bow (and then they can easily replace it) and open it up!
OK I must run!! I know I’m brief but I have a ton to do.
Thank you for stopping by. I hope you all visit me tomorrow for the news.
JRS Blog hop: Hip to be Square
Nov 17, 2009 Author: mytime | Filed under: UncategorizedGuess what time it is?!
![]()
How fun is this?!
JustRite Stampers has a NEW! Release, and this is the PERFECT time for you to get inspired by all the new images!
Im excited because they FINALLY have a square block and NEW! Square images. I was over the moon to see that!
There are 9 new products to check out —->HERE!
Here is my first (of many to come) samples
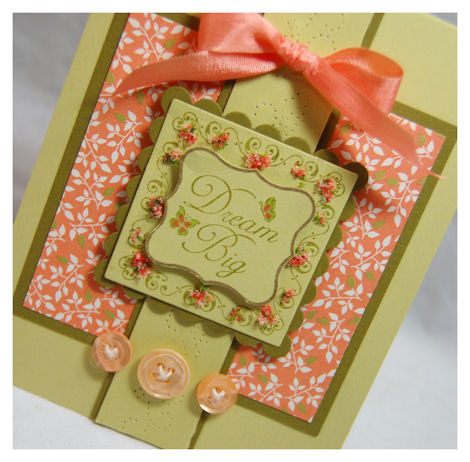
Dream Big
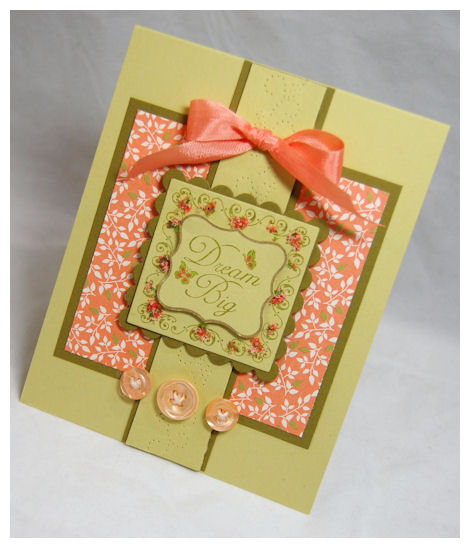
A motto I live by.
This sentiment just called out to me. This is from Just a Note Borders & Centers 1 5/8″. Of course I’m always DREAMING BIG (wink) and love the addition of the butterflies, as they are TOTALLY my thing! I didn’t go with the circle borders though because I wanted you to see that these images can also be used with OTHER shapes, and co-ordinate inside the new square borders they just released! More for you $$!! Love versatility.
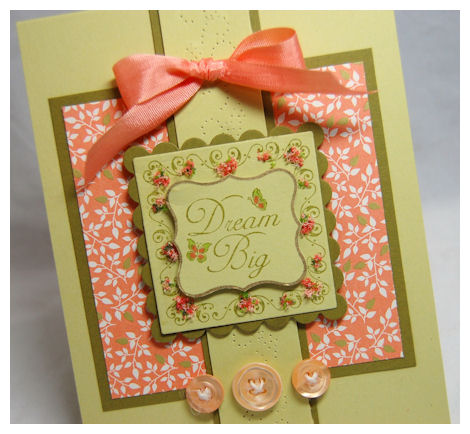
Keep that in mind! JUST because they come in circle form, don’t let that limit your creativeness to only use with circle borders
I really loved this particular border from 2″ Square Decorative Frames. I used a glue pen and added some YUMMY Flower Soft to the vine like border, to appear to be like flowers! I *just* got flower soft and if you haven’t noticed I’m starting to LOVE it. It was just what this frame needed to kick it up a notch! It really looks like little flower clusters in person.
I want to send this to Kelliebecause she is an amazing person, and like me, has many big dreams! She has just been an amazing support to me lately (even though she may not realize it). She is like what every mentor should be! She is encouraging, supportive, understanding, and helpful in every-way. You know she truly believes in you when she says it.
Thank you Kellie!
Well, now it is time for you to hop around to see what yummies the team has dreamed up with the NEW! stuff
starting off at the JustRite Blog!
Then moving along:
Barb Schram
Becca Feeken
Debbie Olson
Heidi Blankenship
Kathy Jones
Kellie Fortin
Angela Barkhouse
Lauren Meader
Lisa Somerville
Michele Kovack
Michelle Wooderson
Sharon Harnist
Sharon JohnsonYou can download the catalog HERE! OR just check out the November releases—> here!
Oh and in case you missed it:
SALE!! Save 20% off every
JustRite Christmas Stamp Set!!!
JB-08780 A Merry Little Christmas was $15.95 now $12.76
JB-08785 Holiday Demi Phrases was $12.95 now $10.36
JB-08775 Something Sweet 2 3/8”was $12.95 now $10.36
JB-08760 Christmas Treasures 3 ¼” was $14.95 now $11.96
JB-08765 Old Fashioned Christmas was $14.95 now $11.96
JB-08770 Christmas Joy 1 ¾” x 5 5/16” was $14.95 now $11.96
Now that is cool! Just pile it all in your cart at once 😀
Well I have much yet to do so I can share more with you this week. Before the weekend I have a HUGE announcement that may leave you all speechless! Something to think about this week 😀
Later!
November Papertrey Ink Release
Nov 16, 2009 Author: mytime | Filed under: Cards, Home decor/3-D items, My Timeless Templates, Papertrey NewsletterSORRY! I know this is late.
As you all know I’ve been sick, so I really needed a quick break to rest up. It isn’t easy when you are sick SMACK in the middle of a big release!! There is NO time to rest when you have projects to create and share.
I’m still not 100% so won’t be too chatty I fear (maybe that is a GOOD thing! LOL!)
My projects are in my Papertrey Ink Gallery but many of you have asked when I’d post HERE!
You really didn’t miss too much since most of the peeks were revealed during the countdown.
BUT, I never like to disappoint 😀 So here are my Papertrey Ink Release projects for November, starting with the newest My Timeless Template © Time for Take Out
What can I say, I LOVE this template. REALLY love! If I wasn’t sick you’d see a million variations popping up, I swear.
I have to say Terracotta Tile is STUNNING!!!!!!!! Love the color.
I decorated both sides to be the same (of course!)
I just used the NEW! Turning a New Leaf, and some more punched paper flowers. I think it turned out quite eye catching, with little work, and very little time 😀 A great mass production project 😀

Then a EASY PEASY card to match!
Supplies:
My Timeless Template: Time for Take Out
Stamps: Turning a New Leaf, background basics: diamonds
Cardstock: Spring Moss, Terracotta Tile, Ripe Avocado
Ink: Ripe Avocado
Ribbon: Ripe Avocado Stitched
Buttons
Flower punches, EK Success Bfly punch, adhesive rhinestones
Now the reason I have gotten SO many emails (awe! I love you all! You make my day :D)
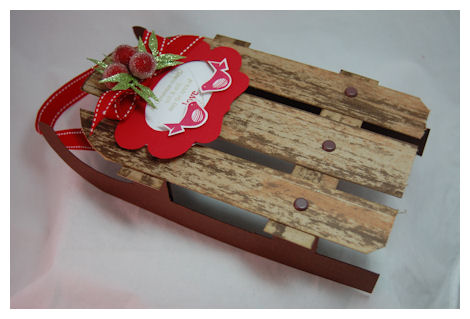
Hanging Sled of Love
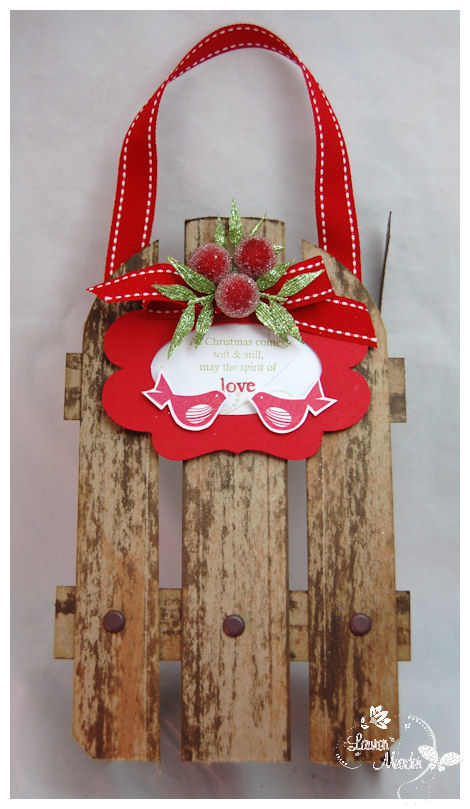
This actually hangs on a door or can be put on a table with some little gifts on top (how cute would that be?! ) A FAB centerpiece for sure. I always wanted a template like this 😀
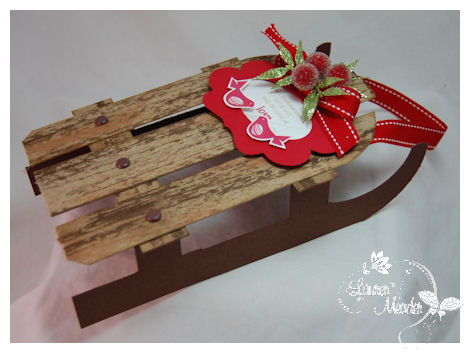
I hand made this sled (for my door this holiday!) out of chipboard that I distresses with tea dye ink! Its rather large too! About 8 inches long and 6 inches wide ( I THINK!) I made it some time ago and have had to wait to post it.
I*may* post it as a holiday freebie if I get some time this week 😀
Here is the tag detail
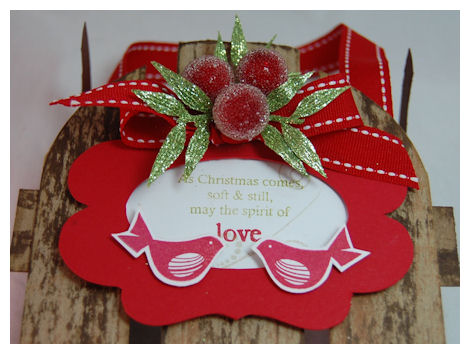
You cold even personalize it with the last name of your own family! Now that would look COOL!
Stamps: Christmas Friends, Snowflake Serenade, holiday tree
Cardstock: Kraft, dark chocolate,white, pure poppy
Ink: tea dye ink duo, spring moss, gold
Pure Poppy saddle stitched ribbon
label from Slice studio essentials cartridge, garland pieces
brown brads by SU!
Check back tomorrow morning, because I have a blog hop project for the NEW! JustRite Stampers release!
(told ya-busy! busy!)
‘Twas the Night Before Christmas
Nov 13, 2009 Author: mytime | Filed under: UncategorizedWell its the 14th! That means that the Papertrey Ink Release party is tonight!
So I have more projects to share using the NEWEST! My Timeless Templates © Home Made © and Time for Take Out ©
Sadly I’m still as sick as ever, so I need to brief. I have all I can do to keep my head up. I felt so bad since yesterday was Noah’s birthday and I wasn’t able to get out of bed for very long. Needless to say we did NOT make it to the movies. He did have a scavenger hunt for his gifts, and decided to spend his day playing with all his new stuff! I don’t think he even noticed my absence. We will save the movie for when we are ALL healthy. I don’t want to pass whatever I have on to ANYONE else.
OK now let’s get to the projects!
Home Made © Twas the Night Before Christmas
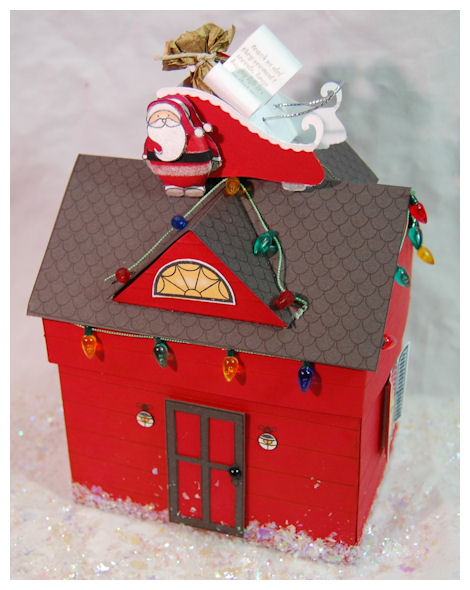
and all through the house
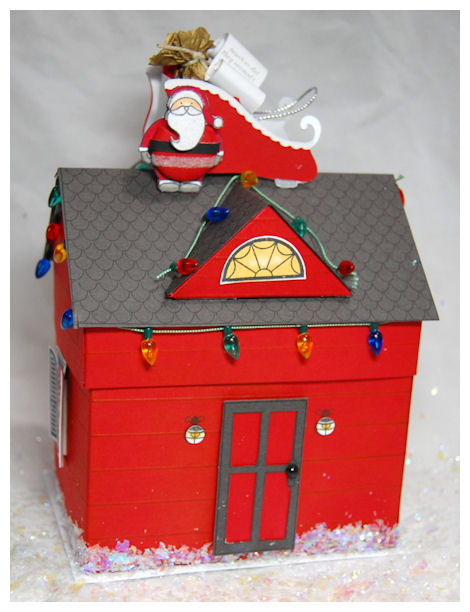
Not a creature was stirring, not even a mouse
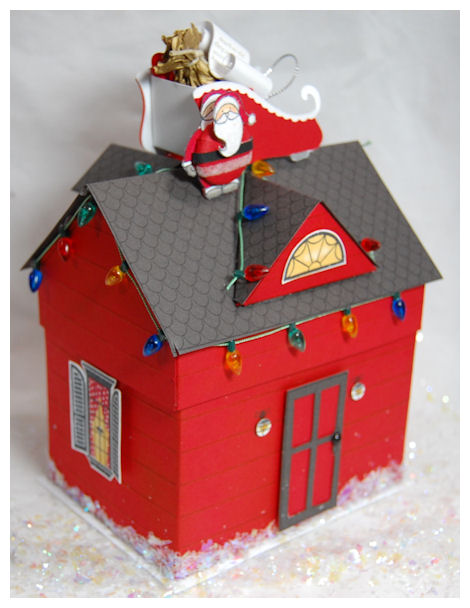
The stocking were hung, by the chimney with care (he sits nicely on the roof, or can come off!)
In hopes that Saint Nicholas soon would be there! (back of house)

That is my version of the ‘Twas Night Before Christmas!
I had some light garland from my PSF (Bonnie – I think! If I remember correctly OR it was my other PSF Barb!) and used to to decorate my Home Made © template. How perfect it was! I scored the boards on the house. Added some snow, and it was just about ready!
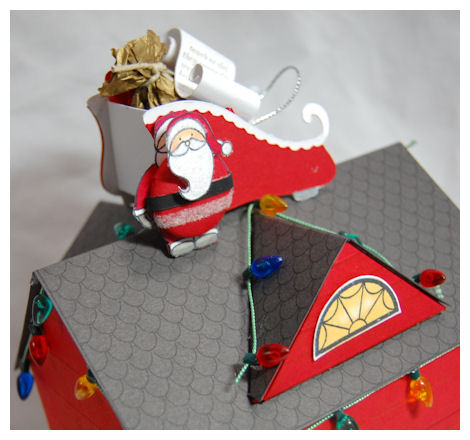
Then I KNEW I had to add Santa and his sleigh
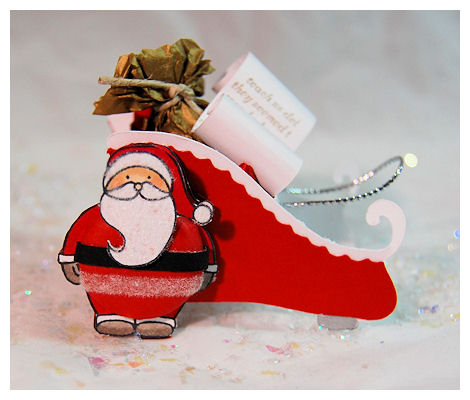
My Santa is from Holiday Button Bits. I used my iTopp to create his brad belly! I love it!! His beard and hat are fun flocked too. I used my Cricut Expression to create my sleigh. I made mine 3D! I then wrapped a cotton ball with gold tissue paper for his sack. The list is one of the signature background basics, cut and rolled into a real life “naughty/nice list”.
Supplies:
My Timeless Template: Home Made, Holiday Button Bits
Stamps: Home Made, Holiday Button Bits
Cardstock: Pure Poppy, Smokey Shadow, White
Ink:Black & copic markers
Christmas light ribbon, sleigh cartridge from cricut, i topp, brad, glue, chunky glitter, silver cording, white fun flock
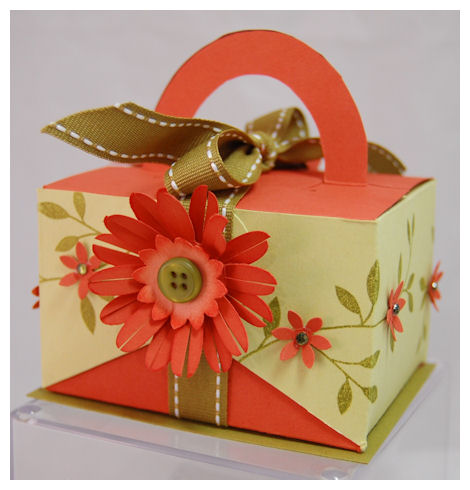
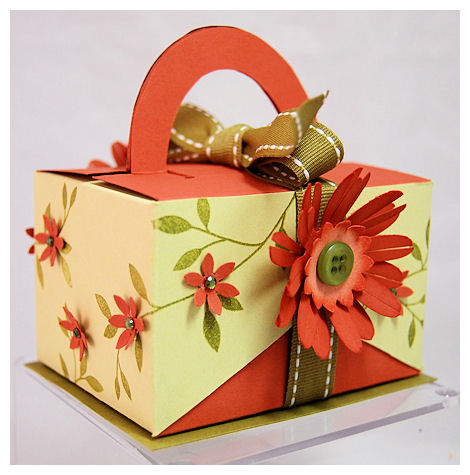
Autumn Delights
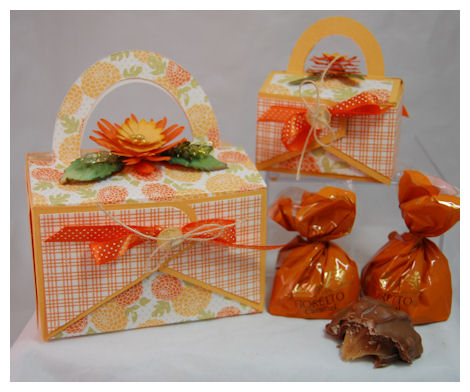
Here is another set using the NEW! Time for Take Out © I hope this template isn’t get overshadowed by the AMAZING Home Made © template, because it is PURE fun!
I love creating with the standard and pretty petite sizes. Now you have lots of options for what you want to package up.
I’m in love with the Autumn Abundance patterned paper. Its stunning all by itself!
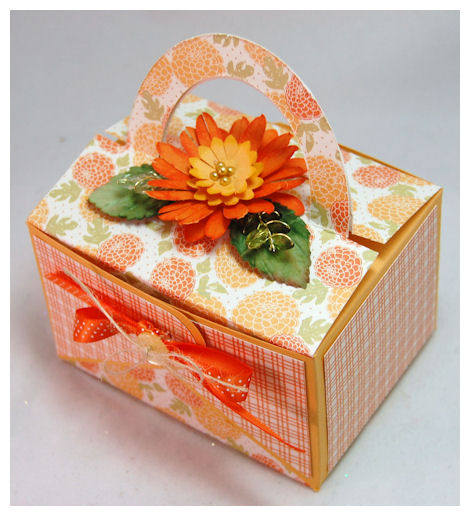
All I did was add a paper punched flower to the top. Some leaves from Prima, and some jeweled ones too.
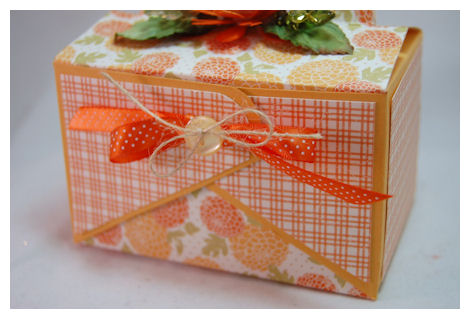
This is the fold in flap detail. Really pretty, with lots of possibilities!
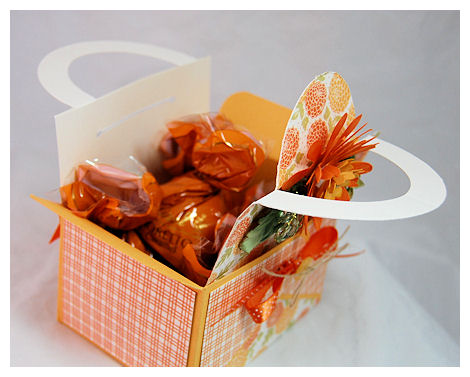
Nothing is better than a box of chocolate! One of my FAVES!
My Timeless Template: Time for Take Out
Cardstock: Summer Sunrise, Orange Zest
Patterned paper:Autumn Abundance
ribbon: orange zest bitty dots
flower punches, adhesive rhinestones
Well that does it for me. I need to get back to bed and recover while Jay is home to care for the kids.
Check out Nichole’s blog today for more inspiration as well as
I’m so happy to have you all share my excitement for the templates each month! I can’t tell you how much I enjoy sharing them with you, and even more so, seeing your creations!
Home Made and template winners
Nov 12, 2009 Author: mytime | Filed under: UncategorizedWell I’m excited to share a PEEK at today’s project!
NOTE: Template not available until the 15th!
It is also my son, Noah’s 7th Birthday!! I can’t believe how fast time went by, and how big he is! That is for another day……
OK back to “business”.
The entire team at Papertrey Ink is getting in on the template FUN! Finally!!
We each have ONE peek of our projects using the NEW! Home Made © Template/Stamp set.
This month will run a little differently. Normally you get 5 EXCLUSIVE ideas with the template download. THIS month you get a PEEK at each project and a grand total of 11 projects ideas, complete with additional photos, supplies and instructions for completing each one with the template purchase.
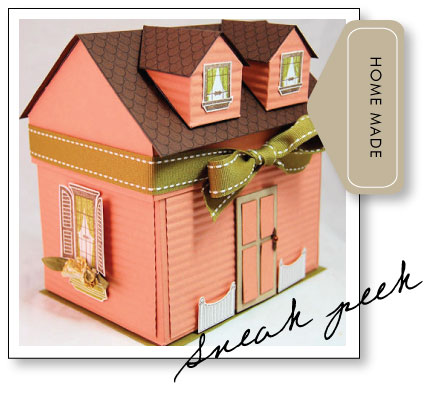
Can you believe this template is ONLY $5!
The template includes:
house base
roof box top
PRINTED roof toppers! So no lining up stamps 😀
2 back dormers
1 larger front dormer
and a chimney.
SOOOOOOOOO many possibilities its insane.
You have PLENTY of time to make your holiday gifts still 😀
How cool is it that we have a template and stamp combo for this one 😀 I cannot tell you how many hours went in to perfecting this template. This is one of those ideas that wakes me up at 4am (it is ALWAYS 4am for some odd reason too! LOL!) and then next thing you know it goes from a sketch, to a tangible template! Just like that! (I wish! LOL!) OK LOTS of cardstock wasted, but it is so worth it 😀
I could seriously gush over this forever, but I don’t think I need to. You can see for yourself and know just how many amazing things can truly be done with it!
Now you may think that the stamp set is *just* for the templates. Well no, it can be used for cards too!
I made mine to match my Home Made box!
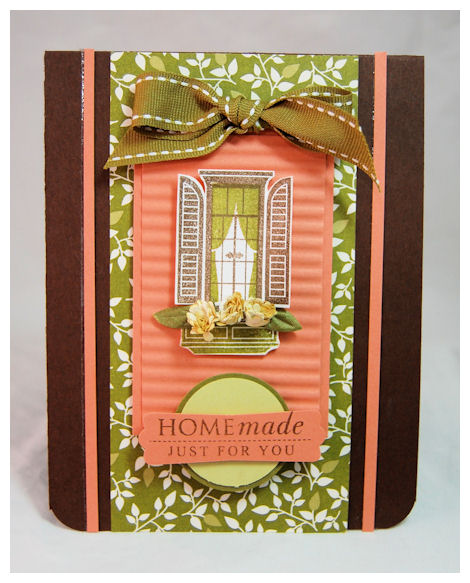
Isn’t that cute?
All the same elements…..just on a card. I love it.
I wish I could share more……but I can’t. But you can check out the design teams projects while you wait!
Each project is so unique!
Tomorrow I have another FAB Home Made ©project, that will REALLY inspire you for the holidays 😀 Can’t wait to share that. I think if you were on the fence, you will fall over to the other side! LOL!
I think you may all have some ideas of why I’m always so “busy” these days! There is just SO much more to come 😀
Thanks for stopping by!
Before I end, I need to share the winners of the My Timeless Templates ©for this month!
I felt like since it was Noah’s 7th birthday to pick #7 from BOTH posts!!
So we have
From Time for Take Out post:
Amy |
Yum! I love to make homemade marshmallows ![]() These take out boxes would be perfect!!!
These take out boxes would be perfect!!!
———————————————————————————————–
From Home Made post:
7. Mandy Kirk |
You truly are amazing!! The templates just keep getting better and better!
———————————————————————————————–
Then to be fair I thought I’d pick 2 RANDOM winners via www.random.org.
I decided that the all the winners would get BOTH templates! Please contact me 😀
From the Time for Take Out
Random Integer Generator
Here are your random numbers:
211
Jen McGee | Every year during the holidays, my mom and I would make Goodie Trays to deliver to friends & neighbors over the holidays. A variety of things like fudge, chocolate covered pretzels, carmels, etc. With my kids, I have packaged up cut out cookies that they have decorated. I pick a weekend and let them go to town (messy but fun). Can’t wait to get my hands on another one of your templates! Now we have the random winner from Home Made postRandom Integer Generator
Here are your random numbers:167Crisanne | Oh how I needed this template not too long ago! Of course, the little card with a house I made wasn’t too bad, but this would have made my house warming gift simply amazing!! This is an absolute must-have! Well I am going to do my best to celebrate my son's 7th birthday! We are suppose to go see the NEW! 3D movie a Christmas Carol! I think the kids will either a) LOVE IT! or b) be terrified! LOL!Have a great day, and see you back here tomorrow!
#3 Communique Curves Inspirations and another template peek
Nov 11, 2009 Author: mytime | Filed under: Cards, Home decor/3-D items, My Timeless Templates, Papertrey NewsletterWell are you loving all the goodies this month?
I have been DROOLING reading about all your yummy treats you give around the holidays! I may have to hit some of you up for the recipes 😀 If you don’t mind 😀 The template winners will be posted tomorrow 😀
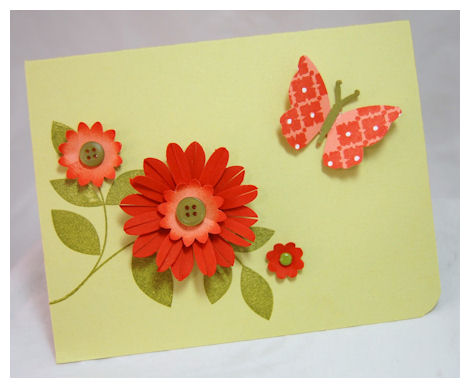
Well today we have a group post. This is the first set this year from Allie Miles. It is called Communique Curves & Sentiments. We were asked to take this set and show you two variations of the same card! So, basically create a holiday card, then an everyday type of card.
Here is my set: Happy Holidays Duo

I love how you can use the same layout, then by swapping out the images, and changing the colors, you get a totally fresh and new look! You really can get lots of mileage out of stamp sets when you have a few key layouts! Just keep re-using them, and changing different elements! This also shows you don’t need a ton of supplies to make great looking cards.
Here is Tis the Season
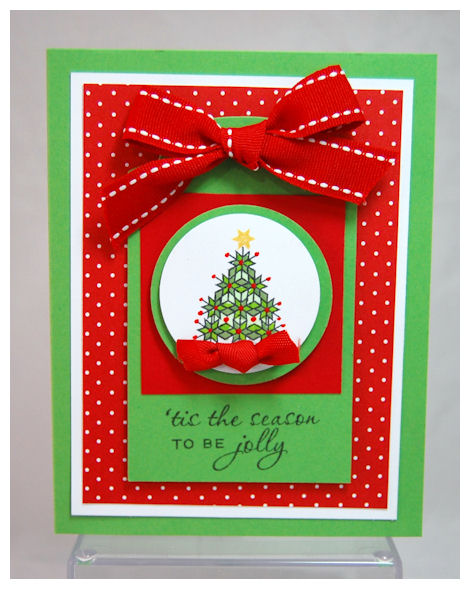
The main layer is a tag I cut. This is a very basic layout that can serve circle, heart, or rectangle image centers!
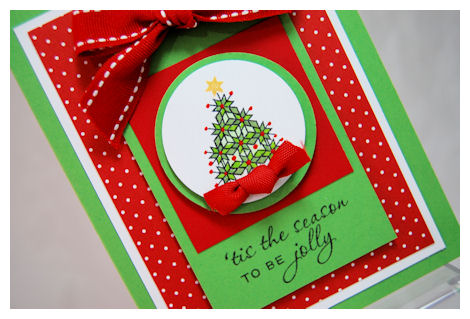
I used various copic markers in shades of green to color my snowflake style tree. Quick and cute!
Supplies:
Stamps: Communique curves & sentiments
Cardstock: New Leaf, Pure Poppy, White
Patterned Paper: Bitty Dots
Ink: Black & Copic
Ribbon: Pure Poppy twill & Saddle stitch
circle punches
Now keeping with similar elements, we move on to a birthday card.
I colored my paper to match

Again dotted paper, tag center, everything exactly the same, except my image and colors.
Fun huh?
Supplies:
Stamps: Communique curves & sentiments
Cardstock: black, white, raspberry fizz, orange zest
Patterned Paper: Black & white basics
Ink: black, rspberry fizz, orange zest, avocado & copic markers
ribbon: stitched grosgrain
circle punches
Be sure to check out what the team has done:
Now I have another fun post to share!
How about another template peek?
This was a quickie. Sorry I’m going to be brief. I’ve been sick the last few days and the worst of it is really hitting me now. I feel like I have sinus infection. Not fun. OK enough about me and my drama-just note I typed this on lots of cold medicine so I apologize in advance if its a bit “all over”. I’m doing my best.
Happy Everything

Here we have another version (the standard size) with newest template (releasing on the 15th) Time for Take Out. I can’t tell you how fun this little box is! You may recall I used it for my daughter Amber’s birthday party —->HERE! I didn’t show any details yet, but I loved it and had to use it early! It can be hard sitting on some great template ideas for so long! Keep in mind I still have like 40 templates you have yet to see. So, when I need one and it fits, it can be hard not sharing what I made. I’m sure you can imagine being in a constant state of suspense. It gets exhausting! LOL!
I so loved this patterned paper I had in my stash. The colors were SO cheery. So I went with that, for the sentiment “happy everything”.
I added some paper flowers, and buttons around the box. Both sides of this box are ALWAYS designed to look the same. Its just one of those templates that you should try to make pretty no matter WHAT way you turn it.
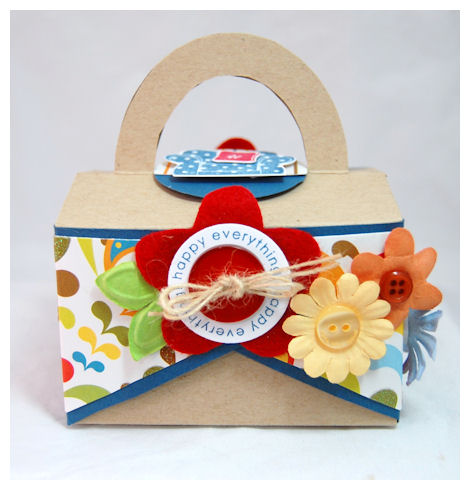
I was thinking cheer up, new apartment, everyday sort of gift box. Maybe put some treats in there, with a gift card or a gift of tea, maybe even candles, or tea lights…..warm slipper socks! I love those. Just a warm gesture of friendship.
Supplies:
My Timeless Template: Time for Takeout
Stamps: On my Couch, Around & About sent.
Cardstock: Kraft, White, Enchanted Evening
patterned paper unknown source
Ink: Enchanted evening, pure poppy
buttons
Prima flowers
Well, tomorrow is our BIG group post using the stamp/template combo Home Made © ! You won’t want to miss that. Plus the template winners will be announced.
Thank you all for stopping by and sharing my excitement. You all make every moment I spend sharing here so enjoyable. I cannot tell you how amazing it feels. I always enjoy reading your comments, emails and when you share your creations with me as well!
Thank you again!
My Etsy

Who I Designed For
Blogroll
- Alicia
- Alli Miles
- Ally Blankenship
- Amber
- Andi @ crafts on a whim
- Angel R
- Angie Z
- Anne Kranitz
- Becky O
- Bee
- Beth Silaka
- Bethany Paull
- Beverly Nash
- Bobbie
- Cambria
- Cammie
- Card of the Week
- Card Positioning System (CPS)
- Cards for Cancer
- Catherine Doucette
- Charmaine
- Cheryl Sims
- Chriss Rollins
- Christina
- Christine Ewing
- Christine Wooden
- Colleen Schaan
- Craft Critique
- Craft Gossip
- Crystal
- Dawn Easton
- Emily Giovanni
- Geny
- Holly
- Igne Groot
- Inspirational Craft Blogs
- Irene
- Jami Sibley
- Jeanne Streiff
- Jen del Muro
- Jeni Bond
- JenMarie
- Jenn Balcer
- Jenn Diercks
- Jenn O
- Jennifer E
- Jennifer Mick
- Jennifer Pereda
- Jennifer-Sweet Treat
- Joanne Basile
- Jodi Collins
- Julia Stainton
- Julie Masse
- Karen
- Kathryn Berthiaume
- Katie Cotton
- Kelley Holland
- Kendra
- Kim Scholfield
- Kris’s Color Stripes! Get inspired here
- Kristen Dubosque
- Kristin Eberline
- Kristine
- Laura @ Sunshine Stamper
- Laura Turnmire
- Laurie Schmidlin
- Lesa Rapp
- Linda Duke
- Linda-LSN
- Lindsey Botkin
- Lisa (lakind scs)
- Lisa Kind
- Lori Craig
- Maggie
- Mara Campbell
- Maria
- Maria Levine
- Mary
- MaryJo
- Melanie M
- Monique Hansen
- Moxie Fab World
- Pam Imholz
- PaperCrafts Connection
- Peppers and Pollywogs Kids party site
- Rebecca Grohall
- Rita
- Robyn
- Rose Ann
- Sarah Vrolyk
- Sharon Harnist
- Sharon Johnson
- Sharon Rivera (a chemisrty with paper)
- Sherrie
- Sophia Landry
- Storage Units, Ink, & More Blog
- Sue Berker
- Susan (Rainy)
- Tangii Crane
- Tracy
- Tricia Traxler
- Trudee
- Velta
- VivLyn
- Zena
MTME Pretty Palette Color Team
MTME Pretty Patterns Sketch Team
My Time Made Easy TM LLC
Shop till you drop!
Lauren Meader
About Me
Copyrighted material
Subscribe To My Blog
Pages
- About me
- Alexa’s Story!
- My Crafty Corner!
- My Time Made Easy™ LLC
- Our Make A Wish Trip to Disney!
- Resume/Publication List
Calendar
Archives
- August 2013
- July 2013
- June 2013
- May 2013
- April 2013
- March 2013
- February 2013
- January 2013
- December 2012
- November 2012
- October 2012
- September 2012
- August 2012
- July 2012
- June 2012
- May 2012
- April 2012
- March 2012
- February 2012
- January 2012
- December 2011
- November 2011
- October 2011
- September 2011
- August 2011
- July 2011
- June 2011
- May 2011
- April 2011
- March 2011
- February 2011
- January 2011
- December 2010
- November 2010
- October 2010
- September 2010
- August 2010
- July 2010
- June 2010
- May 2010
- April 2010
- March 2010
- February 2010
- January 2010
- December 2009
- November 2009
- October 2009
- September 2009
- August 2009
- July 2009
- June 2009
- May 2009
- April 2009
- March 2009
- February 2009
- January 2009
- December 2008
- November 2008
- October 2008
- September 2008
- August 2008
- July 2008
- June 2008
- May 2008
- April 2008
- March 2008
- February 2008
- January 2008
- December 2007
- November 2007
- October 2007
- September 2007
- August 2007
- July 2007
- June 2007
- May 2007
- April 2007
- March 2007
- January 2007
Categories
- About Me
- All That Scraps
- blogger challenge
- camera/photo play
- Cards
- Contests
- family stuff
- FOR SALE
- Home decor/3-D items
- How to FAKE it!
- Introduction
- JUGS Challenge
- JustRite Stampers
- Lizzie Anne Designs
- My family stuff
- My Stamping Space
- My Time Made Easy
- My Time To Color Challenge
- My Time to Create Challenge
- My Timeless Template Challenge
- My Timeless Templates
- Mytime Mail
- MYTIME MOVIE/VIDEOs
- Papertrey Newsletter
- Pink Cat Studio
- Pretty Palette Challenge
- Pretty Patterns Sketch
- Product Opinions and Must haves
- Recipe's
- Saturday Sketch
- Smilebox Creations
- Stampavie
- Tutorials
- Uncategorized
- videos
Most Popular
- Create your own Onesie Card Tutorial-and important NOTE! PLEASE READ (2529)
- Saturday Sketch-Boxed bag holder (2333)
- Going GREEN! Fancy Flower Flourish-Closure Video (1478)
- Fabulous Favorite - Giveaway! (1336)
- a Prayer Request (1232)
- QUICK-Easter Baskets from Nestabilities-PTI style-and blog challenge (1063)
- Teaser Sketch (999)
- February Release Giveway! (and a little peek) (996)
- Group Post and Rambling Rose Video Tutorial (985)
- GIVEAWAY! Who wants it all?! (895)
Recent Comments (RSS)
- 첫충사이트: 완전히 흥미로운 블로그 게시입니다. 저는
- sarah: Wow, Lauren, what a stunning
- hedie: خرید راهبند
- 야동: Love to read it,Waiting For
- 야동: This seller is in a
- 바카라사이트: 여기 처음 왔어요. 나는이 게시판을
- 야동티비: I was surfing the Internet
- 바카라사이트: 비슷한 주제에 대한 흥미로운 정보를
- 바카라사이트: "여기에 제공해 주신 귀중한 정보와
- 온라인홀덤: 유익한 웹 사이트를 게시하는 데
Copyright © 2007 - My Time, My Creations, My Stampendence - is proudly powered by WordPress
This blog has been Tweaked and Designed by Sara Williams