Archive for June, 2012
July Release: Birthday Bash
Jun 30, 2012 Author: mytime | Filed under: Cards, Home decor/3-D items, My Time Made Easy
It’s July 1st and that means all our NEW! Products are available for you to purchase!
Our theme this month is BIRTHDAY, or any celebration really 😀
Be sure you check out our NEW! Products <—HERE!
We have released:
4 NEW! Pretty Packaging Templates
1 NEW! Pretty Impressions Stamp Set
3 NEW! Pretty Printable Digital Paper Collections
4 NEW! Pretty Pieces Cut Files
Check out our
NEW! Perfect Package Collections!
Please view our Gallery for project samples, and alternative ways to use all our amazing coordinating products!
You may also want to check out our blog for weekly challenges, and even more amazing ideas.
Today we have an amazing group post using our NEW! Products
As you may have come to know my company focuses on the “complete package”. We work hard to offer coordinating products that are easily interchanable with previously released products. We really enjoy being able to share the ideas and versatility each product holds.
That being said here is WHO you should visit today for some amazing projects:
3 Tier
Cuppy Cake
Lil’ Cupcake
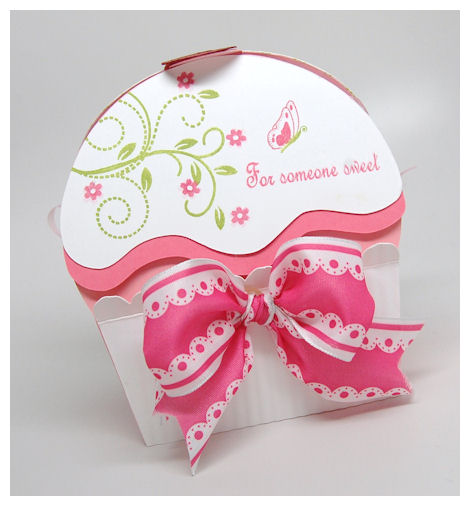
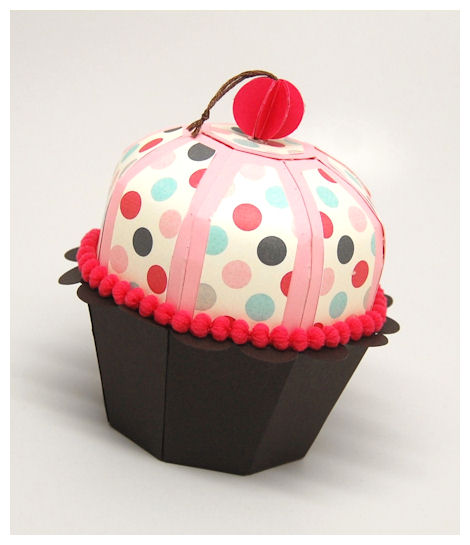
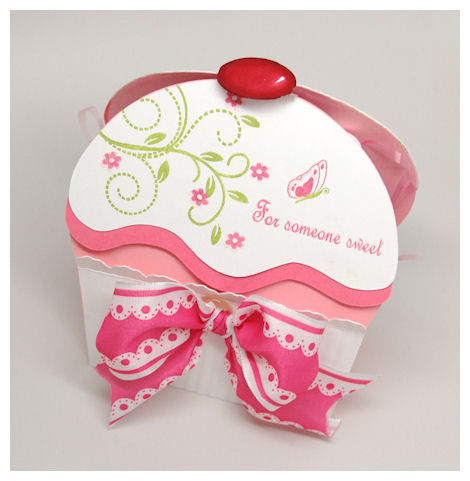
Since our theme is Birthday Bash, I get to share my idea of a super sweet birthday party favor for any age!
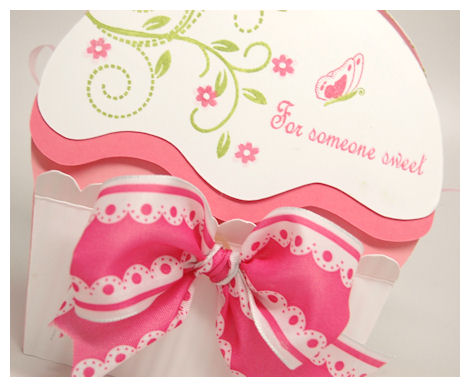
For someone sweet!
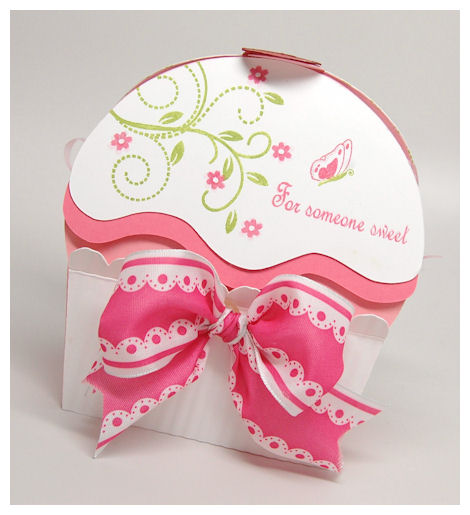
Sweet indeed. I created this cute cupcake party favor for an upcoming birthday I was asked to make favors for.
These cupcake favors are for a 8 year olds party, and they are actually decorating 2 cupcakes as part of the party activity. After they are decorated they will eat one, then bring the other home (if it makes it!) in a coordinating Cuppy Cake box, that I will design to match 😀 I haven’t got that far yet!
How seriously cute would these cupcake themed favor boxy-bags be, when used for a party rather than the standard goodie bag?
I cut my template from a pink cardstock and then made my frosting layers.
You can customize each one in a different color, and design it to suit the guest too!
The white layer is stamped using our vines from Fanciful Flourishes © , flowers from Singing Silhouette © , and the sentiment from On Display 1 © . My cupckae liner was cut and then crimped using my paper crimper, for a realistic effect 😀
Lil’ Cupcake $5
Available in PDF, SVG, GSD, DXF, WPC
Completed Project Size:
5 Inches Tall
3 1/2 Inches Wide
2 1/2 Inches Deep
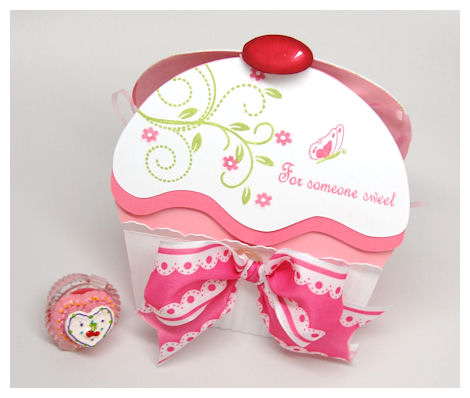
The top closure comes together to create a “cherry” closure! The perfect topping for *any* cupcake! You can use the cardstock piece or use a button, large brad or maybe some BLING!
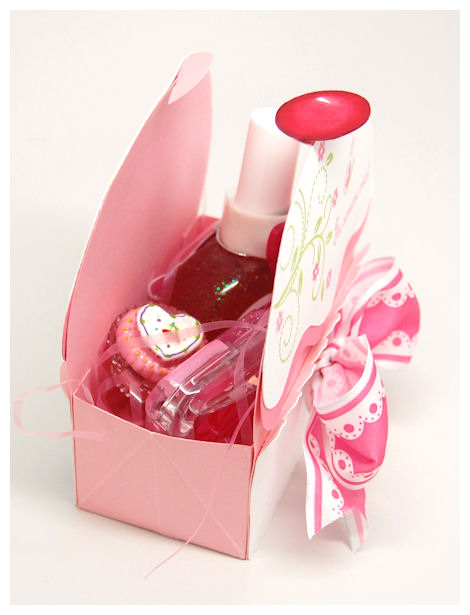
In here I will be packaging some cupcake themed lipgloss, scented glittery lotion, and cupcake themed makeup all from the $1 bin at various stores.
Supplies from My Time Made Easy ™ LLC
Lil’ Cupcake
Fanciful Flourishes, Tending the Garden, Singing Silhoutte, On Display 1
So there you have it! A super sweet party treat for any age 😀
Come back tomorrow for more ideas.
July Preview Day 2: Something Sweet
Jun 29, 2012 Author: mytime | Filed under: Home decor/3-D items, My Time Made EasyJust one more day until our July 1st Release!
Come click the links to our designers for more inspiring ideas:
Cuppy Cake
3 Tier
Lil’ Cupcake
I am very excited about this particular template that I am sharing today. I made it some time ago and have been awaiting the perfect time to release it!
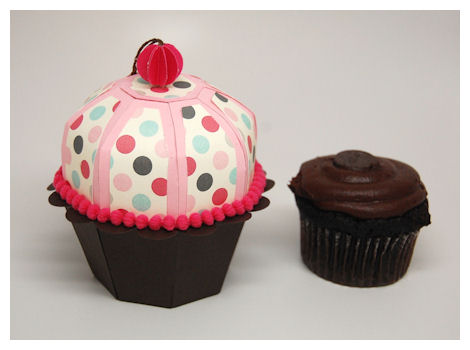
I have MANY birthday’s to celebrate through the year, and I was looking for “THE” perfect packaging for a single cupcake. There is a bakery that I love to go to, to gift a delicious cupcake, and now I have the best way to present it!
ABOUT Cuppy-Cake $5
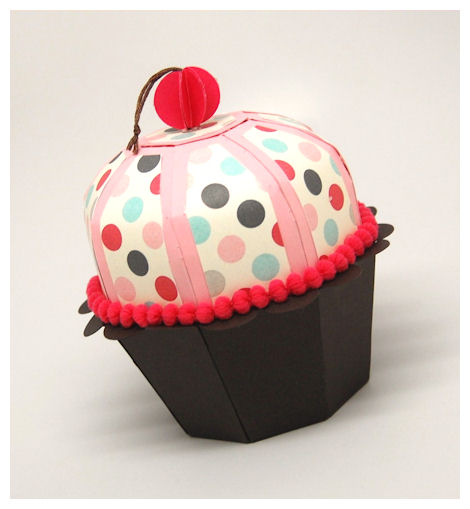
Available in PDF, SVG, GSD, DXF, WPC
Completed Project Size:
3 1/2 Inches Wide
4 1/4 Inch Tall
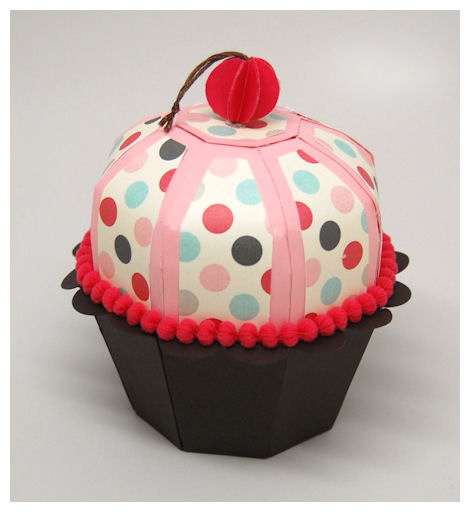
There is a reason this is called “Cuppy” Cake. This is such an adorable package that was designed to resemble a cupcake, but it is so much more than just that. This is a 2 piece template, with a top and bottom, that both offer a variety of functions.
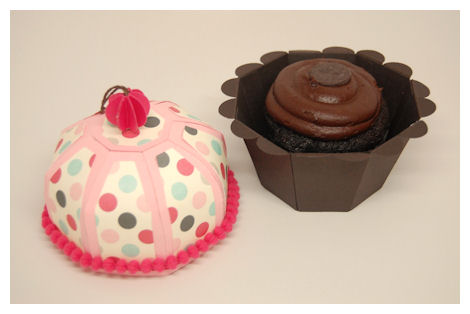
While you can fit an actual cupcake in here, with room for a towering amount for FROSTING, you can also do so much more with it!
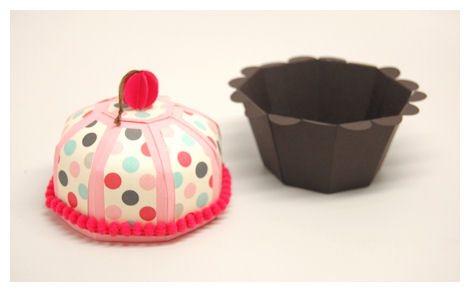
The top of the Cuppy-Cake can be flipped over and turned into an actual tea cup! The bottom is stunning and can be used as a pretty container all on its own as it is the perfect package with this eight edges, and scalloped top. It can also be turned into a basket or a flower pot (to get your ideas started).
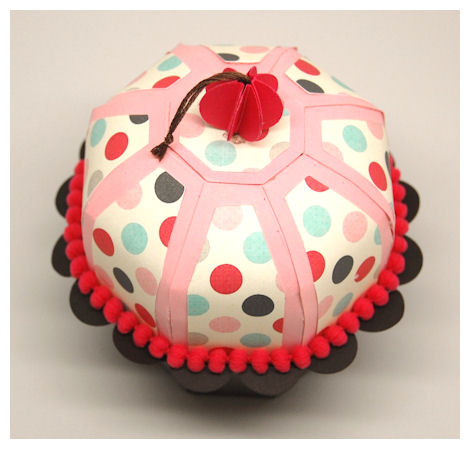
By cutting out 6 small circles, and using some embroidery floss I made a “cherry” for the top of my cupcake. I used the Minty Chocolate © paper collection to create my cupcake “sprinkles”. I trimmed the edge with some pom pom ribbon so it would appear to look like “frosting”. Just have FUN with it.
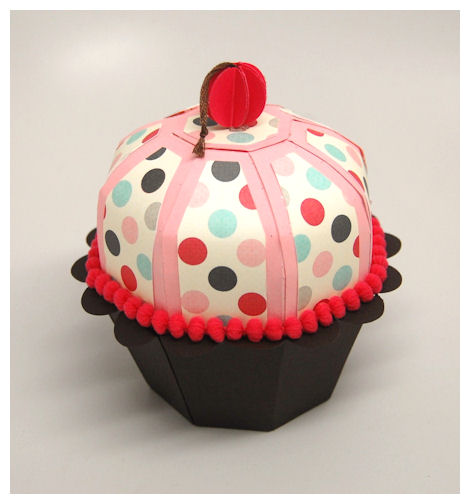
This was a super simple, and easy design option.
You can also design this to create a candy truffle box, strawberry, ice cream sundae or a little bird or animal. With a little creativity this “Cuppy-Cake” is the perfect presentation for just about every occasion!
I don’t think it gets much more delicious than this!
Supplies from My Time Made Easy ™ LLC
Cuppy Cake
Pretty Printable Digital Paper:
That literally wraps up my sample for today.
Thank you for stopping by.
Please return tomorrow for our July Release!
July Preview Day 1: 3 Tiers!
Jun 29, 2012 Author: mytime | Filed under: Home decor/3-D items, My Time Made EasySORRY this is so late! My post didn’t go LIVE on time :C
Summer is here and in full effect!
While I am unsure WHERE June went, here we are getting ready to celebrate the 4th of July soon!
This means it is time for another fabulous release from My Time Made Easy ™ LLC.
We have MANY amazing NEW! products to share this month so I hope you brace yourself for a plethora of amazing ideas 😀
While our July Release won’t be available until July 1st, once our products are in store, they are available for instant download. If you want to know HOW to download any of our products please read instructions HERE!
Our files are formatted to fit over 18 cutting systems on the market! But you DON’T need a personal cutting system to use our products! If you have a home printer you are good to go!
If you want some information about our products please read our ABOUT PAGE.
The team is ready to start sharing, as am I so please pay a visit to the following designers who will share their take on one of our 3 NEW! Pretty Packaging Templates set to be released July 1st:
3 Tier
Lil’ Cupcake
Cuppy Cake
So today I am sharing a sample with two new templates, that really go hand in hand!
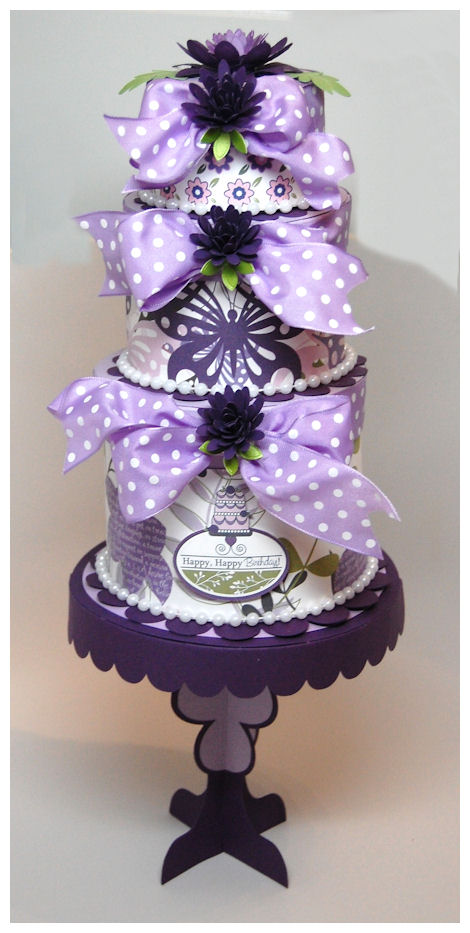
Happy Birthday 3 Tier Tower
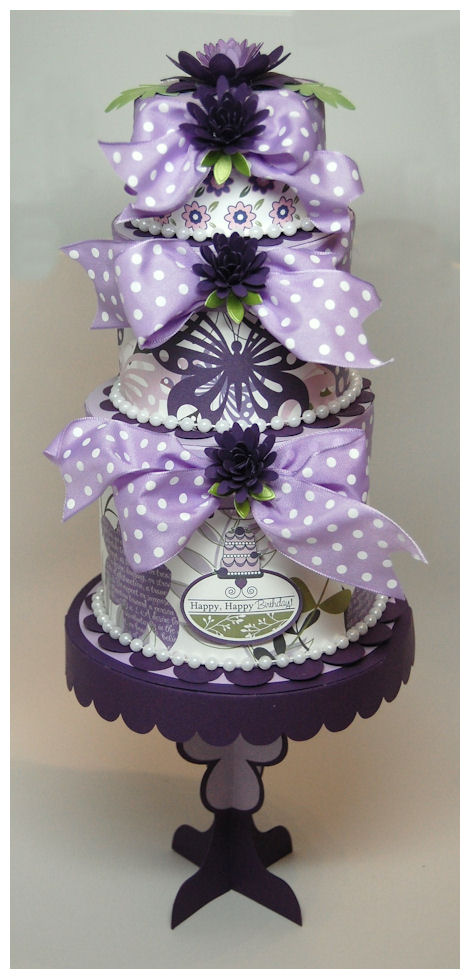
Today I am sharing a sample using the NEW! 3 Tier & Tray-Chic templates!
My sample was designed using some of our older products 😀 As you know you can never get too many uses from older items you may have already purchased. Read more for details and a list of supplies.
Here is the “before” version, so you get a clear idea how these can be simple, or really dressed up to become a total WOW!
Purchase this Template with the Tray-Chic Template for a discount! ($7.50 when sold with the Tray-Chic Template)
Available in PDF, SVG, GSD, DXF, WPC

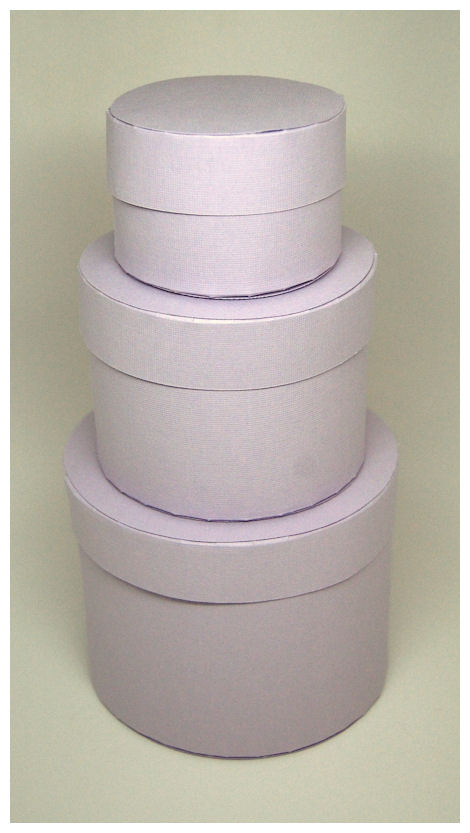
This is a collection of three different sized round boxes that stack together or each can be used on its very own. Fashioned after the vintage hat box, this is sure to let the possibilities for creative gift giving to stack up!
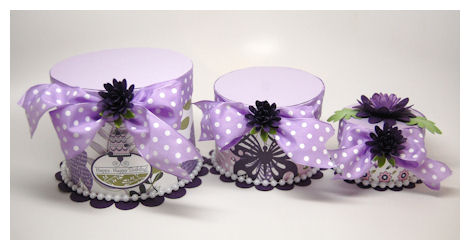
Each box comes complete with a decorative scallop bottom option to further enhance your design possibilities.
My trio today used the stunning Regal Round Up © digital paper collection.
Completed Project Sizes:
Large
5 Inches Around X 4 Inches Tall

I decorated the large tier using the label and sentiment from the Round Off © set, paired with the cake from the On Display 1 © set.
4 Inches Around X 3 Inches Tall
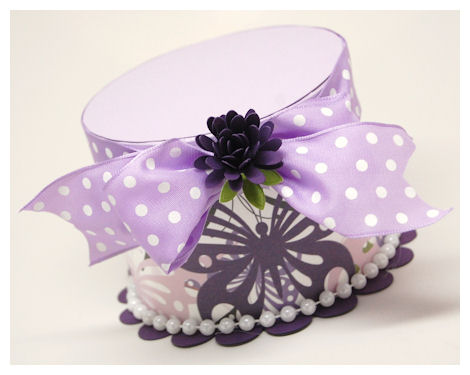
The bottom of each layer used the scallop in eggplant cardstock, and is trimmed with a pear bead strand, which was hot glued on.
Small
3 Inches Around X 2 Inches Tall
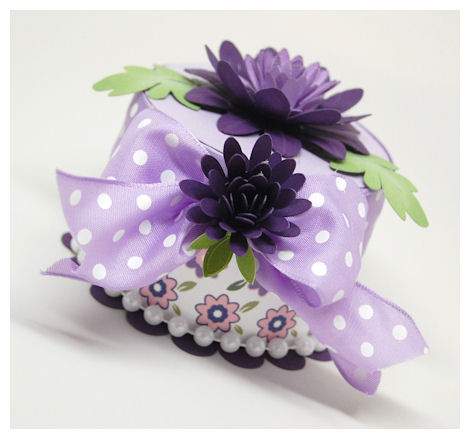
I used the Rolled Bloom Daisy © to accent each bow center of my 3 Tier layers. I love being able to make my own flowers!
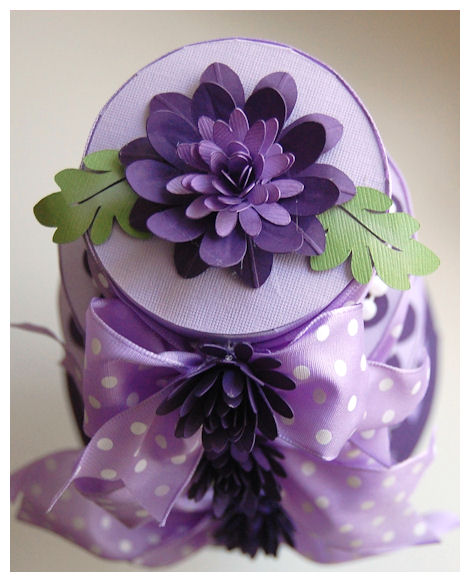
The top of the box uses the Bloom Builders © to further enhance the top layer, and add some leaves.
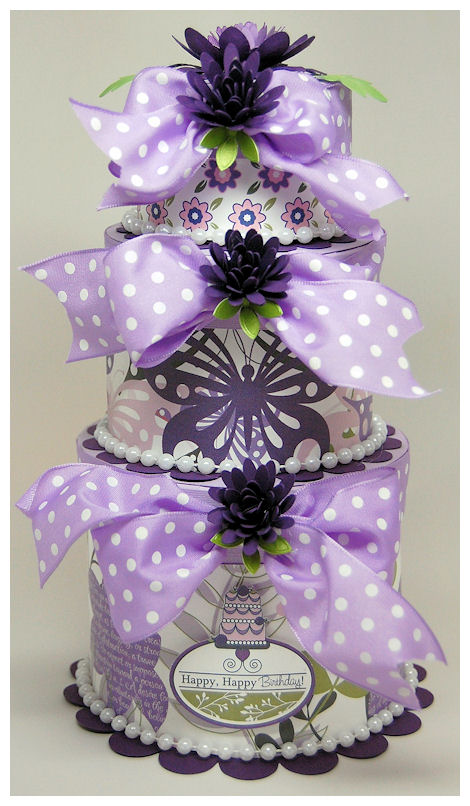
The boxes can be designed to look like anything round! Use them to replicate the vintage hat boxes they were inspired by, a “ball” for any sport, a holiday wreath, ornament, drum, or stack them to create a 3 Tier cake, tree, maybe a snowman, soldier, nutcracker, or Santa box, ladybug, bumblebee….whatever fun things you love that are round, or just a fun table centerpiece!
So whether you choose to use one tier, or all three, the end result will be fabulous.
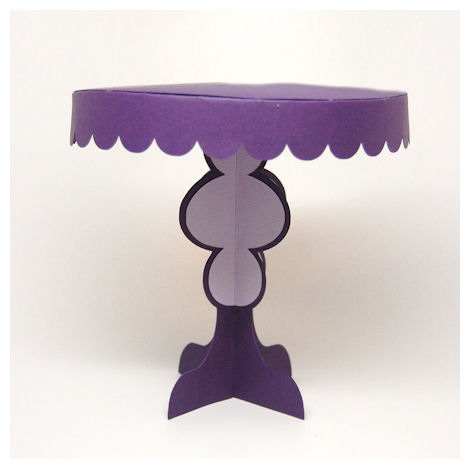
You will also want to check out our AMAZING Tray-Chic Pretty Packaging Template *SOLD SEPARATELY* as it makes the perfect stand to display your 3 Tier Packages!
Now some info on the amazing tray this sits on:
Purchase this Template with the 3 Tier Template for a discount! ($7.50 when sold with the 3 Tier Template)
Available in PDF, SVG, GSD, DXF, WPC
Completed Project Size:
6 1/2 Inches Around
6 1/2 Inches Tall
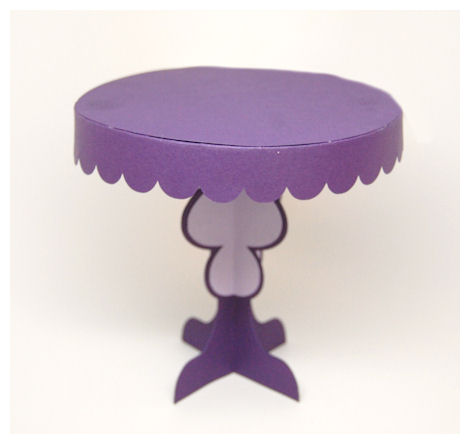
This is a very “chic” display tray for some many amazing Pretty Packaging Templates and gifts! You will want to display everything on this tray, and whatever you do is sure to be noticed! The tray is sturdy, fun and easy to assemble.

You can add some decorative paper circles, or other shapes, pearls, gems and/or adhesive bling to the scallops!
You will also want to check out our AMAZING 3 Tier or Cuppy Cake Pretty Packaging Templates *SOLD SEPARATELY* as they makes the perfect items to display on your tray!
Just IMAGINE the possibilities!
Supplies from My Time Made Easy ™ LLC
3 Tier, Tray-Chic
On Display 1 & Round Off
Pretty Printable Digital Paper:
A Shabby Tea Room Challenge!
Jun 12, 2012 Author: mytime | Filed under: Contestshttps://theshabbytearoom.blogspot.com/2012/06/week-118-shabby-beautiful.html
June:Year in Review
Jun 3, 2012 Author: mytime | Filed under: Cards, Home decor/3-D items, My Time Made EasyIt is everyone’s favorite time of month!
Year in Review
This is when our team gets together to create NEW! samples for you using our old products.
This allows you to see some of our older products you may have missed, and it gives you more ideas and inspiration for NEW ways to use our older products.
So visit the team for some surprising new projects that will get your creativity flowing.
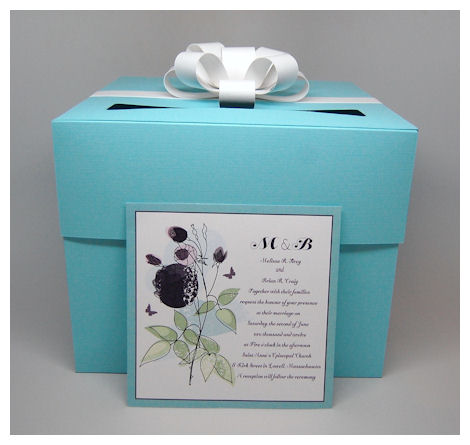
Amongst the MANY things I do, I also design Wedding and Shower favors for VERY special people! LOL! I am generally so busy with running My Time Made Easy ™ LLC that I have very little to no time to do other “jobs”.
One of my best friends got married in June 2nd, and had asked me to design her Wedding invites, RSVP cards and Reception Cards.
Given her unique color scheme of Tiffany Blue and Eggplant, she was having a hard time finding something she LOVED. So working with her colors, and ideas of what she and her new husband wanted, I went to work and this is the fruits of my labor!
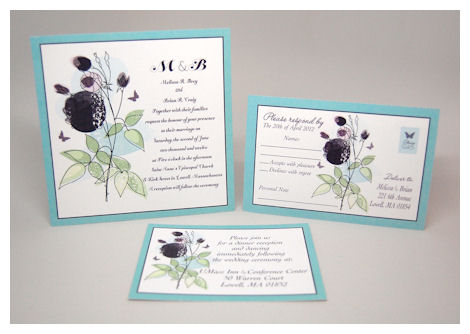
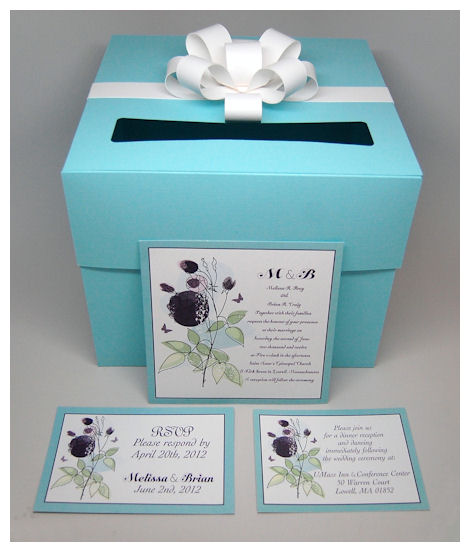
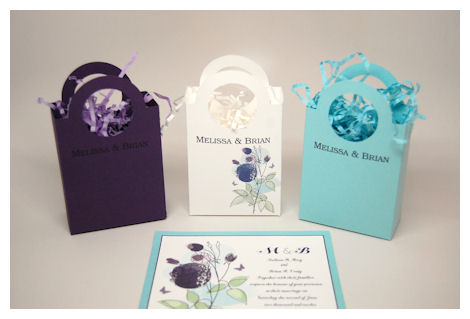
In addition to these, I also designed her Card Box for the gift table, and her Wedding favors. Here is the Card Box with the Invites, Reception & RSVP cards
I custom made the Wedding Invites etc. Here is where the “year in review” part comes in….
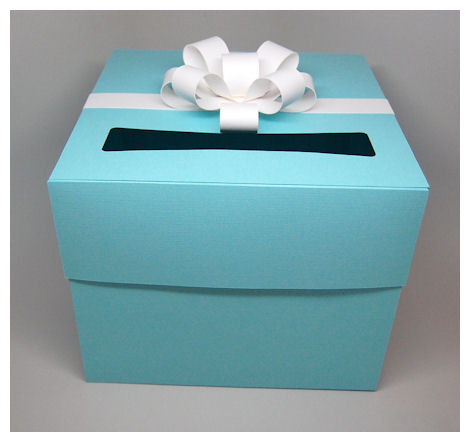
The Card Box was designed using the A Box is a Box © template, enlarged (sides of lid shortened) to suit the amount of cards the new bride and groom would receive.

I created a “slot” in the lid.
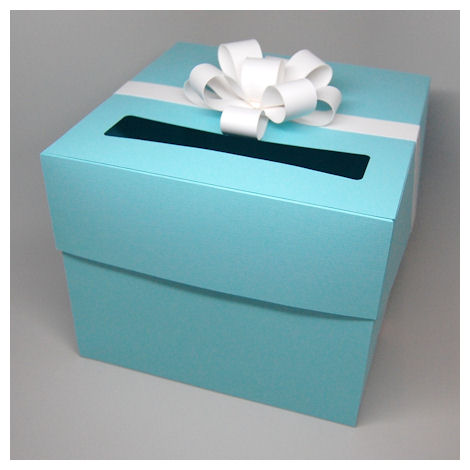
To re-create the “Tiffany” style box I used the Abra-Bow-Dabra © It was a big hit 😀
Now the favors!
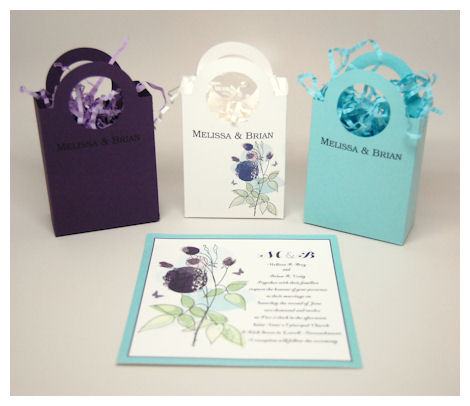
We just released a new cut file called Paper Bag.
This is what she had asked for, for her Wedding Favors.
She wanted a personalized trio of simple style gifts bags to send her guests off with some gourment chocolates. After her sketching a simple drawing of what she wanted we had this simply elegant design that looked amazing on the tables, as they were on each table as you see here, alternating colors! I love the one with the whimsical rose, as it tied everything together.
I hope they have a LONG and HAPPY life together!
Supplies from My Time Made Easy ™ LLC
A box is a box
Abra-bow-dabra, Paper Bag
It is really heartwarming to create and gift your own packaging, gifts and favors! Even the simpliest of gifts become a little something MORE!
When people find out it is NOT store bought their jaw hits the floor, and their hearts swell with joy & love knowing you took the extra time to make something just for them or theie special event. It adds that little something special, and if so much more affordable and of course personal.
I was so honored to be able to do this for my childhood friend. I am sure it will be remembered for years to come and I enjoyed it. It was especailly nice to see the reaction from family and friends of both the bride & groom 😀
Thank you for letting me share what I love, and the continued support so I can continue to keep doing something I love as well!
Happy Crafting
Happy Trails…
Jun 2, 2012 Author: mytime | Filed under: Cards, Home decor/3-D items, My Time Made EasyI hope you are ready for some truly inspiring projects from the team!
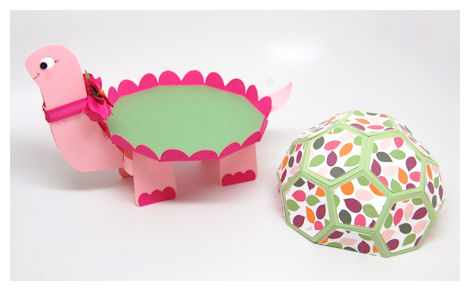
I am quite excited about my little project today! Another “vision” I had when altering the Happy Camper template, and using the Trendy Turtle template. Combining the best of both….
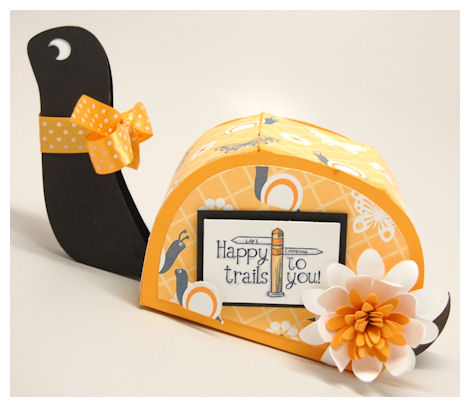
Do you love it?!
I used the turtle head/tail piece to turn the camper into a snail! Of course I had to use the Spring Abound © collection for my little snail shell 😀 I think it looks uber cute.
Seriously a little imagination and you can make many amazing things 😀 Just think outside the box!
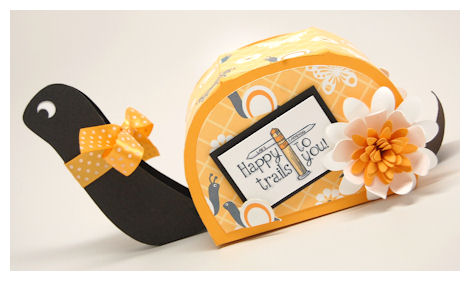
The sign is from the NEW! Let’s Go Camping set. I accented the sign by making my won flowers using the Bloom Builders © in white, and the Rolled Bloom Daisy © in daffodil. I always ensure I decorate all sides of the box. This looks really pretty in person.
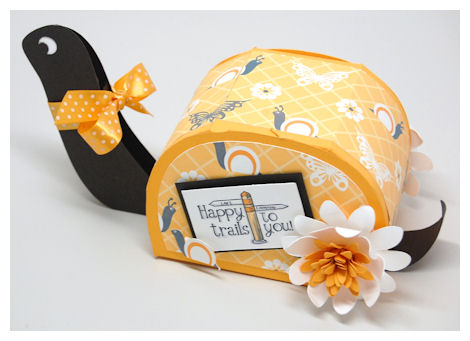
What a great way to say goodbye to your class teacher. I plan on packaging up some of my homemade trail mixes for the Teachers at the end of the year, with a gift card to Staples!
This project was really easy peasy!
Supplies from My Time Made Easy ™ LLC
Happy Camper, Trendy Turtle
Let’s Go Camping
Pretty Printable Digital Paper:
Spring Abound
Bloom Builders, Rolled Bloom Daisy
Tune in again tomorrow because we have our monthly Year in Review projects, when the team get together, and makes new projects with our older products! The ideas just continue and you won’t want to miss it.
See you then!
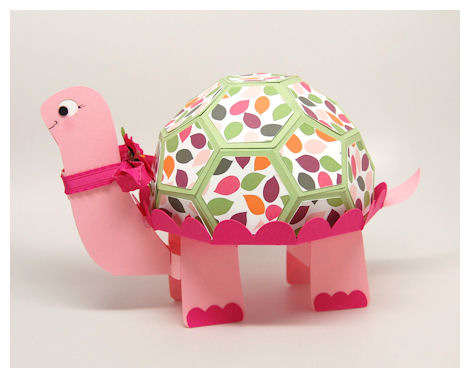
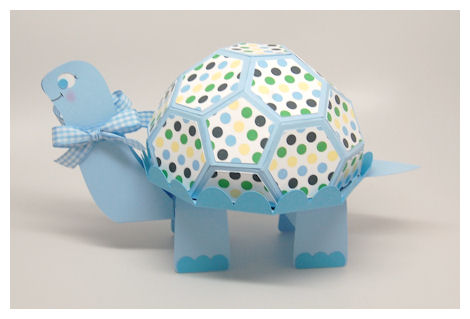
For the boys and girls…
Jun 1, 2012 Author: mytime | Filed under: Cards, Home decor/3-D items, My Time Made EasyWelcome back!!!
I hope you are enjoying the newest products from our June Release 😀 The team and I are here to share even more ideas using our latest products! So take a peek here:
I had posted a gender neutral turtle the other day during our June Preview

Here you can see the first turtle I share, as well as two others, designed for that special someone.
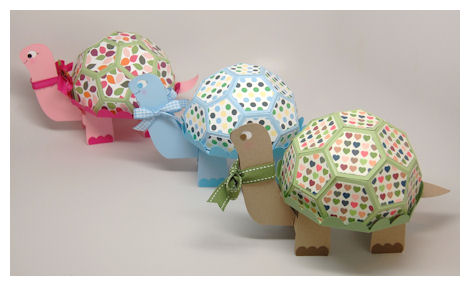
We have a girl turtle, boy turtle, and for “any” turtle.
I think you will agree that it doesn’t take much to make each one unique and they each seem to have their own “personality”! We have SO MANY Pretty Printable Paper collections that you have so many fun options that lend you endless possibilities 😀
So let’s do girls first, shall we?!
Meet Trinity
She is of course pink, and fuschia. I love the monochromatic choice of body colors.
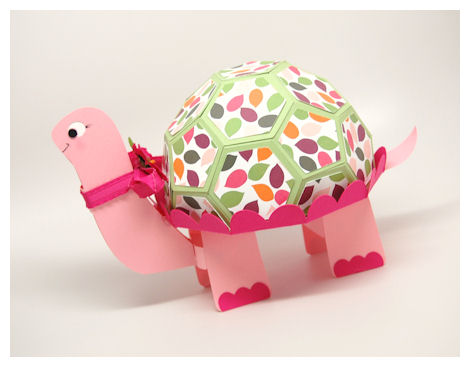
She has a sweet smile, and some eyelashes. A little pink in the cheeks and she couldn’t get sweeter!
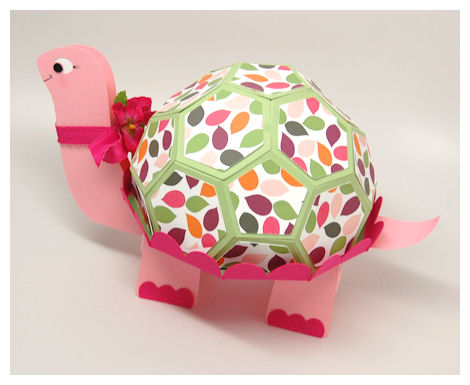
The colors in her shell are super fun, as they are from the Color Infusion paper collection.

In here I put some “turtle eggs” filled with some Chocolate Turtles. They aren’t pictured because I ate them, and had not yet gone to the store to replenish them for the bit photo shoot! LOL! That being said they DID make it to my friend who is a new mom and LOVES gourmet chocolate turtles from a Chocolatier in Manchester.
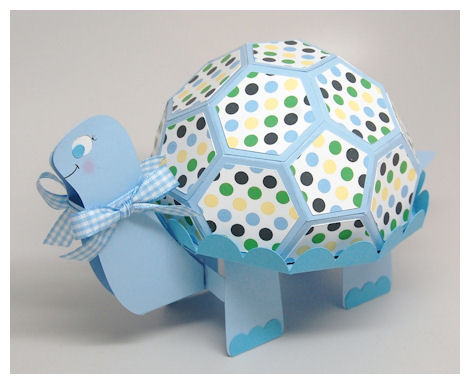
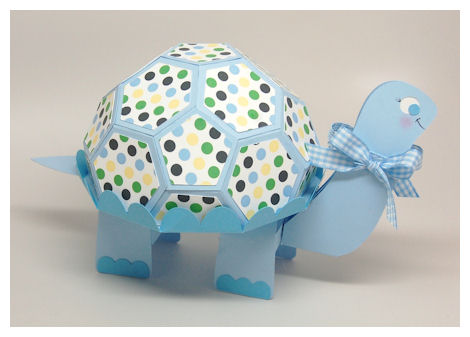
Next up we have Trent
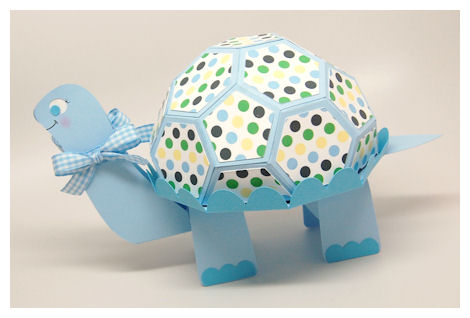
What a CUTE boy gift box! I love this one.
This was designed for my brother, as she is expecting his thrid baby in November. He has two girls, and while we welcome the idea of another, we cross our fingers for a boy!
There hasn’t been a boy born into either side of our family since my son Noah, and he is 9!
I used the polka dot pattern from the Bee Mine paper collection. Easy peasy! Polka dots is always a perfect option 😀
I plan on giving them this turtle for the baby with a gift card to their local photo shop with a gift certificate to get the new baby its first photo shoot!
Supplies from My Time Made Easy ™ LLC
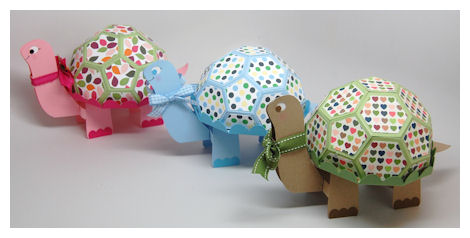
Trendy Turtle
Pretty Printable Digital Paper:
Cute Critters, Color Infusion, Bee Mine
With the team, then my sample from the other day being gender neutral, and my two today you have a bunch of ideas for how the Trendy Turtle can be altered to suit any occasion! Check out my post tomorrow for some MORE ideas.
See you then!
My Etsy

Who I Designed For
Blogroll
- Alicia
- Alli Miles
- Ally Blankenship
- Amber
- Andi @ crafts on a whim
- Angel R
- Angie Z
- Anne Kranitz
- Becky O
- Bee
- Beth Silaka
- Bethany Paull
- Beverly Nash
- Bobbie
- Cambria
- Cammie
- Card of the Week
- Card Positioning System (CPS)
- Cards for Cancer
- Catherine Doucette
- Charmaine
- Cheryl Sims
- Chriss Rollins
- Christina
- Christine Ewing
- Christine Wooden
- Colleen Schaan
- Craft Critique
- Craft Gossip
- Crystal
- Dawn Easton
- Emily Giovanni
- Geny
- Holly
- Igne Groot
- Inspirational Craft Blogs
- Irene
- Jami Sibley
- Jeanne Streiff
- Jen del Muro
- Jeni Bond
- JenMarie
- Jenn Balcer
- Jenn Diercks
- Jenn O
- Jennifer E
- Jennifer Mick
- Jennifer Pereda
- Jennifer-Sweet Treat
- Joanne Basile
- Jodi Collins
- Julia Stainton
- Julie Masse
- Karen
- Kathryn Berthiaume
- Katie Cotton
- Kelley Holland
- Kendra
- Kim Scholfield
- Kris’s Color Stripes! Get inspired here
- Kristen Dubosque
- Kristin Eberline
- Kristine
- Laura @ Sunshine Stamper
- Laura Turnmire
- Laurie Schmidlin
- Lesa Rapp
- Linda Duke
- Linda-LSN
- Lindsey Botkin
- Lisa (lakind scs)
- Lisa Kind
- Lori Craig
- Maggie
- Mara Campbell
- Maria
- Maria Levine
- Mary
- MaryJo
- Melanie M
- Monique Hansen
- Moxie Fab World
- Pam Imholz
- PaperCrafts Connection
- Peppers and Pollywogs Kids party site
- Rebecca Grohall
- Rita
- Robyn
- Rose Ann
- Sarah Vrolyk
- Sharon Harnist
- Sharon Johnson
- Sharon Rivera (a chemisrty with paper)
- Sherrie
- Sophia Landry
- Storage Units, Ink, & More Blog
- Sue Berker
- Susan (Rainy)
- Tangii Crane
- Tracy
- Tricia Traxler
- Trudee
- Velta
- VivLyn
- Zena
MTME Pretty Palette Color Team
MTME Pretty Patterns Sketch Team
My Time Made Easy TM LLC
Shop till you drop!
Lauren Meader
About Me
Copyrighted material
Subscribe To My Blog
Pages
- About me
- Alexa’s Story!
- My Crafty Corner!
- My Time Made Easy™ LLC
- Our Make A Wish Trip to Disney!
- Resume/Publication List
Calendar
Archives
- August 2013
- July 2013
- June 2013
- May 2013
- April 2013
- March 2013
- February 2013
- January 2013
- December 2012
- November 2012
- October 2012
- September 2012
- August 2012
- July 2012
- June 2012
- May 2012
- April 2012
- March 2012
- February 2012
- January 2012
- December 2011
- November 2011
- October 2011
- September 2011
- August 2011
- July 2011
- June 2011
- May 2011
- April 2011
- March 2011
- February 2011
- January 2011
- December 2010
- November 2010
- October 2010
- September 2010
- August 2010
- July 2010
- June 2010
- May 2010
- April 2010
- March 2010
- February 2010
- January 2010
- December 2009
- November 2009
- October 2009
- September 2009
- August 2009
- July 2009
- June 2009
- May 2009
- April 2009
- March 2009
- February 2009
- January 2009
- December 2008
- November 2008
- October 2008
- September 2008
- August 2008
- July 2008
- June 2008
- May 2008
- April 2008
- March 2008
- February 2008
- January 2008
- December 2007
- November 2007
- October 2007
- September 2007
- August 2007
- July 2007
- June 2007
- May 2007
- April 2007
- March 2007
- January 2007
Categories
- About Me
- All That Scraps
- blogger challenge
- camera/photo play
- Cards
- Contests
- family stuff
- FOR SALE
- Home decor/3-D items
- How to FAKE it!
- Introduction
- JUGS Challenge
- JustRite Stampers
- Lizzie Anne Designs
- My family stuff
- My Stamping Space
- My Time Made Easy
- My Time To Color Challenge
- My Time to Create Challenge
- My Timeless Template Challenge
- My Timeless Templates
- Mytime Mail
- MYTIME MOVIE/VIDEOs
- Papertrey Newsletter
- Pink Cat Studio
- Pretty Palette Challenge
- Pretty Patterns Sketch
- Product Opinions and Must haves
- Recipe's
- Saturday Sketch
- Smilebox Creations
- Stampavie
- Tutorials
- Uncategorized
- videos
Most Popular
- Create your own Onesie Card Tutorial-and important NOTE! PLEASE READ (2529)
- Saturday Sketch-Boxed bag holder (2333)
- Going GREEN! Fancy Flower Flourish-Closure Video (1478)
- Fabulous Favorite - Giveaway! (1336)
- a Prayer Request (1232)
- QUICK-Easter Baskets from Nestabilities-PTI style-and blog challenge (1063)
- Teaser Sketch (999)
- February Release Giveway! (and a little peek) (996)
- Group Post and Rambling Rose Video Tutorial (985)
- GIVEAWAY! Who wants it all?! (895)
Recent Comments (RSS)
- 첫충사이트: 완전히 흥미로운 블로그 게시입니다. 저는
- sarah: Wow, Lauren, what a stunning
- hedie: خرید راهبند
- 야동: Love to read it,Waiting For
- 야동: This seller is in a
- 바카라사이트: 여기 처음 왔어요. 나는이 게시판을
- 야동티비: I was surfing the Internet
- 바카라사이트: 비슷한 주제에 대한 흥미로운 정보를
- 바카라사이트: "여기에 제공해 주신 귀중한 정보와
- 온라인홀덤: 유익한 웹 사이트를 게시하는 데
Copyright © 2007 - My Time, My Creations, My Stampendence - is proudly powered by WordPress
This blog has been Tweaked and Designed by Sara Williams