Archive for the ‘Papertrey Newsletter’ Category
Lets Do Lunch
Nov 19, 2009 Author: mytime | Filed under: Home decor/3-D items, My Timeless Templates, Papertrey NewsletterHi everyone.
Well today will be a CRAZY running around day. I know many of you are wondering what is up with me these days. Well tonight at midnight (if you are up then) or tomorrow, I will explain myself. I have some changes that I made recently and it is time to inform you of those. With all those changes I’ve had to switch some of my focus. Trust me it will all make sense in a few hours.
So, for today I’m just popping in quick with a little eye candy, and to send you a link to a article that was written about the My Timeless Templates © Katie Berberich is a fellow stamper/crafter who works for the Craft Journal. She chose to review the My Timeless Templates for her debut!
Thanks so much Katie, and basically to every single person who has given them a try! I swear each month it just gets better and better!! This is my thanks to everyone for their support and sharing how much you too love these templates, with the world! Of course I love them, but when you read how much others do too I think you all believe it more! LOL!
So after receiving the link to that article I figured I better share a sample with you too!! An oldie but goodie……
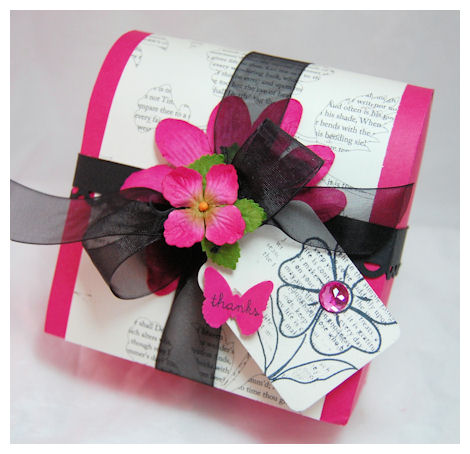
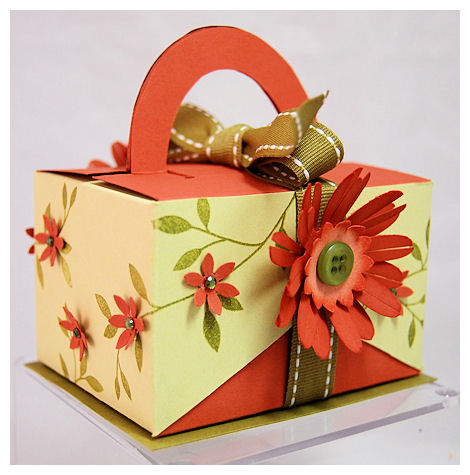
Now I decided I would revamp this template a bit! Many of you think SCHOOL when you see it! Ot that it HAS to have a handle!! But it doesn’t have to be that way. It can also be used for a elegant gift holder! How sweet would this look on a desk, holding some stationary? Maybe have some bath products?

I had this text within flowers paper (I believe it is by Making Memories) and I decided to create my own text within a flower. I used the Remember set and Background Basics Text Style for the tag
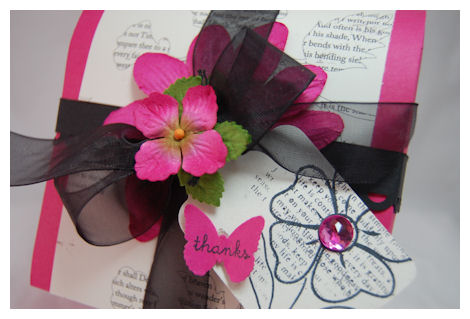
Some masking made it all possible. I love the look! VERY simple.
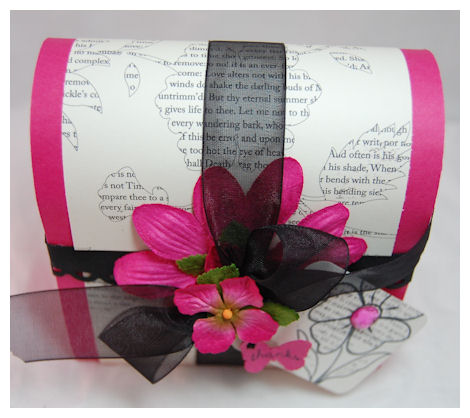
I then tied some ribbon around the top, and embellished with some Prima flowers.
I think it looks fabulous. Someone may not even care if there is anything inside! But all they have to do is slide off the bow (and then they can easily replace it) and open it up!
OK I must run!! I know I’m brief but I have a ton to do.
Thank you for stopping by. I hope you all visit me tomorrow for the news.
November Papertrey Ink Release
Nov 16, 2009 Author: mytime | Filed under: Cards, Home decor/3-D items, My Timeless Templates, Papertrey NewsletterSORRY! I know this is late.
As you all know I’ve been sick, so I really needed a quick break to rest up. It isn’t easy when you are sick SMACK in the middle of a big release!! There is NO time to rest when you have projects to create and share.
I’m still not 100% so won’t be too chatty I fear (maybe that is a GOOD thing! LOL!)
My projects are in my Papertrey Ink Gallery but many of you have asked when I’d post HERE!
You really didn’t miss too much since most of the peeks were revealed during the countdown.
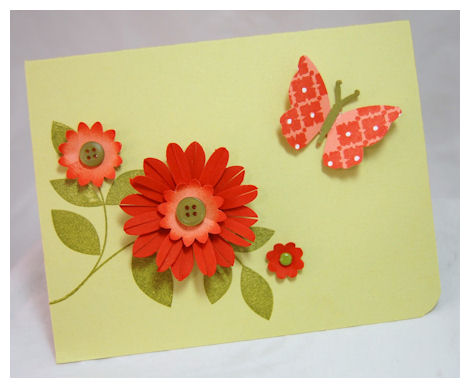
BUT, I never like to disappoint 😀 So here are my Papertrey Ink Release projects for November, starting with the newest My Timeless Template © Time for Take Out
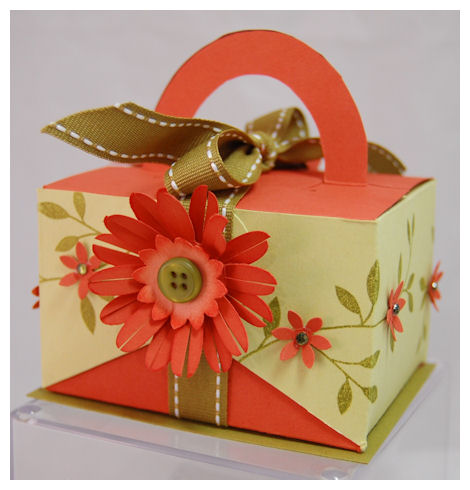
What can I say, I LOVE this template. REALLY love! If I wasn’t sick you’d see a million variations popping up, I swear.
I have to say Terracotta Tile is STUNNING!!!!!!!! Love the color.
I decorated both sides to be the same (of course!)
I just used the NEW! Turning a New Leaf, and some more punched paper flowers. I think it turned out quite eye catching, with little work, and very little time 😀 A great mass production project 😀

Then a EASY PEASY card to match!
Supplies:
My Timeless Template: Time for Take Out
Stamps: Turning a New Leaf, background basics: diamonds
Cardstock: Spring Moss, Terracotta Tile, Ripe Avocado
Ink: Ripe Avocado
Ribbon: Ripe Avocado Stitched
Buttons
Flower punches, EK Success Bfly punch, adhesive rhinestones
Now the reason I have gotten SO many emails (awe! I love you all! You make my day :D)
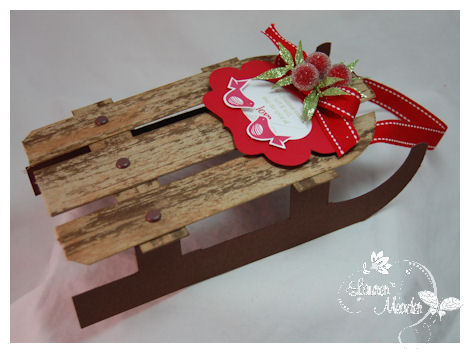
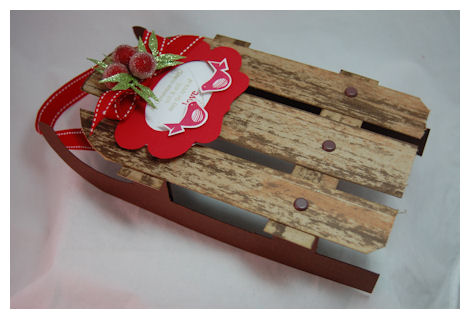
Hanging Sled of Love

This actually hangs on a door or can be put on a table with some little gifts on top (how cute would that be?! ) A FAB centerpiece for sure. I always wanted a template like this 😀

I hand made this sled (for my door this holiday!) out of chipboard that I distresses with tea dye ink! Its rather large too! About 8 inches long and 6 inches wide ( I THINK!) I made it some time ago and have had to wait to post it.

I*may* post it as a holiday freebie if I get some time this week 😀
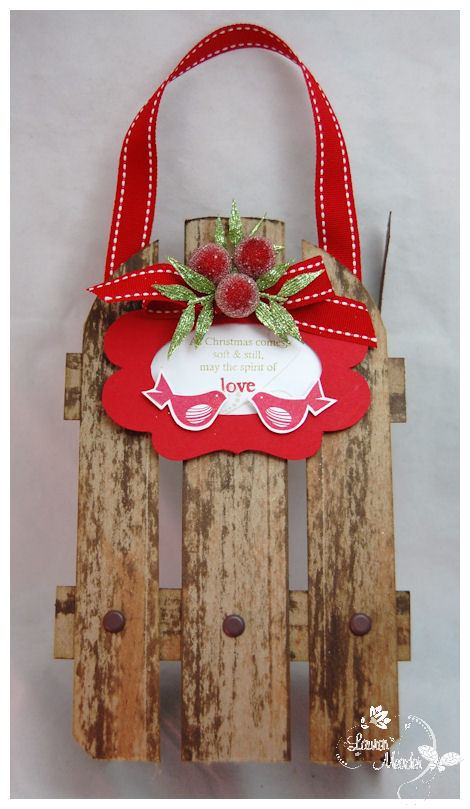
Here is the tag detail
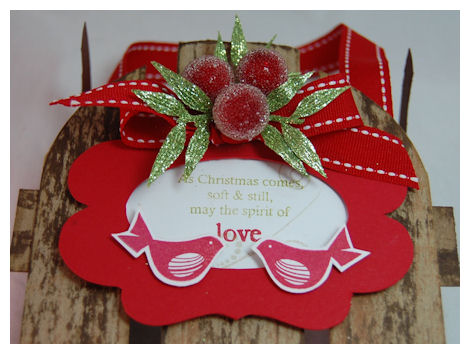
You cold even personalize it with the last name of your own family! Now that would look COOL!
Stamps: Christmas Friends, Snowflake Serenade, holiday tree
Cardstock: Kraft, dark chocolate,white, pure poppy
Ink: tea dye ink duo, spring moss, gold
Pure Poppy saddle stitched ribbon
label from Slice studio essentials cartridge, garland pieces
brown brads by SU!
Check back tomorrow morning, because I have a blog hop project for the NEW! JustRite Stampers release!
(told ya-busy! busy!)
#3 Communique Curves Inspirations and another template peek
Nov 11, 2009 Author: mytime | Filed under: Cards, Home decor/3-D items, My Timeless Templates, Papertrey NewsletterWell are you loving all the goodies this month?
I have been DROOLING reading about all your yummy treats you give around the holidays! I may have to hit some of you up for the recipes 😀 If you don’t mind 😀 The template winners will be posted tomorrow 😀
Well today we have a group post. This is the first set this year from Allie Miles. It is called Communique Curves & Sentiments. We were asked to take this set and show you two variations of the same card! So, basically create a holiday card, then an everyday type of card.
Here is my set: Happy Holidays Duo

I love how you can use the same layout, then by swapping out the images, and changing the colors, you get a totally fresh and new look! You really can get lots of mileage out of stamp sets when you have a few key layouts! Just keep re-using them, and changing different elements! This also shows you don’t need a ton of supplies to make great looking cards.
Here is Tis the Season
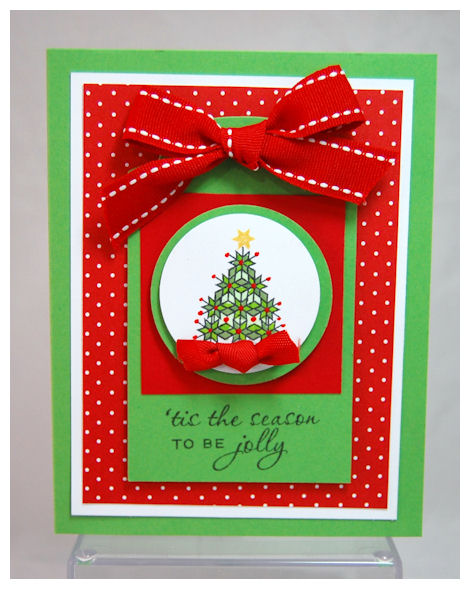
The main layer is a tag I cut. This is a very basic layout that can serve circle, heart, or rectangle image centers!
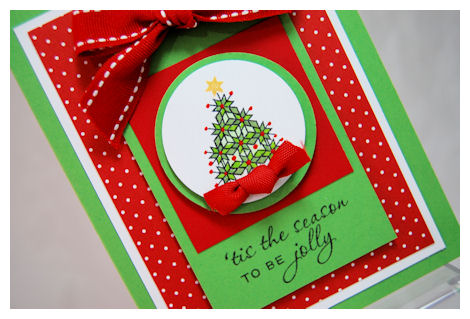
I used various copic markers in shades of green to color my snowflake style tree. Quick and cute!
Supplies:
Stamps: Communique curves & sentiments
Cardstock: New Leaf, Pure Poppy, White
Patterned Paper: Bitty Dots
Ink: Black & Copic
Ribbon: Pure Poppy twill & Saddle stitch
circle punches
Now keeping with similar elements, we move on to a birthday card.
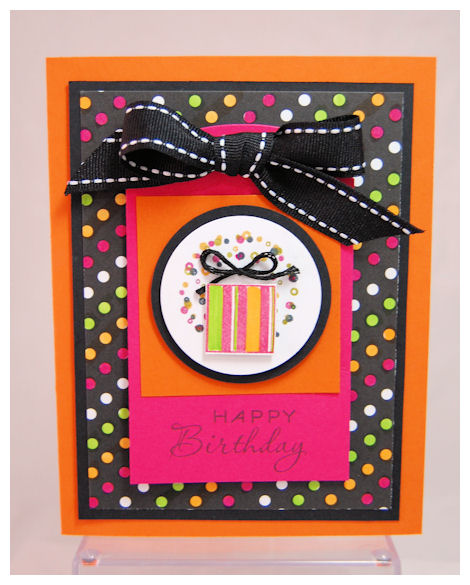
I colored my paper to match

Again dotted paper, tag center, everything exactly the same, except my image and colors.
Fun huh?
Supplies:
Stamps: Communique curves & sentiments
Cardstock: black, white, raspberry fizz, orange zest
Patterned Paper: Black & white basics
Ink: black, rspberry fizz, orange zest, avocado & copic markers
ribbon: stitched grosgrain
circle punches
Be sure to check out what the team has done:
Now I have another fun post to share!
How about another template peek?
This was a quickie. Sorry I’m going to be brief. I’ve been sick the last few days and the worst of it is really hitting me now. I feel like I have sinus infection. Not fun. OK enough about me and my drama-just note I typed this on lots of cold medicine so I apologize in advance if its a bit “all over”. I’m doing my best.
Happy Everything

Here we have another version (the standard size) with newest template (releasing on the 15th) Time for Take Out. I can’t tell you how fun this little box is! You may recall I used it for my daughter Amber’s birthday party —->HERE! I didn’t show any details yet, but I loved it and had to use it early! It can be hard sitting on some great template ideas for so long! Keep in mind I still have like 40 templates you have yet to see. So, when I need one and it fits, it can be hard not sharing what I made. I’m sure you can imagine being in a constant state of suspense. It gets exhausting! LOL!
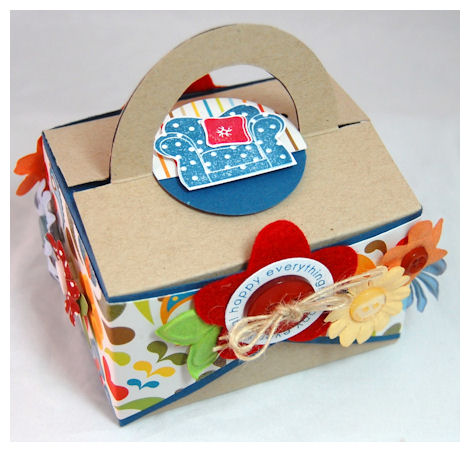
I so loved this patterned paper I had in my stash. The colors were SO cheery. So I went with that, for the sentiment “happy everything”.
I added some paper flowers, and buttons around the box. Both sides of this box are ALWAYS designed to look the same. Its just one of those templates that you should try to make pretty no matter WHAT way you turn it.
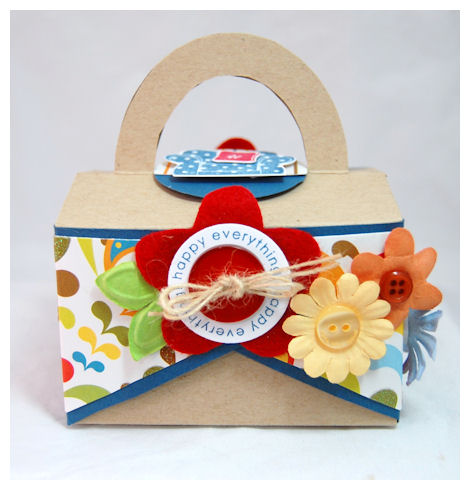
I was thinking cheer up, new apartment, everyday sort of gift box. Maybe put some treats in there, with a gift card or a gift of tea, maybe even candles, or tea lights…..warm slipper socks! I love those. Just a warm gesture of friendship.
Supplies:
My Timeless Template: Time for Takeout
Stamps: On my Couch, Around & About sent.
Cardstock: Kraft, White, Enchanted Evening
patterned paper unknown source
Ink: Enchanted evening, pure poppy
buttons
Prima flowers
Well, tomorrow is our BIG group post using the stamp/template combo Home Made © ! You won’t want to miss that. Plus the template winners will be announced.
Thank you all for stopping by and sharing my excitement. You all make every moment I spend sharing here so enjoyable. I cannot tell you how amazing it feels. I always enjoy reading your comments, emails and when you share your creations with me as well!
Thank you again!
Just like home….giveaway
Nov 10, 2009 Author: mytime | Filed under: Home decor/3-D items, My Timeless Templates, Papertrey NewsletterI’m so excited for todays post I could do a cartwheel (if I could actually do one I would! LOL!) My cheerleader days are LONG gone. I’m certain I’d pull something vital if I attempted it. I have waited for this particular template for what seems like an eternity.
It is now day #2 of the Papertrey Ink peeks and that means I get to share ANOTHER peek at the NEWEST My Timeless Template © with you all!
PLEASE NOTE TEMPLATE IS NOT AVAILABLE UNTIL THE 15th!!
New Home
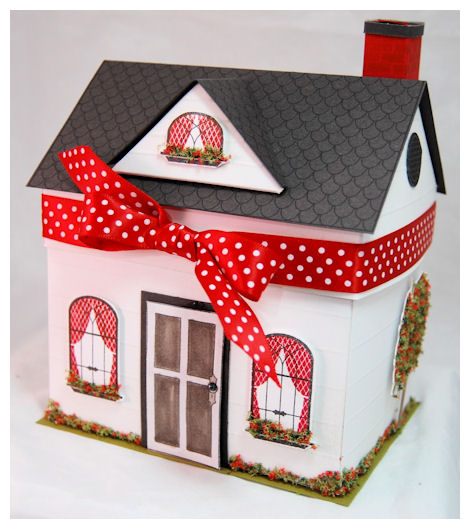
As I said before this template is called Home Made ©, the reasons are obvious. This template is one of the most difficult I have ever created! Angles! Angles!! Angles!!!
The challenge was to get what was in my head, translated to cardstock! Not always easy. Then the bigger challenge, make it EASY for you all to put together. I have to say I think this was BEYOND successful!! I’m so proud of the end result:D I really cannot wait to see the world start making their own Home Made © creations!
This has a coordinating stamp set as well. Now I can’t get into FULL details, since we are having a Group Post day on the 13th, so bear with me. I’m sure you can VISUALIZE it (wink)
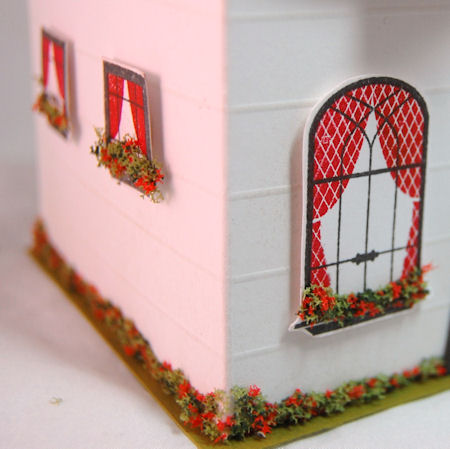
Note: my windows are on dimensionals. I love POP. You could stamp direct on template too 😀 OK zipping lips.
Since I’m not really suppose to be gushing about this too much just yet 😀 You can just imagine the possibilities, I’m sure!
Now you may be wonderin what the red & green stuff is. Its called Flower Soft. I used glue to adhere it. I felt it looked like grass and flowers 😀
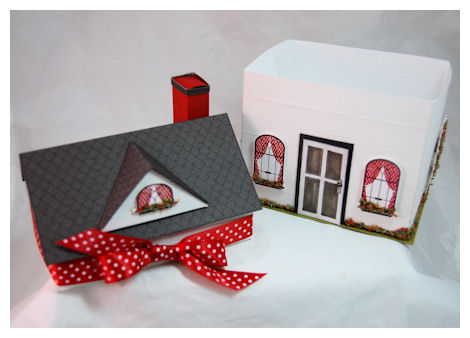
Here is the roof off. Trust me when I say this is a sturdy gift box! You will be in HEAVEN!
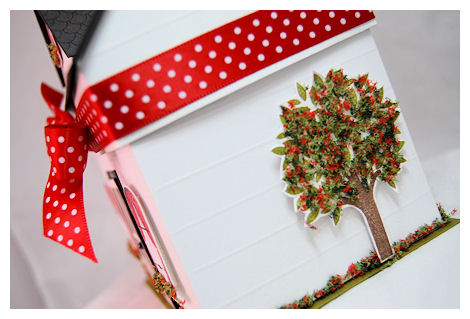
You can also use images from previous sets to decorate your house!
See this tree. It is from Father Know’s Best! Perfect accent to my house!

I can tell you it is a VERY nice sized box for lots of treats! You can put home made treatlets, candles, housewarming gifts, plants, candy, maybe use it as a recipe box, or even a rolodex for names, addresses and phone numbers. Give it to a teacher for their contact info……oh boy! I could go on and on!
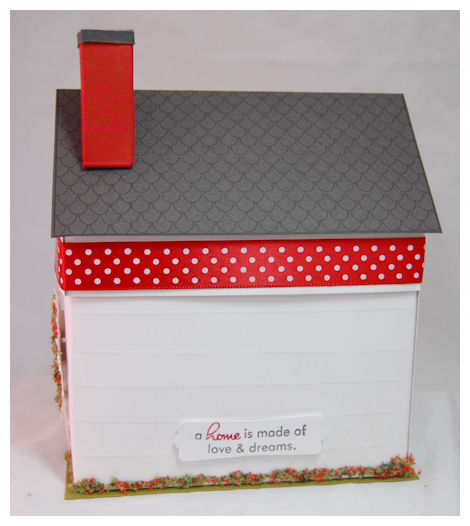
In case you are wondering……I used my Scor-Pal to create the “beams” on my template 😀
Supplies:
My Timeless Template: Home Made
Stamps: Home Made, Father Knows Best, Boards & Beams
Cardstock: White, Smokey Shadow, Pure Poppy
Ink: Black, Pure Poppy, Ripe avocado, dark chocolate
Ribbon: Pure Poppy polka dot
Flower Soft, glue
Well I’m just DYING to know what you think? Are you ready to start making your own
Wait until you see my other samples with the additional elements this has!
So now all you have to do is leave a comment for YOUR chance to win this template on the 15th!
Winners for BOTH templates (leave a comment in previous post for chance to win Time for Take Out) will be posted on the 13th!
In the meantime, for more creative clicks check out Nichole’s Blog, as well as Heather.
More clicks: Check out Allie (who has her first set of the season!), Tiffany, and Dawn!
OK I look forward to your thoughts, and I’ll see you back here tomorrow for MORE peeks!
#1 Papertrey Ink Countdown & template giveaway!
Nov 9, 2009 Author: mytime | Filed under: Home decor/3-D items, My Timeless Templates, Papertrey NewsletterWell today officially kicks off day one of the Papertrey Ink November Release Countdown. Over the next few days I’ll be sharing so many ideas with you all, I can hardly wait. I feel like I’m always on the verge of bursting at the seams! I always have to WAIT to share such good stuff.
All items shown today are PREVIEWS! They will NOT be available until Nov. 15th.
So yesterday, in honor of the Moxie Fab Blog-o-versary you were able to get a glimpse into our first template: Home Made © There will be more on that, here tomorrow 😀
Today you will get to see a peek of a sentiment set that Nichole designed, called Big & Bold Wishes, and the 2nd My Timeless Template © of the month , called Time for Take Out ©
Wish Big Set
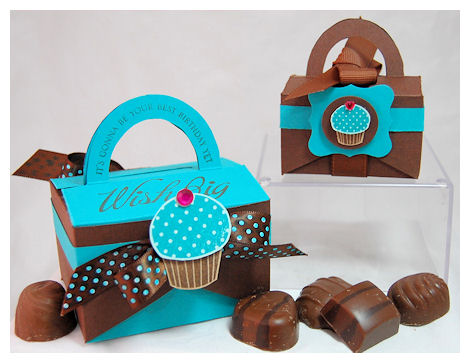
Well by the name of this template you can most likely guess that it was inspired by the original Chinese Take Out box. I say inspired by because my version is definitely created to be different! For example the way it is put together, the way the flap closure can be tied together, and the fun way the flap tucks perfectly into the top! Let’s not forget the handles are super adorable, and functional too! There are so many fabulous design possibilities! Let’s not forget the size is super too! You get the standard size and Pretty Petite version for ONE price.
You can package up a variety of items. The receiver of anything presented in this amazing template will by dying to take out, whatever you took the time to package inside!
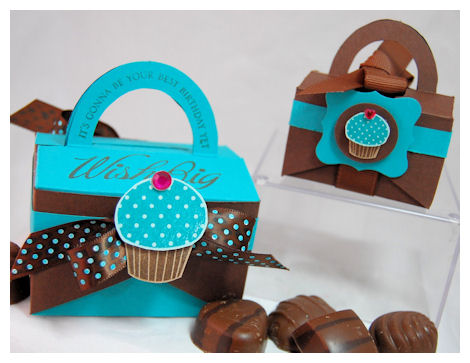
Just look how cute the standard, and Pretty Petite version are together, each made in contrasting colors 😀
Now this stamp set has a few “Big & Bold” sentiments, accompanied by some smaller companion sentiments to match!
I used one of the sentiments “It’s gonna be your best birthday yet!” and curved it to fit my handle of the Time for Take Out © Template. Its so easy to do, and really dresses it up.
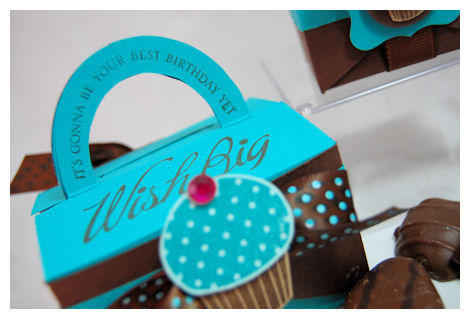
The front flaps are tired together with dark chocolate ribbon, colored with copic’s to match!!
I decided to accent this with the cupcake from the Anniversary set: Everyday Classics. This set is not available for purchase, but I had to use it because the cupcake just called out to me 😀
Now onto the closure
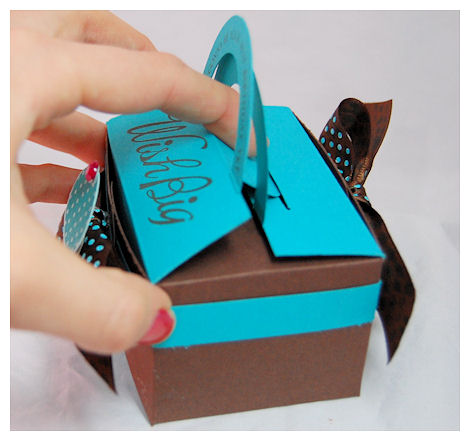
The cut out flap inserts into the slot in the top.
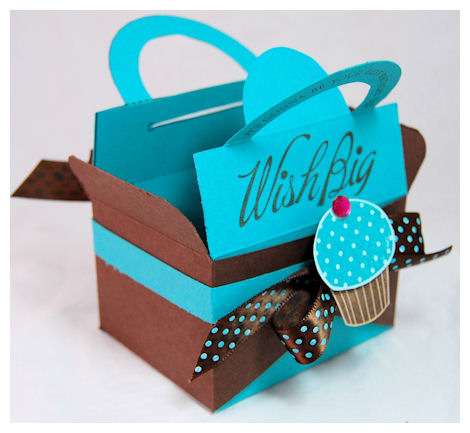
Open up the handles and WOW! Perfect presentation for those treat-lets.
Supplies:
My Timeless Template © Time for Take Out
Stamps: Big & Bold Wishes, Everyday Classics
Cardstock: Dark Chocolate, Kraft, Aqua Mist, Bermuda Bay
Ink: Dark Chocolate, Bermuda Bay
Ribbon: dark chocolate-polka dot and grosgrain
adhesive rhinestone, label punch, circle punch
Well what do you think?
I think this will quickly become a favorite to your My Timeless Template Collection! I could make a hundred of these cuties 😀
Leave me a comment telling me your favorite treat to package for the holiday’s, for your chance to get this template on the 15th!
For more creative clicks check out Nichole’s Blog, as well as Allie (who has her first set of the season!), Tiffany, and Dawn!
Also be sure to check out some samples from the NEW! Template Team!
Be sure to come back tomorrow for more details/eye candy on the other template Home Made ©!!
I’m just so excited 😀
Moxie Fab Gingerbread Box Giveaway and TEMPLATE PEEK!
Nov 8, 2009 Author: mytime | Filed under: Home decor/3-D items, My Timeless Templates, Papertrey NewsletterOH! Boy!!! Wouldn’t you know it, I have been busy!!
A very good kind of busy 😀 You will learn more about that soon enough (wink!) Sometimes there truly aren’t enough hours in a day. Well despite the hustle and bustle going on at my home, I have a special post for you all! I hope you get as excited as I am over this. If I could find a better term to describe the fact that I am OVER THE MOON, I would!
Today the entire design team from Papertrey Ink took part in a giveaway for Cath Edvalson to celebrate the Moxie Fab Blog-o-versary! Each of us on the team had a stamp set to use, and then had to create a card, sign it, and send it in to Paper Crafts as part of the giveaway! How fun! The focus was to be on a newly released holiday stamp set. I got to use Holiday Button Bits. A set that I’m totally in love with.
Now, I have a hard time following instructions because the idea was to create a card for the giveaway, but I couldn’t help myself! I HAD to use the NEWEST My Timeless Template © for this month’s release called Home Made!!
NOTE: This template will NOT be available for download until November 15th! SORRY!
This is what I came up with for the Giveaway
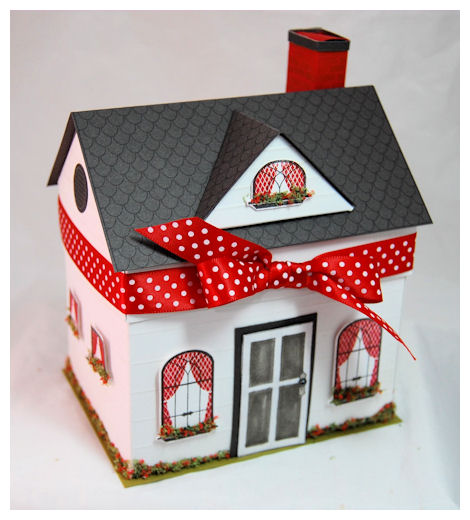
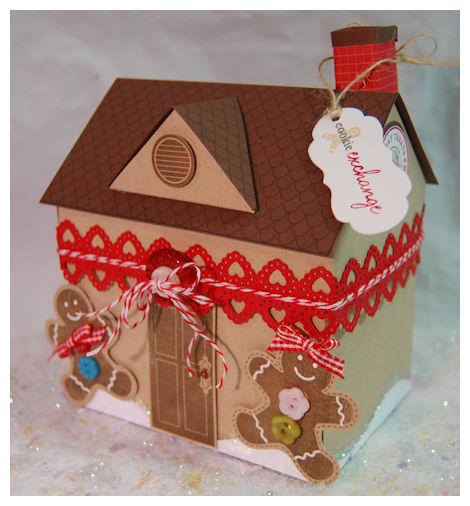
Gingerbread House
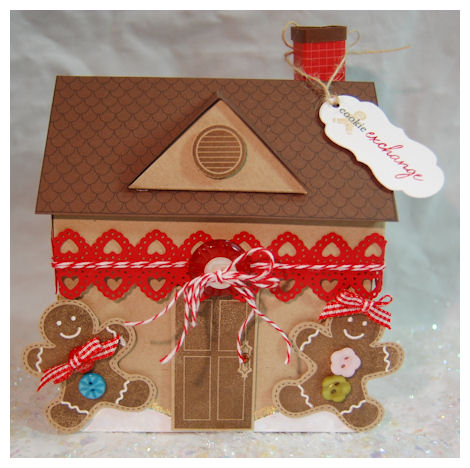
You can get a chance to win this on the Moxie Fab blog today!
How cute is that? I love having a cookie couple.
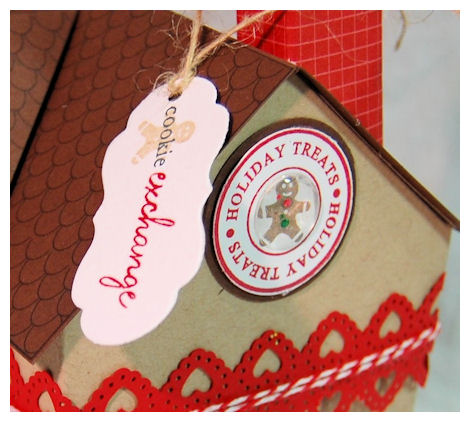
I took total advantage of the gingerbread men in the Holiday Button Bits stamp set, and used it to create my gift box, complete with “cookie exchange” tag!
I love gingerbread men this time of year, and it really is the perfect cookie (or theme) for a holiday cookie swap! OR as a nice table decoration for the holidays 😀 As kids my mom ALWAYS had a yearly tradition of decorating gingerbread men. I just wanted to eat them warm out of the oven.
I decided I wanted to really fancy it up, so I had to use a NEW! Heart border punch from Martha Stewart to go around the roof . I was thinking Hansel & Gretal!

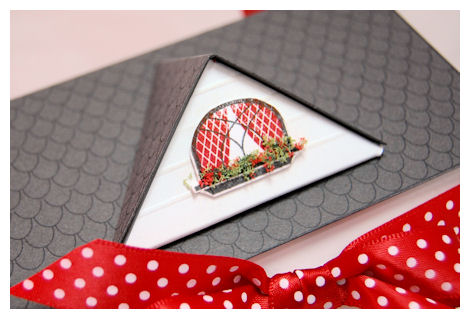
If you are wondering…yes! It is a 3D house!! The roof topper comes off (you will see that another day) The template is complete with chimney, and dormers! One for the front and 2 for the back! You can of course decorate as you see fit! I will have much of that stuff to share over the next couple of days! So be patient 😀
View from the top
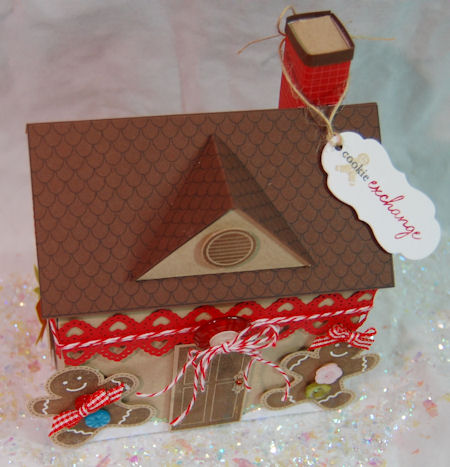
The roof has printed shingles, and there is a complimentary stamp set to add to the design of this template! (again I am purposely being vague-since the focus today is on the giveaway and Holiday Buttons Bits stamp set)
What a FUN teaser though huh?
Side view
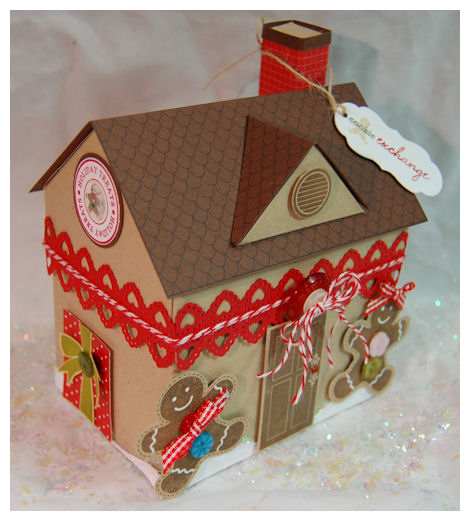
Now I always think it is important that ALL sides of something like this be attractive!
You can see I used the bow from the Holiday Button Bits set as well. Makes a cute gift, sitting in the snow.
Another side view
Supplies:
My Timeless Template © Home Made
Stamps: Holiday Button Bits, Home Made, Holiday Treats, Merry & Bright
Cardstock: Kraft, White, Dark Chocolate, Pure Poppy
Ink: Dark Chocolate, Pure Poppy, Black, Ripe Avocado
bakers ribbon, MS Heart border punch, CM Wavy cutter, stickles, red ginghan, plastic. twine
Now, last but not least….. we move to the back…..

I used a tree from Merry & Bright to add to the decor!
I also use some more buttons to look like wrapped “candy”. Just another CUTE detail
There is of course some glittery “snow-hills ” along the bottom of the house too.
Just so sweet.
I hope you like what I had to share today. I had FUN making this, so I hope whomever it goes to, gets some use out of it 😀
Now that is all I can share TODAY re: the Home Made© template! I promise MORE details will follow soon, as this release blows the roof off the template world-literally!
Be sure to stop by the Moxie Fab Blog-o-versary!! More details and links will follow.
Tomorrow begins the OFFICIAL Papertrey Ink Countdown, where I share a stamp set peek and the second My Timeless Template © 😀
Stay tuned. I have MUCH more to share.
Our Family Tree
Nov 5, 2009 Author: mytime | Filed under: Cards, family stuff, Home decor/3-D items, Papertrey Newsletter, UncategorizedToday’s project is just one example as to WHY I love this craft so much, and sharing what I love to do with the world!
If this doesn’t get you excited for the holidays then I don’t know WHAT will. I am beyond excited to share this is a super fun project that is INEXPENSIVE, and you can even let the kids make their own!! (After you do the basic assembly of supplies!) THIS is a gift worth giving every family member at some point, and it doesn’t even have to be HOLIDAY themed!!
Would you believe it if I told you that this was originally a Wire Folding Easel? <—- Seriously check it out
Family Tree
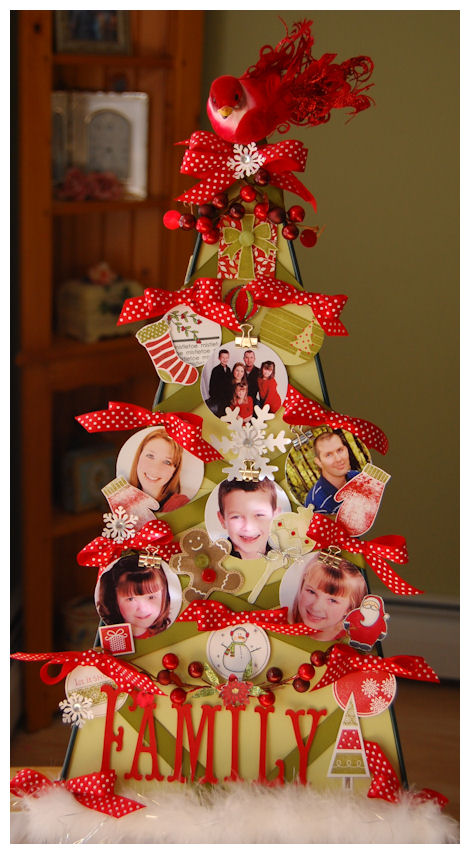
Would you believe me if I told you that I used it to designed my very own photo/card display for ONLY $2.29?
Well believe it.
I have longed to create a special photo/card holder to display during the holidays. One that I can easily switch out photos & cards for, year after year. The store bought ones aren’t generally festive, and can easily cost upwards of $20. All you need is a little imagination and some Papertrey to get your own started!
I was in the plant supply section at JoAnn’s, buying some festive elements to use in my holiday gift packaging. This is definitely the time of year I make something for everyone!! While in the aisle, my 5 yo daughter Amber said “Mommy, is that like a Christmas tree?” and she pointed to the wire easel. IMMEDIATELY my mind began SPINNING!! I said “It’s not suppose to be a tree, but you have very good eyes Amber! We are going to take it home and make a special tree for our house!” I literally forgot about everything I was there to get and about 2 hours later this project was made! Now It took 2 hours because I had NO IDEA what or HOW I was going to execute the “tree” that was in my head.
So with a little cardstock, Scor-Tape, hot glue gun, ribbon, clips, my Cricut Expression, and of course some festive holiday stamps
(—> Click here to view all the images listed in my post)……and our Family Tree was made!
Here is how: (and NO I didn’t get step by step photos, I needed my hands to keep up with my brain, and quite honestly I didn’t think this would actually work! LOL!)
I first wrapped my ribbon around the easel, being sure to secure it with glue as it wrapped around the wire frame. I laid the tree on the floor and used 2 pieces of spring moss cardstock to trace the tree. I then cut them. I used my Scor-Tape to adhere the cardstock to the BACK of the open wire easel frame.
BE SURE TO KEEP EVERYTHING NEAT! You can see the back and sides on this project! NO messy stuff OK.
Added my metal clips to the ribbon that criss crosses in ripe avocado …….then just like after you apply your lights to the tree, you decorate it!
Tippity Top of the easel tree
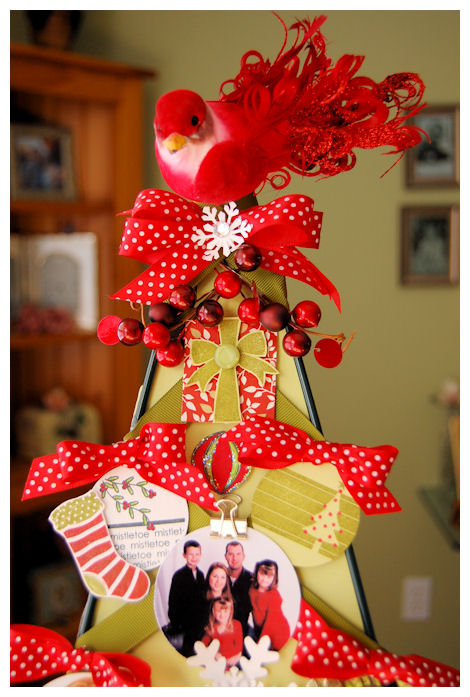
There was a little hook at the top of the easel. I used it to insert my bird. There was a clip under the bird but I removed it. Squeezed in some hot glue, then stuck it onto the hook. I got the bird at the craft store to use as my tree topper (and cover the hook!) I added some of the berries I purchased to the top as well. I used the gift from Holiday Button Bits. I also used an ornament from Vintage Ornaments.
I also used the 2009 Holiday tags, and Stocking Prints. Then our family photo at the top!
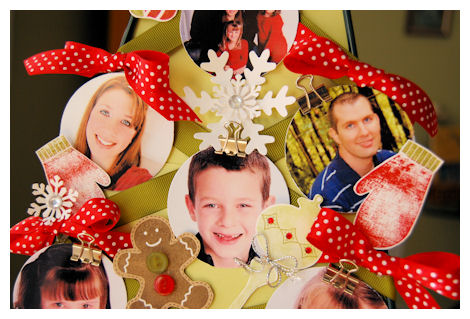
I punched some snowflakes, and added a photo of myself, Jason, and Noah in the middle. I used the mitten image from Snowfall on either side. I thought they looked cute not fully inked.
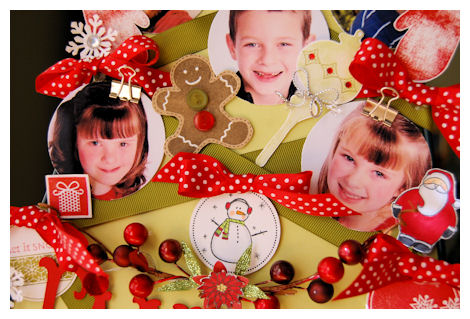
Now under Noah’s face we have the gingerbread man from Holiday Button bits, as well as Santa next to Amber! For Alexa I used a little present from Sign Language. You can also see another Vintage ornament, and the snowman tag from 2009 Holiday Tags.
Added some more berries, and the poinsettia from Peaceful Poinsettia to the center. More tags from the 2009 Holiday Tag collection!
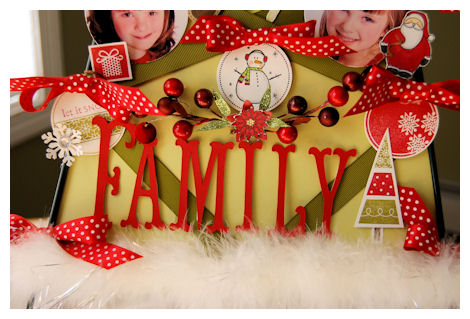
I had to design the bottom to spell out “Family” tree, then use the tree image from Merry & Bright at the end!
Now “Family” is spelled out using my Cricut Expression Story Book cartridge.
Last but not least, I added some white tinsel furry stuff (what is that called??) to look like a snowy bottom.
Once again here is the completed tree
Supplies:
Stamps: Merry & Bright, 2009 Holiday Tags, Snowfall, Holiday Button Bits, Vintage Ornaments, Sign Language, Stocking Prints
Cardstock: White, Spring Moss, Pure Poppy, Kraft
Ink: Black, Pure Poppy, Ripe Avocado, Copic Markers
Ribbon: Ripe Avocado grosgrain, Pure Poppy polka dot
Other: Easel, metal clips, Cricut Story Book, circle punch, snowflake punch, hot glue gun, Scor-Tape, bird, berries, fur, adheisve rhinestones
Now I bet you cannot wait to decorate your own!
Just pick a color scheme and get going.
Now this will be for our family photos, but you can certainly use to hold cards and other fun items too! Maybe even an ART tree for your child’s art work?! Endless possibilities!
Thank you ALL for stopping by!
I can’t tell you how fun this was. Kids have such a great eye for seeing something in other items! For example, just go cloud gazing and you will be shocked at the imagination of a child! I give my daughter Amber full credit for the idea behind this project! I never would have seen a “tree” in that isle. I would have totally overlooked that ugly easel!
Note to self: Take Amber with you on ALL trips to the craft store, from now on!
2009 Photo Finish Holiday Cards
Oct 31, 2009 Author: mytime | Filed under: Cards, Home decor/3-D items, Papertrey NewsletterDo you believe that we have *only* 54 days till Christmas? THAT is insane.
I have a ton to do in preparation for the holidays, and that includes creating our family Christmas cards. Our Papertrey Ink Senior Design team Challenge is to incorporate your photos, into your holiday cards!
The holidays are the perfect time of year for sending cards and photo updates to all your family and friends. I always do some sort of photo card each year. There are SO many possibilities. I generally make several different versions, then pick one. I like to try to have our family photo taken BEFORE Halloween so I have PLENTY of time to think about my design and colors. You can see that post —>HERE! If I need to order supplies, then I should have enough time for everything to arrive, even if it goes out of stock.
Today I have three different versions of our family photo cards to share!
First one
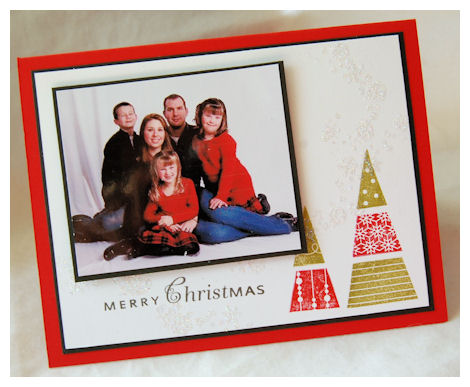
Well who doesn’t LOVE the traditional FAMILY photo? I know those are my favorite cards to receive too.
This is clean, simple, and easy to mass produce!! Obviously switch out my colors/images, for your own, to match your project.
I used the trees from Merry & Bright/Additions, and the sentiment from Silent Night. You may see some TWINKLE in this. I chose to use the snow flurry from the Snowfall set, stamped with my glue-pad, and sprinkled on some glitter! (you can find these sets –> here!) The flurry goes around my sentiment, over the trees and around to our photo.
Using the SAME images, here is yet another idea…..
Ornament Trio
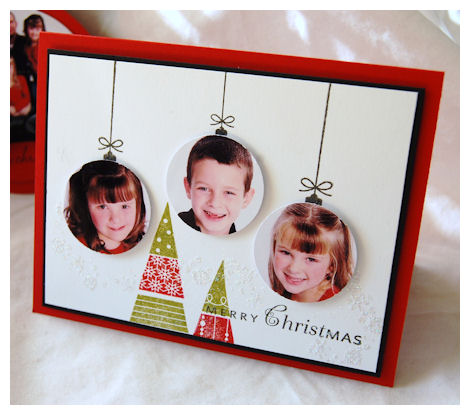
Now this idea isn’t new, but it was fun to actually execute! SOOO simple, and your non-stamping family will think you are a GENIUS.
Now you can take this super cute idea, and no matter how many people are in your family, you can feature them on your Christmas card! Remember ODD numbers look best in an overall design. It is more balanced! I luck out with 3 kids 😀 But I certainly could have altered the design to fit Jay and I in this card too. Quite honestly my kids look far cuter than we would!!
Last but not least….for a more FUN family photo card
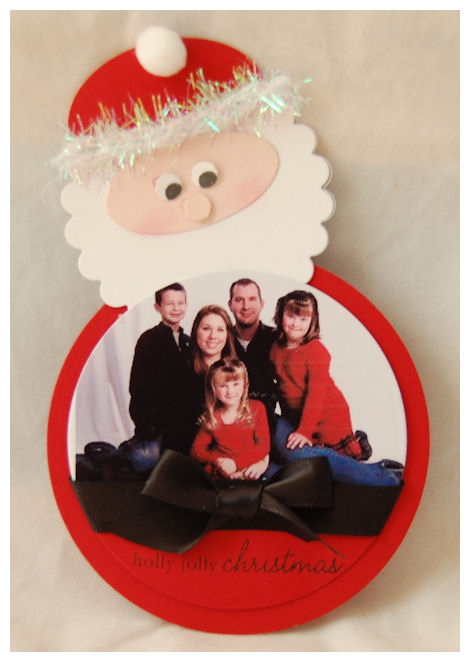
Now this could be a card, turned Christmas Tree ornament! Just put some ribbon on the back 😀
I got inspired my MYSELF last year –>CHECK IT OUT
This time I made a photo card instead.
How fun would this be to make/send this holiday?
Well there are MANY more ideas for you to use your photos in your holiday cards, so be sure to check them all out!
As always thank you for stopping by! I hope you were inspired
I never beaded before….and LAST DAY!
Oct 15, 2009 Author: mytime | Filed under: My Timeless Templates, Papertrey NewsletterFirst met me start by reminding you that its the 15th!
That means it is the LAST DAY to get the Sure Cuts Alot coupon being offered here:
I purchased Sure Cuts A Lot 2.o (since you all said I NEED it :D) and GUESS WHAT! Canda of Canda Craft (where I found the SCAL 2.0 for the CHEAPEST price around WOOT! WOOT!) not only has it on SALE! , but emailed me after I placed my order, to tell me that YOU, my PRECIOUS, much loved and HELPFUL readers will get an ADDITIONAL 10% off!
The code is: MYTIME10.
This offer will expire on 10/15/09.
The coupon will take 10% off of their entire purchase which will make SCAL even cheaper!
So seriously how cool is that? Those of you on the fence can now jump off! I am loving my Cricut Expression and have used it on numerous items (soon to be seen :D) If you have considered getting it, this is the best time. Its not the type of product that goes on sale. SO why wait?
OK now onto the crafty stuff.
Today I’m over the moon to share my final release projects with you, using the NEWEST! My Timeless Templates: Cash or Charge Trio (available NOW! for instant download :D)
Now I told you before that the trio of “cash or gift card” holders can hold other items, and I have given you a couple of examples. Today I’m sharing another TRIO project, where I take all the same elements and use them in the 3 different projects.
What has me uber excited is the fact that I am sharing my VERY FIRST beading project! I am sure many of you make your own jewelry, or give it as gifts, so maybe these will spark your interest 😀
FIRST let me say…….I have NEVER beaded before, AND I know I didn’t end up having ALL the correct supplies, but I’m still over the moon that my project came out so pretty for my FIRST ever try! Once I was actually in the process I realized I needed certain things. Me- being impatient, I just plugged along and made do!
Now, I don’t have a beading book, I just sort of went with it. I created 3 of the same style keychains. I thought they would be the best FIRST project-Again its NOT professional or perfect in ANY WAY, but I was proud of myself all the same 😀
(this is yet another reason I said I was addicted to BLACK this month)
Made with love
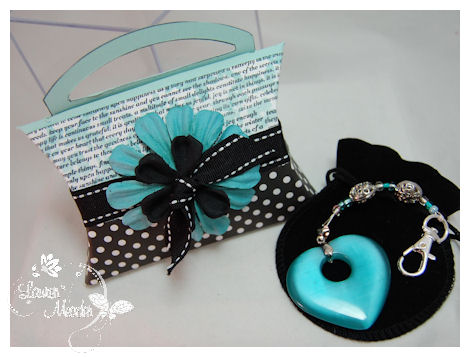
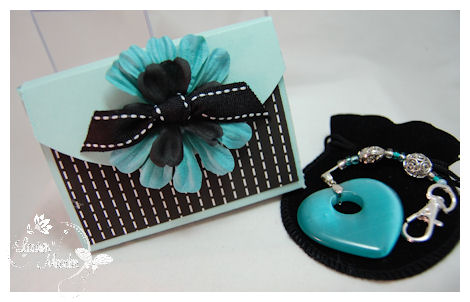
Here is my first keychain, packaged in a velvet bag (that I recycled from jewelry I got from Sonia Jung! I wear it so I don’t need the pretty bag some of the items come in :D). This will go inside the #2 Cash of Charge Trio.
I saw the heart and that was what sparked me making this! I fell in LOVE!!! I then found matching seed beads, and then the filigree style beads. I THINK I needed some end clasp thingy’s. Anyway….its really pretty in person.
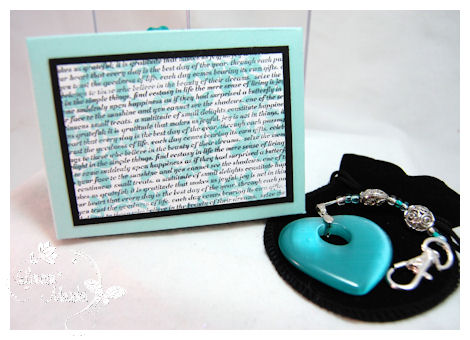
I used the NEW! Text Style II, and Giga Guidelines to customize my box. I think its perfect for such a gift!
I then made the Cash or Charge #3
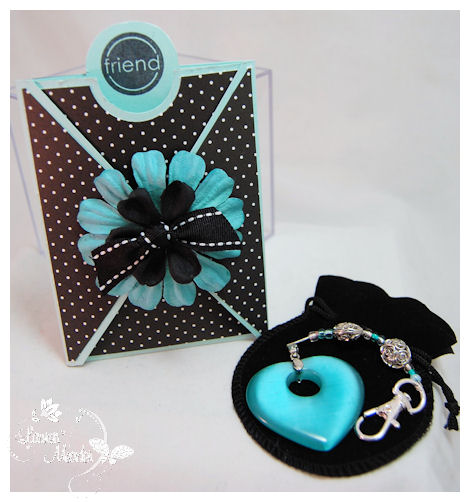
This keychain will fit in the pocket. Virtually NO stamping here!!! Easy peasy.
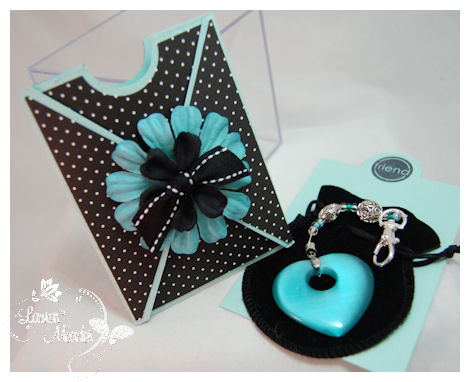
You can just tie it into the insert, and they can pull it out. Nothing too fancy. OR if you make your own bracelets, earring, or necklaces you can use the tabbed insert to put them on!!!!!!!!!!!!!!!!!!!!! How cool is that, seriously? Not only do you have a cool, fancy insert but a pretty pocket cover too!! If you do craft fairs, people are sure to love this presentation too.
Then, last but not least….
Now we had YET to show you that this can hold other treats, like my keychain. Honestly this templates PRIMARY purpose is for holding cash/gift cards, but you can possibly use it for other things. The MOST versatile template in this trio is obviously #2!
For this one, I didn’t create the slit in the bottom of the template. I just put some patterned paper to line it. My velvet bag fits perfectly in here. You’d never think this would be inside would you?
here is the back view
Super simple and fun.
Supplies:
My Timeless Templates: Cash of Charge Trio
Stamps: Text Style bkgd II, Giga Guidelines, floral frenzy (#1 template)
Cardstock: Aqua Mist, white patterned paper: black and white basics
Ink: Aqua Mist, Black
Ribbon: Saddle Stitch black
Prima Flowers
Simple and elegant.
I love my keychains 😀 Not to bad for a first go.
Now tell me….Have you ever walked down the beading isle? HOLY OVERWHELMING! People say stamping is overwhelming, but I think beaders have us BEAT! I had NO IDEA where to start!
I got some silver wire, the keychain toggle thingy and my beads. I had some wire tools in my papercrafting stuff so I was good there.
I think I need some end clasp things. I ended up stringing it through numerous times so it wouldn’t pull apart of unravel.
Basically if YOU bead, ANY basic supply help offered here would really help! I’d love to make more gifts like this and package them up for the holidays! I don’t know WHAT book to get or basic supplies!! I also don’t want to invest a ton of $$, just basic stuff. So anything you care to share, can help me and some of my readers. I’d appreciate it.
Honestly I shouldn’t even CONSIDER another “hobby”! LOL! But I like to mix it up 😀 I’d really LOVE to learn polymer clay too! I got a pasta maker for that purpose YEARS ago, but can’t find it :C Never even used it :C Oh well. Maybe I should stick to making boxes! LOL! I already know how to do that.
Well once again THANK you so very much for stopping by 😀 I hope you get to scroll down to view everything over the last few days. More importantly I hope I inspired you in some way to get creating!!
Till tomorrow….
October Papertrey Ink Release
Oct 14, 2009 Author: mytime | Filed under: Cards, Papertrey NewsletterHi world 😀
Figured I’d share quickly my creations (what is left anyway :D) from the October Papertrey Ink Release here with you today! Now you can download the NEWEST! My Timeless Templates: Around Town Tote & Cash or Charge Trio!!
I know many get so excited to FINALLY order, that you may not even think to check the gallery 😀 The girls really went all out this month. I know I have had days of posts FULL of eye candy! So if you may have missed something be sure to scroll on down 😀
I know I always get the Papertrey hangover! My creativity get drained and takes a nose dive for at least a WEEK! I just pour everything out into my work for the countdown. That then gives me time to do my other “non-crafty” stamp related stuff, that requires computer time instead. OR I usually end up doing a REALLY good whole house clean out, each month 😀 Keeps my house clean and organized all month long, without too much clutter.
Things I am loving, that help me keep my house clean DAILY-Swiffer Wet Jet! LOVE that thing! How I ever lived without it is beyond me 😀 I EASILY wash all my floors every night 😀 Plus Im not using the same dirty mop to push old dirt around-YUCK!
Then the Pledge disposeable duster thingy’s??? OH MY! They are so easy, and help you keep everything dust free without a lot of work. When you are done, chuck it in the trash! With allergies, and being in the house all winter, dusting is a good thing. My house is dust free most days now! I just do a daily sweep, then a really good weekly one. Makes the house automatically appear clean. I love it.
Now if you like stamping, MORE than cleaning…..check out —> THIS POST <—so you can have the BEST of both worlds-a clean house and creative time 😀
OK enough rambling…..
First up-
Dazzling Holiday Ornament
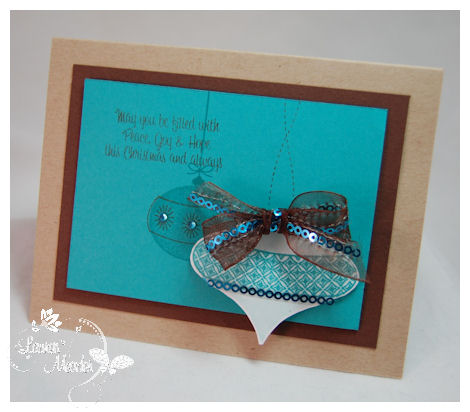
I’m in LOVE with Kraft, Chocolate and this Baha Breeze.
I have to say I LOVED this card! It was simple, and yet that ribbon (found at Michael’s in the Christmas section :D) really made it POP! I pulled the sequins off the ribbon to create the same 0000000 bling across my ornament. Just SO pretty.
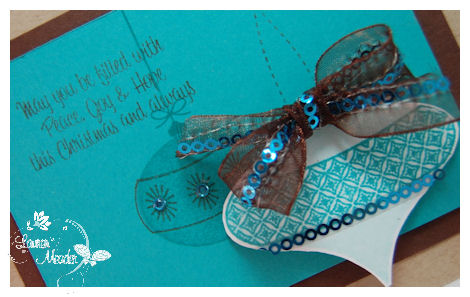
The ornament in the back is just stamped in versmark, with the chocolate band. I added some bling to that too.
Easy peasy! You could make this SAME layout in MANY colors variations for a cool assortment!
This set make a quick holiday card not only easy, but FAB!
Supplies:
Stamps: Vintage Ornaments, Holiday Button Bits (strings)
Cardstock: White, Kraft, Dark Chocolate, Aqua Mist, Teal
Ink:dark chocolate, aqua mist,versamark
Ribbon-craft store
adhesive rhinestones
Celebrate the Season
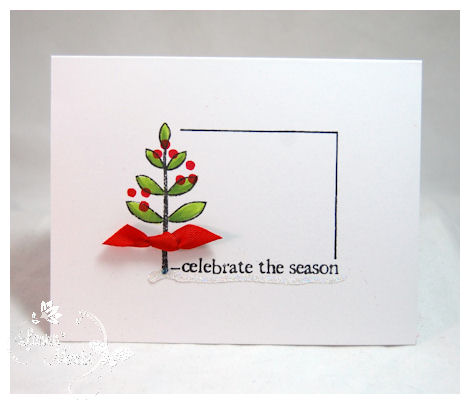
This is Heather’s set-Holiday Tree. Its a really cute tree 😀 I told you I’m on a BLACK kick 😀 I know there is little black, but red, black and green just make me happy.
Talk about WHIPPING up a card! It doesn’t get any easier than this!! This would be another FAB holiday card! QUICK and EASY!
I think we ALL used this image too! I just stamped and colored my tree, then drew a border using a ruler and marker tip. There is a snowy, glittered ground too.
Supplies:
Stamps: Holiday Tree
Cardstock: White
Ink:Black, Pure Poppy, Copic Markers
Ribbon: Pure Poppy Twill
other: Marker, ruler, 2 way glue pen, Prisma Glitter
Well that is it for my countdown samples. I’ll be back with the last release samples using my NEW! templates.
Thank you for stopping by 😀
My Etsy

Who I Designed For
Blogroll
- Alicia
- Alli Miles
- Ally Blankenship
- Amber
- Andi @ crafts on a whim
- Angel R
- Angie Z
- Anne Kranitz
- Becky O
- Bee
- Beth Silaka
- Bethany Paull
- Beverly Nash
- Bobbie
- Cambria
- Cammie
- Card of the Week
- Card Positioning System (CPS)
- Cards for Cancer
- Catherine Doucette
- Charmaine
- Cheryl Sims
- Chriss Rollins
- Christina
- Christine Ewing
- Christine Wooden
- Colleen Schaan
- Craft Critique
- Craft Gossip
- Crystal
- Dawn Easton
- Emily Giovanni
- Geny
- Holly
- Igne Groot
- Inspirational Craft Blogs
- Irene
- Jami Sibley
- Jeanne Streiff
- Jen del Muro
- Jeni Bond
- JenMarie
- Jenn Balcer
- Jenn Diercks
- Jenn O
- Jennifer E
- Jennifer Mick
- Jennifer Pereda
- Jennifer-Sweet Treat
- Joanne Basile
- Jodi Collins
- Julia Stainton
- Julie Masse
- Karen
- Kathryn Berthiaume
- Katie Cotton
- Kelley Holland
- Kendra
- Kim Scholfield
- Kris’s Color Stripes! Get inspired here
- Kristen Dubosque
- Kristin Eberline
- Kristine
- Laura @ Sunshine Stamper
- Laura Turnmire
- Laurie Schmidlin
- Lesa Rapp
- Linda Duke
- Linda-LSN
- Lindsey Botkin
- Lisa (lakind scs)
- Lisa Kind
- Lori Craig
- Maggie
- Mara Campbell
- Maria
- Maria Levine
- Mary
- MaryJo
- Melanie M
- Monique Hansen
- Moxie Fab World
- Pam Imholz
- PaperCrafts Connection
- Peppers and Pollywogs Kids party site
- Rebecca Grohall
- Rita
- Robyn
- Rose Ann
- Sarah Vrolyk
- Sharon Harnist
- Sharon Johnson
- Sharon Rivera (a chemisrty with paper)
- Sherrie
- Sophia Landry
- Storage Units, Ink, & More Blog
- Sue Berker
- Susan (Rainy)
- Tangii Crane
- Tracy
- Tricia Traxler
- Trudee
- Velta
- VivLyn
- Zena
MTME Pretty Palette Color Team
MTME Pretty Patterns Sketch Team
My Time Made Easy TM LLC
Shop till you drop!
Lauren Meader
About Me
Copyrighted material
Subscribe To My Blog
Pages
- About me
- Alexa’s Story!
- My Crafty Corner!
- My Time Made Easy™ LLC
- Our Make A Wish Trip to Disney!
- Resume/Publication List
Calendar
| M | T | W | T | F | S | S |
|---|---|---|---|---|---|---|
| 1 | 2 | 3 | 4 | 5 | 6 | 7 |
| 8 | 9 | 10 | 11 | 12 | 13 | 14 |
| 15 | 16 | 17 | 18 | 19 | 20 | 21 |
| 22 | 23 | 24 | 25 | 26 | 27 | 28 |
| 29 | 30 | |||||
Archives
- August 2013
- July 2013
- June 2013
- May 2013
- April 2013
- March 2013
- February 2013
- January 2013
- December 2012
- November 2012
- October 2012
- September 2012
- August 2012
- July 2012
- June 2012
- May 2012
- April 2012
- March 2012
- February 2012
- January 2012
- December 2011
- November 2011
- October 2011
- September 2011
- August 2011
- July 2011
- June 2011
- May 2011
- April 2011
- March 2011
- February 2011
- January 2011
- December 2010
- November 2010
- October 2010
- September 2010
- August 2010
- July 2010
- June 2010
- May 2010
- April 2010
- March 2010
- February 2010
- January 2010
- December 2009
- November 2009
- October 2009
- September 2009
- August 2009
- July 2009
- June 2009
- May 2009
- April 2009
- March 2009
- February 2009
- January 2009
- December 2008
- November 2008
- October 2008
- September 2008
- August 2008
- July 2008
- June 2008
- May 2008
- April 2008
- March 2008
- February 2008
- January 2008
- December 2007
- November 2007
- October 2007
- September 2007
- August 2007
- July 2007
- June 2007
- May 2007
- April 2007
- March 2007
- January 2007
Categories
- About Me
- All That Scraps
- blogger challenge
- camera/photo play
- Cards
- Contests
- family stuff
- FOR SALE
- Home decor/3-D items
- How to FAKE it!
- Introduction
- JUGS Challenge
- JustRite Stampers
- Lizzie Anne Designs
- My family stuff
- My Stamping Space
- My Time Made Easy
- My Time To Color Challenge
- My Time to Create Challenge
- My Timeless Template Challenge
- My Timeless Templates
- Mytime Mail
- MYTIME MOVIE/VIDEOs
- Papertrey Newsletter
- Pink Cat Studio
- Pretty Palette Challenge
- Pretty Patterns Sketch
- Product Opinions and Must haves
- Recipe's
- Saturday Sketch
- Smilebox Creations
- Stampavie
- Tutorials
- Uncategorized
- videos
Most Popular
- Create your own Onesie Card Tutorial-and important NOTE! PLEASE READ (2529)
- Saturday Sketch-Boxed bag holder (2333)
- Going GREEN! Fancy Flower Flourish-Closure Video (1478)
- Fabulous Favorite - Giveaway! (1336)
- a Prayer Request (1232)
- QUICK-Easter Baskets from Nestabilities-PTI style-and blog challenge (1063)
- Teaser Sketch (999)
- February Release Giveway! (and a little peek) (996)
- Group Post and Rambling Rose Video Tutorial (985)
- GIVEAWAY! Who wants it all?! (895)
Recent Comments (RSS)
- 첫충사이트: 완전히 흥미로운 블로그 게시입니다. 저는
- sarah: Wow, Lauren, what a stunning
- hedie: خرید راهبند
- 야동: Love to read it,Waiting For
- 야동: This seller is in a
- 바카라사이트: 여기 처음 왔어요. 나는이 게시판을
- 야동티비: I was surfing the Internet
- 바카라사이트: 비슷한 주제에 대한 흥미로운 정보를
- 바카라사이트: "여기에 제공해 주신 귀중한 정보와
- 온라인홀덤: 유익한 웹 사이트를 게시하는 데
Copyright © 2007 - My Time, My Creations, My Stampendence - is proudly powered by WordPress
This blog has been Tweaked and Designed by Sara Williams