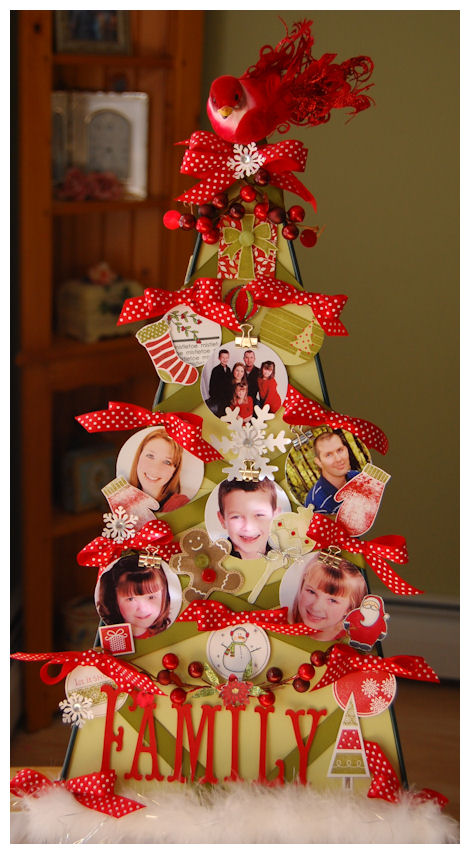
Our Family Tree
Nov 5, 2009Today’s project is just one example as to WHY I love this craft so much, and sharing what I love to do with the world!
If this doesn’t get you excited for the holidays then I don’t know WHAT will. I am beyond excited to share this is a super fun project that is INEXPENSIVE, and you can even let the kids make their own!! (After you do the basic assembly of supplies!) THIS is a gift worth giving every family member at some point, and it doesn’t even have to be HOLIDAY themed!!
Would you believe it if I told you that this was originally a Wire Folding Easel? <—- Seriously check it out
Family Tree
Would you believe me if I told you that I used it to designed my very own photo/card display for ONLY $2.29?
Well believe it.
I have longed to create a special photo/card holder to display during the holidays. One that I can easily switch out photos & cards for, year after year. The store bought ones aren’t generally festive, and can easily cost upwards of $20. All you need is a little imagination and some Papertrey to get your own started!
I was in the plant supply section at JoAnn’s, buying some festive elements to use in my holiday gift packaging. This is definitely the time of year I make something for everyone!! While in the aisle, my 5 yo daughter Amber said “Mommy, is that like a Christmas tree?” and she pointed to the wire easel. IMMEDIATELY my mind began SPINNING!! I said “It’s not suppose to be a tree, but you have very good eyes Amber! We are going to take it home and make a special tree for our house!” I literally forgot about everything I was there to get and about 2 hours later this project was made! Now It took 2 hours because I had NO IDEA what or HOW I was going to execute the “tree” that was in my head.
So with a little cardstock, Scor-Tape, hot glue gun, ribbon, clips, my Cricut Expression, and of course some festive holiday stamps
(—> Click here to view all the images listed in my post)……and our Family Tree was made!
Here is how: (and NO I didn’t get step by step photos, I needed my hands to keep up with my brain, and quite honestly I didn’t think this would actually work! LOL!)
I first wrapped my ribbon around the easel, being sure to secure it with glue as it wrapped around the wire frame. I laid the tree on the floor and used 2 pieces of spring moss cardstock to trace the tree. I then cut them. I used my Scor-Tape to adhere the cardstock to the BACK of the open wire easel frame.
BE SURE TO KEEP EVERYTHING NEAT! You can see the back and sides on this project! NO messy stuff OK.
Added my metal clips to the ribbon that criss crosses in ripe avocado …….then just like after you apply your lights to the tree, you decorate it!
Tippity Top of the easel tree
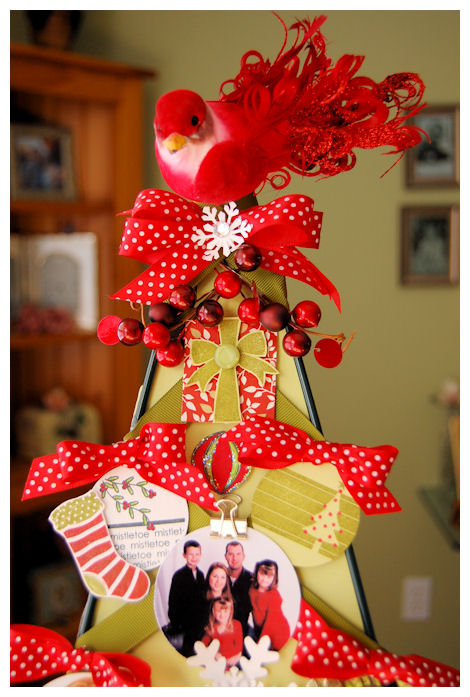
There was a little hook at the top of the easel. I used it to insert my bird. There was a clip under the bird but I removed it. Squeezed in some hot glue, then stuck it onto the hook. I got the bird at the craft store to use as my tree topper (and cover the hook!) I added some of the berries I purchased to the top as well. I used the gift from Holiday Button Bits. I also used an ornament from Vintage Ornaments.
I also used the 2009 Holiday tags, and Stocking Prints. Then our family photo at the top!

I punched some snowflakes, and added a photo of myself, Jason, and Noah in the middle. I used the mitten image from Snowfall on either side. I thought they looked cute not fully inked.
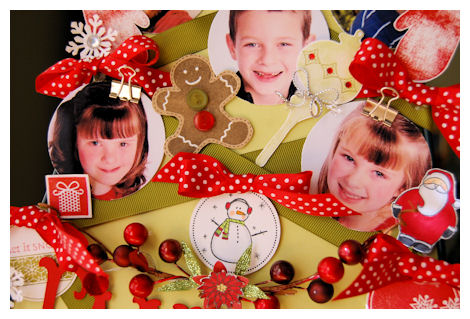
Now under Noah’s face we have the gingerbread man from Holiday Button bits, as well as Santa next to Amber! For Alexa I used a little present from Sign Language. You can also see another Vintage ornament, and the snowman tag from 2009 Holiday Tags.
Added some more berries, and the poinsettia from Peaceful Poinsettia to the center. More tags from the 2009 Holiday Tag collection!
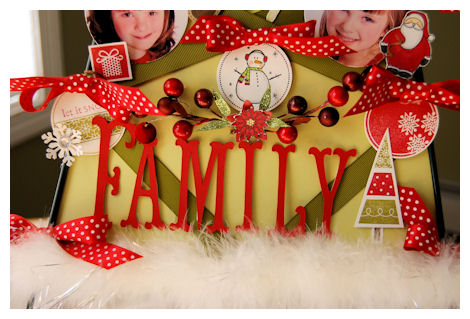
I had to design the bottom to spell out “Family” tree, then use the tree image from Merry & Bright at the end!
Now “Family” is spelled out using my Cricut Expression Story Book cartridge.
Last but not least, I added some white tinsel furry stuff (what is that called??) to look like a snowy bottom.
Once again here is the completed tree
Supplies:
Stamps: Merry & Bright, 2009 Holiday Tags, Snowfall, Holiday Button Bits, Vintage Ornaments, Sign Language, Stocking Prints
Cardstock: White, Spring Moss, Pure Poppy, Kraft
Ink: Black, Pure Poppy, Ripe Avocado, Copic Markers
Ribbon: Ripe Avocado grosgrain, Pure Poppy polka dot
Other: Easel, metal clips, Cricut Story Book, circle punch, snowflake punch, hot glue gun, Scor-Tape, bird, berries, fur, adheisve rhinestones
Now I bet you cannot wait to decorate your own!
Just pick a color scheme and get going.
Now this will be for our family photos, but you can certainly use to hold cards and other fun items too! Maybe even an ART tree for your child’s art work?! Endless possibilities!
Thank you ALL for stopping by!
I can’t tell you how fun this was. Kids have such a great eye for seeing something in other items! For example, just go cloud gazing and you will be shocked at the imagination of a child! I give my daughter Amber full credit for the idea behind this project! I never would have seen a “tree” in that isle. I would have totally overlooked that ugly easel!
Note to self: Take Amber with you on ALL trips to the craft store, from now on!

My Etsy

Who I Designed For
Blogroll
- Alicia
- Alli Miles
- Ally Blankenship
- Amber
- Andi @ crafts on a whim
- Angel R
- Angie Z
- Anne Kranitz
- Becky O
- Bee
- Beth Silaka
- Bethany Paull
- Beverly Nash
- Bobbie
- Cambria
- Cammie
- Card of the Week
- Card Positioning System (CPS)
- Cards for Cancer
- Catherine Doucette
- Charmaine
- Cheryl Sims
- Chriss Rollins
- Christina
- Christine Ewing
- Christine Wooden
- Colleen Schaan
- Craft Critique
- Craft Gossip
- Crystal
- Dawn Easton
- Emily Giovanni
- Geny
- Holly
- Igne Groot
- Inspirational Craft Blogs
- Irene
- Jami Sibley
- Jeanne Streiff
- Jen del Muro
- Jeni Bond
- JenMarie
- Jenn Balcer
- Jenn Diercks
- Jenn O
- Jennifer E
- Jennifer Mick
- Jennifer Pereda
- Jennifer-Sweet Treat
- Joanne Basile
- Jodi Collins
- Julia Stainton
- Julie Masse
- Karen
- Kathryn Berthiaume
- Katie Cotton
- Kelley Holland
- Kendra
- Kim Scholfield
- Kris’s Color Stripes! Get inspired here
- Kristen Dubosque
- Kristin Eberline
- Kristine
- Laura @ Sunshine Stamper
- Laura Turnmire
- Laurie Schmidlin
- Lesa Rapp
- Linda Duke
- Linda-LSN
- Lindsey Botkin
- Lisa (lakind scs)
- Lisa Kind
- Lori Craig
- Maggie
- Mara Campbell
- Maria
- Maria Levine
- Mary
- MaryJo
- Melanie M
- Monique Hansen
- Moxie Fab World
- Pam Imholz
- PaperCrafts Connection
- Peppers and Pollywogs Kids party site
- Rebecca Grohall
- Rita
- Robyn
- Rose Ann
- Sarah Vrolyk
- Sharon Harnist
- Sharon Johnson
- Sharon Rivera (a chemisrty with paper)
- Sherrie
- Sophia Landry
- Storage Units, Ink, & More Blog
- Sue Berker
- Susan (Rainy)
- Tangii Crane
- Tracy
- Tricia Traxler
- Trudee
- Velta
- VivLyn
- Zena
MTME Pretty Palette Color Team
MTME Pretty Patterns Sketch Team
My Time Made Easy TM LLC
Shop till you drop!
Lauren Meader
About Me
Copyrighted material
Subscribe To My Blog
Pages
- About me
- Alexa’s Story!
- My Crafty Corner!
- My Time Made Easy™ LLC
- Our Make A Wish Trip to Disney!
- Resume/Publication List
Calendar
Archives
- August 2013
- July 2013
- June 2013
- May 2013
- April 2013
- March 2013
- February 2013
- January 2013
- December 2012
- November 2012
- October 2012
- September 2012
- August 2012
- July 2012
- June 2012
- May 2012
- April 2012
- March 2012
- February 2012
- January 2012
- December 2011
- November 2011
- October 2011
- September 2011
- August 2011
- July 2011
- June 2011
- May 2011
- April 2011
- March 2011
- February 2011
- January 2011
- December 2010
- November 2010
- October 2010
- September 2010
- August 2010
- July 2010
- June 2010
- May 2010
- April 2010
- March 2010
- February 2010
- January 2010
- December 2009
- November 2009
- October 2009
- September 2009
- August 2009
- July 2009
- June 2009
- May 2009
- April 2009
- March 2009
- February 2009
- January 2009
- December 2008
- November 2008
- October 2008
- September 2008
- August 2008
- July 2008
- June 2008
- May 2008
- April 2008
- March 2008
- February 2008
- January 2008
- December 2007
- November 2007
- October 2007
- September 2007
- August 2007
- July 2007
- June 2007
- May 2007
- April 2007
- March 2007
- January 2007
Categories
- About Me
- All That Scraps
- blogger challenge
- camera/photo play
- Cards
- Contests
- family stuff
- FOR SALE
- Home decor/3-D items
- How to FAKE it!
- Introduction
- JUGS Challenge
- JustRite Stampers
- Lizzie Anne Designs
- My family stuff
- My Stamping Space
- My Time Made Easy
- My Time To Color Challenge
- My Time to Create Challenge
- My Timeless Template Challenge
- My Timeless Templates
- Mytime Mail
- MYTIME MOVIE/VIDEOs
- Papertrey Newsletter
- Pink Cat Studio
- Pretty Palette Challenge
- Pretty Patterns Sketch
- Product Opinions and Must haves
- Recipe's
- Saturday Sketch
- Smilebox Creations
- Stampavie
- Tutorials
- Uncategorized
- videos
Most Popular
- Create your own Onesie Card Tutorial-and important NOTE! PLEASE READ (2529)
- Saturday Sketch-Boxed bag holder (2333)
- Going GREEN! Fancy Flower Flourish-Closure Video (1478)
- Fabulous Favorite - Giveaway! (1336)
- a Prayer Request (1232)
- QUICK-Easter Baskets from Nestabilities-PTI style-and blog challenge (1063)
- Teaser Sketch (999)
- February Release Giveway! (and a little peek) (996)
- Group Post and Rambling Rose Video Tutorial (985)
- GIVEAWAY! Who wants it all?! (895)
Recent Comments (RSS)
- 첫충사이트: 완전히 흥미로운 블로그 게시입니다. 저는
- sarah: Wow, Lauren, what a stunning
- hedie: خرید راهبند
- 야동: Love to read it,Waiting For
- 야동: This seller is in a
- 바카라사이트: 여기 처음 왔어요. 나는이 게시판을
- 야동티비: I was surfing the Internet
- 바카라사이트: 비슷한 주제에 대한 흥미로운 정보를
- 바카라사이트: "여기에 제공해 주신 귀중한 정보와
- 온라인홀덤: 유익한 웹 사이트를 게시하는 데
Copyright © 2007 - My Time, My Creations, My Stampendence - is proudly powered by WordPress
This blog has been Tweaked and Designed by Sara Williams
90 Responses for "Our Family Tree"
Oh my goodness, Lauren, I am blown away! This is incredible – just absolutely amazing! I {{{love}}} it!
Can I borrow Amber to come shopping with me? Well, then I would need you too to make it all happen, of course!
What a fabulous centerpiece this would make and a great gift idea for grandparents… I’m just in awe!
Thanks for sharing… really, thank you!
Hugs and love,
Renee
Wheee! What a special tree! Great eyes Amber…you two make a terrific team 🙂
Hey Lauren! LOOOOOOOVE IT! As Weezie would say. Thanks for sharing all of your great ideas. I truly enjoy visiting your blog to see what new great creation you come up with. I’m not able to spend the time I would like crafting, so visiting brings me smiles. I look forward to having that time someday. Thanks Lauren and much love to your family. By the way, I think your hair color looks great. Smiles!
Ooooooh, just lovely! Absolutely amazing. Love it. Thanks for sharing!
GOSH! That is amazing! I would have never thought of that either….how great is amber
Lauren,
I’m always blown away by your ideas, but this is over the top!!! I LOVE IT!!! Now I want to go and make one for myself! GREAT JOB!!!
What a gorgeous tree -might I suggest that you add the date (2009) it could then become a family heirloom to be brought out year after year.
Wow, wow, wow, just beauitful – you really are so clever
What a lovely addition to your home for the festive season
This is AWESOME! I hope to be able to make one this year too!
Absolutely awesome and totally inspiring! You make things look so easy!! Thanks for sharing!
this is beautiful and what a wonderful idea…..gonna have to try one this year…
Now this is darn cute! What a clever girl you have!
Holy Smokes my jaw in on the floor!! That is soo amazing! 🙂 Love it and such a beautiful display!
Lauren, this is amazing! You have such a gift for seeing the possibilities in all things! Just gorgeous!!!
What a wonderful idea. My SIL and I were trying to come up with a project at Thanksgiving and this just might be it! Thanks for sharing.
I love this idea!!! Thanks so much for sharing. I enjoy making most of my holiday decorations and this would make the perfect addition.
get out! you are one amazing girl and what a joy to have alexa eyes to find the FIND of the day. Love this, going to Joann’s today and get me one. THANK YOU SO MUCH for the inspiration.
lois
What a great idea Lauren! I love it. I will have to scour the craft stores for an easel now. Thanks for sharing such a creative and festive homemade holiday creation!
Now I know how you continually come up with AMAZING creations. You have cute little elves helping you out! 😉
I can’t wait to try to make this myself. I think my little girls will have a great time helping me out. Thank you Amber and Lauren!!
I ma speechless. This is gorgeous and it looks like it took forever. You have a great eye for color and balance.
This is fabulous! I love it! I love those craft stores for awesome finds like the easel where you can turn it into something fun and you did a fantastic job!!!
Lauren, youre MAGIC–that’s all! ;-D
Hi, Lauren
This is beyong amazing!! I love the idea, but I love the execution as well. Every single stamped image and accent you’ve put on there looks beautiful. Thank you for sharing – this is very inspiring!
Cindy 🙂
Holy cow, how stinkin’ CUTE is this??????!!!!! OMG Lauren, I HAVE to make one of these! Thanks so much for sharing your creative genius with the rest of us 😉
Amazing work Lauren. It looks like Amber has the magic crafty touch like you. Love everything about this. So creative!!
xoxo, Christine
OMG Lauren this is amazing! You are so creative I don’t know how you do it!
This is so beautiful Lauren!! I love the vibrant photos with the red… so much life here!!
Love this.. thanks for sharing!!
Wow, this is fabulous, Lauren–you amaze me!
Amy
Fabulous! I love everythingabout it… so very creative Lauren. TFS!
Guess who is going to be making a trip to Joann’s today???? LOL!! I just LOVE this, you are soooo amazing and Amber seems to be following in her mommy’s footsteps!! Thanks Lauren….have a great weekend.
Sure sounds like your little girl will be following in your foot steps. Love the family photo tree!
WOW, Lauren!!!! That tree is absolutely WONDERFUL! I have some great ideas on how I can duplicate it for my son’s wedding reception!
Lauren, I love this!! One question if I may? Am I correct in thinking bc its a easel you only wrapped ribbon, decorations, etc on this front side?
Thanks!
Lauren, this is so beautiful! I sure hope JoAnn’s has enough of these for the run they are going to have! thanks for the great idea!
CindyB
Oh WOW!!!!! This is simply amazing!!!!! 🙂
Lauren this looks awesome! I love it, high five for Amber. I bet she is really proud to have inspired that project! 😀
Hello Lauren, This is the greatest thing I ever seen. It is really awesome. Your creations are the best. Best regards.
Lauren, this is stunning! YOu totally outdid yourself! i must make one! so the two other sides are open still, you just decorated “the front”, right?
Oh man, i have to get to JoAnns today! what about making it a santa hat? 🙂
Simply gorgeous – as only seen through the eyes of a child. “And a little child will lead them….” What a special, thoughtful, family memento. I am so glad you blogged it for all of us to enjoy also. Thank you!
Cheers to Amber (and her creative mom)! Your family tree is as beautiful as the people who are on it! We are blessed by your creativity and generous spirit! Hugs all around!
OMG!!! I WANT ONE!!!! This is absolutely THE most beautiful creation I’ve seen yet… words can’t describe how I LOVE this! Thanks for sharing your how-to so I can attempt this 🙂
wow! that is gorgeous!!!
Fabulous project, Lauren and what a great eye Amber has! You’re so right about seeing things through the eyes of a child. I love having my 10 yr. old granddaughter over for stamping–she just amazes me, with her creativity! I love all of the elements you used, but the mittens (not fully inked) are just so neat (I wouldn’t have thought of that)–such a great look! Thanks for sharing your family tree!
Lauren, this project was over the top in originality! I want one for my house now!
You are just AMAZING!
OMGosh! This is so cute, I can’t stand it.
On my way to JoAnn’s now.
I love your tree but I have one question, when you said you wrapped the ribbon around the easel, I’m not sure what you mean. Is that the red bows? Could you email me at my addy? Thank you. Andddddd thank you for your inspiration. Rosie
Lauren, what a neat gift idea, especially for grandparents. I’m going to have to try this one. My parents spend 10 months out of the year in a motorhome and this would be an idea gift for them. Going to check this out.
Thanks so much for sharing.
Truly Amazing! What a great idea and special addition to holiday decorating. That little one of yours must have art in the genes, too.
Thank you for sharing your gift with us.
Diane M
aka detour3
Absolutely OVER THE TOP COMPLETE AND UTTER GORGEOUSNESS!!
Your tree is so cute and very creative. My mom lives in a nursing home and this would make a great gift for her. Thanks for sharing and kudos to Amber. She must have your creativity.
What a FABULOUS idea!! You have sooooooooooooo much talent. TFS.
I love this idea Lauren! It’s just a really wonderful thing to have and it would make such a beautiful gift. I can see this being done in non-Christmas theme as a family tree and being left out all year long!
Loren, love, love, love your tree. For use who can’t picture the basics of putting this tree together……….are you going to do a tutorial for us???? Please?? I’d love to make some of these for Christmas gifts. Hugs……………Cathy
OOOOOOOOhhhhhhhhh!!! I just got to thinking……(dangerous LOL) Wouldn’t these be absolutely cute for a sweetheart tree for Valentines day or on a table for a wedding?? I do hope you show us the basics in pictures!!
Well the nut didn’t fall far from the tree now did it! Good eye Amber! Kids have such great imaginations don’t they, it helps us to really see things differently! This is a FAB-ulous project and I can see how it took you a couple of hours to create and that you put allot of thought into it! I’m sure you’ll be able to knock another one out in no time flat though when you create the tutorial! **no pressure** lol
Just stunning Lauren! You did an awesome job with the family Christmas tree. I love it!!
Another fabulous project from Lauren! You are some sort of crafting savant. I absolutely love all of the projects you create. Thanks so much for sharing! P.S. I am so glad you got the cricut because I am sure you will be coming ups with some new creative way to use it!
Wow! What a work of Art. Thank you…Absolutely Amazing Amber!!!
Wow, this is simply gorgeous, your daughter has a very crafty eye already! Your family pictures are adorable and you’ve put them to such great use, something to treasure always xx
I am in LOVE with this. Your creativity amazes me 🙂 And that little Amber – she’s going to be a paper crafting princess soon!
Awesome project!
I have been doing all types of crafts for a lot of years and I have to say yours is the best I have ever seen. I look forward to checking out what you have done. You are great and the change in your hair is perfect. I’ve never had a mistake make such a difference .
This is gorgeous. Thank Amber for seeing this and for the end result. It is very creative. I will have to give this a try for the holidays.
Just gorgeous!! I can’t even picture what it must have looked like — now it’s unbelievable!! Magic, as one of your other commentators said!! Love it!
I am truly in awe of people with your kind of creative imagination and talent, Lauren. I wish I had a mind that “just began spinning” with crafty ideas like your tree. This is truly a stunning creation. I wish I had all of those PTI stamp sets, too! Thanks for sharing this post! P.S. I will second the person who commented on your hair colour. It’s gorgeous on you!
WONDERFUL!! How special and precious!
Kim Marie
Absolutely stunning…I remember talking to you the day you made this… what did J say? ‘cute?’ we need to work on expanding his vocabulary 😉 lol. AMAZING job you did with this Lauren — just AMAZING. The things you see in other things (or I guess Amber in this case) never cease to amaze me. you GO girl!
How fabulous & festive! Great Idea!
Olá Lauren, sou brasileira, apaixonada por scrap, conheci o seu blog e quero lhe dizer você é maravilhosa, adorei os seus trabalhos, essa árvore eu me apaxonei pela idéia. Que Deus lhe abençoe sempre com esse dom. Beijos.
Fabulous idea!
Great Idea! Will make a unique centerpiece;Thanks! JayBug
Wow, Lauren! This is a wonderful gift for your family! You had a brilliant burst of creative thought here, WOW! Gorgeous!
Oh Lauren, this is absolutely brilliant and so beautiful! Amazing!!!
You have inspired me! This is the cutest thing I have seen in a loooooooooooooong time!
I was at Jo Ann’s today and saw that tree as I was walking out and thought of you. 😀 I have to say that was a clever idea. I never would have thought to use it that way. Awesome!
Heather
This is A-MA-ZING!!!!!!!!!!!!!!
You have such a wonderful eye for making something beautiful out of nothing!! Thank you for sharing your talents and time with us!!
Lauren,
This is AMAZING! I love it! Your work is incredible!
Thanks for always providing such great ideas!
~Roshni
que c’est beau…génial
Thanks Amber & Lauren for this fabulous idea. We are in a state of transition right now and I think this will fill the bill for our tree. I think I might use the whole Easel. It looks like to cut yours. Am I right? Can’t wait to get started. You are both the best. I guess the creativity has already been passed down from one generation to the next. God bless!
Peggy
Wow!!! It’s fabulous!! I love it!
SO awesome!!!
This is AMAZING! I love it!
WOW STUNNING! Would you kindly do a step by step tutorial? I am a visual learner and if you can post a video that would be terrific! TYFS!
Wow! Okay so I went to Joann’s today and the only thing I saw like this was 30″ tall. Is yours that big?! I bought it, but it was $2.99 so I’m thinking it’s not the same one you have. I’m going to do it anyway even though it’s enormous. =P lol
.: Your family tree is so wonderful!~~ It’ll make such a splendid decorating idea for a Christmas tree, i Loooooove it so much! (^,^) :.
Coach Outlet Online is a good selection if you want to buy the cheap Coach Factory products, besides the Coach Factory Outlet is also a good choice.
As I site possessor I believe the content matter here is rattling magnificent , appreciate it for your efforts. You should keep it up forever! Good Luck.
MY FAMILY TREE
WOW just what I was searching for. Came here by searching for metal spinning video
Leave a reply