Archive for the ‘JustRite Stampers’ Category
MEGA March Blog Hop! Day 2
Mar 24, 2010 Author: mytime | Filed under: Home decor/3-D items, JustRite Stampers, My Time Made Easy
I am so excited to be participating in the BIG event today! If you haven’t heard, JustRite Stampers is have a Mega March Blog Hop! I hope you all enjoy it
I’m going to start with my project, then move on to the details. So I hope you are ready for a ton of inspiration from another AMAZING group of designers 😀 I feel honored to be asked to participate amongst this group 😀
So here is my project, just on time for Spring!
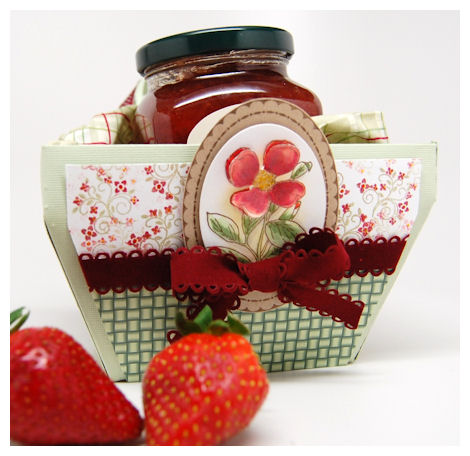
I love giving gift “baskets”. I especially love creating my own and filling them with all sorts of goodness! You can easily dress up the SIMPLEST of gifts! I had a jar of Strawberry Jam that I wanted to package up for a teacher gift. Consumables are always a great idea. I had purchased this fabric to “line” my cardstock basket. I was the start of my color choices.
I absolutley love all the new “natural” images JRS released the last few months. I knew right away that I wanted to use the Beautiful Blossoms Borders & Centers Oval 2 -1/4″ x 3-1/16“ for the main image on my “basket”. I created the basket using the Bouncing Baby Buggy template. Easy Peasy.
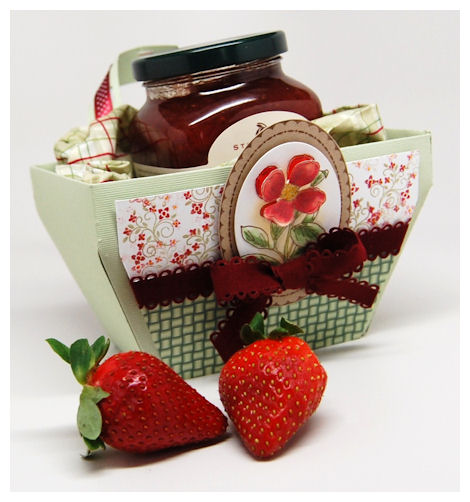
I absolutely love all the new “natural” images JRS released the last few months. I knew right away that I wanted to use the Beautiful Blossoms Borders & Centers Oval 2 -1/4″ x 3-1/16“ for the main image on my “basket” that I made using the Bouncing Baby Buggy © template. I think it makes such a stunning presentation.

For my main focus I knew I wanted to use this particular flower/border combination from the Beautiful Blossoms Borders & Centers Oval 2 -1/4″ x 3-1/16“
I stamped my flower twice in a brown ink, then colored it with Copic markers. I wanted some depth and shimmer so I added some Pearlescent Pastels to the petals. I used my oval nesatiblites to cut out the entire image. I colored and cut just the flower twice, then cut and layered it. I then stamped the frame in the same brown ink, on Sunflower cardstock, and hand cut the oval to layer on flower onto.
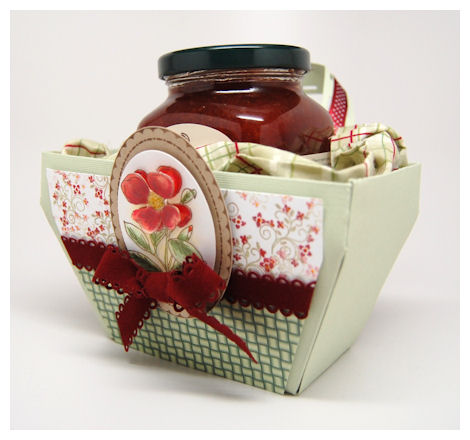
I was thinking someone could use this basket “after” the gift has been given, on the counter, maybe use the handle in the back to hang on a wall (or doorknob) to collect mail, or other items on the desk, or something like that. Maybe even some seed packets or a small planter? Definitely re-useable or re-giftable!
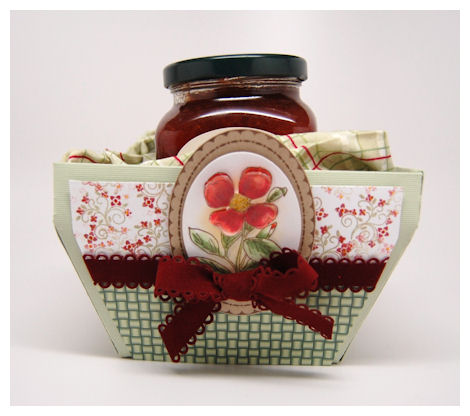
I wanted my “patterned” paper to match so I stamped a smaller flourish from So Sentimental © in coordinating colors, onto my decorative panel layer. I paired it with the Well Woven © pattern, and completed it with a simple bow of some lush velvet ribbon (from SEI).
You can never go wrong with flowers!I hope you liked my quick and simple gift idea. It really took no time at all and I feel like you can tell it is something given from the heart 😀 Nothing says love like handmade :DNow time to hop along!28 designers, FIVE shopping sprees each day. No one knows where the prizes will be! Each day of the hop JustRite will have five Mystery Blog Candy Prizes hidden along the hop with a total retail value of $600. JustRite will randomly select five mystery blogs each day of the hop and randomly allocate each of the shopping sprees. For your chance to win, simply leave a little love (a comment) on each designer’s blog including the JustRite blog. The more designers you leave comments with, the better your chances of winning. Each day’s comments will remain open for three days. A winner from each of the mystery blogs’ comments will be randomly chosen using Random.org. Consult the listing of designers at the JustRite blog each day (each day’s designers will be different) and start out on your way! Beginning Friday, March 26, summaries of all the winners will be posted on the JustRite blog. Good luck to everyone and enjoy all the JustRite eye candy along the hop!
Today during the JustRite Mega March Blog Hop (Day One) JustRite and its sponsors will be giving away the following five prizes:
· $200 JustRite Shopping Spree
· $100 Spellbinders Shopping Spree
· $100 Stampers Dream Shopping Spree, and
· Two additional $100 JustRite Shopping Sprees!
Blog comments for Day One will be open until Thursday at 6pm EST. On Friday, JustRite will announce on their blog which five blogs have the mystery candy for Day One. You will need to go to the JustRite blog to determine where you need to go to find out if you are one of the five lucky winners.
JustRite Inspiration Blog
Sharon Harnist
Sankari Wegman
Marianne Walker
Michelle Wooderson
Linda Duke
Barb Schram
Eva Dobilas
Liz Weber
Jeanne Streiff
Lori Craig
Sharon Johnson
Michelle Woerner
Sherry Cheever
Keri Lee Sereika
Lauren Meader <—-You are HERE!
Michele Boyer
Lucy Abrams
Janine Blackwelder
Edna Morrisedie
Deb Saaranen
Melody Rupple
Charmaine Ikach
Michelle Giraud
Amy Crockett
Lydia Fiedler
Thank you for stopping by!
Best of luck to you to win one of the AMAZING prizes!
Love and the New Year
Dec 31, 2009 Author: mytime | Filed under: Home decor/3-D items, JustRite Stampers, My Time Made EasyThe winner will be picked some time tomorrow.
In the meantime……
I have this sample to share today, but first some banter!
So this is the LAST day of 2009! Seems like just yesterday we were all wondering if the computers around the world would crash with the celebration of Y2K . Now, a decade later…..here we are! Technology is BOOMING!
Did you think there would be iTouch phones, Skype, texting, YouTube, Facebook, and even videos sent via phone? I’m a talker so while I have NEVER sent a single text, and while I don’t have time for Facebook, I’m in awe of everything that has come of this decade.
Now here we are….all connected by the Internet in some way. Most of us (myself certainly included) are DEPENDENT on the technology of today, that connects us to the world! I mean you could stay home 24/7 and feel connected to others.
I feel like I have a huge network of “friends” whom I never even met. All these “screen-names” I somehow “know” and view as an extension of friends. People who are there for me in this Internet of connections, who support me, know me, and cheer me on. People who I would never know otherwise! Other people who understand my papercrafting dreams and obsessions, because they are just like me!
Where were you in the year 2000?
I remember I didn’t even know how to email, much less blog, or anything else. I certainly never heard of stamping!!
Now here I am preparing to start 2010, doing something I had never even thought I’d set out to do. Something I always thought impossible! I have to say I have learned a TON in the last year, and I have so much more yet to learn!
I have accomplished more than I anticipated this past year, and have no sham in saying I’m proud of myself.
I’m beyond excited to see what 2010 will bring.
I’m excited to have you all right there with me, doing something I never, in a MILLION years expected to do.
So now its time for those New Year resolutions!
Obviously I am resolving to do me very best that I can in my new ventures.
I am thinking that I am going to resolve to NOT doubt myself, nor under-estimate what I am capable of doing! I truly believe we can make any dream come true, with hard work and dedication! I have accomplished some pretty big goals the last few years, so the sky is the limit!!! Don’t be afraid to make a leap, take a risk, or step out of your comfort zone! Its far better than saying “I wish I did that”. You may surprise yourself.
I am also going to resolve to become MORE computer savvy (and pity those around me who will have to teach/deal with me as I strive to do so)
I also want to resolve to finding balance between family and work. Family is so important. I’ve been VERY busy lately but have done my best to try to maintain some sort of balance. Admittedly some days it worked better than others, but I’m working on it.
I always have a million goals and resolutions. I commit that to the fact that I strive for continuous personal growth! Having the never ending “accomplish this” list certainly isn’t a BAD thing! Once I complete one goal, a new one takes its place.
I’d love to hear YOUR resolutions! So feel free to share.
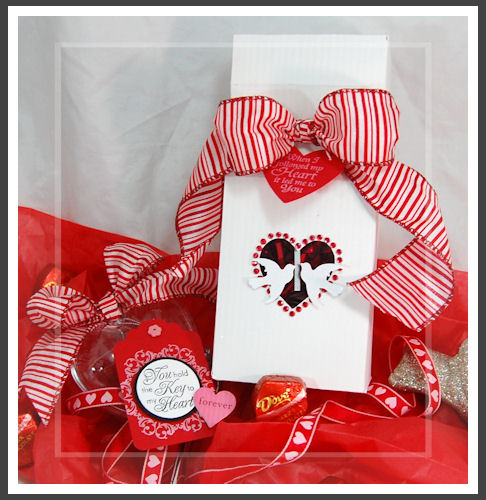
In the meantime….my friend is going to a Wedding tonight with the red & white color scheme (pretty cool-a New Year’s Eve wedding!) and she asked that I make her something to accompany a bottle of Champagne, and to put some $$ in! Not the standard envelope.
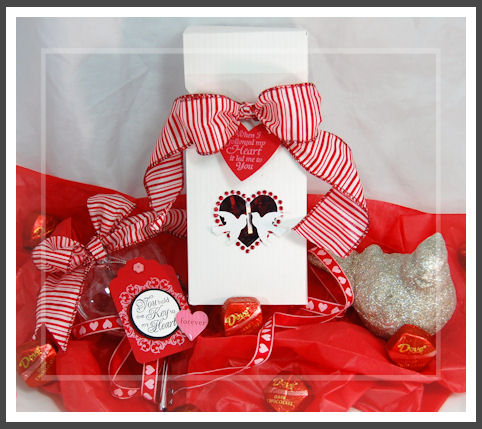
Well I thought that this would be the PERFECT wedding package!
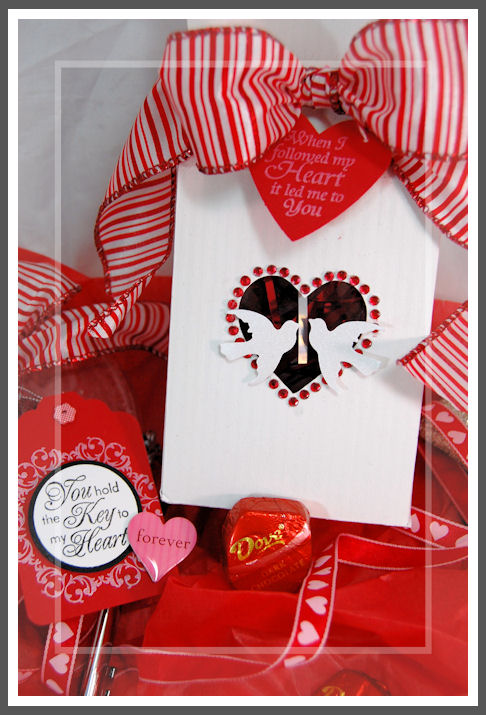
I used the In A Pinch © template, cut using my Cricut Expression in Alabaster Columns. It is a pretty textured white. I used the heart shape that come with my Sure Cuts A Lot to create a window! Took SECONDS!! No more trying to CRAM my templates through a machine that they can’t fit into!

I’m loving wired ribbon lately, and this was perfect for my project.
The sentiment on the heart is from JustRite Stampers Jan 1st release called Romantic Sentiments.
It reads: “When I followed my heart it lead me to you”. I stamped it in white ink, on red cardstock.
Can you get a better Wedding sentiment?! Love it. Made this so perfect for “love birds”
I put some acetate behind the window, then assembled my box.
I decided to use some adhesive rhinestones around the heart window. They were silver, colored red to match.
I also added some punched white doves, from a shimmery white cardstock.
Inside this they will find some Dove Chocolates to match )and Dove because I used Doves in the heart. They will also receive a heart shaped “Key” that is also a bottle opener. I found that in the Wedding section at Michael’s, which is attached to a heart shaped “ornament” that is filled with epoxy hearts, and glitter, and can contain the $$, as well as be saved. That is what will go INSIDE the box!
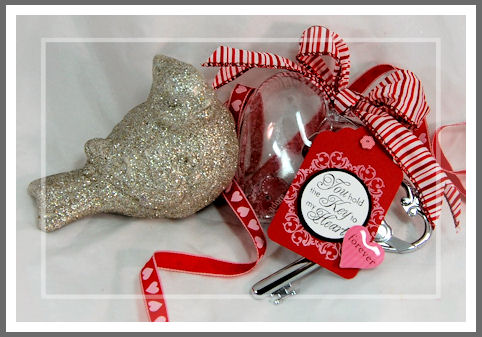
This is the key/ornament/gift, which is adorned by yet another tag…..from the Romantic Sentiments that reads: “You hold the key to my heart”
I stamped one of the borders on the tag to make it look a little more elegant. It was a very easy addition to make it POP.
I think this will make a nice Wedding package! She was very happy with the end result, and took the key bottle opener to be engraved with the couples Wedding date!
Well I am off to spend some time with friends and their children for the evening. We don’t go out on New Years. We like to stay home where it is safe 😀 The kids are going to have a big “camp-out” in their room, while the adults belt out tunes to American Idol (the game! LOL!). Should be FUN!
Before I know it the My Time Made Easy™ LLC release will be here!
YEAH!
I want to wish you and your family a very happy, healthy and SAFE New Year! I hope this is the year that you make all YOUR dreams come true.
See you in 2010!
Swiss Miss Rosalie
Dec 30, 2009 Author: mytime | Filed under: All That Scraps, Home decor/3-D items, JustRite Stampers, UncategorizedToday is the kickoff for the peeks to begin for the January 2010 (<—-whoa! can you believe that! 2010!) release at All That Scraps.
This month she is releasing 5 collections of images, all releasing on Monday January 4th.
You will definitely want to check out the ATS BLOG each day until the release, to see samples from the design team, and enter for your chance to win the set featured!!
My peek today shows one of my favorite lines: The Swiss Pixies
Just in time for Valentines day…….
This is Sweet Miss Rosalie. How adorable!! I love her, the outfit, flowers, and everything!
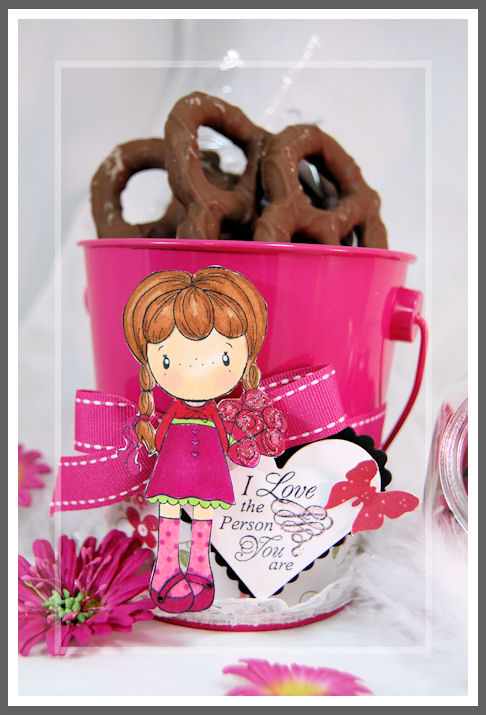
I have had these CUTE metal buckets from the Target $1 Spot, for over 2 years now, and have been awaiting the perfect project. When I saw Sweet Miss Rosalie, I knew it was time to dust this bucket off, stop hoarding, and share the sweetness!!
I used my blending paper to stamp, then color with my Copic markers, and I just had cut her out. Of course my 5 yo Amber, makes me find SOMEWHERE to add glitter, and the flowers were perfect.
The perfect image deserves the perfect sentiment, so I had to pair it up with this NEW! Romantic Sentiments set from JustRite Stampers!!
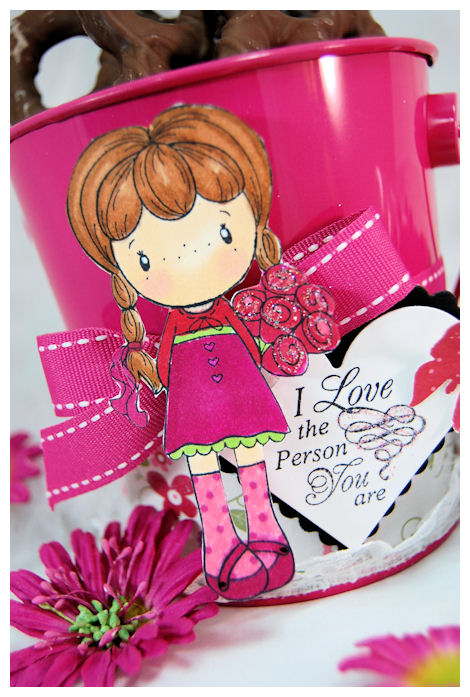
I LOVED the sentiment, so I paired it with the image.
This sentiment set is perfection. So many sentiments in one set, with some stunning borders. I loved the underlined heart in the sentiment, so I added glitter, again!
I covered my bucket and added some ribbon and lace trim, in a unique sort of way. I wanted GIRLY and FRILLY, yet simple.
I think I accomplished what I set out to do.
So I hope you can stop by tomorrow for more ideas and samples!!
JRS Last Minute Gift Ideas
Dec 2, 2009 Author: mytime | Filed under: Home decor/3-D items, JustRite Stampers, Recipe's
As I said yesterday, the team at JustRite Stampers is having a blog hop!
This one is SURE to get the creative wheels turning! The focus is on last minute gift ideas. I think this hop will be helpful for ANY time of year. I know I’m often in a scramble for last minute ideas myself.
With the economy where it is I know we are ALL looking for inexpensive ways to acknowledge those around us. When you give anything handmade, I truly believe it speaks to the heart of the receiver. They know you took the TIME to make them something special. Even the smallest gifts can seem that much MORE special. I feel like this is my life long SPEECH! LOL! It’s truly what I live by and WHY I make all the gift packaging that I do. Simply put-dressing up something inexpensive makes it seem like it cost way more and more importantly….. is always given from the heart, and the bottom line is, that matters!
This year for the extra people I want to thank, I am giving my favorite recipe, all bottled up, and dressed for the winter season.
Snow(man) on the go
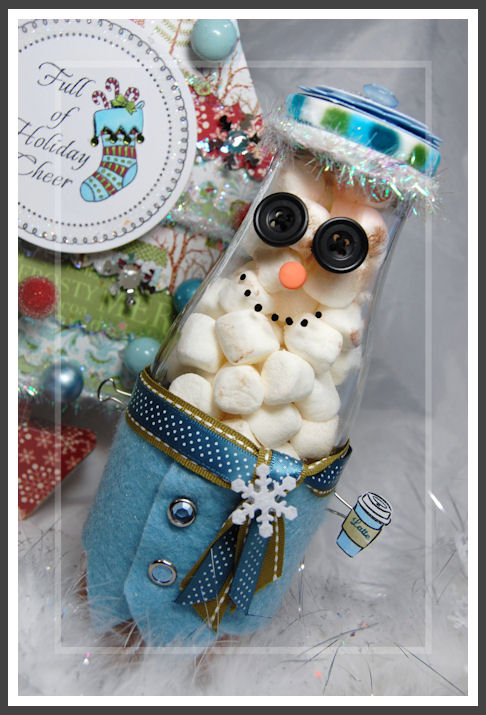
How cute is he?
Made from a simple frapuccino bottle. Just wash in dishwasher, and let dry completely!
Now if you have MANY people on your list buying and drinking that much Starbucks can be PRICEY so check out
—> THIS PLACE <—for a ton of various EMPTY bottles you can purchase! Can you say WOW!
Then alter your design from there. THIS ONE is pretty perfect.
Decorate your bottle , then add your mix.
This is my FAVORITE home made Hot Cocoa Recipe! You can make up several batches in no time!
I found it on the Food Network. Keep in mind the better quality ingredients often make tastier cocoas ![]() (add it to a coffee and YUM!)
(add it to a coffee and YUM!)
Ingredients
- 3/4 cup powdered milk

- 1/2 teaspoon ground cinnamon
- 3/4 cup sugar
- 1/2 cup cocoa powder
- 4 ounces bittersweet chocolate
- Marshmallows
Directions
Combine all the dry ingredients in a large bowl and mix well. Take the bittersweet chocolate and roughly chop it up to give a chunky but consistent size. Mix well with a wooden spoon and then store in a dry airtight container.
This is where YOU need to keep track of how much mix YOU put into each container, so you can print your instructions for the receiver. I like to print mine on a adhesive label sheet, then punch out and stick onto bottom of Snowman Jar.
To make the hot chocolate:
Add 1 cup of water per 1/2 cup of hot cocoa mix.
Heat in a small saucepan over low heat, stirring with a whisk.
Heat until hot, but do not boil, about 6 to 7 minutes.
Serve with marshmallows. (already in your jar :D)
As you can see-my mix is layered in the bottom of my jar. I then topped with marshmallows (and as you can see this makes him LOOK like a snowman!)
You can also make a Snow girl….or SANTA!
Now details…..
The hat

The lid-I punched a circle from blue cardstock. I then layered a scalloped circle piece, with dimensionals for POP.
I used the snowflake image from Merry Little Christmas Borders & Centers Round 1-5/8”. Stamped it in blue ink. (every snowman needs SNOWFLAKES!) I then layered on a silver piece of snowflake table confetti, then added a blinged out button. Gotta have BLING somewhere, even if its a Snow MAN.
The hat rim was created using velvet white ribbon from May Arts, that I used my Copic markers to COLOR!
Just under the lid, I added some tinsel ribbon for that extra WOW!
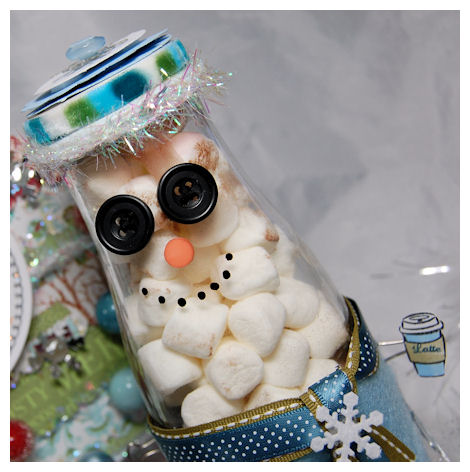
His cute lil face…
Easy peasy!
Two buttons for the eyes (adhered with CLEAR glue dots). An orange piece of Bella Dots for the nose. Then I used a Vitrea Glass Paint Pen in black to dot on my “coal” mouth.
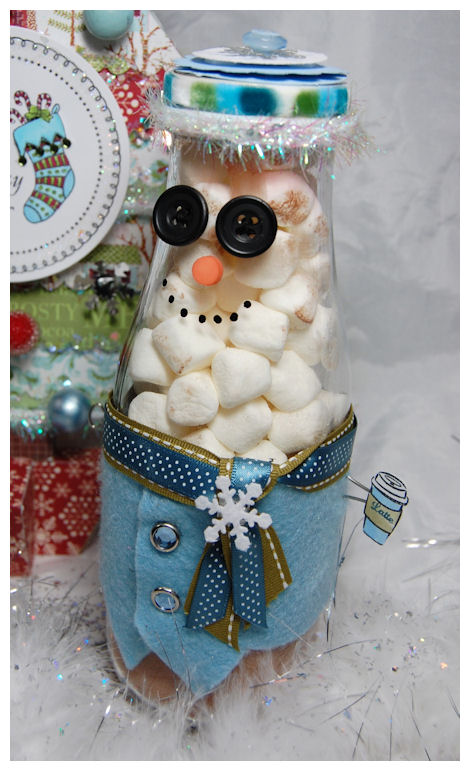
Now the outfit!
I took some felt and free-hand cut a “vest”. It is secured with double sided tape too, so it doesn’t move/shift.
Bling center brads became my “buttons”. Some ribbon for the scarf. I had some felt snowflake ribbon, so I cut a piece for the snowflake there.
Now look at his “hand”. That is a binder clip, inserted into the felt. I used the coffee cup image (and stamped the “latte” sentiment) from Just A Little Caffeine Borders & Centers Set 2″ . Just stamped, colored and cut out. Isn’t that cute, Its attached with a clear glue dot as well. I loved that idea. The cup from Something Sweet Borders & Centers Round 2-3/8” would have worked too.
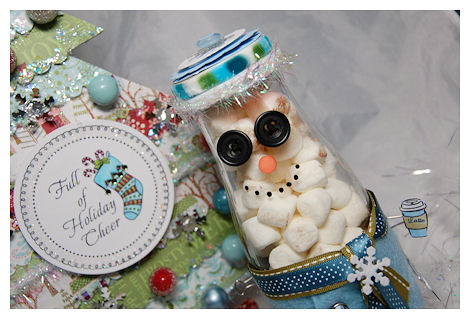
Now isn’t he just delicious?!
If you are eyeing the tree in the background…..you can see THAT project HERE!
I also made a Wreath ornament—->HERE!
Now it is time to move on for MORE last minute gift ideas!
JustRite Blog
Angela Barkhouse
Barb Schram
Becca Feeken
Debbie Olson
Heidi Blankenship
Kathy Jones
Kellie Fortin
Lauren Meader <—-You are here.
Lisa Somerville
Michele Kovack
Michelle Wooderson
Sharon Harnist
Sharon Johnson
Terre Fry
Thanks for stopping by, and letting me share!! I hope you enjoyed this project :DHappy Holidays
What you can do with a ribbon spool…..
Nov 25, 2009 Author: mytime | Filed under: Home decor/3-D items, JustRite StampersI have to start off this post with a family update! If that isn’t your thing, then feel free to scroll down 😀 Past the RED Dotted line!
I am happy to report that my grandpa made it out of surgery, and is doing well! The first 48 hours are critical, but so far so good! They took him off life support yesterday, and pulled out the breathing tube. No sooner was that out he was asking for coffee!! (See the coffee love runs deep through the family tree :D) So they entertained the idea, and after a few sips he couldn’t really tolerate much more. I’m sure his throat is SO SORE after having that tube in. I know I only had a breathing tube in for like 40 minutes for my surgery and I could barely talk for 3 days. For ME that is an ETERNITY!!!
He was sitting up in bed, and joking with all the nurses (sounds familiar doesn’t it! LOL!!). He is such a sweet man I’m sure he is one of the best patients. They are very impressed with his progress. I am so thankful that he is doing so well. I am also thankful that we live close enough to one of the best hospitals in the world! I really want to thank you all for the thoughts and prayers 😀 My family appreciates that very much.
Now I am TRYING to convince him that once he is fully recovered he should take some of his savings and take that life long dream trip to Las Vegas! WHY save it for his family or anyone else to use after he is gone?! He worked hard his entire life! He should live it to the fullest!! He would have so much fun. He deserves to reap what he has sewn. I really hope he seriously considers it.
—————————————————————————————————————————–
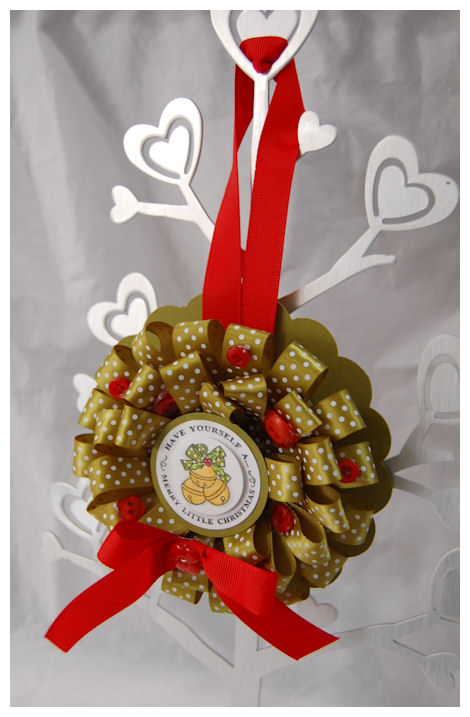
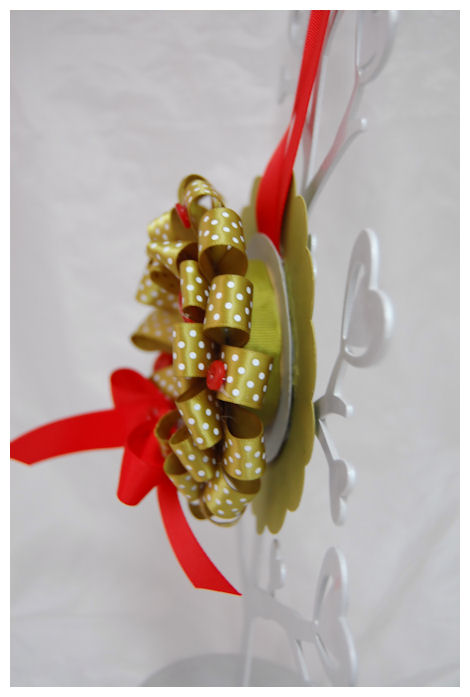
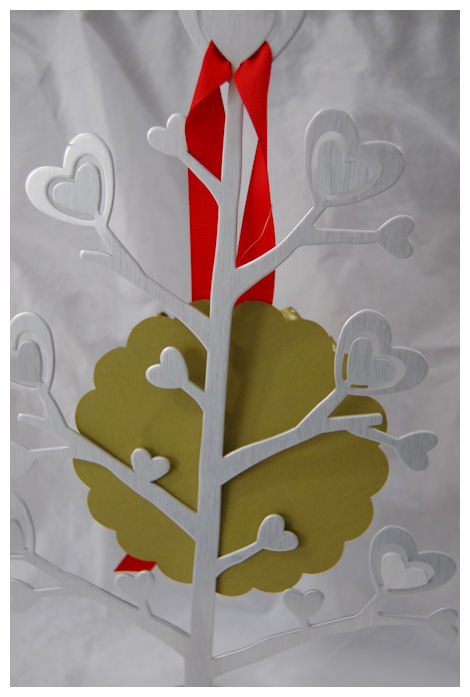
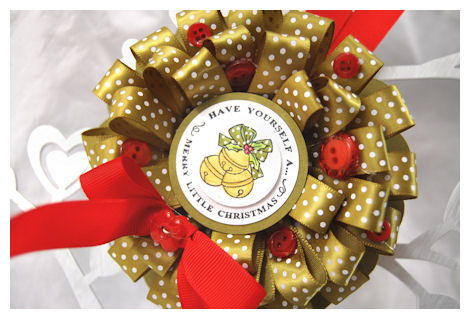
Merry Little Wreath
There has been so much going on here, I can never claim to lead a boring life! I have been busy (as you all know for VERY good reasons :D) and sadly my actual stamping time (and projects I can share) has been limited, leading to my lack of posting. Trust me though, after the holidays I will be sharing so many great projects! To hold you over for another day or two, I did get to go GREEN!!
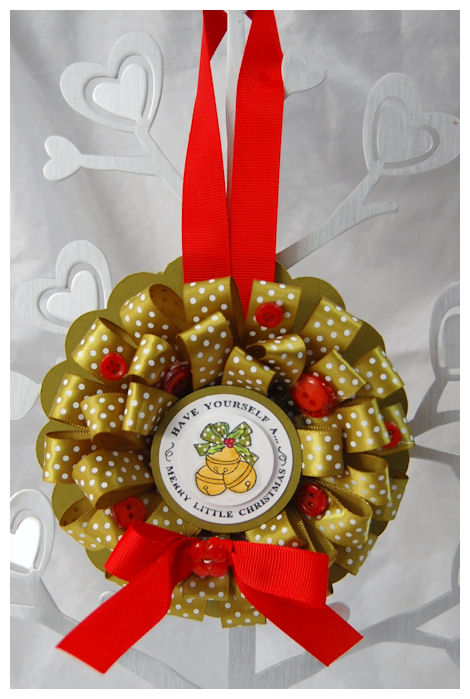
Now what do you think this hanging wreath ornament was designed from?
I love recycling items! As papercrafters we get some really cool, USEFUL stuff with the items we spend our money on. Sometimes it is just a matter of seeing the POSSIBILITIES of saving something for another use….even if it is for “someday”. You will soon realize that hoarding those items that you KNOW someday MAY be of use isn’t really all that bad! Well, not bad for the project, maybe bad for SPACE issues! LOL!
I have seen across so many message boards people asking “Any ideas for what I can do with my empty ribbon spools?” or “I have so many little pieces of ribbon I don’t want to throw away! HELP!”
Well as you can see this is the PERFECT project for just that!
I made this wreath just in time for the holidays! You could take various scrap ribbons and make a really fun shabby chic kind of decoration for ALL year through too.
This is also a GREAT project for the kids (minus the HOT GLUE GUN!)
All you need is a empty ribbon spool. My sizes may vary depending on YOUR spool size, but this is a standard size spool.
A stamp set for the center of your wreath. I chose to use Merry Little Christmas Borders & Centers Round 1-5/8” . I thought it was perfect for my wreath center. Plus JustRite Stampers is having a 20% OFF Sale —–>HERE!
Hot glue gun (For kids I recommend creating a double sided adhesive circle the size of your project, or have then use glue dots or some other non harmful adhesive that they can do them-self! Its not fun doing a project if you mom has to help you do MOST of it!)
A large scallop circle. This project used my Cricut Expression Home Decor Cartridge-5 inch scallop.
3 inch pieces of ribbon/scrap. (My complete project used 36 pieces) You could also do this with scrap patterned paper 😀
Some buttons (or other embellishment of choice) for your holly berries
Then, your hanging ribbon color of choice.
DIRECTIONS:
First thing you need to do is wrap some of your ribbon around the empty spool (where your ribbon would have been wrapped around). This will hide the plain, empty cardboard roll.
Make your hanging loop, and glue it to the BACK of the ribbon spool.
Glue the large 5 inch scallop circle to the back of the ribbon spool. This makes the back side finished, and hides the ribbon hanger! You can also add a family photo, or a message to the back!
Now you are ready to build your wreath!
Starting at the TOP you will work from the outside-in. By having your back piece on you will have a guide as to how far in to place your ribbon pieces. Your ribbons will get folded in half, so this will help you judged placement! You can even take a pencil and draw a quick guide onto your ribbon spool for a PERFECT wreath.
Now, take your 3 inch ribbon scrap, and put a dab of hot glue on the ribbon spool, and attach ribbon end. Fold in half, then glue that end to spool as well. Work around the spool until the outer row is complete. About 16 ribbons will fit around the outside edge.
Now begin your second row. You will want to make sure this layer of ribbons is in between each of the ribbons around the outer edge.
Repeat for 3rd row.
Now to HIDE the ribbon ends, and the OPEN hole in the ribbon spool center you will want to add a nice sentiment!
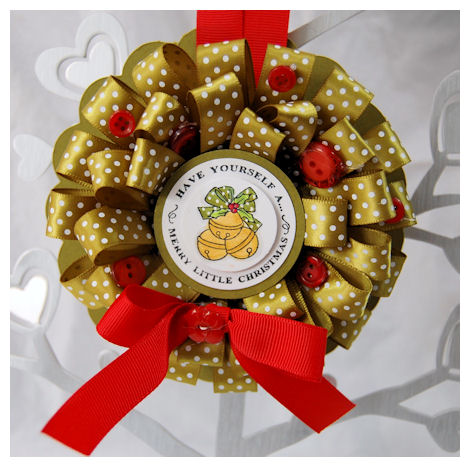
How sweet will this look on a tree or on a door?! Love it.
As I said above I chose to use Merry Little Christmas Borders & Centers Round 1-5/8”. The bells have a Sakura glitter pen on them, and I used a white singlo gel pen to create dots on my olive ribbon on my image, just like the ribbon on my wreath. The bell image is popped out of the center sentiment using dimensionals. I wanted some extra pop.
I then hot glued my buttons on as well! Trust me this thing is stuck together for LIFE! LOL!
I sang “Have yourself a Merry Little Christmas” the entire time I made this! I love that song 😀 I love ALL the Christmas songs that come on the radio this time of year, along with the specials on TV. I usually have so many great memories associated with each one.
I really enjoy this season. The world seems so much more full of kindness, love and good will. Despite the economy people are always more compelled to help others, reach out, be kinder, and seem to be more cheery! Well, unless you go shopping on Black Friday! OH BOY! People can be NASTY that day. Which I personally don’t get. I always go shopping on black Friday, and my opinion is IF you are going you NEED to be in a good mood, and KNOW you ARE going to stand in line for a very LONG time, and you are not likely to get EVERYTHING on your MUST HAVE gift list! If you can’t be patient or aren’t prepared for that, then please don’t show up! LOL! OH! and you can’t complain about the lines either. Its part of the day. Grab a coffee and just stand in line with a smile. Also the more cheery you are to the poor retail people working, the more apt you are to get their help!
Sorry! Not sure WHY I went there! LOL!
Anyway, I am not sure if I will check in tomorrow or not, as I am cooking cookies and stuff with the kids, but if I don’t please have yourself a WONDERFUL and SAFE Thanksgiving.
I hope you are able to really take a moment of pause to reflect on all you have in your life to be thankful for. Remember that even during tough times there is usually something to be thankful for. The hard times won’t last forever. I always look back on the past year, and at my family and friends. I truly feel like I’m one of the most blessed people in the world 😀 I am ever grateful for each and every second I have with my family. I have been so blessed by so many, including all of you! I get so much joy from sharing with you all and the interaction I have from each of you as well. I have gained many amazing friends from my love of sharing this craft with the world.
So thank you for giving me another thing to be grateful for!
I’d love to end this post by YOU sharing something you are thankful for with all of us here. It will feel so good to reflect on that.
Happy Thanksgiving.
Warning: I’m very “chatty” this morning. Not sure why, maybe it’s the coffee 😀
Hope you are all enjoying the weekend. I’d love to hear what everyone has planned for the week. I like knowing I’m not the only one running like a chicken with her head cut off!!
Alexa returns to school tomorrow. I’m a bit terrified, but I can’t keep her home all winter. The rest of us haven’t gotten sick so that is promising.
Noah has his 3rd birthday party to attend this weekend. I will share the cards I made for those tomorrow. I need to brush up on my BOY themed skills! I’m always ALL GIRL.
Today we are going to get some pumpkins and stuff from our local farm, as I wonder HOW I can clone myself to be in THREE places at once on Friday at the children’s Harvest Parade! Each of my children has a party, and the older 2 participate in a town wide parade, while Amber is at the school in her first parade, that takes place THERE at the SAME time! I’m so torn!!!! I’m actually going to tell the afternoon K teacher about the time conflict and see if she can maybe begin the K parade a tiny bit earlier! I’m sure I’m not the only parent with a child in K and older ones in the school. Doesn’t hurt to ASK. If it can’t be changed I’ll go to Amber’s parade first, then FLY downtown and PRAY I make it to the END of the parade for the older two. Still have no idea HOW I’ll be at three parties. Each child is expecting me to be there. CRAZY!
Jay just got a Snowmobile, which he has to pick up today, as a late birthday gift from me :D, and it appears it is from the husband of one of my local area stampers name Monika!! Small world.
Amber also has her “induction” into Daisies. A younger form of Girl Scouts. That should be cute. She is very excited about it. She made me pick out a “fancy dress” and everything! LOL! I fear she may over-do it, so I’m trying to find something middle of the road. She actually wanted to wear her Sleeping Beauty gown! LOL! I had to say NO! on that for sure.
Tuesday we are getting our family photos done. We are giving the Target Photo Studio a shot! Cross your fingers!
I use to be SO good about getting regular professional photos done. Alexa, as a baby had photos every three months!! With Noah we went regularly too. Then poor Amber….getting THREE kids to the photo place and have them ALL look good proved to be too exhausting for me! So things tapered off. Once Alexa got sick, I got busy, and before you know it, its been 2 years since we have been! THAT is terrible!! I got hardly no photos the first year Alexa was sick. I couldn’t stand reliving that time, and seeing her look the way she did. I’m not sure if I regret that or not. I don’t think I do. I just see there is over a year with LITTLE photos of my kids, and Amber was so young, so I feel like I missed a year of her life. I wanted that time to be put behind us with little “documentation” to relive that difficult time. Having photos of the other 2 shouldn’t have gotten away from us, but it did.
So all that being said, I do take a LOT of photos on my own, so that is good. We are due for a group photo. I hope everyone looks good at the same time! Seems like the more people in ONE photo, the bigger the chance someone isn’t going to look good when everyone else does! LOL! Alexa is shy and is so beyond the camera person waving a stuffed toy in her face to make her smile! She is 10, not 2. So if she won’t look at them or smile it cold be a LONG shoot. I really hope she participates without too much fuss. Noah is in the CHEESY smile phase. Oh and my dark hair! I’m still not use to it, and I’m not sure how I feel about long distance relatives getting a peek at it yet! LOL!
Last but not least, this morning I have been packing Etsy orders from my shop, to go out tomorrow morning! So if you ordered something, it is going postal then!
I also have some SEWING projects I want to take on once I get my sewing machine back from Jay’s mom. The holiday’s are coming and everything I give will be HOME MADE! (in some way) They are simple projects, like my felt stocking and what not. I like QUICK sewing projects! Nothing too involved.
With the home-made theme going, here is a card I put in my Etsy shop, but had yet to post on my blog….
Home-made with love
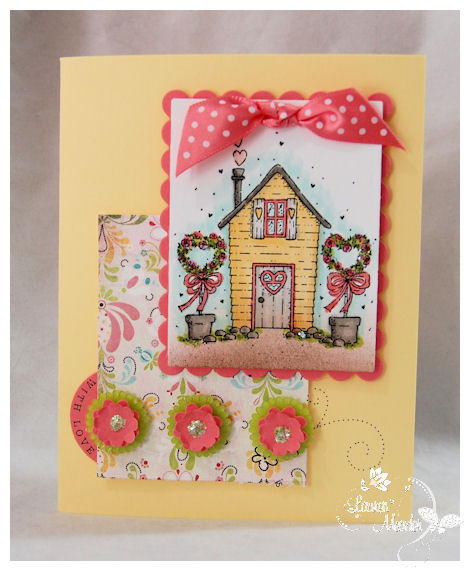
When I saw this image from Stampavie called Home Sweet Home by Helz Cuppleditch I just loved it! I LOVE hearts, and images that contain hearts, so this was SO me! I loved the heart topiary too. Just so cute.
I have issue’s deciding what COLOR I make any house image I create. I usually go with some sort of yellow! LOL!
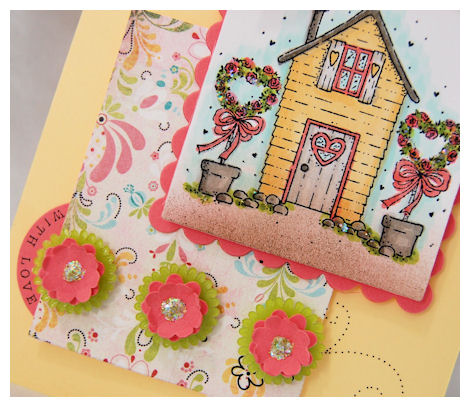
I had fun coloring this, and while you cannot SEE it, there are stickles on the grass and topiary. Really nice sparkle. I added the same stickles to the flowers I created, along the bottom.
Since this is suppose to be like ‘From our house with love” I added the little rounded tab on the left side. The sentiment is only part of the image from Recipe Borders & Centers Set 1-3/16″ which actually reads “homemade with love”. I didn’t need the entire circle so I only used the 1/2 I wanted. I do that often with these images, and find it helps me maximize their use! I think we should all look at things that way.
Well I have much to do, so I better get running. I’ll be back tomorrow with my BOY cards 😀
Till then
WHEW! Etsy Shop update and Santas Sleigh
Oct 23, 2009 Author: mytime | Filed under: Home decor/3-D items, JustRite Stampers, My Timeless Templates, StampavieBoy am I wiped. Who would think that sitting at a computer could be exhausting?
I just spent the entire morning FINALLY updating my Etsy Shop! Many of you asked if I could do that, since some of you are looking for Halloween, Thanksgiving, Christmas and other holiday gifts! So I did that. I put 4 new pages worth of stuff, so be sure to scroll on through! I didn’t realize HOW MUCH I actually make! I still have SO much more to post, but need a break. So maybe in a few days, I’ll get to some of the older stuff.
When I opened up my Etsy Shop I meant to update it ANY time I posted here, but I have had a lot of “behind the scenes” stuff going on here and didn’t get to it as often as I wanted to, so I apologize! If you ever see anything here you want, and it isn’t listed, let me know and I can list it for you.
All the being said here is one of the NEW! Items up in my shop
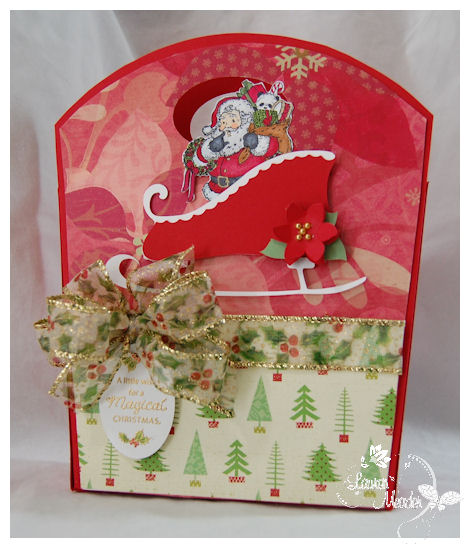
Here comes Santa Claus
You can find it HERE
I used my NEWEST template Around Town Tote for this gift bag. Perfect for the holidays! This template s just the best for making a great size gift holder, fast and EASY.
I had some gorgeous patterned paper by K& Co. that I used to cover the front. Of course I went with the traditional holiday color scheme.
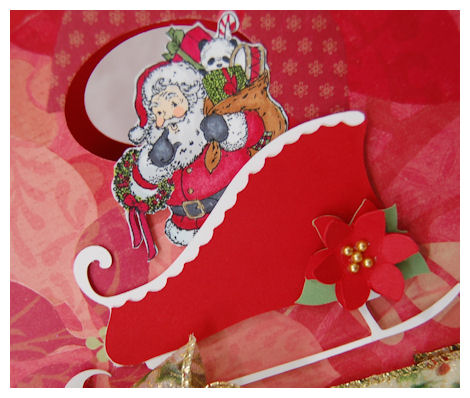
I fell in LOVE with this Noel Santa image from Stampavieby Sarah Kay. Her images generally scare me to DEATH, due to their vintagey feel and detail, but I am actually stepping out and using them more, and as I have success I begin to feel more comfortable with them.
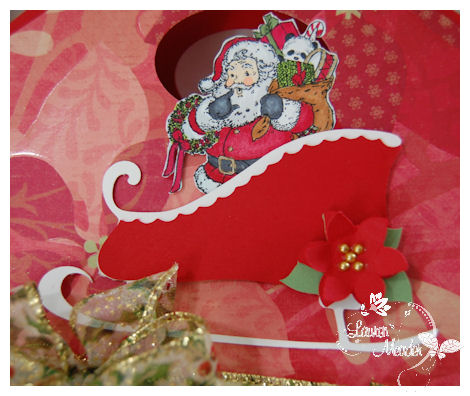
I colored and cut him out, then put him into a sleigh that I created using my Cricut Expression Winder Woodland Cartridge! I have to say I’m in LOVE with my Cricut! Don’t know what I did without it. If you thought about getting one and have put it off……….add it to your Christmas WISHLIST!! Now keep in mind I’m in love and I don’t SCRAPBOOK! I can only image how much more I would use it if I did. It’s really fun.
I also made my poinsettia with the cartridge as well. Too fun. I think it really adds to the detail too. I have to admit I’m not overly impressed with too many of the cartridges they have available :C I am loving the ability to use the Sure Cuts Alot 2.0 (<—this is the best price I have ever found) to download stuff from the web. Granted I haven’t had time to even do much of that, but knowing I can makes me happy.
Now for my tag detail I found this sentiment from Christmas Joy Borders & Centers Oval 1-3/4” x 2-5/16”.

I stamped it in versamark, then gold embossed it.
It added a really nice touch to the bag, and tied in with my Magic of Santa theme. Afterall for kids, Santa is magical!
My ribbon is a gold trimmed wired ribbon I got in the holiday section of Michael’s.
This was really just one of those projects where everything easily fell together.
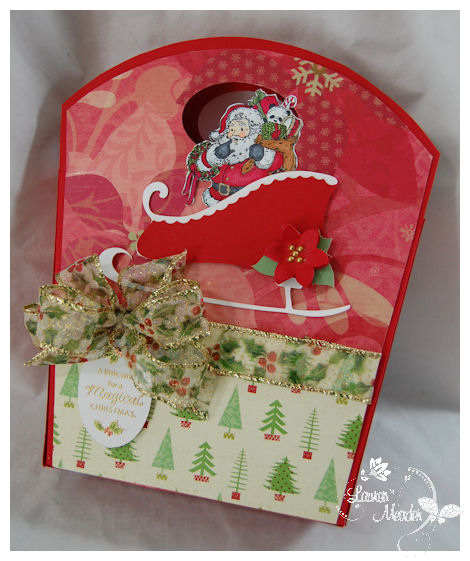
This is definitely the type of bag that WON’T get tossed out after the gift has been opened! It will be passed along for many holidays to come.
I’m excited that soon this will get a new home.
I hope you are getting into the spirit of the holiday season. Is it too early to say that? Sadly I’ve been doing Christmas stuff since AUGUST and the holidays aren’t even here, and I’m already SOOOOOOO OVER IT! LOL! I’m sure once its time to put up our tree I will get back in the spirit 😀 Don’t worry if you are just getting into it, I still have a bajillion holiday themed items to share as the days push on.
Thanks for stopping by!
Until tomorrow….
I have to say you ALL know how to make a girl feel good 😀
As for me taking a photo of the quadruple colors in my hair….ARE YOU KIDDING?! Do you think I wanted PHOTO documentation of that?! NO WAY!!!!!
I honestly didn’t expect to get anyone saying they liked the color! LOL! I figured you’d all say OH NO! What now! LOL!!! Its a very big adjustment, but ONE compliment for a WOMAN equal 100 from a man! Thank you all for such a warm response to my hair trauma story. Its been quite the adjustment for me. You all helped me feel better about it.
I’m getting the TRIPLE take from those I know. When people would say WOW! You totally changed your hair!” I kept saying it was a dye job trauma, and I had no choice, then I quickly explained it to people!! Now I’m just smiling and saying “I needed a change”. So, thank you for letting my confidence build a bit. I guess no one needs to know WHAT really happened, if it looks OK now. You all definitely made me feel better about it.
A lot of people have been shocked that I didn’t BALL. Honestly, the MAIN reason I didn’t cry was because at least my hair didn’t break off, and I remember when Alexa lost her hair to Cancer. She had GORGEOUS, thick, dark hair, down to her waist. We cut it to her shoulders before it fell out, but it still came out it CHUNKS. THAT was one of the hardest things for me to see. She would just sit on the couch and grab a handful, and look at me with tears in her eyes. Her expressive communication then was harder for her, but she was VERY upset about this. I just told her It is going to be OK. it will grow back. I’d say “You don’t need hair to be beautiful. ” So HOW could I cry after telling her all that?! I had my hair. Wasn’t my favorite color, but I wasn’t sick. I just made a crazy dye mistake. I had to repeat the same words I told her to myself. Granted I didn’t feel beautiful, but I didn’t have Cancer or anything like that.
I kept wanting I change! LOL! Guess I got it.
Jay says he likes it, its just going to take time to get use to. He does like the style alot, despite the fact he about DIED when I cut my ahir. I told him this is exactly WHY we women get into hair RUTS! You men want us to look the same all the time!! When he came home after work yesterday he was still a little shocked when he saw me again! LOL! Its just SO different. For the 9 years he’s been with me, I’ve always had long blond hair. Granted in my early 20’s it was more healthy and curly.
My kids love it! LOL! Not sure WHY. Amber wants her hair “painted” too. Since THAT comment I have secretly HID all her paints! I know her too well.
I LOVE the cut and style. In fact I did curl the ends yesterday and it looked REALLY nice 😀 I also have a “Cute” ponytail, and my hair is full of body. I haven’t had much “movement” to my hair in some time, so it feels REALLY good, and yes MODERN! For all that I’m really happy.
MANY people asked WHAT dye I used. I used Loreal. My PROBLEM most likely happened because I tried a different color, since last time I dyed it, it go TOO light on the bottom. I’m NOT blaming the company. I’m sure it was a number of issues, and like most problems USER ERROR!
So thank you again. I feel good about this NEW ME! LOL! Jay said as long as I don’t get a NEW man, he is fine with the NEW ME! LOL!
I’m off the the doctors with the kids today. Alexa will have her follow up to ensure she is recovering from her pneumonia. I’m happy to report (so far) Noah & Amber don’t seem to be sick, nor did they have any reaction to the H1N1 nasal spray, so THANK GOODNESS!!!
Now I promised some eye candy. Sorry I didn’t get to it yesterday! I worked on some eye candy for tomorrow’s post!
Without further delay…….
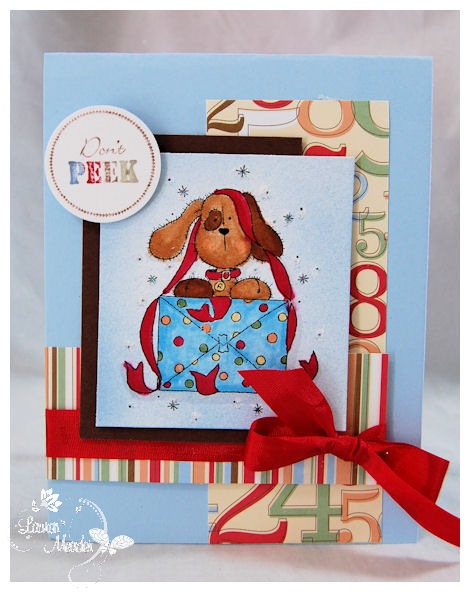
Don’t Peek!
I think I’m finally getting my card mojo back. It’s hard to go from one design mindset to another. When I’m on a roll designing NEW templates, or creating with the templates, it can be hard to switch to just a FLAT surface again! LOL!
Isn’t this lil guy so cute. Looks like he could be in big trouble too 😀 Not sure if he is wrapping or un-wrapping. Noah has 4 birthday parties over the next 2 weeks! So I needed to make some BOY cards. NO pink in this one 😀 This was Noah Approved! LOL!
When the girls have a party to attend I’m now off the hook, as they make their own cards 😀 Noah, well he is too busy playing with BOY stuff to care about crafting these days.
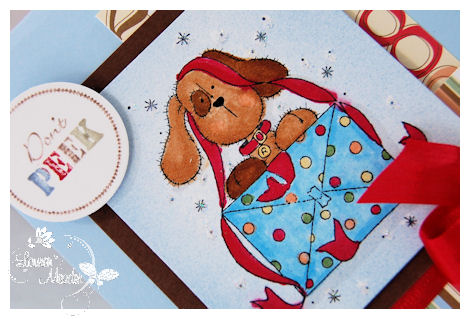
I got inspired by my patterned paper colors, and just colored away. I usually have my paper picked PRIOR to coloring my images. Makes life easier. When I just color first, it can be harder to complete a project when I try to match evrything up, after the fact.
The “Don’t Peek”sentiment comes from Tiny Words Borders & Centers Set 1-3/16″ . I just used markers to color each letter to match! So simple and CUTE!
This cut dog is named Ruffles: A Present for you! He is from Stampavie the Helz Cuppleditch collection. I love her stuff.
The paper is a mini stack from Making Memories. I’ve had it forever, and use it often.
I think this came out pretty cute, and BOYISH. I know there is a BOW but go with the GIFT theme. I also made sure my bow matched the bow in my image. Its a little detail but I found it to be important.
Well once again, thanks for stopping by!! I’ll be back tomorrow with some NEW! Release images from PCS!
Until then
Hi everyone!
I want to say thanks for all the beading tip, links and emails. I still have so many to sort though-but thank you too, in advance. I purchased the hearts for my keychains (in prev. post) at A.C. Moore. As for the beading stuff…..WOW! Am I ever OVERWHELMED! LOL!!! I’m sure Ill sort through everything and figure it out…..eventually! So much to know. I guess that is how most people feel when they start stamping. I don’t remember feeling that, but I have heard so many others say that when I’ve been at the craft store, or at a stamping event. Maybe I will take a class at my local bead store! I like learning new things.
I have been SOOOOOO busy my head is spinning. The stress FINALLY caught up with me and gave me a 2 day migraine. NICE. I decided that I can’t let stress rule my life, so I got off the couch and down to my stamp cave 😀 Once I got stamping my migraine suddenly vanished!! Maybe it was my long computers hours that were KILLING my brain! I actually came up with a FAB project-I’m in LOVE! But, I am saving it for my PTI newsletter 😀 I think you will agree its worth the wait.
On a side note MANY emails asked IF and WHEN I would update my Etsy Shop! Yes, I have stuff from here for like the last 3 months! I’ve just been busy and need to take a few days of REST! Plus I like to ship ASAP so I need to make sure I’m free to pack and ship in a timely manner. I have a lot going on here (behind the scenes) and its just been GO! GO! GO! I will let you all know when I actually get stuff listed.
Anyway……I needed to just play for the day, so I reached for my UBER cute Greeting Farm Girl-Miss Anya
I have had this set for longer than I care to admit. It was time to ink’er up
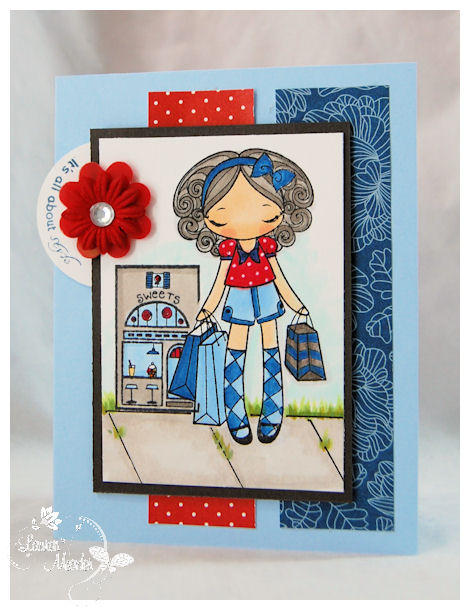
I LOVE this unusual color combo with this image. You see typically I would go all GIRLY with my colors, but I went with this combo instead. Again, I needed and change.
Spring Rain, Enchanted Evening, and Pure Poppy-with touches of Smokey Shadow. Very cool.
I created my sidewalk —> check out my “how to” video for that, and used an OLD A Muse candy shop image as a store. I KNOW the store is tiny, and my “idea” was to have it be in the distance…….but now it just looks like a tiny store! LOL! OH WELL! Win some, lose some! I still loved the card.
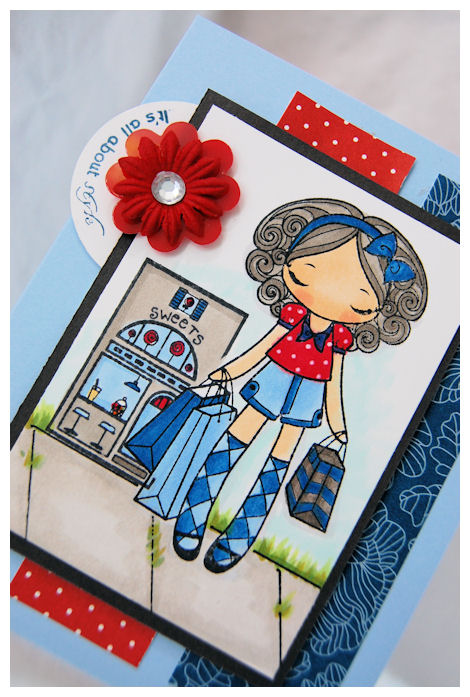
Its kind of Sailor Girl isn’t it?
I used the sentiment “Its all about style” from Birthday Wishes Borders & Centers Set 2-3/8″ ! I loved the sentiment and the font.
Now, get this-for my project the curve of the size it us suppose to be was too big……………so…………… I took the rounded image and put it in their smaller round block ,of course it didn’t REALLY fit the whole thing, so I just made sure the part I wanted was locked in, and inked up! Then stamped it. I then punched it out with my circle punch. Now I can’t recall what size it was!( Sorry! I Told you-migraine!! )But I loved that it worked.
SO that is all for me tonight.
Thank you for stopping by
JustRite Stampers: Mega Font Blog Hop!
Sep 17, 2009 Author: mytime | Filed under: Home decor/3-D items, JustRite Stampers, My Timeless TemplatesWAHOO! In case you didn’t know-today and tomorrow……
JustRite Stampersis having a H-U-G-E Mega Font Blog Hop!
They are even having a 30% OFF Promotion!! Check it out —>HERE! Perfect time to shop 😀
I LOVE my font sets. So many options! What I *really* love is that any/all the font sets are perfect with ANY images you may have bought from other companies. Sometimes we hunt for the PERFECT sentiment, and are willing to spend the $$ for that perfect one, when you can now easily make your own! No more hunting!
This month we are trying to show you the MANY different things you can do using their font sets in ANY and ALL your creations! As you hop along you will see a HUGE variety of uses. It is SURE to get those wheels in your head turning!
“I” of course will be doing a gift item 😀
Now while I was posting the countdown peeks for my newest templates, I WARNED you, that you would see me using It’s on the House © A LOT!!!!!!! I’m over the moon for this template and ALL the possibilities. So I hope you don’t get sick of seeing all the ideas I have had for it.
So, that being said, I used it today, for the hop!
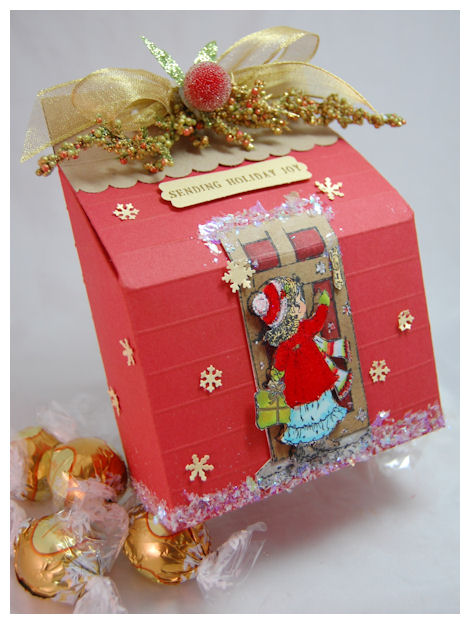
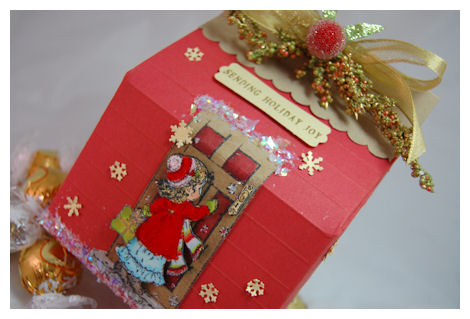
Sending Holiday Joy
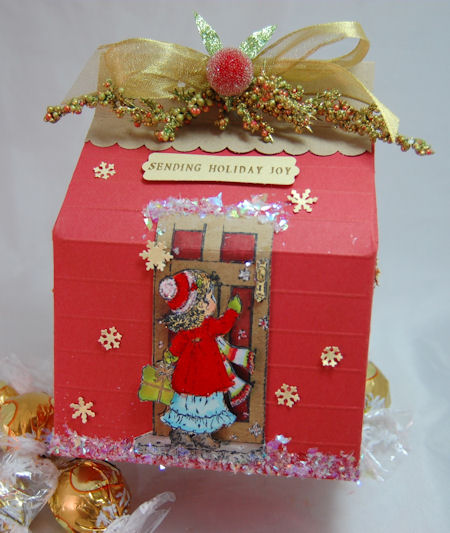
I created this little “house box” to give some White Lindt Chocolates!
It reminds me of a vintage style gift box, given the image! I’m just in LOVE with it.
I’ll get to the “gifty” details in a minute, first let me share the sentiment story 😀
I was inspired by the sentiment in Holiday Demi Phrases Round 2” -“SENDING HOLIDAY JOY”. I didn’t want a rounded sentiment, so I pulled out my Horizontal Wood Stamper Set and used *just* the font from Wood Stamper 2-3/8″ with Bonus 25pt Font & Center to create my own! Now I have the exact sentiment I wanted, and in the same font too!
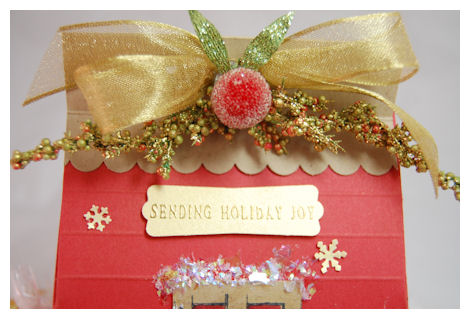
SEE! You don’t even have to be overly “creative” to come up with good sentiments! Just look into some you like, and copy them using your own font set! EASY PEASY!
I just stamped my sentiment in versamark ink, onto brushed gold cardstock, then embossed it with gold EP!
I then, punched it out with my label punch from SU! It was the PERFECT addition to my house gift box!
Now about the BOX!
When I received the NEW! Sarah Kay line, the image Noel Charity just stood out to me. I thought it was truly stunning! While my coloring leaves much to be desired, I knew she was perfect for this project I had in my head!
This image was *just* an adorable girl, knocking on the door, I had to give her a home with it!
I just scored the box to appear more “house-like”, and scalloped the flap for my “roof”. It is distressed a bit, but it didn’t show up well in photos.
As you can see they are the PERFECT union!
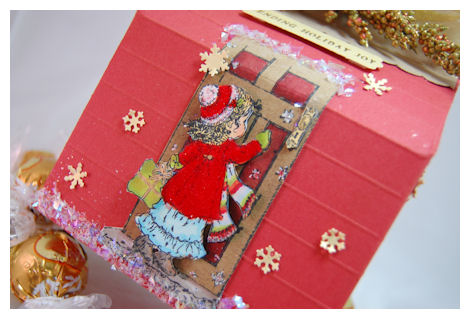
The girl is 3D, as is her little package of love. She truly appears to have just stumbled upon the doorstep.
Trust me when I tell you PHOTOS do this NO justice! It is a must see in person.
I used red, gold, green with hints of a pale blue. Her coat is flocked with red. There are touches of a gold pen here and there, and of course snowflakes of gold.
I added “snow” to the “ground” of the house. Just adds to the detail.
I feel the entire package convey my main message ” Sending Holiday Joy”!
Supplies:
Stamps:
JustRite Stampers: Wood Stamper 2-3/8″ with Bonus 25pt Font & Center
Cardstock: Red, Gold, Kraft, White
My Timeless Template: It’s on the House ©
Ink: Momento Black, Tea Dye ink, Copic Markers, Versamark
Ribbon: Gold
Gold Embossing Powder, Gold pen, Chunky glitter, red fun flock, Martha Stewart snowflake punch, label punch, garland/berry from Michaels Craft store, scallop border punch
Now! I’ve done my part (I HOPE!), to show you some ideas using the FONT! Time to HOP ALONG!!
Here is a list of players:
Michelle Wooderson
Sankari Wegman
Heidi Blankenship
Eva Dobilas
Beate Johns
Sharon Harnist
Barbara Anders
Sharon Johnson
Deb Saaranen
Becca Feeken
Kazan Clark
Lauren Meader <–You are HERE!
Tammy Hershberger
Linda Beeson
Jenny Gropp
Lori Craig
Tanis Giesbrecht
Jenn Balcer
Lisa Somerville
Karen Maldonado
Pamela Smerker
Karen Taylor
Latisha Yoast
Julie Overby
Mary Pfaff
See you here tomorrow as I have a Newsletter Project to share 😀 (with a video)
My Etsy

Who I Designed For
Blogroll
- Alicia
- Alli Miles
- Ally Blankenship
- Amber
- Andi @ crafts on a whim
- Angel R
- Angie Z
- Anne Kranitz
- Becky O
- Bee
- Beth Silaka
- Bethany Paull
- Beverly Nash
- Bobbie
- Cambria
- Cammie
- Card of the Week
- Card Positioning System (CPS)
- Cards for Cancer
- Catherine Doucette
- Charmaine
- Cheryl Sims
- Chriss Rollins
- Christina
- Christine Ewing
- Christine Wooden
- Colleen Schaan
- Craft Critique
- Craft Gossip
- Crystal
- Dawn Easton
- Emily Giovanni
- Geny
- Holly
- Igne Groot
- Inspirational Craft Blogs
- Irene
- Jami Sibley
- Jeanne Streiff
- Jen del Muro
- Jeni Bond
- JenMarie
- Jenn Balcer
- Jenn Diercks
- Jenn O
- Jennifer E
- Jennifer Mick
- Jennifer Pereda
- Jennifer-Sweet Treat
- Joanne Basile
- Jodi Collins
- Julia Stainton
- Julie Masse
- Karen
- Kathryn Berthiaume
- Katie Cotton
- Kelley Holland
- Kendra
- Kim Scholfield
- Kris’s Color Stripes! Get inspired here
- Kristen Dubosque
- Kristin Eberline
- Kristine
- Laura @ Sunshine Stamper
- Laura Turnmire
- Laurie Schmidlin
- Lesa Rapp
- Linda Duke
- Linda-LSN
- Lindsey Botkin
- Lisa (lakind scs)
- Lisa Kind
- Lori Craig
- Maggie
- Mara Campbell
- Maria
- Maria Levine
- Mary
- MaryJo
- Melanie M
- Monique Hansen
- Moxie Fab World
- Pam Imholz
- PaperCrafts Connection
- Peppers and Pollywogs Kids party site
- Rebecca Grohall
- Rita
- Robyn
- Rose Ann
- Sarah Vrolyk
- Sharon Harnist
- Sharon Johnson
- Sharon Rivera (a chemisrty with paper)
- Sherrie
- Sophia Landry
- Storage Units, Ink, & More Blog
- Sue Berker
- Susan (Rainy)
- Tangii Crane
- Tracy
- Tricia Traxler
- Trudee
- Velta
- VivLyn
- Zena
MTME Pretty Palette Color Team
MTME Pretty Patterns Sketch Team
My Time Made Easy TM LLC
Shop till you drop!
Lauren Meader
About Me
Copyrighted material
Subscribe To My Blog
Pages
- About me
- Alexa’s Story!
- My Crafty Corner!
- My Time Made Easy™ LLC
- Our Make A Wish Trip to Disney!
- Resume/Publication List
Calendar
| M | T | W | T | F | S | S |
|---|---|---|---|---|---|---|
| 1 | 2 | 3 | 4 | 5 | 6 | 7 |
| 8 | 9 | 10 | 11 | 12 | 13 | 14 |
| 15 | 16 | 17 | 18 | 19 | 20 | 21 |
| 22 | 23 | 24 | 25 | 26 | 27 | 28 |
| 29 | 30 | |||||
Archives
- August 2013
- July 2013
- June 2013
- May 2013
- April 2013
- March 2013
- February 2013
- January 2013
- December 2012
- November 2012
- October 2012
- September 2012
- August 2012
- July 2012
- June 2012
- May 2012
- April 2012
- March 2012
- February 2012
- January 2012
- December 2011
- November 2011
- October 2011
- September 2011
- August 2011
- July 2011
- June 2011
- May 2011
- April 2011
- March 2011
- February 2011
- January 2011
- December 2010
- November 2010
- October 2010
- September 2010
- August 2010
- July 2010
- June 2010
- May 2010
- April 2010
- March 2010
- February 2010
- January 2010
- December 2009
- November 2009
- October 2009
- September 2009
- August 2009
- July 2009
- June 2009
- May 2009
- April 2009
- March 2009
- February 2009
- January 2009
- December 2008
- November 2008
- October 2008
- September 2008
- August 2008
- July 2008
- June 2008
- May 2008
- April 2008
- March 2008
- February 2008
- January 2008
- December 2007
- November 2007
- October 2007
- September 2007
- August 2007
- July 2007
- June 2007
- May 2007
- April 2007
- March 2007
- January 2007
Categories
- About Me
- All That Scraps
- blogger challenge
- camera/photo play
- Cards
- Contests
- family stuff
- FOR SALE
- Home decor/3-D items
- How to FAKE it!
- Introduction
- JUGS Challenge
- JustRite Stampers
- Lizzie Anne Designs
- My family stuff
- My Stamping Space
- My Time Made Easy
- My Time To Color Challenge
- My Time to Create Challenge
- My Timeless Template Challenge
- My Timeless Templates
- Mytime Mail
- MYTIME MOVIE/VIDEOs
- Papertrey Newsletter
- Pink Cat Studio
- Pretty Palette Challenge
- Pretty Patterns Sketch
- Product Opinions and Must haves
- Recipe's
- Saturday Sketch
- Smilebox Creations
- Stampavie
- Tutorials
- Uncategorized
- videos
Most Popular
- Create your own Onesie Card Tutorial-and important NOTE! PLEASE READ (2529)
- Saturday Sketch-Boxed bag holder (2333)
- Going GREEN! Fancy Flower Flourish-Closure Video (1478)
- Fabulous Favorite - Giveaway! (1336)
- a Prayer Request (1232)
- QUICK-Easter Baskets from Nestabilities-PTI style-and blog challenge (1063)
- Teaser Sketch (999)
- February Release Giveway! (and a little peek) (996)
- Group Post and Rambling Rose Video Tutorial (985)
- GIVEAWAY! Who wants it all?! (895)
Recent Comments (RSS)
- 첫충사이트: 완전히 흥미로운 블로그 게시입니다. 저는
- sarah: Wow, Lauren, what a stunning
- hedie: خرید راهبند
- 야동: Love to read it,Waiting For
- 야동: This seller is in a
- 바카라사이트: 여기 처음 왔어요. 나는이 게시판을
- 야동티비: I was surfing the Internet
- 바카라사이트: 비슷한 주제에 대한 흥미로운 정보를
- 바카라사이트: "여기에 제공해 주신 귀중한 정보와
- 온라인홀덤: 유익한 웹 사이트를 게시하는 데
Copyright © 2007 - My Time, My Creations, My Stampendence - is proudly powered by WordPress
This blog has been Tweaked and Designed by Sara Williams