Archive for August, 2010
September Release Blog Hop GIVEAWAY!!
Aug 31, 2010 Author: mytime | Filed under: Cards, Home decor/3-D items, My Time Made EasyToday is the My Time Made Easy ™ LLC Release and to celebrate we have a BLOG HOP with some hidden treasure!
Each design team member is featuring a different themed house/Shoppe! You won’t want to miss anyone!!
Be sure you leave a comment on each design team member’s blog today because TWO of the design team members are going to be picked to have someone from their blog comments WIN a $50 Gift Certificate to My Time Made Easy ™ LLC!
NO ONE knows which two designers are hiding the treasure, so don’t forget to stop by each design team members blog and leave a little love there. Include your email address-so you can be contacted if YOU are one of the lucky winners!
Winners will be drawn September 3rd, and announced on HERE!
Don’t miss viewing all our NEW! Release items—> HERE!
Stop by and view our NEW! Gallery!!
Now today the team and I are ALL using the NEW! Shop Around & Accessories Mega template to create a different themed a Shoppe and we are each using the Homemade Card & Envelope Pretty Pieces Cut File to make a card project to match our theme.
Here is what I have come up with for today 😀
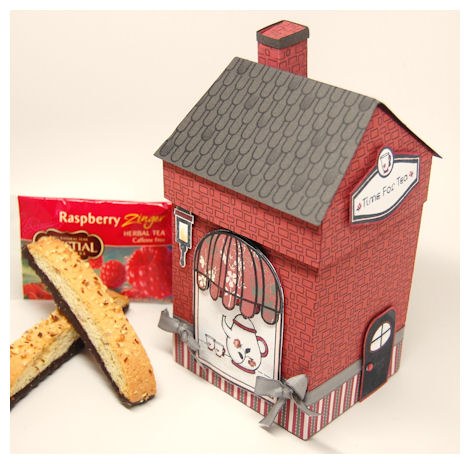
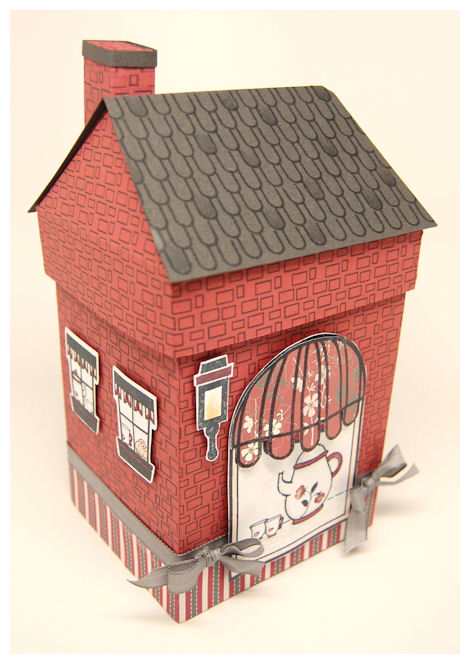
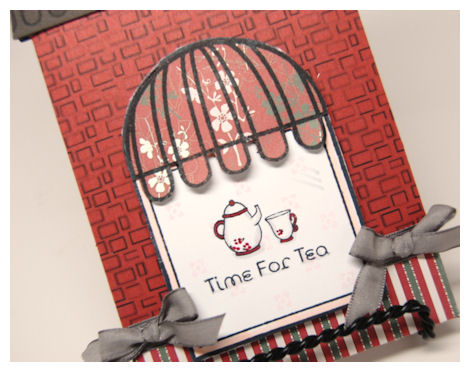
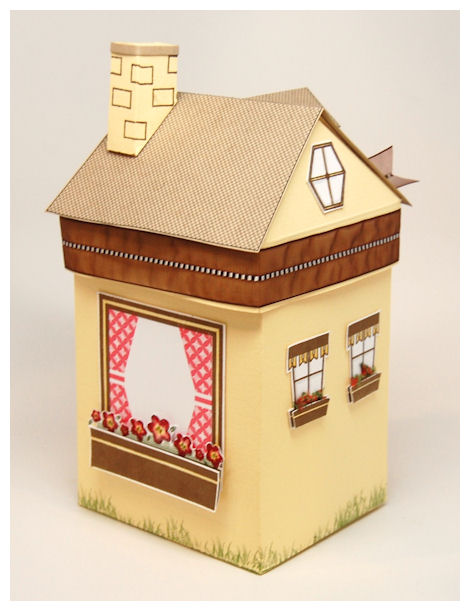
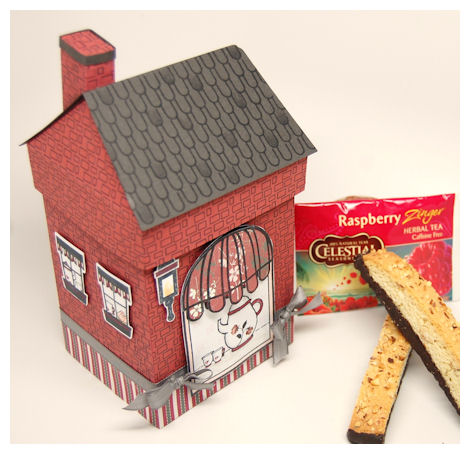
Time for Tea!
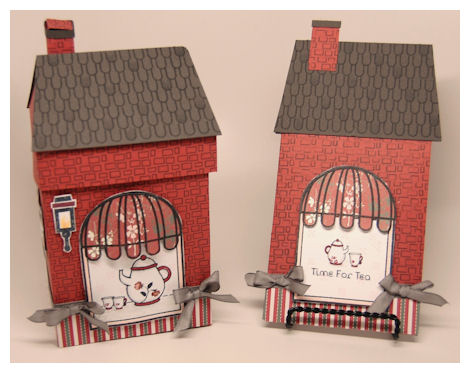
Well if you don’t like coffee, but you love tea – or someone you know does, this Tea Parlor my be just the gift you are looking for!
This gift set is simply stunning and full of interesting details. You can rest easy knowing this will most likely be displayed by the recipient for a long time to come, or re-gifted with style!
I used the NEW! Shop Around & Accessories Mega template, with the Homemade Card & Envelope Pretty Pieces Cut File to create a matching tea themed gift set. I designed both to match each other. As you can see it was VERY easy, and lots of FUN!
I wanted to package up some Biscotti and Raspberry Tea, to go along with my tea invitation.
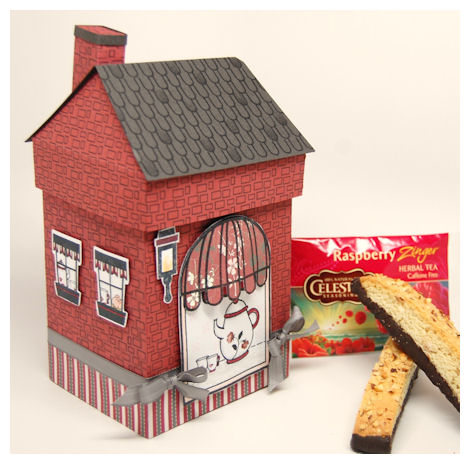
I used the NEW! Shoppe Window for my main focus of this gift set.
I began by printing the Brick pattern from the Color Me Pretty Digital Paper: Constructions Materialson my Cherry cardstock. I LOVE this collection of paper because it allows you to QUICKLY and EASILY create realistic looking house patterns!!
There are 9 different patterns: Bricks, Stone, Vinyl Siding, Wood Planks, Wood Siding, Wooden Shingles, Scallop Roof /Siding, Square Roof Tiles, and Spanish tiles!
The patterns print horizontally and vertically so no matter what your project, your pattern can suit the needs of it! Now you can have these fun patterns in any/every color of the rainbow with a few clicks of a button. SO FUN.
I then cut and assembled my Shop Around & Accessories Mega template, and the envelope slider from the Homemade Card & Envelope.
I added the stripe pattern from the Pretty Prinatbles Digital Paper: Cherry On Top Collection Cherry On Top.
To avoid BULK on this I used printer paper for this one!! It works like a nice lightweight cardstock, only much easier to use when wrapping around the base of my template. I then wrapped around my ribbon.
For my Shoppe Window, I printed the Cherry Floral pattern from Cherry On Top Collection , then cut out my awning top! Looks so pretty doesn’t it? I also stamped/colored/cut my lantern image.
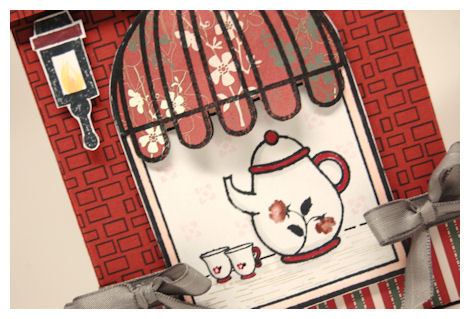
In the window I created a “scene”. I stamped the tea pot image from On Display 1, I then stamped the mini tea cups from the Sign It set. On those I used a marker tip to create mini flowers on them. The wood grain pattern from the Home Improvement set fites perfectly in the window, so I used to make the display table. I then doodled the table end.
For the look of wall paper I used the small flower image from the Fanciful Flourishes set, lightly in the background! I love that little touch.
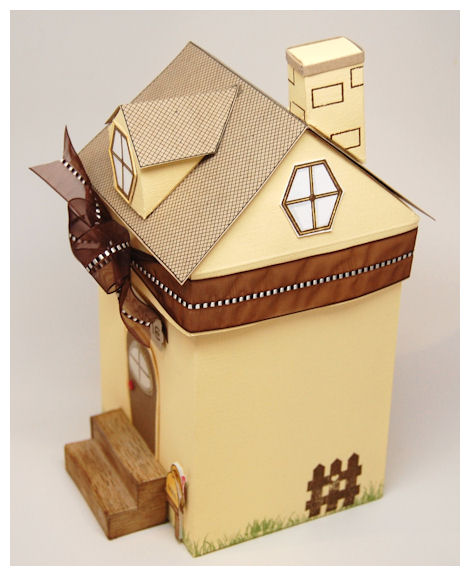
Now as we go towards the side, you can see my two side windows. They are from the Home Improvement set (as is the door).
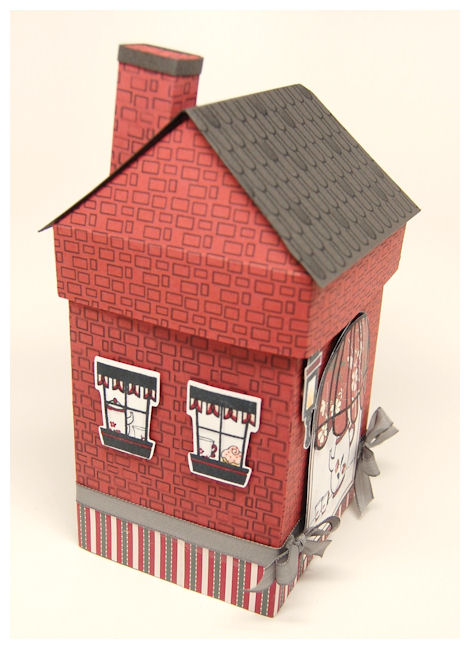
I used the Home Improvement Cut File to trim out my windows. Makes it SO much easier 😀 I love saving TIME.
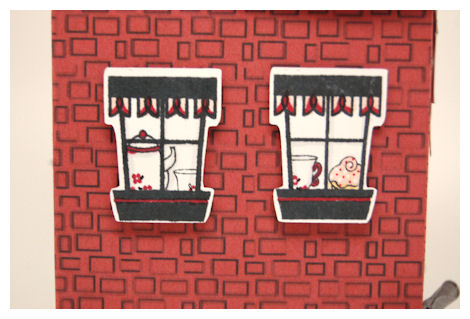
As you can see they are stamped and colored to match my Tea Parlor. I love creating little peeks into the house, through the windows! The possibilities are endless. I used the small tea pot from the Just For You set, and again doodled flowers on it. The tea cups from the Sign It set, are the same as the ones I used in front window, and cupcake image is also from the Sign It set.
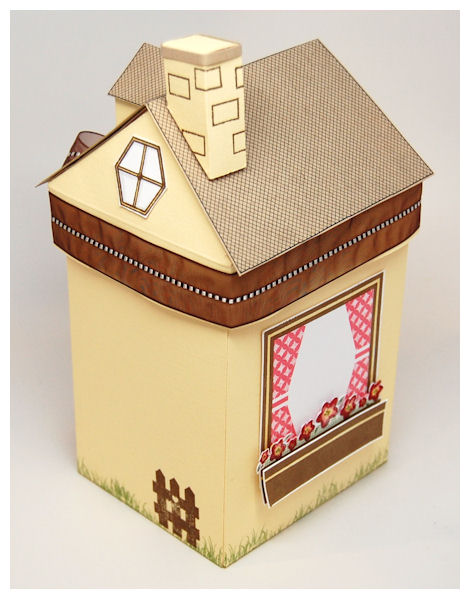
Now lets move on to the other side…..
Looks just like the side of an old fashioned store.
I have my door, offset to the right, towards the back of the Tea Parlor

I used the Home Improvement Cut File to trim out my door, then colored around the “trim”. I added a little brad for my door knob.
Here is my sign
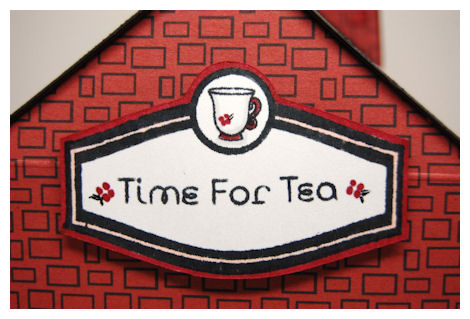
This label is from the Sign It set. This set has images and coordinating sentiments to match.
I LOVE being able to create coordinating signs to display what your Shoppe theme is! The sign was also cut using the Home Improvement Cut File, and the trim also colored, like the door. I stamped the tea cup, and again made little flowers to add to the design.
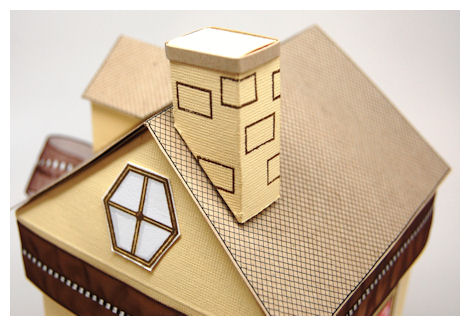
I used the same Brick pattern from the Color Me Pretty Digital Paper: Constructions Materials to create my chimney. Easy peasy.
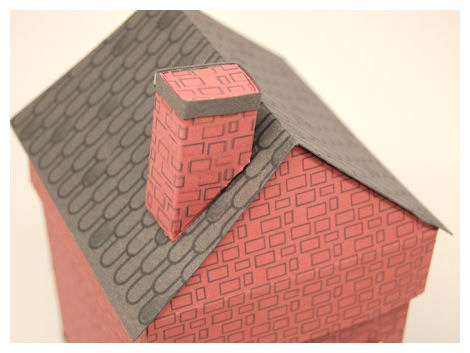
For the roof, I decided to use the scallop border building image from Home Improvement set to create my shingles. Once stamped, I used a gray copic marker to quickly add some color/dimension to the shingles.
This easily fits my Biscotti and tea, as you can see here. This template is quite large and can hold a ton!
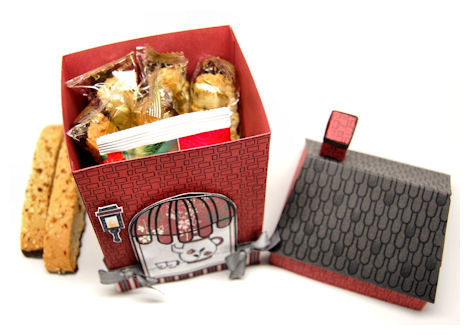
I could have fit an entire package of the Biscotti, but I ate some of it while taking my photos! LOL!
If you have a personal cutting machine you can alter the size too 😀 Now how fun is that?
Now how about that invitation?
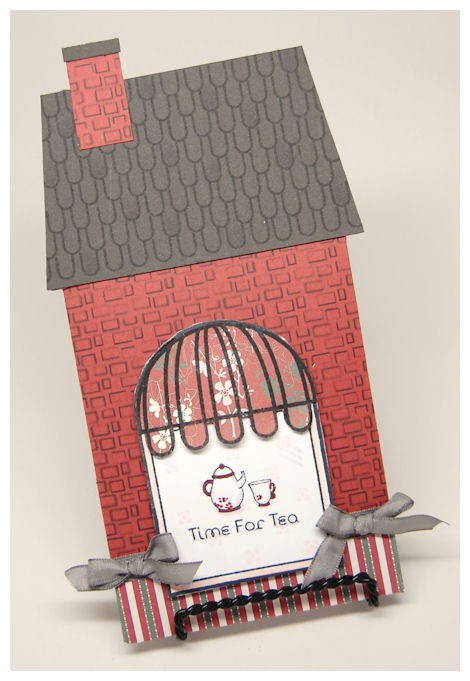
Pretty Pieces Cut File : Homemade Card & Envelope $2.50Available in PDF, SVG, GSD, DXF, WPCCompleted Project Size4 1/2 Inches Wide7 3/4 Inches Tall
Fashioned after the Shop Around Template, this coordinating cut file is a super sweet and rather large Shop/House shaped card & envelope file, that was created so you can further utilize the images from Home Improvement, Shoppe Window, On Display 1, and Sign it stamp sets.
You can decorate the slide-on style envelope, to look *just* like a customized Shop/House and put your message on the house/shop shaped insert card!!How cute and perfect would this be for:Holiday card from your family-feature a photo inside!
a special themed party (be it birthday, brunch/lunch/dinner, little girls invite)
welcome to the neighborhood
new home
bringing home baby
bridal shower
open house
school /store/shop themed gift card holder
home Improvement
moving/just moved
House warming card or invite
or other card/invitation?!
No matter what the occasion, just the fact that this card is homemade, is sure to grab the admiration and attention of the receiver, no matter what the occasion!
Today mine serves as an invitation to tea!
Just like the Tea Parlor I created I made this to match.
This time I used that mini tea pot from the Just For You set, with the little tea cup from the Sign It set.
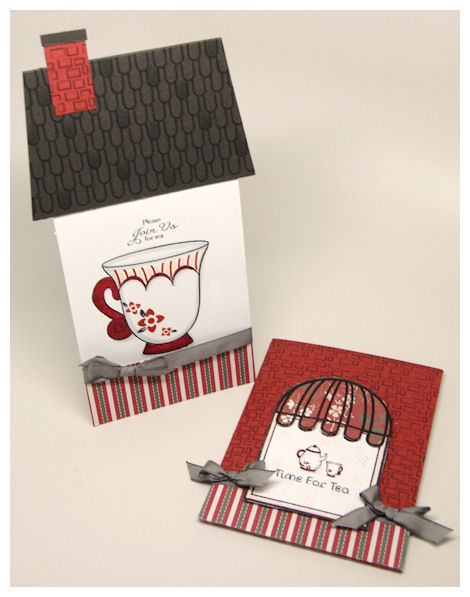
Now the envelope on this was meant to slid over the card, and it’s purpose is to also serve as the card FRONT in the fact that you decorate it like you would your card front, then as you slide it off, it reveals the INSIDE of your card.
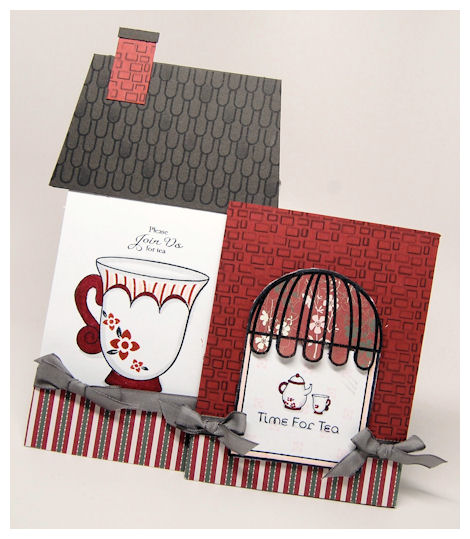
So the envelope is to the right, and the tall house shaped note card is to the left! This template comes complete with the roof pattern which covers the card top.
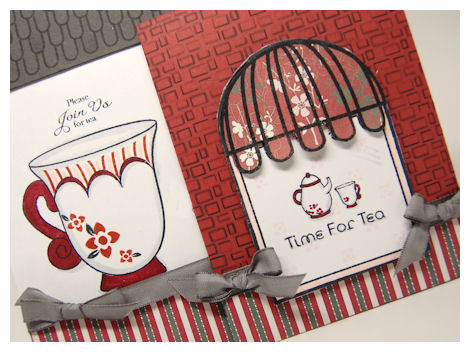
I chose to use the A Spot of Tea set to really tie in this theme! It was the perfect addition!

I just colored and stamped the pattern to match! The flowers I stamped are from the Fanciful Flourishesset. I stamped them because they are the larger version of the flowers that are in my “wall paper” and look like what I doodled on the mini tea cups! The sentiment is also from the A Spot of Tea set
Supplies from My Time Made Easy ™ LLCPretty Packaging Templates: Shop Around & Accessories Mega template
Pretty Impressions Stamp Set: On Display 1, Sign it, Home Improvement, A Spot of Tea, Just for You, Fanciful Flourishes
Pretty Printable Digital Paper: Color Me Pretty: Construction Materials, Cherry On Top
Pretty Pieces Cut File: Home Improvement, Homemade Card & Envelope
I hope you enjoy the plethora of ideas you pick up as you HOP along, and view the gallery! The ideas don’t stop there though! We still have another week of daily ideas to share, so come back tomorrow.
Happy Shopping!
Perfect Peeks Day #4!
Aug 30, 2010 Author: mytime | Filed under: Cards, Home decor/3-D items, My Time Made EasyToday is the LAST day of PEEK projects before you can purchase the AMAZING NEW! Release items for September! Now just because our product are releasing on the 1st, doesn’t mean our projects end! We still have over a WEEK of inspiring projects that are sure to jump start your own creative juices!!
As of the 1st, our Gallery will be live too! This will be a very exciting new feature that will definitely enable you to view so many projects, new and old, in one place. I can’t wait until YOU the customer has a chance to upload soon too!
Today our newest Design Team Member: Lisa Kind has a super cute project for you!! Be sure to check her out as she shares her first peek with MTME!
Yesterday I totally spaced and forgot to link Dawn and Tammy! So check our their creations!
Now as you know My Time Made Easy ™ LLC prides itself on coordinating products that are designed to make your papercrafting and gift giving easier than ever!!
I am happy to announce that we are offering an amazing set of 10 different pre-designed stores for our Color Me Pretty Digital Paper Collection called: Simply Sensational Shoppes
Today I want to share a super fun TOTALLY digital project using the NEW! Shop Around & Accessories Mega Template and a NEW!Color Me Pretty Digital Paper Collection called: Simply Sensational Shoppes
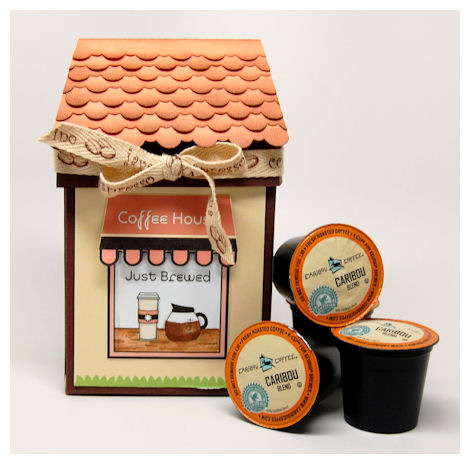
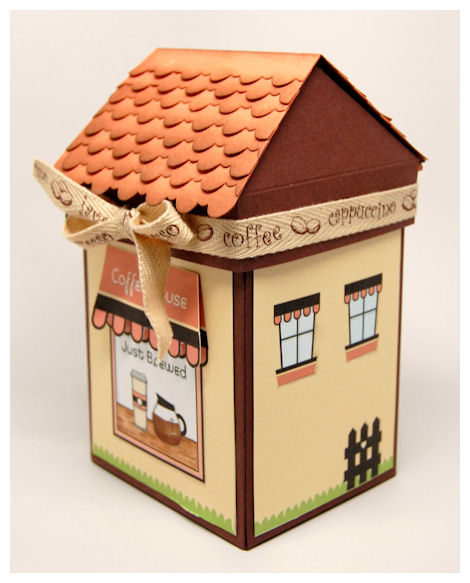
You read it right! This is TOTALLY digital.Coffee House

My colors were fashioned after this gift, and a collection of papers being released by Kristin called Citrus Peel.
One of my most favorite things in the world is coffee!! Who wouldn’t LOVE this? A gift of K-Cups.
I am personally addicted to my Keurig, but you could put ANY coffee themed gift in here too! Or heck, just the idea of a Coffee House sitting on the counter-CUTE!
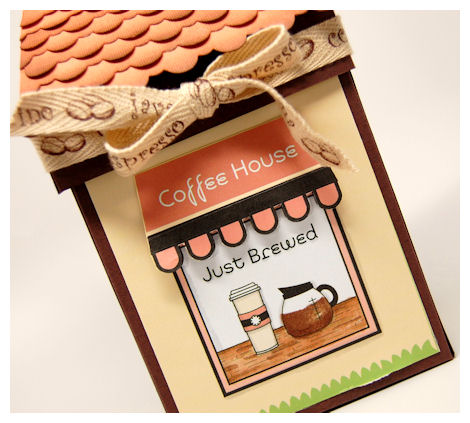
This is the Coffee House – Shoppe Window! (the coffee pot image is from Sign It, and it is SOOOOOO cute! I love it)
Would you believe me if I told you I made this in about 20 minutes (Including the time it took to “color” my design-and MINUS the roof-that took about 15 minutes)? Ok so it was actually almost 40 minutes, but once the coloring was done, I could just print and cut a ton of these for gifts. That wouldn’t take long at all. This template is a snap to put together.
The shoppes designs were put together by Sara, using all our NEW! images.
They include the following themes:
Antique Store
Baby Boutique
Bakery
Candy Store
Coffee House
Flower Shoppe
Hardware Store
Pet Store
Tea Parlor
and a Travel Agency!
That is only the beginning to the themed shoppe designs you can create.
All 4 sides of the Simply Sensational Shoppes are pre-designed, all you need to do is add the color, print and cut!!! It couldn’t get any easier. It is especially great for those mass production of gifts, just in time for the holidays 😀 Now don’t get me wrong-we all LOVE to get INKY, and the 4 NEW! sets: Home Improvement, On Display 1, Sign It & Shoppe Window (all available in digital too!) are ALL fabulous to aid you in the creative process, but sometime we need QUICK and even EASIER way of getting things made-like around the holidays!
You just go ahead and digitally “color” your sheet (simply follow the same instructions you would for coloring the digital stamp images ), then print! BAM! All 4 Shoppe sides are completed in minutes. LOVE IT!
PS We do plan on adding to this line as we add more elements to our upcoming release of coordinating products for the NEW! Shop Around & Accessories Mega Template. Your holiday projects will be so fun and easy.
So let me share the 360 degree view of these amazing Simply Sensational Shoppes
Front:
Side 1:
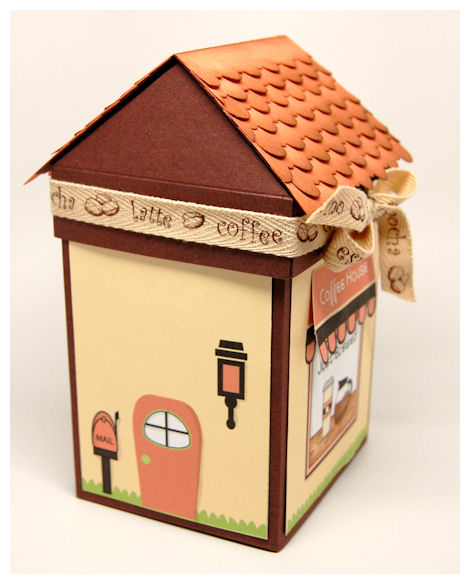
Side 2 (A)
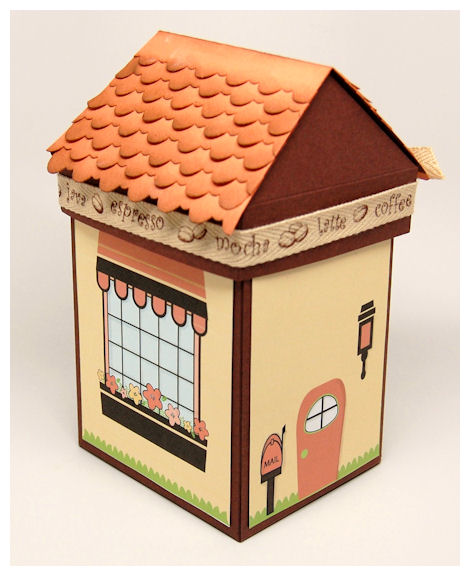
Side 2 (B)
Side 3
As you can see I printed my store front twice, so I could cut a little 3 D awning!
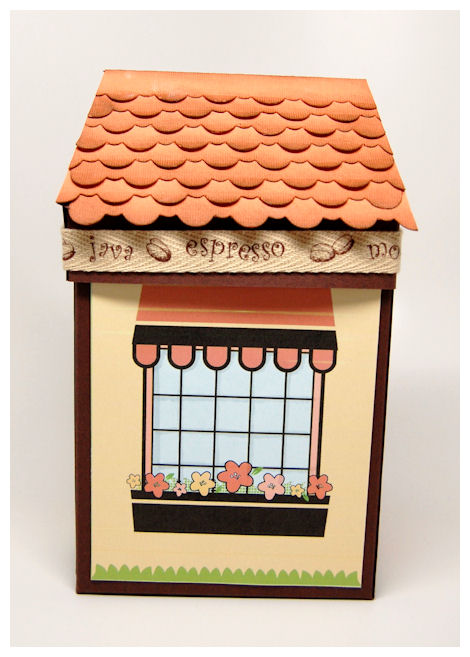
Now how about those shingles??? Aren’t they fabulous?!
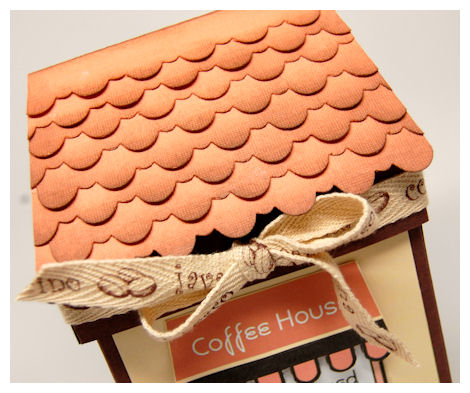
My 3 dimensional roof layer was made by cutting 14 of the Border Builders: Scallop Dot (resized to be about 5 inches long-then trimmed to fit my roof layer!) and one of the Border Builders: Scallop Dot that I made by welding 2 together for my top piece.

I just sponged each layer, and pulled the larger scallops forward for some dimension.
They really add to the WOW factor!
Now INSIDE this neat little Coffee House, I easily fit 9 K-Cups! (with room to spare)
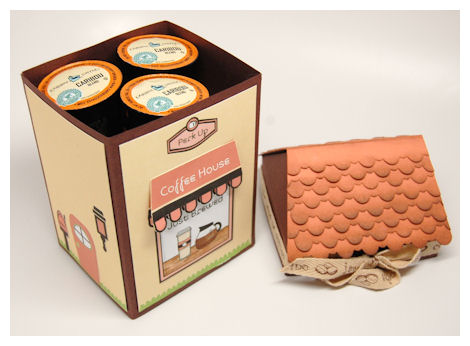
What a great way to package up a sampler of coffee for a friend. Done in no time.
Supplies from My Time Made Easy ™ LLCPretty Packaging Templates: Shop Around & Accessories Mega Template
Pretty Impressions Stamp Set: Home Improvement Digital set <—Use to ADD elements to your pre-designed paper, or make your own shoppe’s!
Pretty Printable Digital Paper: Simply Sensational Shoppes
Pretty Pieces Cut File: Border Builders: Scallop Dot
Well it won’t be long now until YOU can place your order and start whipping up sample after sample of these amazing homes and shoppe themes!
I hope you enjoyed today’s project.
Please come back tomorrow for a BLOG HOP! ONE of my talented design team members is holding a $50 gift certificate! Details to follow tomorrow.
Thanks for stopping by!
Perfect Peek Day #3
Aug 29, 2010 Author: mytime | Filed under: Home decor/3-D items, My Time Made EasyWell here we are with day #3 of the My Time Made Easy ™ LLC September Release peeks, and the ideas/samples are just getting started! I have TONS to share, but am pacing myself for what I am sharing daily. We have so many amazing coordinating products coming out that it is hard to hold back and decide what to share and when!
Today you will definitely want to see what both Pam Imholz and Tracey Cuccia have created using the NEW! Pretty Impressions stamp sets that are being released with the NEW! Shop Around & Accessories Mega Template!!
You will have SO many possibilities for projects using any/all of the NEW! items. We are *only* releasing this template for September because of ALL the amazing possibilities that this ONE template has to offer. I wanted the team and myself to be able to take the time to show you just how amazing each and every creation can be!
We already have 3 ADDITIONAL stamp sets that are going to be released VERY SOON to coordinate with this template! These additions will allow you to easily further maximize the use of your Shop Around & Accessories Mega Template design/gift options.
OK enough of the blah, blah, blahing!!! Let me share a project that went from a simple, idea to reality, and turned out exactly as planned-which we all know that more often than not, usually doesn’t happen!
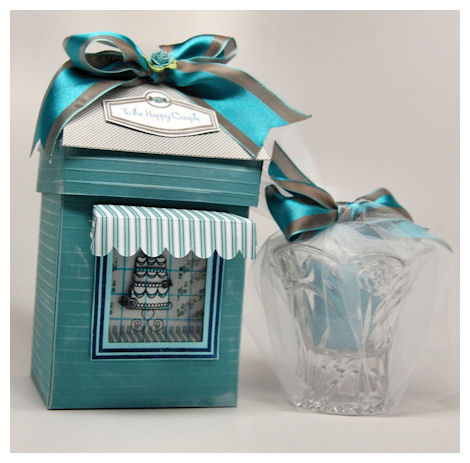
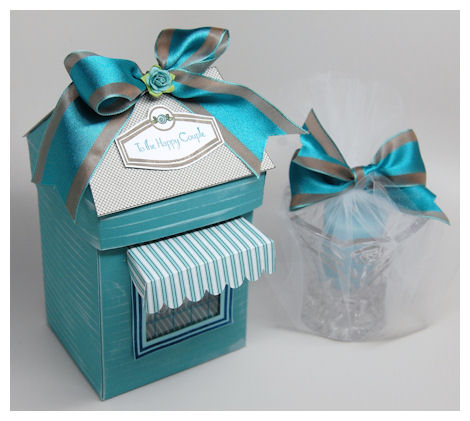
The colors and concept came from Kristin Bueter, where when we were rolling over this idea (of what we thought impossible), and in the conversation she was trying to get me away from creating the cake image using the colors PINK or RED! LOL! She challenged me to “Tiffany & Co.” like colors, along with the idea of this Shoppe. You know I can’t resist a challenge 😀
This was the result-

To the Happy Couple!
I made this themed shoppe, with the stunning cake image in the window to convey the look of a Wedding Cake in the window of a Bakery! I know I ALWAYS stop and stare when I see cakes in the bakery!
I kept the design of the Shop Around & Accessories Mega Template VERY SIMPLE!! I wanted the FOCUS to be on the window scene, and create something conceivable to give someone at a Wedding or Bridal Shower. The cake is from the On Display 1 set. I love the design of it. Since the cake is a MAIN attraction at Weddings what better Shoppe theme?
When creating this I used a textured cardstock, then scored the lines on the box every 1/2 inch, then brushed it with white craft ink! I think it looks neat. Like a old fashioned baker of sorts.
Once I again I digress….getting a super photo of this was very challenging because of the shadow cast by the awning. In person these stores look so amazing, but getting the photo is a bit problematic.
The cake actually looks like it is sitting on the shelf of a store, and the cake itself is in a ROUNDED 3 dimensional version.
This really is a MUST SEE in person to get the full effect!

To do this I made a box like “room”, that I adhered into the Shop Around template. That way it appears as if you are actually looking INTO a shoppe!! Because it is a enclosed “box/room” it stays safe from harm, not matter what gift you add inside!
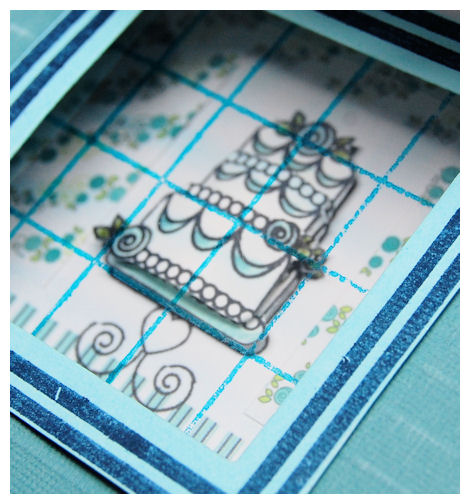
I printed rose pattern from the Tea Parlor collection, so it looked like wall paper, and Picket Fence for the counter! That same pattern was used for the stripped awning.
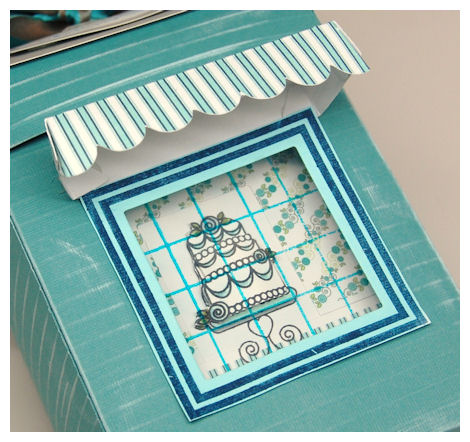
When I made the Shop Around template, I used the Home Improvement Cut File, to create the cut out for my window. I then stamped my window frame from the Home Improvement set, cutting out the center first. I then layered some acetate behind it, which was stamped the with window pane image from the Shoppe Window set. I used a Teal Pallette ink for that, to match my project.
My roof is printed on the Sarah Sand since I wanted a subtle look, and picked up the gray from the satin ribbon which was my biggest starting point. I think its so luxurious and elegant looking!
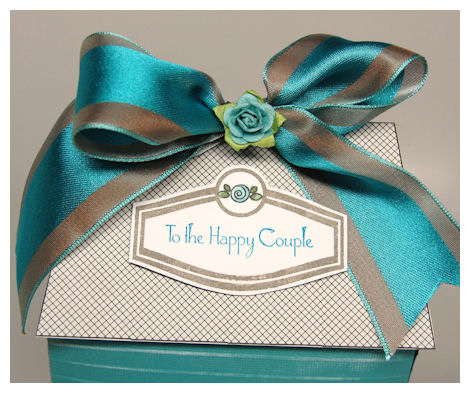
The sign and coordinating rose are from the NEW! Sign it set. The sentiment is from the So Sentimental set. I love this sentiment, and it really tied in my gift/theme!
Supplies from My Time Made Easy ™ LLCPretty Packaging Templates: Shop Around & Accessories Mega TemplatePretty Impressions Stamp Set: On Display 1, Sign It, Shoppe Window, Home ImprovementPretty Printable Digital Paper: Picket Fence, Tea Parlor
Pretty Pieces Cut File: Home Improvement Cut File
Ribbon by May Arts, Prima FlowersQuite honestly I have no one to give this to, so my “prop” is a crystal candle/votive holder from Princess House. Not sure if they are still in business but they were a DSA that I use to constantly purchase crystal any/everything from over a decade ago, pre-kids time. Since having children most of my precious crystal is carefully packed away from clumsy feet, and dirty curious hands 😀 I want my house to be a HOME, where my children could LIVE and grow and not be told “NO! Don’t touch that” constantly. I didn’t get rid of everything when I had children, just some of the stuff I felt I wanted to have once they moved out someday! LOL!
Well that does it for me today!!
Return for even more amazing ideas from myself and the team tomorrow. The first is approaching quickly and you will get to see all the amazing new goodies!
Until then!
How sweet it is! Project Peeks Day #2
Aug 28, 2010 Author: mytime | Filed under: Cards, Home decor/3-D items, My Time Made EasyI’m here with Day #2 of the My Time Made Easy ™ LLC September 1st Release peek projects!
So many SWEET sets, and so little time! I feel like I could create about 100 different projects with this release. While I actually won’t be making 100, you all will receive OVER 40 different project ideas between myself and the team using these new release items over the next 10 days! Our Gallery will be LIVE on the 1st, so make sure you keep checking in as the team and I load new projects daily!
Today, some of the team and I have some SUPER SWEET projects for you to drool over 😀 Hop on over to:
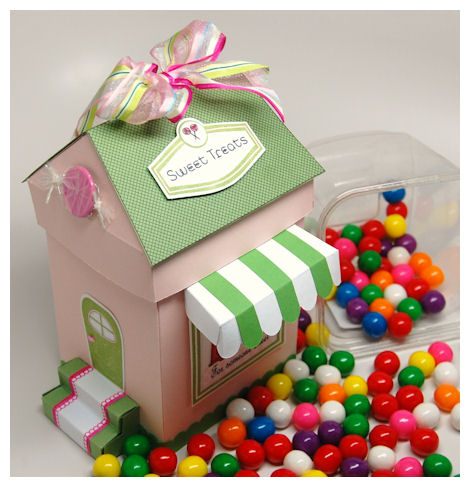
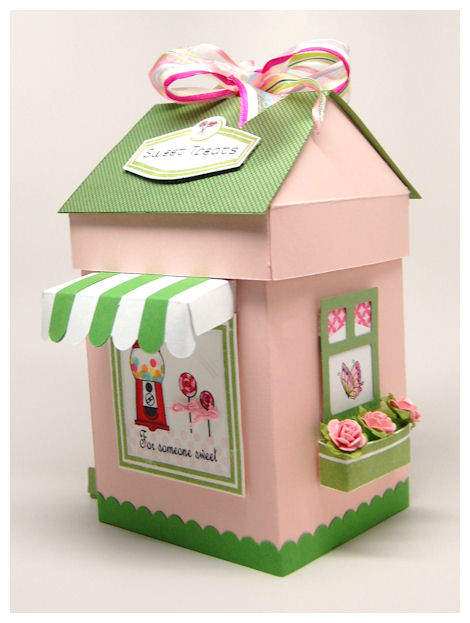
For someone sweet!
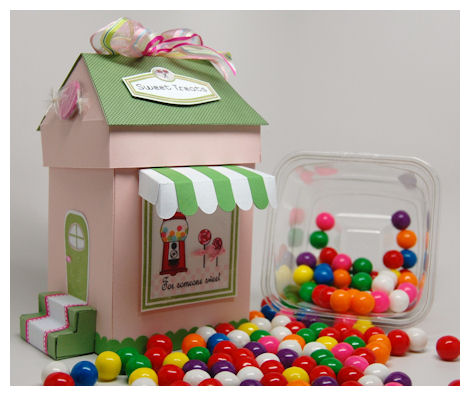
My kids love candy, and what better way to present it than in a Sweet Treat candy store?!! When I think sweets- I love the color combination pink, red, and green!
Today I chose to create a Sweet Treats themed store using the NEW! Shop Around & Accessories Mega Template and the On Display 1, Sign it, and the polka dot border from the Home Improvement set.
This is the “front” or side of my themed Sweet Shop!
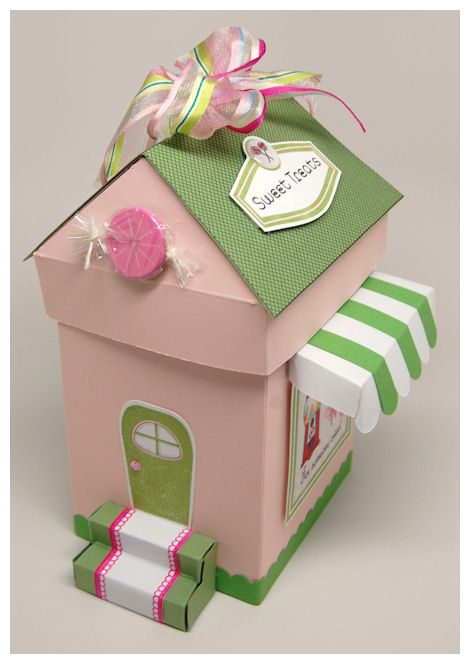
I stamped my door from the Home Improvement set. I used the Home Improvement Pretty Pieces Cut File for the door, sign and shop window.
I wrapped a fancy brad (tabs cut off) I had on hand, in cellophane to create a pink peppermint candy! Super fun and simple! You could also use cardstock, buttons, or REAL candy!!
I used the stairs template from the NEW! Shop Around & Accessories Mega Template. I stamped my stairs using a border image from the Paper Pattern Pieces for some WOW! factor. To complete the scallop design I used the Border Builders Open Scallop for my trim along the bottom.
NOTE: It is very difficult to get a good photo of your shop window, when your awning is casting a shadow! LOL!!! I wanted to get an additional light source to light up under the awning, but all my bulbs were burnt out (I always drop/knock over my photo lights! GRR!).
Our NEW! Pretty Impressions stamp sets (releasing Sept 1st) really allow you so many options for creating some amazing THEMED shops and window displays (hence the name :D)!
From a candy store, ice cream parlor, flower shop, pet shop, coffee or tea house, new home/home improvement, welcome baby and bakery…..the possibilities don’t even end there!
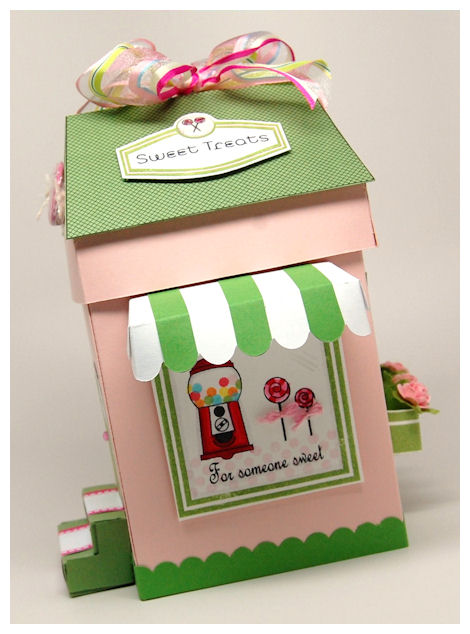
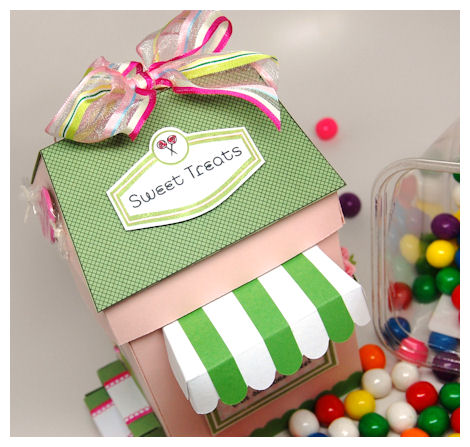
To create my theme sign, I stamped the sign, “sweet treat” sentiment, and mini version of the lollipops from the Sign It set!! The images in the Sign It set coordinate perfectly with the On Display 1 set.
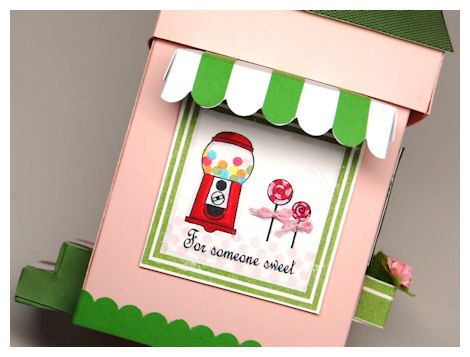
In my window from the Home Improvement set, I stamped one of my FAVORITE images from the On Display 1 set that takes me back to MY childhood-the Gumball Machine! It has a “gumball” image that allows you to easily stamp a rainbow of gumballs with ease. I also used the CUTE lollipop image too! I LOVE IT!
The think what I LOVE most about On Display 1 is that not only is this set perfect for the Shop Around & Accessories and the Home Improvement set, but it features great images and sentiments that are perfect on their own!
As you can see I stamped the images IN the window, and even added a sentiment to it-just like you’d see on an actual store window.
I used the Shop Around & Accessories to create my awning! I simply cut the template from both white, and green cardstock. I cut the green awning into strips (using the scallop as my guide) to make my dual colored, realistic, 3 dimensional store awning. I think it looks *just* like an old fashioned shop from back in the early 1900’s! They just don’t typically have these types of stores around anymore like they use to.
Now for the side window
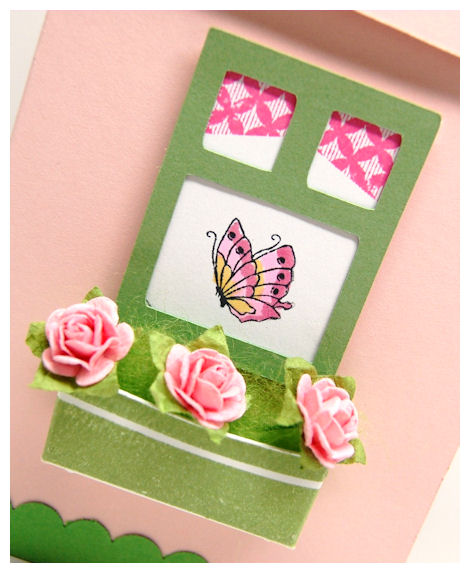
This is part of the Shop Around & Accessories. This is the window, and the window box.
The flower box stamp image from the Home Improvement set stamps perfectly on the Shop Window Box Accessories!! I love the idea of a 3 dimensional window box. Some people don’t actually stamp so I wanted this Mega Template to be as complete, and user friendly as possible! Oh and as I mentioned a million time, and I am certain is blatantly obvious by now-I LOVE 3 dimensional details.
I added some “grass” (aka wool roving) to my flower box, and popped in some petite Prima flowers!
The curtain valance was made using the patterned curtain from the Home Improvement set, stamped horizontally 😀 I HAD to add the butterfly from the Tending the Garden set. It looks like it is enjoying fluttering over the roses in the window box.
It just completed the entire look for me.
Supplies from My Time Made Easy ™ LLCPretty Packaging Templates: Shop Around & AccessoriesPretty Impressions Stamp Set: Home Improvement, On Display 1, Sign It, Paper Pattern Pieces and Tending the Garden set
Pretty Pieces Cut File: Home Improvement Pretty Pieces Cut File
Well thank you for checking in today! There is MUCH, MUCH more to come, as you can imagine 😀
I will be sharing more and more home/shop samples with our new papers, and the Homemade Card & envelope cut file! I will also share some ideas for using these new products on *just* cards too!
See you back here tomorrow!
A MTME Winner and questions answered
Aug 28, 2010 Author: mytime | Filed under: UncategorizedHi all!
Sorry this is later than intended, I got busy and couldn’t get online for a while.
We have a winner for the first MEGA Pretty Packaging Template, with 4 Co-ordinating Stamp sets, and a Color Me Pretty Prinatables paper package !!!!!
Generator 137
The winner was
Cindy |
I think it’s a birdhouse. Maybe fall themed?
Can’t wait to see it!!
Congrats Cindy! I will be in touch with you about your prizes!
On another note…..
I’ve received many questions about the Guest Designer positions 😀
If you aren’t on facebook you can simply submit your entry to me via email [email protected]
And CAN submit more than one time :D, and it MUST be a new card/project.
Projects CAN be published by you on your blog or gallery 😀 That is perfectly fine.
Stay tuned…..more to come in a few hours!
September Release: Perfect Peek Day #1 and Announcements!
Aug 27, 2010 Author: mytime | Filed under: Home decor/3-D items, My Time Made EasyOh my gosh! I’m so excited that I don’t even know WHERE to begin! If I were talking I would be in FAST FORWARD mode.
Let me start by saying, you WILL want to read every word 😀 I have much to share and you most likely won’t want to miss all the goodness. I can tell you it took like 3+ hours just to type it all up!
September 1st is the My Time Made Easy ™ LLC Release!
You will want to grab a cup of something, get comfy in front of your screen-preferably a quiet area, relax, and read!
This month is going to be the start of an amazing next couple of month’s, all designed to enhance all your holiday gift giving! The best part is these gift items can be made, or given ANY time of year, for ALL ages. Male, female, the young and old.
I *will* be offering some holiday themed goodness begining with our Oct 1st release. These will be some amazing themed stamp sets that coordinate with our packaging templates for the ultimate gift giving experience.
Let me get started sharing all the AMAZING news and NEW! Products for September!
We are starting early because this month we have SO MUCH to share! Now many of you took guesses at WHAT this release was ALL about, and MANY of you were spot on!
Let start with the NEW! Announcements!
I’m excited to announce that with the release on the 1st, we will FINALLY have our GALLERY open! That means you will EASILY be able to view any/all projects made by myself and the design team, in one place, right at your fingertips! To say I’m over the moon is an understatement.
As we reveal our projects for the release, we will each upload our photos to the NEW! Gallery. Because we fill out all our MTME supplies in our keywords, you can easily navigate the site and find any/all samples made with a particular product from our store!
As you may know this is a very exciting and much anticipated addition to the store! Lot’s of time, effort and research went into this addition. While it took some time to pull together, we needed it to be done RIGHT! A HUGE thank you to my web girl Sara for getting all this together. She is like my other right hand 😀
This month’s release will go LIVE on the 1st-with projects being added to the gallery daily during our project release peek week (say that 5 times fast). ALL of the projects myself, and the current design team have created over the last 10 months will get loaded fully by Oct. 1st. We’ve made a ton of projects, and I’d like to give my team some time to get their gallery loaded, so keep checking back 😀
Now for all of you customers wanting to upload, we aren’t ready for that just yet. We want to ensure we have all our bases covered with the design team loading, before opening the gallery up to everyone who wants to load their latest and greatest MTME projects!!
So stay tuned for the announcement when the customer portion of the gallery is ready. It won’t be too long from now.
We will soon also have a blog, and forum, so stay tuned! Another thing long in the making, but I want to ensure we do things RIGHT.
MORE changes!
Geny Cassidy is no longer with MTME, and sadly this will be Dawn Easton‘s last month with us. While we are sad to see them go we are excited to bring on two new very talented ladies:
Tammy Hershberger and Lisa Kind !!! Make sure you send them a warm welcome! I ahve worked with both these talented women on other teams and have long enjoyed and admired thier talent.
Next announcement: WE WANT YOU!
I am having a contest, in search of a GUEST Designer!
I will host a design team call every quarter! This means that every 3 months I will host a search, then pick 3 participants to be a guest for one month! After the 3 are chosen and complete thier turn, I will put my search out again!
You will be required to make a total of 6 cards for your release month! Template projects will be optional 😀
I am currently running this contest in search for guests for Oct, Nov, and Dec!
To enter our contest:
You must create a card using the Digital Paper and Images from My Time Made Easy ™ LLC. We offer several FREEBIES!! So no excuses 😀
Become a friend of MTME on Facebook–> HERE!
Then submit a link to your creation on our FACEBOOK page < —-CLICK ME! under Guest Designer Contest Entry!!
I will choose 3 designers on the 10th of September! Winner will be announced here on my blog, and on Facebook! Details will follow to the winning contestants.
*If you aren’t picked don’t worry! You can try again in 3 months!*
I am excited to see what you enter.
Any & all questions can please be sent to [email protected]
KEEP READING!
Now time for the projects to begin! FINALLY!!!!!!!!!!!!!!!!!
Be sure you stop by and visit Katie Cotton, and Lesa Rapp!!
They are using our NEW! Pretty Packaging Template, with our NEW! Coordinating Pretty Impressions Stamp sets, and you won’t want to miss anything. (also note the gallery will feature all our projects on the 1st as well! YIPPEE!)
You will also want to see what Dawn and Tammy have to share using the NEW! Pretty Impressions Stamp sets for CARDS today!
ALL our stamp images are not only perfect for gift giving, but also versatile because they can be used to create *any* card, tag or scrapbook project.
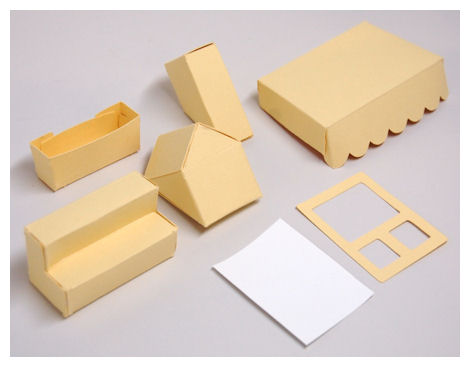
We are releasing ONE Mega Pretty Packaging Template-that includes 7 templates for just $10.
This template has 4 coordinating stamp sets with MANY more to follow in the next couple of months!! You will have limitless possibilities for unique gift giving in no time 😀 Especially for the holidays (wink)
Shop Around: Mega Template $10
 Available in PDF, SVG, GSD, DXF, WPC
Purchase includes a Shoppe/House template with printable roof pattern, and six 3 dimensional accessories: Awning, Chimney, Pop Up Window, Stairs, Window, and Window Box! Each piece comes complete with step by step photo instructions!
Shop Around Accessories:
The Shop Accessories were designed to further enhance the design possibilities of the Shop Around Template!! They were designed to perfectly work together!
Awning:
3 1/4 Inches Wide
1 1/4 Inches Deep
Chimney:
2 Inches Tall
3/4 Inches Wide
1 Inch Deep
Pop Up Window:
1 1/4 Inch Wide
1 1/2 Inch Tall
Stairs:
2 Inches Wide
1 1/4 Inches Tall
1 Inch Deep
Window:
2 Inches Tall
1 1/2 Inches Wide
Window Box:
1 3/4 Inches Wide
3/4 Inches Deep
1/2 Inch tall
Wait until you see all these elements used 😀
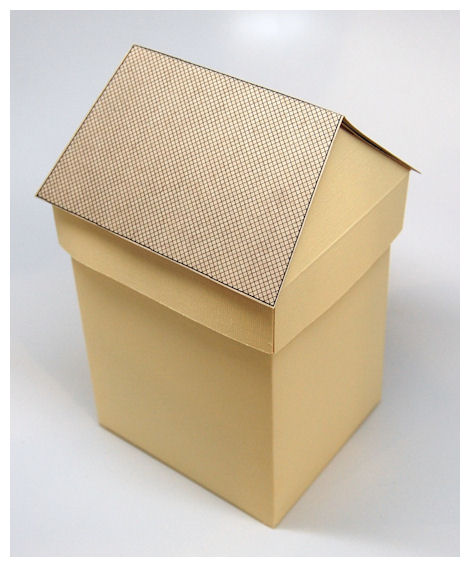
Completed project sample: Welcome Home
I have had SO many requests for this particular stamp/template/paper combination that I could hardly wait to share it all with you. I’ve had this design done for some time now, but wanted to really MAXIMIZE the possibilities. There is SO much to share that you will have to return each day for a mega dose of inspiration.
Completed Project Size
7 1/2 Inches Tall
4 Inches Wide
3 1/2 Inches Deep
Can you imagine all the possibilities this one Shop Around & Accessories Mega Template can hold?
This is sure to dress up any gift giving occasion. It is a gift within itself!
If you’ve been “shopping around” for the perfect gift box, for ANY time of year, then this is the box for you! Imagine all the little houses and shops you can create for yourself, or to dress up any gift, that can later be displayed in the receivers home, or re-gifted with style!
As stated above, over the next few months we are releasing stamp set additions that make this Shop Around & Accessories template AMAZING!
Here is the angled roof view.

The printable roof pattern is just the perfect addition to this template, but the possibilities DON’T stop there.
As you will soon see the Home Improvement stamp set kicks the possibilities up a few notches! (Details on this set below)
Whether you are going to be creating a “themed” shop, or a house, the stamps combined with the size and style of this template is going to blow you away.
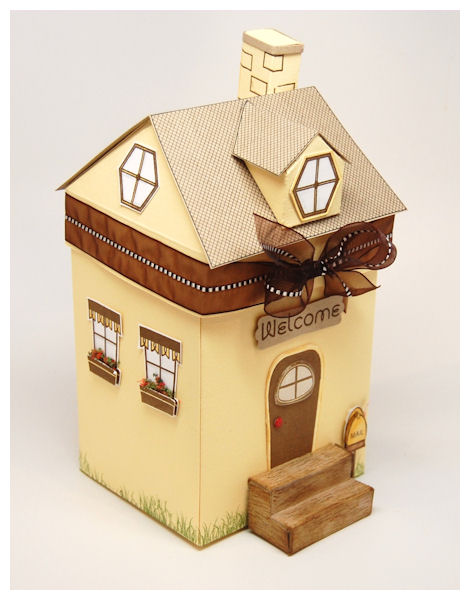
My box is a Welcome gift!

This is the door image, which was cut out using the coordinating Home Improvement Pretty Pieces Cut File.
You can also see the stairs, which have a wood-grain pattern stamped on them!! The wood grain stamp image fits perfectly on each step. They are just so cute and FULL of possibilities.
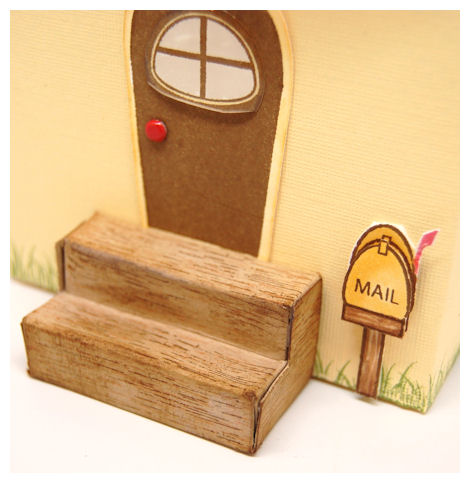
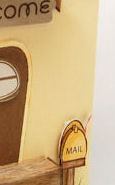
The mailbox is a super fun addition that can be great for this template, or hold its own on *any* card or tag! I cut the front of mine, and put it on a dimensional. I love the effect of anything being popped up, as much as possible!
Now for the side view!
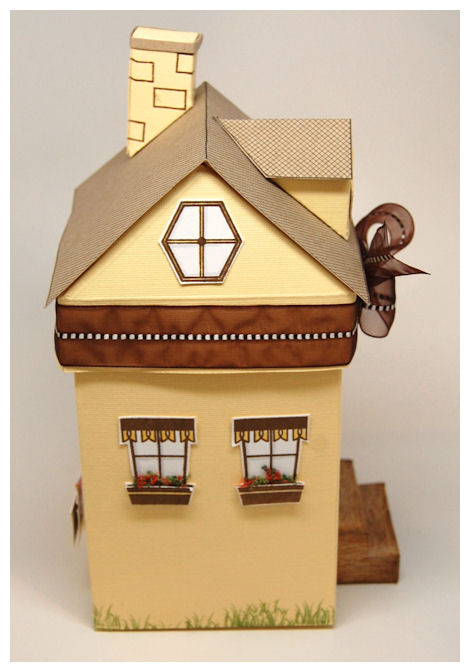
As you can see I stamped 2 of the window images from the Home Improvement stamp set, to fit on the side of the house.
I stamped the grass image to go around the entire base of my house. It is easiest if you stamp the bottom prior to fully assembling your template.
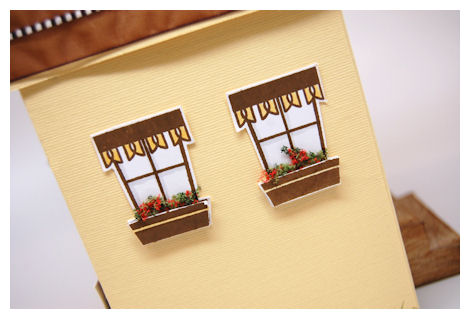
I used the Home Improvement Pretty Pieces Cut File for my windows, which are stamped in a brown ink. I then re-stamped, and trimmed out my flower box part of the window, to create a 3 D effect. I used some pretty Flower Soft for my flower boxes! EASY PEASY.
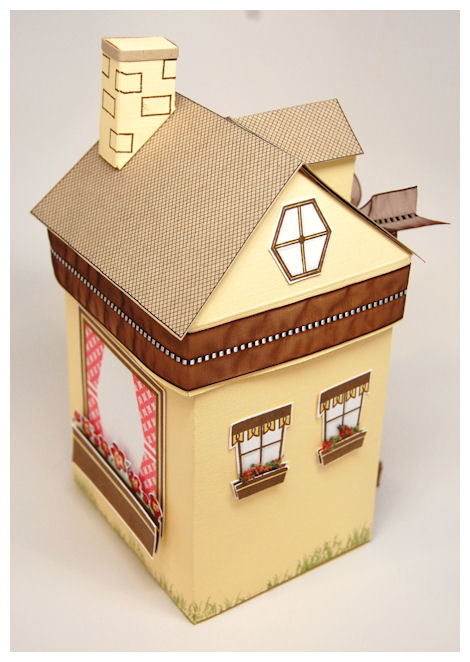
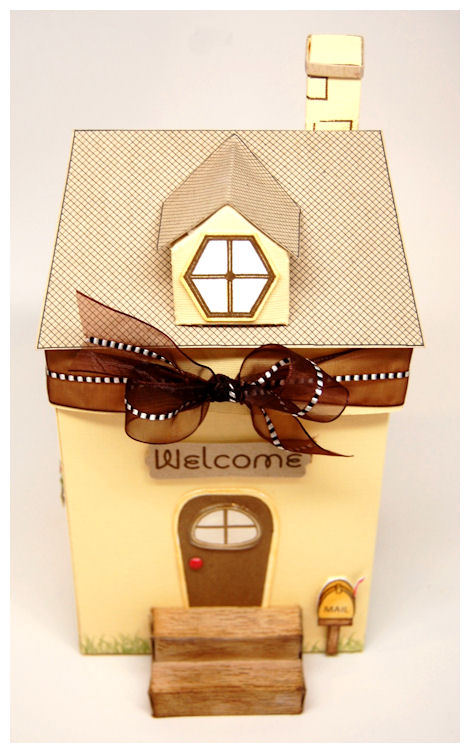
As we make our way to the back of the house you can see the picture window that makes this template the perfect shop window, or large picture window! There ARE images that fill the shop window too (details below!).
On this project I stamped my window, colored my trim to match my house, and stamped by designer curtains in red. Both the designer curtain and solid curtain can layer on each-other for so many great color/pattern combinations! Use the curtains on either side of the windows, OR use it along the TOP for the look of a valance! Gotta love versatility.

I used the window box image for the front of my window. Now this stamp image also fits our 3 dimensional window box in the Shop Around Accessories template! “In” my window box I stamped my grass, and the flowers, cutting them out to be 3 dimensional. There is some fun flock on them too, for some added texture!
As we round to the other side of the house, I stamped my gate. Another great image for a quick, cute card sample.
You can also see the randomly stamped brick pattern on the chimney. Its a great whimsical touch! This Home Improvement set has several design building possibilities, like the brick, wood grain, and stone….to name a few!
I love the “attic” style windows on either side of the house. My grandmother had these in her house.
One of the *best* additions to the set is our Construction Materials Pretty Printables Paper! I did not have it while creating this first Shop Around & Accessories version, but you will get to see WHY it is a must have when you see what myself and the design team has done using these papers to EASILY make an even MORE realistic house/shop!
This is a 3 dimensional house/shop like box, perfect for year round gift giving! So many things you can put in there. Even if left empty is is a great decoration for all year long.
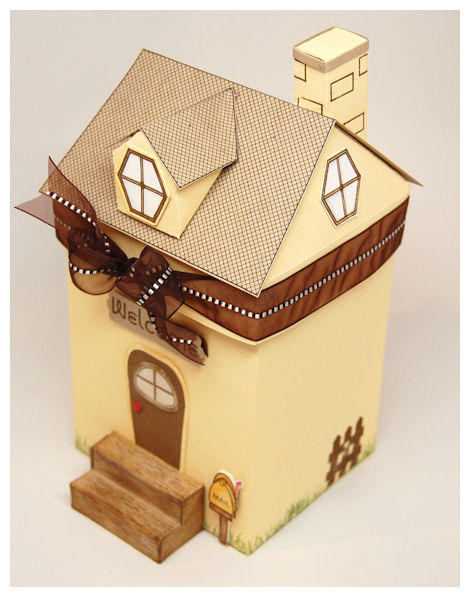
Not only is the gift box fun, but even more importantly it is FUNCTIONAL! With it being an amazing size you can put a wide variety of gifts in here, or use it in your home to HIDE items you may not want seen on a daily basis, like your remote control! LOL!
But best of all it can hold some amazing treats……
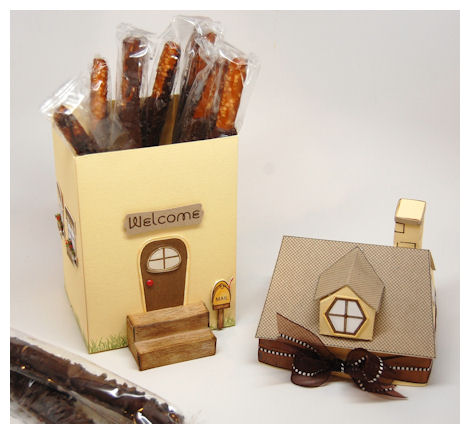
Hide any gift in here and it is certain to steal the show!
Here I have some pre-packaged chocolate covered Pretzel Sticks! Due to the roof angle I was able to easily fit them in here. Imagine bringing this to a Cookie Swap?! You’d be the talk of the party-and I don’t mean your cookie recipe.
You can use ANY of the Shop Around Accessories © (which are ALL included with ONE purchase!) to further enhance your “shop building” possibilities, as you’ve seen a few ideas today. There are MANY more possibilities to be shared. We have many SHOP building options that will just have your creative brain spinning with gift giving ideas, wait until you see.
Supplies from My Time Made Easy ™ LLCPretty Packaging Templates: Shop Around & AccessoriesPretty Impressions Stamp Set: Home Improvement and Sign It Pretty Impressions stamp set
Pretty Printable Digital Paper: Construction Materials Pretty Printables Paper
Pretty Pieces Cut File: Home Improvement Pretty Pieces Cut File
Other Supplies:
Cardstock by Couture Cardstock
Ink by Momento & Copic Markers
Ribbon: May Arts
Other: Flower Soft, Fun Flock, SU! Brad & Label punch
Now how about some info on the stamp sets that help make this set a WOW!
4 Coordinating Pretty Impressions Stamp sets(also available in digital!)
Home Improvement : Set of 21 Images $20– *Also Available in Digital Download*
This set was designed to not only enhance your Shop Around template, but also help make your little Shop Around box look like a home!
This set has a door, windows, curtains, window box, flowers, grass, mailbox, fence/gate, as well as bushes/clouds, brick, stone, scallop trim, clapboard/wood grain images for endless template enhancement and background building possibilities. Now you can quickly and easily enhance your projects with this stamp set and template file combination.
This set was designed to not only enhance your Shop Around template, but also help make your little Shop Around box look more like a home, with little time and need for effort!
Some Stamp Sizes:
Door: 1 1/4 inches wide, 2 inches tall
Large window: 2 1/2 inches squared
Curtains: About 2 1/2 inches tall
Window Box: About 2 3/4 inches long, almost 3/4 inches tall
Completed window: About 1 inch wide, almost 1 1/2 inches tall
Mailbox: 1 1/2 inches tall
Gate/Fence: 1 inch wide, 1 1/8 inch tall
There are endless design possibilities for this one, even for cards, tags, and even scrapbook pages! Don’t miss the Pretty Pieces Cut File : Homemade Card & Envelope, also sized perfectly for use with this set!
Images from On Display 1 were designed to fit perfectly IN the window, to allow you various “store front” possibilities as well, but you can put any images you feel you want inside as well!
Shoppe Window: Set of Large 4 Images $10- *Also Available in Digital Download*
This was designed to become the PERFECT window for your Shop Around Template. Images from On Display 1 were designed to fit perfectly IN the window! There is even the option for adding window panes to your Shop window.
It looks just like the old fashioned store windows! There is even the option for adding window panes to your Shoppe Window. You also have a lantern, and Boutique sign for an additional add on.
Window size is 3 3/4 inches tall, 2 1/2 inches wide
On Display 1: Set of 27 images $20 *Also Available in Digital Download*
This is a wonderful stamp set on its own, but this set was also designed to coordinate with the Shop Around set, Shoppe Window, Sign It as well as the Home Improvement set, to allow you to create various themed shop windows. .
Images vary in size but most are 1 1/2 inches tall. Large enough to be the focus of your project!
Sentiments Include:
Simply Sweet
Hope your day is as sweet as you are!
Piece of cake!
I hope you have the time of your life
You can soar as high as you can dream
Flyin’ by
For someone sweet
Have a ball!
You are Paws-itively the best!
You “ perk me up” when I am down
You’re Tea-riffic!
With a latte thanks!
Let’s Chat!
Hello
I’m Just Sayin’
Sign It: Set of 30 Images $20 *Also Available in Digital Download*
This set was designed to allow you to highlight your gift giving occasion, or give a hint at what may be presented inside! The “sign” was created so your “Shop” template can easily have a theme! The images and sentiments coordinate to fit within the sign. This set is also meant to coordinate with the images in the On Display 1 set.
These images make great backgrounds or tag accents for any project. I think you will find the sentiments to be perfect for SO MANY gift ideas too!
You can create your own themed stores for example: candy store, ice cream parlor, flower shop, pet shop, coffee or tea house, new home, welcome baby and the possibilities don’t even end there!
Sign is about 2 1/2 inches wide, 1 1/2 inches tall
House image is about 3 1/4 inches tall, 1 3/4 inches wide
Sentiments include:
Just a Lil’ Something
Imagine, Dream, Believe
Sweet Treats
Just Brewed
Homemade
Timeless Treasures
Just Paw-fect
Fresh Baked
Time For Tea
Coffee House
For your travels
Shoppe
Home Improvement
Welcome
Hand Picked
Party Time!
2 Coordinating Pretty Pieces Cut Files:
Pretty Pieces Cut File: Home Improvements Coordinating Cuts $2.50Available in SVG, GSD, DXF, WPCThis cut file was designed to coordinate with the Home Improvement © , Shoppe Window, and Sign It © Pretty Impressions Stamp Sets.No more cutting out those stamped images 😀
Now you can quickly and easily enhance your projects with this cut file. This file was designed to allow you to cut out the image elements in the Home Improvement, Sign It, and Shoppe Windows set.
This is the perfect companion for the Shop Around Template as well as the Homemade Card & Envelope Pretty Pieces Cut File. Also be sure to check out the Welcome Home template.Homemade Card & Envelope: Available in PDF, SVG, GSD, DXF, WPC
Fashioned after the Shop Around Template, this coordinating cut file is a super sweet and rather large Shop/House shaped card & envelope file, that was created so you can further utilize the images from Home Improvement, Shoppe Window, On Display 1, and Sign it stamp sets. MORE<—-Details to follow soon!!
and a plethora of Pretty Printables Digital Paper! Including a to DIE FOR Color Me Collection!
WHEW! Are you exhausted yet? I hope not because we have MUCH more to share, as you can imagine from the other stamp set descriptions we have for you.I am just bursting at the “beams” (wink) to hear your thoughts on what you’ve seen and read so far! So lets hear it! Are you excited yet?
This release is sure to ROCK THE HOUSE!! Tune in tomorrow to see what I have IN STORE for you 😀
Before I even begin to explain WHERE I’ve been since last posting on the 7th (OH MY WORD! Has it really been that long?), and WHAT I’ve been up to, WHO wants a PEEK at what is being revealed tomorrow?
Here is a TINY view
Can you take a guess at what this months stamp/paper/template combo will be?
ALSO, we have a BIG announcement to make to, just in time for the release! So who wants to guess what that *may* be?
I’d love to hear your thoughts!
Comment on this post, to be entered to WIN the first MEGA Pretty Pacakging Template, with 4 Co-ordinating Stamp sets, and a Color Me Pretty Prinatables paper package !!!!!
Winner will be drawn TOMORROW! (Saturday 28th)
I promise this week of project will have been worth the wait since my last posting!
OK where have I been? What have I been up to?
More like what HAVEN’T I been doing?
Summer vacation = very limited crafting time for mom.
It was Amber’s 6th Birthday on the 13th! <—no party yet! We wait until Sept for that.
TONS of play dates, and time with my 18 month old niece.
We’ve all paid for the Dentist’s vacation home with all our appointments this summer!
Alexa is STILL in remission! As we had her checkup last week.
Back to school shopping.
August 23rd was our Wedding anniversary
Kristin and her daughter Tia came to stay for the last few days!! We had a BLAST! I miss them both already (they left this morning :C)
We FINALLY put our house up on the market! Granted it is the WORST time to do it, but once my hubby said OK I got right on it! I have my heart set on this house in particular, but obviously we have to wait for our home to sell. That is tough, but I believe in fate. I know God has a plan, and I just need to wait and be patient. If you know me, patience is NOT a quality I possess. I want everything yesterday, and I am willing to work my hiney off to make anything I set my mind to possible! I don’t shy away from hard work, and I’m totally dedicated to doing whatever I need to do, to get where I want to be. So having to depend on others to get to where I want to be is tough! With my business expanding and kids growing we need a little more room. We bought our home 8 years ago, and even added to it! It was originally only 2 bedrooms. We added an addition (then the market was sky high!) and have tried to make it work, but its not. Anyway….the time has come to move on. I just pray its before Christmas.
Juggling being a mom, and designing for my own company, on top of cranking out tons for samples for *every* release is quite challenging! Each release I look back and wonder HOW I got it all together! I do my best to consistently provide you with an arrangement of gift/card/tag ideas each month, in between the laundry and house keeping. MOST people would have a Nanny! LOL! I choose to do what I can in between being wife, mom, friend, maid, nurse, and taxi….to name a few of the hats we as women wear!
I’m not perfect at any of it either. As I type this post I just tried to DRINK my yogurt, instead of my coffee! (that is NOT even a joke!)
I’ve been feverishly designing for this release and finalizing all the templates and cut files for the upcoming holidays!! We have some amazing things in store, starting with our September Release! I tried to pull out all the stops in the next few months for you all to be able to create your own AFFORDABLE gifts this year.
Let’s be honest the economy isn’t what it use to be, so making your own gifts it not only heartfelt, but more affordable!
You know once the kids go back to school, and the days get shorter that it is time to start thinking FALL and gift giving. I’ll save all my blah, blah, blah, and excitement for tomorrow’s post!
In the meantime, I’ve been SUPER busy here, as I said. As you know with my children home for the summer I do my best to do as many fun & family oriented day activities as humanly possible!
This will be the FIRST year that all 3 of my children are in school FULL TIME! That is 6 hours of MY TIME! Don’t get me wrong, I am actually a bit teary about it. A day I so wanted/needed when they were at the “DRIVE ME INSANE” ages of 1, 3 and 5 are gone. I enjoy my children much more now that they are a smidgen older. I will miss them. I get so use to having them home in the summer that the first week of school I loathe the silence. I almost don’t know what to do with myself, and I watch the clock till it is time for them to come home. Once week 2 hits I get into a regular routine again. I’ve never had 6 consecutive crafting hours, so I can only imagine what I will get done!! Right now I craft like 2 MAYBE 3 hours (that includes design/computer time) a day, and more often than not that is even a stretch!
Anyway….the point is, I am here. I am still crafting! I’ve just been juggling alot (as I do most summer’s) and the payoff will be seen as the kids head off to school and the holidays unfold.
I have some amazing opportunities coming and I look forward to sharing everything with you as time allows.
I really want to thank ALL my loyal readers/followers/friends/customers and everyone in between for hanging in with me through the summer. I’m sure you have all been as busy as I have, and maybe you too are looking forward to returning to the routine of fall.
I hope you plan on stopping by because tomorrow will prove to be the start of a very exciting release!!!!!!!!!!!
See you then.
August Release Blog Hop!
Aug 7, 2010 Author: mytime | Filed under: Cards, Home decor/3-D items, My Time Made EasyToday is the last day of scheduled projects for My Time Made Easy ™ LLC using the August Release.
We have all had a blast with this latest products, so you are sure to get a ton of inspiration overload by visiting the team members blogs for more projects.
Here is the list of places to visit:
I decided to save the best for last so to speak! I plan on offering more projects through the month (that is the PLAN anyway) but I am also getting ready for my children to go back to school and gear up for the holiday releases!! It is coming quicker than I evern imagined.
So let me share what I have today!
If you are on the store’s email list you have seen a peek at this project as it also came with an EXCLUSIVE SALE.
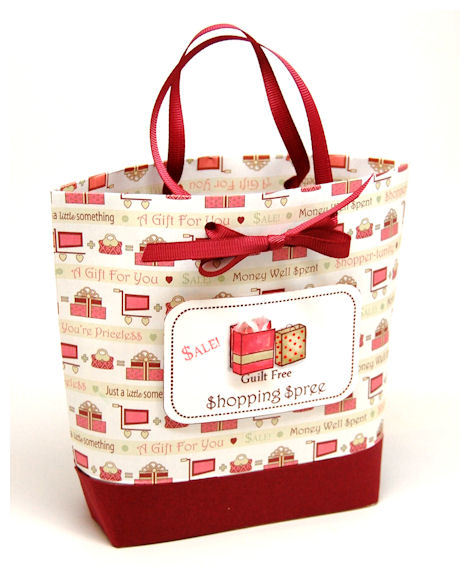
As the bag reads: $ALE! Guilt Free $hopping $pree, many of my store subscribers were able to take advantage of the sale by going on a little shopping spree!! I love that all the “S” letters in the set are actually $ signs 😀
I love the Tote-All Package and the NEW! Money Well Spent set! They are a perfect match.
I am totally in LOVE with the Shopping Shirley’s paper collections! Here I used the Candies Apple Thistlestalk collection for all my projects!!
For my bag I printed the Shopping Shirley’s paper made it from the added some plain cardstock to the bottom to add to design and break up the pattern.
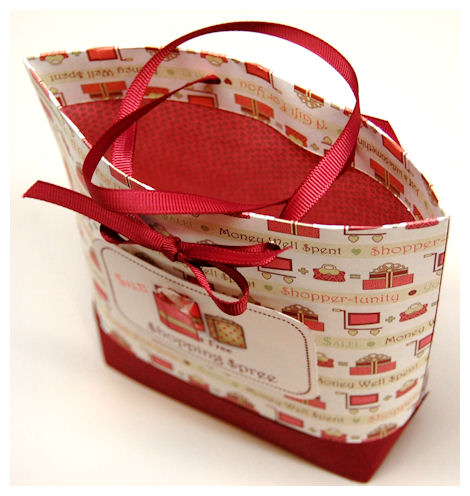
I, of course printed the other side of my cardstock using the confetti dots paper. I love being able to pick and choose patterns that will make up my dual sided paper!
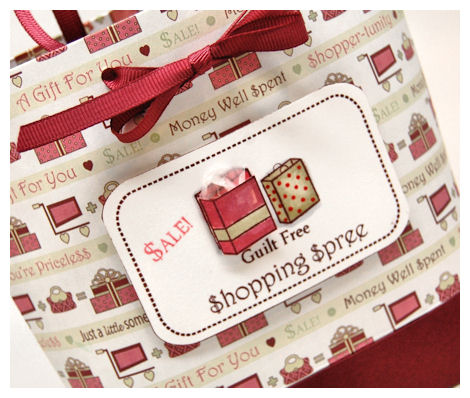
On the main image I made my gift bag 3D, with a little tissue sticking out the top 😀
Super simple gift bag that looks far more involved than it actually was.
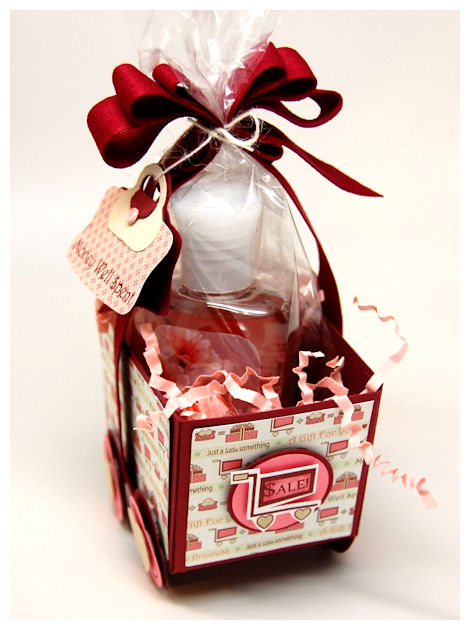
Now one of my favorite templates to date: Shop Til You Drop! Designed to coordinate with my Tote-All Package
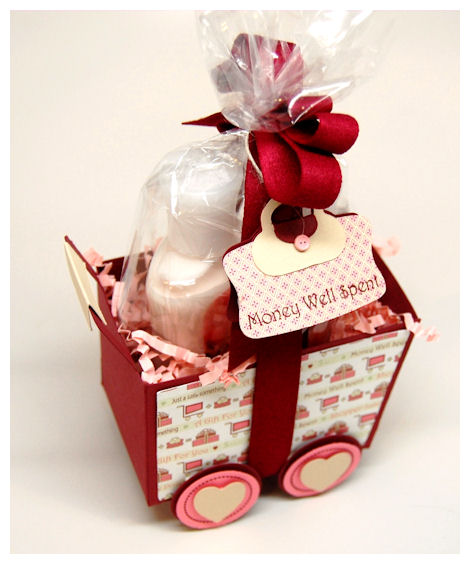
How cute is this?
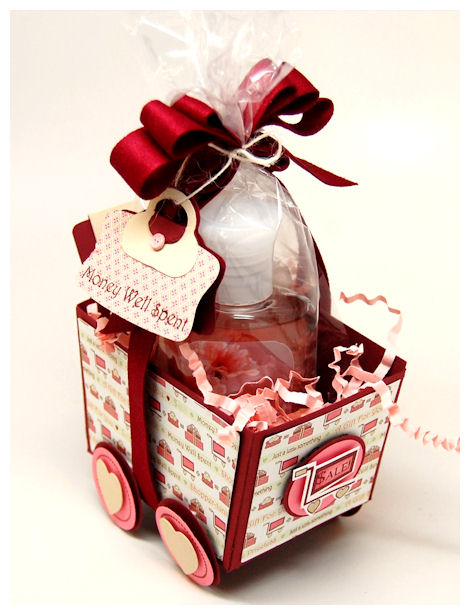
I used the shopping cart ot package up my travel size bath & body works lotion/shower gel!
I tied the ribbon just like the ribbon on the gift image from the NEW! Money Well Spent set.
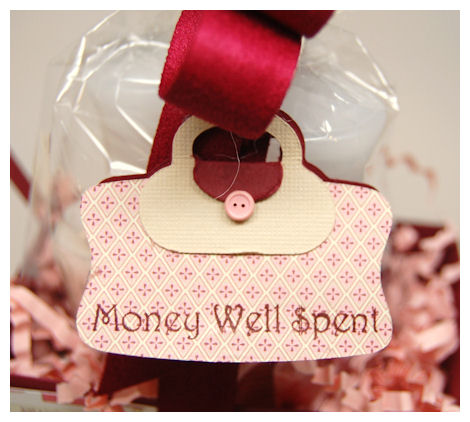
I chose to SHRINK the Purse-onality Cut File to become my 3 D tag! I can’t recall what size I shrunk it too (SORRY!!!)
Open it up and you can write the To: and From: info or a message! I used the purse pattern paper from the Shopping Shirley’s paper from my purse tag, and a button brad for the accent.
I love having the sentiment fit on the front of the tag.
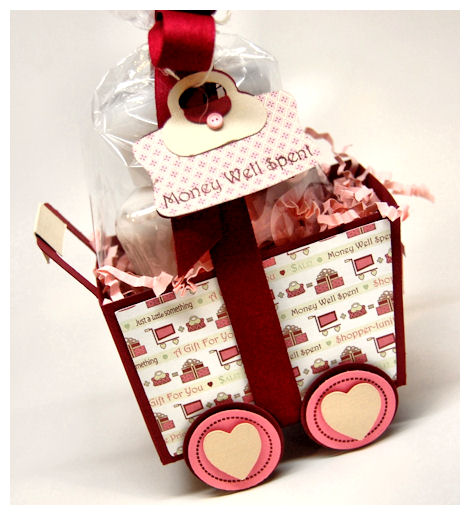
This file comes complete with the heart wheel layers.I used the dashed circle image from the Just For You to add some additional detail to wheels.
I didn’t use the open cart pattern that comes with the file because I wanted the paper to shine.
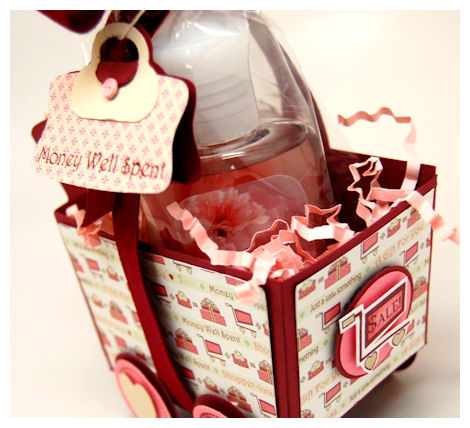
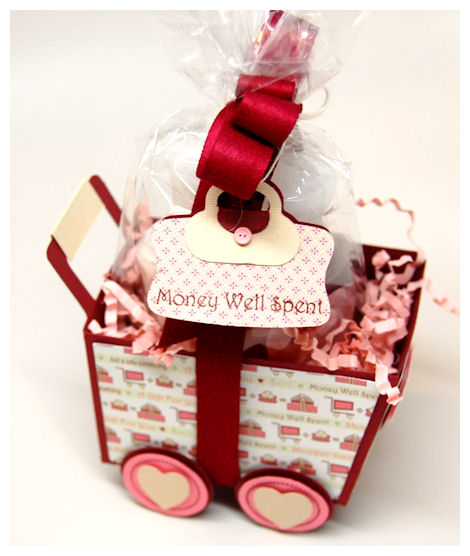
As we move towards the front of the shopping cart you can see the little shopping cart image that I used to decorate the cart with!!
Here is a more frontal view.
I Love that the cart image is OPEN because it allows you to stamp something IN that negative space. The SALE sentiment from NEW! Money Well Spent fits perfectly in there.
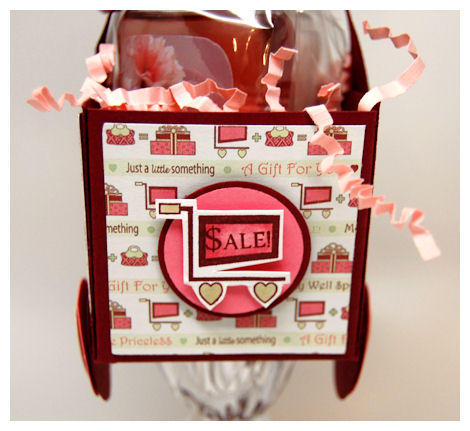
I;mjust in love. All the fun shopping images and sentiments within the Money Well Spent are so fun and easy to use. A true quick option when you need something and fast.
This one has not gotten nearly enough use from me, but I will make a note to use it more in the next few weeks.
OK now I’ll move on to the coordinating gift card holder using the Purse-onality Cut File
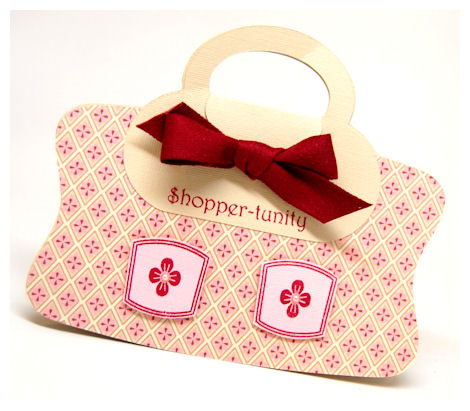
This was designed to look *just* like the tag on the shopping cart! Same paper and all!
I used the Tending the Garden set to create my “pockets”, and stamped the flower image from Argyle Amazement in the centers since it seemed like a match to the pockets.
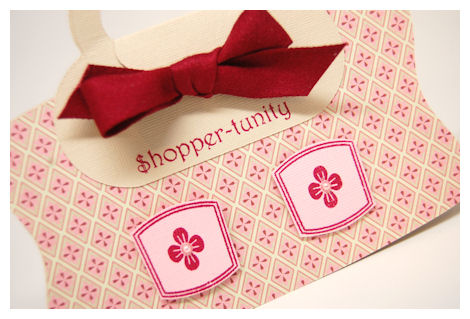
I added pearls to flower centers. The flap closure is held securely closed by tucking under the bow of my purse.
Now here is the inside….
OK I didn’t actually have a gift card, so I used a coupon card I had on hand to show how it will hold a card when I actually gift it to someone.
This is a FAB teen template too!! Older teens can be hard to buy for and even harder to make something for. You can’t go wrong with some $$$!!!!
Supplies from My Time Made Easy ™ LLC
Pretty Packaging Templates: Shop Til You Drop, Tote-All Package
Pretty Impressions Stamp Set: Money Well Spent, Just For You, Argyle Amazement, Tending the Garden
Pretty Printable Digital Paper: Shopping Shirley’sCardstock by Couture Cardstock:Pretty Pieces Cut File: Purse-onalityWell thank you all for stopping by! This has been a fabulous release.
I am hoping to post through the month and share some family stuff too as time permits!
Amber’s 6th birthday is Friday August 13th! Lots to do for that……
Be back soon, but until then, happy shopping.
Handy Holder of Pansy’s
Aug 6, 2010 Author: mytime | Filed under: Cards, Home decor/3-D items, My Time Made EasyHi all!
Hope you are having an enjoyable weekend!!
Today Tracey Cuccia and I have some projects to share. Be sure you stop by Tracey Cuccia‘s blog today to see just what she has up her sleeve!
When I posted the August Release I told you all how fabulous the Handy Man © Cut File was, and that it matches the Trendy Tool Tote ©
Many time when you see something you get an idea in your head, and it just ends there. I want you all to see that this file has MANY more possibilities!! One of them being able to be used for a feminine card!
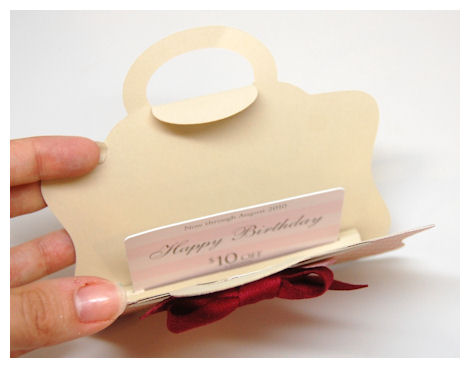
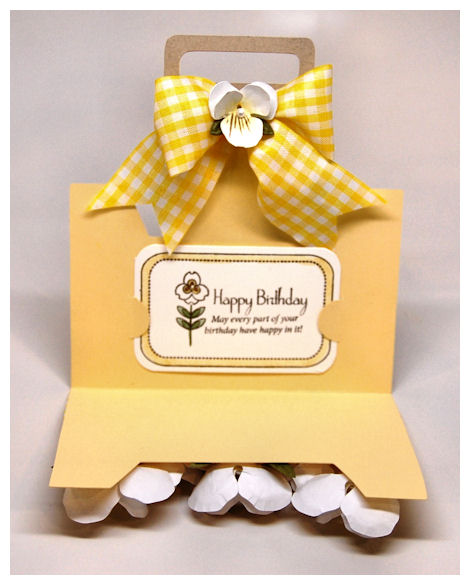
Would you believe that THIS is the Handy Man © Cut File?
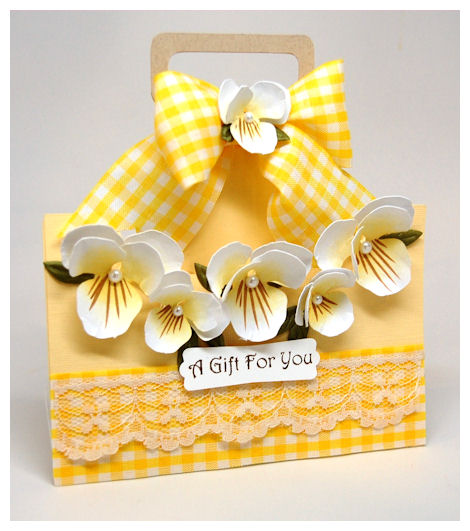
Stunning isn’t it?
I just made my Handy Man © Cut File from a Nomad (yellow) cardstock, and it went on from there!
I wanted this to look like a flower box with a handle! So I added my Perfect Pansy’s to the front of it.
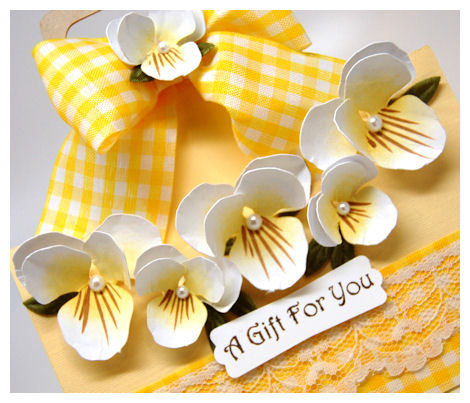
I plan on creating a video this week, if there is any interest in seeing HOW these are made, but I assure you it is VERY easy with our PERFECT PANSY CUT FILE.
CLICK HERE TO PURCHASE PERFECT PANSY CUT FILE
So simple and so fun! You can make and endless amount of your own realistic flowers.
My pansy’s on here were inspired by a flower photo I googled.

I re-sized the smaller pansy’s to I THINK 75%.
There is a wide variety of colors and even styles of Pansy flowers, so you can really use this Perfect Pansy’s file and easily replicate the look of ANY pansy you find!!
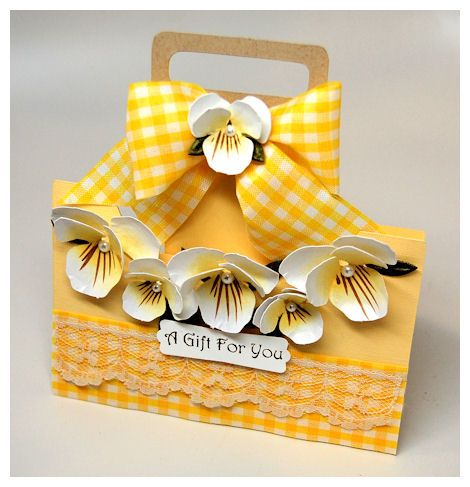
I used my wide yellow gingham ribbon to embellish the bottom, with a little lace trim.
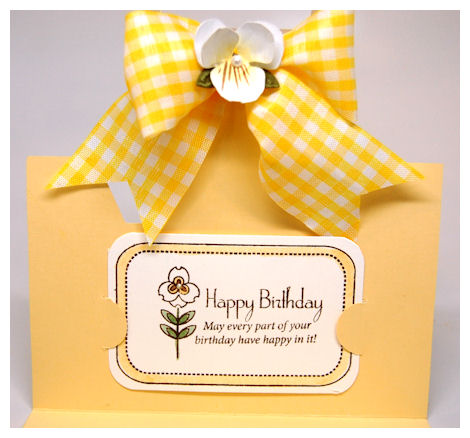
The tag was stamped with the sentiment from Money Well Spent.
Now here is the OPEN version so you can see HOW my Perfect Pansy’s are attached.
I used the frame image from Money Well Spent to cover my gift card.
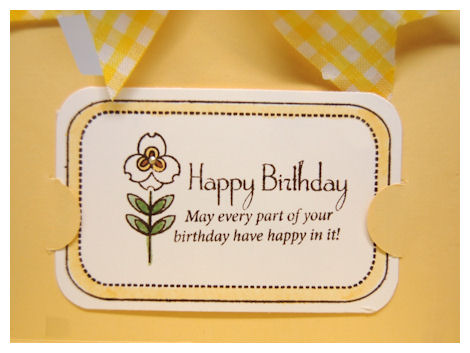
I stamped the pansy like flower from the Tending the Garden set, and paired it with the sentiment from So Sentimental.
So Sentimental is a fabulous set of main sentiments mixed with verses to match!
I chose to put the Happy Birthday at the top, then my sentiment underneath!
The gift card will be under the stamped gift card overlay. Now it doesn’t matter if your gift card matched your project, you can customize (aka cover) it to match.
So super simple and a definitely WOW!
Supplies from My Time Made Easy ™ LLC
Pretty Impressions Stamp Set: Money Well Spent, Tending the Garden, So Sentimental
Pretty Pieces Cut File: Perfect Pansy, Handy Man
Well I hope you enjoyed the project and that you get to give the Perfect Pansy’s a try!
Tomorrow I return with a group blog hop to celebrate the end of the August release! I have a trio of project’s to share that you won’t want to miss!
See you then.
From an elegant event to a party favor for kids
Aug 5, 2010 Author: mytime | Filed under: Home decor/3-D items, My Time Made EasyBe sure you stop by and visit Lesa Rapp!! She has a great sample for you today!!!!!
Every single Pretty Packaging Template that I design has endless limits and possibilities.
No matter what YOUR style is you can truly take these designs and make them your own. By putting your own touch or personal spin on them, each one can be different from the last! You can really get a whole new look each time you use a Pretty Packaging Template!
I love to get inspired by the item I am packaging, an ad with wonderful colors in a magazine or on TV, and sometimes it’s as simple as some patterned paper. No matter what you always need a idea or starting element.
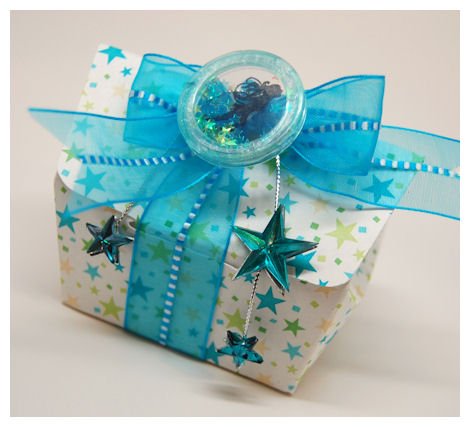
Today I want to share 2 project using the NEW! Tuck-ered Out!
You will CLEARLY see how this one box can go from an elegant Wedding favor, to a child’s birthday party favor!
First up we have a party favor for a Wedding next May.
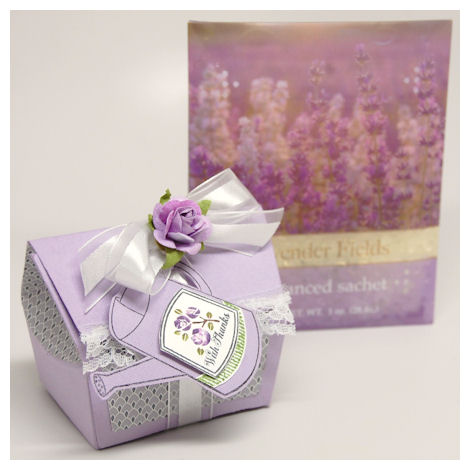
My inspiration came from the scented sachet in the background.
A friend of mine is getting married in NH at a gorgeous place, in a Gazebo, in the middle of a garden. So, that being said she asked me to do a mock up of what I think would be the perfect wedding favor for such an event. Since her dress (and the grounds) has lots of lavender and it is her color scheme I was over the moon to give it whirl!!
She will be carrying lavender roses, and they will also make up the centerpieces.
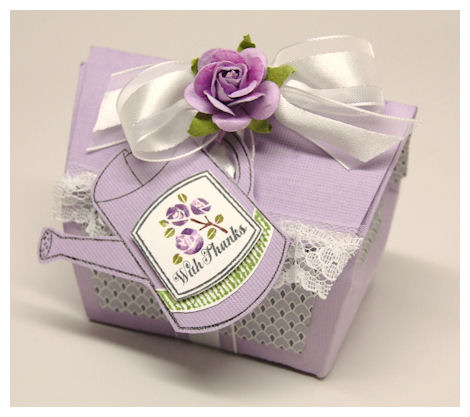
She hasn’t finalized her decisions, but inside this sweet favor box, that will sit at each seat will either be: a sachet of fresh lavender, lavender soap, lavender scented candle, or mini flower pots with seeds, or just packet of flower seeds.
I love the drawer sachet idea, but she is still thinking, and she has plenty of time. In the meantime they will be making these for the big day.
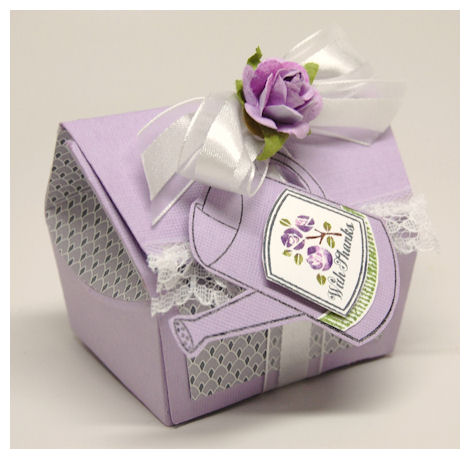
So all that being said, my NEW! Tuck-ered Out template was made from carousel cardstock. I printed the Gardening Greats: Plum Silent Night paper collection to accent my packaging.
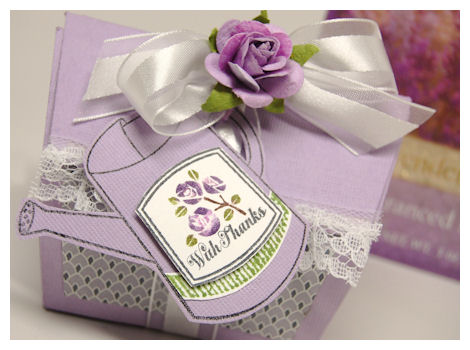
I chose to use the watering can with layering images from Tending the Garden. Icut it out to hang from the satin ribbon that tes around my box. Since she is carrying roses, I stamped the rose buds on the label and added a Prima rose to the center of my bow.
I added a little lace trim along the top for a touch of elegance.
Now we move on to the kids party favor.
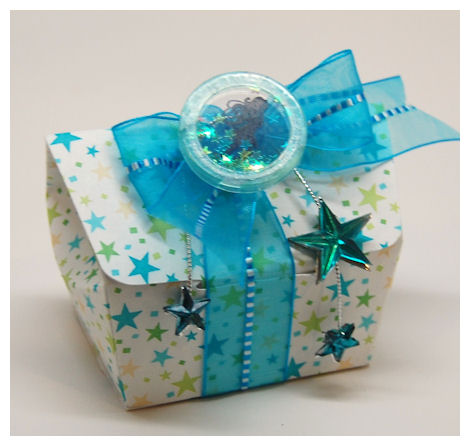
Amber is going to be 6 on August 13th. She loves Tinkerbell and has toyed with a Fairy dress up party. So I’ve been toying with a colorful arrangement of quick and simple favor ideas.
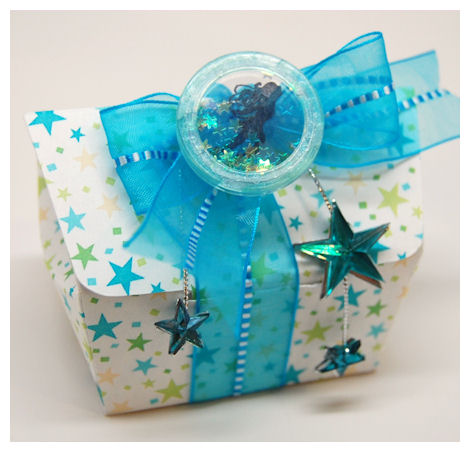
We are thinking about a rainbow theme of colors.
I thought that I would use the star confetti design from the Taylors Teeth collection of papers, to make each box a different color! It would be like a rainbow of favor boxes, unless she decides on a specific color for her party.
By printing these on the confetti paper most of the design is done.

For this one I stamped my fairy on this kids toy embellishment maker (I think they are called SPOTZ) with black StazOn. I sandwiched in some acetate to add some start glittery confetti that I had 😀 So its like a fairy shaker.
I added some siler cording, and glued on some glittery stars
Super simple and super sweet.
Talk about an affordable favor 😀
Now the original size of the package is perfect for any party favor! You can fit just the right amount inside without it being “cheap” or “over the top”. Since hosting my three children’s birthday parties year after year I am a pro at the perfect party favor 😀 I really enjoy making the elements that make the party come together and leave people talking.
Supplies from My Time Made Easy ™ LLC
Pretty Packaging Templates: Tuck-ered Out
Pretty Impressions Stamp Set: Lost My Tooth, Tending the Garden
Pretty Printable Digital Paper: Taylors Teeth, Gardening Greats
Ribbon by May Arts, Spots , Glitter Confetti, Rose by Prima, silver cord, star embellishments
Thanks for stopping by once again. Tomorrow I have even more to share, as does the team! So see you then!
My Etsy

Who I Designed For
Blogroll
- Alicia
- Alli Miles
- Ally Blankenship
- Amber
- Andi @ crafts on a whim
- Angel R
- Angie Z
- Anne Kranitz
- Becky O
- Bee
- Beth Silaka
- Bethany Paull
- Beverly Nash
- Bobbie
- Cambria
- Cammie
- Card of the Week
- Card Positioning System (CPS)
- Cards for Cancer
- Catherine Doucette
- Charmaine
- Cheryl Sims
- Chriss Rollins
- Christina
- Christine Ewing
- Christine Wooden
- Colleen Schaan
- Craft Critique
- Craft Gossip
- Crystal
- Dawn Easton
- Emily Giovanni
- Geny
- Holly
- Igne Groot
- Inspirational Craft Blogs
- Irene
- Jami Sibley
- Jeanne Streiff
- Jen del Muro
- Jeni Bond
- JenMarie
- Jenn Balcer
- Jenn Diercks
- Jenn O
- Jennifer E
- Jennifer Mick
- Jennifer Pereda
- Jennifer-Sweet Treat
- Joanne Basile
- Jodi Collins
- Julia Stainton
- Julie Masse
- Karen
- Kathryn Berthiaume
- Katie Cotton
- Kelley Holland
- Kendra
- Kim Scholfield
- Kris’s Color Stripes! Get inspired here
- Kristen Dubosque
- Kristin Eberline
- Kristine
- Laura @ Sunshine Stamper
- Laura Turnmire
- Laurie Schmidlin
- Lesa Rapp
- Linda Duke
- Linda-LSN
- Lindsey Botkin
- Lisa (lakind scs)
- Lisa Kind
- Lori Craig
- Maggie
- Mara Campbell
- Maria
- Maria Levine
- Mary
- MaryJo
- Melanie M
- Monique Hansen
- Moxie Fab World
- Pam Imholz
- PaperCrafts Connection
- Peppers and Pollywogs Kids party site
- Rebecca Grohall
- Rita
- Robyn
- Rose Ann
- Sarah Vrolyk
- Sharon Harnist
- Sharon Johnson
- Sharon Rivera (a chemisrty with paper)
- Sherrie
- Sophia Landry
- Storage Units, Ink, & More Blog
- Sue Berker
- Susan (Rainy)
- Tangii Crane
- Tracy
- Tricia Traxler
- Trudee
- Velta
- VivLyn
- Zena
MTME Pretty Palette Color Team
MTME Pretty Patterns Sketch Team
My Time Made Easy TM LLC
Shop till you drop!
Lauren Meader
About Me
Copyrighted material
Subscribe To My Blog
Pages
- About me
- Alexa’s Story!
- My Crafty Corner!
- My Time Made Easy™ LLC
- Our Make A Wish Trip to Disney!
- Resume/Publication List
Calendar
Archives
- August 2013
- July 2013
- June 2013
- May 2013
- April 2013
- March 2013
- February 2013
- January 2013
- December 2012
- November 2012
- October 2012
- September 2012
- August 2012
- July 2012
- June 2012
- May 2012
- April 2012
- March 2012
- February 2012
- January 2012
- December 2011
- November 2011
- October 2011
- September 2011
- August 2011
- July 2011
- June 2011
- May 2011
- April 2011
- March 2011
- February 2011
- January 2011
- December 2010
- November 2010
- October 2010
- September 2010
- August 2010
- July 2010
- June 2010
- May 2010
- April 2010
- March 2010
- February 2010
- January 2010
- December 2009
- November 2009
- October 2009
- September 2009
- August 2009
- July 2009
- June 2009
- May 2009
- April 2009
- March 2009
- February 2009
- January 2009
- December 2008
- November 2008
- October 2008
- September 2008
- August 2008
- July 2008
- June 2008
- May 2008
- April 2008
- March 2008
- February 2008
- January 2008
- December 2007
- November 2007
- October 2007
- September 2007
- August 2007
- July 2007
- June 2007
- May 2007
- April 2007
- March 2007
- January 2007
Categories
- About Me
- All That Scraps
- blogger challenge
- camera/photo play
- Cards
- Contests
- family stuff
- FOR SALE
- Home decor/3-D items
- How to FAKE it!
- Introduction
- JUGS Challenge
- JustRite Stampers
- Lizzie Anne Designs
- My family stuff
- My Stamping Space
- My Time Made Easy
- My Time To Color Challenge
- My Time to Create Challenge
- My Timeless Template Challenge
- My Timeless Templates
- Mytime Mail
- MYTIME MOVIE/VIDEOs
- Papertrey Newsletter
- Pink Cat Studio
- Pretty Palette Challenge
- Pretty Patterns Sketch
- Product Opinions and Must haves
- Recipe's
- Saturday Sketch
- Smilebox Creations
- Stampavie
- Tutorials
- Uncategorized
- videos
Most Popular
- Create your own Onesie Card Tutorial-and important NOTE! PLEASE READ (2529)
- Saturday Sketch-Boxed bag holder (2333)
- Going GREEN! Fancy Flower Flourish-Closure Video (1478)
- Fabulous Favorite - Giveaway! (1336)
- a Prayer Request (1232)
- QUICK-Easter Baskets from Nestabilities-PTI style-and blog challenge (1063)
- Teaser Sketch (999)
- February Release Giveway! (and a little peek) (996)
- Group Post and Rambling Rose Video Tutorial (985)
- GIVEAWAY! Who wants it all?! (895)
Recent Comments (RSS)
- 첫충사이트: 완전히 흥미로운 블로그 게시입니다. 저는
- sarah: Wow, Lauren, what a stunning
- hedie: خرید راهبند
- 야동: Love to read it,Waiting For
- 야동: This seller is in a
- 바카라사이트: 여기 처음 왔어요. 나는이 게시판을
- 야동티비: I was surfing the Internet
- 바카라사이트: 비슷한 주제에 대한 흥미로운 정보를
- 바카라사이트: "여기에 제공해 주신 귀중한 정보와
- 온라인홀덤: 유익한 웹 사이트를 게시하는 데
Copyright © 2007 - My Time, My Creations, My Stampendence - is proudly powered by WordPress
This blog has been Tweaked and Designed by Sara Williams