Archive for July, 2010
It’s August first and that means the My Time Made Easy Release is here!!
CLICK HERE to view ALL our NEWEST products!
Or see our detailed post outlining what is NEW! —->HERE!
In honor of the first of the month my design team has gotten together to create some cards using all the amazing images from this month. Our stamps are perfect for creating coordinating cards, tags, and gift packaging! With coordinating cut files and digital paper, the ideas and possibilities are limitless!
When you are done here you will definitely want to visit the team:
This month I released 3 NEW! Pretty Pieces Cut Files that are PERFECT for giving gift cards! Since we have a shopping theme going, this is a great new addition to the lineup.
Now you don’t have to use it as a gift card holder, as they make the perfect themed/shape card as well!
So let me get started in sharing some ideas 😀 I have more to come with each new card file as well, so stay tuned!
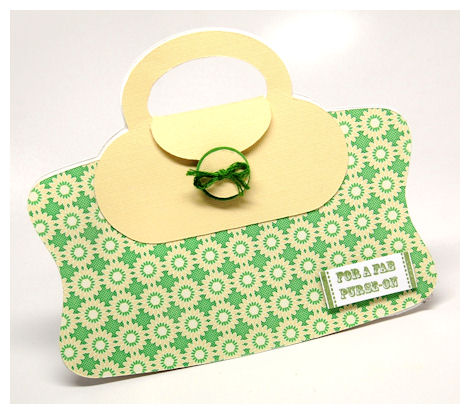
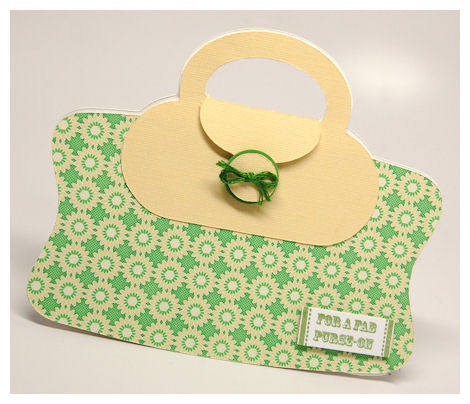
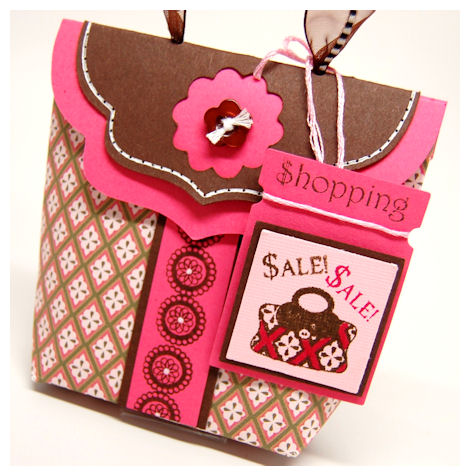
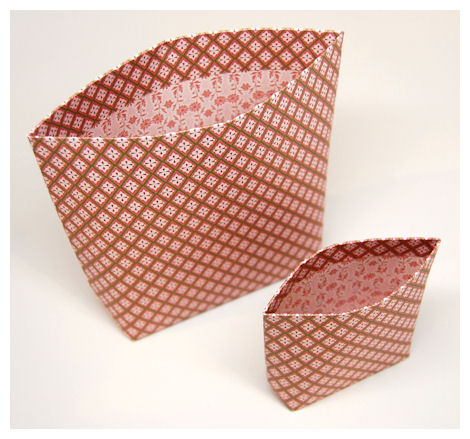
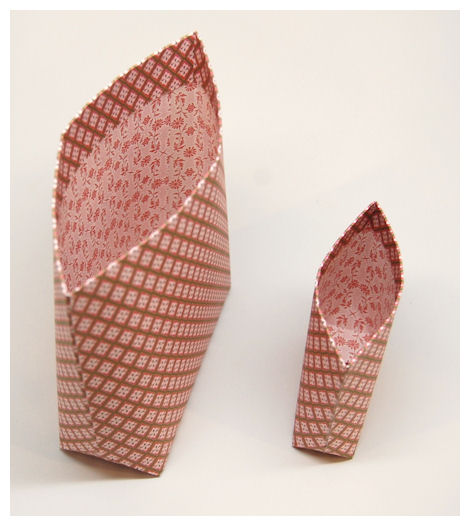
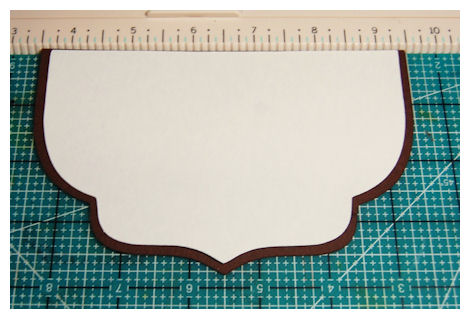
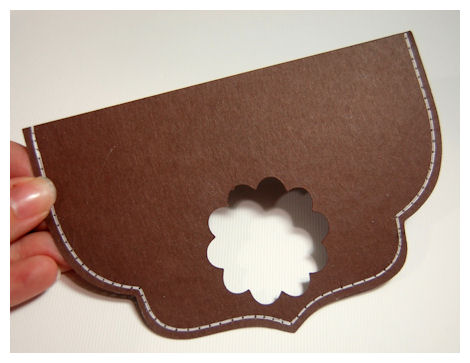
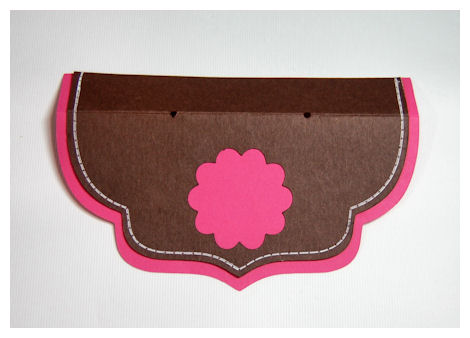
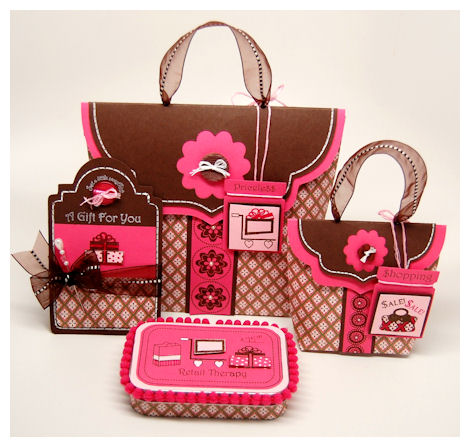
Purse-onality
Available in PDF, SVG, WPC. DXF, and GSD
This template was actually designed after the image in the Money Well Spent © set.
Completed Project Size
4 1/4 Inches Tall 5 1/2 Inches Wide
1/2 Inch Deep
This template was actually designed after the purse image in the Money Well Spent © set. We even have some coordinating paper called the Shopping Shirley collection, that is to die for!
However you decide to embellish it, this is sure to be full of “purse-onality”!
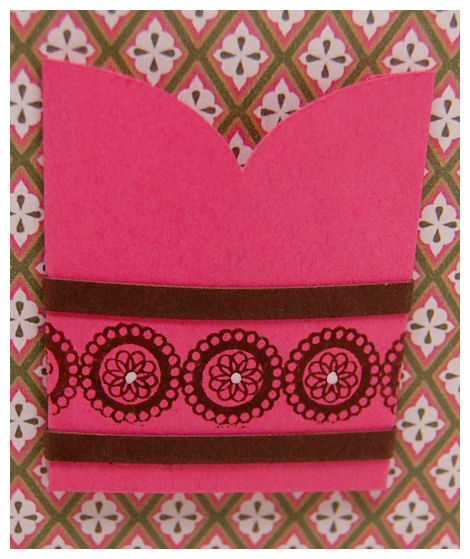
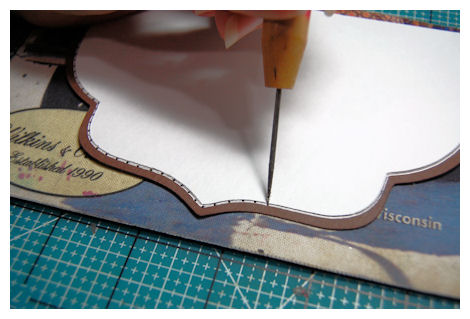
I used the sentiment from the Money Well Spent © set. I stamped the sentiment in the rectangle label from the Lovely Labels 1 set, then cut it out to be like the label on a designer purse. It was just perfect. This literally came together in just a couple of minutes.
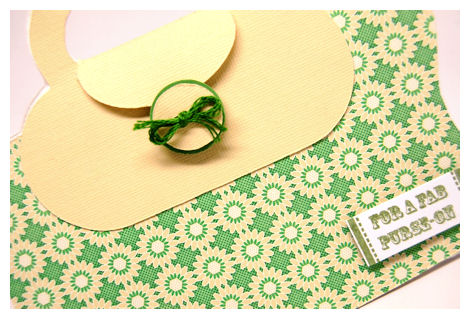
All the details are just perfect, right down to the cardstock button!
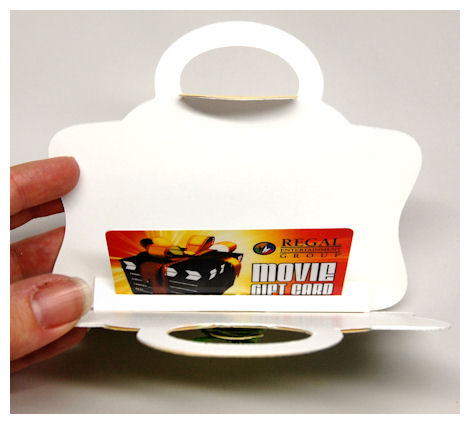
Un-tuck the flap and it will reveal your gift card.
Naturally we all love our purses! You can never have too many. It is a shopping and wardrobe essential. Now it will be an essential part of your gift giving too. Wait unitl later this week when I share some other ideas for this one!
For my “fabric” pattern I used the Gardening Greats: Nomad’s Pea Pod digital paper for a fresh look!
This super cool shaped “purse” is a MUST HAVE, to help you package up that gift of cash, or a fun gift card to shop somewhere…. ANYWHERE!!
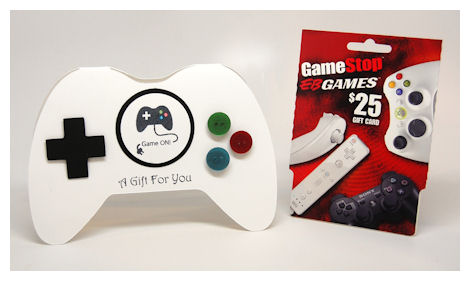
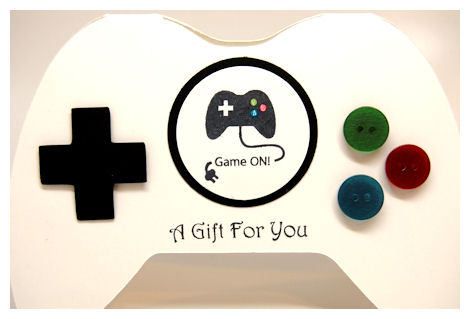
Game On Pretty Pieces Cut File
Available in PDF, SVG, WPC. DXF, and GSD
Completed Project Size 6 1/4 inches wide
4 1/4 inches tall
My son is a HUGE video game fan, so this image and cut file was designed for him!
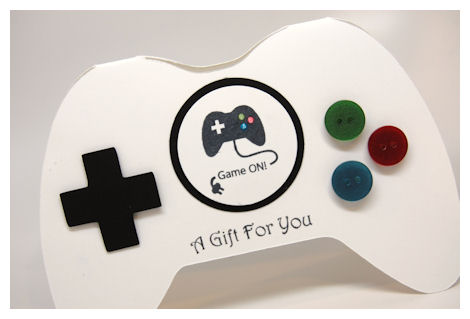
This template was actually designed after the game controller image in the Money Well Spent © set.
Perfect for the video game lover in your life! This gift card holder was fashioned after a game controller! When you put any gift card (or cash) in this shaped holder it will certainly WIN the happiness of its receiver.
Cut file includes the + piece and the O button pieces. The stamped image from Money Well Spent just adds to the fun!
Within the card are the tabs to hold the gift card, but you certainly don’t have to this as a gift card holder. This would make the cutest embellishment for a gift bag (like on our NEW! Tote-All Package ©!). You can also alter the size to create a little card / tag too.
Funny story:
This was the card I made for my hubby, from our son Noah for Father’s Day.
Noah took his OWN money that he saved from doing chores to buy Jay a $25 gift card to the game store.
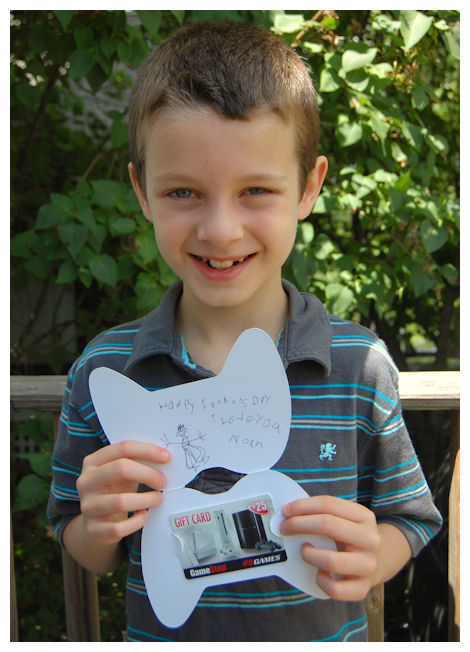
Noah drew a picture and signed it, then placed the gift card inside for his dad. zhe seemed very happy and proud of what he did all on his own for his dad.
So, on Father’s Day, while Jay opened the card I told him how Noah chose what to get, and how he dediced to spend his own money on it.
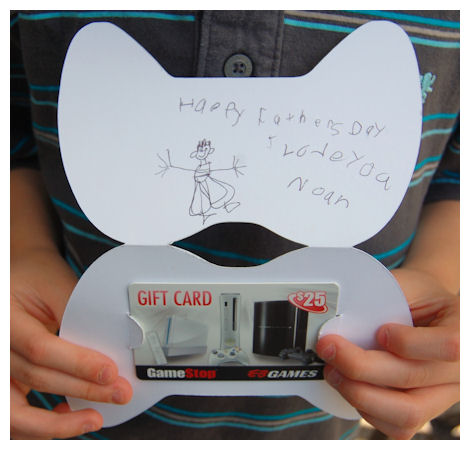
When Jay opened the card he saw the sweet picutre Noah drew for him and the gift card.
Jay said “WOW! Noah this is for me. I can’t believe you spent your own money on something like that for me buddy! Thanks I love it.
It was then that Noah went on to “explain” the gift. He said “Daddy “this ” is your card (pointing to the white game controller shaped piece of cardstock) with the picutre I drew and “this” is my card .”(pointing to the game store gift card).
I explained to Noah that he bought the game store gift card FOR his dad, as HIS gift to him. Obviously he didn’t fully understand that he wasn’t KEEPING the gift card for himself. He felt like the cardstock card was for dad and the money he put on the gift card was still his.
OH! BOY!! It was one of those funny kid moments.
Next up….another mascline card design that I will later share a more feminine version of!
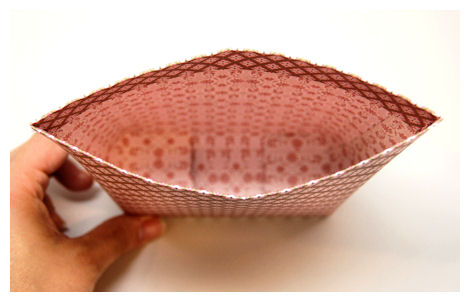
Handy Man Pretty Pieces Cut File 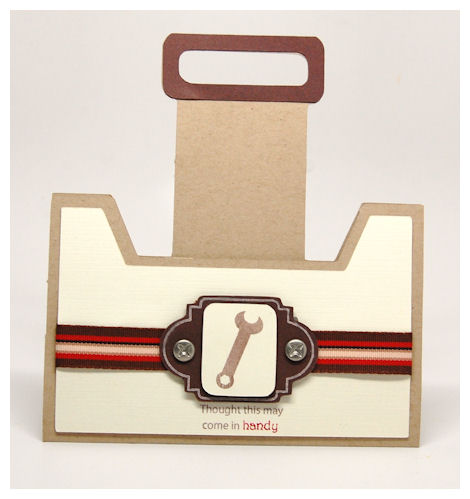
Available in PDF, SVG, WPC. DXF, and GSD
Completed Project Size 6 1/2 Inches Tall
5 1/2 Inches Wide
This was designed be like a tool box! A perfect companion to our Trendy Tool Tote template!
This gift card holder is perfect for the man (or woman) in your life. Wait until you see more possiblities!
The wrech and sentiment are part of the Money Well Spent © set. I also used the Lovely Labels 1 set with coordinating cut file
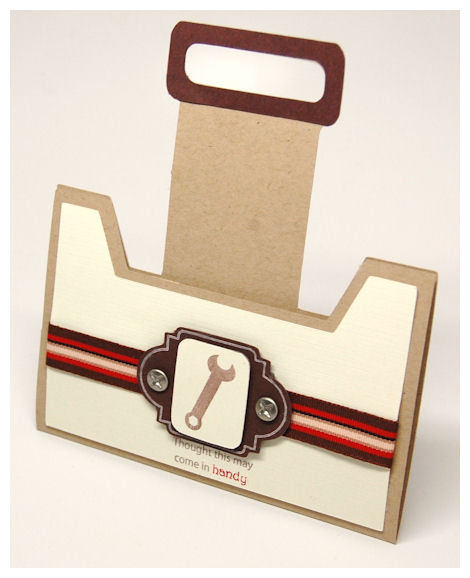
Here is the inside

This is the perfect shaped gift card holder for the “handy man” in your life! Or it is great to gift to the new neighbor, or homeowner!! 
Use this to also “fill” with paper flowers for the gardener in your life or to serve as a little get well.
Whatever occasion you design it for, this is sure to come in HANDY for packaging those gift cards!
Supplies from My Time Made Easy ™ LLC
Pretty Impressions Stamp Set: Money Well Spent, Lovely Labels 1
Pretty Printable Digital Paper: Gardening Greats: Nomad’s Pea Pod
Cardstock by Couture Cardstock: Santa’s Beard, Sunflower, Ganache, Slate, OSW White, Nomad, Meadow
Pretty Pieces Cut File: Purse-onality, Handy Man, Game On, Laovely Labels 1
OK that is all for today, but please come back by tomorrow because there is MUCH more to share 😀
I hope you all have a great day and of course “happy shopping”!!
August Release MTME
Jul 31, 2010 Author: mytime | Filed under: My Time Made EasyI’m so very excited that the My Time Made Easy ™ LLC August release is finally here!
You can view * ALL NEW PRODUCTS HERE *
We have many NEW! Products that coordinate together! So don’t miss out ![]()
My shipping is VERY affordable and I ship WORLDWIDE ![]()
3 NEW! Pretty Packaging Templates
3 NEW! Pretty Impressions Stamps Sets
Lost My Tooth © 17 Images *Also available in Digital*
Money Well Spent © 19 Images *Also available in Digital*
10 NEW! Pretty Printables Paper Collections
TOO MANY TO LIST! So check them out.
4 NEW! Pretty Pieces Cut Files
1 NEW! Perfect Package Collection <—Check it out!!
If you haven’t yet you may want to sign up for our NEWSLETTER on our Website.
Detailed information about our products can be seen on the ABOUT PAGE
Do not forget to READ DOWNLOAD INSTRUCTIONS prior to checking out, and be SURE you selected the correct file type!!!!
Also do NOT let your download expire before you have a change to download it.
If you have *any* customer service questions or issues please contact me at:
August Release Perfect Peek Day #3
Jul 30, 2010 Author: mytime | Filed under: Cards, Home decor/3-D items, My Time Made EasyIts just about here!
Well today is the final day of peek projects, but certainly not the final example of ideas using the latest products from the August 1st release!! We have a FULL week left of FUN. In fact tomorrow we have a group post, and you will see a few more new products revealed then during our group hop, along with some card ideas, which is always handy.
In just a few hours you can place your August order 😀
I’d really love to hear what you think you are most excited about (so far) with this release 😀 (there is more to come tomorrow) I think I’m most excited about the last template I will be sharing today called Shop Til’ You Drop!
I think it is obvious how much I LOVE gift packaging, and this is one that has something for everyone! Be it boy, girl, teen, tween, man or woman-you can find a use for it!
Today you will definitely want to see what the amazing DT put together using the NEW! Shop Til’ You Drop!template! So please stop by and “pay” a visit to:
Well now it is my turn to share the 3rd template of the month! Something I ALWAYS wanted in cardstock form, but never had until now!
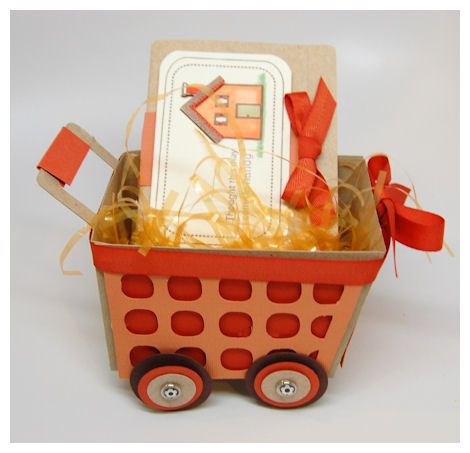
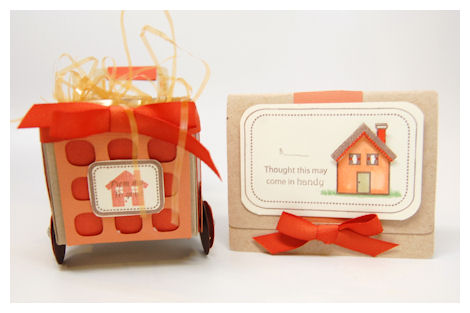
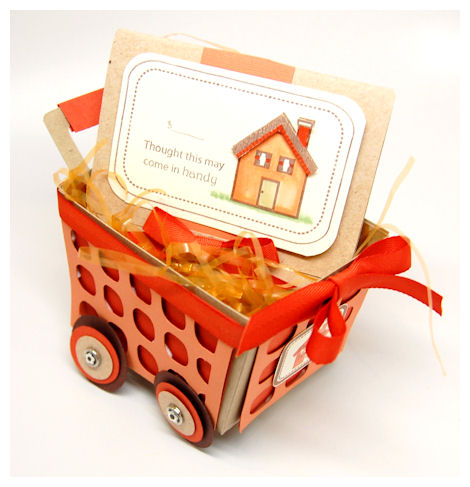
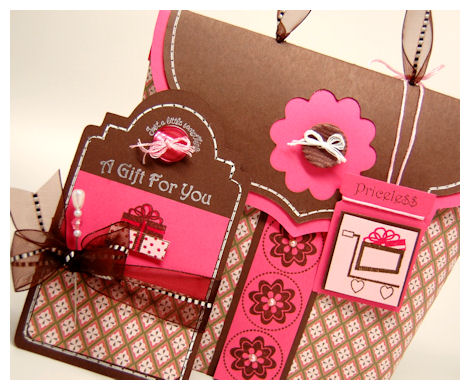
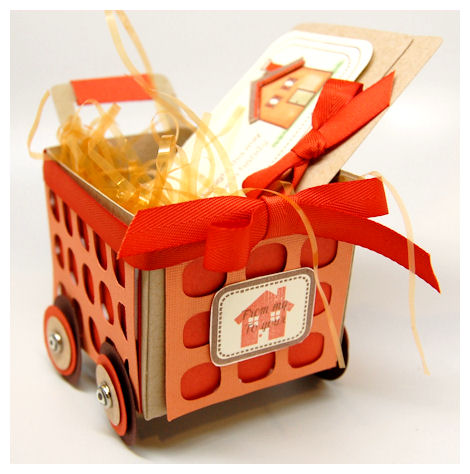
Here is the NEW! Shop Til’ You Drop!
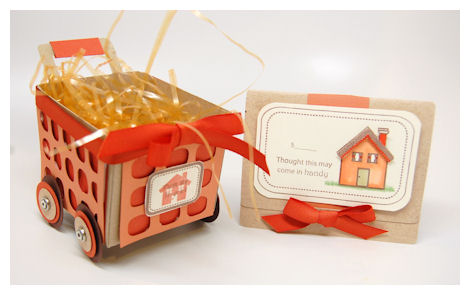
Shop Til You Drop $5
Completed Project Size 4 Inches Wide
2 3/4 Inches Tall (without wheels)
2 1/2 Inches Deep
Available in PDF, SVG, WPC. DXF, and GSD
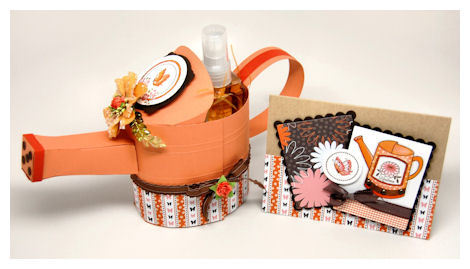
Seriously does it get any CUTER or more shopping savvy?! I consider myself a professional “shopper” so this is SO perfect! LOL!
I have always dreamed of having a shopping cart style template! Oh the possibilities of filling it up.
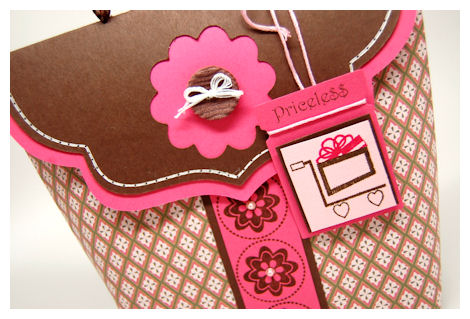
This template was orignally inspired by the shopping cart image from the Money Well Spent set.
The set comes with everything you need to make your shopping cart from cardstock, from the sweet handle, angled basket, right down to the heart wheel layers (not shown here). I love the option of the realistic shopping cart side panels too! Too fun.
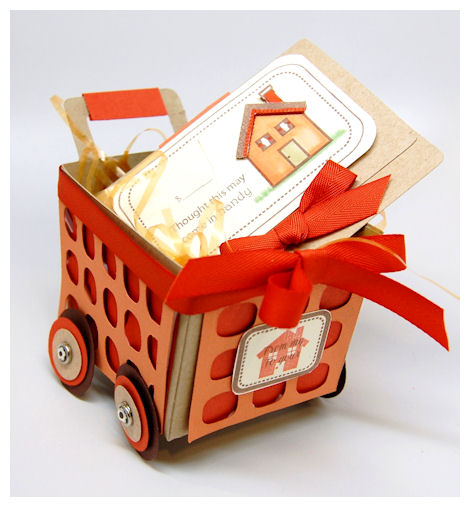
For my cart I was going with the whole “Home Depot” kind of idea for the gift card for a new home/home improvement kind of thing. So I used the orange color (like Home Depot) to match my gift card, and the sentiment “Thought this may come in handy” was definitely meant for such a time.
For the front of my cart I decorated it just like the store shopping carts we have in our grocery store, where there is a little plaque that advertises the store, or some other paid for “ad”.
I used the rectangle label from the Lovely Labels 1 (with the Lovely Labels 1 Cut File), and the small solid house image on the cart from the You’ve Got Mail. The sentiment “From my to your” (which was meant to go with the house or heart image in the set) is also from the You’ve Got Mail set .
This template was actually designed after the shopping cart image in the Money Well Spent set. Imagine all the fun treats you can put in here! Candy of all kinds
Travel size items
Get well items
Home baked goodies
Office Supplies
Doll Clothes
Little toys/ dolls /animals
Pretend food for the kids to “shop” with CASH (Use the Money Well Spent set to make pretend credit cards to they stop playing with yours!)
It is also perfect for those gift cards!
Shopping couldn’t get any more fun, anc the ideas are truly endless with possibilities.
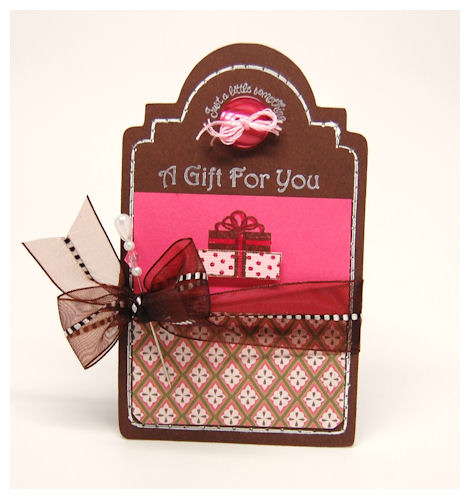
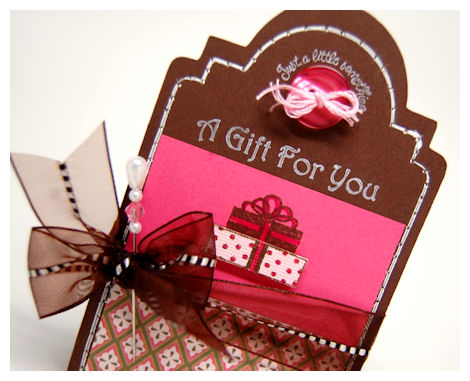
The card that is in the basket is the Lunch Box Love Note!!

It is the sweetest card size (no envy needed!) and it holds a gift card PERFECTLY!
I used the frame from the Money Well Spent set, as well as the dollar symbol (so you can add the amount the GC was purchased for) and the sentiment, which is also in the set 😀
The adorable large house on this gift card is actually from a favorite set of mine: Just For You. It really completed the entire ensemble.
I love taking new sets and pairing them with the older ones. With tough econimic times we need to maximize our dollars, and making gifts can certain be far more economical as well!
==============================
Supplies from My Time Made Easy ™ LLC
Pretty Packaging Templates: Shop Til You Drop
Pretty Impressions Stamp Set: Money Well Spent, You’ve Got Mail, Just For You, Lovely Labels 1
Cardstock by Couture Cardstock: Santa’s Beard, Sunflower, Acorn, Warm Apple Cider
Pretty Pieces Cut File: Lunch Box Love Notes, Lovely Labels 1
OK please return tomorrow for our special group post!
There is more releasing than you’ve yet to see, so I hope you are as excited as I am.
Till next time!
August Release Perfect Peeks Day #2
Jul 29, 2010 Author: mytime | Filed under: Cards, Home decor/3-D items, My Time Made Easy, Product Opinions and Must havesHi everyone!!
I hope you are all enjoyed yesterdays projects, and are taking advantage of the wonderful weather we’ve been having.
Today is day #2 of project peeks for the August 1st My Time Made Easy ™ LLC release!
This month Dawn & Geny both had some urgent things pop up, so they won’t be stamping with us this go round, but both Pam Imholz and Tracey Cuccia have some amazing samples to share today using a NEW! Pretty Packaging Template: Tuck-ered Out. So be sure to check them out.
Also Kristin Bueter is back for a sample 😀 YEAH! Kristin we are happy you have returned! Kristin was away for work, and now is back with us so you should see some new stuff from her soon.
I have so much to share I’m not even certain WHERE to begin!
This month we are release several templates, cut files and of course digital paper…..but only 2 stamp sets.
We have yesterday’s set feature: Money Well Spent © , so today I will be previewing the 3nd packaging template called Tuck-ered Out (we have 3 templates this month!), using our 2nd set for this month called Lost My Tooth ©!
I am very excited about today’s stamp set peek, as it filled a gap (for me) in an area for those of us with smaller children.
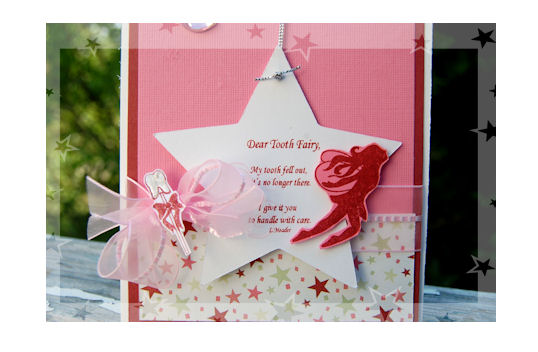
Little Tooth Fairy Fun
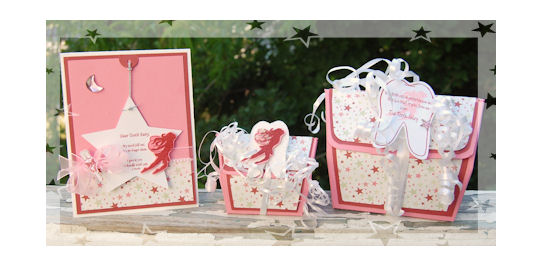
Here is a little gift set that I whipped together (yesterday! EEK!) to showcase both the Tuck-ered Out template and Lost My Tooth ©! stamp set. I’m not even sure WHERE to start with the explanation of WHAT I have going on here!
I guess I will start with the Tuck-ered Out template explanation, then move on to the stamps!
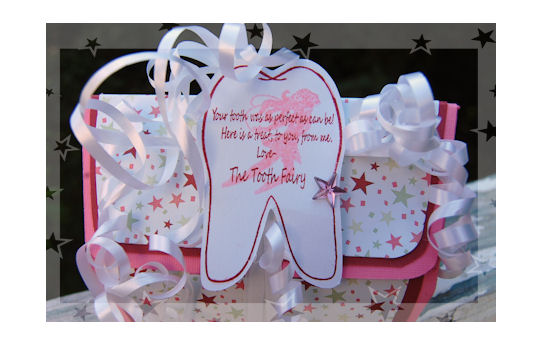
Note: In this photo the design on the left is the actual completed project size. The larger project on the right is the same template, enlarged to 155%. I thought it would be fun to share some sizing options.
Completed Project Size (see box on left)
3 1/3 Inches Wide
2 1/2 Inches Tall 2 1/4 Inches Deep
Available in PDF, SVG, WPC. DXF, and GSD
This template comes with the side tuck in decorative panels, a front bottom decorative panel, ans a optional handle (not shown here).
This can be made to look like a little purse, house, barn, or even a treasure chest! Limitless possibilities.
This is just the cutest “tuck” tab style, little treasure box! All the sweet “tucked” folds, un-tuck as you open it, to reveal your sweet treasure inside!
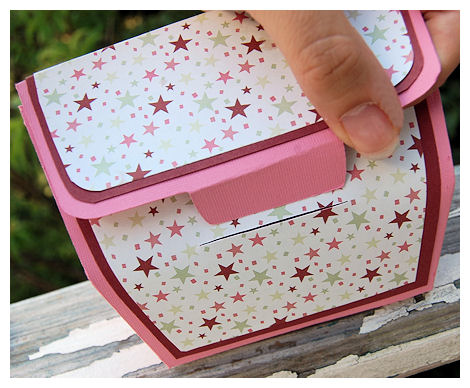
See….the little tab just tucks right into the front slot.
Once it is un-tucked……
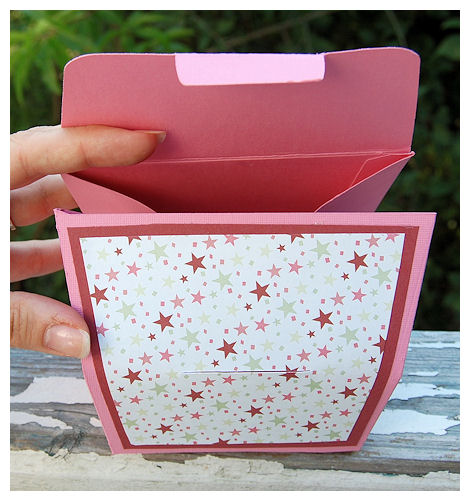
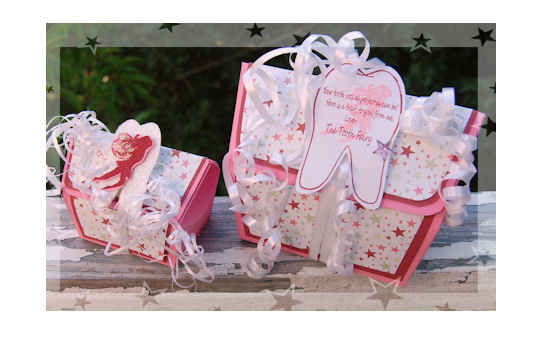
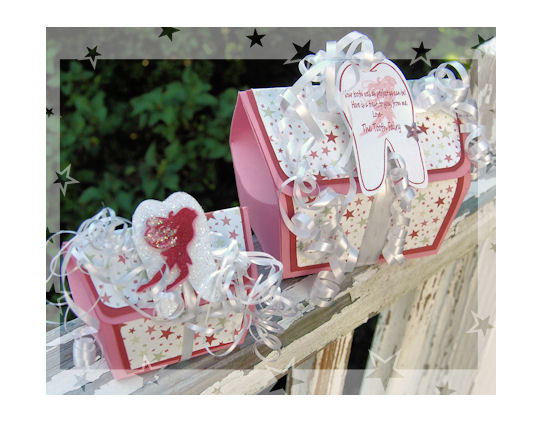
The flap opens to to reveal whatever sweet treat you package up in there!! Makes the perfect party favor, or packaging for a little treat! (Or a big treat should you decide to enlarge it!)I had packaged my favorite Australian Licorice in here, it was a perfect match :D, but my kids saw it on the counter while I was downstairs designing the next project, and I ascended to find an empty licorice bag :C Oh yes, its been one of “those” days.This will also fit gift cards, and tooth boxes perfectly!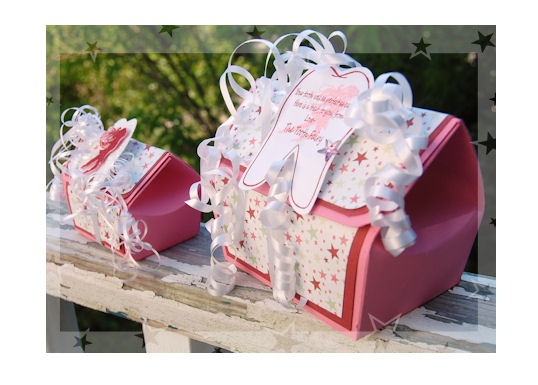
The smaller box is for the tooth fairy, and the large box is the gift left by the tooth fairy! (I often like to leave little stuffed animals, art supplies, mini games etc when my children lose a tooth.
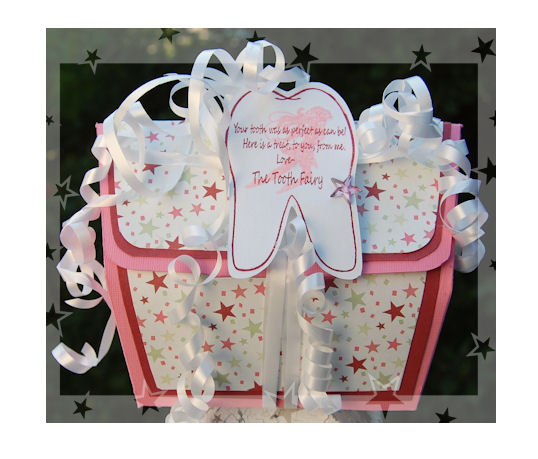
I used the NEW! Pretty Printable Digital Paper: Confetti Star pattern in Candied Thistle Stalk for my color scheme on this. The paper is SO pretty and based off of a scattered star pattern from the Lost My Tooth ©! stamp set.
This is the enlarged version.
ALL my templates are base on the standard 8 1/2 X 11 inch cardstock, so those with printers (or who only own that size cardstock) can easily make fabulous gifts. That being said they can all be resized 😀
I created this using my Cricut Expression and enlarged it to be 155%. You would need to use 12 X 12 paper to create one this large. It ends up measuring 5 1/4 inches across, 3 3/4 inches tall, 3 1/2 inches deep.
How literally sweet would this be for a Fairy Themed party? (Ignore the TOOTH!! LOL! We do have stars too!)
Note: I will also share some BOY stuff with this set so you mom’s out there with no girls, don’t fear.
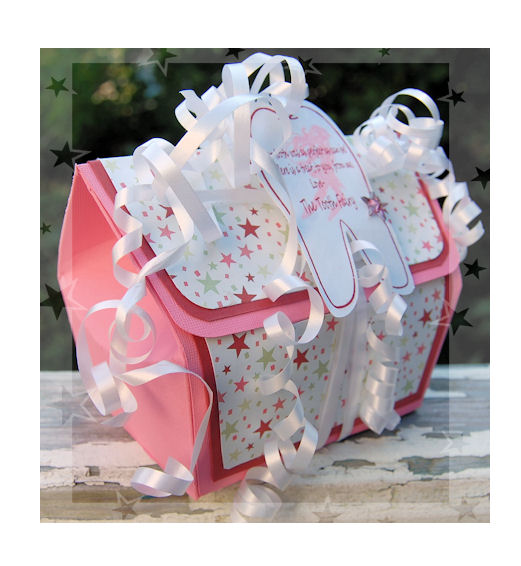
This is the side view of the box. I love the tucked in panels.
I used some really of that party ribbon you can get really cheap, and I LOVE the result. I’m not sure WHY I haven’t used it before! SO FESTIVE!
I love all the sentiments featured in this set and the fairy shilouette (there is a large and small version). The large fairy is 1 1/4 inches tall. The smaller fairy is about 3/4 inches tall, and a 1/2 inch wide.
Now here is the tooth image from the Lost My Tooth © set. It measures about 2 3/4 inches tall, and 2 inches wide. It was cut out using the coordinating Lost My Tooth © Pretty Pieces Cut File .
The Lost My Tooth © Pretty Pieces Cut File Available in SVG, WPC. DXF, and GSD
This is a coordinating cut file to enable you to easily create some super treats using the Lost My Tooth ©Pretty Impressions Stamp set! Within the cut file there is the coordinating tooth, tooth fairy shilouette, a star, and a label that is also from the set.
This is the standard size below:
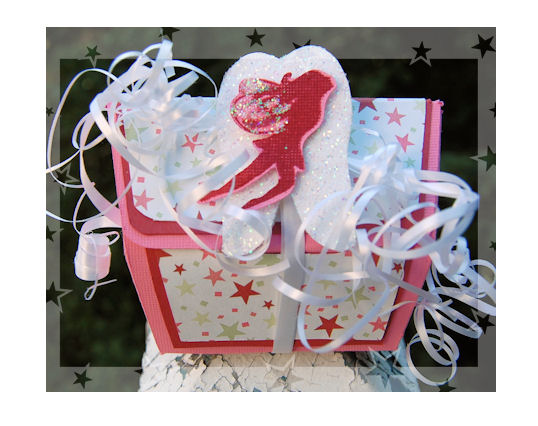 I also used the Lost My Tooth © Pretty Pieces Cut File to cut out my fairy, which was then stamped on the pink layer, and glitter added to the wings. I also resized the same tooth image to be smaller to fit on the Tuck-ered Out template.
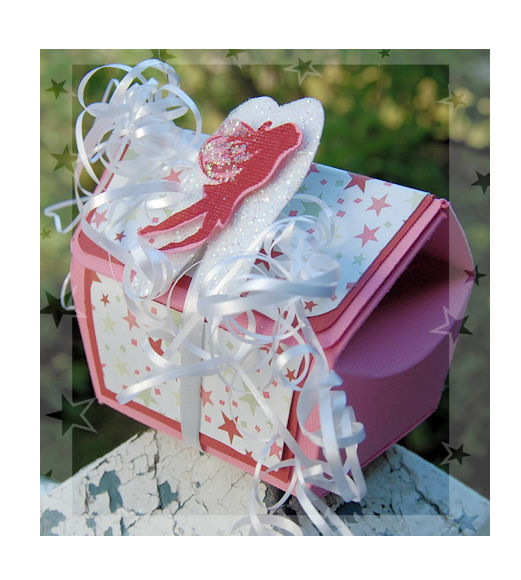
I glitterized it, and added it to my template. The ribbon and tooth embellishment just slide off. Perfect!!
This will become the star of any tooth losing event! Or steal the show if you use it for a gift or party favor!
Now let us get to the set description, shall we?I will definitely be sharing MORE uses for this set (using some of the suggestions below) so stay tuned if you need visual.
———————————————-
Lost My Tooth © Set of 17 Images $20 *
Also available in digital format* $12
This is the perfect set for anyone with little boys or girls!
Well if you are like me, and you have small children then the Tooth Fairy is a big part of your life from the age of about 4 years old!Myself having 3 children, I was always looking for creative ways to package up their little tooth treasure, or leave a note from her, or even to her from the kids! This set has so many wonderful features!
There are 2 small label style images in the set. In them you can fit the sentiments “My First Tooth ” or the “My Little Tooth Box”.
The labels in the set are meant to fit atop a mini metal slider tin (aka: Lip Balm tin), for your little one’s tooth!
NOTE: Slider Tin can be found here: https://www.sks-bottle.com/340c/fin7k.html
The labels fit perfectly on a Avery 8160 mailing label, which is the perfect size for the slider tin!
I created 4 of the poems within this set myself, with sentiments like I always wanted to have.
Here is the card that matches the gift set.
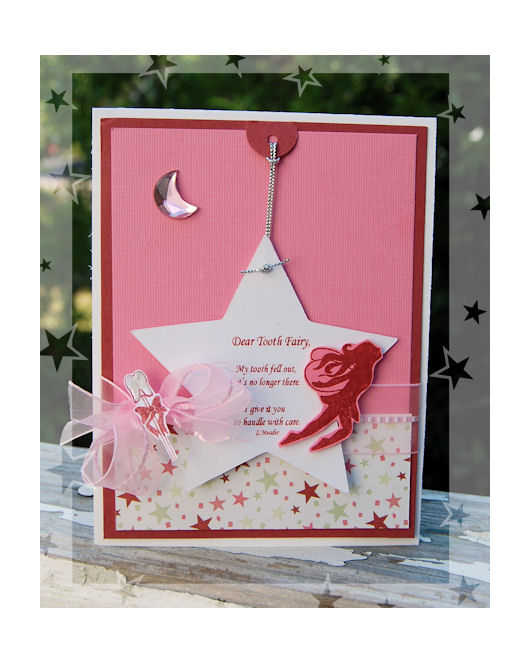
NOTE: Yes, we have a little TYPO :C The sentiment should read “I give it “to” you to handle with care.”
This sentiment will be replaced within the set, so for anyone ordering you will get the corrected version.
This is a note TO the tooth fairy.
Most of the sentiments in the set fit in the large tooth image which can easily be cut out ,or you can use our Lost My Tooth Cut File which coordinates with the set! You can also fit the poems on the star that is in the Lost My Tooth Cut File
There is a large and small tooth fairy silhouette. She can fit in the large tooth, or the smaller one can fit on the mailing label! This makes creating easier than ever!
There is also a “build” a wand set! There is a stick, with the tooth, and a star! So use whatever you like. The bow is “optional” just in case you were making a boy themed treasure! See I used the wand on this card. I placed it in the center of my bow. I also used Fanciful Flourishes for a fairly trail, but you can’t see it in the photo (bummer).
Sentiments include:Your tooth was as perfect as can be! Here is a treat, to you, from me.Love-The Tooth Fairy(this one is the poem featured on the Tuck-ered Out template)——————————
Dear Tooth Fairy,
My tooth fell out,
it’s no longer there.
I give it to you
to handle with care.
L.Meader
(this one is on the card)
——————————–
Under my pillow I hope to find
a treat of another kind!
———————————
Wiggle, wiggle, little tooth
It’s no longer there, but it once was loose.
Off with the Tooth Fairy it will go,
then another tooth in it’s place will grow!
-Lauren Meader
———————————
My Little Tooth Box
———————————
My First Tooth
———————————
Other than a dimple in a cute little chin,
What’s more adorable than a toothless grin?
~Azu “Betty” Espezia
———————————————————
Supplies from My Time Made Easy ™ LLC
Pretty Packaging Templates: Tuck-ered Out
Pretty Impressions Stamp Set: Lost My Tooth © , Fanciful Flourishes
Pretty Printable Digital Paper: Taylor’s Teeth: Confetti Star print
Cardstock by Couture Cardstock: OSW white, Sweetheart, Blessings, The Other Woman
Pretty Pieces Cut File: Lost My Tooth © Pretty Pieces Cut File
WHEW! What a whopper of a post!! Well what do you think?
Just wait until you see the other projects I have using this set!!
Well I am off to take my kids to the sprinkler park for some fun 😀 I love the sprinkler park. No worry about drowning 😀 and I get to have some girl time with my friends while our kids play.
Thank you for stopping by!
August Relase Perfect Peek Day #1
Jul 28, 2010 Author: mytime | Filed under: Cards, Home decor/3-D items, My Time Made Easy, TutorialsYes, I am FINALLY back!
I am a mom first, so my family has kept me really busy 😀 It is summer, so I like to get together with my friends and their children for frequent day trips with the kids. On top of that the dentist has kept us busy, and Amber recently go glasses! It’s been really crazy (as I expected since every summer is nowadays), and I’m taking whatever time I can to enjoy my family 😀 I will post photos after this release, I promise.
Sorry for my longer than expected absence, but there has been much to do for the August release, and even more for September! I’m very excited about the line up of sets and templates I have for the next few months! Things just get better and better!!! My brain is on overload now that I’m warming up back into crafting mode since our vacation earlier this month. I have to be honest the mojo was SLOW to return.
Now lets get to the long awaited eye-candy!
So get your coffee, tea, water, soda…or whatever beverage you fancy, because I have MUCH to share today.
It’s that time again! Project Peeks for the My Time Made Easy ™ LLC August 1st release are here! Note most products shown will not be available until that date.
At this point, I really feel like ANYTIME I make and share ANYTHING new its like Christmas for me!!! I can’t believe I’m able to share what I love with the world every month!
We are releasing a bunch of new stuff this month so be sure you stop by each day for the next 10 days!
TODAY if you want to see even more, you will definitely want to stop by and visit:
I am over the moon to bring you my first release peek using a NEW! template: Tote-All Package, and of course ad NEW! stamp set: Money Well Spent!! Details about both are within this post and of course will be on the website on August 1st.
Today is all about the SHOPPING! One of my favorite things to do 😀
So here is my sampling of new products.
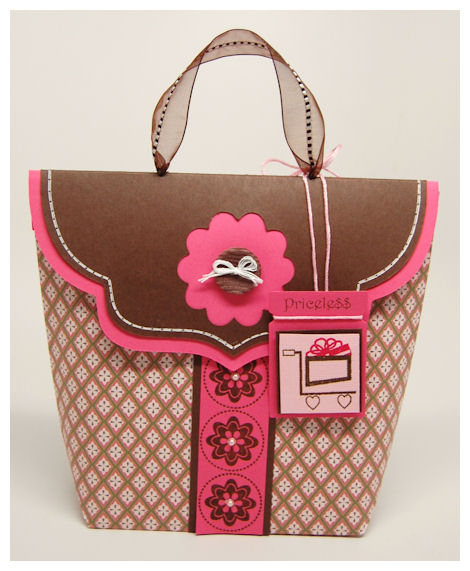
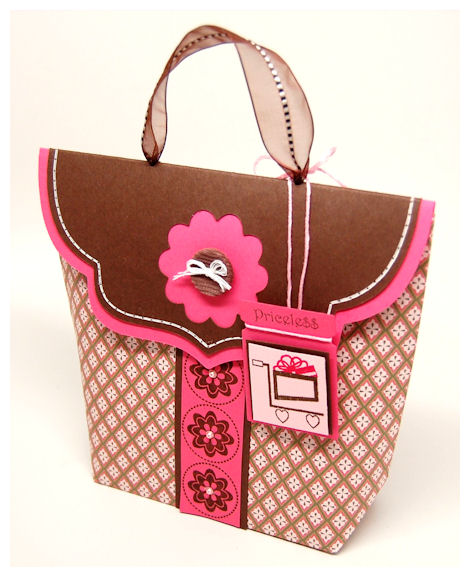
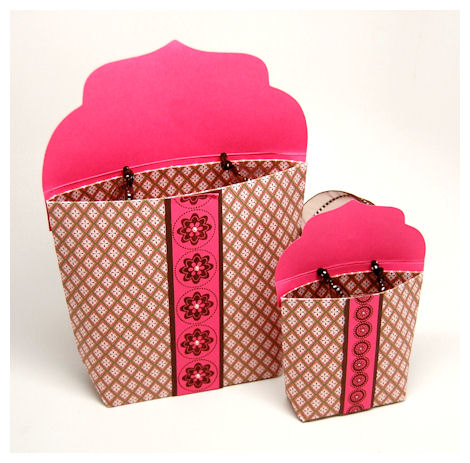
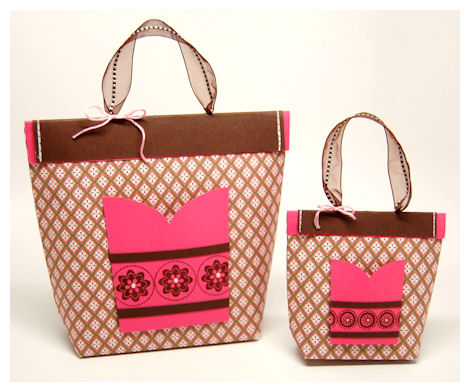
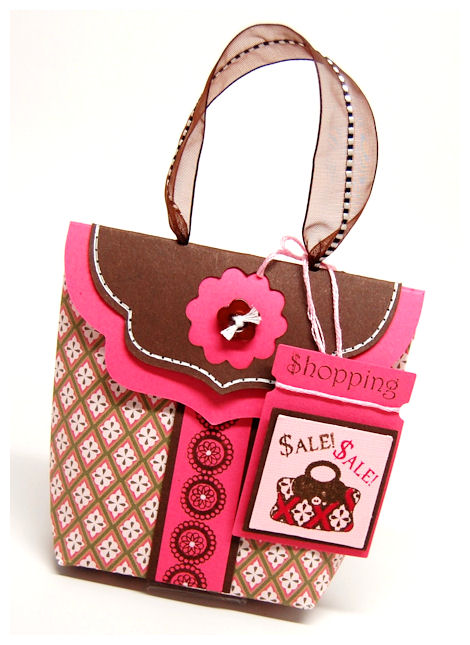
Tote-ally Priceless Gift Set

Tote-All Package $5
Completed Project Size
6 1/2 Inches Wide
6 Inches Tall
1 3/4 Inches Deep
Available in PDF, SVG, WPC. DXF, and GSD
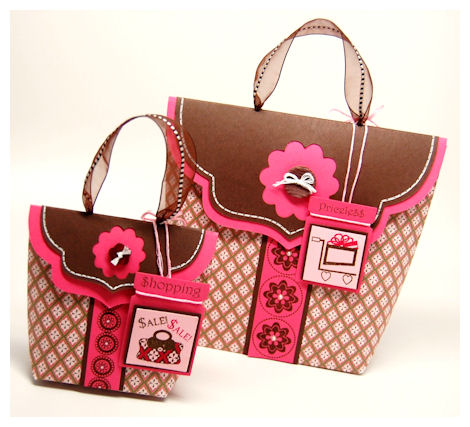
NOTE: Template is for the large tote. Mini tote was created using the original template, resized to be smaller using cutting machine software.
You can “tote” just anything you want in here! Plus it will be so stylish and FUN! This template truly is the Tote-All Package!
Designed after some of my favorite fabric purse totes, I thought we could have a fun “gift bag” with some unique options! There is a sweet angled/tucked bottom that allows you some space for all sort of gifts! Let’s face it, sometimes you just need a awesome gift tote/bag. This is definitely “it”.
The tote base is wonderful on its own-just add some sweet ribbon handles!
This is the standard version:
I love how this turned out. I used the Pretty Printable Digital Paper :Purse Patterns for my tote “fabric”. For the decorative stip I stamped the flower from Sensational Stems, with the circle image from the Just For You set to make my own pattern for the front of this.
I think this look *just* like a fancy fabric bag you would purchase! Can you say…….H*E*A*V*E*N*!!!!!!
Again this is styled after some of my favorite tote bags. Take a look–>here.
This is the mini version, close up.
I used the border image from Paper Pattern Pieces to create my decorative strip. I wanted the design to be similar to the large one and this was a perfect option!
I resized my template (and all of it’s pieces) to be at 55% the original size. Its SO cute!!!! Now it is about 3 1/2 inches tall and 3 3/4 inches wide (at widest point).
I wanted to take this basic tote template idea, and step it up a little by adding a fun flap closure (which is included and optional for use-I will show you ways many ways to use this template in the days to follow).
Here you can see both of my tote bags, open.
Because I used a knotted ribbon handle the tote lid is adhered up a little higher. This allows for easier closing and less bulk at the flap seam 😀 I do offer other tying options which you will soon see. I also include instructions for tying your ribbon handle with the template purchase. Wait until you see my super tying tip in there! Makes everything so much easier!
I also decided to add a optional pocket, which can be used to hold a tag, or mini card. It also fits a gift card in there perfectly!
Here is the back of the gift set:
Here you can tuck a tag, gift card, or mini card (as I said above), or even some cash!
While the pocket is totally optional it is also totally CUTE! (even if you do leave it empty! LOL!)
I used the same stamps as on the front of each tote, to create the pocket decoration on each.
This is the close up view of the large pocket:
As I did on the front, I used the circle image from the Just For You set, and the flowers from the Sensational Stems set to create this pattern.
Now for my mini tote:
I put the hanging tag inside the pocket on this one. Super cute.
This is the close up of the pocket on my mini tote:
I used the border image from Paper Pattern Pieces to create this smaller version
Whatever you fill this with it is sure to be “Tote-ally” fantastic!
If you like shopping the Money Well Spent © set makes the perfect addition to this template!
Now if you are wondering what this template looked like before all the fun stuff was added…..
Here is what this set looked like BEFORE decorating
I think it is important that as much of a project is as complete and as detailed as possible! It really makes all the difference in the world to a professional looking project.
See the tucked in angles at the bottom? Just like a REAL tote.
I think this template is perfect for using our Pretty Printable Digital Paper to create your OWN dual sided papers!! You can easily mix and match your own, as I did here.
The outside of my tote used the Pretty Printable Digital Paper :Purse Patterns from our August Release.

This (above) is the paper sample of the front and back, prior to assembly.
Here is the INSIDE of the tote, using the Pretty Printable Digital Paper: Botanical Beauties: Candied Applejack (from the July Release).
See mixing and matching is an AWESOME thing!
I love being able to pick and choose WHAT patterns I want to use together, rather than having purchased dual sided patterned paper, with patterns already mixed together. I find I’m more apt to hoard papers that I love, till I no longer even like them, which leads to a huge waste of $$!! We have some AMAZING patterns so be sure to check them out —>HERE!
View my tutorials HERE! There is one on using the digital paper, in case you have questions. We also have some FREE items on our site so you can try our products RISK FREE 😀
Now let me share with you the HOW TO, on making the cool stitched flap!
I used my Cricut (and Sure Cuts A Lot software) to cut my lid out from the sweetheart cardstock. I then wanted an additional layer in brown color, so I set up my cricut to cut out that layer, and made sure to add the flower cut out from Fanciful Flowers (which I resized to my liking).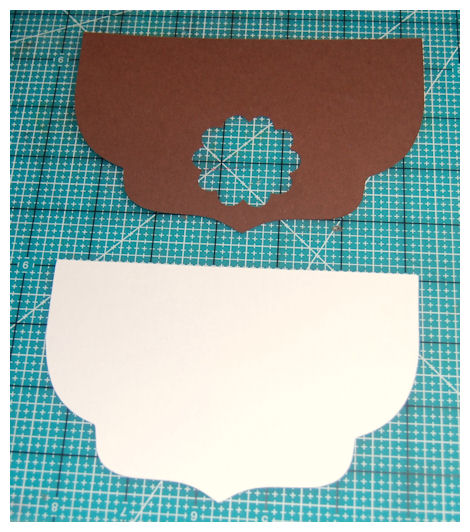
BEFORE I CUT:I made sure to SHRINK my chocolate lid layer to 95%. I then went ahead and created my stitching layer (from white cardstock) by resizing another lid to be at 90%.
Once that was done I layered the tracing template, onto my tote lid, and used removable adhesive to keep everything together!
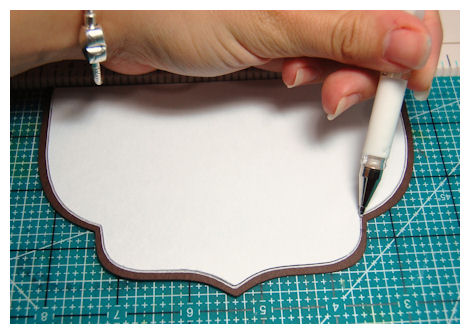
I then took a white singlo gel pen, and traced the lid outline, just like the photo above.
After tracing the lid with the singlo gel pen, I use a paper piercer to poke holes along the edge, giving me a truly realistic stitched look, that is not only perfect but SUPER easy!
Now once that was done, it is then layered to my main lid piece, where the pink base shows through to create he pink flower center.
Isn’t that just so simply, yet so SWEET! I just embellished with buttons for my flower center and was done!
Now lets get on to some of the details about the amazing images what were also used to create this set!
(don’t worry-we do have some masculine images in the set as well!)
Money Well Spent Set of 19 Images $20
*Also available in digital format* $12
This set has 3 coordinating cut files based on images within the set:
(you will learn more about these soon!)
Now to further your creativity in gift card giving I have several Pretty Packaging Templates and Cut Files that you can use to “dress up” those gift cards even further!
I am one of those people who gives a lot of gift cards! They are the perfect gift for any occasion. My problem: never having the perfect stamp set to gift them. I also want the receiver to know that I still put a lot of time, thought and heart into their gift, even though they are doing the actual shopping.
Well now the problem is solved! I have created a set of sentiments with coordinating images, that are perfect for every gift card giving occasion!
Whether it is for a birthday, friend, shopping spree, home improvement, or a gamer, you will find the perfect sentiment to suit your needs! Combine this set with other images you may have and the possibilities are endless!
One of the best features is that all of the letter “S”, are dollar signs 😀 I totally love that about this set.
There is a large label in the set. This has a few benefits!
1) It actually covers an actual gift card.
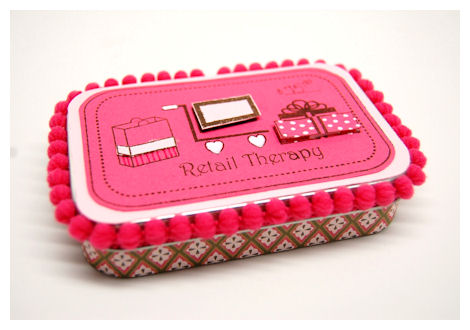
2) It fits perfectly on top of the metal hinge top tins.
Note: Metal Hinge Top Tin can be found here: https://www.sks-bottle.com/340c/fin7b.html
3) When the images are stamped within the label they can look just like a credit card!
4) Great for ANY age.
Here is the super sweet gift card tin just to show you what I mean:
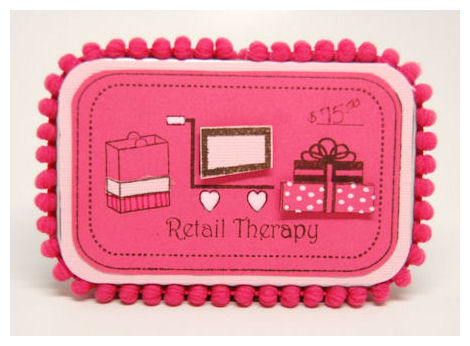
Retail Therapy!
Who doesn’t want, need and love a little of that?
I so wanted even MORE ways to dress up the gift of shopping for everyone. Especially with the holidays fast around the corner (I know! I said “it”! Hate me all you want, but it is SO true, the holidays are going to come faster than you think!), this is a great set for such gifts ALL YEAR LONG!
As you can see the label is the perfect fit for the tin, as well as the perfect cover of a gift card.
I have to say I love all the little shopping elements. I had a hard time finalizing WHICH ONE’S would go on here! I LOVE the dollar symbol so you can add an amount if you like too.
I obviously love haing things MATCHY MATCHY! That is what got me paper-crafting in the first place! My need to coordinating gifts/cards/tags.
This is the gift card inside the tin:
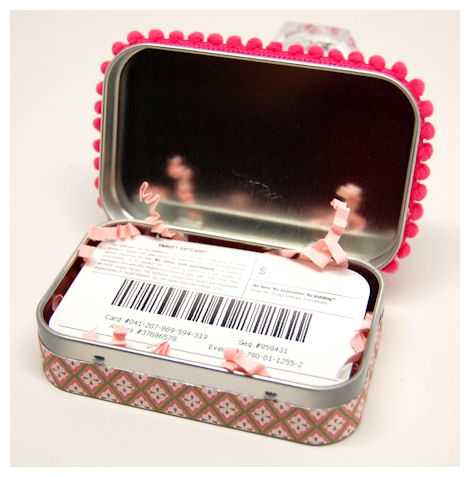
Seriously how super sassy, and cute, and totally re-giftable!!
Sentiments include:
Money Well $pent
Retail Therapy
$ALE!
Just a little something
$______
You’re Pricele$$
Guilt Free $hopping $pree
A Gift For You
Game On
Thought this may come in handy
For a FAB Purse-on
$hopper-tunity
===================================
Now that is what I call HAPPY SHOPPING and gift giving!
As you can see I took advantage of all the possibilities when I created my gift set today.
Here is the mini tote again:
I used the purse in the set for a tag I made myself just by cutting a rectangle, and using my hole punch to snip the sides 😀
I added the shopping sentiments to the top, then added the “sale” sentiment. Easy peasy and oh so cute.
This is the tag ( on the larger tote) I made for the Tote-All Package set
As you can see I used the same tag like I made above, and this time I used the shopping cart image from the Money Well Spent set, and with a little masking-I added the present to the inside!! I think the possibilities for that are definitely endless!
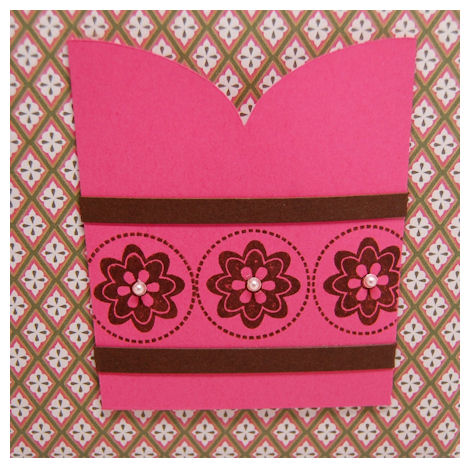
Now using the same “gift boxes” I made this…..
Using ALL the same elements as in the Tote-All Package set I made this tag using the Tag You’re It © Cut File.
For this I used the same technique as above on my tote lid, for my tag.
I think the gift packages are so cute and perfect for any celebration where a gift is in order 😀
The bottom present is stamped, and cut out, then adhered with a dimensional for some 3D POP!
I stamped the ” Just a little something ” sentiment from the Just For You set at the top. I love how it perfectly fits my tag!
========================================
Supplies from My Time Made Easy ™ LLC
Pretty Packaging Templates: Tote-All Package
Pretty Impressions Stamp Set: Money Well Spent, Sensational Stems, Paper Pattern Pieces, Just For You
Pretty Printable Digital Paper: Purse Patterns, Botanical Beauties: Candied Applejack
Cardstock by Couture Cardstock: Ganache, Sweetheart, Blessings
Ink: Sei, SU, and Momento
Pretty Pieces Cut File: Fanciful Flowers (for flower cut out on tote flap), Tag You’re It ©
Other: Buttons/ Brads by SU, Ribbon by May Arts, embroidery floss
Well that is all for today! I still have much to share and so much to do, so I really hope you stop by and visit tomorrow to see what we have “in store” for you next!
I appreciate you all for stopping by and if you have time letting me know your thoughts. Summer can be crazy busy and I have be AWOL so I appreciate you all for hanging in there with me as I battle the hazy crazy days of summer with my family and balancing a buisness 😀
Enjoy your day.
Until tomorrow.
I have so much to report upon my return to reality! So if you have a minute I’ll catch up with you here.
Well first and foremost any stamp set orders put in while I was away will be shipped tomorrow 😀 If you were waiting to order, then go ahead 😀 Also I am all caught up on any/all customer service emails.
I thought I’d share a quick card I made right before I left for vacation. It was my favorite from this past release.
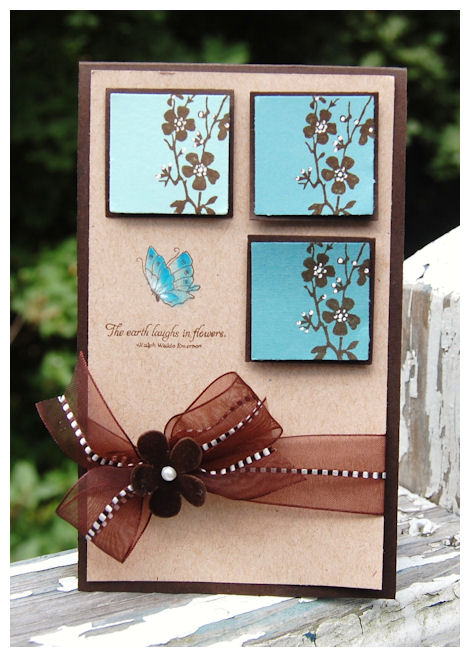
The earth laughs in flowers
This is a simple layout with MANY possibilities. I wanted to keep it simple.
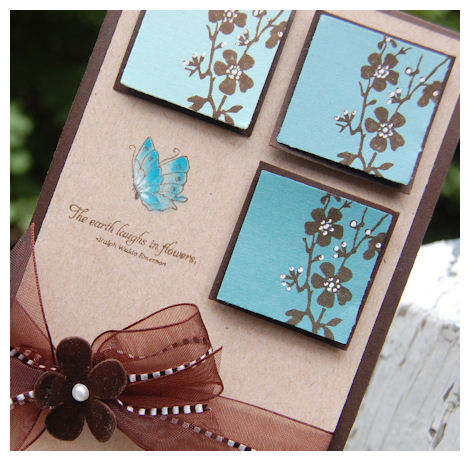
For this I used the flower shilouette from the Killer Curves set, and the Tending the Garden set from the July Release. I used a singlo white gel pen to add to the details.
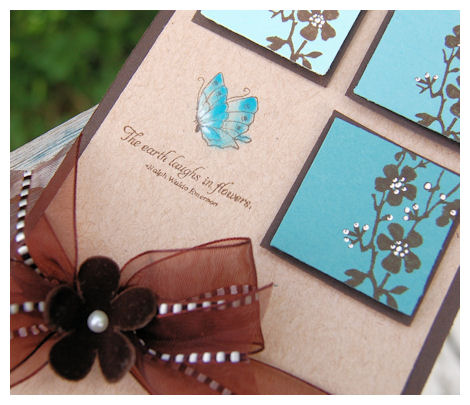
The butterfly was actually colored using some pigment inks and a Fantastix stick.
Now onto the “other” stuff.
While I was away on vacation I left for part of the day on Thursday to meet my mother at court. We had to have a hearing to see if her husband would be released from jail until his actual trial.
If you haven’t read the story-view it here
The short version: it was determined by the court, based on all the evidence (as I said there is a lot you all DON’T know) and attorney arguments, that he is definitely too dangerous to be out of jail! He will be staying there until his actual trial.
I cannot tell you what a relief this was to me. I’ve lost much sleep over this, especially before this actual date, as it was vital to my mother’s safety and well being. Now I know my mother will be safe for a while.
We still have his trial to go through but given the various charges we know he will serve some sort of sentence in jail, and hopefully when his sentence is completed they will deport him back to Portugal.
My mom is experiencing a wide range of emotions from this. She would be terrified if he was out, but at the same time still sees the man she loved. My heart breaks for her but the man she thought she knew really never was. I am very proud of my mom, that she has stuck through his insanely draining process and despite her heartache has continued to fight. I hope my mom continues to be strong and moves forward.
I found a frame for her that I found so profound. It read ” When one door of happiness closes, another opens; but often we look so long at the closed door that we do not see the one which has been opened for us.” -Helen Keller
I just want her to know she WILL be happy again. She can and will move forward. She is stronger than she thinks, she just needs to dig deep.
OK on a lighter note…..
The DAY before we left for vacation Amber decided Alexa’s bangs could use a TRIM! So she would be her hairdresser and fix them. So, off we begin our vacation with Alexa having bangs a 1/2 inch long!
My family and I had a wonderful vacation at Point Sebago Resort in Casco Maine. What a WONDERFUL place to go for families 😀 We will certainly be returning there soon. They offer so many wonderful things for families to do, and plenty of “camps” for the kids to attend.
We were able to spend time with the kids and even have a few much need “date time”!
We went to the beach daily, participated in Arts & Crafts where I tried my hand at ceramic painting, we went to shows, used the paddle boats, Jay & I went Kayaking for the first time, and really just enjoyed literally every second there.
While we were there Alexa SHOCKED us the first night by getting into the middle of the Welcome Party by dancing in the middle of the crowded dance floor! Given that she is VERY shy we were in awe! When she was done she got an standing ovation from several tables, telling her what a great job she did, and I thought she would run off the floor, once she realized what was going on, but instead she took a bow! LOL! VERY unlike her so it was such an amazing thing to see.She even followed the choreography for a line dance!! I seriously couldn’t believe she was picking it all up. I was certainly flooded with emotions when I recalled her early days of leukemia when she could walk for 3 months, and every step was painful. She had to re-learn to walk all over again, and stairs weren’t even an option. Here she is 3 years in remission, and line dancing! God is good.
In the fall she wants to start taking dance lessons again here in town. I think she is definitely ready again 😀
One of the camps for her age group had morning dance classes given by the trained dancers they had there for various shows from NY. Alexa attended each one and REALLY enjoyed herself. The Camp staff was awesome at making some accommodations for Alexa when certain activities would be a little too much for her, especially in the heat! I couldn’t say enough about them all.
I could go on for hours about all our adventures.
While we were there we were also able to check out Camp Sunshine! This is a “camp” for families of children with life threatening diseases. It offers families like ours, an AMAZING experience, and this camp was developed by the owners of Point Sebago! So I was obviously pleasantly surprised to find all this out upon our arrival. What better place to support. I love supporting a place that so openly uses its funds to help make a difference in the lives of others.
Long story short it was a wonderful place for our family to take a vacation, and we were sad to return home to reality. We are already planning of returning year after year as it was THAT amazing, and not too far from home 😀
I’m too tired and have way to much to do upon my return, so I have yet to edit/share photos. I will this week ( I hope 😀 )
Color Throwdown Sponsor!
Jul 7, 2010 Author: mytime | Filed under: Cards, Home decor/3-D items, My Time Made EasyThis is the second post for today, so please be sure you check out our group post!
Now the Color Throwdown is celebrating thier 100th Challenge!
Here are the colors. GO HERE to check out —-> Color Throwdown 100th Challenge!
I had wanted to participate with a sample but sadly I got the swatch too close to my vacation to play along :C
I am participating by donating the All-a-Flutter package to one lucky participant!
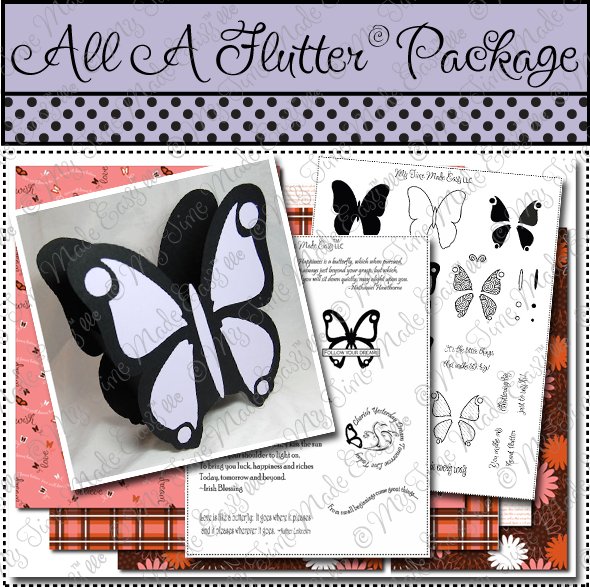
Here is a Pretty Package © that will make your heart feel All A Flutter ©! That’s right we have gathered all the pretty butterflies into one easy package.
- All A Flutter © Template
- All A Flutter © Stamp set *acrylic OR digital*
- All A Flutter Sentiments ©
- Fluttering-by © Digital Paper
Be sure you visit the Color Throwdown blog where an entire list of prizes will be posted, along with the Inlinkz tool for people to enter their creations !!
Group Post! Not so blue
Jul 6, 2010 Author: mytime | Filed under: Cards, Home decor/3-D items, My Time Made EasyHow is everyone enjoying the projects share for the July MTME Release?
Today is the LAST day of peeks, so to end it we have a wonderful GROUP POST!
This means a day of inspiration, ideas and great projects!
Be sure you stop by and visit the team today, to get the ideas and mojo flowing
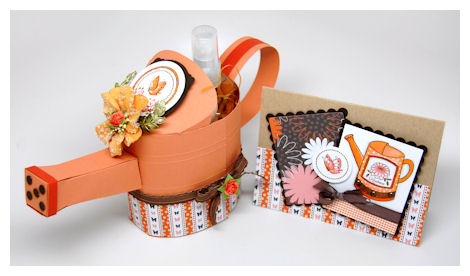
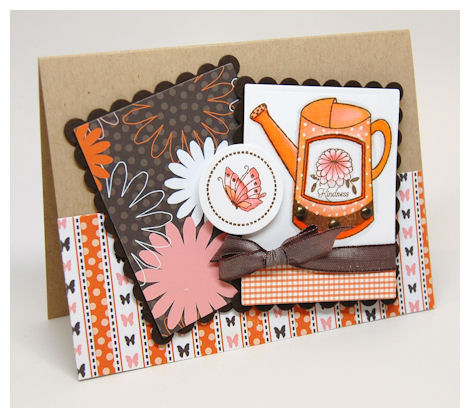
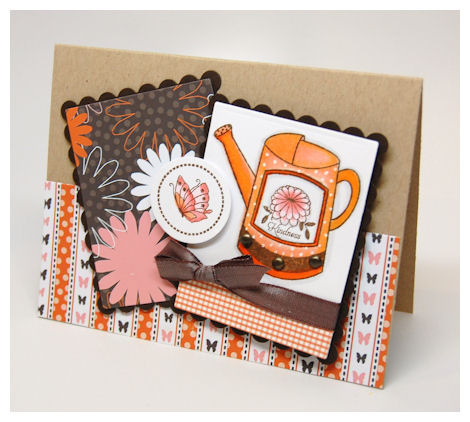
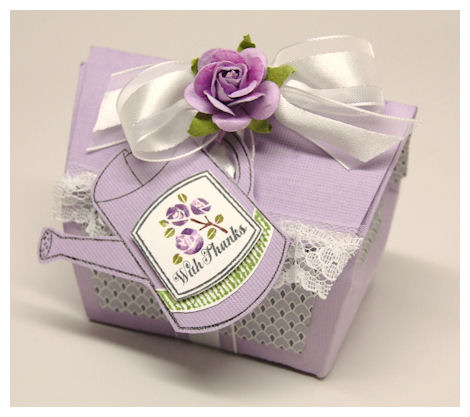
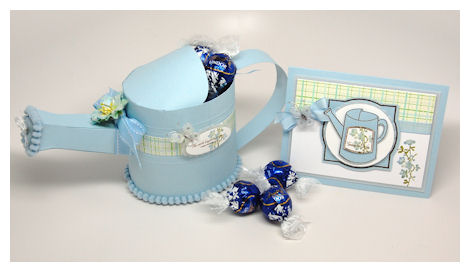
I personally have a bunch more to share, but for today I had to share the last of my Wonderful Watering Can projects. I think I went overboard with this one this month, but I just couldn’t stop! I still have a LIST of ideas that I may or may-not ever get to.
Sometimes you just need a little gift to brighten up a blue day for that special someone. I needed such a gift as of late.
Now brightening someones day doesn’t mean it has to be a VIBRANT and cheery color palette, sometime a softer palette is appreciated. I often look up the meaning of certain colors when I want to convey a certain message. For this gift set blue was very intentional on my part.
Here is what the color blue means:
Blue is the color of the sky and sea. It is often associated with depth and stability. It symbolizes trust, loyalty, wisdom, confidence, intelligence, faith, truth, and heaven.
Blue is considered beneficial to the mind and body. It slows human metabolism and produces a calming effect. Blue is strongly associated with tranquility and calmness. In heraldry, blue is used to symbolize piety and sincerity.
You can use blue to promote products and services related to cleanliness (water purification filters, cleaning liquids, vodka), air and sky (airlines, airports, air conditioners), water and sea (sea voyages, mineral water). As opposed to emotionally warm colors like red, orange, and yellow; blue is linked to consciousness and intellect. Use blue to suggest precision when promoting high-tech products.
Blue is a masculine color; according to studies, it is highly accepted among males. Dark blue is associated with depth, expertise, and stability; it is a preferred color for corporate America.
Avoid using blue when promoting food and cooking, because blue suppresses appetite. When used together with warm colors like yellow or red, blue can create high-impact, vibrant designs; for example, blue-yellow-red is a perfect color scheme for a superhero.
Light blue is associated with health, healing, tranquility, understanding, and softness.
Dark blue represents knowledge, power, integrity, and seriousness.
Here is my gift set
Not so blue day
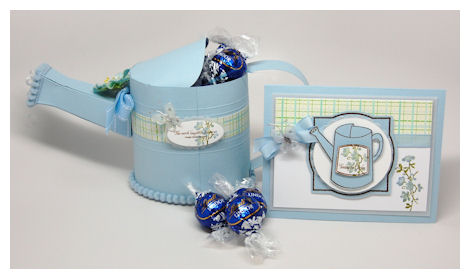
I created a serene Wonderful Watering Can using the Tending the Garden set, combined with the Killer Curves set
A little chocolate never hurt anyone either (sort of)! That alone can be a tiny pick me up, so I added some inside. I love Lindt Chocolates, so I often give them to others 😀
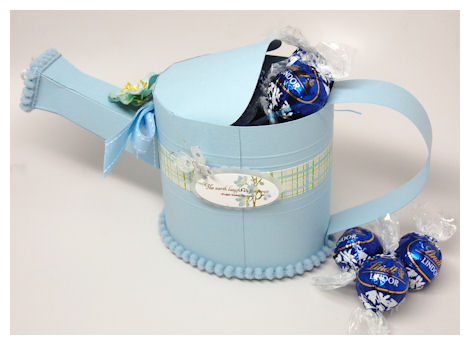
I think this is the softness looking gift set. I makes me happy just looking at it. It is decorated very simply, and I love that.
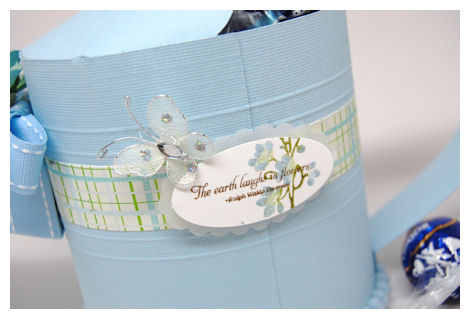
I have to have butterflies whenever, wherever I can, and this was no exception. Here I chose a simple oval tag to embellish my Wonderful Watering Can. I inked my flowers from the Killer Curves set using my markers, stamped my sentiment, then punched teh oval. The scallop layer is done with vellum for a very soft layer. Add the butterfly and its simple perfection.
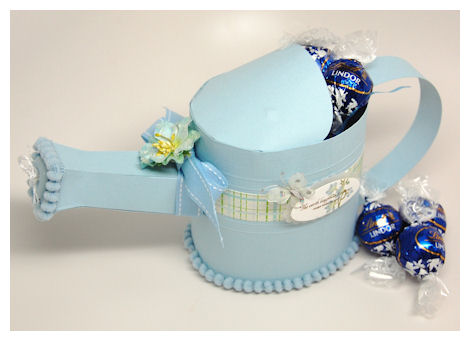
This is the top view. Just like the Daisy set I created the other day, the pompoms are just meant for this template!
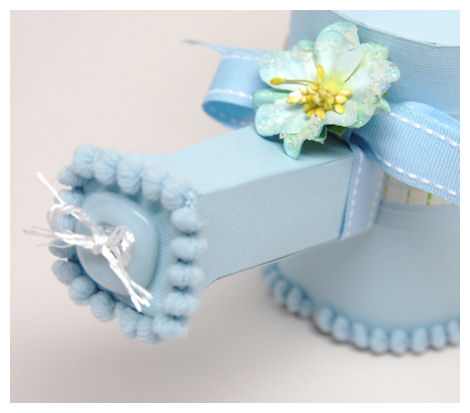
For my spout I used a squared fancy button. I love the unexpected embellishment there. It was perfect. I embellished my bow using a Prima flower.
Of course I needed a card to match…..so here it is.
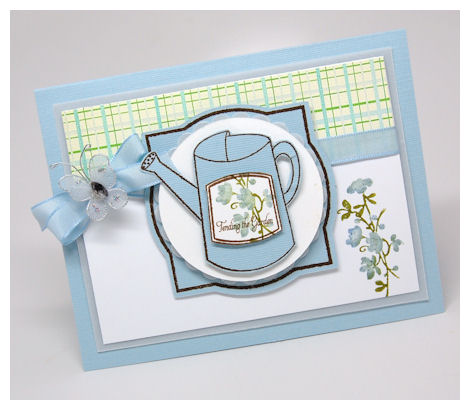
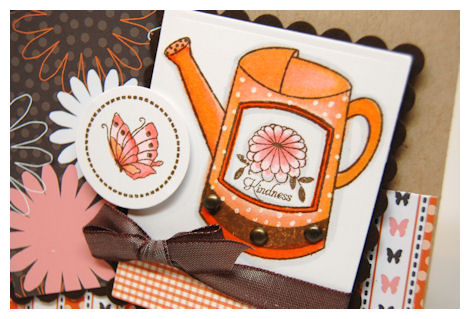
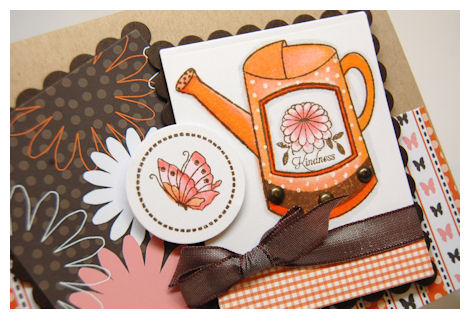
I love the watering can image from Tending the Garden . The ability to add the label, and all the various images and sentiments that fit inside is just amazing. So many possibilities.
I layered the watering can onto the Killer Curves Cut file ink which I stamped the outlined frame from the Killer Curves set.
Keeping with the same plaid strip of paper, the flower, and butterfly, while this is simple it is also clean and striking, Your eye goes from the lower right hand corner, across the watering can to the butterfly on the ribbon.
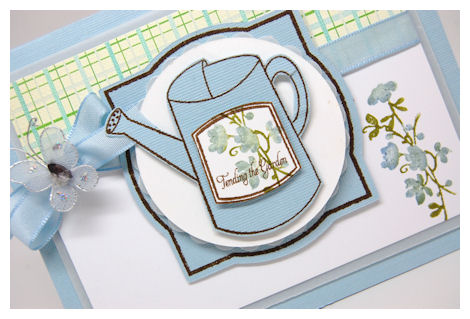
As you can see I continued the design by adding a vellum scallop layer under the watering can image.
I hope this does what it was meant to do-brighten someones blue day.
Supplies from My Time Made Easy ™ LLC
Pretty Packaging Templates: Wonderful Watering Can
Pretty Impressions Stamp Set: Killer Curves, Tending the Garden
Pretty Printable Digital Paper: Vintage Plaid
Cardstock by Couture Cardstock: Rain Drop, OSW white, vellum
Pretty Pieces Cut File: Killer Curves
Thank you for stopping by! I hope you liked today’s project.
To love and be loved
Jul 5, 2010 Author: mytime | Filed under: UncategorizedAre you all enjoying the projects we’ve had to share far this week?
There is more to come 😀
Today you will want to check in on
They both have some stunning projects to share with you!
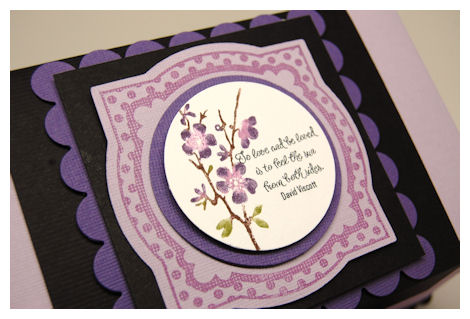
I have been on a purple kick the last few months. Since it is my favorite color I try to use it as often as possible 😀 I had realized that while this was a favorite color of mine, I rarely USED it.
Today I thought it would be great to share a project using The Flapper © and the NEW! Killer Curves set.
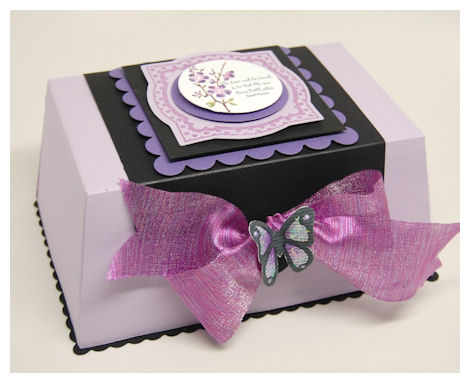
This project was increased in size by 15% using my Sure Cuts A Lot program and my Cricut machine. I just increased each template by that much so I could get a larger box . So each piece was sized to read to 115%
Now this box has some wonderful decorative panels that make decorating it easy, but I wanted to show you that you can get a striking gift set without all the layers if you want.
This project took like 12 minutes to make 😀 Now THAT is what I love 😀 It would take me longer to drive to a store and would certainly cost far more than I would want to spend, and wouldn’t look as wonderful! When you MAKE your packaging it turns into a gift within itself!
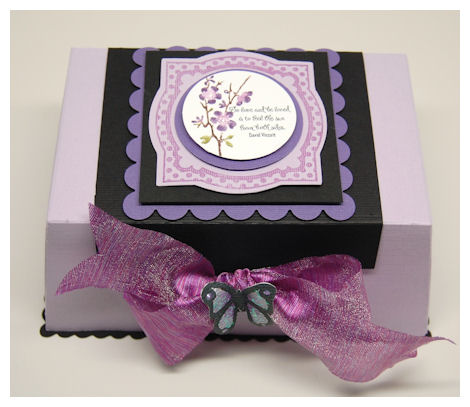
I achieved a lot of WOW factor here by using black to make this really stand out. The purple just POPS against it.
I used the Killer Curves Cut file with the polka dot frame from the Killer Curves set. The frame fits really nicely with all the extra layers. I stamped it in a purple pigment ink by SEI.
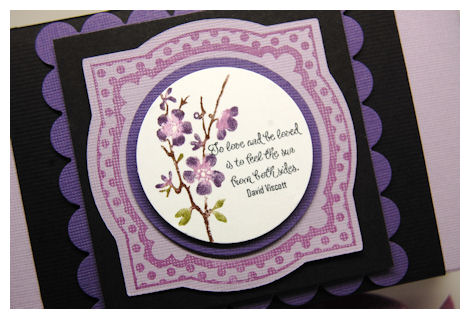
I used my markers to ink up the flower image. The shades of purple against the back really make this interesting.
The sentiment is from the Tending the Garden © set, and reads “To love and be loved is to feel the sun from both sides” I think that sentiment is so heartwarming.
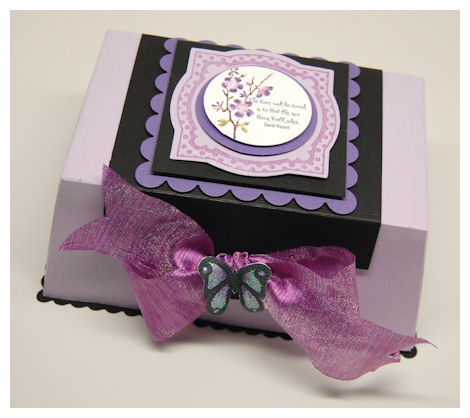
I am not yet sure what I am packaging up in here, but I know it will fit something fabulous 😀
For the front I used a shimmery ribbon from May Arts to tie the box closed. That is one of the funnest parts about this template, you can finally really use and show off those stunning ribbons we all tend to hoard.
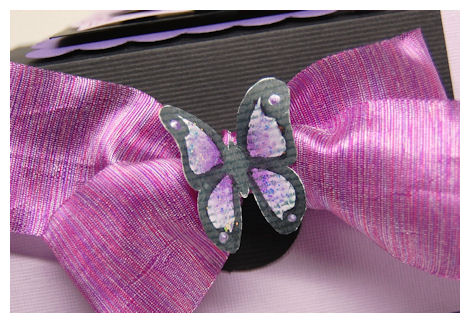
I definitely felt the need to add a butterfly embellishment from the All A Flutter set. It just went perfectly with this closure. I used the Flutters and Flower cut file to cut it out of purple cardstock. I stamped it in black ink, then colored it with my copic markers and then added soem stickles! Everything is better with GLITTER!
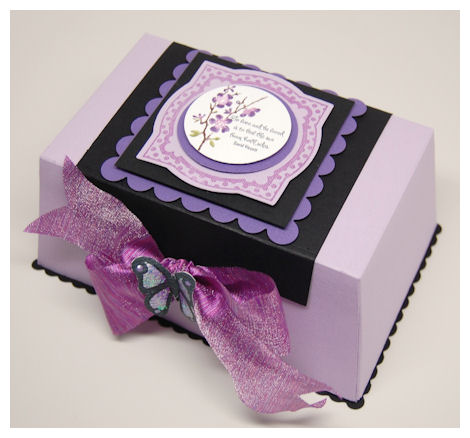
I think it looks so pretty don’t you?
Supplies from My Time Made Easy ™ LLCPretty Packaging Templates: The Flapper
Pretty Impressions Stamp Set: Tending the Garden, Killer Curves, All A Flutter
Cardstock by Couture Cardstock: Raven, Quest, Ticket Booth, OSW whitePretty Pieces Cut File: Killer Curves, Flutters and FlowersThank you for stopping by! I hope you enjoy all the projects we had to share today.
Tune in tomorrow for even more projects as we share a final group post to wrap up the July release!
Little Butterfly
Jul 4, 2010 Author: mytime | Filed under: Cards, Home decor/3-D items, My Time Made EasyWell we are all back and ready to share some more creations with you all!
Today you will want to be sure to visit:
Today I am going to share another gift set using the Wonderful Watering Can and the NEW! Stamp set: Tending the Garden ©
It is my favorite: Butterfly themed!
I believe there is no such thing as too many butterfly or flower images, and ideas!
This was a gift set for my daughter Alexa’s para (one to one teacher). She is beyond amazing, and has been with Alexa the last 4 years or so. I bought her some Butterfly Flower scented items from Bath & Body works, with a gift card to Borders book store.
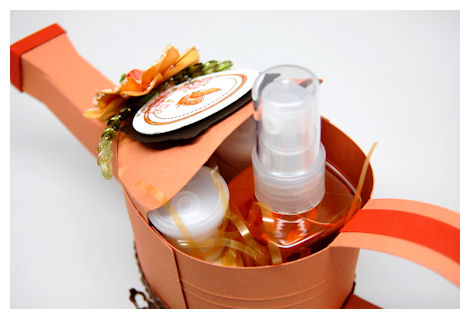
As you can see it all tucked in there so nicely. Bath products are my most favorite gifts to give and receive (next to chocolate!)
The packaging of the bath items inspired the colors and design of this set.
As you can see for my spout today I just trimmed with cardstock and added some punched paper pieces for the holes. I wanted the focus to be on the butterfly image on top. SIMPLE!
This set was created using one of our FIRST Pretty Printable Digital Paper collections:: Shutt-erfly and Fluttering-by. Be sure you check out our AMAZING collection of digital papers. They are SO affordable! I did a post about that HERE! Along with a video tutorial.
My Wonderful Watering Can was created using Warm Apple Cider cardstock. I created some fun score lines again for a realistic look. The base covered with my Shutt-erfly patterned paper, and tied it with some American Crafts ribbon.
I added some prima rosed to the center.
Now for the top of my Wonderful Watering Can , that was my main design focus.
I used the Killer Curves Cut File, with the circle image from Well Preserved to make the sweet butterfly from Tending the Garden © as my main attraction. I LOVE the butterfly in this set.
Now I also stamped the little rose cluster that is also in the Tending the Garden © set. It appears as if they are budding out from the large chunky Prima flower.
Now for the card
Using the watering can image, colored with my copics to be similar to my template, I created a card to match my gift set.
I LOVE the flower image that is in this set. It is perfectly perfect!
I did some masking with the solid leafy image to create the image in the label of my watering can. I love the addition of the brads along the watering can base. To keep with the coordination I added the little butterfly to my card as well.
It is like it is just fluttering away……
I was so in love with that little flower that I immediately made another card using that image!
Bloom with Happiness
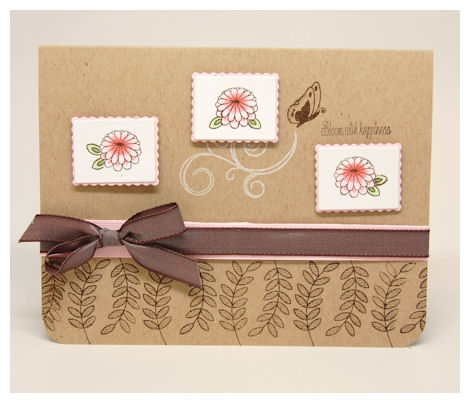
How simply sweet is that? I just wanted a card that used the flowers as the focus. The are so delicate looking, and soft.
I enjoyed coloring the flower buds, and used the little leaves from the set instead of the other leaves.
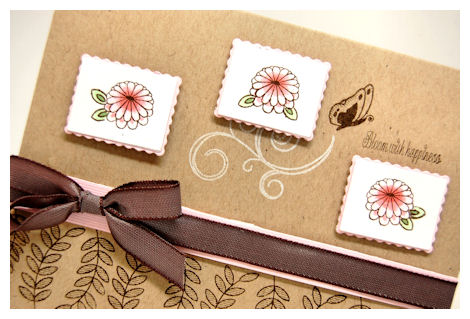
The pretty leaves that make up my border and the butterfly are also from Tending the Garden © set. I used the flourish from teh Fanciful Flourishes set. It was that little something extra that I needed!
Supplies from My Time Made Easy ™ LLC
Pretty Packaging Templates: Waonderful Watering Can
Pretty Impressions Stamp Set: Tending the Garden, Well Preserved, Take Time, Fanciful Flourishes,
Pretty Printable Digital Paper: Shutt-erfly, Fluttering-By
Cardstock by Couture Cardstock: Oat, Warm Apple Cider, OSW White, Blushing, Ganache
Pretty Pieces Cut File: Killer Curves
Well that does it for today. Return tomorrow because I have a stunning presentation using The Flapper template!
My Etsy

Who I Designed For
Blogroll
- Alicia
- Alli Miles
- Ally Blankenship
- Amber
- Andi @ crafts on a whim
- Angel R
- Angie Z
- Anne Kranitz
- Becky O
- Bee
- Beth Silaka
- Bethany Paull
- Beverly Nash
- Bobbie
- Cambria
- Cammie
- Card of the Week
- Card Positioning System (CPS)
- Cards for Cancer
- Catherine Doucette
- Charmaine
- Cheryl Sims
- Chriss Rollins
- Christina
- Christine Ewing
- Christine Wooden
- Colleen Schaan
- Craft Critique
- Craft Gossip
- Crystal
- Dawn Easton
- Emily Giovanni
- Geny
- Holly
- Igne Groot
- Inspirational Craft Blogs
- Irene
- Jami Sibley
- Jeanne Streiff
- Jen del Muro
- Jeni Bond
- JenMarie
- Jenn Balcer
- Jenn Diercks
- Jenn O
- Jennifer E
- Jennifer Mick
- Jennifer Pereda
- Jennifer-Sweet Treat
- Joanne Basile
- Jodi Collins
- Julia Stainton
- Julie Masse
- Karen
- Kathryn Berthiaume
- Katie Cotton
- Kelley Holland
- Kendra
- Kim Scholfield
- Kris’s Color Stripes! Get inspired here
- Kristen Dubosque
- Kristin Eberline
- Kristine
- Laura @ Sunshine Stamper
- Laura Turnmire
- Laurie Schmidlin
- Lesa Rapp
- Linda Duke
- Linda-LSN
- Lindsey Botkin
- Lisa (lakind scs)
- Lisa Kind
- Lori Craig
- Maggie
- Mara Campbell
- Maria
- Maria Levine
- Mary
- MaryJo
- Melanie M
- Monique Hansen
- Moxie Fab World
- Pam Imholz
- PaperCrafts Connection
- Peppers and Pollywogs Kids party site
- Rebecca Grohall
- Rita
- Robyn
- Rose Ann
- Sarah Vrolyk
- Sharon Harnist
- Sharon Johnson
- Sharon Rivera (a chemisrty with paper)
- Sherrie
- Sophia Landry
- Storage Units, Ink, & More Blog
- Sue Berker
- Susan (Rainy)
- Tangii Crane
- Tracy
- Tricia Traxler
- Trudee
- Velta
- VivLyn
- Zena
MTME Pretty Palette Color Team
MTME Pretty Patterns Sketch Team
My Time Made Easy TM LLC
Shop till you drop!
Lauren Meader
About Me
Copyrighted material
Subscribe To My Blog
Pages
- About me
- Alexa’s Story!
- My Crafty Corner!
- My Time Made Easy™ LLC
- Our Make A Wish Trip to Disney!
- Resume/Publication List
Calendar
Archives
- August 2013
- July 2013
- June 2013
- May 2013
- April 2013
- March 2013
- February 2013
- January 2013
- December 2012
- November 2012
- October 2012
- September 2012
- August 2012
- July 2012
- June 2012
- May 2012
- April 2012
- March 2012
- February 2012
- January 2012
- December 2011
- November 2011
- October 2011
- September 2011
- August 2011
- July 2011
- June 2011
- May 2011
- April 2011
- March 2011
- February 2011
- January 2011
- December 2010
- November 2010
- October 2010
- September 2010
- August 2010
- July 2010
- June 2010
- May 2010
- April 2010
- March 2010
- February 2010
- January 2010
- December 2009
- November 2009
- October 2009
- September 2009
- August 2009
- July 2009
- June 2009
- May 2009
- April 2009
- March 2009
- February 2009
- January 2009
- December 2008
- November 2008
- October 2008
- September 2008
- August 2008
- July 2008
- June 2008
- May 2008
- April 2008
- March 2008
- February 2008
- January 2008
- December 2007
- November 2007
- October 2007
- September 2007
- August 2007
- July 2007
- June 2007
- May 2007
- April 2007
- March 2007
- January 2007
Categories
- About Me
- All That Scraps
- blogger challenge
- camera/photo play
- Cards
- Contests
- family stuff
- FOR SALE
- Home decor/3-D items
- How to FAKE it!
- Introduction
- JUGS Challenge
- JustRite Stampers
- Lizzie Anne Designs
- My family stuff
- My Stamping Space
- My Time Made Easy
- My Time To Color Challenge
- My Time to Create Challenge
- My Timeless Template Challenge
- My Timeless Templates
- Mytime Mail
- MYTIME MOVIE/VIDEOs
- Papertrey Newsletter
- Pink Cat Studio
- Pretty Palette Challenge
- Pretty Patterns Sketch
- Product Opinions and Must haves
- Recipe's
- Saturday Sketch
- Smilebox Creations
- Stampavie
- Tutorials
- Uncategorized
- videos
Most Popular
- Create your own Onesie Card Tutorial-and important NOTE! PLEASE READ (2529)
- Saturday Sketch-Boxed bag holder (2333)
- Going GREEN! Fancy Flower Flourish-Closure Video (1478)
- Fabulous Favorite - Giveaway! (1336)
- a Prayer Request (1232)
- QUICK-Easter Baskets from Nestabilities-PTI style-and blog challenge (1063)
- Teaser Sketch (999)
- February Release Giveway! (and a little peek) (996)
- Group Post and Rambling Rose Video Tutorial (985)
- GIVEAWAY! Who wants it all?! (895)
Recent Comments (RSS)
- 첫충사이트: 완전히 흥미로운 블로그 게시입니다. 저는
- sarah: Wow, Lauren, what a stunning
- hedie: خرید راهبند
- 야동: Love to read it,Waiting For
- 야동: This seller is in a
- 바카라사이트: 여기 처음 왔어요. 나는이 게시판을
- 야동티비: I was surfing the Internet
- 바카라사이트: 비슷한 주제에 대한 흥미로운 정보를
- 바카라사이트: "여기에 제공해 주신 귀중한 정보와
- 온라인홀덤: 유익한 웹 사이트를 게시하는 데
Copyright © 2007 - My Time, My Creations, My Stampendence - is proudly powered by WordPress
This blog has been Tweaked and Designed by Sara Williams