Moving Mermaid
Apr 22, 2008
Today I am running late for several reasons #1 my kids keep killing each other #2 my camera batteries died, and #3 I was putting together a post, jam packed with FUN ideas for you to try!
So grab your coffee and get ready for a FULL post of fun!
In this post you will learn to make a Moving Mermaid card, be reminded how to make your own cloud template and use fantasy film, make simple “starfish” and how to MAIL these interactive, or more 3D cards, in style!!!
MOVING MERMAID
Last August I made a Hula Kitty. You can find that —>here! I got many requests on “how to” do it. I did answer many of you privately. Well, now is the time to share it here.
When I saw this Mermaid from Lizzie Anne’s set By the Sea (FYI this is the “sister” set to Shore Thoughts which is where the Sun image is from on this card), I knew I had to make the Mermaid “swim”. That took me back to the Hula Kitty idea.
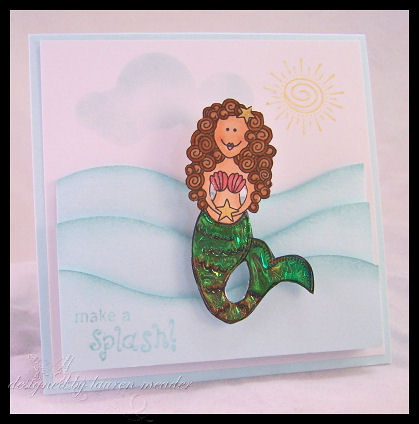
So here are two photos for you to view, the motion this Mermaid has!
Swimming to the right
Now swimming the the left
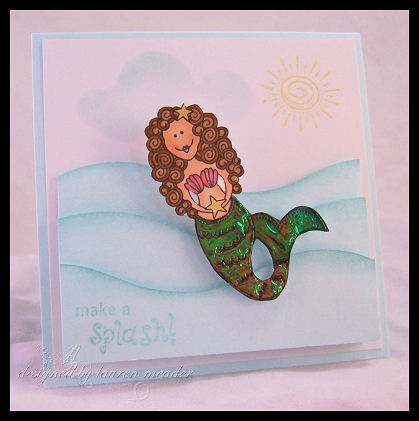
All you have to do is tilt the card from one side, to the other, and she is swimming side to side! Isn’t she so cute?
Moving Card-You need- one or two pennies, 1/2 inch Circle punch and Dimensional’s
QUICK DIRECTIONS-Punch 1/2 inch hole in cardstock. Layer 2 dimensionals stacked onto each-other on back of image, and place through hole in cardstock. Adhere penny to back of cardstock layer. It is important that is layer is on dimensionals so that the penny can rotate around!
I have another Make It Move <—-tutorial . If you like this one, but want a slider idea 😀
Here is a photo once the layer is complete-from side view

See 2 dimensionals-penny is behind wave layer. My waves were done using my Creative Memories Wavy cutter. I LOVE that tool!!! I sponged the wave edges, each on dimensionals for depth.
Now for the Mermaid! I colored her with Copic markers, and used a clear Atyou glitter pen for her seashells, star fish, and the sun!
I made her tail using Fantasy Film, in waterfall. You can see a tutorial on Fantasy Film–>HERE. I thought it was just PERFECT for the tail. Shimmery, and fin-like!
NOTE:If you “Google” Fantasy Film you will come up with some X Rated material! LOL! I was informed by one of my reader’s when she tried to hunt some down. You can purchase it at most Stamp stores, or online venue’s. I am going to be asking Christine at All That Scraps to get some in. Since it has a variety of colors, feel free to give some input on your faves, so I can “make a list” for her to place an order!
Now I made the cloud, making my own homemade template. It is my most favortie way to create them! And CHEAP!!
Tutorial for that can be seen ->here
Lastly the Starfish! I loved the Starfish from the Shore Thoughts set, but by this card’s end I was TOO lazy to stamp/color/cut out the one’s in the set! LOL!
I used my SU! Star punch, and used the little elements from the stamp set (the swirl, and sand stamp) to create my own EASY starfish! I stamped ALL the edges with the sand image (on this I only did 1/2 so you get the “idea”), then I rounded the tips with my paper snips, and curled the ends under.

Now this is for the LAST idea.
I get so many emails asking me HOW to mail interactive cards, of bulky cards without ruining them, or how to go about sending them”in style”.
SEE TOP PHOTO!!! My Mermaid card in a box.
I put mine in the Clearly Creative Card boxes! Just secure the ends with tape, and put the mailing and postage labels on the back! Isn’t this the cutest way to send a special card? I wanted to add a few more things to pretty it up, so that is where the starfish and filler come in.
Now it will cost a little more to mail, but can you imagine how cool this would be to see when you open your mailbox? AND you can bet the women at the PO will take extra care not to squish it-unless they keep it (YIKES! LOL!)
This is going to my friend Jenn in Canada who made me the most BEAUTIFUL address book with all my PSF’s info! It was just the sweetest thing to do for us. I wanted to send her a special TY note, and I think this should do it! Her gift was so amazing and thoughtful. I am going to send her a GC via email , to an online store. I dont want to send one IN this card package-just in case.
So that is all for today! I hope you enjoyed it.
Tomorrow I will FINALLY have my seed packet tutorial for you.
Till then-
Lauren

My Etsy

Who I Designed For
Blogroll
- Alicia
- Alli Miles
- Ally Blankenship
- Amber
- Andi @ crafts on a whim
- Angel R
- Angie Z
- Anne Kranitz
- Becky O
- Bee
- Beth Silaka
- Bethany Paull
- Beverly Nash
- Bobbie
- Cambria
- Cammie
- Card of the Week
- Card Positioning System (CPS)
- Cards for Cancer
- Catherine Doucette
- Charmaine
- Cheryl Sims
- Chriss Rollins
- Christina
- Christine Ewing
- Christine Wooden
- Colleen Schaan
- Craft Critique
- Craft Gossip
- Crystal
- Dawn Easton
- Emily Giovanni
- Geny
- Holly
- Igne Groot
- Inspirational Craft Blogs
- Irene
- Jami Sibley
- Jeanne Streiff
- Jen del Muro
- Jeni Bond
- JenMarie
- Jenn Balcer
- Jenn Diercks
- Jenn O
- Jennifer E
- Jennifer Mick
- Jennifer Pereda
- Jennifer-Sweet Treat
- Joanne Basile
- Jodi Collins
- Julia Stainton
- Julie Masse
- Karen
- Kathryn Berthiaume
- Katie Cotton
- Kelley Holland
- Kendra
- Kim Scholfield
- Kris’s Color Stripes! Get inspired here
- Kristen Dubosque
- Kristin Eberline
- Kristine
- Laura @ Sunshine Stamper
- Laura Turnmire
- Laurie Schmidlin
- Lesa Rapp
- Linda Duke
- Linda-LSN
- Lindsey Botkin
- Lisa (lakind scs)
- Lisa Kind
- Lori Craig
- Maggie
- Mara Campbell
- Maria
- Maria Levine
- Mary
- MaryJo
- Melanie M
- Monique Hansen
- Moxie Fab World
- Pam Imholz
- PaperCrafts Connection
- Peppers and Pollywogs Kids party site
- Rebecca Grohall
- Rita
- Robyn
- Rose Ann
- Sarah Vrolyk
- Sharon Harnist
- Sharon Johnson
- Sharon Rivera (a chemisrty with paper)
- Sherrie
- Sophia Landry
- Storage Units, Ink, & More Blog
- Sue Berker
- Susan (Rainy)
- Tangii Crane
- Tracy
- Tricia Traxler
- Trudee
- Velta
- VivLyn
- Zena
MTME Pretty Palette Color Team
MTME Pretty Patterns Sketch Team
My Time Made Easy TM LLC
Shop till you drop!
Lauren Meader
About Me
Copyrighted material
Subscribe To My Blog
Pages
- About me
- Alexa’s Story!
- My Crafty Corner!
- My Time Made Easy™ LLC
- Our Make A Wish Trip to Disney!
- Resume/Publication List
Calendar
Archives
- August 2013
- July 2013
- June 2013
- May 2013
- April 2013
- March 2013
- February 2013
- January 2013
- December 2012
- November 2012
- October 2012
- September 2012
- August 2012
- July 2012
- June 2012
- May 2012
- April 2012
- March 2012
- February 2012
- January 2012
- December 2011
- November 2011
- October 2011
- September 2011
- August 2011
- July 2011
- June 2011
- May 2011
- April 2011
- March 2011
- February 2011
- January 2011
- December 2010
- November 2010
- October 2010
- September 2010
- August 2010
- July 2010
- June 2010
- May 2010
- April 2010
- March 2010
- February 2010
- January 2010
- December 2009
- November 2009
- October 2009
- September 2009
- August 2009
- July 2009
- June 2009
- May 2009
- April 2009
- March 2009
- February 2009
- January 2009
- December 2008
- November 2008
- October 2008
- September 2008
- August 2008
- July 2008
- June 2008
- May 2008
- April 2008
- March 2008
- February 2008
- January 2008
- December 2007
- November 2007
- October 2007
- September 2007
- August 2007
- July 2007
- June 2007
- May 2007
- April 2007
- March 2007
- January 2007
Categories
- About Me
- All That Scraps
- blogger challenge
- camera/photo play
- Cards
- Contests
- family stuff
- FOR SALE
- Home decor/3-D items
- How to FAKE it!
- Introduction
- JUGS Challenge
- JustRite Stampers
- Lizzie Anne Designs
- My family stuff
- My Stamping Space
- My Time Made Easy
- My Time To Color Challenge
- My Time to Create Challenge
- My Timeless Template Challenge
- My Timeless Templates
- Mytime Mail
- MYTIME MOVIE/VIDEOs
- Papertrey Newsletter
- Pink Cat Studio
- Pretty Palette Challenge
- Pretty Patterns Sketch
- Product Opinions and Must haves
- Recipe's
- Saturday Sketch
- Smilebox Creations
- Stampavie
- Tutorials
- Uncategorized
- videos
Most Popular
- Create your own Onesie Card Tutorial-and important NOTE! PLEASE READ (2529)
- Saturday Sketch-Boxed bag holder (2333)
- Going GREEN! Fancy Flower Flourish-Closure Video (1478)
- Fabulous Favorite - Giveaway! (1336)
- a Prayer Request (1231)
- QUICK-Easter Baskets from Nestabilities-PTI style-and blog challenge (1063)
- Teaser Sketch (999)
- February Release Giveway! (and a little peek) (996)
- Group Post and Rambling Rose Video Tutorial (985)
- GIVEAWAY! Who wants it all?! (895)
Recent Comments (RSS)
- 바카라사이트: 비슷한 주제에 대한 흥미로운 정보를
- 바카라사이트: "여기에 제공해 주신 귀중한 정보와
- 온라인홀덤: 유익한 웹 사이트를 게시하는 데
- 홀덤나라: 나는 당신의 블로그를 정말 좋아합니다.
- lisa: Technology, too, has left an
- 주소모음: 흠 !! 이 블로그는 정말
- FutureGen Apps: Thank You For Sharing fantastic
- 웹툰사이트: 터키에서 온라인 스포츠 베팅을 할
- 툰코: It is a really very
- 온라인홀덤: I’ll be sure to come
Copyright © 2007 - My Time, My Creations, My Stampendence - is proudly powered by WordPress
This blog has been Tweaked and Designed by Sara Williams
45 Responses for "Moving Mermaid"
Oh my gosh, Lauren!! Your interactive mermaid is soooo awesome!! Thanks for sharing all of the deets! You rock, girl!!
F-A-B-U-L-O-U-S!!! Thank you for all the wonderful tips and information. and TFS.
Bet you will be glad when they go back to school. By the way the card is beautiful. Susan
COOL!!! 😀 The effect on the tail is awesome and so perfect! ♥
Awesome Lauren! Love this card….so adorable! I’m not sure I remember a card from last summer but didn’t you do one that looked like someone was skiing? Thanks for explaining how you do this! Maybe someday I’ll be brave enough to try it…haha!
Have yourself a fab day….if you aren’t busy enough???? You can come to my house to help me shovel…ugh!
How cute! What talent you have!!
LOVE IT! Thanks for the directions!
That is so neat. You are way too creative. Have a good rest of the week with your kiddos 🙂 -Molly B
Wow you are amazing! This is so cool! Her tail is great too. What did you use on her tail?
Terri F
Okay… Duh… you already explained that!
Terri F
I’m soooooooo excited that you are sending it to Jenn cuz then I will get to see it and the box IRL!! It’s like it’s being sent to me when it isn’t! LOL!! I love mermaids and Lauren this card rocks!! Awesome job! Now I HAVE TO HAVE this set even tho I could probably make do with the mermaid I have! 🙂
AMAZING!!! I LOVE that your mermaid moves like that!!! So clever!
Awesome! I made slider cards a long time ago but they didn’t compare to this wonderful creation! I do like that new LAD set as well.
Oh my! I love the mermaid. And I love how she can move. That is one of the neatet things I have ever seen. I love the way she moves! Cool!
Don’t ya love when you “google” something and it sends you something not so nice?!
I have done that before. Thanks for the tutorial too.
This is so gorgeous! That mermaid is so cute and you made the greatest card with her! I love the movement and the waves and her shiny tail is fabulous! Oh, I hope my set comes soon! Love it!!
awwww your mermaid card is soooo cute!
So, so cute! I love the fact that you are mailing her in the clear box! How cool is that! I would have never thought to do that:) I too, would be afraid that someone at the PO would swipe it! Hee hee hee!
omg….I cannot stand how talented you are!!! I love stalking your blog!!
*stalking the blog hoping that some of Lauren’s talent/creativity rubs off on me!!*
Very, very cute Lauren!
Lovin’ it….
….absolutely lovin’ it! ♥
Jenn is just going to love this! What a surprise it will be when she gets this!
I love how it will be mailed! (making mental note to self to check into those envelopes).
You are the best! Hugs!
just wonderful Lauren! I love the fantasy film you used for the tail. I don’t know how your girls let you mail it to a friend without a promise that you make them one too!
[…] […]
How exciting for Jenn!!!! I’m so thrilled it is going to her. Thank you!!!!!
Thank goodness I already bought this set last week or I’d be in trouble. 🙂 Jenn is going to flip when she see’s it.
Lauren, this is sooo cute. I just love spinner cards and this one is adorable. I’ll bet it makes your friend’s day. TFS!! Have to check out that Fantasy Film…you enabler, you. 🙂
[…] […]
I love your moving Mermaid…
Sweet Card!!
All the details are wonderful…
Fantastic Starfish too!
*****The packaging is definately
a 5 star….”Clearly Creative”!!!!
Thanks for the link 🙂
Dee
Your Killin me here:0 I hope you dont mind to answer me , see I have had to teach myself and I Live isolated so I dont have stores I shop online , so how would I get Fantasy flim online ??who makes it ..Im sorry ..But when I grow up I want to be like you LOL
Thanks Again Diana
[email protected]
very cute and creative!
[…] […]
[…] together a post, jam packed with FUN ideas for you to try! So grab your coffee and get ready for a Fhttp://laurenm.blogs.splitcoaststampers.com/2008/04/22/moving-mermaid/Win was a long time coming, says relieved Crozier Irish ExaminerTEN months ago, a sizeable portion […]
[…] EDITING TO ADD: If you would like to see other versions I have created, as well as my instructions READ HERE […]
There was mounting evidence on Sunday night that some of the second night of rioting in London was part of an orchestrated plan, as violent disturbances broke out sporadically across parts of the capital.
JS Wings GID
Caroline Babulle,Louis Vuitton a spokeswoman for the publisher, Fayard, said: ‘They have not contested anything in the book, but they are trying to bury it by pretending it doesn’t exist.’Louis Vuitton Sale online offers a big discount on the Mother’s Day. We even offers Louis Vuitton UK as gifts for the first ten guests who buy our items. We are looking forward to your coming.
Hi, exactly where did you get this info can you please support this with some proof or you might say some very good reference as I and others will actually enjoy. This details is actually great and I will say will usually be helpful if we attempt it possibility free. So if you can back it up. That may really support us all. And this may well bring some good repute for you.
Curious to determine what all you intellectuals need to say about this?-?-.
There are so many different types of cheap oakleys Sunglasses on the market today that finding the right pair to fit one’s needs can be a very daunting task. The best pair of sunglasses should offer protection from UV rays, be extremely durable, look good, and serve any special needs that the wearer might have. Once one has found the right pair, they should be so comfortable that the wearer may even forget that he or she is wearing them! There are a few elements to consider when buying oakley outlet. Frame and lens options, sun protection, and the purpose of the sunglasses should all be considered.
Hi, thank you so a great deal for these ideas!
I wants to thank you with the endeavors you have produced in publishing this article. I am trusting the same greatest work from you within the future as well. In fact your fanciful writing abilities has inspired me to start my own weblog now. Truly the blogging is spreading its wings rapidly. Your generate up is a fine example of it.Thanks yet again for discussing this cost-free on the web!
One of the best sites for relevant facts on this niche !?!
That is definately one of the best blogs I’ve sen in ages online. Maintain up the excellent posts.
Me and my friend were arguing about an problem similar to this! Now I realize that I had been correct. lol! Thank you for that information you article.
Positive glad that I navigated in your web page by accident. I’ll be subscribing to your feed in order that I can get the latest updates. Appreciate all of the details right here
OBD2 Scan Tool – Buy All-In-One Automotive Computer
Once you’re an expert, you’re in the business of being right. If you’re right,business is good. If you’re right a lot,business is better AUTO
Leave a reply