Archive for November 30th, 2008
Well it’s December 1st. Am I the ONLY one who thinks that is INSANE?? Where did July go?!
Yesterday we actually got an accumulation of snow.
What I can’t believe is I have to STOP the talk about gift giving and actually get started! UGH!! This means it will be a crazy next couple of weeks.
Anyway every month on the 1st Nichole gives us a Design Team Challenge, and this month was to create a unique presentation for a gift card or cash.
I think this was a great challenge for us all because I know we have many TEENS in our family, and I’m not killing myself making them some keepsake (that they will toss) or try to figure out WHAT to buy-so I ALWAYS go the gift card route. You can’t lose 😀
I decided this challenge would help me get some holders ready in time for the holiday. Often even if I don’t MAKE a gift, and give cash or a gift card, I always like to present it in a FUN way.
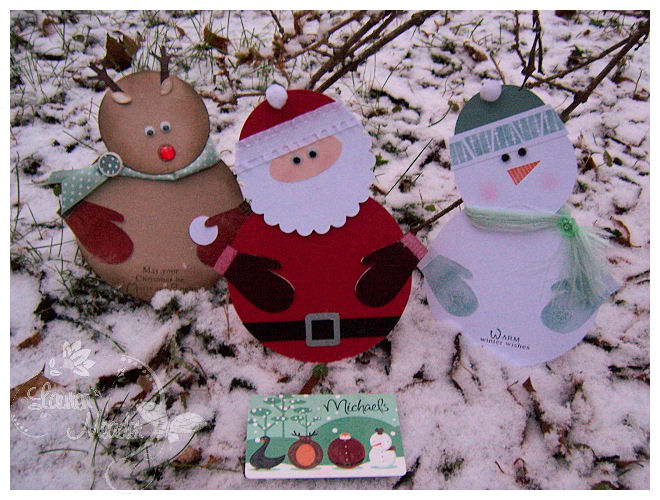
Well I decided when I saw this gift card design

at Michaels, that it would inspire my design. Did I have FUN!!!!!
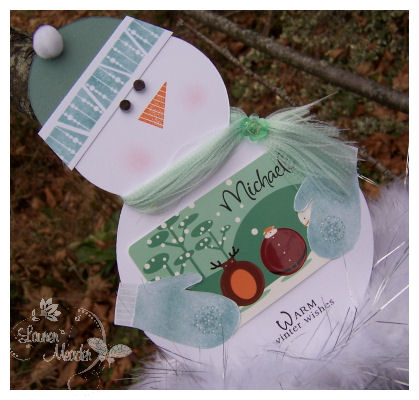
You can see how I used a hobby blade to make the mittens “hold” the gift card in the photo above. I stamped my mittens first, then used a coluzzle to cut a circle around them for the body ![]() Easy peasy.
Easy peasy.
I think its great to make your theme fit your gift card theme.
Here is the full view of my first of THREE gift card holders: Spender Snowman
Is he not the most adorable thing you have ever seen?!
I have to say my finished gift card holder just came out better than the vision in my head 😀
The very first thing that ever came to mind when I saw the actual size of the mitten image from the Snowfall set was to hold a gift card! It was one of those ideas that I had, but didn’t execute right away. I just jotted it down, to save for later. Well I’m happy to say that while this was different than my original vision in my head, I just LOVE it. There is a snowman on the card that sparked the idea, as did the colors in the gift card.
Now the hands and body were the easy part. I had to decide what to do for the face!

I used the top of the tree from the Merry & Bright set for my snowman nose, and a middle image of a different tree from the Merry & Bright additions set for my little hat cuff! I thought it matched the gift card perfectly! The rest of the hat was just a die cut circle from Ocean Tides cardstock. Added a pom pom to the top.
The sentiment on the bottom of the snowman is from Merry & Bright
Now my eyes are Bella Dots– just colored with a black sharpie marker!!
I used Pebbles Pearlescent Chalks for the shimmery pink cheeks.
Now the scarf I used the Aqua Mist grosgrain and pulled the fiber apart, securing it in place with a brad from Making Memories. A perfect scarf don’t you think?
This lil Spender Snowman took me about a 45 minutes to make, which isn’t bad considering I had NO real idea what I was going to use for each step.
The BEST part of this entire project was when I showed my husband. He said it was his favorite thing I have ever made! ( I thought-WOW! REALLY?!!) Then he went on with a FABULOUS idea. He since since I was seeking inspiration from my gift card I should also make a Santa and a Reindeer!
What great idea. Considering he never offers creative input or shows too much excitement, I figured I better listen to show him his opinion matters (and get some of our family gift card holders done a tad bit earlier than Christmas Eve! LOL!)
NOTE: You can tell the snow started to fall as I stamped! Put me in the Christmas spirit as I FROZE my hiney off taking photos in our yard outside my stamp room. I crawled out the window-in my slippers-no jacket-to get these photos! OYE! What we do for our hobby eh?
Next up: Santa Sends Some $
Now aside from the mittens (like above) the rest is just cardstock and creativity!
I used Pure Poppy cardstock , and stamped his mittens in black and white ink.
For the belt buckle that was an OLD punch I had from EK Success and never used-till now! LOL! His beard is done in white-using a scallop circle nestability, and his face was a large oval, punched from blush cardstock, with the addition of googly eyes, and pink cheeks!!
Ribbon makes his hat cuff here, and another pom pom.
Then I debated-a mouth or no mouth?
So I slapped one on, and didn’t like it :C
I didn’t have the right size circle for his mouth and I wanted him to be happy. At the end of the day I ripped this mouth off! LOL! Oh well. What is your opinion? Mouth on or off? I guess writing this it is kind cute…….HMM.
Now he only took me a bit over 20 minutes.
Now last but not least: Buck-a-roo
By now its FREEZING and DARK! Sorry this photo is awful :C
BUT…………Isn’t he cute?!
I created him using Kraft cardstock then sponged the edges. For the stamping- his mittens were done with Pure Poppy and Dark Chocolate ink. I made him also hold a snowball.
Want to know what made his antler’s? It was the OPEN line image of the tree trunk from Father Knows Best, stamped in black, on dark chocolate cardstock, then cut out!
His ears are colored Bridal Confetti flowers 😀
His Rudolph nose was originally the layered circle stamp-also from Father Knows Best, and covered with a large Bling (colored with a sharpie marker), but you can still see some of the circle outline, which is what I hoped for. More googly eyes to complete the face 😀
His scarf is a polka dot Ocean Tides ribbon, secured with a button that I embellished with some dotted cardstock.
The sentiment on the bottom is from Merry & Bright
The Buck-a-r00 took about a 1/2 hour since I wasn’t sure HOW to make him look just like a reindeer.
Now here we have a photo of the gift card trio-with the inspiration gift card!
By now I am a icicle! LOL! Covered in falling snow.
I hope you like my version of some cute little gift card holders, all created from the inspiration of the mittens! These didn’t take that long to make, and considering I have done the design part, to re-create them and whip up several, wouldn’t be as long! LOL!
I really don’t care how long they took, as I truly had fun with the challenge, and the extra push of inspiration that my husband set before me 😀 Thanks honey! Im just so happy with these.
Now for MORE inspiring ideas for Cash and Carry be sure to check out the design teams members!
Thanks for taking the time to stop by! Id LOVE to hear which one is YOUR favorite!
Mine is the snowman
Alexa liked Santa
Amber liked the Santa
Noah liked the Santa
I should have expected the kids to say that one! LOL!
Jay wouldn’t pick-he said they were all equally cute. I think he thought it was a trick question! You know like most men think when we ask them stuff. Too funny.
Anyway-hope you find some time to stamp for FUN! Challenging yourself while crossing off your “to do” list is a great way to multitask 😀
Thanks for reading and only 24 more creating days till Christmas!
Warms my heart! A New Release
Nov 30, 2008 Author: mytime | Filed under: CardsRelease day! Make sure you check out C.C. Designs! She is releasing 3 new sets, 2 new single images, and a digi set! All TODAY! So check it out.
SugarPlum Snowman
SugarPlaum Winter Scenery
Stampin Spot Studio Snowboarding Brandon & Winter Sadie
Winter Bear
and the digi download set- Sweet Pea winter
The sample to follow uses the SugarPlums Snowman set.
So many of you out there in cyber world TRULY touch my heart, and my life. The kindness of stamper’s is amazing. Here is another little story I thought I’d share……….
A few weeks ago I had some intermittent contact with one of my blog readers Sarah N. I had helped her out with some stuff in the best way I could, and after some chatter, she mentioned to me that she was compelled a few weeks before to buy some purple yarn. So not her color she mentioned. Anyway, she went on to say that she thinks she was drawn to it, for the scarf she made, to send to me! How sweet is that?!
I hope she will like this. I love my K & Co Christmas print slab, as it has inspired many recent creations. I used my creative memories wavy cutter for some 3D snow hills. Some Stampendous pink glitter, and silver snowflake table confetti from Target!
I was just over the moon with her lovely gesture (Now I have MANY thank you’s to write, so many on the list. I get caught up on really making each one special that they all end up so late! This one was just perfect for the gift I received-the scarf is gorgeous!!!!!!!!) so I made her this card as a thank you! I should have made it purple! DUH! Oh well.
I tied a pretty ribbon around her neck-(love the little hearts on it) as a thank you for the scarf. Just an added touch. I think she is SO cute.
SO this will go postal this week I believe. I also hope to get our holiday cards OUT the door!!
So a huge thank you to Sarah 😀
So that’s it for me. I have SO many other samples to share, but will wait till later in the week. Monday’s are INSANE for me.
Later.
Squigglefly –
Nov 30, 2008 Author: mytime | Filed under: CardsI’m excited to share a new kind of imagery with you today! Take a look, maybe give it a try and see what you think!
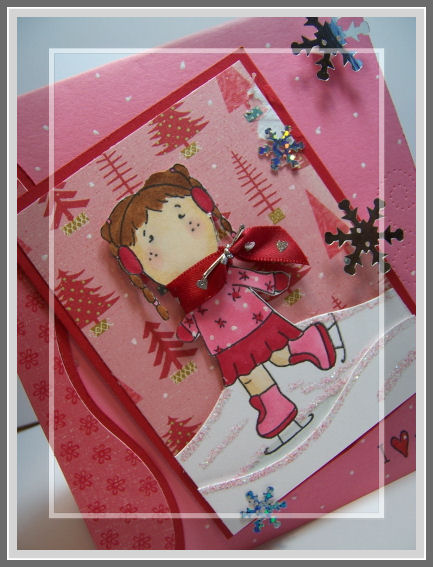
See this cute little girl…………….OOPS! Look what she has done!
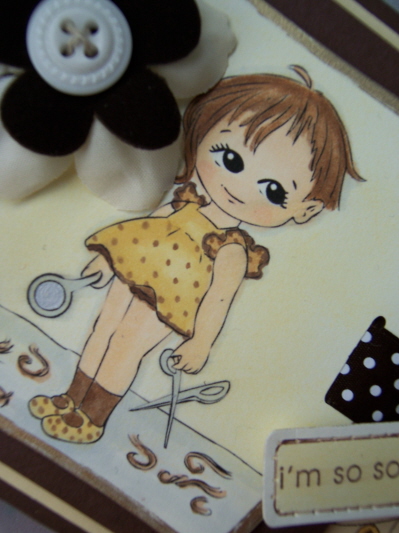
This is First Haircut
Looking at this image I felt she would make the perfect Im Sorry card 😀 So thats what I did.
She looks just like a cupie doll, maybe a Campbell’s soup kid-only not so pudgy, or an adorable vintage postcard. I love her to pieces. This line totally brought out my other shabby/vintage side (OK as shabby as I get) of me.
So my dear cyber friend Holly (she made me this frame) has a UBER talented daughter Chesney. You may have known some of Chesney’s work from My Favorite Things. She is the illustrator for the BC Dzyns line. When I saw some of Chesney’s drawings (made into cards on Holly’s blog) I told Kimabout them. Soon after, with collaboration from Kim’s daughter Brianna, that line was born. Pretty cool stuff. Little did I know that Chesney could draw some of the CUTEST images-I had never seen until recent.
Here is the info-
Get Squigglefly
Squigglefly is offering digital downloads of all kinds of images that people can print and use like stamps. They will come flipped right and left and come in two pre-set sizes for convenience, but can be re-sized for personal preference.
This is the card in its entirety
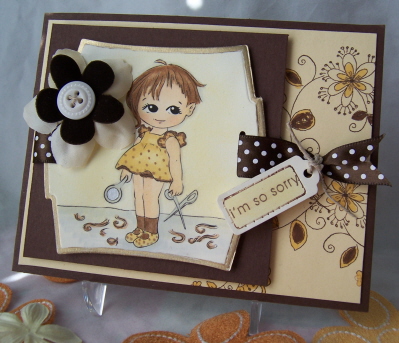
So I printed her onto my vintage cream cardstock, and die cut with the Labels set.
I then took my gold marker, and ran it along the embossed edge of the die cut for that VINTAGE, antiqued look.
I had to add a velvet flower in chocolate by May Arts. I also added a vintage button I got from my stash for more “vintage” stuff.
The stamp along the side I believe is Hero Arts-my dear friend Paulette bought that for me some time ago and I felt it went with the vintage, almost faux stitched looking element to the card. I just added some color to my leaves and petals.
I stamped the I’m so sorry sentiment from Stampin Up, and die cut it with a Spellbinder’s tag. I also drew my line and pierced it around the tag for a faux sewn look.
Pretty cool huh?
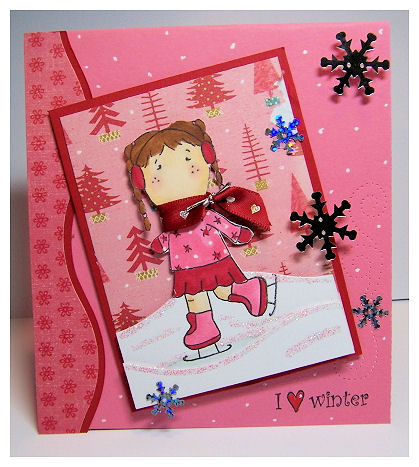
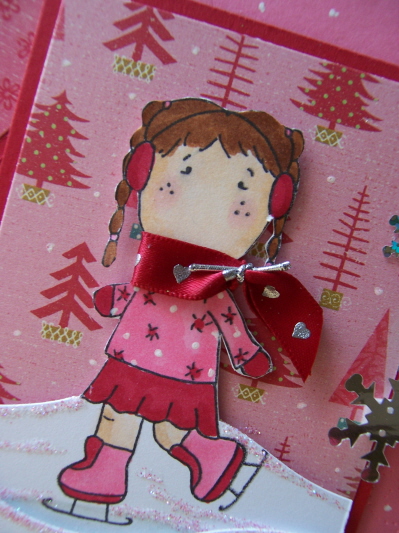
I think for me the coolest part came when I did get to make that same image SMALLER to suit a card I wanted to make
Here is a close up of the SAME image, only smaller
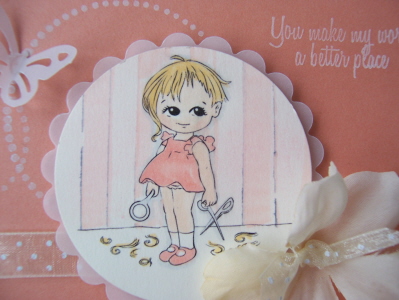
Now, looking back I WISH I paid attention to the sizes I made it as to help you-sorry! You can figure out what they will look like before you print my hitting PRINT PREVIEW.
On that image I used a ruler and the wide end of a copic marker, and “drew” my wall paper. I then lightly traced with a ruler and a black marker-faintly to make it like the drawing and not over power it.
I layered it with a vellum scallop. So soft.
Now the full view-
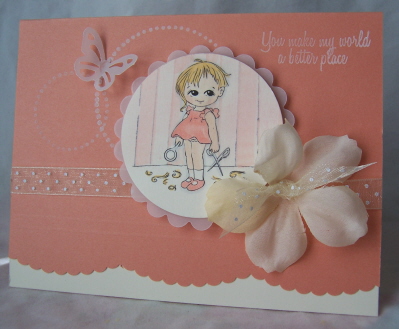
What better sentiment? You make my world a better place. It is from Papertrey Ink’s Mailbox Greetings set. The dotted circles are from the Borders & Corners Circle set
To me this was like when times are tough you make everything OK. I was thinking what a perfect image-First Haircut-locks on the floor-this is bad! LOL! But YOU make it all ok.
See the difference in size from the first to second card? These are BOTH A2 size cards, and the bottom image is significantly smaller. It reminds me if Elzybells. The UK has the larger images (which I ADORE) and the US sells select smaller images. Sometimes you wish a particular image was either bigger or smaller. Sort of the best of both worlds as far as sizes go.
I used my Scor-Pal to make some scored lines at the bottom, and added a scallop border (using Martha Stewart punch) and a vintage cream underlay for a fun feminine touch. I then used some Bazzill flower tied in the center with ribbon.
I’ll share another sample I have on Tuesday 😀
If you check it out let me know what YOU think.
I’m a busy girl today-so I better run.
My Etsy

Who I Designed For
Blogroll
- Alicia
- Alli Miles
- Ally Blankenship
- Amber
- Andi @ crafts on a whim
- Angel R
- Angie Z
- Anne Kranitz
- Becky O
- Bee
- Beth Silaka
- Bethany Paull
- Beverly Nash
- Bobbie
- Cambria
- Cammie
- Card of the Week
- Card Positioning System (CPS)
- Cards for Cancer
- Catherine Doucette
- Charmaine
- Cheryl Sims
- Chriss Rollins
- Christina
- Christine Ewing
- Christine Wooden
- Colleen Schaan
- Craft Critique
- Craft Gossip
- Crystal
- Dawn Easton
- Emily Giovanni
- Geny
- Holly
- Igne Groot
- Inspirational Craft Blogs
- Irene
- Jami Sibley
- Jeanne Streiff
- Jen del Muro
- Jeni Bond
- JenMarie
- Jenn Balcer
- Jenn Diercks
- Jenn O
- Jennifer E
- Jennifer Mick
- Jennifer Pereda
- Jennifer-Sweet Treat
- Joanne Basile
- Jodi Collins
- Julia Stainton
- Julie Masse
- Karen
- Kathryn Berthiaume
- Katie Cotton
- Kelley Holland
- Kendra
- Kim Scholfield
- Kris’s Color Stripes! Get inspired here
- Kristen Dubosque
- Kristin Eberline
- Kristine
- Laura @ Sunshine Stamper
- Laura Turnmire
- Laurie Schmidlin
- Lesa Rapp
- Linda Duke
- Linda-LSN
- Lindsey Botkin
- Lisa (lakind scs)
- Lisa Kind
- Lori Craig
- Maggie
- Mara Campbell
- Maria
- Maria Levine
- Mary
- MaryJo
- Melanie M
- Monique Hansen
- Moxie Fab World
- Pam Imholz
- PaperCrafts Connection
- Peppers and Pollywogs Kids party site
- Rebecca Grohall
- Rita
- Robyn
- Rose Ann
- Sarah Vrolyk
- Sharon Harnist
- Sharon Johnson
- Sharon Rivera (a chemisrty with paper)
- Sherrie
- Sophia Landry
- Storage Units, Ink, & More Blog
- Sue Berker
- Susan (Rainy)
- Tangii Crane
- Tracy
- Tricia Traxler
- Trudee
- Velta
- VivLyn
- Zena
MTME Pretty Palette Color Team
MTME Pretty Patterns Sketch Team
My Time Made Easy TM LLC
Shop till you drop!
Lauren Meader
About Me
Copyrighted material
Subscribe To My Blog
Pages
- About me
- Alexa’s Story!
- My Crafty Corner!
- My Time Made Easy™ LLC
- Our Make A Wish Trip to Disney!
- Resume/Publication List
Calendar
Archives
- August 2013
- July 2013
- June 2013
- May 2013
- April 2013
- March 2013
- February 2013
- January 2013
- December 2012
- November 2012
- October 2012
- September 2012
- August 2012
- July 2012
- June 2012
- May 2012
- April 2012
- March 2012
- February 2012
- January 2012
- December 2011
- November 2011
- October 2011
- September 2011
- August 2011
- July 2011
- June 2011
- May 2011
- April 2011
- March 2011
- February 2011
- January 2011
- December 2010
- November 2010
- October 2010
- September 2010
- August 2010
- July 2010
- June 2010
- May 2010
- April 2010
- March 2010
- February 2010
- January 2010
- December 2009
- November 2009
- October 2009
- September 2009
- August 2009
- July 2009
- June 2009
- May 2009
- April 2009
- March 2009
- February 2009
- January 2009
- December 2008
- November 2008
- October 2008
- September 2008
- August 2008
- July 2008
- June 2008
- May 2008
- April 2008
- March 2008
- February 2008
- January 2008
- December 2007
- November 2007
- October 2007
- September 2007
- August 2007
- July 2007
- June 2007
- May 2007
- April 2007
- March 2007
- January 2007
Categories
- About Me
- All That Scraps
- blogger challenge
- camera/photo play
- Cards
- Contests
- family stuff
- FOR SALE
- Home decor/3-D items
- How to FAKE it!
- Introduction
- JUGS Challenge
- JustRite Stampers
- Lizzie Anne Designs
- My family stuff
- My Stamping Space
- My Time Made Easy
- My Time To Color Challenge
- My Time to Create Challenge
- My Timeless Template Challenge
- My Timeless Templates
- Mytime Mail
- MYTIME MOVIE/VIDEOs
- Papertrey Newsletter
- Pink Cat Studio
- Pretty Palette Challenge
- Pretty Patterns Sketch
- Product Opinions and Must haves
- Recipe's
- Saturday Sketch
- Smilebox Creations
- Stampavie
- Tutorials
- Uncategorized
- videos
Most Popular
- Create your own Onesie Card Tutorial-and important NOTE! PLEASE READ (2529)
- Saturday Sketch-Boxed bag holder (2333)
- Going GREEN! Fancy Flower Flourish-Closure Video (1478)
- Fabulous Favorite - Giveaway! (1336)
- a Prayer Request (1232)
- QUICK-Easter Baskets from Nestabilities-PTI style-and blog challenge (1063)
- Teaser Sketch (999)
- February Release Giveway! (and a little peek) (996)
- Group Post and Rambling Rose Video Tutorial (985)
- GIVEAWAY! Who wants it all?! (895)
Recent Comments (RSS)
- 첫충사이트: 완전히 흥미로운 블로그 게시입니다. 저는
- sarah: Wow, Lauren, what a stunning
- hedie: خرید راهبند
- 야동: Love to read it,Waiting For
- 야동: This seller is in a
- 바카라사이트: 여기 처음 왔어요. 나는이 게시판을
- 야동티비: I was surfing the Internet
- 바카라사이트: 비슷한 주제에 대한 흥미로운 정보를
- 바카라사이트: "여기에 제공해 주신 귀중한 정보와
- 온라인홀덤: 유익한 웹 사이트를 게시하는 데
Copyright © 2007 - My Time, My Creations, My Stampendence - is proudly powered by WordPress
This blog has been Tweaked and Designed by Sara Williams