Archive for October 13th, 2008
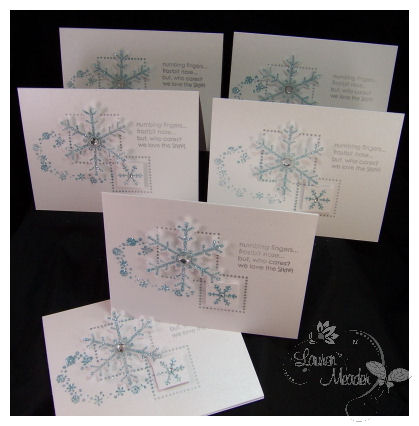
Holiday Cards- Gently Falling Snow
Oct 13, 2008 Author: mytime | Filed under: Cards, Papertrey NewsletterToday is a very special post. This may just be what you need to jump start your family holiday card design!
DON’T miss the post below for MORE of My Timeless Template peeks!
Nichole asked our team to get some great holiday card ideas together for you! The only stipulation was they had to be able to be mass producible. Nichole has taken each of our Holiday cards and compiled a supply list, with the sketch each of us used for our creation to help you re-create any of the design teams designs SIMPLE and EASY! All the work has been done if you don’t want to think about your holiday layout, and what you need for supplies. They supplies are listed for 25 cards.
Details for my cards and supplies-on Nicholes Blog
I decided that I would use Snowfall & Snowfall additions-to be released tomorrow!
My creations are called Gently Falling Snow because that is what I am reminded of when I look at them. The shimmery white cardstock, and Ocean blue art glitter-like ice, are the perfect pair.
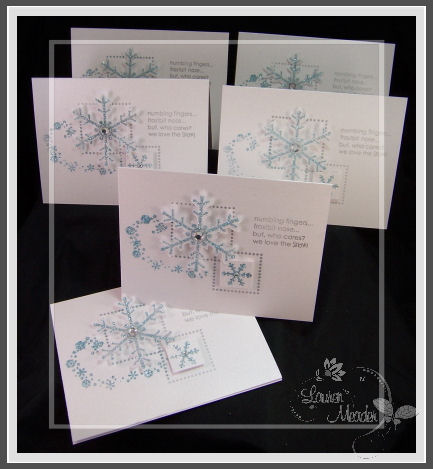
Set of 6
When designing my own holiday cards, I like to keep it as simple as possible and the less layers the better, as I have WAY over 50 to make! 😀
If it’s not fast and easy then its not for me! Mass producing is something I LOATHE. I have to say that playing with all the glitter was fun!
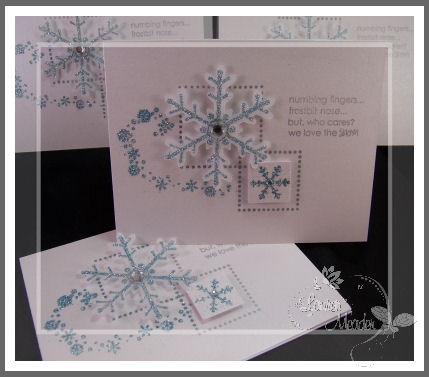
To me its in the little details that make the simple cards POP! I LOVE glitter, and vellum, so those were definitely going to be a part of this years design. The snowflake punch and this set are AWESOME together! I went with the shimmery white cardstock with Encore silver ink and lots of glitter!! Doesn’t is remind you of snow?
My cards were VERY easy this year! Just a couple simple steps.

Close up photo
By layering the 2 dotted square frames from Borders & Corners square set in silver ink, it gives the illusion of layers.
For some POP- I punched my vellum snowflakes, and used the glue pad to stamp the snowflake, then dusted on my glitter. Applied the large snowflake with a dimensional. I also punched a little square, and added a little snowflake to that!
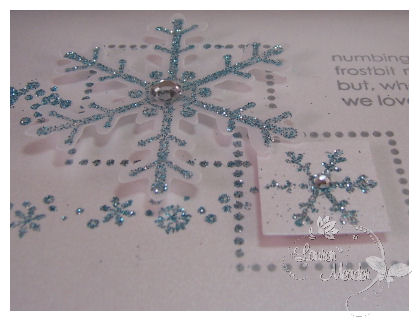
See the dimension.
By adding these 2 layers on dimensionals, my card looks like it took a lot of work when in reality they were very quick.
When these 6 were done I did package them up all nice 😀 You will see that tomorrow!
I hope you like my version of a snowy white Christmas card!
Make sure you check Nicholes blog for all the details!! The release party is TONIGHT! 9pm EST! You know I am over the moon with excitement, so I hope to chat with you then!
Templates Review-so easy a kid can do it
Oct 13, 2008 Author: mytime | Filed under: My Timeless TemplatesWell we are on day 4 of My TimelessTemplate © peeks here on my blog! Tonight is the release party over on the Papertrey Ink forum! I hope to chat with you all there!! If you are new to Papertrey and the release party just jump on in, and say HI!!
The best part about this for me, so far, has been reading a comment that says YOU are getting inspired. Inspired to actually try making your own handmade gifts this season (which truly are the best kind), inspired to try gift packaging, something you felt so out of reach is now do-able!
THAT is why I do what I do, and share what I share here everyday! Its the comments and emails that say you liked it, loved it, or it helped me get inspired to make X for this special person 😀
That is what this entire thing is ALL about. I get so much from knowing something I did sparked some creativity in someone else. Making this process affordable, FUN and better yet-easy, is a true dream!
I have more to share today.
I will be picking 15 RANDOM winners to receive a FREE My Timeless Template © from the people who leave comments on my My Timeless Template countdown posts, over the next couple of days!What does that mean?
Well from the comments left from the 11-14th I will have www.random.org pick several winners from comments left EACH day! So 4 people from the post on the 11th will win, 4 people from the 12th , 4 from the 13th, and 3 from the 14th will be drawn! So by commenting your thoughts on the projects each day, you get another chance to win!
I will announce the winners during the Papertrey Ink release, in the party thread, and of course here on my blog. All you really need to win is make sure I have an email address!
Are you bored yet? I hope not! Tomorrow I begin the challenges because you will be able to get the downloads right away! Im just dying to hear your feedback 😀
This is where I say “So easy a kid can do it, and Kid tested mom-approved”
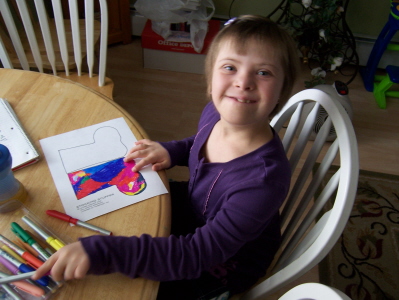
I enjoyed using them for my kids craft time! We always do an afternoon craft before mommy gets her stamp time, and this has been a lifesaver for me! They are QUIET for at least on hour!
In this post they used the Stocking Stuffer to make ornaments for the Christmas tree!
You just print-then let the kids color, cut, and glue! Here we go…….
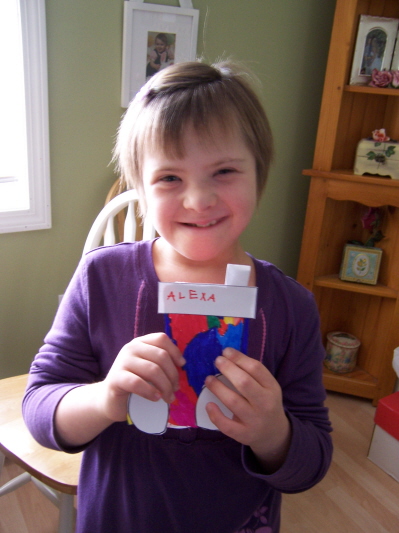
Alexa coloring-she gets very involved, and really didn’t want me taking pictures while she was “working” but stopped for a quick photo and smiled.
Here it is, stocking complete! All done by herself!
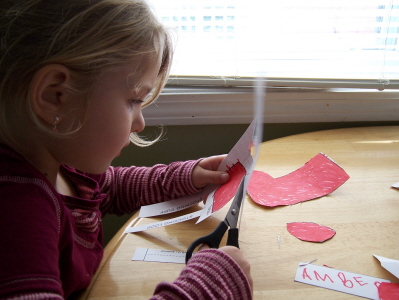
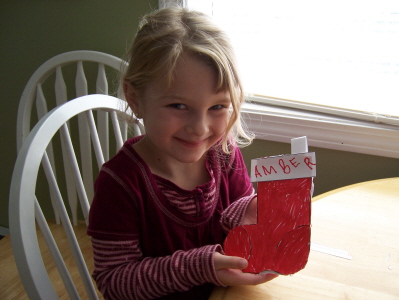
This is Amber coloring-She just turned 4, and LOVES to work with mommy. She said her stocking was going to be like Santa’s stocking and HAD to be red & white! She is the only one who amuses my photographing of her doing everything step by step.

Now its time to cut everything out
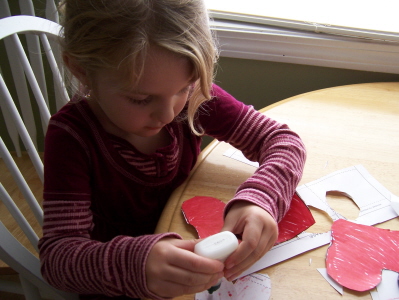
All her pieces are cut, so now she is gluing
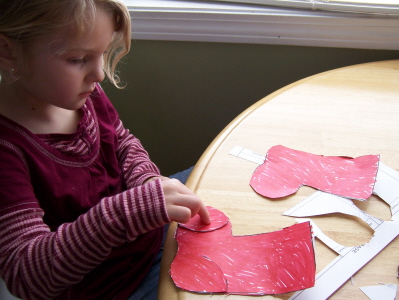
Now she puts everything into place-making sure its the perfect fit. She is a little perfectionist, its so cute to watch. ( I tried to tell her to keep her heel and toe pieces white but she said I could do what I wanted when I make my own stocking! LOL! I about died with laughter. OK then)
Now she is done!
We will hang a ribbon from the stocking tab to hang this on the tree this year.
Now here is Noah. He has colored his, then he began the cutting…..
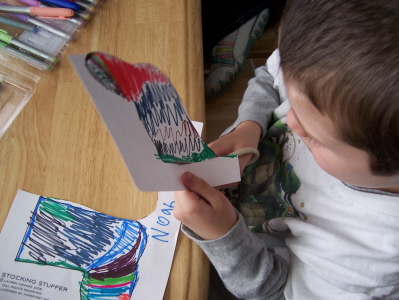
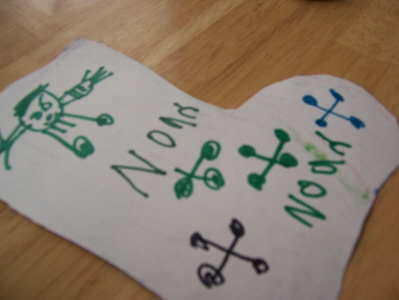
He REFUSED to make it an ornament and glue the 2 pieces together! He decided to make it a magnet to go on the fridge. When he creates something he writes his name, draws himself, then marks it with a “special” X so no one “steals it” as he says. He cracks me up sometimes. He said if it was glued, no one would know it was his. OK Noah, we will make magnets instead.
See- he is so proud!
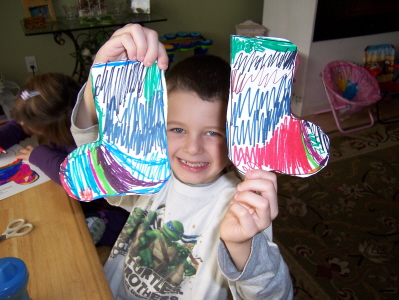
Gotta love the crazy coloring! LOL!
See-even the kids can do it. Amber’s pre-K class said they are going to do the Stocking Stuffer boxes for a Christmas project with the kids! I cannot wait to see that 😀
Now we have another mommy activity! I used the Stocking Stuffer template to make a bag cover .
Im here for you

This is a great treat holder to brighten someones day, and nothing says cheer up like some chocolate! LOL!
I printed my Stocking Stuffer template onto the Lemon Tart cardstock, then adhered a piece of adhesive cotton paper over it. I then stamped my design using Floral Frenzy, all over the sheet, then cut out! Looks like an actual fabric stocking 😀
This is the side view-
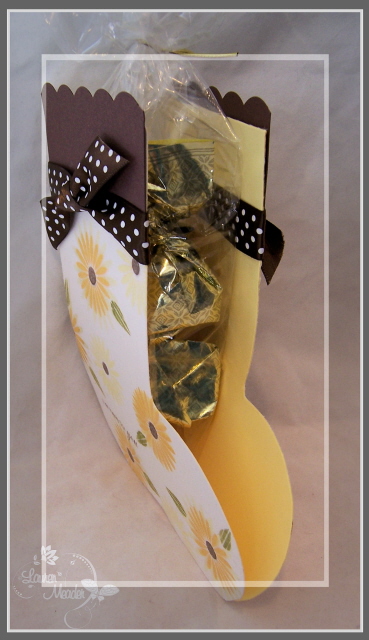
My bag is adhered between the 2 stockings. I think its cute. Again really quick and simple, as you will get to try for yourself in just HOURS!! FREE!!
Supplies
My Timeless Template-Stocking Stuffer
Stamps-Floral Frenzy
Ink– Summer sunset, Lemon Tart, Dark chocolate , ripe avocado
Cardstock-Lemon tart, dark chocolate
Ribbon– Dark Chocolate polka dot
Food item- Starbucks Truffles, cello bag from Michaels, gold cord
Now we have another project using the For Keep {sake} template.
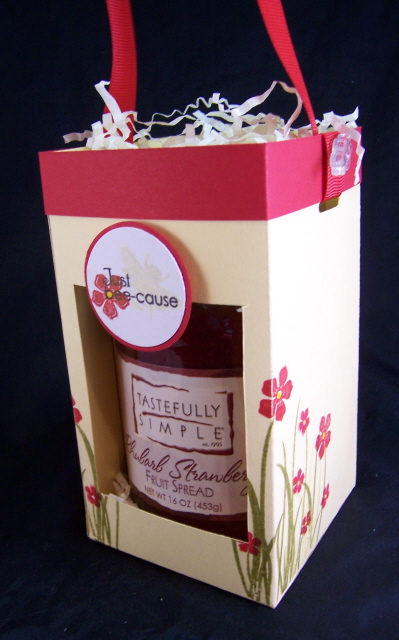
Just bee-cause Fruit Basket
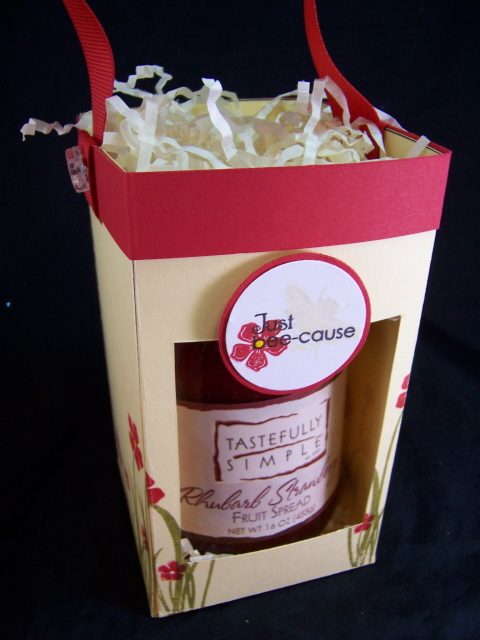
I am calling this a “basket” because I used the For Keep{sake} template, but omitted the lid! Instead I decided I would put some trim at the top, and create a ribbon handle! Just attached with a slot punch, and some brads. That leaves the top open, and creates a basket of sorts!
Another view
Now can you see the variations my templates bring to YOUR crafting? The only limit is your imagination 😀
I didn’t put in a acetate window. I wanted it left open. I also only stamped partially around the sides. I thought is was better than stamped the entire container. Too busy that way.
I LOVE all the products that Tastefully Simple carries! When I provided the first peek of this template, someone asked if this template was able to hold a jar of jelly. Well, here we have a 16oz jar, and we still have room! So YES! Make all the homemade preserves you want, and package them in my this fancy Keep{sake} box! Well I guess now, like I said, its a basket!
See the top view
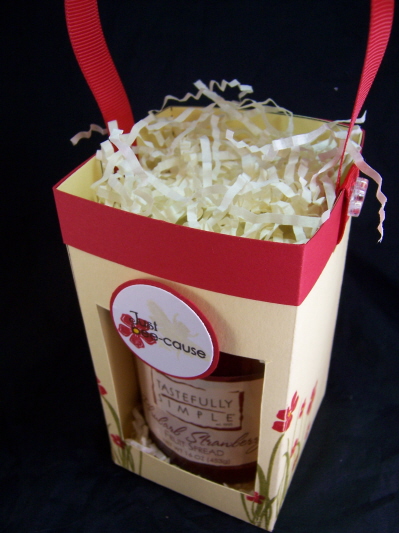
I maybe even could have added some special crackers to top, to use with the fruit spread! I like that idea! Didn’t have any, and didn’t think of it till just now!
Supplies:
My Timeless Templates-For Keep{sake}
Stamps-Honeybees and Honeybee sentiments
Ink– Lemon Tart, Black, Pure poppy, Ripe avocado
Cardstock-Lemon Tart, Pure Poppy
Ribbon-Pure poppy grosgrain
Food Item Tastefully Simple Strawberry Rhubarb fruit spread
brads by Making memories, slit punch
Feeling Better Makeover
Next reivew is of my Music Makeover template! This isn’t JUST for jewel cases.
I wanted to do another quick gift idea to send to a sick friend/loved one. One that you could actually get out the door BEFORE your friend recovers! LOL! You know sending some cheer through the mail!
My Music Makeover template was the perfect thing!
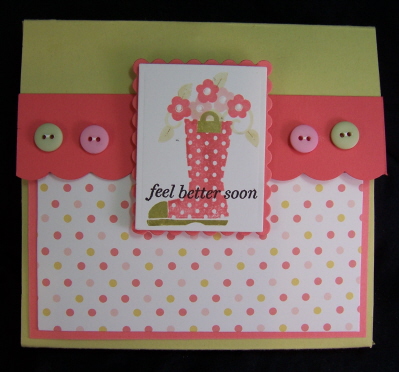
Now for a feel better gift item you want it to be CHEERFUL, not gloomy! So I went with some great colors inspired by the New! Polka Dot Parade patterned paper! Don’t you just SMILE looking at it?
I love the boot! Of course working with my Stocking Stuffer template reminded me of this image 😀
I decided to place some “staples” you need when you are sick inside, and they fit PERFECT!
Open it up and you will see….
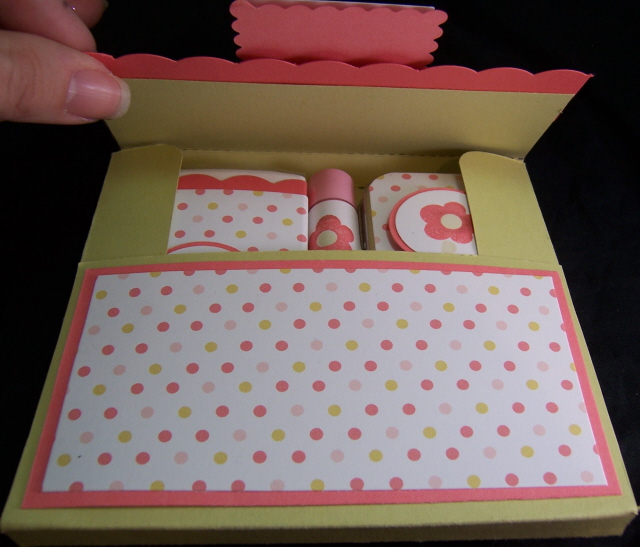
Everything packaged so neatly!
Now I couldn’t just toss in some items, I had to alter them a little. Really quick, no time at all. This packet of feel better items took UNDER 15 minutes to make!
Inside you have
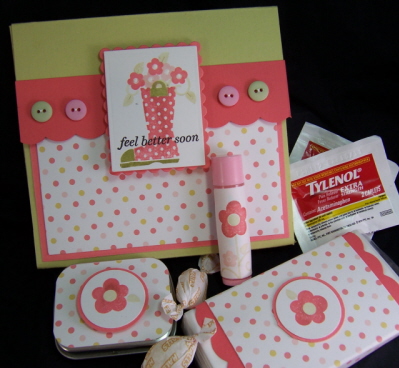
A package of tissues, some chap stick, we all need some Tylenol, and of course some lemon & honey cough drops! I put mine in the little tin. I would also have included some thera-flu or some little packet like that, if I had one on hand. You get the idea. I think its a cute little gesture.
Again, its the THOUGHT that counts, and what says it better that “I was thinking of you” than this?
Stamps-Green Thumb, Anniversary set (feel better sentiment)
Ink- berry sorbet, spring moss, blush blossom
Cardstock berry sorbet, spring moss, white, Polka dot Parade
So that is all my friends. My big reveal is tonight. I may need a nap! Im WIPED OUT!! Can you even believe I have MORE to share too. I can’t believe it myself. I’ve been a creating machine.
The winners for the 15 templates are being picked tonight! Don’t forget to comment and cross your fingers 😀
I’ll chat with you later, at the the release!
Thank you a million times over for the lovely comments and tremendous support I have felt beginning this new venture 😀
Hugs to you all.
A couple things to check out!
Oct 13, 2008 Author: mytime | Filed under: UncategorizedHi everyone-
Popping in quick to point you in the direction of some REALLY cool stuff!!
My dear friend Holly made the COOLEST project using 2 photos of me & my girls. It is alled Then & Now! You are going to want to follow her tutorial and make your own. It seriously brough tears to my eyes!
CHECK IT OUT—>HERE!
Thank you Holly! Im sending you HUGE hugs from us here 😀
Then a woman lead me to a great coupon book that would be PERFECT for the Stinky Stocking in the post below 😀 Check it out HERE!
Lastly I saw Just Rite Stampers is having a contest again! CHECK IT OUT–>HERE! I wish I got to play in the last one but couldn’t. I don’t have the stamps for the contest but if you do, ENTER! You got nothing to lose right?!
Be back later with a special Papertrey post, and MORE template samples!
My Etsy

Who I Designed For
Blogroll
- Alicia
- Alli Miles
- Ally Blankenship
- Amber
- Andi @ crafts on a whim
- Angel R
- Angie Z
- Anne Kranitz
- Becky O
- Bee
- Beth Silaka
- Bethany Paull
- Beverly Nash
- Bobbie
- Cambria
- Cammie
- Card of the Week
- Card Positioning System (CPS)
- Cards for Cancer
- Catherine Doucette
- Charmaine
- Cheryl Sims
- Chriss Rollins
- Christina
- Christine Ewing
- Christine Wooden
- Colleen Schaan
- Craft Critique
- Craft Gossip
- Crystal
- Dawn Easton
- Emily Giovanni
- Geny
- Holly
- Igne Groot
- Inspirational Craft Blogs
- Irene
- Jami Sibley
- Jeanne Streiff
- Jen del Muro
- Jeni Bond
- JenMarie
- Jenn Balcer
- Jenn Diercks
- Jenn O
- Jennifer E
- Jennifer Mick
- Jennifer Pereda
- Jennifer-Sweet Treat
- Joanne Basile
- Jodi Collins
- Julia Stainton
- Julie Masse
- Karen
- Kathryn Berthiaume
- Katie Cotton
- Kelley Holland
- Kendra
- Kim Scholfield
- Kris’s Color Stripes! Get inspired here
- Kristen Dubosque
- Kristin Eberline
- Kristine
- Laura @ Sunshine Stamper
- Laura Turnmire
- Laurie Schmidlin
- Lesa Rapp
- Linda Duke
- Linda-LSN
- Lindsey Botkin
- Lisa (lakind scs)
- Lisa Kind
- Lori Craig
- Maggie
- Mara Campbell
- Maria
- Maria Levine
- Mary
- MaryJo
- Melanie M
- Monique Hansen
- Moxie Fab World
- Pam Imholz
- PaperCrafts Connection
- Peppers and Pollywogs Kids party site
- Rebecca Grohall
- Rita
- Robyn
- Rose Ann
- Sarah Vrolyk
- Sharon Harnist
- Sharon Johnson
- Sharon Rivera (a chemisrty with paper)
- Sherrie
- Sophia Landry
- Storage Units, Ink, & More Blog
- Sue Berker
- Susan (Rainy)
- Tangii Crane
- Tracy
- Tricia Traxler
- Trudee
- Velta
- VivLyn
- Zena
MTME Pretty Palette Color Team
MTME Pretty Patterns Sketch Team
My Time Made Easy TM LLC
Shop till you drop!
Lauren Meader
About Me
Copyrighted material
Subscribe To My Blog
Pages
- About me
- Alexa’s Story!
- My Crafty Corner!
- My Time Made Easy™ LLC
- Our Make A Wish Trip to Disney!
- Resume/Publication List
Calendar
Archives
- August 2013
- July 2013
- June 2013
- May 2013
- April 2013
- March 2013
- February 2013
- January 2013
- December 2012
- November 2012
- October 2012
- September 2012
- August 2012
- July 2012
- June 2012
- May 2012
- April 2012
- March 2012
- February 2012
- January 2012
- December 2011
- November 2011
- October 2011
- September 2011
- August 2011
- July 2011
- June 2011
- May 2011
- April 2011
- March 2011
- February 2011
- January 2011
- December 2010
- November 2010
- October 2010
- September 2010
- August 2010
- July 2010
- June 2010
- May 2010
- April 2010
- March 2010
- February 2010
- January 2010
- December 2009
- November 2009
- October 2009
- September 2009
- August 2009
- July 2009
- June 2009
- May 2009
- April 2009
- March 2009
- February 2009
- January 2009
- December 2008
- November 2008
- October 2008
- September 2008
- August 2008
- July 2008
- June 2008
- May 2008
- April 2008
- March 2008
- February 2008
- January 2008
- December 2007
- November 2007
- October 2007
- September 2007
- August 2007
- July 2007
- June 2007
- May 2007
- April 2007
- March 2007
- January 2007
Categories
- About Me
- All That Scraps
- blogger challenge
- camera/photo play
- Cards
- Contests
- family stuff
- FOR SALE
- Home decor/3-D items
- How to FAKE it!
- Introduction
- JUGS Challenge
- JustRite Stampers
- Lizzie Anne Designs
- My family stuff
- My Stamping Space
- My Time Made Easy
- My Time To Color Challenge
- My Time to Create Challenge
- My Timeless Template Challenge
- My Timeless Templates
- Mytime Mail
- MYTIME MOVIE/VIDEOs
- Papertrey Newsletter
- Pink Cat Studio
- Pretty Palette Challenge
- Pretty Patterns Sketch
- Product Opinions and Must haves
- Recipe's
- Saturday Sketch
- Smilebox Creations
- Stampavie
- Tutorials
- Uncategorized
- videos
Most Popular
- Create your own Onesie Card Tutorial-and important NOTE! PLEASE READ (2529)
- Saturday Sketch-Boxed bag holder (2333)
- Going GREEN! Fancy Flower Flourish-Closure Video (1478)
- Fabulous Favorite - Giveaway! (1336)
- a Prayer Request (1232)
- QUICK-Easter Baskets from Nestabilities-PTI style-and blog challenge (1063)
- Teaser Sketch (999)
- February Release Giveway! (and a little peek) (996)
- Group Post and Rambling Rose Video Tutorial (985)
- GIVEAWAY! Who wants it all?! (895)
Recent Comments (RSS)
- 첫충사이트: 완전히 흥미로운 블로그 게시입니다. 저는
- sarah: Wow, Lauren, what a stunning
- hedie: خرید راهبند
- 야동: Love to read it,Waiting For
- 야동: This seller is in a
- 바카라사이트: 여기 처음 왔어요. 나는이 게시판을
- 야동티비: I was surfing the Internet
- 바카라사이트: 비슷한 주제에 대한 흥미로운 정보를
- 바카라사이트: "여기에 제공해 주신 귀중한 정보와
- 온라인홀덤: 유익한 웹 사이트를 게시하는 데
Copyright © 2007 - My Time, My Creations, My Stampendence - is proudly powered by WordPress
This blog has been Tweaked and Designed by Sara Williams