Archive for October 9th, 2008
I am very excited about the first peek I get to share here for the October Papertrey Ink release!
If you haven’t noticed I LOVE party planning. Love it.
I am always seeking new and fun party ideas for my children. Parents Magazine is a favorite for me, with their yearly special birthday issue. Years ago, when I subscribed, they had a recipe card invite idea. I used that idea to have a cookie decorating party for Alexa when she turned 4. To date it was one of my favorite parties, ever!
Anyway……when I saw Nichole come out with these new Recipe cards (get this, you get 100 in a pack!!), and a co-ordinating Recipe stamp set, with Recipe Labels, I was over the moon! Not only did I have a bajillion gift ideas pop into my head, but I immediately thought of a Papertrey themed “Recipe for a fun party” invite.
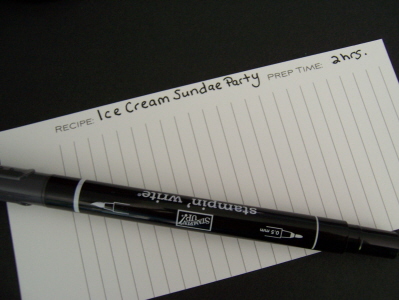
So I took my recipe card, and filled out what my party theme was going to be in the “recipe” section.
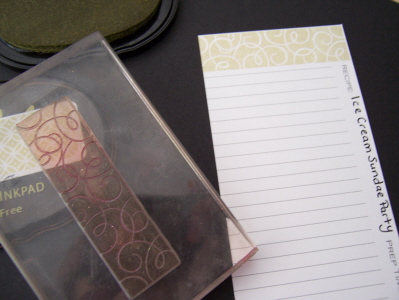
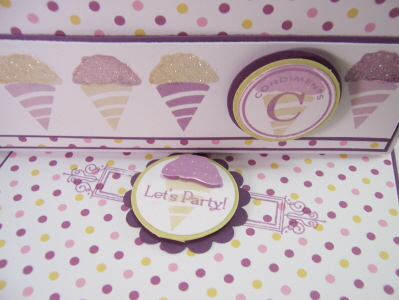
Label image
In the set there are several label images. I stamped my recipe card label topper with the swirly pattern, in spring moss.
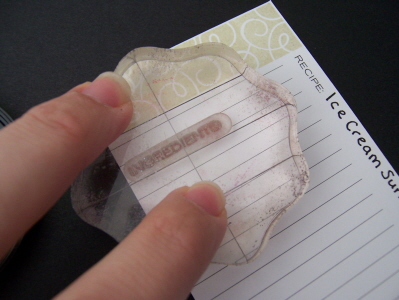
There are also sentiments you would see on a recipe card. Since they are stamps you can place them where you want/need, depending on where your info starts and stops!

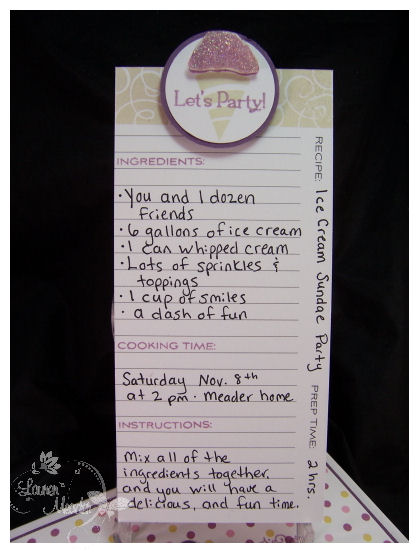
I used the elements from the set to give instructions about the party, and keep with the recipe theme. I wrote out my info in black, then stamped the recipe elements in Plum Pudding ink.
See, after I write my necessary info, I then can space the next category, where I left off.
No more SQUISHING it into the place you are given! You just write what you need, then stamp the next category. The recipe card is 2 sided, so you can continue info on the back! No need to worry about fitting everything in the front.
Once my card was filled out ,I then made a topper using the It’s a Celebration set. Instead of party hats, and cupcakes, I decided that one of the party hats would be a “cone”, and the cupcake top would be my scoop of ice cream.

Now a fun and EASY way to get that glittery scoop, with perfect coverage:
Get some double sided CLEAR adhesive (like wide red line tape). Stamp your image, and cut out. Layer the tape onto the front of your image.
Trim excess tape off.
Remove protective layer, and sprinkle on iridescent ice embossing powder. Tap off excess, and heat set!
Layer onto scoop on label.
It works PERFECTLY! No need to get messy with the versamark anymore. Cute huh?
This is the completed recipe invitation (Don’t mind my horrible handwriting-I am a TYPER, not a writer! LOL!)
Now the Recipe cards are made to fit perfectly with the Just Hatched Egg boxes. Hooray for awesome gift ideas this holiday. Knowing that, this entire party idea just fell together perfectly!
I had to use the absolutely YUMMY new paper collection from Papertrey Ink called Polka Dot Parade, as my color inspiration. This pattern is the petite plum moss moon dots!! Wait until you see this months paper, you will just be in heaven.
This is what I came up with.
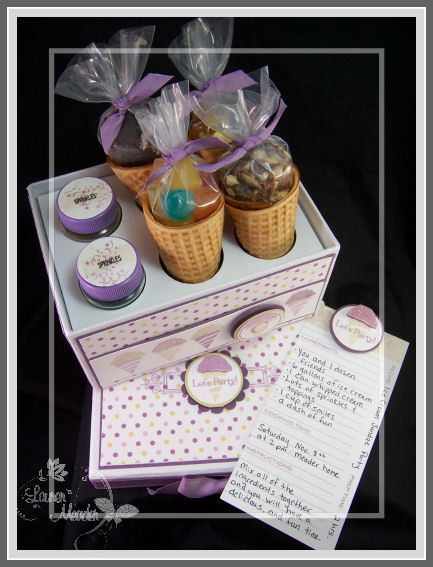
Sundae Party Box/Invite
Recipe for a : Ice Cream Sundae Party invitation
How fun does this sound? You come to the party and make your own YUMMY ice cream sundaes!
There are stamps in this Recipe set that you can use for your “categories” to file your recipe’s into.
Example, my set used the “condiments” label. There are also desserts, appetizers, entrees….the list goes on.
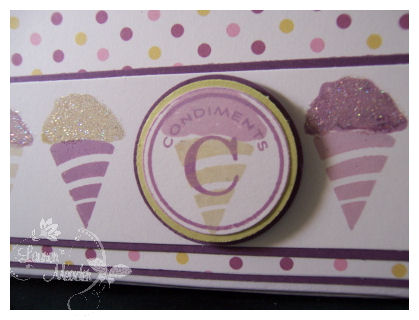
Now the front of my box was decorated to match my theme. I used the Condiments label for the front to show that ice cream sundae condiments were included in my Sundae Party Box. These are the labels you could otherwise use to section off your recipe’s inside the Just Hatched box.
I think its always cute stamping something that appears to be UNDER the label. You can do this by making sure your label is stamped in a darker ink. EXAMPLE: My ice cream cone was stamped in spring moss ink, and my scoop was stamped in Lavendar Moon ink. So my condiments label was stamped in Plum Pudding.
Now for a view of my box lid.
In this photo the open box is sitting on top of my lid, but I wanted you to see the label for the top. I used the Recipe Label, and then decorated the top cone to match!
Now what is inside the box……
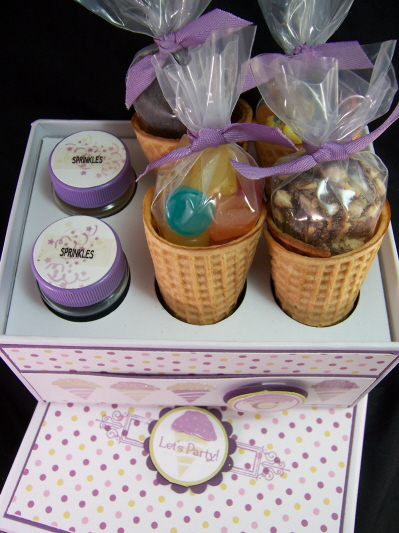
This is what is included in my box.
I have 4 ice cream cones. Each filled with a fun yummy ice cream topping!
We have 2 jars of different sprinkles. I totally lucked out having purple tops to match!! I just stamped the confetti image from the Its a Celebration set, and made my labels.
Then we have 4 ice cream cones. I used disposable frosting bags (I purchased mine at Michaels), and filled them with gummy dots, crushed chocolate covered toffee pretzels, crushed oreo’s, and Jelly Belly jelly beans, then tied with twill Plum pudding ribbon. The tops were cut down, and they fit PERFECTLY into the cones!
I would put different toppings into each party box.
Now WHO wouldn’t want top come to such a fun party? I cannot wait to have one of these!
This is the box. All closed up, for after the party.

You can decorate these and place them on your party table. It would looks so pretty and festive! OR you can send this off with your guests as a favor, and put in any condiments you want for them to use in the future. If you have the cones in the holders with the candy (as presented above) it obviously would NOT close! You may even decide to omit the lid! I did a great project using my lid –>here<–, so no waste!
Well I hope this is just the tip of the iceberg of ideas you get for this awesome set!
I know this recipe set will be used on many of my holiday gift’s this year.
Thanks for reading 😀 and be sure to check Nichole’s blog for more details.
Tomorrow I have a HUGE announcement here, so check back in, as you will NOT want to miss it 😀
You know you’re old when…
Oct 9, 2008 Author: mytime | Filed under: CardsHi world!
Just popping in super quick here.
I have a Papertrey Ink peek tomorrow to kickoff the countdown 😀 So I have to finish getting that done, and again finish up stuff for my big news! AND, I have to get my butt in gear for my classes at The Paper Tree. YIKES -Tick, tock.
In the meantime here is the card I made Jason, for his 31st birthday!
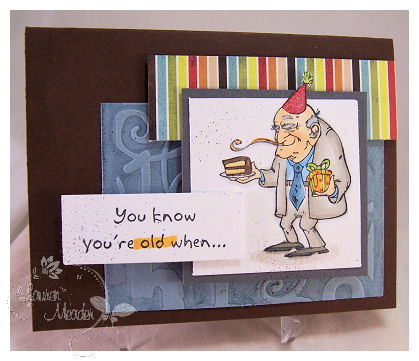
You know you’re old when-set is by Gina K Designs
I don’t know what it was about this set, but I really just HAD to have it. Granted it has never seen ink until 2 weeks ago, but the important thing is it was there when I NEEDED IT!
I think the set is hilarious and has the best sentiments! I fell in love with this old guy for some reason. He isn’t my “usual” style and I like that sometimes.
Jason is the one with the sense of humor in the relationship. So, when thinking of WHAT set to use for his card (he gets really mad if I don’t make him a card, and holds me to high standards! LOL!) this one came to mind because of the OLD MAN 😀
I colored him all up to match my strip of paper (Basic Grey paper- Cucpacke collection??), using my Copic markers. I then added fun flock to the hair on his head, and in his ears! LOL! Its really cool in person.

OK blurry photo-sorry.
Anyway, for the inside I stamped ALL the hilarious sentiments from this set.
It turned out really cute, and was such a Jason card 😀
I swear he is going to look just like this when he gets old! LOL!
I used my number collage embossing folder, inked up for the bkgd piece on this card too.
All in all this card took about 20 minutes. The layout was what stumped me most.
Well thanks for checking in with me everyone. I still have SO much stuff to share but LIFE is demanding to be first these day, and deadlines! LOL!
Don’t miss tomorrow’s post.
Later!
My Etsy

Who I Designed For
Blogroll
- Alicia
- Alli Miles
- Ally Blankenship
- Amber
- Andi @ crafts on a whim
- Angel R
- Angie Z
- Anne Kranitz
- Becky O
- Bee
- Beth Silaka
- Bethany Paull
- Beverly Nash
- Bobbie
- Cambria
- Cammie
- Card of the Week
- Card Positioning System (CPS)
- Cards for Cancer
- Catherine Doucette
- Charmaine
- Cheryl Sims
- Chriss Rollins
- Christina
- Christine Ewing
- Christine Wooden
- Colleen Schaan
- Craft Critique
- Craft Gossip
- Crystal
- Dawn Easton
- Emily Giovanni
- Geny
- Holly
- Igne Groot
- Inspirational Craft Blogs
- Irene
- Jami Sibley
- Jeanne Streiff
- Jen del Muro
- Jeni Bond
- JenMarie
- Jenn Balcer
- Jenn Diercks
- Jenn O
- Jennifer E
- Jennifer Mick
- Jennifer Pereda
- Jennifer-Sweet Treat
- Joanne Basile
- Jodi Collins
- Julia Stainton
- Julie Masse
- Karen
- Kathryn Berthiaume
- Katie Cotton
- Kelley Holland
- Kendra
- Kim Scholfield
- Kris’s Color Stripes! Get inspired here
- Kristen Dubosque
- Kristin Eberline
- Kristine
- Laura @ Sunshine Stamper
- Laura Turnmire
- Laurie Schmidlin
- Lesa Rapp
- Linda Duke
- Linda-LSN
- Lindsey Botkin
- Lisa (lakind scs)
- Lisa Kind
- Lori Craig
- Maggie
- Mara Campbell
- Maria
- Maria Levine
- Mary
- MaryJo
- Melanie M
- Monique Hansen
- Moxie Fab World
- Pam Imholz
- PaperCrafts Connection
- Peppers and Pollywogs Kids party site
- Rebecca Grohall
- Rita
- Robyn
- Rose Ann
- Sarah Vrolyk
- Sharon Harnist
- Sharon Johnson
- Sharon Rivera (a chemisrty with paper)
- Sherrie
- Sophia Landry
- Storage Units, Ink, & More Blog
- Sue Berker
- Susan (Rainy)
- Tangii Crane
- Tracy
- Tricia Traxler
- Trudee
- Velta
- VivLyn
- Zena
MTME Pretty Palette Color Team
MTME Pretty Patterns Sketch Team
My Time Made Easy TM LLC
Shop till you drop!
Lauren Meader
About Me
Copyrighted material
Subscribe To My Blog
Pages
- About me
- Alexa’s Story!
- My Crafty Corner!
- My Time Made Easy™ LLC
- Our Make A Wish Trip to Disney!
- Resume/Publication List
Calendar
Archives
- August 2013
- July 2013
- June 2013
- May 2013
- April 2013
- March 2013
- February 2013
- January 2013
- December 2012
- November 2012
- October 2012
- September 2012
- August 2012
- July 2012
- June 2012
- May 2012
- April 2012
- March 2012
- February 2012
- January 2012
- December 2011
- November 2011
- October 2011
- September 2011
- August 2011
- July 2011
- June 2011
- May 2011
- April 2011
- March 2011
- February 2011
- January 2011
- December 2010
- November 2010
- October 2010
- September 2010
- August 2010
- July 2010
- June 2010
- May 2010
- April 2010
- March 2010
- February 2010
- January 2010
- December 2009
- November 2009
- October 2009
- September 2009
- August 2009
- July 2009
- June 2009
- May 2009
- April 2009
- March 2009
- February 2009
- January 2009
- December 2008
- November 2008
- October 2008
- September 2008
- August 2008
- July 2008
- June 2008
- May 2008
- April 2008
- March 2008
- February 2008
- January 2008
- December 2007
- November 2007
- October 2007
- September 2007
- August 2007
- July 2007
- June 2007
- May 2007
- April 2007
- March 2007
- January 2007
Categories
- About Me
- All That Scraps
- blogger challenge
- camera/photo play
- Cards
- Contests
- family stuff
- FOR SALE
- Home decor/3-D items
- How to FAKE it!
- Introduction
- JUGS Challenge
- JustRite Stampers
- Lizzie Anne Designs
- My family stuff
- My Stamping Space
- My Time Made Easy
- My Time To Color Challenge
- My Time to Create Challenge
- My Timeless Template Challenge
- My Timeless Templates
- Mytime Mail
- MYTIME MOVIE/VIDEOs
- Papertrey Newsletter
- Pink Cat Studio
- Pretty Palette Challenge
- Pretty Patterns Sketch
- Product Opinions and Must haves
- Recipe's
- Saturday Sketch
- Smilebox Creations
- Stampavie
- Tutorials
- Uncategorized
- videos
Most Popular
- Create your own Onesie Card Tutorial-and important NOTE! PLEASE READ (2529)
- Saturday Sketch-Boxed bag holder (2333)
- Going GREEN! Fancy Flower Flourish-Closure Video (1478)
- Fabulous Favorite - Giveaway! (1336)
- a Prayer Request (1231)
- QUICK-Easter Baskets from Nestabilities-PTI style-and blog challenge (1063)
- Teaser Sketch (999)
- February Release Giveway! (and a little peek) (996)
- Group Post and Rambling Rose Video Tutorial (985)
- GIVEAWAY! Who wants it all?! (895)
Recent Comments (RSS)
- 야동: Love to read it,Waiting For
- 야동: This seller is in a
- 바카라사이트: 여기 처음 왔어요. 나는이 게시판을
- 야동티비: I was surfing the Internet
- 바카라사이트: 비슷한 주제에 대한 흥미로운 정보를
- 바카라사이트: "여기에 제공해 주신 귀중한 정보와
- 온라인홀덤: 유익한 웹 사이트를 게시하는 데
- 홀덤나라: 나는 당신의 블로그를 정말 좋아합니다.
- lisa: Technology, too, has left an
- 주소모음: 흠 !! 이 블로그는 정말
Copyright © 2007 - My Time, My Creations, My Stampendence - is proudly powered by WordPress
This blog has been Tweaked and Designed by Sara Williams