Archive for the ‘Home decor/3-D items’ Category
I am going to have 2 posts to share today! Lots going on over the next 2 weeks in the design team world! I better get my butt in gear. The good thing for reader’s is you will most likely get MORE to view here than usual some days. Lot’s of amazing releases too. I feel bad for your wallet’s!
Today is like a mini-design team reveal.
If you want to see the PTI Design Team samples, with Nichole’s ROCKIN Anniversary set-Simple Little Things, then just click on this ——>LINK<—-. I find browsing the gallery confusing at times, so just be sure to click on EACH design team member’s folder, and you can view their creations with the set.
I will always post my samples to my blog as well. I am sure the other designer’s will do the same. You can find links to their blogs, on my sidebar underPapertrey Ink.I recently added design team member’s under team categories, that way when I post peeks of releases, you can quickly be linked to other team member’s if you need a little push of enable-ment (is that a word?).
Now BEFORE I share these samples, I have to tell you this set is NOT available for purchase! It is an exclusive set, that customer’s earned. It was one of the rewards, offered by Papertrey Ink, when you purchased 12 or more sets, during that last year Feb 07-Feb 08.
FROM NICHOLE’S BLOG:
If you didn’t earn this set, do not worry! We are presenting this promotion again this year! You have from February 15. 2008 through February 15th, 2009 to purchase 12 sets and earn the 2008 Limited Edition Anniversary set! If you have any questions about any of this, just contact Customer Service!
Make sure you visit her today-HERE. Her samples are KILLER!
Now for my 2 samples. I will definitely be using this set MORE! But I had so many other obligations, including my 16 samples for the PTI release, that I only got 2 done :C
I have to say I was SHOCKED with how many awesome images there were, and the plethora of sentiments! WOW! It was a FREE set! I would have purchased it, in a heartbeat!
Anyway-here we go.
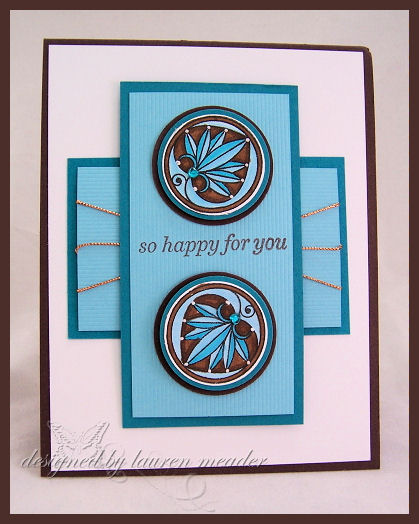
Oriental Inspiration
 I have no idea what it is, but anytime I see this image, I feel it has an Oriental feel with the pink & brown. Sort of like a Chinese cherry blossom. Anyway-that is just my thought here.
I made this to be like a panel at the bottom. The left half is paper pierced. I just loved the circles! LOL! My pink layer, had the edges around it, dry embossed. Looks better in person. You know how much I love popping out circles. I couldn’t help myself.
The scallop border, at the top of the card, to me was like the flowers in the image. It is a new border punch, by Fiskars. I purchased mine at Target.
This card uses the sweet blush from PTI, and chocolate chip from SU! Lots of circle punches. I got a larger punch from Fiskars, which mats the largest SU! circle punch, which is awesome, because I have been looking for one forever! Sometimes you need a bigger circle.
I colored in the flower’s with my singlo gel pen.
The ribbon is the sweet blush twill. The twill is my favorite!!!
Java Blue
Now for those you you familar with Vera Bradley, you may recognize my source of inspiration! Those of you who are not, I figured I would share the pattern with you. You can see I used the colors, and was also inspired by the pattern. I even added some white dots, like in the bag fabric.
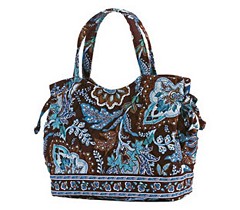 This is a handbag, from Very Bradley, using the Java Blue. This bag is the Sherry style, and I bought it for a friends daughter, for her birthday! I love the pattern and colors, so to me, this image from Papertrey Ink, was very similar. See you really can get inspired ANYWHERE!
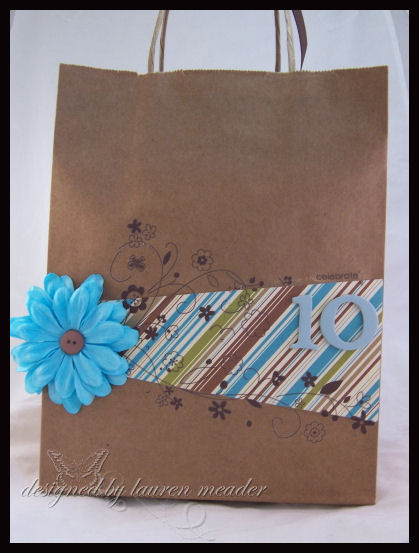
Now to wrap this gift I went on toe create a bag with matching card. It was also inspired by the gift.
Here is the bag I made to hole the handbag.
 Sorry that it was difficult to get a good photo.
As you can see the colors are very similar. I just covered a portion of a simple brown, handled bag. I used some Scenic Route paper, some Rub-On’s by Stampin Up!, and a large Prima Flower. The chipboard number is also by Scenic Route. Since she was turning the BIG 10 I felt it should be highlighted. That is a big birthday! DOUBLE DIGITS!!
Here is the card, that went with the gift.
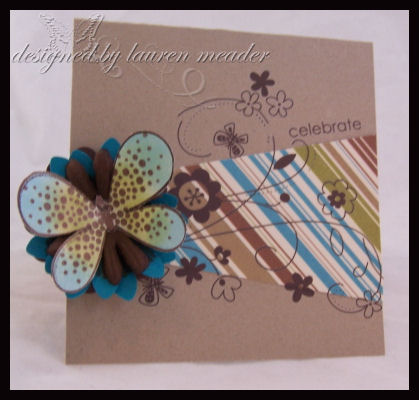 I used Kraft cardstock, and the same rub-on’s and layout as the bag. I had to add a butterfly (Butterfly Kisses), since it represented to me, a little girl morphing into a young lady!
The butterfly was stamped on glossy white, then color was sponged on. I love that effect with this image.
I used paper punches, to create my flower.
Now I did not realize my rub-on’s got rubbed off till I edited this photo! I am SOOO bummed. So here is a FYI-Make sure you rub, those rub-on really well, and be careful when handling items with them! GEESH! I obviously rubbed some off. That is so embarrassing.
Oh well. Too late now! I think its neat you can gain so much from ONE piece of inspiration. I can’t tell you how stressed I was about making a 10 yo b-day card/bag! I wanted it to be geared towards an older girl, so nothing “little girl”, yet still be fun and funky. I think I achieved it in the end.
So I hope you enjoyed today’s post, as well as the samples from the DT.
I’ll be right back with ANOTHER post, so stay tuned!
Lauren
My Papertrey Ink Projects-April
Apr 15, 2008 Author: mytime | Filed under: Cards, Home decor/3-D itemsWell I hope you are all in LOVE with the new releases from PTI! In fact, I think I went a little overboard with samples. Once I got going I could NOT stop! LOL!
I know I had way too much fun to call it “work”! LOL! Well, I guess the work part is the uploading/supply lists. That part isn’t ever fun. I thought you may like to be able to view all my creations here.
I am going to share my projects with you by SET. Here I will include more of a commentary sort of thing, as to my thought’s behind each project. I think this month I had a descent variety of technique’s and styles. I went for clean and simple single layers, to multi layered cards. As always, I had some idea’s for altered items that I so enjoy creating!
I would love to hear your thoughts too 😀 Let me know what set has you in a tailspin, or what samples you like the most.
I have to say the new colors are just scrumptious!!! The photo’s do no justice! I swear.
Pond Life
This set is perfect for a variety of people-boy, dad, and even baby or toddler! I think you will agree when you see the wide variety of samples. I know I always look for more boy/masculine themed sets. This one is quite a bit of BOTH!
Little OneLittle One Stamps- Pond Life, Borders & Corners Circle set, Mixed Messages |
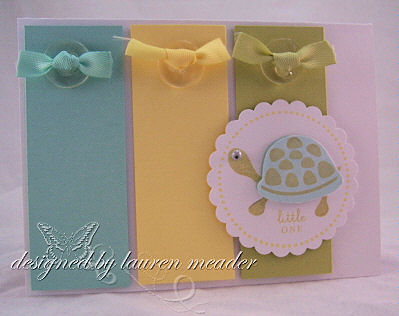
I think this is the cutest card either to welcome a new baby, or for a 1st birthday! Look how sweet the new color looks with the previous release colors! His shell is popped up on dimensonals. I love the little googly eye!! So cute on him. This card was really simple! Hope you like it. I think its in my top 3 fave’s of my own projects for this release. Love the colors.
Hippity Hopping Frog
Hippity Hopping Frog
Stamps-Pond Life
cardstock-PTI select white, aqua mist
ink-palette black, various versamagic inks
other-wire, circle punch, paper piercer, rectangle nestability, bridal confetti
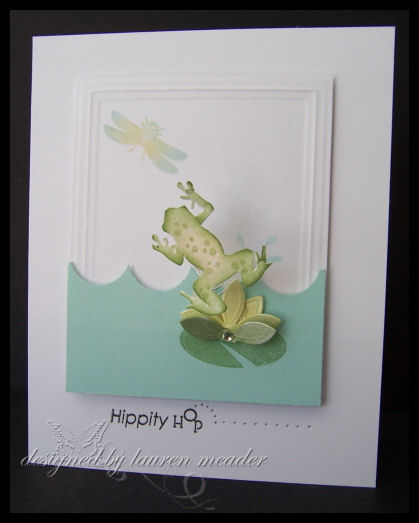
I had so much fun creating this card. The frog appears to leap in air to catch that bug! I just wound some wire around a pencil, and there you have it! I created a lily pad flower using some bridal confetti flower’s colored with my Copic markers. The water was done using 1/2 a circle punch to create “waves”.
I also love the pierced bottom.
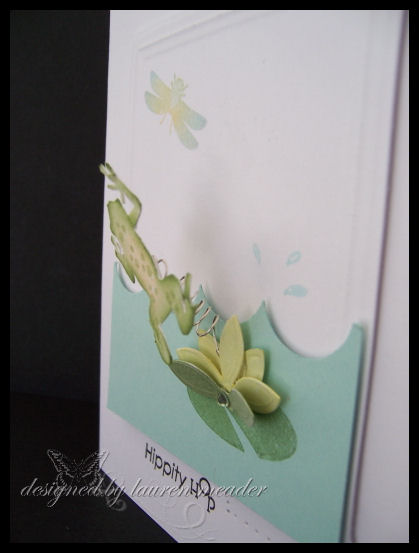
Here is a side view
Gold Fishes Favor
Gold Fish Favor
Stamps-Pond Life, Pond Life sentiments
Cardstock-PTI select white, lemon tart
Paper-Father Knows Best Retro stripes/Lemon Tart retro circles, aqua mist
Ink-white stazon, palette black
Summer sunrise polka dot ribbon
Frosted tin tie bags (small), acetate, pearlescent pastels, circle punches

I made this look just like a little fish bowl! I punched my acetate with a large circle punch. Stamped my fish image in white stazon, then brushed on pearlescent pastels to color! Under the acetate, I used a smaller circle punch to create the look of “water in the bowl”.
Filled the bag with gold fish crackers, and tied closed with my sunrise polka dot ribbon
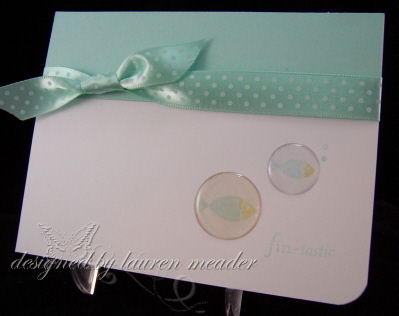
Fin tastic FishyFin-tastic Fishy Stamps-Pond Life
I loved how quick, clean and simple this was. The little fish are trapped in “bubbles”. Makes a great thank you, to mass produce 😀 |
For DadFor Dad Stamps-Pond of Life, Father Knows Best, borders & corners circle set
I wanted to create a sunset look, with two ducks, on a pond, side by side. You can see a “shadow” of the second duck swimming next to the front duck. I used glossy paper & a rubber brayer to create my sunset. I love the masculine feel this has. The sentiment from Father Knows Best was perfect.
|


Another one of my favorites!
I found this cool bug catcher at the Target $1 spot. I knew it was begging to be altered! They even had some plastic bugs, that I packaged up, to match! There is a dragonfly attached to the top of the catcher. The wings on the dragonfly are 3D. I felt the sentiment was just perfect for this type of gift.
I packaged the plastic bugs in a PTI clearly creative card boxes! It was the perfect holder. I stamped an insert to place inside.
I then personalized the box of bugs by die cutting the letter “C”, then using my Simple Alphabet to spell the child’s name!
Father Knows Best-
This set is really awesome! Not only does it have amazing images, but some fabulous sentiment’s as well. I was surprised at how much versatility this set really offer’s from fun and whimsical, to elegant. Pretty little girly stuff, to masculine. Hope you like my take on this set’s many options for style’s.
Sweet Birthday WishesStamps-Father Knows Best, Garden of Life, borders & corners square |
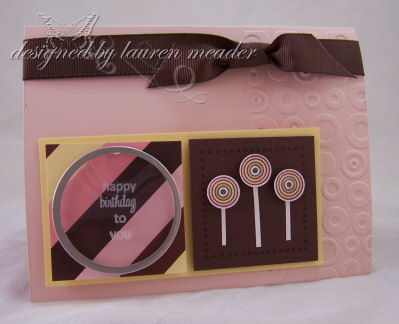
I wanted to use the circles from the set to create lollipops, for a “sweet” birthday wish. I went with more circles and sweet colors to keep with that theme.
Looking Up
Looking Up-Retro Tree
Stamps-Father Knows Best
Cardstock-PTI select white, Spring Moss, Berry Sorbet
other-Old olive, choc. chip
Ink-Palette black, Copic marker’s
Other accessories-white singlo gel pen, Spotz Maker, Butterfly punch by Martha Stewart various circle punches & buttons
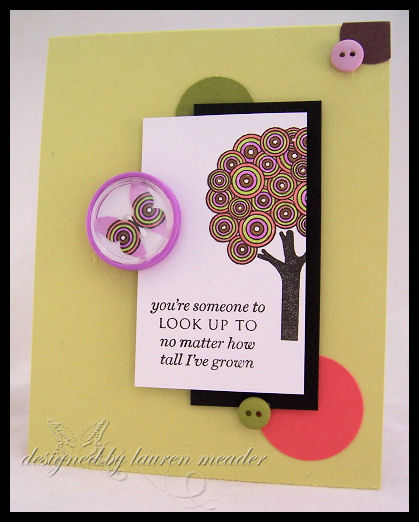
I wanted to continue the retro feel the circle’s in the tree offered. Using various circles allowed me to not only pull out the colors I used to color my tree, but continue the theme through the card.
The butterfly wings were stamped with the circle, and colored to match! I punched it out, and placed it in the Spotz circle.
Twinkling Tree Shaker
Twinkling Tree Shaker Close up
Twinkling Tree Shaker
Stamps-Father Knows Best
card-stock-PTI Select white
other-black, ruby red, copper card-stock
Ink-versamark, black palette
Other-copper embossing powder, heat tool, pearl ex, future floor wax, bridal confetti, copper brads, copper cord, plastic cover
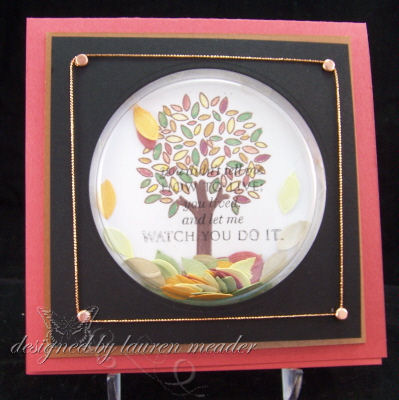
This is an unusual 3D shaker card. Like falling twinkling leaves. The sentiment is stamped directly on the shaker window. Very striking in person. See the side view.
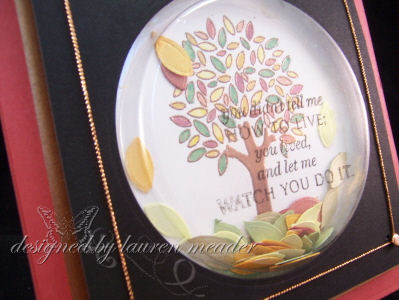
This card came to be from a plastic cover that was on a ceramic coffee mug I purchased. The disposable plastic lid fit right over the top, where a bag of candy was placed. I knew it would make an awesome shaker window! The window pop’s through a piece of black card-stock.
I was first embossed with Copper embossing powder.
I then used my Pearl ex/future floor wax to paint the leaves various colors.
I had some bridal confetti flowers that I colored with my Copic markers, then snipped the petals apart, to make like fallen leaves-they match the tree leaves perfectly!
Now last but not least
Garden of Life
I have a personal belief that there is no such thing as too many flower sets! When I saw this set I went NUTS!!! Nothing is better than MORE flowers! I love how with this set you can use 2-step images or just the bottom or top flower layers on their own. It really maximizes the number of images and uses to me.
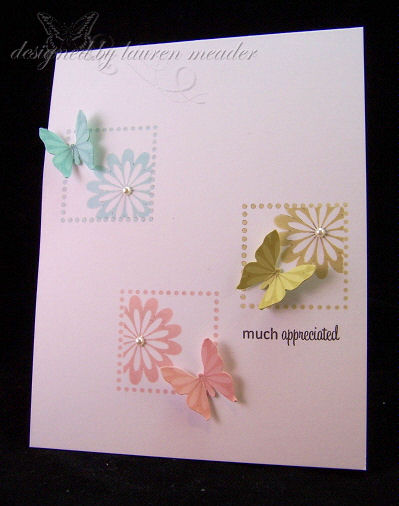
Fluttering GardenFluttering Garden Stamps-Garden of Live, Borders & Corner’s square
Another top three for ME. Knowing how much I LOVE butterflies What is prettier than butterflies, flying off the card? |
garden grownGarden Grown Stamps-Garden of Life
|
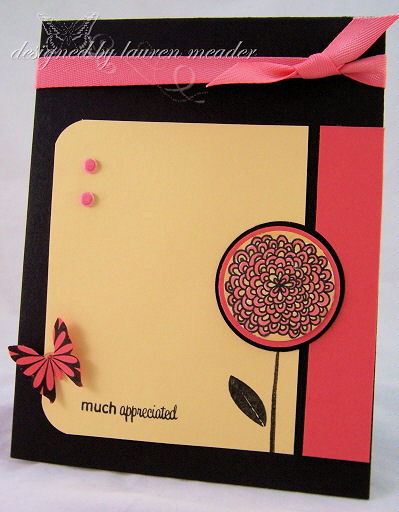
This is just a cheery card, where the flower blossom is made to stand out.
I just loved the funky feel this had to it. I made the butterfly the exact same way as the sample above
Spiraling BouquetSpiraling Bouquet Stamps-Garden of Life |
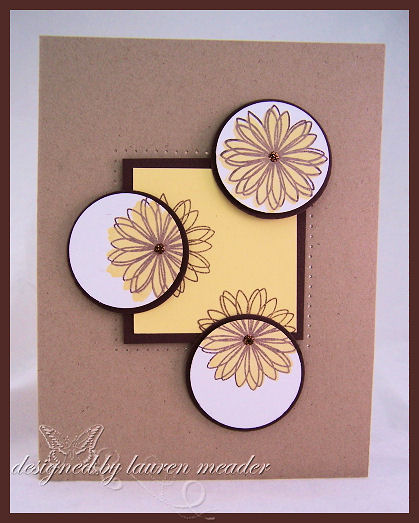
This was just a fun twist on the spot light technique. I thought it was fun to have the spiral floral images, dancing off the mat. Then highlighting parts of the flower’s in color.
Friendship grows
Friendship grows
Stamps-Garden of Life, Women of life (friend sentiment)
Cardstock-Summer sunrise, PTI select white, choc. chip
Ink-Choc. Chip, Copic Markers
Patterned paper-Father Knows Best retro leaves

This is such a fun & cheery card for a friend. The patterned paper really pop’s on this one!
I just loved this combo of stamps/paper. I colored in the white space of the flower. It is just SO pretty!!! It makes cardmaking a breeze!
grows with love
Grow with love
Stamp-Garden of Life
Ink-Choc. chip, Copic markers
Cardstock-PTI select white, choc. chip
Lemon tart twill ribbon
other-paper piercer, Fiskars scallop border punch
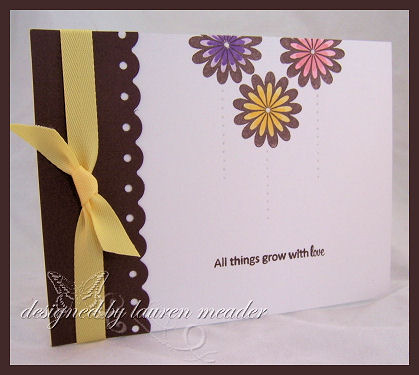
Everything grows with love! I adore coloring the centers of this flower. I made pierced stems for this one. The possibilities with this set are endless. These flowers are growing right off the card 😀
Last but not least-
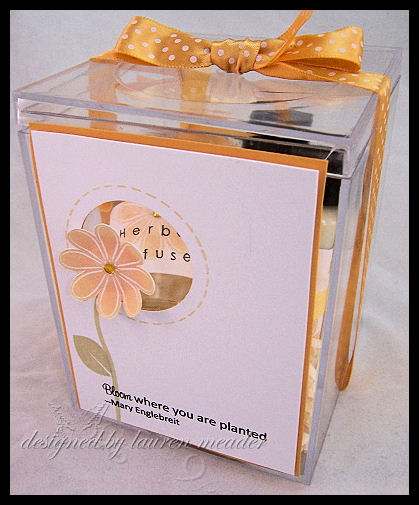
Bloom Where Planted Gift set
Bloom where planted-side/top view
Bloom where planted gift set- wrapped lotions
Stamps-Garden of Life, Simple Alphabet, Border’s & Corner’s Circle
Cardstock-PTI select white, Summer Sunset
Ink-black palette, spring moss, versamagic thatched straw, and mango
Ribbon-Lemon tart (twill), Summer Sunrise (polka dot/ Satin)
Other-clear plastic gift box, adhesive rhinestones, mailing label, circle punch
Items inside- Herbal diffuser oil with sticks, herbal body wash/lotion
I created this gift container of some relaxing herbal scented wash/lotion which are wrapped together with a stamped band, then tied nicely.
I used my simple alphabet to stamp the label for my diffuser oil, and I also tied together the diffuser sticks.
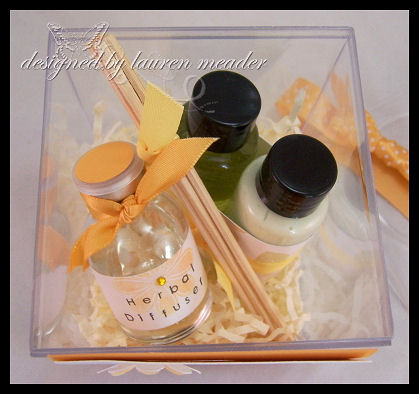
I love how you can peek through the circle cut out in the front. The other 3 sides are left open. A cute and easy way to package a special hand stamped gift!
Tied the box closed with my polka dot ribbon and done.
Well that is “IT” for my PTI projects today! Where else can you see a post with like 16 project’s in one day? Crazy! This post took forever too. I hope you take away some sort of inspiration.
Thanks for looking/reading.
Alexa has Chemo tomorrow so I may not get something posted. Not sure yet. I am in the process of re-organizing my stuff-YES! AGAIN!!!
What can I say, it increases the MOJO, and curbs spending (I think LOL!).
So till then.

For the boy’s challenge
Apr 14, 2008 Author: mytime | Filed under: blogger challenge, Cards, Home decor/3-D items, TutorialsI have a fun post for you today! It is a “For the Boy’s Challenge”.
If you are a mom of a boy, then you agree there just isn’t enough CUTE stuff for boy’s. What you can find, that is cute, you must get immediately! LOL! Girls can be so easy for me, but boy’s, are much more challenging. Let’s not get into boy gift/favor idea’s. What is even more funny, even though they are challenging, I enjoy coming up with ideas for them.
Charmaine and I have become great PSF’s over the month’s.
As of late, we are both loving Lily from Pink Cat Studio. We also LOVE Billy!! After some behind the scene’s “chatter”, we decided it would be fun for us to give each other a challenge. I love doing a fellow blog challenge! It is always fun to see what other people come up with, using the same concept.
So here were the Challenge Rules!
1)We both had to use the Billy set
2) It had to be a party gift , or a party favor set. So I assumed a card, and gift/favor item.
Now in that set there are a few things we could choose from that would make our idea’s very different!You have a Pirate, Cowboy, Super Hero, and a boy with a frog.
We did NOT tell what each of us was planning on using. It was going to be a surprise!! I can’t wait to see what she decided on.
Here is my set-
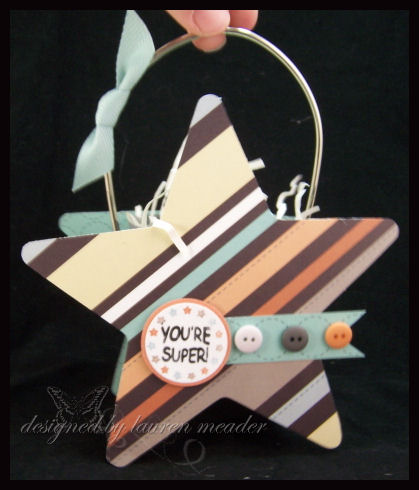
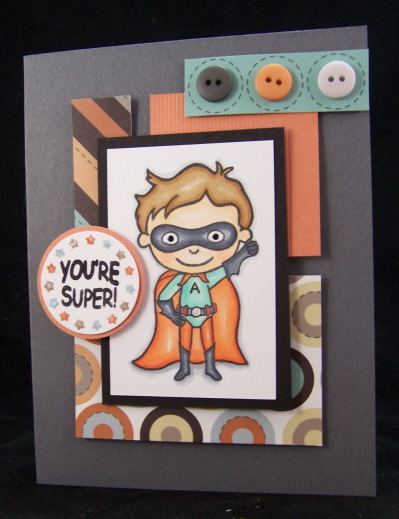
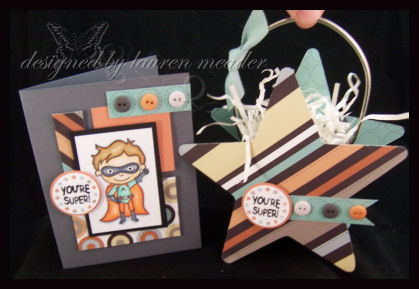 Super Hero Party Gift Set
I had a hard time deciding what I would do. I was leaning towards the cowboy. Noah has a birthday party to attend this coming weekend. I got out my Billy set, and asked him what HE wanted me to make for his friend, Austin’s party. Afterall he should be the one picking out what to give right?
He said “I like the super hero best!” That was NOT what I thought he would pick, but I did give him full authority!
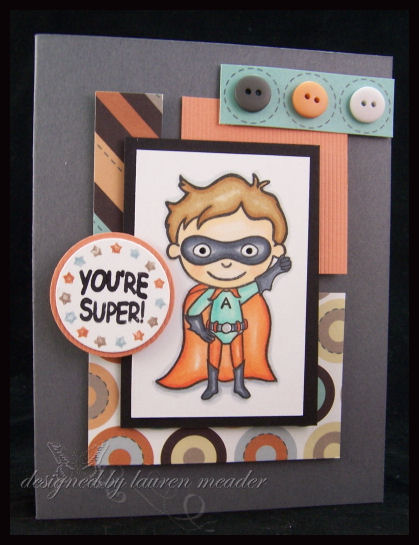 A is for Austin.
So here is a close up of the card. I used the Simple Alphabet for the “A” on his chest. When in doubt color block!!
Inside I stamped a sentiment from Verve Visual (starlight starbright)-that says “SUPERSTAR, thats what you are”. I thought that was cute.
Noah also picked the paper after having several collections to choose from.
WOW! Talk about a challenge. The paper in this collection is by SEI–Such a Boy collection ( I LOVE that set, had it 2 years, and have never used it!!!). It is a great collection of unusal color’s I would not normally use. THIS is why I “collect” paper!
It is like a pumpkin, groovy guava, aqua mist, so saffron, choc. chip, gray, and black! I think I like it!
I colored him with various Copic Marker’s. I always have a scrap piece to practice my colors/blending on BEFORE I try them on my image 😀 I also like to test what colors work best with my paper.
Then it was the next deliemma, “WHAT do I do for a gift item?”
Well since he is a super hero, and there is a bit of a star theme, I decided to do a Star shaped gift bag!
I wanted to do these for a while, and most likely would have done one similar for the Cowboy theme.
I liked the dual sided stripped paper for this, so I went with that.
I decided to decorate it like my card-the You’re Super! sentiment, then the 3 buttons going across. I am on this kick of making these little banner style tags that go off the ends. Don’t know WHY!
To create this bag : I used my star Coluzzle template. I cut 2 of the largest star panels, then made it onto a bag-by cutting a panel.
FROM MEMORY-The panel was 3 1/2 wide by 8.
Using my Scor-Pal–
Along the 3 1/2 side I scored it at 1/2 inch, then 3 inch mark
Along the 8 inch side- I scored it at 2 1/2, then 5 1/2.
That gives you a finished holder that is 2 1/2 inches squared. I adhered the 1/2 scored sides to the stars with redline tape.
Then I debated on my handles! Ribbon handles would be too girly. I was scouring my stamp room, when I saw an empty Prima’s Paint Can! SCORE!!!!! I knew there was a reason to save EVERYTHING!
So I put in 2 large brass eyelets, one on each side (just like on your prima paint can) then I put in the metal handle!!! I had to sqeeze the handle in a little, so the handle would not fall out of the eyelet holder’s.
It was so PERFECT!!! It looks SOOOOOO much more professional I think :D. I love it.
I added a snippet of twill ribbon from Martha Stewart.
This star bag will hold a gift card to Toys R’Us. I think it will be a hit. I hope it will be!
Now, you need to go check out Charmaine’s set!! I know she will love to hear what you think.
Tomorrow is the PTI release! So I will have my projects for that posted here, then.
Till then!
A published piece-and some tips!
Apr 9, 2008 Author: mytime | Filed under: Home decor/3-D itemsGood Morning!
Hope you are having a great week! I think some of you may find today’s post helpful. I am going to publically address many of the behind the scene’s questions/emails I receive, on a very important topic. Read on.
I have an article up on the Craft Critque today, for Craft’s n’Things magazine. I hope if you have time you will check it out. I give some fact’s about the magazine, and my opinions on it as well. I know I get many emails asking what magazine I personally love! That is one of them.
As you will read it is a great one for the papercrafter, and those who might want to dabble in other craft’s as well.
I thought it would be suiting if I share ONE of the project’s I had published in the current April issue. It is one of my most favorite-to date!!
Butterfly Journey

You can view this on page 58
Details are in the magazine.
I used Butterfly Kisses by Papertrey Ink. You all know how much I love butterflies, and this set is one of my most favorite! The felt the metal plaque was perfect!
You may also know how much I love to re-use everyday items, and make 3D projects. This one in particular is a Pop Up’s Prima box-that held a tin with my Prima’s in it. I popped out the box, and this creation was born!
The flowers were part of the box-so I colored them.
Anyway-here is where this post hopefully gets “helpful”.
I get many emails asking about being published very regularly. Especially following a publication I am in. I am flattered that many of you seek advice from ME of all people! LOL!
Some of the questions I get will be generalized and addressed here.
Q. What advice do I have, what is the “secret” to getting published?A. The #1 secret to getting published in ANY magazine is to SUBMIT! LOL! Seriously so many people think that there is a secret way to get in, and some editor is going to magically email you and request your work. NOT SO! YOU need to take the time and submit it, through whichever process they use.Every magazine has a website that has their requirements for submissions. Make sure you read them carefully, and follow their specific rules!
Q. Do you have any pointer’s on HOW I can get in?Many magazine’s often have thier TIPS, on how to get IN! What theya re looking for. Read those.A HUGE thing that may seperate YOU for THEM is your photographs! Think about it. You are presenting your work through a photo, often times. If that photo is not stellar then you may not get picked up. You can’t have it be all blurry, or dark. make sense?
Another tip someone told me years ago was always make sure your Macro setting is ON! That is the little flower picture
Try to make sure you have good lighting as well. I usually take several photos one one card to ensure the best shot. I also get a few different angle’s. Try to get a close-up of a great detail too if neccessary.
Q. ” How do you know what to submit?”A. Well that is a great question. each magazine also has a calendar for what they would to see. I personally don’t go by the calendar. I have to just create what I like, and not create JUST for the sole purpose of submitting. If it is not fun, then its not for me. Submitting is actually a lot of “work”, so I have to let the creative process be the fun part. I do find it helpful in order to guide me in a particular direction if that is my goal.I have been so insanely busy I have not had time to submit anything is quite sometime. I went through a little guilt over it, since it can be so fun once it is published, but as I said before, I publish myself everyday HERE! I’m just not in print.
Q. How long does stuff take to get published?A. That again varies from place to place. Some have a quick turn around of just 3 months, other may take projects up to over a YEAR in advance-like my project today! I submitted that when Butterfly Kisses first came out. It got picked up over a YEAR ago. I ahve stuff get published I forgot all about! LOL! You will be told when it is going to be put in print.Q. Do you get paid?A. Depends! Each magazine is different, and again look into what the incentive may be for each place you plan to apply to.
Q. Why is it a lot of work?A. Well first you create, then you photograph, then you edit. Now it is on to submitting it maybe online. You then have to include a detailed supply list with instructions. Then you wait. IF you get picked up, some times you have only a few days to get it OUT the door. Then it get’s picked up, you then not only have to get your supply list done, but a detailed step by step set of directions so that say someone who never stamped before can re-make the card. THAT is time consuming.Q. Can I submit the same card/item to several places?A. No you should NOT do that, until you know it has been rejected by the first place. You are not allowed to get the SAME idea published in more that ONE magazine. If it got chosen to be picked up at two places, you would have to tell one-SORRY! They don’t really like that, because they are planning on your project being available. Afterall you sent it to them. That is an awkward position to put yourself in. Why do it?Think of it as a store having a shoe sale! You fall in LOVE with these shoes. Must have them. You call ahead, and ask the store clerk to HOLD them for you. You get all excited, run to the store to buy the shoes, only to find they already sold it to someone else, who happend to show up 4 minutes before you.
Q. How do I know if it is rejected?A. Each magazine is different. Some will say/do nothing, which is hard. Some email you and say something along the lines of this- “Thank you for your submissions. We get more beautiful work than we often have room for. Thank you for taking the time to submit your projects for publication in our magazine. We regret we cannot use any of them at this time. We hope you will try again next time.” Can you tell I have gotten that email a couple of times?Some will give you date-if you don’t hear back by X, then you know you are a REJECT! LOL!
Some will take a few weeks/months. If you want to know, you can email them and ask! Give them time to get back to you, and make sure it is AFTER the possible alotted time where is could possibly be accepted. You dont want to be annoying!
NOW FOR THE PEP TALK!Yes rejection stinks!BUT-You don’t know until you try. Try and try again! You miss 100% of the chances you DONT take! You definitely won’t ever get published, or win that contest, or get that design team position (or whatever your goal is in life) if you don’t even ever TRY and enter! I can’t stress that enough.
What do you have to lose? NOTHING that you wouldn’t if you didn’t bother.
IF you get rejected-and if you submit , or enter contests or anything else-you will at some point, try not to feel bad and take it personally! It is par for the course. We have all been there! Even some of the BEST stuff is rejected. They only have so much room. Plus maybe your project didn’t suit a theme, or color scheme. Maybe it was too difficult for others to re-create. It can be very simple. Just know it doesn’t mean you aren’t good enough!
Well I hope that helps you. I always encourage anyone to go after what they want, because nothing just falls in your lap. Anyone, who is anywhere, most likely had to work for it.
Speaking of working- I’m off to go create!
I hope you enjoyed this and if you have any questions-feel free to ask them in the comments section. I will edit this and add responses below. So check back in if you had a question.
Keep in mind Im not a professional-Im just speaking about things that “I” have personally found helpful to ME! There are many opinions about this I am sure. I am offering my personal expieriences and what I have learned, by trial an error.
Have a fabulous day
Lauren
After making THIS Onesie Bouquet, I got hundreds (no joking) of emails/request’s asking me to share HOW I got the baby onesie’s to look like flower buds. Many people wanted to order them. It would be rather pricey for me to sell them, if you count the cost of the items, and MY TIME 😀
I was so overwhelmed, and flattered that SO many people liked it that much 😀 THANK YOU!
As I am going to share, it is actually REALLY EASY to make. It is however, somewhat time consuming if you are a little anal-like myself 😀 I need my onesie “buds” to be perfect. I do think I will make this for every new mom. It’s just a really FUN gift idea 😀
Let’s get to it!
My fellow PTI design team member Geny, is due to have a bouncin baby boy this June! So I promised her I would make her one for her son 😀 Now the “tin” part isn’t done being decorated yet, because I ordered THIS SET, the other day, and am waiting for delivery 😀 Then if she does see this here on my blog she will still be a bit surprised by the decoration on the tin itself.
NOTE: This is not for contest or publication
If you decide to create one-send me a link! I would love to see it 😀
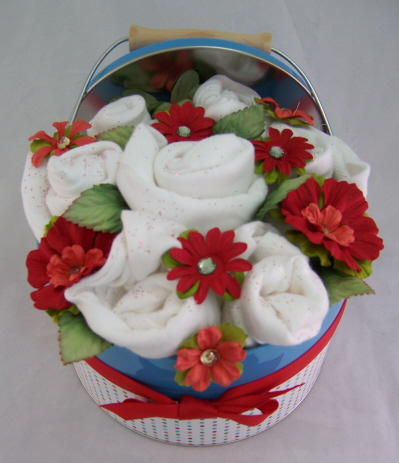 Bouncin Baby Boy Blue
So I decided that white onesie’s would be best for the boy project, since I wasn’t sure if I were going with yellow, blue or red accent flowers. I think I should always have a pack on hand now! You just never know. make one in yellow and you are golden for a last minute gift for any sex child 😀
You should get the 0-3 month size. a 5 pack is best!
I found this bucket at Michaels for $1.99, and it was just the PERFECT size! To me it screamed BOY! BUY ME! It has a cute handle, and I secured the top under the handle with a large glue dot.
In the girl tin I used the large heart tin from Papertrey Ink-I didnt want a heart for a boy though-needed to be more “rugged”.
I used some designer paper from SU! called the East Coast Prep collection (again-perfect!). I simply covered the bottom portion of the tin. Kept it simple. I plan on cutting out particular animals in the set I linked above, and adding them around the tin. I think it is pretty cute as is though.
WHAT YOU NEED
*Tin/container of choice* 5 pack of white onesies-size 0-3 months* White floral tape* Glue Dots* Leaves* Paper/Prima Flowers* Tin filler*
Decorate your container as desired FIRST! This will help determine what your flower theme will be.
Make sure your work surface is CLEAN!
If you want to see the photos closer-please click to enlarge!
DIRECTIONS
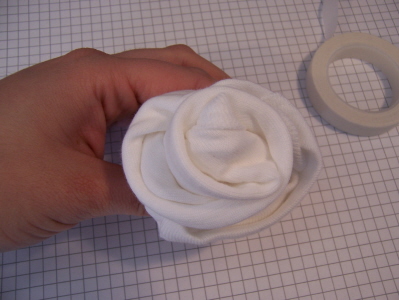
Step one
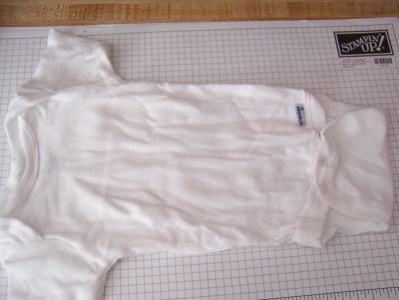
 Snap onesie bottom. Fold in either side.
Step two
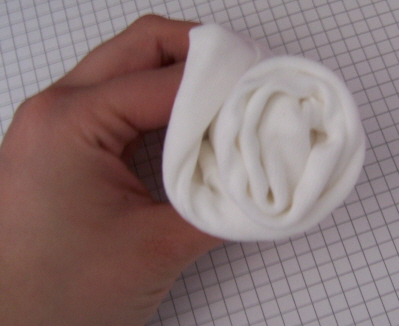
 From top end, roll neatly into a snug ball. Wrap mid-bottom oprtion tightly with floral tape. You do not want to use any other type of tape because should the mom-to-be decide to USE the onesie’s, it would get gooey and stick to the shirts-ick!
Step three
 Now you want to fold back one of the edges, like a rose petal unfolding. It is also good to try to fold over the seam where the folded shirt ends to hide it.
Mini Dual Buds-Now if you look at my bouquet-I bought a 5 pk of onesie’s, but have 7 flowers. I did not do this with my last bouquet, but decided in order to fill this larger bucket I would make 2 of the onesies have double buds! So instead of 5-I have 7 buds!
Step one
 Fold in sides like above. Then fold up bottom.
Step two
 Now roll from the side, in.
Step three
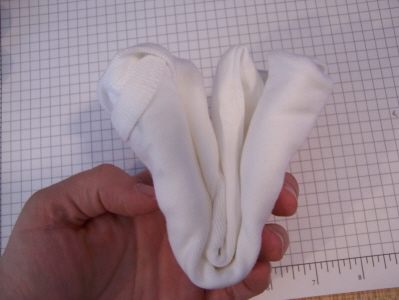 Now fold the “jelly roll” in half. So ends come together. Tape like in Step Two above. Unfold the edges a little as above in step three above.
Last but not least
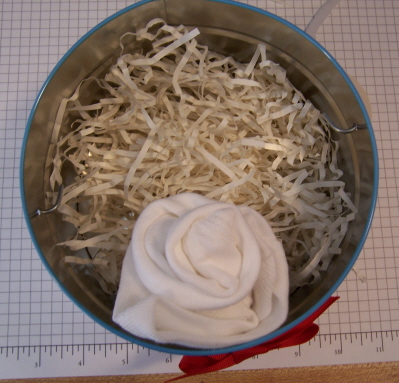 Now it is time to arrange the onesie’s in your tin! make sure you put some sort of filler in the bottom. Try not to get a tin that is too deep. You may want to arrange the set up of your bouquet. Place larger/taller onesie flowers in center.
After they are all set, now for the fun! I like to choose a variety of flowers ot add in between, and on top of my “bouquet” I place them first-then, if I am happy I use glue dots to secure them all in place.
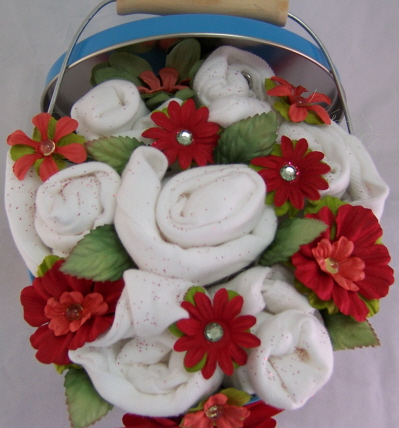 Close up view.
For this one (since I know the mom is NOT going to use the onesie’s) I sprinkled some red glitter to finish it off.
I will shrink wrap this, tie it all nice with ribbon, and send if off in the mail!
Now this beats the $60 bucks you’d spend on a bouquet of flower’s that will die in 5 days.
I really hope you enjoyed seeing HOW it comes together! Now for a perfect card to accompany a Onesie Bouquet , can be found ->HERE.
So that is it for today! Thanks for stopping by.
Nursing you back to health-fun news
Apr 7, 2008 Author: mytime | Filed under: Cards, Home decor/3-D itemsDid you miss me yet today?
Well I have been very busy. Creating, photographing, and editing. A lot of behind the scene’s stuff. The PTI release is almost here!!
The baby shower went great! I think they got every big ticket item imaginable!!! That includes ALL baby furniture! WOW!! That is so nice for them 😀 The new mom to be looked SO cute. Isn’t that what we always think of OTHER pregnant women? When it is ourselves we are disgusting, fat beached whales, who look like they swallowed the largest watermelon, known to man, but our friends and family we just say “AWE! You are just so cute!” I never felt “cute” when I was pregnant. I always POPPED out early.
Anyway-I have some great stuff to share this week.
Tomorrow I will FINALLY post HOW I made the Onesie bouquet! So check in then. Oh, yeah, and it is for a BOY!!! I know many of you asked HOW to go about doing one for a boy. I hope you like my solution 😀
TODAY-I have a cute little altered band-aid tin to share, and some fun news! 😀
Here it is:
 I am going to be a Guest Designer for Pink Cat Studio for May!! May 3rd is my 30th birthday, so what a great way to celebrate right?! I am in love-since finding her stuff only a few weeks ago. I obviously jumped at the chance. Then, when I saw the set I would be working with I was even more excited 😀 I have Tweet & Billy arriving this week 😀 Can’t wait. So stayed tuned for more on the and sneak peeks and prizes the end of this month into May!
Well what do you think? Pretty cool huh? Now dont miss the BOTTOM of this post because it includes some fun news for YOU!
You probably want to see something fun, since you have been waiting all day 😀
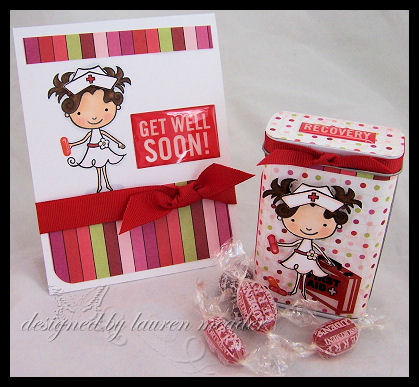
Here is a little “Nursing you back to health”, altered band aid tin and card.
The card I really threw together, in a rush-and Im not totally happy with it, so would most likely make a different one for a gift.
I had to do a brunette cause I have done Dress up Lily with red hair and blond hair already!
I thought about this altered band aid tin from the moment I saw that Dress-Up Lily could be a nurse! So I went to work! I decided to fill my tin with assorted berry flavored cough drops 😀
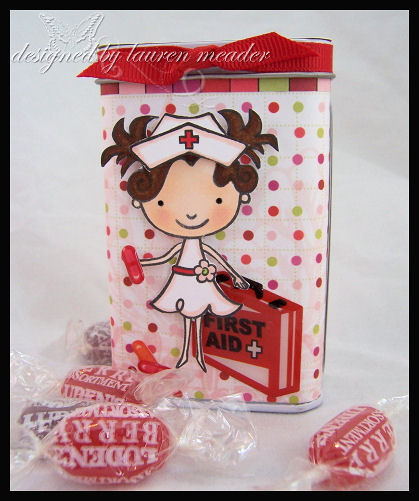
How cute is it that she is “holding” a pill, and first aid kit? I used these super awesome Epoxy Stickers by Around the Block. They were just perfect.
Another view
 Left side-thermometer
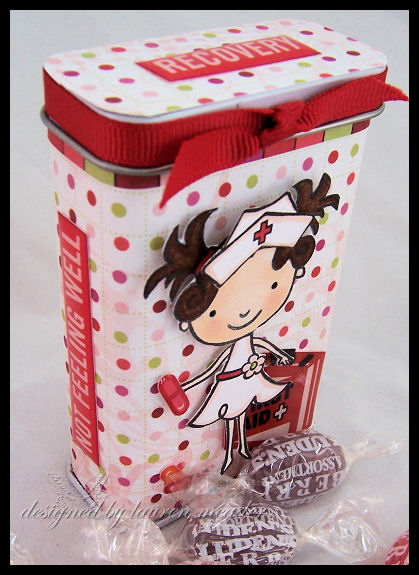 Right side-Not feeling well
Note: The back has an epoxy red cross sticker-too cute!
Now there are most likely a million little things you could put in here to help make someone who is not feeling so great, feel a little better! Maybe some Vitamin C drops, or thera-ful packs. Maybe some tea? Little honey sticks. ENDLESS Possibilities. Whatever you feel the person you are giving this to needs. I liked that my cough drops co-ordinated with my Scenic Route paper! LOL! Plus I LOVE Luden’s cough drops-even when Im not sick! LOL! This would also be cute to keep on your desk at work so when you get a tickle in your throat, you can have a drop handy 😀
Well that is it for today! Hope you enjoyed the post!
Now onto some more good new’s-Then I’m off!
NEW PERSONALIZED OPTION!!!Remember THIS POST? Well, after talking with Melissa, she agreed, it would be SO cool to let EVERYONE have that option! Read on-her wordsPink Cat Studio is now offering a service that allows you to choose the name that will appear on the packaging of the Lily, Billy and Cat Plate 1 stamps.
This would be fun to do for yourself and would also be great for an extra special gift for a friend or relative who has a little girl, a little boy or a cat.
There is a small fee of $1.00 for this service. Information on how to have your stamps personalized is available on the Pink Cat Studio website at www.pinkcatstudio.com in the Cat, Lily and Billy stamp category pages.
———————————————————————————————————————————————————–
This is my song for today 😀 It is from Veggie Tale’s-and is called the Busy, Busy song
Archibald (Mayor): I’m busy, busy, dreadfully busy
You’ve no idea what I have to do.
Busy, busy, shockingly busy
Much, much too busy for you.
Larry: Oh, I see.
Archibald and Doctor: We’re busy, busy, dreadfully busy
You’ve no idea what we have to do.
Busy, busy, shockingly busy
Much, much too busy for you.
‘Cause we’re busy, busy, frightfully busy
More than a bumblebee, more than an ant.
Busy, busy, horribly busy
We’d love to help, but we can’t!
I love that song! LOL!
April 4th-and it is snowing right now.
Do you believe that? WHERE is Spring? Did she forget she had somewhere to be? This is just insane.
I’m in such a happy mood today-despite the SNOW (blech!). I have my nice HOT cup of Keuirg brewed Dunkin Donut’s coffee-yum ( also love Gloria Jeans Butter Toffee, Cinnamon Mocha, and French Vanilla -note: I am not usually a flavored coffee person).
I got the Wedding invites/RSVP’s DONE!! I made a few boo-boo’s so I do have to buy a few more supplies and make like 10 more-but I see the light at then end of the tunnel.
I made another onesie bouquet for my friend (more on that later-and yes a tutorial for you to do your own).
Im the Featured Crafter today on Craft’s on a Whim! ………………….. Thanks Andi :D, and I am ahead on my End of the Year-Thank You gift for Amber’s Dance teacher!!
Since I am sure many of you have kids in Dance, and the end of the year is coming up, I thought I would share my gift for Amber’s Dance teacher today!
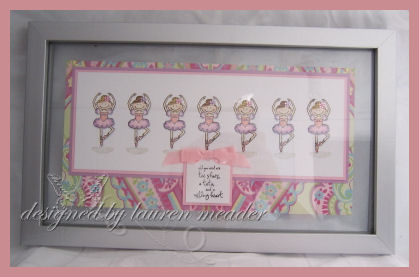 Dancing Ballerina’s frame
Here it is!
7 Ballerina’s Dancing. That is how many girls are in Amber’s class. I wanted to do something special that she could save, yet was dance related. When I saw the Ballerina & saying, from LAD, I knew it would make the PERFECT gift! I am also giving her, her own Ballerina stamp & sentiment, since she is a stamper as well.
I “thought”, very briefly, on letting each girl sign under the ballerina’s, but the frame is so cute, I just cant bring myself to do it! LOL! They are, afterall only 3-4 years old! maybe I’ll let them sign the back!! LOL! Is that awful or what.
I bought a “floating” frame-which is just 2 pieces of glass, that you sandwich your “photos” in. I loved the look, so wanted to use that idea.
Here is a side view
 I decided to use this year’s recital costume to make my ballerina’s Tutu costume colors, as well as copy the flowers they are wearing in their hair, on the side. I used adhesive flower rhinestones.
Here is a close up view
 The Tutu’s are pink/purple and each girls hair piece on this alter’s from pink, purple, pink, purple………as well as altered the hair color from blonde to brown.
The Tutu’s have dazzling diamonds on them, so this really shimmers.I had this paper by K & co in my stash, and it matched the girls costume’s perfectly. I think and hope she will like this. Heck I wanted to keep it! LOL! How cute would this be (even a single one) stamped/colored/framed in a girls room? LOVE IT.
Well that is all for today. As I said I’m “busy, busy”. I need to get some projects done today-so wish me luck, and mojo! LOL!
Hope you come back tomorrow for my Saturday Sketch!!! Its going to be a fun one.
Till then
Jack of all trades C.C. Designs peek #3
Mar 31, 2008 Author: mytime | Filed under: Cards, Home decor/3-D items, TutorialsOOPS! I posted this early by mistake! OH WELL!
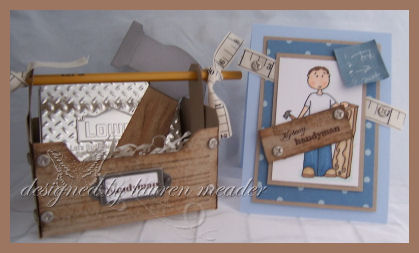 My Handyman!
Now is this set not adorable??? I believe he is called Jack of all trades! He is being released by C.C. Designs on the 4th.
I so needed another cool guy set! I LOVE cutesy. You can’t have a cutesy handyman without a tool box right? I love making boxes and gift items-with cards to match. I had SO MUCH FUN making this tool box 😀 It was perfect with my handmade hammer accessory, and my cool Lowe’s gift card holder tin. I almost altered that, but liked it as is.
Here is a close up
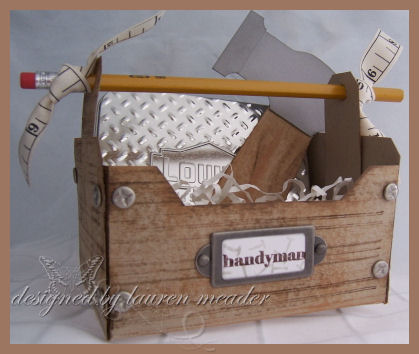 Handyman tool box
How cute would it be for your kids to decorate one for their dad? They can make/buy what they think should go inside of it?
There is also a lined background coming out with this release and I used it on my toolbox. Can you see it? I stamped it in Walnut ink. I also used my Tim Holtz distress inks (my faves are linen, tea dye and walnut), and randomly rubbed them side to side on this for a woodgrain look. Added some screw style brads for that added “look” of a real tool box. I liked the pencil handle for a more handyman feel. The measuring tape ribbon was another cute touch.
I created the hammer just for FUN, as another thing to add to the box. It’s good size. Made with some punches. No biggie.
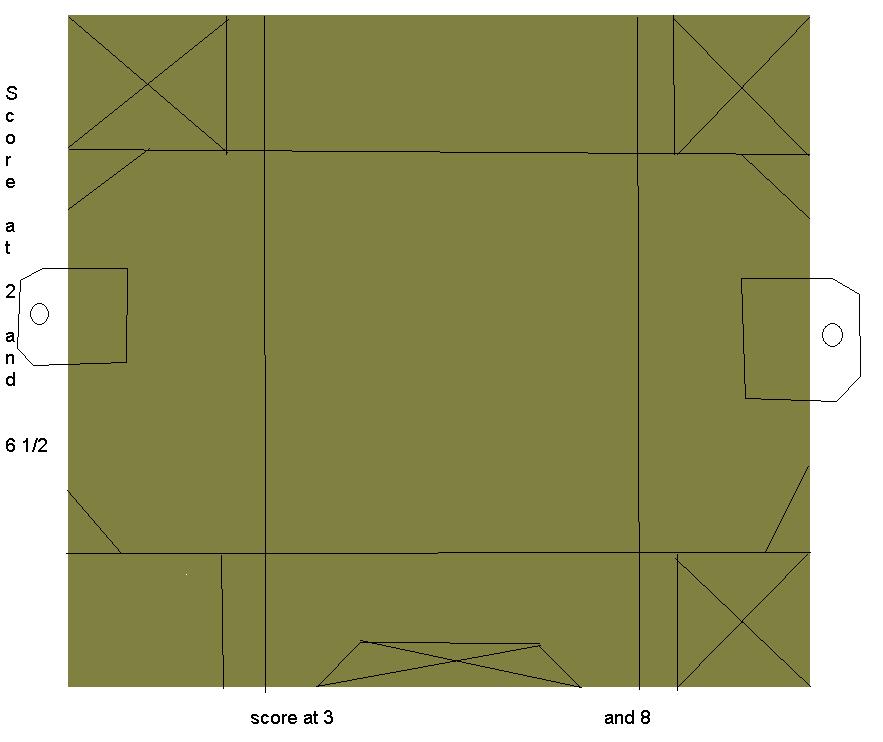
I made the tool box using a 8 1/2 X 11 sheet of Kraft cardstock.
Here is the template below-CLICK IT TO ENLARGE. Keep in mind Im NOT a pro making this-is just a little guideline to help you a bit, if you need a more visual idea. NOT a print and cut template!
Im no Paint Shop wizard. I recommend making any template with copy paper FIRST, that way you can work out any kink’s or question’s you may have. If you get it perfect first time, then you have a real template to reference in the future 😀
THIS IS FOR PERSONAL USE ONLY PLEASE 😀 No contest or publication submissions.
Directions:
1)Along the 11 inch side – score at 3 and 8. This will be the SIDE panels of your toolbox and will be LONGER than the front/back piece.
2) Along the 8 1/2 side – score at 2 and 6 1/2. This becomes the front of you tool box.
3) Trim along scored edges to center. In photo you will see a little extra left on either side of the 3 and 8 mark. That is so you have excess on your panels that adhere the ends together. Cut away the X’s-that is excess cardstock
4) Use tag corner punch on tool box sides. I also cut 2 pieces of cardstock 1 1/2 wide by 3 inches long. Use tag corner on those as well. Punch 2 holes large enough to fit a pencil through. Adhere to inner side panels-as seen in photo.
5) For front of box cut away from panel as you see fit. I just used my ruler and hobby blade for an even look.
Decorate as desired!
Now for the card 😀
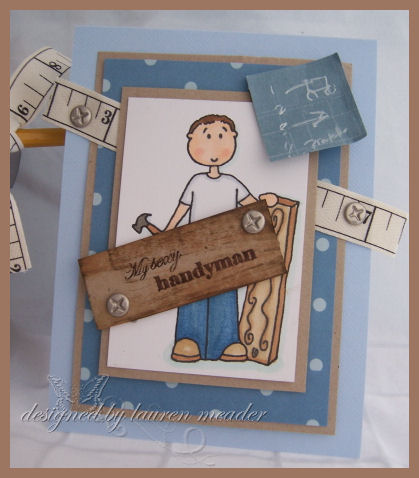 My Sexy Handyman
The little square at the top is suppose to be like blueprints. I stamped the bkgd going across, then up and down for a grid paper appearance. I then scribbled 1 2 3 4-for like steps in the project. Scribbled a picture too.
Just a fun card.
Well I hope you likey!
Thanks for checkin in with me here.
Till tomorrow.
Lauren
Just like Strawberry Shortcake-gift tin
Mar 26, 2008 Author: mytime | Filed under: Home decor/3-D itemsWhat’s in your tin?
That name reminds me of the “What’s in your wallet?” the Chase Credit card commercial. At least I think its Chase! LOL! Too funny.
Anyway, I only got Melanie’s– What’s in Your Tin II set, and am so wanting What’s in your Tin I. They really do go hand and hand. Im slapping myself on the forehead right now! SERIOUSLY!
Anyway-I love her set cause it got me using my GAJILLION Hinge tins I’ve had forever,and NOT used.
I am admitting I have issue’s with purchasing alterable’s in insane quantities for NO reason other than I panic if I use ONE! I know-its a disease.
Im now on the HUNT for cool things to put inside. YEAH!
Well yesterday at Target, I stumbled upon some super cute Strawberry Shortcake goodies!

Now if you don’t know, Amber is OBSESSED with Strawberry Shortcake-even more so with lipgloss and jewelry! I scored these items from the $1 section!! YEAH!! As well as about $60 of other $1 spot goodies.
I think these items really makes a great-“just because mommy is thinking of you” surprise! Dont you think?
I made the ring holder myself, using the Key tag punch, and slit punch!! Cute eh?
I had to decorate the tin to match-so keep reading!
OK now onto MORE fabulous finds.
Speaking of Amber…………….
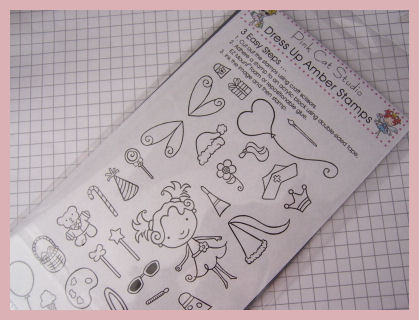
 Here she is- and if I could make Amber into a stamp set……………….
This is what she would look like —–>Dress Up Lily<——!
I got this ROCKIN set from Pink Cat Studio. Is it not the cutest thing ever? OMG! I’m so in love.
So I ordered it like a week ago. She emailed me SHORTLY after, telling me when it was to ship. She told me it would take 2 weeks to get to me FROM Canada-to- New Hampshire-No big deal. I expected at least that. Well, let me tell you-7 Business days!!! THAT’S IT!!!
Her communication and service ROCK!!!! THANKS MELISSA!
Before she sent me the set I put in a note telling her that I loved the set, she looked like my 3yo daughter Amber, and blah, blah, blah……………..I went on to say I almost named her Lily! Which we ended up naming the cat instead-LOL!
Anyway, so my set arrives………….and READ the title!
She printed Amber’s name on the set for me in place of Lily!!!
Amber saw it and thinks someone created a stamp to look like her! LOL! Is that not the sweetest little thing for the owner-Melissa, to do? I had NO idea, till Amber noticed it had her name! (Yes she is very observant and recognizes her name on anything, since we have to label all the girls stuff so we know what, belongs to who)
Anyway-I am a happy customer. I definitely recommend them.
Now onto the COVER of the tin!
I colored her to look like Strawberry Shortcake!
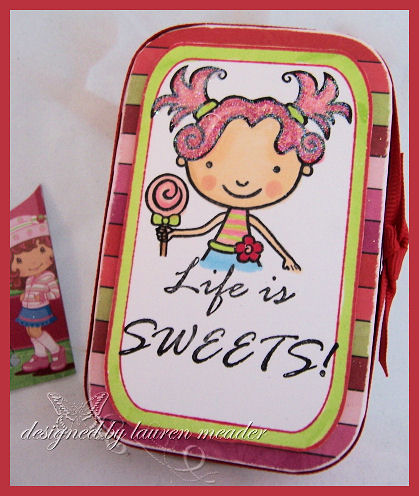 Not bad huh?
I wanted to have the words on the front, so I masked the rest of her body.
I think its way cute, and Amber will LOVE it!
The hair is all glitterfied! The paper is by Scenic Route, and was PERFECT!!! Who needs a Strawberry Shortcake stamp when I have this right?
I wasn’t expecting this to be my FIRST thing with this set, so I guess Ill have to play again today! You just never know where inspiration will hit from and when.
I love all the accessories she has too. I don’t know what to use NEXT!
Well that is all for today my friends.
Hope you enjoyed, and check out that company-they are also coming out with a “Billy” set that I see in my future!
Till tomorrow!
Let’s CREATE!!! Pretty Paper Flowers
Mar 23, 2008 Author: mytime | Filed under: Cards, Home decor/3-D items, Tutorials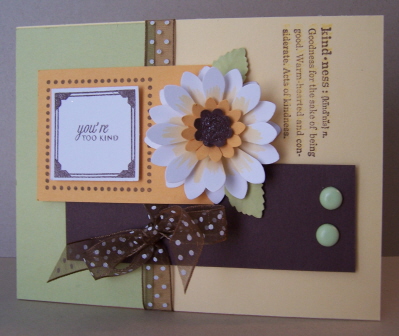
Happy Easter everyone!
Hope you have a wonderful day with family and friends, or doing whatever else it may be that you have planned.
I don’t have an Easter card! GASP!! But, I do have a tutorial that I have been asked to do, in it’s place.
Before we begin don’t miss your chance to enter the MYTIME MAIL—>HERE<—!! I will now draw the winner Tuesday.
Many of you contacted me, in response to my Pretty Paper Flower Favor, asking HOW did I make my paper flowers.
Well I am SO happy you enjoyed it, and are wanting to make your very own. It was VERY easy!
So here we go!
For the SMALL photo’s click to enlarge! Sorry but I only get so much room to post with :C.
Now I know this is going to most likely sound “info-mercial-ish”, but I assure you, its my HONEST opinon and I’m not getting paid! LOL! I just LOVED this book. I would recommend it to anyone.
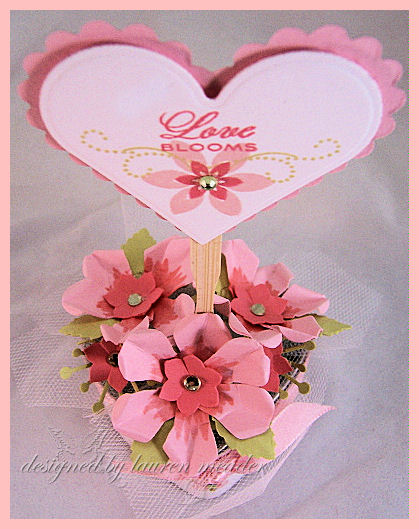
 Pretty Paper Flower Favor
I bought this amazing book-well more of a magazine with step-by-step directions on HOW to use different shaped punches and shapes, to create paper flowers!
You can use them on cards, boxes, bags, frames, and all sorts of gifts.
I wanted to do a paper flower favor for myPapertrey Ink project’s when I came across this book!
The Paper Garden Summer Blooms collection by Susan Tierney Cockburn
I got my book from —->HERE
I LOVE creating paper flowers, and own MANY punches. This was SOOOOO up my alley!
The directions are clear, and very easy to follow. Each step includes a photo as well, so I truly believe ALL skill levels can create these flower bouquet’s, with this book.
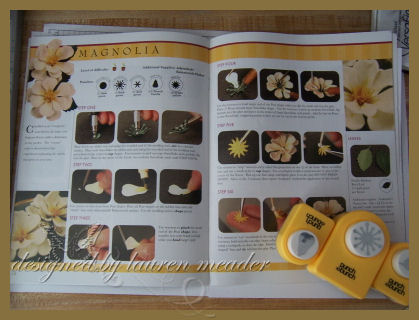 Here is a photo of the page I used to create my Papertrey Paper Flower favor. I adapted my flower to suit my needs, and match my project.
I say feel free to take creative liberty!
You can see it clearly shows you the punches you need, as well as supplies. Each step has a photo so you know you are doing it correctly.
The neat thing is if you purchased some of the recommended punches, like I did, they are used in numerous flower’s through the book! So that is really cool too. You would be surprised at what you can do with some of the shapes.
It cost $15.25, and to me was well worth every penny. There are several series, each feature different types of flowers. So make sure you get one that YOU feel you will most likely use.
My book here features directions on how to make the following flowers:
Buddlegja* Dahlia* Daisy* Geranium* Hydrangea* Lily* Magnolia* Nasturtium* Rose* Sunflower
These are some of my favorite’s, and upon viewing the book, you can certainly adapt a lot of the ideas 😀
Now for HOW I made my flowers!
I used the following punches
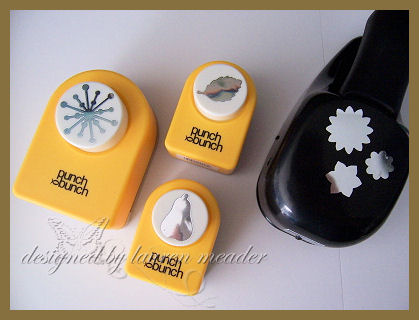 A star-burst, A Pear, and a leaf punch. I then added my SU! punch.
I then looked at my stamped flower from Boxes, Bags & Tags, and created the same number of petals.
I used Berry Sorbet, Sweet Blush & Spring Moss-cardstock & ink for this collection
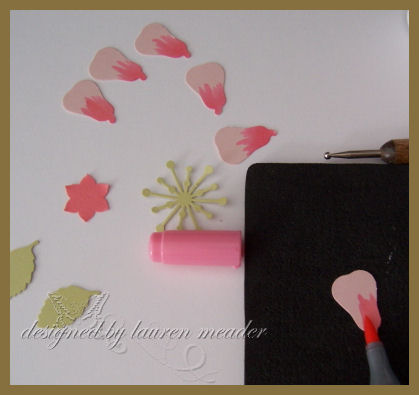 PUNCHED-6 petals, 2 leaf’s, 1 star burst, and one mini SU! flower.
1-You color the bottoms of the “pear shaped” petals.
2-Then you take your embossing stylus, and press the bottom of the petal in. This makes it pop up at the petal top.
3-Use your paper craft tweezer’s to curl the petal tops back.
4-Use a clear pop up glue dot. Lay on starburst shape. Then layer on your petals.
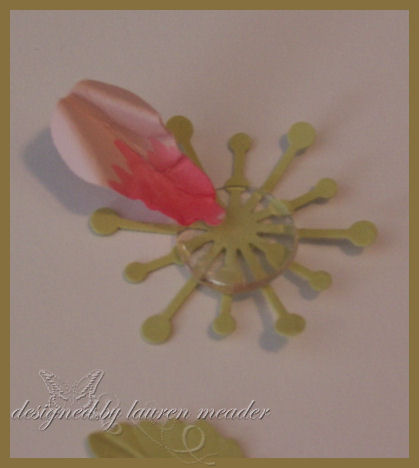

5-Next your place your smaller flower in the center-and push it down with your embossing stylus. This makes it all curl up, like natural flower. I added a adhesive rhinestone to my center, but you could use a variety of other things, like liquid pearls.
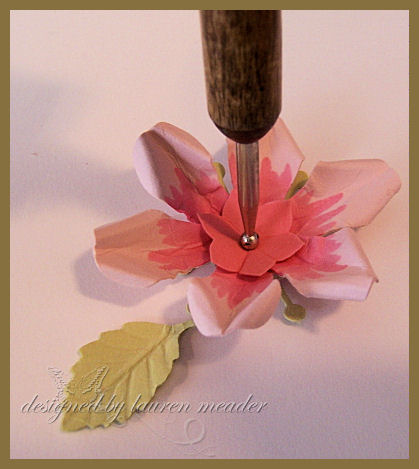
6-For the leaf, you simply take your embossing stylus and draw the spine!!! Attach where needed!
Here is a top view from my favor
Now here is a card using that same flower idea
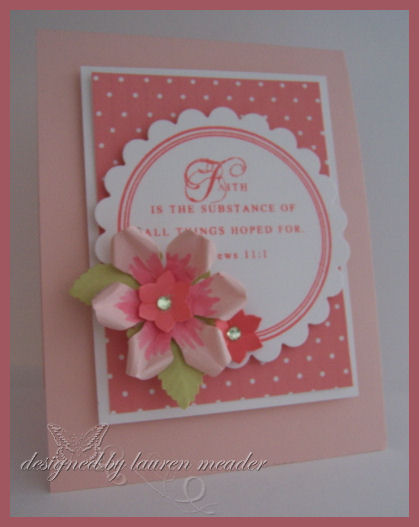 Faith-
I used Everyday Blessings and Circle Borders & Corners on this card, as well as the Pink Patterns paper.
Now here is a close up view of the flower for the card sample at the top of this post. I used the book as a guide to create my own flower. It also shows you how to trim up some punches and get a whole new variety of looks!! REALLY EASY & FAST
On this card I used:
Define your life by SU!, Borders & Corners-square set, and Mixed Messages.
For punches I used a Marvy flower-layered 3 x’s, and My SU! flower punch (same as above), and the same leaf punch. DIMENSIONALS are crucial to this technique! The more volume you have the BETTER!!! IMO!
In the center of this flower I used Mirco beads.
So that is that! I hope you enjoyed it.
I still have a few tutorials left to put together, and I want to share my Daisy thank-you tomorrow. I MAY have time to get the kids room’s into a Smilebox for Tuesday-we shall see.
Anyway-thanks for reading! Let me know what you think of the tutorial, and if you try it on your own-or buy the book!
Happy Easter!
My Etsy

Who I Designed For
Blogroll
- Alicia
- Alli Miles
- Ally Blankenship
- Amber
- Andi @ crafts on a whim
- Angel R
- Angie Z
- Anne Kranitz
- Becky O
- Bee
- Beth Silaka
- Bethany Paull
- Beverly Nash
- Bobbie
- Cambria
- Cammie
- Card of the Week
- Card Positioning System (CPS)
- Cards for Cancer
- Catherine Doucette
- Charmaine
- Cheryl Sims
- Chriss Rollins
- Christina
- Christine Ewing
- Christine Wooden
- Colleen Schaan
- Craft Critique
- Craft Gossip
- Crystal
- Dawn Easton
- Emily Giovanni
- Geny
- Holly
- Igne Groot
- Inspirational Craft Blogs
- Irene
- Jami Sibley
- Jeanne Streiff
- Jen del Muro
- Jeni Bond
- JenMarie
- Jenn Balcer
- Jenn Diercks
- Jenn O
- Jennifer E
- Jennifer Mick
- Jennifer Pereda
- Jennifer-Sweet Treat
- Joanne Basile
- Jodi Collins
- Julia Stainton
- Julie Masse
- Karen
- Kathryn Berthiaume
- Katie Cotton
- Kelley Holland
- Kendra
- Kim Scholfield
- Kris’s Color Stripes! Get inspired here
- Kristen Dubosque
- Kristin Eberline
- Kristine
- Laura @ Sunshine Stamper
- Laura Turnmire
- Laurie Schmidlin
- Lesa Rapp
- Linda Duke
- Linda-LSN
- Lindsey Botkin
- Lisa (lakind scs)
- Lisa Kind
- Lori Craig
- Maggie
- Mara Campbell
- Maria
- Maria Levine
- Mary
- MaryJo
- Melanie M
- Monique Hansen
- Moxie Fab World
- Pam Imholz
- PaperCrafts Connection
- Peppers and Pollywogs Kids party site
- Rebecca Grohall
- Rita
- Robyn
- Rose Ann
- Sarah Vrolyk
- Sharon Harnist
- Sharon Johnson
- Sharon Rivera (a chemisrty with paper)
- Sherrie
- Sophia Landry
- Storage Units, Ink, & More Blog
- Sue Berker
- Susan (Rainy)
- Tangii Crane
- Tracy
- Tricia Traxler
- Trudee
- Velta
- VivLyn
- Zena
MTME Pretty Palette Color Team
MTME Pretty Patterns Sketch Team
My Time Made Easy TM LLC
Shop till you drop!
Lauren Meader
About Me
Copyrighted material
Subscribe To My Blog
Pages
- About me
- Alexa’s Story!
- My Crafty Corner!
- My Time Made Easy™ LLC
- Our Make A Wish Trip to Disney!
- Resume/Publication List
Calendar
| M | T | W | T | F | S | S |
|---|---|---|---|---|---|---|
| 1 | 2 | 3 | 4 | 5 | ||
| 6 | 7 | 8 | 9 | 10 | 11 | 12 |
| 13 | 14 | 15 | 16 | 17 | 18 | 19 |
| 20 | 21 | 22 | 23 | 24 | 25 | 26 |
| 27 | 28 | 29 | 30 | 31 | ||
Archives
- August 2013
- July 2013
- June 2013
- May 2013
- April 2013
- March 2013
- February 2013
- January 2013
- December 2012
- November 2012
- October 2012
- September 2012
- August 2012
- July 2012
- June 2012
- May 2012
- April 2012
- March 2012
- February 2012
- January 2012
- December 2011
- November 2011
- October 2011
- September 2011
- August 2011
- July 2011
- June 2011
- May 2011
- April 2011
- March 2011
- February 2011
- January 2011
- December 2010
- November 2010
- October 2010
- September 2010
- August 2010
- July 2010
- June 2010
- May 2010
- April 2010
- March 2010
- February 2010
- January 2010
- December 2009
- November 2009
- October 2009
- September 2009
- August 2009
- July 2009
- June 2009
- May 2009
- April 2009
- March 2009
- February 2009
- January 2009
- December 2008
- November 2008
- October 2008
- September 2008
- August 2008
- July 2008
- June 2008
- May 2008
- April 2008
- March 2008
- February 2008
- January 2008
- December 2007
- November 2007
- October 2007
- September 2007
- August 2007
- July 2007
- June 2007
- May 2007
- April 2007
- March 2007
- January 2007
Categories
- About Me
- All That Scraps
- blogger challenge
- camera/photo play
- Cards
- Contests
- family stuff
- FOR SALE
- Home decor/3-D items
- How to FAKE it!
- Introduction
- JUGS Challenge
- JustRite Stampers
- Lizzie Anne Designs
- My family stuff
- My Stamping Space
- My Time Made Easy
- My Time To Color Challenge
- My Time to Create Challenge
- My Timeless Template Challenge
- My Timeless Templates
- Mytime Mail
- MYTIME MOVIE/VIDEOs
- Papertrey Newsletter
- Pink Cat Studio
- Pretty Palette Challenge
- Pretty Patterns Sketch
- Product Opinions and Must haves
- Recipe's
- Saturday Sketch
- Smilebox Creations
- Stampavie
- Tutorials
- Uncategorized
- videos
Most Popular
- Create your own Onesie Card Tutorial-and important NOTE! PLEASE READ (2529)
- Saturday Sketch-Boxed bag holder (2333)
- Going GREEN! Fancy Flower Flourish-Closure Video (1478)
- Fabulous Favorite - Giveaway! (1336)
- a Prayer Request (1232)
- QUICK-Easter Baskets from Nestabilities-PTI style-and blog challenge (1063)
- Teaser Sketch (999)
- February Release Giveway! (and a little peek) (996)
- Group Post and Rambling Rose Video Tutorial (985)
- GIVEAWAY! Who wants it all?! (895)
Recent Comments (RSS)
- Daya Sons: Daya Sons, a renowned manufacturer
- 첫충사이트: 완전히 흥미로운 블로그 게시입니다. 저는
- sarah: Wow, Lauren, what a stunning
- hedie: خرید راهبند
- 야동: Love to read it,Waiting For
- 야동: This seller is in a
- 바카라사이트: 여기 처음 왔어요. 나는이 게시판을
- 야동티비: I was surfing the Internet
- 바카라사이트: 비슷한 주제에 대한 흥미로운 정보를
- 바카라사이트: "여기에 제공해 주신 귀중한 정보와
Copyright © 2007 - My Time, My Creations, My Stampendence - is proudly powered by WordPress
This blog has been Tweaked and Designed by Sara Williams