Archive for the ‘Home decor/3-D items’ Category
Altered-
Mar 20, 2008 Author: mytime | Filed under: Home decor/3-D itemsStill insanely busy here!!! It will continue over the next few weeks. Easter is really too early this year, and bringing alot to extra stuff at an unexpected time. Time is just flying past me here.
We made it to and from Chemo safe & sound!
Only 2 more CHEMO trips left-God willing 😀 She will still get count’s and a physical done at Dartmouth monthly for several months following, then it will go to every couple of months.
After that, she will continue to have to be screened for Cancer every year for the rest of her life. I’m OK with that. I just wonder if the looming hear of return ever leaves you? I doubt it.
Then to plan a BIG PARTY for her!!! I’m trying to decide what is BIG enough. I want a rockin idea that she will LOVE. She has been through SO much, and totally deserves the moon IMO. If I could give it to her I SO would.
Alexa did awesome, as usual. We ALWAYS get McDonald’s after as a reward. Now I have to pray she doesn’t get clogged arteries at the age of 10, from all the bribery fast food.
You do what you have to right? It really help’s her get through it.
Her count’s are great, but she feels a little icky. Not lookin so hot. Asleep for the night at 5pm.
I’m wondering if she caught something from the visit to the hospital. It is afterall, a breeding ground for GERMS!!
Now to pray she has the fight to get rid of whatever icky thing that she picked up :C BLAH!!!! She has gotten so much stronger this past year-thank the good lord!
Now back to the stamping portion of today’s post!
Its no secret I LOVE to alter items, make boxes, bags, tag, tins, 3D gifts …………….you name it! If it involves stamping and paper Im SO IN!! Unless its scrapping-NOT IN!!! SORRY!!
Anyway, when I saw Melanie‘s set –What’s in your tin? II-I LOVED it!! She asked me to come up with some ideas for it.
Here is my first of MANY to come!
NOTE: I need to shop for some more “filler’s” first (wink). Once I get shopping, I’m sure I’ll have lot’s of yummy idea’s for these tins. You can find them–> HERE
Modern Girl

I LOVE pink & black. LOVE it!!!
This tin was done in black and white-with a pop of pink.
I HAD to have this Rubber Romance image-which I bought here. Upon trying to find which one she was, I found a dozen MORE must have’s from her! LOL! OH! Boy!
You can also buy them—–>HERE<———. If you see some you want her to get in-let her know!
My ONLY issue is that some are pretty large, and I get a little intimidated by them. I perfer the ATC size for “some” of them. It really varies, image to image. In fact I have a bunch of RR images, yet to see nk, due to my own intimidation :C
Like the girl on this tin-she is a BIGGIN! (aka HUGE)
I tried to NOT purchase her, but her face/image was stunning! I had to get her. Now I am SOOOO happy I did. She was truly perfect for this tin idea.
I used the black Atyou glitter pen on her hair as well.
Inside the tin is a little make-up brush set, with some soft pink lip-gloss!! It all fits nice and neatly in here! I took out the items a bit so you could view them.
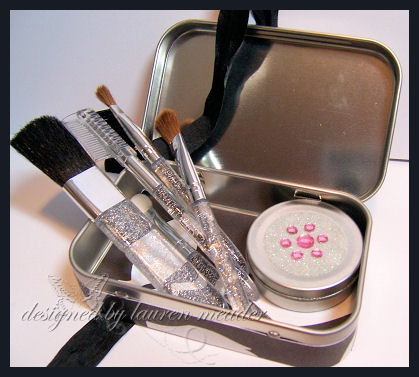
The lip gloss tin was already all decorated! I got these item’s at the Target $1 spot! The brush set was in a clear glittered compact kind of thing.
I want to add a mirror to the lid-but was too impatient to wait to post. The bottom of the tin is lined with co-ordinating paper as well.
I so needed one of these brush sets for myself-and for a $1! Plus it looks great in your handbag 😀
The flower is from the Bridal confetti I got at Michaels a few posts ago.
Now one more altered gift.
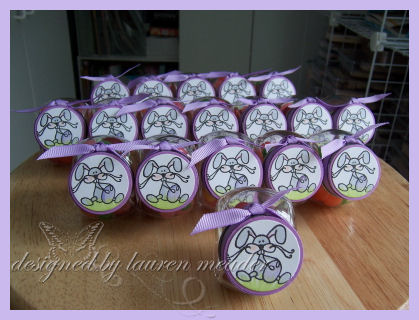
Well I had to share one of my projects for the kids in Alexa’s class.
(note: I did make candy carrot’s for the kids in Noah’s class, just not the box. For Amber she wanted to give Easter Egg chalk’s-so we did!)
I went with the Whisker’s Easter image, since he was PERFECT size for my 1 1/4 circle punch-and oh so cute! I hadn’t used him in forever!!
I used these mini glass jars from Michael’s , and filled them with Starburst Jelly Beans (I LOVE those one’s in particular! ON SALE $1.66!!!!), and stamped, colored, and punched the image for the jar lids-then ties with a pretty bow! Alexa wanted purple, so she got purple!
I made 20 of these in seriously 20 minutes!! GO LAUREN!!!!!-OK add like 7 to tie all the crazy ribbon.
But thats, stamping, coloring, punching, adhering and filling!!! Not too bad eh?
So I hope you enjoyed my post today, and get inspired to alter “something”.
I’m off and running-
I still have more to share, so stay tuned! Oh and thanks for stopping by.
Lauren
My Papertrey Projects for March-
Mar 17, 2008 Author: mytime | Filed under: Cards, Home decor/3-D itemsWell I thought instead of spreading it out, I would just post my PTI projects here together. I also provided some “commentary” on my thoughts for each project.
I hope you enjoyed the projects I had created.
I’ll be back later today to announce MYTIME MAIL winners-so till then there is still time.
Some were shared in previous posts. Other’s I will include tutorials for are-the Paper Flower favor, and Pop up-two hearts card! Lot’s of emails about those! Just have patience with me, I WILL get it done.
If you like any of the creations used, and want MORE details- you can see my complete supply list in MY gallery at PTI.
Just click ——>HERE<—–and browse my gallery, by stamp set!
All the desinger’s really created a great assortment of projects! So check it all out, if you have not done so already.
All the stamps used in these projects can be purchased at Papertrey Ink.
Here we go! I’d love to hear if you had a favorite too!
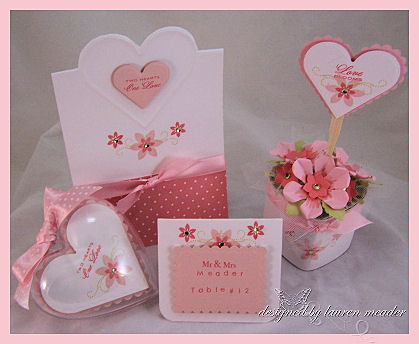
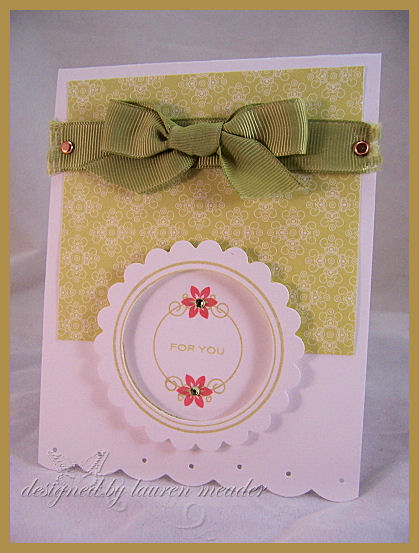
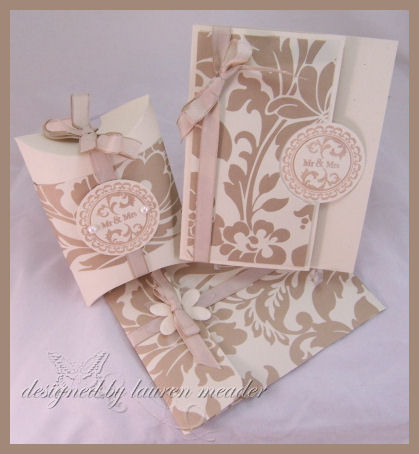
I had so much fun, combining the stamping, with the patterned paper for this project. The the upper left-we have our -Pop up-two hearts, one love Wedding invitation.
To the far right we have the “centerpiece” or a favor, made with ALL paper! I utilized the PTI heart tins for this one. This continue’s with the heart and love theme.
Then, we have our table cards. Pretty straight forward. I like that everything matched so well.
To the bottom left, is a favor idea. Behind the front panel inside the heart ornament-is a heart shaped packet that holds Sweet Peas. Another fun way to package seeds. Print the planting info, and put it inside as well!
This project was just too fun for me.
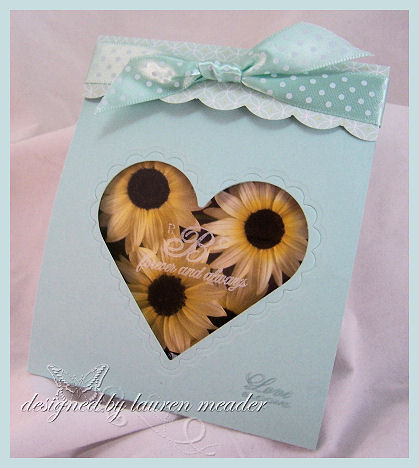
Next up-
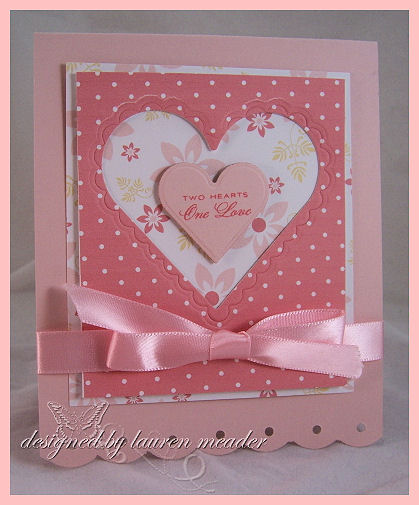
I loved the patterned paper peeking through the larger heart. The idea for this was to be a wedding card to present to the happy couple. It co-ordinated with their wedding theme (above). Also a great Valentines or anytime kind of card!
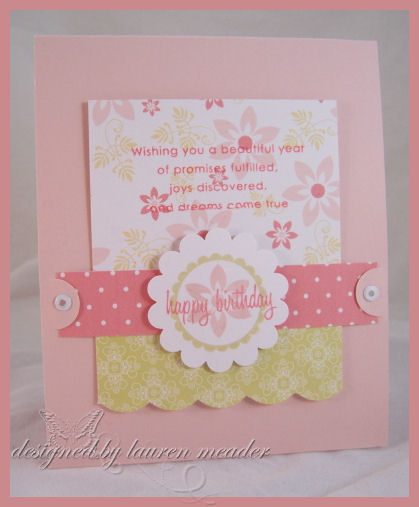
Oh I so loved this one for many reasons. SIMPLE, SOFT and PRETTY!!!
It show’s off the paper!
Used the boxes, bags, and tags set, in the un-intended way, and I LOVE using my “inside” card sentiments as the FRONT FOCUS of my card! When you do this its much more for your money! Just because its a sentiment that you THINK should go on the inside, doesn’t mean it HAS to! Put it on the FRONT!!!!! Don’t you agree?
I loved using the Boxes, bags & tags as the main focus of this creation. The circle layer is up in dimensionals, for some POP! I love being able to use a set for more than it is intended to be used for. That set is a MUST OWN!!! I seriously fell in love with it. The flowers in the set were my absolute favorite! I had to STOP myself from using them. This card can be for ANY ONE, ANY TIME!
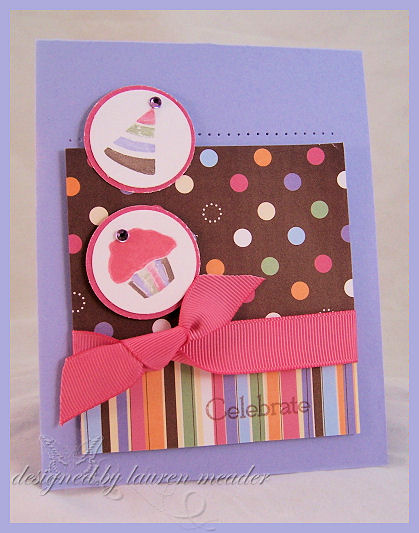 Pretty Party
I loved using purple! Oh and I LOVE adding circle elements to my projects. This paper by Making Memories created the perfect party palette! I loved the striped and dots.
 Seeds of Love
I think seed packets are a great wedding favor. Unfortunately they aren’t all that pretty, in their entirely! So I covered it! I let the flower’s show through, and loved how this turned out. Just give seeds with your “theme” flower, and they are PERFECT! Plus seed packets make a elegant, yet cheap favor, that in the end, is a gift the recipient WON’T chuck in the trash! Every-time they look at their beautiful blooms, they will remember your happy day!
This also doens’t JUST have to be for weddings! Think TEACHER’s or other wondeful people that you need to get gifts for.
I believe this seed packet was a whopping 0.32 CENTS at Walmart!
I loved this as the favor idea, because not only is it pretty, but I PERSONALIZED it! I added a layer of acetate, then using the Ambassador alphabet, I stamped the LAST initial. I them used the simple alphabet and did the groom & brides first initials!
This says:
R B C
forever & always (my uncle and aunt to be’s initials)
Then in the corner-Love Blooms!!! How perfect is that? They take NO time to make too!!
OK we talked about favors for the guests, how about YOUR gift to them?
Now isn’t this such an elegant presentation for your card for the new happy couple?
Once ANYONE gets married, one of the first things they think is “Oh Mr & Mrs. X”. So this is perfect!
PRESENTATION is everything!!! I think this would be one of the first things opened. It looks like it would have something grand inside, and shows how much you care.
I am actually giving this to my Uncle and his new wife when they get married in August. Her colors are ivory and teal. I am in charge of favors, and Wedding invites! (Don’t ask me WHEN I am fitting this in-I have no idea-but I NEED to get the invites done ASAP!!!) I am going to take a Sunday and just DO IT!
There is an envelope, I made to match, and a pillow box for your gift! I think its a great way to present a gift card, or check, in place of putting it in the card. Or a small gift. But lets be honest-they want and need the cash 😀 LOL!
Well that is that! I hope you enjoyed the release.
I do have MORE of my “rejects’ to share. Those are creations I make, but didn’t include in the reveal. So sometime soon I will post those.
Once again-thanks for looking. I had SO much fun with this stuff, in case you couldn’t tell! LOL!
Till tomorrow!

This little light of mine…………….. Im gonna let it shine, let it shine, let it shine, let it shine.
Not sure WHERE I remember that song from. Maybe church? Its one of those, that you know it but you don’t really know it, cause that is the ONLY part I remember! LOL!
That was what went through my head for an hour and half, over and over, as I created these projects 😀
Before I go forward-dont miss your chance to win some MYTIME MAIL——>HERE<—–. All this talk about “lights”, made me remember to remind you. I have read EVERY comment, and each one has made my face “light up”! Literally! Thank you SOOOOO much!
I am also going to pick a random winner tomorrow, for THIS post, and that person will receive ALL 5 items made by me in this post. So don’t forget to comment if you would like to have them.
OK, now I want to take the time to introduce you to the BRAND SPANKIN NEW!!! company I am guest designing for called Our Daily Bread Designs. Please read through her site for stamp sets/prices/shipping and other info. This set will be availablele soon. I believe she will slowly add to her collection.
The owner/designer is named Kelley Holland, and you can view her blog–>HERE. She has been so sweet to work for.
Kelley contacted me a few months ago, and told me her vision, for her company. I liked what she represented!
I was so excited to be able to try and help her out, but cannot commit to another Design Team full time, so I am going to guest design for her. All this design work for me is PURE fun, joy and play!! I love it and enjoy it, and do my best to KEEP it that way. I don’t want it to become “work” and stress over it, even though I take it all very seriously. Does that make sense???
Anyway……………..
She already has a team of AMAZING girls, that I’m sure will really rock out these sets! So check them out HERE
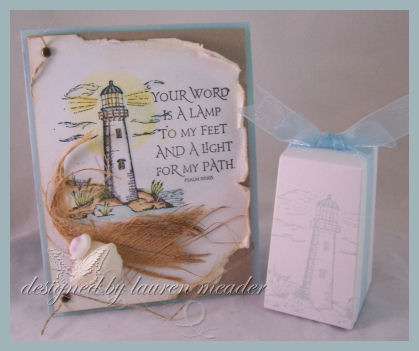
When I saw this first set Light of the World, I went crazy! I knew she would be onto something here! It also takes me back to being a child, and our family trips to the beach in Maine. GREAT memories. I still take my own children there every year.
I hope you enjoy what I made during my “break in” of the set.
You know I don’t own ANY lighthouse images? I had an old SU! one YEARS ago, but sold it. I missed it, after it was gone!
Anyway here is what I did with it-
The top card of this post, was done using twinkling H2O’s, so this really shimmers!! Its very simple, and you may not see, the lighthouse was cut out, and placed on dimensionals. Simple yet striking in person. I wanted simple black and white so the soft/shimmery colors would just POP!
Next up is my FAVORITE
 Sandy Beach set
I so love this because it has real seashells in the corner (from my honey moon in Hawaii, and the husk from a coconut tree on the beach). Its just got a very earthy, beachy feel to it, with like colors.
The box was from a set of Wedding Favor boxes at Target-40 pieces on SALE for $6!!!!! Now that ROCKS! All I did was stamp the light house with my soft sky ink, and pop the box together-seriously too longer to clean the stamp, then to create the box! LOL!
My next card also uses the same beachy colors.
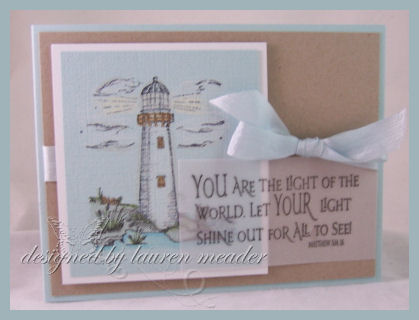 Shining light
This one the main image was done on textured sky cardstock, and colored with some Copic’s but mainly watercolor crayons-left unblended. So a very different look for all 3 card creations here. I love the POP of color this has. You can see the lighthouse is white in person.
Very clean and simple, yet soothing. I like the softness of the vellum layer, as oppose to the heaviness of an additional layer for my sentiment.I feel it would have overpowered my softness of my main image.
Lastly- I HAD to do a candle!!!! It smells amazing too! Just stamped the lighthouse in Bordering Blue, then the words in Brocade Blue.

Thats it for today!
Hope you are inspired by this set, and it finds a place in your collection! It can really make some nice things to “brighten” someone’s day, or give them the lift they need.
I’d love to hear your thoughts on it.
I still have some MFT and a bunch of other stuff to share so stay tuned OK!
Till tomorrow!!!

3-Papertrey Party Package PEEK!
Mar 12, 2008 Author: mytime | Filed under: Cards, Home decor/3-D items, TutorialsAre you enjoying the peeks of the upcoming Papertrey Ink Release?
I cannot tell you how excited I am to be able to share in Day 3 of the PARTY!!!
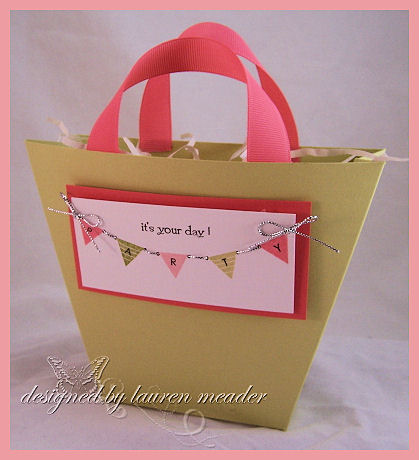
As you may have read, this month is a Celebration theme for the release. What better way to celebrate than an all occasion party themed card and matching gift bag!
You know how much I love co-ordinating cards/gifts. I especially love one’s that can be easily created.
Papertrey Party Package

When I saw the set’s to be released this month I was absolutely ecstatic! (OK I know that is every month, but seriously!)
I fell in love with It’s a Celebration by Candice Agulair.
The adorable pennants just screamed PERSONALIZE ME!
Then, when I saw the Simple Alphabet- I screeched! YEAH! This is just perfect. I have been dying for a quality mini clear alphabet set. This has upper & lower case letter’s, as well as number’s and punctuations. It will retail for only $15! A MUST have. It stamps like a DREAM! No squishy unclear letters. FINALLY!
Throw in the New! Color’s Sweet Blush & Berry Sorbet, and I can’t get any happier! Well I can ,once I saw the patterned paper………………..:D
OK enough rambling! Let’s get to the details!
Party Pocket
Now this one is FUN!!
Supplies for Pocket
Scor-Pal, 8 1/2 X 11 piece of Spring Moss card-stock, ruler, hobby blade, redline tape, and Berry Sorbet grosgrain.
Directions for Pocket-click photos to enlarge
1) Take Spring Moss card-stock, and along the 11 inch side-score at 5, and 6 inches.

2) Turn paper to 8 1/2 inch side, and put top corner at the 8 1/2 inc mark, while bottom corner is at an angle, against the edge of the Scor-Pal (or 101/2 inch mark if you don’t have a Scor-Pal). Score at 7 1/2, 8 1/2, then 9 to the center score line for bottom. Turn card-stock and repeat step for all 4 corners.
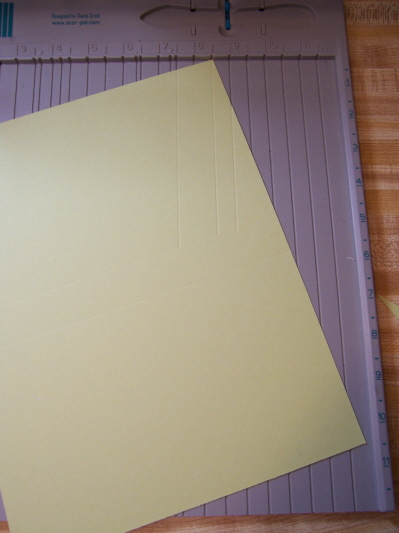
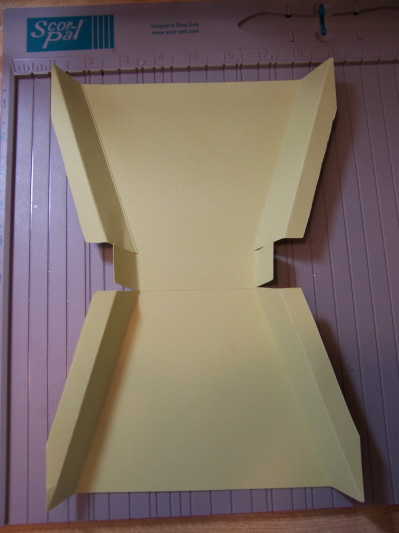
3) Cut excess cardstock away. Score bag edges. The wide end, folds in, and the little fold, folds out. Trim excess at bottom panel as well.
NOTE: PrintableTemplate below for quick reference-click and print.
 If you are unsure what to cut off get rid of the dark gray!
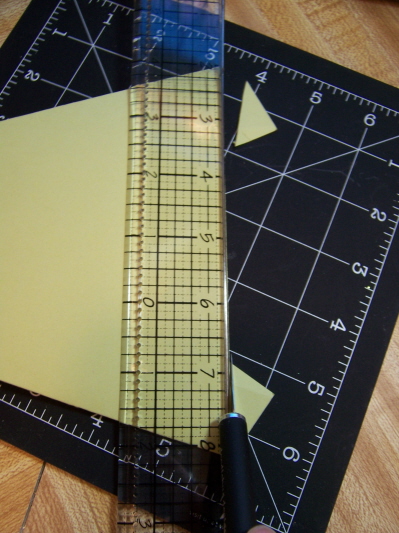
4) Fold the ends, into the center. Take a ruler, and hobby blade. Trim excess card-stock. This is so you get even sides.
5) Apply adhesive to sides. Tuck in bottom folds first. Then fold pocket in half to adhere end pieces evenly.


6) Cut 2 even pieces of wide Berry Sorbet Grosgrain, and apply red-line tape to bottoms. Adhere inside bag. Then attach your pennant to the front.
Supplies for Pennant
Banner stamp in plain and stripped, ink of choice (spring moss, berry sorbet, sweet blush, old olive, and black), 1/16 hole punch or paper piecer, Needle, silver cord (or color of choice)and glue dots.
Directions for Pennant-click to enlarge
Figure out how many pennants you want for your banner. Choose your colors/and or word to be spelled.
1) Stamp the MIDDLE pennant FIRST! Then work your way from there out. This will ensure an even banner.
2) Use your Simple Alphabet, then stamp desired word. In our case P A R T Y.
3) Use a 1/16 hole punch, and punch holes on either side on the pennant corners. You may also use a paper piercer. You want your holes to remain small, so it appears that your pennants are hanging from the cord!
4) Thread your cord through the holes. Adhere to back.
5) Tie 2 separate bows using silver cord, then adhere to banner ends with glue dots.
6) Layer onto Berry Sorbet card-stock with dimensionals, then attach to the bag! DONE!
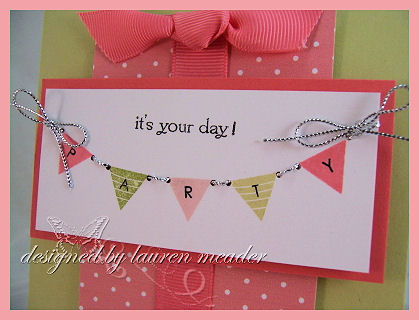
For the card!
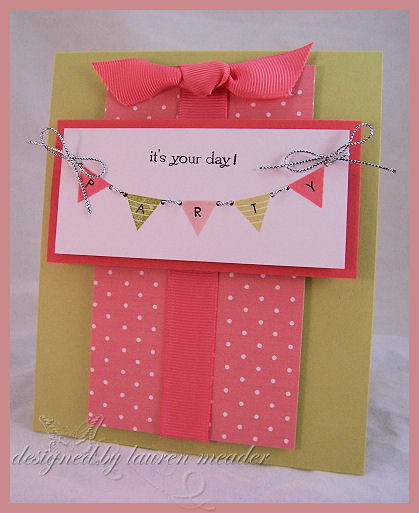
Finished size- 4 1/2 X 5 1/2. Card base made with Spring Moss card-stock.
I followed the directions above, and created the exact same banner for this card.
I used the Pretty Pink Polka Dots, from the Pink Patterns Collection. I thought it made the perfect “gift”, tied nicely with my Berry Sorbet grosgrain.
The patterned paper is YUMMY!!! You know how much I LOVE pink!!
Once the reveal hits, you will be able to see just how much I enjoyed using it. FYI-MORE tutorial’s to follow too!
I LOVE the color’s and assortment of design’s offered in the set. I especially LOVE the option of buying 6×6 or the 12 x 12. As you can see by the photo, the paper is a Perfect Match (HE!HE!HE!) to the ribbon and ink.
One question I have been asked is how does the Berry Sorbet’s paper/ink/ribbon compare to Stampin’ Up! Groovy Guava-since that was not a color compared on Nichole’s original post.
Here is a photo:
Top Layer on Left is Papertrey Ink Berry Sorbet.
Bottom Layer on Right is Stampin Up! Groovy Guava

As you can see they are VERY different. Guava being more orange in tone.
Well that is it for me! I am so honored to have been able to take part in this today! I really hope you enjoyed my part of the peek!
Make sure you check Nichole’s blog each day till the release! There will be sneak peeks, as well as an additional daily sample, provided by an assigned Senior Design Team member!
Lisa’s stamped twill-HERE
and
Pine’s scrap page-HERE
Till tomorrow!
I am very excited about this project today. A little MFTeaser for you all, using the New Release (tonight) called Ride Em’ Cowgirl.
I have to say when I saw this set, I thought it was just adorable. When I got to actually PLAY with it, I totally fell in love with it.
It was very QUICK and simple project. You know I’m all about that!
Better yet you probably already own what I used 😀 If not-it would be worth the purchase of this container (wink)!
I LOVE giving cards with matching gift containers. Sometimes IMO the container is so pretty, it may not meet the expectation of what is inside. Ever feel that way?
I often make my own container’s and bags, but sometimes the PERFECT- already made- container is waiting for you to use, and you just need to realize it.

Here is proof that nothing should be thrown away!
I was in my stamp room-munching away on Somoas Girl Scout cookies-and playing with this set. I went into my template drawer, where I keep all my own templates, as well as other “I can’t throw this packaging away, I may NEED it someday” item, and saw my empty Sprite’s Brown Dot Prima box.
I saved mine after seeing one altered in Paper Crafts Feb 2008 edition- page 56 Hearts Treat container by Nicole Keller. In case you want another idea, go check her’s out. It was pretty genius!
I was planning on making a Pillow Box-but this was even better.
B-I-N-G-O!
This would be PERFECT to put those Somoas in 😀 So I did.
 Here is a front view.
Since the cowgirl comes with a border, I just cut an even border around her, then colored it in. I had to distress the edges for that rustic look.
I LOVE Guava, and close to cocoa for this Cowgirl set! Its so pretty without being TOO girly. You know what mean-more rustic girly! LOL!
I loved how the tag is hanging like it was Lasso’ed.
Just untie the bow-and pop off the top! Now you can munch the cookies-without ruining the package.
Now for the card-
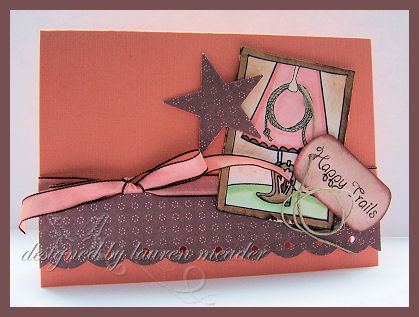 Happy Trails to you-until we meet again
My dad ALWAYS sang that song to us, when he would leave. Too funny. It was the first thing I thought when I saw this sentiment. Maybe I should send this to him. I have not seen him in over 2 years! HMMM!
Enough on that.
I loved using the Guava textured card-stock on this one. The Star punch by SU! ROCKS!!!! Perfect size.
I wanted to continue the “dots” theme. SO I used Berry Bliss paper by SU! Its a perfect combo with this set.
My ribbon is by Martha Stewart, and was PERFECT!
Now the DETAILS on the MFT party!
My Favorite Things (www.mftstamps.com) is having a New Release Cocktail Party on Wednesday, March 5 from 9-11 p.m (Eastern Time). THATS TONIGHT PEOPLE!!!Lots of fun is planned including finding out how YOU can be the next MFT Guest Designer. Head over to the MFT forum on www.splitcoaststampers.com to find out all the details and join us here on Wednesday night.
Hope you will come chat it up with us. I will be there! I also hope you all enter to be the guest designer. If you have never entered before NOW is the time!!!
Put any insecurities aside and GO FOR IT! SOMEONE has to win-why not you?
This is ALWAYS my motto:
You miss 100% of the chances you DON’T take!
What are you waiting for?
Till tomorrow.
Can you believe it’s MARCH?!!!
What happened to the summer? LOL! Seems like just yesterday I was planning Christmas stuff, now I’m back praying for summer. We are getting SLAMMED with the snow this year, here in New England.
Makes me really wish for warmer weather.
Im so into SPRING mode-its insane.
So here is a taste of Spring-well in really summer’s end, but let’s not get technical.
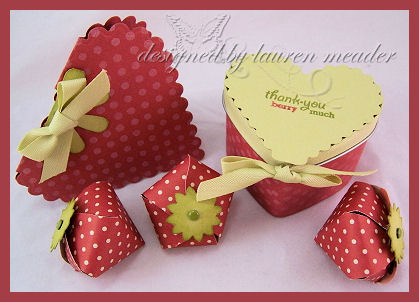
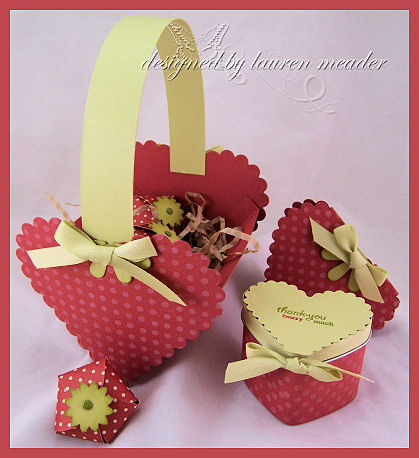 So Berry Sweet set
Nothing screams AWESOME more than a gift set, that is all co-ordinated!!
Here in the photo we have a Strawberry theme!
A Basket, a strawberry shaped card, strawberry themed heart tin, and little strawberry shaped gift boxes.
I just used my Ruby Red cardstock stamped with my Polka Dot Basics (with white craft ink), to create my Strawberry theme.
The leafy green was done using Spring Moss cardstock/ribbon. I actually used the wild flowers die, cut apart, for the berry tops.
The basket-that was created from the very same large scallop heart nestabilties, as my previous heart baskets.
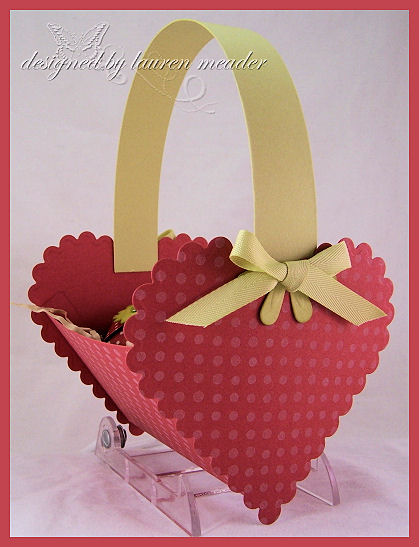 Closer view of basket
I cannot even tell you how much FUN I had making this set.
I love Strawberries, and think this is the cutest set to give at almost anytime of year.
You could fill the basket with home-made strawberry jam, chocolate covered strawberries, plain strawberries, strawberry shortcake, strawberry scented candles, or body lotions. OR whatever other awesome strawberry thing you can find! LOL! Maybe a Strawberry Shortcake party?!!
 Top off tin
In this case I filled the heart tin (decorated to look like a strawberry) with Lifesavers Strawberry Creme Candy.
There is also a “strawberry” shaped card to match! Inside has the same sentiment, as the tin. Sentiment is from the Green Thumb set
Now I KNOW you are wondering about those ADORABLE little strawberry shaped boxes!! These were a breeze to make! I wish it were my creative genius, but it was not.
Kelsy Hull, had sent me a photo of a nestability basket she had made, after seeing a few I posted a couple weeks ago. It was ADORABLE!! I noticed in the basket, she had these berry like things that looked paper crafted. So I asked her about it. You can view her’s —->HERE
She was kind enough to share the template with me! THANKS GIRL!
They were created by Sherrie Brickey——>HERE is her template, that is printable. Please credit her if you use this template for anything.
I used the SU Ginger Blossom paper for my strawberries. I then used the SU! Boho Blossoms punch to create my berry tops. Felt flowers would be GORGEOUS!!! But I wanted to keep it ALL paper. Just sponged the edges, and added a olive brad.
Pretty cute huh?
I thought they make nice accents to surround what ever I else I add inside my gift basket.
So that is it for today.
Ill be back Sunday with my sample for my “Saturday Sketch”. Sorry-so much to do, so little time, and sometime’s a girl has to go with what she WANTS to do, not HAS to do! LOL!
But if you REALLY want to play today-here is the sketch! Click for larger view
 Pretty simple/standard this week. But its one of my favorite’s to use.
I have 2 samples this week so stay tuned OK!! AND they BOTH use Stampin Up!
Till tomorrow.
Basket Challenge!
Feb 29, 2008 Author: mytime | Filed under: Home decor/3-D itemsAre you ready for today’s post?
I know I am pretty excited.
Jen and I challenged each other to make a Basket from our Nestabilties! Being that we both love a challenge, and altering stuff I think this was a great idea Jen had 😀 I know I had so much fun doing this.
But that wasn’t the only challenge-we had to use the Priceless stamp set from Stampin’Up!, any bkgd we choose, AND the following colors-
Orchid Opulence, So Saffron, Purely Pomegranate, Certain Celery and Chocolate Chip (optional).
WOW! Sounds like alot-but it really is a great combo.
EDITED TO ADD: I’m a dork! I used Garden Whimsy instead of Priceless! LOL! Thanks Debbie for letting me know. Goes to show how out of the Stampin’Up! loop I am. I just grabbed my (what I thought) was Priceless set-and away I went! LOL!
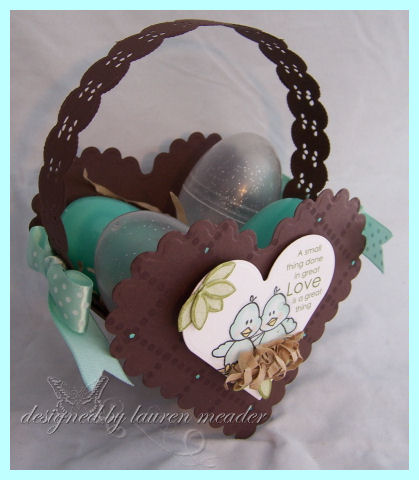
Heart’s A Flutter Basket
So here is my basket! I went with using the scallop heart for this design.
I ended up making 3 heart shaped baskets in all, after I got started!
The bkgd stamp is just GORGEOUS! Its called Dotted Diamonds, byCHF, and was designed by fellow Dirty Girl Lisa Strahl (in case you didn’t know :D) I thought it made a nice simple “weave” design for my basket.
I used the sentiment, and butterfly from Priceless (one of my fave SU! sets). The pomegranate ink was daubered on my stamp, as was the orchid. It gave a nice blended butterfly wing, with the touch of glitter.
I used those Bridal flowers, and colored them with my SU! markers to match. I know they LOOK coated but they take any ink 😀 Real nicely I might add.
Here is the side view
I decided to use my ribbon for a hanger. These dont stand well on their own :C You could put “feet” on it, but they also look nice in a corner-where they can stand, or hung from a hook-like this one.
I added COLORED glitter eggs (infrom the $1 store) to this basket. It will be one of the kids Teacher’s basket’s for Easter.
Well I couldn’t stop there! I have another one to share with you today-then the last one I will post tomorrow, as it has a bunch of accessories made to match-and deserves its very own post! You really won’t want to miss that one!!!
HINT-Papertrey Ink.
So next one I had an idea!
 Front view
Here is the Love Nest!
I LOVE this bird image by C.C. Designs-Love Ya Much.
Last April, for the Dirty Dozen, I made a nest, using scraps of paper-you can see that–>HERE. If you can’t view it, it is because you are not a Fan Club member-SORRY!! You should join 😀
But the idea is the same. Only this time I saved myself some shredding and used gift bag filler instead! LOL!
I then used those SAME Bridal flowers, colored, and cut-for my tree leaves!
The sentiment is from the SAB rub-on’s by SU! I thought it was cute, and perfect since you would give small gifts in this basket.
See the little eggs match!
The ribbon is the Polka Dot Aqua Mist, which was PERFECT!!!!!
I made my handle by using a Martha Stewart embossed scallop border punch. I cut a thin strip, then lined up the punch on either side to create a elegant handle.
This is the other side
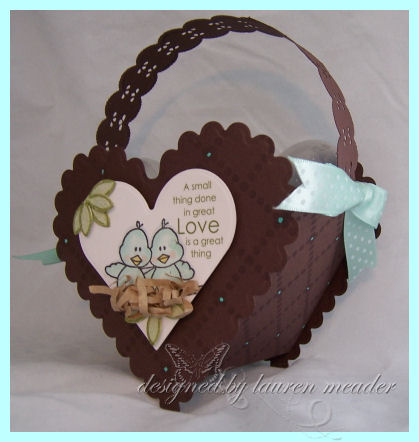
Funny because this one stand well on it’s own! Maybe because the contents inside “balance it out”?
Anyway-here is some more info-
For this heart basket, I used Chocolate Chip, and the same bkgd. Just added some dots with Souffle gel pen for the flower centers!
DIRECTIONS!!!!
Now I KNOW you are going to ask HOW I made the sides!
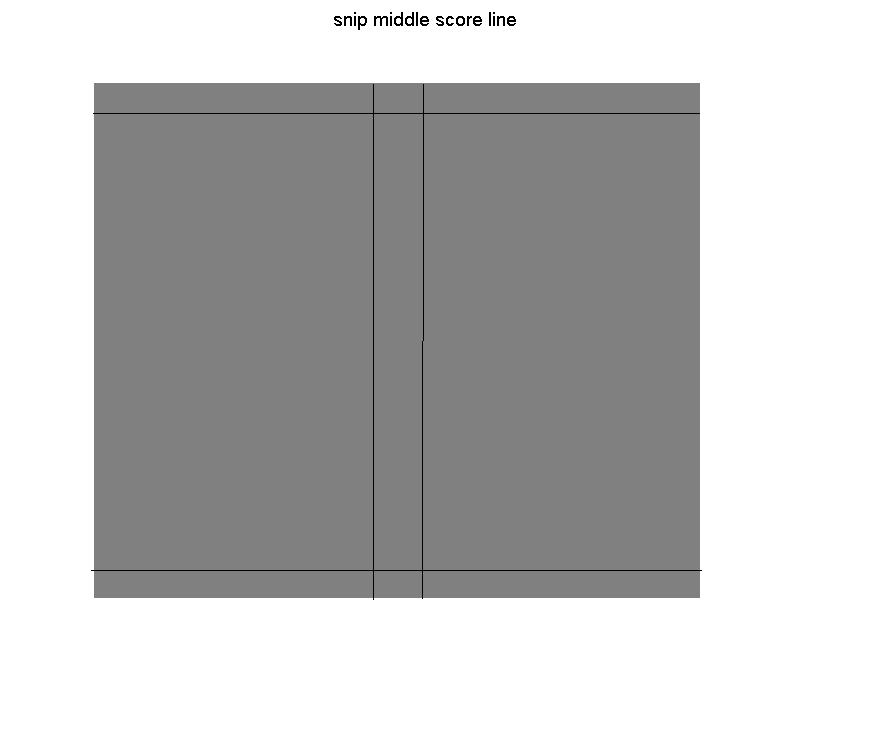
All you need is a piece of cardstock-whatever width you want-since that will affect how long your basket is. I believe mine was 4 1/2 X 6 1/2.
X wide by 6 1/2 inches long.
Using my Scor-Pal, along the 6 1/2 inch side score at 3 then 3 1/2.
Then along the width, score a 1/2 inch on either end!
Snip the sides of the center score-and put together!!! DONE!
Don’t forget to check out Jen’s version too! You can find that here—->HERE
So that is it for today! I hope you enjoyed our challenge. Feel free to create you won and post us a link in the comment’s section.
I want to thank Paulette for lending me her Scallop Heart Nestabilities. I have no idea HOW I am going to part with them now, since I am in LOVE with them! LOL! AND they aren’t around ANYWHERE! BUMMER!
Stay tuned for tomorrow’s Basket ensamble!!!
Till then.
My Girls-My crown and glory gift
Feb 27, 2008 Author: mytime | Filed under: Home decor/3-D itemsDon’t they say that about a woman’s hair? Anyway I am using it for my title today-because I like it, and it fits my post.
I love having girls! Being a “girly girl”, its a ton of fun to be able to make things for their room. They really appreciate their mommy made things, and that makes it even more fun.
If you haven’t noticed before I LOVE to alter items and create boxes, bags and other fun items.
So when I found these Crown shaped banks at Michaels I was ECSTATIC! Especially since I had been DYING to ink my Once Upon a Time set.
(Noah informed me he wants a ROCKET bank-oh boy! I have no idea how I will pull that off! LOL!)
My girls room is like a “garden” theme. The walls are a very pale yellow, and I stenciled a picket fence around the room, as well as flowers. I painted some animals in there, and a tree with some birds. Oh yeah, and you KNOW there are butterflies.
This allows me to decorate their room with many colors-mainly purple’s and pink’s, since they both love those colors. It also is easy to fit in their love for Princess themed stuff-without totally re-doing the room.
First up we have Alexa’s Crown bank
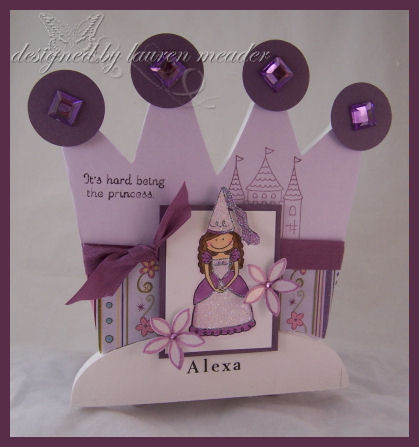
Well as promised, yesterday-see the flowers? Those are the white shimmery bridal flowers. I just colored them 2 colors using my markers! REALLY pretty huh?
I got the girls names on the banks by using Rub-On’s from Making Memories. WORKS PERFECTLY!!!
The purple paper is a pastel pack, by Martha Stewart. The pattern paper is by Cloud 9. It was a gift.
The princess is colored with Copic Markers, and them some dazzling diamonds was added.
For the sentiment-I just inked the part I wanted on the bank.
Now these banks come already painted white-which is a GREAT time saver! I chose to cover the front, and the back-which is the bank box.
You may wonder HOW to even begin to cover something like this!
Well here is what I do.
I place my item face down on the BACK of the paper I want to use. I then CLOSELY trace the outline, of the item. I them CAREFULLY cut on the INNER part of the drawn line.
Then after its cut-a lay it onto my item, making sure it is PERFECT!!
I then use Martha Stewarts modge podge glue (its clear and I LOVE it), apply all over the item, then carefully apply my paper. Once the paper is on, I cover with white scrap paper (don’t want to transfer the dye of a colored card-stock!!!) and use my rubber brayer to seal it down and smooth it out.
IF I do have any overhang, I lay the image flat, face down, and carefully trim excess with my hobby blade, once the glue is dry.
This one was more tricky because you have the crescent in the front! Again-I just cut away with my hobby blade.
Now onto Amber’s-
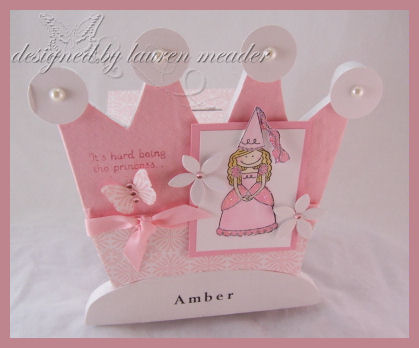
Can you see tha back part a bit? This is the bank portion.
It was VERY hard to photograph these and get the back part in the detail. Sorry!!! The back was a BREEZE to cover. For the money slot I just used my hobby blade again. A sharp one really comes in handy.
I used roughly the same layout. Amber wanted a butterfly, so I have to fiddle around a bit. It was hard to keep the balance, adding it.
This is all Martha Stewart WRAPPING paper! The pink is a quilt pattern texture-really pretty IRL, but it made adhering things to it difficult for some reason. Plus it bubbled easily and I had to be VERY careful about the modge podge, and rolling.
There are those shimmery flower’s again. They really are perfect! Great size, and the embossed shimmer really takes you to a WOW!
You would think I worked for Michaels wouldn’t you! LOL! I should get a discount or SOMETHING! LOL! Lord knows I buy enough.
I didn’t have all the same pink rhinestones for the crown jewels so I used adhesive pearls (thanks Barb!!!).
Its funny because Amber and Alexa are VERY different.
Alexa

Alexa is very independent, and likes to play on her own. She loves to play with Groovy Girls-has since she was 14 months old-which is funny. She has like over 65 now. She will make them sing and dance and get dressed a hundred times, and still be entertained. She loves anything artsy. She could color and draw ALL day. She also loves to read.
But when it comes to GIRLY stuff-she doesn’t like doing the little bit of hair she has, nor wearing dresses and whatnot-unless it is of course a Princess dress! LOL! No nail polish, and its rare she will even want chapstick if she needs it.
Her favorite color is purple. That is why her’s is purple, and she has dark hair.
Amber-

this is my girly girl-LOVES to go shopping with mommy-ALL the time.
Loves to do stuff WITH people, but can occupy her own time too.
She is very girly, yet she also has some tomboy traits-too funny! Loves video games, and sports. She even watches the football/baseball games with Daddy.
She loves wearing lipstick, and any make-up she can sneak out of my pocketbook. Always has to have her nails painted, and if she isn’t in PJ’s, prefer’s dresses. She doesn’t play with babies though! Only pocketbooks and trinkets. She will also sneak into my jewelry and wear it.
She loves to sing and dance. She is always making up little songs. She has TONS of little items under her pillow (so much I don’t know HOW she sleeps on it, and her next aspiration is to have mommy get her ears pierced! Um don’t know about that!
Her favorite color is pink, and she is blond-so was her Princess.
I can’t wait to see what Alexa thinks. Amber loved hers, and insisted on carrying it around the house :C While that freaked me out-I did GIVE it to her, so I pleaded that she be careful.
I think these would make super cute gifts for girls-or if PRE-COVERED a fun party activity. The girls could decorate the crown bank, and color their Princess.
Im always on the hunt for fun party ideas.
I wishes this set were out when I had Alexa’s big Princess Party! LOL!
Oh well.
Thanks for reading. Hope you got something out of it.
Till tomorrow!
QUICK-Easter Baskets from Nestabilities-PTI style-and blog challenge
Feb 15, 2008 Author: mytime | Filed under: blogger challenge, Cards, Home decor/3-D items, TutorialsYEAH! The weekend is just about here. I am very excited about that.
So for the weekend-I KNOW Valentine’s day *just* ended, but in this industry, you have to be ready to move on to the next thing, and fast. Trust me, I have been in Easter mode for a month now, due to stamp releases! LOL! I felt like the stores had to catch up with us, for once.
Publications are currently taking Halloween ideas! EEEKKK! Needless to say “I” will not be submitting for that 😀
OK so moving on-lets think Easter! I am going to share my basket’s and Blogger’s Challenge
 Purple Posie’s-in the PTI gallery
Women of Life, and Just Hatched were used on all of these samples. Flowers are popped out using the Cuttlebug Flowers #1 die. Not an exact match, but I still love the look
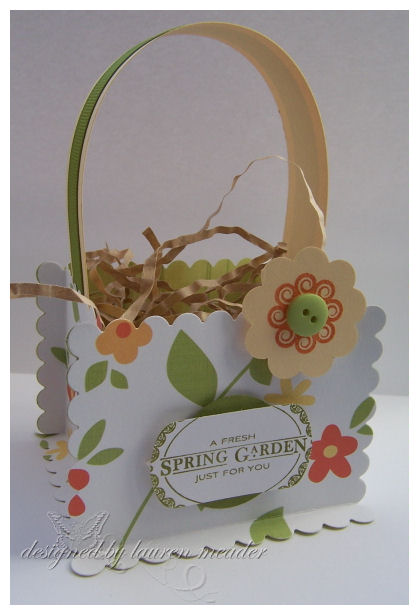 Spring Garden-using patterned paper by Scenic Route.
I made these QUICK and cute Easter Baskets JUST from my large rectangle nestability dies!
You can stamp your basket’s, or use patterned paper. If mass producing-obviously EMBOSSING the edges takes MORE time-so you don’t have to do that.
You could alter this design by using squares as well.
The tutorial/idea would be the same, just your measurement’s may change 😀
For the purpose of this tutorial I a making my basket in a pattern, and a solid, so you get the visual idea. It also did come very cool.
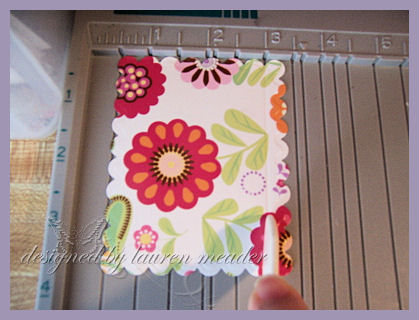
DIRECTIONS: Click thumbnails to enlarge
Step 1
Die cut your desired cardstock/paper. You will need 4. Two for the front/back, then two for the sides.
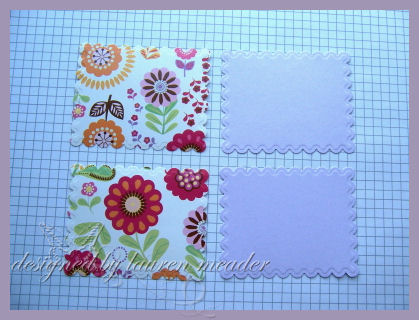
Step 2
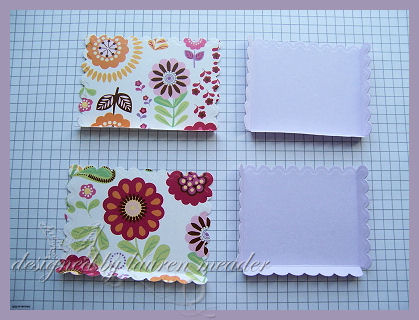
I used my Scor-Pal, and scored in between the last scallop-edge to edge. See photo.
On the front/back piece ONLY score bottom. On side pieces score both side AND bottom.
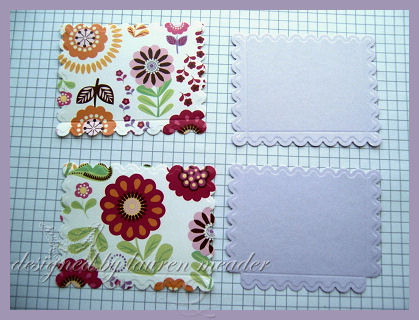 -On the side pieces snip the corner (triangle off)
Step 3
Bend all scored edges FORWARD. Apply adhesive to all bent edges.
Step 4
When putting together-line up the tops scallop to scallop.
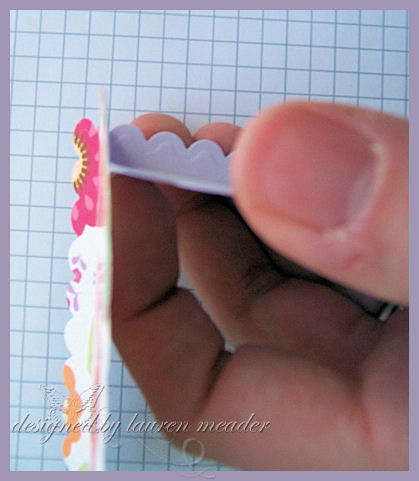
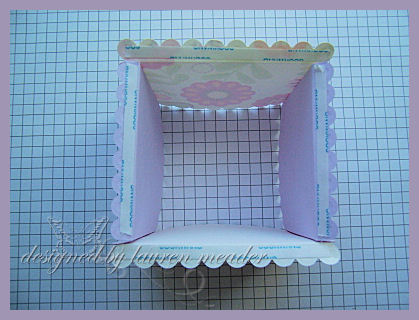 Photo of basket sides together, bottom of basket.
 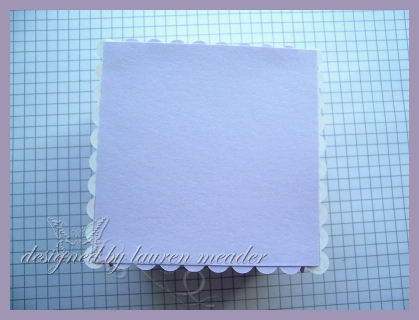 Bottom attached.
Using the LARGEST scallop rectangle, it turns out to be 3 1/2 inches squared, for your bottom piece. It becomes a square due to the way the sides were scored.
Step 5
Add a handle! Just cut about 1 1/4 inches wide by 11 inches long-end will fit perfect. Just put ends on the inside! They will also keep the sides from buckling in ![]()
Here is our finished basket!
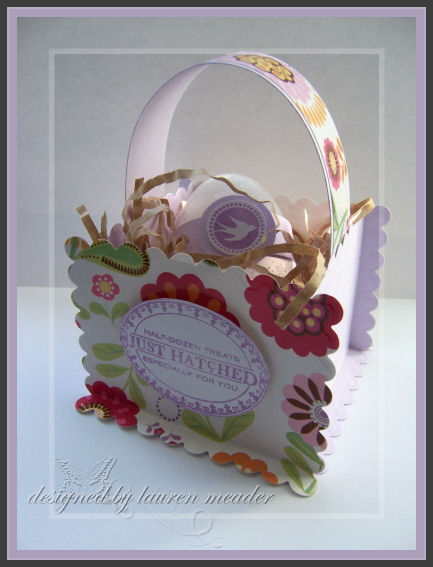 Flowering Treats Basket
Now here is a close-up of my CLEAR-glitter egg! I found it an our local $1 spot! 12 for a $1.
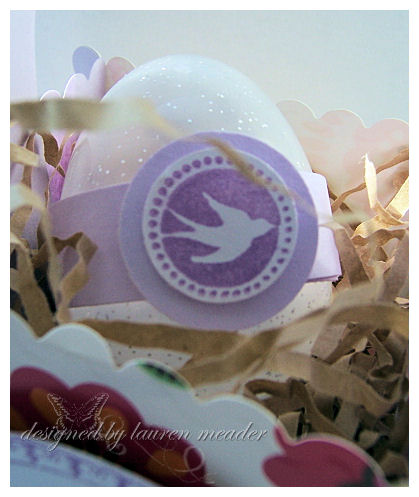
I added a band to it, and used the bird from Just Hatched. Its the perfect thing for hiding the closure, and easily slides on and off. That means REUSABLE!
Please ask any ?’s you may have here, and I will edit to answer.
If you give them a try-well send us a link here so we can all view YOUR version.
I am making these for ALL my kids classmates-which turns out to be 36 baskets! I am also giving myself plenty of time, since Easter is ABOUT 4 weeks away. That is only 9 baskets a week. I could do 3 every other day. Very workable.
NOW onto mu blogger’s challenge! WHEW! Are you still with me???
We had to use a layout on page 42 in the SU! Catalog for our card.
Well, while using this paper I decided a card to match my basket would be PERFECT!
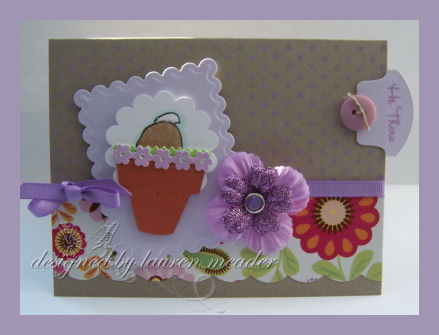
So, I used the bunny image from the New! Eggstra Special Easter, and stamped him-upside -down. I also used Essential Sentiments for the sentiment, and the Behind the Scenes bkgds as well.
I used my Sizzix flower pot die, and created a flower pot for his butt to pop out of. I got this concept after seeing some Whipper Snapper images at a store. I wanted the stamp-but figured I was better off making my own, with my already owned, cute set.
The bunny is flocked. So looks all soft and fuzzy in person.
I used some Doodlebug Paper frills for the pot flowers.
Added some Prima’s and DONE!
Well that is all for today! WOW! What a LONG post. I hope you enjoyed it though.
I would like for you to try out the baskets as PART of my Saturday Sketch.
Speaking of which I better get working on that 😀
Till tomorrow!
SO what did you think of the reveal? I can’t believe its over. I doesn’t feel real.
Pretty fabulous stuff huh? I couldn’t get into the forums at all. Insert sad face. I would have loved to chat it up with all of you. Oh well. That what happens when you get a bunch of PTI starvedwomen on one site right-LOL!
If you wonder which stuff is mine-it was posted under gallery administrator. Just a last minute glitch. Im sure it will be fixed soon. Im sure you figured it out anyway, but just thought I’d let you know all the same.
Wait till you have the new things in hand. The ribbon is to DIE for! Seriously. The colors are gorgeous. I can’t wait to play mor with the new colors.
I noticed my friend Tracey Cuccia, and Elisabeth Neumann got an honorable mention! YEAH! Cyber hi-5 girl!
Congrats to the winners and other honorable mentions. I never know HOW Nichole can pick from all the amazing samples she must get. AMAZING.
So speaking of samples here is my Just Hatched project.
Feel free to ask any ?’s. I will edit to answer any here.
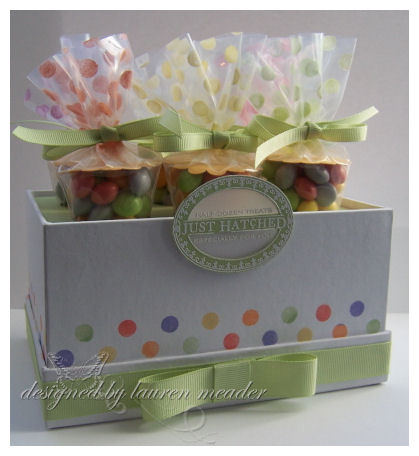
This is my Candy Carrot Box.It is suppose to look like the perfect Candy Garden!Just pluck a candy carrot from the “ground” and you have the perfect treat.
When filling these “carrots”, the possibilities for a themed garden is endless.
This box is a great size. You will notice that I stamped a border, using an image from the Polka Dot Basics set. The box has a matte finish and takes the ink beautifully.
I used various versamagic inks on the project. Kept it clean and SIMPLE!
I stamped my sentiment in versamark onto celery cardstock AND vellum cardstock. I them embossed with white EP.
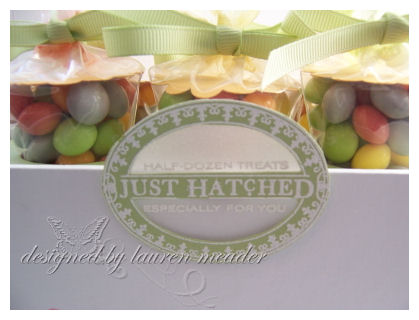
I used a hobby blade to cut out the center pieces, so that the vellum would be seen through the green overlay. A cute way to use the sentiment.
Because my carrots stick out over the top, I put my lid underneath, then decorated with wide grosgrain ribbon
I covered my insert with a celery cardstock, to look like “grass”. Just measure the insert, then trace the holes on back of piece, use the 1 3/8 circle punch-DONE! I moved the egg hole insert, up, and adhered with redline tape.
For the carrots-

I cut down disposable frosting bags, to about 6 inches. I used the polka dot images to stamp the tops of my bag’s with white stazon. I used my Poppin Acetate technique found —>HERE. It really helps take those PLAIN bags, and give them some POP!
I quickly brushed on Pebbles Inc. shimmery pastels, while StazOn was still wet. This made the bag tops co-ordinate with the colors of my candy, and border.
When I filled the bags (I used tropical Skittles) I then punched a scallop circle from a Apricot piece of cardstock-so from the top, the appeared to look like carrots. Tied with celery ribbon and done.
Candy Carrot Garden-Supplies from www.papertreyink.com
Supplies-Just Hatched egg box
Stamps-Just Hatched, Polka Dot Basics
Ink- White StazOn, Versamagic
versamagic ink in Aloe Vera, Spring Pansy, Thatched Straw, Pink Grapefruit and Persimmon
Cardstock-Celery, Cardstock Vellum
Ribbon-wide/narrow celery grosgrain
Disposable frosting bags
White Detail embossing powder
Hobby blade, heat tool, 1 3/8 circle punch, scallop circle punch
Pebbles Inc Shimmery Pastels
Well I hope you liked my version of the Just Hatched boxes. They really do have UNLIMITED possibilities.
Im off to prepare another tutorial for you all, and hopefully work on my blogger’s challenge!
Be back soon.
My Etsy

Who I Designed For
Blogroll
- Alicia
- Alli Miles
- Ally Blankenship
- Amber
- Andi @ crafts on a whim
- Angel R
- Angie Z
- Anne Kranitz
- Becky O
- Bee
- Beth Silaka
- Bethany Paull
- Beverly Nash
- Bobbie
- Cambria
- Cammie
- Card of the Week
- Card Positioning System (CPS)
- Cards for Cancer
- Catherine Doucette
- Charmaine
- Cheryl Sims
- Chriss Rollins
- Christina
- Christine Ewing
- Christine Wooden
- Colleen Schaan
- Craft Critique
- Craft Gossip
- Crystal
- Dawn Easton
- Emily Giovanni
- Geny
- Holly
- Igne Groot
- Inspirational Craft Blogs
- Irene
- Jami Sibley
- Jeanne Streiff
- Jen del Muro
- Jeni Bond
- JenMarie
- Jenn Balcer
- Jenn Diercks
- Jenn O
- Jennifer E
- Jennifer Mick
- Jennifer Pereda
- Jennifer-Sweet Treat
- Joanne Basile
- Jodi Collins
- Julia Stainton
- Julie Masse
- Karen
- Kathryn Berthiaume
- Katie Cotton
- Kelley Holland
- Kendra
- Kim Scholfield
- Kris’s Color Stripes! Get inspired here
- Kristen Dubosque
- Kristin Eberline
- Kristine
- Laura @ Sunshine Stamper
- Laura Turnmire
- Laurie Schmidlin
- Lesa Rapp
- Linda Duke
- Linda-LSN
- Lindsey Botkin
- Lisa (lakind scs)
- Lisa Kind
- Lori Craig
- Maggie
- Mara Campbell
- Maria
- Maria Levine
- Mary
- MaryJo
- Melanie M
- Monique Hansen
- Moxie Fab World
- Pam Imholz
- PaperCrafts Connection
- Peppers and Pollywogs Kids party site
- Rebecca Grohall
- Rita
- Robyn
- Rose Ann
- Sarah Vrolyk
- Sharon Harnist
- Sharon Johnson
- Sharon Rivera (a chemisrty with paper)
- Sherrie
- Sophia Landry
- Storage Units, Ink, & More Blog
- Sue Berker
- Susan (Rainy)
- Tangii Crane
- Tracy
- Tricia Traxler
- Trudee
- Velta
- VivLyn
- Zena
MTME Pretty Palette Color Team
MTME Pretty Patterns Sketch Team
My Time Made Easy TM LLC
Shop till you drop!
Lauren Meader
About Me
Copyrighted material
Subscribe To My Blog
Pages
- About me
- Alexa’s Story!
- My Crafty Corner!
- My Time Made Easy™ LLC
- Our Make A Wish Trip to Disney!
- Resume/Publication List
Calendar
| M | T | W | T | F | S | S |
|---|---|---|---|---|---|---|
| 1 | 2 | 3 | 4 | 5 | ||
| 6 | 7 | 8 | 9 | 10 | 11 | 12 |
| 13 | 14 | 15 | 16 | 17 | 18 | 19 |
| 20 | 21 | 22 | 23 | 24 | 25 | 26 |
| 27 | 28 | 29 | 30 | 31 | ||
Archives
- August 2013
- July 2013
- June 2013
- May 2013
- April 2013
- March 2013
- February 2013
- January 2013
- December 2012
- November 2012
- October 2012
- September 2012
- August 2012
- July 2012
- June 2012
- May 2012
- April 2012
- March 2012
- February 2012
- January 2012
- December 2011
- November 2011
- October 2011
- September 2011
- August 2011
- July 2011
- June 2011
- May 2011
- April 2011
- March 2011
- February 2011
- January 2011
- December 2010
- November 2010
- October 2010
- September 2010
- August 2010
- July 2010
- June 2010
- May 2010
- April 2010
- March 2010
- February 2010
- January 2010
- December 2009
- November 2009
- October 2009
- September 2009
- August 2009
- July 2009
- June 2009
- May 2009
- April 2009
- March 2009
- February 2009
- January 2009
- December 2008
- November 2008
- October 2008
- September 2008
- August 2008
- July 2008
- June 2008
- May 2008
- April 2008
- March 2008
- February 2008
- January 2008
- December 2007
- November 2007
- October 2007
- September 2007
- August 2007
- July 2007
- June 2007
- May 2007
- April 2007
- March 2007
- January 2007
Categories
- About Me
- All That Scraps
- blogger challenge
- camera/photo play
- Cards
- Contests
- family stuff
- FOR SALE
- Home decor/3-D items
- How to FAKE it!
- Introduction
- JUGS Challenge
- JustRite Stampers
- Lizzie Anne Designs
- My family stuff
- My Stamping Space
- My Time Made Easy
- My Time To Color Challenge
- My Time to Create Challenge
- My Timeless Template Challenge
- My Timeless Templates
- Mytime Mail
- MYTIME MOVIE/VIDEOs
- Papertrey Newsletter
- Pink Cat Studio
- Pretty Palette Challenge
- Pretty Patterns Sketch
- Product Opinions and Must haves
- Recipe's
- Saturday Sketch
- Smilebox Creations
- Stampavie
- Tutorials
- Uncategorized
- videos
Most Popular
- Create your own Onesie Card Tutorial-and important NOTE! PLEASE READ (2529)
- Saturday Sketch-Boxed bag holder (2333)
- Going GREEN! Fancy Flower Flourish-Closure Video (1478)
- Fabulous Favorite - Giveaway! (1336)
- a Prayer Request (1232)
- QUICK-Easter Baskets from Nestabilities-PTI style-and blog challenge (1063)
- Teaser Sketch (999)
- February Release Giveway! (and a little peek) (996)
- Group Post and Rambling Rose Video Tutorial (985)
- GIVEAWAY! Who wants it all?! (895)
Recent Comments (RSS)
- Daya Sons: Daya Sons, a renowned manufacturer
- 첫충사이트: 완전히 흥미로운 블로그 게시입니다. 저는
- sarah: Wow, Lauren, what a stunning
- hedie: خرید راهبند
- 야동: Love to read it,Waiting For
- 야동: This seller is in a
- 바카라사이트: 여기 처음 왔어요. 나는이 게시판을
- 야동티비: I was surfing the Internet
- 바카라사이트: 비슷한 주제에 대한 흥미로운 정보를
- 바카라사이트: "여기에 제공해 주신 귀중한 정보와
Copyright © 2007 - My Time, My Creations, My Stampendence - is proudly powered by WordPress
This blog has been Tweaked and Designed by Sara Williams