Archive for the ‘Home decor/3-D items’ Category
Yummy Treat quick bag
Dec 17, 2007 Author: mytime | Filed under: Home decor/3-D items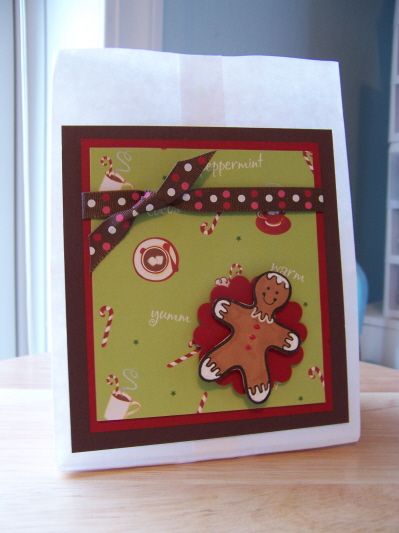
This was a super-dee-duper QUICK -bag cover I did in the morning, cause I forgot a group of secretaries that I wanted to give yummy treats to. I was WAY short on time, so it was perfect. Once filled I just stapled shut. Nothing fancy.
It took like 7 minutes-only because of the cutting and coloring. Not everything can be over the top KWIM?
The set is Holiday Treats by ACWP. I really love the cookies and whatnot in that particular set.
They are now having a pre-order—–> HERE, on 3 new Valentine themed sets. I don’t have mine yet, but when I do, watchout! LOL!
OK I gotta run. I’m whipping up so cool stuff to share so stay tuned 😀
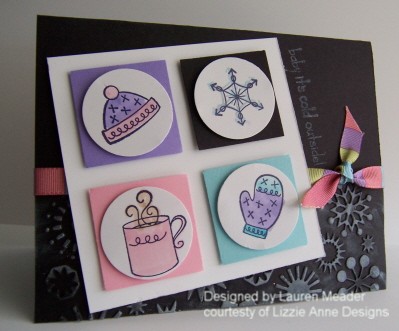
Baby its cold outside- a Saturday sketch
Dec 15, 2007 Author: mytime | Filed under: Home decor/3-D items, Saturday SketchYEAH! Its Sketch time! Hope you are not FREEZING your hiney off. Its so cold here, and we are expecting a MEGA storm. I swear I am stamping today! I’m beginning to shake LOL! I think to its the busy time of year. I have most our wrapping done-Jason has been responsible for SENDING our Christmas cards-and you know what, they are still sitting here! GRRRR! I swear I will NOT mail them, I swear.
Daisy is doing great-when Jason tries to take her she want’s me-so she now has her own bed in my stamp room. I just need to pray I dont drop an acrylic stamp 😀 Thanks again for letting me share my Daisy love 😀
She is definitely sleeping throught the night-no problem-o! Just a little crying when its potty time to go outside. I got her the cutest sweater, and will share those photos soon.
I still have to do Amber’s Smilebox-from her Christmas Dance Recital. I really need to show you the video portion its so stinkin cute.
I have my usual Papertrey Ink release party, hangover! LOL! I LOVE when a company release falls on a weekend! The worst part of it was, I was in such a flurry to buy what I wanted that I missed the 1/2 set ($5). I then went back and ordered it, and had to pay the $5.50 S/H.
Can you believe that? MORON! I’m so mad at myself. I should have taken my time, but NO! I had to get it in there asap. How about you? Did you get anything? Did you do the math contest? OK I totally got the wrong number cause of some of the questions, but that’s ok. I HATE math! It was a fun and stressful game all in one. I was typing as fast as I could. CRAZY!
Leave it to Nichole Heady to get us all going nuts. Too funny.
Oh well.
WHEW! OK card time.
 BRRRRR!
Well if you got your recent issue of Craft’s n’Things then you have something I don’t! LOL!
I hear I have 6 or 7 cards in there :D. I KNOW this is one of them, and it was my favorite! The set is Christmas in the City
So I am using THIS for the Saturday Sketch today! I CANNOT figure out how to do a slanted rectangle/square, so this is your template.
ANOTHER great way to use those SMALL images.
I colored these on glossy cardstock, with SU! Markers-back in the day before I had Copic’s!
I think its so cute.
I want to share another project that was published in last months issue of Craft’s n’Things!
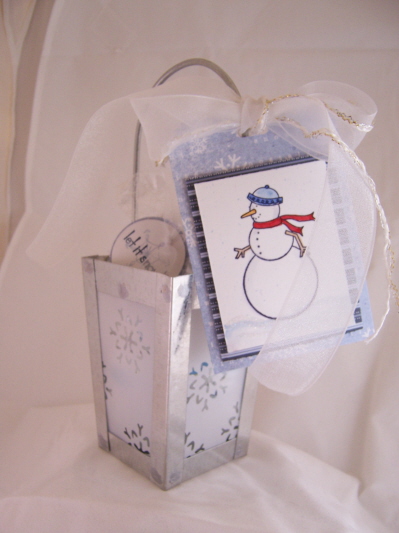 Lindt Chocolate Lantern
I loved this little tea light lantern when I saw it last year at Target. I still have 6 left to use for gifts 😀 Someday. You know the hoarder in me, wants to keep them for myself, forever.
I removed the top portion. Inside is a bag of Lindt Chocolates! I stamped the snowflake image on the bag.
It can later be used as a tea light (remove the ribbon/tag).
I used Vellum Cardstock, and punched the snowflake image on each panel. I put the vellum in FRONT of the glass panels-so they don’t catch fire when a tea light it lit.
All the details are in the magazine. I just wanted to share it with you here today 😀
So I will have some super cute stuff over the next week to share, if I get what in my head, onto paper.
So stay tuned 😀
Can you believe Christmas is next week? Where does the time go?
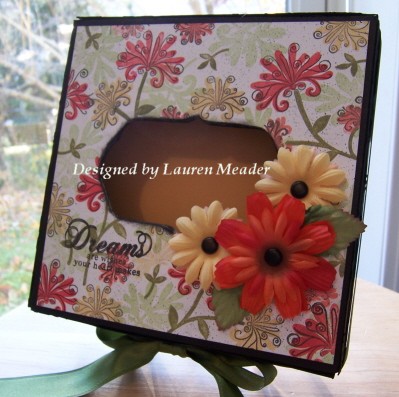
Pretty Papertrey Patterned Paper-Gift Ideas
Dec 6, 2007 Author: mytime | Filed under: Cards, Home decor/3-D items, Tutorials
So WHO jumped on the Cigar Box wagon with me? Or the Spiral Bouquet Wagon? Or the stationery kits, and monograms?
Then you don’t need ME to tell you they are AWESOME!!!
I haven’t made my won patterned paper in EON’s (a word my mom uses frequently, and now that I’m getting old I find myself turning into her)! It means a LONG time. It was fun to do that again.
I found it really easy to do using the new PTI set. The possibilities are just endless. Do I sound like an info-mercial? I’m not trying too, seriously!
So I am going to share a few samples with you doing just that-making my own patterned paper with Spiral Bouquet!
I also have another gift idea/template! YEAH!!!
All the items/stamps used are already linked in the above paragraph 😀 Unless noted.
OK FIRST up!
The Cigar Box
 Autum Bouquet
I think this is very fall. I have to try to remember that SOME women just don’t do pinks, and purples-SHOCK!!! LOL! I will say I am in LOVE with these colors! It’s good to step outside my normal range one in a while eh?
They are- celery, olive, banana, saffron, coral, and guava-with a splash of balck that really makes this POP!!!
The ink was all versamagic ink-but I listed the compared SU colors for you to understand 😀
The sides of the box are in black cardstock, and were run through my Cuttlebug with the Stylized Flowers embossing folder. I tied around a large Olive Satin ribbon from May Arts. The flower’s are by Making Memories, and Bazzil as are the black brads.
I sponged all the edges in black, and then spritzed with my color spritzer. This is the box to house a yet to be created Monogram note-card set. I’ve been out of commission-so thats is my excuse for not having a view a of it first. But I didn’t think you wanted to wait to see it!
I adhered this stuff using myATG Gun.
Next up-G is for Grateful.
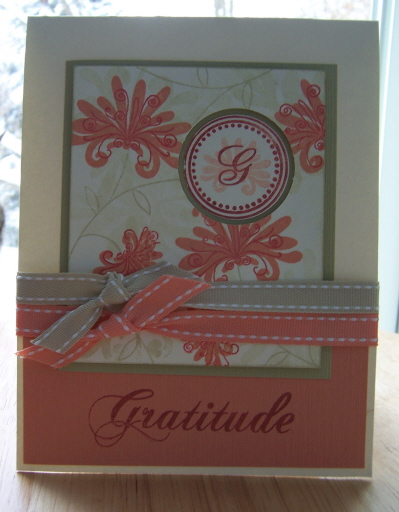
You don’t have to use the monogram’s sets, JUST for monogram’s ya know 😀
I love making sets like this. If the person’s first/last initial happens to match then that is pure GENIUS!!! Unfortunately for me-this is not the case. But I think 6 of these as a set is a great gift for those Yankee swaps and whatnot. Especially when they have a $5 value. If its more then I do more. People usually fight over my sets when Jason brings them in 😀 That makes me all warm and fuzzy. I am always told they re-gift it, but I am taking that as a compliment! Try to keep it SIMPLE.
So this set, is another with earthy colors. I so LOVE the color River Rock. Its really beautiful. Funny because I thought it was HIDEOUS when I saw it in the catalog! LOL! Now lookie who loves it!
These colors are river rock, wasabi, guava, and ruby red. SURPRISINGLY Pretty aren’t they?
What I love is the fact that the circle cut out reveals the under layer, and the inner circle is on dimensionals. A new thing I have been doing, and I just love the look. In person its very striking.
Now what you may have been waiting for!
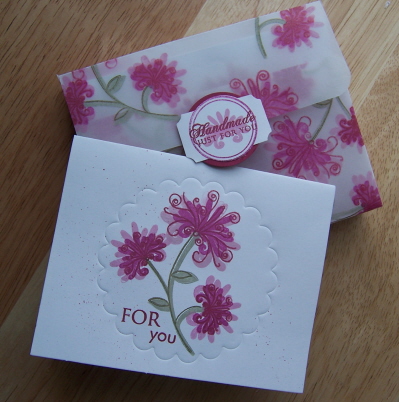 Notes- For you.
Quick and simple note card set! The “For you” is PTI-Paper Tray set.
I bought these little notecards/envelopes at Walmart- $1.89 for a set of 8.
I decided to make a quick set of these, with a vellum cardstock holder. Vellum gives it an elegant touch I think. I certainly could GLAM it up, but chose SIMPLE. I asked Amber’s teacher what her favorite color was. She said pink and purple!
YEAH!!! So this is Lilac, Peony, and Merlot ink. Its all colorbox chalkink for this one. GORGEOUS colors in person-I swear.
I just took mylarge scallop nestabilitiy, and made my scallop frame. It steps this simple card up form plain Jane, to a WOW I think! Again for a splash of color I spritzed it with my color spritzer. I did 8 of these in a 1/2 hour. Due to the framing, and 3 step stamping.
I then decided to create a holder.
Now you need to note my holder is for cards that are sized 4 3/4 X 3 3/4.
Click to view larger image
So there you have my latest Paper Trey stuff!
I hope to do more. We shall see 😀
Hope you enjoyed.
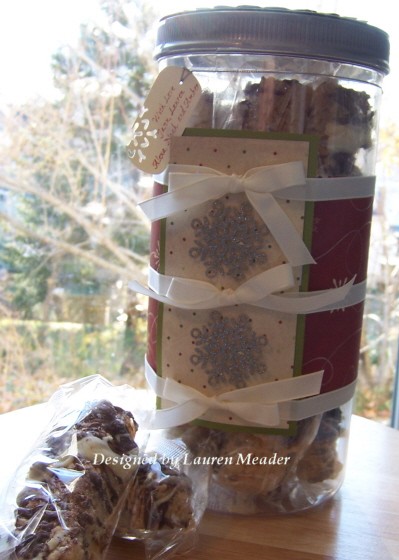
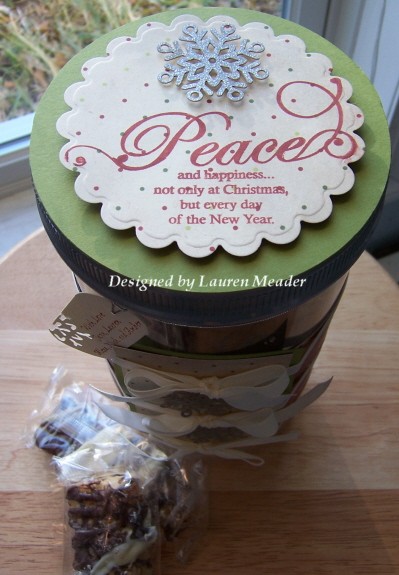
Winter Wonderland Dreams
Dec 4, 2007 Author: mytime | Filed under: Home decor/3-D items, UncategorizedI may be out of commission, but I still have stuff to share! Make sure you check back later cause I have MORE stuff, plus info on the MFT Stamps New Release party tonight 😀
Winter Wonerland Dreams
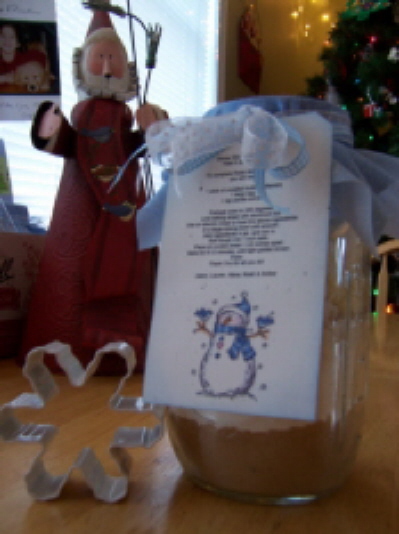
Love gourmet cookies? Think white chocolate, coconut, and macadamia nuts.
Last year I made these cookies in a jar. I cannot even tell you how many emails I have received asking for the recipe! Even THIS year. I got the cookie holders at the dollar store, and were a nice touch I think.
I heard back from every recipient that they were YUM-AZING!!! (another Lauren word!). This is a gourmet yummy cookie. It won’t disappoint. I will say the ingredients are a little more pricey than some cookies in a jar, but it makes a great gift since they aren’t your run of the mill type of cookie in a jar gift. Great for the Hostess of a Holiday party or teachers, and teacher’s aides! I gave them out to a dozen people, and were a HUGE hit!!
Sorry the photo is small and blurry-it was when I was an newbie camera moron! LOL!
So here you all go!
———————————————————————————————————
Layer bottom to top, and pack down each layer tightly!!! It will fit snug! Make sure you use the BALL canning jars, so you can seal this AIRTIGHT, to ensure freshness!
1/2 cup packed brown sugar
1 1/2 cups of all purpose flour (mix in 3 TBSP white sugar,1/4 tsp salt, and 1/2 tsp baking soda, 3/4 tsp baking powder)
1/2 cup of chopped Macadamia nuts
1 cup of white chocolate chips/chunks
1/2 cup of flaked coconut
Then cover with fabric, and print your tag!! Leave some room to stamp your image 😀
Due to my computer challenged nature, I have NO CLUE how to attach a file for you to download and print! Maybe someday I will learn! LOL! You can copy/paste this to your word document! 6 should fit per sheet of cardstock!
This is what you will need to include on your jar so the recipient knows how to make it, and what is left to have on hand.
——————————————————————————————————————–
Winter Wonderland Dreams
Yield 2 dozen cookies
To complete these delightful cookies
you will need:
1 stick of unsalted butter (softened)
1 large egg
1 tsp vanilla extract
Preheat oven to 350 degrees.
Line baking sheet with aluminum foil.
Use an electric mixer to beat the above ingredients
in a large mixing bowl until smooth.
Add ingredients in jar, and mix in.
Roll dough into 1 inch balls.
Place on cookie sheet 1 1/2 inches apart.
Bake for 9-12 minutes, until light golden brown.
Enjoy
Thank You for all you do!
——————————————————————————————————————————————————————————————————–
Who says!
Nov 30, 2007 Author: mytime | Filed under: Home decor/3-D items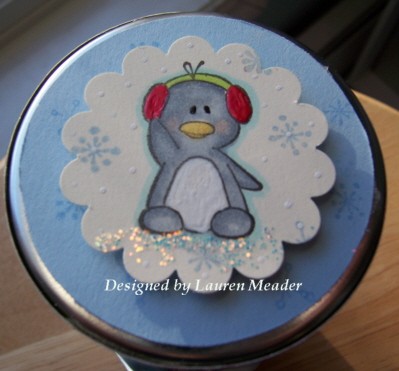
Who says you can’t get the FLU from the Flu shot?
Cause they need a SLAP! LOL!
Seriously. I took Alexa for her Chemo on Wednesday-about 11:30 am, while she was in Pain Free, I got my FREE Flu Shot. She is doing well thanks for those who asked :D. Noah has yet another tummy bug-YUCK!
Its really important that our family have this for Alexa’s well being. I haven’t gotten one in 3 years! I was so excited (yes excited), because then I didn’t have to make an appointment, drag 3 kids, pay a $15 co-pay, to then eventually somewhere between 10-12 hours later GET THE FLU!
Yes you read it. I have the FLU. Spent the day SICK in bed. I’m dying over here. By dying, I mean of BOREDOM. You all know me and sitting around doing nothing, and I, are not FRIENDS.
I was so sad cause I didn’t do my penguin projects, or blog challenges NOTHING :C But I am hoping to feel better to get something done. Don’t worry, I still got “stuff”, just not what I wanted.
OK I also want to say that ” YES! I will do a tutorial on Lucky Sledding!”. Maybe Sunday-ish depending on how long this kicks around.
But never fear, I do still have penguins. Keep scrolling.
The BEST part was presenting the gifts I made this year (Alexa isn’t due back till the day after Christmas so I brought them now).
People were so sweet and appreciative! The most amazing thing! They had already hung up the snowman ornaments I made for them LAST year!!! They put him up in Nov. and keep him up till March’s end! Each one of them got one. I was so touched by the fact they still had him, and didn’t chuck him! LOL! They say they get loads of compliments on them 😀 YEAH!
And you can bet no sooner was the rice crispy treat container presented , it was opened and devoured 😀 It felt great.
The doctor’s went CRAZY for the monogram notecards 😀 More so than the card assortment I gave them last year (was my stamping that bad last year), with a altered Altoids tin and a Border’s gift card! So see, its the way to go!
Now to the penguin
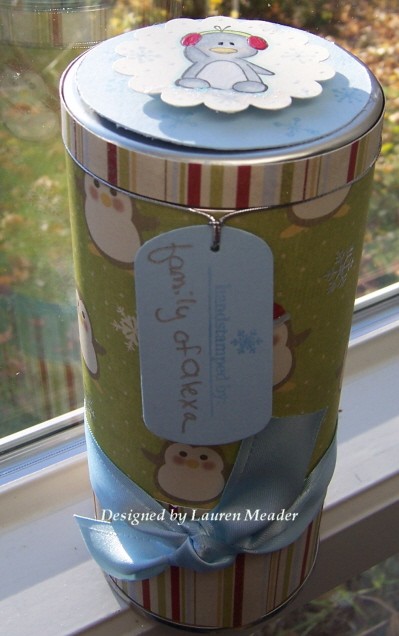 This is a Tea Tin, that I altered for the nurses in Pain Free! IGNORE the writing! I have horrific handwriting-that is why I have a personalized name stamp 😀
Now lookie what was inside!!!
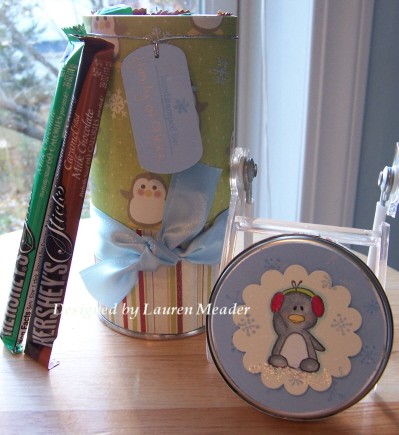 Yummy mint and caramel Hershey’s Sticks! I had to test a couple just to make sure they were worthy of giving. Yes, they were! This tin fit 2 boxes of the sticks.
This is the penguin from the Wintertime Fun set. Is he not adorable? The paper I want to say is by Imaginese??? It inspired my design. You can see the close-up view of the top at the top of the post.
So it was a HIT!
I have so many holiday tips and ideas to share, so hope I can squeeze them ALL in over the next 26 days!
Sorry Im not all chipper-its hard to be when you feel so BLECH!!!!!!
Till tomorrow
Ghirardelli Gift Wrapper !
Nov 28, 2007 Author: mytime | Filed under: Home decor/3-D items, Tutorials, UncategorizedOk let me be straight with ya!
I LOVE making my own boxes, and giftlets (thats my lil word for them).
So if you visit me here-especially like the past month-you will see I have made alot of different styles of gifts, and boxes or bags. I TRULY believe it makes the simplest things WOW people. It also shows how much time and effort went into the easiest gifts.
I know BLAH BLAH BLAH-but to me its SO true.
I also figure I have saved quite the penny on designing the holder’s that I do. Plus I have FUN doing it. People are SHOCKED when they find you not only MADE it all, but designed the box as well. Sometimes the gift doesn’t live up to the packaging right! LOL!
Today I am sharing a FAVORITE of mine. Rather a lightbulb moment.
I LOVE chocolate! What woman doesn’t right? If you don’t, don’t admit it here! We chocolate lover’s DONT GET IT! NEVER will.
Anyway, alot of people seem to like the Ghirardelli Chocolate squares (as do I – raspberry filled being my personal fave, GODIVA Raspberry Starfish-Oh HEAVEN!!!!), as they come in quite the little assortment now! So I got several assortments.
I bought some-on sale $2.33, for a good sized bag. I thought how YUMMY they would be for my mail woman or Jason’s co-workers. I don’t know how about ANYONE that breathe’s. Just a great little gift PERIOD. Any occasion.
I also thought-I can’t just leave them in this bag. I wish I had a cute lil box-AH HA! Thats when it hit me.
MAKE ONE!!!
So I did. I got out my Scor-Pal (yes I use it THAT much), and away I went scoring like a fiend.
I wanted it to house 10 little squares. Obviously the box can be altered for more or less, but 10 was good for me.
So I did all the necessary measuring, and came out with THIS (PS the ribbon really does match in person)
 LuLu LOVE’S Chocolate.
This box uses a stamp set that is NEW from C.C. Designs. The New! Little Bits Kits that sell for ONLY $11!!! This set will be on sale the 7th. Oh and wait till you see them. WAY too cute. I have more coming with them, so stay tuned. I’ve truly fallen in love with Lucky and LuLu!!!
I HAD to use my NEW! Large scallopnestability. You can see that it really makes any single layer SPECIAL.
I used the raspberry wrapper to draw my color combo from. Inside this are 5 raspberry, and 5 caramel squares.
Colored with myCopic markers (of course, what else right!! Hey I get my monies worth), and added strawberry ice stickles to the trim of the coat. You can’t see by the photo, but I also used my Atyou Glitter Pen, to make it all glittery.
HINT-honestly you don’t NEED all the coolors of the glitter pens! Just get the CLEAR one! It doesn;t change the color you put it over-just gives it a perfect touch of BLING. So, save your money for the ACTUAL Copic’s!!!
I stamped the window sheet with Snowflake Serenade by Papertrey Ink, in white Stazon. I filled in the bare area’s with the little snowflakes that come in the Little Bits set.
Here is the template-click for larger view. WAY TOO EASY.
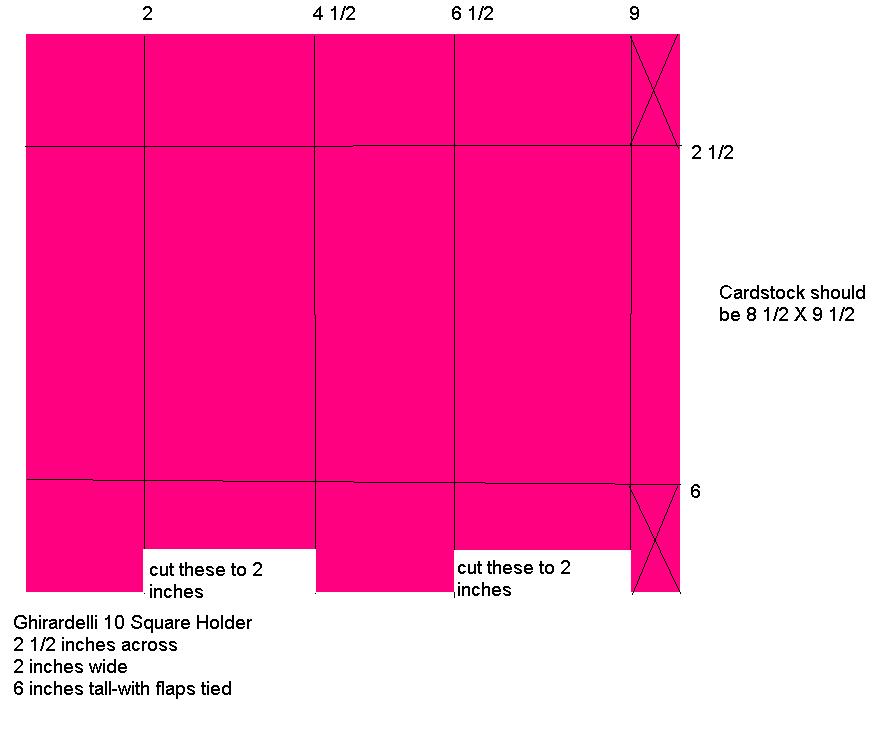
Score per the guidelines.
On the bottom you will cut down the 2 flaps as shown, so the box will fold together perfectly.
Not for the top. the 2 side panels fold down (I secured them with my tape), and the front and back flaps are tied together. EASY PEASY!!
Any questions, let me know. And send me the link HERE if you try it out.
Now here is what Ilike to think of the same idea-only ALL occasion!
 Spiral Blooming square holder
Isn’t this so pretty?
I used ALL the same elements as above. I just made it EVERYDAY themed. This was done using the Papertrey Ink set Spiral Bouquet (LOVE IT)!!!
I stamped the flowers on the box and used my Poppin Acetate technique—–>HERE, for the design. My Pebbles Pearlescent pastels were PEFECT for the extra shimmer on the box. I also outlined the flowers with my atyou glitter pen, but didn’t capture it well in the photo. Oh well.
OK another rambling post.
Maybe this will be JUST what you needed for an idea for that “someone”.
Enjoy the day. The week is HALF over.
Stay tuned tomorrow-MORE ideas 😀 FUN FUN
The good and the bad of today
Nov 27, 2007 Author: mytime | Filed under: Home decor/3-D itemsI had a crazy day of running around.
Kids-ready for school, trip to Target, post office (my favorite place-NOT), get gas, buy my coffee-blah blah blah
I also had a parent/teacher meeting for Alexa on top of it. She is doing well, so thats good. She is loving school. I am SO happy we held her back. Great group of kids and she has confidence in herself. That is very good news.
Tomorrow Alexa has Chemo, bright and early. Eh? bad news?
The other bad news (cause is Chemo really good news? Well as long as she stays cancer free than I guess its good news-anyway).
She will have her intrathecal infusion (AKA chemo is put directly into her spine) meaning we are going to Pain Free, which is a LONG day-lots of puking and exhaustion.
Also meaning I didn’t make them (nurses and whatnot) anything yet, cause I thought pain free was DECEMBER! How did I get that wrong???
YIKES!!!
So I spent the day making MORE altered goodies!
Now thats the GOOD news-for you! You can see what I did.
More BAD news-
You all must be LOVING those chocolate covered rice crispy treats from Archer Farms I post about, cause there was only ONE container left!!!
That last part is the good news- I went into PANIC mode, then found ONE. Um, thanks to whomever left that one behind.
I was going to make a neat-o holder but then said DUH!!! The container itself is PERFECT! Why bother-you got enough to do, and need to give them every last one! It will be hard to say goodbye to those! But I am trying to be good-not doing to great BTW. But like Scarlette O’Hara always says “tomorrow is another day”.
So here is the LOVELY DELICIOUS and Oh so Fabulously decorated treat container
I just got some GORGEOUS paper by Imaginesce??? Sorry dont remember. Anyway-it has a silver flurry following the snowflakes. I had these gorgeous glitter 3D snowflake stickers (by Hot Hues- Target) for 2 years! The time had come to say goodbye.
Now that panel was done to “cover” the seams of my paper wrap job. I thought the ribbon enriched the look.
Its all very shimmery and sparkly in person.
Here is the top
The stamp set is Papertrey Ink Snowflake Serenade. PERFECT!!!!
I used my large scallop circles nestability for this topper.
Notice the tag-it has a personalized name stamp on it 😀 Easy signing!!!
I loved the punched snowflake in the corner too.
Anyway-I guess the point is they are just gonna eat them right?
Can I at least HOPE someone will fight for the container? That would be GOOD news.
They can re-gift it!
Oh the horror of it being TRASHED. Now that is VERY BAD news
Anyway-I have some more cute stuff that I will have ready to post tonight. So check back with me OK!
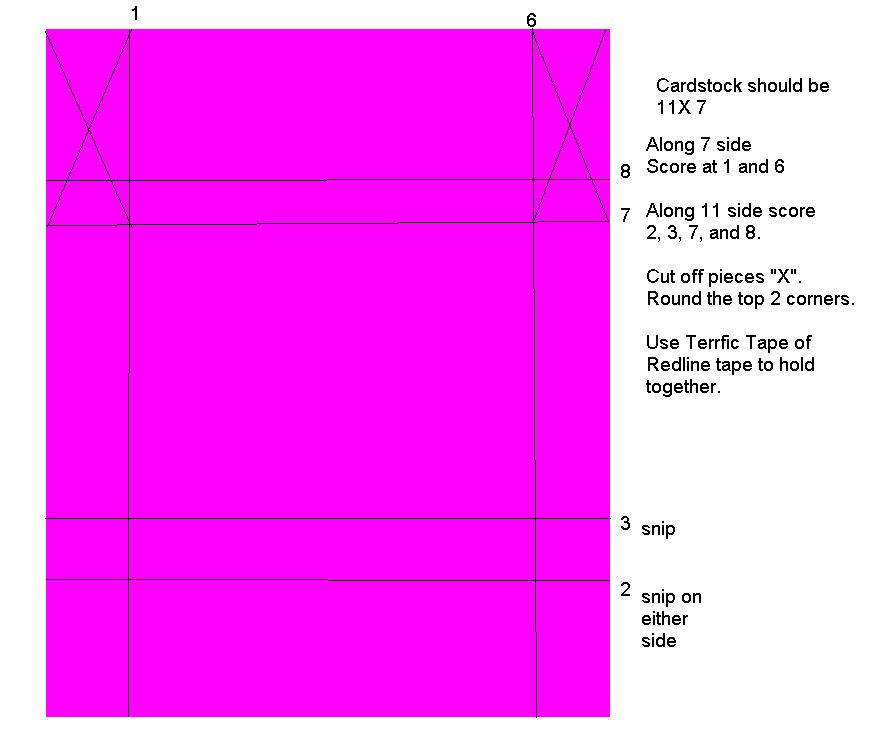
Dress it up! SIMPLE Box Holder
Nov 26, 2007 Author: mytime | Filed under: Home decor/3-D items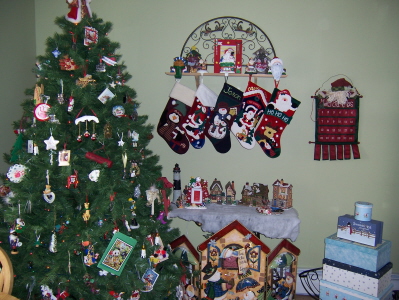 We put up our Christmas tree!
I love watching the kids get so excited over it. The BEST part about our tree-MOST of the ornaments are ones made BY my kids! I love it!! Its like the TREE OF ART! I think they feel special seeing all their little creation’s hanging from the branches.
Popsicle stick reindeer, felt mouse candycane holder, plaster of paris BLOB with glitter, felt trees with sparkles and jewels, decoupage ornaments a plenty-Now those are real ornaments to me.
I also love that each child gets ONE special ornament each year. Some are nicely engraved, and others serve as reminders of their favorite interest-like Bob the Builder-Barney LOL! Stuff like that. Alexa got one last year that was a gorgoeus butterfly for support of Cancer Research. Noah got Sponge Bob, and Amber a cool Cat one.
You will not find glorious glass ornaments or victorian style fancy baubles. Just cardstock my kids decorated with glitter-or that have their handprints.
To think someday it iwll just be Jay and I at home. I am so trying to enjoy this time while they are little. I am really happy that I can stop and soak it all up!
OK I’m getting all mushy thinking about it, so anyway………
Now speaking of tree’s…………………………
Is this not YUMMY?
These are chocolate peppermint candy canes by Hershy. YUM! LOVE the colors, and they taste awesome too.
But, I wasn’t talking about the candy canes, I was talking about the holder! 😀 Another SUPER SIMPLE idea to package those holiday goodies. Think homemade cookies, or other baked good. Maybe some stationary, or cards. Hey- add a top (or not), and you have a card holder! Made in just minutes.
I used Holiday Cheer, for my tree’s and tag. It was seriously perfect. All sides of this holder are decorated. That is important too. Complete the job. A container has more than ONE side!
The rectangle layer of tree’s is embossed with my rectangle nestabilities die, so it adds more interest (not seen in photo). It really makes it possible to not need the addition of a mat of color when you do this. Its elegant and cleanly detailed all on its own.
I think its ALL about PRESENTATION-and just a box of the simplest candy canes can look amazing in the right container. This will go to work with Jason to liven up the office 😀
To make this I used my Scor-Pal –
8 1/2 X 11 Olive Cardstock
score along the 11 inch side at 5 and 16
score along the 8 1/2 inch side at 1, and 7 1/2.
Snip the edges of the 1 inch panel- to make your sides

I got this AMAZING patterned paper at my LSS www.nhstampingmemories.com. Its by American Crafts. It not only matched my Candy Canes, but helped the flow of the color scheme I was after. It also continue’s the RETRO feel.
I also used Old Olive cardstock, SU! Wide grosgrain ribbon in red, and Choc. chip cardstock. I used co-ordinating SU! markers for this as well.
The shimmery shredded paper was a $1 Target find!
How cool is that?
Hope they enjoy it! If anything its at least FESTIVE! Nothing say’s Christmas like candy canes.
Till tomorrow 😀
OK I hope you aren’t sick to death of Christmas stuff, because if you are-then this isn’t the post for you!
I am still whipping up the gifts/cards and ideas! Im doing really good getting stuff done 😀 The BEST part is I’m seriously having a BLAST. Unlike last year when I was rushing around doing gifts. It was “fun” but morestressful. Plus I have ALOT of super cute sets to play with this year to mix it up a bit.
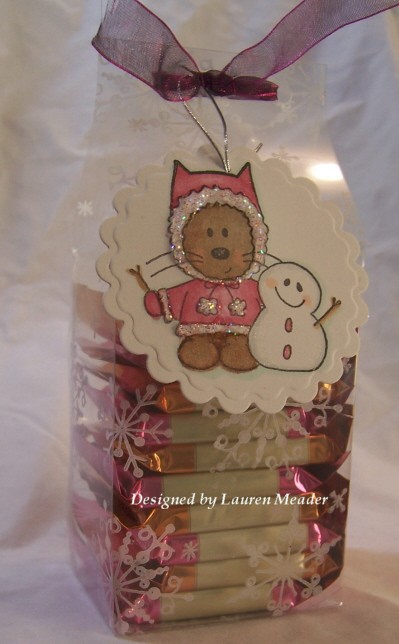
The first box you are going to see ( I made 2 ) is for the Secretaries at school, and at the Oncology clinic Alexa goes to monthly. They are really nice, and should not be forgotten. Inside this box will have some DELICIOUS gourmet chocolate toffee covered pretzel sticks from Archer Farms. You get a good amount for $3.99! That will be just enough for them to enjoy and know they are thought of, again without breaking any bank accounts.
Now this first box-is a Star Box. I got this idea from the Scor-Pal website. Tutorial can be found —-> HERE
It was VERY easy. I had a bit of a challenge cutting my bottom piece-cause I’m not a good trace and cut kinda girl! AND I’m a perfectionist.
 Click to enlarge
Pretty cool huh?
The tag (and card below) was made by using the ACWP -Christmas Cheer set.
Here is the card

How flipping cute is that reindeer? I love him/her. I will need to do something else with it for sure.
I just kept it “simple”. I did stamp, and cut the tree 3 times on different layers of patterned paper. So its very 3D in person. This will go to one of the groups.
Liquid pearls make the “snow”.
Stay tuned, later I will have some more gift idea’s using Lizzie Anne sets, and I have another super cute Bella card 😀
WOW! I never knew how many people LOVE my step by step instructions for things, until I DONT post them! LOL!
I figured most people don’t care.
Sometimes I don’t even get many comments.
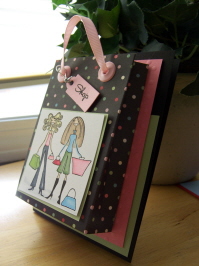
BUT-I cannot even count how many have emailed, and asked for the measurements for the shopping bags-on the cardfront!
So rather than reply to every single one of you, Ill reply here.
Post for card is below this one is below—->HERE.

INSTRUCTIONS:
Cut cardstock 6 X 6
Score at 1/2 inch, 1 inch, 1 1/2 inches, 4 1/2 , 5, 5 1/2.
Then score on other side at 1/2 and 1 1/2
Your adhesive will go on the 3 ends (2 sides, and bottom-it has no back, as the sides will adhere to cardfront) that are scored 1/2 inch. The two other 1/2 inch scores make the sides of the bag.
Have fun!
I’m not getting into all the step by step because you will “see it” as the measurements are scored, just how it all comes together. I am also not posting the photos and whatnot, as Diana (at Scor-Pal) has asked me to leave it for a future tutorial.
Hope this helps 😀
My Etsy

Who I Designed For
Blogroll
- Alicia
- Alli Miles
- Ally Blankenship
- Amber
- Andi @ crafts on a whim
- Angel R
- Angie Z
- Anne Kranitz
- Becky O
- Bee
- Beth Silaka
- Bethany Paull
- Beverly Nash
- Bobbie
- Cambria
- Cammie
- Card of the Week
- Card Positioning System (CPS)
- Cards for Cancer
- Catherine Doucette
- Charmaine
- Cheryl Sims
- Chriss Rollins
- Christina
- Christine Ewing
- Christine Wooden
- Colleen Schaan
- Craft Critique
- Craft Gossip
- Crystal
- Dawn Easton
- Emily Giovanni
- Geny
- Holly
- Igne Groot
- Inspirational Craft Blogs
- Irene
- Jami Sibley
- Jeanne Streiff
- Jen del Muro
- Jeni Bond
- JenMarie
- Jenn Balcer
- Jenn Diercks
- Jenn O
- Jennifer E
- Jennifer Mick
- Jennifer Pereda
- Jennifer-Sweet Treat
- Joanne Basile
- Jodi Collins
- Julia Stainton
- Julie Masse
- Karen
- Kathryn Berthiaume
- Katie Cotton
- Kelley Holland
- Kendra
- Kim Scholfield
- Kris’s Color Stripes! Get inspired here
- Kristen Dubosque
- Kristin Eberline
- Kristine
- Laura @ Sunshine Stamper
- Laura Turnmire
- Laurie Schmidlin
- Lesa Rapp
- Linda Duke
- Linda-LSN
- Lindsey Botkin
- Lisa (lakind scs)
- Lisa Kind
- Lori Craig
- Maggie
- Mara Campbell
- Maria
- Maria Levine
- Mary
- MaryJo
- Melanie M
- Monique Hansen
- Moxie Fab World
- Pam Imholz
- PaperCrafts Connection
- Peppers and Pollywogs Kids party site
- Rebecca Grohall
- Rita
- Robyn
- Rose Ann
- Sarah Vrolyk
- Sharon Harnist
- Sharon Johnson
- Sharon Rivera (a chemisrty with paper)
- Sherrie
- Sophia Landry
- Storage Units, Ink, & More Blog
- Sue Berker
- Susan (Rainy)
- Tangii Crane
- Tracy
- Tricia Traxler
- Trudee
- Velta
- VivLyn
- Zena
MTME Pretty Palette Color Team
MTME Pretty Patterns Sketch Team
My Time Made Easy TM LLC
Shop till you drop!
Lauren Meader
About Me
Copyrighted material
Subscribe To My Blog
Pages
- About me
- Alexa’s Story!
- My Crafty Corner!
- My Time Made Easy™ LLC
- Our Make A Wish Trip to Disney!
- Resume/Publication List
Calendar
| M | T | W | T | F | S | S |
|---|---|---|---|---|---|---|
| 1 | 2 | 3 | 4 | 5 | ||
| 6 | 7 | 8 | 9 | 10 | 11 | 12 |
| 13 | 14 | 15 | 16 | 17 | 18 | 19 |
| 20 | 21 | 22 | 23 | 24 | 25 | 26 |
| 27 | 28 | 29 | 30 | 31 | ||
Archives
- August 2013
- July 2013
- June 2013
- May 2013
- April 2013
- March 2013
- February 2013
- January 2013
- December 2012
- November 2012
- October 2012
- September 2012
- August 2012
- July 2012
- June 2012
- May 2012
- April 2012
- March 2012
- February 2012
- January 2012
- December 2011
- November 2011
- October 2011
- September 2011
- August 2011
- July 2011
- June 2011
- May 2011
- April 2011
- March 2011
- February 2011
- January 2011
- December 2010
- November 2010
- October 2010
- September 2010
- August 2010
- July 2010
- June 2010
- May 2010
- April 2010
- March 2010
- February 2010
- January 2010
- December 2009
- November 2009
- October 2009
- September 2009
- August 2009
- July 2009
- June 2009
- May 2009
- April 2009
- March 2009
- February 2009
- January 2009
- December 2008
- November 2008
- October 2008
- September 2008
- August 2008
- July 2008
- June 2008
- May 2008
- April 2008
- March 2008
- February 2008
- January 2008
- December 2007
- November 2007
- October 2007
- September 2007
- August 2007
- July 2007
- June 2007
- May 2007
- April 2007
- March 2007
- January 2007
Categories
- About Me
- All That Scraps
- blogger challenge
- camera/photo play
- Cards
- Contests
- family stuff
- FOR SALE
- Home decor/3-D items
- How to FAKE it!
- Introduction
- JUGS Challenge
- JustRite Stampers
- Lizzie Anne Designs
- My family stuff
- My Stamping Space
- My Time Made Easy
- My Time To Color Challenge
- My Time to Create Challenge
- My Timeless Template Challenge
- My Timeless Templates
- Mytime Mail
- MYTIME MOVIE/VIDEOs
- Papertrey Newsletter
- Pink Cat Studio
- Pretty Palette Challenge
- Pretty Patterns Sketch
- Product Opinions and Must haves
- Recipe's
- Saturday Sketch
- Smilebox Creations
- Stampavie
- Tutorials
- Uncategorized
- videos
Most Popular
- Create your own Onesie Card Tutorial-and important NOTE! PLEASE READ (2529)
- Saturday Sketch-Boxed bag holder (2333)
- Going GREEN! Fancy Flower Flourish-Closure Video (1478)
- Fabulous Favorite - Giveaway! (1336)
- a Prayer Request (1232)
- QUICK-Easter Baskets from Nestabilities-PTI style-and blog challenge (1063)
- Teaser Sketch (999)
- February Release Giveway! (and a little peek) (996)
- Group Post and Rambling Rose Video Tutorial (985)
- GIVEAWAY! Who wants it all?! (895)
Recent Comments (RSS)
- 첫충사이트: 완전히 흥미로운 블로그 게시입니다. 저는
- sarah: Wow, Lauren, what a stunning
- hedie: خرید راهبند
- 야동: Love to read it,Waiting For
- 야동: This seller is in a
- 바카라사이트: 여기 처음 왔어요. 나는이 게시판을
- 야동티비: I was surfing the Internet
- 바카라사이트: 비슷한 주제에 대한 흥미로운 정보를
- 바카라사이트: "여기에 제공해 주신 귀중한 정보와
- 온라인홀덤: 유익한 웹 사이트를 게시하는 데
Copyright © 2007 - My Time, My Creations, My Stampendence - is proudly powered by WordPress
This blog has been Tweaked and Designed by Sara Williams