Archive for the ‘Home decor/3-D items’ Category
A note from MFT:
My Favorite Things is pleased and proud to introduce you to our brand-spankin’ new line, My Favorite Things Presents! My Favorite Things Presents opens the door for us to work with new Illustrators and continue to offer images that are “Fresh, Fun and Completely Distinctive!” This spin-off brand will begin by offering images from artist Annie LaPointe, being introduced over the next few months. Other Illustrators, as *need* arises, will be added as we find artists and styles we feel would translate well into the stamp world and as we see a niche we can uniquely fill. My Favorite Things original brand will continue to be drawn by the irreplaceable Christy Beckwith, whose style has so completely captured our hearts.
With that being said I am so happy to share ONE of my creations with this new style of stamps with you. You can buy your Take a Break stamp at www.mftstamps.com! I am really loving Annie’s new take on MFT.
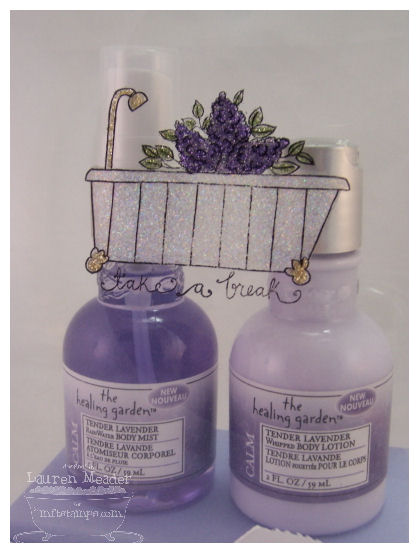
Take a Break Bath set

I LOVE little packaging projects!! LOVE them! Especially SIMPLE and ELEGANT one’s. Its all about the packaging and details. I am lured in by ideas that if I saw it in a store the package alone would make me want it. When I saw this image I fell in LOVE!!!! Did I already say LOVE? Yeah, you get the idea.
We have a friend who’s wife is due to have their first baby ANY day now. She is due June 15th. Everyone always brings the baby a gift, but never mom. Well, I decided to include this with our hospital gift for her.
She is a naturey (is that a word???) person, and I think she will need some pampering. Plus lavender is suppose to be soothing.
I warned you previously that I am addicted to this Acetate and Art Glitter glue/glitter stuff. So here is yet another project with it. I think it really adds to the beauty of this package.
I bought some nice lavender scented lotion and spray, and made this cute holder for it.
here is a close up of the details-
Now I know you may want directions:
Cut 2 pieces of acetate 4 X 11.
Score each one at 2 1/2 inches
For front piece: Stamp image on acetate with black StazOn, and use Art Glitter glue/glitter to color image.
Let dry.
Adhere the 2 1/2 scored panel together to create a bottom \_/ <—–looks like that.
Bring tops together. /_\ <——then looks like that.
Make a topper 4 X 3. Along the 3 inch mark score at 1 1/2 inches
Place topper on acetate “bag” and use Key Tag punch for a handle.
Secure in place with 2 brads.
Now for the base piece -that slides into the bottom of the acetate holder. (the amethyst piece)
Cut amethyst cardstock 6 X 4 1/2
Along 6 inch side score at 1 and 5
Along 4 1/2 inch side score at 1 1/2 and 3 1/2
Snip sides and adhere rectangle.
Use glue dots to adhere body wash/lotion onto the TOP of the rectangle.
Slide into side of holder.
Tie ribbon around bottom. This keeps insert in securely.
DONE!!
So I hope you like my project! It was a fun one to do.
Thanks for checkin in. Tomorrow I have another fun project to share.
Don’t miss the release party tonight!
My Favorite Things (www.mftstamps.com) is having a New Release Cocktail Party on Wednesday, June 4 from 9-11 p.m. Eastern time. LOTS of fun (and a surprise release) is planned including finding out how YOU can be the next MFT Guest Designer. Head over to the MFT forum on www.splitcoaststampers.com to find out all the details and we hope to see you there tonight.
Got Kids?
Jun 2, 2008 Author: mytime | Filed under: Home decor/3-D itemsWell then YOU need a great Father’s Day project-right?
If you signed up for the Lizzie Anne Newsletter, then you may have seen my SUPER simple project in there! If you haven’t signed up-WHY? Hello! Its awesome and FREE!! Go sign up.
This would be a great project to let your children do!
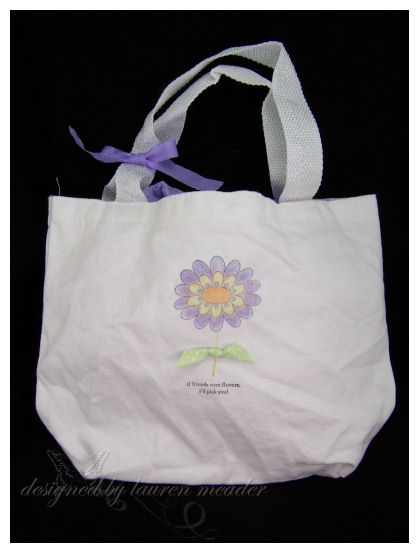
I made Father & Son t-shirts for the project.
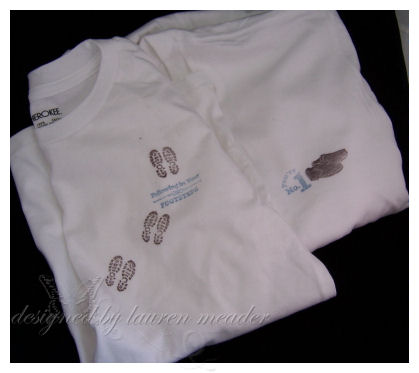
Now this set was VERY simple-just get a 100% cotton t-shirt
A Man’s Sole stamp set
then your choice of ink colors in either a Craft ink, Palette ink, or even StazOn.
Place a piece of cardboard in between shirt to prevent bleeding into back of shirt.
Simply stamp, then heat set with iron high heat for a few minutes, or in dryer on high 30 minutes.
DONE!
Here are my favorite boys!
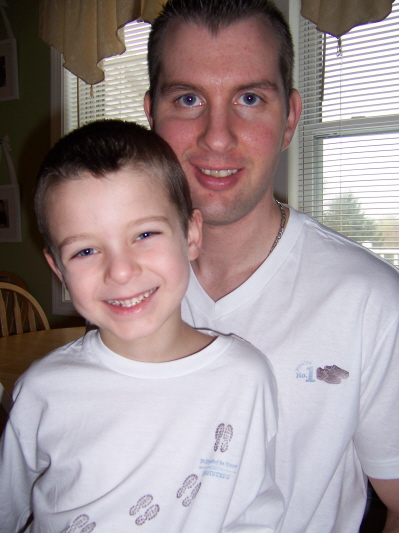
Noah had the footprints, and Daddy has the shoes. So he is “following in his footsteps”
Cute huh? Imagine the funky shirts all the dad’s of stamper mom’s are going to get from their kids! LOL! It could turn out some interesting creations 😀
Well I have much to do, so I’ll be back later to post some ATS samples and a PEEK at the new things coming out this week at MFT!!
Later.
Ask and you shall receive! CLASS INFO!
Jun 1, 2008 Author: mytime | Filed under: Cards, Home decor/3-D items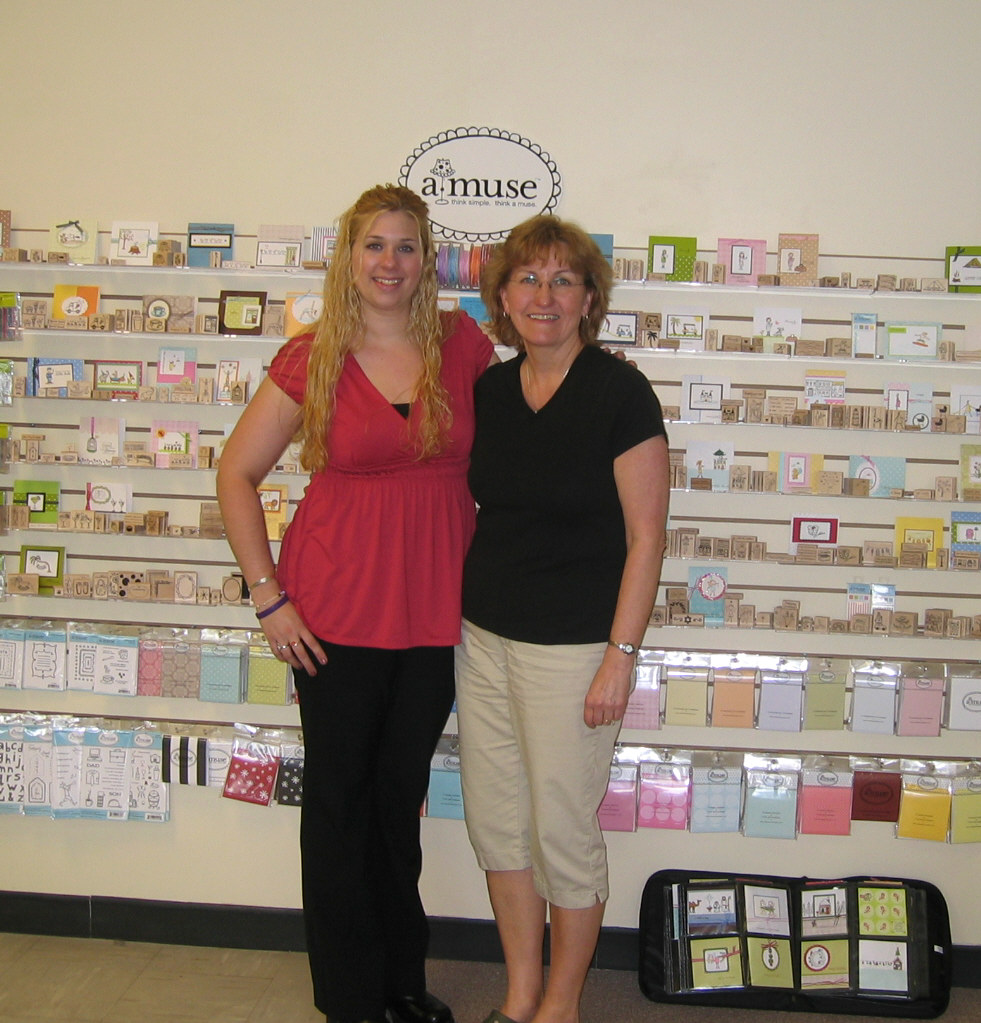 Click to enlarge-WARNING: I look so tired and awful! LOL!
This is me, and Julia Aston. She decided to take a photo of her and I, in the class at the END of the day! LOL! So Im looking haggard and exhausted. She emailed me this photo yesterday! I did bring my camera but was SO busy I didn’t get a single photo :C
Well, as you can see I survived my classes at The Paper Tree!! I had SO much fun with the women there. I hope they had as much fun as I did.
I know many of you wanted to know how it went-more on that below. I really think HOW it went is up to the people who attended! LOL! But they seemed to enjoy the projects. That is the BEST part! Making people happy.
I am already booked for my next 2 classes! Keep in mind ALL my projects are new, not ever posted here on my blog-or any other online venue.
People wanted to make cards with me so………………….
Friday June 13th 7pm- It don’t mean a thing, if it aint got that BLING!
Its all about the bling these days. In this class we will make 5 cards that are sure to sparkle and shine. Each one will feature a different way to add sparkle to your creations. You will use new products and a few fun techniques! You really don’t want to miss this one.
Sunday June 29th 10am-Clearly Creative Cards
This class shows you a few more ways to use those window sheets! I love creating with acetate, and you will be hooked after this class.We will make 5 cards in that class that are “clearly” creative, fun and fresh ideas for your creations.
Here comes the ASK and you shall receive part: Michelle has received so many emails, on top of the one’s I have as well, about my Class Kits for my classes (WOW! Thanks everyone!!) and we are doing 2 class kits this month!I hope to get more in the works, but I do have design deadline’s to meet first and I have to complete my class samples for my classes!
CLASS KIT DETAILS!
We are offering these kits, which Michelle is starting to put together. They are going to be available in LIMITED quantities. FIRST COME FIRST SERVE. Supplies are limited. You can go to the Paper Tree website www.thepapertree.net for kit details on Friday June 6th for specific kit details, and prices, then contact Michelle to order.
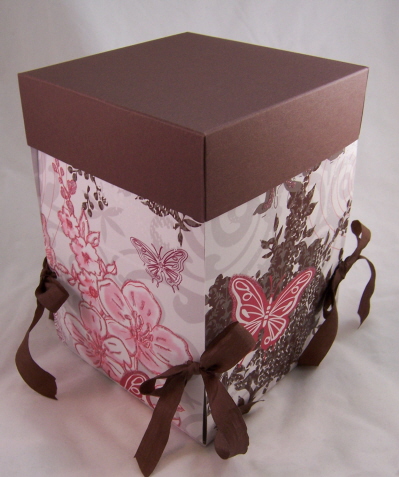
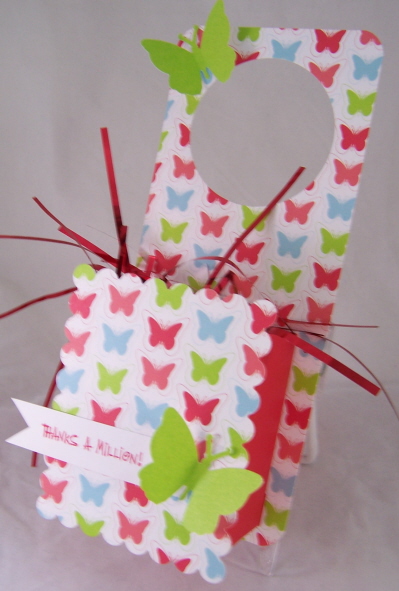
Also if you get your kit and have questions, you can email me directly 😀 That info will be provided with the kit instructions.Now below I will share the 2 kit projects.All Tied Up:
This boxed set uses a paper collection by SEI Chocolat. This paper is gorgeous. It glitters, and shimmers. The butterflies are embossed! Truly gorgeous collection to give away (or as many stated KEEP for themselves)
It also used the Flourish set by Inkadinkadoo-also included in the kit!!!
Note: we used Papilon paper for the outside of the box for the class, and the top is decorated. I had not completed the top for the photo, and we had to improvise on the paper due to availability. Michelle will include NEW! photos of this box, completed on her site Friday.
Box tied up
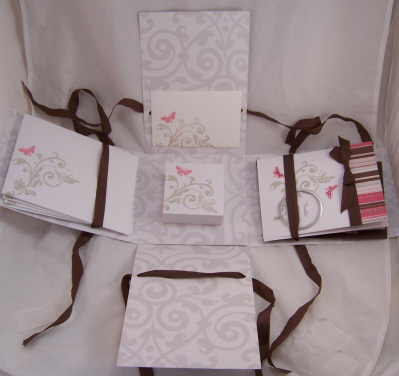
Top off box
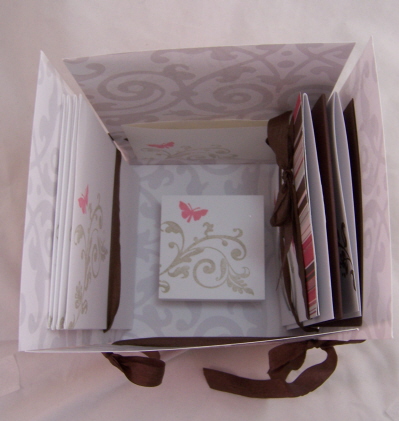
Box united-4 cards in one side, 4 stamped envelopes, memo cube, and stamp holder. Space for you to add a note book or birthday calendar-whatever you choose.
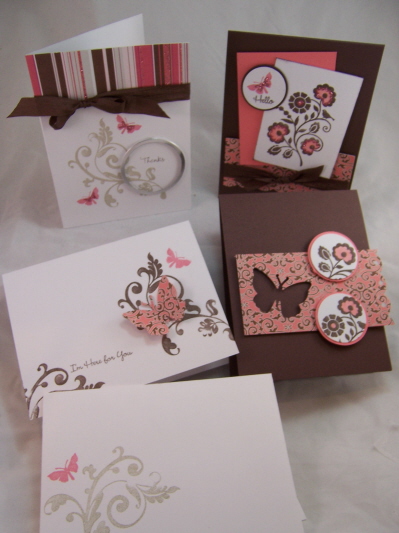
The collection of cards you will make with your kit.
Next up we have the Make it Monogrammed class

Well we all know just how popular those Just Rite monogram stampers have become. I am sure we can ALL thank the lovely and talented Miss Debbie Olson for that!! Well we did a class using them, and they are fun! I have the C-30 which fits your SU! 1 1/4 circle punch!!! I love that.
You can see that set-HERE!
It also uses the GORGEOUS Le Jardin , which is the sister set to Jolies Fleurs.
Now this class you will make 8 monogrammed cards and envy’s with a GORGEOUS exclusive box I designed, that is really unique in the way it looks, and is put together!!! Everyone LOVED this box.
You will too!! Think Teacher gifts!!!
Now I will share my Favor It class-that will NOT be part of a kit.
We made 5 great, party favor’s for any occassion.
If you didn’t want to buy the Nestabilities after this class, then there is NO hope for you! LOL! I was surprised at how many people had NEVER see or heard of them! Lauren to the rescue! LOL! I even sold some Cuttlebug’s for AC Moore down the road after everyone got to try everything out! LOL!
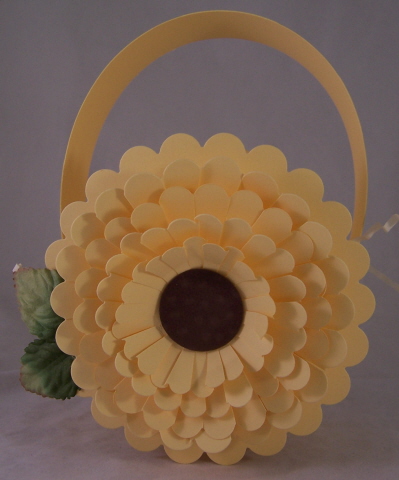 Sunflower Basket
Now this was my personal favorite project.
We uses the Large Circle Scallop Nestabilties for this!!! Just snipped in between the scallops and layered! The center is a chocolate circle, that we used our embossing stylus to create a flower center!! FUN!!
Leaves are by Prima
Door knob hanger and Fold-n-go origami party pouch
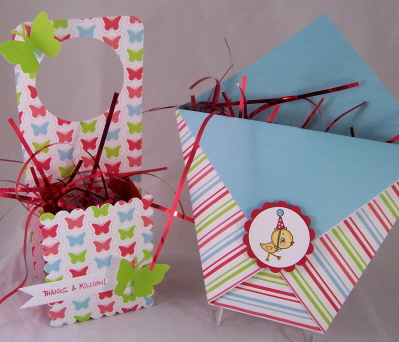
The sentiment is Lizzie Anne-Sketched Sentiments
Party Chick is A Muse
Butterfly punch is EK Success.
Next up-
Dinosaur egg holder, and Rodeo Round-Up stick holder (lollipop holder)
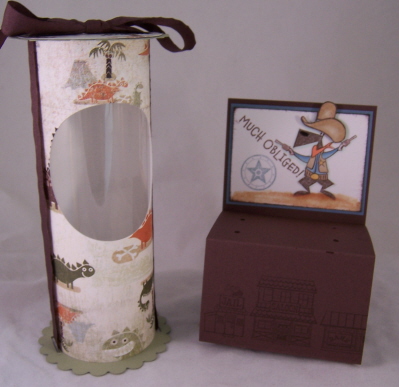
You can’t see by the photo but the Cat’s Pajama’s is a lollipop holder! There are 4 holes in the top for the sticks to go! WAY CUTE!!
Stamp is Its a Western Thing
SOOOOOOOOOOOOOOOO……………………….that is that.
I think it went well. The first one was a little hectic, and the ink on one of the projects wasn’t inking, and we had a lot of improvising! LOL! BUT, in the end it was great and I think everyone enjoyed it.
I really felt like I bombed my first class, but my gineau pigs were nice about it. I was much more on the ball the next 2 classes. 6 people had signed up to stayed for all 3! How sweet!!
Julia Aston wrote about her expieriecne HERE! AND, you have to see her blog because she has a photo of the most adorable tote bag she made for me out of cardstock!! What a nice thing for her to do!! I LOVED that bag. Its looks real! LOL!
She was funny because she got home and uploaded her photos and wrote all about it, then emailed. I wasn’t even unpacked fully! LOL!
Thank you again Julia for the super sweet tote/notecards gift and your super kind words of encouragement.
I didn’t realize how LITERAL people are when they stamp. I just sort of eyeball things. Someone asked how far up and in to punch holes for a particular project and I said “I don’t just eyeball it. It’s about 2 inches up and 1/2 and inch in” Well, everyone got out their rulers! LOL! It was hysterical to me!!
So basically it was a fun time, and the day FLEW by! I am still recovering! My feet are killing me-next time its SNEAKERS for me! LOL!
OK Im off to rest.
INSPIRED-a product must have :D
May 27, 2008 Author: mytime | Filed under: Cards, Home decor/3-D itemsWell if you wandered where I was today, I have been busy stamping! This is a super busy time of the month for me as the NEW! Releases begin to get ready for samples to get DONE. I have a lot to do this week, and my FIRST class at The Paper Tree is this weekend. EEEKKK!! No way near ready for that. I better get on the ball. I have to pick up all the supplies. Then a cutting and prepping I go.
Plus-The eye candy has to get made sometime right? I definitely have no magic wand.
It was either blog, or stamp. Well, since I had not gotten ANY stamp time in about a WEEK (that is a rare thing for me) I had to choose STAMP! Once I got warmed up, there was NO stopping-except get the kids fed, wahsed, dressed, snacks packed, run around and drop off, then to do some mommy stuff with the kids when they get home, clean, and get Daisy groomed, make cards while I also make phone calls to a zillion people about insurance and other NON-FUN things-all in a day’s work. Then there is photographing and editing. BLAH BLAH BLAH BLAH BLAH BLAH-right!
I also wanted to share, I have some Pink Cat samples featured HERE! Along with a mini questionaire that Mandy had me fill out. Thanks Mandy!!
I have been SO inspired in my week long hiatus. My brain is on overload! In fact, so inspired it’s my card theme for today!
 INSPIRED!
inspired
verb
- (past of, inspire)
adjective
- Having excellence through inspiration.
- The actor’s performance of Hamlet’s soliloquy left the audience dumbfounded.
- Filled with inspiration or motivated.
- The artist was to paint a true masterpiece.
- He was to learn to fly.
inspired
verb
- (past of, inspire)
adjective
- Having excellence through inspiration.
- The actor’s performance of Hamlet’s soliloquy left the audience dumbfounded.
- Filled with inspiration or motivated.
- The artist was to paint a true masterpiece.
- He was to learn to fly.
You KNOW I had to throw the defintion of inspired in there didn’t you?
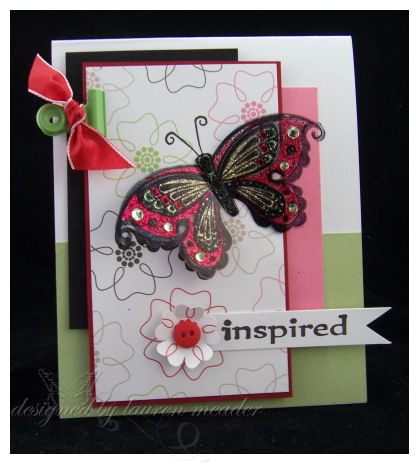
The butterfly & sentiment are from Unity Stamps-Beautiful Butterflies. I so enjoy this set.
I used a new technique I stumbled upon at the Paper Tree last week. I saw a sample, and said “What do I need, to be able to do that?” Then ca-ching! I took it all home. I love anything that involves glitter, and acetate is like one of my favorite things to use. Add a butterfly and I am one HAPPY girl.
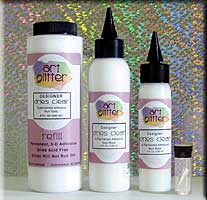 Art Glitter Glue’s
You stamp on a window sheet, using black StazOn, then apply the Art Glitter glue on the back, sprinkle on the BLING!! Let dry-and DONE! It also works on fabric!! The glue dries clear so you all you see is the glitter! Its GORGEOUS!!! You are going to get so sick of seeing it here! LOL! I’m in LOVE!! I made a bunch of release samples for multiple companies using this technique. I actually HAD to STOP myself. You should get the fancy adapter to allow yourself to work in small areas with detail, and get a professional look.
So this technique inspired so many of my other cards. I can’t wait to share them all soon!
Pretty cool huh?
Now for more inspiration.
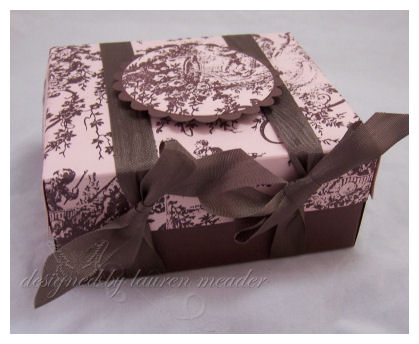
If you shop at Michaels, you may have seen these SUPER pretty fabric covered storage boxes. I just fell in love with them. They are pink or blue, with brown-HEAVEN!!!
Well I was SO inspired by the boxes that I decided to re-create one! Only mine is not a huge storage box, and the top flips open, not comes off.
 Side view
The store one- the ties stay on, and are a decoration. Mine you unite to open the box. This box is about 2 inches deep, by 4 inches and like 5 inches across?? Sorry I forgot to measure it.
I decided to use Sweet Blush cardstock, and chocolate craft ink for this cover. The stamp is the gorgeous-Tea Time Toile. Which I JUST learned that I missed a holiday sale from Unity-BUMMER!!!! The ribbon is by Martha Stewart
I wanted to highlight one of the images in the bkgd, so I layered it over the image on my box top.
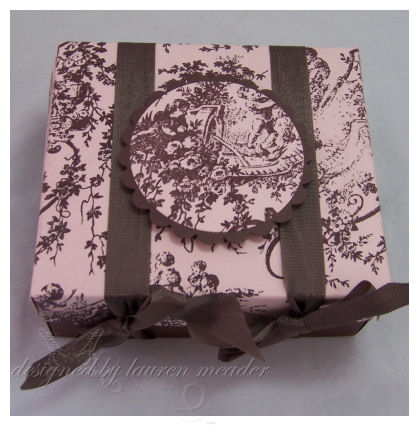
So pretty and classic.
I made this in 10 minutes!!! Can you believe how quick that was? That included designing HOW my box would be 😀
Well thank you, as always for checking in, and the many of you who pondered my existence since I last wrote.. I have not ventured out online or into blog land in a week as well, and feel SOOOO out of the loop!!
Maybe tomorrow. I still have a lot to do before I can catch up.
Till then!!
Lauren
This is what happens when you try to say “I don’t need a list”.
OK so I didn’t say I don’t NEED a list, I misplaced my list, but its the same thing in my eyes since I never went to find it.
I totally missed the day of the new release for Our Daily Bread Designs! I got my designs done, but crashed and burned before uploading them. I actually thought the release was set for the 1st! My brain was just in overload I guess. I was just wiped out. Alexa left school really early yesterday because this round has made her pretty sick. So being consumed with my bucket holding got quite exhausting.
I think my projects were worth the wait of one more day! LOL! OK so I HOPE they were!
Anyway the newest sets are so pretty. They are Path of Life and Fruit of the Spirit. I definitely wanted to work with them this month, so I opted IN!
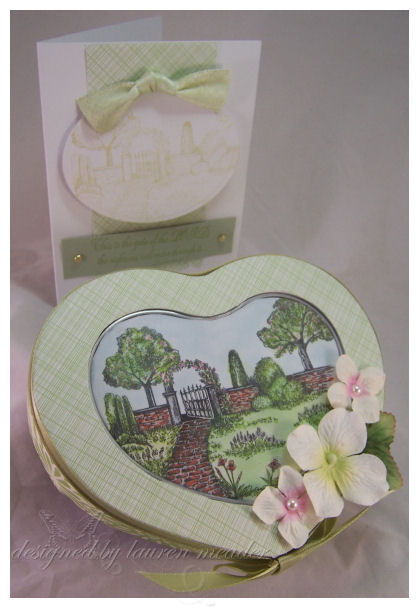
I personally, normally am not into coloring scenery. Im not very good at it, so that adds to my lack of ambition- but, this scene with the gate, to me was breath taking. I decided to TRY my hand at coloring it al in.
A first I was only going to highlight certain things in the scene, but once I got started I didn’t stop!
So I got my scene done. I used Pebbles Peralescent chalks for some of the “filler”, and bling! It was going to be a card. I looked at it and thought NO WAY! I can’t just slap this onto a card! It needs to be displayed-forever! Cause Lauren Meader is NO scene maker, but I was happy with this. So here is my Heart Tin, a keepsake I can have forever.
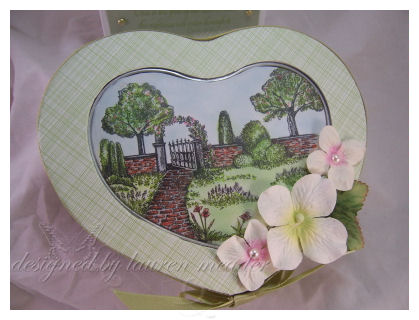
I used some weave paper by Martha Stewart. The stamped/colored image is attached UNDER the lid 😀 Now this definitely opens up a whole new world to me for decorating these tins. as you can see, the path image is rather large 😀 In a good way! It lends itself to many possibilities of being colored, cut down-whatever you like.
These images I find awesome to do a quick, simple, single color. So I decided to make my card much simpler. Lets be honest-I really didn’t want a complicated card to outshine the gift. I wanted clean and SIMPLE!

This scene was die cut/embossed with my oval nestabilities.
I really enjoyed creating this set! What a great gift for someone filled with homemade yummies! Or a few candles, soaps and whatnot.
Speaking of what to put inside:
Recently a friend of mine-Sonia sent me an AMAZING package of fresh smelling soaps, lotions and bath scrubs. I tried one of the soaps immediately, and my hands smelled and FELT wonderful!! Her stuff would be perfect for putting in the tin. Not that I am parting with any of it 😀 She said it was for my 30th b-day. WOW.
When I picked up the pkg from the PO it smelled amazing. The woman at the PO was like WOW! That smells great! (You could smell it all from outside the box.) When I ever opened it I about died. I could not even believe all she sent.
THANK YOU SONIA!! Even more-she is having some tough family issue’s, so for her to take the time to think of me and the kids was just unbelievable.
Here are some photos of all the yummies. I think I won the lottery! Click to enlarge
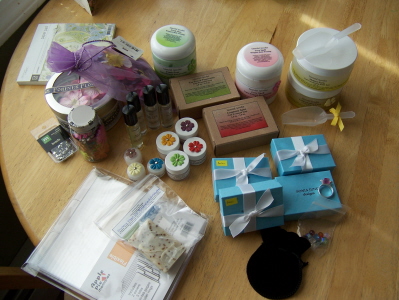

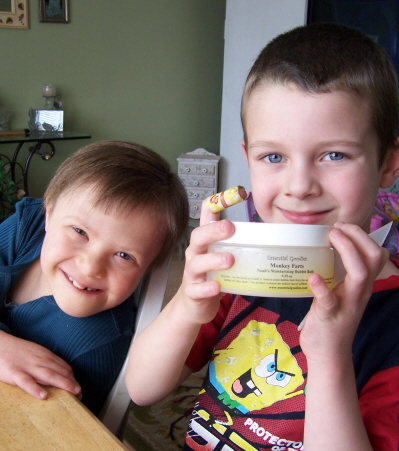
She personalized Noah’s bubble bath stuff to say Noah’s Monkey Farts bubble bath. Boy did he think that was HILARIOUS!! He kept saying he was taking a bath in Monkey Fart’s and was going to smell like a big Monkey Fart! Oh BOY! You gotta love BOYS! LOL!
You can see her stuff here-Essential Goodies.I am so excited she has an Etsy Shop! Now I can just order what I want in the future.
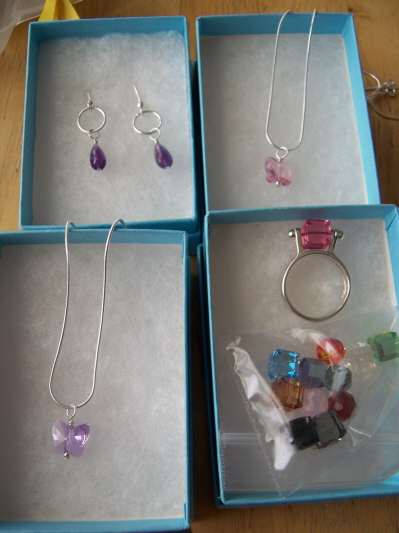
Now as if the lotions weren’t enough, she sent me jewelry! I already got several comments on the ring! The ring comes apart and you can change out the stones!!!! They can match your outfits! I LOVE it.
The butterfly necklaces are for the girls-Amber has Purple, and Alexa has pink. They are butterflies. You have no idea how bad I wanted to keep them for me! LOL! We can share.
 You have to enlarge it!
Here are the girls with the jewels on!

You can find the jewelry here-> Sonia Jung Designs. Next up for me is a Mother’s Bracelet! I never found a mother’s ring I really liked, and since Im done ADDING to the family its time to get something I can wear.
I had to go and ask her where to find all this stuff!! So thanks for sharing with me Sonia! You made my year.
Color Challenge Fruit Bowl
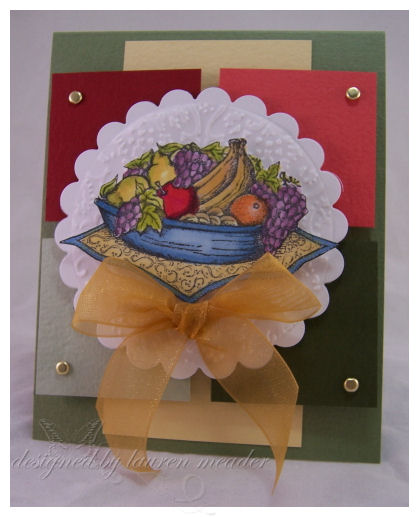
Im so sad that you cannot see the SHIMMER in my project. I colored most of this image using Twinkling H20’s. I got them at CKC last year, and LOVE them. Again, Im so not a great colorer of things in “Nature”. Im bad with color choices and shadowing, but Im a work in progress. I see some other’s work and about fall over, they look so real!
You may be wondering WHY I have all these colors on my card! Well, it is a fruit collection, and Kelley at ODBD gave us a bit of a color challenge! I LOVE a challenge! I had to add the blue. Not sure WHY, looking back, but I just did.
Here are the PRISM colors:
Herbal Garden Light, Medium and Dark
Sunflowers Light
Blush Red Medium and Dark
Spring willow Light
The cardstock on this card is by Prism! You can view the colors HERE!
I stamped/colored/ cut my main image. I layered it onto a cut piece of embossed vellum, that was layered onto a scallop white circle. Added to the texture and elegance for me.
Fruit of the Spirit Paper Pieced!
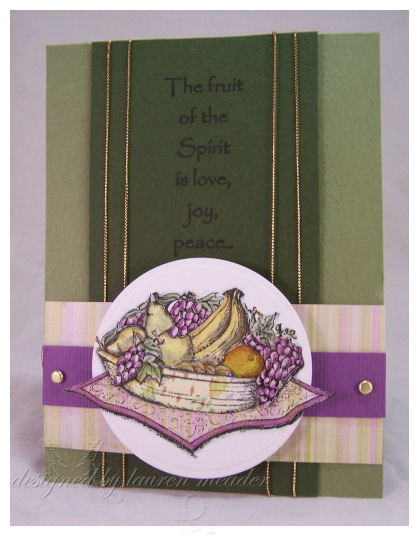
Would you believe me if I told you this entire fruit assortment is paper pieced-except for the leaves? I can’t tell you how cool it appears to be in person!! Everything is layered on!! I stamped 7 different images onto patterned paper to get my colors.
I used the Basic Grey Aerial Collection for my fruit bowl! I then added a touch of color to some of it with my Copic Markers!
The place mat was done with the stripped pattern
The bowl used a funky leaf pattern
grapes-the purple pattern
Bananas and pears from a yellow on the paper’s
The orange was a bird on the paper
Pretty cool.
I used my circle nestabilties to cut out the image. Since I was paper piecing, I just layered the place mat so it overhung.
Clean and simple with a pop of purple! Love it.
OK peeps! That is all for today! That’s enough isn’t it? Well maybe-I need to get a challenge card done. OYE!
I am having dinner tonight with some of my bestest friends!! Counting down the minutes! I really need a night out after this week. Then tomorrow is CKC in Manchester! Are you going? Maybe I’ll see ya there!
Till tomorrow.
Thank you ALL soooooo much for the thoughts & prayers for Alexa. We got her tests back and things look great. I am still on the rollercoaster of emotions. Its hard to really explain and put into words. Yes its a happy time, but there is so much more to it. I know I am certainly looking forward to the weekend of retail therapy at CKC! But especially meeting up with some PSF’s!
My PSF Laura Sneden sent a gorgeous planter of Violets! THANK YOU!!!! Lord please help me to NOT kill them. They are the PRETTIEST purple ever.
Then there is another Laura who sent her a stunning bouquet! Laura-you didn’t include your last name! Please email me. I have so many PSF’s named Laura. I want to properly thank you. It was so sweet of you to do.
Photos will be posted this week/weekend, along with the pkg of goodies I got the other day with some cards too.
OK now today I want to share my PTI projects with you all!!! I hope you all enjoyed the release, and be sure to check out the Design Team gallery and their blogs.
Please let me know which project you liked most. I always enjoy reading the different responses and why they are such. Everyone is so different.
*NOTE ALL PROJECTS USE STAMPS FROM PAPERTREY INK!
Loving Lavender Moon! Oh and the PAPER!! WOW!
OK here we go!
Holiday Greetings
Stamps-Mailbox Greetings
Cardstock-PTI select white
Patterned Paper by Chatterbox
Acetate
Ink-Pallette black, Copic Markers, bashful blue, white StazOn
CM Wavy cutter, glitter, ribbon by Martha Stewart
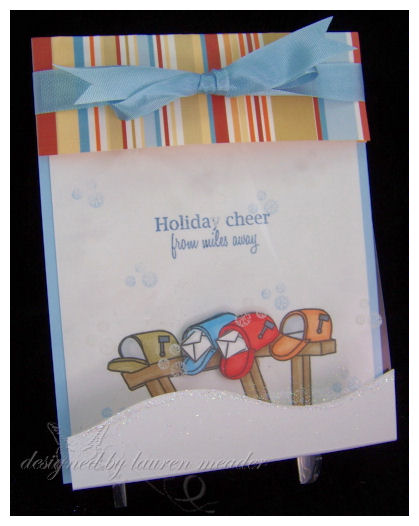
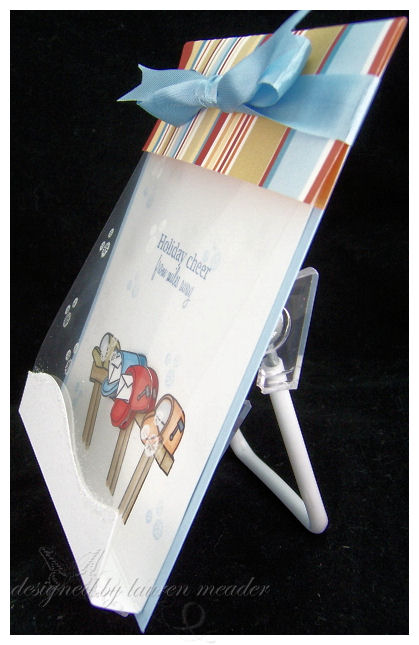
This is a super cute 3D style card. The acetate layer folds up under the top flap. Snowflakes are stamped on the acetate layer so they appear to be falling from the sky. I cut the mailboxes in the middle out, and put “mail” in them! I made the wavy snow-hill with my CM wavy cutter. I think this is definitely a unique holiday card, if you are one who starts in July, or has some special people on that holiday/winter card list!
Side view
Honey Sweets Set
Stamps-Honey Bees, Beautiful Blooms
Cardstock-Lemon Tart, Spring Moss, PTI select white, vellum cardstock
Patterned Paper- Bitty Baby Blessing in Big Blossoms
Ink-White StazOn, Lemon Tart, Pallette black, Old Olive, caramel
Other-Lemon Tart twill ribbon, Spring Moss Polka Dot ribbon, Corner rounder, Bunch Bunch flower punches, stickles

I wanted to create a “sweet” gift set. I made my bees in 3 layers!
We have the bottom layer, just the body. Middle layer-bee stamped on vellum cardstock with white stazon-then cut out for the wings-then the bee body again. Candice’s set makes the perfect bee easy!
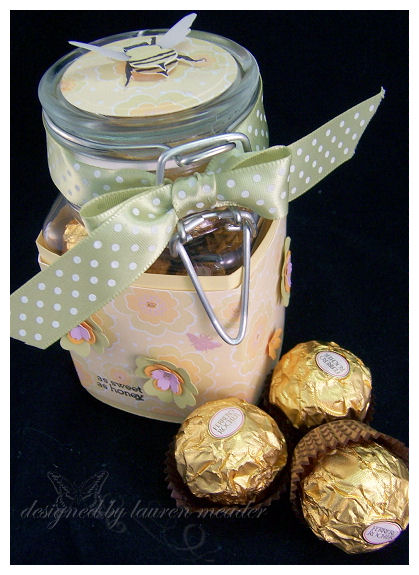
So I got this jar at Michaels, and filled it with Rocher chocolates! I liked the jar because it seemed like an old honey jar. I found that my Punch Bunch punches made flowers similar to that of the 12 X 12 Big Blossoms paper! So it was super easy to create a 3D look. I also stamped the little bee on random places of the honey Jar.
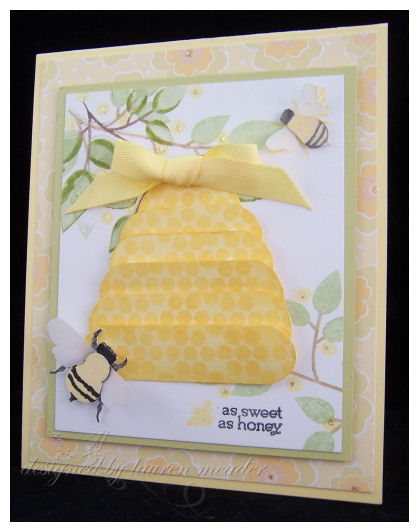
For my hive-I stamped the honey combs onto my cardstock. Cut strips, then used a corner rounder. Dimensionals give it the ultimate dimension. When I saw Taylor’s sneak peek post I about died at how similar our creations were!
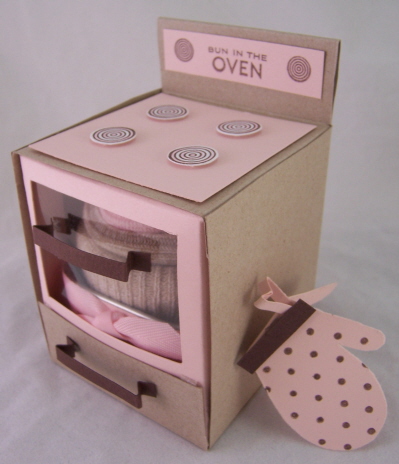
Bun in the oven
This is a cute little box, designed to look like an oven!
Inside is a cute little baby favor for the new mom to be, or shower favor!
Bun IN the oven box favor
Stamps-Favor It Baby, Father Knows best (circle from set for oven burners), polka dot basics (oven mit, and tin decoration)
Ink-Chocolate Chip ink
Cardstock-PTI select White, Sweet Blush, Kraft, Chocolate Chip
Sweet blush twill ribbon
acetate, Scor-Pal, Clear top square tin, 1/2 circle punch
 IN the oven
I took the sentiment “Bun in the oven” literally with this creation. I designed this little box, to look and open like an oven! The burner’s were done using the circle image from Father Knows Best!
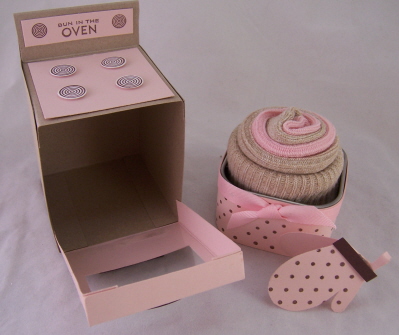 OUT of the oven
I covered the square tin and rolled up a pair of pink, and brown socks, to look like a cinnamon bun. It fits perfectly in there, and in my oven box.
I hand cut the little oven mit card to go with the package!
Cinn-a-bun in the oven
Stamps-Favor It, Garden of Life (for the cinn-a-bun image), Border’s and Corner’s circle set
Cardstock-sweet blush, chocolate chip, PTI select white
Patterned Paper -PTI Pink Collection
Ink-Brown Stazon, Copic Marker, White StazOn
Sweet blush polka dot ribbon, sweet blush satin ribbon
Clear round tin, circle scallop nestabilties, Pillsbury cinnamon rolls, circle punches, scallop punch

I used the scallop circle nestabilties to create a pretty circle box, to hold my little circle tin, which has a cooked cinnamon bun inside it. I designed the top of the tin to look like a cinnamon bun using Garden of Life, and some white glitter, for the frosting.
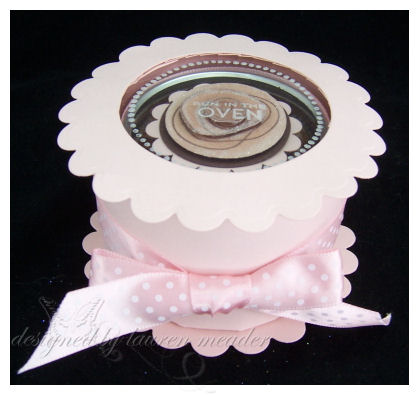
A sweet little round box created using nestabilities!
Holds this little favor perfectly!
Hippity Hop Hat
Stamps-Bitty Baby Blessings, Pond Life
Ink-Pallette ink in black and Lavender Sachet
fabric, scissors, Ribbon stiff, fusible webbing, iron
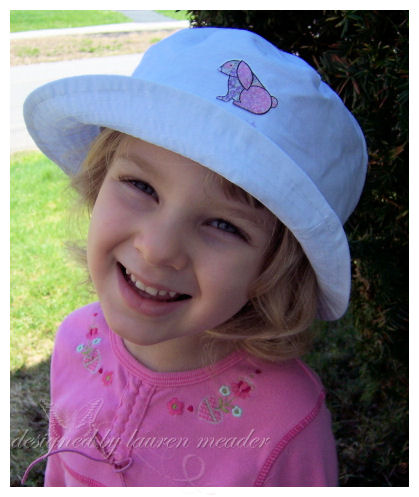
When I found this bucket hat at Target I was just giddy! I knew I could make it go from a plain old hat, to one my daughter would LOVE!! The best part-no sewing required!!
I asked Amber to pick an image she wanted on the hat, and she chose the bunny. We then organized some scraps from my pile from when I use to sew!
Here is a closer view
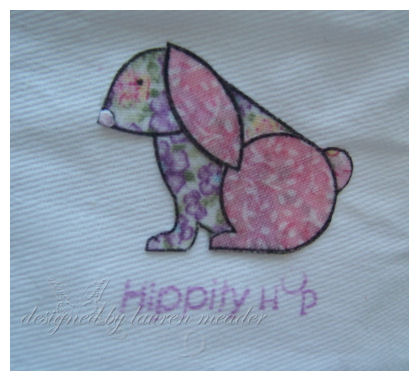
All I needed was some black pallette ink, and a little Ribbon Stiff, and I had this cute fabric pieced bunny for her hat! The nose is liquid pearls. The sentiment uses a Lavender Sachet Pallette ink.
If you can cut, piece and iron you are on your way!
Sweet Baby Door hanger
Stamps-Bitty Baby Blessings
Cardstock-PTI select white, spring moss
Pattern Paper-Pink Collection
Ink-black pallette
Spring Moss Stain ribbon, lace scrap
Acrylic frame by Making Memories, white chipboard coaster 4 X 4

This was a quick and simple door hanger, made to decorate any baby room. It became part of a gift basket.
Little Sailor
Stamps-Bitty Baby Blessings, Borders & Corners circle set
Cardstock-PTI select white, navy, red
Ink-white craft, pallette black, copic markers
circle punch, star eyelets by Making Memories
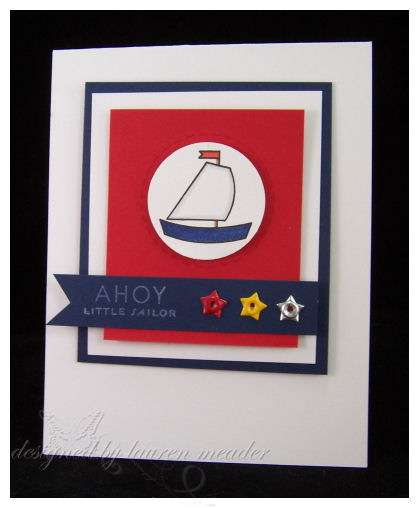
This is a simple and adorable card for any little boy from birth to the first few years! My friend just took this card for a baby shower, where the baby boy to be, has a room , that is a Pottery Barn nautical theme. Such a sweet and simple image. I love the clean lines this has.
2 Peas in a Pod
Stamps-Bitty Baby Blessings, Green Thumb
Ink-black pallette, spring moss, blush, apricot, plum
cardstock-plum, PTI select white
Patterned Paper-Bitty Blessings in big blooms
spring moss polka dot ribbon, scallop rectangle nestabilties, punch bunch flower
punched, making memories page pebble, circle punches, stickles
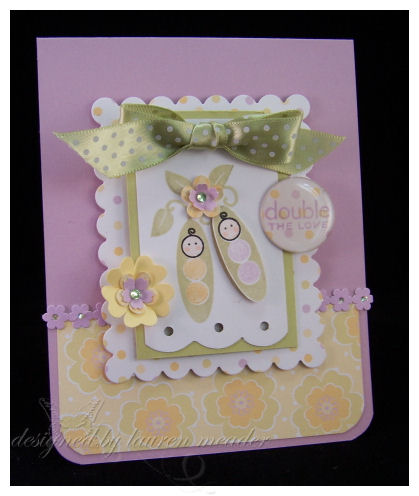
THIS is my favorite project of the month. I have no idea why-it just is.
When I saw the little head image from Bitty Baby Blessings I KNEW I had to attempt to pair it with Green Thumb’s pea pod image! Well, as you can see it worked! Its this not the cutest little baby in a pea pod you have ever seen? I loved making this.
I took my punch bunch punches and re-created the same flowers as in the patterned paper!
Circus Fun invitation
Stamps-Bitty Baby Blessings
Cardstock-PRI select white, Summer Sunset, Spring Moss
Patterned Paper from Bitty Baby Blessings collection
Ink-Black pallete
other- Cutterbee, Making Memories page pebbles

I was definitely thinking Circus Fun themed birthday when I saw this image, and the patterned paper! I paper pieced the elephant, which is so fun & easy to do. punched out the 2 circles from the Big Spots, and added a page pebble to create a “ball” look to it. The elephant is suppose to be in the circus ring-get it?!
Well that is plenty of eye candy for today!
I am hoping to pull it together and get my Friday Blogger’s Challenge done, and a sketch completed for you.
Once again thank you for reading.
Till tomorrow.
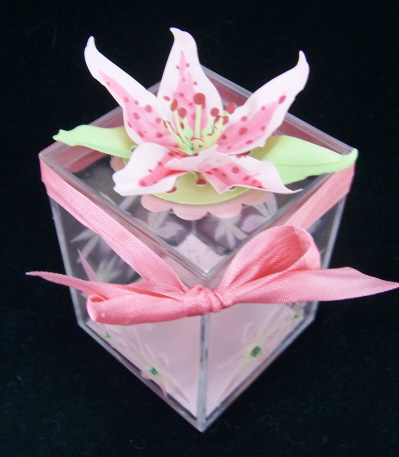
Another Paper Flower Box top
May 8, 2008 Author: mytime | Filed under: Home decor/3-D items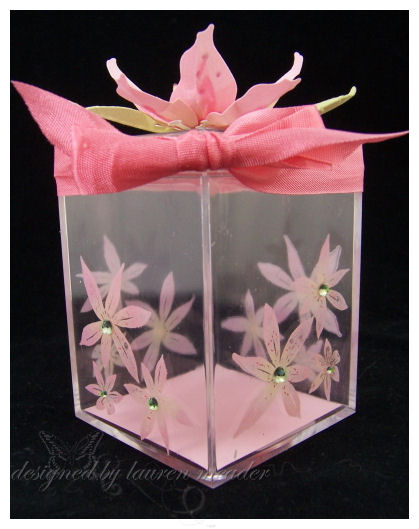
Sorry, I am so busy here. I do have plenty to share over the next week or so. Just trying to cram it all in. I have an insane next couple of days, but never fear! I have my sketch all ready to go 😀
With Mother’s Day quickly approaching I have gift items to make, and I would like to share one with you here today. Very simple, yet elegant. A great re-gift item! LOL! This isn’t your ordinary paper gift bag people.
Here is a clear box I decorated using Lizzie Anne’s In the Meadow set.
This is going to be given to Jason’s grandmother. Her gift will fit inside so nicely. Ill tuck in some pink tissue paper.
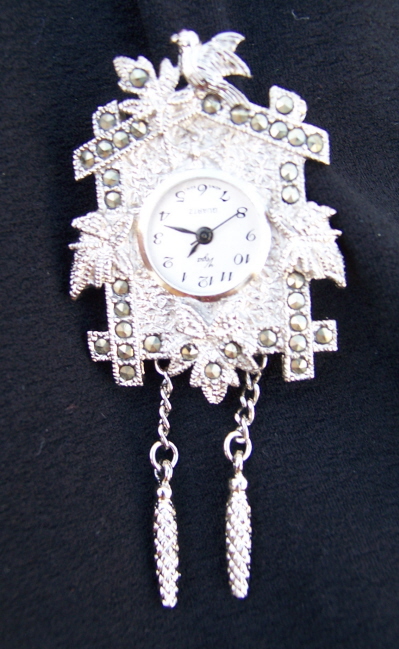
While at an antique shop I found the prettiest old broach. It is like a coo-coo-clock, and has a tiny clock in the center. It even has the dangling “pine-cone” thingys that hang from a clock. It sounds gawdy when I type it up, but its truly a gem!! I swear the photo isn’t very good, and does it no justice. Jason’s grandmother LOVES birds, and this clock is just stunning in person. It can also be worn on a necklace. We are getting it fixed at the jewlers tomorrow. The clock is up-side down, and needs a battery. I wish you could see the detail in the photo. Oh and the rhinestone’s aren’t gray or funky in person either.
Back to the box-
I stamped the flower cluster in the corner’s using white StazOn. I then quickly applied Pebble’s pastels. I used a gel pen to create the little dots on the petals. Then, get this-the BLING in the center’s started off as clear diamonds. I used my Copic Marker to color them green, since I ran out of the little green one’s!! YEAH!! Worked like a charm.
I wanted to create ANOTHER paper flower (using my book HERE), since I got the Lily Petals punch, for my birthday, I wanted to give that a whirl.
I KNOW that the stamp image isn’t really Lily’s, but I like taking that creative liberty and saying YES! they are, for my project.
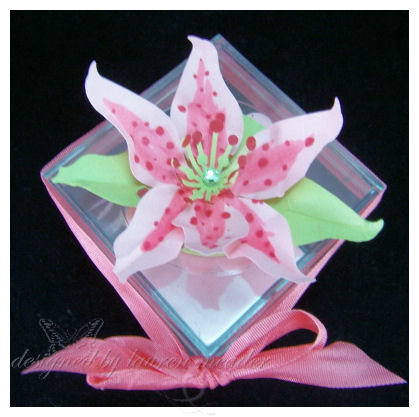
Here is the top view of the box. PLEASE NOTE: The colors are warped in my photo and after a million, I was too lazy to go back and re-set up AGAIN to get another photo! Can you tell I had to take a million photos today, and it didn’t go very well?
They cardstock is really Spring Moss, and Sweet Blush from PTI, if that helps you visualize the real look. Sorry. I do think its still a pretty darn good looking paper flower.
You can read my review on the Punch Bunch punches HERE if you like.
Now if you read my blog, you know how much I LOVE to look up the meaning of things. So here is yet another!
———————————————————————————————-
MEANING OF LILY-
The lilies are loved for their bright colors and are often used for decoration purposes. Lily has been an important flower ever since the Biblical period. Like other flowers, lily too has different flower meanings. According to the Bible, petals of white lily signify virginity, purity and the radiant soul of Virgin Mary.
This notion of purity had been with the lily flower since the ancient days. The Chinese and the Greeks had linked white lily to purity. To the Chinese, the symbolic meaning of lily is summer and abundance. The lily flower meanings mainly symbolize the western deities. The Greeks believe that Lilies were born out of the breast milk of Goddess Hera, but the Romans give this honor to their Goddess Juno. Lily is also associated with the Roman Goddess Venus.
In modern days, the lily flower meanings have changed a lot. Today lilies symbolize feminine sexuality. If someone dreams of lilies, then it means that he/she is hoping for marriage, happiness and prosperity. In some cultures, calla lilies and tiger lilies stand for rise in social rank of the individual. A valley full of lilies stands for sweetness and the closeness of loved ones.
There are also other kinds of lily flower meanings. When one has dreams of lily in the winter then it symbolizes the approach of sad news. Such dreams indicate that there would be a departure of a dear one or frustrating times ahead. An orange Lily symbolizes hatred while a yellow Lily symbolizes falsity.
———————————————————————————————-
OK so in the end the MEANING of the Lily isn’t the best match for my gift! BUT hey, its the thought that counts-right?
I also want to thank MORE PSF’s who sent b-day cards, and some little presents! A collective AWE!! Thanks girls!
here is a photo

I got lovely cards (Left to right) from Bonnie, Amy S, Sally Renee, Charmaine, Staci M, Katie, Shelby, Monika, Jenn, and Debbie!!
I also got a butterfly Inkadinkadoo stamp (how did you know?!)with candy(hugs Renee), Debbie sent an ADORABLE Memory box penguin that I have wanted forever!!! With my Tastefully Simple Vanilla bean chiller, an adorable A Muse SPRING stamp! Thank you! And Katie got me some YUMALICIOUS lipgloss-that is to de for (not in photo) , and Staci found the coolest butterfly rubber bands and paper clips!! How lucky am I? So undeserving! Thank you my friends.
Speaking of friends my PSF sent me this stuff
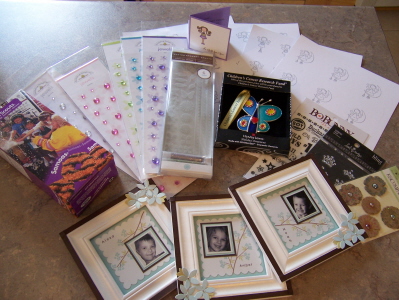 Can you say WOW!
The frames were enough and totally did me in! They belong in a magazine. I got Samoas (OMG!), lots of the most gorgoeus bling I ahve ever seen!! Martha adhesive stickers (dont have those) rub-ons and more bling! Then I got the ornament for Cancer Research which this year is a butterfly! AWE! How sweet is that?
My kids look like models in the frames she made-lookie here
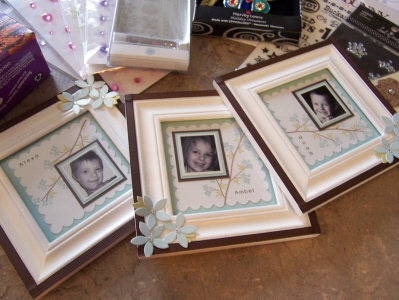
I believe these were meant to go in my stamp room, but seriously they need to be somewhere EVERYONE can see them. Im thinking my bedroom. Its on the main floor and everyone sees it.
They are just to pretty to hide for lil ole me in the basement.
So a HUGE thanks.
WOW! I got way off on this post. Sorry about that. Im just feeling so thankful for all the people in my life.
Only ONE MORE WEEK to CKC!!!! In Manchester NH! Im hoping to meet up with some awesome friends! Hope to see you there too.
Tomorrow- I’ll have a mother’s day card for you for the Blogger’s Challenge.
Till then!
Paper Basket 3D frame
Apr 29, 2008 Author: mytime | Filed under: Home decor/3-D itemsHello from under my work pile! LOL!
I am having a blast, and I LOVE being busy. Before anyone thought I got smothered under my work pile, I figured I better stop by and make an appearance! No worries, I’m OK. This is all a very GOOD kind of busy. I really live for this stuff and the challenges.
STILL finalizing my class options, writing up directions, and supplies for my first class. I was SO excited to hear many of you already called about booking your spot in a class with me! I so hope my projects meet your expectations!!
It will be so cool to finally meet so many of you in one day. YEAH!!
Well Thursday I have an article going live for Craft Critque. Make sure you check it out then! I will be sharing this frame with you!
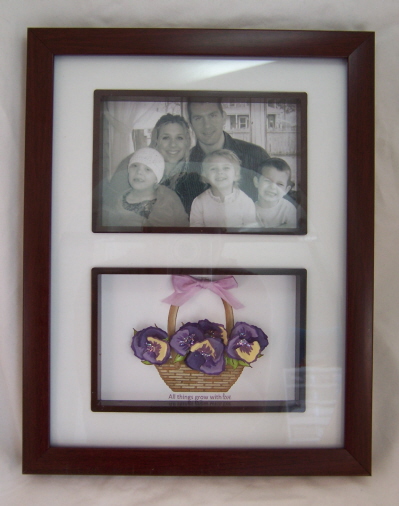 Grown with love
This is one of the gifts that I will be giving to my mom, for Mother’s Day! It is her favorite photo my family. It was taken on her sun porch. I decided to convert it to black & white, so it will match my AWESOME paper flower basket. The wood in the frame matches the furniture in her dining room, as well as the lavender color in her accessories as well.
My mom always planted Pansy’s when we were kids. They always remind me of her. When I found the Gingko leaf punch is used to create paper pansy’s I knew I had to get it.
Here is a closer view from the side
This is a special box frame that is made specifically to hold 3D items. I bought this at Walmart I believe. Or it could have been Michaels. Not sure. It was one of those things that it was on SALE and I KNEW I’d need it eventually! I think I’ve had it for about a year, just waiting for the PERFECT project.
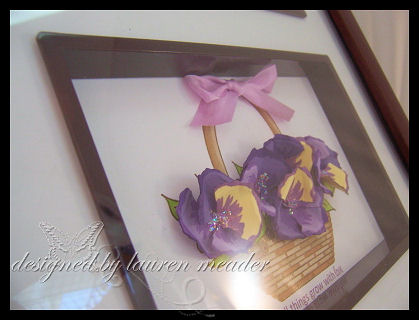
Now close-up front view.
 I used stickles for the flower centers for MORE interest.
The basket is a stamp that is made to go WITH the punches!! Cool huh? This one is from Make an Impression, and can be found HERE. Talk about extending the mileage from your punches, and combining 2 great hobbies into ONE! LOVE IT.
For the basket-I stamped and embossed it with gold EP. Then I colored with my Copic’s. I went on to create the paper pansy’s. I used textured Bazzill cardstock, and my markers (as directed from a book) to create this real look.
The sentiment is from Garden of Life
Well I hope you like it. More importantly I hope my mom LOVES it! LOL! I think she will. She has been at me to get her this photo for some time now.
Well its back to stamping for me. Thank you again for the support in my new ventures. You all are just the BEST!!!!
Tomorrow starts the Sneak Peeks!! YEAH!! I hate being on the other end of sneak peeks, because I need it yesterday, and having to wait is PURE torture!
TTFN
(ta ta for now-as Tigger from Winnie The pooh would say!) I don’t know what compelled that, but I’m so going with it.
Well, if you read my blog, you most likely know how BAD I am about getting things out in the mail. I swear I am trying to get better. It really is an awful thing I have going on with that. I have a stack of mail, sitting here, waiting to go postal (TODAY! I SWEAR!).
The problem is most of it is always to heavy to just slap on a stamp or sometimes even two, so I can’t just stick it IN the mailbox-KWIM? I have to GO IN.
Anyway, I made a super long to-do list, since I have been UBER busy, and I have gotten several things, crossed off! YEAH!!
This next project was one, of the many, that I wanted to get done, before a year had past! LOL! It also made me realize how many I have NOT got done. Oh boy!
Especially For You Juanita
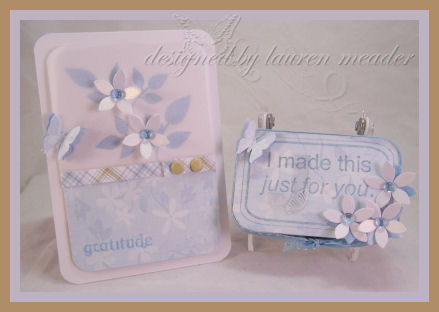
I wrote a few weeks ago (wow time flies) that Juanita sent me What’s in your tin 1, after reading I was kicking myself for only getting set 2! I was so touched by her sweet gesture. I knew I had to make her, her very own tin! So away I went with this tin, and notecard for her.
Now not knowing people, and their favorite things, can make creating something for them difficult. I decided I would go with whatever I thought was pretty! LOL! So I turned to some of my favorite things!
I LOVE altering things, so that was of course so FUN for me! The set she sent me-What’s in your tin 1, Chatterboxpaper, Bridal Confetti flowers (LOVIN those in case you have not noticed), my Martha Stewart butterfly punches, Faux Dew Drops :D, acetate, my Cuttlebug Red Tag alphabet, White StazOn, Vellum cardstock, brads by SEI, and one of my all time FAVORTIE floral sets Beautiful Blooms
EDITED TO ADD: HERE is my link for the dew drops. I color mine with my Copic markers to change the color!
The Close-ups
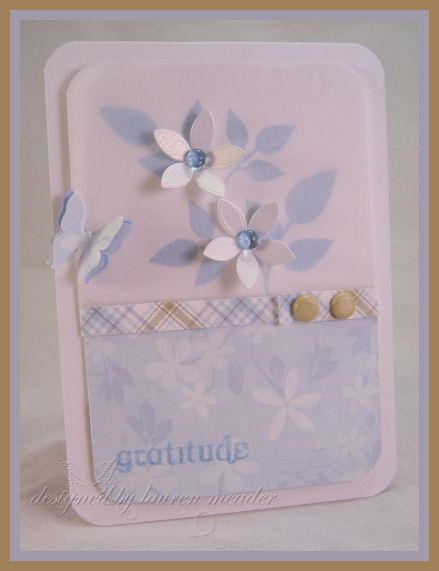
I so LOVED the softness this card portrayed. I stamped the leaf from Beautiful Blooms, in bashful blue ink. It was a bit harsh, so I layered Vellum cardstock OVER it, to soften the look! Pretty NIFTY huh? It will immediately soften any color you layer it over. Sometimes if your ink is a bit too harsh, just give this a try. It HAS to be the cardstock, not vellum paper! Vellum paper is very thin, and to me useless. I LOVE vellum cardstock. You can get it at some stamp store or through Stampin’Up!
I then layered on my bridal confetti flowers, and my hand made dew drops for the centers!
My butterfly is punched 3 times-bashful blue on bottom, vellum cardstock in the middle, then the patterned paper on top 😀
The rounded corners were done to match the tin! Plus I love the floating, and soft look it offers to this design. No HARSH edges.
 The tin
Not sure WHAT to put in there? Open to suggestions 😀
Well I used the same papers, and the set she sent me. Same flowers/butterfly as above. Maybe overboard with the flowers? Oh well. I colored the “leaves” blue. I tried to keep it balanced. One wasn’t enough, two was an even number and looked odd. Scattering them across the tin didn’t work either. I did need “something” and this was the end result. Has that “home-made” imperfect appeal I guess.
What I LOVE on this is the “J”. Can you see it? I just die cut my acetate with my Cuttlebug, and stamped just the corner of the “J” with white StazOn, using the floral image from the Simple Little Things set from Papertrey Ink (note: set was earned and not for sale). I also did this because “J” is the first initial in her name, and the “just” is at a slant, so I like that too. The letter is attached under the stamped white corner with a glue dot. LOVE those things!!
So that is it for today!
I am definitely off to Michaels today! I haven’t been in like 2 weeks. I hear they have new Martha Stewart stuff-so I’m all over it.
I hope I find some neat little thing to put in here for her, before I go to the post office!
As always, thanks for checkin in today.
Tomorrow is going to be a 2 poster day! I have my blogger’s challenge, and later in the day is the Papertrey Ink Blog Hop!! So hope you come back then. I can’t wait to see what everyone has up their sleeve’s for that.
Till then
Lauren
Many of you asked just HOW to make—> THIS <—Seeds of Love packet I had done.
I told you it was VERY simple, and now you will all get to see for yourself. These would be AWESOME Wedding or Shower favors! Easy to whip out, and they can be very inexpensive!
Now I seriously don’t have a day that goes by that I don’t use my Scor-Pal! No lie! If you read my blog you will see it is invaluable to me-that and my ATG Gun! LOL! Anyway let’s get to the template tutorial shall we?
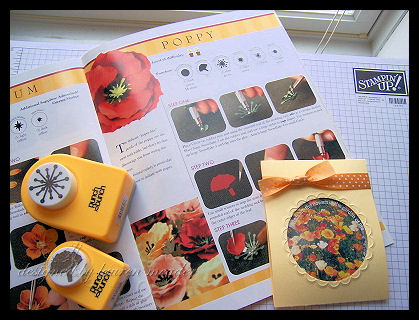
 Pretty Poppies seed packet coverlet
Supplies-Scor-Pal, terrific tape, Garden of Life, lemon tart cardstock, black cardstock, acetate, bazzill cardstock (flower), wasabi (leaf), black cardstock, butterfly punch by Martha Stewart, circle nestabilites, summer sunrise polka dot ribbon by PTI, various punches, The Paper Garden book.
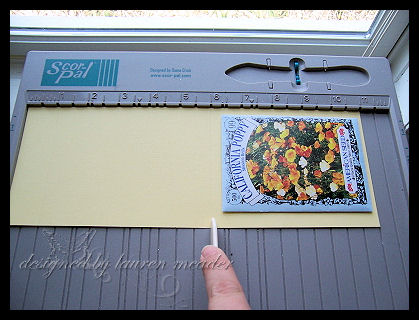
Step 1
Cut cardstock to 4 X 11. Using your Scor-Pal Score at 1 and 6 (see how seed packet will easily fit)
Step 2
Choose die cut, and cut out, mid, lower portion of FRONT panel. See above photo. It is the panel the seeds are laying on.
(SEE NEXT PHOTO)
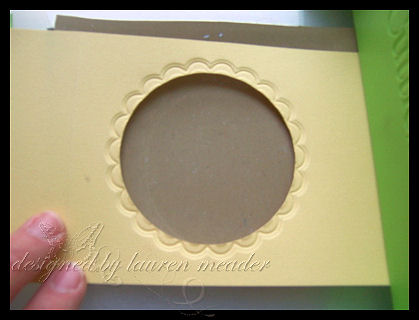
Step 3 OPTIONAL
OPTIONAL-then take larger nestability die, and JUST emboss border around cut out panel.
To JUST emboss-in your Cuttlebug-you take A plate, B plate, tan mats, cardstock, nestabilitily and then B plate.
Then it won’t cut.

This is what your panel will look like
Now you can choose which side you want to use on the front of your packet holder. I chose the opposite side to use as my front design.
Then use Scor-tool to bend score marks.
Step 4
Cut aceate layer 4 X 4, and adhere behind cut out, using terrific tape or redline tape (clear tape). Stamp if desired. I used Garden of Life for this sample. I bent the friends sentiment, to fit in the top half of the circle.
Apply a adhesive strip to the back panel, and place seed packet

Step 5
Fold closed. Secure with band of ribbon to tie shut. Then decorate as desired.
 See finished packet at top
Since I used a Poppy Seed packet I am using my book The Paper Garden ( that and ALL the punches used in the book will soon be at All That Scraps!) to decorate the front of mine with Paper Poppy’s! If I don’t have an exact punch I try to improvise with what I do have. It’s all about creative liberty!
And that my friends is all there is to it! Just a very simple seed coverlet.
Hope you liked it. If you get to try it, send me a link! I’d love to see your version.
Till tomorrow.
My Etsy

Who I Designed For
Blogroll
- Alicia
- Alli Miles
- Ally Blankenship
- Amber
- Andi @ crafts on a whim
- Angel R
- Angie Z
- Anne Kranitz
- Becky O
- Bee
- Beth Silaka
- Bethany Paull
- Beverly Nash
- Bobbie
- Cambria
- Cammie
- Card of the Week
- Card Positioning System (CPS)
- Cards for Cancer
- Catherine Doucette
- Charmaine
- Cheryl Sims
- Chriss Rollins
- Christina
- Christine Ewing
- Christine Wooden
- Colleen Schaan
- Craft Critique
- Craft Gossip
- Crystal
- Dawn Easton
- Emily Giovanni
- Geny
- Holly
- Igne Groot
- Inspirational Craft Blogs
- Irene
- Jami Sibley
- Jeanne Streiff
- Jen del Muro
- Jeni Bond
- JenMarie
- Jenn Balcer
- Jenn Diercks
- Jenn O
- Jennifer E
- Jennifer Mick
- Jennifer Pereda
- Jennifer-Sweet Treat
- Joanne Basile
- Jodi Collins
- Julia Stainton
- Julie Masse
- Karen
- Kathryn Berthiaume
- Katie Cotton
- Kelley Holland
- Kendra
- Kim Scholfield
- Kris’s Color Stripes! Get inspired here
- Kristen Dubosque
- Kristin Eberline
- Kristine
- Laura @ Sunshine Stamper
- Laura Turnmire
- Laurie Schmidlin
- Lesa Rapp
- Linda Duke
- Linda-LSN
- Lindsey Botkin
- Lisa (lakind scs)
- Lisa Kind
- Lori Craig
- Maggie
- Mara Campbell
- Maria
- Maria Levine
- Mary
- MaryJo
- Melanie M
- Monique Hansen
- Moxie Fab World
- Pam Imholz
- PaperCrafts Connection
- Peppers and Pollywogs Kids party site
- Rebecca Grohall
- Rita
- Robyn
- Rose Ann
- Sarah Vrolyk
- Sharon Harnist
- Sharon Johnson
- Sharon Rivera (a chemisrty with paper)
- Sherrie
- Sophia Landry
- Storage Units, Ink, & More Blog
- Sue Berker
- Susan (Rainy)
- Tangii Crane
- Tracy
- Tricia Traxler
- Trudee
- Velta
- VivLyn
- Zena
MTME Pretty Palette Color Team
MTME Pretty Patterns Sketch Team
My Time Made Easy TM LLC
Shop till you drop!
Lauren Meader
About Me
Copyrighted material
Subscribe To My Blog
Pages
- About me
- Alexa’s Story!
- My Crafty Corner!
- My Time Made Easy™ LLC
- Our Make A Wish Trip to Disney!
- Resume/Publication List
Calendar
| M | T | W | T | F | S | S |
|---|---|---|---|---|---|---|
| 1 | 2 | 3 | 4 | 5 | ||
| 6 | 7 | 8 | 9 | 10 | 11 | 12 |
| 13 | 14 | 15 | 16 | 17 | 18 | 19 |
| 20 | 21 | 22 | 23 | 24 | 25 | 26 |
| 27 | 28 | 29 | 30 | 31 | ||
Archives
- August 2013
- July 2013
- June 2013
- May 2013
- April 2013
- March 2013
- February 2013
- January 2013
- December 2012
- November 2012
- October 2012
- September 2012
- August 2012
- July 2012
- June 2012
- May 2012
- April 2012
- March 2012
- February 2012
- January 2012
- December 2011
- November 2011
- October 2011
- September 2011
- August 2011
- July 2011
- June 2011
- May 2011
- April 2011
- March 2011
- February 2011
- January 2011
- December 2010
- November 2010
- October 2010
- September 2010
- August 2010
- July 2010
- June 2010
- May 2010
- April 2010
- March 2010
- February 2010
- January 2010
- December 2009
- November 2009
- October 2009
- September 2009
- August 2009
- July 2009
- June 2009
- May 2009
- April 2009
- March 2009
- February 2009
- January 2009
- December 2008
- November 2008
- October 2008
- September 2008
- August 2008
- July 2008
- June 2008
- May 2008
- April 2008
- March 2008
- February 2008
- January 2008
- December 2007
- November 2007
- October 2007
- September 2007
- August 2007
- July 2007
- June 2007
- May 2007
- April 2007
- March 2007
- January 2007
Categories
- About Me
- All That Scraps
- blogger challenge
- camera/photo play
- Cards
- Contests
- family stuff
- FOR SALE
- Home decor/3-D items
- How to FAKE it!
- Introduction
- JUGS Challenge
- JustRite Stampers
- Lizzie Anne Designs
- My family stuff
- My Stamping Space
- My Time Made Easy
- My Time To Color Challenge
- My Time to Create Challenge
- My Timeless Template Challenge
- My Timeless Templates
- Mytime Mail
- MYTIME MOVIE/VIDEOs
- Papertrey Newsletter
- Pink Cat Studio
- Pretty Palette Challenge
- Pretty Patterns Sketch
- Product Opinions and Must haves
- Recipe's
- Saturday Sketch
- Smilebox Creations
- Stampavie
- Tutorials
- Uncategorized
- videos
Most Popular
- Create your own Onesie Card Tutorial-and important NOTE! PLEASE READ (2529)
- Saturday Sketch-Boxed bag holder (2333)
- Going GREEN! Fancy Flower Flourish-Closure Video (1478)
- Fabulous Favorite - Giveaway! (1336)
- a Prayer Request (1232)
- QUICK-Easter Baskets from Nestabilities-PTI style-and blog challenge (1063)
- Teaser Sketch (999)
- February Release Giveway! (and a little peek) (996)
- Group Post and Rambling Rose Video Tutorial (985)
- GIVEAWAY! Who wants it all?! (895)
Recent Comments (RSS)
- Daya Sons: Daya Sons, a renowned manufacturer
- 첫충사이트: 완전히 흥미로운 블로그 게시입니다. 저는
- sarah: Wow, Lauren, what a stunning
- hedie: خرید راهبند
- 야동: Love to read it,Waiting For
- 야동: This seller is in a
- 바카라사이트: 여기 처음 왔어요. 나는이 게시판을
- 야동티비: I was surfing the Internet
- 바카라사이트: 비슷한 주제에 대한 흥미로운 정보를
- 바카라사이트: "여기에 제공해 주신 귀중한 정보와
Copyright © 2007 - My Time, My Creations, My Stampendence - is proudly powered by WordPress
This blog has been Tweaked and Designed by Sara Williams