Papertrey Ink Release May
May 15, 2008Thank you ALL soooooo much for the thoughts & prayers for Alexa. We got her tests back and things look great. I am still on the rollercoaster of emotions. Its hard to really explain and put into words. Yes its a happy time, but there is so much more to it. I know I am certainly looking forward to the weekend of retail therapy at CKC! But especially meeting up with some PSF’s!
My PSF Laura Sneden sent a gorgeous planter of Violets! THANK YOU!!!! Lord please help me to NOT kill them. They are the PRETTIEST purple ever.
Then there is another Laura who sent her a stunning bouquet! Laura-you didn’t include your last name! Please email me. I have so many PSF’s named Laura. I want to properly thank you. It was so sweet of you to do.
Photos will be posted this week/weekend, along with the pkg of goodies I got the other day with some cards too.
OK now today I want to share my PTI projects with you all!!! I hope you all enjoyed the release, and be sure to check out the Design Team gallery and their blogs.
Please let me know which project you liked most. I always enjoy reading the different responses and why they are such. Everyone is so different.
*NOTE ALL PROJECTS USE STAMPS FROM PAPERTREY INK!
Loving Lavender Moon! Oh and the PAPER!! WOW!
OK here we go!
Holiday Greetings
Stamps-Mailbox Greetings
Cardstock-PTI select white
Patterned Paper by Chatterbox
Acetate
Ink-Pallette black, Copic Markers, bashful blue, white StazOn
CM Wavy cutter, glitter, ribbon by Martha Stewart
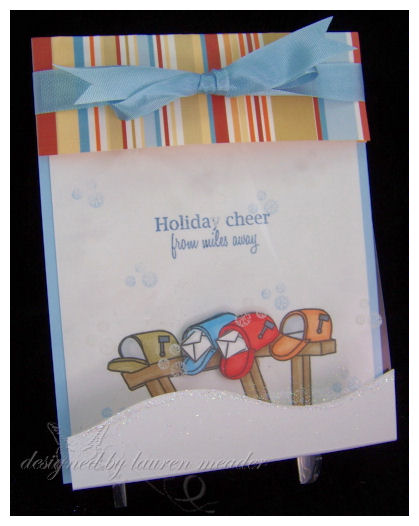
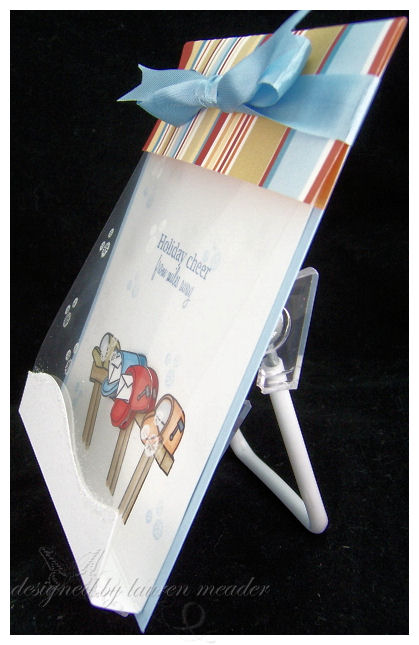
This is a super cute 3D style card. The acetate layer folds up under the top flap. Snowflakes are stamped on the acetate layer so they appear to be falling from the sky. I cut the mailboxes in the middle out, and put “mail” in them! I made the wavy snow-hill with my CM wavy cutter. I think this is definitely a unique holiday card, if you are one who starts in July, or has some special people on that holiday/winter card list!
Side view
Honey Sweets Set
Stamps-Honey Bees, Beautiful Blooms
Cardstock-Lemon Tart, Spring Moss, PTI select white, vellum cardstock
Patterned Paper- Bitty Baby Blessing in Big Blossoms
Ink-White StazOn, Lemon Tart, Pallette black, Old Olive, caramel
Other-Lemon Tart twill ribbon, Spring Moss Polka Dot ribbon, Corner rounder, Bunch Bunch flower punches, stickles

I wanted to create a “sweet” gift set. I made my bees in 3 layers!
We have the bottom layer, just the body. Middle layer-bee stamped on vellum cardstock with white stazon-then cut out for the wings-then the bee body again. Candice’s set makes the perfect bee easy!
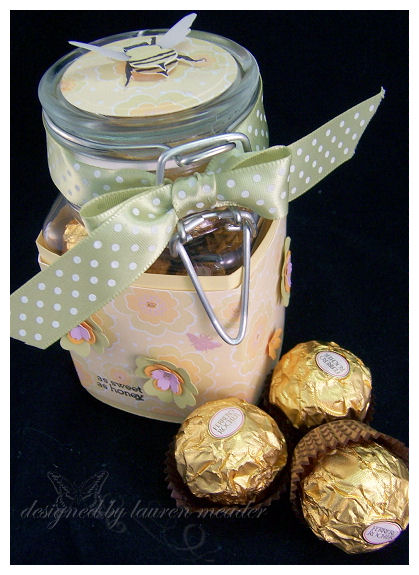
So I got this jar at Michaels, and filled it with Rocher chocolates! I liked the jar because it seemed like an old honey jar. I found that my Punch Bunch punches made flowers similar to that of the 12 X 12 Big Blossoms paper! So it was super easy to create a 3D look. I also stamped the little bee on random places of the honey Jar.
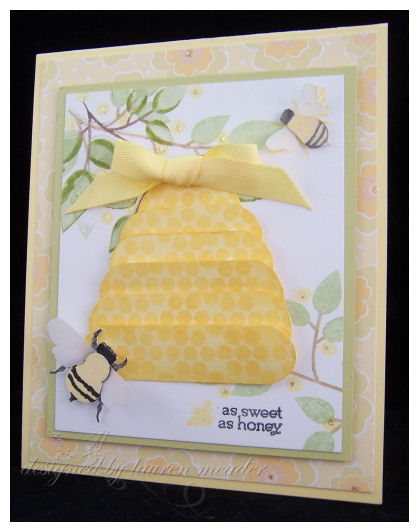
For my hive-I stamped the honey combs onto my cardstock. Cut strips, then used a corner rounder. Dimensionals give it the ultimate dimension. When I saw Taylor’s sneak peek post I about died at how similar our creations were!
Bun in the oven
This is a cute little box, designed to look like an oven!
Inside is a cute little baby favor for the new mom to be, or shower favor!
Bun IN the oven box favor
Stamps-Favor It Baby, Father Knows best (circle from set for oven burners), polka dot basics (oven mit, and tin decoration)
Ink-Chocolate Chip ink
Cardstock-PTI select White, Sweet Blush, Kraft, Chocolate Chip
Sweet blush twill ribbon
acetate, Scor-Pal, Clear top square tin, 1/2 circle punch
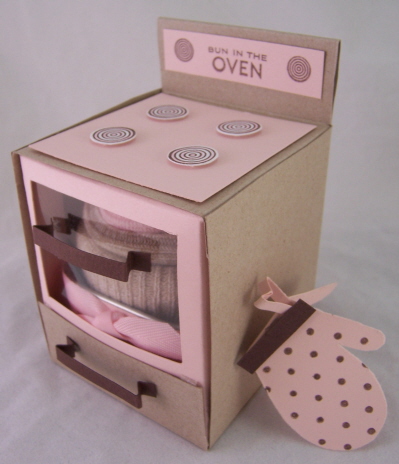 IN the oven
I took the sentiment “Bun in the oven” literally with this creation. I designed this little box, to look and open like an oven! The burner’s were done using the circle image from Father Knows Best!
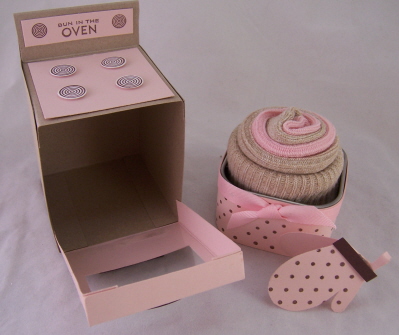 OUT of the oven
I covered the square tin and rolled up a pair of pink, and brown socks, to look like a cinnamon bun. It fits perfectly in there, and in my oven box.
I hand cut the little oven mit card to go with the package!
Cinn-a-bun in the oven
Stamps-Favor It, Garden of Life (for the cinn-a-bun image), Border’s and Corner’s circle set
Cardstock-sweet blush, chocolate chip, PTI select white
Patterned Paper -PTI Pink Collection
Ink-Brown Stazon, Copic Marker, White StazOn
Sweet blush polka dot ribbon, sweet blush satin ribbon
Clear round tin, circle scallop nestabilties, Pillsbury cinnamon rolls, circle punches, scallop punch

I used the scallop circle nestabilties to create a pretty circle box, to hold my little circle tin, which has a cooked cinnamon bun inside it. I designed the top of the tin to look like a cinnamon bun using Garden of Life, and some white glitter, for the frosting.
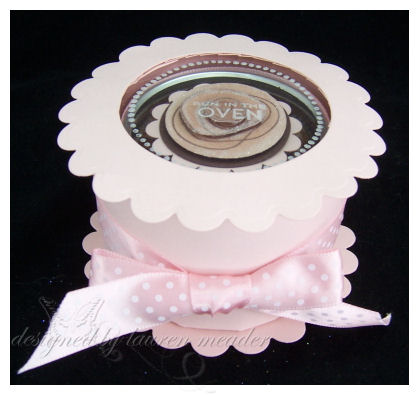
A sweet little round box created using nestabilities!
Holds this little favor perfectly!
Hippity Hop Hat
Stamps-Bitty Baby Blessings, Pond Life
Ink-Pallette ink in black and Lavender Sachet
fabric, scissors, Ribbon stiff, fusible webbing, iron
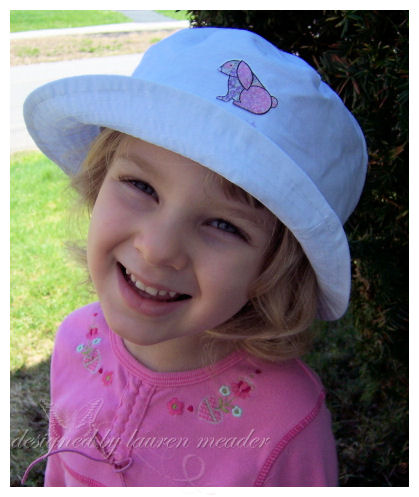
When I found this bucket hat at Target I was just giddy! I knew I could make it go from a plain old hat, to one my daughter would LOVE!! The best part-no sewing required!!
I asked Amber to pick an image she wanted on the hat, and she chose the bunny. We then organized some scraps from my pile from when I use to sew!
Here is a closer view
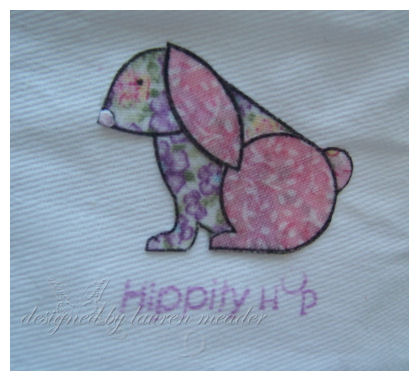
All I needed was some black pallette ink, and a little Ribbon Stiff, and I had this cute fabric pieced bunny for her hat! The nose is liquid pearls. The sentiment uses a Lavender Sachet Pallette ink.
If you can cut, piece and iron you are on your way!
Sweet Baby Door hanger
Stamps-Bitty Baby Blessings
Cardstock-PTI select white, spring moss
Pattern Paper-Pink Collection
Ink-black pallette
Spring Moss Stain ribbon, lace scrap
Acrylic frame by Making Memories, white chipboard coaster 4 X 4

This was a quick and simple door hanger, made to decorate any baby room. It became part of a gift basket.
Little Sailor
Stamps-Bitty Baby Blessings, Borders & Corners circle set
Cardstock-PTI select white, navy, red
Ink-white craft, pallette black, copic markers
circle punch, star eyelets by Making Memories
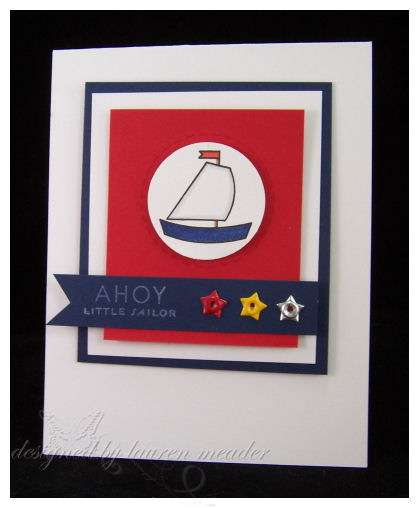
This is a simple and adorable card for any little boy from birth to the first few years! My friend just took this card for a baby shower, where the baby boy to be, has a room , that is a Pottery Barn nautical theme. Such a sweet and simple image. I love the clean lines this has.
2 Peas in a Pod
Stamps-Bitty Baby Blessings, Green Thumb
Ink-black pallette, spring moss, blush, apricot, plum
cardstock-plum, PTI select white
Patterned Paper-Bitty Blessings in big blooms
spring moss polka dot ribbon, scallop rectangle nestabilties, punch bunch flower
punched, making memories page pebble, circle punches, stickles
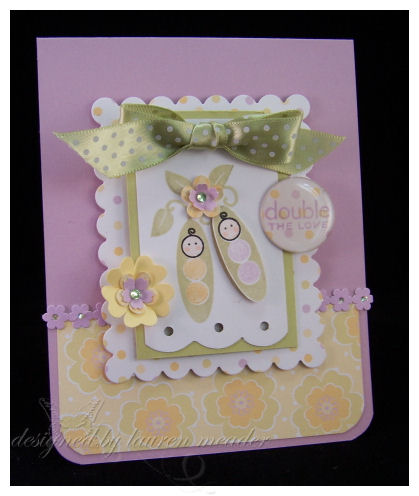
THIS is my favorite project of the month. I have no idea why-it just is.
When I saw the little head image from Bitty Baby Blessings I KNEW I had to attempt to pair it with Green Thumb’s pea pod image! Well, as you can see it worked! Its this not the cutest little baby in a pea pod you have ever seen? I loved making this.
I took my punch bunch punches and re-created the same flowers as in the patterned paper!
Circus Fun invitation
Stamps-Bitty Baby Blessings
Cardstock-PRI select white, Summer Sunset, Spring Moss
Patterned Paper from Bitty Baby Blessings collection
Ink-Black pallete
other- Cutterbee, Making Memories page pebbles

I was definitely thinking Circus Fun themed birthday when I saw this image, and the patterned paper! I paper pieced the elephant, which is so fun & easy to do. punched out the 2 circles from the Big Spots, and added a page pebble to create a “ball” look to it. The elephant is suppose to be in the circus ring-get it?!
Well that is plenty of eye candy for today!
I am hoping to pull it together and get my Friday Blogger’s Challenge done, and a sketch completed for you.
Once again thank you for reading.
Till tomorrow.

My Etsy

Who I Designed For
Blogroll
- Alicia
- Alli Miles
- Ally Blankenship
- Amber
- Andi @ crafts on a whim
- Angel R
- Angie Z
- Anne Kranitz
- Becky O
- Bee
- Beth Silaka
- Bethany Paull
- Beverly Nash
- Bobbie
- Cambria
- Cammie
- Card of the Week
- Card Positioning System (CPS)
- Cards for Cancer
- Catherine Doucette
- Charmaine
- Cheryl Sims
- Chriss Rollins
- Christina
- Christine Ewing
- Christine Wooden
- Colleen Schaan
- Craft Critique
- Craft Gossip
- Crystal
- Dawn Easton
- Emily Giovanni
- Geny
- Holly
- Igne Groot
- Inspirational Craft Blogs
- Irene
- Jami Sibley
- Jeanne Streiff
- Jen del Muro
- Jeni Bond
- JenMarie
- Jenn Balcer
- Jenn Diercks
- Jenn O
- Jennifer E
- Jennifer Mick
- Jennifer Pereda
- Jennifer-Sweet Treat
- Joanne Basile
- Jodi Collins
- Julia Stainton
- Julie Masse
- Karen
- Kathryn Berthiaume
- Katie Cotton
- Kelley Holland
- Kendra
- Kim Scholfield
- Kris’s Color Stripes! Get inspired here
- Kristen Dubosque
- Kristin Eberline
- Kristine
- Laura @ Sunshine Stamper
- Laura Turnmire
- Laurie Schmidlin
- Lesa Rapp
- Linda Duke
- Linda-LSN
- Lindsey Botkin
- Lisa (lakind scs)
- Lisa Kind
- Lori Craig
- Maggie
- Mara Campbell
- Maria
- Maria Levine
- Mary
- MaryJo
- Melanie M
- Monique Hansen
- Moxie Fab World
- Pam Imholz
- PaperCrafts Connection
- Peppers and Pollywogs Kids party site
- Rebecca Grohall
- Rita
- Robyn
- Rose Ann
- Sarah Vrolyk
- Sharon Harnist
- Sharon Johnson
- Sharon Rivera (a chemisrty with paper)
- Sherrie
- Sophia Landry
- Storage Units, Ink, & More Blog
- Sue Berker
- Susan (Rainy)
- Tangii Crane
- Tracy
- Tricia Traxler
- Trudee
- Velta
- VivLyn
- Zena
MTME Pretty Palette Color Team
MTME Pretty Patterns Sketch Team
My Time Made Easy TM LLC
Shop till you drop!
Lauren Meader
About Me
Copyrighted material
Subscribe To My Blog
Pages
- About me
- Alexa’s Story!
- My Crafty Corner!
- My Time Made Easy™ LLC
- Our Make A Wish Trip to Disney!
- Resume/Publication List
Calendar
Archives
- August 2013
- July 2013
- June 2013
- May 2013
- April 2013
- March 2013
- February 2013
- January 2013
- December 2012
- November 2012
- October 2012
- September 2012
- August 2012
- July 2012
- June 2012
- May 2012
- April 2012
- March 2012
- February 2012
- January 2012
- December 2011
- November 2011
- October 2011
- September 2011
- August 2011
- July 2011
- June 2011
- May 2011
- April 2011
- March 2011
- February 2011
- January 2011
- December 2010
- November 2010
- October 2010
- September 2010
- August 2010
- July 2010
- June 2010
- May 2010
- April 2010
- March 2010
- February 2010
- January 2010
- December 2009
- November 2009
- October 2009
- September 2009
- August 2009
- July 2009
- June 2009
- May 2009
- April 2009
- March 2009
- February 2009
- January 2009
- December 2008
- November 2008
- October 2008
- September 2008
- August 2008
- July 2008
- June 2008
- May 2008
- April 2008
- March 2008
- February 2008
- January 2008
- December 2007
- November 2007
- October 2007
- September 2007
- August 2007
- July 2007
- June 2007
- May 2007
- April 2007
- March 2007
- January 2007
Categories
- About Me
- All That Scraps
- blogger challenge
- camera/photo play
- Cards
- Contests
- family stuff
- FOR SALE
- Home decor/3-D items
- How to FAKE it!
- Introduction
- JUGS Challenge
- JustRite Stampers
- Lizzie Anne Designs
- My family stuff
- My Stamping Space
- My Time Made Easy
- My Time To Color Challenge
- My Time to Create Challenge
- My Timeless Template Challenge
- My Timeless Templates
- Mytime Mail
- MYTIME MOVIE/VIDEOs
- Papertrey Newsletter
- Pink Cat Studio
- Pretty Palette Challenge
- Pretty Patterns Sketch
- Product Opinions and Must haves
- Recipe's
- Saturday Sketch
- Smilebox Creations
- Stampavie
- Tutorials
- Uncategorized
- videos
Most Popular
- Create your own Onesie Card Tutorial-and important NOTE! PLEASE READ (2529)
- Saturday Sketch-Boxed bag holder (2333)
- Going GREEN! Fancy Flower Flourish-Closure Video (1478)
- Fabulous Favorite - Giveaway! (1336)
- a Prayer Request (1231)
- QUICK-Easter Baskets from Nestabilities-PTI style-and blog challenge (1063)
- Teaser Sketch (999)
- February Release Giveway! (and a little peek) (996)
- Group Post and Rambling Rose Video Tutorial (985)
- GIVEAWAY! Who wants it all?! (895)
Recent Comments (RSS)
- 바카라사이트: 여기 처음 왔어요. 나는이 게시판을
- 야동티비: I was surfing the Internet
- 바카라사이트: 비슷한 주제에 대한 흥미로운 정보를
- 바카라사이트: "여기에 제공해 주신 귀중한 정보와
- 온라인홀덤: 유익한 웹 사이트를 게시하는 데
- 홀덤나라: 나는 당신의 블로그를 정말 좋아합니다.
- lisa: Technology, too, has left an
- 주소모음: 흠 !! 이 블로그는 정말
- FutureGen Apps: Thank You For Sharing fantastic
- 웹툰사이트: 터키에서 온라인 스포츠 베팅을 할
Copyright © 2007 - My Time, My Creations, My Stampendence - is proudly powered by WordPress
This blog has been Tweaked and Designed by Sara Williams
99 Responses for "Papertrey Ink Release May"
Lauren you amaze me! Every single project is awesome! How do you come up with so many ideas???? You really inspire me to try my best to be creative! YOU GO GIRL!!
Renee
Amazing, as always! I don’t know how you do it. I’ve been checking your blog daily for a few months now and everyday you amaze me. How do you seem to never run out of ideas?
[…] Its hard to really explain and put into words. Yes its a happy time, but there is so much morehttp://laurenm.blogs.splitcoaststampers.com/2008/05/15/papertrey-ink-release-may/It??s No Hallucination: Polka-Dot Buses Aim to Cut Travel Time New York TimesAn experimental project […]
I just want to know if you get any sleep Lauren!!! I’m glad things went well with Alexa yesterday and I hope this is a new beginning for all of you.
I absolutely love all your designs in this posting but my favourite has to be your Bun in the Oven oven…you are sooooo clever and my chin drops with each of your new creations. You are a great inspiration.
Wow, stunning projects Laura! I love every single one of them! And WOW at that little oven you made, that is SO cute!
[…] Its hard to really explain and put into words. Yes its a happy time, but there is so much morehttp://laurenm.blogs.splitcoaststampers.com/2008/05/15/papertrey-ink-release-may/Calendar of Events Hollis Brookline JournalThe library is open Saturdays from 10 a.m. to 2 p.m. The […]
Lauren,
What gorgeous projects! Such a variety of incredible ideas! Thanks for all you do – it’s truly
inspiring.
I’ll continue to pray for you and Alexa and your family. God’s peace upon you all.
[…] Its hard to really explain and put into words. Yes its a happy time, but there is so much morehttp://laurenm.blogs.splitcoaststampers.com/2008/05/15/papertrey-ink-release-may/Lakeshore update Manitowoc Herald Times ReporterMANITOWOC A ceremony to honor law enforcement […]
WOW!. Thats it just WOW!
No really these are amazing. Have to come back later to take it all in. Amber is so cute. So glad that everything went well yesterday.
2 days left!!!!!! And after last night I am soooooo ready to go shopping. (did you check out Nicholes blog yet this morning? happy dance!!!) I’m so tired. -Molly B
These are fabulous! I can’t believe the bun in the oven… it’s so gorgeous and ingenious!
Wow Lauren! You outdid yourself this month! Love the mailboxes on acetate. Such a pretty card. The cinnamon bun out of the rose is too clever and all the baby cards are so sweet. I can’t pick a favorite — I love them all!
GOOD HEAVENS!!!!!!!!!!!!! Holy Moly! You are awesome chickie! I love them all but my fav (if I have to pick 2 :-)) would have to be Bun in the Oven and the pea pod card. But how cute is Amber in that hat! OH my!
Alexa continues to be in my thoughts and prayers!
All the Best!
Oh my gosh Lauren – you out did yourself this time! The bun in the oven in just so darn cute – wow, amazing!
So happy to read things with Alexa went well yesterday! Your cards are incredible! Absolutely stunning! Do you ever sleep?You pack more into a day than anyone I know!
as always, just stunning, Lauren. I love the last two projects, they are my faves! That baby set is just too cute!
Lauren, I don’t know how you sleep at night. How do you turn your brain off? I can’t believe the clever ideas you come up with! That bun in the oven is over the top cute! You are amazing girl!
Oh my word Lauren! No wonder you have been smokin’ busy! Look at all these gorgeous projects you completed for PTI. They are so lucky to have you…wow! I can’t even pick a favourite…they are all fantastic!
the mailboxes were the stamps I got and I love what you did with them! YAY
Happy to hear about Alexa’s results. I’m sure you won’t breath right till 2012, but we will continue our prayers and positive thoughts and hold you up!
hugs,
emily
What great projects Lauren ! you sure have been busy girl!! I saw the oven on Nicole’s blog and thought it was just soooooo cute!!! I love your snowy mail boxes card with the acetate front – and the coffee roll in the round container is just so cle-vah! I like the colors on the sailor boy card – super duper designs on all!!
OMGoodness!!!
What a creating machine you are! I can’t image what is swimming in your head all day if that is what you have time to get out.lol
Congrats on Alexa’s done-ness. (yes, I made that word up)
All the best for some rest…
You never cease to amaze me with your wonderful projects and your endless talent! Thank you so much for sharing with us everyday! I am so glad to hear good news about Alexa! God bless!
You always amaze me with your projects! The “bun in the oven” is absolutely the cutest! (and I thought you onesie card was the bomb for a baby card!) The Ahoy Matey card is stunning. Love these new sets. Can’t wait to read your blog every day. Keep up the inspiring work.
I don’t know why I am continually amazed by your creations – but I am!! You have such a wonderfully creative eye. There is no way that I could pick a favorite project – they are each one wonderful. Thank you for sharing your creations with us.
I’m just totally in love with all of your projects…I think my favorites are the bunny hat, and the bun in the oven…too clever…the cinnamon bun too…aw heck…I’ll just stop now.
This time tomorrow, I’ll be on my way to NH! YIPPEE! Well, maybe a little later, but…
I’m glad Alexa is doing ok – and we will continue to pray that her blood tests continue to come back great, and that she will resume her normal healthy childhood!!!
SEE you tommorow! 🙂
So good to hear all is well with Alexa, Now you can breathe 🙂
Love the holiday card, your snow is so pretty and love the mail in the boxes!
Love your bee card, the background is just lovely and great dimension on your bees!
The oven is just too cute and clever what a fun gift!
The bun in the oven is just too sweet too!
Love the way you dressed up her hat, tfs!
Pretty frilly feel to the frame
Terrific boy card, like those colors!
The two peas in a pod is just darling!
Oh WAOW! You are so right calling it eye candy!hat a treat to look at all your projects! Thanks so much for sharing with us, when really all those creations belong in a book!! Seriously, I know you don’t have time but you should have a book made with your work! Too bad I don’t live closer or I would help you! 😉 ….
My favorite projects are the “Bun in the oven” (too cool!) and the “Little Sailor” card, simple and classy, such punch! 😀
Awesome work once again! ♥
Oh Lauren all your projects are beautiful, and that baby girl of yours sure favors you. I am keeping alexa in my prayers. Susan
Well, you did it again…. left me speechless! *All* your creations are just ‘out of this world’ fantastic! 🙂 How do you do it? I just love your creativity!
I’m happier than words can express the good news with Alexa. I will continue holding her in prayers for a long and healthy life. {{{hugs}}}
Have fun this weekend with the psfs that you’re meeting up with. I’m so jealous that I can’t be there too. Not really ‘jealous’… I’m thrilled for you all, just wish I could be there too, kwim? Have fun…. enjoy yourself… you deserve it!
Love, Renee
Awesome, stunning projects (as always)!!! You are so clever and creative! I can’t imagine how you come up with the neat ideas that you do. I’m envious of your talent.
I do have a quick question for you though. Where do you get the different flower shaped punches that you used on the pea pod card and the honey bee candy jar??? I’ve never seen those punches around before but I have to have them!!! Please tell me they are available somewhere!
Enjoy your weekend and retail therapy. I am praying that everything continues to go well for Alexa. She is such a sweet little blessing to the world. I think of her and all she’s had to suffer when I’m feeling a little sorry for myself, really puts things into perspective. You all are truly inspirational. Bless you.
Amy
Oh my goodness!! These are great projects. My favourites are the Christmas Card with the acetate, the sailor card with the great star eyelets, and the two peas baby card. I am amazed by your creativity. Thanks for sharing your projects with us 🙂
Lauren, you are just amazing! I LOVE every single one of your creations but the bun in the oven is genius! You rock!
Amazing work, as usual! I was wondering, Lauren, which size Punch Bunch punches did you use for the flowers? I found them online and would like to get some. Thanks!
I think Circus Fun invitation, 2 Peas in a Pod, Bun in the oven are my favorites.
I was wondering if you could have a tutorial of Bun in the oven. That is the neatest idea. And Amber’s hat is a neat idea too.
Amy S.
OMG!!!! I don’t even know where to start! These projects are just soooo amazing!!!! I think my favorite is the holiday card with the mailboxes. I LOVE the snow!!! All the baby projects are just tooooo cute!!! I had decided that I didn’t NEED these stamps and now I am starting to rethink that decision! Thanks so much for sharing. You have blown me away with your creativity. Papeetrey is lucky to have you on the design team!
Holy Smokes, Lauren. You have been busy! My favorite is the little oven…that is ADORABLE!!! Everything is super cute…especially your little Amber!!
OH MY GOSH! What a great bunch of projects!! My favorite has got to be the little oven set, however!!! I LOVE that box. Completely wonderful!
Wow – AWESOME projects! And I thought I’d be good this month. MMmm maybe not.
I’m glad you liked the flowers. The second boquet was from us too for Alexa. I hope she liked it.
I hope you all have a great time at CKC. I can’t wait to hear about it.
It was VERY hard to pick a favorite! The little oven was so detailed, I thought it was truly amazing. And the pea pod card was also just too cute for words. As always, your creativity astounds me!
WOWZA, you amaze me at your creativity and talent. My jaw is on the ground with the bun in the oven idea. SO cute and creative. Thanks for sharing with us, you really do inspire me!
Good grief, how do you find the time to do all these amazing creations! I love them all but my favorite is the little oven! I love that for some reason but everything is beautiful!
Oh my goodness…they are all fabulous…I don’t even think I could pick a favorite if I had to …they all are!!
Wow, what a feast for the eyes!! Holy moly! You want us to pick one??? Weeell, I think that bunny on Amber’s hat is sooo adorable, as is the model:) The oven is waaaay fun! The holiday card is so unique. Oh, nuts! I can’t pick one:) I love them all!
So glad that Alexa is getting good reports and that the Chemo has ended:)
So happy to hear that your daughter is doing well; such great news!!
Your PTI projects are … awesome. That’s the word … I know it’s overused, but in this case, it’s perfect!! Wonderful designs, wonderful execution, and great presentation; you rock, Lauren!
~Hugs, Deb
Great work, as always! It’s hard to pick a favorite, but I think my favorites are the first card with the acetate and mailboxes and the oven party favor is so neat! How in the world did you come up with that?!?
Honestly Lauren???Where do you find the time. I am so in AWE of your talent!! Love the new PT releases. Your bun in the oven is precious…and don’t get me started on your adorable bee hive…and I am so happy everything is okay with Alexa!!! Amber looks precious with her bunny hat!!!
HOLY COW, girl — when do you sleep?!?!? With everything going on, how do you crank out so many amazing projects? My mouth just kept flying open! The bun in the oven is so clever! Each one is beautiful — there’s no way to choose a favorite! 🙂
Good gravy Lauren! When in the world do have time for all of this? I love them all, but I think my favorites (cuz I can’t pick just one) are the bun in the oven with the cinnamon roll socks and Amber’s hat. I really liked the holiday card with the letters in the mailbox too. They all ROCK!
as always, you amaze me. Sheesh. I wish i could come up with some of this stuff! haha. I just placed my first PTI order yesterday! I’m so excited to try out their stuff. Yippeee!
I really love your Bun In the Oven project, Its just tooo cute!
I’m going to have to try it the next time I need a baby gift.
And your 3-D Bees are so cute. I’m not normally into bees but You may change my mind.
WOW! that is overwheleming ….I just cant get over how talented you are and I sit in my room forever trying to think up things for my stuff…Gezzzzzzzz great stuff..
Now I have never heard of Vellum paper ..what is it and how would you use it ..
Thanks again
Merciful heavens, your projects are AWESOME, as always! And could Amber be any cuter in that hat??? Adorable!
I am SOOOOO happy for you all, that Alexa’s chemo is OVER! YAY YAY YAY YAY!!!!! I can’t even imagine how good that feels, not having been thru it, but I just know I am VERY HAPPY for all of you. I hope she will have good health, and no signs of cancer for decades and decades!!! She deserves that! You can feel good knowing you are entering the thirties now, a new decade, with new outcomes! And better health, praise God! The best to all of you, always! 😀
Lauren – Wow! Love it all! I must admit I love the lil oven the best. Too cute! I visit your blog daily. You are so talented. My prayers are with you and your family for health and happiness – you deserve it! 🙂
OK wow, you definitely have been very busy! And the news about Alexa is wonderful, I hope you can take an emotional rest! I love the mailbox stamp and I love what you did with the acetate! It’s so cute!~
Wow, these are all amazing!!
HOORAY FOR THE GOOD NEWS! I cannot imagine the joy you must be feeling. God is good. In other news, I love the projects for this release! The oven TOTALLY rocks!
Awesome on the good news!!! I cannot imagine all that you’re feeling right now. I love all of your projects. You are truly amazing and such an inspiration!
Where do all those ideas come from – how can you come up with so many of them and cope with all that is going on! Love the bun in the oven and the bunny hat. The pea pods too really caught my eye. Hope things go from good to excellent as far as young Alexa is concerned and she can have a ball without worrying about sickness, treatments etc. I also hope you can relax a bit.
Yippee!!! Good news for you and the family with Alexa well on her way to full recovery!!! We’ll keep you in our prayers.
WOW!!! on all your projects! I have to say my favorite is the bunny hat…because with 3 kiddos we are always searching for “the” hat to wear…never enough. I’ll have to start making some “special” ones and maybe they won’t get misplaced! 🙂
My favorite card is the holiday cheer from miles away! I love the style…there’s a lot to it and a lot going on but it comes across as simple and clean…and the color combo I love. You do a rockin’ job on everything….your “buns” are so cute!
Gotta head back to the school! Only one week left!!! Summer time fun soon!!!
So glad Alexa’s tests look good!!!!!!!!! Today is the 1 year anniversary of my son’s accident at the sitter in which he broke his leg and was in a hip spica cast for 6 weeks! Anyways – great release projects! Love what you did with the bun in the oven sentiment. My favorite is the double the love with the faces and peas!!!!!!!!!! You are so creative!
Wow! Amazingly creative! Love all the projects. One question, did you actually bake a cinnamon bun in the round tin or bake it and transfer it to the tin? Thanks so much for sharing your awesome ideas with us!
Lauren,
That is wonderful news about Alexa, I will continue to keep you and your family in our prayers!
Your cards and creative projects for PTI are just incredible! I LOVE the beautiful Bee card and the fun bun in the oven, soooo cute!
BRAVO Lauren, thanks so much for your creative work & inspiration!!!
Stamping hugs,
Jennifer 🙂
I’m happy Alexa’s doing well; your children are adorable! I like the honey sweets set card best. The composition and colors are pleasing and striking.
these are amazing!! i love the cinnamon bun in the tin with the scallop box & the baby card with the peas!!! love them!! thank you for such awesome inspiration!
I am so in love with the oven, it knocked my socks off.
Your blog is my favorite, thanks for being such an inspiration.
Amazing as always…I don’t think I can pick which one I like the best…I like them all!
Charmaine
Lauren,
Stunning and gorgeous as always!!! I love the first card the most – the colors are wonderful. I must admit it is truly hard to pick just one. All your projects are terrific. (My friend and I just love your blog. It is our favorite!) Thank you for sharing your talent and ideas each day.
Congrats on Alexa’s last chemo. I know that there are many more blessings coming your way. I wish your family all the best.
Michele
God is good and now only happy smiles with his blessing will be coming your way!! so for that a triple big hug!!… Now as for your projects.. Man amazing as always.. my fav. well all the baby ones.. esp. the “Bun in the Oven” I was giggling over that! Its sooo cute I love it.. and then little pea in the pod card how sweet! Oh I love it all!!
Thank you for sharing as always!
Everything is fabulous but the Bun in The Oven with the socks really stand out. So very very creative!
I love all of them! The bun in the oven, OMG! You are so creative! Thank you so much for sharing with us every day, I always look forward to your posts.
If I can only pick one, it would have to be the oven- I can’t believe what your mind comes upwith! But from the cards, I love the elephant… Great work! And amber is quite the little model!
Diane
Wow! Lots and lots of eye candy! I absolutely love the bun in the oven box which tied first place with the Honey sweets set. the honey sweets set would actually be perfect for my father-in-law! He used to have honey bees! He made his own honey!
How do you manage to get sooo much done? I thought perhaps you managed without sleep but even then there’s not enough time to make so much and fit everything else in as well. A truly amazing selection of creations Lauren. Thank you.
Glad all went well yesterday. That blessed daughter of yours is going to do great things in this world, so much strength and determination will carry her far. GO ALEXA!!
Oh my gosh, where did you find that oven box? You have so many awesome ideas Lauren, you blow my mind away!
GEEEZ, I am in sensory overload!! I think I need to go back and look at all of them again, there is so much to see!! You are so super talented!! Thanks for sharing with us!!
you just ooze with creativity! hard to choose a favorite but that door hanger is probably my fav. I love the bun in the oven too – super fun and I like food themed items. I also really love that pea card – the layout is awesome – I will be saving that for later.
[…] that my Punch Bunch punches made flowers similar to that of the 12 X 12 Big Blossoms paper! … laurenm.blogs.splitcoaststampers.com/2008/05/15/papertrey-ink-release-may/ My Time, My Creations, My Stampendence […]
Hi Lauren! I am truly thankful that Alexa is OK, and the chemo is now history. What a difficult ordeal for the entire family. And your Amber is just so cute in that hat! I went to Target last night and found a white infant size hat. Now I need to get the stamps and make it before we leave next Thurs. for Chicago to see our 2-wk old Lydia! BTW, what is “Ribbon stiff”, and what is it used for? I think I can do this, but I’ve never heard of that particular product. I can guess, but could you give me a few more details? Thank you again for all your talent and willingness to share. I LOVE YOUR BLOG!!!!!!!
WOW Lauren! All of these projects are incredible, but I must say that the “Bun in the oven” box is my fav! Soooo cute and clever! LOVE IT! I also am glad to here the news about Alexa! I have been going through “MY Time withdrawals, as I have not been by in some days! 🙁
All of these wonderful projects are amazing as always! TFS!
Oh my goodness—you have totally outdone yourself! I love every one of those projects! I especially like the “Ahoy, Little Sailor” card and the “Bun in the oven tin” with a cinnamon bun in it—what an amazing idea! Thanks for sharing all your stuff with us~
[…] […]
HOLY COW!!!! I know that’s not very eloquent…but it’s hard to be eloquent when my jaw is gaping open!!! Lauren, these projects are nothing short of AMAZING!!!! Wow!!!
These projects are amazing!!! YOU are amazing!! I love to look at your blog and see what incredibly creative thing you have come up with. All your projects are so uplifting–they’re not just arty or merely creative, though they are very creative–they are uplifting–they have a goodness about them. I hope the joy you bring to others comes back to you and your family a thousand-fold.
These are all such wonderful projects! You are so creative and just plain amazing! 🙂
that sock cinnamn bun is the BOMB!!!!
[…] Its hard to really explain and put into words. Yes its a happy time, but there is so much morehttp://laurenm.blogs.splitcoaststampers.com/2008/05/15/papertrey-ink-release-may/You??d think there was a membership fee Seattle WeeklyThe rest of Aurora Avenue will never live up […]
HELLO LOVE EVRYTHING BUT I WOULD LOVE THE TEMPLATE FOR THE STRAWBERRY BOX AND THE OVEN WOWOWOWWWW I’M A PASTRY CHEF SO A BOX THAT IS AN OVEN I JUST GOTTA HAVE WHO HAS THE TEMPLATE ANYONE???
Absolutely Wonderful Post…
Glad I was checking back to see the ones I had missed!
Cute “Holiday Cheer”…mailboxes are sweet..nice 3-D.
Honey Sweet set is awesome..great dimension!!
Love the Bees and Honey Combs!!
“Bun in the Oven”..Wow..How sweet is this!!
Adorable Bun and mitt too….Excellent!!!
Very pretty circle box too…so delicate..Beautiful!!
*Sweet picture of Amber..Adorable Bunny Hat..
and door hanger.
All cute cards..fabulous colors!!
Thanks for sharing..ALL very inspiring 🙂
Dee
[…] Its hard to really explain and put into words. Yes its a happy time, but there is so much morehttp://laurenm.blogs.splitcoaststampers.com/2008/05/15/papertrey-ink-release-may/Sweet Deal As schools cut back art budgets, non-profits create more programs for kids Urban TulsaIn […]
[…] Will your Bun in the Oven box ever become a “My Timeless Template” […]
[…] my project today, I have to say that I was inspired by Lauren Meader’s oven here. I didn’t make mine the same way though. I started out with one of the cupcake boxes from […]
Hi Lauren,
Is there a template for the Bun in the oven favour. I think they are just fabulous and would love to make them for my up coming baby shower.
Thanks Christine
thank your for you explaination , your imformation is very important for me . thank you again.
hi i love all your invites…. i just want to know is there a way i can get a copy of how to make the oven please please please….
What youre saying is completely true. I know that everybody must say the same thing, but I just think that you put it in a way that everyone can understand. I also love the images you put in here. They fit so well with what youre trying to say. Im sure youll reach so many people with what youve got to say. Sbobet Agen Sbobet
This is a smart blog. I mean it. You have so much knowledge about this issue, and so much passion. You also know how to make people rally behind it, obviously from the responses. Youve got a design here thats not too flashy, but makes a statement as big as what youre saying. Great job, indeed, Thanks betty and friends
Amazing work, as usual! I was wondering, Lauren, which size Punch Bunch punches did you use for the flowers? I found them online and would like to get some. Thanks!
Read was appealing, remain in touch…
remember to stop by the online websites we adhere to, like this a particular, due to the fact it represents our picks from the web…
Cambridgeshire wedding ceremony photographer…
an example of our readers a short despite the fact that ago preferred the subsequent websites…
It’s very good to see this useful post on dog training.
I have a concern however. How do you work with a younger dog?
Leave a reply