Jack of all trades C.C. Designs peek #3
Mar 31, 2008OOPS! I posted this early by mistake! OH WELL!
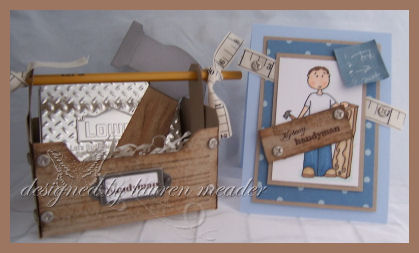 My Handyman!
Now is this set not adorable??? I believe he is called Jack of all trades! He is being released by C.C. Designs on the 4th.
I so needed another cool guy set! I LOVE cutesy. You can’t have a cutesy handyman without a tool box right? I love making boxes and gift items-with cards to match. I had SO MUCH FUN making this tool box 😀 It was perfect with my handmade hammer accessory, and my cool Lowe’s gift card holder tin. I almost altered that, but liked it as is.
Here is a close up
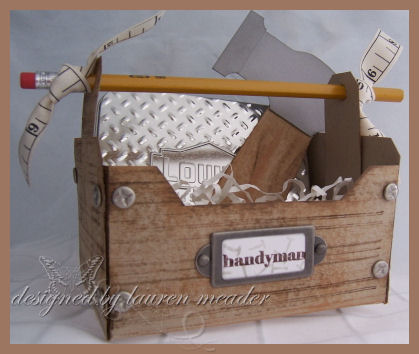 Handyman tool box
How cute would it be for your kids to decorate one for their dad? They can make/buy what they think should go inside of it?
There is also a lined background coming out with this release and I used it on my toolbox. Can you see it? I stamped it in Walnut ink. I also used my Tim Holtz distress inks (my faves are linen, tea dye and walnut), and randomly rubbed them side to side on this for a woodgrain look. Added some screw style brads for that added “look” of a real tool box. I liked the pencil handle for a more handyman feel. The measuring tape ribbon was another cute touch.
I created the hammer just for FUN, as another thing to add to the box. It’s good size. Made with some punches. No biggie.
I made the tool box using a 8 1/2 X 11 sheet of Kraft cardstock.
Here is the template below-CLICK IT TO ENLARGE. Keep in mind Im NOT a pro making this-is just a little guideline to help you a bit, if you need a more visual idea. NOT a print and cut template!
Im no Paint Shop wizard. I recommend making any template with copy paper FIRST, that way you can work out any kink’s or question’s you may have. If you get it perfect first time, then you have a real template to reference in the future 😀
THIS IS FOR PERSONAL USE ONLY PLEASE 😀 No contest or publication submissions.
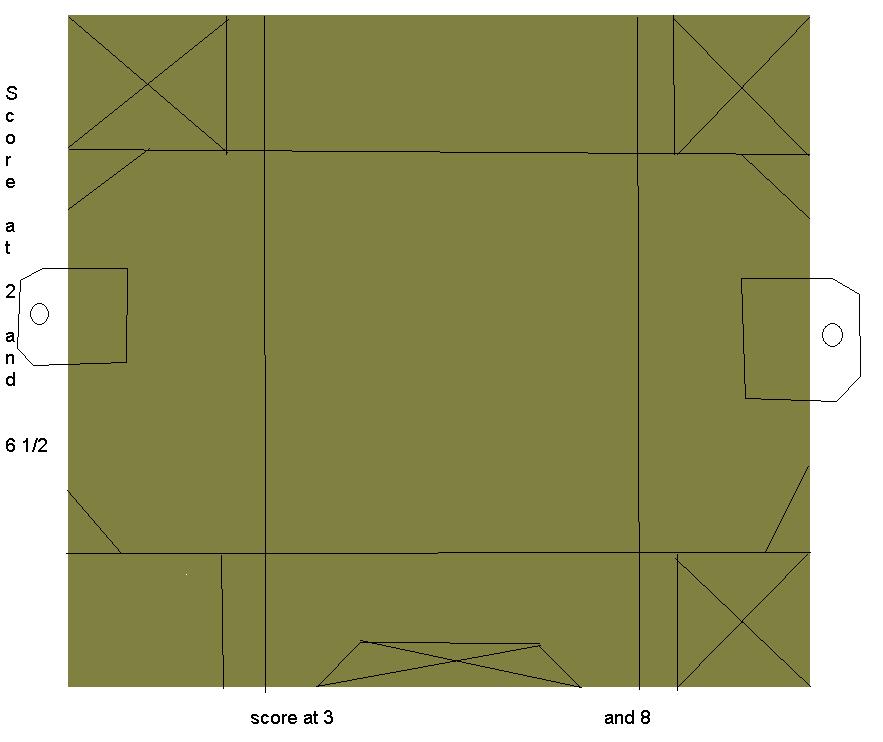
Directions:
1)Along the 11 inch side – score at 3 and 8. This will be the SIDE panels of your toolbox and will be LONGER than the front/back piece.
2) Along the 8 1/2 side – score at 2 and 6 1/2. This becomes the front of you tool box.
3) Trim along scored edges to center. In photo you will see a little extra left on either side of the 3 and 8 mark. That is so you have excess on your panels that adhere the ends together. Cut away the X’s-that is excess cardstock
4) Use tag corner punch on tool box sides. I also cut 2 pieces of cardstock 1 1/2 wide by 3 inches long. Use tag corner on those as well. Punch 2 holes large enough to fit a pencil through. Adhere to inner side panels-as seen in photo.
5) For front of box cut away from panel as you see fit. I just used my ruler and hobby blade for an even look.
Decorate as desired!
Now for the card 😀
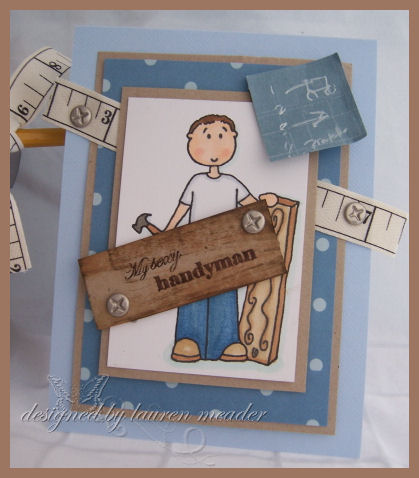 My Sexy Handyman
The little square at the top is suppose to be like blueprints. I stamped the bkgd going across, then up and down for a grid paper appearance. I then scribbled 1 2 3 4-for like steps in the project. Scribbled a picture too.
Just a fun card.
Well I hope you likey!
Thanks for checkin in with me here.
Till tomorrow.
Lauren

My Etsy

Who I Designed For
Blogroll
- Alicia
- Alli Miles
- Ally Blankenship
- Amber
- Andi @ crafts on a whim
- Angel R
- Angie Z
- Anne Kranitz
- Becky O
- Bee
- Beth Silaka
- Bethany Paull
- Beverly Nash
- Bobbie
- Cambria
- Cammie
- Card of the Week
- Card Positioning System (CPS)
- Cards for Cancer
- Catherine Doucette
- Charmaine
- Cheryl Sims
- Chriss Rollins
- Christina
- Christine Ewing
- Christine Wooden
- Colleen Schaan
- Craft Critique
- Craft Gossip
- Crystal
- Dawn Easton
- Emily Giovanni
- Geny
- Holly
- Igne Groot
- Inspirational Craft Blogs
- Irene
- Jami Sibley
- Jeanne Streiff
- Jen del Muro
- Jeni Bond
- JenMarie
- Jenn Balcer
- Jenn Diercks
- Jenn O
- Jennifer E
- Jennifer Mick
- Jennifer Pereda
- Jennifer-Sweet Treat
- Joanne Basile
- Jodi Collins
- Julia Stainton
- Julie Masse
- Karen
- Kathryn Berthiaume
- Katie Cotton
- Kelley Holland
- Kendra
- Kim Scholfield
- Kris’s Color Stripes! Get inspired here
- Kristen Dubosque
- Kristin Eberline
- Kristine
- Laura @ Sunshine Stamper
- Laura Turnmire
- Laurie Schmidlin
- Lesa Rapp
- Linda Duke
- Linda-LSN
- Lindsey Botkin
- Lisa (lakind scs)
- Lisa Kind
- Lori Craig
- Maggie
- Mara Campbell
- Maria
- Maria Levine
- Mary
- MaryJo
- Melanie M
- Monique Hansen
- Moxie Fab World
- Pam Imholz
- PaperCrafts Connection
- Peppers and Pollywogs Kids party site
- Rebecca Grohall
- Rita
- Robyn
- Rose Ann
- Sarah Vrolyk
- Sharon Harnist
- Sharon Johnson
- Sharon Rivera (a chemisrty with paper)
- Sherrie
- Sophia Landry
- Storage Units, Ink, & More Blog
- Sue Berker
- Susan (Rainy)
- Tangii Crane
- Tracy
- Tricia Traxler
- Trudee
- Velta
- VivLyn
- Zena
MTME Pretty Palette Color Team
MTME Pretty Patterns Sketch Team
My Time Made Easy TM LLC
Shop till you drop!
Lauren Meader
About Me
Copyrighted material
Subscribe To My Blog
Pages
- About me
- Alexa’s Story!
- My Crafty Corner!
- My Time Made Easy™ LLC
- Our Make A Wish Trip to Disney!
- Resume/Publication List
Calendar
Archives
- August 2013
- July 2013
- June 2013
- May 2013
- April 2013
- March 2013
- February 2013
- January 2013
- December 2012
- November 2012
- October 2012
- September 2012
- August 2012
- July 2012
- June 2012
- May 2012
- April 2012
- March 2012
- February 2012
- January 2012
- December 2011
- November 2011
- October 2011
- September 2011
- August 2011
- July 2011
- June 2011
- May 2011
- April 2011
- March 2011
- February 2011
- January 2011
- December 2010
- November 2010
- October 2010
- September 2010
- August 2010
- July 2010
- June 2010
- May 2010
- April 2010
- March 2010
- February 2010
- January 2010
- December 2009
- November 2009
- October 2009
- September 2009
- August 2009
- July 2009
- June 2009
- May 2009
- April 2009
- March 2009
- February 2009
- January 2009
- December 2008
- November 2008
- October 2008
- September 2008
- August 2008
- July 2008
- June 2008
- May 2008
- April 2008
- March 2008
- February 2008
- January 2008
- December 2007
- November 2007
- October 2007
- September 2007
- August 2007
- July 2007
- June 2007
- May 2007
- April 2007
- March 2007
- January 2007
Categories
- About Me
- All That Scraps
- blogger challenge
- camera/photo play
- Cards
- Contests
- family stuff
- FOR SALE
- Home decor/3-D items
- How to FAKE it!
- Introduction
- JUGS Challenge
- JustRite Stampers
- Lizzie Anne Designs
- My family stuff
- My Stamping Space
- My Time Made Easy
- My Time To Color Challenge
- My Time to Create Challenge
- My Timeless Template Challenge
- My Timeless Templates
- Mytime Mail
- MYTIME MOVIE/VIDEOs
- Papertrey Newsletter
- Pink Cat Studio
- Pretty Palette Challenge
- Pretty Patterns Sketch
- Product Opinions and Must haves
- Recipe's
- Saturday Sketch
- Smilebox Creations
- Stampavie
- Tutorials
- Uncategorized
- videos
Most Popular
- Create your own Onesie Card Tutorial-and important NOTE! PLEASE READ (2529)
- Saturday Sketch-Boxed bag holder (2333)
- Going GREEN! Fancy Flower Flourish-Closure Video (1478)
- Fabulous Favorite - Giveaway! (1336)
- a Prayer Request (1232)
- QUICK-Easter Baskets from Nestabilities-PTI style-and blog challenge (1063)
- Teaser Sketch (999)
- February Release Giveway! (and a little peek) (996)
- Group Post and Rambling Rose Video Tutorial (985)
- GIVEAWAY! Who wants it all?! (895)
Recent Comments (RSS)
- 첫충사이트: 완전히 흥미로운 블로그 게시입니다. 저는
- sarah: Wow, Lauren, what a stunning
- hedie: خرید راهبند
- 야동: Love to read it,Waiting For
- 야동: This seller is in a
- 바카라사이트: 여기 처음 왔어요. 나는이 게시판을
- 야동티비: I was surfing the Internet
- 바카라사이트: 비슷한 주제에 대한 흥미로운 정보를
- 바카라사이트: "여기에 제공해 주신 귀중한 정보와
- 온라인홀덤: 유익한 웹 사이트를 게시하는 데
Copyright © 2007 - My Time, My Creations, My Stampendence - is proudly powered by WordPress
This blog has been Tweaked and Designed by Sara Williams
58 Responses for "Jack of all trades C.C. Designs peek #3"
Amazing. Your creativity knows no bounds!
OMG this is just adorable. Your talent just amazes me. TFS 🙂
I see you found your mojo. Maybe mine was hiding with yours somewhere? I love that little tool box. Very creative. That little handyman is so cute. -Molly B
Get out of here!!!! I can’t even believe that toolbox! Cutest. Thing. Ever.
Man, you are so incredibly good at what you do! Thanks for sharing your ideas so that the rest of us can appear to be gifted!
What an adorable toolbox! Kinda early to be thinking about Father’s Day though. What did Jason and Noah think of it?
These are absolutely adorable! I love the cutesy tool guy! Your designs just amaze me !
This is darling. I love the little tool box. I think the tape measure ribbon is perfect too. The brads too. I could go on and on. Great job!
OMG Lauren!!! This is fabulous, your brilliant!!! This is an AWESOME project, I luv it! Leave it to you to think of something so fabulous! Where on earth did you find that ribbon??? This would have been a perfect card/project for my son a few years ago when he remodeled his condo himself. I did make him a scrapbook about it all but this card would have completed the gift. Oh well I guess for his next birthday maybe… Great job Lauren, you continue to amaze me!
this card is great and love the handyman stamp and love your handyman container with all its goodies.
Lauren,
Thanks so much. I look forward to your blog every day.
OH MY goodness! This is absolutely adorable!!! And I thought the onesie was cute (unfortunately I have no use for it!! but THIS, FOR SURE!!) Thanks so much for sharing the template. I’ll see if I can get it right by the 3rd or 4th try! haha
Thanks for such inspiring work and great things to just ooh and aah over!!!!
Amanda
Lauren! You never cease to amaze me! This is down-right PERFECTION! I LOVE it!!!
omg…this is adorable!!!
Oh my freakin’ goodness! holy smokes! this rocks!!! Girl is there anything you don’t have….brads that look like screws? measuring tape ribbon….wow girl….you creativity always amazes me!!
Can’t wait for all these goodies…come on postal peeps!!LOL!
Thanks for sharing that template too!
WOW! How amazing is that tool box?! Brilliant and oh so cute:D
Awesome!! That toolbox looked so “real”. Awesome job.
Great ideas! Love Mr. Handyman.
Charmaine
Lauren! How do you do it? This is just adorable looks like such fun to make! You amaze me.
This is genius, Lauren!! I love that tool box!!
LOVE IT! My husband is pretty handy so I can’t wait to get this and ink it up! You did a fabulous job with the whole project.
Wow! Love the tool box!! Great card too, looks like another really fun stamp set!! Thanks for shareing the directions!
Well, this is a ‘must have’ for me. My DH is all this…. and more! I love, love, LOVE the toolbox! You always amaze me with your creativity!
Big hugs!
Renee
SHUT UP!!!!!!! That is so awesome!!! My little ol’ card just won’t compare!! 😉
this is one of my top favorite things you’ve done! seriously – that tool box and matching card are just too cool! my man is not handy in the least, but it makes me want the set anyway!
Hi Lauren, your creations are awesome:-D Love the toolbox ánd the card very much!!!
xx, Inge
you’re soo creative! have a nice day
kyky
WOW-WOW-WOW-WOW-WOW-OMG SHREEK! – OMG SHREEK! -WOW-WOW-WOW
Lauren, you are a gifted genius, and I mean that from the tips of my toes to the top of my head. You continue to ~*AMAZE*~ me with your mind-blowing creations and designs.
I wonder what you were in a “Past Life”? Perhaps an Egyptian architect who designed the Pyramids thousands of years ago. Obviously, you have been granted an amazing ~gift~ that allows you to invision objects in your mind, and then change them, with great ease, into these wonderous paper creations.
Since I wasn’t blessed with this particular ~gift~, the very next best thing is being part of your blog and watching you evolve into this stunning artist.
BRAVO Miss Lauren 🙂
This is super SUPER cute! Does your brain ever rest?! This is amazing!
Lauren…Once again you knock me out with your creativity! I was searching for some inspiration for my dad for Father’s Day (he’s 87) and this will absolutely fit the bill. It is so cute and so cool. Thank you for sharing.
Have a wonderful day!
Love this box you created Lauren! how fun – love the pencil handle so clever! Thanks for sharing your design!
just saw your beautiful wedding Accordian card in the May issue of Card Maker too! it’s just lovely!
http://www.createwithjulia.blogspot.com
Holy cow!!! This is so adorable!
No Way! That is adorable! You are so Creative!!! Wouldn’t that make a husband’s day!! It would mine!
Waow, this rocks!! 😀
I can’t believe the wood grain you created there! I thought for sure you had bought the paper as is! Awesome job!
And your little set is just too cute with the matching card… 🙂
Is this going to Jay for father’s day or do you have other surprises up your sleeve?!… 😉
That toolbox is so clever and cute, Lauren! Love it!
Love that toolbox!! Awesome, and the tape measure in the card…genius!
Just adorable and so clever!
Oh Wow, this is AWESOME! I am so making a toolbox for my Jack too!!! Thanks so much for the directions!
You continue to amaze me! The things you create are brilliant! This would be perfect for my husband!
I totally love it. Very clever 🙂
This was so cute! Thanks a lot for sharing the directions!
You are SO creative! Love the WHOLE set!
Oh that is just too cute, love all the detail you put into the card, and the little handyman box is just darling!
FANTASTIC creations!!! Thank you for the template, I love that you do a lot of masculine cards because they are great inspiration to me. TFS.
Lauren Lauren Lauren!
W-O-W!!!! Girl….you are so stinkin’ creative! That is such a cute thing. And so great for any man. (boy) Thanks for showing a “boy” thing. It is easy to make things for girls, ladies or women. But boys are hard to make things for. At least for me!
thanks!!!!
F A N T A S T I C B R A V O S U P E R B
CHRISS X
What an adorable tool box. This would be so appropriate for my dad since he’s head over heels into woodworking (as is my brother but I just missed his birthday to use this idea). Thanks so much for sharing! Jeanne
How freakin’ cute is that toolbox?! I can’t wait to make this….for every man I know! Adorable! You are so talented! Thank you so much for sharing with us!!
Cute idea. You are sooo clever!
Ohmygosh….this is totally rockin’, Lauren!! I LOVE it!
Stunning and creative work as always Lauren! Thank you so much for sharing your ideas! Your work is truly inspirational!! What a perfect Father’s Day gift !! We (kids and I) are going to make several…Daddy, Grandpa, Pappa….Where do we get the “screw” brads and the measuring tape ribbon from? Thank you again Lauren! 🙂
Amazing! What a gorgeous project. Love the pencil! :0)
How great is this tool box and card???? Found you in Julie buhler’s comment section, paper Pleasing Ideas!! AND how awesome is that???? Googled Tip Junkie and here I am—way too funny.LOL TFS gotta go make that box.
Disount genuin ugg boots roseberry 5734 for sale online.ugg boots roseberry 5734 is one of our hot sale styles.Free shipping and no tax to USA,Canada,UK.
In outdoor activities place, especially in the summer
How’s it going? I enjoyed reading through this publish. My husband and I have been researching for this kind of article with the longest time and We know that your details about the issue at hand is spot on. I’ll be certain to introduce this posting to my neice. Can you tell me how to acquire your new RSS feed? Continue to keep on blogging!
[…] source […]
I’m gone to inform my little brother, that he should
also visit this website on regular basis to get updated from hottest
news.
Leave a reply