Archive for January 15th, 2009
Little House on the Papertrey
Jan 15, 2009 Author: mytime | Filed under: Home decor/3-D itemsWant a special box to package a gift for a housewarming? This os perfect for the gardener, or bird lover. How about that perfect little doll-she would look great in here too. You might just want to WOW! them with your presentation.
Well I designed a house shaped gift box for just about any occasion!

Lo and behold Papertrey Ink had the perfect sets to make my “dream home” box a reality.
Come see!
Here is my very FIRST YouTube tutorial on video if you want a visual step by step!
Be kind, as this my first video and I did learn SO MUCH about the recording, lighting, editing process.
I made 6 of these boxes getting this to work right, and I have to say they got easier and easier, faster, and faster, and better and better.
I do need to change my video settings. I had to drastically edit this to get it to load-I had an hour of work, to cut down to 20 minutes-then found out I had to get it UNDER 10 minutes! OH BOY! Do you have any idea how long winded I am? Thats so hard. Its too bad because I had some funny conversations with myself for you! LOL! Another time I guess.
So bottom line I kept the most important parts.
For those of you on dial up, or just wanting the eye candy-I still included step by step directions for you here!
This was my first time editing and whatnot and I learned SO much, so Im certain that this will be the worst video ever. From now on it should go much smoother, as I know what to do, and not to do filming.
I will get a better angle/lighting in the future as well.
It has been so hard as I have been sitting on this project for over a month!
DYING to create a gift box that looks like a house! I wanted to create one that would fit a Groovy Girl doll or other dolls to give as a special gift.
Now lets get to work!
House Base
2 pieces of Kraft cardstock-81/2 X 11
1) Along the 8 1/2 side-score at 4 1/4 & 8
2) Along 11 inch side score at 4 1/4
Repeat steps for both pieces of Kraft cardstock.
Making the peek of the house
You will repeat this step on both pieces. (use scrap on 2nd box panel to ensure even peeks)
(along the 8 1/2 inch side) From the center of the 4 1/4 panel-Cut from the middle, at an angle / to the outer corner. Take the scrap piece, and trace it from the center to the other corner, and cut at an angle \.
Once your / \ peek is cut, you will want to cut in from outer edge, in up to the peek. This becomes the flat sides to the box, allowing the peeks to pop up.
Now, on the bottom of the house pieces, trim on score lines, up to bottom score for your bottom.
NOTE: On the 2 panels with the peeks you will cut down the bottom flap to 3 3/4. This eill ensure a even base when box is folded.
Now pick a panel to become the front of your house.
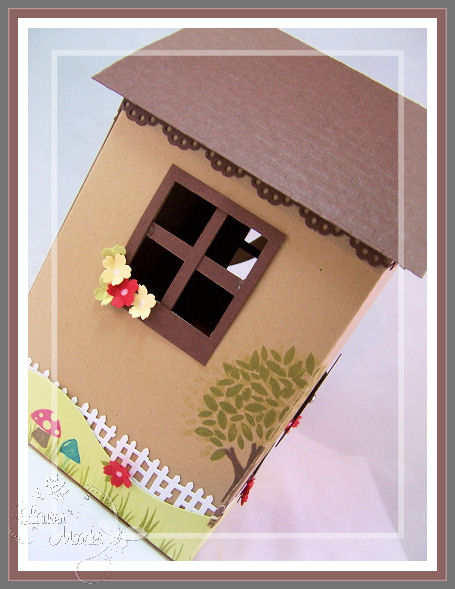
Stamp the tree from Father Knows Best in the corner.
Grass
I used my Creative Memories wavy cutter to cut 2- 1 X 11 inch strips of grass. Put them together to wrap around my house base.
I then stamped grass from Forest Friends, as well as some of the Mushrooms.
Fence
I used the Martha Stewart Fence punch to punch 2- 1 1/2 X 11 strips of fence.
I adhered this fence behind my stamped grass hills.
Once adhered I attached it to the bottom of my house, all the way around both panels.
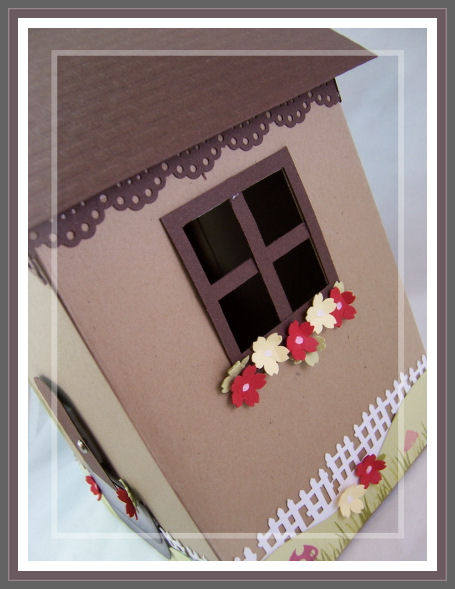
Trim under the roof
I used another Martha Stewart punch to line the top of my box, all the way around. It gives a nice finished look.
Windows
You will make 2.
Simply take your 1 3/8 square punch, and punch a square on either side of the house box along the flat portion. If you push the punch to the end it will ensure even windows on both sides of the house.
Take your 1 1/4 square punch and punch a square into some dark chocolate cardstock. Trim 1/8 around 3 sides, and 1/4 inch on one side.
Now take 1/8 inch strip of dark chocolate cardstock, and make your window panes by making a “t”. Once done adhere window panels over punched squares in house.
Now put the house box together!
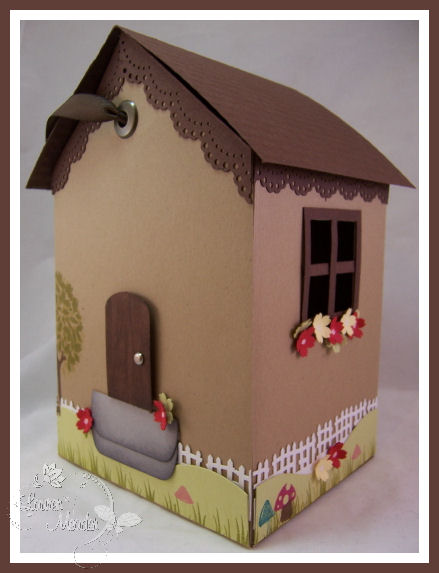
The steps
Punch 2 pieces of gray cardstock using the Key Tag punch.
Sponge the edges, and cut down top step, to be flat. layer onto house front.
Door
Punch a piece of dark chocolate cardstock with key tag punch.
Rub chocolate ink pad over door.
Cut down bottom.
Insert a brad for a door knob.
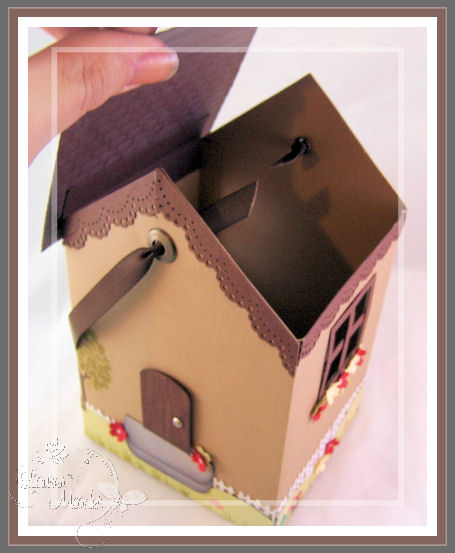
Roof
I took a piece of dark chocolate cardstock 4 1/2 X 6 1/2. Score in half at 3 1/4.
Ran it through my cuttlebug using the brick pattern Fiskars texture plate.
Adhered a 1 inch strip of cardstock (scored at 1/2 inch), and adhered on part of the score to the inside of my house box. This will allow my roof to stay attached, and hinge open/closed.
Now you get to decorate it, as you please with little punched flowers, or other fun items you wish to add to bring out your own personality!
Left side view-all decorated
Right side view
There you have it. The perfect little house box!
I would love to hear your thoughts! I know its not the best video in the world but after having to drastically edit 6 times I know what to do next time.
I hope you enjoyed the project 😀
Thank you for visiting me.
Hello from Mytime! First video
Jan 15, 2009 Author: mytime | Filed under: MYTIME MOVIE/VIDEOsPlease scroll down today! I have like 6 new posts :D Yes, I am insane. Blogging took longer than my projects! LOL!
Thanks for reading.
OK everyone-I actually got this to work! Im seriously doing a dance in front of my computer right now.I KNOW it's NOT Monday, but I planned on featuring my videos on Monday's, and this was suppose to be done yesterday, so go with me here. Thanks to Sara Williams-my blog girl!! She designed my blog and helped me with this concept for WordPress and enabled my video features, which I didn't have before.Now, before you watch please realize I had NO IDEA what I was doing. I just tried fiddling around with everything, just to see if I could even get this to work. I just wanted to get my HELLO WORLD uploaded.I do have my first video tutoiral ready to go for my Papertrey Ink newsletter! YEAH! So be watching for that. I am including directions for those who don't have high speed internet :DI felt like the biggest geek, sitting there, talking at the camera. No one even around to "listen" or guide me. If anything you will get a good giggle :D I hate my voice, had a bad hair day, and don't forget the camera adds 10lbs! LOL!I swear my next video will be more professional and I hope I can figure out some of the cool editing software my program has. I didn't have "segments" like I would if doing a tutorial so even attempting some of the features was pointless.Also note-this is like talking to yourself. I honestly hate watching this video, but after a million tries figured I better just go with it. Just be myself, and no focus on every little mistake, or my talking with my hands, and moving my head constantly. You will see Im definitely ALL valley girl :D Oh and my voice-gosh I don't sound like that in my own head. Oh well.
I think once I get into the stamping part of doing a tutorial then it won't be so awkward. I'll be in my element, and not starring at a camera making a one sided conversation with myself! I'll have the camera over my shoulder instead.
Anyway-I am just excited that this will open up a whole new, hopefully more exciting venture on my blog with this new year!
So here I am-feeling like I am naked, in front of the world :C EEK!
All in all I'm still excited.
PS! I will work on the lighting! I had to film it at night because during the day the kids were running around and wanting to be on camera. Then I had Daisy chasing the cat, and then again you could hear the kids KILLING eachother upstairs! LOL! So, Ill do daylight stuff from now on and you can get a chuckle from my house drama! LOL!
OH BTW my video tutorial is going LIVE 10pm on the 15th. It was kinda dark like this-sorry :C
PPS- I have NO IDEA why its instant playing but promise they won't all do that.I have to figure out what I set, and HOW I set it. Told you this was a big process! LOL! For now just hit stop so my Fran Dreshcer voice doesn't play endlessly :C
Thanks for the feed back :D
Papertrey Ink Release Projects
Jan 15, 2009 Author: mytime | Filed under: Home decor/3-D items, My Timeless Templates, UncategorizedWOW! Am I exhausted.
The Papertrey Ink release was another amazing one. I always have such a huge creative breakdown after, since I pour every ounce of creativity I own into every project.
Most of them were revealed up to the release, but I kept a few for today.
My first project today is very special, and I want to share it with you all. I did get special permission to post all this info, so I hope you get to read it.
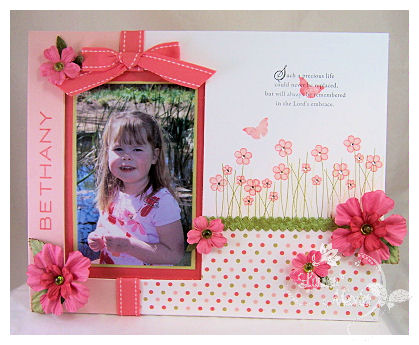
Bethany-
I have to say with all the sympathy sentiments, while beautiful, it was emotional for me. Having been close to losing my own child a few times, I can’t even fathom the pain. I only know a portion of the pain that comes with just thinking of the “what ifs”. When Alexa got sick I planned her funeral in my head too many times. Something I hate to admit, but when she had so many close calls I couldn’t help but have those horrible thoughts not only cross my mind, but be lurking so close to reality.
This release came at a time that I really needed. It was so amazing because over the holiday a blog reader of mine-Melinda had sent me some amazing things from Australia. I was touched by her graciousness.
I was beyond amazed by her talent, but what got me was this photo attached with her letter, of her daughter Bethany.
She told me how stamping has helped her emotionally, to cope, as she lost that beautiful little girl in the photo last year to a tragic accident.
Here she is-
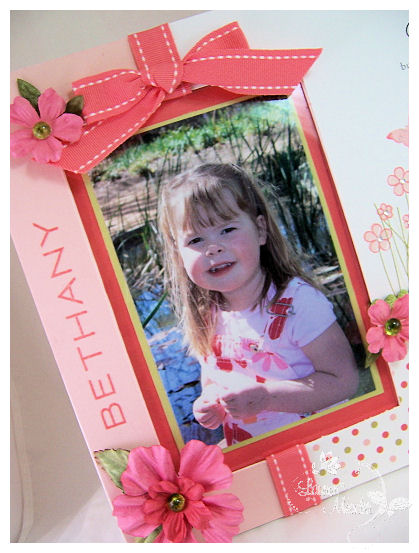
Every person in my home cried reading her letter, and starring at Bethany’s face.
Melinda said she has a hard time scrapping photos of Bethany, and this one was so special to her because it was the last photo she had of her-taken just a week before her accident. She was in her favorite dress. She loved pink flowers, and butterflies!
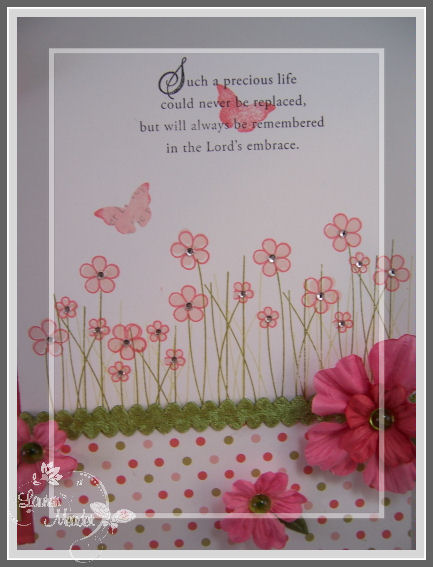
I knew I wanted to make her something special, to honor her. I had no idea what to say or where to start! Then the Loss of Child set was sent to me. I knew the words were perfect.
I have to admit I balled my eyes out the entire time I made it. I felt such a wave of pain and emotion, and I never even “knew” her. I never made a more meaningful gift in my life. I truly poured every ounce of love I felt for my own three children into making a keepsake for Bethany’s mom.
Supplies:
Stamps-Fresh Alphabet, Loss of a Child, With Sympathy
Ink-Berry Sorbet, black, ripe avocado, spring moss, sweet blush
Cardstock- sweet blush, berry sorbet, spring moss, white
Patterned Paper- Polka Dot Parade
Berry Sorbet stitched grosgrain, leaf pattern ribbon
B.E. Frame
Other-Prima Flowers, Prima leaves May Arts velvet ric rac, dew drops, adhesive rhinestones

Now when I asked Bethany’s mom if I could share this, she agreed. I asked her what she would like people to know about Bethany, since she isn’t just a photo for a project, or another post on my blog, but a person who is so missed and so loved. A person who’s short life will have made a difference in others. I know that despite her mom losing her, she will not let her loss be in vain, but will make a difference in others lives.
If you have lost a child and need support, Melinda has offered to help you-so contact me for her info. Melinda is also looking forward to being able to eventually working with SIDS & KIDS.
This is what she had to share-
From Bethany’s mother Melinda:
Bethany lived at fast forward all the time. She was born after a 40 minute labour on November 11th 2001. That day is Remembrance Day in Australia and each year at 11am on that day the country observes a minute silence for soldiers who fell in battle, but we also like to think the nation stops for Bethany (as of course we feel it should).
Bethany started to talk very early, weaned herself at 10 months and decided she was too big for nappies (diapers) a month after her little brother was born so toilet trained herself that very day (she was only 22 months old). She was little but had a voice that carried and would have long conversations with any and everybody she met. At nearly 5 she had just started wearing size 3 clothes and was a little dynamo. She didn’t watch TV or DVD’s but preferred to just hang out with me or her brothers and sisters. It was spring when she died and 3 weeks earlier I had bought her new sandals which she loved but refused to wear them. Her older sister, Emily, talked to her about it and found Bethany thought her toes were ugly. They went through Emily’s nailpolish and Beth chose a pretty pink (her favourite colour) to decorate her toes and then wore her new shoes. For all her speed to grow up, when I cleaned up her room after she died I found she had hidden one of her little brothers dummies (pacifiers) under her pillow and must have snuck it in her mouth after I tucked her in to bed. I will always be grateful that I was able to be a stay at home Mum and spent every minute possible with her. She was secure in the fact that she was very much loved and confident of her place in the world.
I’m not sure if what I have typed makes any sense, but I won’t edit it as I know I could go over and over it trying to get it perfect in her honour.
Butterflies have become very special to us all as they have appeared at significant moments as if she is letting us know she is somehow here. As we were getting ready for her funeral a butterfly somehow flew into the house and landed on her portrait, the day a friend and I went to collect her ashes a butterfly fluttered around the door of the funeral home the whole time and when we were on a recent holiday there was a butterfly who followed us as we walked around Wiggle World. So you see, the butterflies on your frame are so very special as is the sentiment. It is often these smaller things that combine into something amazing and bring great comfort.
The only thing I would add is that if there is another family who read your blog who have suffered the loss of a child and would like to contact me, please feel free to give them my email.
I just thought of one more anecdote I wanted to share with you. Bethany’s older brother Liam (he is now 10) has always loved to draw and create his own comics. He spends hours creating and binding them. They are really very intricate and Beth always loved them and wanted to copy them which was a cause of much dispute between the two of them. Going through Beth’s room we find her treasure draw and hidden at the bottom was one of Liam’s comic books. Beth had gone through and very carefully added her name to every page. Liam would have really gone off at her for that one but now it is his most treasured possession, almost like a little note from Bethany left specially for him.
This is a poem that Bethany’s mom finds comfort in:
The mention of my baby’s name may bring tears to my eyes,but it never fails to bring music to my ears.If you really are my friend,please don’t keep me from hearing the beautiful music.It soothes my broken heart and fills my soul with love.
Those who wish to sing always find a song.
————————————————————————–
OK now I’m done that, and still balling, lets move on to my other projects.
This is yet another sample I made (for today’s post, not in my release gallery) using the With Sympathy set. It was going to be a countdown project but I had to wait to share it-

This box is from my newest template-The Perfect Match ©
I thought that the With Sympathy set was perfect for making a nice thoughtful set of cards.
Did you know it can hold little note cards and envelopes?

I got this set from Stampin Up! a while back 😀 Now was the perfect time to use them.
They are about 3 X 4 in size.
Here are a set of 20-with envelopes! Room to spare too.

Isn’t that so simple? Great teacher gifts without lots of work!!!!!!!!!!! YEAH!!! Love that.
Another sample using my Perfect Match Box was paired with Heather’s set 😀
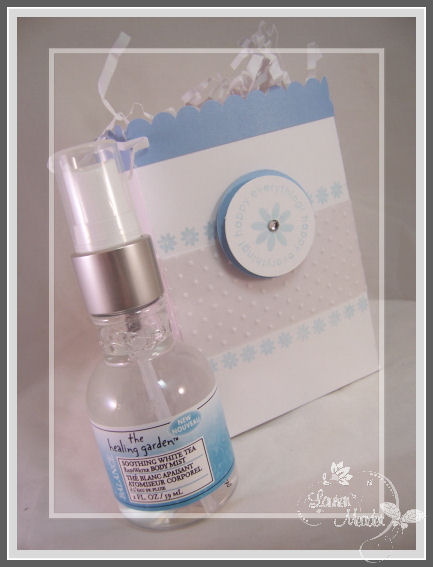
I used the slider cover of my Perfect Match Box © template as a basket like box to hold my body mist. I had fun with the clean, crisp design I could get easily with this set. This came together in just minutes! A perfect quick gift wrap.

Supplies
My Timeless Template-The Perfect Match Box ©
Stamps- Around & About sent.
Cardstock- PTI select white, Spring Rain, Vellum cardstock
Ink-Spring Rain
Other-adhesive rhinestone, swiss dots embossing folder, circle punches, Doodlebug paper frills border
Now another one with her set-Get Well Soon!!
I LOVE this card-Very clean and simple-but so pretty to me.
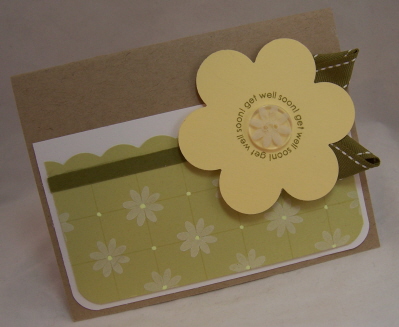
I used guideline’s to make my grid, then stamped the single flower from the set to make my own patterned paper.
I used the flower punch and stamped the circle sentiment inside, then added a button which I also stamped for the center 😀
My leaves are just some avocado stitched ribbon, folded up 😀
So there you have it everyone. Scroll down over the last few days, and let me know what project you liked best!
Thank you for visiting and thanks to anyone who gets any of the templates 😀 Don’t forget I WANT to see what YOU make 😀
Have a happy day-
Pink Cat Release! Today-
Jan 15, 2009 Author: mytime | Filed under: CardsYeah! Its here!!
The newest release from Pink Cat Studio 😀
Here are the sets for your viewing pleasure, in their entirety.
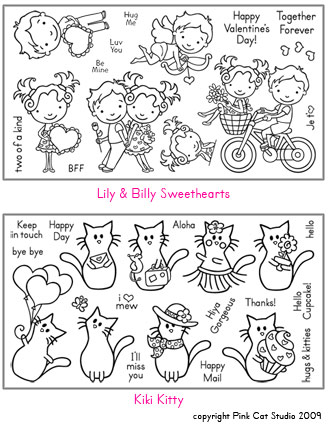
For one last push, over the edge-I have ONE more card before you go shopping

Hello little butterfly-
This last one is SIMPLE! I just loved the little Kiki & the butterfly 😀 You know me & the butterflies. How could I NOT use her? And well purple being my favorite color-it was just meant to be.
I had a old SU! butterfly punch that looked similar to the butterfly in the image, so I made it look like a little flutter-trail-OK in my brain that was the idea. I liked the outcome all the same.
Clean and simple-but oh so cute! Can you say under 5 minute card? YUP! UNDER 5!
Have fun 😀
My Etsy

Who I Designed For
Blogroll
- Alicia
- Alli Miles
- Ally Blankenship
- Amber
- Andi @ crafts on a whim
- Angel R
- Angie Z
- Anne Kranitz
- Becky O
- Bee
- Beth Silaka
- Bethany Paull
- Beverly Nash
- Bobbie
- Cambria
- Cammie
- Card of the Week
- Card Positioning System (CPS)
- Cards for Cancer
- Catherine Doucette
- Charmaine
- Cheryl Sims
- Chriss Rollins
- Christina
- Christine Ewing
- Christine Wooden
- Colleen Schaan
- Craft Critique
- Craft Gossip
- Crystal
- Dawn Easton
- Emily Giovanni
- Geny
- Holly
- Igne Groot
- Inspirational Craft Blogs
- Irene
- Jami Sibley
- Jeanne Streiff
- Jen del Muro
- Jeni Bond
- JenMarie
- Jenn Balcer
- Jenn Diercks
- Jenn O
- Jennifer E
- Jennifer Mick
- Jennifer Pereda
- Jennifer-Sweet Treat
- Joanne Basile
- Jodi Collins
- Julia Stainton
- Julie Masse
- Karen
- Kathryn Berthiaume
- Katie Cotton
- Kelley Holland
- Kendra
- Kim Scholfield
- Kris’s Color Stripes! Get inspired here
- Kristen Dubosque
- Kristin Eberline
- Kristine
- Laura @ Sunshine Stamper
- Laura Turnmire
- Laurie Schmidlin
- Lesa Rapp
- Linda Duke
- Linda-LSN
- Lindsey Botkin
- Lisa (lakind scs)
- Lisa Kind
- Lori Craig
- Maggie
- Mara Campbell
- Maria
- Maria Levine
- Mary
- MaryJo
- Melanie M
- Monique Hansen
- Moxie Fab World
- Pam Imholz
- PaperCrafts Connection
- Peppers and Pollywogs Kids party site
- Rebecca Grohall
- Rita
- Robyn
- Rose Ann
- Sarah Vrolyk
- Sharon Harnist
- Sharon Johnson
- Sharon Rivera (a chemisrty with paper)
- Sherrie
- Sophia Landry
- Storage Units, Ink, & More Blog
- Sue Berker
- Susan (Rainy)
- Tangii Crane
- Tracy
- Tricia Traxler
- Trudee
- Velta
- VivLyn
- Zena
MTME Pretty Palette Color Team
MTME Pretty Patterns Sketch Team
My Time Made Easy TM LLC
Shop till you drop!
Lauren Meader
About Me
Copyrighted material
Subscribe To My Blog
Pages
- About me
- Alexa’s Story!
- My Crafty Corner!
- My Time Made Easy™ LLC
- Our Make A Wish Trip to Disney!
- Resume/Publication List
Calendar
Archives
- August 2013
- July 2013
- June 2013
- May 2013
- April 2013
- March 2013
- February 2013
- January 2013
- December 2012
- November 2012
- October 2012
- September 2012
- August 2012
- July 2012
- June 2012
- May 2012
- April 2012
- March 2012
- February 2012
- January 2012
- December 2011
- November 2011
- October 2011
- September 2011
- August 2011
- July 2011
- June 2011
- May 2011
- April 2011
- March 2011
- February 2011
- January 2011
- December 2010
- November 2010
- October 2010
- September 2010
- August 2010
- July 2010
- June 2010
- May 2010
- April 2010
- March 2010
- February 2010
- January 2010
- December 2009
- November 2009
- October 2009
- September 2009
- August 2009
- July 2009
- June 2009
- May 2009
- April 2009
- March 2009
- February 2009
- January 2009
- December 2008
- November 2008
- October 2008
- September 2008
- August 2008
- July 2008
- June 2008
- May 2008
- April 2008
- March 2008
- February 2008
- January 2008
- December 2007
- November 2007
- October 2007
- September 2007
- August 2007
- July 2007
- June 2007
- May 2007
- April 2007
- March 2007
- January 2007
Categories
- About Me
- All That Scraps
- blogger challenge
- camera/photo play
- Cards
- Contests
- family stuff
- FOR SALE
- Home decor/3-D items
- How to FAKE it!
- Introduction
- JUGS Challenge
- JustRite Stampers
- Lizzie Anne Designs
- My family stuff
- My Stamping Space
- My Time Made Easy
- My Time To Color Challenge
- My Time to Create Challenge
- My Timeless Template Challenge
- My Timeless Templates
- Mytime Mail
- MYTIME MOVIE/VIDEOs
- Papertrey Newsletter
- Pink Cat Studio
- Pretty Palette Challenge
- Pretty Patterns Sketch
- Product Opinions and Must haves
- Recipe's
- Saturday Sketch
- Smilebox Creations
- Stampavie
- Tutorials
- Uncategorized
- videos
Most Popular
- Create your own Onesie Card Tutorial-and important NOTE! PLEASE READ (2529)
- Saturday Sketch-Boxed bag holder (2333)
- Going GREEN! Fancy Flower Flourish-Closure Video (1478)
- Fabulous Favorite - Giveaway! (1336)
- a Prayer Request (1232)
- QUICK-Easter Baskets from Nestabilities-PTI style-and blog challenge (1063)
- Teaser Sketch (999)
- February Release Giveway! (and a little peek) (996)
- Group Post and Rambling Rose Video Tutorial (985)
- GIVEAWAY! Who wants it all?! (895)
Recent Comments (RSS)
- 첫충사이트: 완전히 흥미로운 블로그 게시입니다. 저는
- sarah: Wow, Lauren, what a stunning
- hedie: خرید راهبند
- 야동: Love to read it,Waiting For
- 야동: This seller is in a
- 바카라사이트: 여기 처음 왔어요. 나는이 게시판을
- 야동티비: I was surfing the Internet
- 바카라사이트: 비슷한 주제에 대한 흥미로운 정보를
- 바카라사이트: "여기에 제공해 주신 귀중한 정보와
- 온라인홀덤: 유익한 웹 사이트를 게시하는 데
Copyright © 2007 - My Time, My Creations, My Stampendence - is proudly powered by WordPress
This blog has been Tweaked and Designed by Sara Williams