Little House on the Papertrey
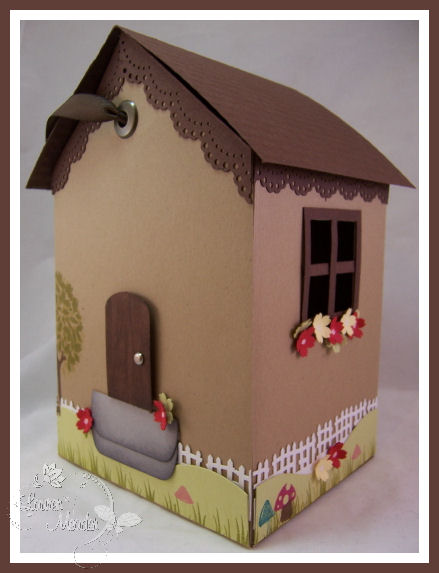
Jan 15, 2009Want a special box to package a gift for a housewarming? This os perfect for the gardener, or bird lover. How about that perfect little doll-she would look great in here too. You might just want to WOW! them with your presentation.
Well I designed a house shaped gift box for just about any occasion!

Lo and behold Papertrey Ink had the perfect sets to make my “dream home” box a reality.
Come see!
Here is my very FIRST YouTube tutorial on video if you want a visual step by step!
Be kind, as this my first video and I did learn SO MUCH about the recording, lighting, editing process.
I made 6 of these boxes getting this to work right, and I have to say they got easier and easier, faster, and faster, and better and better.
I do need to change my video settings. I had to drastically edit this to get it to load-I had an hour of work, to cut down to 20 minutes-then found out I had to get it UNDER 10 minutes! OH BOY! Do you have any idea how long winded I am? Thats so hard. Its too bad because I had some funny conversations with myself for you! LOL! Another time I guess.
So bottom line I kept the most important parts.
For those of you on dial up, or just wanting the eye candy-I still included step by step directions for you here!
This was my first time editing and whatnot and I learned SO much, so Im certain that this will be the worst video ever. From now on it should go much smoother, as I know what to do, and not to do filming.
I will get a better angle/lighting in the future as well.
It has been so hard as I have been sitting on this project for over a month!
DYING to create a gift box that looks like a house! I wanted to create one that would fit a Groovy Girl doll or other dolls to give as a special gift.
Now lets get to work!
House Base
2 pieces of Kraft cardstock-81/2 X 11
1) Along the 8 1/2 side-score at 4 1/4 & 8
2) Along 11 inch side score at 4 1/4
Repeat steps for both pieces of Kraft cardstock.
Making the peek of the house
You will repeat this step on both pieces. (use scrap on 2nd box panel to ensure even peeks)
(along the 8 1/2 inch side) From the center of the 4 1/4 panel-Cut from the middle, at an angle / to the outer corner. Take the scrap piece, and trace it from the center to the other corner, and cut at an angle \.
Once your / \ peek is cut, you will want to cut in from outer edge, in up to the peek. This becomes the flat sides to the box, allowing the peeks to pop up.
Now, on the bottom of the house pieces, trim on score lines, up to bottom score for your bottom.
NOTE: On the 2 panels with the peeks you will cut down the bottom flap to 3 3/4. This eill ensure a even base when box is folded.
Now pick a panel to become the front of your house.
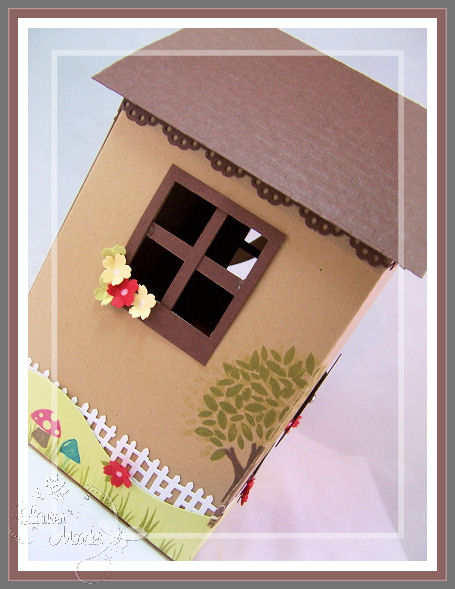
Stamp the tree from Father Knows Best in the corner.
Grass
I used my Creative Memories wavy cutter to cut 2- 1 X 11 inch strips of grass. Put them together to wrap around my house base.
I then stamped grass from Forest Friends, as well as some of the Mushrooms.
Fence
I used the Martha Stewart Fence punch to punch 2- 1 1/2 X 11 strips of fence.
I adhered this fence behind my stamped grass hills.
Once adhered I attached it to the bottom of my house, all the way around both panels.
Trim under the roof
I used another Martha Stewart punch to line the top of my box, all the way around. It gives a nice finished look.
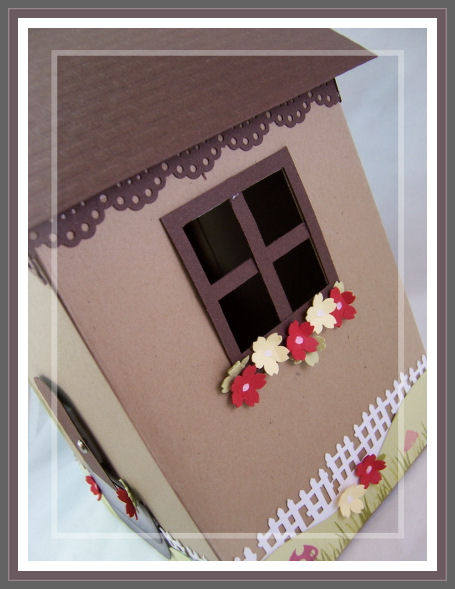
Windows
You will make 2.
Simply take your 1 3/8 square punch, and punch a square on either side of the house box along the flat portion. If you push the punch to the end it will ensure even windows on both sides of the house.
Take your 1 1/4 square punch and punch a square into some dark chocolate cardstock. Trim 1/8 around 3 sides, and 1/4 inch on one side.
Now take 1/8 inch strip of dark chocolate cardstock, and make your window panes by making a “t”. Once done adhere window panels over punched squares in house.
Now put the house box together!
The steps
Punch 2 pieces of gray cardstock using the Key Tag punch.
Sponge the edges, and cut down top step, to be flat. layer onto house front.
Door
Punch a piece of dark chocolate cardstock with key tag punch.
Rub chocolate ink pad over door.
Cut down bottom.
Insert a brad for a door knob.
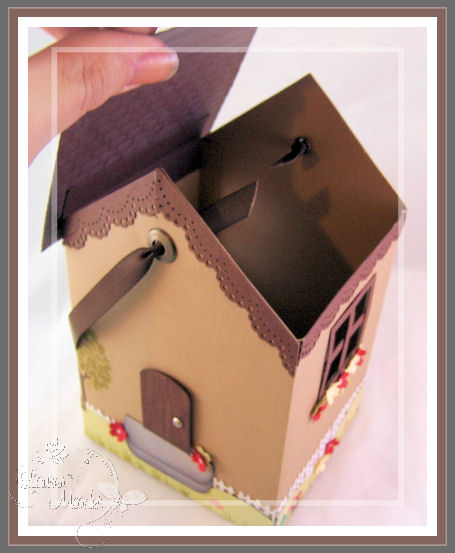
Roof
I took a piece of dark chocolate cardstock 4 1/2 X 6 1/2. Score in half at 3 1/4.
Ran it through my cuttlebug using the brick pattern Fiskars texture plate.
Adhered a 1 inch strip of cardstock (scored at 1/2 inch), and adhered on part of the score to the inside of my house box. This will allow my roof to stay attached, and hinge open/closed.
Now you get to decorate it, as you please with little punched flowers, or other fun items you wish to add to bring out your own personality!
Left side view-all decorated
Right side view
There you have it. The perfect little house box!
I would love to hear your thoughts! I know its not the best video in the world but after having to drastically edit 6 times I know what to do next time.
I hope you enjoyed the project 😀
Thank you for visiting me.

My Etsy

Who I Designed For
Blogroll
- Alicia
- Alli Miles
- Ally Blankenship
- Amber
- Andi @ crafts on a whim
- Angel R
- Angie Z
- Anne Kranitz
- Becky O
- Bee
- Beth Silaka
- Bethany Paull
- Beverly Nash
- Bobbie
- Cambria
- Cammie
- Card of the Week
- Card Positioning System (CPS)
- Cards for Cancer
- Catherine Doucette
- Charmaine
- Cheryl Sims
- Chriss Rollins
- Christina
- Christine Ewing
- Christine Wooden
- Colleen Schaan
- Craft Critique
- Craft Gossip
- Crystal
- Dawn Easton
- Emily Giovanni
- Geny
- Holly
- Igne Groot
- Inspirational Craft Blogs
- Irene
- Jami Sibley
- Jeanne Streiff
- Jen del Muro
- Jeni Bond
- JenMarie
- Jenn Balcer
- Jenn Diercks
- Jenn O
- Jennifer E
- Jennifer Mick
- Jennifer Pereda
- Jennifer-Sweet Treat
- Joanne Basile
- Jodi Collins
- Julia Stainton
- Julie Masse
- Karen
- Kathryn Berthiaume
- Katie Cotton
- Kelley Holland
- Kendra
- Kim Scholfield
- Kris’s Color Stripes! Get inspired here
- Kristen Dubosque
- Kristin Eberline
- Kristine
- Laura @ Sunshine Stamper
- Laura Turnmire
- Laurie Schmidlin
- Lesa Rapp
- Linda Duke
- Linda-LSN
- Lindsey Botkin
- Lisa (lakind scs)
- Lisa Kind
- Lori Craig
- Maggie
- Mara Campbell
- Maria
- Maria Levine
- Mary
- MaryJo
- Melanie M
- Monique Hansen
- Moxie Fab World
- Pam Imholz
- PaperCrafts Connection
- Peppers and Pollywogs Kids party site
- Rebecca Grohall
- Rita
- Robyn
- Rose Ann
- Sarah Vrolyk
- Sharon Harnist
- Sharon Johnson
- Sharon Rivera (a chemisrty with paper)
- Sherrie
- Sophia Landry
- Storage Units, Ink, & More Blog
- Sue Berker
- Susan (Rainy)
- Tangii Crane
- Tracy
- Tricia Traxler
- Trudee
- Velta
- VivLyn
- Zena
MTME Pretty Palette Color Team
MTME Pretty Patterns Sketch Team
My Time Made Easy TM LLC
Shop till you drop!
Lauren Meader
About Me
Copyrighted material
Subscribe To My Blog
Pages
- About me
- Alexa’s Story!
- My Crafty Corner!
- My Time Made Easy™ LLC
- Our Make A Wish Trip to Disney!
- Resume/Publication List
Calendar
Archives
- August 2013
- July 2013
- June 2013
- May 2013
- April 2013
- March 2013
- February 2013
- January 2013
- December 2012
- November 2012
- October 2012
- September 2012
- August 2012
- July 2012
- June 2012
- May 2012
- April 2012
- March 2012
- February 2012
- January 2012
- December 2011
- November 2011
- October 2011
- September 2011
- August 2011
- July 2011
- June 2011
- May 2011
- April 2011
- March 2011
- February 2011
- January 2011
- December 2010
- November 2010
- October 2010
- September 2010
- August 2010
- July 2010
- June 2010
- May 2010
- April 2010
- March 2010
- February 2010
- January 2010
- December 2009
- November 2009
- October 2009
- September 2009
- August 2009
- July 2009
- June 2009
- May 2009
- April 2009
- March 2009
- February 2009
- January 2009
- December 2008
- November 2008
- October 2008
- September 2008
- August 2008
- July 2008
- June 2008
- May 2008
- April 2008
- March 2008
- February 2008
- January 2008
- December 2007
- November 2007
- October 2007
- September 2007
- August 2007
- July 2007
- June 2007
- May 2007
- April 2007
- March 2007
- January 2007
Categories
- About Me
- All That Scraps
- blogger challenge
- camera/photo play
- Cards
- Contests
- family stuff
- FOR SALE
- Home decor/3-D items
- How to FAKE it!
- Introduction
- JUGS Challenge
- JustRite Stampers
- Lizzie Anne Designs
- My family stuff
- My Stamping Space
- My Time Made Easy
- My Time To Color Challenge
- My Time to Create Challenge
- My Timeless Template Challenge
- My Timeless Templates
- Mytime Mail
- MYTIME MOVIE/VIDEOs
- Papertrey Newsletter
- Pink Cat Studio
- Pretty Palette Challenge
- Pretty Patterns Sketch
- Product Opinions and Must haves
- Recipe's
- Saturday Sketch
- Smilebox Creations
- Stampavie
- Tutorials
- Uncategorized
- videos
Most Popular
- Create your own Onesie Card Tutorial-and important NOTE! PLEASE READ (2529)
- Saturday Sketch-Boxed bag holder (2333)
- Going GREEN! Fancy Flower Flourish-Closure Video (1478)
- Fabulous Favorite - Giveaway! (1336)
- a Prayer Request (1231)
- QUICK-Easter Baskets from Nestabilities-PTI style-and blog challenge (1063)
- Teaser Sketch (999)
- February Release Giveway! (and a little peek) (996)
- Group Post and Rambling Rose Video Tutorial (985)
- GIVEAWAY! Who wants it all?! (895)
Recent Comments (RSS)
- 바카라사이트: 비슷한 주제에 대한 흥미로운 정보를
- 바카라사이트: "여기에 제공해 주신 귀중한 정보와
- 온라인홀덤: 유익한 웹 사이트를 게시하는 데
- 홀덤나라: 나는 당신의 블로그를 정말 좋아합니다.
- lisa: Technology, too, has left an
- 주소모음: 흠 !! 이 블로그는 정말
- FutureGen Apps: Thank You For Sharing fantastic
- 웹툰사이트: 터키에서 온라인 스포츠 베팅을 할
- 툰코: It is a really very
- 온라인홀덤: I’ll be sure to come
Copyright © 2007 - My Time, My Creations, My Stampendence - is proudly powered by WordPress
This blog has been Tweaked and Designed by Sara Williams
134 Responses for "Little House on the Papertrey"
Great job on the videos! I love this little house, how cute it is!!! Thanks for sharing.
[…] unknown var varsarray=[]; varsarray[0]=’10649′; if(!token) {var token=’0′} else {var […]
OMG – how CUTE is that little house! I had found a little birdhouse template before Christmas and made a couple of those and I’ve been wanting to go larger – now you’ve just saved me some work. 😉
I watched your video!! So fun to see you “in person” lol… You did fine, I think it’s just a learning process. I would have actually liked to have seen you stamp the grass and get the fence border done (I know you had to edit for time, but for future projects).
You do amazing projects all the time, so the chance to see you work through one on a video will be great for all of us out here!
Good job! See you again Monday! 🙂
Lauren, I rarely take time to comment, but follow you religiously. Since this is a new venture for you and I know every kind word goes along way toward self-confidence, I’ll add my 2 cents to the hat. GREAT JOB!
You are an impossible person to not adore. From what you say to how you say it, you are highly personable. Add to it your crazy talent and personal triumphs and tragedies, and you are a woman that I admire in a “I hope I grow up to be like her some day,” kind of way (we’ll just ignore the fact that I’m already a couple years older than you).
Thanks for everything, and rest assured…you’re doing a fantastic job!
Me again – I just had one thought. Is there a way to add the videos so they don’t automatically start? When we come to your blog they all start playing so we have to go find them and pause them. Then if we want to leave a comment, the video in that post starts playing again.
Just a suggestion that, if it’s possible, would make it easier for us – especially as you start adding more and more videos!
What I want to know is how the heck did you think of this one? When do these ideas come to you? Does your brain ever shut off? This is simply amazing! You make it seem so simple to do – I might even give this a try. I am just trying to imagine how an idea like this goes from just an idea to an actual project. Were you sitting staring out the window one day and “poof” an idea pops into your head and you run to your craft room and make a house? I would love to hear how this happens in your world. I am in such awe I really don’t know what to say. That has got to be one of the cutest gift boxes I have ever seen. You did a great job!
That little house is just adorable and your video was very good. How do you keep coming up with such great ideas?? I know what you mean about having to edit the videos down, it’s not easy at all. Sometimes if you can convert them to another format it will make them a smaller file size without having to cut as much out.
IM LOVIN THE VIDEO BUT BOTH OF THEM ARE RUNNING AT THE SAME TIME SO ITS KIND OF HARD TO LISTEN BUT GREAT JOB
I never comment but since you put yourself out there..I thought you did a great job and I know that everytime you do this you will learn something new. I could never do this. (I always hate the way my voice sounds and I always hate the way I look!!) Great Job, and thanks for sharing everything you do!
Lauren you are such a talented lady! I love love that darling house box! You did a great job on your tutorial, I commend you. I could never do that. Thank you so much for sharing everything.
Keep creating,
Joan
this is too adorable!!! My sound isn’t working right now, but as soon as my techie DH fixes I will be watching the video and trying one out myself. 🙂
Great! So dang cute and a total must for making… The lighting is way better….
but, please find a way to make them stop opening when you come to the blog… I can see it getting really bad if you have say ten going at once…LOL
reflections:0)
Girl, you make the cutest stuff. When you you find the time in a day. Especially with your little ones!
Fantastic job on the video Lauren, I luv this house it’s so darn cute!!! Thanks for the tutorial!
Great job, Lauren. Wonderful video and project. My comment is when the screen flashes to give directions, the red is hard to see and maybe it’s the font that was used. I didn’t have time to read the ones that were longer. Again maybe a different font would be easier to read a bit faster. Other than that, you did a marvelous job.
Oh. My. Goodness! That house box is so stinkin’ adorable! Good for you for putting yourself in front of the camera. You’re doing great! And now when I read your posts, I’ll actually hear your voice in my head too. 🙂 Thanks for all you share. You are an inspiration to so many!!!
This house is so cute!!! Thanks for sharing!
You did a great job with the video! Cannot wait until the next one:)
I love it! Great job on the video again!
Love the clips but your clips keep playing. I was also hoping you could tell me the name of your glue.
So very cute.
oh my gosh girl! you did so great! 🙂 seriously, I know I need to get over it, but your accent is so cute. I don’t hear it all the time, but you will say something every once and a while and it totally makes me smile!
I loved your step by step video! NO one does that! 🙂 You are the awesomest of all, because you give great directions. I would have loved to hear your conversations with yourself. 🙂 Glad I’m not the only one that does that!
Hugs girl! Thanks for being you!
~Kendra
Um….BRILLIANT! Thanks so much for sharing with us!
This is the most amazing thing I’ve ever seen! Great first tutorial!! You’re a video tutorial pro already! Thanks so much for sharing this with us. Also thank you for your response regarding where to get acetate. I can’t wait to try and make this for my kids (maybe for Valentines day but I think I may cut heart-shaped windows :-).
Great tutorial Lauren, the box is adorable!!! Can’t wait to make some of those for my friends 🙂 I think you did great, it was nice seeing everything step by step, and if I missed anything you have the directions typed up – perfect!
Just as a heads up – I noticed that as soon as your page loaded, the videos started playing, which meant your “hello” video and the “house tutorial” video were going simultaneously. If there’s a feature so that they don’t play all at the same time, that would be cool. 🙂
Can’t wait to see what you come up with next!! Hugs, Deepa 🙂
So adorable! Love all the little details and for this being your first video, I think you did an amazing job…thanks for sharing your amazing talent with all of us!
WOW WOW WOW…. This project is great. You are truly blessed. TFS your talent with us. Love all your work.
Hey Lauren ~ **BRAVO** my dear, you’ve accomplished what you had set out to do a week or so ago. I only watched it quickly, but it looks wonderful ~ I’m just disappointed as the volume on our desktop computer doesn’t work!!! Grrrrr!
Please don’t be so rough & tough on yourself, afterall, there always has to be a learning-curve to things, otherwise we’d all be brilliant and talented just like you 🙂
BTW, should I now call you Mam, Miss Lauren, Mrs. Meader, Ms. Lauren, or what? Or what about bowing before you and saying …. “Queen Of Paper” or “Queen Of Rubber”. hehehehehe
You are already a *Super*STAR* in all our eyes ~ Wonderful job and I love your house.
Great job for your first tutorial, Lauren! Pretty soon you’ll be an old pro at it! Love that house! Where do you come up with this stuff?! Watching the video makes me much more likely to try it than just reading the instructions. Thanks so much!
I started following your blog about a month ago and you are soooooo talented! Every project is better & cuter than the one before. I bought one of your templates & I am definately going to buy more.
As far as your videos…Don’t change a thing. Keep up the great work & thanks so much for sharing your enormous talent.
Another wonderful project Lauren! I don’t know how you do it, but I’m so glad you do! I think your filming and editing was great!
Fantastic job on the video and box, Lauren. I must try one of these to give for Valentine’s Day. Love your projects.
YOU ROCK! GREAT VIDEO! AMAZING PROJECTS!
Lauren you are an amazing woman from so many perspectives. Your creative talents leave me in awe – almost daily. I LOVE that you are now doing videos. Thank you so much. You rock girl! This birdhouse is so stinking cute I may just have to make one today – school is closed because of extreme cold but I still have to go in for a while (yeah I’m an administrator). BUT I’ll have some extra this afternoon 🙂
Hugs!
Didn’t get a chance to see the video but this house is adorable. Do you sleep?
Lauren…this is so very creative and cute! Thanks for sharing….I really love your templates but have you ever thought of offering them in different sizes for cards..ie besides A2, A1 (4 Bar); 4×4, 3×3 etc 5×7 etc… I am an A1 card maker as Im sure there are probably lots others…. Anyway, just a thought!
Awesome Lauren! Love everything about it! Great colors and images you used. Love the tutorial. Helps so much to see things. TFS!
Once again you never cease to amaze me! What an adorable creation.
My only criticism…Because you also provided the instructions in text format, the video did the job beautifully. If you did not show instructions as well, the dimensions flashed by on the screen a little too quickly sometimes.
Excellent job, really not much room for improvement here!
Thanks and keep them coming. You are so awesome!
I have to say that this is one of the most awesome, gorgeous, amazing projects I have ever seen! WOW!
Wow! Very pretty! Well done.
This is INCREDIBLE!!! Just love this Lauren – and your video is great too – tho I think my ‘puter is dying 🙁
Way to go girl – you are too much!!
Wow, Lauren, I can’t believe how much more connected I’m feeling! As above, your accent is sooo cute! Being from the south, I tend to “draw out” my words, and I was a little surprised to hear how you really sound…so cute!!!!! It would take me 3x as long to say what you did…seriously!
I did have some comments- Can you do anything about the fact that it’s difficult to read the red-on-black writing, and I missed some instructions, when there was a lot on one page. Also, I know people mentioned already, all the videos begin simultaneously when the page is opened. (I’m computer illiterate, so I wouldn’t begin to know.)Great job, & I look forward to watching ALL of the videos!!!!! Thanks!
WOW! You did a great job! You are truly such a talented person and so inspiring! How did you know this would be perfect for a gingerbread house favor! Every year the family gets together to make a gingerbread house (and eat tacos) the week before Christmas! These will be perfect!!! Thank you so much for sharing!
I loved the tutorial and the project! SOOOO CUTE! And you sound and look awesome! (I too get the two videos running as soon as I open the page – but no biggie). Have a fab weekend – Marta
Great job on your tutorial! You make it look so easy and the house is adorable. Your blog is the first one I check each morning. Thanks for your inspiration!
The project is great, and the video is a BIG help! Some of the steps that are inserted in the video in text come and go a little too fast though. I am glad you also had the write up for us to follow.
Thanks so much again for taking time to show us this amazing project.
Lauren, you did a fabulous job of your first YouTube tutorial. Very helpful instructions for an absolutely adorable project. LOVE the house box and will definitely be making some. Thanks for sharing this fun project. BTW…Love your blog design!
I thought the video was great. Your creation is amazing! thank you for sharing this with all of us. I love it all! beth g.
This is so cute!!! Great job on your first video tutorial!! You really got some cute stuff going on here!
HOLY SMOKES GIRLLLL YOU FREAKING ROCKED that video! OH my hmm you know what I would like to see HOW THE HECK do you come up with ideas for your Templetes! That would be cool.. of course Now I want to go make me a house I LOVEEEED IT! 🙂
thank you so much for doing this!
Great video! Hope you make many more to share with all of us.
I love it. The video is great!! Please continue!! I still stand by my suggestion of yesterday that you do some tutorials of your templates to assist in marketing them. I am so sold that on the 15th of each month, I purchase as long as I am able. If not on the 15th I order asap. I have made at least 1 idea with all of them. Will this little house be a new one? This is also too cute and I already see it as a multi functional template–if nothing else, it can be decorated to fit each holiday. Thanks for sharing your creative brain with us all.
Absolutely FANTASTIC – Lauren!!! Love this house!!!
Thank you for sharing that with us, it was a great project and your awesome on your video, can’t wait to see the next one.
Great job. That house is adorable! Stay warm. -Molly B
That house is stinkin cute! Very nice job with the video. I’ll look forward to your weekly video tutorials. Kristina Werner does very nice videos too (www.kwernerdesign.com).
Hi, Very cute house! I will second the above comments about the red on black words and they don’t stay up long enough to read. You are doing an incredible job for the first video ever. Keep up the great ideas and videos.
Great Job and thank you for providing the written instructions as well.
great job!! I’m just a bit confused on the triangle part, could you explain a bit more?
Wow Lauren your first video was wonderful and of course the project rocked too. You’re doing just great keep up the great work and you for sure are keeping your followers HAPPY. Looking forward to more crafts by Lauren via video.
Lynn
Have I mentioned lately that you are a freaking genius?
Awesome job lauren! Your video rocks! It’s like a private lauren crafting class. And your creation is beautiful.
This house is so stinking cute!! I wish I had 1/2 of your awesome talent… Girl you ROCK!!!!
stop putting yourself down ! You did another great job and well done to you ! If anyone isn’t happy, they are just ungrateful – you go, girl !
This little house is too darn cute !!!! I’m already thinking of the possibilitie… You did a great job on the video. Thanks for sharing with us.
What a totally adorable house!! Love it and it would blow the socks off anyone receiving it for a housewarming gift! Great job!!
Fantastic job Lauren loved your tutorial!
Love the house gift box.
Look forward to seeing some more of your wonderful work!
Julie
The house is darling! Any gift received in it will be LOVED!!
This is adorable! And thanks so much for giving us ‘dial-up’ people written instructions (although I would have preferred more photographs, hopefully I can understand how to do it by just reading it.
Loved watching you demonstrate the house gift box in your craft room. It was a real treat!
You did so well with the video and I’m looking forward to your next one.
Thanks for sharing with us!
Lindsay
Thank you, thank you, THANK YOU! Being on slow dial up, I am so thankful that you included the step-by-step and some pictures for me, so I can try this, too. I did attempt to watch your first video the other day—-30 minutes later, I had seen 14 seconds of it in 1/2 to 1 second intervals. So that is a lost cause. Terrific house package.
Gail S.
OH MY GOODNESS! Great job on the video and I LOVE the house! What a cute, cute idea!!!
Lauren,
This is just so adorable. I just love this house and what a creative idea. Your written tutorial rocks and you’re just a SUPERSTAR on the video. Thanks so much for taking the time to share all your talent with us.
This is soooo cute! You put so much creativity into this. Thanks for sharing!
Great job on the video, Lauren! I think you did fine! And I love, LOVE, (did I say L-O-V-E ?) the house box!!!! ADORABLE!
wow — the house is soooo cute!!! thanks for taking all the time to learn how to show all of us how to make it — we really appreciate all the extra time you had to put into the making of this video for us !!! 🙂
Super Cute! Now i had to create another file folder in my favourites to include Lauren’s Tutorials. You amaze me Girl!
Thanks for sharing with us your wonderful gifts of crativity.
Please answer the questions about how you come up with all your fabulous ideas. We REALLY want to know, KWIM?
SPECTACULAR!! Once again, you have knocked our socks off!! Absolutely, undeniably one of the most fantastic and and creative boxes I have ever seen – thank you for all your hard work and willingness to share it with us. Your video is just great!!
The house is darling. A suggestion – make sure your written instructions stay on the screen long enough to read. Thanks, it’s great.
Another packaging treasure! Your imagination must work overtime, you never cease to amaze me with your ideas. The video was great I am so glad you are going to be doing videos as I am a see and do gal. Thanks for all the effort you put into sharing your projects with us. Ann Lind
I’m speechless….
Okay, I’m not really…. THIS IS TOTALLY AWESOME, LAUREN! You did a wonderful job! Super cute project too! I can’t wait to do it myself.
I’m imagining a really cool gingerbread house around Christmas using the same template!
Way to go!
Hugs and love,
Renee
That was awesome – great job on the video. It was so nice to see how you put that together….I mean your instructions are always really good – but the visual was extra nice.
One suggestion for another video – maybe you could give us a tour of your scrap area and what you like and don’t like. I know I am always trying to figure out ways to store my stuff that makes the most sense. I almost spend more time organizing than I do creating:-).
And one more – do you have suggestions on how to store ribbon spools? That one really has me stumped. I store all mine in separate baskets but there is no real order and I never know what I have unless I take everything out..
Thanks again – you rock!
Watched your video. Such a great job. Love this project !! It is so adorable.
The house is too cute for words!!! You did an awesome job on your video! There is no way I would ever even consider making that house until I watched the video. You made it look easy and do able. Keep up the graet job
LOVE the video! And I’ll probably watch it at least 2 or 3 more times! LOVE the house too! You did a fabulous job of the video. I really love that after reading your blog for so long, I can actually see you talking and crafting.
Same as above! The house is very cute and I appreciate the time and effort to do the video. Keep it up
Thanks for a great how-to-video. Nice project. I will be sure to give this a try. I have lots of discontinued wallpaper sample books I got from the Paint and Wallpaper Store. They were going to put them in the dumpster. Great use for the wallpaper since it can’t be used for scrapbooking.
I will have to post a photo of one after I create it. Have a creative day! 🙂
You did a great job! I definately feel the itch to buy a scor mat now! Never realized how cool they were!
I LOVE this and can’t wait to make one!! You are sooo talented – keep up the great work and thank you for sharing with us!!
You are so very talented! I love this, and especially the video – that’s the way I learn things! Thanks so much for sharing!
I just had to make one, so easy following your video :-), but I can’t get the roof to stay down. What’s the trick or does it lift a bit on the one side?
Awesome,video!!! It helps so much to have the written as well as the visual! Thanks for all of your hard work, I really appreciate it!! Nancy
Not only is your house adorable, but your first video tutorial is wonderful as well. Great job Lauren. Your imagination is just never ending!
YOU ROCK!!!! I check your blog every morning and get my eye candy fix and I am so excited that you are doing videos. I am a very visual learner if I see it I can do it. SO thank you so very much for sharing your creativity with all us out here in cyber space! 🙂
P.S. What do you use to adhere everything together? I saw the atg but did you use it on the whole project?
Great job on your video and your box is a really neat project. tfs
You are amazing, this is wonderful!
The house is really sweet. Since you are learning the video thing, one small suggestion.if you are short on time like this video, either refer to your post for the details or have the little text pop ups, not both. Most of them were too quick to read!! Adding a diagram to your post with exact mwasurements of the cutting and score lines would also be a huge help cause your video went by so fast! Do you KWIM? Don’t get me wrong, I love the project. I just hope some constructive criticism will help you. Soon you will be an expert and will do a tutorial on making tutorials. Just wait! 🙂
I haven’t even watched the video yet, but wanted to say YOU ROCK! How amazing are you?! Really! Thanks so much for putting that together. I would seriously move to live next door to you so that I could get all these cute “neighborly” gifts if I could talk my husband in to it. hee hee! Hugs, Lisa K in tx
Nice Job Lauren. The vidoe is fun because we get to see and hear you. Thanks so much for sharing your cute project!
Bravo!!! Bravo!!! Wonderful job!!!
Great job on the tutorial, although a bit fast on the details. Thanks for including the written instructions as well. The house box, itself, is absolutely adorable!!
Great job on this new venture, Lauren! Or shall we say adventure?! 🙂
I think you did great on your first video tutorial, and kudos to you for daring put yourself out there like that! SUPER-cute project.
The only advice I can think of is the words between segments. A little hard to read the longer ones…meaning not enough time, and maybe the font? Just a thought. 🙂
Great job – I look forward to seeing more!
Great first video – your personality shines through. It was great seeing your working method, too. And about that house, WOW! Thank you for sharing.
Hi Lauren,
Love your house and all your crafts! I was wondering what glue do you use? I have never seen a glue gun quite like that?
Thanks for sharing. Vicki
Lauren…this is super cool!
Lauren – what a great job you did on the house and the video! It’s always so cool to finally “hear” the voice of a blogger. You were terrific and I can’t wait to see your next project. Thanks so much for sharing your work with the rest of us.l
That was an ambitious first video project! And you did outstanding. Loved actually seeing you stamp.
Lauren,
I love your amazing work!!! I have been following your blog for over a year now, and you are my papercrafting idol. The house is incredible!!! Thank you for all your wonderful ideas and inspiration.
As for the video – they did not start automatically on my system. I had to hit play. So if you did anything to remedy the problem noted by the others – great job. I love seeing you in action! Thanks for putting yourself out there and sharing your wonderful creativity with us. I also wanted to let you know that the step by step detailed instructions are great to have with the video. Thank you for taking the time to do both. I can’t wait to see what you do next.
OMGosh! Thats amazing. I love it. Thanks for the tutorial, You were great!
Hugs~Kris
Such a cute little house!!! :-))
Thank you for that video, you did a great job!
Greetings from Renate
You did such a Fantastic job on your tutorial, it is neat to see you work, and this house is just too cute!
Thanks for sharing your talent with us!
Hi Lauren! Love your work…the house is adorable! Your tutorial was fantastic! My only issue was the written parts were a little tough to read because of the colors and the speed…seemed to scroll a little too quickly (though if I were to make the project I could pause for the written parts.) I still think you were great though!
Janna
Hi Lauren! I love that house! I have been wanting to learn how to make one of those for awhile. Thanks! As I’ve told you before, I love your blog and I think you are the sweetest girl. You are such an inspiration in so many ways. It is so great to finally put a voice to your face. I love the videos. I hope you keep making them!
Michele
Oh, Lauren…your tutorial is FANTASTIC, and your project is over-the-top cuteness!! Great job…and thanks so much!!
I thought your video was excellent and thorough. I love the angle you have chosen. How exciting!
Wow! You did amazing…You are truly remarkable to me..You find time be a wife, mom to amazing kids, craft and find time to help others learn from your talent.. Thank you for your blog and now your videos..I am not as talented as you but am trying my hand at improving..Your blog is the first one I look at for it always inspires me..I am not up to the house yet, but just seeing your use of colors helps a beginner like me. I would love to see some card techiniques (like different folds, and ways to do backgrounds..) I know you asked what we would like to see…
Thanks again!
This is the cutest project yet! Thanks so much for the video tutorial. I’m a very “visual” person, and it helped a lot.
How do you come up with these awesome ideas? You must have lots of patience to figure it all out – then spend so much time doing the video. Thank you, thank you, thank you! 🙂
Loved it only I am on dail up and it kept stopping, but I still enjoyed it. Have fun shopping. Susan
Hi Lauren, thanks for putting up your first video tutorial – it was great and lovely to see and hear you in person!
I find video tutorials really helpful – sometimes when you are just reading instructions for a project, you may not really comprehend what is required and this is where the videos are such a help.
Both are great for sharing projects with everyone and I love to print out the instructions then watch the assembly on the video for tips and I make notes on my paper.
Then I go off to create!
Good luck with your future videos – your introduction and this first one were great. Looking forward to more of them!
Hi!
You did very well and all the things you make are great and the tutorial where fantastic.I have tried to make the house,not finshed yet but very soon.Thanks for a great tutorial.
Have a nice weekend!
Great videos I can not wait until the next video I hope it is a card I just love your work.
Wow Lauren, what a fabulous project. I finally had a few minutes to watch your video…love it! Great job with the video. TFS!
hey Lauren, thanks for remembering some of us are on dialup, lol! I was able to see your first video thoughts via my latop at work, so I will watch the videos but remain on dial-up at home! We love you! babies~ Beth
Hi Lauren,
Thanks for the wonderful idea. I took your template and modified it to create a church, including steeple and bell. My parents’ 30th is coming up in Feb. and I had been struggling with what I wanted to do. Thanks again for the instructions.
I finally got to watch your paper house box tutorial video and it was great! It was so helpful to have both the written tutorial and the video tutorial – so great. You did an excellent job and seem to be a natural at the filming and “hosting” your own program (even if you don’t feel you are natural ) – you are uber talented! I can’t wait to be able to watch more of your Monday features. Your blog is very inspiring and I love love love all of your projects/packaging/presentation/box ideas and now your templates OMG! Keep up the super fanstastic work!
That house is adorable, you have the greatest taste when it comes to your projects, I totally love everything you come up with! You did a great job with the video I know it has to be so much harder to make the videos than you think when you’re watching them. I’m still struggling with basic photoshop elements stuff so I give you so much credit.
Hi Lauren, I just found out you started making and posting video’s. I really liked the house video. You really did a great job. You sounded like a pro. Now I’ll go and watch the others.
Eveline.
Lauren, what an adorable house! I’m a Stampin Up demonstrator in Fairmont, WV, and I might like to do this as a make-n-take at one of my workshops! Thank you for all your wonderful ideas!
Great job Lauren, you should have no worries about your presentation you looked and sounded the true professional, great work on the editing too.
No Worries. The house is so adorable just the right size to put my family of knitted s, Dad, Mum and newbie little girl.
leaving you loads of love and many hugs.
[…] had originally wanted to embellish them a little more, something like this — flower boxes at the windows, trim around the roofline, etc. But the day I had a friend […]
Valuable information.
Love the house…would be perfect as a parting gift for my housewarming…If you plan on selling these in bulk, please let me know
The mbt chapa women in many designs. and even if they are not so fashionable, you can pick up a few tricks to help them to be. many of the shoes are the fancy materials, such as high quality leather and suede. You can easily link up with the fitness suits. otherwise you can do the same with casual outfits, especially with shorts. but they actually achieve more than the universal appeal. mbt shoes , are in addition to the low-cut boots, mid cut shoes and sandals. The mbt chapa for sale give you options for the design professional, casual and fitness wear. so you can choose which style you use most often. The boots never been cut, but they look very portable and coolly chipped in the sale or MBT minimalist design.
Leave a reply