A challenge from Pink Cat
Jan 27, 2009No eye candy today
OK this is late in the day, but Im lucky to even squeeze this in. Not to bore you with the details but its been a while (thankfully) since my house has been THIS crazy.
I have 3 sick kids-
Alexa -JUNKY icky cough. Disgusting nose. She is doing good though, so Im crossing my fingers for her.
Noah-Croup as of 2 am. I hate croup. Its very scary, and just plain rotten
Amber-Poor Amber. She has gotten sick a lot this school year. Bronchitis and a double ear infection. At the doctors till 9pm last night!!!!!!Nasty harsh persistent coough that won’t quit and has kep ME up since Friday, and random hgh fevers :C No meds are helping.
She is VERY good when she is sick. Just wants cuddling
Me-exhausted, stressed, sore throat, headache, and body aches.
BLAH!
Oh did I mention all the snow heading our way tomorrow?
All I need is ONE night of sleep, and I’ll be refreshed.
I hope!
OK so I need to post the challenge posted in the Pink Cat Studio forums
so here you go! LOVE Challenge!
Looks fun. I hope I get to give it a try one day soon.
Sorry to be a downer-I’m wiped.
I will say NOT getting to stamp has put my brain in oeverdrive and I have lots of ideas brewing in my head now 😀
OK now I need to get back to the family.
Have fun with the challenge

Note-
Jan 26, 2009I have now added past Veoh videos to my site!
So if you missed My Timless Templates, start to finish video-go here!
or my video tour of my Craft Space-check it out now!
Thanks
My Copic Coloring Tutorial Video’s
Jan 26, 2009OK! Kurtis is a genius! He fixed me up-so now everyone should be able to see the tutorials from Veoh on my site!
Let me know what you think! Especially those from other countries, unable to view others.
I’m going to embed the other videos, into my older posts.
Part one
[veoh v173265089DCzTwe7 ]
Part two
[veoh v17326532NzewxWm7 ]
Be sure to read the post below for information, and the completed card project!
Thanks again!
VIDEO-Monday’s with Mytime-Copic Coloring Tutorial
Jan 26, 2009Quite honestly this video has got to be the MOST intimidating thing I have had to do-to date!
That, and the fact I considered (for a very brief moment) sharing a video of me in my “before” jeans and “after” jeans! LOL! To hopefully motivate you all some more. That will not be happening! LOL! Just like a commercial-I could so be on with my clothing-too funny. The good thing is bathing suit shopping won’t be pure torture this year. I just can’t stand spending $40 on a suit. They are insanely pricey.
OK back to the subject.
So for today’s video’s I did the much asked for Copic Coloring Tutorial.
I am not a coloring expert. Nor do I claim to be. I honestly don’t even feel qualified, but you all wanted to see how I color, and some asked about making my scenery-so its my “job” to share it all with you! LOL! So be gentle! I do hope you gain something from it-even if its pure amusement.
This is the finished image I have colored to create my sample here
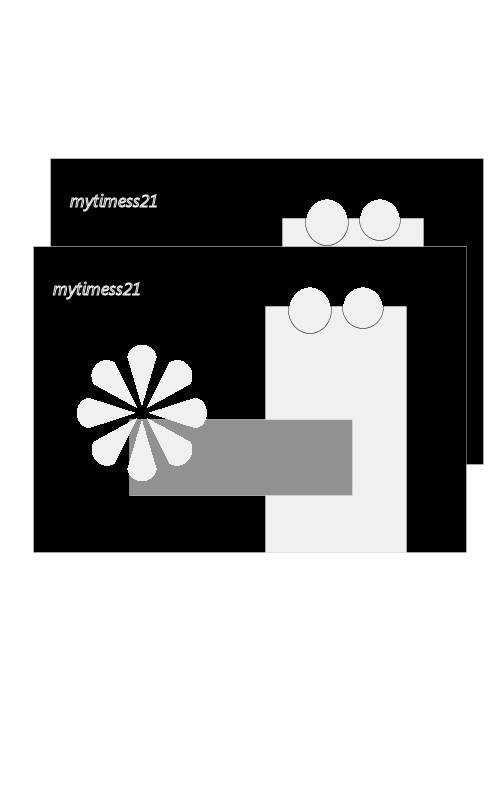
I used my Saturday Sketch #21-mytimess21
Now for the videos:
EDITING TO ADD! My videos are ON my site in the post above!
Kurtis DID enable them so we are all set, from here on out!
The rest of my babble below was my frustration with the video situation, but now its all smooth sailing!
—————————————————————–
GOOD NEWS!! My plug-ins will be enabled soon. I tried to do it myself, and only got a black box to work. That is huge progress.What that means is in the future you can ALL watch it here, on my blog-without going to Veoh! Just like the YouTube one’s I am able to feature.
Again I did post on Veoh. There are MANY reasons I like Veoh more.
Easy to upload, better video quality. No time restrictions, and the list goes on. I tried to do 2 parts so that I could post to YouTube. Obviously-of course, I went over! After MUCH editing too! So Im no longer breaking it up into segments, after this. Im uploading to ONE place, ONE video. It is too much more of my time to try to keep editing down, and then to split it up, save and load 2 or three segments. Stresses me out just reliving it in blog land! LOL! This is the part of the process that causes me the most duress-TIME! So I’m done with it.
I offer these videos for a fresh approach, and something fun. I won’t want to do them if I have to keep doing so much just to keep everyone happy. (Not that I dont want you to be happy )
I know YouTube is more “popular” but I don’t need to be popular, or use the most popular place. I want to use what site can best accommodate me, and right now that isn’t YouTube. I’m actually in PURE awe at the girls who can whip up an under 10 video. My personality and chatty nature just can’t handle it-sadly. I’m a talker, and a visual person. so I feel its all relevant
We are women-Its impossible for us to ALL be happy ALL the time! LOL!
I apologize if you cannot view it where you are from :C I do not know how you could view it otherwise. Once my plugin gets working everyone should be able to view it right here, no matter what Country you are from-so YEAH! Let’s cross our fingers shall we.
Now onto the details:
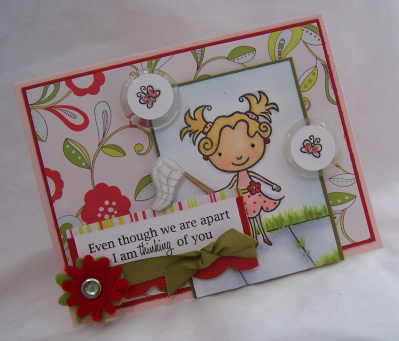
What better image to use than my Dress Up Lily Amber set from Pink Cat Studio? (remember you can personalize those! So I got Amber stamps!!) In this video I show you step by step (OK so severely edited steps in some parts) how to get Lily colored, and in this scenery!
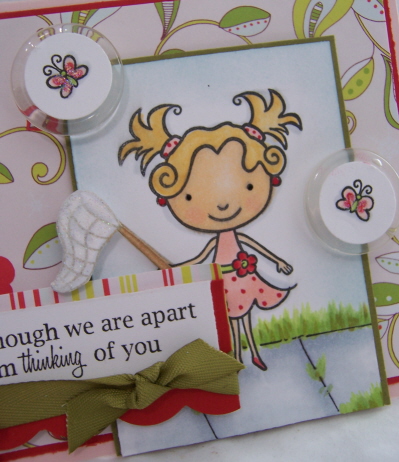
She is so cute, I think.
My colors are Sweet Blush, Pure Poppy, Ripe Avocado, white, and some paper I got at Target a year ago! LOL!
The sentiment is from Papertrey Ink- Mailbox Greetings. That set has some rockin sentiments.
OK I hope you enjoy the video’s. You know I love hearing your thoughts on them. I think I improve a little each time.
Please don’t be harsh in judgement on my coloring-since I seriously have no claim to be a “professional”. Just a regular, self taught stamper, trying to show you some of what I do while playing around 😀
Thats the best way to learn-hands on.
OK I do enough blabbering in the video’s, so I’ll hush up now.
OK I need a nap. I have been up all weekend with the kids being sick so I need to take advantage of the quiet. I’m wiped out.
Enjoy!
And as always thanks for stopping by with a hello, the kind words and support 😀
Oh, and thanks for watching.
PS Yes I know I look exhausted in the video too-I was.
Birthday Card Box Winner
Jan 25, 2009Scroll down for my post today.
Sorry this is late! Amber has been sick, and I spent the day with my family.
Here is the winner of the Card Organizer.
If you are wondering I have a random computer generated number get picked from
That way its 100% fair!
Today’s # was
—————————————————
Random Integer Generator
Here are your random numbers:
39
Timestamp: 2009-01-25 14:53:30 UTC
—————————————————-
So that means the winner is:
Debbie |
Bad day is almost over and tomorrow will be better! I was just wondering how much weight you had lost by now. I started dieting and exercising last week and feel better already. I only hope I can hang in there like you are doing. I’d love to lose 55 lbs! I have been doing the Wii Fit and having fun doing it ![]() We all love you!
We all love you!
——————————————————
Thank you so much for all taking the time to make my day and lift my spirits 😀
Debbie-send me your address so I can mail this baby out tomorrow!
Loves me, Loves me not….
Jan 25, 2009You know it has to end with Loves me right?!
Well its Sunday and I am preparing to record my next video. I really am having fun-minus editing! LOL! If I got this down I’d do one everyday! 😀 That may get old though, and Im sure you’d get sick of it. So no worries there. Plus its very time consuming. I so appreciate the feedback though-so thank you again. You are all helping me improve by leaps and bounds with your suggestions.
I also have to get ahead on some projects that are due because my brothers baby is due any time now and i am going to be IN the delivery room. I can’t even wait. I’ve been baby shopping like crazy!! I already bought some mini frames to that once she is named I can make a frame for each letter of her name, and plan on using the Rachelle Anne Miller Spring line of animals with each letter! OMG! Wait till you see them and my finished project! I don’t have anything in INK yet, since they have wavered on her name. I know what that is like because Amber was going to be Rebecca. I didn’t really settle on that name since I also loved Brielle, and Lily (now our cats name! LOL!) so I’m impatiently waiting 😀
Anyway-I want to share anotherJustRite Stampers project since you have now SEEN how easy they are to work with. I also wanted to tell you what I REALLY think you need to use your alpha’s successfully, since I didn’t get what I should have (IMO) the first time.
If you get any alpha sets you should get the Harmony Classic Rectangle block set. 2 blocks come in the set. This will let you spell out lots of great stuff, without be made to use JUST a circle/oval block. After that important purchase, the rest is deciding what fonts you want! LOL!
So upon starring at my wall of Prima’s I decided that I should use them in a card.
This was my thought:
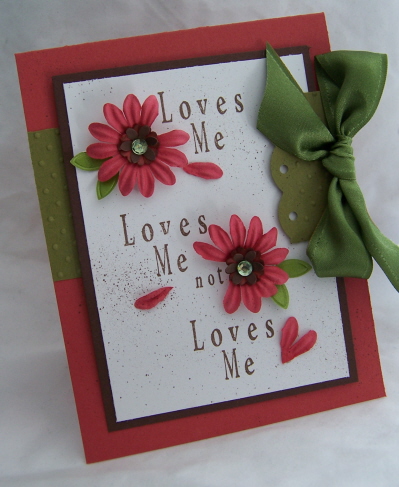
In Ruby Red, Dark Chocolate, and Ripe Avocado-with a May Arts olive ribbon.
I always loved the sentiment : Loves Me, Loves Me not, Loves Me.
I don’t have ANY stamps that say that, so I made my own using the New Times Roman upper/lowercase font. I’m so happy they are offering a upper/lower combo now. I enjoy making my own sentiments. I also like how they layer into the grooved blocks so I get PERFECT alignment and spacing.
OK back to the card-a close up
I knew I wanted a Prima next to each sentiment-so I staggered my wording.
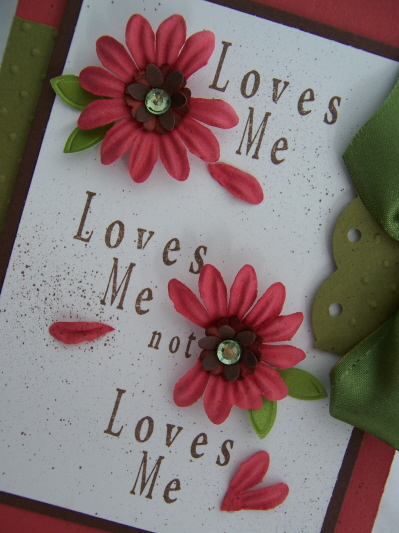
I stamped Loves me not first, then removed the “not” and stamped my Loves Me.
When cutting my Prima petals, its suppose to be like the same flower-so the first one had one petal cut.
The second one I cut 2 petals. Upon doing that I saw that they could look just like a heart!
So for my last sentiment-it is suppose to be like the 2 petals above, layered together to form a heart-Loves Me.
Isn’t that pretty?
I had fun with it.
For my Prima’s I just layered 2 punched paper flowers, sponged for my centers, and a little blign rhinestone.
Finished with a light color spritzing and was DONE!
So that’s it! Quick post today.
I hope you like this and it sparks some ideas for you as well.
Thanks for reading.
Get your sketch on……
Jan 24, 2009AWE! How can I thank all of you for cheering me up so much? I mean that with all my heart.
I’m also trying to focus on what is TRULY important in life-and that is my kids, and my husband. If I got a phone call that Alexa’s cancer was back, nothing else in the world would matter. The bottom from the bucket would just fall out. This hurt I feel is nothing by comparison. Its just another bump in the road. I hope that makes sense. I just wasn’t expecting it, thats all. Sometimes thing take us by surprise. So Im diving into stamping and letting it roll off my back.
Your words really meant a lot to me. You have no idea how down I was. Thank you-a million times over.
Many of you expressed concern for my stamp-insanity! LOL! I have to say that doing all the stamping I do, and sharing here IS my therapy. I truly enjoy it. Trust me I don’t get paid to blog! LOL! I wouldn’t enjoy it if it was a “job”. I do it for the enjoyment of it.
As far as the videos……….well I enjoy making them and sharing them, the editing-well I could hang myself! LOL! Part of it is my editing software, the other part is YouTube restrictions. I simply can’t edit myself that much! LOL! I feel its all worth it.
Also thanks for the congrats on my weight loss!! I have worked hard, and exercise daily, so I appreciate that 😀
Anyway…….I’ll pick a winner tonight. I’m typing this Friday eve so a winner right now would be “unfair”. So, in the meantime, it is time for another sketch!
I hope you like it! I am lovin it.
WARNING: blonde working PSP program.
Im sorry that the sketch double layered itself-see my card for better “visual”.
UPDATE! I replaced the sketch!! Deanne Burton fixed it for me!! Thank you
Here is the mytimess21

Now here is my card.
Anyway, you slice it
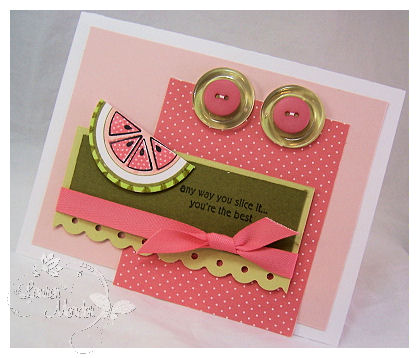
I LOVE the patterned fruit set called Tutti Fruity by Lizzie Anne Designs.
When I was the set I immediately wanted to make a watermelon. I don’t have ANY fruit sets! Crazy. The sentiments in this ROCK! Im so over the moon with it.
ONE PROBLEM: Making a watermelon required not only stamping the polka dot wedges (I used Berry Sorbet ink) but also the black seed wedge outline. Now these are RUBBER stamps, so I dusted off my Stamp-a-ma-jig and went to town. It was REALLY easy using that, and I felt happy with the outcome.
I then colored in the edge with a pink marker. The outer edge I colored green, then drew lines for a rind 😀
How summer is that? Its freezing here and this card warms me right up.
Now who’d of thunk it!
This “watermelon” image sparked all this!
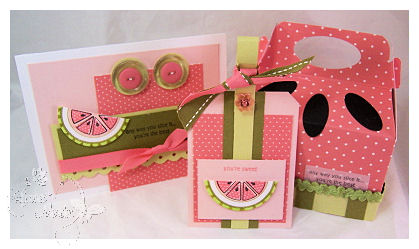
How flippin yummy is this gift set?!
We have a card-a “watermelon” gable box- I made myself-from scratch, by looking at a smaller version of a box, and a tag to match. I used 2 pieces of patterned paper, adhered together to get a good size. That was one of those-I can’t sleep at 2am projects! LOL!
The box was NOT an easy task. Im beyond excited over it though. It was refining MANY template desings, then finally tracing one I perfected onto my patterned paper.
In the future I’m just going to BUY some boxes in a large size.
ALWAYS use SCRAP first!! Then create and save a final template for future use 😀
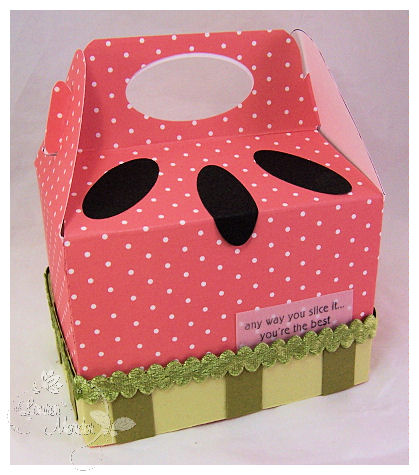
I used Papertrey Ink Pink patterned paper for my watermelon “wedge” paper. The “seeds” are True Blackcardstock punched with my SU! oval 😀 The handle is a oval nestablity.

The bottom is just strips of spring moss cardstock, and ripe avocado-layer on some may arts ribbon and my friends we have a watermelon rind! I added a vellum tag for my sentiment
Here is a closer view of the tag.
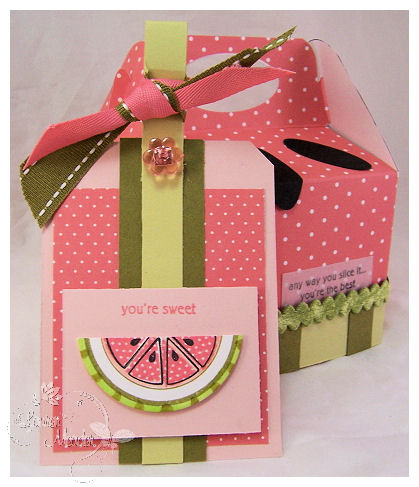
I like the tag. I don’t make many “tags” so this was fun.
I stamped the round image first, then filled it in with the watermelon wedges using my Stamp-a-ma-jig. I then cut it out, so from ONE image, I got my card and tag watermelon slice!
I like it all. I hope you do too.
Now time to go check the Sketch team samples!
Please send us a link here if you give the sketch a whirl.
I’ll be back in a bit to post a winner for my Birthday Box Organizer!
As always thank you for stopping by 😀
Video time: Birthday Box Organizer GIVEAWAY!
Jan 22, 2009OK girls I had a REALLY bad day.
One of those days where something comes up, and takes you by surprise. Just hurts. Not the end of the world kind of thing, but just makes you feel awful about yourself, and self doubt settles in. Makes you question everything you do, and why. I was going to take a break from blogging and dive into some chocolate.
Well, if you didn’t know….. that was how I USE to deal with things when I was upset or stressed. Now that I’m down over 55lbs (yeah me!!) I’m so NOT going there again. Not anymore! Instead I decided that I would DIVE head first into another project, for all of YOU, who always cheer me up (and lock up all the chocolate in the meantime!). I will just be positive, and push through this time, like I always do. No sense in getting upset over something I can’t change. Right? It is what it is.
Now to make me feel even better-I am giving this project away to one of you! You all cheer me up everyday, and giving you a chance at today’s video project will definitely cheer me up! I hope you like it.
Just leave a comment on the project here, and I will pick a random.org winner on Saturday! OK!
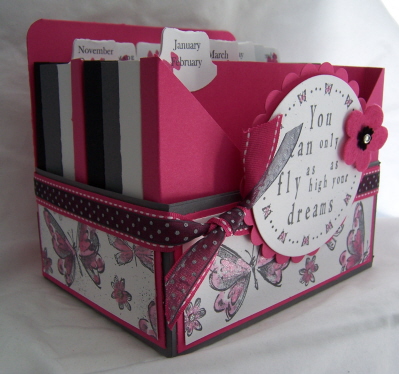
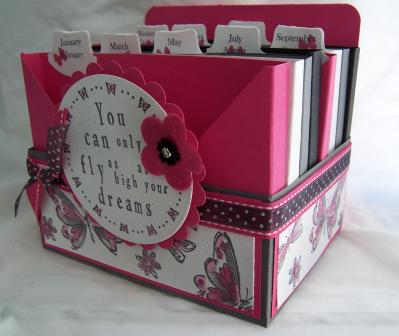
So this is what you have a chance at winning……….
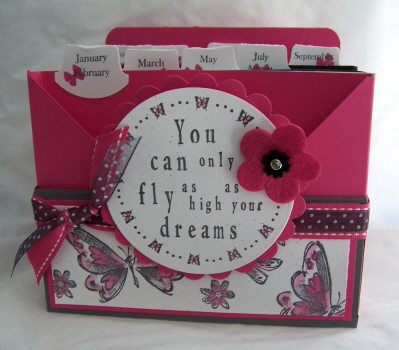
As high as your dreams-I created the sentiment and LOVE IT!
I love the whimsical feel it has, and the colors are perfect! It has the perfect amount of shimmer too. Can’t go wrong 😀
Woot! Woot!
So this project is up for grabs, and is the subject of a 3 part video I have for you all.
You KNOW Im too long winded to stick to UNDER 10 minutes! Seriously!
I hope you don’t get sick of hearing me. Let me tell you this project for you all was a true joy and stress reliever for me today. I had fun.
What I LOVE about doing these videos is I get to ENJOY teaching, without all the prep work! My own little classroom from home-heaven!
Video 1-Start to finish My Timeless Templates-card box pockets
[veoh v17296879Qpns5Xq6 ]
——–>Click Here!!<———
SORRY YouTube REJECTED this because it was 44 seconds too long!! GRR!! So you need to go to Veoh. Now I just wish I uploaded it all to ONE place. Im very annoyed with YouTube. Plus I couldn’t edit it any more than it was :C
Video 2-Making the box base
Video 3-Creating the center sentiment with JustRite Stampers
——————————————————————–
Thanks for watching 😀
After much anticipation, many of you asked for a few things:
1) To see My Timeless Templates used-start to finish-CHECK! see video #1
2) For the directions for the Birthday Card Organizer-CHECK! That is what the video is for-all 3!
3) To see how theJustRite Stamper’s sets work-CHECK! See video #3
4) Most you you didn’t like Veoh because you couldn’t view it, so you asked that I separate the videos into 3 parts-so I tried! Honestly that was a HUGE ole pain in my derriere, and my site crashed 3 times, making me re-do 2 of the 3 videos! UGH! I should soon have the plug-in here for longer stuff. Im just waiting in the SCS guy to fix it 😀
5) Longer wording in between segments-I tried that too. I can read these just fine, and with so many wordings, it cuts into precious video timing-so pause if needed. I think I timed it well this time. I am getting better. Its only #3 and I see a big difference.
PS tell me if you like me shooting from that angle instead or not!
6) Written instructions for my videos, along with the video. OK Im not sure how often that is going to happen because this is all so time consuming already. I pour so much of myself into my projects, and the behind the scenes stuff, now videos…….AND updating here DAILY. Lets not forget I have 3 kids, so not sure if thats always going to happen.
Bottom line-you talk, I listen! So I hope you know I appreciate every comment and email, and ALL the feedback. Thanks!
Now for more photos, and an IMPORTANT note
After video #1 I had to re -create 1 & 2. After re-doing it twice, I forgot the put the segment in the video where I made my label tabs on the pocket segments :C

Sorry about that. I think you will agree, the videos share enough info, and this was a minor detail. I do apologize!
I stamped 2 months per label, and made sure they were all staggered! Not too much more than that was shared.
I put them on AFTER all my pockets are done.
Thanks!
Supplies:
My Timeless Template: All Boxed Up
Stamps:JustRite Stampers Upper/lowercase New Times Roman alpha (sentiment made using these)
JustRite Stampers Harmony Circle III border (butterfly border around sentiment)
Butterfly of Happiness from Stampin Up!
Wedding Day -used for label months/butterfly on labels
Punches/Die Cuts: Stampin Up! Label punch, Circle nestabilities , corner rounder
Cardstock: White, True Black, Raspberry Fizz, and SU! Gray
Ink: SU! gray, raspberry fizz
Other: Scor-Pal , Shimmerz in Magenta, SU! Felt flower, Maya Road black velvet flower, diamond brad by Making Memories.
Now I have the quick directions for the basic box!
Pockets
1) Print 8 pocket templates using All Boxed up Template (linked above).
2-white
2-Raspberry Fizz
2- Gray
2-on copy paper to make true black pockets
2) Cut, score and assemble.
3) Punch 8 white tags. Stamp with months using gray ink. Stamp butterfly in scattered pattern.
4) Adhere tags to pockets, being sure to stagger them for easy viewing.
Birthday Box Base
8 1/2 X 11 piece of cardstock for base
1) Along 11 inch side score at 2 1/2 & 8 1/2
2) Along 8 1/2 side-score at 2 1/2 & 7
3) Along both 11 inch sides-cut on scored tabs, to scored edge.
4) Assemble box (there will be ONE long end that is shorter-this is what your back panel will adhere to/cover)
Apply decorative panels if you wish.
Back Panel
1) Take 6 X 11 sheet of cardstock for back panel. Along 11 inch side-score at 5 1/2
2) Apply adhesive to entire back, and fold over adhere to back (of short panel) on assembled box.
Stamp panels as desired
Insert pockets-then fill with cards and envelopes!
———————————————————-
So that is it!
So leave me a comment telling me your thoughts, or whatever.
Thanks for the pick me up, and enjoy the video 😀
Tommorrow is another day.
Check in Saturday too, for another Saturday Sketch.
Till then
P.S. I love you
Jan 21, 2009You didn”t actually think I’d let the day go by without a post now did you?!
Oh boy, oh boy! have I been a busy girl! My head is spinning with ideas 😀
I am working on MORE templates, and my projects for the next reveal! I think I just developed my best one yet! HAPPY DANCE!!
I have so many things I want to share all at once but not real time to do that-yet!! Plus Im loving this whole video thing! My last one (you haven’t seen it yet) was SO much easier! And Im only on #3!!
Many of you asked about Veoh. Well Veoh allows me to post LONGER videos! Me being long winded. I like that 😀 I am getting a feature enabled here soon, so YOU can ALL see them HERE! So that will be exciting.
I so hope you don’t get sick of “me”, and seeing ideas using my templates, because believe you me-I have a ton of ideas.
I promised before the holiday that I would share with you another version of what you can do with the base template from the Lolli-pop Along ©. You may remember —>THIS POST. I told you that you could also switch it up to be for Valentines Day!
So here it is

P.S. i love you. (and giving Dove chocolates, believe me they will love you back! LOL)
How sweet -literally- is that?!
Raspberry Fizz is my newest FAVORITE color! Im beyond in love with it. Pair it with chocolate, and we have HEAVEN!!!!!!!!!!
Taking the colors from my YUM-A-LICIOUS Dove raspberry chocolates, I made this box from my Lolli-pop Along © base.
That is the thing with my templates. SO many uses 😀
I LOVED the bucket image from the Love Songs set. The hearts are suppose to be piled up on the cake stand, but I stamped them into my bucket and trimmed out.
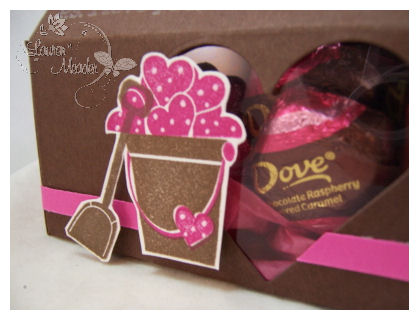
I used a heart nestability, and added some acetate to create my window.
Now you get a peek at the yumminess you are about to embark into.
Isn’t that so cute.
OK one last photo, then I’m off.

I am working on a project and would LOVE to hear little treats that you WISH you had a cute packaging for OR would like to see me use in an upcoming template-made all cute!
Thanks for stopping by! I always appreciate all the love & support you give me-believe me, it means the world to me.
You all rock!
Simple Take Along
Jan 20, 2009Well guess who just got another video done! Whoot! Whoot!
Its all videographed, now I just need to do photos and editing. I can’t wait, because the Birthday Card Box Organizer came out SOOOOO pretty-IMO!
Thank you all for sharing the excitment with me 😀
Its cool to be able to share with your HOW the templates work! So I hope you all enjoy it when the time comes 😀 Seeing them in action !! I’m really so proud of that line 😀
My goal with My Timeless Templates © is to give you a inexpensive way to create great gifts, and an easy jump start on packaging your items, so that you can spend as much, or as little time focusing on the details and designing it to suit your project/style.
Some of you like to cut back on your time even MORE by simply replicating a design idea you have already seen.
Well if you want QUICK and EASY PEASY then this is the post for you!!
This was my concept project for the Take Along Tote ©, so I thought I’d share it with you today.
My Friend Take Along Tote ©

This is the front view. This holds 8 simple cards.
I love the clean and simple look this has. The BIG pop is the use of the page pebble in the flower center, everytime the image is used.
This gift set uses the leaf pattern from Wise Owl, and the flower from Floral Frenzy.
The cardstock/ink are white, spring moss, berry sorbet, sweet blush.
Berry sorbet polka dot ribbon, and patterned paper-pink patterned
But you know me by now that the back is *just* as important!
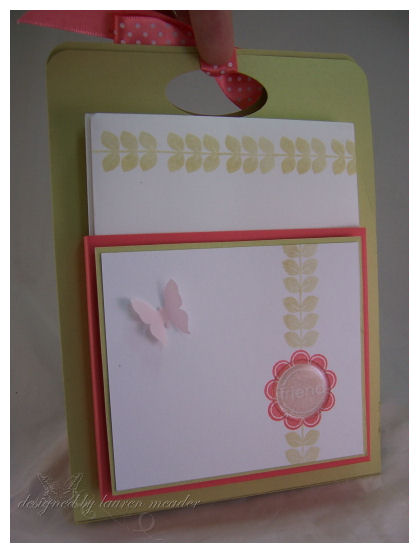
Now the back is designed just like the front, and it hold 8 stamped envelopes to match!
This is the side view

Butterfly punch is from Martha Stewart.
Now the inside is perfect because it holds a Legal not pad, cut to fit-and wrapped to match (of course)
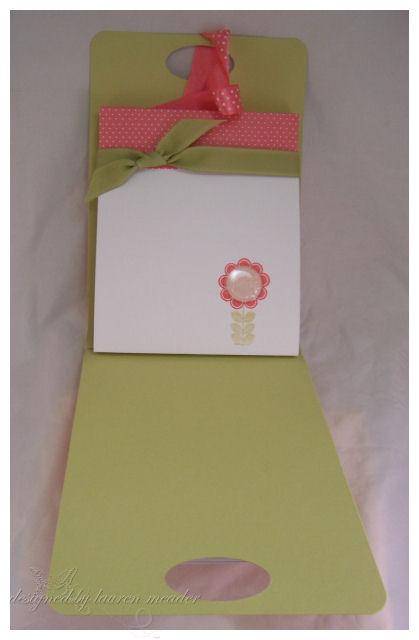
It featured the same design as my cards.
Here are my notecards/envelope design.

Very clean and simple! Great for when you are tight on time, or have much to make!!
Speaking of tight on time, I need to RUN!
Just wanted to do a quick post done today for ya (wink).
Thanks for looking 😀
Till tomorrow.
My Etsy

Who I Designed For
Blogroll
- Alicia
- Alli Miles
- Ally Blankenship
- Amber
- Andi @ crafts on a whim
- Angel R
- Angie Z
- Anne Kranitz
- Becky O
- Bee
- Beth Silaka
- Bethany Paull
- Beverly Nash
- Bobbie
- Cambria
- Cammie
- Card of the Week
- Card Positioning System (CPS)
- Cards for Cancer
- Catherine Doucette
- Charmaine
- Cheryl Sims
- Chriss Rollins
- Christina
- Christine Ewing
- Christine Wooden
- Colleen Schaan
- Craft Critique
- Craft Gossip
- Crystal
- Dawn Easton
- Emily Giovanni
- Geny
- Holly
- Igne Groot
- Inspirational Craft Blogs
- Irene
- Jami Sibley
- Jeanne Streiff
- Jen del Muro
- Jeni Bond
- JenMarie
- Jenn Balcer
- Jenn Diercks
- Jenn O
- Jennifer E
- Jennifer Mick
- Jennifer Pereda
- Jennifer-Sweet Treat
- Joanne Basile
- Jodi Collins
- Julia Stainton
- Julie Masse
- Karen
- Kathryn Berthiaume
- Katie Cotton
- Kelley Holland
- Kendra
- Kim Scholfield
- Kris’s Color Stripes! Get inspired here
- Kristen Dubosque
- Kristin Eberline
- Kristine
- Laura @ Sunshine Stamper
- Laura Turnmire
- Laurie Schmidlin
- Lesa Rapp
- Linda Duke
- Linda-LSN
- Lindsey Botkin
- Lisa (lakind scs)
- Lisa Kind
- Lori Craig
- Maggie
- Mara Campbell
- Maria
- Maria Levine
- Mary
- MaryJo
- Melanie M
- Monique Hansen
- Moxie Fab World
- Pam Imholz
- PaperCrafts Connection
- Peppers and Pollywogs Kids party site
- Rebecca Grohall
- Rita
- Robyn
- Rose Ann
- Sarah Vrolyk
- Sharon Harnist
- Sharon Johnson
- Sharon Rivera (a chemisrty with paper)
- Sherrie
- Sophia Landry
- Storage Units, Ink, & More Blog
- Sue Berker
- Susan (Rainy)
- Tangii Crane
- Tracy
- Tricia Traxler
- Trudee
- Velta
- VivLyn
- Zena
MTME Pretty Palette Color Team
MTME Pretty Patterns Sketch Team
My Time Made Easy TM LLC
Shop till you drop!
Lauren Meader
About Me
Copyrighted material
Subscribe To My Blog
Pages
- About me
- Alexa’s Story!
- My Crafty Corner!
- My Time Made Easy™ LLC
- Our Make A Wish Trip to Disney!
- Resume/Publication List
Calendar
| M | T | W | T | F | S | S |
|---|---|---|---|---|---|---|
| 1 | 2 | 3 | 4 | 5 | ||
| 6 | 7 | 8 | 9 | 10 | 11 | 12 |
| 13 | 14 | 15 | 16 | 17 | 18 | 19 |
| 20 | 21 | 22 | 23 | 24 | 25 | 26 |
| 27 | 28 | 29 | 30 | 31 | ||
Archives
- August 2013
- July 2013
- June 2013
- May 2013
- April 2013
- March 2013
- February 2013
- January 2013
- December 2012
- November 2012
- October 2012
- September 2012
- August 2012
- July 2012
- June 2012
- May 2012
- April 2012
- March 2012
- February 2012
- January 2012
- December 2011
- November 2011
- October 2011
- September 2011
- August 2011
- July 2011
- June 2011
- May 2011
- April 2011
- March 2011
- February 2011
- January 2011
- December 2010
- November 2010
- October 2010
- September 2010
- August 2010
- July 2010
- June 2010
- May 2010
- April 2010
- March 2010
- February 2010
- January 2010
- December 2009
- November 2009
- October 2009
- September 2009
- August 2009
- July 2009
- June 2009
- May 2009
- April 2009
- March 2009
- February 2009
- January 2009
- December 2008
- November 2008
- October 2008
- September 2008
- August 2008
- July 2008
- June 2008
- May 2008
- April 2008
- March 2008
- February 2008
- January 2008
- December 2007
- November 2007
- October 2007
- September 2007
- August 2007
- July 2007
- June 2007
- May 2007
- April 2007
- March 2007
- January 2007
Categories
- About Me
- All That Scraps
- blogger challenge
- camera/photo play
- Cards
- Contests
- family stuff
- FOR SALE
- Home decor/3-D items
- How to FAKE it!
- Introduction
- JUGS Challenge
- JustRite Stampers
- Lizzie Anne Designs
- My family stuff
- My Stamping Space
- My Time Made Easy
- My Time To Color Challenge
- My Time to Create Challenge
- My Timeless Template Challenge
- My Timeless Templates
- Mytime Mail
- MYTIME MOVIE/VIDEOs
- Papertrey Newsletter
- Pink Cat Studio
- Pretty Palette Challenge
- Pretty Patterns Sketch
- Product Opinions and Must haves
- Recipe's
- Saturday Sketch
- Smilebox Creations
- Stampavie
- Tutorials
- Uncategorized
- videos
Most Popular
- Create your own Onesie Card Tutorial-and important NOTE! PLEASE READ (2529)
- Saturday Sketch-Boxed bag holder (2333)
- Going GREEN! Fancy Flower Flourish-Closure Video (1478)
- Fabulous Favorite - Giveaway! (1336)
- a Prayer Request (1232)
- QUICK-Easter Baskets from Nestabilities-PTI style-and blog challenge (1063)
- Teaser Sketch (999)
- February Release Giveway! (and a little peek) (996)
- Group Post and Rambling Rose Video Tutorial (985)
- GIVEAWAY! Who wants it all?! (895)
Recent Comments (RSS)
- Daya Sons: Daya Sons, a renowned manufacturer
- 첫충사이트: 완전히 흥미로운 블로그 게시입니다. 저는
- sarah: Wow, Lauren, what a stunning
- hedie: خرید راهبند
- 야동: Love to read it,Waiting For
- 야동: This seller is in a
- 바카라사이트: 여기 처음 왔어요. 나는이 게시판을
- 야동티비: I was surfing the Internet
- 바카라사이트: 비슷한 주제에 대한 흥미로운 정보를
- 바카라사이트: "여기에 제공해 주신 귀중한 정보와
Copyright © 2007 - My Time, My Creations, My Stampendence - is proudly powered by WordPress
This blog has been Tweaked and Designed by Sara Williams