Archive for September, 2009
JustRite Stampers: Mega Font Blog Hop!
Sep 17, 2009 Author: mytime | Filed under: Home decor/3-D items, JustRite Stampers, My Timeless TemplatesWAHOO! In case you didn’t know-today and tomorrow……
JustRite Stampersis having a H-U-G-E Mega Font Blog Hop!
They are even having a 30% OFF Promotion!! Check it out —>HERE! Perfect time to shop 😀
I LOVE my font sets. So many options! What I *really* love is that any/all the font sets are perfect with ANY images you may have bought from other companies. Sometimes we hunt for the PERFECT sentiment, and are willing to spend the $$ for that perfect one, when you can now easily make your own! No more hunting!
This month we are trying to show you the MANY different things you can do using their font sets in ANY and ALL your creations! As you hop along you will see a HUGE variety of uses. It is SURE to get those wheels in your head turning!
“I” of course will be doing a gift item 😀
Now while I was posting the countdown peeks for my newest templates, I WARNED you, that you would see me using It’s on the House © A LOT!!!!!!! I’m over the moon for this template and ALL the possibilities. So I hope you don’t get sick of seeing all the ideas I have had for it.
So, that being said, I used it today, for the hop!
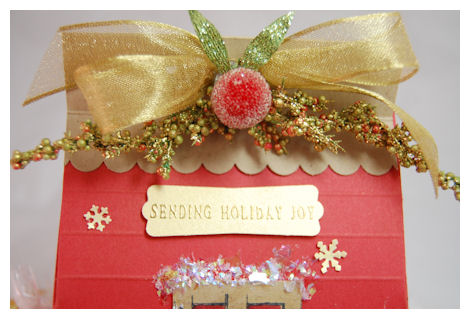
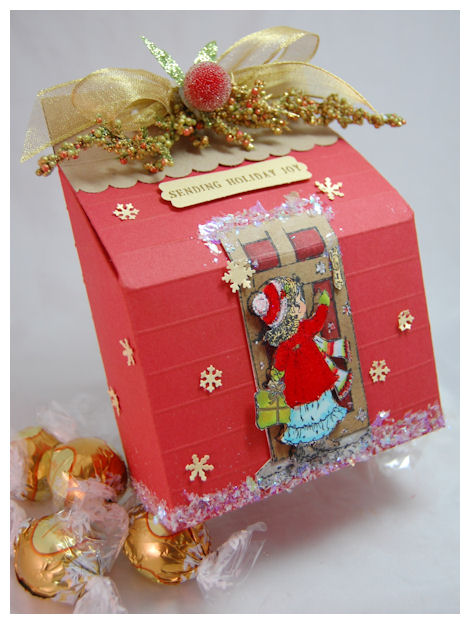
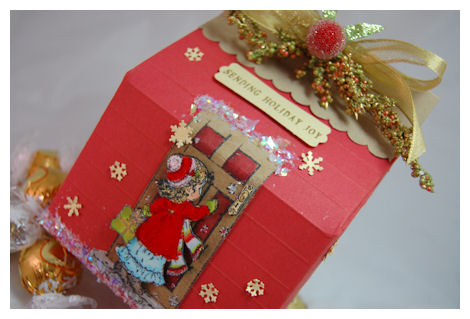
Sending Holiday Joy
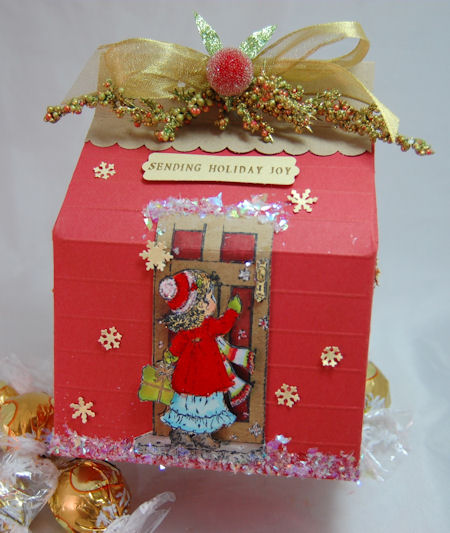
I created this little “house box” to give some White Lindt Chocolates!
It reminds me of a vintage style gift box, given the image! I’m just in LOVE with it.
I’ll get to the “gifty” details in a minute, first let me share the sentiment story 😀
I was inspired by the sentiment in Holiday Demi Phrases Round 2” -“SENDING HOLIDAY JOY”. I didn’t want a rounded sentiment, so I pulled out my Horizontal Wood Stamper Set and used *just* the font from Wood Stamper 2-3/8″ with Bonus 25pt Font & Center to create my own! Now I have the exact sentiment I wanted, and in the same font too!
SEE! You don’t even have to be overly “creative” to come up with good sentiments! Just look into some you like, and copy them using your own font set! EASY PEASY!
I just stamped my sentiment in versamark ink, onto brushed gold cardstock, then embossed it with gold EP!
I then, punched it out with my label punch from SU! It was the PERFECT addition to my house gift box!
Now about the BOX!
When I received the NEW! Sarah Kay line, the image Noel Charity just stood out to me. I thought it was truly stunning! While my coloring leaves much to be desired, I knew she was perfect for this project I had in my head!
This image was *just* an adorable girl, knocking on the door, I had to give her a home with it!
I just scored the box to appear more “house-like”, and scalloped the flap for my “roof”. It is distressed a bit, but it didn’t show up well in photos.
As you can see they are the PERFECT union!
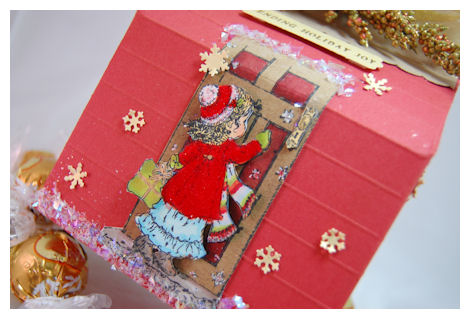
The girl is 3D, as is her little package of love. She truly appears to have just stumbled upon the doorstep.
Trust me when I tell you PHOTOS do this NO justice! It is a must see in person.
I used red, gold, green with hints of a pale blue. Her coat is flocked with red. There are touches of a gold pen here and there, and of course snowflakes of gold.
I added “snow” to the “ground” of the house. Just adds to the detail.
I feel the entire package convey my main message ” Sending Holiday Joy”!
Supplies:
Stamps:
JustRite Stampers: Wood Stamper 2-3/8″ with Bonus 25pt Font & Center
Cardstock: Red, Gold, Kraft, White
My Timeless Template: It’s on the House ©
Ink: Momento Black, Tea Dye ink, Copic Markers, Versamark
Ribbon: Gold
Gold Embossing Powder, Gold pen, Chunky glitter, red fun flock, Martha Stewart snowflake punch, label punch, garland/berry from Michaels Craft store, scallop border punch
Now! I’ve done my part (I HOPE!), to show you some ideas using the FONT! Time to HOP ALONG!!
Here is a list of players:
Michelle Wooderson
Sankari Wegman
Heidi Blankenship
Eva Dobilas
Beate Johns
Sharon Harnist
Barbara Anders
Sharon Johnson
Deb Saaranen
Becca Feeken
Kazan Clark
Lauren Meader <–You are HERE!
Tammy Hershberger
Linda Beeson
Jenny Gropp
Lori Craig
Tanis Giesbrecht
Jenn Balcer
Lisa Somerville
Karen Maldonado
Pamela Smerker
Karen Taylor
Latisha Yoast
Julie Overby
Mary Pfaff
See you here tomorrow as I have a Newsletter Project to share 😀 (with a video)
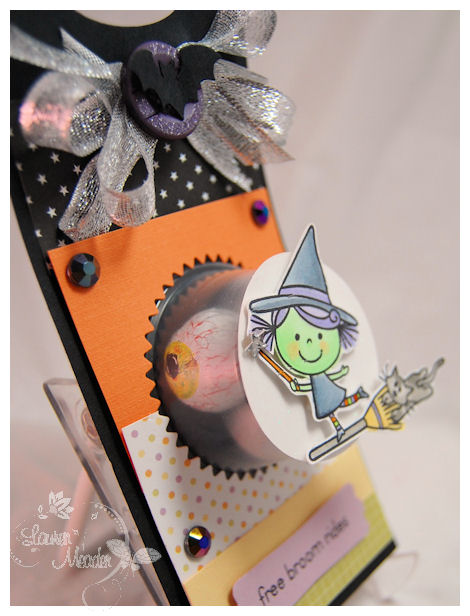
Itty Bitty Halloween Ideas
Sep 15, 2009 Author: mytime | Filed under: UncategorizedToday is the day for the Pink Cat Studio release of Itty Bitty Halloween!
Here they are!
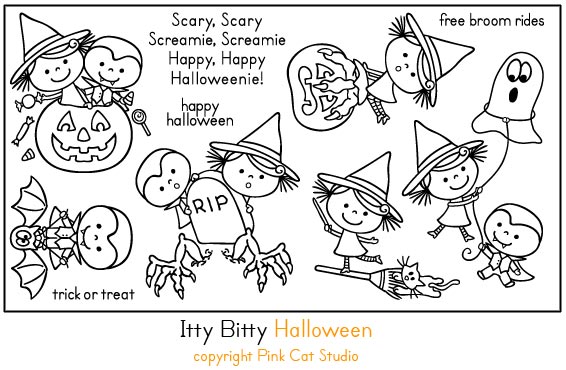
Aren’t they so cute?
You can get your set —>HERE!
In the meantime, if you need some ideas, I have 2 more for you 😀

I thought this image and sentiment were SO cute!
I have been making lots of fun tag style treatlets, this past month or so, and I have another FUN one for you 😀
Well, I LOVE to be green!
And NO! I don’t mean my witches face!! I mean RECYCLING!
I have MANY recycled projects from the past: (click links)
Amongst others, that I just couldn’t EASILY locate for you :C
So back to being GREEN…….
I save ALL my Crystal Light drink mix cups. Once I make a pitcher, I rinse out the cup and put it in my stash to later re-use them on gift packaging.
Like this!
Can it get cuter?
I just pop it through the front of my tag, and filled it with Chocolate candy crunch balls, wrapped like eyeballs! It only fits 3 or 4 so its PERFECT for when you need a LOT! You can sparingly give the candy! LOL!
Pretty cute huh?
I’m bummed that the glittery moon doesn’t show up glittery!
Anywho, I have another “green” project for ya!
How about covering a black paper bag? You know those cheapie lunch bags you can get at the Craft store? Some come in colors.
Then take it and make a COOL Pop Up bag?
Now this is WAY cooler than MOST standard covered bags! Its totally 3 D!
All I did was take some black cardstock, and folded it like a card.
Flipped it up side down (fold at bottom) and “decorated” what would be the INSIDE of the card. Then adhered it to my bag front!
Using dimensionals and the pop out cardstock form you would use for a pop out card, I adhered the kiddies to the base!
I just love this fun bag cover!
The tree is a Back to School cartridge from my SLICE 😀 Bat is a Martha Punch, and the moon-obviously a circle 😀
So there you have my last contributions for the countdown, with the ever adorable Itty Bitty Halloween Set!
Check out all the designers blogs for more great samples.
Haunted Happenings
Sep 15, 2009 Author: mytime | Filed under: Home decor/3-D items, My Timeless Templates, Pink Cat StudioHi peeps!
Today is post #2 for today, so be sure to scroll on down!
I have been quite busy switching creative gears back and forth. It can really confuse the MOJO, let me tell you!
I know, I just took you through Christmas, but now we are switching gears back to Halloween!
We still have 1 1/2 months until Halloween, so PLENTY of time to get stuff done ![]()
Back the the Halloween talk! I have a peek at some Halloween images from Pink Cat Studio! This set called Itty Bitty Halloween, and it will release tomorrow 😀
The set is UBER ADORABLE! Melissa developed a whole NEW! line of character’s, that are of course FAB!! They are called Bitty Betty and Bitty Bobby. OH! and don’t worry, they will be back for the next release! (WINK!)
So first up-my personal favorite project I created……
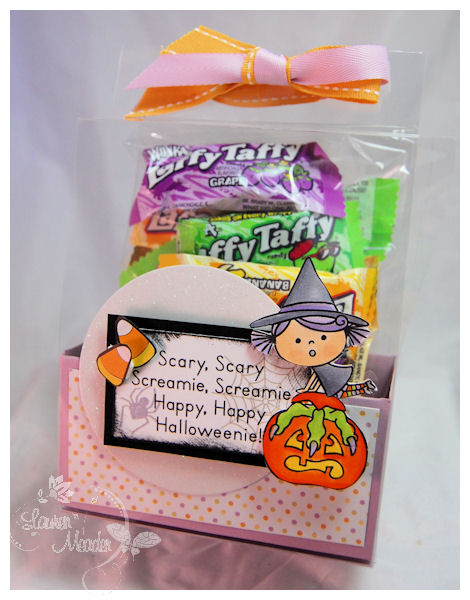
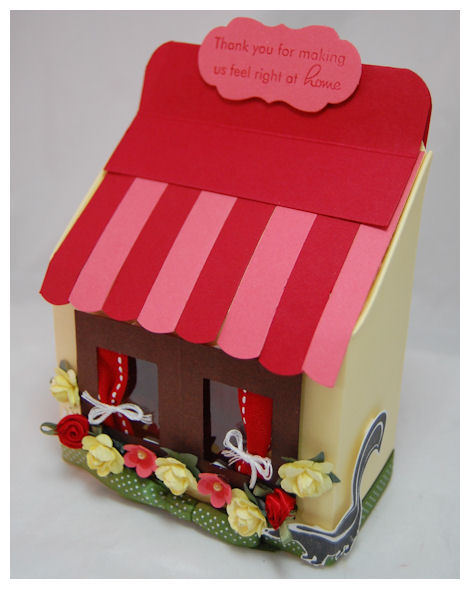
Haunted House
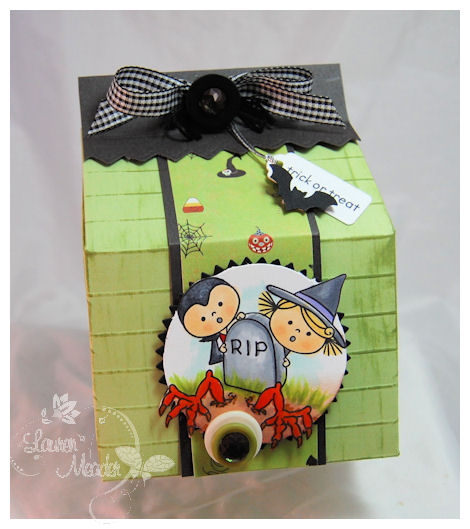
How cute is this little project?
The creepy monster popping out of the grave!!
I wanted to go for slightly creepy in a cute way! Make sense? I’m not a scary/creepy kind of girl. I’m more cutesy.
TODAY the My Timeless Template: It’s on the House, was released! I seriously LOVE it to pieces! I HAD to use it when I saw this creepy, crawly image!
I printed my template, then scored it, every 1/2 inch, to look the house boards. I also distressed it a bit. Now I could have gone TOTAL haunted house with this, but I wanted the image to be the focus, and of course—> POP!! I didn’t want to get off track by creating just a haunted house.
Going with creepy and cute…some details….
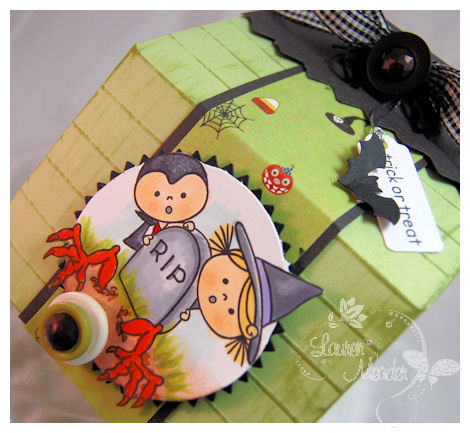
I used some layered buttons-white, avocado, and colored BLING to make a 3D eyeball sticking out of the image! EW! The hands look like they are going to grab it!
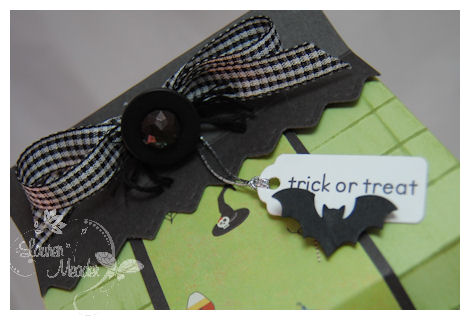
I also used a button and MORE colored bling, along with some embroidery floss for a fun-and cute spider like detail on the ribbon. The ONLY spider I would ever think of calling CUTE! LOL!
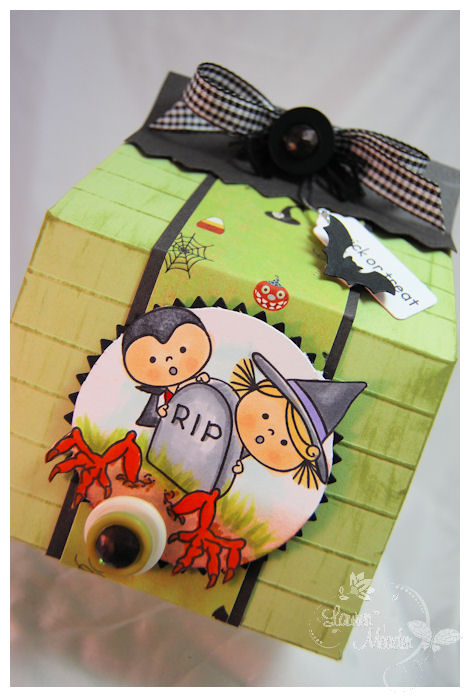
Then the lil bat punched out, holds the “trick or treat” tag.
I just like it. Inside this I would put a bag of gummy bugs (they sell them at Target). My kids actually found them, and ate them before I could use them here-SORRY! Gotta love it.
Now for another project!
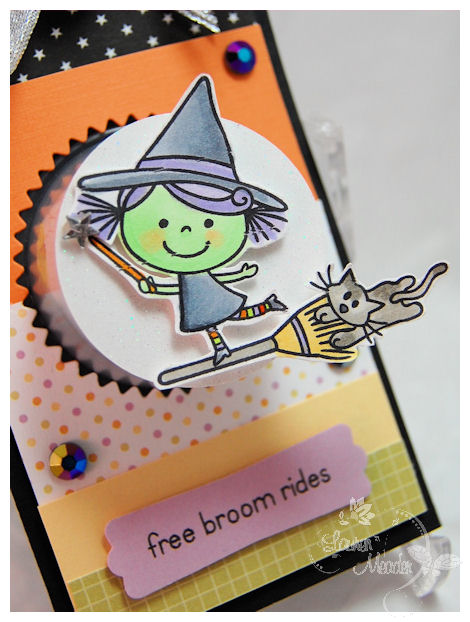
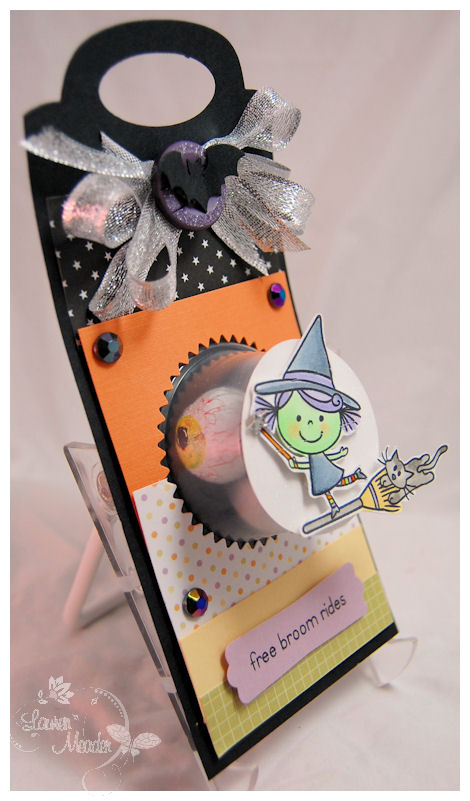
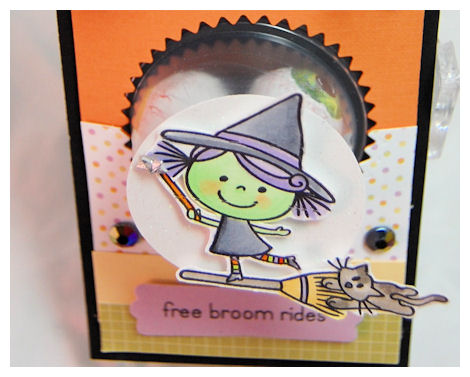
Taffy Treat Take Along
This project used the My Timeless Template: Lolli-pop Along
Turning the “lolli=pop” insert base over, it creates a “bucket” of sorts to hold your goodies! My kids (and I) LOVE Laffy Taffy. I thought this was a fun item to just package up, and place inside. Plus they are in your expected Halloween colors 😀
The glittery white layer is suppose to be the full moon! LOL!
How seriously cute is the sentiment?
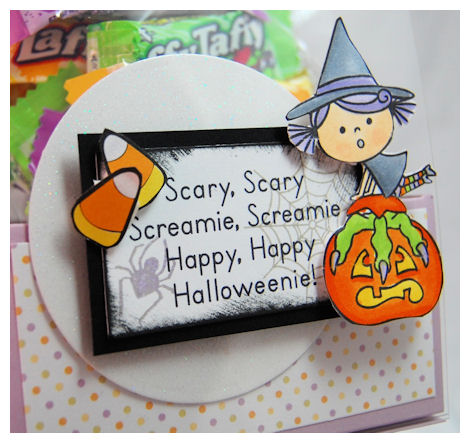
I love her! I love the cutesy scared look she has on her face as she holds closed that creepy cute pumpkin, for dear life! LOL!
I added a web and spider stamp to the background. The candy corn is some ancient patterned paper I found in my stash, so I cut out the candy corns.
This was an EASY PEASY project.
Perfect treat.
Well I am done for today! Lots more to share tomorrow. You don’t have to wait long since Melissa is releasing them early for you! No long ended suspense!
Check out all the designers blogs for more great samples.
Make sure you tune in tomorrow for my 2 other fun projects, and the peek at the entire set that will be released tomorrow 😀
Thank you for popping by!
On a side note 😀 I cracked open my Cricut!!
I was honestly PETRIFIED of it! Once it was open it just looked so complicated and overwhelming. But, I watched the intro video and found that VERY helpful!!! After seeing that I wasn’t scared at all. They did an excellent job explaining all about it, I feel. Especially since I’m a visual person. I’m not good at “reading” instructions. I need to see it, or DO it myself.
I actually used it today to make the tags, layered flowers/leaves on Amber’s birthday party favors! Its a FUTURE My Timeless Template 😀 so I’m not sure when I will share the photos. Trust me though, its FABULOUS! One of my faves so far!
I also used my Sure Cuts Alot program for the tag part. Not sure if I did all that stuff correctly-I had to have a cartridge IN my Cricut to even get the paper to load prior to printing the tags I designed, using just the stuff that comes with the SCAL 2.0 program. I bought a couple of other .svg files to test the waters too, but couldn’t “play” too long as Amber’s party is Sat, and we have a FULL schedule this week. I’m on major crunch time.
I guess my bottom line is WOW! I LOVE my Cricut Expression! I can’t believe it took me so long to get one! LOL! I do need to go get the tool kit, and of course I want EVERYTHING! The time it saves me from punching or die cutting my own flowers ALONE was worth it. Oh! And I can totally see needing a new mat, and most likely will get some extra cutting blades 😀
OK I’m really done now!LOL!
Anyone with SCAL 2.0 advice-please share! LOL! I’m so clueless. I have to check out some of the links to videos people sent too! It is hard to even know where to start some times.
Papertrey Ink September Release
Sep 14, 2009 Author: mytime | Filed under: Cards, Papertrey NewsletterWell now it the time!
The Papertrey Ink September release has arrived! Now all the items you have seen over the last couple days can be yours 😀 I just released 2 NEW! My Timeless Templates: Keeping Tabs and It’s on the House. I do have a few other samples to share using My Timeless Templates, but they will be spread out over the next few days or so.
I have been pretty busy here, as you can imagine.
Let me share the 2 items that you hadn’t seen peeked during the countdown-
Deck the Halls
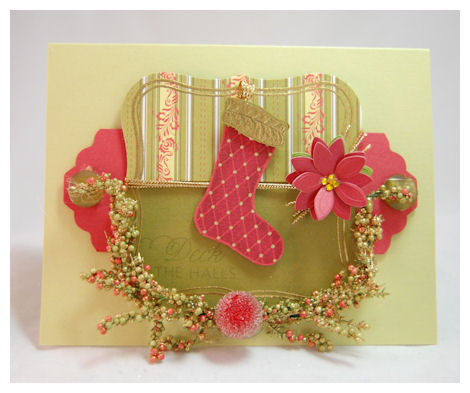
This has to be my most favorite card in quite some time!
I love all the embellishments. This is clean but definitely detailed. A card you would keep on the mantle for sure.
The frames was gold embossed. Really makes this feel more elegant.
I love the garland touches too!
I love the Stocking Prints stamp set. I can definitely see myself reaching for it ALL holiday season long.
I gold embossed the stocking cuff, and added gold dots to the argyle pattern on the stocking.
I don’t know, I just loved it.
Supplies:
Stamps: Stocking Prints, Vintage Labels
Cardstock:Spring Moss, Ripe Avocado, and a Ruby Red
Patterned Paper Holiday Vintage Prints
Ink:Ruby Red, Versamark, Ripe Avocado
Gold ribbon
Vintage buttons, twine
Gold Embossing Powder, Heat tool
Labels one nestability
Tag punch by marvy
Adhesive gold pearls
Gold Cord, Bridal confetti in red and olive, red bead/garland from Michael’s Craft Store, gold marker
Then last but not least……
Snow Ornament
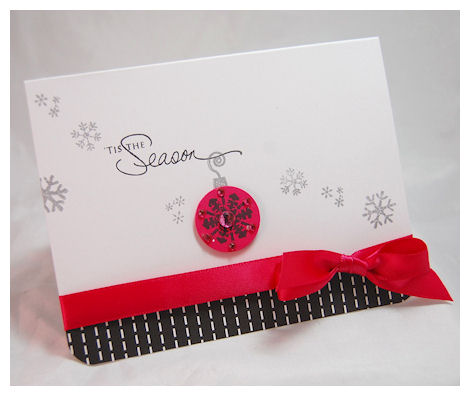
Talk about a simple card!
I love the ornament hanging off the greeting and the vibrant retro color combo of raspberry, black, white, and silver! The solid snowflake was stamped on the raspberry layer, then punched out. Added some bling and called it day! Easy Peasy
Supplies:
Stamps: Winter Swirls, Signature Christmas
Cardstock: White, Raspberry Fizz
Patterned paper: Black & White Basics
Ink: Silver by Encore, Black
Ribbon: Satin in Raspberry Fizz
1/2 inch circle punch, adhesive rhinestones
Thanks for sharing the excitement of the countdown with me. I can’t wait to see what you all do with your new goodies!
Day #4 Countdown
Sep 13, 2009 Author: mytime | Filed under: Home decor/3-D items, My Timeless Templates, Papertrey Newsletter, Product Opinions and Must havesOK the countdown is nearing the end!
I have SO many more samples, so just keep coming by 😀
Tonight is the Papertrey Ink Release party!!! I hope to chat with you all there!
I think you are going to like the ideas I have to share today using my 2 NEWEST My Timeless Templates: It’s on the House, and Keeping Tabs!
Starting tomorrow -YOU can start using them yourself!
*If you didn’t know* The My Timeless Templatesare an INSTANT download! UNLIMITED USE! You pay ONLY $5, each of tonights template release has 2 sizes-Standard, and Pretty Petite! Oh! and NO SHIPPING! So no matter WHERE you live yo can have them right away 😀
All the templates just print from your computer, onto 8 1/2 X 11 cardstock.
They come with step by step photos and written instructions. Any questions you can always contact me directly [email protected]
Each has an EXCLUSIVE idea book with 5 projects.
The projects have color photos, a supply list, and step by step instructions to get you going with 5 ideas! So, if you don’t feel very creative, we have some of the ideas done for you!
People LOVE getting the finished templates as gifts! I cannot even tell you the amazing feedback I received from user’s telling me the response from the receivers they have made gifts for! Each person has said that they felt not only proud but it made being creative EASY 😀 I love hearing stories like that 😀
So enough blabbering……let’s get to the projects OK!
Star Student
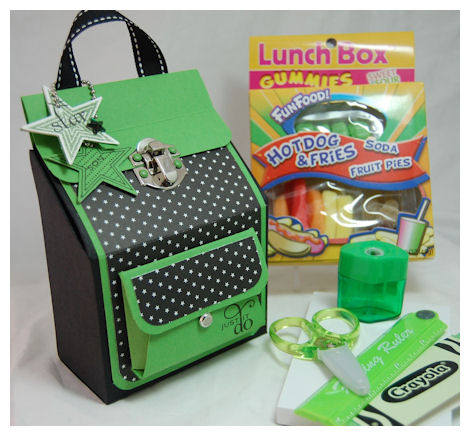
The It’s on the House © template easily transforms into a backpack!
I bet you didn’t think this template could be great for “school” themed projects and gifts too! This take “back to school” or fun gift packaging to a whole new level!!
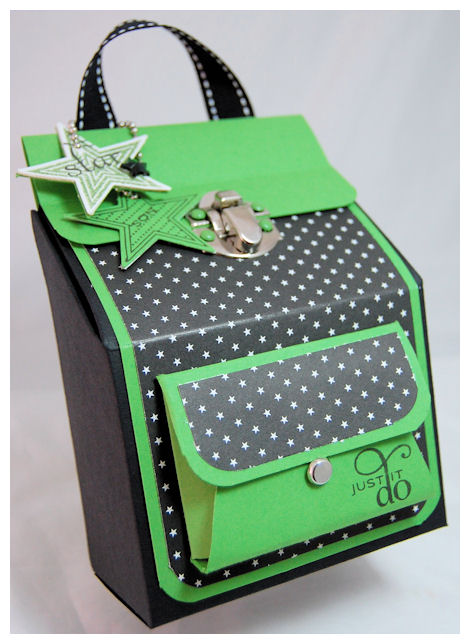
Given the way the template comes together, I printed the back New Leaf cardstock. I just rounded the corners of the top flap closdure for my back pack top.
Teh front of the template used the “print on copy paper, and use as a score/cut guide” so I could use black cardstock for my front of the bag.
I then just made mat layers (rounding corners) for the front panel.
I found some lunch box style latches at my hardware store for $1, and away I went!
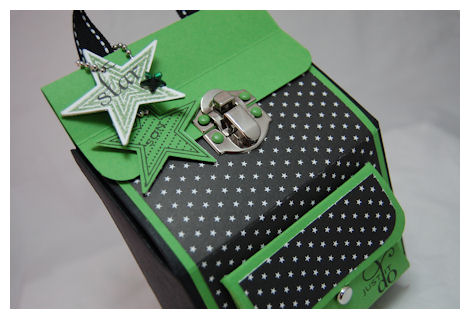
It REALLY unlatches 😀 I love it!! It’s details like that, that can totally step it up, easily! Instead of using the screws that came with the latch, I used brads! They worked perfectly!
I hand made a front pocket detail that does open and hold little notes 😀 The brad tucks the flap in. You could use little envelopes, or those small envelope die cuts by Sizzix or other die cut makers! I believe SU! has a pretty scallop one that would fit too.
No backpack is complete without the straps!
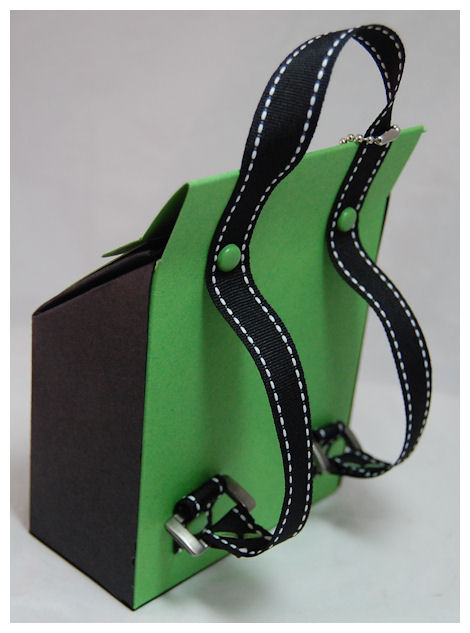
I grabbed my son’s backpack to ensure I was making them as REALISTIC as possible!

Using some hodgepodge hardware pieces, and more brads, looks pretty cool to me!
Perfect backpack! This can OBVIOUSLY be easily altered for a girl too! What I love is that this LOOKS difficult, but was OH! SO EASY!
I filled this with some fun school items! My son went CRAZY for it, as I usually do girly stuff 😀 He was so happy to have a BOY item just for him!
Supplies
My Timeless Template: It’s on the House
Stamps: Star prints
Cardstock: New Leaf, White
Patterned Paper: Bitty Star Basics
Ink: Black, New Leaf
Ribbon: Stitched Black
other: hodge podge hardware. lunch box latch, key chain toggle, chipboard, silver brad, corner rounder, CTMH brads
Just a Note set
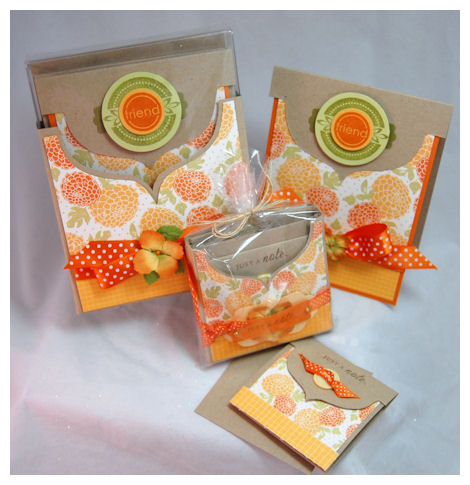
This gift set was created using *just* the pockets from the Keeping Tabs© template using the standard template, as well as the Pretty Petite version!
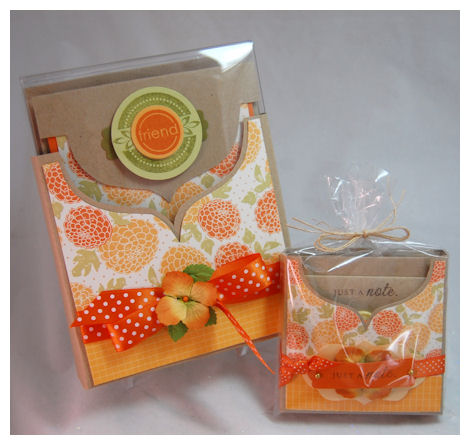
They make just the perfect card holder all on their very own.
This project has a card set for A2 size cards, and then a sample with 3X3 cards-wrapped up in a cello bag with twine ribbon!
Here is the large card box
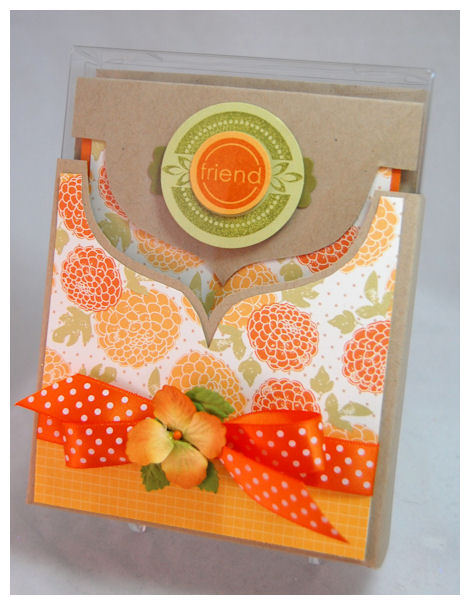
As I mentioned in the first reveal of the Keeping Tabs template, the pockets from this template are PERFECT on their own!
Even better is the fact that they are the perfect wrap for our Clearly Creative Card Box!
NOTE: Just place card box inside template, prior to adhering 😀
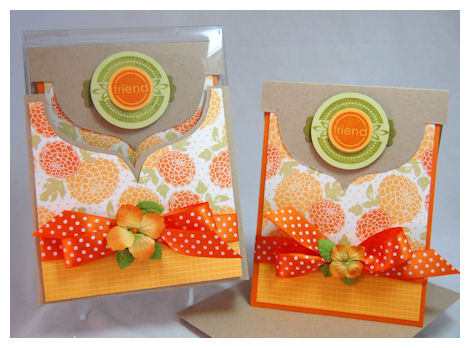
I used the large pocket to create a stunning Clearly Creative card box wrap, and hold 5 of these A2 size cards/envelopes.
I used the decorative mat layering template to create a pretty look on my card design as well!
So for the standard version, the box is designed much like the card. When the cards are inside, they look just like the card front.
Such a pretty gift set, don’t you think? Virtually no stamping either. Quick assembly.
Now for our Petite version
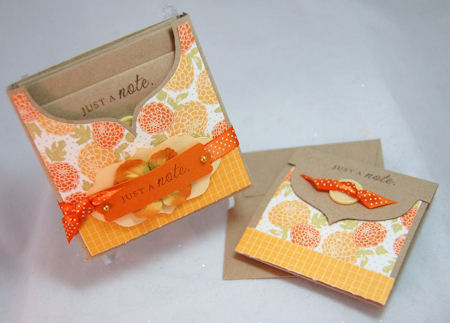
The Pretty Petite version 3 X 3 cards/envelopes!
Such a fun size when mass producing or wanting to send little notes
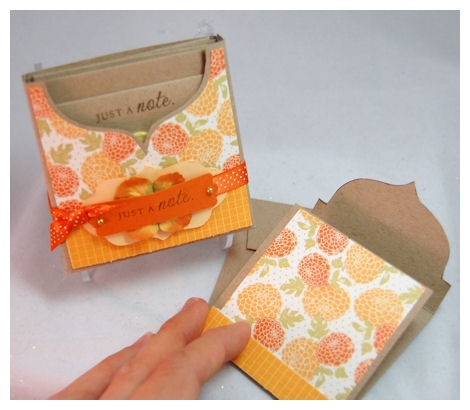
The card also used the layering template to create a decorative flap on our fold out note card! Just un-fold and you have plenty of room to write.
As seen in above group photo, I wrapped it up in a cello bag, then was on my way!
This is the perfect gift! Now you can see just how fun and versatile this template is too!!
Supplies:
My Timeless Template: Keeping Tabs (pockets)
Stamps: Vintage picnic, 2009 Autumn tags, Floral Frenzy
Cardstock: Kraft, Orange Zest, Spring Moss, Summer Sunset, Ripe Avocado
Patterned Paper: Autumn Abundance, Bitty Box Basics
Ink: Orange Zest, Ripe Avocado, Dark chocolate
Ribbon: Orange Zest, twine
Prima flowers
A2 and 3 X 3 envelopes in Kraft
Slice Studio Design Essentials cartridge
Circle punch, tag punch
Well that about does it for my peeks today. I hope you enjoyed what I have shared so far. More to come tomorrow. I’d love to hear your feedback on this month’s templates, and what project you liked most so far 😀 There weren’t enough days in the countdown to share everything I made with you, but that just means more to come.
On a SUPER happy note, I completed ALL my work and I’m FINALLY going to BUST open my Cricut today!!! While the kids are at school of course! I pray I can use it rigth away! I have so many project ideas already 😀 If youa re looking for a SUPER deal on the Sure Cuts a Alot 2.0, check out my post —> HERE! I have a coupon code for me readers 😀
In the meantime, check out Nicholes samples today!! Also sharing is Becky O , Melissa, Beth Silaika and Dawn McVey.
See you tonight at the release!
Thank you for stopping by.
Peek # 3 Fall:Keeping House
Sep 12, 2009 Author: mytime | Filed under: Home decor/3-D items, My Timeless Templates, Papertrey NewsletterGet it? Keeping Tabs & It’s on the House shared together.
OK I admit, sometimes my excitement gets the best of me!!!!
Are you ready for MORE peeks using the NEWEST My Timeless Template © release??
Remember, then 2 templates featured today are not available until the 15th
I decided I would share some FALL themed items! Thanksgiving is around the corner, and it IS Autumn here in New Hampshire, so why not celebrate?
These gift ideas are sure to WARM you up (wink!), even though we are “technically” gearing up for Christmas, I have the urge to do some fall themed projects.
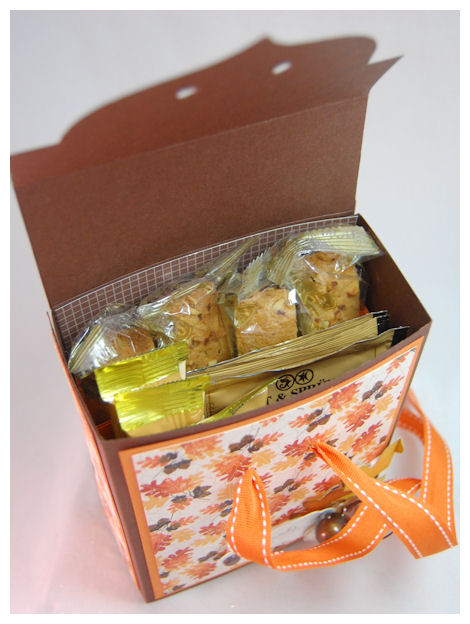
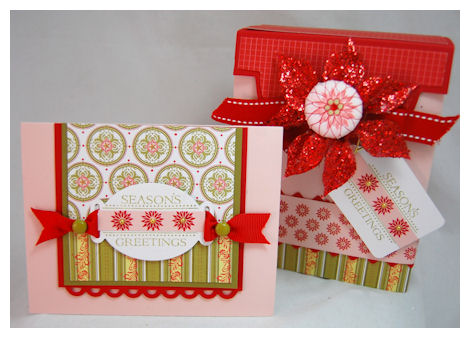
First up-Giving Thanks Duo
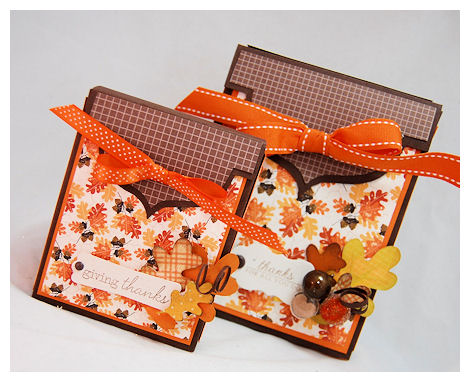
You are looking at a gift set created using the Keeping Tabs © templates.
I really like sharing both template sizes (standard fitting A2 cards, and Pretty Petite perfect for 3×3 and other larger items), side by side, yet designed the same. It shows how versatile the stamps can be, and how easy it is to use the same design elements on various sized packages! It also shows that big or small, these templates look FABULOUS!
I have to say I’m HEAD over HEELS for the NEW! Autumn Abundance themed papers 😀 I just got mine and have been DYING to play with them! So expect to see a couple projects with this new paper line!
Now lets get to WHAT is inside!
We obviously know that cards are a definite fit for this template, so I’m working on “other” ideas to get your creative gift ideas flowing!
First I will share the large/standard version
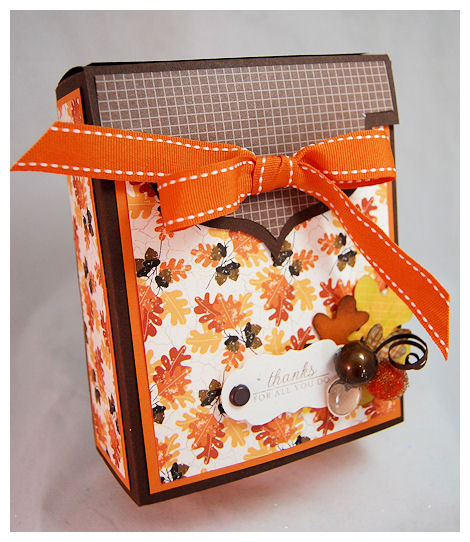
I love this! Truly a masculine gift! OR anyone really! It just oozes Autumn.
Taking from the paper the oak leaves, I used my SLICE Back to School cartridge to die cut my own, from patterned paper, in various sizes, for my tag decor.

I scored them, and distressed them with the tea dye ink duo. I’m addicted to these berry bundles I bought at Michael’s a few weeks ago! They are adding such a FAB element to my latest creations. A CHEAP and simple touch. I even usedMy Punny Valentine for the acorn (covered with a page pebble)-which is also found on Oak trees 😀
Sentiment is from Autumn Abundance set.
Now we open it up….
Well, what do we have here?
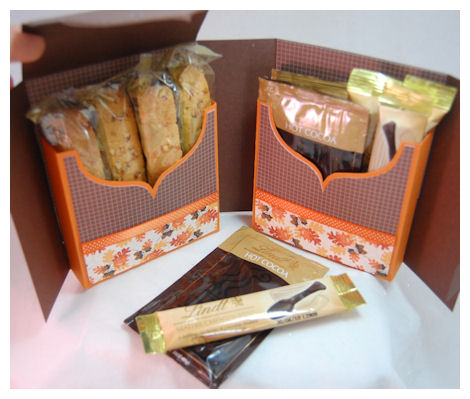
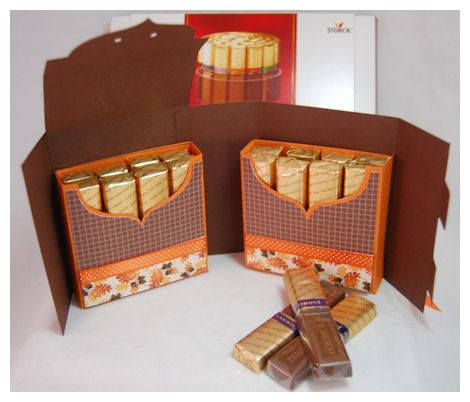
OH! On the left-2 individually wrapped Chocolate Almond Biscotti!
A perfect companion for our other pocket of YUM (and they aren’t too bad for you :D)
Then on the right pocket we have 4 SCRUMPTIOUS Lindt Cocoa packets-WITH 4 Lindt chocolate SPOONS!
(yes part of my HUGE purchase at the Lindt store :D) Cocolate SPOONS! Does it get any better? I think NOT!
OMGosh! Could you just DIE! How YUM-azing is that for a gift?! Seriously! I had all I could do to NOT make myself a cup of this mix immediately 😀
OK now onto the Pretty Petite version-just as scrumptious!
I love the size of this particular one! Totally cute and EASY!
As you can see, same design, just left off the “acorns” Too big and bulky for this one.

Leaves were die cut using a smaller version as well. EASY PEASY!
Have I told you that Orange Zest is AMAZING?! Im beyond in love with it.
Sentiment here is from Vintage Picnic (LOVE that set).
Now, let’s peek at what is inside here
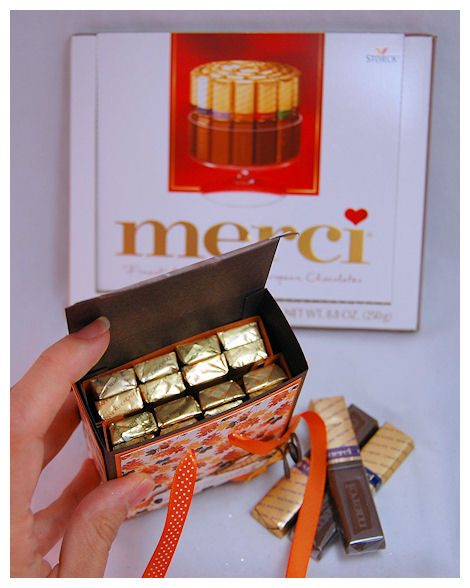
I found this box of Merci Chocolates. They are like truffle bars!
I can vouch that they are so delicious! There is a variety pack of various “flavors”. Oh man! I wanted to eat them ALL! But I was a good girl and limited myself to like 2.
I have to say I like my box MUCH better than the original packaging.
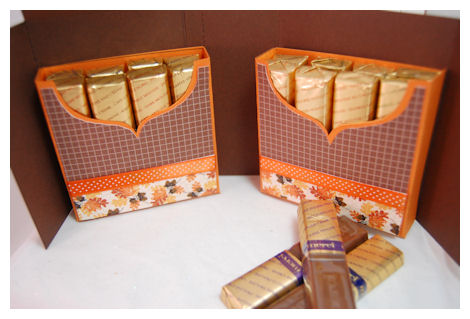
As you can see each pocket holds 8 chocolate truffle bars-easily.
Who wouldn’t want to open this box of heaven?!
Best part is this decadent box of chocolates was only like $5 at Target, tastes fab, and you have MORE than enough to fill this template and sample a handful or two too!
Supplies:
My Timeless Template: Keeping Tabs
Stamps:My Punny Valentine, Autumn Abundance, Vintage Picnic
Cardstock: Dark Chocolate, Orange Zest, vintage cream
Patterned Paper: Bitty box basics, Autumn Abundance
ink: tea dye ink duo, dark chocolate
Ribbon: Orange zest
Slice cartidge/machine-Back to School
tag punch, SEI brad
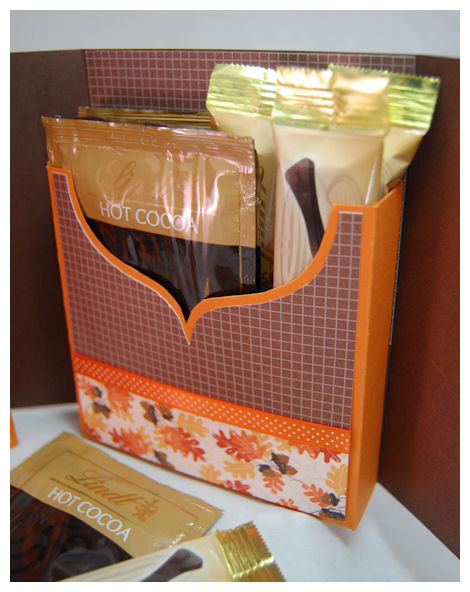
Now we will go to the “It’s on the House” template.
Let me WARN you now, that you are going to see me using this one A LOT! Its SUPER cute, and EASY to work with! It will easily become a favorite! I already have so many variations made to share this month!
I promised you it wasn’t *just* a house, but a FAB template for packaging up just about anything you see fit, and just running with a fun (non-house) design!
Now I will prove it.
OK, go with me here!
Think teachers, co-workers, neighbors, mailman, someone, ANYONE really. Near of far…….young or old………
Breezy Autumn day, after apple picking, or some warm apple crisp topped with vanilla ice cream………
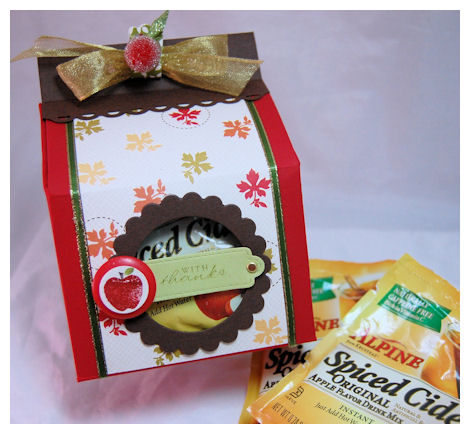
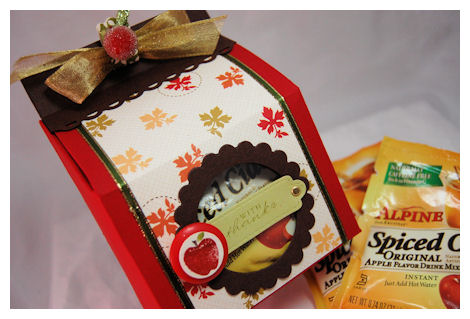
A warm cup of Spiced Apple Cider!
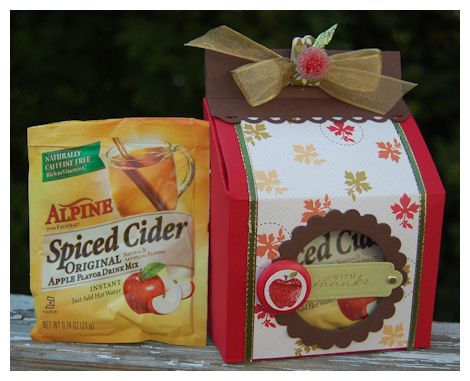
Now THIS is a fab box for such a gift!
(YES! This template also has a pretty petite version-I just haven’t used it yet! Patience! :D)
You saw this template made as it’s name suited- a house, and now you can view it as a great template for all sorts of gifts!
6 packets of this Cider, easily fit like a DREAM! What a cute gift.
Now this is a great “apple” themed teacher gift I could get on board with! Teachers love consumables .Or so my teacher friends tell me.
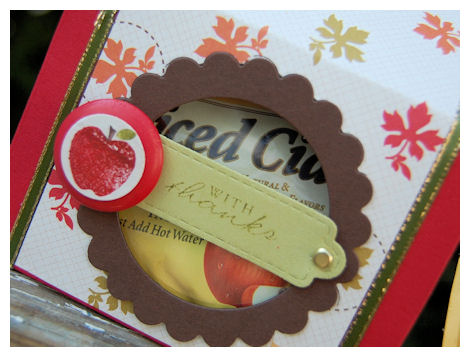
Now you can also see this template with a window of another kind, cut in the front!
The perfect little peek at what is inside!

Also another gender neutral design.
I love the apple berry detail at the top of the ribbon too 😀 A simple and fun touch.
Can you imagine the teacher coming in to school and seeing this on her desk?
She would be giddy! (I think! LOL!)
I’m excited because this is the first time I packaged Apple Cider. I’m just over the moon for this one.
Supplies:
My Timeless Template: It’s on the House
Stamps: 2009 Autumn Tags
Cardstock:vintage cream, spring moss, pure poppy, dark chocolate, clearly creative cardstock
Patterned paper: Green Tea Leaves, First Fruits
ink: Pure poppy, ripe avocado, dark chocolate
ribbon:gold, and other gld trim from craft store
vintage buttons
scallop nestability, berry, tag die, label punch, 1/2 inch punch, gold brad
Well that is it for me today!
The fun is just beginning, as I have so much more to share. Tune back in tomorrow-
In the meantime, check out Nicholes samples today!! Also sharing is Michelle, Melissa, Beth Silaika and Dawn McVey.
Holiday Jumpstart
Sep 11, 2009 Author: mytime | Filed under: Cards, Home decor/3-D items, My Timeless Templates, Papertrey NewsletterToday we all have a group post to share!
These are always so fun for me, as I think you can really see how each person on the team is special in their own way! Hopefully between all of us, you can find something that suits your fancy 😀 and this helps get you started on getting ready (EARLY!) for your own home-made holiday gift ideas!
The idea behind this group post was to share something homemade, practical, heartfelt and economical!
I cannot even tell you how excited I am with my project today 😀 Seriously!
To me, nothing says heartfelt like great homemade gift packaging 😀 I personally love giving and receiving such gifts. Another thing I also LOVE is chocolate! Preferably chocolate treats that I didn’t have to make!! I usually try to package up something I can buy in bulk, that MOST people enjoy, then divide it up!
For my gifts this year, I got a great deal, and stocked up.
Here is the ECONOMICAL PART: I was tipped off ,by my friend Tracey, that Lindt Chocolates was having a Anniversary sale. Check it out –>HERE!
Buy 60 truffles, get 60 FREE! That is ONLY 0.25 cents a piece! WAHOO! You can pick and choose whatever you want!
I spent $98 at that store! With everything on sale, they said it would have come to $219! HUGE SAVINGS to me 😀
Plus,who doesn’t love those chocolates?! AND, if they don’t, its a respectable re-gift item MALE or FEMALE!!
So I bought my fill, and rushed home to make my gift! OK so THAT isn’t HOMEMADE! But that is SO me-homemade packaging for store bought items! LOL!
I wasn’t sure what I was going to package my chocolates in. I have SO many fab My Timeless Templates ©, it was hard to choose. I decided I would just start wrapping up some cello bags of chocolates, to ensure I had gotten enough for everyone, then I would worry about the gift packaging.
Well I separated my chocolate, then made this tag!
Totally retro, fun and funky holiday colors…..

Lindt chocolate colors of the Raspberry, Peanut Butter, and Mint chocolate flavors.
I ADORE this stocking image! I used elements from Vintage picnic to FILL my stocking! Cute huh?
It was THIS tag that gave me that LIGHTBULB-AH! HA! moment for my heartfelt, homemade gift!
As I was coloring the image I said out loud-“Oh my gosh! I LOVE IT!! I wish I had a Christmas Stocking like this!”
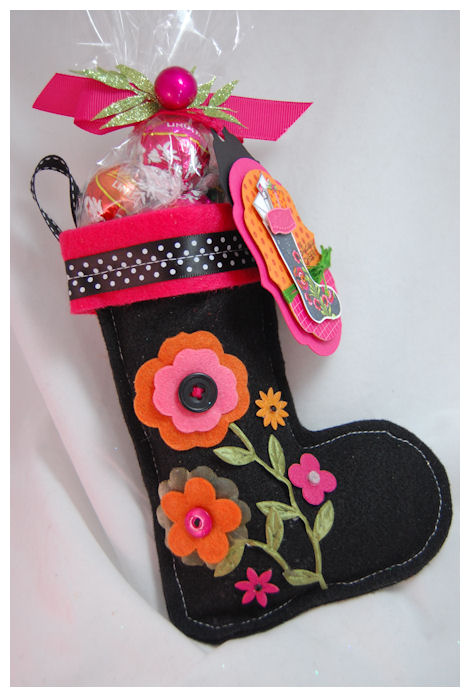
Well, no sooner did the words leave my lips (and yes, I admit, I often talk to myself when creating! Its a process OK!) I remembered my FREE! My Timeless Template : Stocking Stuffer! <—Now THAT is definitely economical!
So I ran up to my computer! Printed my template onto COPY paper.
I grabbed my UBER cheap-o sewing machine (Its was $5 at RiteAid after Christmas last year!), and some black felt, that cost 0.35 CENTS, and layered the template onto my (folded in half) piece of black felt.
Ran it through my sewing machine, using the copy paper as my SEW on pattern, and in like 3 minutes, I had a stocking!
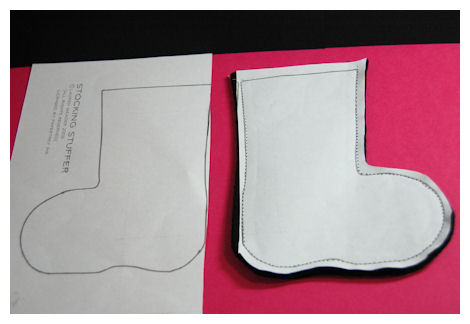
NOTE: Do NOT sew the top!
Once sewn, I trimmed a 1/4 inch border around the outside edge.
Since felt doesn’t FRAY I wanted the sewing to be shown. Plus I think I did a great job on it 😀
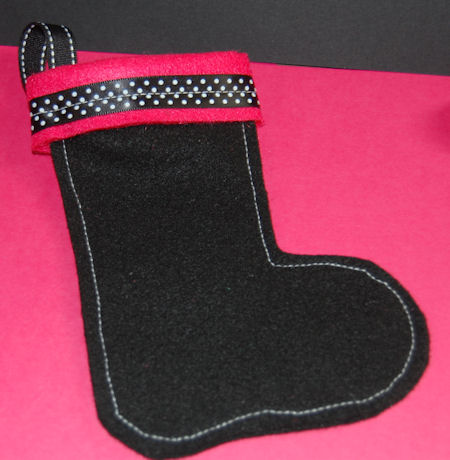
I then ripped off the paper, and added my cuff, with sewn ribbon detail.
At this point Im freaking out with excitement!
Now-time to add the flowers, like in my tag. I scoured my stamping supplies and found all sorts of felt flowers in colors to match! (see hoarding is NOT always a bad thing-I had the felt colors I wanted/needed and felt flowers to match too!) So I got out my hot glue gun, and got work.
Now for the WHOPPING cost of well UNDER $1…….here is the end result of my labor of love
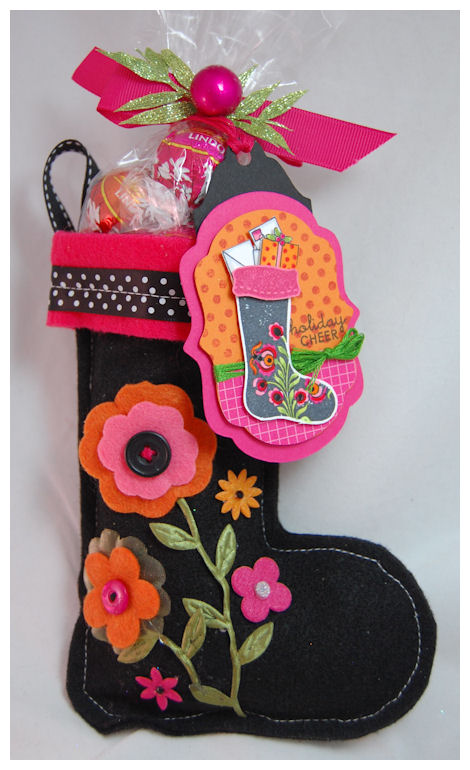
Isn’t it so pretty?
I am SO happy with this. What a fab gift for ANYONE! You could even let the kids decorate their own (minus hot glue gun).
Now this stocking can be kept around ALL year! I was going to give this one away, but I may keep it for me. I plan on creating these for gifts, but each being different. I NEVER repeat designs. Makes me ill! LOL! Everything is ONE OF A KIND!
This project took about 20 minutes to make! How FAB is that?! (not including tag)
That includes design concept! Once you get going there is NO stopping you 😀 You don’t even have to have expert sewing skills! TRUST ME!
Just go SLOW around the toe, and you are GOLDEN!
Here are the flower details-totally inspired by my tag

I used the leaf ribbon for that detail.
Flower centers are buttons, bella bling, and adhesive rhinestones.
Just so easy!
Supplies
My Timeless Template: FREE Stocking Stuffer Tag:
Stamps: Stocking Prints, Vintage Picnic, Polka Dot Basics 2, Holiday Treats
Cardstock: White, Black, Raspberry Fizz, Tangerine
Patterned paper: Bitty box basics
Ink: Black, Copic markers
Embroidery floss in pink & green
Slice machine and Studio Design Essentials cartidge
other-gel pen in pink, orange and blackStocking:
My Timeless Template: Stocking Stuffer
Sewing machine
Black & pink felt
Ribbon: True black polka dot, stitched, Leaf ribbon, Raspberry Fizz grosgrain
Vintage buttons, Felt flowers
embroidery floss in black
Bella dot in silver
Leaf/berry additions from Michaels Craft Store
Bag of Lindt ChocolatesNow, I’m not done yet! I have my card to share.
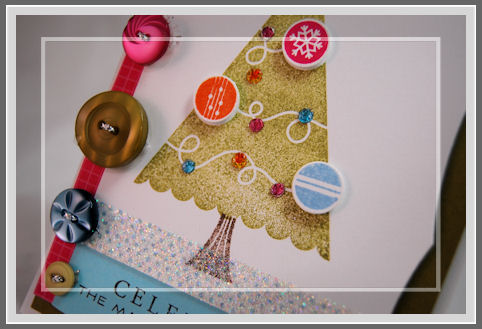
I wanted a fun and funky retro sort of look, so I went with cheery colors-olive, raspberry, tangerine and aqua!
It used a new stamp set from this month’s Papertrey Ink Release: Tree Trimming
O’ Papertrey Tree

I love all the ornaments that came in the set. It was so hard to pick and choose WHAT I wanted to do!
You could use the ornaments, add buttons, bling, punched patterned paper……OH! I could go on and on!
Overall, I kept it simple.
Stamped my tree in olive ink, then added “snowfallen” ground using polka dot basics 2. By taking my Scor-Tape and applying it along the bottom I was able to then add glitter in a cinch!

I added my adhesive rhinestones, along the curvy lines, for them to appear to be a string of holiday lights. Now, for the twinkly light look, ran the layer through my die cut machine so they would “crackle”. The pressure from the die cut breaks them but the adhesive holds them together on the tree. Its really cool in person, and I totally recommend giving it a try.
I then went on to add my 3D, 1/2 inch punched ornaments.
Of course I needed BUTTONS too.
Just a simple design with this fun, new set!
| Supplies:Stamps: Tree Trimming, Polka Dot Basics 2 Cardstock: white, Raspberry Fizz, Old Olive, and aqua color Patterned paper-bitty box basics 2008 Ink:Black. Old Olive, Raspberry Fizz, Tangerine, Aqua color versamagic Scor-tape, Vintage buttons , adhesive rhinestones, glitter, 1/2 inch circle punch, Labels 8 nestability, Silver cording |
WHEW! Are you sick of my blabbering yet?! Yikes! See what happens when I get excited?
OK totally ending now-
Be sure to visit the Design Teams blogs:
Tomorrow I will return with more peeks at the NEW! My Timeless Templates: It’s on the House and Keeping Tabs! I have been busy working on so many ideas for you.
Also I am having Kristen host the My Time To Inspire challenge today, as I didn’t even get my own challenge done :C BAD HOST!!
So check in with her-OK! As well as the other girls
Till tomorrow
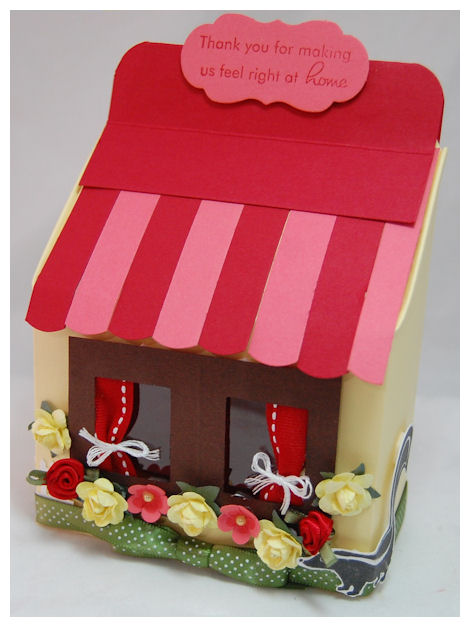
#2 -My Timeless Template Peek-It’s on the House
Sep 10, 2009 Author: mytime | Filed under: Home decor/3-D items, My Timeless Templates, Papertrey NewsletterWell we are on day 2 of the Papertrey Ink Countdown!
That means I will share the 2nd template for this month’s release!
I could do a cartwheel right now.
I have to say I am completely OVER THE MOON for this project 😀 as it takes the template name quite literal!
Now keep in mind this can be made into MANY fab “general use” gift boxes, but I HAD to make the sample I did.
The next My Timeless Template is called ……..
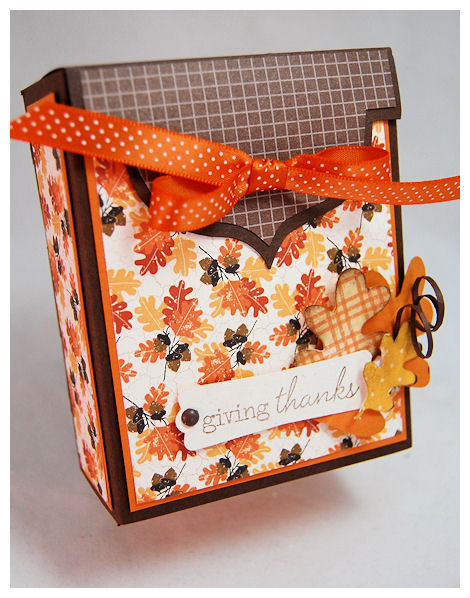
It’s on the House © (release is September 15th!)
Given it’s name, I couldn’t resist decorating *just* like one!
About It’s on the House
I just cut scallop strips to add to the front of the box design, as my “awning”.
This cute little template is SURE to hit a home run with everyone!
It received the name because of its shape! It looks like half of a house.
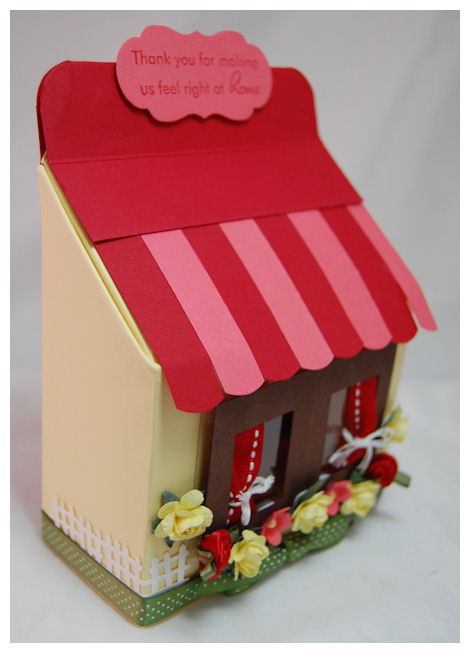
This is the side view. I have to say that I love the punched fence going around the house box 😀 The tied ribbon being the “grass”, and the overall easy “house” I was able to create in minutes.
Obviously i could NOT resist the play on words!
Now you can totally run with that idea, and decorate it just like a house front, as I have here, or just have fun playing with this fun shaped box, which has a fun folded flap closure.
TRUST ME-if all you can see this template for is a “house” I will share with you this week the MANY other design possibilities this really has.
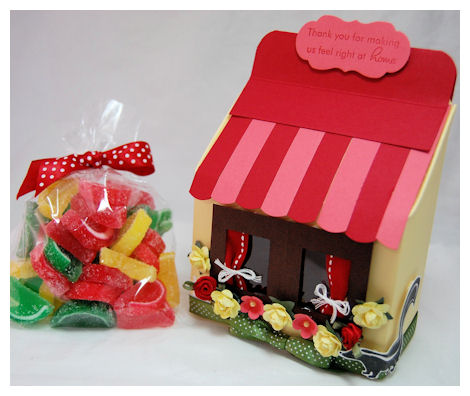
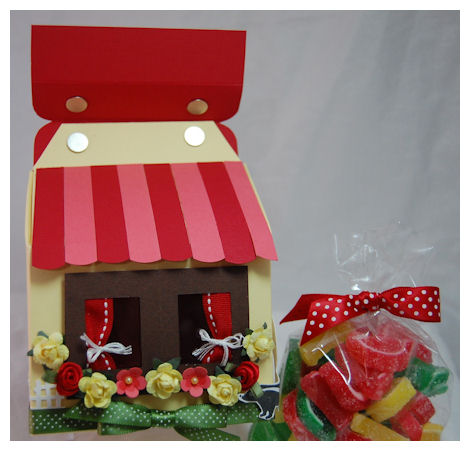 As you can see the top flap folds down. I used magnetic closures on this one. This template holds this yummy bag of sugared jelly fruit candy. Matching colors I might add 😀
This template goes together easily, and has unlimited possibilities! You can package so many amazing things in this one, and the design options are endless.
Now check out the close up

See the fruit candy IN the window?
What do you think of that UBER cute skunk sniffing the flowers?!
OH! and LOOK! Curtains made from ribbon 😀 My FAVORITE detail yet.
Can it get any cuter or easier? Seriously this box took about 40 minutes to make, and that is ONLY because I had no idea WHAT I was going to do and HOW to execute it. Now you can see my version, so it could go MUCH quicker for you 😀
You can cut a variety of windows into the box bottom, or just decorate the front. NO! I don’t mean HOUSE windows either! I just mean regular cut outs if you like 😀
Add to the design by punching a variety or borders along the top, tie it closed with ribbon….you get the idea!
No matter who’s home this goes to, it will be adored!
I cannot wait to show you the other projects I have using this template. You are sure to get inspired, and will want one for yourself! You may get sick of seeing me use it even! I have already made so much with it 😀
Supplies:
My Timeless Template: It’s on the House
Stamps: Boards and Beams, Forest Friends
Cardstock: Lemon Tart, Dark Chocolate, Clearly Creative (for windows), Berry Sorbet, Pure Poppy
Ink: Black, Pure Poppy
Ribbon: Pure Poppy Stitched, bitty dots new leaf, white embroidery floss
Other: flower punch, mini flowers by Prima, ribbon flowers, adhesive pearls, basic grey magnets
Label by SU!, corner rounder, fence border punch by Martha Stewart
Now if you want to see more with this template hop over to Kelly Lunceford- Template Team, and our Template Guest Designer Alyssa!
Obviously you will want to check out Nicholes samples today!! Also sharing is Melissa, Beth Silaika and Dawn McVey.
Thank you all for stopping by and sharing your feedback! I so enjoy reading your comments and emails! I cannot tell you how much I truly enjoy sharing all this with you, and my excitement each month! Especially when you share YOUR projects with me 😀
So thank you to each and every one of you, reading this, for popping by 😀
#1 Papertrey Ink Peek-My Timeless Template & Peaceful Poinsettia -VIDEO
Sep 9, 2009 Author: mytime | Filed under: Cards, Home decor/3-D items, My Timeless Templates, MYTIME MOVIE/VIDEOs, Papertrey Newsletter, TutorialsIt’s the 10th!! I think by now you know what that means here on my blog!
The FIRST of MANY peeks and ideas for the Papertrey Ink Release Countdown 😀 and peeks of my 2 newest My Timeless Templates ©
I cannot tell you how excited I get every month. Granted the first week of the month I’m working like a MAD woman, HOPING to inspire you with some great ideas to get you jump started. It’s ALWAYS nerve wracking as I try to top my last months projects. Fingers crossed 😀
I will say you all help me strive to better my best 😀 I LOVE a challenge, and thrive on being busy. I feel like the busier I am, the more creative I get. It’s weird. I don’t know what to do when I’m NOT running around. I can’t handle QUIET. Thank goodness because my life has always been full of everything BUT that!
OK I know you are TOTALLY over my blabbering on, so I’m going to just get to it OK!
PLEASE NOTE: Release of stamp set and My Timeless Template is September 15th!
Supplies listed/linked at post bottom 😀
I’m happy to share that my design with this template is a peek of a New! stamp set Peaceful Poinsettia by
Melissa Bickford . Check her BLOG for more samples with this set.
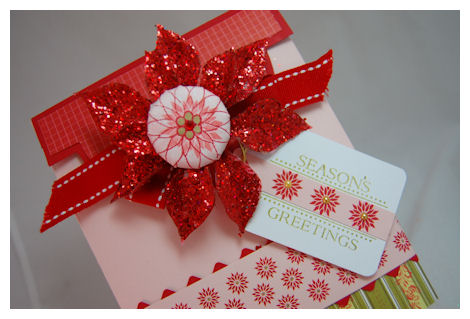
Season’s Greetings Set
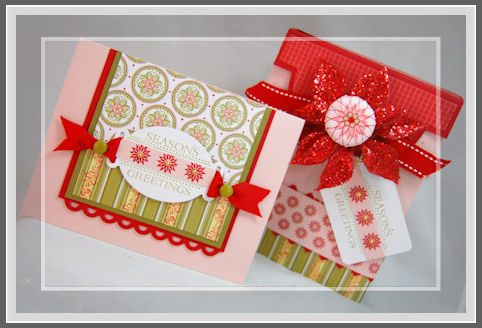
I love matchy matchy gift sets, and this one is so prefect for the holidays!
I love Sweet Blush, Pure Poppy, Spring Moss, and Ripe Avocado for holiday gifts!
This set is just so pretty, and the best part-EASY to work with!!!! I just adore Melissa’s sets to pieces. and her style is so ME! Oh, and I’m sure so YOU too!
Here is the card

I used the tag image from the set to create 2 different tags-one on my card, the other on the box.
While using the tag I stamped my sentiment in Ripe Avocado, and then the poinsettias (they are a separate stamp trio :D)in pure poppy ink, on my sweet blush strip, adding gold adhesive pearls to their centers! A very easy way to add to the POP of the tag .
I also used the border image along my template, in which I dotted my border flowers centers with a gold pen.
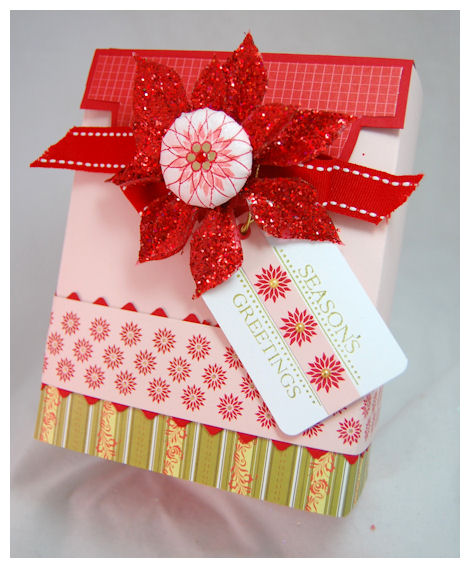
The large layering poinsettia flower was used to make my very own brad embellishment for the center of my Poinsettia flower on my gift box!
More on that…keep reading!
So this month’s My Timeless Template is named: Keeping Tabs ©
We have the standard size, and will also offer the Pretty Petite version as well!!
Today’s peek shares the standard size version.
About Keeping Tabs ©
I am always looking for really neat ways to “un-wrap” or reveal what is inside a gift I package. When it does reveal your gift in a fun way, it makes it so much fun!
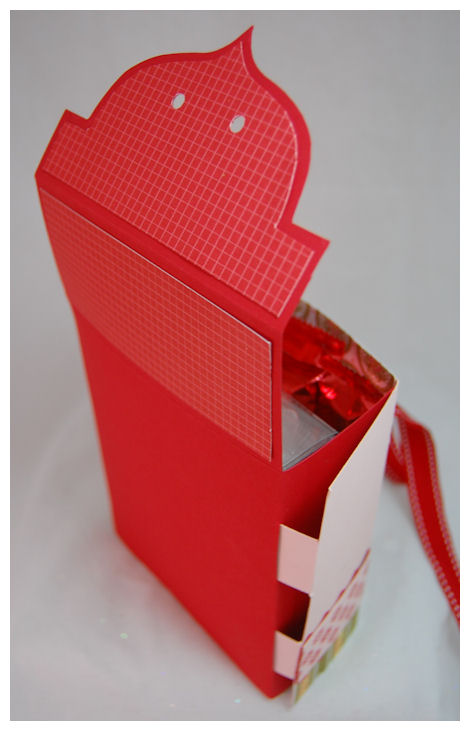
This amazing box is held closed on the side, by inserting 2 tabs into the back. You cannot even see them! They just tuck right in there, effortlessly!
(That is how this template received its name)
Now to add even more detail, it is tied closed (that is of course optional) with some of that stunning ribbon, we all tend to hoard! Making this so pretty couldn’t get any easier.
Now I am SURE you want to know HOW I made that stunning brad in the center of my sparkly poinsettia flower, so here is a Video on that
Isn’t that the COOLEST tool ever?
I love the I Top! You can find it –> HERE!
Now opening our template……
Untie the ribbon
Lift the lid
and…….
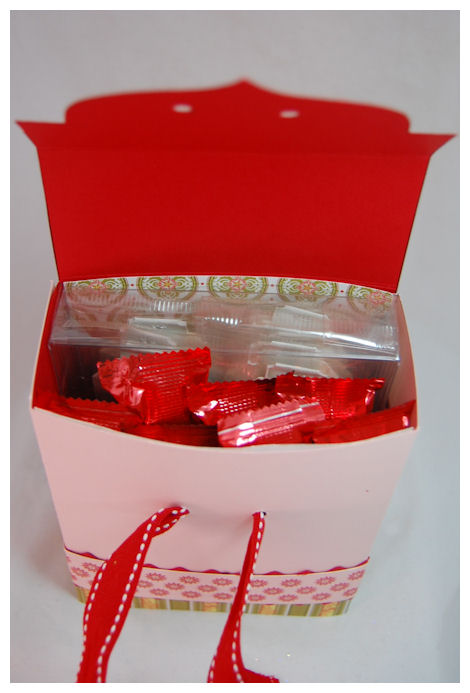
Look how much this can hold!!
Its FULL of fun, and yum!
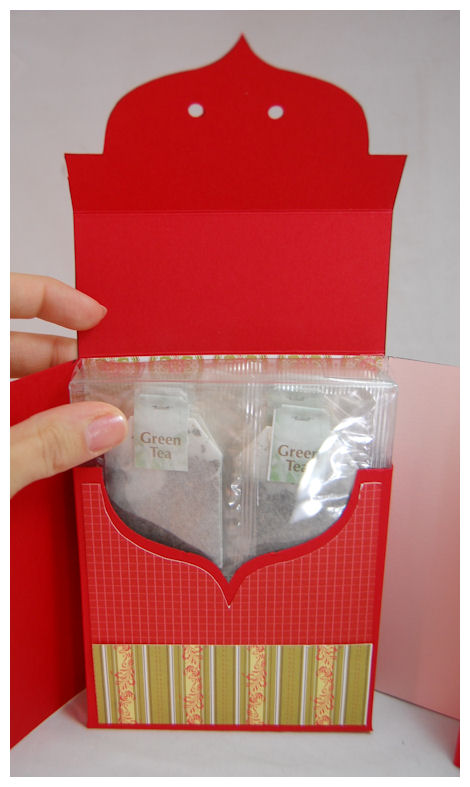
Once unfolded. the template has 2 pretty pockets, that are a very nice size.
The front flap design, as well as the 2 pockets inside, have killer curves, that once again add to the WOW! factor.
One other GREAT detail-you cannot see any of this “messy” stuff when this box is complete.
Like all the My Timeless Templates ©, this one was made so you can EASILY assemble it!
As a card maker, we can never have too many ways to package our precious paper masterpieces! I am happy to announce that this is another great take on card packaging!!
The standard Keeping Tabs © template can hold your standard A2 cards and envelopes. It is also perfect for MANY other gift ideas!
The Pretty Petite version is perfect for our 3×3 envelopes and cards/tags, or many other fun size treats! More on that to come 😀
Now don’t get stuck thinking it is ONLY good for cards! You can package so many different items in here. This template will leave you wondering what you can Keep Tabs on next.
So to show you something besides card packaging I thought I’d make a nice gift set for a Party Hostess or someone special! Maybe even a Yankee Swap?
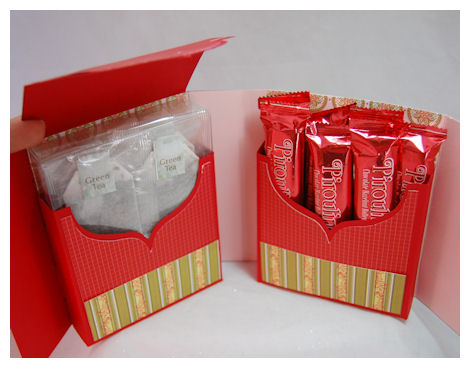
So, all opened up…..
We have tea!
Yes! You are seeing correctly.
Our Clearly Creative Card Boxes fit IN this one ![]() Can you imagine the FAB wraps you can now make JUST using the pockets of this template, for your card boxes, or other items you like to stuff in them…..like my packages of Green Tea
Can you imagine the FAB wraps you can now make JUST using the pockets of this template, for your card boxes, or other items you like to stuff in them…..like my packages of Green Tea ![]()
Our decorative mat layer helps you make a perfect and professional cut, every time!
Now in the other pocket (on the right), one of my FAVE treats
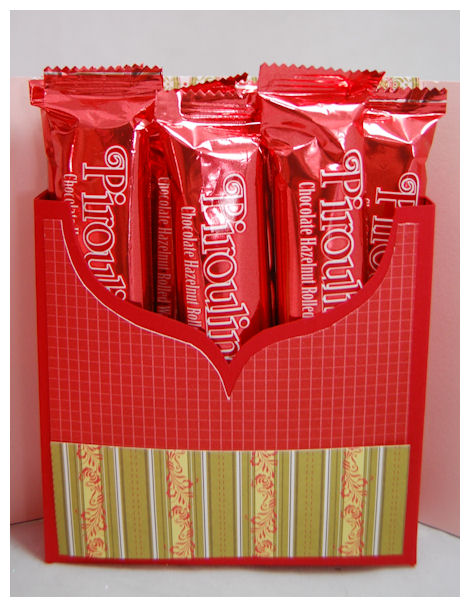
Pirouline Cookie Duo Packs! Each package has 2 cookie stix at 100 calories total 😀 YUM!!
So once your template is filled, you just wrap it all up, and you are off and running!
Its a great holder for SOOOOO many things.
Well, what do you think? I would love to hear your feedback 😀
Supplies:
My Timeless Template © Keeping Tabs
Stamps: Peaceful Poinsettia
Cardstock: White, Sweet Blush, Pure Poppy, Ripe Avocado
Patterned paper: Holiday Vintage Prints, Bitty Box Basics
Ink: Sweet Blush. Berry Sorbet,Pure Poppy, Ripe Avocado
Ribbon: Pure Poppy stitched & twill
Tools: I Topp tool, brads, punch, tag punch by Marvy
Nestability: Ribbon Tags Trio Two
Apron border punch, pinking border by EK Success
Other: Glittery poinsettia from Michaels, Brads by SEi, Adhesive Pearls by Hero Arts, Clearly Creative Card box
I hope you like what I had to share so far! There is so much more to come 😀 I have had ideas flowing like crazy!!
Now if you want to see more with this template hop over to Kelly Lunceford- Template Team
Don’t miss Nicholes samples today!! She always WOWS us! Oh! and Beth Silaika releases her FIRST set with Papertrey Ink this month! Also hop over Dawn McVey’s blog, as she peeks her set too!
So that is all for today. Tomorrow I will share an AMAZING sample with my other My Timeless Template © got this month, so stay tuned.
JRS Product Focus and a Pretty Princess invite
Sep 9, 2009 Author: mytime | Filed under: Cards, JustRite StampersWell its Wednesday! We are half way through the week-WHEW!
Today JustRite Stampers is the product focus on SCS. You can see that HERE!
They are reviewing-
Merry Little Christmas Borders & Centers Round 1-5/8”
and Wood Stamper 2″ with Bonus 15pt Font & Center
There is a video on how to use the 2″ stamper–>HERE!
So, I thought I’d share a sample with you too 😀
Have Yourself a Merry Little Christmas……

I ended up singing that Christmas song to myself the entire time I was making this! LOL!
This was made to look like a hanging holly wreath.
I embossed my mistletoe with gold, then colored it in using my copic markers
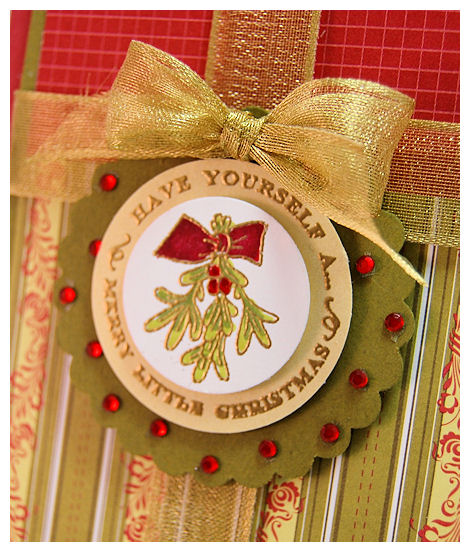
I then embossed the sentiment, in gold, on gold cardstock, and punched with a 1 3/8 circle.
That was then layered onto a scallop circle from Marvy (pink punch). I added some red adhesive rhinestones for my “berries”
This was actually a quick and simple card. I think you could definitely mass produce this version for the holidays, or use it for a gift set 😀
My paper and ribbon are all from Papertrey Ink.
Now you can see what some of the other girls did
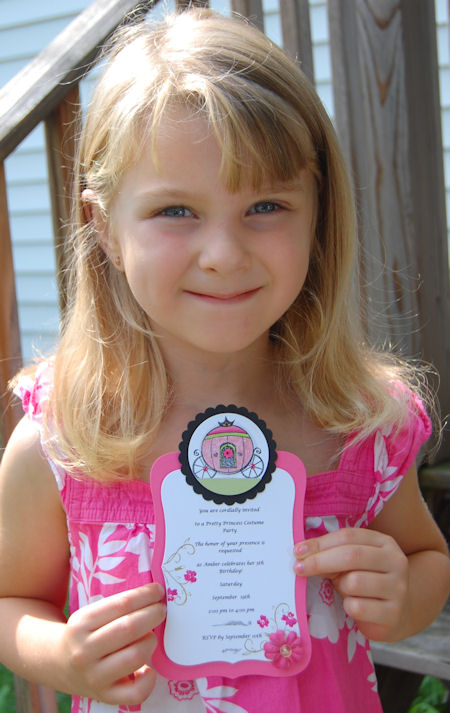
Now for all you with a little Princess in your life…..you may enjoy this post!
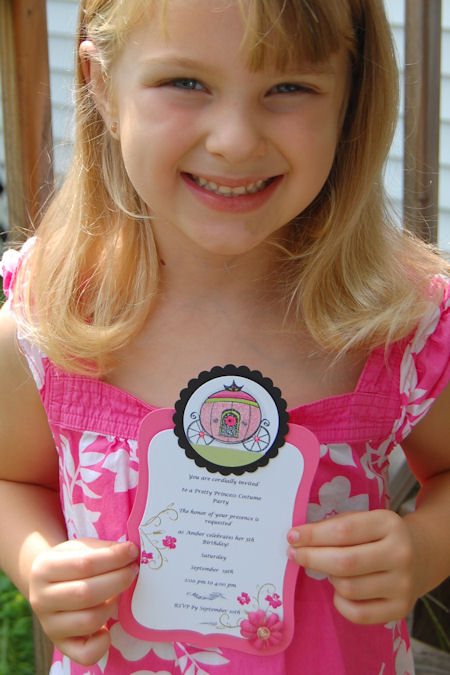
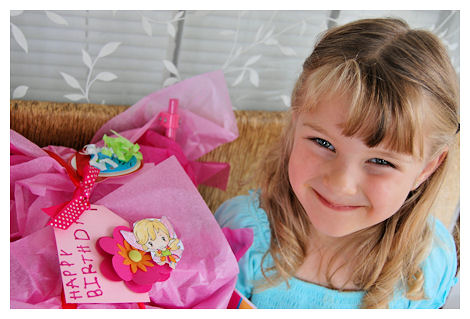
Amber and her invitation
Amber is an August birthday, so we always celebrate with a party Mid-September, since people are usually away on vacation and whatnot in August.
This year she wants a Pretty Princess Costume Party! These are her invites from LAST YEAR—>HERE! You can also see the Disney Stamp set there too (used for flowers on invite this year)
We will use a My Timeless Template for the Princess party favors (not sure which one yet! Thinking something like —> THIS! <— BUT, she hasn’t decided-and I’m waiting for a head count-Ill share once they are done!). We have a Castle pinata, and I ma having a Castle cake made, with matching Lollipops.
We are making crowns, frames, and necklaces too for the party activities. I may also let them decorate their template box favors too!
She has a STUNNING Sleeping Beauty costume, complete with glittery shoes, crown, and light up wand.
She picked out everything for her party.
For the invites, they totally had to meet her approval, and she made many helpful suggestions 😀
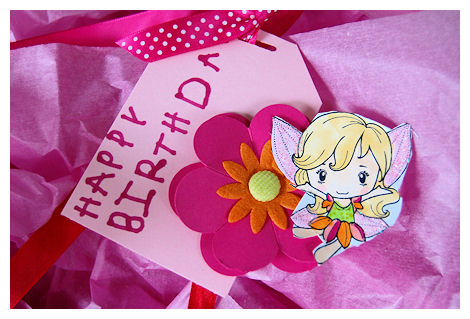
I blurred out the personal info-just so you know the invites are defective!
This is the invite in its entirely.
I used her fave color-Hibiscus Burst (Sleeping Beauty wears pink too!) She was totally into telling me what she HAD to have! She is quite the little paper crafter! I’ll share some stuff she made after this.
I cut the main layer using the Labels 8 nestability. What a pretty way to layer a girly invite 😀
I printed the info on my computer, ensuring it would fit when die cut with the smaller layering Labels 8.
Amber chose this carriage byImaginisce as her focus. Really cute choice, and it was only $1!!
I colored it with Copic markers.
Amber said “It needs lots of glitter!” So I added the glitter. A definite nice touch!
She then said it needed “grass”, so I added the green layer.
She then said it needed jewels-so I put some on the wheels.
Lastly she wanted a fancy border-so we matted it with the black scallop layer.
Smart girl!
Then it was all layered.
Well, the thought the bottom was plain and wanted me to put flowers!

So I used the Disney Princess set from last year (linked above) masked each one, since it was already adhered with dimensionals, and added the flowers.
She was right! A real WOW!
If THAT wasn’t enough, she wanted a REAL flower on them too!
SO I got out my Prima’s and called it a day!

Finally!!!
Amber was SOOOOO happy. She kept telling me how beautiful they were, and she knows how hard I worked on them. It was REALLY sweet. Her teacher said that each one she handed out, she would say “My mom made these special for the party, and worked really hard, so you can never throw it in the trash” She said it was HILARIOUS!! Can you tell she listens to my EVERY word 🙂
I was then asked my 3 teachers to do party planning for them. Um, NO thank you! I have all I can do to get my own kids party stuff done! LOL!
The last week of September Alexa will be 10!!
I was going to have a party, but 10 is HUGE! I REALLY want to get her tickets to the Miley Cyrus concert instead, that comes Nov. 9th to Boston MA but tickets are STARTING at over $200, for BALCONY and most are sold out :C So I’m crossing my fingers I can find something before her b-day. It would be a dream come true for her, and a GREAT way to celebrate 10! Wish me luck on that! I don’t have $500 for 2 tickets!!
OK now time for some things Amber had made on her own
This was for her teachers at the end of the year in Pre-K. I’m not sure WHY the main layer is at the lower rigth-but it was HER project!
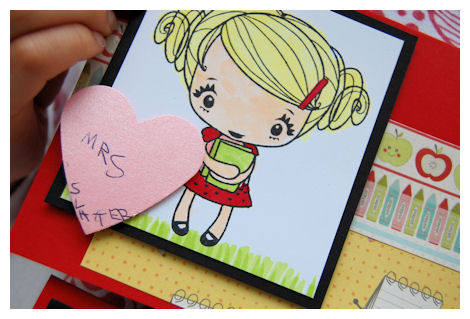
Mrs Slater
then Mrs Bartlett
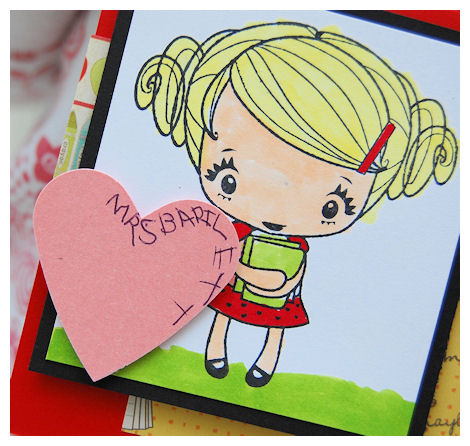
She then wrote their names going around the heart! So cute

She even picked what she wanted to write inside herself!
Then when we had our friends daughter’s first birthday party, Amber wanted to make her own tag for the gift
She did the whole thing herself 😀
Yes, she LOVES the images from The Greeting Farm
She always likes to pick out her own images.
She colored it herself in colors of her choice, added her own glitter, and cut it out too! I helped her punch the flowers and tag, but that was it!
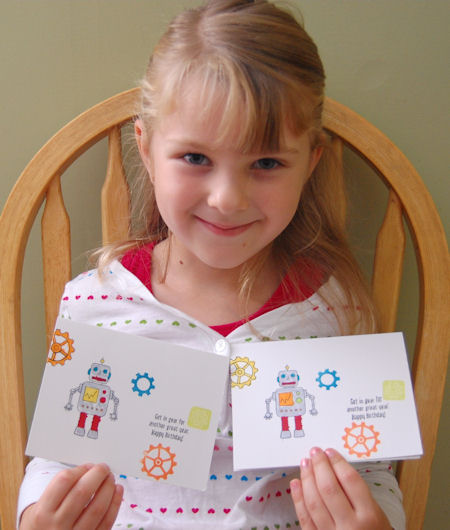
Then this past weekend we had a boy’s double birthday to go to. She totally took the pressure off me to have a card made, by making ot for me 😀 (WHEW! Off the hook! LOL!)

She stamped them and colored them herself-asking for help with the sentiment, so it was straight 😀
This stamp set is by Lizzie Anne-Gizmos and Gears
I think she will take my job some day! LOL!
I’m so happy to see how much she enjoys something I enjoy too. All my kids love crafts, but she loves the stamping. Alexa LOVE writing and just coloring, and Noah, well he prefers video games, but I’d say he mostly enjoys the cooking craft stuff we do most.
OK signing off now! I have my Papertrey Ink peeks to prepare for TOMORROW! SO excited.
See you then!
My Etsy

Who I Designed For
Blogroll
- Alicia
- Alli Miles
- Ally Blankenship
- Amber
- Andi @ crafts on a whim
- Angel R
- Angie Z
- Anne Kranitz
- Becky O
- Bee
- Beth Silaka
- Bethany Paull
- Beverly Nash
- Bobbie
- Cambria
- Cammie
- Card of the Week
- Card Positioning System (CPS)
- Cards for Cancer
- Catherine Doucette
- Charmaine
- Cheryl Sims
- Chriss Rollins
- Christina
- Christine Ewing
- Christine Wooden
- Colleen Schaan
- Craft Critique
- Craft Gossip
- Crystal
- Dawn Easton
- Emily Giovanni
- Geny
- Holly
- Igne Groot
- Inspirational Craft Blogs
- Irene
- Jami Sibley
- Jeanne Streiff
- Jen del Muro
- Jeni Bond
- JenMarie
- Jenn Balcer
- Jenn Diercks
- Jenn O
- Jennifer E
- Jennifer Mick
- Jennifer Pereda
- Jennifer-Sweet Treat
- Joanne Basile
- Jodi Collins
- Julia Stainton
- Julie Masse
- Karen
- Kathryn Berthiaume
- Katie Cotton
- Kelley Holland
- Kendra
- Kim Scholfield
- Kris’s Color Stripes! Get inspired here
- Kristen Dubosque
- Kristin Eberline
- Kristine
- Laura @ Sunshine Stamper
- Laura Turnmire
- Laurie Schmidlin
- Lesa Rapp
- Linda Duke
- Linda-LSN
- Lindsey Botkin
- Lisa (lakind scs)
- Lisa Kind
- Lori Craig
- Maggie
- Mara Campbell
- Maria
- Maria Levine
- Mary
- MaryJo
- Melanie M
- Monique Hansen
- Moxie Fab World
- Pam Imholz
- PaperCrafts Connection
- Peppers and Pollywogs Kids party site
- Rebecca Grohall
- Rita
- Robyn
- Rose Ann
- Sarah Vrolyk
- Sharon Harnist
- Sharon Johnson
- Sharon Rivera (a chemisrty with paper)
- Sherrie
- Sophia Landry
- Storage Units, Ink, & More Blog
- Sue Berker
- Susan (Rainy)
- Tangii Crane
- Tracy
- Tricia Traxler
- Trudee
- Velta
- VivLyn
- Zena
MTME Pretty Palette Color Team
MTME Pretty Patterns Sketch Team
My Time Made Easy TM LLC
Shop till you drop!
Lauren Meader
About Me
Copyrighted material
Subscribe To My Blog
Pages
- About me
- Alexa’s Story!
- My Crafty Corner!
- My Time Made Easy™ LLC
- Our Make A Wish Trip to Disney!
- Resume/Publication List
Calendar
Archives
- August 2013
- July 2013
- June 2013
- May 2013
- April 2013
- March 2013
- February 2013
- January 2013
- December 2012
- November 2012
- October 2012
- September 2012
- August 2012
- July 2012
- June 2012
- May 2012
- April 2012
- March 2012
- February 2012
- January 2012
- December 2011
- November 2011
- October 2011
- September 2011
- August 2011
- July 2011
- June 2011
- May 2011
- April 2011
- March 2011
- February 2011
- January 2011
- December 2010
- November 2010
- October 2010
- September 2010
- August 2010
- July 2010
- June 2010
- May 2010
- April 2010
- March 2010
- February 2010
- January 2010
- December 2009
- November 2009
- October 2009
- September 2009
- August 2009
- July 2009
- June 2009
- May 2009
- April 2009
- March 2009
- February 2009
- January 2009
- December 2008
- November 2008
- October 2008
- September 2008
- August 2008
- July 2008
- June 2008
- May 2008
- April 2008
- March 2008
- February 2008
- January 2008
- December 2007
- November 2007
- October 2007
- September 2007
- August 2007
- July 2007
- June 2007
- May 2007
- April 2007
- March 2007
- January 2007
Categories
- About Me
- All That Scraps
- blogger challenge
- camera/photo play
- Cards
- Contests
- family stuff
- FOR SALE
- Home decor/3-D items
- How to FAKE it!
- Introduction
- JUGS Challenge
- JustRite Stampers
- Lizzie Anne Designs
- My family stuff
- My Stamping Space
- My Time Made Easy
- My Time To Color Challenge
- My Time to Create Challenge
- My Timeless Template Challenge
- My Timeless Templates
- Mytime Mail
- MYTIME MOVIE/VIDEOs
- Papertrey Newsletter
- Pink Cat Studio
- Pretty Palette Challenge
- Pretty Patterns Sketch
- Product Opinions and Must haves
- Recipe's
- Saturday Sketch
- Smilebox Creations
- Stampavie
- Tutorials
- Uncategorized
- videos
Most Popular
- Create your own Onesie Card Tutorial-and important NOTE! PLEASE READ (2529)
- Saturday Sketch-Boxed bag holder (2333)
- Going GREEN! Fancy Flower Flourish-Closure Video (1478)
- Fabulous Favorite - Giveaway! (1336)
- a Prayer Request (1232)
- QUICK-Easter Baskets from Nestabilities-PTI style-and blog challenge (1063)
- Teaser Sketch (999)
- February Release Giveway! (and a little peek) (996)
- Group Post and Rambling Rose Video Tutorial (985)
- GIVEAWAY! Who wants it all?! (895)
Recent Comments (RSS)
- 첫충사이트: 완전히 흥미로운 블로그 게시입니다. 저는
- sarah: Wow, Lauren, what a stunning
- hedie: خرید راهبند
- 야동: Love to read it,Waiting For
- 야동: This seller is in a
- 바카라사이트: 여기 처음 왔어요. 나는이 게시판을
- 야동티비: I was surfing the Internet
- 바카라사이트: 비슷한 주제에 대한 흥미로운 정보를
- 바카라사이트: "여기에 제공해 주신 귀중한 정보와
- 온라인홀덤: 유익한 웹 사이트를 게시하는 데
Copyright © 2007 - My Time, My Creations, My Stampendence - is proudly powered by WordPress
This blog has been Tweaked and Designed by Sara Williams