Archive for the ‘Home decor/3-D items’ Category
Store Reopened and Introducing the Gingerpinches
Dec 23, 2009 Author: mytime | Filed under: Home decor/3-D items, My Time Made EasyWe’re Back! My Time Made Easy™ LLC is OPEN! But please read first!
I’m SO excited and when I’m excited I gush, and gush! But the top portion is ALL necessary so please read, the rest is my happiness sharing my dream and projects with the world. I’m hoping I can help make any last minute holiday gift giving EASY and affordable 😀
I am happy to announce that he site server has been successfully moved, and we are now back up and running!!
Things took a bit longer than we hoped for but as long as the transition was perfect, that is all that really matters.
WHEW!! What a weekend that made for. It is great that we headed off anything too major EARLY!
I appreciate your support and understanding as we had some unexpected issue’s arise.
Now
You may need to close and re-open your browser to view the changes. If you don’t see the store in an open state then you may need to close and re-open the browser or even clear your browser cache. If closing and re-opening does not do it…then do this! Internet Explorer:Click on ToolsClick on Internet OptionsClick Delete under Browser History sectionClick the box that says Temporary Internet Files ONLY…uncheck the othersClick OK Firefox:Click ToolsClick Clear Recent HistoryClick the box that says Cache ONLY…uncheck the othersClick Clear NowIf you signed up for our Newsletter, then anything in purple will be a repeat. Feel free to skip over this information and move on to the projects below! If you have NOT signed up for our Newsletter, please read.
If you wish to sign up for it—> GO HERE!
We will offer store updates, projects, and exclusive coupon codes etc. Be sure you confirm you wish to receive the newsletter, otherwise you will not receive it. Check your SPAM folder, and be sure to add us to your accepted list of emails! Thank you.
———————————————————————————————————————-
Very important: To my knowledge, I have responded and/or fixed any customer issues that I am aware of. Please read ALL the content in this newsletterto ensure I have resolved/helped and/or answered any of your own questions or queries. If I have not personally responded, your issue my have been fixed, as you will find as your read below. If many of you had the same problem, I updated my blog with info (and sent a previous newsletter confirming we are aware of the issue) and we looked into fixing it, rather than send the same response to each email.Now downloads will have a typical running speed, and everything should be faster!
Our sale, and coupon code (that you would have received in our first Newsletter email) has been extended due to our store delays. We also have a SURPRISE coming to you all FREE! as a thank you for being so amazing while we overhaul everything. That will be sometime after Christmas, but before the New Year!
Now let’s talk Pretty Packaging © templates!
As stated previously, ALL our CUT Files include the PDF version of the template for use of the scoring guide!
Our PDF templates have “dotted” score lines, and the “dots” are kept to a minimum! That way if you are utilizing our printer versions for gifts they will look nice with barely noticeable, if at all, once the packaging is assembled.
Based upon the information in our database, if you purchased the In A Pinch © Pretty Packaging © template, we sent that file via email. This file should replace any existing file you already may have had in .SVG and PDF format., in order to correct any download issues that may or may not have occurred.
If you purchased the Hanging Holiday Sled © you should have already received that Pretty Packaging © template from us, via email.We did NOT send ANY of the FREE Download products via email. You can re-download any/all free products again.
Please be aware that this follow up email, in which we sent purchased Pretty Packaging © templates, is not and will not be a normal occurrence upon purchase from the store. This is a one-time response in an effort to rectify potential unexpected download issues due to our web host’s inability to support the magnificent response we received.
If you did NOT receive the template, and paid for it, check your SPAM folder, or please email [email protected] and let us know which file type you purchased, your order number and customer name. You may be asked to forward your Pay Pal invoice. Once your order has been confirmed, we will reset your order, in which you will receive an email confirming this action. Please label your subject as follows to ensure expeditious service: PP Template ORDERIf you purchased the Pretty Printable © papers-Throw Me a Line©, and/or That Hit the Spot © your order has been reset. Simply log into your account history, where you will have 5 attempts to download your files. If for some reason you are unable to access your files, in your account history, please email [email protected] and let us know your order number and customer name. You may be asked to forward your Pay Pal invoice. Once your order has been confirmed, we will reset your order, in which you will receive an email confirming this action. Please label your subject as follows to ensure expeditious service: PP Paper ORDER
If you previously attempted to download any/all of the FREE Pretty Packaging Templates/Pretty Printable © paper, and were unsuccessful, please go ahead and place a NEW! order. If you have any other questions or concerns, please don’t hesitate to contact me
[email protected]In the meantime we are working on getting a Gallery, Forum and Blog ready for all our NEW! My Time Made Easy™ LLC customers! This should be really exciting once it is all set.We really appreciate your support, and patience as we worked out all these issues prior to our Official Release, which will be January 3rd!
I can hardly wait 😀
So go ahead and check out the store —> CLICK HERE —–> My Time Made Easy™ LLC
————————————————————
OK it is now time to introduce you to the Gingerpinches
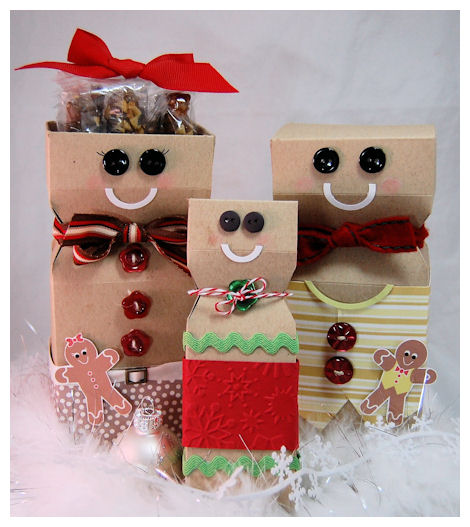
Before I even saw the Snowgirl, I first saw what I like to call the Gingerpinches.
I thought how cute would it be to have a little family! Especially if you were to want to give a treat to each member of the family whose house you were attending for a holiday gathering!
Its cute packages like this that would TOTALLY get my attention in a store, and I would BUY no matter what was INSIDE!!! Its just too cute to resist,and these are SOOO easy peasy!
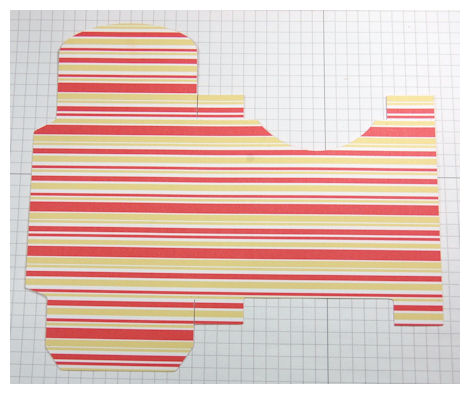
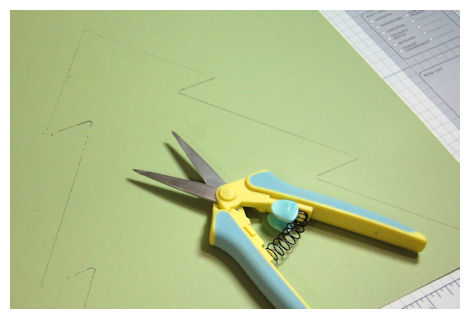
I just used the FAB Pretty Packaging © called In a Pinch © template, and cut my projects using Pumpernickle cardstock! Perfect “Gingerpinch” base.
Having the .SVG option (or any cut file) LOVING IT!!) I can EASILY resize my templates, and having a MACHINE cut them is SO fabulous, and a great time saver. Every second counts to the busy papercrafter.
NOTE: As stated above-the PDF version of every template IS included in every CUT file! Now you have the scoring guide on hand for easy reference, and as a backup, if you switch cutters 😀
The PDF versions of the templates use spaced out “dots” to ensure you have more refined looking projects, with less likeliness of any score lines showing when your Pretty Packaging © is complete! I recommend you trying the FREE! Cutesy Cover © template to give everything a try, and see how fabulous this way of marking out the scores really is!
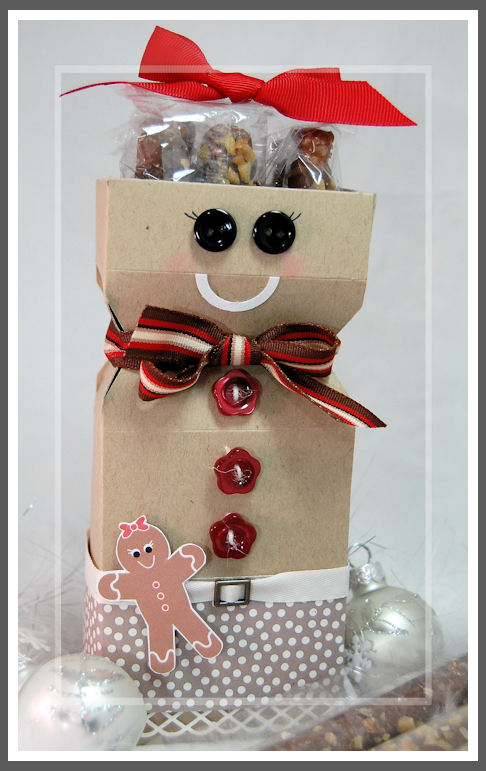
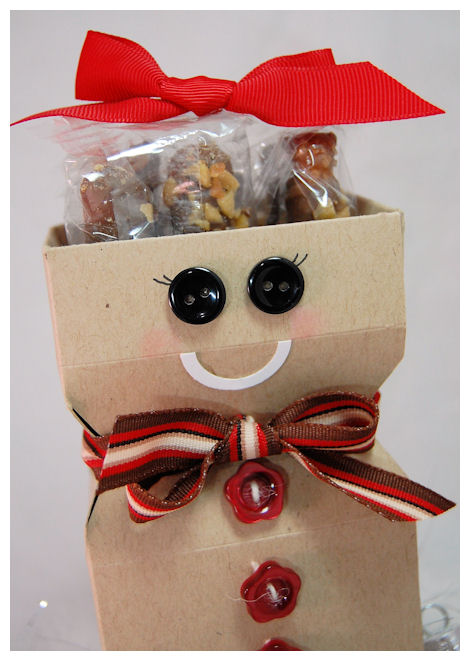
So first up we have Daddy Gingerpinch
He is packed to the top using 2 1/2 bags of Hershey Nuggets! This box holds a ton! (Don;t forget you can make is smaller too!)
I LOVE LOVE LOVE this template to pieces.
Made with NO stamps, just some supplies I had on hand. Oh and a little digital gingerbread boy I made on my computer for inspiration.
The eyes are some buttons, and the mouth used two circle punches (creating a circle frame, then cut in half). A super sweet felt ribbon around his neck.
Inspired by my Snowman cocoa jar, to create a vest for this sweet treat.
I printed the Pretty Printable © paper called Throw Me a Line © in moss/olive (but not in top quality so it mached the color of my gingerboy), to create my vest. I then added some more buttons, and my digital gingerboy 😀
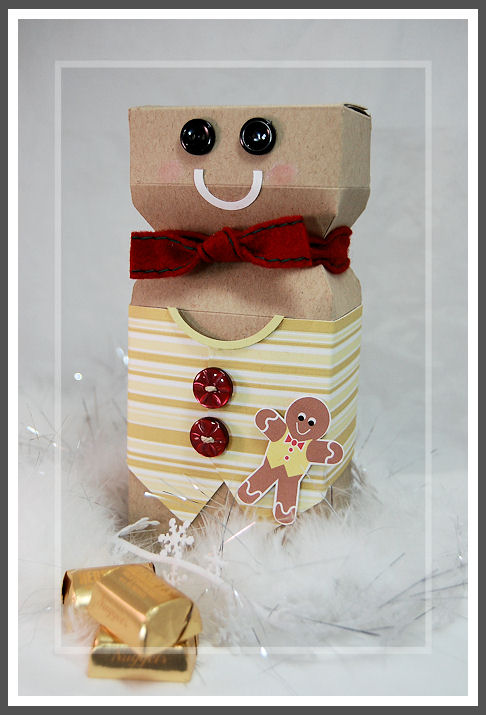
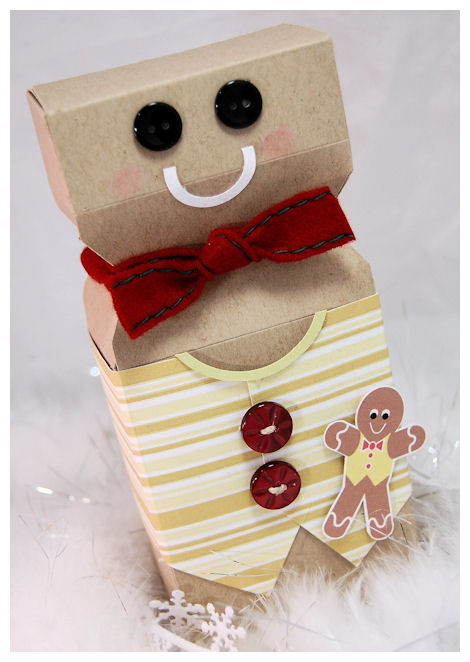
Next up we have Mommy Gingerpinch
She is just the sweetest!
I tucked in my top flap/panels, and filled her with chocolate covered pretzels (YUM) from Target. Having the tops stick out looks like some cute hair sticking out the top of her head! Like some vintage cloth dolls in a Raggedy Anne style, complete with red bow.
I knew she needed to be girlied up so I used flower buttons, and created a skirt. For the skirt I used the That Hit the Spot © Pretty Printable paper. I adjusted my setting to print in a paler shade of brown. I added a belt using ribbon and hardware. I also used a punch from Martha Stewart for the bottom of the skirt.

OH! I just love her. She is so cute.
Well, now we have Lil Gingerpinch
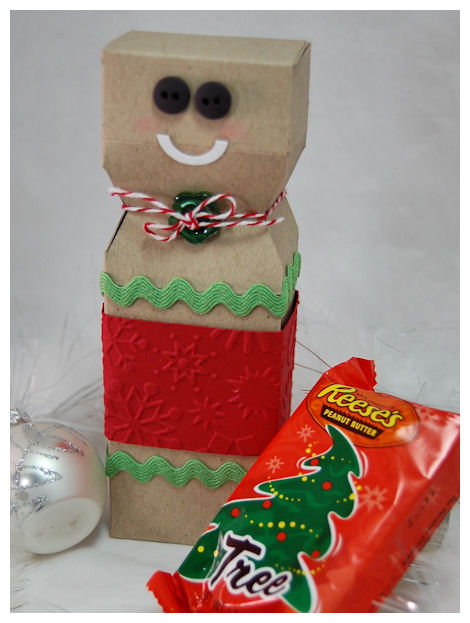
He is holding a scrumptious Reese Peanut Butter Cup! Perfect for mass producing projects!
This is where it is fun! I resized my template using my SCAL program. I decreased the size ( be sure to keep your setting set to “maintain proportions” when you resize) by 2 inches. If you do this you only have to change ONE measurement on the file, and the rest will resize along with it without altering the template design.
It was a lot of fun to make some of the templates larger/smaller with ONE click.
Now big, or small you can give some really nice gifts this holiday to everyone on your list!
This would also make a FAB gift card holder too! Disguised perfectly!
Now when you go to our website you get to see some completed projects using the Pretty Packaging © in our samples. You are also able to view each template in it’s PLAIN assembled view. This allows you see some possibilities of what can be done, or the clean slate! I personally love seeing what can come from a plain box, and having one next to other other is a great way to share the beginning of MANY possibilities!
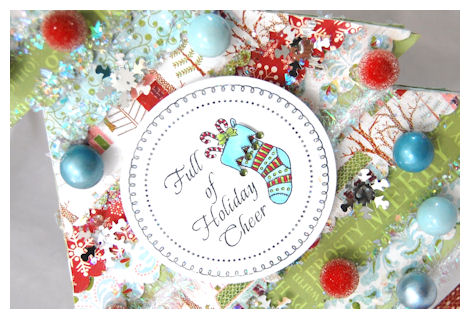
That being said, you may recognize this project as the Cutesy Cover © sample on our website!
This template is FREE too!
This is coming to you just in time for Christmas Eve!
This is one of the easiest templates to put together quickly! From my Cricut Expression (which cuts this in under a minute easy), to scoring and assembling it took 3 1/2 minutes! It is also one of my favorite that I designed to date! It was one of those surprises. I didn’t think it was a big deal, but sometimes its the SIMPLEST of gift wraps that really makes you swoon.
This template is one you will turn to for so many gift ideas. Especially when you choose to resize it! It can be made much bigger or smaller.
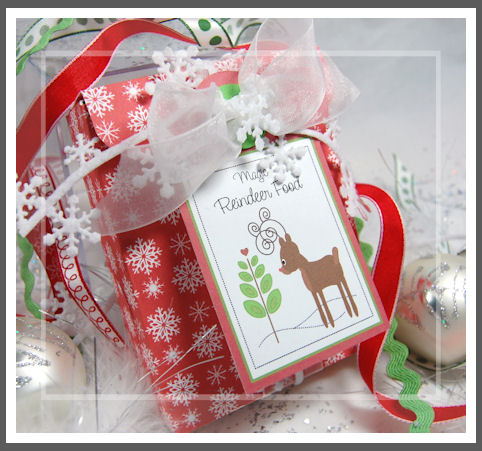
I made a package for Reindeer Food! This is something my children love to have each year. Its easy and really gets you in the holiday spirit.
The tag is one I made myself, using my computer 😀 Then just tied around the box with a variety of ribbons from American Crafts, and May Arts.
I’ve been using some new cardstock lately from Couture Cardstock. Since I am diving into my own business, I needed a new paper/cardstock source. I also wanted to get more 12 X 12 paper in a variety of options for color and TEXTURE! I am especially in LOVE with their One Sheet Wonder! for my coloring projects and main card bases!
Info on that from their site: One Sheet Wonder has been endorsed by Sally Lynn MacDonald, Copic Design Team Member and Regional Certification Instructor, as the preferred 120 lb white cardstock for alcohol ink shading and coloring. Specifically suited for creating one layer cards, One Sheet Wonder now gives you the ability to custom color your stamped images without bleed through or adding unnecessary bulk.
(PS I don’t work with them, just a happy customer)
SO I put in my order and gave it a try myself……OH MY WORD! Wait till you see some of what I have using this with my Copic Markers and this paper! Oh and the Blending paper is FAB too!! OK moving on….
This is the reindeer package opened.

The tag reads:
Sprinkle the Reindeer Food outside tonight
The moonlight will make it sparkle bright
As the reindeer fly and roam
This will get them to your home.

Now if you notice the box is printed on both the outside and inside.
I also printed my own DOUBLE SIDED patterned paper using the FREE Pretty Printable © 12 Days of Snowflakes (for the outside)
NOTE: This is a large file and depending on your connection speed, that will determine you download speed.
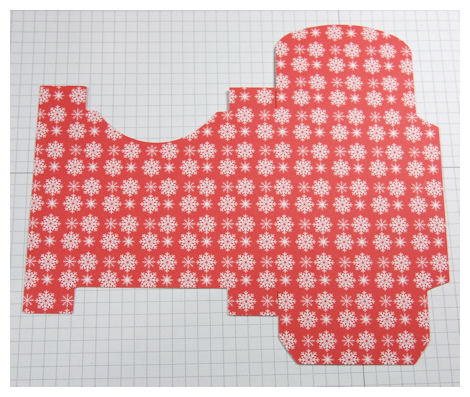
and the Throw Me A Line © for the inside
Now with our Pretty Printable © digital paper you have an ENDLESS supply of your favorite papers, and YOU can decide what to mix and match, and when. No more hoarding anything until it is suddenly out of style! LOL!
You can easily resize the paper too so there isn’t a lot of “waste”. Plus it is a ONE time purchase for an ENDLESS supply. That is really cool!
Its nice to have the INSIDE look as wonderful as the outside! This is especially FAB for all you using the PDF versions too. Another way to hide the score lines with little effort. Especially since we are using widely spaced “dots” the chance of seeing any harsh score lines is minimal!
This template also comes with a decorative mat layer for the curved front pocket, as well as an insert liner, that can also be used on the OUTSIDE! So endless possibilities!
Now if you are looking for MORE fabulous samples using the Pretty Packaging ©, look here:
Kristin made a GATE using Hanging Holiday Sled ©-this gate is AMAZING and the handle look so real.
Pam made a gift card holder using Cutesy Cover ©-this project was for a teen boy! We all need help with “male” themed gifts.
Mona made something for Valentines Day using Cutesy Cover– ©-the way she tucked in the flap is cute as is her project!
Katie used Cutesy Cover (and the Snowflakes paper) to hold cards-they are so pretty, so check it out!
And Catherine created an adorable gift package using Cutesy Cover ©-she also adds some helpful hints!
Come back tomorrow as I have much more to share. Especially if you need to WHIP out a quick, last minute project for several people!
Somebody PINCH ME! I’m LIVE
Dec 18, 2009 Author: mytime | Filed under: Home decor/3-D items, My Time Made EasyThis post is JAM packed with a lot of eye candy and information! So please be sure to read it all. I wouldn’t want you to miss out on anything.
Somebody PINCH me! (wink)
The time has FINALLY come for My Time Made Easy™ LLC to “unofficially” be opened! So hurry and go check everything out!! If you subscribed to our newsletter be sure to check your IN BOX or Spam folder (just in case!!!) You don’t want to miss your FREE template in there.
By “unofficial” opening, I mean we do not yet have our first release of the complete packaging line with coordinating paper and acrylic stamps yet, but we DO have THREE fabulous NEW! and easy to assemble templates for all your gift giving needs *just in time for the holidays*!
All my NEW! My Time Made Easy™ LLC Pretty Packaging © templates will be offered in the following formats:
- PDF files – for those of you with home printers
- SVG files – compatible with Provocraft Cricut Personal, Cricut Expression & Cricut Create
- The Cricut series cannot cut 3rd party shapes unless extra software is purchased. To enable the ability to cut 3rd party shapes, you must buy and install Craft Edge’s Sure Cuts A Lot (SCAL) software. This will allow the Cricut to cut files in the SVG format. This software dramatically changes the utility of the Cricut machines. It should be the first addition to anyone’s Cricut machine!
- GSD files – compatible with Xyron Wishblade, Quickutz Shilouette, Graphtec CraftROBO (although due to size restrictions of this machine some templates may be smaller than other actual versions)
- Graphtec CraftROBO. This machine is also sold as the following: Xyron Wishblade and the Quickutz Silhouette. These machines natively use the GSD format but can easily import the DXF format. No additional software is required.
- DXF files – Pazzles Creative Cutter Inspiration, Klic N Kut Element , Groove and Maxx
- These machines can cut both the PDF and DXF formats. Their native format is a proprietary format called KNK
To summarize:
Here are the most common home cutting machines and the suggested format to cut My Time Made Easy templates.
- Cricut machines: (Must buy SCAL software): SVG
- CraftROBO machines (including Wishblade and Silhouette): GSD
- Klic N Kut Series: DXF
- Pazzles: DXF
These are an instant download, so you can start creating in minutes! For ONE low price you can make so many gifts for everyone on your list!
Our template files are priced at only $5. You get UNLIMITED use from the template download. Each file includes step by step, detailed photo instructions. There will also be a PDF download of the scoring guide included for those using personal cutting machines.
Right now the economy is in a bad place and we could ALL use a break on our wallet wherever we can get it, we have ONE free template called Cutesy Cover (this will always be FREE), Hanging Holiday Sled- listed for ONLY $1, and another FAB template called In a Pinch © for only $3! These sale prices will expire the day after Christmas!
The trio of Pretty Packaging templates are just what you need to “Pretty” up any inexpensive item, and affordably make gifts for everyone on your list!
Now even MORE!! We have some Pretty Printable © digital paper too! What could be more fun?
Another instant download! All our patterned paper is 300dpi and delivered in a zip file so you can download it and print it right from home. Each digital page is saved as a jpeg which allows you to easily resize it for your cardstock size! Now you can have patterns in your favorite sizes for any project.
Our pricing will be at only 0.50 cents a sheet! So our collection costs will range according to the number of designs offered. VERY affordable.
We have worked hard to ensure the colors in our collection of digital papers come close to those you may already have in your ever building collection of cardstock, and ink. That will make matching up easy.
We have 3 collections ready for you!
12 Days of Snowflakes is FREE, That Hit the Spot is on SALE for ONLY $ 3, then we have Throw Me a Line for $6!
So today you can get several NEW! Pretty Packaging templates, and NEW! Pretty Printable © digital paper.
If you were to purchase everything we have today you would pay ONLY $13!!! What an amazing value to be able to make UNLIMITED personalized gifts.
If you are excited now, wait until you see what we have for our very first “official release”.
First up…..In a Pinch ©
Frosty the Snowgirl
You are going to be BLOWN away with the possibilities this template has to offer.
I saw a cute lil snowman……I mean snowgirl, when I looked at this! (oh and another collection that I will share very soon)
This template goes together-in a pinch (hence the name!). You can easily fill it with so many treats!
Those of you wither personal cutters can easily resize this to suit any project/gift. Plus having a machine cut these templates out saves you SO MUCH time! I am in complete gift packaging HEAVEN! I have LONG awaited the templates that I create to be able to be made into this type of format. FINALLY!!
Even if you don’t have a personal cutter, this is still fun and easy 😀
I created mine using my Cricut Expression. This is set to be created in the standard template size.
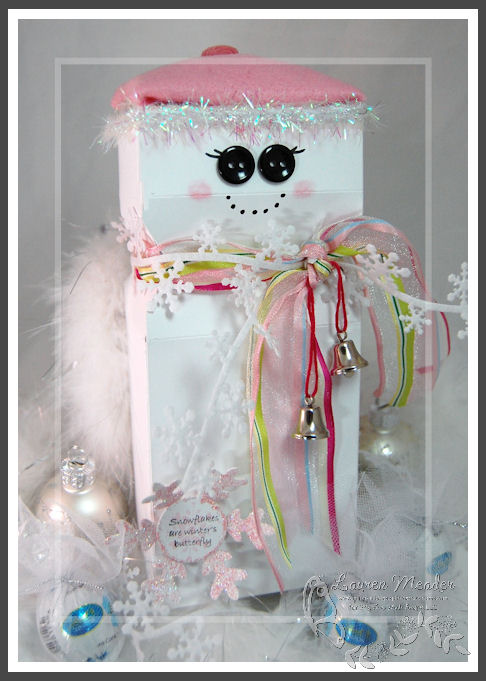
Completed Project Size
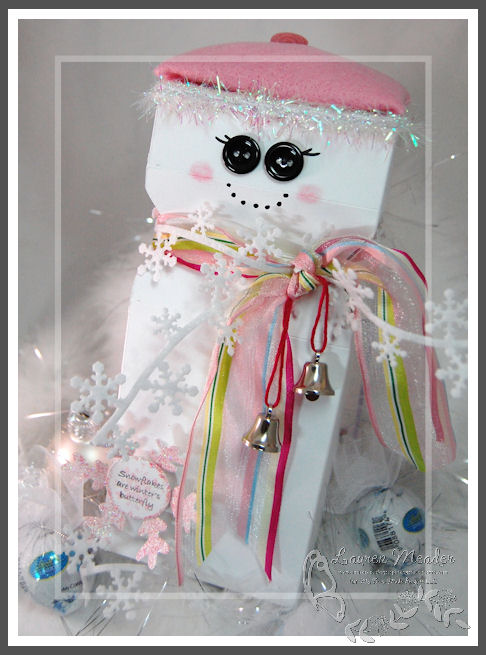
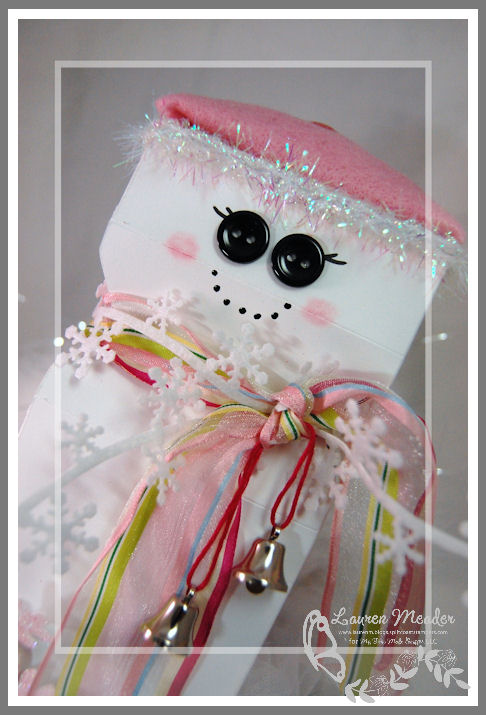
Now we have a super cute felt hat, with corduroy pom pom, glittery tinsel trim, some buttons for the eyes (complete with handdrawn eyelashes, and “coal” smile) pretty wide organdy ribbon, felt snowflake ribbon, and some jungle bells make this a total WOW! Would anyone really care WHAT is inside?
Well, if you do…..I took some Lindt chocolate balls, wrapped them in white tulle so they look like snowballs (sort of!).

I punched and glitterized a snowflake. Sentiment if from an upcoming stamp set (next year! sorry) I designed. Just a TINY peek.
Now if you aren’t convinced yet wait until you see what my NEW! Design Team has put together!
I received MANY emails when I announced my new venture. I had already selected my design team, prior to my BIG announcement. I am sure you are wondering WHO will be creating the knock out samples you are going to see month after month.
I have to say there is SO much talent out there too! Many “undiscovered” little gems 😀
Each person on this team is very talented! They each bring something special to My Time Made Easy™ LLC. I hope you will grow to enjoy their talent, and be inspired by them, as much as I have. I simply cannot say enough about these women.
I decided to let their projects become their introduction to the world!
I am going to post their sample, and you will find out WHO is WHO when you click thier project link.
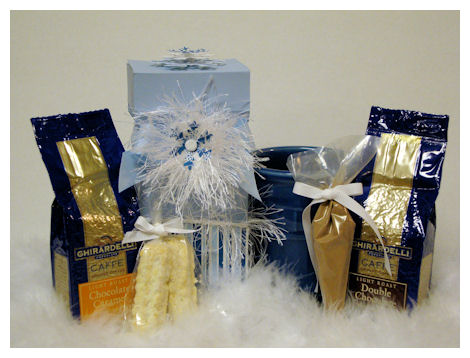
This team member fit all this into their template! A girl after my own heart. Look how nicely everything is coordinated.
What stunning collection that is sure to warm up the coldest day. I love the ilish embellishment with the punched snowflakes. Oh and did I mention the cocoa? YUM!
This design team member has been my right hand girl these last few weeks. I can’t even say how much of a blessing she is. She is also the official designer of the NEW! Pretty Printable © digital paper! Here she showcases the Throw Me A Line © Pretty Printable © digital paper.
Please welcome—-> CLICK HERE!

Lavender never looked so festive! I am in love. The 12 days of Snowflakes Pretty Printable © digital paper is sure to spark an arrangement of stunning winter creations. This is clean, simple and finely detailed. Look at the stitching detail! Amazing.
This design team member has been a complete blessing to me. She and her husband have helped me get everything off the ground. I cannot say how much I appreciate both of them! She is a template QUEEN for sure, and helps me fine tune all the template files. Did I also mention she is sweet as pie? How can so much talent and sweetness ooze from one person?!
You can meet her here—-> CLICK HERE!

Now showcasing another FAB version of our Pretty Printable © digital paper called That Hit the Spot, in lavender……this also POPS with the touches of chocolate! Isn’t everything better with chocolate? This is very rich looking. Love the addition of the seed beads too.
This team member created the My Time Made Easy™ LLC blinkie for me. SO sweet!
I have long loved her talent, energy and pure spark she brings to the crafting world. I am happy that she found time to join the team, as she has her own company (which I LOVE). She also juggles family and several blogs! Not sure how she does it all, but I am glad she does. (I’m also wondering why this doesn’t have an “L” for Lauren, instead of an “R”! :D)
Go say hello—-> CLICK HERE!
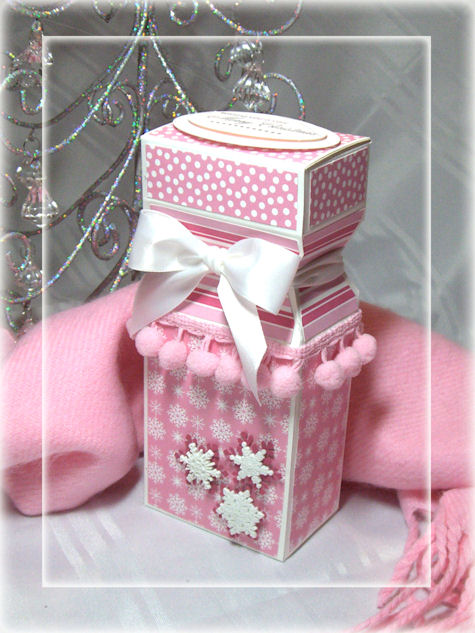
Pink and Pom Poms! Does it get any better than that?
Here we have all THREE of our Pretty Printable © digital papers in pink! All three of these collections coordinate together perfectly as you can see by this sample! This design team member packaged up this soft scarf into the In A Pinch © template. WOW! I never got a scarf wrapped like that before! Stunning.
It is perfectly accented with those pom poms and snowflake embellishments!
This design team member is a rising star. She has recently become a “cover girl”, making the cover of two publications! I am so proud of her. She is very organized and sure to keep me on my toes! I have put her in charge of coordinating the design team, and projects for our newsletter!
Let’s give a warm welcome—> CLICK HERE!

WOW! That is what I said when I saw this beauty!
I noticed this person immediately when she would create some amazing projects using the My Timeless Templates ©. I always wondered WHY she had not yet been “discovered”. I love everything she does. I simply cannot wait to see what she does using all our coordinating products.
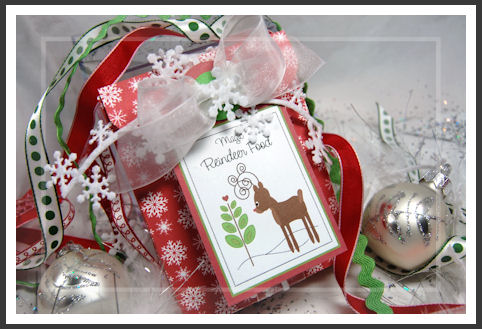
This design team member used a label die to create a window for the In A Pinch. I love having a window in here. You can see she used the red version of our That Hit the Spot © Pretty Printable © digital paper, then accented it with ribbon, ric rac, bells and punched leaves, just perfect!
Last, but not least!
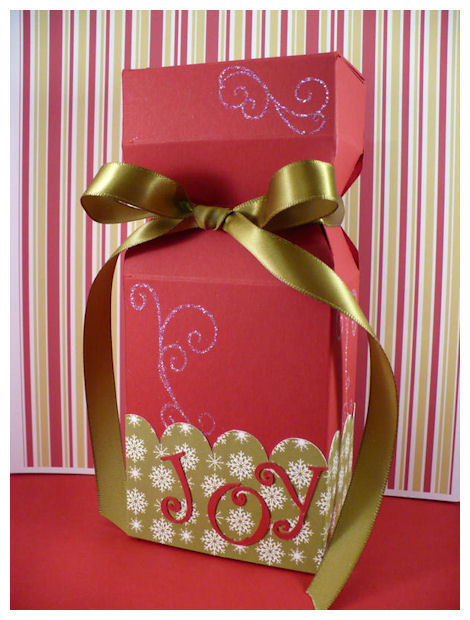
Another stunning creation using In A Pinch, and the olive collection of 12 Days of Snowflakes © Pretty Printable © digital paper (and and see the stripes in the back-that is the Throw Me A Line © collection)!
Joy-that is what I feel when I see this! You could whip these up for everyone on your list this year.
This person has been in my crafting “circle” for some time now. She should be able to quit her job, and stay home and stamp all day! This person is multi-talented being gifted in music as well as papercrafting. She also made the watermark for all our team members! She is SUPER savvy with any of the digital stuff too. She does some great work for some other design teams and thier digital projects. She works wonders with it all and I admit I am a but envious of those skills. I am learning though 😀
Come meet this digi girl—–> CLICK HERE!
Well what do think? Pretty exciting stuff!
Is your head just SPINNING with projects ideas now? I hope so!!IThere is more to share, but I will let this all sink in and I will return with MORE eyecandy tomorrow.
I have SO many thank yous to post, but will give that the appropriate attention soon.
I really need to thank my web girl (that is what I call her) Sara. She is a complete miracle worker (and all mine :D). She designed my blog and my store.
I would NOT trust anyone else in the world but her. I am so thankful for all her hard work and hours she put into this for me during the BUSIEST time of year. She spent countless hours not only designing this for me but doing research, and all sorts of “legwork” to ensure this site was PERFECT and just as I envisioned. I have so much love and respect for her. I cannot even tell you all how much she has meant to me. We still have a few “tweaks” before the GRAND opening but she did an amazing job getting done everything I needed.
She deserves a great big holiday bonus just for dealing with me. She talks “computer” talk and the poor girl….its all FRENCH to me! She has genius I could never imagine possible having. A pure JOY to work with.
Well I think that is all the typing my lil fingers can handle for ONE day. After taking such a LONG break from blogging this post has been a killer on my creative digits 😀
I really want to say THANK YOU, to all of you who have followed me here, and joined me in my creative ventures. You, my fellow crafters, mean the world to me. You are encouraging and really do share my excitement. A wonderful community of people I have come to know. It is a feeling that is hard to describe, but I’m sure you “get it”. These aren’t just words I’m typing on a keyboard, they come from the bottom of my heart. I cherish you all and enjoy every second I get to share what I love doing with the world.
That being said I’ll be back to share more of what I love tomorrow 😀
Thank you for all the well wishes and support. I’m dying to see your projects (especially once the complete line of stamps, paper and templates goes LIVE!) with the new stuff.
Happy Holidays to you and your family.
JRS Last Minute Gift Ideas
Dec 2, 2009 Author: mytime | Filed under: Home decor/3-D items, JustRite Stampers, Recipe's
As I said yesterday, the team at JustRite Stampers is having a blog hop!
This one is SURE to get the creative wheels turning! The focus is on last minute gift ideas. I think this hop will be helpful for ANY time of year. I know I’m often in a scramble for last minute ideas myself.
With the economy where it is I know we are ALL looking for inexpensive ways to acknowledge those around us. When you give anything handmade, I truly believe it speaks to the heart of the receiver. They know you took the TIME to make them something special. Even the smallest gifts can seem that much MORE special. I feel like this is my life long SPEECH! LOL! It’s truly what I live by and WHY I make all the gift packaging that I do. Simply put-dressing up something inexpensive makes it seem like it cost way more and more importantly….. is always given from the heart, and the bottom line is, that matters!
This year for the extra people I want to thank, I am giving my favorite recipe, all bottled up, and dressed for the winter season.
Snow(man) on the go
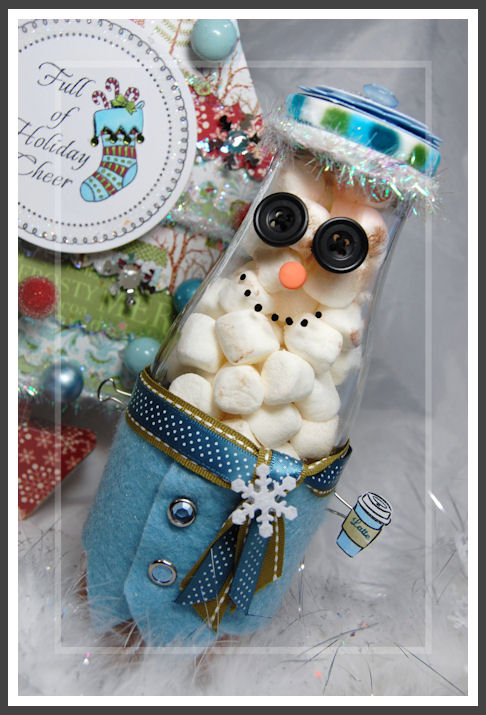
How cute is he?
Made from a simple frapuccino bottle. Just wash in dishwasher, and let dry completely!
Now if you have MANY people on your list buying and drinking that much Starbucks can be PRICEY so check out
—> THIS PLACE <—for a ton of various EMPTY bottles you can purchase! Can you say WOW!
Then alter your design from there. THIS ONE is pretty perfect.
Decorate your bottle , then add your mix.
This is my FAVORITE home made Hot Cocoa Recipe! You can make up several batches in no time!
I found it on the Food Network. Keep in mind the better quality ingredients often make tastier cocoas ![]() (add it to a coffee and YUM!)
(add it to a coffee and YUM!)
Ingredients
- 3/4 cup powdered milk

- 1/2 teaspoon ground cinnamon
- 3/4 cup sugar
- 1/2 cup cocoa powder
- 4 ounces bittersweet chocolate
- Marshmallows
Directions
Combine all the dry ingredients in a large bowl and mix well. Take the bittersweet chocolate and roughly chop it up to give a chunky but consistent size. Mix well with a wooden spoon and then store in a dry airtight container.
This is where YOU need to keep track of how much mix YOU put into each container, so you can print your instructions for the receiver. I like to print mine on a adhesive label sheet, then punch out and stick onto bottom of Snowman Jar.
To make the hot chocolate:
Add 1 cup of water per 1/2 cup of hot cocoa mix.
Heat in a small saucepan over low heat, stirring with a whisk.
Heat until hot, but do not boil, about 6 to 7 minutes.
Serve with marshmallows. (already in your jar :D)
As you can see-my mix is layered in the bottom of my jar. I then topped with marshmallows (and as you can see this makes him LOOK like a snowman!)
You can also make a Snow girl….or SANTA!
Now details…..
The hat

The lid-I punched a circle from blue cardstock. I then layered a scalloped circle piece, with dimensionals for POP.
I used the snowflake image from Merry Little Christmas Borders & Centers Round 1-5/8”. Stamped it in blue ink. (every snowman needs SNOWFLAKES!) I then layered on a silver piece of snowflake table confetti, then added a blinged out button. Gotta have BLING somewhere, even if its a Snow MAN.
The hat rim was created using velvet white ribbon from May Arts, that I used my Copic markers to COLOR!
Just under the lid, I added some tinsel ribbon for that extra WOW!
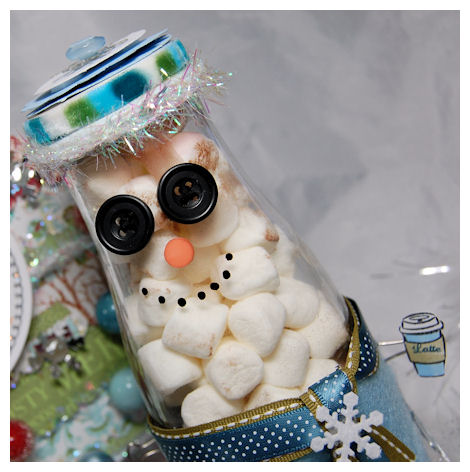
His cute lil face…
Easy peasy!
Two buttons for the eyes (adhered with CLEAR glue dots). An orange piece of Bella Dots for the nose. Then I used a Vitrea Glass Paint Pen in black to dot on my “coal” mouth.
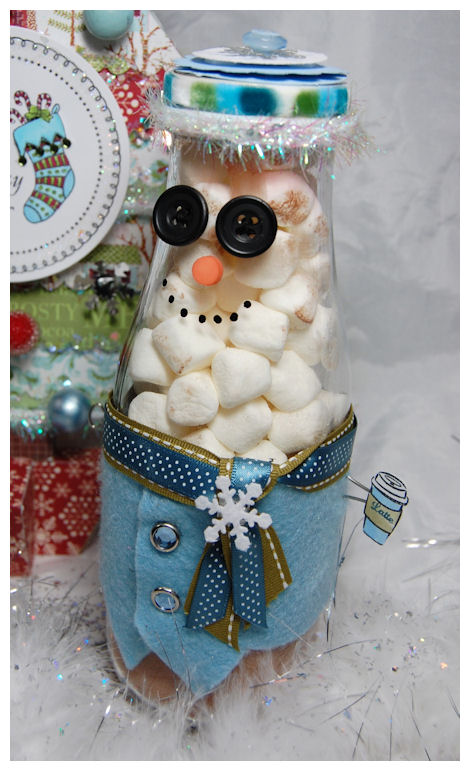
Now the outfit!
I took some felt and free-hand cut a “vest”. It is secured with double sided tape too, so it doesn’t move/shift.
Bling center brads became my “buttons”. Some ribbon for the scarf. I had some felt snowflake ribbon, so I cut a piece for the snowflake there.
Now look at his “hand”. That is a binder clip, inserted into the felt. I used the coffee cup image (and stamped the “latte” sentiment) from Just A Little Caffeine Borders & Centers Set 2″ . Just stamped, colored and cut out. Isn’t that cute, Its attached with a clear glue dot as well. I loved that idea. The cup from Something Sweet Borders & Centers Round 2-3/8” would have worked too.
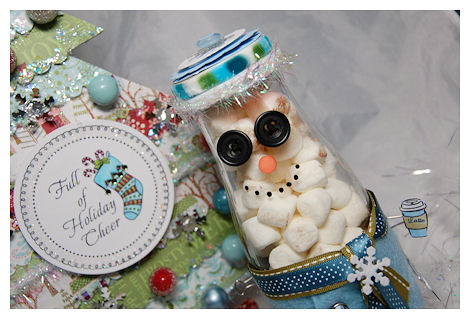
Now isn’t he just delicious?!
If you are eyeing the tree in the background…..you can see THAT project HERE!
I also made a Wreath ornament—->HERE!
Now it is time to move on for MORE last minute gift ideas!
JustRite Blog
Angela Barkhouse
Barb Schram
Becca Feeken
Debbie Olson
Heidi Blankenship
Kathy Jones
Kellie Fortin
Lauren Meader <—-You are here.
Lisa Somerville
Michele Kovack
Michelle Wooderson
Sharon Harnist
Sharon Johnson
Terre Fry
Thanks for stopping by, and letting me share!! I hope you enjoyed this project :DHappy Holidays
In a pinch….and some sale info!
Nov 27, 2009 Author: mytime | Filed under: All That Scraps, Home decor/3-D itemsHope you all had a wonderful Thanksgiving.
It was nice to see Jay’s family. It’s been a while.
Poor Alexa ended up with a tummy bug right after lunch, so we cut the family festivities SHORT! Now we are home and she is not looking so fab. Poor thing. My grandpa is recovering, but has been VERY confused. That is another story. Please keep them both in prayers for a speedy recovery.
With all the family”drama”, for the first time in a DECADE, I didn’t venture out for Black Friday. I may have serious shopping withdrawals! We planned on later going to FINALLY see the 3D version of A Christmas Carol at the IMAX theater, but it seems to not be our destiny! Last time I was sick and now Alexa is. Oh well! HOME IT IS!
Well I have been quite consumed with my family these days, and this bit has just slipped right past me (where did November even go?!)………you may already know that All That Scraps has begun their countdown for the newset release. The release will actually take place on Monday November 30th!! You can see the last few days of peeksHERE on THE BLOG!
In honor of Black Friday TODAY there is 25% OFF STOREWIDE!!! A great time to stock up 😀
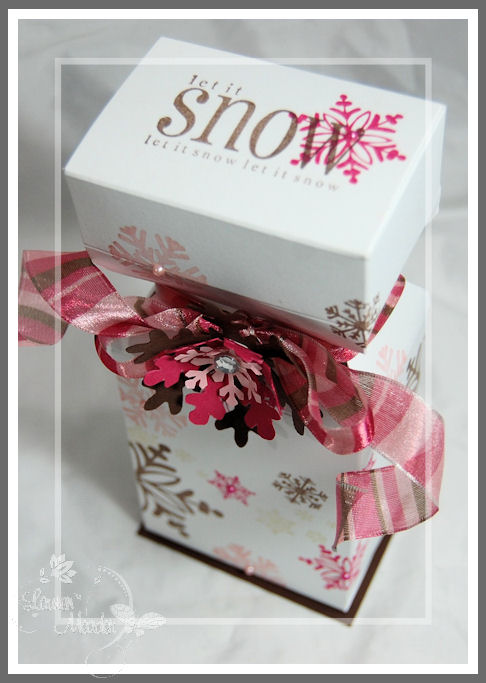
OK now on to MY project for today’s peek using AmyR’s Snowflakes Sentiment set
I went with Chocolate, pink and (that new SU! pink…..melon mambo???I can never recall) I just made this from white cardstock, and stamped away! I’m in LOVE with these snowflakes! So pretty. Well done Amy!
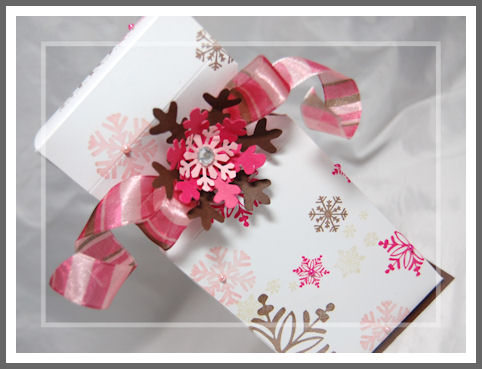
I created this box I like to call “In a Pinch” ©
I actually created the “template” version some time ago, but finally decided to create a sample! I have been sitting on SO many box ideas for so long, it feels good to just put one together “just because”.
I saw a box about a year ago, in a local department store, around the holidays, with rolled socks in it. They were red & white “candy” stripped socks. Think peppermint candy!
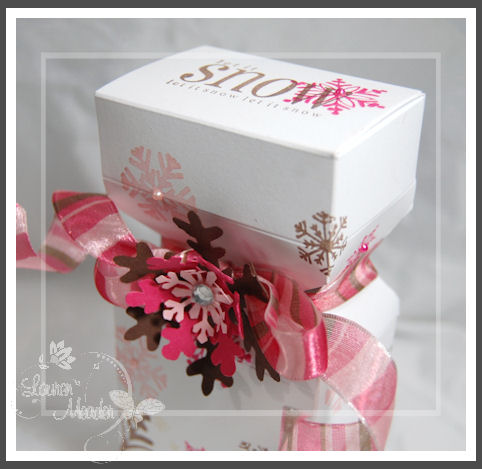
Sentiment reads ” Let it snow, let it snow, let it snow ”
It was pretty clever as the long box lay on its side with 2 “pinched” (in my own words) in ends that appeared to look like a wrapped candy, only in box form. Their box was all acetate, to mimic the “candy wrapper”. I was in AWE!
I LOVE the “pinched in” angles this has! It took me quite a bit of tweaking to get it to be like my sketch and recall HOW it looked based on memory but I’m over the moon for the end result!
For the LIFE of me I can’t find the sock set again anywhere (I’d love to have had a photo), but I did picked up the box and studied it (the sock set was $34!! Otherwise I would have bought them, they were SOOOOOO cute!) so I could TRY to figure it out myself. I jotted down a quickie sketch in my notebook that I always have in my purse to later recreate my own version.
SO the “In a Pinch” © was created.
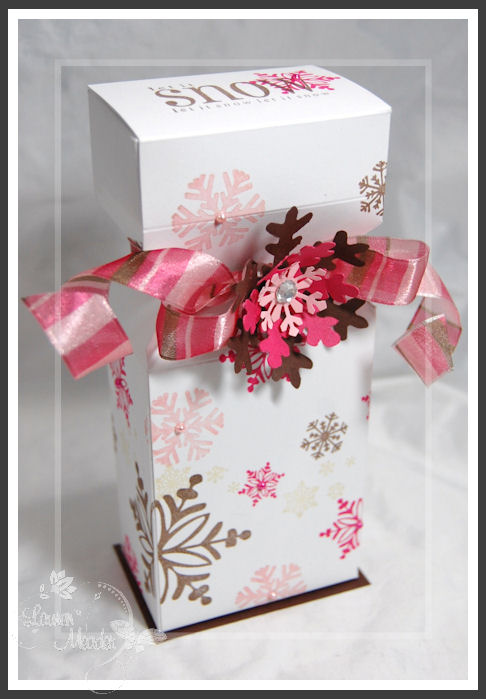
My ribbon is wired, and from Michael’s. The snowflakes are from my Slice Fa La La La cartridge.
Now mine doesn’t have 2 “pinched” in ends, as I wanted to be a little different, and enable my box to stand upright, but it could easily be done. I also wanted my box to be as large as possible!! Their box was a lot smaller.
This is 3 inches wide, 2 inches deep and 7 inches tall! PERFECT for SOOOO many gift ideas 😀 It was also pretty easy to put together 😀
Well that will do it for me today.
OH! Before I go! One more sale to check out! JustRite Stampers is having……
20% OFF EVERY ITEM IN OUR COLLECTION, except for our latest November release.
Visit the Super Sale Section and receive an additional 20% off our current sale price for this 5 day Promotion.
Complete Kits
1 3/16″ Sets1 5/8″ Sets2″ Round2 3/8″ 3 ¼”Small OvalLarge OvalFont SetsSuper Sale Thank you for stopping by! I hope you enjoyed today’s sample.
Now I need to get back to the family 😀 Have a fab weekend.
What you can do with a ribbon spool…..
Nov 25, 2009 Author: mytime | Filed under: Home decor/3-D items, JustRite StampersI have to start off this post with a family update! If that isn’t your thing, then feel free to scroll down 😀 Past the RED Dotted line!
I am happy to report that my grandpa made it out of surgery, and is doing well! The first 48 hours are critical, but so far so good! They took him off life support yesterday, and pulled out the breathing tube. No sooner was that out he was asking for coffee!! (See the coffee love runs deep through the family tree :D) So they entertained the idea, and after a few sips he couldn’t really tolerate much more. I’m sure his throat is SO SORE after having that tube in. I know I only had a breathing tube in for like 40 minutes for my surgery and I could barely talk for 3 days. For ME that is an ETERNITY!!!
He was sitting up in bed, and joking with all the nurses (sounds familiar doesn’t it! LOL!!). He is such a sweet man I’m sure he is one of the best patients. They are very impressed with his progress. I am so thankful that he is doing so well. I am also thankful that we live close enough to one of the best hospitals in the world! I really want to thank you all for the thoughts and prayers 😀 My family appreciates that very much.
Now I am TRYING to convince him that once he is fully recovered he should take some of his savings and take that life long dream trip to Las Vegas! WHY save it for his family or anyone else to use after he is gone?! He worked hard his entire life! He should live it to the fullest!! He would have so much fun. He deserves to reap what he has sewn. I really hope he seriously considers it.
—————————————————————————————————————————–
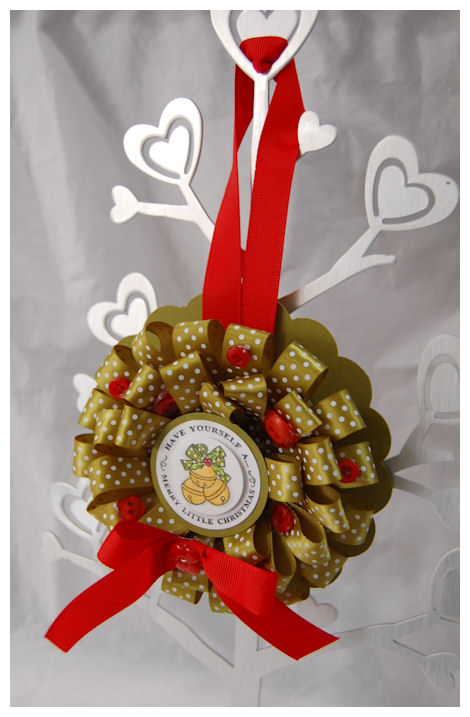
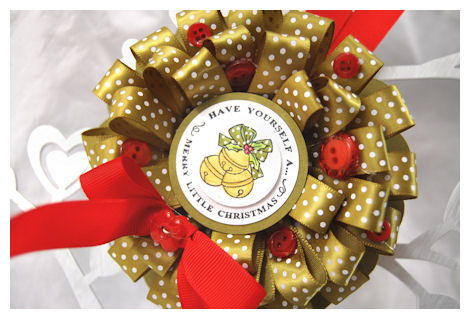
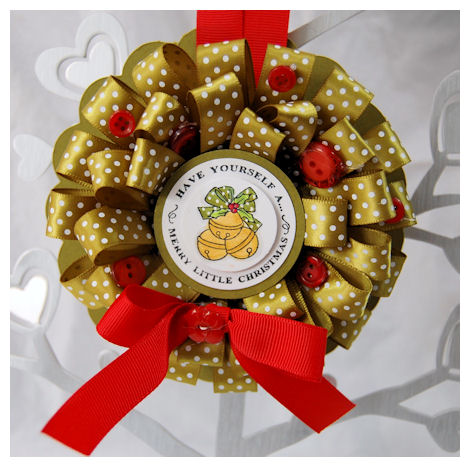
Merry Little Wreath
There has been so much going on here, I can never claim to lead a boring life! I have been busy (as you all know for VERY good reasons :D) and sadly my actual stamping time (and projects I can share) has been limited, leading to my lack of posting. Trust me though, after the holidays I will be sharing so many great projects! To hold you over for another day or two, I did get to go GREEN!!
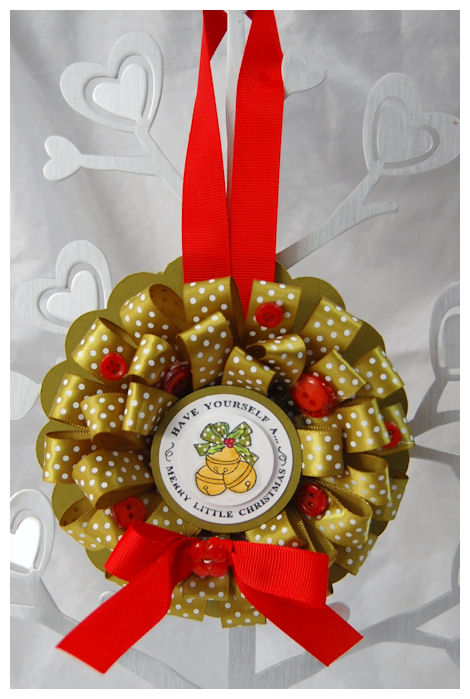
Now what do you think this hanging wreath ornament was designed from?
I love recycling items! As papercrafters we get some really cool, USEFUL stuff with the items we spend our money on. Sometimes it is just a matter of seeing the POSSIBILITIES of saving something for another use….even if it is for “someday”. You will soon realize that hoarding those items that you KNOW someday MAY be of use isn’t really all that bad! Well, not bad for the project, maybe bad for SPACE issues! LOL!
I have seen across so many message boards people asking “Any ideas for what I can do with my empty ribbon spools?” or “I have so many little pieces of ribbon I don’t want to throw away! HELP!”
Well as you can see this is the PERFECT project for just that!
I made this wreath just in time for the holidays! You could take various scrap ribbons and make a really fun shabby chic kind of decoration for ALL year through too.
This is also a GREAT project for the kids (minus the HOT GLUE GUN!)
All you need is a empty ribbon spool. My sizes may vary depending on YOUR spool size, but this is a standard size spool.
A stamp set for the center of your wreath. I chose to use Merry Little Christmas Borders & Centers Round 1-5/8” . I thought it was perfect for my wreath center. Plus JustRite Stampers is having a 20% OFF Sale —–>HERE!
Hot glue gun (For kids I recommend creating a double sided adhesive circle the size of your project, or have then use glue dots or some other non harmful adhesive that they can do them-self! Its not fun doing a project if you mom has to help you do MOST of it!)
A large scallop circle. This project used my Cricut Expression Home Decor Cartridge-5 inch scallop.
3 inch pieces of ribbon/scrap. (My complete project used 36 pieces) You could also do this with scrap patterned paper 😀
Some buttons (or other embellishment of choice) for your holly berries
Then, your hanging ribbon color of choice.
DIRECTIONS:
First thing you need to do is wrap some of your ribbon around the empty spool (where your ribbon would have been wrapped around). This will hide the plain, empty cardboard roll.
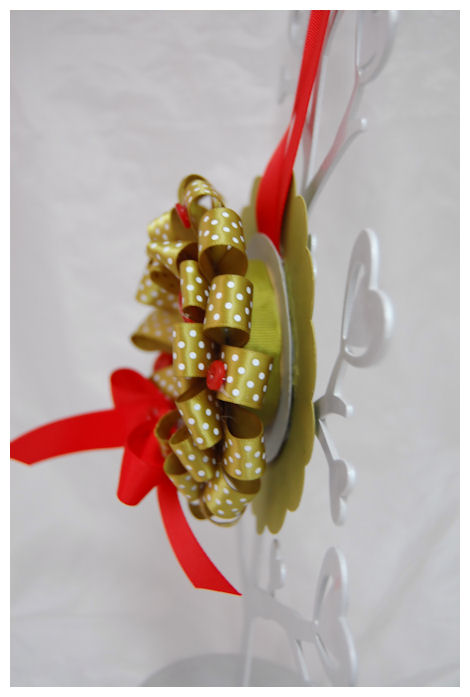
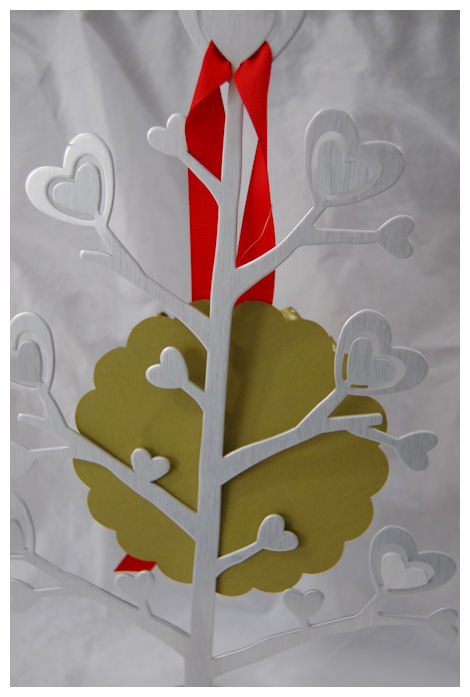
Make your hanging loop, and glue it to the BACK of the ribbon spool.
Glue the large 5 inch scallop circle to the back of the ribbon spool. This makes the back side finished, and hides the ribbon hanger! You can also add a family photo, or a message to the back!
Now you are ready to build your wreath!
Starting at the TOP you will work from the outside-in. By having your back piece on you will have a guide as to how far in to place your ribbon pieces. Your ribbons will get folded in half, so this will help you judged placement! You can even take a pencil and draw a quick guide onto your ribbon spool for a PERFECT wreath.
Now, take your 3 inch ribbon scrap, and put a dab of hot glue on the ribbon spool, and attach ribbon end. Fold in half, then glue that end to spool as well. Work around the spool until the outer row is complete. About 16 ribbons will fit around the outside edge.
Now begin your second row. You will want to make sure this layer of ribbons is in between each of the ribbons around the outer edge.
Repeat for 3rd row.
Now to HIDE the ribbon ends, and the OPEN hole in the ribbon spool center you will want to add a nice sentiment!
How sweet will this look on a tree or on a door?! Love it.
As I said above I chose to use Merry Little Christmas Borders & Centers Round 1-5/8”. The bells have a Sakura glitter pen on them, and I used a white singlo gel pen to create dots on my olive ribbon on my image, just like the ribbon on my wreath. The bell image is popped out of the center sentiment using dimensionals. I wanted some extra pop.
I then hot glued my buttons on as well! Trust me this thing is stuck together for LIFE! LOL!
I sang “Have yourself a Merry Little Christmas” the entire time I made this! I love that song 😀 I love ALL the Christmas songs that come on the radio this time of year, along with the specials on TV. I usually have so many great memories associated with each one.
I really enjoy this season. The world seems so much more full of kindness, love and good will. Despite the economy people are always more compelled to help others, reach out, be kinder, and seem to be more cheery! Well, unless you go shopping on Black Friday! OH BOY! People can be NASTY that day. Which I personally don’t get. I always go shopping on black Friday, and my opinion is IF you are going you NEED to be in a good mood, and KNOW you ARE going to stand in line for a very LONG time, and you are not likely to get EVERYTHING on your MUST HAVE gift list! If you can’t be patient or aren’t prepared for that, then please don’t show up! LOL! OH! and you can’t complain about the lines either. Its part of the day. Grab a coffee and just stand in line with a smile. Also the more cheery you are to the poor retail people working, the more apt you are to get their help!
Sorry! Not sure WHY I went there! LOL!
Anyway, I am not sure if I will check in tomorrow or not, as I am cooking cookies and stuff with the kids, but if I don’t please have yourself a WONDERFUL and SAFE Thanksgiving.
I hope you are able to really take a moment of pause to reflect on all you have in your life to be thankful for. Remember that even during tough times there is usually something to be thankful for. The hard times won’t last forever. I always look back on the past year, and at my family and friends. I truly feel like I’m one of the most blessed people in the world 😀 I am ever grateful for each and every second I have with my family. I have been so blessed by so many, including all of you! I get so much joy from sharing with you all and the interaction I have from each of you as well. I have gained many amazing friends from my love of sharing this craft with the world.
So thank you for giving me another thing to be grateful for!
I’d love to end this post by YOU sharing something you are thankful for with all of us here. It will feel so good to reflect on that.
Happy Thanksgiving.
Tree of Cheer
Nov 23, 2009 Author: mytime | Filed under: Home decor/3-D itemsHi everyone!
I’m starting today’s post on a personal note.
Today my grandfather is having a very high risk open heart surgery . I am leaving my house at 3am to go be with him in Boston Ma. If you believe in prayer, and could spare a moment, please pray he makes it through this surgery. There are 3 parts to his procedure that we are told high risk for him to NOT make it through. Today I will literally be holding my mother up as he undergoes the 6 hour surgery. My grandfather has always been like my father growing up. I cannot bear the thought of anything happening to him. That being said, I know God has a plan for him and I have faith things will be OK. I will say I have much peace about this, now I just need to try to give a piece of that feeling to my mom.
On another personal note….thank you all SOOOOOOO much for sharing my excitement for my NEW! venture My Time Made Easy © LLC! It made me so happy to know you are all as excited as I am. I am beyond excited to get everything started, and I will keep you ALL posted on our progress! I’ve been working SO hard to make everything AMAZING! I’ll be sending out our first email soon, as our first template and SAMPLE of Digi paper will be ready to go (SOON!!).
I have MANY emails to sort through, but as you can see my family has needed me that last few days. So if it needed a reply I’ll be in touch soon! Thank you all again for the support as I make my dreams a reality!
OK now on a “eye-candy” note……I am the guest designer today at Say it with Letters! I love their stuff, and have made several creations in the past.
I really enjoy cardmaking but my real passion lies with coordinating cards, gift packaging, and altered items! I get so much joy in personalizing just about ANYTHING I can get my hands on. To be able to dress up the SIMPLEST of gifts, and making them a WOW! My family and friends can’t believe everything I make starts with some cardstock!!
I found Say it with letters after attending a Stampin Around Event in March this past year. We created an altered Chick that was designed by Julie Massee. I immediately went home and placed a order!! HOW FUN!
Now just in time for the holidays I have a FABULOUS tree for you that is SO easy, but will definitely be the talk of the holiday decor! There are so many possibilities, but with Christmas around the corner I wanted something SPECIAL!
I hope you like my project. This took about 25 minutes to make. Definitely a great project to create for so many!
You can view the step by step directions on the —> Say it with Letters Blog
I had a BLAST, and I hope it inspires you this holiday season. This is by far the most wonderful time of year! Most people are more giving and willing open their hearts to others.
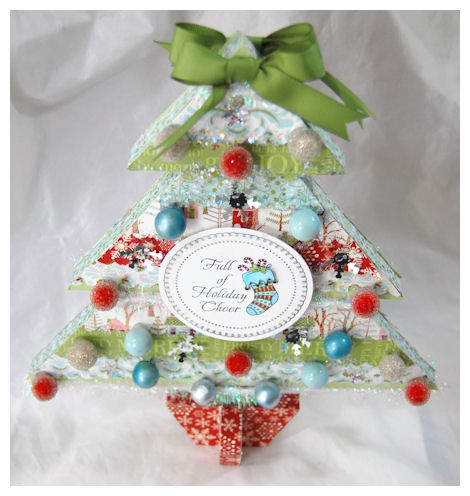
Tree of Cheer
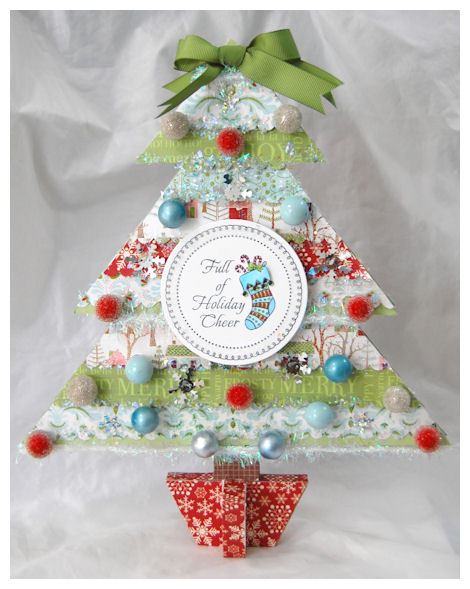
You can find the TREE shape—>HERE!
This is the front. All decked out for the holidays!
I used some various papers from a couple different companies, one being Cosmo Cricket (I believe! EEK! I should have kept track! Sorry! I just got carried away!
I found some various holly berry branches at the craft store, I cut off the “berries” and hot glued them on with a hot glue gun.
Each paper layer is scalloped, and on dimensionals in the center for some POP. There is also some glitter, and silver snowflakes.
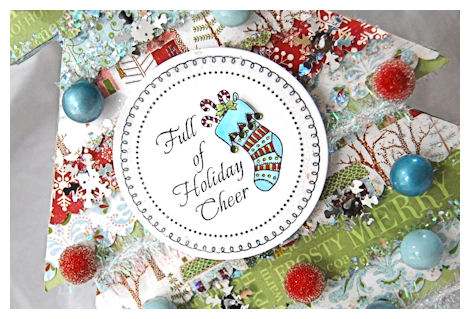
I added a stamped centerpiece using Old Fashioned Christmas Borders & Centers Round It was the perfect accent to my project! The cuff is 3D. The frame is glittered, and there are of course, glittered tassels. Christmas trees, and stockings are a perfect combination!! The stamp set has several great center options.
View from the top
Hopefully you can see how glittery, and dimensional this is.
This is just a stunning centerpiece or holiday decoration!
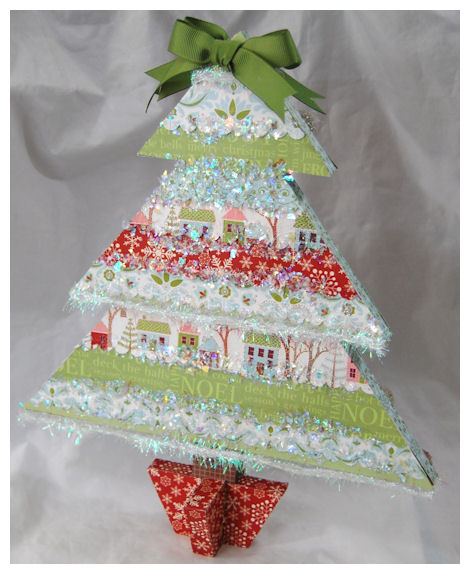
Now this is the back of the tree. You could decorate it the same as the front.
I felt that maybe whomever purchases it (it will be going in my Etsy shop soon) will be able to personalize it.
Well I want to thank Deb for having me as a guest! I enjoyed creating once again with my Say it with Letters shapes!
Well I have a long day ahead of me.
Hug your loved ones and don’t wait for the holidays to get together with friends, family and others you love. Try to reach out and donate your time to a cause you belive in too! It will help someone else and make you feel amazing inside. Whatever is dear to your heart!
I could go on and on, but need to get a move on.
Thanks for stopping by
Lets Do Lunch
Nov 19, 2009 Author: mytime | Filed under: Home decor/3-D items, My Timeless Templates, Papertrey NewsletterHi everyone.
Well today will be a CRAZY running around day. I know many of you are wondering what is up with me these days. Well tonight at midnight (if you are up then) or tomorrow, I will explain myself. I have some changes that I made recently and it is time to inform you of those. With all those changes I’ve had to switch some of my focus. Trust me it will all make sense in a few hours.
So, for today I’m just popping in quick with a little eye candy, and to send you a link to a article that was written about the My Timeless Templates © Katie Berberich is a fellow stamper/crafter who works for the Craft Journal. She chose to review the My Timeless Templates for her debut!
Thanks so much Katie, and basically to every single person who has given them a try! I swear each month it just gets better and better!! This is my thanks to everyone for their support and sharing how much you too love these templates, with the world! Of course I love them, but when you read how much others do too I think you all believe it more! LOL!
So after receiving the link to that article I figured I better share a sample with you too!! An oldie but goodie……
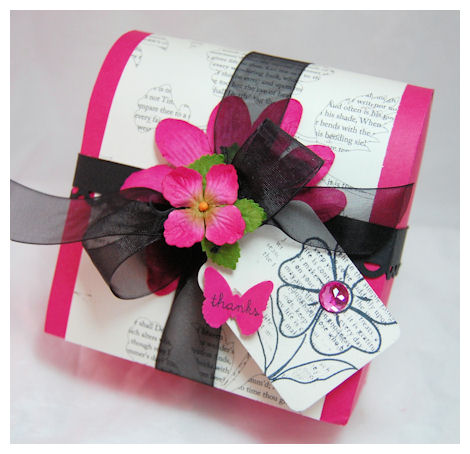
Now I decided I would revamp this template a bit! Many of you think SCHOOL when you see it! Ot that it HAS to have a handle!! But it doesn’t have to be that way. It can also be used for a elegant gift holder! How sweet would this look on a desk, holding some stationary? Maybe have some bath products?

I had this text within flowers paper (I believe it is by Making Memories) and I decided to create my own text within a flower. I used the Remember set and Background Basics Text Style for the tag
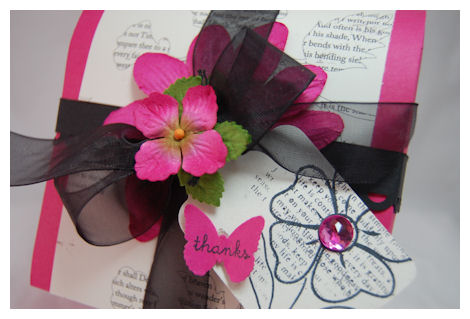
Some masking made it all possible. I love the look! VERY simple.
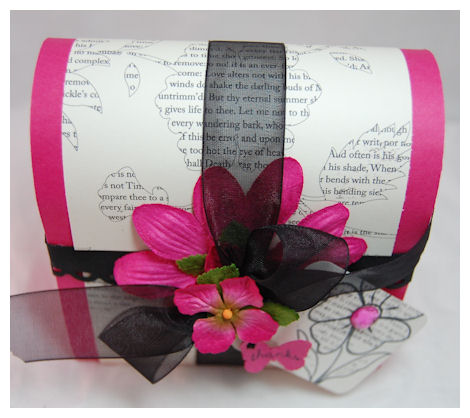
I then tied some ribbon around the top, and embellished with some Prima flowers.
I think it looks fabulous. Someone may not even care if there is anything inside! But all they have to do is slide off the bow (and then they can easily replace it) and open it up!
OK I must run!! I know I’m brief but I have a ton to do.
Thank you for stopping by. I hope you all visit me tomorrow for the news.
November Papertrey Ink Release
Nov 16, 2009 Author: mytime | Filed under: Cards, Home decor/3-D items, My Timeless Templates, Papertrey NewsletterSORRY! I know this is late.
As you all know I’ve been sick, so I really needed a quick break to rest up. It isn’t easy when you are sick SMACK in the middle of a big release!! There is NO time to rest when you have projects to create and share.
I’m still not 100% so won’t be too chatty I fear (maybe that is a GOOD thing! LOL!)
My projects are in my Papertrey Ink Gallery but many of you have asked when I’d post HERE!
You really didn’t miss too much since most of the peeks were revealed during the countdown.
BUT, I never like to disappoint 😀 So here are my Papertrey Ink Release projects for November, starting with the newest My Timeless Template © Time for Take Out
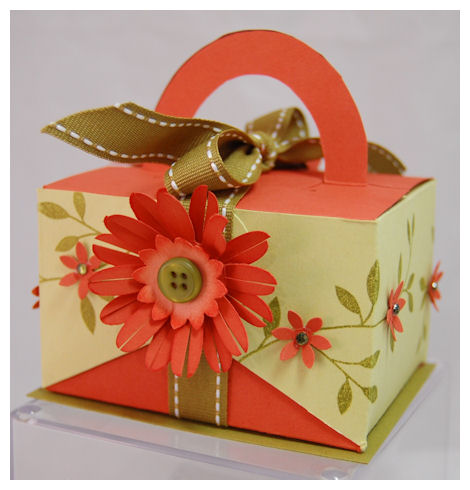
What can I say, I LOVE this template. REALLY love! If I wasn’t sick you’d see a million variations popping up, I swear.
I have to say Terracotta Tile is STUNNING!!!!!!!! Love the color.
I decorated both sides to be the same (of course!)
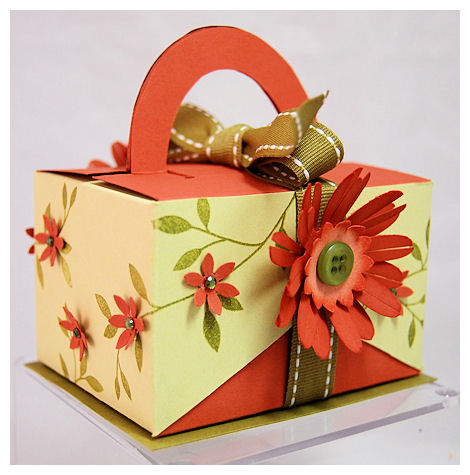
I just used the NEW! Turning a New Leaf, and some more punched paper flowers. I think it turned out quite eye catching, with little work, and very little time 😀 A great mass production project 😀

Then a EASY PEASY card to match!
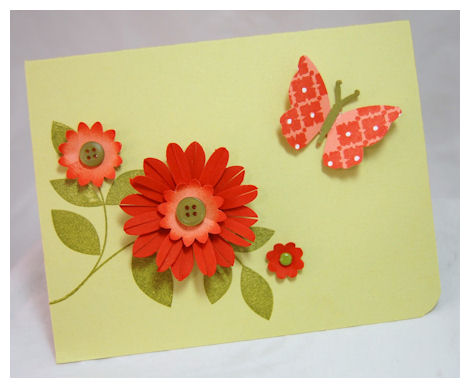
Supplies:
My Timeless Template: Time for Take Out
Stamps: Turning a New Leaf, background basics: diamonds
Cardstock: Spring Moss, Terracotta Tile, Ripe Avocado
Ink: Ripe Avocado
Ribbon: Ripe Avocado Stitched
Buttons
Flower punches, EK Success Bfly punch, adhesive rhinestones
Now the reason I have gotten SO many emails (awe! I love you all! You make my day :D)
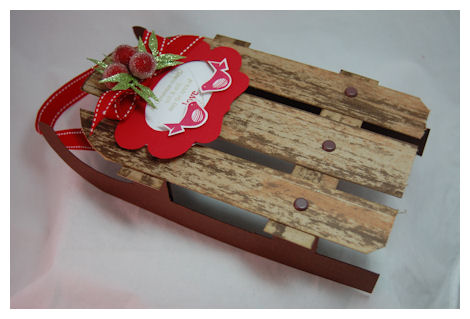
Hanging Sled of Love
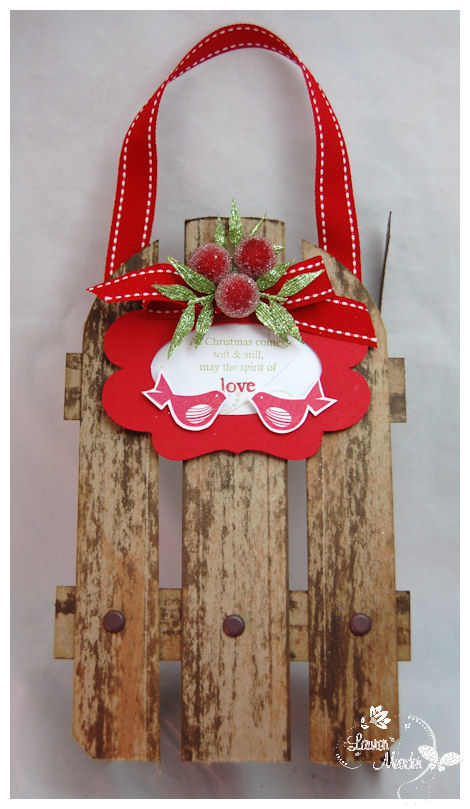
This actually hangs on a door or can be put on a table with some little gifts on top (how cute would that be?! ) A FAB centerpiece for sure. I always wanted a template like this 😀
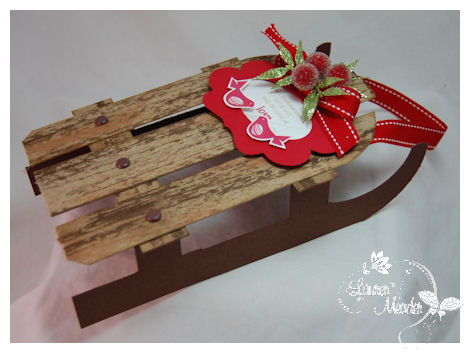
I hand made this sled (for my door this holiday!) out of chipboard that I distresses with tea dye ink! Its rather large too! About 8 inches long and 6 inches wide ( I THINK!) I made it some time ago and have had to wait to post it.
I*may* post it as a holiday freebie if I get some time this week 😀
Here is the tag detail
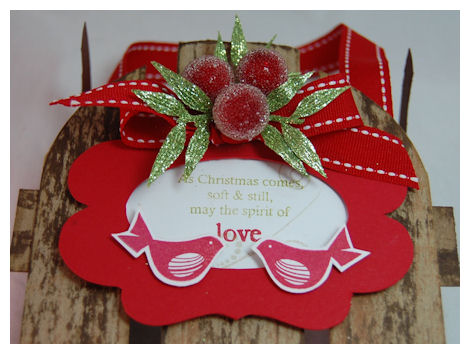
You cold even personalize it with the last name of your own family! Now that would look COOL!
Stamps: Christmas Friends, Snowflake Serenade, holiday tree
Cardstock: Kraft, dark chocolate,white, pure poppy
Ink: tea dye ink duo, spring moss, gold
Pure Poppy saddle stitched ribbon
label from Slice studio essentials cartridge, garland pieces
brown brads by SU!
Check back tomorrow morning, because I have a blog hop project for the NEW! JustRite Stampers release!
(told ya-busy! busy!)
#3 Communique Curves Inspirations and another template peek
Nov 11, 2009 Author: mytime | Filed under: Cards, Home decor/3-D items, My Timeless Templates, Papertrey NewsletterWell are you loving all the goodies this month?
I have been DROOLING reading about all your yummy treats you give around the holidays! I may have to hit some of you up for the recipes 😀 If you don’t mind 😀 The template winners will be posted tomorrow 😀
Well today we have a group post. This is the first set this year from Allie Miles. It is called Communique Curves & Sentiments. We were asked to take this set and show you two variations of the same card! So, basically create a holiday card, then an everyday type of card.
Here is my set: Happy Holidays Duo

I love how you can use the same layout, then by swapping out the images, and changing the colors, you get a totally fresh and new look! You really can get lots of mileage out of stamp sets when you have a few key layouts! Just keep re-using them, and changing different elements! This also shows you don’t need a ton of supplies to make great looking cards.
Here is Tis the Season
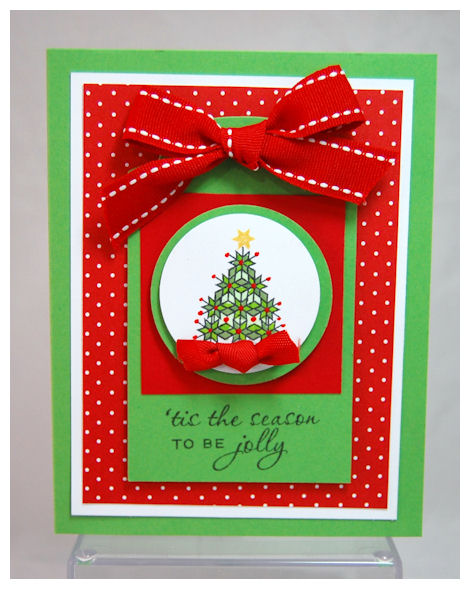
The main layer is a tag I cut. This is a very basic layout that can serve circle, heart, or rectangle image centers!
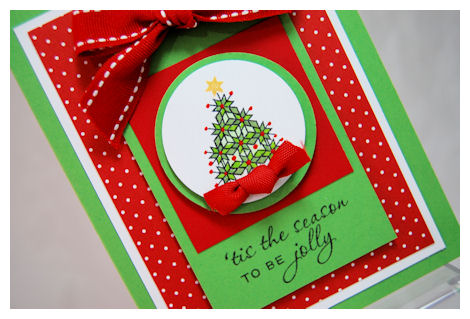
I used various copic markers in shades of green to color my snowflake style tree. Quick and cute!
Supplies:
Stamps: Communique curves & sentiments
Cardstock: New Leaf, Pure Poppy, White
Patterned Paper: Bitty Dots
Ink: Black & Copic
Ribbon: Pure Poppy twill & Saddle stitch
circle punches
Now keeping with similar elements, we move on to a birthday card.
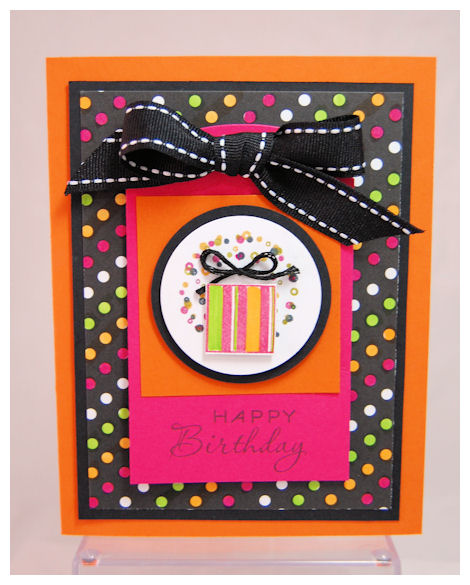
I colored my paper to match

Again dotted paper, tag center, everything exactly the same, except my image and colors.
Fun huh?
Supplies:
Stamps: Communique curves & sentiments
Cardstock: black, white, raspberry fizz, orange zest
Patterned Paper: Black & white basics
Ink: black, rspberry fizz, orange zest, avocado & copic markers
ribbon: stitched grosgrain
circle punches
Be sure to check out what the team has done:
Now I have another fun post to share!
How about another template peek?
This was a quickie. Sorry I’m going to be brief. I’ve been sick the last few days and the worst of it is really hitting me now. I feel like I have sinus infection. Not fun. OK enough about me and my drama-just note I typed this on lots of cold medicine so I apologize in advance if its a bit “all over”. I’m doing my best.
Happy Everything

Here we have another version (the standard size) with newest template (releasing on the 15th) Time for Take Out. I can’t tell you how fun this little box is! You may recall I used it for my daughter Amber’s birthday party —->HERE! I didn’t show any details yet, but I loved it and had to use it early! It can be hard sitting on some great template ideas for so long! Keep in mind I still have like 40 templates you have yet to see. So, when I need one and it fits, it can be hard not sharing what I made. I’m sure you can imagine being in a constant state of suspense. It gets exhausting! LOL!
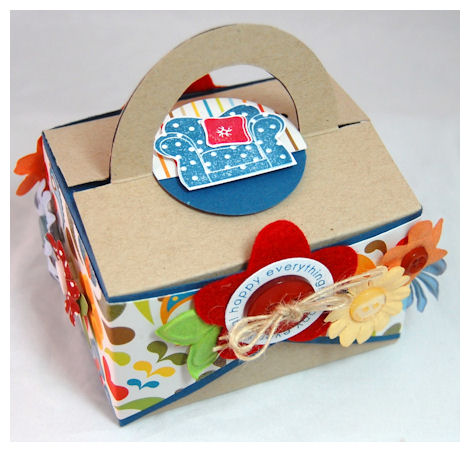
I so loved this patterned paper I had in my stash. The colors were SO cheery. So I went with that, for the sentiment “happy everything”.
I added some paper flowers, and buttons around the box. Both sides of this box are ALWAYS designed to look the same. Its just one of those templates that you should try to make pretty no matter WHAT way you turn it.
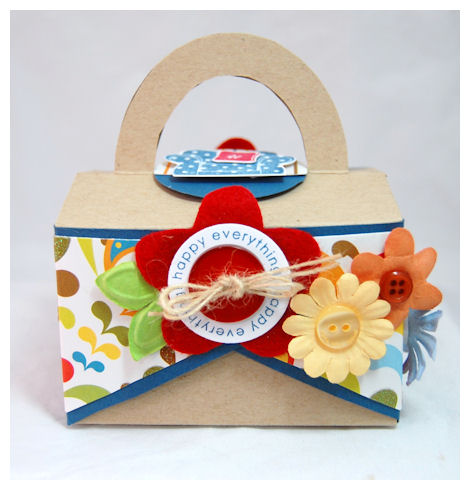
I was thinking cheer up, new apartment, everyday sort of gift box. Maybe put some treats in there, with a gift card or a gift of tea, maybe even candles, or tea lights…..warm slipper socks! I love those. Just a warm gesture of friendship.
Supplies:
My Timeless Template: Time for Takeout
Stamps: On my Couch, Around & About sent.
Cardstock: Kraft, White, Enchanted Evening
patterned paper unknown source
Ink: Enchanted evening, pure poppy
buttons
Prima flowers
Well, tomorrow is our BIG group post using the stamp/template combo Home Made © ! You won’t want to miss that. Plus the template winners will be announced.
Thank you all for stopping by and sharing my excitement. You all make every moment I spend sharing here so enjoyable. I cannot tell you how amazing it feels. I always enjoy reading your comments, emails and when you share your creations with me as well!
Thank you again!
Just like home….giveaway
Nov 10, 2009 Author: mytime | Filed under: Home decor/3-D items, My Timeless Templates, Papertrey NewsletterI’m so excited for todays post I could do a cartwheel (if I could actually do one I would! LOL!) My cheerleader days are LONG gone. I’m certain I’d pull something vital if I attempted it. I have waited for this particular template for what seems like an eternity.
It is now day #2 of the Papertrey Ink peeks and that means I get to share ANOTHER peek at the NEWEST My Timeless Template © with you all!
PLEASE NOTE TEMPLATE IS NOT AVAILABLE UNTIL THE 15th!!
New Home
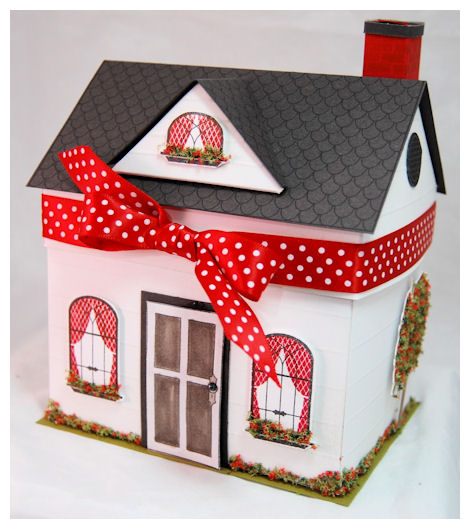
As I said before this template is called Home Made ©, the reasons are obvious. This template is one of the most difficult I have ever created! Angles! Angles!! Angles!!!
The challenge was to get what was in my head, translated to cardstock! Not always easy. Then the bigger challenge, make it EASY for you all to put together. I have to say I think this was BEYOND successful!! I’m so proud of the end result:D I really cannot wait to see the world start making their own Home Made © creations!
This has a coordinating stamp set as well. Now I can’t get into FULL details, since we are having a Group Post day on the 13th, so bear with me. I’m sure you can VISUALIZE it (wink)
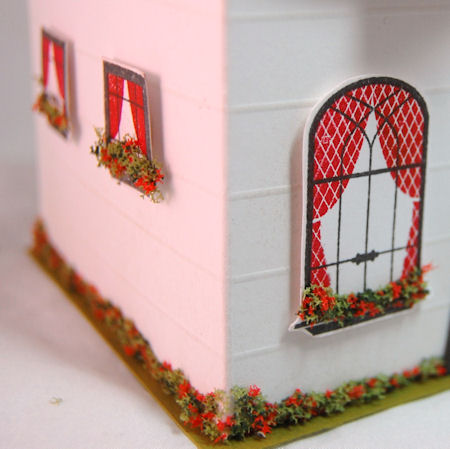
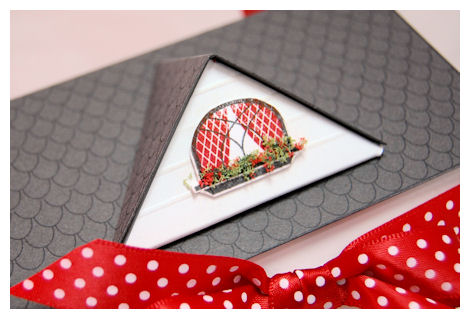
Note: my windows are on dimensionals. I love POP. You could stamp direct on template too 😀 OK zipping lips.
Since I’m not really suppose to be gushing about this too much just yet 😀 You can just imagine the possibilities, I’m sure!
Now you may be wonderin what the red & green stuff is. Its called Flower Soft. I used glue to adhere it. I felt it looked like grass and flowers 😀
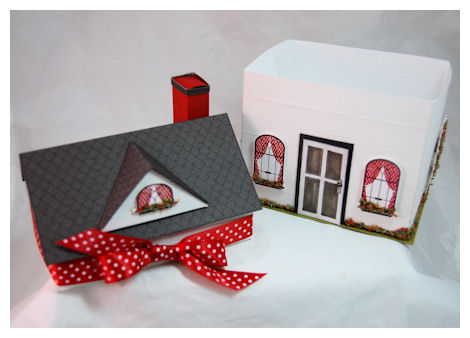
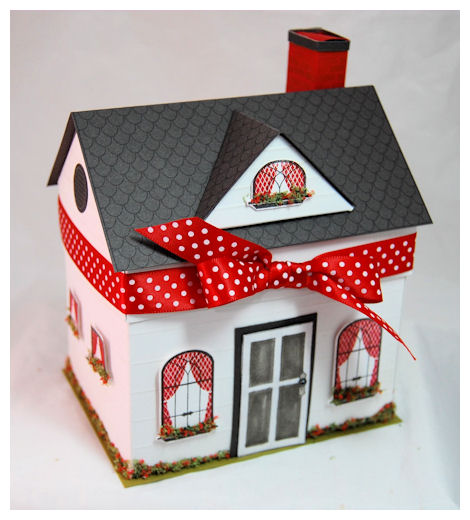
Here is the roof off. Trust me when I say this is a sturdy gift box! You will be in HEAVEN!
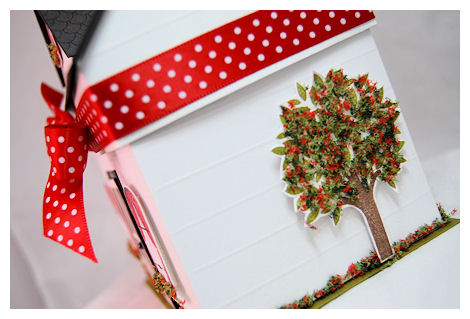
You can also use images from previous sets to decorate your house!
See this tree. It is from Father Know’s Best! Perfect accent to my house!

I can tell you it is a VERY nice sized box for lots of treats! You can put home made treatlets, candles, housewarming gifts, plants, candy, maybe use it as a recipe box, or even a rolodex for names, addresses and phone numbers. Give it to a teacher for their contact info……oh boy! I could go on and on!
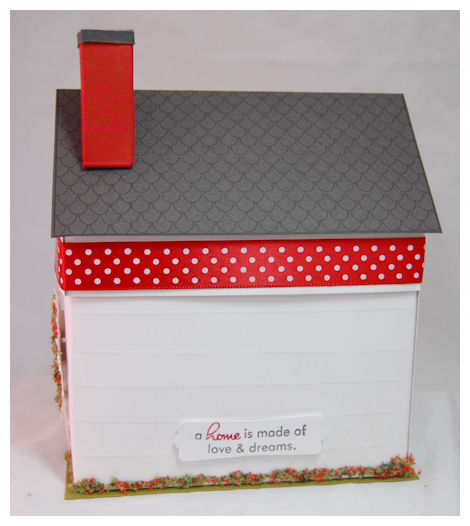
In case you are wondering……I used my Scor-Pal to create the “beams” on my template 😀
Supplies:
My Timeless Template: Home Made
Stamps: Home Made, Father Knows Best, Boards & Beams
Cardstock: White, Smokey Shadow, Pure Poppy
Ink: Black, Pure Poppy, Ripe avocado, dark chocolate
Ribbon: Pure Poppy polka dot
Flower Soft, glue
Well I’m just DYING to know what you think? Are you ready to start making your own
Wait until you see my other samples with the additional elements this has!
So now all you have to do is leave a comment for YOUR chance to win this template on the 15th!
Winners for BOTH templates (leave a comment in previous post for chance to win Time for Take Out) will be posted on the 13th!
In the meantime, for more creative clicks check out Nichole’s Blog, as well as Heather.
More clicks: Check out Allie (who has her first set of the season!), Tiffany, and Dawn!
OK I look forward to your thoughts, and I’ll see you back here tomorrow for MORE peeks!
My Etsy

Who I Designed For
Blogroll
- Alicia
- Alli Miles
- Ally Blankenship
- Amber
- Andi @ crafts on a whim
- Angel R
- Angie Z
- Anne Kranitz
- Becky O
- Bee
- Beth Silaka
- Bethany Paull
- Beverly Nash
- Bobbie
- Cambria
- Cammie
- Card of the Week
- Card Positioning System (CPS)
- Cards for Cancer
- Catherine Doucette
- Charmaine
- Cheryl Sims
- Chriss Rollins
- Christina
- Christine Ewing
- Christine Wooden
- Colleen Schaan
- Craft Critique
- Craft Gossip
- Crystal
- Dawn Easton
- Emily Giovanni
- Geny
- Holly
- Igne Groot
- Inspirational Craft Blogs
- Irene
- Jami Sibley
- Jeanne Streiff
- Jen del Muro
- Jeni Bond
- JenMarie
- Jenn Balcer
- Jenn Diercks
- Jenn O
- Jennifer E
- Jennifer Mick
- Jennifer Pereda
- Jennifer-Sweet Treat
- Joanne Basile
- Jodi Collins
- Julia Stainton
- Julie Masse
- Karen
- Kathryn Berthiaume
- Katie Cotton
- Kelley Holland
- Kendra
- Kim Scholfield
- Kris’s Color Stripes! Get inspired here
- Kristen Dubosque
- Kristin Eberline
- Kristine
- Laura @ Sunshine Stamper
- Laura Turnmire
- Laurie Schmidlin
- Lesa Rapp
- Linda Duke
- Linda-LSN
- Lindsey Botkin
- Lisa (lakind scs)
- Lisa Kind
- Lori Craig
- Maggie
- Mara Campbell
- Maria
- Maria Levine
- Mary
- MaryJo
- Melanie M
- Monique Hansen
- Moxie Fab World
- Pam Imholz
- PaperCrafts Connection
- Peppers and Pollywogs Kids party site
- Rebecca Grohall
- Rita
- Robyn
- Rose Ann
- Sarah Vrolyk
- Sharon Harnist
- Sharon Johnson
- Sharon Rivera (a chemisrty with paper)
- Sherrie
- Sophia Landry
- Storage Units, Ink, & More Blog
- Sue Berker
- Susan (Rainy)
- Tangii Crane
- Tracy
- Tricia Traxler
- Trudee
- Velta
- VivLyn
- Zena
MTME Pretty Palette Color Team
MTME Pretty Patterns Sketch Team
My Time Made Easy TM LLC
Shop till you drop!
Lauren Meader
About Me
Copyrighted material
Subscribe To My Blog
Pages
- About me
- Alexa’s Story!
- My Crafty Corner!
- My Time Made Easy™ LLC
- Our Make A Wish Trip to Disney!
- Resume/Publication List
Calendar
| M | T | W | T | F | S | S |
|---|---|---|---|---|---|---|
| 1 | 2 | 3 | 4 | 5 | ||
| 6 | 7 | 8 | 9 | 10 | 11 | 12 |
| 13 | 14 | 15 | 16 | 17 | 18 | 19 |
| 20 | 21 | 22 | 23 | 24 | 25 | 26 |
| 27 | 28 | 29 | 30 | 31 | ||
Archives
- August 2013
- July 2013
- June 2013
- May 2013
- April 2013
- March 2013
- February 2013
- January 2013
- December 2012
- November 2012
- October 2012
- September 2012
- August 2012
- July 2012
- June 2012
- May 2012
- April 2012
- March 2012
- February 2012
- January 2012
- December 2011
- November 2011
- October 2011
- September 2011
- August 2011
- July 2011
- June 2011
- May 2011
- April 2011
- March 2011
- February 2011
- January 2011
- December 2010
- November 2010
- October 2010
- September 2010
- August 2010
- July 2010
- June 2010
- May 2010
- April 2010
- March 2010
- February 2010
- January 2010
- December 2009
- November 2009
- October 2009
- September 2009
- August 2009
- July 2009
- June 2009
- May 2009
- April 2009
- March 2009
- February 2009
- January 2009
- December 2008
- November 2008
- October 2008
- September 2008
- August 2008
- July 2008
- June 2008
- May 2008
- April 2008
- March 2008
- February 2008
- January 2008
- December 2007
- November 2007
- October 2007
- September 2007
- August 2007
- July 2007
- June 2007
- May 2007
- April 2007
- March 2007
- January 2007
Categories
- About Me
- All That Scraps
- blogger challenge
- camera/photo play
- Cards
- Contests
- family stuff
- FOR SALE
- Home decor/3-D items
- How to FAKE it!
- Introduction
- JUGS Challenge
- JustRite Stampers
- Lizzie Anne Designs
- My family stuff
- My Stamping Space
- My Time Made Easy
- My Time To Color Challenge
- My Time to Create Challenge
- My Timeless Template Challenge
- My Timeless Templates
- Mytime Mail
- MYTIME MOVIE/VIDEOs
- Papertrey Newsletter
- Pink Cat Studio
- Pretty Palette Challenge
- Pretty Patterns Sketch
- Product Opinions and Must haves
- Recipe's
- Saturday Sketch
- Smilebox Creations
- Stampavie
- Tutorials
- Uncategorized
- videos
Most Popular
- Create your own Onesie Card Tutorial-and important NOTE! PLEASE READ (2529)
- Saturday Sketch-Boxed bag holder (2333)
- Going GREEN! Fancy Flower Flourish-Closure Video (1478)
- Fabulous Favorite - Giveaway! (1336)
- a Prayer Request (1232)
- QUICK-Easter Baskets from Nestabilities-PTI style-and blog challenge (1063)
- Teaser Sketch (999)
- February Release Giveway! (and a little peek) (996)
- Group Post and Rambling Rose Video Tutorial (985)
- GIVEAWAY! Who wants it all?! (895)
Recent Comments (RSS)
- Daya Sons: Daya Sons, a renowned manufacturer
- 첫충사이트: 완전히 흥미로운 블로그 게시입니다. 저는
- sarah: Wow, Lauren, what a stunning
- hedie: خرید راهبند
- 야동: Love to read it,Waiting For
- 야동: This seller is in a
- 바카라사이트: 여기 처음 왔어요. 나는이 게시판을
- 야동티비: I was surfing the Internet
- 바카라사이트: 비슷한 주제에 대한 흥미로운 정보를
- 바카라사이트: "여기에 제공해 주신 귀중한 정보와
Copyright © 2007 - My Time, My Creations, My Stampendence - is proudly powered by WordPress
This blog has been Tweaked and Designed by Sara Williams