Archive for the ‘Home decor/3-D items’ Category
#2 -My Timeless Template Peek-It’s on the House
Sep 10, 2009 Author: mytime | Filed under: Home decor/3-D items, My Timeless Templates, Papertrey NewsletterWell we are on day 2 of the Papertrey Ink Countdown!
That means I will share the 2nd template for this month’s release!
I could do a cartwheel right now.
I have to say I am completely OVER THE MOON for this project 😀 as it takes the template name quite literal!
Now keep in mind this can be made into MANY fab “general use” gift boxes, but I HAD to make the sample I did.
The next My Timeless Template is called ……..
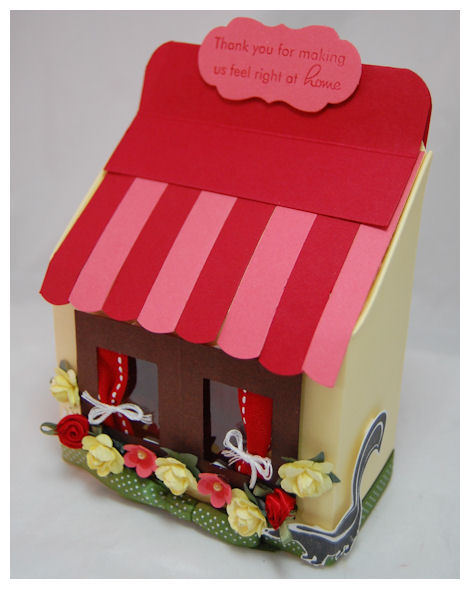
It’s on the House © (release is September 15th!)
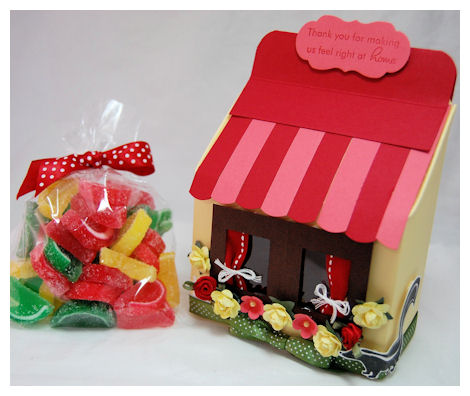
Given it’s name, I couldn’t resist decorating *just* like one!
About It’s on the House
I just cut scallop strips to add to the front of the box design, as my “awning”.
This cute little template is SURE to hit a home run with everyone!
It received the name because of its shape! It looks like half of a house.
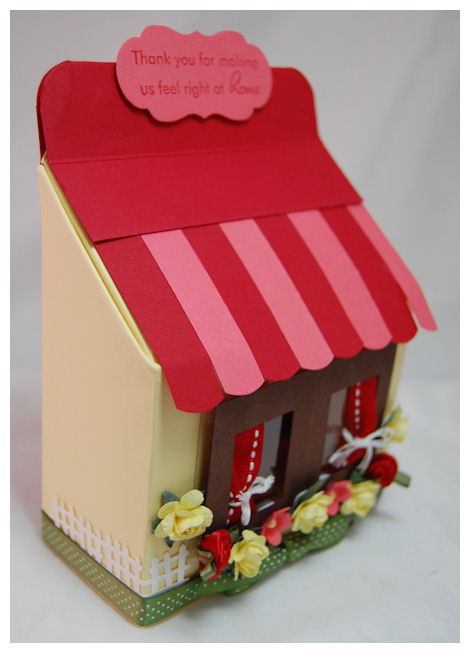
This is the side view. I have to say that I love the punched fence going around the house box 😀 The tied ribbon being the “grass”, and the overall easy “house” I was able to create in minutes.
Obviously i could NOT resist the play on words!
Now you can totally run with that idea, and decorate it just like a house front, as I have here, or just have fun playing with this fun shaped box, which has a fun folded flap closure.
TRUST ME-if all you can see this template for is a “house” I will share with you this week the MANY other design possibilities this really has.
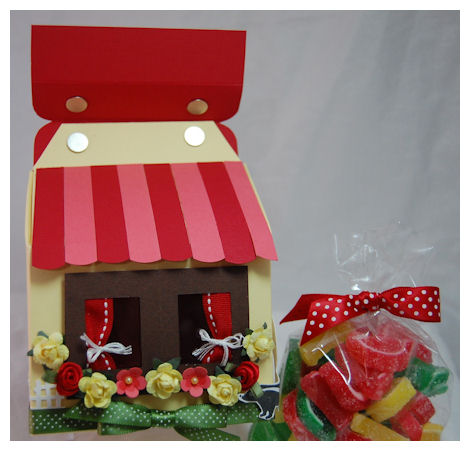 As you can see the top flap folds down. I used magnetic closures on this one. This template holds this yummy bag of sugared jelly fruit candy. Matching colors I might add 😀
This template goes together easily, and has unlimited possibilities! You can package so many amazing things in this one, and the design options are endless.
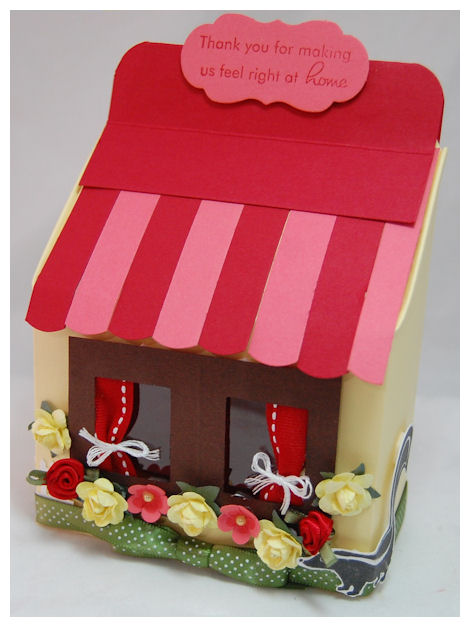
Now check out the close up

See the fruit candy IN the window?
What do you think of that UBER cute skunk sniffing the flowers?!
OH! and LOOK! Curtains made from ribbon 😀 My FAVORITE detail yet.
Can it get any cuter or easier? Seriously this box took about 40 minutes to make, and that is ONLY because I had no idea WHAT I was going to do and HOW to execute it. Now you can see my version, so it could go MUCH quicker for you 😀
You can cut a variety of windows into the box bottom, or just decorate the front. NO! I don’t mean HOUSE windows either! I just mean regular cut outs if you like 😀
Add to the design by punching a variety or borders along the top, tie it closed with ribbon….you get the idea!
No matter who’s home this goes to, it will be adored!
I cannot wait to show you the other projects I have using this template. You are sure to get inspired, and will want one for yourself! You may get sick of seeing me use it even! I have already made so much with it 😀
Supplies:
My Timeless Template: It’s on the House
Stamps: Boards and Beams, Forest Friends
Cardstock: Lemon Tart, Dark Chocolate, Clearly Creative (for windows), Berry Sorbet, Pure Poppy
Ink: Black, Pure Poppy
Ribbon: Pure Poppy Stitched, bitty dots new leaf, white embroidery floss
Other: flower punch, mini flowers by Prima, ribbon flowers, adhesive pearls, basic grey magnets
Label by SU!, corner rounder, fence border punch by Martha Stewart
Now if you want to see more with this template hop over to Kelly Lunceford- Template Team, and our Template Guest Designer Alyssa!
Obviously you will want to check out Nicholes samples today!! Also sharing is Melissa, Beth Silaika and Dawn McVey.
Thank you all for stopping by and sharing your feedback! I so enjoy reading your comments and emails! I cannot tell you how much I truly enjoy sharing all this with you, and my excitement each month! Especially when you share YOUR projects with me 😀
So thank you to each and every one of you, reading this, for popping by 😀
#1 Papertrey Ink Peek-My Timeless Template & Peaceful Poinsettia -VIDEO
Sep 9, 2009 Author: mytime | Filed under: Cards, Home decor/3-D items, My Timeless Templates, MYTIME MOVIE/VIDEOs, Papertrey Newsletter, TutorialsIt’s the 10th!! I think by now you know what that means here on my blog!
The FIRST of MANY peeks and ideas for the Papertrey Ink Release Countdown 😀 and peeks of my 2 newest My Timeless Templates ©
I cannot tell you how excited I get every month. Granted the first week of the month I’m working like a MAD woman, HOPING to inspire you with some great ideas to get you jump started. It’s ALWAYS nerve wracking as I try to top my last months projects. Fingers crossed 😀
I will say you all help me strive to better my best 😀 I LOVE a challenge, and thrive on being busy. I feel like the busier I am, the more creative I get. It’s weird. I don’t know what to do when I’m NOT running around. I can’t handle QUIET. Thank goodness because my life has always been full of everything BUT that!
OK I know you are TOTALLY over my blabbering on, so I’m going to just get to it OK!
PLEASE NOTE: Release of stamp set and My Timeless Template is September 15th!
Supplies listed/linked at post bottom 😀
I’m happy to share that my design with this template is a peek of a New! stamp set Peaceful Poinsettia by
Melissa Bickford . Check her BLOG for more samples with this set.
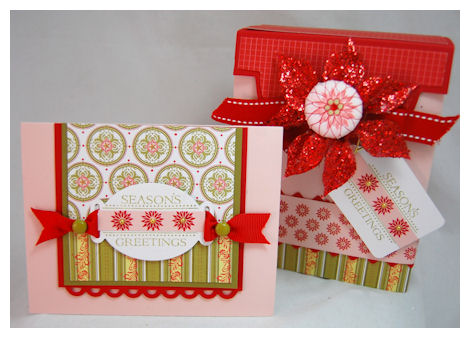
Season’s Greetings Set
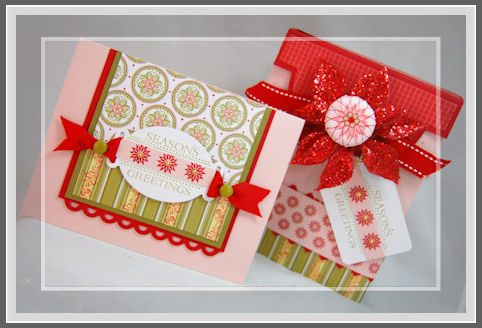
I love matchy matchy gift sets, and this one is so prefect for the holidays!
I love Sweet Blush, Pure Poppy, Spring Moss, and Ripe Avocado for holiday gifts!
This set is just so pretty, and the best part-EASY to work with!!!! I just adore Melissa’s sets to pieces. and her style is so ME! Oh, and I’m sure so YOU too!
Here is the card

I used the tag image from the set to create 2 different tags-one on my card, the other on the box.
While using the tag I stamped my sentiment in Ripe Avocado, and then the poinsettias (they are a separate stamp trio :D)in pure poppy ink, on my sweet blush strip, adding gold adhesive pearls to their centers! A very easy way to add to the POP of the tag .
I also used the border image along my template, in which I dotted my border flowers centers with a gold pen.
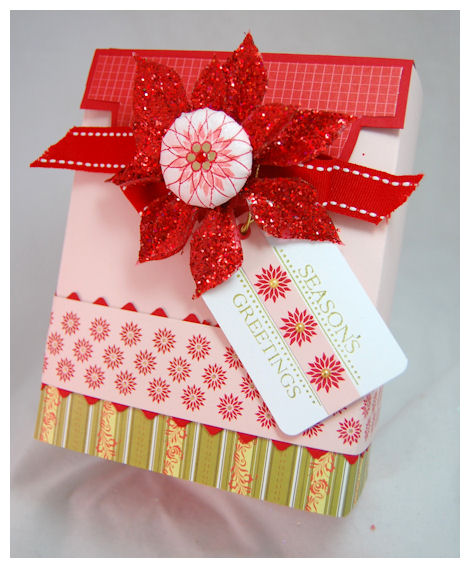
The large layering poinsettia flower was used to make my very own brad embellishment for the center of my Poinsettia flower on my gift box!
More on that…keep reading!
So this month’s My Timeless Template is named: Keeping Tabs ©
We have the standard size, and will also offer the Pretty Petite version as well!!
Today’s peek shares the standard size version.
About Keeping Tabs ©
I am always looking for really neat ways to “un-wrap” or reveal what is inside a gift I package. When it does reveal your gift in a fun way, it makes it so much fun!
This amazing box is held closed on the side, by inserting 2 tabs into the back. You cannot even see them! They just tuck right in there, effortlessly!
(That is how this template received its name)
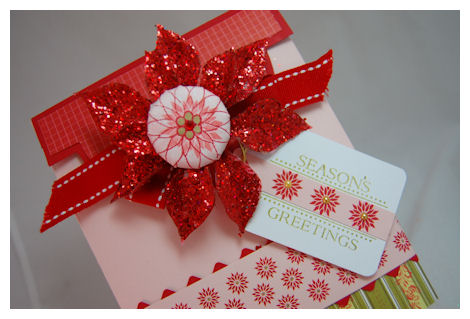
Now to add even more detail, it is tied closed (that is of course optional) with some of that stunning ribbon, we all tend to hoard! Making this so pretty couldn’t get any easier.
Now I am SURE you want to know HOW I made that stunning brad in the center of my sparkly poinsettia flower, so here is a Video on that
Isn’t that the COOLEST tool ever?
I love the I Top! You can find it –> HERE!
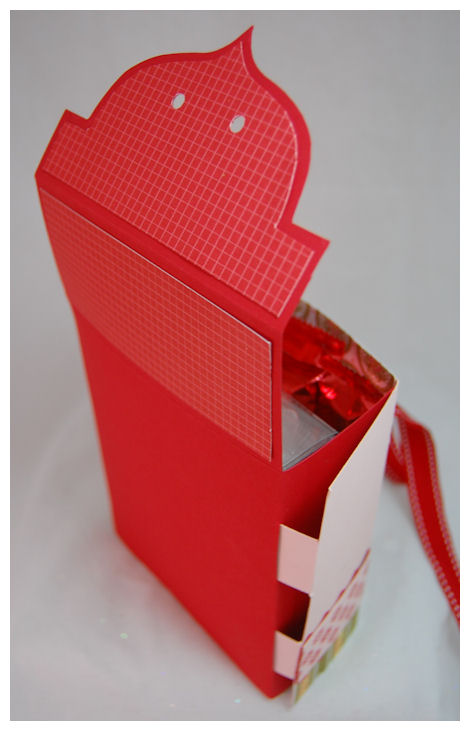
Now opening our template……
Untie the ribbon
Lift the lid
and…….
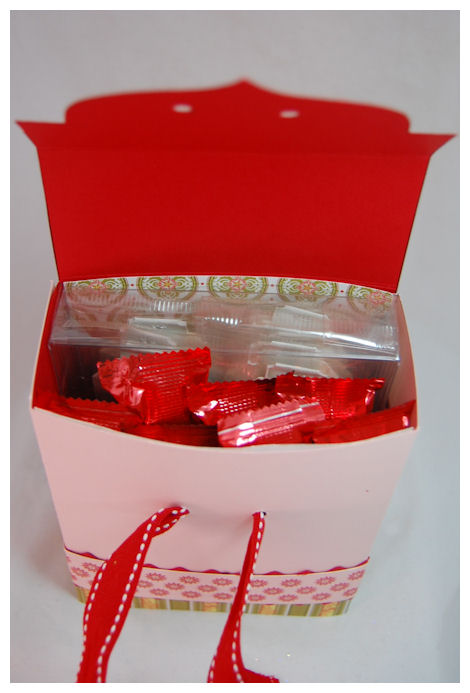
Look how much this can hold!!
Its FULL of fun, and yum!
Once unfolded. the template has 2 pretty pockets, that are a very nice size.
The front flap design, as well as the 2 pockets inside, have killer curves, that once again add to the WOW! factor.
One other GREAT detail-you cannot see any of this “messy” stuff when this box is complete.
Like all the My Timeless Templates ©, this one was made so you can EASILY assemble it!
As a card maker, we can never have too many ways to package our precious paper masterpieces! I am happy to announce that this is another great take on card packaging!!
The standard Keeping Tabs © template can hold your standard A2 cards and envelopes. It is also perfect for MANY other gift ideas!
The Pretty Petite version is perfect for our 3×3 envelopes and cards/tags, or many other fun size treats! More on that to come 😀
Now don’t get stuck thinking it is ONLY good for cards! You can package so many different items in here. This template will leave you wondering what you can Keep Tabs on next.
So to show you something besides card packaging I thought I’d make a nice gift set for a Party Hostess or someone special! Maybe even a Yankee Swap?
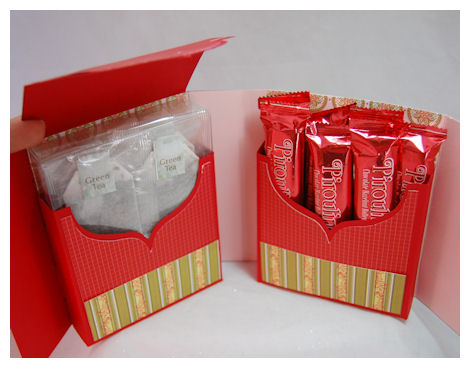
So, all opened up…..
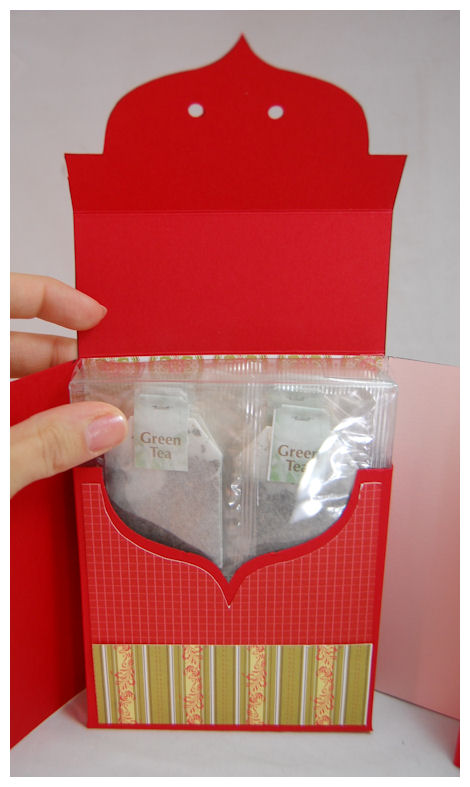
We have tea!
Yes! You are seeing correctly.
Our Clearly Creative Card Boxes fit IN this one ![]() Can you imagine the FAB wraps you can now make JUST using the pockets of this template, for your card boxes, or other items you like to stuff in them…..like my packages of Green Tea
Can you imagine the FAB wraps you can now make JUST using the pockets of this template, for your card boxes, or other items you like to stuff in them…..like my packages of Green Tea ![]()
Our decorative mat layer helps you make a perfect and professional cut, every time!
Now in the other pocket (on the right), one of my FAVE treats
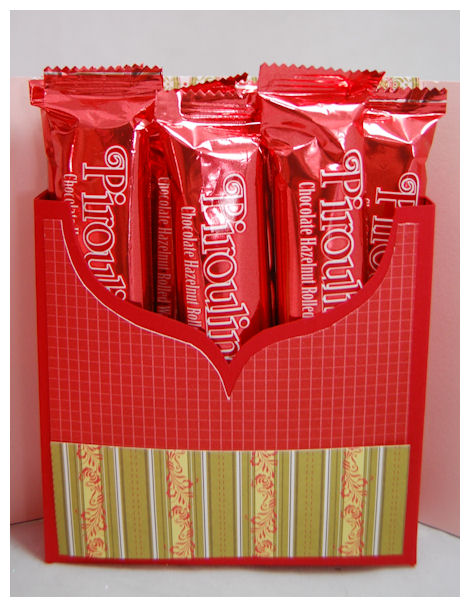
Pirouline Cookie Duo Packs! Each package has 2 cookie stix at 100 calories total 😀 YUM!!
So once your template is filled, you just wrap it all up, and you are off and running!
Its a great holder for SOOOOO many things.
Well, what do you think? I would love to hear your feedback 😀
Supplies:
My Timeless Template © Keeping Tabs
Stamps: Peaceful Poinsettia
Cardstock: White, Sweet Blush, Pure Poppy, Ripe Avocado
Patterned paper: Holiday Vintage Prints, Bitty Box Basics
Ink: Sweet Blush. Berry Sorbet,Pure Poppy, Ripe Avocado
Ribbon: Pure Poppy stitched & twill
Tools: I Topp tool, brads, punch, tag punch by Marvy
Nestability: Ribbon Tags Trio Two
Apron border punch, pinking border by EK Success
Other: Glittery poinsettia from Michaels, Brads by SEi, Adhesive Pearls by Hero Arts, Clearly Creative Card box
I hope you like what I had to share so far! There is so much more to come 😀 I have had ideas flowing like crazy!!
Now if you want to see more with this template hop over to Kelly Lunceford- Template Team
Don’t miss Nicholes samples today!! She always WOWS us! Oh! and Beth Silaika releases her FIRST set with Papertrey Ink this month! Also hop over Dawn McVey’s blog, as she peeks her set too!
So that is all for today. Tomorrow I will share an AMAZING sample with my other My Timeless Template © got this month, so stay tuned.
ATS Newsletter Project: Faux Painted Bottle
Sep 8, 2009 Author: mytime | Filed under: All That Scraps, Home decor/3-D itemsHi everyone 😀
Do you get the Newsletter from All That Scraps?
It’s a free weekly email where each design team member takes a turn to feature a project, product focus or technique each week. This week was my turn! Actually my first newsletter for ATS!
I have to say I was totally OVER THE MOON for my project 😀 I hope you like it too!
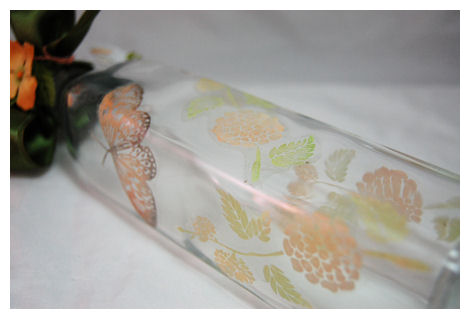
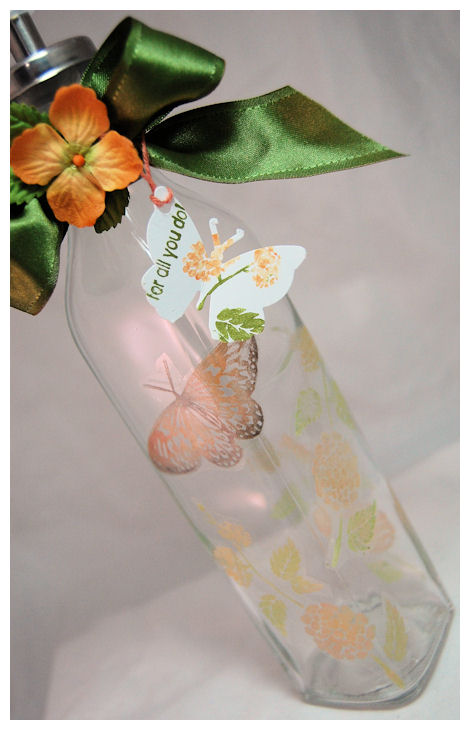
I like to call it Faux Painted Glass
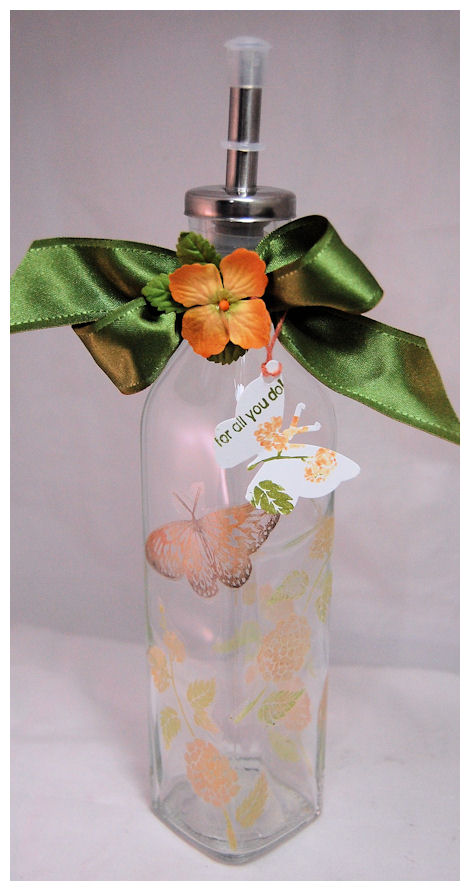
I have always LOVED the painted glass items I see in stores. They often are expensive, and aren’t always in designs that I would choose to put in my home, or give as a gift. Given the fact I personally cannot even draw a stick figure, I cannot even attempt to paint my own! Another great reason “I” am a stamper.
I have also attempted to stamp on glass. Have you?
While I have been successful, it is time consuming, and when you have uneven glass, or rounded edges, it borders impossible at times. For anything uneven the image won’t appear, and with the glass being slippery, you can easily smudge if you are new to this method of stamping, leaving MOST people too frustrated to attempt it again.
Well, when I saw the Grafix Rub Ons in the store I thought that MAYBE that was my solution to the LOOK of painted glass, that I could actually EASILY customize!
I was right! The Grafix Rub Ons worked like a charm!
I just followed the instructions that come with the product, and in MINUTES I had my beautiful glass Olive Oil jar! There is also a link on the product to view a video on HOW TO, but I didn’t need it.
I will fill my bottle with something else, like bath oil or something…….not sure.
Now instead of colored ink I used a juicy white StazOn ink pad, then carefully brushed on my shimmery pastels for the colors you see. The Poppin Acetate Technique can be seen —-> HERE <—- and/or —> HERE <—
This gave my finished project a little shimmer 😀
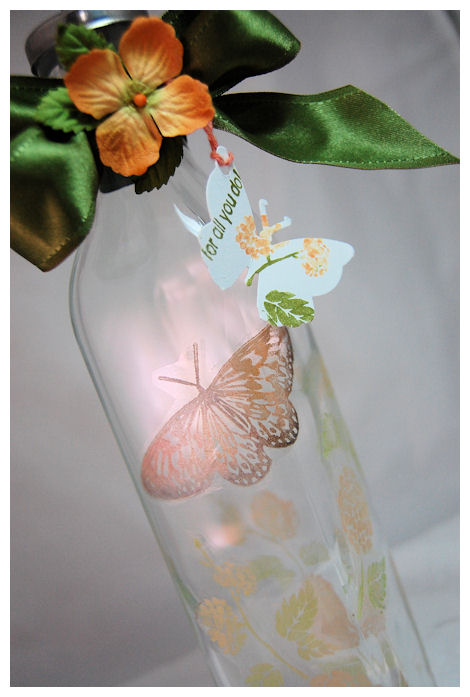
Stamped, and punched my tag, and was done!
Supplies:
Stamps:
Fresh Flowers by AmyRButterflies by AmyR
Thank You Sentiments by AmyR
Grafix Rub Ons
Pebbles Pearlescent pastels
White StazOn
May Arts Satin Ribbon
Prima Flowers
Butterfly Punch by EK Success
Glass Olive oil bottle from craft store $2
What do you think??
Not too bad for a couple bucks!
The image that is stamped ends up being against the glass, so you don’t have to worry about the shimmery pastels coming off! Obviously you wouldn’t soak or SCRUB this bottle, like anything with a rub-on. Just hand clean and gently dry the outside.
You can also stamp in colored permanent ink like Pallette inks, or you can stamp and color them with Copic’s or other permanent markers.
I want to also remind you that you will end up with a mirror image! So NO WORDS! Unless you print them from the printer-backwards!
There are SOOOOOO many possibilities! I have a special project using Rub Ons in a super cool way, for a FAB gift-but for that you have to wait till the 25th! SORRY :C
Hope you get to give it a try!
See you back here tomorrow!
Witch Way and Pumpkin patch
Sep 7, 2009 Author: mytime | Filed under: All That Scraps, Home decor/3-D items, JustRite Stampers, My Timeless TemplatesOK I gotta make it quick today 😀 Lots to do on the last day of a LONG weekend
Tonight is the official release for C.C. Designs!! Stamps go LIVE 10pm EST!
Winner of the HOP to be announced SOON!
How did you all like the hop? Was it fun? Lots of eye candy to go around.
Well now that you all got to hop along and see what the entire team created with the Fall Kit, and now I have 2 more samples to share with you 😀 (Boy I was a creating machine huh?! LOL!)
First up
Pretty Petal Pumkin Patch
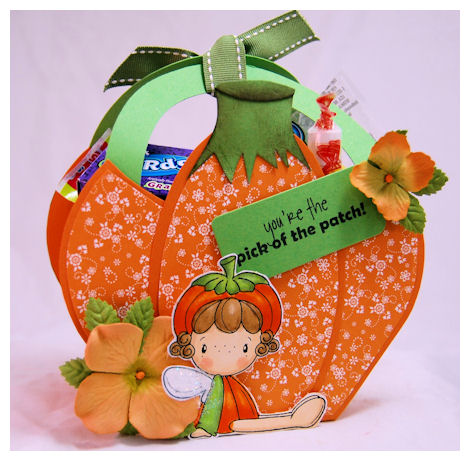
How cute is this?!
The My Timeless Template: Pretty Petal Pocket © makes THE perfect pumpkin!!
I know many people have already discovered that 😀 How cute would this be for classmates to use as a Trick or Treat holder, OR give to the teacher?!
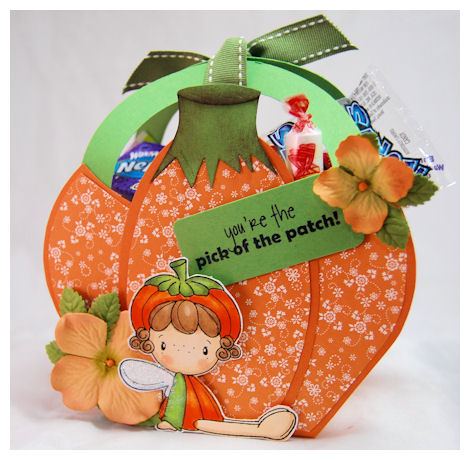
This image is Pixie Pippi (releasing tonight)
I have been sitting on this sample for about a month or so!!! Its so hard to have to wait to share stuff sometimes! I filled it up with a grab bag of candy! WOW! This template holds MORE than enough for all the “little” people to eat! They truly don’t need more than that!
I hand cut the stem and layered on some OLD SU! patterned paper. Made my pumpkin easy peasy.
The sentiment on the tag is AmyR’s Spooky Sentiments. Again perfect for the gift!
Now I have ONE more……
Witch Way to the Treat!
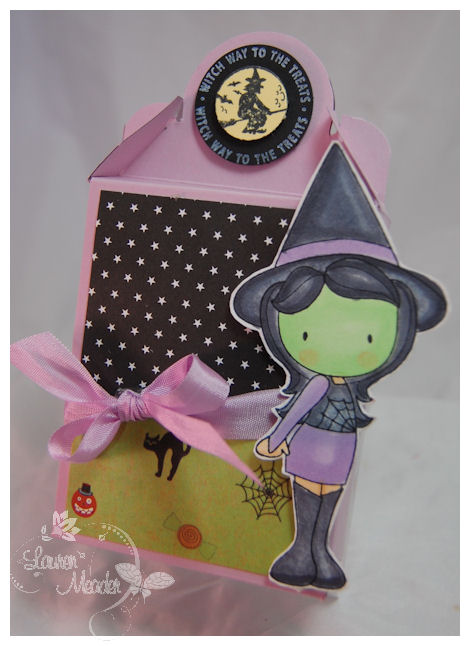
This one used the Witch from the Fall Kit 😀
I LOVED the sentiment from JustRite Stampers:Witch Way to the Treats Centers & Borders Round 1-3/16”
This template was the Pretty Petite version of the Fold n ‘Go! A great one for making a bunch of homemade treat holders 😀
OK that does it for me.
Stay tuned because I have a month full of gift-giving inspiration to come!
Super DEAL on SCAL and some new release peeks :D
Sep 1, 2009 Author: mytime | Filed under: All That Scraps, Cards, Home decor/3-D items, UncategorizedWell I just have to start today by saying a HUGE thank you to each of you who have helped me with links and advice on my NEW! Cricut Expression! YOU ROCK!
While it sits in the box (I simply CAN’T open it until I get my WORK done!) I have LOTS to review now 😀 thanks to you all.
I have a HUGE list of TO Buys! LOL! Thanks to all the wonderful suggestions you made (and what can I say I’m EASY to persuade!). I will keep you posted.
So far I got the Design Studio and Juke Box (both on sale)
I purchased Sure Cuts A Lot 2.o (since you all said I NEED it :D) and GUESS WHAT! Canda of Canda Craft (where I found the SCAL 2.0 for the CHEAPEST price around WOOT! WOOT!) not only has it on SALE! , but emailed me after I placed my order, to tell me that YOU, my PRECIOUS, much loved and HELPFUL readers will get an ADDITIONAL 10% off!
NOTE: LINKS NOW FIXED! SORRY!
The code is: MYTIME10.
This offer will expire on 10/15/09.
The coupon will take 10% off of their entire purchase which will make SCAL even cheaper!
So seriously how cool is that? Those of you on the fence can now jump off!
Let me know if you took the plunge with me 😀 OK!
Obviously I’ll keep you posted on my success once I get past the next 3 weeks of work stuff. (NO my Cricut won’t be in the box all that time :D) I know once I get going, everything else will fall apart till I had my FUN FILL.
OK on to business people!
Now I have the start of a week of peeks featuring designs from C.C. Designs September Release. Check out the BLOG for your chance to win the peeking set each day!
The release will be Monday Sept 7th!!
First up……
Too Cute to Spook

And is it ever! I love the owl on the moon like that-Great job Diane 😀
I missed posting day one of peeks yesterday which began with Dianes set: Ollie and Griselda
I decided to stamp, color and cut the owl image, and make a QUICK pixie stix holder for a sweet treat! Easy peasy.
The bling is my starry night sky (in case you were wondering).
Next up is AmyR’s Halloween Sentiments set
Something good-
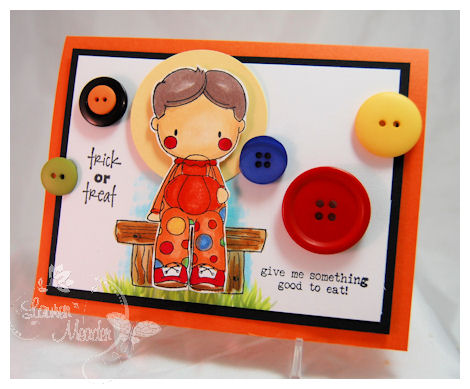
I adore the sentiment with that sad lookin lil clown! How cute is he?!
I bet he’d perk right up with some candy.
I had to mimic the circles in his out fit, by adding all the FUN buttons. The reminded me of gumballs too.
He was part of the Fall Kit-but will be available as a single for the Autumn Sugar Plums Stamps-which have kids, sentiments and accessories (like the bench he is on). Really AWESOME stuff let me tell you. These are part of the images I brought to the hospital to color when Jay had surgery. Oh did the nurses go NUTS!!!!!!!!
Well that does it for me. I’m having a hard time getting back into my mojo these days. Almost a month of LITTLE to NO stamping about KILLED me, and my mojo is SLOW to return. Normally my ideas are flowing and I’m whipping it out, but jeesh, this past week has been ROUGH.
Hopefully it returns before the end of the week! I got stuff to do!
Spooky Sweets
Aug 31, 2009 Author: mytime | Filed under: family stuff, Home decor/3-D items, My Timeless Templates, Papertrey Newsletter, Recipe'sWOW! It is September ALREADY! Time for a Papertrey Ink Senior Design Team Challenge.
These are always so fun, and really get me thinking.
Before you know it Halloween will be here, and gone! Never too soon to start thinking WHAT you will do!
Nichole posed such a challenge for the team this month-Make a small Halloween treat!
I thought of WOWING you all with some fancy treat idea. I actually found a TON of really cool stuff to make. I wanted to top myself from last years treats in which I actually made—> EDIBLE EYEBALLS! As I searched, and agonized over WHAT to do, I asked myself “Would I actually MASS PRODUCE these treats for my kids classmates?” Given the fact I loathe cooking, the HONEST answer would be NO! Then it occurred to me…….if you are ANYTHING like me, then you are BUSY, (maybe you don’t enjoy cooking either) money may be tight, and if you have more than a handful of people that you want to spoil with something (like your co-workers, neighborhood party/trick or treaters, your own children’s classmates/teachers-let alone the fact if you have MORE than one child that can really add up!) you really don’t have enough hours in the day (or energy) to slave over something.
I wanted a SIMPLE WOW!
SO……today I will share my true to life treats! This is a SUPER tasty treat that is QUICK, EASY, and INEXPENSIVE! Totally up my alley! It focuses on the PRESENTATION (which I thoroughly enjoy working on far more than cooking :D)
It takes a simple bag of MICROWAVE popcorn (directions below :D) and turns it into a gourmet treat that is loved by everyone! You can make it for ANY occasion and you can also let your children do most of the work 😀 (I love it even more now!)
Now here are the 2 ideas that JUMPED into my head 😀 Both use my template Pretty Petite version of Pack a Picnic 😀
So, first up…….A Witches Cauldron
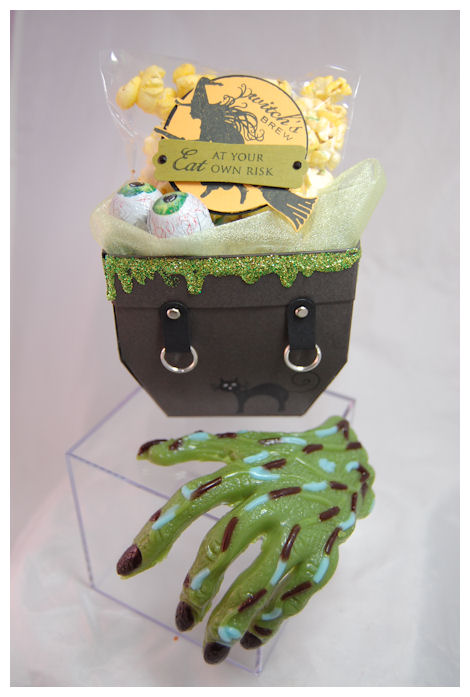
filled with a Popcorn Potion!
I turned the Pretty Petite version of the My Timeless Template-Pack a Picnic into a Cauldron in MINUTES!!
NOTE: You can also take this same idea and make ONE huge Witches Cauldron (using the standard version of Pack a Picnic) to hold all your Halloween bags of popcorn potion, rather than do individual templates for each person/child.
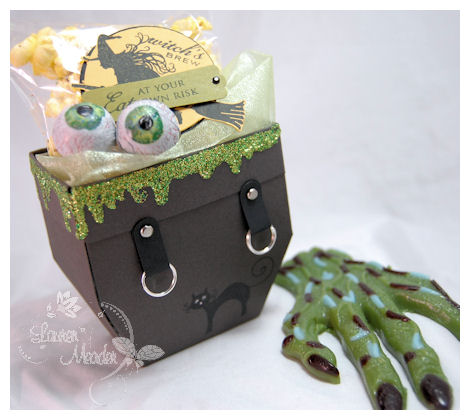
I printed the template onto Smokey Shadow cardstock.
Prior to assembling, I stamped the black cat from Spooky Sweets II, onto the front.
I used a singlo white gel pen for the eyes, then dotted the centers black. Made the nose pink 😀 So cute and easy peasy.
I then cut, scored and assembled as directed.
Then it was time to add the pot handles 😀
I just used my word window punch and folded the paper punched pieces around some jump rings.
I attached them to the pot using silver brads! Perfect pot handles!
I then wanted the Cauldron to appear to be boiling over!
So green stickels to the rescue! Just drizzle large amounts around the entire top!
Let dry a couple hours (its a lot of glittery glue! SO worth it)
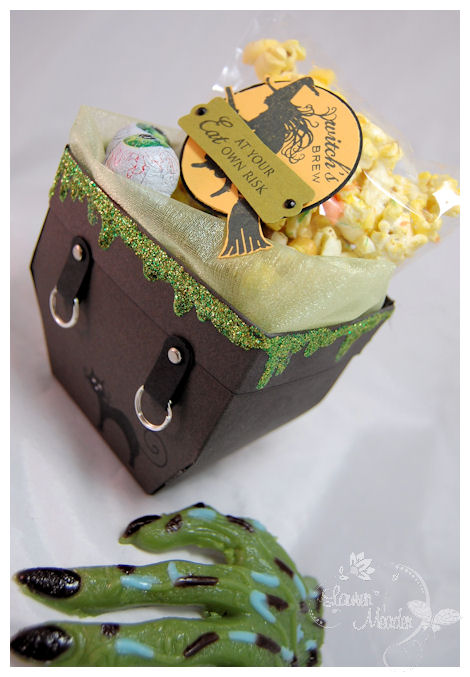
In the meantime you can make your Popcorn Potion, package it into the bags, and then make your tags!
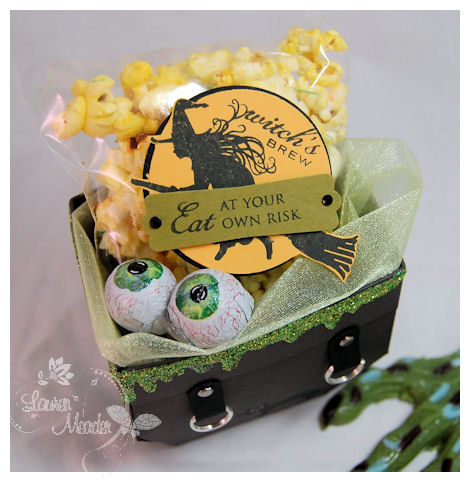
My tag images/sentiments are also from Spooky Sweets II.
I put the bag into the Cauldron, and added 2 chocolate eyeballs! The eyeballs and creepy hand (a huge gummy candy that was actually DELISH! LOL!) were bought at Michael’s Craft store-just add to the fun!
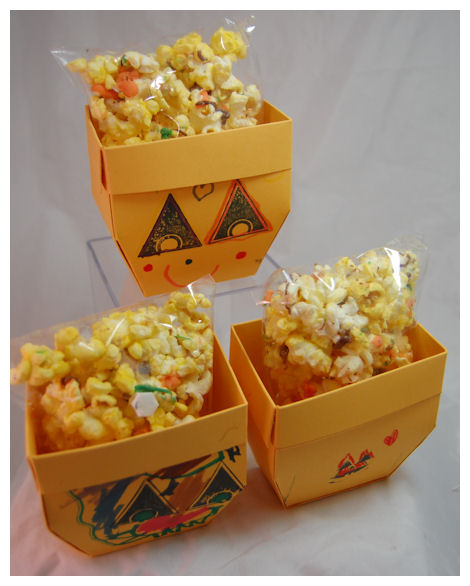
Now I have another idea 😀 and this one is WAY easy.
This SAME template made the CUTEST pumpkin!
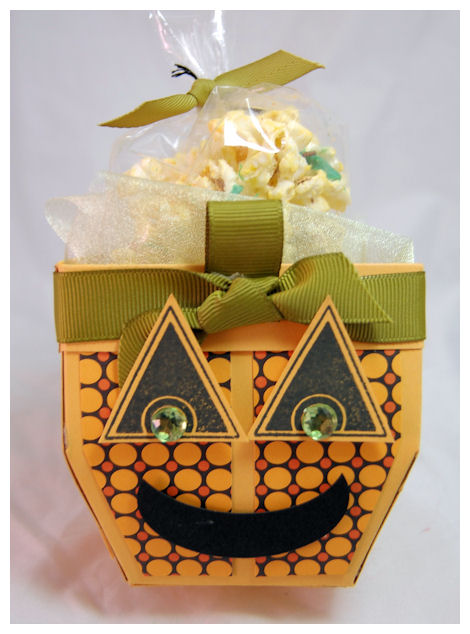
Seriously HOW CUTE is that?
Again you can make a LARGE version too 😀
In case you are KICKING yourself for NOT having Spooky Sweets II (there is plenty of time to order it :D) I decided to use Spooky Sweets (first edition!) for this one.
The NEW! Hocus Pocus paper was perfect for making my pumpkin have some POP!
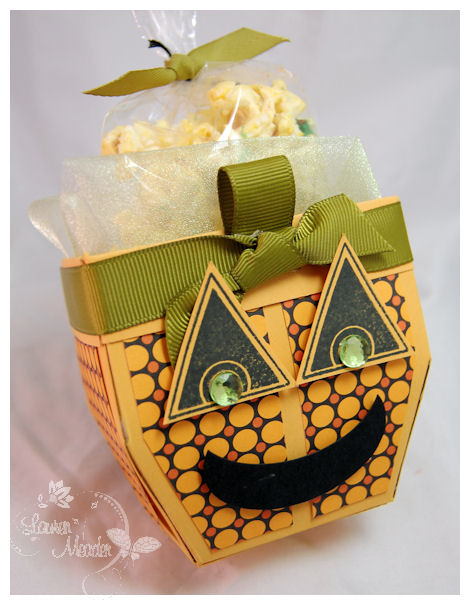
I adore the “make your own pumpkin face” images in that set, and it was SO prefect for this one!
I just stamped and cut out the eyes-adding some BLING 😀 For the mouth I just used oval punches.
I then tied around some ripe avocado grosgrain for the topper
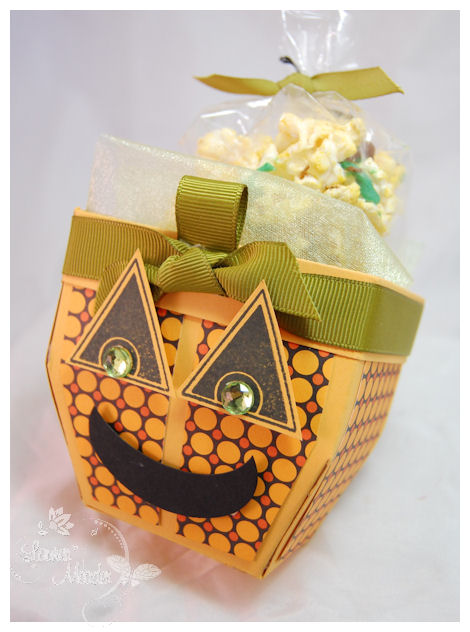
Then filled with my popcorn potion
Now you may be wondering-HOW do you make the POPCORN POTION?!
Well, in just a few minutes you can have a LOT of YUM!!
Popcorn Potion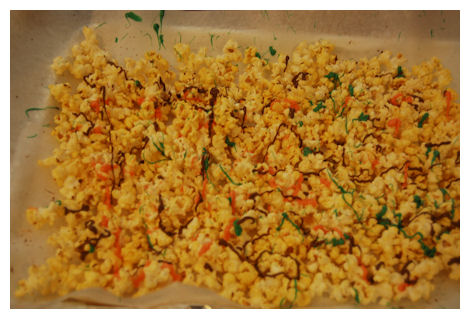
All you need is some Microwave popcorn (or pre-popped popcorn)
Chocolate melting waffers in colors of choice (I chose orange, green and milk choc. only $3 for a large bag that goes a LONG way!!!)
Note: Usually 3 colors is perfect-o!
Directions:
Pop (or pour out) as much popcorn as you need.
Pour Popcorn onto parchment or wax paper-remove kernals!!!!
Let COOL completely!
Melt chocolate wafers in squeeze bottles.
Squirt generously over popcorn.
Let chocolate cool.
Package into baggies!
DONE
This project is SOOOOO easy my kids actually made it themselves:D
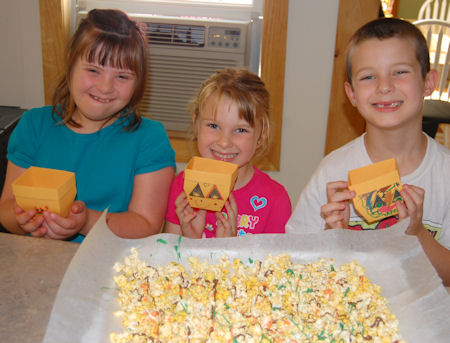
I did a video of this venture, and it was such a FUNNY disaster, that I decided to NOT share it! After-all, I’m trying to be PROFESSIONAL here! LOL! Anything that COULD go wrong did! But my kids did make the popcorn, and they made their own versions of the Pumpkin templates!!
NOTE: ALL the templates make FAB kid project in one way or another 🙂
Top: Amber
Bottom left: Noah
Bottom Right: Alexa
I just assembled the templates FLAT, let them decorate (they stamped the faces and colored), then we put them together. You could have your kids do ALL of it! From making the popcorn (each of my kids had a color) to decorating the templates!
You can make a couple a day and let them decorate them-OR just assemble the template BLANK and let the kids you give them to decorate them for them-self.
ANOTHER idea-the LARGE version could be your child’s Trick or Treat container too 😀
Pretty cool huh?
Can you tell I make my kids do lots of crafts? That means more craft time for me if they do! LOL!
More photos of the kids pumpkins
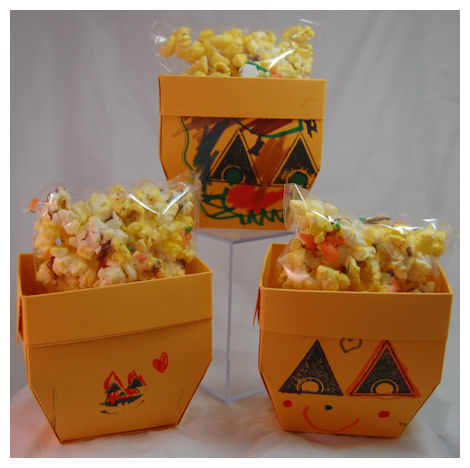
They had fun and were so proud.
As soon as the photo was done the popcorn got eaten.
Bottom line-this was so FUN, inexpensive, , and got the kids involved- as it was total hands on! I love that. Oh and the popcorn really is YUMMY!!! We demolish a huge bag of it 😀
Now it is time to go check out what the team did-
and check out our Guest Designer : Teri Anderson
I HOPE you liked my projects 😀 I really wanted to share something do-able and affordable. I’d love to hear what you thought.
I’ll see you back here tomorrow as I have TONS to share this week 😀
Until then
Tucked Away Birdie
Aug 25, 2009 Author: mytime | Filed under: Home decor/3-D items, My Timeless Templates, Papertrey NewsletterQuick post for a quick gift.
I have lots to do before the first day of school tomorrow! I don’t know how I feel about it being here ALREADY.
I want to get First Day of School teacher gifts done, but we shall see! LOL!
I’m always needing little gifts for people “just because”. LIKE teacher gifts. This project is not what I have planned-my kids teachers will be getting a early peek at my NEWEST My Timeless Template for September Release- for their gifts-and they don’t even have a CLUE! LOL!
Sometimes I’m tight on time (shocker I know! LOL!) and want to make something special , but QUICKLY! I don’t think that because something was done “quicker” doesn’t mean it has any less sentiment than something you poured over for a longer time-either way, you made it from the heart, and that is what matters!
Here is a recent gift I made using the My Timeless Template: Tucked Away ©
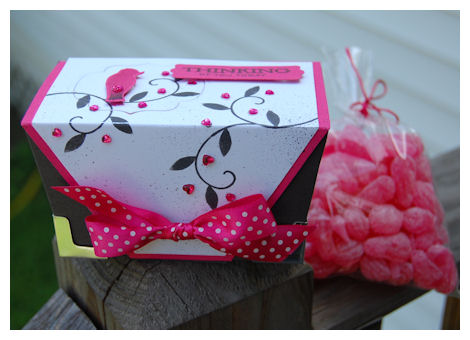
This color combo is FAB!
Raspberry Fizz, Smokey Shadow and White-LOVE T!
I LOVE stamping/paper-crafting because now you can REALLY make personal gifts that suit the receivers personality, or reflect the gift that you are giving-in this case it is a bag of Dutch Masterpieces-Blushing Pear hard candies (they are so YUM-O!). All I could think of was Partridg in a pear tree! LOL! Granted this isn’t a partridge, nor is my tree bearing fruit, but I went with it! LOL!
I used Birds of a Feather, and Beyond Basic Borders for this one.
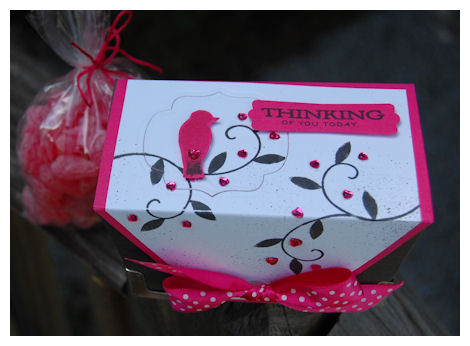
The Thinking of You is from the Anniversary set (unavailable for purchase) and was popped out using a SU! punch (LOVE that one!)
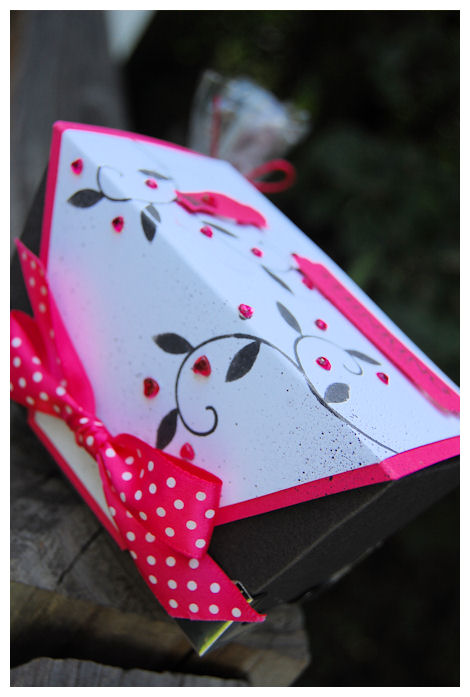
Now for my back panel-that was printed on Raspberry Fizz. My decorative mat layer was done in white, then stamped. I adhered the layers together, prior to assembling my template. I then ran the top flap though my Cuttlebug Machine, using a label die from nestabilties, to be able to get a DEEP frame shape cut and embossed into the top layer 😀 Now it didn’t cut through the layers, just made a very cool SIMPLE accent to my Tucked Away top!
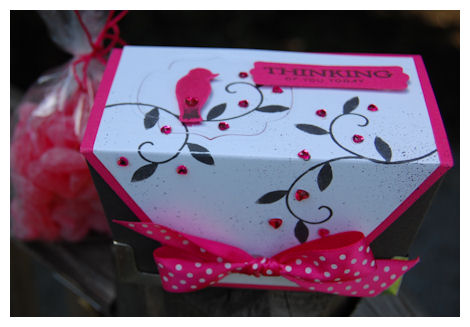
Here you can see my bird is stamped in Raspberry onto Raspberry, with a dab of the gray on the tail, then cut out on dimensionals. The little heart rhinestone accentuates the tail and leafy swirls-perfection 😀
Now in the corners, if you look closely-you can see I added these metal side tabs (usually used on wooden purse boxes). I love the way they add to the box design, without over powering it! Just a fun embellishment!
I also spritzed my layer with my color spritzer! Fun touch.
Anyway-this was done in like 20 minutes TOPS! So definitely a fast gift!
Well speaking of gifts, I better get INKING!
Tomorrow I send the kids off to school so I hope to get some photos posted.
Till then
Back to School Template Challenge!
Aug 21, 2009 Author: mytime | Filed under: Home decor/3-D items, My Timeless Template Challenge, My Timeless Templates, Papertrey NewsletterWell as you know its ALMOST time for the kidlets to go Back to School!
Many may already be back to the hustle and bustle of getting the kids up early, snacks packed, lunches made (or in my case $ for lunch sent :D) dressed and off to the bus they go! Then after a full day, have it be followed by all the after school activities that come with fall like Girl Scouts, Ballet, Soccer……. whatever it may be. I know my kids are very active as they get older.
Anywho, that all being said, this weekend kicks off our NEWEST! My Timeless Template © Challenge!
Seeing how we are all getting back to school………
If you get to play along link your creation HERE!
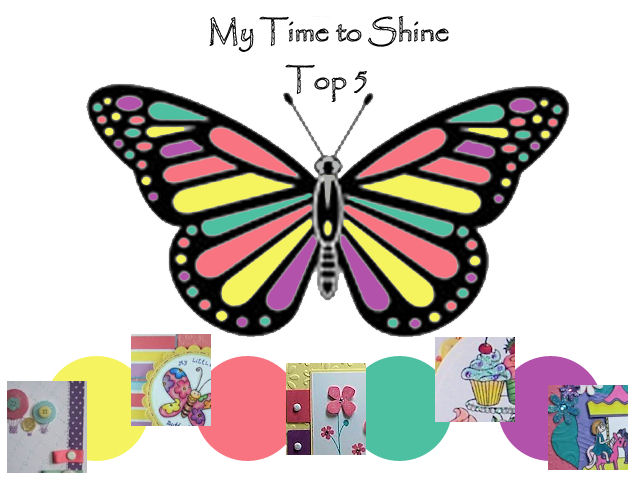
Next week I will highlight my top 5 😀
Thanks to Pam for having such a FAB idea for our theme this month!
RULES:
You can use ANY My Timeless Template ©,
Challenge is to create some sort of Back to School themed gift!
That is it 😀
Let me tell you I personally had a BLAST with this one ;D
My idea came when I got the Back to School letter, that alerted me what supplies each of my children needed for their grade.
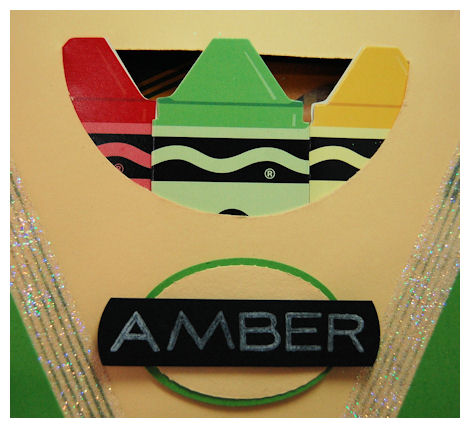
When I saw the list-Pencil Box was first in line, then directly under it Crayons, I had my Epiphany!
Drum-roll please…………………………..
Tah Dah!!!!!!!!!!!!!!!
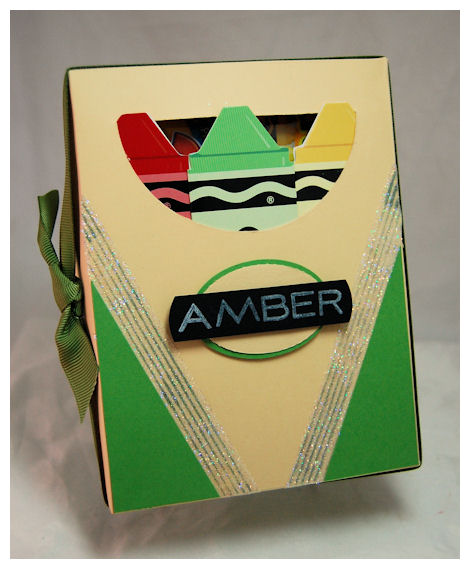
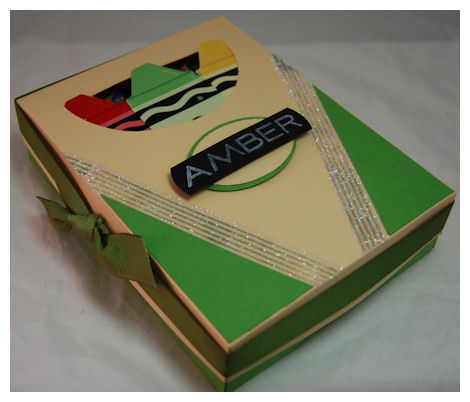
Captured Card Case © becomes Amber’s Crayon Supply Box!
Now picture making these for all your children or WITH your class!!! FUN! FUN! Even as a party favor box for a toddler’s birthday! I know I made Alexa a Crayola Crayon Box cake for one of her parties! —> Click here to view cake<— Trust me when I tell you my paper-crafting skills FAR out match my CAKE decorating skills! LOL!!
My 5 year old, Amber is entering Kindergarten, and needed a pencil box full of supplies. I immediately KNEW that the Captured Card Case © template would make the PERFECT personalized supply box for her cubby!
My inspiration was OBVIOUSLY from the Crayola Box of crayons.
I had also found these SUPER cute Crayon Lunch Box Note Cards (at Michael’s – you get 10 with envelopes for ONLY $1!) which were PERFECT for this project idea! I do have a crayon Sizzix Die, and prior to this find, planned on die cutting my own Crayola Crayons, but this was BEYOND perfect! Plus it made this easy peasy!
So, I printed my templatebase onto New Leaf cardstock. Then cut, scored and assembled as directed .
I then printed my templatelid onto Lemon Tart cardstock. Cut and scored as directed.
Prior to assembling I used my Coluzzle to create the 1/2 circle opening- Like the open box of Crayons.
I then adhered the crayon note cards to the INSIDE lid of the template, making sure they’d pop out a bit!
cardstock-by first cutting a rectangle 1 1/2 X 3 1/2
I then just cut that rectangle corner to corner to get both of my 1/2 triangles! I noticed that the lined image from Background Basics: Retro was perfect for the lines that are on the crayon box. Amber requested GLITTER somewhere, so I used my handy dandy 1/2 inch Scor-Tape © (which is my tape of choice that I use on ALL my templates :D), then sprinkled on some Glitter!
I personalized Amber’s name using the Fresh Alphabet. It was totally perfect!
Amber FREAKED when she saw this! Boy did that make me so happy
The Captured Card Case © holds all her supplies

Don’t they look so cute in there?
We have a box of crayons, glue stick, scissors, folding ruler, note pad, pencil sharpener, eraser, and pencils-with room to spare.
Now, because the “crayons” are little note-cards, (I adhered them closed) they are dual sides, even the INSIDE looks cute ![]()
Now this is fun and functional, and better yet it cost only 0.66 CENTS to make!!!!!
(that is because each sheet of cardstock is 0.18 cents-then the crayon notes are 0.10 cents each)
This could be cute to make for the Teacher’s desk too!!!!!!!! Can’t forget the teachers 😀
This project only took about 40 minutes to make-and I think the 2nd would be much faster. I had NO idea HOW I was going to make the crayon box work, but now that you have my version yours could really go quick!
Now it is YOUR turn to give the challenge a whirl! Maybe it will be a EARLY push to start teacher gifts for the holidays too 😀
Be sure to see what ideas the Design team has created too, using the templates! They really work hard each week!
Now I’d like to share the TOP 5 picks from Last Weeks Color Challenge!
(I”ll be posting MY color challenge tomorrow-with my top 5 from the week before that I missed)
Please check out their creations by clicking the links on their names 😀
They all did a great job!
I can’t wait to see what you all do with this weeks challenge!
I hope you enjoy it.
JustRite Stampers Christmas Blog Hop!
Aug 17, 2009 Author: mytime | Filed under: Cards, Home decor/3-D items, JustRite Stampers![]()
Yes! You read it correctly! A Christmas Blog Hop!
We have a grand total of 35 players too 😀 So once you are done here, scroll on down for WHO else has eye candy!
JustRite Stampers is having an AMAZING Christmas Release! You can view ALL the NEW! Release items —>HERE<—!
I’m totally head over heels with the images/sentiment combos this release has. I totally love the turn this company has taken with the variety they are offering! Not only can I get FAB alphabets sets (for CHEAP $-excellent quaility :D) in various sizes with ONE purchase, I can now get great bordering sentiments WITH co-ordinating images too.
So let me get to my project so YOU can get hopping!
In case you didn’t know, another FAB NEW! item that JustRite Stampers carries (for a LIMITED TIME!) is Storage Box with Drawer . I love this new item, and found a way to make it a decorative, fun and functional item for your home during the holiday season!
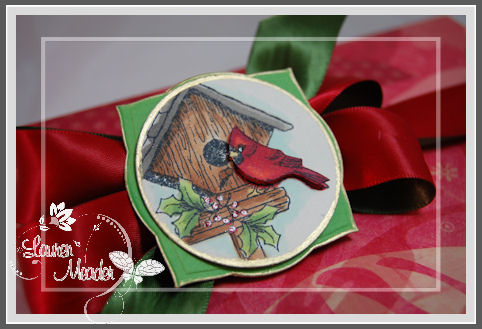
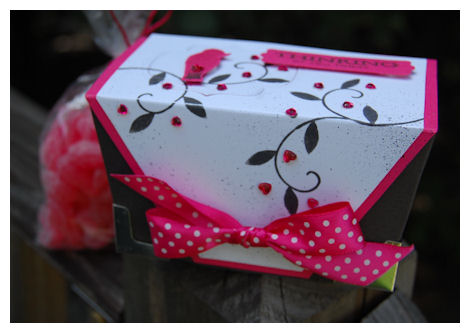
Christmas Card Cardinal Box
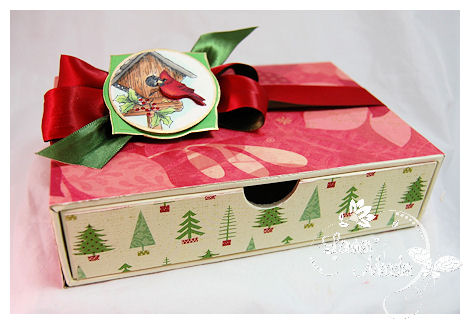
My Holiday Idea: I designed this box so that it can be used to hold last year’s Christmas cards!
Each year we receive photos with updates from our families. I just can’t bare to throw away the cards after the season is over, but I also cannot leave them up all year! This box allows me to keep them, and display the decorative box during the holidays, so that we can open it up and reflect on how everyone has grown and changed from one year to the next! People love to go through the cards and compare 😀 Now I can cherish them, and keep each year organized.
OR it can just be a great box to give something in 😀
I chose the Cardinal from the Christmas Treasures Borders & Centers Round 3-1/4”set as my main focus.
I thought it was so pretty, and perfect for the occasion. Stamped on a vintage cream cardstock, it was colored with Copic Markers.
I used some Poinsettia themed patterned paper by K& Co. to cover the top of my box. I then used some tree pattern from the same paper stack to cover the front drawer of this box. I used Zip Dry for ALL my projects that involve “covering” something. Its clear, quick to dry and easy to remove from areas you DON’T want it on, after it dries. For example-sometimes glue leaks out from under the paper and onto the “pretty” parts of the project where you DON’T want them! Just rub off-and you never knew it was there. It doesn’t even ruin your project 😀 I love that.
For my tag I used *just* the Cardinal center image.
I also used a Labels 3 Nestability for my tag
Some of the image was omitted when I cut the circle tag, but I love that the main focus is on the bird and holly berries.
I added the tag to the center of my Dual Sided Satin Ribbon from My Little Ribbon Shop, which was tied in a quad bow. I love the elegance the ribbon added to the project, and how it pulled out even more of the richness of the colors, out of my project!
Now in case you cannot tell-
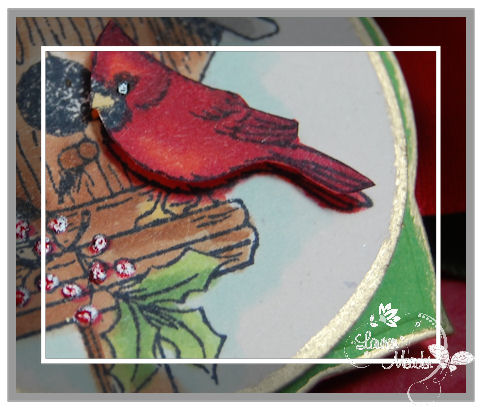
My bird is 3 D
My holly berries are covered with a clear glaze pen for a 3D pop.
Then both of my tag edges are traced with a Gold marker!
This box was completed in UNDER a 1/2 hour!
My post took longer to type up 😀
OK Now it is time for you to hop along to anyone you may not have seen samples from yet!
Here is the list
*JustRite Stampers-Blog
*Jenn BalcerMichelle Wooderson
WHEW! That is an amazing list of crazy talented players! So I hope you hop along to see what each one has done for the HOP!!
Thank YOU for stopping by here. I hope I gave you a fun idea for how to store those Christmas cards year after year, in style!
August Papertrey Ink Release! AND a Color Challenge!
Aug 14, 2009 Author: mytime | Filed under: Cards, Home decor/3-D items, My Time To Color Challenge, My Timeless Templates, Papertrey NewsletterEvery month I cannot believe its THAT month’s release! LOL!
Time is just WHIPPING by isn’t it? Before I know it Christmas will be done and over and it will be 2010!
Well today is the 15th and that means I have my Papertrey Ink projects to share 😀 That also means the latest and greatest of the My Timeless Templates: Tucked Away & Fold n’ Go! are now available for purchase too! WOOT! WOOT! I truly cannot wait to see what YOU do with them-so don’t forget to share 😀
Now as I get ready to share my release items, please be sure to scroll down so you can see all I had to share this week, leading up to the release!! I previously shared projects using 3 NEW! Release sets: Sign Language, and 2009 Halloween & 2009 Fall Tags! Don’t miss them.
In the meantime….here are the remainder of my samples!
Scattered Showers Additions
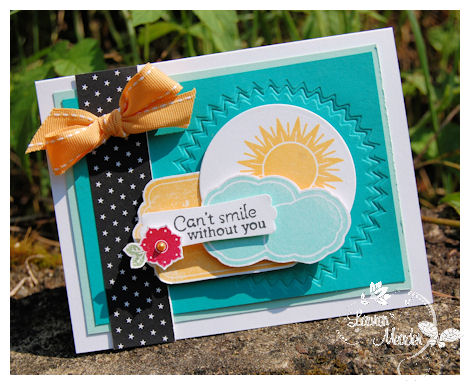
I know this set is the scattered shower additions set, but I found it to be TOTALLY cute on its own! I had fun layering the tag, with the clouds and sun images in the set. The sentiment reminds me of my most favorite song I used to sing as a girl by Barry Manilow-Can’t Smile Without You! I just LOVE this fun & cheery card!
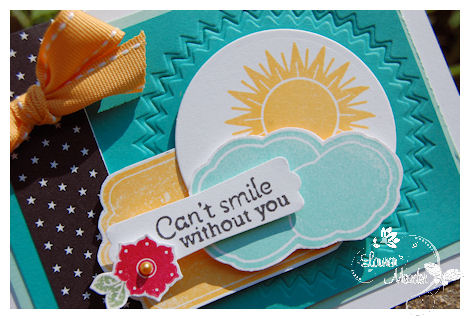
Seriously are the colors not FAB?! I had a blast with this one!
Supplies:
Stamps: Scattered Shower additions
Cardstock: white, teal
Patterned Paper 2008 bitty star basics
ink: summer sunset, aqua mist, pure poppy, new leaf, black
ribbon: saddle stitched grosgrain
tag punch by SU!, adhesive pearl, pinking circle nestability
Fall Elegance
This set is very pretty. The perfect all around “fall” set. Tiffany did a FAB job with all the elements she combined when creating this. I look forward to using more of her designs in the future. The ideas of this project I am about to share just flowed!
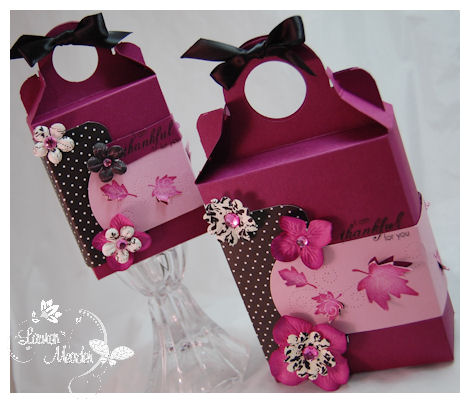
Thankful for-
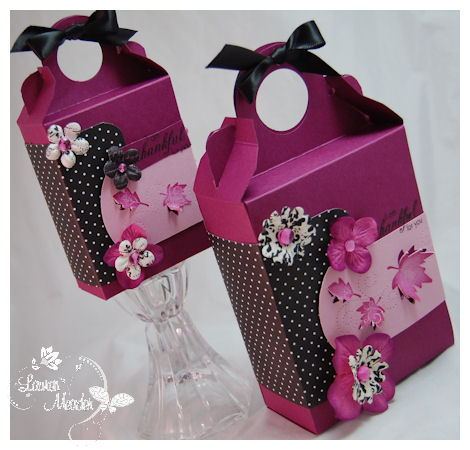
I used my Fold n’ Go! template with this new fall set to create a elegant gift package!
I loved the flourished pattern on the leaves, so I tried to mimic that idea into my design by paper piercing a flourish of “wind” around the leaves
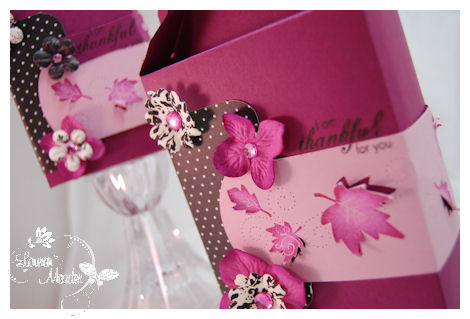
I also used a hobby blade to cut portion of each leaf, so I could pop it forward, as if it were swirling off my box!
I’m in love the contrast of the black, Razzleberry (a SU! color) and lavender moon, on this package.
As you can see I used the standard and Pretty Petite version of the template to create the similar designs.
Supplies:
My Timeless Template: Fold N’ Go!
Stamps: Fall Elegance
Cardstock: Rich Razzleberry (SU!) Lavender Moon
Patterned Paper: Bitty Dots 2008
Ink: versamagic trio, and black
Prima Flowers, adhesive rhinestones, paper piercer and template, 1 1/4 circle punch, corner rounder
Autumn Abundance
What a pretty set this is! I’m just in love (as always).
When I saw this set I went to rich colors like the blues and greens. I love the “not so typical” fall colors, in case you can’t tell! I did a similar color scheme last year for fall and I still just LOVE that color combination! See my table setting post <—-CLICK IT!
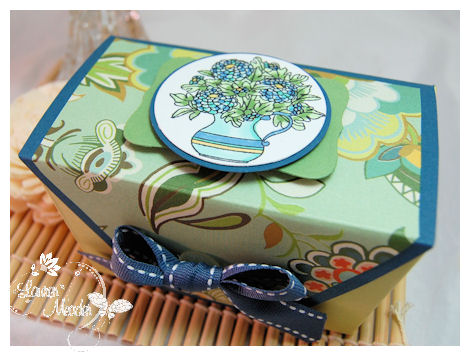
Now here are my samples using the stamp set, and The My Timless Template Tucked Away
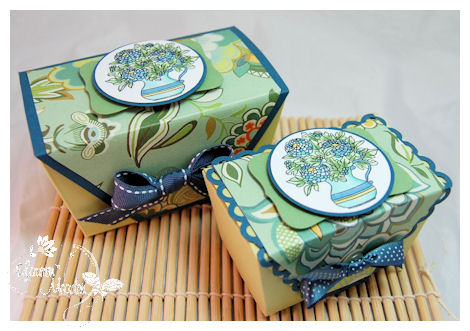
My colors were also pulled from some new paper by K & Co.
Again a standard and Pretty Petite version of my Tucked Away template! I love showing the various designs ideas for BOTH sizes.
Top view of standard size
Now we have the Pretty Petite version
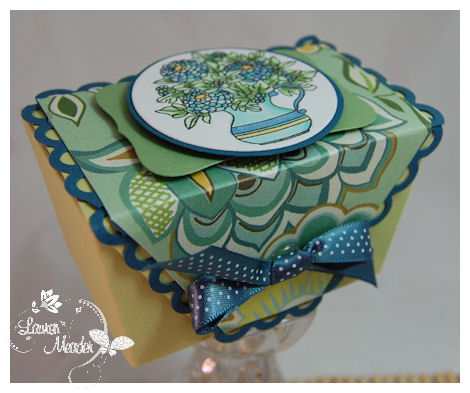
For this one I used the Apron border from EK success to create the cute scalloped edge on my layer 😀 Loved it.
This is the set stacked!
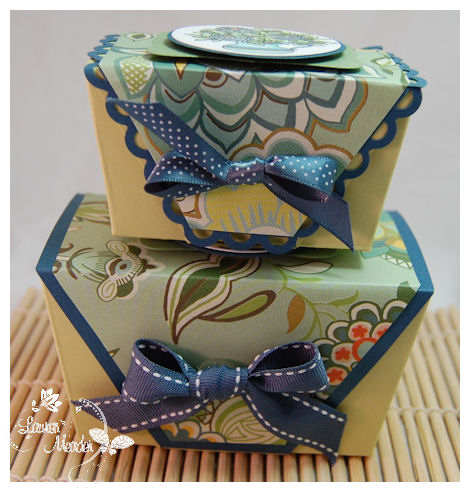
I think it looks so cute like that 😀
You could put ANYTHING in here from after dinner mints, to tea, maybe chocolates, of other homemade goodie? Embroidered napkin/handkerchief…….love that idea!
Seriously Perfect!
Now seriously simple…….
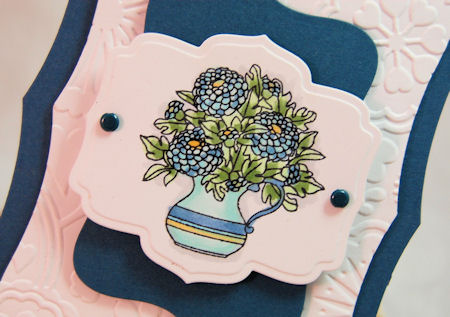
Oh boy was my eye ever drawn to the flower image in the set (go figure! LOL!)
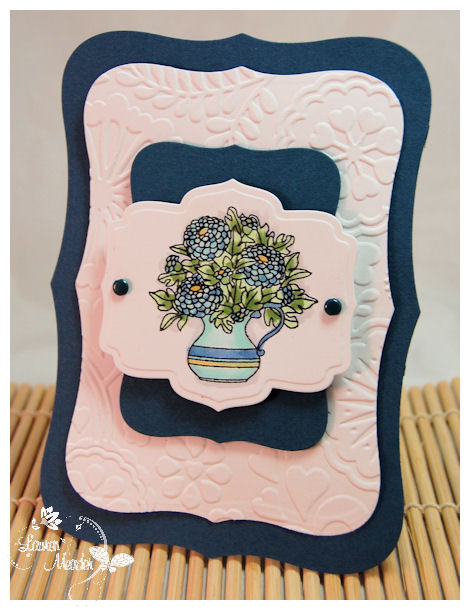
I just did a SIMPLE card using my nestabilities and this image as my MAIN focus!
Simple, clean and understated. I like it 😀 You don’t always need a LOT to make an impact.
P.S. If you purchase the Fold n’ Go! Template you will see another version I did using this set and colors-I was over the moon for it!
Supplies:
My Timeless Template: tucked Away
Stamps: Autumn Abundance
Cardstock: Spring Moss, Enchanted Evening, White, New Leaf
Saddle stitched ribbon in Enchanted Evening
patterned paper by K& Co
Labels dies, circle dies, apron border by EK Success, brads, cuttlebug embossing folder
Next up we have……
Boo to You!
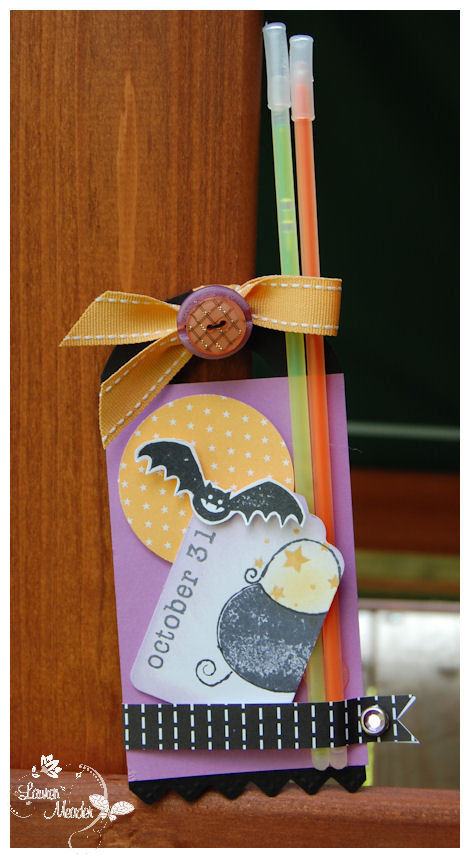
When I saw this set I immediately saw a witch cauldron! I decided that was exactly what I would do. Making that change from a pumpkin, to a pot, was easy peasy! I made this cute tag to hold 2 glow sticks, for a duo colored necklace! What trick or treater wouldn’t be excited to get these instead of the traditional “candy” that rots their teeth! LOL!
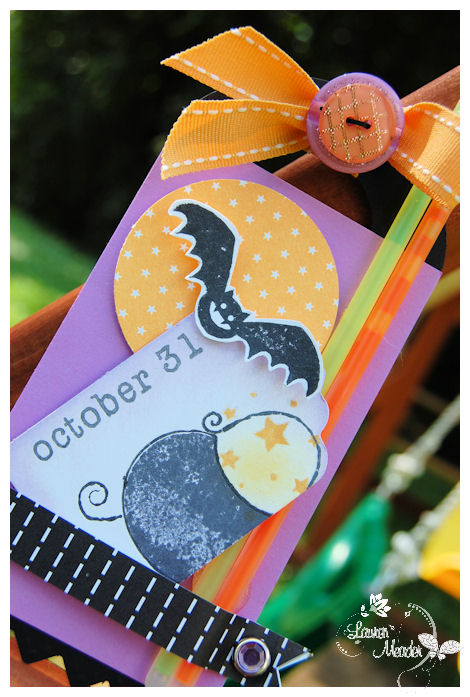
Wouldn’t a classroom of kids FREAK over these? Easy peasy!! I may have my own treat idea done (hopefully on time :D)
Supplies:
Stamps: Boo to you
cardstock: black, white, purple
patterned paper: black and white basics, 2008 bitty star basics
ink: black, smokey shadow, summer sunrise, orchid
stitched grosgrain
vintage buttons
tag punch by marvy, circle punch. jewel brad
That is that!
WOWZERS! Do I ever need a break! LOL! I always go into creative overload after the release! I pour every ounce into it, so by the end I am just EMPTY! Hopefully all the day trips we are taking with the kids will help refill my creative tank 😀 It feels so good and refreshing spending time with the kids, and making memories together!
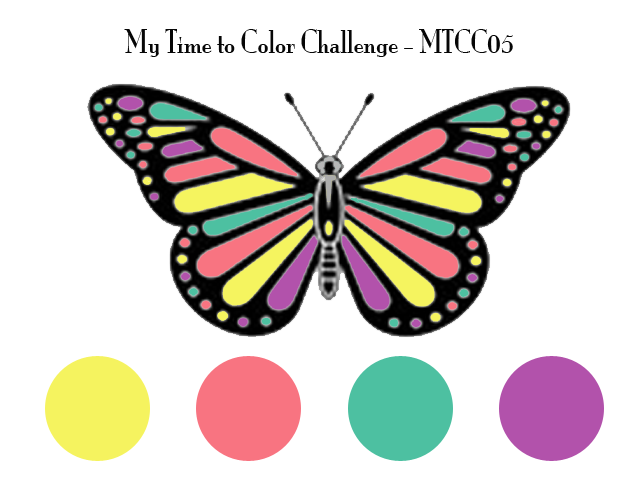
COLOR CHALLENGE!
Before I go I do have a challenge for you! It is after-all Saturday! Sadly I did NOT get anything done-so I apologize 😀 I was just crazy busy with Amber’s birthday and the PTI release.
You can see the samples from our team here:
Pam, was kind enough to get a color challenge posted for us!
This is her color choice:
Link your creations here!
NOTE:
I will be picking and displaying a Top 5 from last week, but didn’t properly get to go through all the entries, so I will post them in a couple of days along with my sample using the challenge!
So once again, thank you for stopping by!
I hope you like the projects I have shared over the last week 😀
Enjoy the day
My Etsy

Who I Designed For
Blogroll
- Alicia
- Alli Miles
- Ally Blankenship
- Amber
- Andi @ crafts on a whim
- Angel R
- Angie Z
- Anne Kranitz
- Becky O
- Bee
- Beth Silaka
- Bethany Paull
- Beverly Nash
- Bobbie
- Cambria
- Cammie
- Card of the Week
- Card Positioning System (CPS)
- Cards for Cancer
- Catherine Doucette
- Charmaine
- Cheryl Sims
- Chriss Rollins
- Christina
- Christine Ewing
- Christine Wooden
- Colleen Schaan
- Craft Critique
- Craft Gossip
- Crystal
- Dawn Easton
- Emily Giovanni
- Geny
- Holly
- Igne Groot
- Inspirational Craft Blogs
- Irene
- Jami Sibley
- Jeanne Streiff
- Jen del Muro
- Jeni Bond
- JenMarie
- Jenn Balcer
- Jenn Diercks
- Jenn O
- Jennifer E
- Jennifer Mick
- Jennifer Pereda
- Jennifer-Sweet Treat
- Joanne Basile
- Jodi Collins
- Julia Stainton
- Julie Masse
- Karen
- Kathryn Berthiaume
- Katie Cotton
- Kelley Holland
- Kendra
- Kim Scholfield
- Kris’s Color Stripes! Get inspired here
- Kristen Dubosque
- Kristin Eberline
- Kristine
- Laura @ Sunshine Stamper
- Laura Turnmire
- Laurie Schmidlin
- Lesa Rapp
- Linda Duke
- Linda-LSN
- Lindsey Botkin
- Lisa (lakind scs)
- Lisa Kind
- Lori Craig
- Maggie
- Mara Campbell
- Maria
- Maria Levine
- Mary
- MaryJo
- Melanie M
- Monique Hansen
- Moxie Fab World
- Pam Imholz
- PaperCrafts Connection
- Peppers and Pollywogs Kids party site
- Rebecca Grohall
- Rita
- Robyn
- Rose Ann
- Sarah Vrolyk
- Sharon Harnist
- Sharon Johnson
- Sharon Rivera (a chemisrty with paper)
- Sherrie
- Sophia Landry
- Storage Units, Ink, & More Blog
- Sue Berker
- Susan (Rainy)
- Tangii Crane
- Tracy
- Tricia Traxler
- Trudee
- Velta
- VivLyn
- Zena
MTME Pretty Palette Color Team
MTME Pretty Patterns Sketch Team
My Time Made Easy TM LLC
Shop till you drop!
Lauren Meader
About Me
Copyrighted material
Subscribe To My Blog
Pages
- About me
- Alexa’s Story!
- My Crafty Corner!
- My Time Made Easy™ LLC
- Our Make A Wish Trip to Disney!
- Resume/Publication List
Calendar
| M | T | W | T | F | S | S |
|---|---|---|---|---|---|---|
| 1 | 2 | 3 | 4 | 5 | ||
| 6 | 7 | 8 | 9 | 10 | 11 | 12 |
| 13 | 14 | 15 | 16 | 17 | 18 | 19 |
| 20 | 21 | 22 | 23 | 24 | 25 | 26 |
| 27 | 28 | 29 | 30 | 31 | ||
Archives
- August 2013
- July 2013
- June 2013
- May 2013
- April 2013
- March 2013
- February 2013
- January 2013
- December 2012
- November 2012
- October 2012
- September 2012
- August 2012
- July 2012
- June 2012
- May 2012
- April 2012
- March 2012
- February 2012
- January 2012
- December 2011
- November 2011
- October 2011
- September 2011
- August 2011
- July 2011
- June 2011
- May 2011
- April 2011
- March 2011
- February 2011
- January 2011
- December 2010
- November 2010
- October 2010
- September 2010
- August 2010
- July 2010
- June 2010
- May 2010
- April 2010
- March 2010
- February 2010
- January 2010
- December 2009
- November 2009
- October 2009
- September 2009
- August 2009
- July 2009
- June 2009
- May 2009
- April 2009
- March 2009
- February 2009
- January 2009
- December 2008
- November 2008
- October 2008
- September 2008
- August 2008
- July 2008
- June 2008
- May 2008
- April 2008
- March 2008
- February 2008
- January 2008
- December 2007
- November 2007
- October 2007
- September 2007
- August 2007
- July 2007
- June 2007
- May 2007
- April 2007
- March 2007
- January 2007
Categories
- About Me
- All That Scraps
- blogger challenge
- camera/photo play
- Cards
- Contests
- family stuff
- FOR SALE
- Home decor/3-D items
- How to FAKE it!
- Introduction
- JUGS Challenge
- JustRite Stampers
- Lizzie Anne Designs
- My family stuff
- My Stamping Space
- My Time Made Easy
- My Time To Color Challenge
- My Time to Create Challenge
- My Timeless Template Challenge
- My Timeless Templates
- Mytime Mail
- MYTIME MOVIE/VIDEOs
- Papertrey Newsletter
- Pink Cat Studio
- Pretty Palette Challenge
- Pretty Patterns Sketch
- Product Opinions and Must haves
- Recipe's
- Saturday Sketch
- Smilebox Creations
- Stampavie
- Tutorials
- Uncategorized
- videos
Most Popular
- Create your own Onesie Card Tutorial-and important NOTE! PLEASE READ (2529)
- Saturday Sketch-Boxed bag holder (2333)
- Going GREEN! Fancy Flower Flourish-Closure Video (1478)
- Fabulous Favorite - Giveaway! (1336)
- a Prayer Request (1232)
- QUICK-Easter Baskets from Nestabilities-PTI style-and blog challenge (1063)
- Teaser Sketch (999)
- February Release Giveway! (and a little peek) (996)
- Group Post and Rambling Rose Video Tutorial (985)
- GIVEAWAY! Who wants it all?! (895)
Recent Comments (RSS)
- 첫충사이트: 완전히 흥미로운 블로그 게시입니다. 저는
- sarah: Wow, Lauren, what a stunning
- hedie: خرید راهبند
- 야동: Love to read it,Waiting For
- 야동: This seller is in a
- 바카라사이트: 여기 처음 왔어요. 나는이 게시판을
- 야동티비: I was surfing the Internet
- 바카라사이트: 비슷한 주제에 대한 흥미로운 정보를
- 바카라사이트: "여기에 제공해 주신 귀중한 정보와
- 온라인홀덤: 유익한 웹 사이트를 게시하는 데
Copyright © 2007 - My Time, My Creations, My Stampendence - is proudly powered by WordPress
This blog has been Tweaked and Designed by Sara Williams