Spooky Sweets
Aug 31, 2009WOW! It is September ALREADY! Time for a Papertrey Ink Senior Design Team Challenge.
These are always so fun, and really get me thinking.
Before you know it Halloween will be here, and gone! Never too soon to start thinking WHAT you will do!
Nichole posed such a challenge for the team this month-Make a small Halloween treat!
I thought of WOWING you all with some fancy treat idea. I actually found a TON of really cool stuff to make. I wanted to top myself from last years treats in which I actually made—> EDIBLE EYEBALLS! As I searched, and agonized over WHAT to do, I asked myself “Would I actually MASS PRODUCE these treats for my kids classmates?” Given the fact I loathe cooking, the HONEST answer would be NO! Then it occurred to me…….if you are ANYTHING like me, then you are BUSY, (maybe you don’t enjoy cooking either) money may be tight, and if you have more than a handful of people that you want to spoil with something (like your co-workers, neighborhood party/trick or treaters, your own children’s classmates/teachers-let alone the fact if you have MORE than one child that can really add up!) you really don’t have enough hours in the day (or energy) to slave over something.
I wanted a SIMPLE WOW!
SO……today I will share my true to life treats! This is a SUPER tasty treat that is QUICK, EASY, and INEXPENSIVE! Totally up my alley! It focuses on the PRESENTATION (which I thoroughly enjoy working on far more than cooking :D)
It takes a simple bag of MICROWAVE popcorn (directions below :D) and turns it into a gourmet treat that is loved by everyone! You can make it for ANY occasion and you can also let your children do most of the work 😀 (I love it even more now!)
Now here are the 2 ideas that JUMPED into my head 😀 Both use my template Pretty Petite version of Pack a Picnic 😀
So, first up…….A Witches Cauldron
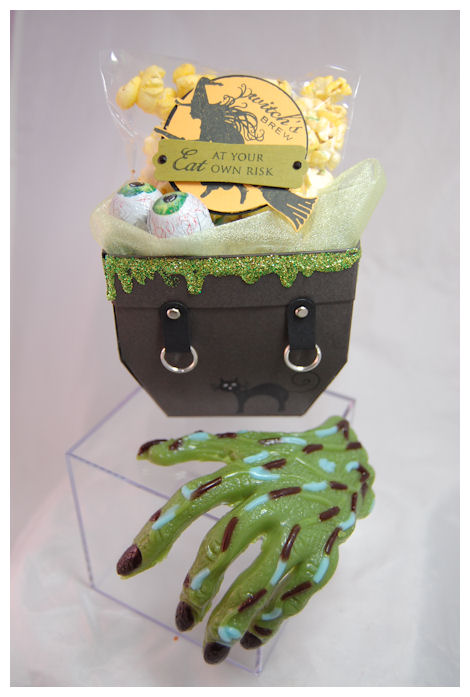
filled with a Popcorn Potion!
I turned the Pretty Petite version of the My Timeless Template-Pack a Picnic into a Cauldron in MINUTES!!
NOTE: You can also take this same idea and make ONE huge Witches Cauldron (using the standard version of Pack a Picnic) to hold all your Halloween bags of popcorn potion, rather than do individual templates for each person/child.
I printed the template onto Smokey Shadow cardstock.
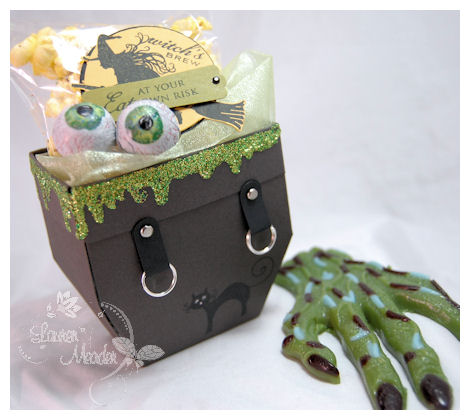
Prior to assembling, I stamped the black cat from Spooky Sweets II, onto the front.
I used a singlo white gel pen for the eyes, then dotted the centers black. Made the nose pink 😀 So cute and easy peasy.
I then cut, scored and assembled as directed.
Then it was time to add the pot handles 😀
I just used my word window punch and folded the paper punched pieces around some jump rings.
I attached them to the pot using silver brads! Perfect pot handles!
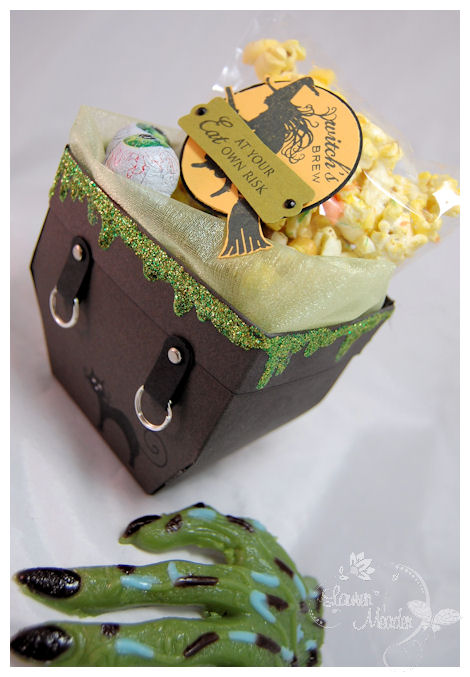
I then wanted the Cauldron to appear to be boiling over!
So green stickels to the rescue! Just drizzle large amounts around the entire top!
Let dry a couple hours (its a lot of glittery glue! SO worth it)
In the meantime you can make your Popcorn Potion, package it into the bags, and then make your tags!
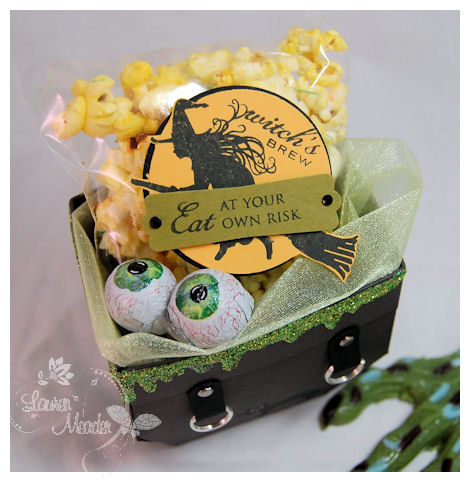
My tag images/sentiments are also from Spooky Sweets II.
I put the bag into the Cauldron, and added 2 chocolate eyeballs! The eyeballs and creepy hand (a huge gummy candy that was actually DELISH! LOL!) were bought at Michael’s Craft store-just add to the fun!
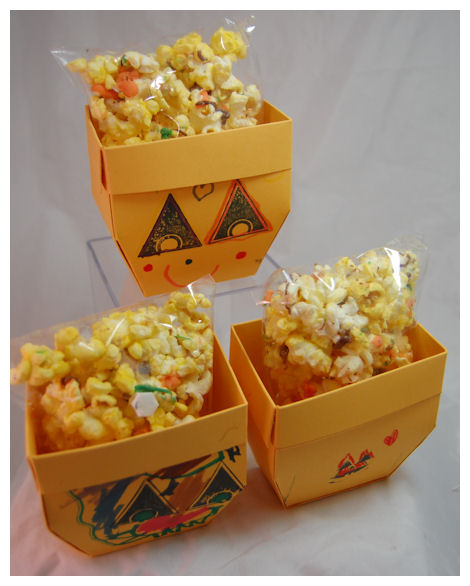
Now I have another idea 😀 and this one is WAY easy.
This SAME template made the CUTEST pumpkin!
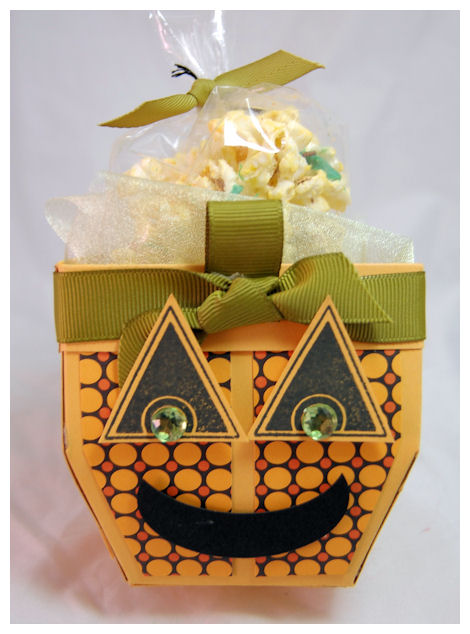
Seriously HOW CUTE is that?
Again you can make a LARGE version too 😀
In case you are KICKING yourself for NOT having Spooky Sweets II (there is plenty of time to order it :D) I decided to use Spooky Sweets (first edition!) for this one.
The NEW! Hocus Pocus paper was perfect for making my pumpkin have some POP!
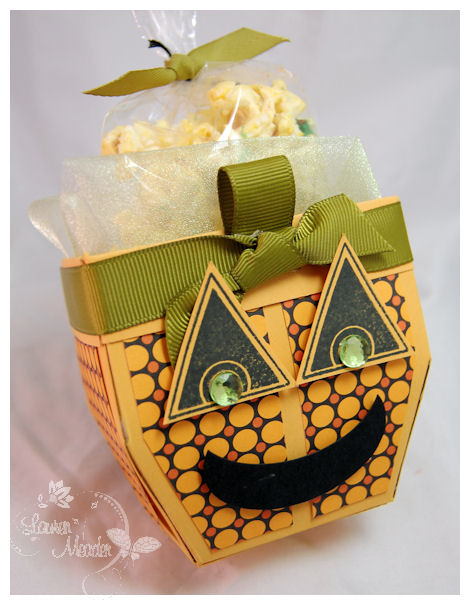
I adore the “make your own pumpkin face” images in that set, and it was SO prefect for this one!
I just stamped and cut out the eyes-adding some BLING 😀 For the mouth I just used oval punches.
I then tied around some ripe avocado grosgrain for the topper
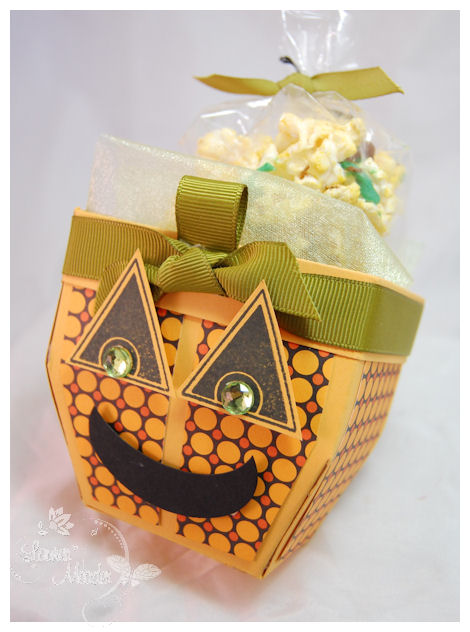
Then filled with my popcorn potion
Now you may be wondering-HOW do you make the POPCORN POTION?!
Well, in just a few minutes you can have a LOT of YUM!!
Popcorn Potion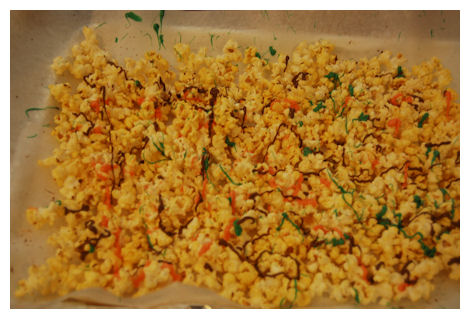
All you need is some Microwave popcorn (or pre-popped popcorn)
Chocolate melting waffers in colors of choice (I chose orange, green and milk choc. only $3 for a large bag that goes a LONG way!!!)
Note: Usually 3 colors is perfect-o!
Directions:
Pop (or pour out) as much popcorn as you need.
Pour Popcorn onto parchment or wax paper-remove kernals!!!!
Let COOL completely!
Melt chocolate wafers in squeeze bottles.
Squirt generously over popcorn.
Let chocolate cool.
Package into baggies!
DONE
This project is SOOOOO easy my kids actually made it themselves:D
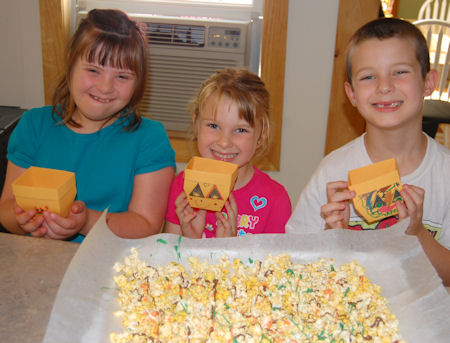
I did a video of this venture, and it was such a FUNNY disaster, that I decided to NOT share it! After-all, I’m trying to be PROFESSIONAL here! LOL! Anything that COULD go wrong did! But my kids did make the popcorn, and they made their own versions of the Pumpkin templates!!
NOTE: ALL the templates make FAB kid project in one way or another 🙂
Top: Amber
Bottom left: Noah
Bottom Right: Alexa
I just assembled the templates FLAT, let them decorate (they stamped the faces and colored), then we put them together. You could have your kids do ALL of it! From making the popcorn (each of my kids had a color) to decorating the templates!
You can make a couple a day and let them decorate them-OR just assemble the template BLANK and let the kids you give them to decorate them for them-self.
ANOTHER idea-the LARGE version could be your child’s Trick or Treat container too 😀
Pretty cool huh?
Can you tell I make my kids do lots of crafts? That means more craft time for me if they do! LOL!
More photos of the kids pumpkins
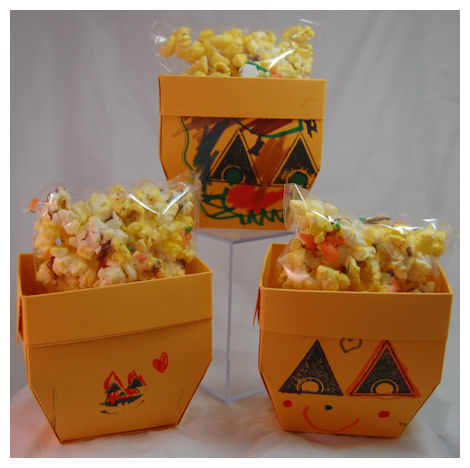
They had fun and were so proud.
As soon as the photo was done the popcorn got eaten.
Bottom line-this was so FUN, inexpensive, , and got the kids involved- as it was total hands on! I love that. Oh and the popcorn really is YUMMY!!! We demolish a huge bag of it 😀
Now it is time to go check out what the team did-
and check out our Guest Designer : Teri Anderson
I HOPE you liked my projects 😀 I really wanted to share something do-able and affordable. I’d love to hear what you thought.
I’ll see you back here tomorrow as I have TONS to share this week 😀
Until then

My Etsy

Who I Designed For
Blogroll
- Alicia
- Alli Miles
- Ally Blankenship
- Amber
- Andi @ crafts on a whim
- Angel R
- Angie Z
- Anne Kranitz
- Becky O
- Bee
- Beth Silaka
- Bethany Paull
- Beverly Nash
- Bobbie
- Cambria
- Cammie
- Card of the Week
- Card Positioning System (CPS)
- Cards for Cancer
- Catherine Doucette
- Charmaine
- Cheryl Sims
- Chriss Rollins
- Christina
- Christine Ewing
- Christine Wooden
- Colleen Schaan
- Craft Critique
- Craft Gossip
- Crystal
- Dawn Easton
- Emily Giovanni
- Geny
- Holly
- Igne Groot
- Inspirational Craft Blogs
- Irene
- Jami Sibley
- Jeanne Streiff
- Jen del Muro
- Jeni Bond
- JenMarie
- Jenn Balcer
- Jenn Diercks
- Jenn O
- Jennifer E
- Jennifer Mick
- Jennifer Pereda
- Jennifer-Sweet Treat
- Joanne Basile
- Jodi Collins
- Julia Stainton
- Julie Masse
- Karen
- Kathryn Berthiaume
- Katie Cotton
- Kelley Holland
- Kendra
- Kim Scholfield
- Kris’s Color Stripes! Get inspired here
- Kristen Dubosque
- Kristin Eberline
- Kristine
- Laura @ Sunshine Stamper
- Laura Turnmire
- Laurie Schmidlin
- Lesa Rapp
- Linda Duke
- Linda-LSN
- Lindsey Botkin
- Lisa (lakind scs)
- Lisa Kind
- Lori Craig
- Maggie
- Mara Campbell
- Maria
- Maria Levine
- Mary
- MaryJo
- Melanie M
- Monique Hansen
- Moxie Fab World
- Pam Imholz
- PaperCrafts Connection
- Peppers and Pollywogs Kids party site
- Rebecca Grohall
- Rita
- Robyn
- Rose Ann
- Sarah Vrolyk
- Sharon Harnist
- Sharon Johnson
- Sharon Rivera (a chemisrty with paper)
- Sherrie
- Sophia Landry
- Storage Units, Ink, & More Blog
- Sue Berker
- Susan (Rainy)
- Tangii Crane
- Tracy
- Tricia Traxler
- Trudee
- Velta
- VivLyn
- Zena
MTME Pretty Palette Color Team
MTME Pretty Patterns Sketch Team
My Time Made Easy TM LLC
Shop till you drop!
Lauren Meader
About Me
Copyrighted material
Subscribe To My Blog
Pages
- About me
- Alexa’s Story!
- My Crafty Corner!
- My Time Made Easy™ LLC
- Our Make A Wish Trip to Disney!
- Resume/Publication List
Calendar
Archives
- August 2013
- July 2013
- June 2013
- May 2013
- April 2013
- March 2013
- February 2013
- January 2013
- December 2012
- November 2012
- October 2012
- September 2012
- August 2012
- July 2012
- June 2012
- May 2012
- April 2012
- March 2012
- February 2012
- January 2012
- December 2011
- November 2011
- October 2011
- September 2011
- August 2011
- July 2011
- June 2011
- May 2011
- April 2011
- March 2011
- February 2011
- January 2011
- December 2010
- November 2010
- October 2010
- September 2010
- August 2010
- July 2010
- June 2010
- May 2010
- April 2010
- March 2010
- February 2010
- January 2010
- December 2009
- November 2009
- October 2009
- September 2009
- August 2009
- July 2009
- June 2009
- May 2009
- April 2009
- March 2009
- February 2009
- January 2009
- December 2008
- November 2008
- October 2008
- September 2008
- August 2008
- July 2008
- June 2008
- May 2008
- April 2008
- March 2008
- February 2008
- January 2008
- December 2007
- November 2007
- October 2007
- September 2007
- August 2007
- July 2007
- June 2007
- May 2007
- April 2007
- March 2007
- January 2007
Categories
- About Me
- All That Scraps
- blogger challenge
- camera/photo play
- Cards
- Contests
- family stuff
- FOR SALE
- Home decor/3-D items
- How to FAKE it!
- Introduction
- JUGS Challenge
- JustRite Stampers
- Lizzie Anne Designs
- My family stuff
- My Stamping Space
- My Time Made Easy
- My Time To Color Challenge
- My Time to Create Challenge
- My Timeless Template Challenge
- My Timeless Templates
- Mytime Mail
- MYTIME MOVIE/VIDEOs
- Papertrey Newsletter
- Pink Cat Studio
- Pretty Palette Challenge
- Pretty Patterns Sketch
- Product Opinions and Must haves
- Recipe's
- Saturday Sketch
- Smilebox Creations
- Stampavie
- Tutorials
- Uncategorized
- videos
Most Popular
- Create your own Onesie Card Tutorial-and important NOTE! PLEASE READ (2529)
- Saturday Sketch-Boxed bag holder (2333)
- Going GREEN! Fancy Flower Flourish-Closure Video (1478)
- Fabulous Favorite - Giveaway! (1336)
- a Prayer Request (1231)
- QUICK-Easter Baskets from Nestabilities-PTI style-and blog challenge (1063)
- Teaser Sketch (999)
- February Release Giveway! (and a little peek) (996)
- Group Post and Rambling Rose Video Tutorial (985)
- GIVEAWAY! Who wants it all?! (895)
Recent Comments (RSS)
- 야동: Love to read it,Waiting For
- 야동: This seller is in a
- 바카라사이트: 여기 처음 왔어요. 나는이 게시판을
- 야동티비: I was surfing the Internet
- 바카라사이트: 비슷한 주제에 대한 흥미로운 정보를
- 바카라사이트: "여기에 제공해 주신 귀중한 정보와
- 온라인홀덤: 유익한 웹 사이트를 게시하는 데
- 홀덤나라: 나는 당신의 블로그를 정말 좋아합니다.
- lisa: Technology, too, has left an
- 주소모음: 흠 !! 이 블로그는 정말
Copyright © 2007 - My Time, My Creations, My Stampendence - is proudly powered by WordPress
This blog has been Tweaked and Designed by Sara Williams
32 Responses for "Spooky Sweets"
Your ideas were wonderful! You really outdid yourself with those pumpkins! They look fabulous Thanks so much for all the inspiration
These are all so cute! But I want to see the funny disaster video!! Pretty please! You don’t have to worry about your “professional” credentials–we all think you are amazing!
Oh..that’s just soooo cute. You are a Super Mom to have your kids right there sharing the spotlight. Are you sure you won’t share the video? You could call it you “Blooper Videos” and start a new category on you blog. 🙂
Hi Lauren!
I love this idea! Not that we celebrate halloween in Sweden, but they are just super cute. Love the black with the green glitter!
Hugs /Hanna
Hi Lauren, Great projects and so fun! The kids should be very proud of their pumpkins, they’re just so cute. They did a great job. Have a great day! Dottie K.
I love this! Thank you so much for sharing all of your wonderful ideas!
Cute ideas! Halloween is probably the funnest time to do crafts for – you can get sooo carried away!
Very cute! You can even buy flavored oils that can be mixed into melted chocolate – caramel sounds yummy for halloween. (water based flavors will harden the chocolate before you put it on the popcorn)
Cute and fun projects. I would so love it if you shared your video.
OMG! these are adorable Lauren. What a great idea for trick or treats.
What a cute idea! I was totally needing an idea for a fall gift for Abby’s Sunday School :o)
Brilliant ideas Lauren! I don’t have kids to make these with, but I do have friends with kids that might be getting treats like these for hallowe’en. Thanks for sharing!
Ok so, again as usual there projects are perfect. Having 3 kids of my own and daycare children I’m always looking for projects they can do as well. Thanks for the ideas. Now it’s time to get to work!
Clever as all get out. Love this, Lauren!
Such a FUN IDEA!! All the pumpkins are CUTE!!!! and the popcorn sounds YUMMY too!
Love, love, love your cauldron Lauren! it’s so fun with the boiling over edge and fun treats inside! and your kids pumpkin ones are just wonderful – job well done you guys!!! thanks for sharing the popcorn idea – super Halloween projects!!!
Adorable Halloween gifts!
Lauren, these are both GREAT ideas. Wonderful job on your DT project this month;)
Lauren, these are just great!! Love everything about this project!
They’re fabulous Lauren!
Hi Lauren ~~ I’m glad to hear that Jay is healing and back to work … let’s just hope he doesn’t over-do it during his first week back.
Your Halloween creations are always THE BEST! You still amaze me after all these years =)
The best feedback you could ever have, is seeing your three adorable kiddies, smiling and obviously thrilled about your creations in their hands.
Love the cauldron, how did you print it on the black cardsock so you can see where to cut? Could you let me know I want to make some for a Halloween Party!
Thank you,
Pam
Way too cute Lauren, both the templates and the smiles.
Lauren, this is AWESOME!!!!!! I love it! I totally know when we start playing the Phantom (Boo) this Halloween what I’ll be using as my goodie container! Thanks for the inspiration!
These are so cool! I love your kid’s decorated pumpkins…they’ve definitely got their mom’s creativity!!
OMG, thank you Lauren. My budget is so tight this year, this will be perfect. I already have the template, add popcorn, perfect Halloween treat!
That is so cute! and thanks for the recipe. I have snack duty for my sons pee-wee soccer team in Oct, and this will be on the list for them, they will love it!
Would be really really great if you could upload the video.. I could personally do with a few laughs *.^. And more importantly, it’ll probably be the stick that nudges me up to purchase the pack a picnic template, which I have been hesitating because I’ve heard that it’s so big and that is a big turn off for me, as I generally feel that big cardstock boxes means I need to find something big and light so that my box doesn’t go out of shape when I carry it…
But your cauldron is so adorable! Right now it sounds as though I have to spend a bomb on stickles, and the handles look a little complicated, so it really would help if I could see the video, since you’ve ALREADY done it anyway!
Lauren, I know I’m not a very good subscriber because I haardly EVER comment, but I love these projects, they are perfect for me! We only have a few kids in the neighborhood and I’ve always wanted to do something special for them — this is it! I love your templates! Mary
You really are an amazing talented woman! What more can I say!
Got your article QUINCY JONES ON MICHAEL JACKSON | TV One: The Spin in Msn. Great weblog.air max 2009
I was third. Jim singled that they required to MBT stop for fuel, so with the next place we stopped.
Leave a reply