Archive for the ‘Home decor/3-D items’ Category
Pinch Me! It’s time for a Pink Cat Studio Release
Jan 6, 2010 Author: mytime | Filed under: Cards, Home decor/3-D items, Pink Cat Studio, UncategorizedI can always count on Melissa at Pink Cat Studio to come up with the CUTEST images.
She is my cutesy fix 😀
It feels like forever since she has had a release (and it has been about a month or so) so it was overdue! She has some really sweet images for Valentines Day, some in rubber, and others in Digi downloads so be sure you check it out —> HERE! SO much variety

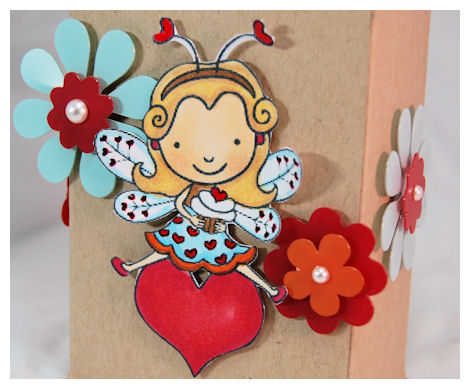
Today I am working with a NEW! Lily Valentine Fairy
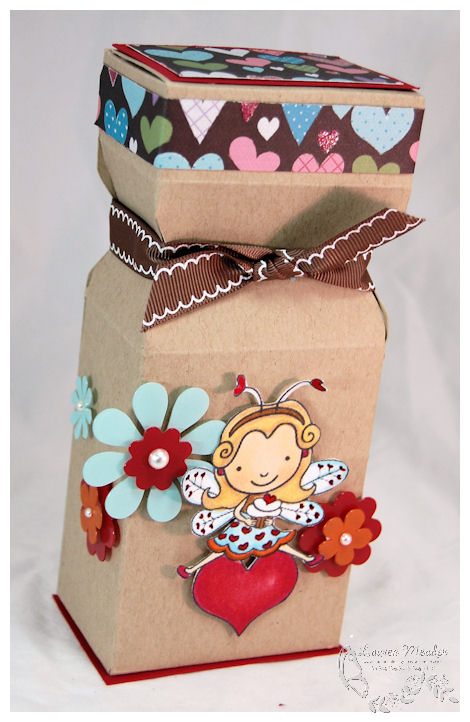
She is just the sweetest thing.
I have missed using her stuff. I’ve gotten so busy….its just fallen to the wayside. But Lily is my FAVORITE so it was nice to se aside some time to just play.
I knew I wanted to package up some candy in the In a Pinch © Pretty Packaging template. I also knew I wanted to use RED and some other non-traditional Valentine colors, so I got inspired by the heart paper, and added some flowers from American Crafts.
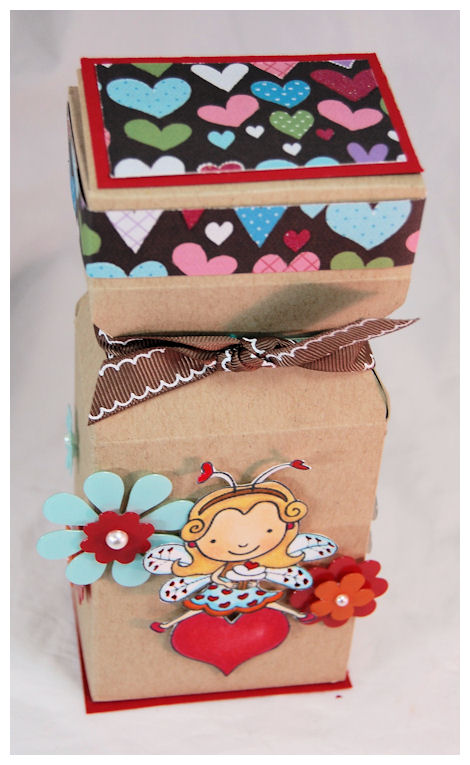
Admittedly this was created during a MOJO lacking moment, and when I was completely exhausted. No excuses though, but now I’m thinking (with a clearer head and some creativity) I could have totally omitted the heart paper! LOL! Oh well…..
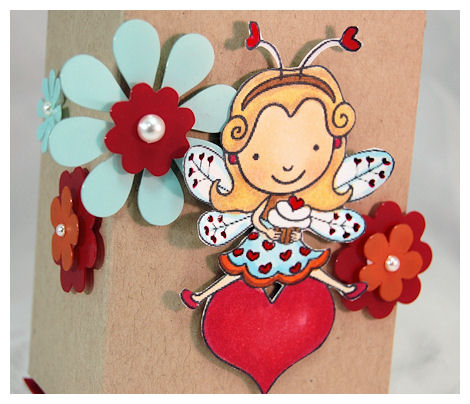
I had to cut her all out. I so love the coloring and colors (of this portion anyway)
Be sure you go to the BLOG to see what all the team members have out together to get yourself inspired.
Thanks for stopping by
Being able to share what you love with the world.
Being thankful for everyday.
Fulfilling your dreams.
Accomplishing you goals.
LOVING what you do.
It is also the beginning of one of my most favorite quotes:

Happiness is a butterfly, which when pursued,
is always just beyond your grasp, but which,
if you will sit down quietly, may alight upon you.
-Nathaniel Hawthorne
That is such a beautiful quote. It reminds me to sit back, and reflect, or take in what is going on in life, and to find the happiness and joy in the moment. While at times this can be difficult, it is necessary. Sometimes I get caught up in things, or let something upset me. I put myself back in check by taking a moment to think of all the good things I have. I have so much to be happy and thankful for. First and foremost the health, love and support of my family. Without them nothing really matters. They are my heart, my life. Everything I do is for them. To be able to watch 3 little people grow up, and view the world through their eyes is beyond words. I am blessed.
I feel like I have been on a journey of transformation myself, in just about every aspect of my life. I am welcoming all aspect of this transformation. I feel like something just clicked when I turned 30. It was like I woke up and discovered who I am, what I want, where I want to go, and how to get there. Through my daughters battle with cancer, I learned that every second is precious, and not to be wasted. I do my best to make the most of each day. I’m not perfect. I don’t always think “happy” thoughts, and I have plenty of bad days, and mood swings (just ask Jay! LOL!) but I always catch myself at some point in attempt to make the best of everything. To live my life in a way that if it were my last day, would I be ok with what I had done or accomplished.
That all leads me here.
I truly LOVE what I do. I love sharing it with all of you too! I love having an idea, executing it, then somehow inspiring someone else.
I have SOOOO much to share with the first release of My Time Made Easy™ LLC, so I’m happy you could stop by. I have a ton to share, but for today I felt the project deserved its own post.
Today you will also find some inspiration from our latest release by stopping by to see
Here is a peek at All A Flutter ©
Then her Shutt-erfly ©
and more to come from Kristin Bueter (our digi paper girl) who was just announced as the NEW! design team member for the Color Throwdown! Make sure you check out the Color Throwdown, since they are all used our NEW! Pretty Printables © digital paper!!!
OK now I will get along with my sample! You already got a PEEK above….
Recently I released a Pretty Packaging © templates called Hanging Holiday Sled © I alluded to the fact that it was far more than just a “holiday” sled. It could be utilized for any time of year.
After that the emails flowed like lava!! People asking ” What other holiday can this template be used for?”
Well, that is just it….not just ANY holiday….how about ALL year?

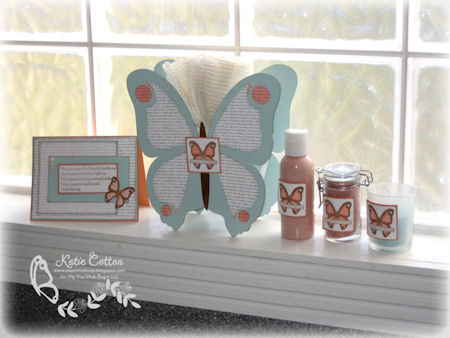
I used the Hanging “Holiday” Sled and designed this to hang on the door. As you can see this is an everyday type of decoration.
What you CAN’T see is that I used a stunning shimmery paper called Mother Of Pearl. I then used a gold, and brilliance ink in beige to “distress” it. It’s really pretty in person. Imagine coming upon the home of someone and this was at the door to greet you? Or hung in their home somewhere?
I think your first thought would NOT be that it was cardstock. It looks like an expensive item you’d get from a specialty home magazine. Meanwhile it cost just dollars to create!
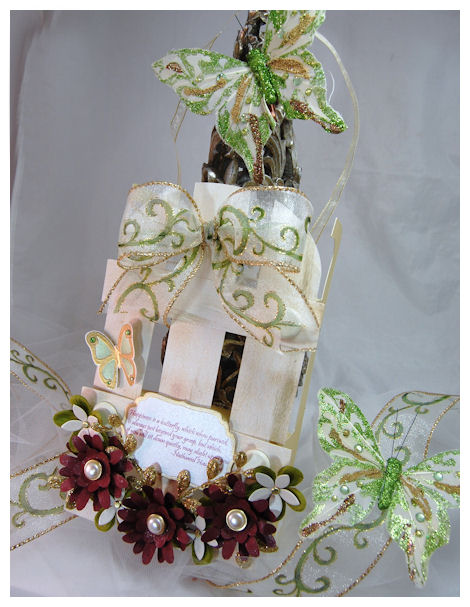
This is the side view

Even the sled rails are in a gold cardstock. Its a shimmering masterpiece, that I am just so proud of.
Who would have thought a “sled” could look so elegant?
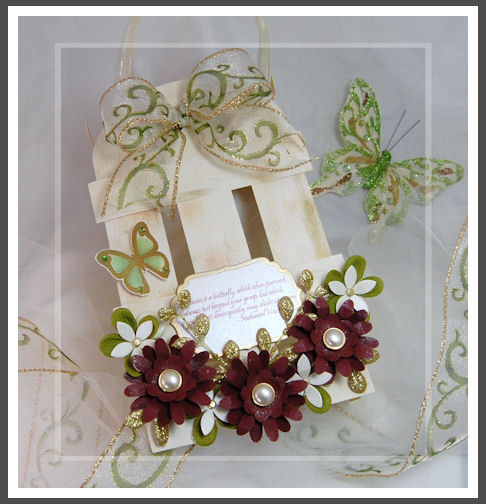
The wired ribbon was the main source of inspiration for this creation. We all need a starting point, right? It then blossomed from there-literally!
I used the Pretty Pieces © Cut File-Flutters and Flowers © to create the shimmery daisies you see along the bottom of my sled! I just used my Cricut, and cut out 6 of them. I then manipulated the petals, and painted them with Shimmerz. What a fantastic touch that adds!! I then put in some glittered leaves, and some other shimmery bridal confetti adorned with gold brads and pearls.

The butterfly was inspired by the glittery butterfly in the photo. Stamped on Mother of Pearl carstock, and gold embossed. I then used some Copic markers to fill in the color, and adhesive rhinestones on the circles of the wings.
I am in love with the All A Flutter © image and sentiment set. Here I used the All A Flutter Sentiment set on a large label nestability, stamped on the Mother of Pearl cardstock, in which I drew a gold border around using a gold pain marker.
There are 9 sentiments in this set. Each sentiment uses a different font.
The purpose was to provide you with the perfect “butterfly themed” sentiments that could be used as the main focus of a card, scrapbook page, photo mat or Pretty Packaging © project, or on its own for a tag, or maybe inside a card. The All A Flutter © image set makes the perfect accents to these sentiments. They can just “flutter” around them, as you have seen over the last few days. With the Flutters and Flowers CUT file, you don’t have to even cut them out, the machine can do it for you. It also saves you tons of money on punches. Especially since these are all re-sizable!
Many of you inquired what the sentiment set actually has for sentiments: (the website is updated with that info too :D)
The butterfly image reads” Follow your dreams”
The circle sentiment reads: “Cherish Yesterday Dream Tomorrow Live Today”
The butterfly counts not months but moments,
and has time enough. ~Rabindranath Tagore
May the wings of the butterfly kiss the sun
And find your shoulder to light on,
To bring you luck, happiness and riches
Today, tomorrow and beyond.
~Irish Blessing
Love is like a butterfly: It goes where it pleases
and it pleases wherever it goes. ~Author Unknown
From small beginnings come great things…….
(used in today’s project)
Happiness is a butterfly, which when pursued,
is always just beyond your grasp, but which,
if you will sit down quietly, may alight upon you.
-Nathaniel Hawthorne
What the caterpillar calls the end of the world,
the master calls a butterfly
-Richard Bach
But these are flowers that fly and all but sing:
And now from having ridden out desire
They lie closed over in the wind and cling
Where wheels have freshly sliced the April mire.
~Robert Frost, “Blue-Butterfly Day”
Supplies:
Pretty Impressions © acrylic stamp sets: All A Flutter © image set, All A Flutter Sentiments © set
Pretty Packaging © templates : Hanging Holiday Sled ©
NEW! Pretty Pieces © Cut File : Flutters and Flowers ©
Cardstock from Couture Cardstock: Mother of Pearl, Bow Bells, Vivian (gold)
Michael’s craft store: Gold leaves, shimmery bridal confetti, wired ribbon, pearls and pearl brads
Shimmerz, gold embossing powder, copic markers
Well my friends that is all she wrote for today. More to come tomorrow!!
Thank you ALL for stopping by, and taking time out of your busy day.
We are half through the week 😀 I am already looking forward to the weekend. I hope to get more crafting done this week too. Its been several days since my fingers have seen ink!
Take time for you today.
A little glitz, a little glamour, and a little love…..
Jan 4, 2010 Author: mytime | Filed under: Cards, Home decor/3-D items, My Time Made EasyI hope you are all enjoying the week, and all the project samples myself and the My Time Made Easy™ LLC design team have been sharing. We had our official opening on the 3rd, and I have been steadily packaging orders!
I can’t wait to see what you all start creating with the all our coordinating products.
We have released : Pretty Impressions © acrylic stamp sets: All A Flutter © image set and All A Flutter Sentiments © Pretty Packaging © templates : All A Flutter© and Shutt-erfly © Pretty Printables © digital paper collections : Fluttering By© and Shutt-erfly © and we have a NEW! Addition to the digi paper line: our EXCLUSIVE Color Me Pretty © Collection.
Today
have some projects to share! Be sure to stop by their blogs!!
Now I have some things to share with you.
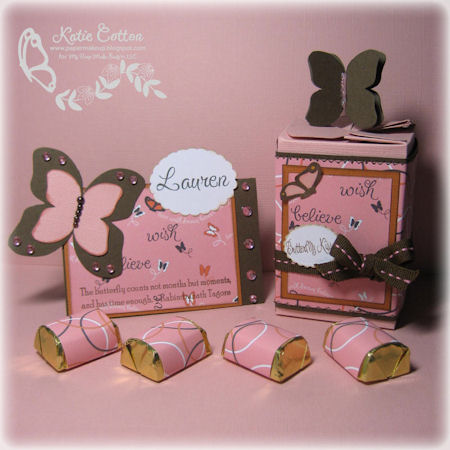
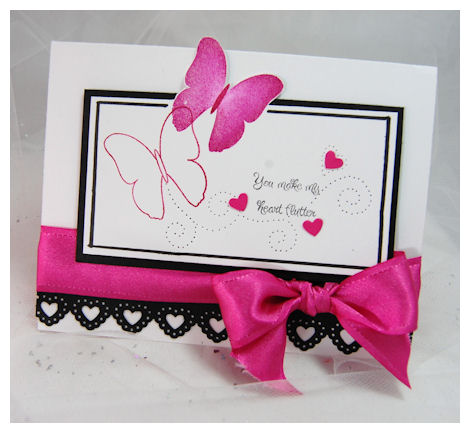
I love Valentines Day. Probably because I LOVE pink, and I love hearts! I also LOVE “hot” colors and monochromatic projects 😀 So I have another card/gift set to share with you.
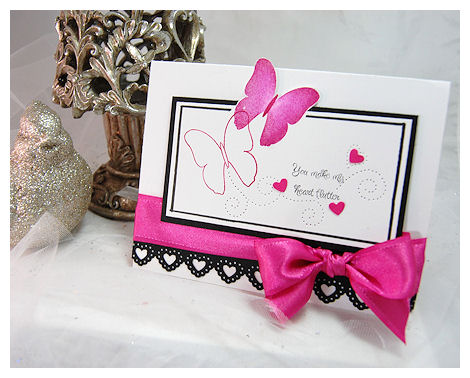
I love the All A Flutter © image set because it has SOOOOO many possibilities for creating a variety of butterflies. For my sample I had fun coordinating the open line, and solid butterfly from the set.
The various pieces allows you to quickly create a variety of butterflies. No two will be the same 😀
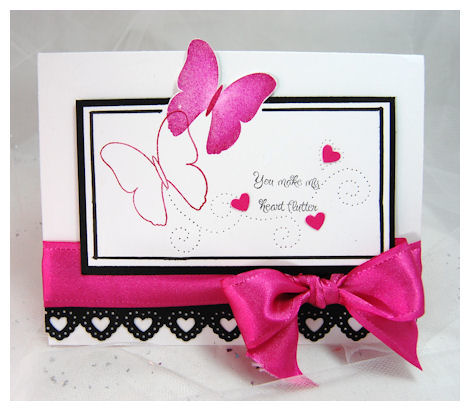
I love how the 2 images are intertwined, and the solid image seems to be flying off the card.
I pierced a flutter trail, and added some hearts around the sentiment. I adored the punched border, and satin ribbon.
I love the colors. LOVE. So much POP.
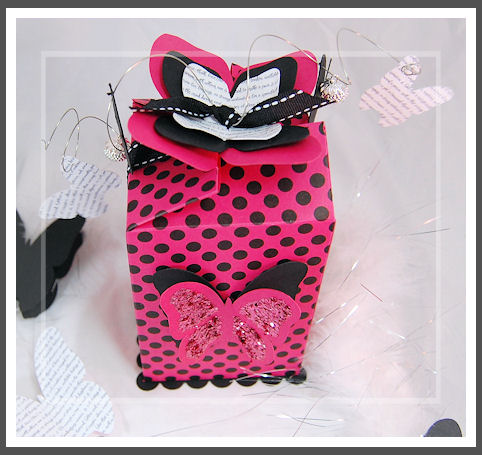
Now we have a gift set using Shutt-erfly ©

I was definitely thinking POP, Glitzy…and HOT!
I think I got it!
I printed the large dot pattern from the Color Me Pretty © Flutters and Flowers collection. I love that you can have about ANY color of polka dotted paper, in seconds, without having to line up stamps or anything too time consuming! Its all about time saving, and creating great projects simply.
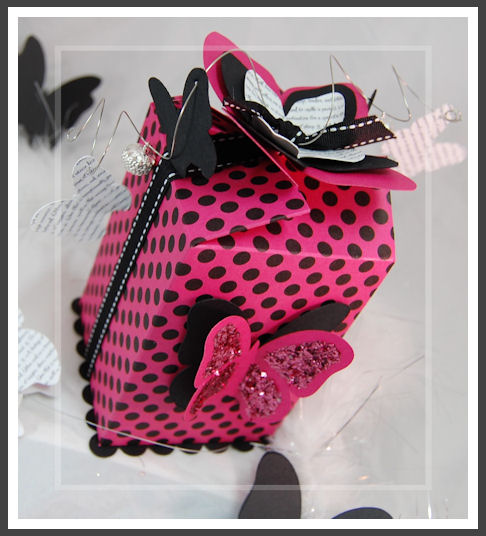
Now we all know that TEXT is all the rage! Text on everything!! Now with our Pretty Printables© paper I was able to use the black text from the Color Me Pretty collection! I printed my paper and used the front/back butterfly from All A Flutter © template (resized to various sizes) to cut several pretty TEXT printed butterflies!
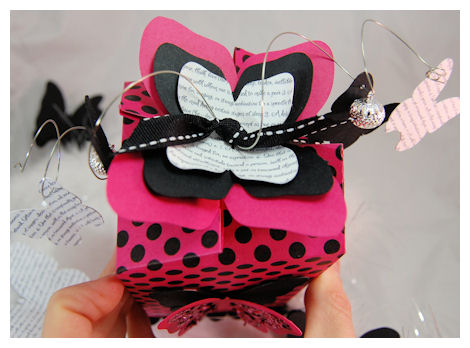
No need to feel guilty about wasting paper, or ruining an old book. It was quick and easy and I can get a pretty text pattern at the click of a button!!
I just spiraled some wire, and added the butterflies and hanging beads. I think it looks so fun and funky!

For the front I just added some chunky glitter to another butterfly I cut using my Cricut.
I also layered on a scalloped rectangle, to the bottom. Just gives it that last minute “finished” look. This is a perfect TEEN style gift. I love all the butterflies on the wires!

Supplies:
Pretty Impressions © acrylic stamp sets: All A Flutter © image set
Pretty Packaging © templates : Shutt-erfly ©, All A Flutter© (for the butterfly pieces on template!)
Pretty Printables © digital paper collections : Color Me Pretty ©Collection (text pattern and polka dots printed on pink cardstock)
Cardstock: Devotion fromCouture Cardstock
Ink: Versamagic
Other: Border punch by Martha Stewart, Glitter by Martha Stewart , Satin/stitched ribbon by May Arts, Paper piercer, wire, hanging beads
So I hope you enjoyed today’s projects. There is so much more to come over the next few days, so I hope you can come back tomorrow!
There have also been 2 customers who wrote some very nice reviews
Check them out if you have time
Go see—>TED
and —> Katie
If you have a project or review you want to share, feel free to link your post in our comments section. I know myself and other want to see what you have been doing!
See you tomorrow
My Time Made Easy ™ LLC Opening Day 2
Jan 3, 2010 Author: mytime | Filed under: Cards, Home decor/3-D items, My Time Made EasyWOW! I’m overjoyed at the response to our first release yesterday!
If you didn’t know My Time Made Easy™ LLC is now officially open ☺
We have released :
2 Pretty Impressions © acrylic stamp sets: All A Flutter © image set and All A Flutter Sentiments ©
2 Pretty Packaging © templates : All A Flutter© and Shutt-erfly ©
2 Pretty Printables © digital paper collections : Fluttering By© and Shutt-erfly ©
and we have a NEW! Addition to the digi paper line: our EXCLUSIVE Color Me Pretty © Collection.
NEW! Pretty Pieces © Cut File : Flutters and Flowers ©
This is SO exciting to get such a warm welcome into the industry. Thank you to all of you who have supported me from the beginning. I have to say there have been quite a few people who told me that I would not be able to do this on my own, and while I’ve had my share of learning experiences (with many more to come), here I am!
This shows everyone, you can do anything you set out to do! Goals big or small, nothing is out of grasp.
So without further delay, let’s get to what you came for! More samples!
I have 2 samples for you and today my Design Team member Katie Cotton has 2 projects to share with you as well!
Here is a PEEK at her 2 projects.
All A Flutter ©
I believe Katie has a gift tutorial for you too!
Here is a peek at her second project
Shutt-erfly ©
HMM! I like what I see so far ☺
Now it is my turn!
First I will share a SIMPLY elegant gift set that uses our All A Flutter © image and sentiment set, in coordination with the Pretty Packaging template: Shutt-erfly ©. This template is flying off the virtual shelf!!! I simply can’t wait to see your take on projects made with it.
I wanted to share a SIMPLE coordinating gift set with you.
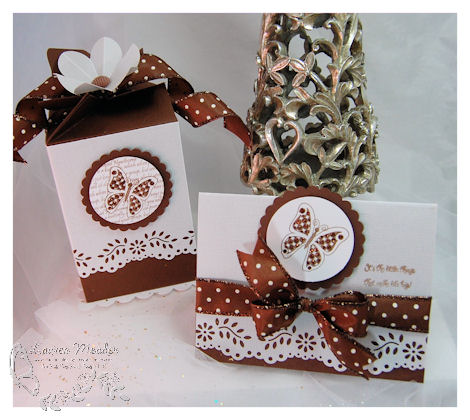
I LOVE chocolate and white. A monochromatic color scheme always looks so clean, fresh and elegant.
So for my box, I made it as large as I could to fit 12 X 12 cardstock. I cut my template from a Ganache cardstock.
What goes better with butterflies than this punched border?! Simple WOW!
I was inspired by the wired polka dot ribbon for this gift set. It reminded me of the dotted wing prints from the All A Flutter © set.
I kept this as simple as possible. I used my nestabilities for my circle layers.
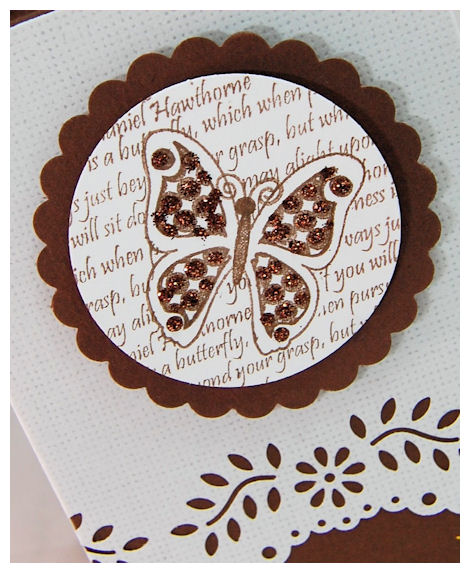
I stamped the butterfly first, then masked it. I stamped a sentiment from the All A Flutter Sentiment set © to fill the background. LOVE the look!
The shimmer in the wing prints, matched the shimmer in the ribbon. I brown stickles to the dots, and it was perfect!
I love the look of the wired ribbon too.
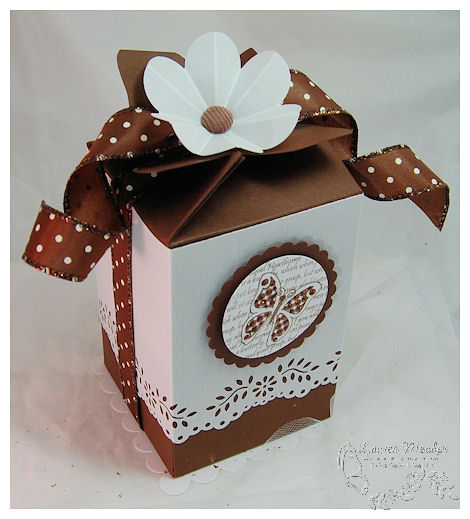
Now for the top…I view the “butterfly/flower” shaped closure as the “leaves” for my vellum flower, which I scored to add more POP and interest.

Take note of the bottom. There is a scalloped square layer. I used the largest scallop square nestability. Fits perfectly!
I decided that I would make a card to match my Shutt-erfly © box
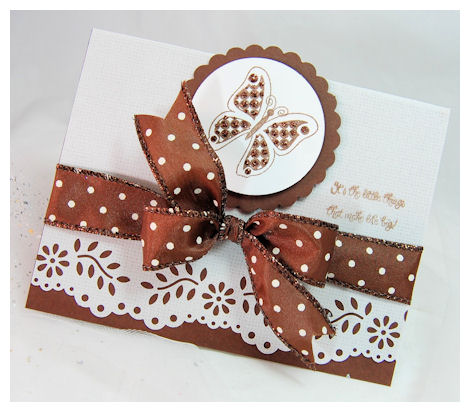
“It’s the little things that make life big” I adore that sentiment, and enjoyed finally having it in this fun and whimscial font.

Supplies:
Pretty Impressions ©: All A Flutter ©, All A Flutter Sentiments ©
Pretty Packaging ©: Shutt-erfly ©
Cardstock: Ganache, White Vellum, White
Ink: Chocolate
Other: Martha Stewart border punch, polka dot wired ribbon, chocolate stickles, circle nestabilities, flower punch
NEXT UP!!
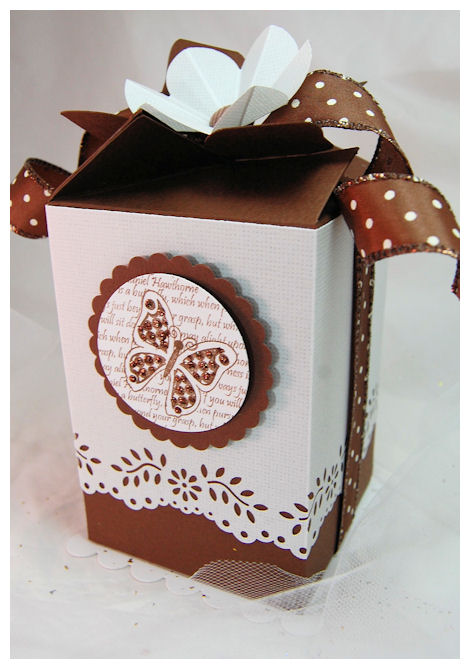
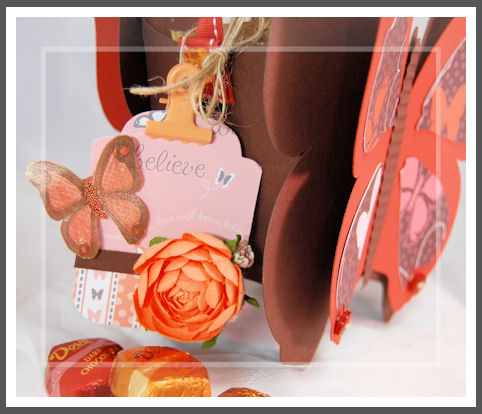
Now I have a sample utilizing the All A Flutter © Pretty Packaging.

When I created this I knew I wanted to create a gift package with this template where the wings flutter forward!
I think it looks amazing in person! And it’s filled with an assortment of DOVE chocolates.

I created the main All A Flutter © template in the standard size, and assembled it as directed. I then resized the wing front/back, and wing prints to be about 2 inches smaller.

As you can see I also used the NEW! Pretty Printables Paper in Shutt-erfly © for my wing prints. I switched out the circles for buttons. The body cut out was created using my oldie but goodie paper crimper!
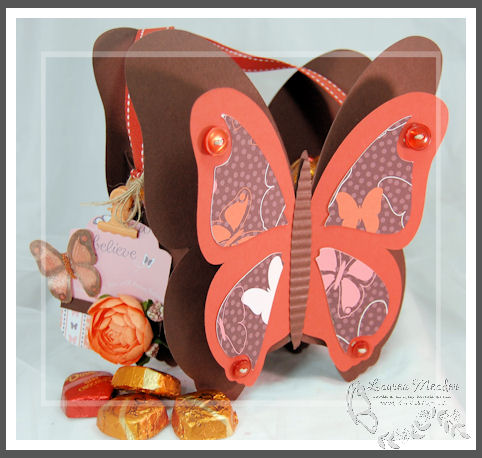
I added a simple ribbon handle, that is attached using some cute flower brads, to match (from Making Memories).
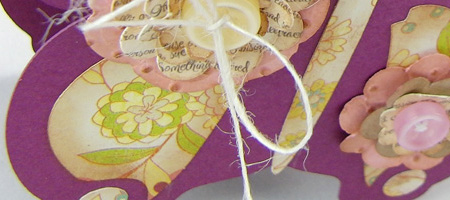
I knew I wanted to add a tag
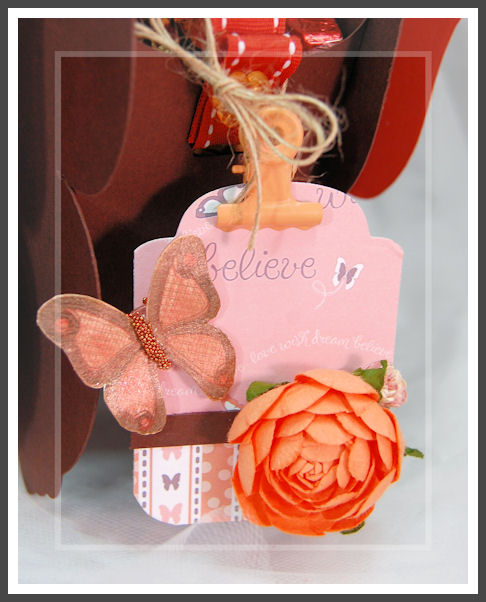
So I created one using some of the Flutter-By Pretty Printables paper.
I tied a tag with some twine, then added a clip to adhere a tag.
I stamped my solid butterfly in chocolate ink, the solid center in a rust ink, then stamped the grid like wing prints, repeating in a copper in. To ADD to that, I painted the butterfly with pumpkin Shimmerz. For the body, I added some copper micro-beads.
DONE!
Supplies:
Pretty Packaging ©: All A Flutter ©
Pretty Impressions ©: All A Flutter ©
Pretty Printables ©digi paper in Shutter-Fly ©, and Flutter-By ©
Cardstock: Ganache, white
Ink: Chocolate, Rust, Copper
Other: ribbon, nestabilities, Prima Flower, Pumpkin Shimmerz, Micro beads, twine, desk clip, buttons, making memories brads
Well, I hope you feel inspired to give all the coordinating products a try! The *key* is to have FUN, get creative, and enjoy what you are doing!
I know I am enjoying the chance to finally share things I have been working on that I had to keep quiet!
Well it’s back to the daily grind! The kids go back to school and life goes back to a schedule!
Enjoy your Monday
I hope you come back tomorrow for more ideas!!
My Time Made Easy ™ LLC is OPEN
Jan 3, 2010 Author: mytime | Filed under: Cards, Home decor/3-D items, My Time Made EasyI’m sorry this post is SOOOO late! Splitcoaststampers Blogs are technically “down” leaving me unable to load any photos :C Its actually been 3 days, and I have yet to hear when the issue will be resolved! Anything I had posted that included photos, was from before the site went “down”.
Thankfully my web girl (and savior!) Sara found a way to help me load my projects! I stayed up till 5:15 am (almost 24 hours!) just to get this done for the opening. Better late than never!
I’m over the moon to announce the Grand Opening of My Time Made Easy™ LLC !
![]()
Now you can purchase an entire collection of coordinating products! Customizing your own creative gifts, cards and tags couldn’t be more easy and affordable! Plus MOST of what we have is an INSTANT download, so if you order any stamps, you can start on your projects while you wait 😀
For detailed information about all our products please read —> here
Also each product contains a description when you click to view it.
We have released :
2 Pretty Impressions © acrylic stamp sets: All A Flutter © image set and All A Flutter Sentiments ©
2 Pretty Packaging © templates : All A Flutter© and Shutt-erfly ©
2 Pretty Printables © digital paper collections : Fluttering By© and Shutt-erfly ©
and we have a NEW! Addition to the digi paper line: our EXCLUSIVE Color Me Pretty © Collection.
NEW! Pretty Pieces © Cut File : Flutters and Flowers ©
*Now this is the first we have mentioned the NEW! Pretty Pieces ©*
We are happy to be able to also offer something to further extend our coordinated line of products called Pretty Pieces ©
This product line is NOT available in PDF format.
These are additional shaped CUT files, formatted to be used in your cutting machine. These shapes will often be a cut image that is designed to layer our stamped images, so you won’t have to manually “cut out” your images! Just have your machine do it, then STAMP! This will be a great resource, as you will save $$ and space on purchasing ONE size punches or dies!! Not only can these Pretty Pieces © be used for stamps, but we will offer a variety of images for you to add to your library that you can also RESIZE! This gives you a multitude of options!
These will be offered whenever possible, to add to the coordination of our Pretty Packaging ©, Pretty Impressions © acrylic stamp images ©, and of course the Pretty Printables © digital paper.
All our Pretty Packaging © templates come in the following formats: PDF, .SVG, .WPC, .GSD, and .DXF.
Please —> read here <— for more information.
Now how about some samples?
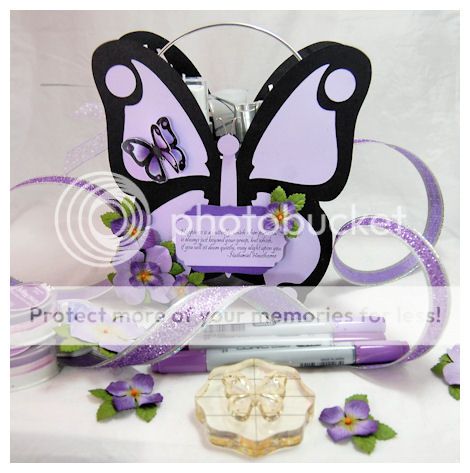
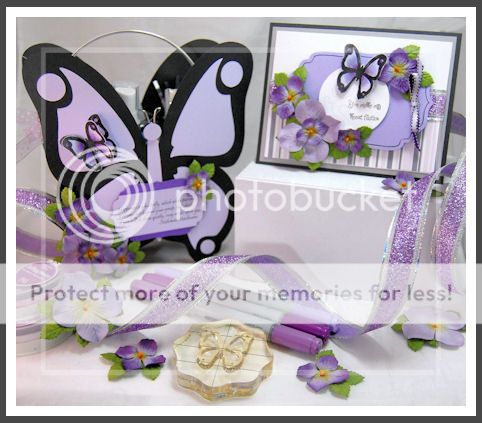
This is a STUNNING 3 dimensional butterfly shaped gift box, designed using an enlarged version of our All A Flutter © Pretty Impressions ©stamp set. You have so many design possibilities. Now you can create gift packaging and card/tags to match perfectly. This box is a super fun size, and if you own a personal cutter, can be resized to suit your gift giving needs. OR just use the butterfly shape pattern, and resize to make a plethora of layered butterfly accents for any project you can dream up!
Obviously I have a slight obsession with butterflies. They have so much significance to me. They signify time, change, life, new beginnings and endings. They are so carefree, and amazing to watch as they flutter along.
When I started to design my own stamp images, naturally butterflies were my first set. I always wanted a butterfly set that I could build upon, and have various wing options.
I loved the stamp design SO MUCH that I designed the All A Flutter © template to match! All my butterfly dreams and obsessions were really able to be brought to life through this release!
Another obvious point, I LOVE lavender. It is my favorite color. I think you can see that through my website, and packaging!
So here is my first gift set I created using my Pretty Packaging © All A Flutter, and Pretty Impressions © All A Flutter and All A Flutter Sentiments
I stamped my butterflies on the lavender cardstock, in black ink, then colored them with my Copic markers. I also did some multi-layering
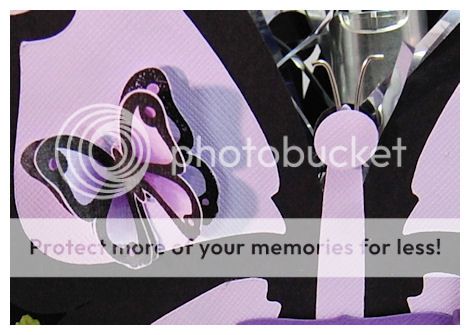
I created my base to match my stamped image by cutting it in a black cardstock, and used the purple wing prints. The antennae were created using a simple BINDER CLIP!! Loved that idea. Just sandwich it behind the body/head cut out.
I added a sentiment to the front, on a nestabilities label. I applied the Prima flowers for that something extra!
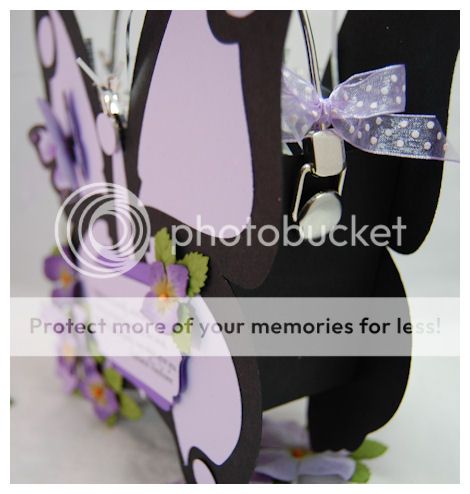
I used a metal purse handle for the side. They are attached with some large brads. I feel like it looks so elegant. A touch of May Arts ribbon and it was PERFECT!
I don’t think I can ever part with this box!!
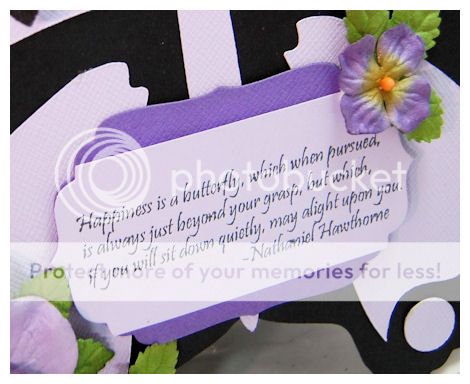
Then it was time to create my card to match.
Using the same elements, and adding some of the patterned paper, this card compliments the All A Flutter template perfectly!!
Here is a closer view.
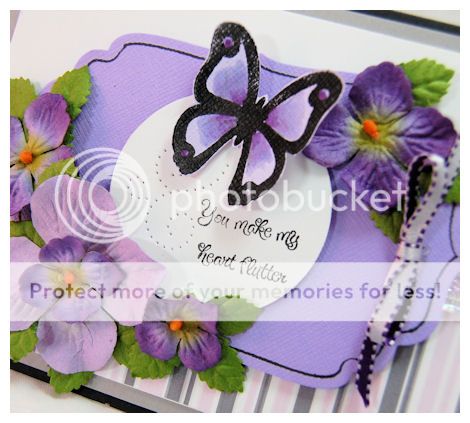
Using the textured paper provides a really nice look too! I stamped my sentiment, then pierced a flutter trail.
Its definitely a very feminine gift set! Who wouldn’t love something like this?
Inside I put some bath and body works lotion, shower gel, and body spray-in Lavender scent!
Supplies:
Template- Pretty Packaging ©: All A Flutter ©
Stamps-Pretty Impressions © : All A Flutter, All A Flutter Sentiments
Paper- Pretty Printables ©: Throw Me A Line © (purple/ gray)
Cardstock- One Sheet Wonder, Raven, Carousel
Ink- Momento Black, various Copic Markers
Ribbon: May Arts, Glitter ribbon from Michael’s
OTHER: Prima Flowers, Labels nestability, Purse Handle, Silver Brads
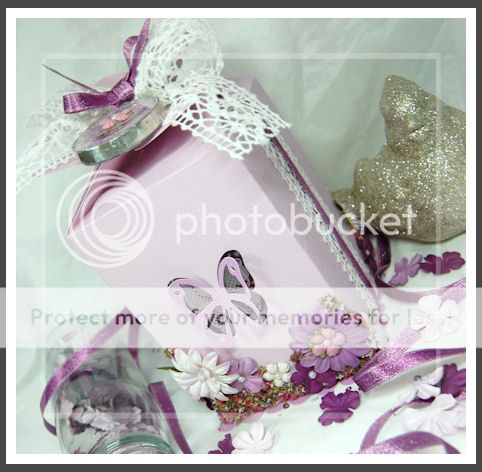
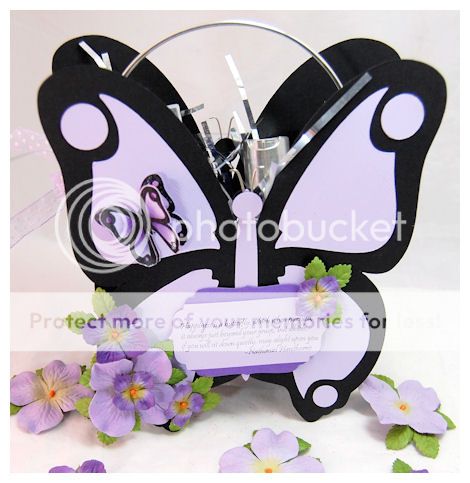
This is a very unique box due to the way it folds “shut”. The top flaps fold in together to create a “butterfly” like (or flower) shape, hence the name combination- “Shutt-erfly” © There is also a layering “Shutt-erfly” © template so you can easily layer and create a butterfly or flower like accent for the top! This is yet another perfect Pretty Packaging © template to use with our Pretty Printable © All A Flutter digital paper as well as our Pretty Impressions © acrylic images – All A Flutter © image/ and or All A Flutter Sentiments ©
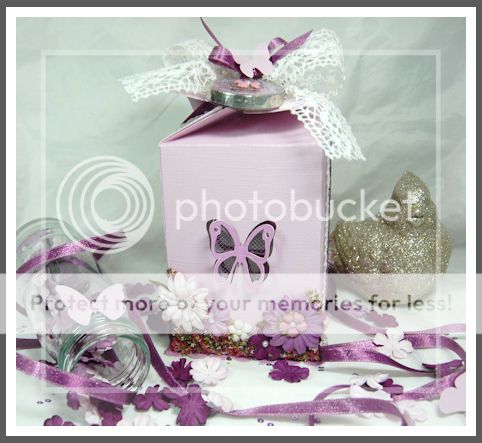
This is a REALLY nice sized box, and the top folds in a unique fashion, with the end result forming a butterfly or flower-like shape!
I folded the template closed, as directed in instructions. Tied it closed with a lace and purple shimmer ribbon.
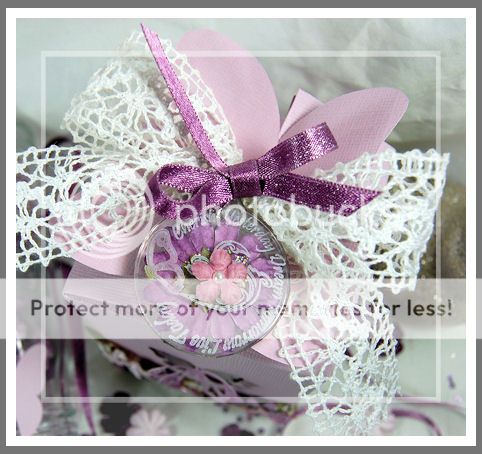
I wanted to adhere a special tag, to really dress it up, so I decided to use some acrylic tags from Michael’s. I stamped the circle sentiment from All A Flutter Sentiments ©, in white Staz On. I decided to make what appears to be like a dried flower, pressed in glass. To do this I sandwiched a Prima flower in between the 2 tags, and added a silver foil.
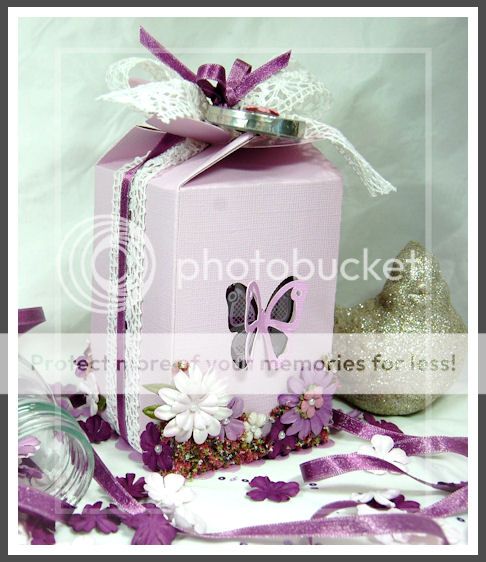
Now for this project I pulled the Shutt-erfly © template into my SCAL program. Once it was in place I used the Pretty Pieces © Flutters and Flowers Cut File © to create a butterfly shaped window in my box front/back! Once the template was cut, I stamped the Criss Cross pattern from the wing prints of All A Flutter © on a piece of acetate in White Staz On. I then used my Pearlescent Pastels to make them a shimmery purple. I layered the acetate window to the inside of the box, then assembled.

I took a darker shade of lavender to then cut the open wing cut file, and layered it into the center of my butterfly window on the front/back.
I decided to make the “garden” on the bottom of both the front/back of the template using Prima flowers with adhesive pearls and some Flower Soft to complete the butterfly “garden” feel.
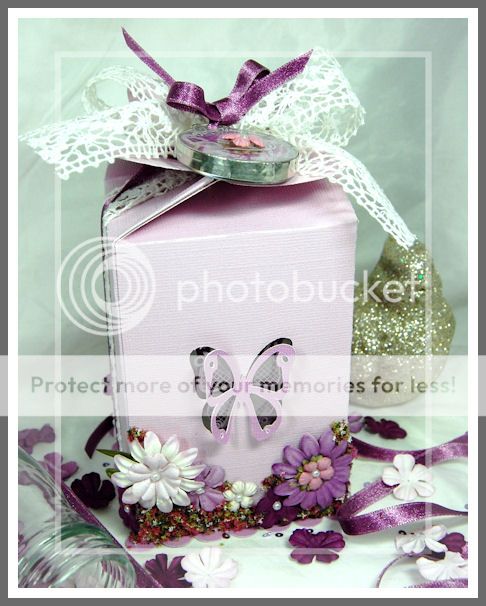
You can’t really tellbut th dark purple and colors in the Flower SOft is a really nice match. It really completed this project!
This is one of those projects that is FAR more attractive in person. Lots of wonderful details.
Supplies:
Template- Pretty Packaging ©: Shutt-erfly
Pretty Pieces ©: Flutters and Flowers
Stamps- Pretty Impressions ©: All A Flutter Sentiments
Ink: White Staz On
Cardstock-Carousel, Fortune Teller
Ribbon: Lace and leaf ribbon by May Arts, Shimmery purple
Other: Pearlescent Pastels,Prima Flowers, Flower Soft, adhesive pearls, Tim Holtz Acrylic Tags, Silver tape
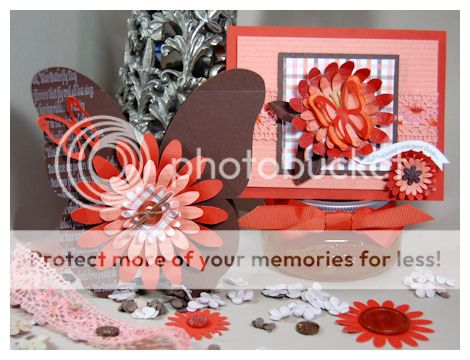
Now this was a FUN project!
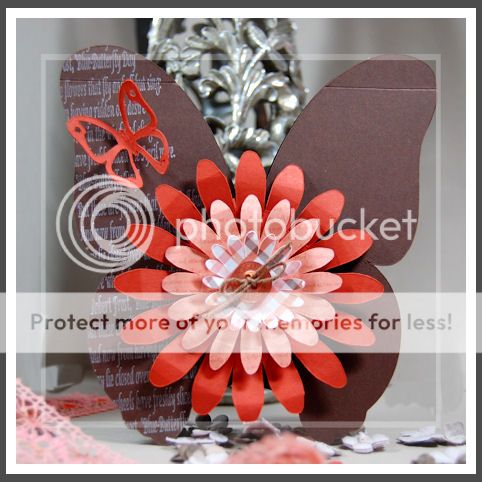
By now its is more than obvious that I LOVE butterfly any/everything!
I used the Pretty Pieces © Flutters and Flowers Cut Files to cut 2 butterflies, in Ganache cardstock and create a card base!
You could also do this using the front/back portion of the All A Flutter template 😀
I resized the solid butterfly template, and layered the 2 cut butterfly patterns together, scored a 1/2 inch from the top, and added some adhesive tape along the inside of the score lines.
Adhered the 2 pieces together and you have a FLAWLESS butterfly shaped card!
I stamped one of the sentiments from All A Flutter Sentiments, along the left side of the card in white. I love the simple addition of the outlined butterfly (also resizable!) on this creation.
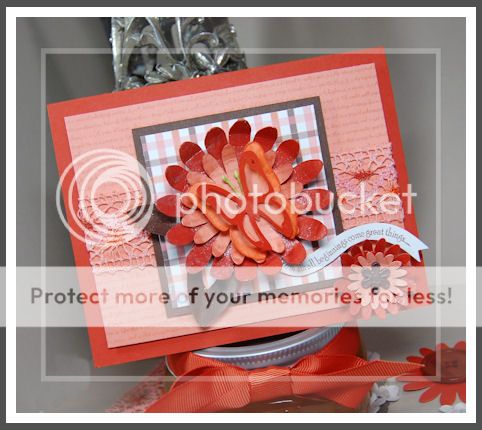
I added my cut Darling Daisies, which were created from the Pretty Printables © digi paper! I used the text pattern in Red Clay onto a berry cardstock for a pretty printed flower, in which I then layered on my multi-plaid cut flower! They look so pretty together.

The paper collections are REALLY amazing! We used some very unique color combinations to freshen things up! Printing your own patterns and creating so many Darling Daisy combinations ALONE is worth it! You’d spend far more on ONE bottle of paper flowers, that get used up and come in select sizes! Now you can create your OWN patterned flowers in any size and pattern YOU want!
Plus having RESIZABLE butterfly shapes! That is CRAZY AMAZING! That file is ONLY $2.50!! What can you buy for that?
This card is definitely one you can whip out. I’m totally thinking TEEN girl, but could easily be new baby, new beginning, wedding…..get well……love it!
Supplies:
Pretty Pieces ©: Flutters and Flowers
Stamps- Pretty Impressions ©: All A Flutter Sentiments
Cardstock: Ganache, Rusty Hinge, Melon Berry
Pattern Paper-Pretty Printables ©: Flutter-by & Shutt-erfly collection
Ink: White Craft
Other: Twine by Martha Stewart, Buttons by Foo Fa La
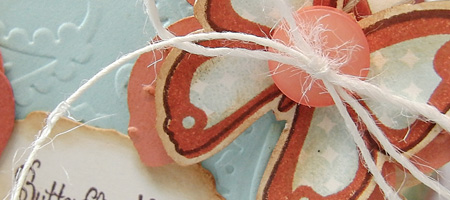
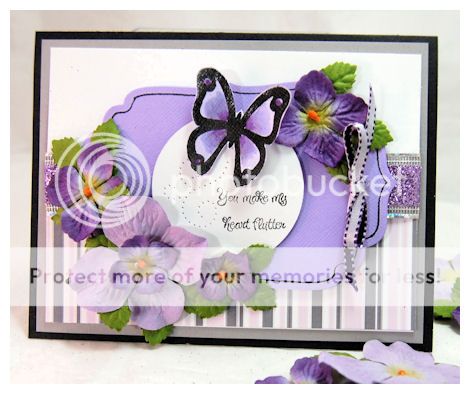
Next up a card using similar elements!
This time I used the butterfly cut file for the center of the flowers. SO PRETTY!
I also cut the daisy and the leaves, and painted them with Shimmerz! That really added a subtle bling. You have to add it wherever you can!
I stamped my sentiment from All A Flutter, and hand cut a flag like tag. I think it came out so cute.
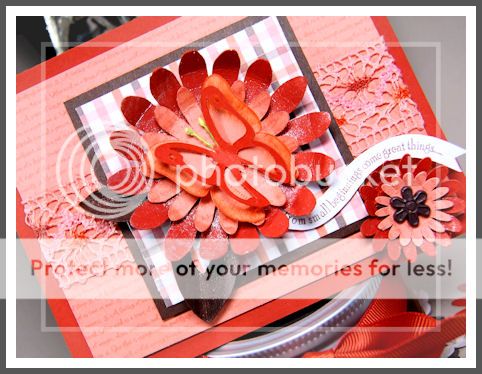
I’m LOVING the text bkgd found in the Fluttering-By © paper collection, as is this weave like plaid.
The ribbon was a lace from May Arts that I dyed in a rust ink. When dry, I colored some “flower-like” portions with my Copic markers to make sure it was a customized match.
Supplies:
Pretty Pieces ©: Flutters and Flowers
Paper-Pretty Printables ©: Shutt-erfly & Flutter-By
Stamps- Pretty Impressions ©: All A Flutter
Ribbon: May Arts Lace (dyed and colored with Copic markers)
Shimmerz in Pumpkin , Flower Stamens for antenna (idea from Kristin)
Each day for the next week you will get to see ideas from myself, and the Design Team for creating your own coordinating gifts, tags and cards, using supplies from our first release.
So please be sure to check out the Design Team blogs,as they each have 2 complete gift ensembles to share:
They each did an outstanding job!
I hope you get inspired by all the projects shared today! I cannot wait to see what you all do with the products, once they are in YOUR hands! This is a true dream come true for me, as I have never enjoyed working so hard in my life. Just knowing I can share what I love to do with the world, in this manner is amazing.
Being on my own is such a freeing feeling. I admit terrifying, but also amazing at the same time. This is a journey I never thought I’d have the courage to take. I have had SO many supportive people there to help me along this journey that I need to thank, and I will do that at the end of the week 😀
I want to thank each of you as well! You all encourage me to push myself further than I ever thought possible, and enable me to share what I love!
Thank you all for a successful beginning.
I hope you come back tomorrow for more ideas and inspiration!
Love and the New Year
Dec 31, 2009 Author: mytime | Filed under: Home decor/3-D items, JustRite Stampers, My Time Made EasyThe winner will be picked some time tomorrow.
In the meantime……
I have this sample to share today, but first some banter!
So this is the LAST day of 2009! Seems like just yesterday we were all wondering if the computers around the world would crash with the celebration of Y2K . Now, a decade later…..here we are! Technology is BOOMING!
Did you think there would be iTouch phones, Skype, texting, YouTube, Facebook, and even videos sent via phone? I’m a talker so while I have NEVER sent a single text, and while I don’t have time for Facebook, I’m in awe of everything that has come of this decade.
Now here we are….all connected by the Internet in some way. Most of us (myself certainly included) are DEPENDENT on the technology of today, that connects us to the world! I mean you could stay home 24/7 and feel connected to others.
I feel like I have a huge network of “friends” whom I never even met. All these “screen-names” I somehow “know” and view as an extension of friends. People who are there for me in this Internet of connections, who support me, know me, and cheer me on. People who I would never know otherwise! Other people who understand my papercrafting dreams and obsessions, because they are just like me!
Where were you in the year 2000?
I remember I didn’t even know how to email, much less blog, or anything else. I certainly never heard of stamping!!
Now here I am preparing to start 2010, doing something I had never even thought I’d set out to do. Something I always thought impossible! I have to say I have learned a TON in the last year, and I have so much more yet to learn!
I have accomplished more than I anticipated this past year, and have no sham in saying I’m proud of myself.
I’m beyond excited to see what 2010 will bring.
I’m excited to have you all right there with me, doing something I never, in a MILLION years expected to do.
So now its time for those New Year resolutions!
Obviously I am resolving to do me very best that I can in my new ventures.
I am thinking that I am going to resolve to NOT doubt myself, nor under-estimate what I am capable of doing! I truly believe we can make any dream come true, with hard work and dedication! I have accomplished some pretty big goals the last few years, so the sky is the limit!!! Don’t be afraid to make a leap, take a risk, or step out of your comfort zone! Its far better than saying “I wish I did that”. You may surprise yourself.
I am also going to resolve to become MORE computer savvy (and pity those around me who will have to teach/deal with me as I strive to do so)
I also want to resolve to finding balance between family and work. Family is so important. I’ve been VERY busy lately but have done my best to try to maintain some sort of balance. Admittedly some days it worked better than others, but I’m working on it.
I always have a million goals and resolutions. I commit that to the fact that I strive for continuous personal growth! Having the never ending “accomplish this” list certainly isn’t a BAD thing! Once I complete one goal, a new one takes its place.
I’d love to hear YOUR resolutions! So feel free to share.
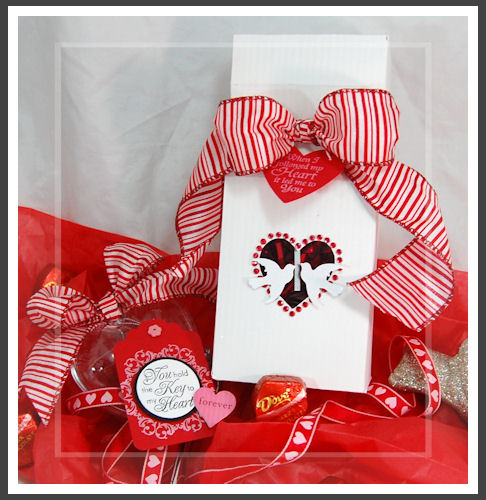
In the meantime….my friend is going to a Wedding tonight with the red & white color scheme (pretty cool-a New Year’s Eve wedding!) and she asked that I make her something to accompany a bottle of Champagne, and to put some $$ in! Not the standard envelope.
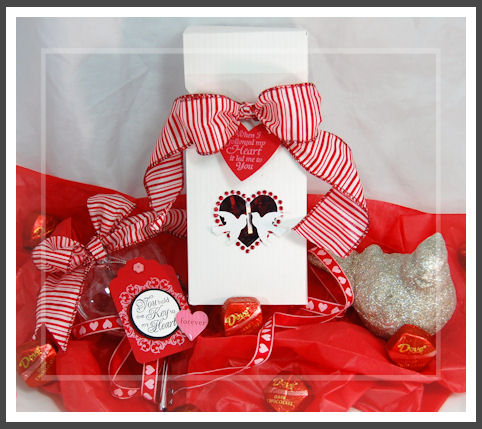
Well I thought that this would be the PERFECT wedding package!
I used the In A Pinch © template, cut using my Cricut Expression in Alabaster Columns. It is a pretty textured white. I used the heart shape that come with my Sure Cuts A Lot to create a window! Took SECONDS!! No more trying to CRAM my templates through a machine that they can’t fit into!

I’m loving wired ribbon lately, and this was perfect for my project.
The sentiment on the heart is from JustRite Stampers Jan 1st release called Romantic Sentiments.
It reads: “When I followed my heart it lead me to you”. I stamped it in white ink, on red cardstock.
Can you get a better Wedding sentiment?! Love it. Made this so perfect for “love birds”
I put some acetate behind the window, then assembled my box.
I decided to use some adhesive rhinestones around the heart window. They were silver, colored red to match.
I also added some punched white doves, from a shimmery white cardstock.
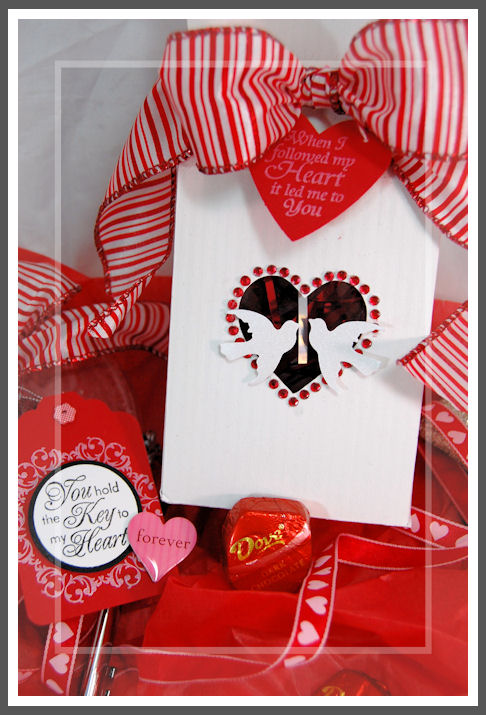
Inside this they will find some Dove Chocolates to match )and Dove because I used Doves in the heart. They will also receive a heart shaped “Key” that is also a bottle opener. I found that in the Wedding section at Michael’s, which is attached to a heart shaped “ornament” that is filled with epoxy hearts, and glitter, and can contain the $$, as well as be saved. That is what will go INSIDE the box!
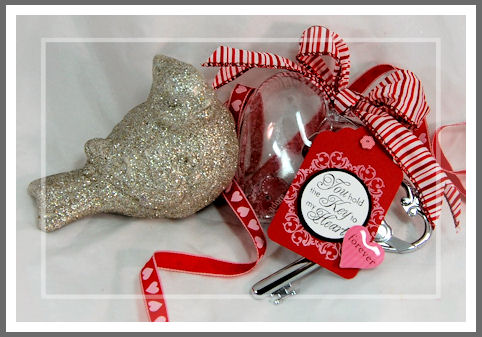
This is the key/ornament/gift, which is adorned by yet another tag…..from the Romantic Sentiments that reads: “You hold the key to my heart”
I stamped one of the borders on the tag to make it look a little more elegant. It was a very easy addition to make it POP.
I think this will make a nice Wedding package! She was very happy with the end result, and took the key bottle opener to be engraved with the couples Wedding date!
Well I am off to spend some time with friends and their children for the evening. We don’t go out on New Years. We like to stay home where it is safe 😀 The kids are going to have a big “camp-out” in their room, while the adults belt out tunes to American Idol (the game! LOL!). Should be FUN!
Before I know it the My Time Made Easy™ LLC release will be here!
YEAH!
I want to wish you and your family a very happy, healthy and SAFE New Year! I hope this is the year that you make all YOUR dreams come true.
See you in 2010!
Swiss Miss Rosalie
Dec 30, 2009 Author: mytime | Filed under: All That Scraps, Home decor/3-D items, JustRite Stampers, UncategorizedToday is the kickoff for the peeks to begin for the January 2010 (<—-whoa! can you believe that! 2010!) release at All That Scraps.
This month she is releasing 5 collections of images, all releasing on Monday January 4th.
You will definitely want to check out the ATS BLOG each day until the release, to see samples from the design team, and enter for your chance to win the set featured!!
My peek today shows one of my favorite lines: The Swiss Pixies
Just in time for Valentines day…….
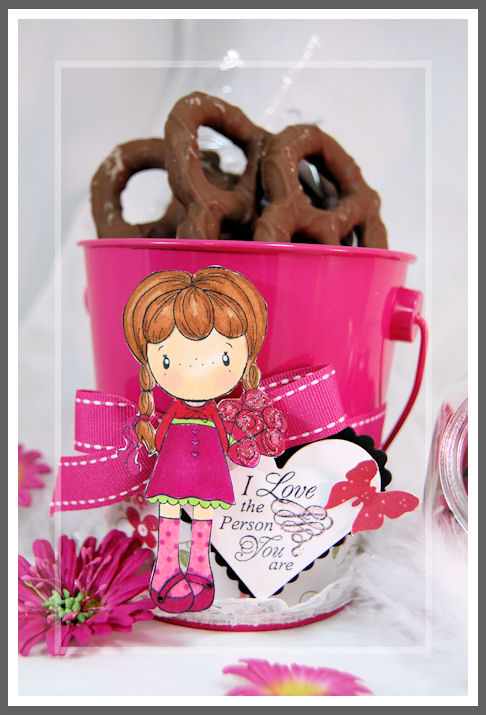
This is Sweet Miss Rosalie. How adorable!! I love her, the outfit, flowers, and everything!
I have had these CUTE metal buckets from the Target $1 Spot, for over 2 years now, and have been awaiting the perfect project. When I saw Sweet Miss Rosalie, I knew it was time to dust this bucket off, stop hoarding, and share the sweetness!!
I used my blending paper to stamp, then color with my Copic markers, and I just had cut her out. Of course my 5 yo Amber, makes me find SOMEWHERE to add glitter, and the flowers were perfect.
The perfect image deserves the perfect sentiment, so I had to pair it up with this NEW! Romantic Sentiments set from JustRite Stampers!!
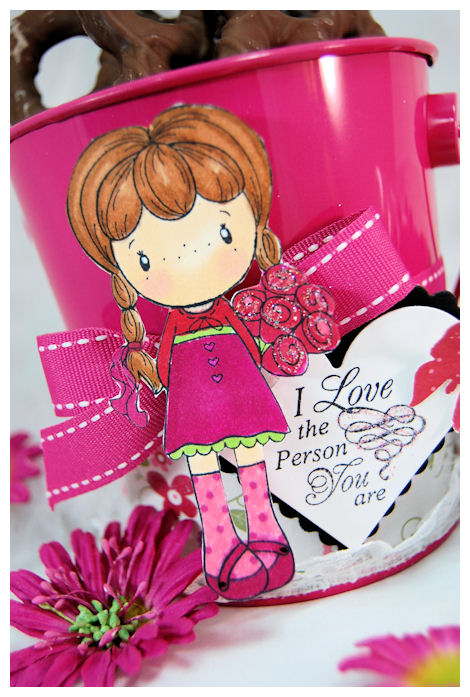
I LOVED the sentiment, so I paired it with the image.
This sentiment set is perfection. So many sentiments in one set, with some stunning borders. I loved the underlined heart in the sentiment, so I added glitter, again!
I covered my bucket and added some ribbon and lace trim, in a unique sort of way. I wanted GIRLY and FRILLY, yet simple.
I think I accomplished what I set out to do.
So I hope you can stop by tomorrow for more ideas and samples!!
GIVEAWAY! Who wants it all?!
Dec 29, 2009 Author: mytime | Filed under: Home decor/3-D items, My Time Made EasyAMAZING Giveaway today!!
In honor of the FIRST release at My Time Made Easy™ LLC , which will take place Jan. 3rd, I want to share my excitement and appreciation with all my customers!
What better way to do that than to offer an AMAZING Giveaway!
I will be picking a RANDOM winner via www.random.org on January 1st to win our very first release which consists of:
* Pretty Impressions –All A Flutter © stamp set, and the All A Flutter Sentiment additions
* 2 NEW! Pretty Packaging Templates called All A Flutter © and Shutt-erfly ©
* 2 Pretty Printables coordinating digital paper collection called Fluttering-by © and Shutt-erfly ©
* AND to make it EVEN better CandaCrafthas sponsored a GIVEAWAY of the Sure Cuts A Lot, which is the software that is compatible with Provocraft Cricut Personal, Cricut Expression & Cricut Create.
Now if you want to BUY the software now, Canda has extended a coupon to you until Jan. 2nd
Code: JAN2
She is an amazing supporter of My Time Made Easy™ LLC and I feel so grateful for her generosity!
I am just so excited! I don’t think I can handle waiting until the 3rd to share something with you (JUST THIS ONCE though!)
Now I normally won’t be giving you any “peeks”. I want you to normally be able to buy it when you see it, but since we have a sample, using a template already available, I thought a TINY peek wouldn’t hurt? Would it?
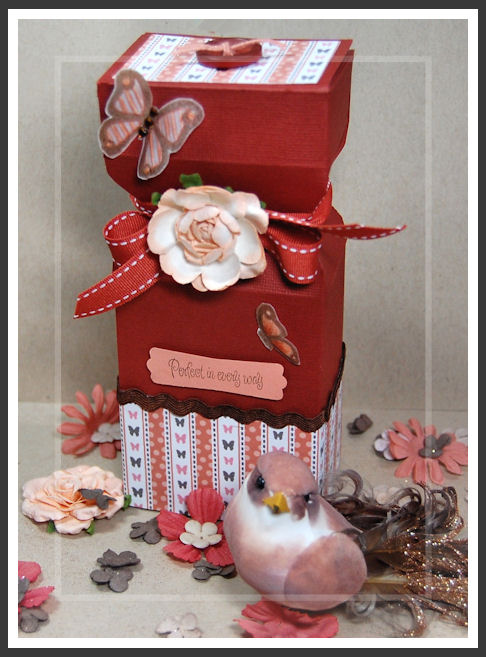
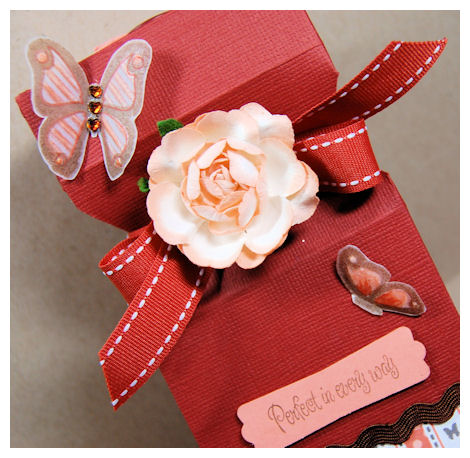
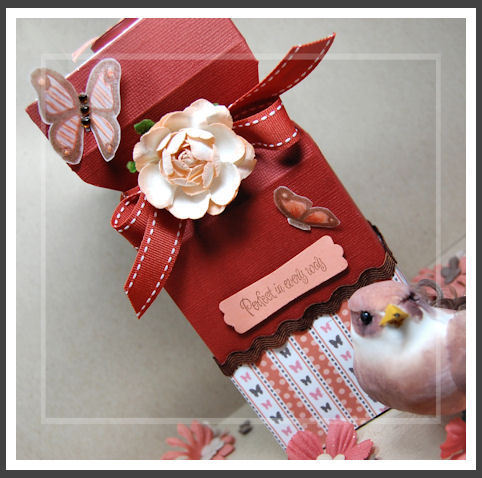
Perfect in every way. I love the sentiment! Fits perfectly with a SU! label punch too.
This sample showcases the Pretty Packaging © In a Pinch ©, made from Burning Embertextured cardstock.
You can see a PEEK at one of the many amazing sheets of our NEW! Pretty Printables paper. I’m in love with our color combinations in this collection as well!
Let’s just say if you “like” butterflies you will LOVE this entire release! As you can see our paper coordinated PERFECTLY with our butterfly images, and you will fall in love with all the various patterns Kristin has designed!
Wait until you e what the design team has come up with combining our images, templates and paper!

You all KNOW my first set HAD to be butterflies!
Wait until you see the versatility this set offers. There are so many ways you will be able to “create” your own butterfly, each time it will be like pulling out a new stamp set.
In my sample I stamped the SOLID image, of the various butterfly bodies (a full butterfly and half butterfly) onto vellum cardstock, in brown stazon. I then stamped one of the WING PRINTS from the set, inside the open butterfly wing, and embossed/colored from the back.
The half butterfly was just colored in with my copic markers, and adhered by only the body so it “flutters” off the box.
Its really stunning in person. You don’t get the effect of the embossed vellum and richness of the colors in my photos. I had to use my overhead lighting as it was PITCH black out and one of my photo lights has been busted for a while.
I sent this to my accountant for the holidays and his wife went crazy for it!
So that is all I’m sharing today!
Now all you need to do is leave a comment, to enter to win. Say whatever you want, or nothing at all. Just make sure to include your name, and be sure you link your email address inthe response so you can be contacted to be able to receive you prizes!!
Thank you for stopping by.
Christmas is over, but it is still winter…..
Dec 27, 2009 Author: mytime | Filed under: Home decor/3-D items, My Time Made EasySo I am going to share this project with you!
Well since we are 2 days post Christmas I thought it may be too late to share this project with you, but then I thought again…winter is a LONG season and this style of gift can be given, and accepted, all winter long!
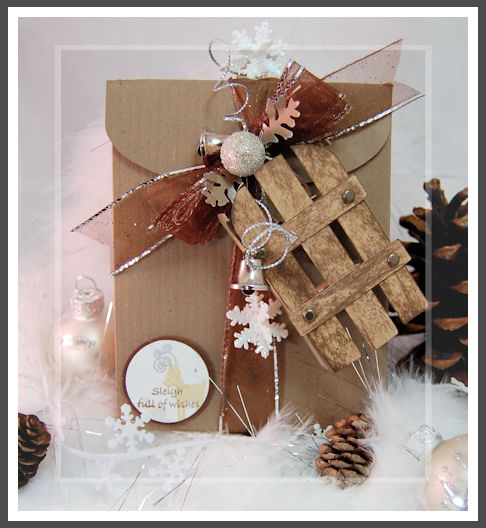
I used the Pretty Packaging © template Cutesy Cover © AND Hanging Holiday Sled © together for this one. The sled make s a FABULOUS addition on a gift.
I often find MASCULINE gifts a bit more difficult but I think this one is pretty impressive for any gender!

I ENLARGED Cutesy Cover by 2 1/2 inches! I then SHRUNK the sleigh to about 2 inches!
So my box completed is about 4 1/8, almost 1 1/2 deep and 5 1/8 inches tall. Perfect for some handmade cards, tags, cocoa, warm socks, or many other great gifts.
I cut my Cutesy Cover © template from a fabulous textured cardstock from Couture Cardstock called Brown Paper Packages
The Sleigh is cut from Pumpernickle, then distressed.
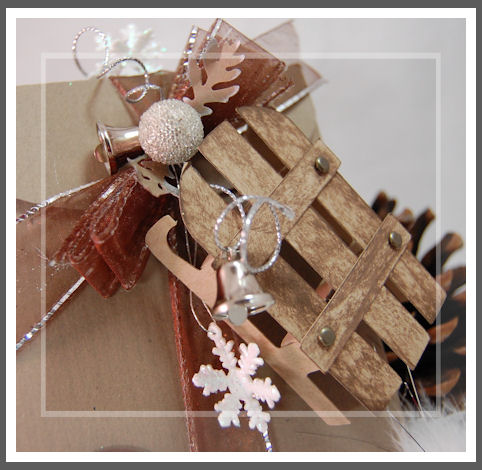
I then just tied it to my ribbon, which can easily slip on/off.
I adorned the ribbon with wired silver cording, mini snowflake ornaments and silver bells (for sleigh bells! LOL!)
I love how this turned out! Don’t you love the template combination and the fact they can cont only be CUT out with your cutting machine, but RE-SIZED to fit you project needs with the click of a button!!
This went together really quick!
This is a PURE dream for me. I have long wanted all my gift packaging in files like this, so to be able to offer them to the world in this format makes me over the moon. I’m happy so many of you are as excited as I am. I have gotten so much fabulous feedback, so thank you!
I certainly enjoyed the break from work to spend the Holiday with my family. We had a fabulous Christmas. It was nice putting everything aside to just enjoy a couple days with the kids, and nothing else. I really cherish these years, as they pass to quickly. I’ll have to share some photos at some point, but now the workload is piled high as I left it to sit for a few days.
Then we have the first official My Time Made Easy™ LLC release is the 3rd! I can hardly contain myself 😀
Much to do before then!!
I hope you had a happy holiday, and come back tomorrow to see some samples using In a Pinch ©
Till then
Super Easy Super CUTESY Snowman
Dec 24, 2009 Author: mytime | Filed under: Cards, family stuff, Home decor/3-D items, My Time Made EasyWell I wanted to stop in ultra quick and wish you all Happy Holidays and a very Merry Christmas! If you are of another faith then I wish you the happiest of celebrations!
I’ve never had SO much to do on Christmas Eve! Goodness.
I want to thank you all for a wonder response to the “re-opening” of the store My Time Made Easy™ LLC
I have never gotten more emails with happy and excited people. Many of you shared how you were able to get some last minute gifts done too! Amazing. You warm my heart. What a great venture this is going to be, and all because YOU motivate me, support me in my crazy ideas, and encourage me to do more and make it the very best I can.
Thankfully we have had little issues! WHEW! The *only* thing was some people didn’t clear their cache, and were using the site on the “old” host (yes it is still there), so PLEASE follow instructions in my previous post and reset your cache!! Otherwise it’s going pretty smooth.
I will be heading out to spend time with my family and will not be answering/checking my emails until the day after Christmas. I have been working around the clock to get everything set for the unofficial opening as well as our FIRST official release, and my family deserves 100% of my attention! I appreciate your understanding.
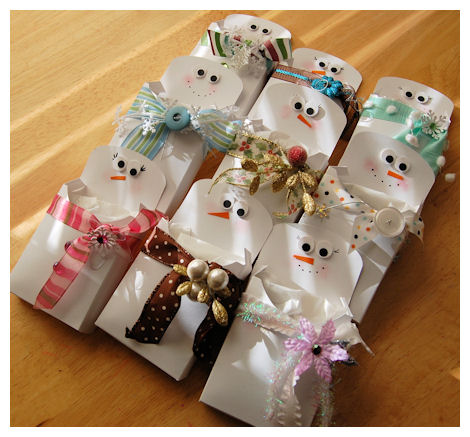
Now before I go I need to share a quick ( and I mean QUICK ) project I did for my children’s teachers.
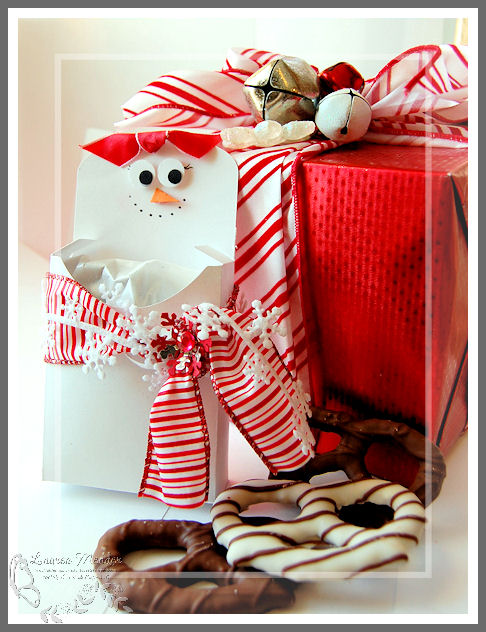
I used the Cutesy Cover © Pretty Packaging template to make a snow man themed pocket!
This one was designed to accompany this gift ) Alexa’s one to one aid always gets something more from me-I LOVE her!). A super fun and simple project that the KIDS can do!
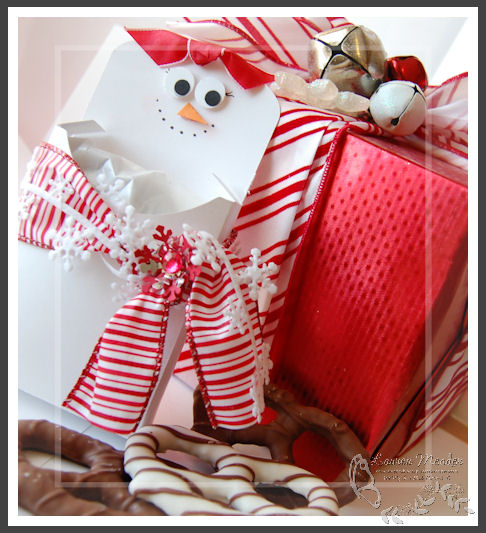
I didn’t score the lid, I kept it open to create the head, then the opening is where I was able to take 3 chocolate covered pretzels:
one milk, one dark and one white chocolate-to package up in a frosted bag then inserted inside the pocket for all the teachers.
It wasn’t much, but it was something!
I was SO consumed with all the business stuff that I really put off getting their gifts together. I had 12 gifts that I needed to get done, and yes, my children expected it to be a HOMEMADE gift! LOL! I have set a precedence with them and they of course deserve that. I was really tight on time. I’m talking 1 1/2 hours before school started, to get these all done.
I was the ONLY mom to show up for Noah’s party and he was beyond excited (last year I got the Thanksgiving party date messed up and I think it traumatized him!) So, seeing me show up with the gifts I promised for his teachers made his day. Alexa was also excited, and of course Amber was too, she helped a little on a couple, but I didn’t have time to let her do too much.
So I turned to the Pretty Packaging template: Cutesy Cover © to whip out what everyone seemed to thing was a cute gift!
Just took 12 sheets of white cardstock….and 12 snow pockets were created
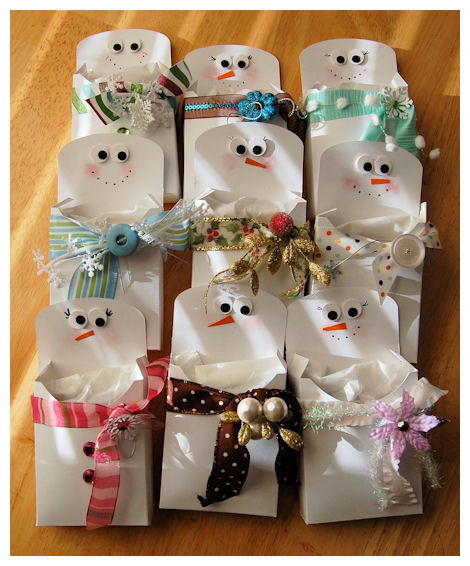
Having had more time I’d of fancied them up a bit, but I finished like 3 minutes before the bus came.
Since I used my Cricut Expression I was able to cut, score, and assemble the 12 templates, in about 40 minutes. The other 40 were spent decorating! Not too bad for creating 12 gifts in a short time.
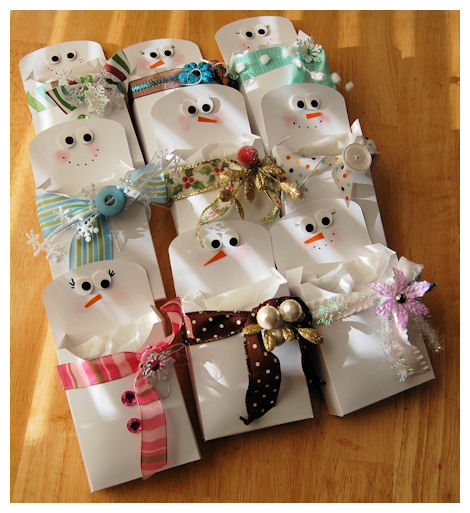
(only 9 are here because I had to give them out before getting photos of the rest)
I ALMOST didn’t get ANY photos, but I knew I’d kick myseld if I didn’t!
Amber wanted a googlie eye girl (in the lower left corner-so no its not a mistake! LOL!)
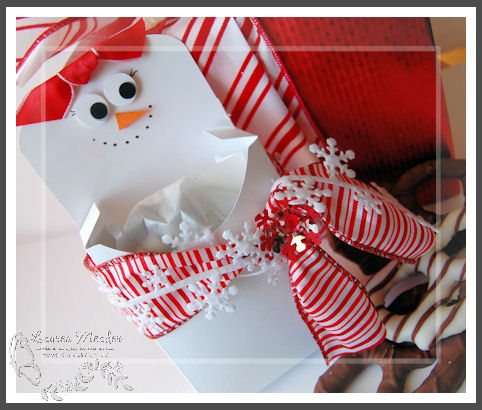
I kept it easy, using punches for the eyes (large googlie eyes would have been better but I didn’t have ANY! EEK!) a marker for the eyelashes, and coal smile, and pastels for the pink cheeks
My ribbon scraps were used for all the scarves!
Each snow person is different. Plus I was able to use my scraps!
SO there you have an EASY idea, if you are like me and need to really WHIP out something cute, fun and handmade!!
Well it is time for me to go be with my family! I promised Amber we’d get the gingerbread cookies made, and she waited patiently while I typed this post.
Thank you for stopping by, and Merry Christmas!
My Etsy

Who I Designed For
Blogroll
- Alicia
- Alli Miles
- Ally Blankenship
- Amber
- Andi @ crafts on a whim
- Angel R
- Angie Z
- Anne Kranitz
- Becky O
- Bee
- Beth Silaka
- Bethany Paull
- Beverly Nash
- Bobbie
- Cambria
- Cammie
- Card of the Week
- Card Positioning System (CPS)
- Cards for Cancer
- Catherine Doucette
- Charmaine
- Cheryl Sims
- Chriss Rollins
- Christina
- Christine Ewing
- Christine Wooden
- Colleen Schaan
- Craft Critique
- Craft Gossip
- Crystal
- Dawn Easton
- Emily Giovanni
- Geny
- Holly
- Igne Groot
- Inspirational Craft Blogs
- Irene
- Jami Sibley
- Jeanne Streiff
- Jen del Muro
- Jeni Bond
- JenMarie
- Jenn Balcer
- Jenn Diercks
- Jenn O
- Jennifer E
- Jennifer Mick
- Jennifer Pereda
- Jennifer-Sweet Treat
- Joanne Basile
- Jodi Collins
- Julia Stainton
- Julie Masse
- Karen
- Kathryn Berthiaume
- Katie Cotton
- Kelley Holland
- Kendra
- Kim Scholfield
- Kris’s Color Stripes! Get inspired here
- Kristen Dubosque
- Kristin Eberline
- Kristine
- Laura @ Sunshine Stamper
- Laura Turnmire
- Laurie Schmidlin
- Lesa Rapp
- Linda Duke
- Linda-LSN
- Lindsey Botkin
- Lisa (lakind scs)
- Lisa Kind
- Lori Craig
- Maggie
- Mara Campbell
- Maria
- Maria Levine
- Mary
- MaryJo
- Melanie M
- Monique Hansen
- Moxie Fab World
- Pam Imholz
- PaperCrafts Connection
- Peppers and Pollywogs Kids party site
- Rebecca Grohall
- Rita
- Robyn
- Rose Ann
- Sarah Vrolyk
- Sharon Harnist
- Sharon Johnson
- Sharon Rivera (a chemisrty with paper)
- Sherrie
- Sophia Landry
- Storage Units, Ink, & More Blog
- Sue Berker
- Susan (Rainy)
- Tangii Crane
- Tracy
- Tricia Traxler
- Trudee
- Velta
- VivLyn
- Zena
MTME Pretty Palette Color Team
MTME Pretty Patterns Sketch Team
My Time Made Easy TM LLC
Shop till you drop!
Lauren Meader
About Me
Copyrighted material
Subscribe To My Blog
Pages
- About me
- Alexa’s Story!
- My Crafty Corner!
- My Time Made Easy™ LLC
- Our Make A Wish Trip to Disney!
- Resume/Publication List
Calendar
| M | T | W | T | F | S | S |
|---|---|---|---|---|---|---|
| 1 | 2 | 3 | 4 | 5 | ||
| 6 | 7 | 8 | 9 | 10 | 11 | 12 |
| 13 | 14 | 15 | 16 | 17 | 18 | 19 |
| 20 | 21 | 22 | 23 | 24 | 25 | 26 |
| 27 | 28 | 29 | 30 | 31 | ||
Archives
- August 2013
- July 2013
- June 2013
- May 2013
- April 2013
- March 2013
- February 2013
- January 2013
- December 2012
- November 2012
- October 2012
- September 2012
- August 2012
- July 2012
- June 2012
- May 2012
- April 2012
- March 2012
- February 2012
- January 2012
- December 2011
- November 2011
- October 2011
- September 2011
- August 2011
- July 2011
- June 2011
- May 2011
- April 2011
- March 2011
- February 2011
- January 2011
- December 2010
- November 2010
- October 2010
- September 2010
- August 2010
- July 2010
- June 2010
- May 2010
- April 2010
- March 2010
- February 2010
- January 2010
- December 2009
- November 2009
- October 2009
- September 2009
- August 2009
- July 2009
- June 2009
- May 2009
- April 2009
- March 2009
- February 2009
- January 2009
- December 2008
- November 2008
- October 2008
- September 2008
- August 2008
- July 2008
- June 2008
- May 2008
- April 2008
- March 2008
- February 2008
- January 2008
- December 2007
- November 2007
- October 2007
- September 2007
- August 2007
- July 2007
- June 2007
- May 2007
- April 2007
- March 2007
- January 2007
Categories
- About Me
- All That Scraps
- blogger challenge
- camera/photo play
- Cards
- Contests
- family stuff
- FOR SALE
- Home decor/3-D items
- How to FAKE it!
- Introduction
- JUGS Challenge
- JustRite Stampers
- Lizzie Anne Designs
- My family stuff
- My Stamping Space
- My Time Made Easy
- My Time To Color Challenge
- My Time to Create Challenge
- My Timeless Template Challenge
- My Timeless Templates
- Mytime Mail
- MYTIME MOVIE/VIDEOs
- Papertrey Newsletter
- Pink Cat Studio
- Pretty Palette Challenge
- Pretty Patterns Sketch
- Product Opinions and Must haves
- Recipe's
- Saturday Sketch
- Smilebox Creations
- Stampavie
- Tutorials
- Uncategorized
- videos
Most Popular
- Create your own Onesie Card Tutorial-and important NOTE! PLEASE READ (2529)
- Saturday Sketch-Boxed bag holder (2333)
- Going GREEN! Fancy Flower Flourish-Closure Video (1478)
- Fabulous Favorite - Giveaway! (1336)
- a Prayer Request (1232)
- QUICK-Easter Baskets from Nestabilities-PTI style-and blog challenge (1063)
- Teaser Sketch (999)
- February Release Giveway! (and a little peek) (996)
- Group Post and Rambling Rose Video Tutorial (985)
- GIVEAWAY! Who wants it all?! (895)
Recent Comments (RSS)
- Daya Sons: Daya Sons, a renowned manufacturer
- 첫충사이트: 완전히 흥미로운 블로그 게시입니다. 저는
- sarah: Wow, Lauren, what a stunning
- hedie: خرید راهبند
- 야동: Love to read it,Waiting For
- 야동: This seller is in a
- 바카라사이트: 여기 처음 왔어요. 나는이 게시판을
- 야동티비: I was surfing the Internet
- 바카라사이트: 비슷한 주제에 대한 흥미로운 정보를
- 바카라사이트: "여기에 제공해 주신 귀중한 정보와
Copyright © 2007 - My Time, My Creations, My Stampendence - is proudly powered by WordPress
This blog has been Tweaked and Designed by Sara Williams