All occassion holiday holder
Dec 18, 2008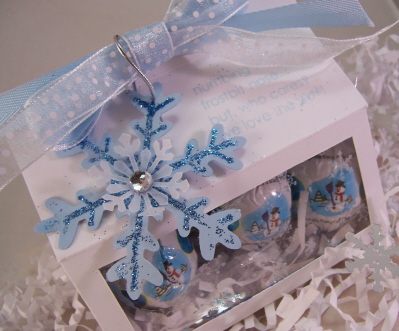
I think we are always on the hunt for the perfect package for little treats.
Do you have a long list of people you want or need to give a little something to this holiday season? Even if you don’t have a long list, you are going to love this treat idea. It is sure to make people OH! and AH! over the simplest of gifts, any time of year.
There really is such a thing as “It’s the thought that counts!”, so why not let everyone know you are thinking of them, in a way that is affordable?
I have just the quick treat holder for you!
Did you know that if you purchased the Lolli-pop Along © Template, you have an entire new use of JUST the base template? Let me show you how.
I’m certain as the years pass, the list of people in our life grows, but our finances don’t! With 3 kids now in school-and some of the extra services they get, I like to acknowledge everyone who impacts my children’s lives. Like everyone else in the world, we are on a tight budget, so this year (like the past 3 or 4) I am mainly making gifts for all our family and friends.
I love gourmet chocolate, and it can make a really nice gift. You don’t need to spend a fortune on it either.
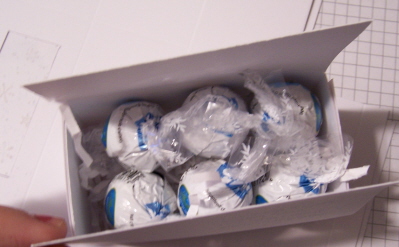
I whipped up 16 of these gifts, and it only cost me $1.20 each!
I went the the Lindt Chocolate store and purchased 2 large bags of truffles (48 in each bag). Regular price $12. But if you purchase 2 bags they were on Sale for $10. So I purchased 2. That is 96 truffles for $20. Which means they are 0.20 cents per truffle.
My little treat holder, holds 6, so I was able to get 16 gifts, for a mere $20 purchase. That means I spent $1.20 for each gift!!
Side view-

I want people to know I appreciate all they do, but not break the bank doing it. I think I accomplished that this year, for much cheaper than I normally do, and without having to bake a thing!
Also consider that many people have “food issue’s”. Meaning people are a bit leery of food prepared from someone’s home. They have no idea how clean your kitchen is! Packaged items are always a great way to go, and if they hate these truffles a re-gift is definitely OK.
So lets get started shall we?
Print Lollipop Along ©base on white cardstock.
Cut and score bottom as directed.
At end panels, score at 1/2 inch from edge. (As seen in photo)
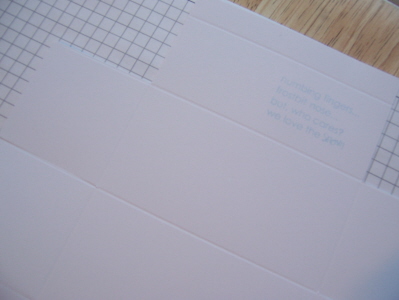
Then stamp sentiment from Snowfall Additions in right corner in Spring Rain Ink
Use long rectangle nestability (or a ruler) to trace a rectangle window, on front panel.
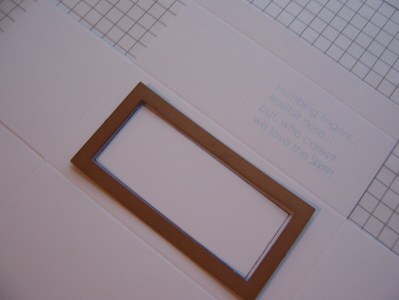
Use a hobby blade to cut out window.

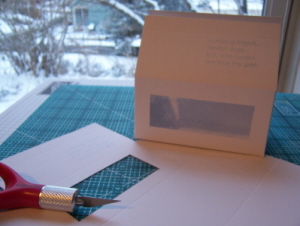
Stamp a piece of acetate, in white StazOn with snowflake cluster from Snowfall set. While wet, sprinkle on glitter of choice.
Adhere window to inside of holiday-Lollipop Along © window

Then put sides of box base together.
Photo of -Window in place, box together
Now add a little white bag filler for “snow”. Then fill the box.
Now inside this box you can easily fit 6 Lindt Chocolate Truffles!
The snowman ones are milk chocolate, with white chocolate centers! YUM!
Make sure you have the snowmen turned to the front of the window.
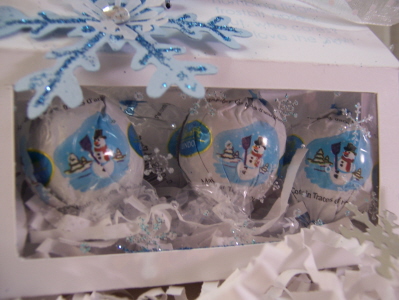
It’s a perfect treat to let someone know you are thinking of them this winter season. Plus its easy on the wallet!
Now for the tag-
You want to use the snowflake punch , and punch a shape from Spring Rain cardstock.
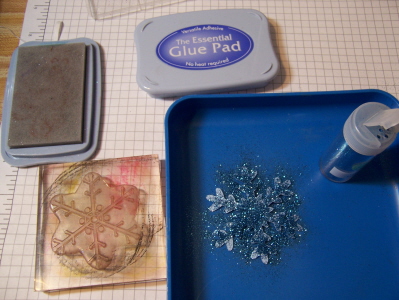
Stamp the snowflake image onto punched snowflake using the Glue Pad, then sprinkle on glitter.
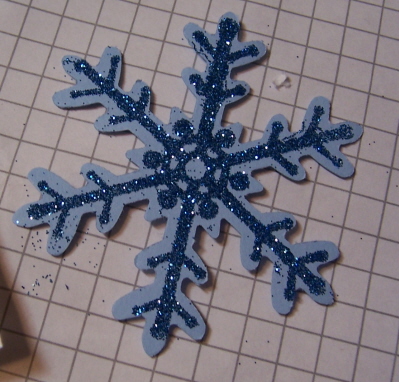
Now layer a smaller punched snowflake from vellum cardstock (mine is Martha Stewart), and add a bling sticker to the center.
Then punch a hole in one corner of the snowflake, and string it through your tied ribbon.
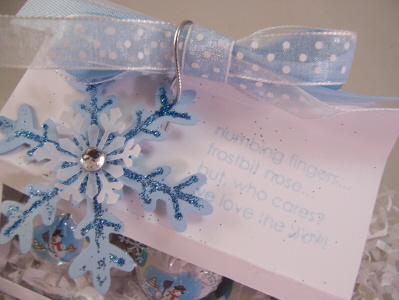
Isn’t it the perfect little tag?
Everything is better with a little bling.
So there you have another treat idea using My Timeless Templates ©! There is still time to make those last minute gifts 😀
After Christmas I plan on sharing my Valentine’s version of this idea 😀
Thank you for checking in ♥

Snail Mail……
Dec 18, 2008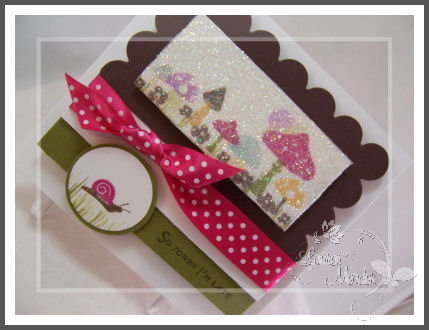
So sorry I’m late
This is my Saturday mytimess15 sketch, flipped up side down!
Story of my life! I sit here in pure PANIC as I realize I still have gifts to make for family and Christmas is ONE week away!!!!!!!! GASP! Please tell me you are doing the mad dash too? How did this happen? I started Christmas stuff in like August for all my design work!
That little snail is me, if I were ever to be reincarnated into an animal! LOL! At least I’d be Raspberry Fizz and Dark chocolate 😀
I make tons of stuff, but never get around to mailing it. I know I talk about this often. It’s a super awful habit. Can you tell it truly weighs on me? I usually end up donating all my creations. I don’t know what it is that I can never get any Thank Yous out in a timely manner. I put so much pressure to make each one special and perfect. I guess ANY thank you is better than a super late one.
I didn’t even make our Christmas cards this year, even though I had my design. I just printed our family photo, and put it in cards from the American Cancer Society–here is that post, and can’t even finish getting those out! Good grief.
Another view for those who get dizzy with my tilted photos!
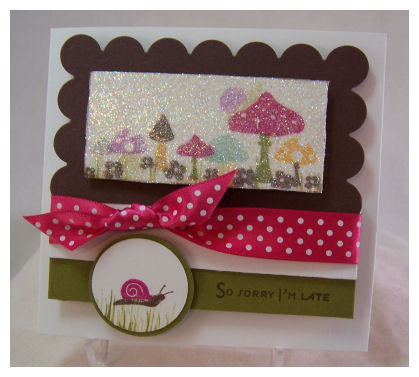
This card is 5 X 5 for those who are wondering
I do have some special cards to make for my PSF’s who got Alexa a special necklace (more on that when they are done and posted here) ,but am waiting to get PTI’s next release 😀 as it suits them all so fabulously! They gave her the gift in MAY! Now that my friends, is LATE.
OK now for the card details-this is going to a sweet friend Sonia (eventually! LOL!)
She has been so super sweet to me and I need to thank her. This suits my predicament.
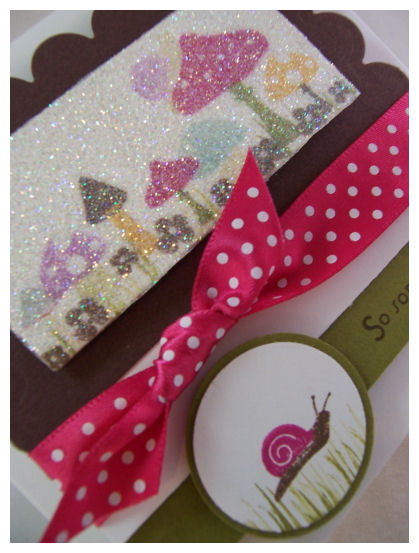
I LOVE the mushrooms from the newest set release Forest Friends. Sentiment from Forest Friends sent. set. I think they are the best! LOL!! I had so much fun making them different funky colors.
I then added some glitter all over it. Not sure if that was a good thing or not, as it did dull my awesome vibrant colors. Oh well-too late.
The Raspberry Fizz everything is amazing! Lovin the ribbon. I just love these colors.
Well my friends, I am on the run. I know I promised more to share, but that will most likely be the weekend post.
I do have a PTI Newsletter Project to share tomorrow, something that saved me with some of my gift giving this year for teaches and other people in my life!
So come back 😀
I remember why I love my Copic’s
Dec 17, 2008Sorry this is a bit later than norm. I have been sledding out back with the kids. So fun. I miss being a kid sometimes. Only care was will there be hot chocolate when I get home, with some warm soup & grilled cheese sandwich! Now its so much more.
My hiney is officially FROZEN. They are still outside with my brother. I remember being a kid and being outside ALL day. My kids don’t ever get out unless I’m there with them the entire time. The world is a much different place than it once was. Granted I am pretty paranoid about people taking my kids, so that doesn’t help. I would NEVER leave them in our own back yard alone, and we live in a “nice” quiet town. That may even be worse! You get a false sense of “safety”. I cringe when I think of what I did as a kid at their ages. I would DIE letting my kids do any of that.
OK you don’t need to hear about my paranoia.

Purr-fect together forever
More stamped creations with LeLo Designs 😀 This image is called You Go First.
I got over 200 emails asking where YOU can get them. WOW! I should get a commission. I’m in the wrong “business”! LOL! I have to say the images are REALLY cute.
Well All That Scraps IS getting in the designs soon! Don’t worry I will let you know. I was fortunate enough to get to pre-order some when buying some other stuff 😀
There is also a Store Page if you want to find some in your area 😀 They sell to all over the world it looks like.
Well “back in the day”, about 1 1/2 years ago, before my luscious Copic markers, I use to use my Prismacolor pencils, and gamsol. I use to be pretty good with them, until my Copic markers came. Then I dropped my pencils like a hot potato! Granted Im not fabulous with them either, but I love them.
I loved my Prismacolor pencils, and that is why I kept them all, but am sadly out of practice :C
The Stampavie DT does AMAZING things with these images, and it seems they ALL use the Prismacolor pencils, so-wanting to be like them with their mad skills, I decided to try my hand at them again.
Well, obviously its not gone too well for me! LOL! Need to get back to practicing again. I think I just need to be me, and not try to be like anyone else. Stick with what I’m better at-KWIM?
So I will.
Here is my close up with the pencils

I will say I did have fun making the cat a tiger cat with the pencils-other than that, no such luck :C My copic’s are just easier for me now. Still practicing, but thats OK.
If you didn’t recognize it this is my sketch from Saturday mytimess15 . I used the heart for my “circle” and the cats as my space where there was paper before. Its a loose version of the sketch but I like the lovey, cheery colors!!
My sentiment is actually from the JustRite Stampers Romance small pre-inked words set.It was so purr-fect! LOL!
The paper is from K&co I believe. Very pretty. I got it last year! LOL!!
OK now I know I have a few more things to share, but with the snow I need to get back to time with my kids.
So, till tomorrow-
Darling Dragon
Dec 16, 2008So I got myself a little gift 😀
I found some new stamps from Stampavie.
They are such a Lauren company! LOL! Yeah Im talking in 3rd person, annoying I know. But they are. I love cute and whimsical stuff. The animals are fab.
I am beyond in LOVE with the Rachelle Anne Miller line. I found it on a SCS banner ad and about died and went to heaven when I saw the little owls!! I bought them, but haven’t used them yet. Then I picked up some more stamps when ATSgot them in (boy do they sell out quick) As far as the company goes, I’m not sure how its actually pronounced though! LOL! When I was talking to some stamp friends about the images I had no clue how to say it-Stampavie.
Anyway, I saw they have a new line called LeLo Designs. When I saw it, I fell in LOVE with the little dragon. He is beyond the cutest thing ever! I am attempting to expand my boy line if images, so I had to take him home 😀 It could of course be made girly as you will sort see.
First I used Party Dragon
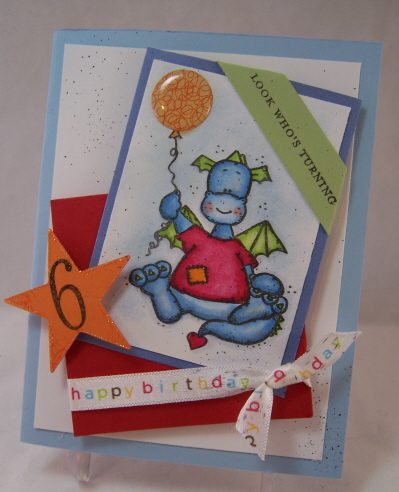
Noah had a b-day party to attend, so I thought this little guy would be perfect!!
The sentiment “look who’s turning” is from Impress.
Obviously the child was turning 6. I used my JustRite Stampers Number set for that. I love how the number is highlighted in the glittered edge star. That is a SU! punch.
I think he’s cute flying in the sky. I had some American Crafts ribbon that had the colors I wanted. I used an epoxy sticker to cover my balloon. It made it pop and had a fun design.
I loved him in blue.
Close up
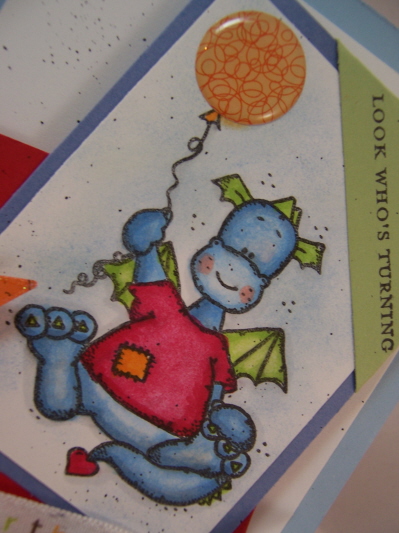
Granted my coloring is not by any means professional, but I find it so therapeutic! My copics are my most used tool, next to my scor pal, paper cutter and ATG gun 😀
Is he not adorable? Reminds me of Puff the Magic Dragon.
So I got to using that one, and used one more I picked up-
Here is Dragon Flower

I think he looks beyond awesome in red/orange/green!!
I think I should have added more flowers but when I attempted too it was a little too much. There is such a thing.
If you can’t tell, he is stamped, colored and cut out. You cannot tell but his ears and wings are popped forward, and shimmer, since I added some olive Shimmerz to them.
He’s so cute.
The sentiment is A Muse. An oldie but goodie!
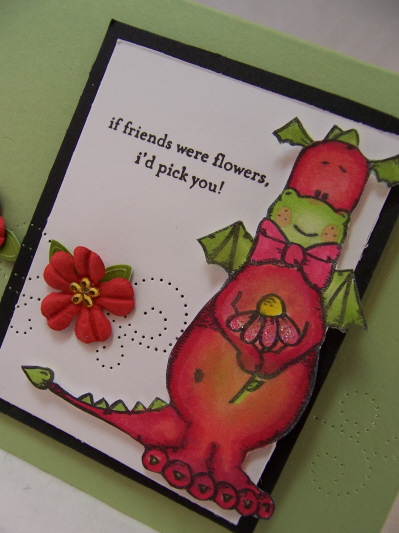
I did some piercing with my Onare template, and added some primas with hero arts flower stickers in the center. This was quick cute & easy. He is certain to make someone smile!!
Well that is it today. Im crashing from my week of PTI peeks.
I have so much more to do before the holidays. I made a rockin project yesterday that will are going to LOVE! (I think) I’ll post it sometime this week. Im seriously FLIPPING for it.
The kids are feeling better, and now the running of class room duties begins. I’m getting sick :C Just worn down feeling. Not fun. Exhausted isn’t the word.
Anyway-have an enjoyable day. I’ll be back tomorrow with more to share.
I also have some requests for special snacks and ideas for assisting the many of you wanting to know more about adopting a new healthy lifestle in the new year.
My friend Erin just started the Mitch Gaylord workout that I use ( i got it for her for her b-day) and dropped several pounds and inches by her 11 day mark! She has a hard time losing weight so she is really happy with herself. Im proud of her too. She calls me regularly to check in and tell me the temptation she avoided! Its good to have a back up. Its hard for me living with a pregnant woman who wants to eat every amazing delicious thing under the sun, and wants everyone else to join her! UH-AH!! Not me!! I just slipped into the tiniest pair of dress pants for a Christmas party I have to attend this weekend. I had to keep having the woman get me a smaller sizes! Between my shirts and my pants! I was definitely doing a dance in that dressing room. No CHOCOLATE is worth feeling awful about yourself. I’ll stick with my yogurt and Soy Joy bars!!
I do have a great low cal-but scrumptious dessert to share next time too. But for now-I gotta run-
later
December Papertrey Ink Release samples
Dec 15, 2008Good grief! I can’t believe its the 15th of December!!
We have had power loss on & off here due to bad weather. That means no lights, and no hot water or heat. NO EMAIL or INTERNET. So if you have contacted me, and I have not responded-I will get to it.
What is worse is my children have all juggled the stomach bug, and I am the designated bucket holder :C I have only slept a few hours total since Wednesday night. Then all the PTI excitement, that always gets me 😀 So much to do before the holiday approaches. I also need to re-evaluate my responsibilities and goals for the New Year! Reflection is never easy. I do enjoy the fresh start the new year brings. OK before I get way off focus-lets move on.
We have a light design load this month. THANK GOODNESS! I shared MANY samples with you over the last few days (just scroll down if you missed any) and samples using My Timeless Templates. I do have ONE more to share (for now anyway! LOL!) and a few samples with the New Releases. I have so enjoyed the excitement during the countdown with my templates 😀 Thanks for all the support and kind words. I can’t wait to see what everyone does with the new templates. I have so enjoyed hearing how your holidays were made easier :D, and you got to take some time to get creative this year, saving some $!
Now to the samples.
Valentines was a VERY hard switch when you are really preparing for Christmas, but I truly love that holiday-so I had fun. Plus the sets rock, so how can you NOT be inspired?
First up I will share my card projects
Tree of love
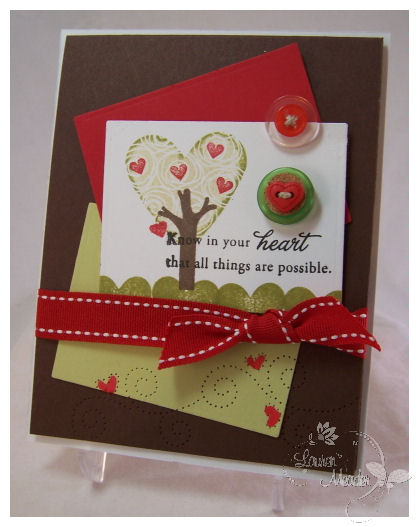
OK love the colors-and the layout.
When I saw Heart Prints I just fell in LOVE! Seriously. I have a million ideas that flooded my head, but only so much time. When I saw the swirly flower pattern, it reminded me of a tree. So I decided to go with that, and stamped it in spring moss, then rocked & rolled it in ripe avocado. There was my tree top.
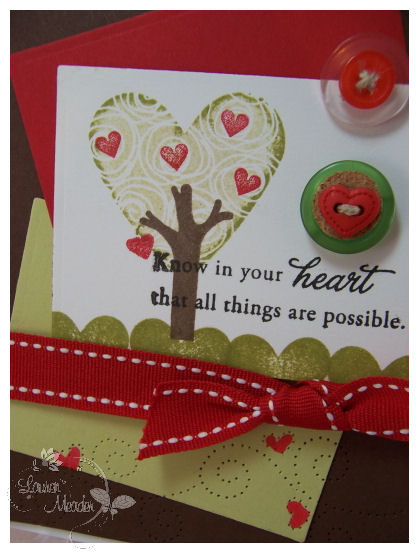
I used the solid trunk from Father Knows Best ( I really love that set!), and my tree was born. I used the little “cherry hearts” from Lisa’s set Love Songs, for my tree fruit.
Now my “grass” is the solid heart from the Heart Prints in avocado ink. I liked using all the little elements to create a cute scenery.
I used aonare piercing template for the swirly border, and free pierced the little hearts. I used a paint pen to fill in the color of the hearts. Cute touch I thought.
I also love the little buttons. I enjoy fitting buttons into my creations in fun ways.
The sentiment is from Heart Prints Sentiments. LOVING that set too!
So much so that I went on and make this card using it-
In dreams and in love-layering
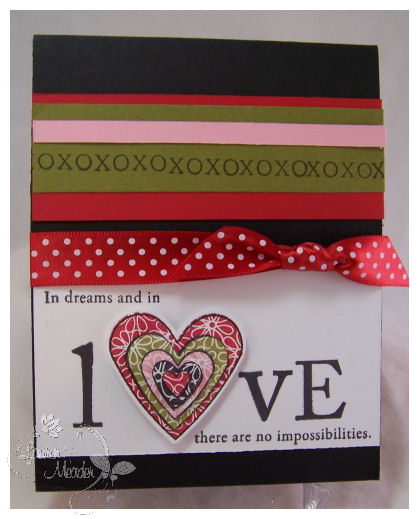
Now again this card used 3 sets! I love that.
The Heart Prints Sentiments , heart prints (the layered heart image), and Lisa’s set –Love Songs has the elements to spell out “love”. I wanted to be different in what I used from her set (trust me I made more stuff but am waiting to share :D) so I chose to use the sentiment and her words to create a different look, and show how awesome ALL PTI’s set co-ordinate together!

Now when I saw the layered heart image it reminded me of a cookie cutter! I also love the solid floral heart image, so I stamped it 5 times in poppy, avocado, berry, and black-then cut and layered them all to create a cool look! I do have the heart punches, and they ROCK! I used the largest of them here.

Now since we did share peeks through the week this is all I had to share for the release that you had not seen.
I do however have another template idea (and more to come) to share today.
A new and improved snowman soup
How many times have you given or received Snowman Soup?
If you don’t know what that is, then I will fill you in. Its basically a packet of cocoa, and marshmallows (maybe candy cane or candy pieces of chocolate to add), packaged up for a gift.
Its a very cute and popular gift in the holiday/winter season. Well, I wanted to step up my snowman soup gift giving to a more “gourmet” style presentation!
Wouldn’t you know that my newest template-the Lolli-pop Along© is PERFECT for such a gift ![]()
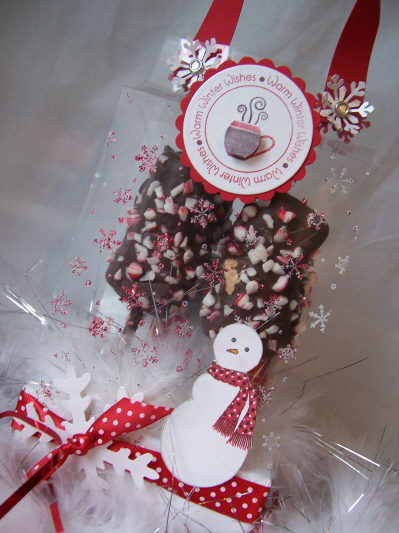
SO I created my base for my lolli-pop along using shimmery white cardstock.
I punched 2 holes for my Marshmallow Melts stick stirrers. I find that the Crop-a-dile big bite is a perfect companion for this template :D. Reaches in perfectly.
I then cut a long slot (using a ruler and finger hobby blade) to fit my 2 packets of cocoa mix (behind the skewers).
This has 2 packets of Swiss Miss Cocoa. You could get more expensive cocoa, but this matched my project and I had it on hand.
I then made some gourmet chocolate covered peppermint marshmallow stick stirrers. I had only ever seen these in candy shoppes so I tried my own, and it worked.
How to make Marshmallow Melts
Get some wooden BBQ skewers (cut down a little bit to fit my project).
Put on 2 large marshmallows.
Melt some chocolate wafers (found in baking section of Michaels), and quickly drizzled all over the marshmallows. Be fast as they could REALLY melt.
Then lay the chocolate covered mallows on wax paper.
Sprinkle on crushed candy canes. YUM!!
Let them cool on wax paper, and then you are ready to go!
Now to put them in a gift set. Once they were in place I adhered some of this Marabou (? is that what thats called?! LOL!) for some faux snow! It is a nice finished detail I think.
My base is tied in with the polka dot poppy ribbon, tied through a punched snowflake.
My wrap was made using acetate. I stamped my snowflakes from the Snowfall set, in white Stazon and sprinkled on some red glitter before it dried.
I used snowflakes for my top closure, with some bling brads. The handle is cardstock.
I made my tag using the 2008 Holiday Tag Collection, making my mug 3D.
The snow man was stamped, and cut out. Layered with clear glue dot.
A quick and easy, new presentation of an old favorite.
So that is it for today. I hope you enjoyed the release, and all the countdown projects. I’d love to hear what your favorite thing I shared over this last week was 😀
I hope you all have a super start to the week!
Tubular Template ideas!
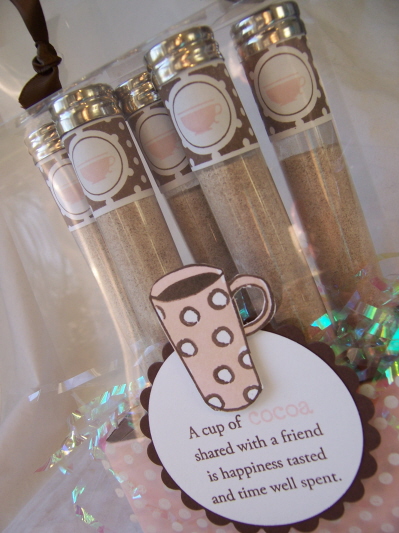
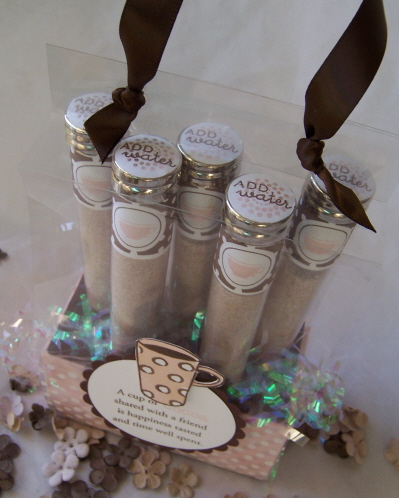
Dec 13, 2008OK if you read my blog even some of the time, you may know how much I LOVE packaging up test tubes filled with whatever I can cram into them 😀 I just love little containers of all kinds. I always have, since I was a girl.
My templates have provided me with some amazing presentations of those ideas, and this month is no exception. I am beyond in love with my projects today! You have no idea. I truly hope you get inspired by them as well.
As a SAHM, with this economy, living on ONE fixed income, we don’t always have a lot of $$ to get gifts for people we want to. I’m endlessly thinking of ways to acknowledge people, without breaking the bank, and not making it “chincy”. Like I just threw it all together. I want people to SEE the thought I put into their gifts, and I think my templates definitely help me accomplish that, and taking not so much actual TIME to create 😀 That is what I REALLY love about my templates 😀 Fast, functional and affordable. Since you use them limitlessly, its such a huge savings. No guess work everytime you make a 3D item, priceless.
So I am over the moon with excitement to tell you that Papertrey Ink is now going to be carrying the silver cap test tubes, and that they fit PERFECTLY with My Timeless Templates!!!!!!!!!!
The silver top tubes will be sold in sets of 3, and they are also going to be carrying the square plastic tubes in sets of 3 as seen HERE!! Is that not exciting news?
Can life be any sweeter?
So let’s start with how they fit with my Lollipop Along © first. Remember this won’t be available to download until the 15th. But when it is live, you can purchase it, and get it INSTANTLY!!! You can start making gifts at 12am on the 15th!
OK I feel like the “exclaimation mark” Queen today. Can you tell I’m so excited? If you were standing in from of me, and I were talking to you, you would probably ask me to be quiet. I know I also tend to talk loudly too when I’m excited. Loud and fast. Its a Vigeant trait (my dad’s side of the family).
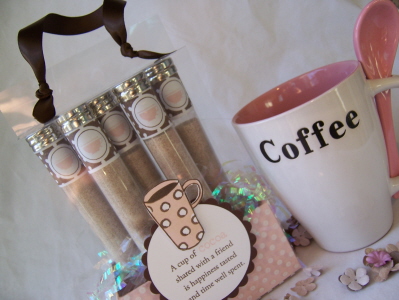
Cafe To Go! Go!
You KNOW how much I LOVE coffee. I do still drink it, but in less quantity, and now without real sugar and fat free cream. So, I had to do a coffee themed set with a new found product I love! Pink & brown are like my favorite combo-so this was a perfect set.
Now see the tubes. They are an exact fit! The lollipop along base holds 5 of the PTI tubes perfectly, so each one can be on display.
In these tube, there is 5 tsp of General Foods Inernational Sugar Free French Vanilla Coffee Mix. SUPER yummy. You technically only need 4 tsp, but I like it sweeter!! And it fills the tubes more. All you do is add 8oz of boiling water, and you are ready to go!
I found some uber cool-make your own mix recipes HERE! There is quite the variety, and they all sound YUM-A-LICIOUS!
So if you have many people, this may be the way to go. Maybe even a $5 limit Yankee swap?
I used sweet blush cardstock to print my base template. I added a cute little chocolate piece to where the tubes insert for some interest, then cut my little circles for my tubes. I used the smallest circle on my Coluzzle circle template for this package. Then I put in some fun filler!
I created my wrap using acetate. I stamped my acetate bottom with the polka dot basics stamp, in white StazOn. I purchase mine in bulk at Staples. I get like 100 sheets for $20 (I believe) Its been a while since I had to buy them. They are just window transparencies. Basically for use with classroom projectors.

For my tubes-I used Holiday Treats, as it pairs perfectly for this project with Warm Happiness. I wanted them to be a little fancy schmancy, so I stamped my labels to match, and wrapped them around the tops. This is quick and easy, and adds so much detail.
My tag is pretty straight forward. I think its a nice addition to the design. Stamped my sentiment (it technically should have said coffee, but I THOUGHT this was cocoa mix! Blond moment.)
View from the top-Just add water
That was also done stamping the labels, then punching them out with my 3/4 inch circle punch.
That is truly all you do! Pour it in the cup-add your 8oz of boiling water, and you have super yummy coffee with friends 😀
As you can see I used ribbon for my handle. Easy peasy. Just grab the handle and go.
Who wouldn’t love that? I think its just so cute. Plus you can get the kids in on it 😀 Let them mix the ingredients up and use a funnel to pour in the mix.
OK moving on-
Now for a super way you can use the tubes with the Desk Top Stationery holder!
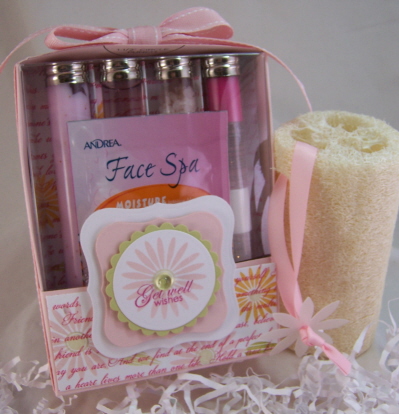
I call this Spa in a Box.
Supplies-
Desk top organizer template
Stamps- Floral Frenzy
Ink-Sweet Blush, Spring Moss, summer sunset, the dark pink – its a Pallette ink pad that is that close to Raspberry Fizz by ribbon comparison
Cardstock-Sweet Blush, spring moss, select white
Raspberry Fizz patterned paper
Ribbon-sweet blush stitched grosgrain, sweet blush twill
clear cardbox, Labels nestability, nestability circle, dew drop, test tube, May Road frosted flowers
Who doesn’t love to be pampered right? This is a gift for all ages too. I always make things I would personally love to receive. When you buy one larger product of each item, you can repackage it in many tubes, for several gifts. This gives that person a day or two of pampering.
Look how PERFECT the tubes fit in this box, which is flipped up side down. You can easily fit 4, if you want to use dividers. I also believe 5 fit snuggly.
Is this not SO pretty, and professional/store bought looking? Only YOU had fun creating it.
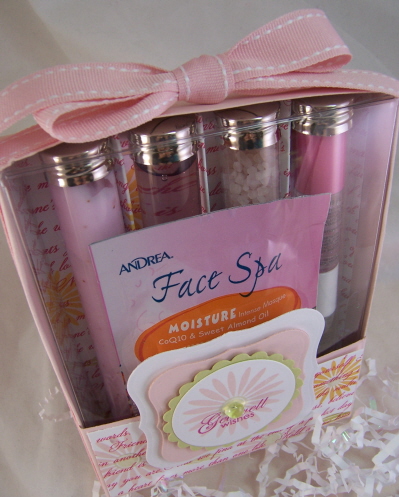
I have 4 tubes-Body lotion, body wash, bath salts, 2 lip glosses (2 fit in 1 tube), and a face spa packet! I used my label maker to mark what is in each tube (in case you are wondering how the receiver will know what is in each) The face packet inspired my color combo for this gift!
Now for the clear cover insert!

Clear cover insert:
Cut off the just the back panel of the card box.
Now cut down the card box to about 5 inches.
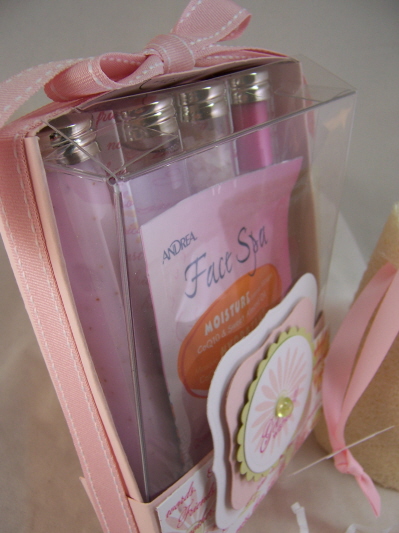
Insert box front, into box
This step is optional, as they stay in place just fine without it.
Now lets move onto the sections:
Sections close up
.
Now what I did for this set was to take my patterned piece of Raspberry Fizz paper, and stamped flowers from Floral Frenzy randomly all over, in co-ordinating colors.
For the tube insert- You will make mountain/valley folds.
Apply adhesive to back, and insert into holder.
Adhere the 2 ends to the sides of the holder.
For label-die cut 2 labels.
Large label from white cardstock, layered label onto sweet blush cardstock.
Die cut a scallop circle from spring moss cardstock. Layer on white die cut circle- stamped with flower & sentiment. Add dew drop with glue dot.
Wrap stitched grosgrain ribbon around box.
Last but not least-
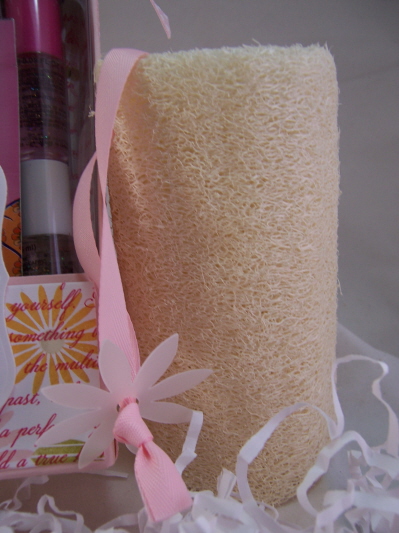
Loofa-
Remove original string from loofa
String through ribbon to match.
Insert through center of Maya Road flower, and make a knot.
Trim excess.
This was a simple addition, but really makes the set a WOW!
Its all about the details.
So there you have my projects for today. I hope you like them, as much as I do.
I’d love to hear your thoughts!!
Be sure to check out more samples on Nichole’s blog, as well as Lisa & Debbie!
2 posts today
Dec 13, 2008OK please make sure you scroll down today! I have 2 posts to share. I’m a stamping fiend these days, and don’t want you to miss any of it.
One for each template, and my sketch is under the Papertrey Ink group post.
Thanks for visiting 😀
Have a great weekend.
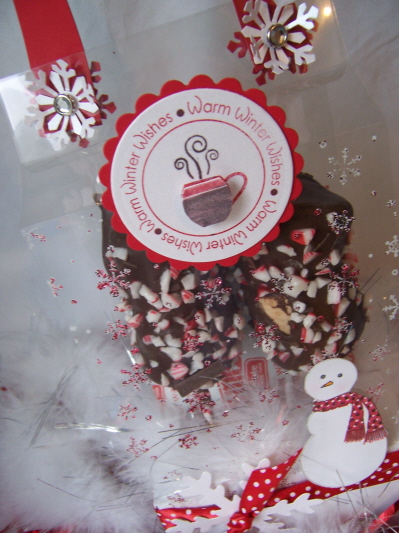
Sweets for the Sweet
Dec 12, 2008I really hope you are all enjoying the countdown, and the peeks.
Well this month as part of our countdown, Nichole asked her team to come up with a Valentine Day treat. While I LOVE all the holidays and coming up with fun ideas, by now you may know my love does not lay with any type of cooking or baking. I’m sorta the type that likes home-made containers, and prefers wrapping something store bought in a fun way! LOL! I enjoy taking the time to create the packaging, not the baking process! LOL! I’ll leave those cool cooking ideas to the rest of the girls 😀 Plus it saves me more time to stamp.
So for baking, cooking or anything like that, this is as home-made as I will get this season-
Home made chocolate flower lollipops, in my NEW! My Timeless Template -the Lollipop Along
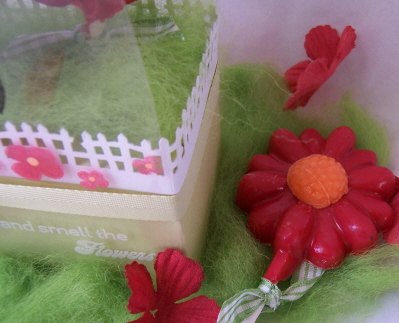
Stop and smell the flowers

Could this skunk be any cuter? I think this is so stinkin adorable! (pun intended). This gift item uses the NEW! RELEASE-Forest Friends. I’m totally loving that set!!!
I used my lollipop along template to create a traveling chocolate lollipop garden.
When I saw this skunk I fell in LOVE! He/She is adorable. I also laughed so hard when I saw it because I don’t know what it is, but Alexa (my 9yo) has a love/hate relationship with skunks. BIG TIME! So this is for her.
The handle is made from cardstock. I punched 4 flowers from pure poppy, and secured my handle between them with brads. I think its a nice touch 😀
Now the close up details-
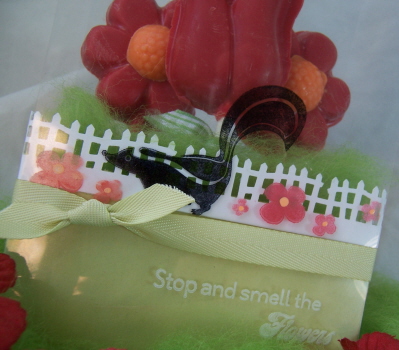
I made my base from Spring Moss. Punched my holes for the lollipop sticks. These pops are large and I wanted them well seen, so I only used 3. I then punched a fence border (a Martha Stewart punch) and wrapped it around my template.
The “grass” is what is called wool roving. A hobby I THOUGHT I would try, but never did get to. I’m happy because the wool came in handy for my grass. I love when that happens.
I made my wrap from acetate, and stamped my sentiment in white stazon. I then stamped my skunk in black pallette ink (lightly heat set), then my flowers in white stazon. I used my Poppin acetate technique with Pebbles Inc pearlescent chalks for the flower to pop out in color. I then took a Souffle gel pen for the flower centers.
Easy peasy.
This project took MAYBE 20 minutes. Really simple.
Make sure you check the other design team member blogs for their treat ideas 😀
Tomorrow’s peeks are my favorite items 😀 So I hope you are ready!
Thank you for stopping by.
Sketch time and another template peek!
Dec 12, 2008We interrupt this weekend of countdowns to bring you a sketch challenge! Oh and a uber cool new template peek too!
I have NO IDEA where the month is going. I’m no where near done my Christmas stuff! YIKES!
We have had no power on & off due to ice storms so sorry this is late.
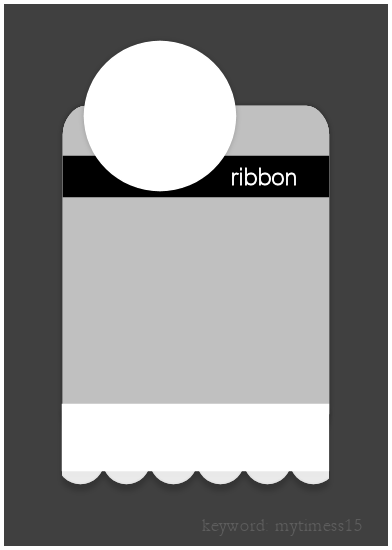
Keyword mytimess15 (thank you Dawn for making the image for me :D)
Here is my sample
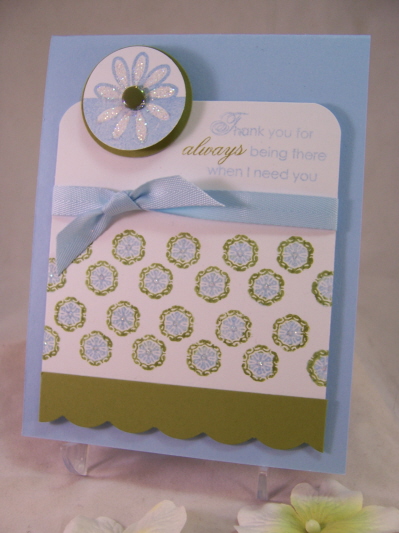
I used the Out of the Box image-popped out with a circle punch. The sentiment is Heartfelt Basics (love that set). My “patterned paper” was done using the background basicis stars, colored in olive and blue. I stamped them in blue first, then colored the edges with a marker before stamping them. I used my glue pen to add some bling to the centers. I think they look like cute flowers.
Don’t miss the sketch team samples too!
Now I’m moving on with a template peek 😀 This time using the Desk Top Stationery box. Only 2 more sleeps! Unless you stay awake for the release 😀
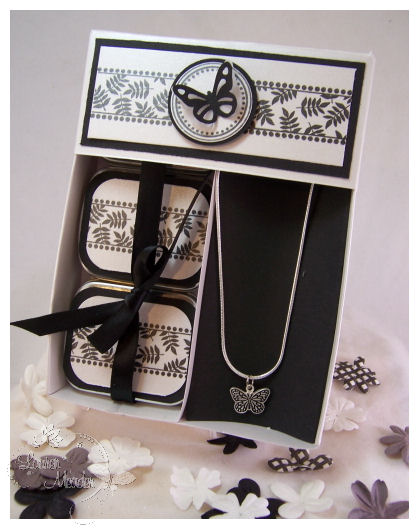
Now how is this for a gift presentation?
Black and shimmery white is just an elegant and stunning color combo. Perfect for any style.
I made this gift to re-package a jewlery kit. This will be for my MIL. She loves making jewelry.
I purchased a make your own photo bracelet kit. I cannot for the LIFE of me remember where! I want to say Michaels, on SALE for $3 after Christmas last year. I KNEW it would come in handy-someday.
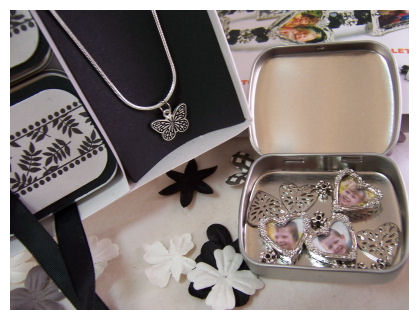
In this Desk Top Stationery holder, I have put 3 of the small hinge tins. They are a PERFECT fit. I think you can fit 6 of the tins in this template. Not positive. I covered each tin which is stamped with the leaf pattern label from Limitless labels ( I LOVE that set-and not just for candy nuggets!). I just created 2 sections for my gift. the 3 tins on one side, with my jewelery supplies, which tie in with some satin ribbon, and my necklace.
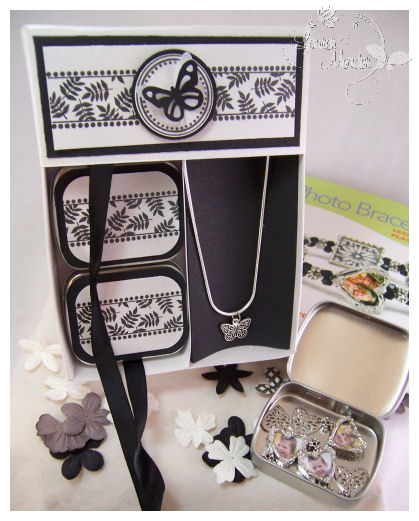
You can see the gift packaging in the background.
The bracelet kit included 3 heart shape photo holders which I put in one tin (and I already put the kids photos in there) and 3 rectangle ones, which are in the other tin (that has myself, Jay and a photo of Daisy in there).
The third tin had the string and additional beads in the kit. I whipped up the necklace myself by purchasing the butterfly charm, and necklace separately.
Another great, inexpensive gift idea ![]()
Well I hope you get inspired to try the sketch, or more uses for the templates!
Template Time!
Dec 11, 2008I’m excited to share todays peek at our next new template! I hope you keep an open mind at the possibilities this one has to offer as well. I will, of course be filling your brain with creative ways to utilize this as the days go on (HOPEFULLY!).
You can NEVER have enough great ways to package your card creations, and sets! Its the gift that keeps on giving, and perfect to keep on hand for any occasion. I hope this template will peak your interest. I know one of the most popular, well received, handmade gift items that I personally make are my card sets. I am always trying new ways to present my sets, and this box is a keeper.
With all that being said, here is a peek at our next My Timeless Template: Desk Top Stationery!

Petal Pink Set
I printed my template onto chocolate cardstock, then cut, scored, and assembled.
In this box there are 8 A2 size, well embellished cards, with stamped envelopes to match! The box was designed to match the cards that are inside, perfectly!
Now the main purpose for this template wasn’t JUST for boxing up some pretty cards. It is meant to store your cards or stationary sets, on a desk or area out in the open. We work hard to make pretty packaging, why not make it so its not stuffed in a drawer, but a functional part of the room, office or creative space of the receiver? Maybe remind them of the note they are suppose to send off.
Think of the person’s room decor, and design it to match!
This particular gift set is going to Alexa’s 1:1 aide, who I love to pieces.
Now let me share my details with you
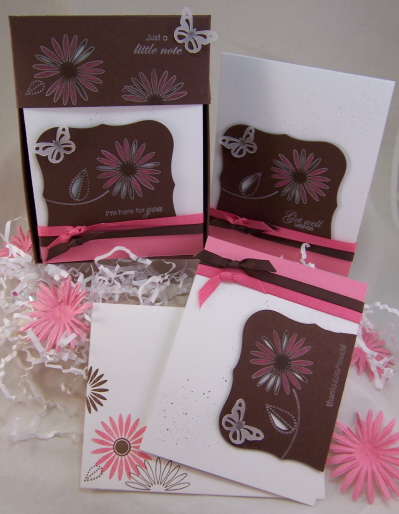
You can see the 2 designs that are included in this box set.
Each card uses the same elements. There are 8 in a set. 2 different designs. So, 4 of each design. Envelopes stamped to match. Each card also has different sentiments from the sets Floral Frenzy, flower garden sentiments, and Butterfly Kisses

Here is set #1 Birthday Wishes, thanks sow much, Get Well Wishes, and we also have I’m here for you.

Now onto set #2
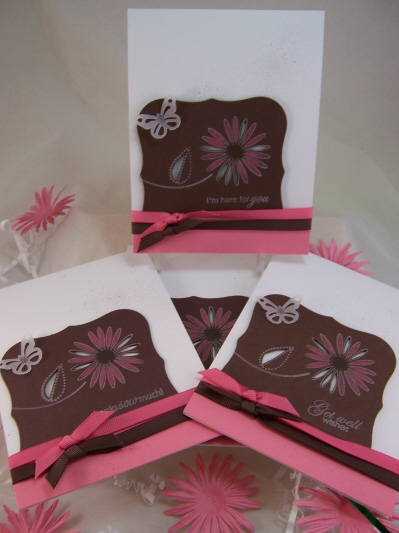
I’m not big on mass production, but these were fun! I think they are just SO pretty too. But not over the top busy.
Now, a more close up view
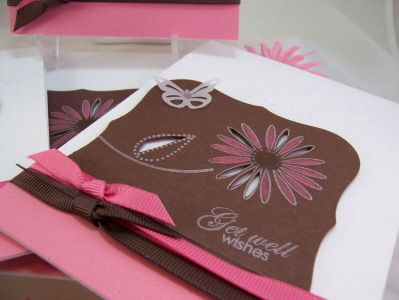
Each set uses the same pieces, just arranged differently. I like doing that. Keeps it balanced too.
A die cut label from dark chocolate, that is stamped with Floral Frenzy in white craft ink. The petals are colored with a Prisma Color Pencil. Gives a nice look I think. Sentiments vary, an are also stamped in white. Some of the petals on each flower, and the leaf is cut away, so the white peeks through. I am totally in LOVE with that look. Then the perfect touch, my signature-a vellum butterfly. I have to use butterflies with every release! It’s my thing 😀 Then the finished card is spritzed with some chocolate ink.
I think this set is just SO pretty! I hope you do too. You can get started on the cards while you wait for the 15th to order 😀
Now should I share what else you can use this template for?
OK! One more peek!!
How about a treat holder?
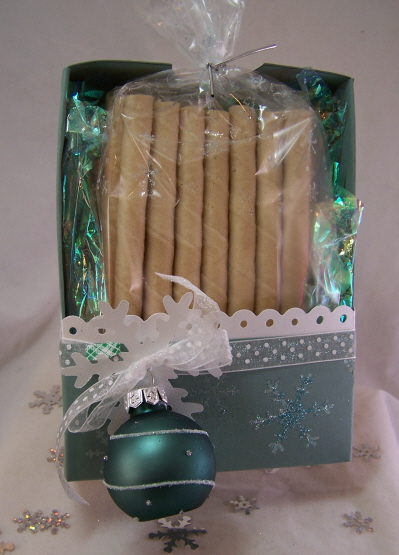
Pretty Pirouettes Package
All you have to do is flip it, and you have a super cute treat holder!
I used Snowflakes for this set.
I don’t know about you but I LOVE Pirouette Sticks. They fit perfectly in this container too.These are filled with white chocolate. It was SO hard to not eat them during this packaging venture. OMW! I used about 1/2 my container for this little treasure.
Its packaged goodies like this that make such nice “for no reason” surprise, or inexpensive gifts for the mailman, secretary, or anyone else you may want to acknowledge. Maybe you have a large group of people in an office? Sam’s Club sells these in bulk, for a pretty good deal, so I think I’m going to go get some this week for gifts 😀 Jay likes to give things out to his staff and this may just do thr trick in time for the holiday. I like that its not Christmas, entirely, in case there are other reilgious preferences in the group.
For freshness sake, I did put mine in a gusset bag (stamped with my white stazon, and glitter sprinkled onto the bag) and tied the top.
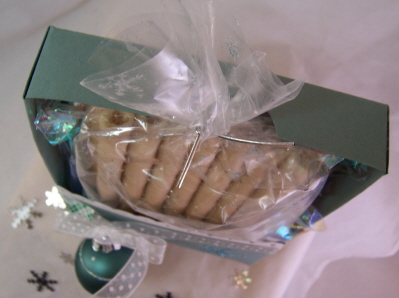
I used the optional notch cut out so that my bag doesn’t get squished.
Now for the details-

As you can see, this entire design was inspired by my little 2/$1.00 ornaments I got at Michaels last week! It makes the perfect little embellishment keepsake for an extra $0.50! It matched my Ocean Tides cardstock to perfection!! I punched a white vellum snowflake, and tied through some white polka dot ribbon. The scallop border is a Fiskars punch, and is done in shimmery white.
So there you have it! One template, 2 totally different uses! Wait until you see what else I have done with it 😀
More on that later! I have 2 projects that I could scream over 😀
Thank you, as always for taking the time to check in with me here. I so enjoy the excitement that builds, and you amazing emails and comments.
Tomorrow I have more template ideas, as the team shares a group post! So don’t miss that.
More creative ideas today on Nichole’s blog, as well as Lisas.
Till tomorrow.
My Etsy

Who I Designed For
Blogroll
- Alicia
- Alli Miles
- Ally Blankenship
- Amber
- Andi @ crafts on a whim
- Angel R
- Angie Z
- Anne Kranitz
- Becky O
- Bee
- Beth Silaka
- Bethany Paull
- Beverly Nash
- Bobbie
- Cambria
- Cammie
- Card of the Week
- Card Positioning System (CPS)
- Cards for Cancer
- Catherine Doucette
- Charmaine
- Cheryl Sims
- Chriss Rollins
- Christina
- Christine Ewing
- Christine Wooden
- Colleen Schaan
- Craft Critique
- Craft Gossip
- Crystal
- Dawn Easton
- Emily Giovanni
- Geny
- Holly
- Igne Groot
- Inspirational Craft Blogs
- Irene
- Jami Sibley
- Jeanne Streiff
- Jen del Muro
- Jeni Bond
- JenMarie
- Jenn Balcer
- Jenn Diercks
- Jenn O
- Jennifer E
- Jennifer Mick
- Jennifer Pereda
- Jennifer-Sweet Treat
- Joanne Basile
- Jodi Collins
- Julia Stainton
- Julie Masse
- Karen
- Kathryn Berthiaume
- Katie Cotton
- Kelley Holland
- Kendra
- Kim Scholfield
- Kris’s Color Stripes! Get inspired here
- Kristen Dubosque
- Kristin Eberline
- Kristine
- Laura @ Sunshine Stamper
- Laura Turnmire
- Laurie Schmidlin
- Lesa Rapp
- Linda Duke
- Linda-LSN
- Lindsey Botkin
- Lisa (lakind scs)
- Lisa Kind
- Lori Craig
- Maggie
- Mara Campbell
- Maria
- Maria Levine
- Mary
- MaryJo
- Melanie M
- Monique Hansen
- Moxie Fab World
- Pam Imholz
- PaperCrafts Connection
- Peppers and Pollywogs Kids party site
- Rebecca Grohall
- Rita
- Robyn
- Rose Ann
- Sarah Vrolyk
- Sharon Harnist
- Sharon Johnson
- Sharon Rivera (a chemisrty with paper)
- Sherrie
- Sophia Landry
- Storage Units, Ink, & More Blog
- Sue Berker
- Susan (Rainy)
- Tangii Crane
- Tracy
- Tricia Traxler
- Trudee
- Velta
- VivLyn
- Zena
MTME Pretty Palette Color Team
MTME Pretty Patterns Sketch Team
My Time Made Easy TM LLC
Shop till you drop!
Lauren Meader
About Me
Copyrighted material
Subscribe To My Blog
Pages
- About me
- Alexa’s Story!
- My Crafty Corner!
- My Time Made Easy™ LLC
- Our Make A Wish Trip to Disney!
- Resume/Publication List
Calendar
| M | T | W | T | F | S | S |
|---|---|---|---|---|---|---|
| 1 | 2 | 3 | 4 | 5 | ||
| 6 | 7 | 8 | 9 | 10 | 11 | 12 |
| 13 | 14 | 15 | 16 | 17 | 18 | 19 |
| 20 | 21 | 22 | 23 | 24 | 25 | 26 |
| 27 | 28 | 29 | 30 | 31 | ||
Archives
- August 2013
- July 2013
- June 2013
- May 2013
- April 2013
- March 2013
- February 2013
- January 2013
- December 2012
- November 2012
- October 2012
- September 2012
- August 2012
- July 2012
- June 2012
- May 2012
- April 2012
- March 2012
- February 2012
- January 2012
- December 2011
- November 2011
- October 2011
- September 2011
- August 2011
- July 2011
- June 2011
- May 2011
- April 2011
- March 2011
- February 2011
- January 2011
- December 2010
- November 2010
- October 2010
- September 2010
- August 2010
- July 2010
- June 2010
- May 2010
- April 2010
- March 2010
- February 2010
- January 2010
- December 2009
- November 2009
- October 2009
- September 2009
- August 2009
- July 2009
- June 2009
- May 2009
- April 2009
- March 2009
- February 2009
- January 2009
- December 2008
- November 2008
- October 2008
- September 2008
- August 2008
- July 2008
- June 2008
- May 2008
- April 2008
- March 2008
- February 2008
- January 2008
- December 2007
- November 2007
- October 2007
- September 2007
- August 2007
- July 2007
- June 2007
- May 2007
- April 2007
- March 2007
- January 2007
Categories
- About Me
- All That Scraps
- blogger challenge
- camera/photo play
- Cards
- Contests
- family stuff
- FOR SALE
- Home decor/3-D items
- How to FAKE it!
- Introduction
- JUGS Challenge
- JustRite Stampers
- Lizzie Anne Designs
- My family stuff
- My Stamping Space
- My Time Made Easy
- My Time To Color Challenge
- My Time to Create Challenge
- My Timeless Template Challenge
- My Timeless Templates
- Mytime Mail
- MYTIME MOVIE/VIDEOs
- Papertrey Newsletter
- Pink Cat Studio
- Pretty Palette Challenge
- Pretty Patterns Sketch
- Product Opinions and Must haves
- Recipe's
- Saturday Sketch
- Smilebox Creations
- Stampavie
- Tutorials
- Uncategorized
- videos
Most Popular
- Create your own Onesie Card Tutorial-and important NOTE! PLEASE READ (2529)
- Saturday Sketch-Boxed bag holder (2333)
- Going GREEN! Fancy Flower Flourish-Closure Video (1478)
- Fabulous Favorite - Giveaway! (1336)
- a Prayer Request (1232)
- QUICK-Easter Baskets from Nestabilities-PTI style-and blog challenge (1063)
- Teaser Sketch (999)
- February Release Giveway! (and a little peek) (996)
- Group Post and Rambling Rose Video Tutorial (985)
- GIVEAWAY! Who wants it all?! (895)
Recent Comments (RSS)
- 첫충사이트: 완전히 흥미로운 블로그 게시입니다. 저는
- sarah: Wow, Lauren, what a stunning
- hedie: خرید راهبند
- 야동: Love to read it,Waiting For
- 야동: This seller is in a
- 바카라사이트: 여기 처음 왔어요. 나는이 게시판을
- 야동티비: I was surfing the Internet
- 바카라사이트: 비슷한 주제에 대한 흥미로운 정보를
- 바카라사이트: "여기에 제공해 주신 귀중한 정보와
- 온라인홀덤: 유익한 웹 사이트를 게시하는 데
Copyright © 2007 - My Time, My Creations, My Stampendence - is proudly powered by WordPress
This blog has been Tweaked and Designed by Sara Williams