Archive for the ‘Cards’ Category
Day 1 February Release Peeks!
Jan 28, 2011 Author: mytime | Filed under: Cards, Home decor/3-D items, My Time Made EasyThe time has come for our February Release Peeks to begin! Offical Release is February 1st.
I’m over the moon for this month’s release, and I think you will be too!
Today you want to check out several team members for a first glance at what is in store for you!
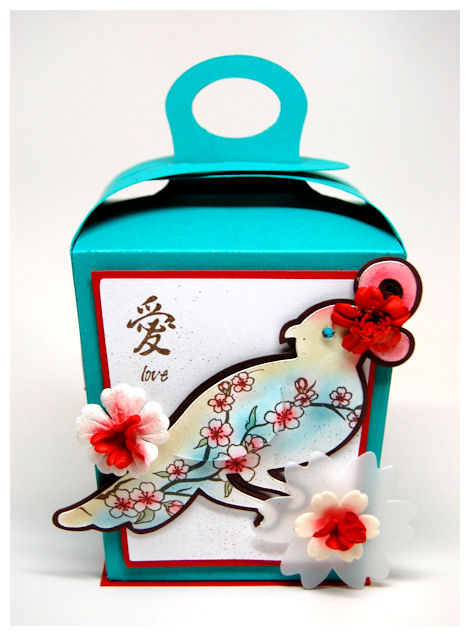
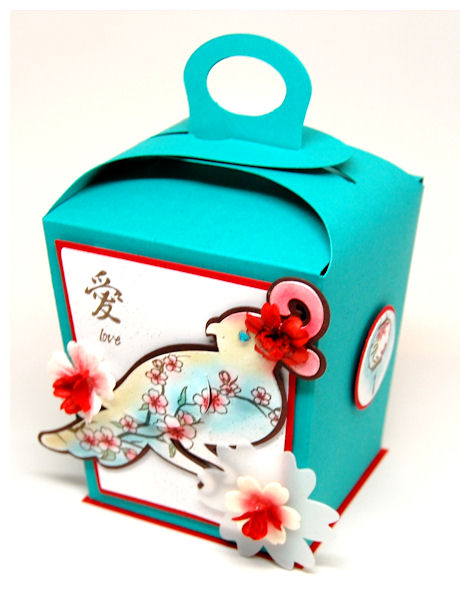
Our design team members are using a some new images (we have 3 stamp sets releasing this month), paired our NEW! Pretty Packaging Template called: Creative Card Candy!
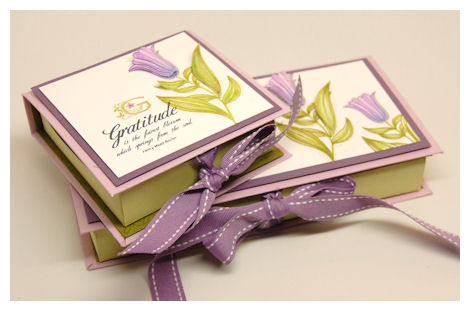
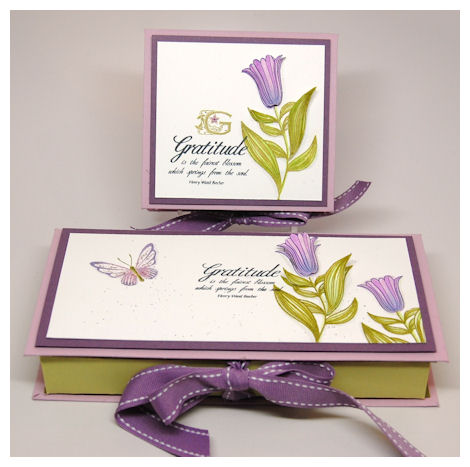
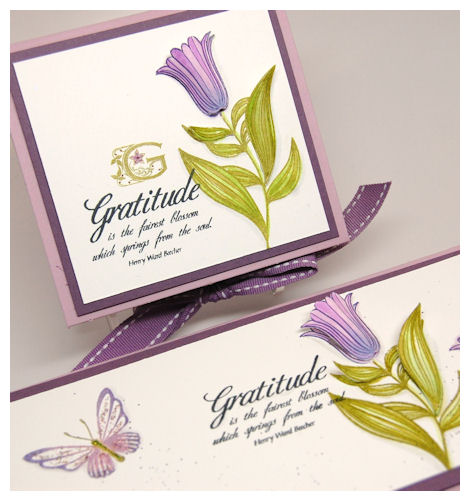
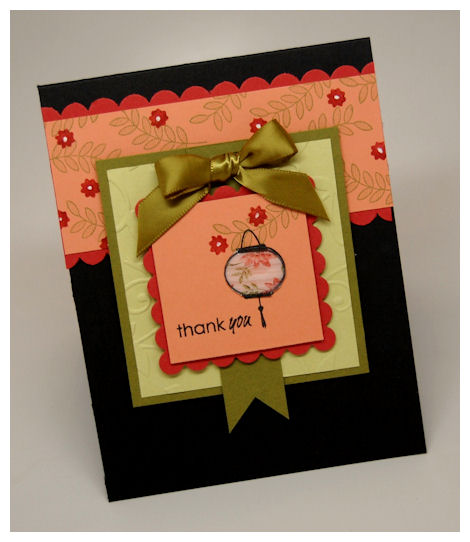
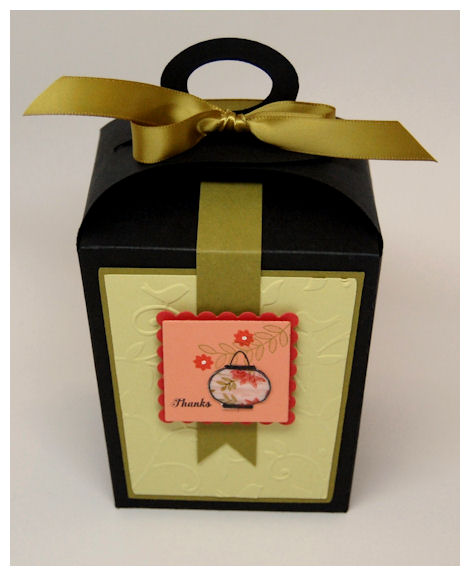
G is for Gratitude Gift Set
I designed both of my samples today to look exactly the same, just in the 2 different sizes, to show you the versatility in BOTH.
I managed to use two of the three NEW! Stamp sets we are releasing.
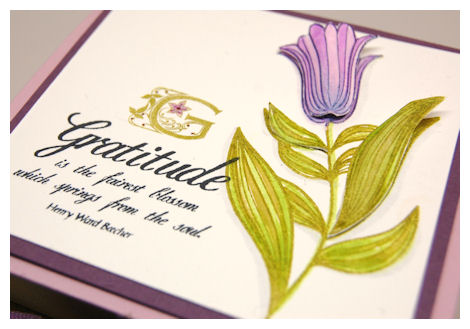
The flowers are from Bold Botanicals set, which is simply AMAZING. More info on that to follow.
Tulips are my FAVORITE flower, so this set is beyond my favorite to date. I love that it can be colored, or just stamped in one color, or various colors-as you will see. No matter how it’s used its perfection every time.
The letter “G” is from an over the stop-STUNNING new set called Monograms Defined! You will LOVE IT! Its an elegant alphabet set, for perfectly personalizing all your gifts, tags, and cards! Each letter is perfect on its own, but it also has an accompanying word to define the letter, making it even more amazing!
The Bold Botanicals set and the Monograms Defined were designed to work perfectly together. As the release peek projects reveal I know you will agree 😀
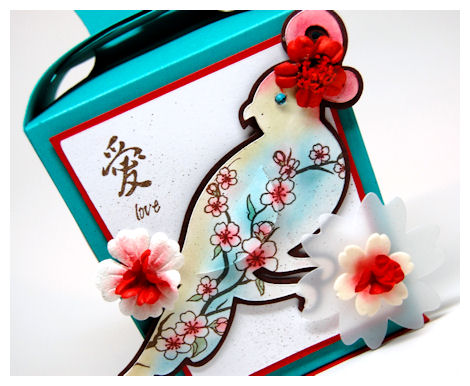
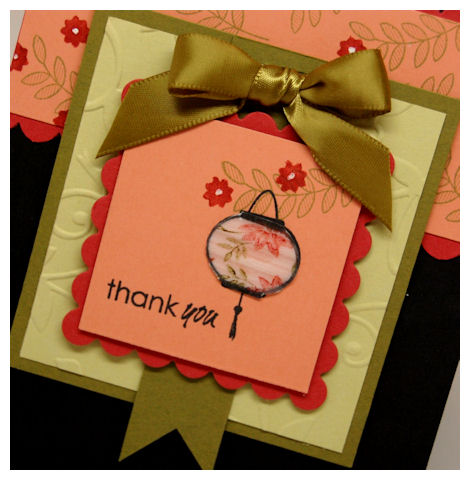
Now check out the flower details…
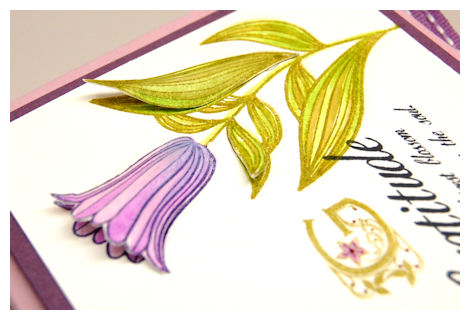
The flower was stamped, colored and cut out for some added dimension, as were 2 of the leaves. Its a subtle detail that brings this gift set to life!
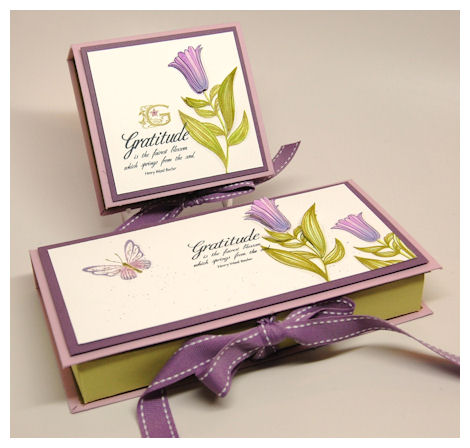
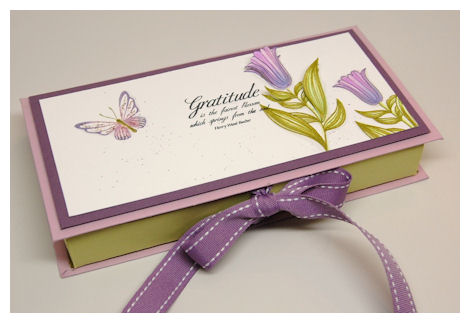
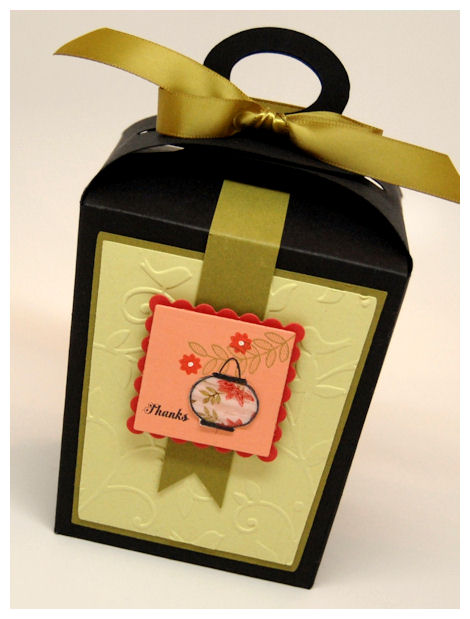
Sometime you just need a simply elegant box to hold your gifts in! Look no further! This is a dual gift set. The completed gift box looks store bought when assembled. The details of how these boxes go together makes them sturdy, professional and stunning!
This template was properly named because it is just perfect for the gifts we love to give: cards & candy! Or whatever else you want to fit in inside.
They are BOTH fabulous to package up so many various gifts.
You will flip over how simply cute, and well made this template is, as well as the VALUE! You receive 2 templates, for the price of one, in this package.
Let’s get to the template details, shall we?
Creative Card Candy Template $5
*Includes FREE Mini Template!*
Available in PDF, SVG, GSD, DXF, WPC
Completed Project Size
Standard
7 1/2 Inches Long
3 3/4 Inches Wide
1 Inch Deep
The long/standard template is the perfect box to hold long cards, all types of candy like truffles, wrapped chocolate, pretzel sticks, chocolate bark, nuts, cashew turtles….you get the idea. You can also use our Creative Card/Envelope 1 and Creative Card/Envelope 2! Simply place the cards on one end, and the envelopes on the other!
In this particular sample-with Valentines Day on the way, I chose to package up some Bliss Chocolate Candy! There is a double layer in here, giving the receiver about 36 chocolates! 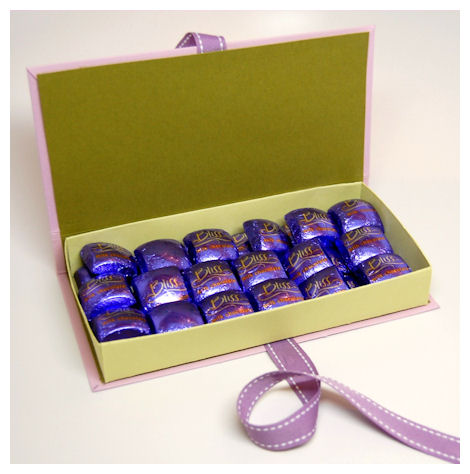
Can you say YUM!! Note: An entire bag fits in here, with a few left over for YOU!
I love how this is simple, yet stunning. I love the ribbon closure . I mean really, why should we hoard all that gorgeous ribbon, when you can add it to this box?!
Mini
4 Inches Long
3 3/4 Inches Wide
1 Inch Deep
The mini version of this template is the perfect packaging for Creative Card/Envelope 1 and Creative Card/Envelope 2!
Check out this gift set
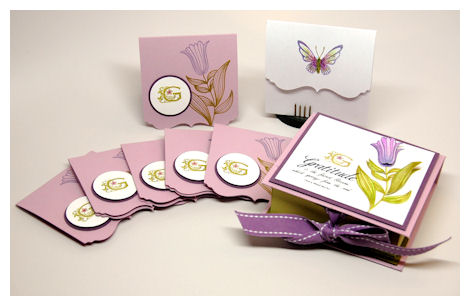
I created 6 of the NEW! Creative Card/Envelope 1 to fit inside my Mini Creative Card Candy Template. The envelopes were made to match by stamping the butterfly from the Bold Botanicals set.
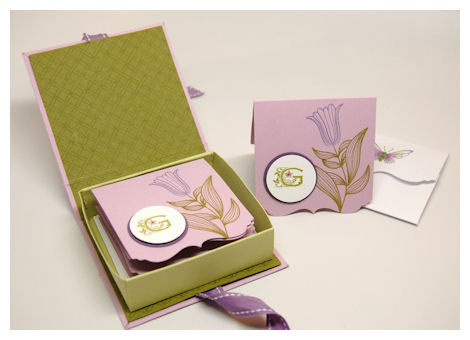
Look how perfectly these new cards/envelopes fit in the Creative Card Candy Template
On the inside of my box I also used the Puckered Up Patterns stamp set to create a decorative pattern on the lid.
Now on my template packaging I colored my Tulip. Here on my gift set of 6 cards, with coordinating envelopes I inked the petals in a lavender ink, and the stem/leaves in an olive ink, making the card process easy, but still stunning!
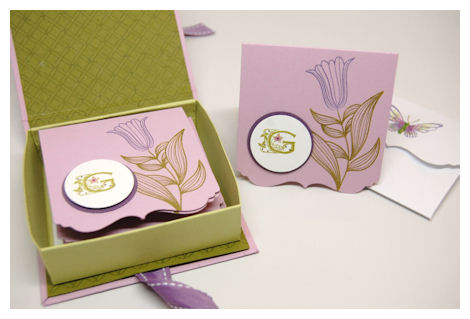
The “G” is highlighted on each card, within the circle layers.
Inside the card you have the sentiment stamped, that was on the front of the box.
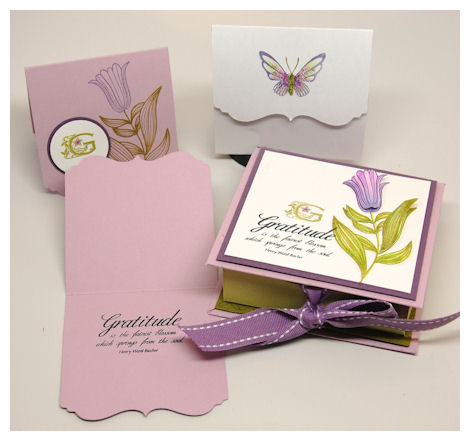
On the envelope I made it a little more WOW! by added stickles to the wings 😀
You can make all sorts of personalized gift sets that are quick and simple!! Or use it to package smaller amounts of your favorite candy treat, a gift card, cash, or how about jewelry!
So get creating, because it won’t take much to make this box a deliciously creative treat!
Supplies from My Time Made Easy ™ LLC
Pretty Packaging Templates: Creative Card Candy
Pretty Impressions Stamp Set: Monograms Defined, Bold Botanicals, Puckered Up Patterns
Pretty Pieces Cut File: Creative Card/Envelope 1
Well what do you think?!
Are you getting excited to see what is new? There is MUCH MUCH more to share, so come on back tomorrow.
I’m back!
Can you believe it?
Told ya, I’ve been getting crafty again! It’s been months since I was able to get 3 post days in a ROW when it wasn’t a relase 😀 Stress drives my creativity, so I can usually get an unusual amount of stuff done when I DO get some time 😀 I really hope to be posting more often, especially once my mom is done treatment.
For today my focus is on happy thoughts, and wishes. Sometimes when you can be somewhere you can at least SEND some of that happiness through the mail 😀
One thing that people LOVE is getting HAPPY MAIL! I always TRY to keep some “just because” cards on hand, for times when someone needs a pick me up. I will be honest and say I am the WORST at mailing them, but my intentions are pure 😀 hahahaha Its ridiculous that I’m so terrible mailing cards/gifts because I DO go to the post office daily to ship orders-so no good excuses.
Anyway……Happy mail….that was the main reason for creating the You’ve Got Mail set with the coordinating templates You’ve Got Mail & Happy Mail.
So with the introduction of the You’ve Got Mail Digital Stamp set, it made me want to get it inky again 😀
So here is what I made…
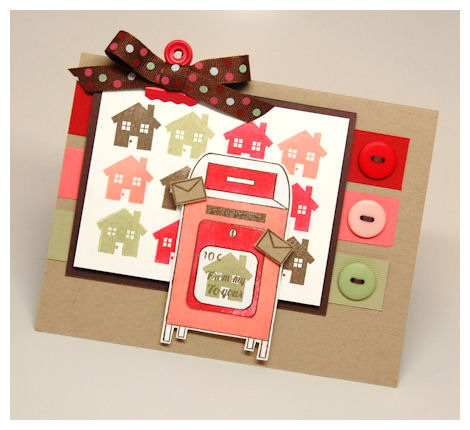
From my house to your house.
I LOVE the mailbox in the set, and the fact you can make it fit any occasion by switching out your center image. There are lots of fun layers to this, and it can be colored by hand, or if you don’t like coloring, there are solid layers for you to use-which is what I did here.
I love the colors in this: Kraft, White, Chocolate, Celery, Red, and Regal Rose. I could use them over and over again. I had some polka dot ribbon, that I used my Copic markers to color, to match 😀
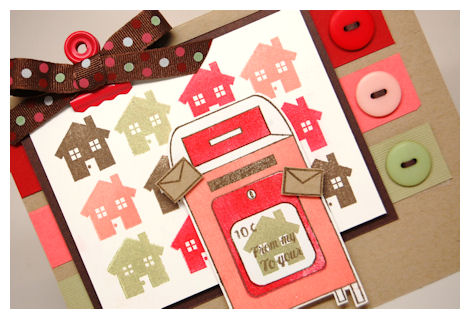
I love the little solid house image in this set, so I used to to create my own patterned paper. I think smaller images are so fun when used in that way 😀

I cut out the little envelopes too, to add to the design. Overall this was quick cute and simple. Just how I like it.
Well tomorrow kicks off our first peeks of our February Release. I have been creating like crazy, as had the team, so I hope you’ll come back to see what’s next.
Hi peeps!
Just thought I’d pop in an share a sample I made using the Gingersnap’s Stamp Set. I’m really enjoying going back and using some of the older releases 😀
When I created the set, I designed it to be used for ANY occasion 😀 The sentiments are definitely usable year round! This set is ONLY $6! and is so adorable.
Here is what is included:
- I love you this much! (That fits in between their arms!)
- You make life sweet
- Warmest Holiday Wishes
- From our family to yours
- You warm my heart
- Hugs & Kisses
- Sugar & Spice with everything nice!
With Valentine’s Day, I felt like I wanted to dust this set off, and create a card for each of my children!
I love you this much!

Isn’t this adorable?
I “built” my gingerbread girl, and cut her out. I stamped the I love you this much! sentiment across her arms.

I decided to stamp a house image from Sign It © partially on the red layer. This house image in itself is so cute and FUN. I’ll definitely be using it more and more in the future.
I also added the “peppermint” image from the Sugar & Spice set.
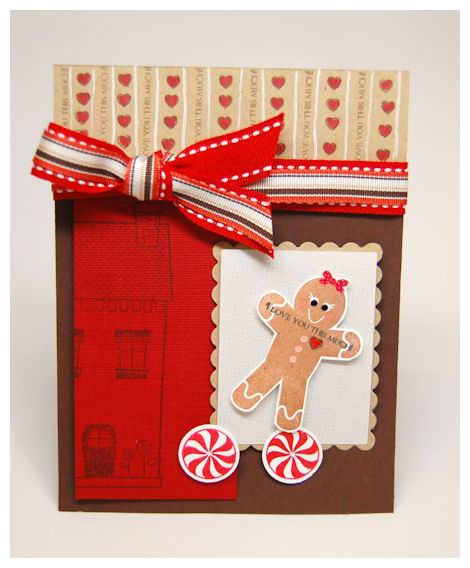
I used the I love you this much! sentiment to create my own whimsical patterned paper, featured at the top. In between the sentiments I stamped the heart image, into row, then colored them in. I proceeded to hand draw some white lines (purposely NOT perfect-you could use a ruler if you wanted them perfect).
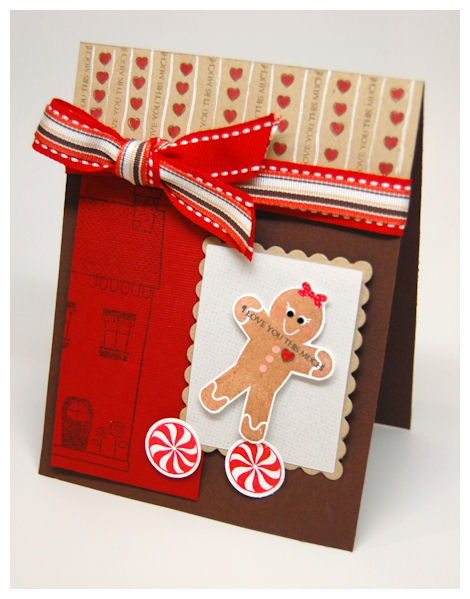
So use what you have, and think out of the box! I really love finding versatility within stamp sets, and try to keep things like this in mind.
Well thanks for letting me share today 😀 I’ll be back with more tomorrow!
See you then
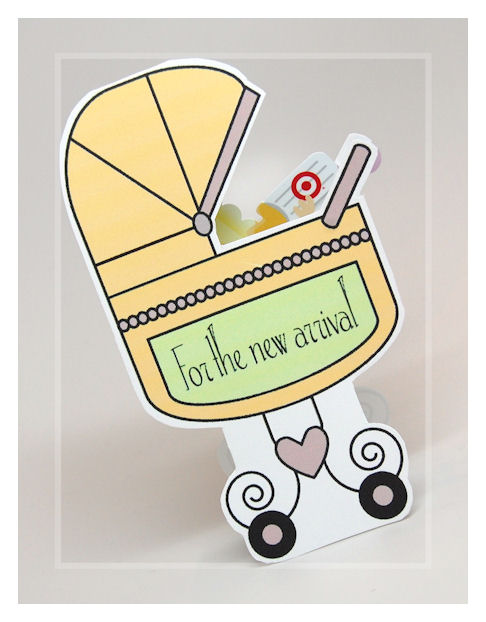
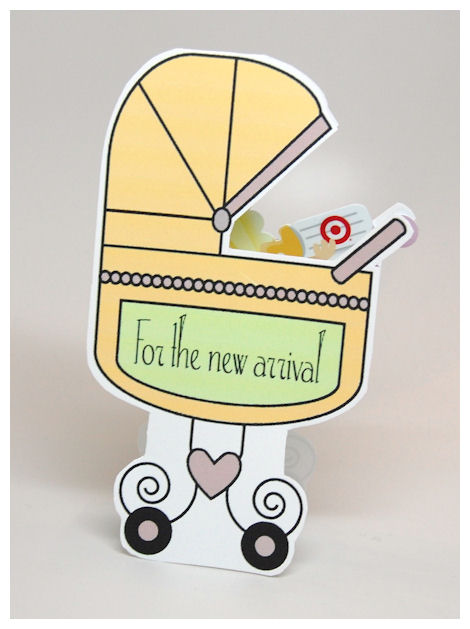
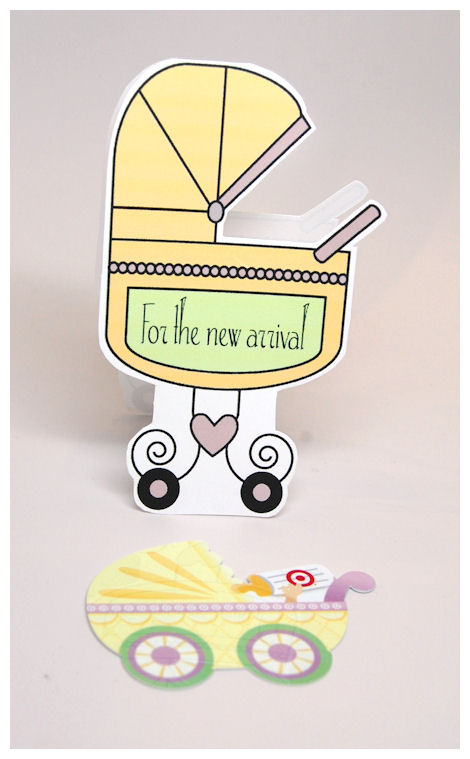
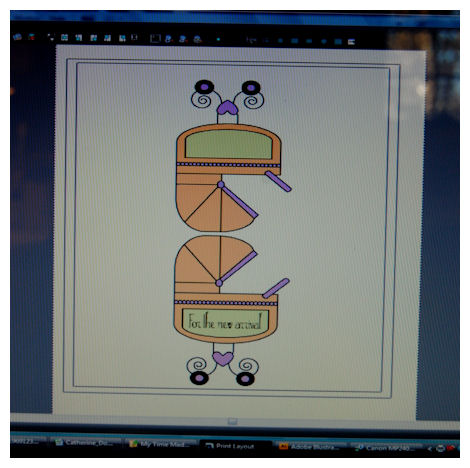
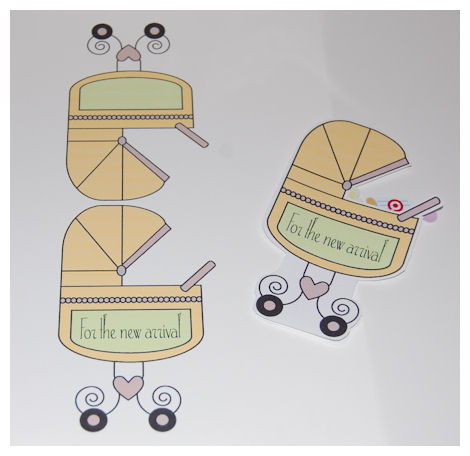
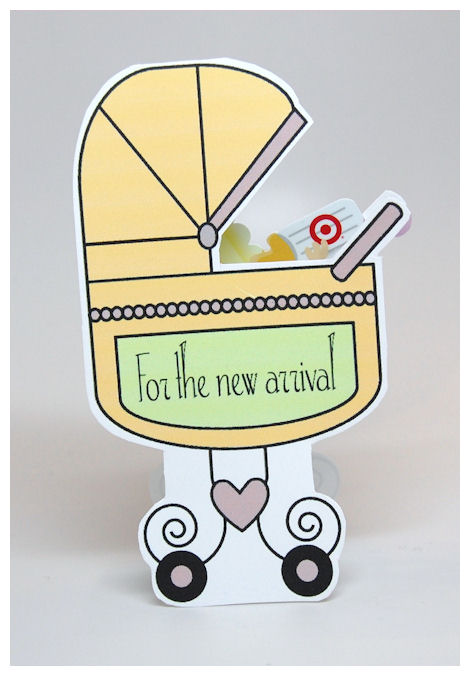
The New Arrival! New ideas!
Jan 26, 2011 Author: mytime | Filed under: Cards, Home decor/3-D items, My Time Made EasyAre you enjoying the winter? We have been getting hit heavy with snow here, with another storm anticipated for tonight. With our new home I LOVE when it snows. Being in the woods is so serene. I get to see bunnies, deer, all sorts of birds, chipmunks, and red squirrels (which I’ve never seen before!).
Life has been busy here. I feel like I always say that! LOL! The February Release for My Time Made Easy ™ LLC is *just* around the corner (peeks begin Saturday! YEAH!) and I’ve really enjoyed relieving my stress in my new craft room😀 to prepare for the release. Feels so good to get creative again.
My mom is doing AMAZING during her chemo/radiation treatments, and I attribute that to all the prayers being said for her 😀 She is in a positive mindset, and it helps that we just found out my brother will be welcoming a new addition to the family around Oct 3rd!!
I LOVE babies, and the fact I can get my baby fix, and NOT have to have my more of my own is wonderful! LOL! I can’t wait to be an aunt again 😀 So a HUGE congrats to my brother and his girlfriend Heather 😀
In honor of the news I have a card to share, and the announcement of some not so “new”- New Arrivals to the store!
For the new arrival!
Over the last year I’ve introduced select stamp sets in the Digital Download. I wasn’t sure I would get that into digital images, but the demand has been overwhelming! That being said many of the sets that weren’t previously available as a digital download, have now been added to the store!
We’ve added the following set to our Digital Download Stamp Sets:
Fanciful Flourishes © 21 Images – Digital$12.00
Puckered Paper Pieces © 24 Images – Digital$18.00
Secret Surprise © 7 Images – Digital$8.00
So Sentimental © 30 Images – Digital$12.00
You’ve Got Mail © 38 Images – Digital$12.00
Well I hope this inspired you to check out all our images and consider trying digital sets, if you haven’t yet! Check out our FREE Digital Image –> HERE! We want to you try things out before you buy, to ensure you are 100% happy! Each digital download arrives with a set of step by step photo instructions to help you get started! Easy peasy!
Well, thanks for stopping by today. I have much more to come, so stop by again soon! Our peeks begin Saturday. You won’t want to miss what is next!
Till then
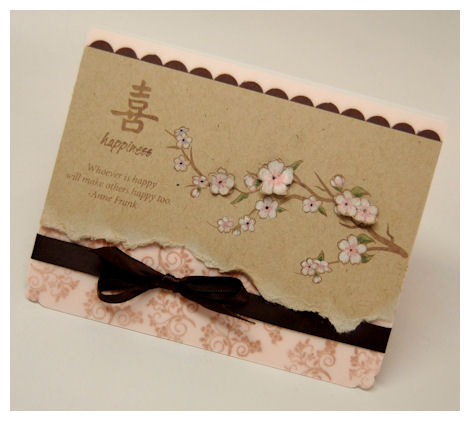
will make others happy too.- Anne Frank

Isn’t that the truth?!
Attitude can be infectious, and you certainly get back what you project.
I’ve been busy caring for my mom these days as she undergoes her Chemo & Radiation treatments. I’ve stayed positive and kept her focused. Each day I am certain to point out what is GOOD. We don’t look at HOW many days of treatment are left, but rather the day that we put behind us, that gets us closer to our goal- a CURE!
I’m proud of my mom. She has stayed in a positive frame of mind, and has been strong and brave. She has managed to keep from getting too ill and is getting the rest she needs. I’ve enjoyed the time we’ve spent together.
That being said during her treatments I’ve been able to design LOTS of stuff for the upcoming releases, and turned my STRESS into creativity!! SADLY the hospital allows NO INTERNET access, due to security issues (I think that is crazy because other hospitals allow it-but whatever). While most my time spent has been computer/file base, I did have time to whip this card up.
We all need a HAPPY card. They can serve so many purposes 😀
I used our latest stamp set release: So Fortunate. I LOVE this set to pieces.
The Cherry Blossoms are colored with a Prisma Color Pencil. I stamped and cut out several, select flowers for some additional dimension. I tore the bottom, and sponged it with some craft white cardstock.
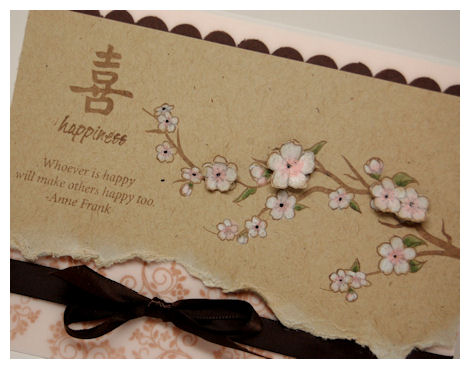
I paired the Happiness Symbol with a sentiment from So Sentimental. I also took the flourish from that set, and stamped it onto vellum cardstock, and layered it along the bottom.
I love the simplicity of this.
I have a few other projects I hope to post this week, as (if) time allows. I’m already preparring projects for our February Release-which is sure to make you all happy 😀
Well thanks for checkin in here! Hopeful I’ll be around more in the next week or so.
Till then
A Year in Review!
Jan 5, 2011 Author: mytime | Filed under: Cards, Home decor/3-D items, My Time Made EasyHi everyone.
I’m excited about today’s blog hop, and hope you will be too!!
As you know, each month we release more and more great new products!! While that is awesome, we often neglect/move on/forget about the OLD ones! Now it’s not that we don’t love the older stuff anymore… we are just too busy playing with our NEW stuff. So I decided to add a new monthly feature to our release called: A Year in Review!
This new feature means MORE inspiring ideas using some of our past products. So if you never saw a sample using X paper, or need more ideas for a stamp set or template you purchased, then be on the lookout for this fun new monthly addition, as each team member, and myself focus on creative a NEW! project using products from previous releases!!
OK now it is time to see what the team has made NEW with the OLD!
|
|
You will also want to VISIT THE GALLERY for loads of ideas using our products, new & old!
Here is my sample…..Wonderful Surprise!
Since we took a break for December, and I had NO CRAFT room, I feel like I really missed out on some of the design possibilities using our Wonderfully Wrapped template. So, I took this opportunity to use it again here!
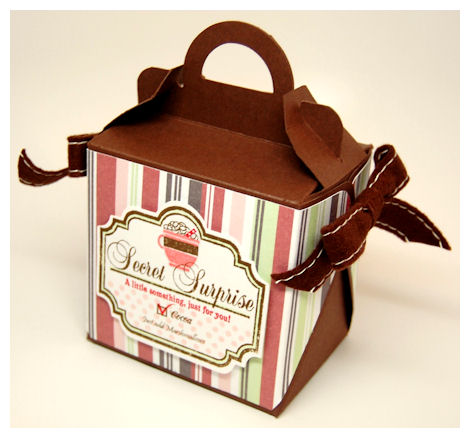
I love the design of this template. You can EASILY dress it up. I kept it simple. I chose to use the stripe pattern from the Candy Shoppe © Digital paper collection. It inspired the colors for the tag I created.
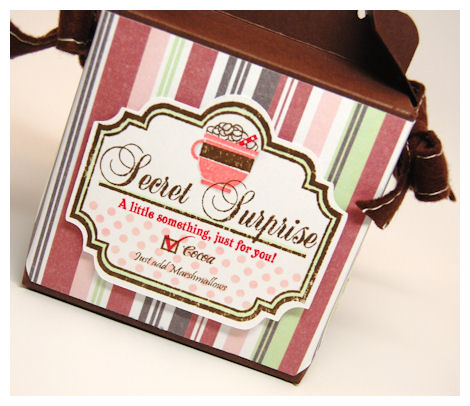
I LOVE this tag. It looks like one you’d actually find on a store bought product. It was fun and easy to make!
The tag, “secret surprise” sentiment & coordinating sentiment in red, is from the Secret Surprise set. I stamped it in chocolate ink, on the white layer, which is our coordinating Secret Surprise Cut File. I colored the edges with a copic marker.
The cup of cocoa is from our Grab a Cup set! Its a super cute set for any hot beverage lover!! Don’t miss the coordinating Grab a Cup Sentiments © too 😀 That is where the “just add marshmallows” is from!
The pink polkadot border, “Cocoa” sentiment with the square box and check mark, are from the Fancy a Cuppa? set
Now here is what is going inside!
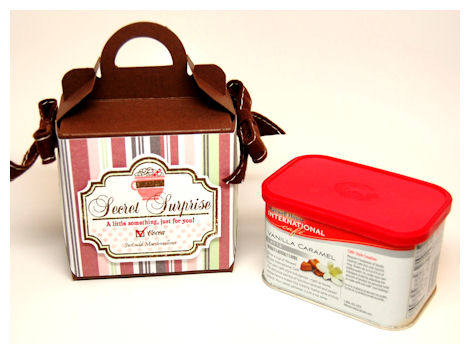
If you looking for more ways to package up some of your favorite treats, then we have it all covered! I love all the International Cafe drink mixes. Once I’m done with whatever flavor I have, I often save the tin to repackage hot chocolate & other drink mixes. I often purchased those in bulk at my local Sam’s Club, to divide up and repackage as gifts! I just properly measure out enough for them to make the correct amount 😀
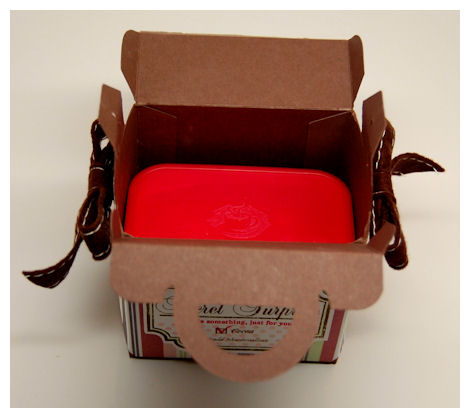
As you can see this particular tin fits perfectly in the Wonderfully Wrapped template! The tin will also keep the cocoa mix fresh inside for the user. I typically would re-cover the tin, but for your viewing purposed, left it as is.
Supplies from My Time Made Easy ™ LLC
Pretty Packaging Templates: Wonderfully Wrapped
Pretty Impressions Stamp Set: A Secret Surprise, Fancy a Cuppa?, Grab a Cup, Grab a Cup Sentiments
Pretty Printable Digital Paper: Candy Shoppe
Pretty Pieces Cut File: A Secret Surprise Label
So there you have it!!
I hope you all enjoyed this new addition to our monthly line up! This means more ideas for your previous purchases 😀
I’ll be back soon as I still have a few samples I’ve yet to share.
Thanks for stopping by!
Inspiring ideas are everywhere!
Jan 4, 2011 Author: mytime | Filed under: Cards, Home decor/3-D items, My Time Made EasyToday I am back to share more inspiring ideas, as is some of the team!!
Today you will surely want to visit:
Tomorrow we have a FABULOUS group post that you won’t want to miss!
In the meantime let me share one of my latest projects.
I always say inspiration is EVERYWHERE and you can take some inspiration from anywhere, as a starting place to use what you have to make it into something FABULOUS!
Here is MY inspiration for today: Lennox Chirp pattern

This is the theme in my dining room. I thought it would make a perfect starting point for my project today.
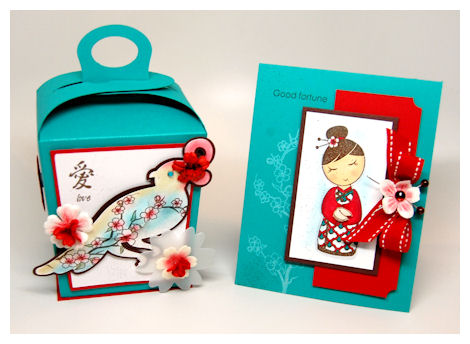
Here is my gift set: Love in bloom

I LOVE the rich colors. I used a teal, red, and chocolate combination.
For the So Fortunate © Template, I created the template from a teal cardstock, with the red accent layers.
Like the place settings I love the bird, so I used my Cricut Storybook cartridge to cut my bird from white cardstock, and shadowed it onto chocolate cardstock. The bird was stamped with the Cherry Blossom image from the So Fortunate © stamp set.
I used my Pebbles pearlescent pastels to color the image in. I wanted to mimic the whimsical coloring in of the bird on my China pattern. I love the soft look, and subtle shimmer you get using these. Best part, if you mess up, you can ERASE it 😀
I added some flowers to the So Fortunate © Template to continue the 3 D effect, and add some floral details. The wing is on dimensionals. I also added some plumage/bling to the birds head. I love how it turned out!
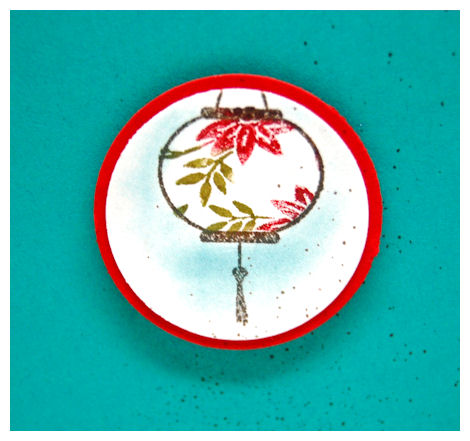
On either side of the So Fortunate © Template I stamped and colored the lantern image from the So Fortunate © stamp set. Clean and simple. I love it. More often than not its a small and subtle detail that can really complete a gift.
Now for the card-Good Fortune to you
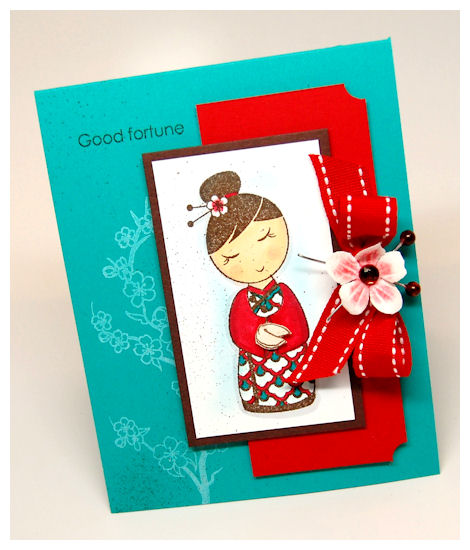
Once again I just kept it SIMPLE. Something as subtle as snipping the corners make this simple elegance at its finest. No need to layer and layer till the card weighs 1 pound 😀 OH! I do believe in using tons of dimensionals! No FLAT cards for me.
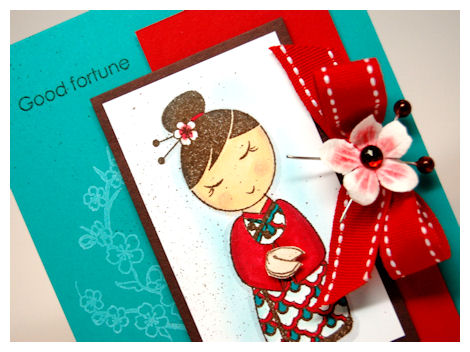
I can’t help but use the Geisha girl. She is the SWEETEST! Mimicing the image of the hair sticks, I used some pearl stick pens, colored to match with a chocolate colored Sharpie marker! I LOVE customizing my supplies like this. More for my $$!! I also added a cherry blossom, like on her hair to complete the image.
Now I wish I could take creative genius for putting the small fortune cookie image from the So Fortunate © stamp set, in her hands, but that was an idea I HAD to use from our Guest Designer: Jeannie DeGruccio! I LOVED that idea!!
So there you have it!
Supplies from My Time Made Easy ™ LLC
Pretty Packaging Templates: So Fortunate
Pretty Impressions Stamp Set: So Fortunate
This gift set took about a half hour to create. Having a starting point of inspiration made it quicker and easier. I was able to keep my vision on track!
I hope you look around and find something as a starting point for YOU next time you create.
Well, thanks again for stopping by. You really won’t want to miss tomorrow’s projects!
See you then.
A little thank you
Jan 2, 2011 Author: mytime | Filed under: Cards, Home decor/3-D items, My Time Made EasyWell we are back today with some more projects to share with you!
You will want to check out these girls today:
As you all know I’ve been busy with caring for my mother. Today she is going in for surgery, and a biopsy, so keep her in prayer if you can. It’s been great that I’ve had a few days to get creative for this release. I may even have been able to do what I normally do as if nothing has been going on!! I’m happy because I was worried I didn’t pack my mojo and take it with me when I moved! LOL! I truly love this release, so it made get crafty easy for me!
Catherine did a awesome job with the So Fortunate set, don’t you agree? I can’t tell you all how much I have enjoyed the possibilities! Did you all see the projects from the team yesterday? If not, I invite you to check them out!
Well since my mother has so much going on, when all is said and done, I know I will need to be passing out THANK YOU gifts to people!
Here is the first one I created using the NEW! So Fortunate template
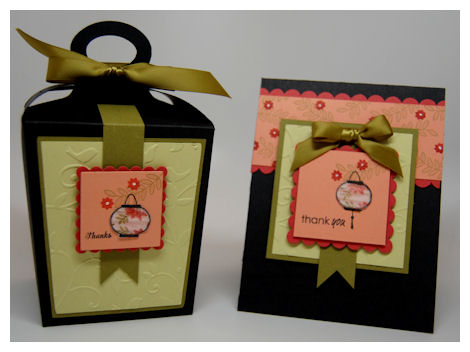
I wanted a SIMPLE gift set with some POP! I definitely think this color combination is striking.
We have olive, celery, ruby red, and coral for this color combination.
I love to have coordinating items. That is how/why I started this craft in the first place! I needed packaging/tags/cards that matched what I was gifting. I find the coordination the best part about it all. Designing stamps/paper/templates that do the hard work for me is SO fun for me. Makes projects so much easier.
Thank you card-standard A2 size card.
I used the lantern, lantern pattern, and thank you sentiment So Fortunate set. The leaves, and thanks sentiment (on template) are from Tending the Garden, and the mini flowers are from Take Time. I used a white singlo gel pen for the flower centers. See how fun it can be to mix and match your stamp sets. I used them to make my own patterned paper layer on my card too.
The lantern was stamped on my main card layer. I then restamped it onto vellum cardstock, where I also stamped my pattern. I heat set the ink, then cut it out. From there I ran it through my paper crimper! I adhered it with a clear glue dot. Now it looks just like a real lantern, and the pattern/image pop out at you!
I designed the card first, so with the design of the NEW! So Fortunate template, I mimiced the layout of my card!
I love this clean simplicity of this box.
Now a funny thing…when I designed the NEW! So Fortunate template, I made it so the sides would lay flap across the top. Many members of team took the creative liberty to NOT score the side panels, and the result was FABULOUS!
By NOT scoring them, it is almost as if you have a completely NEW template! I love the look! Either way YOU do it, it will be fabulous!
Now you may be wondering what I am gifting in here….
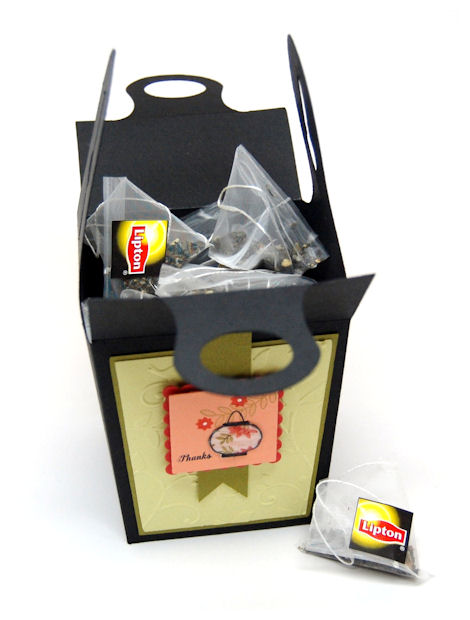
TEA!! One of my favorite things to give to others. This is a orange tea. SO yummy and relaxing after a long day. One of my mother’s nurses said this was her favorite, and I like her alot so this will be for her.
Now we do offer template that are perfectly suited for gifting tea, but I think you can package ANYTHING in virtually all our templates. I so enjoy some of the items we carry that are specific to gifting certain items, but that doesn’t mean that is the only use for those, and you can’t package those items in other templates too! Its all about creativity and FUN!
I did use a cuttlebug embossing folder for my light green layer. It is a swirly bird pattern. I think it added a nice touch of texture, while keeping the overall lookuncluttered and simple!

The lantern…oh how I love that little lantern! I love that there is a “building pattern” that is optional, so you can leave it alone, or use the pattern within the set, or even use other images for the design. Now how is this for a crazy, random fact about me….when I see lanterns like this, it reminds me of Karate Kid 2 (the movie). I loved all the pretty lanterns that were in that movie when I was a girl, and I always think of that movie when I see them. Strange I know! I love the crimped hanging lanterns the most. Plus Cherry Blossoms are just my favorite!

Supplies from My Time Made Easy ™ LLC
Pretty Packaging Templates: So Fortunate
Pretty Impressions Stamp Set: So Fortunate, Tending the Garden, Take Time
Well I hope your new year is off to a creative start! I look forward to sharing even more tomorrow 😀 So stay tuned!
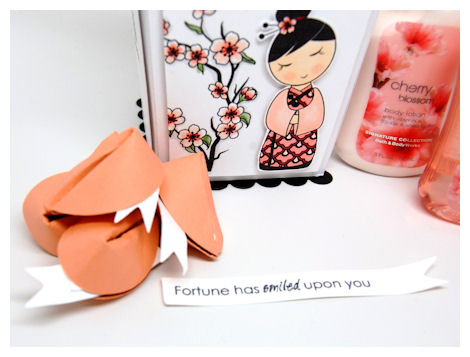
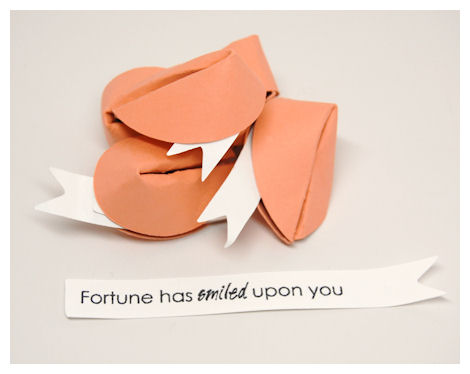
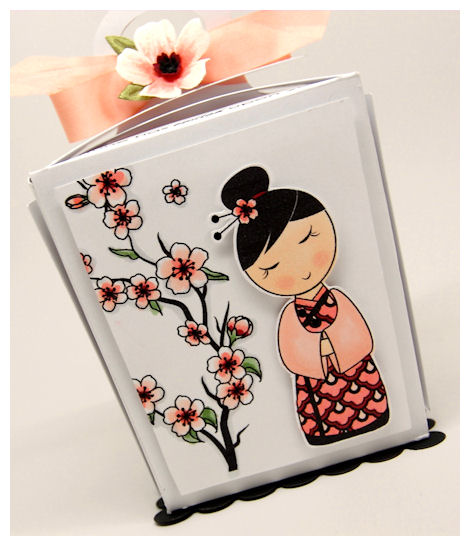
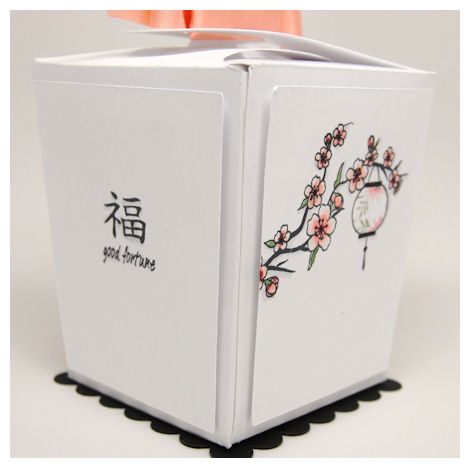
Good Fortune For You
Jan 1, 2011 Author: mytime | Filed under: Cards, Home decor/3-D items, My Time Made EasyHi everyone!
Hope you are having a wonderful New Year!
We just had out latest release —> View NEW PRODUCTS!
I’ve personally had a blast working with the latest release products. I’ve been really busy with my family, but was able to squeeze out some projects to hopefully inspire you all 😀 Now I need to get them loaded to the gallery! I’m a bit behind on that :C I’m just happy to have gotten some creative time in! These are the first projects using my NEW! craft room. My mojo was slow coming, but I’m happy with what I was able to create.
Today the team will be sharing a sample using the NEW! So Fortunate Template, and may mix it up with some of our OLDER images/paper!!
So stop by and see:
I am sharing a gift set using some of the images in the So Fortunate stamp set.
My So Fortunate templatewas made from Vellum Cardstock!!!! So easy, yet SO elegant looking! I wanted to put a light inside but the batteries were dead :C
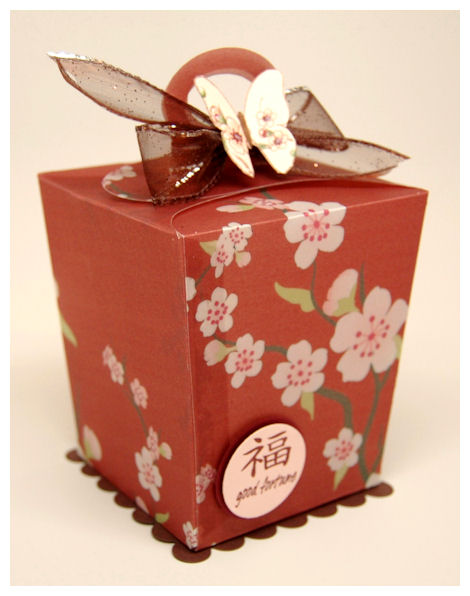
I printed my Blooming Cherries paper onto the vellum, then cut the So Fortunate template.
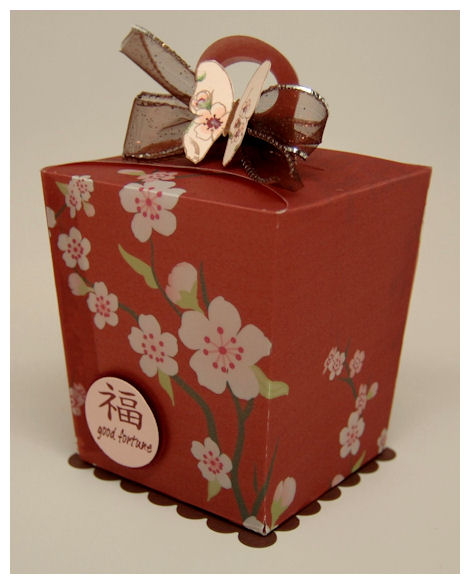
The patterned paper did all the “hard work” for me, making this simple, single layer template a true WOW!!!!!! It is just so AMAZING having this made from vellum cardstock.
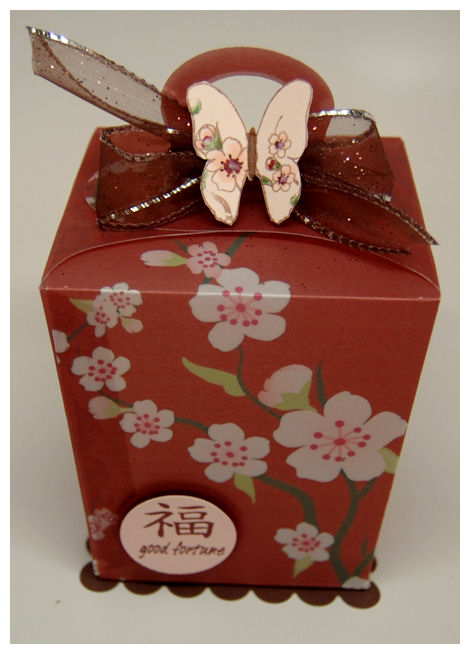
The top of my template is tied with a silver trimmed – chocolate ribbon. The center is adorned with a cardstock butterfly, that I stamped using the All A Flutter stamp set.
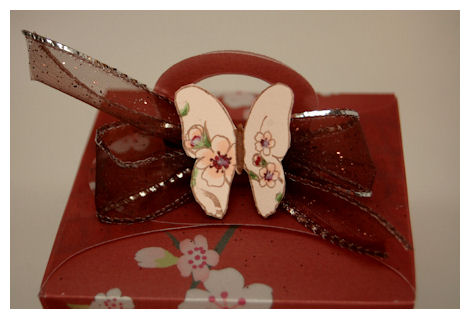
I stamped part of the cherry blossom image on the wings 😀 It was cut out using the Flutters and Flowers Cut File.
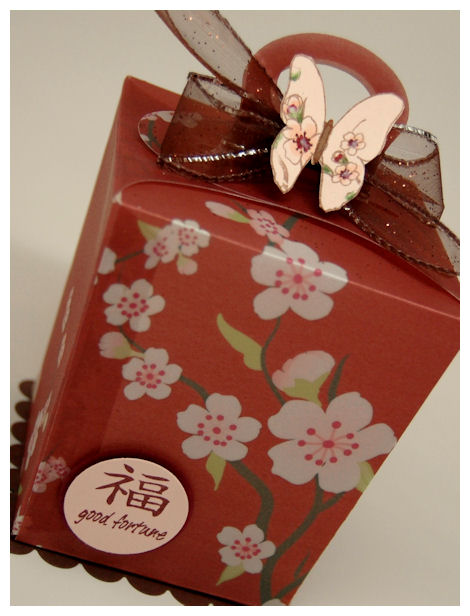
I used the “Good Fortune” image/sentiment in the lower left corner. I layered a scallop square on the bottom for some added detail 😀
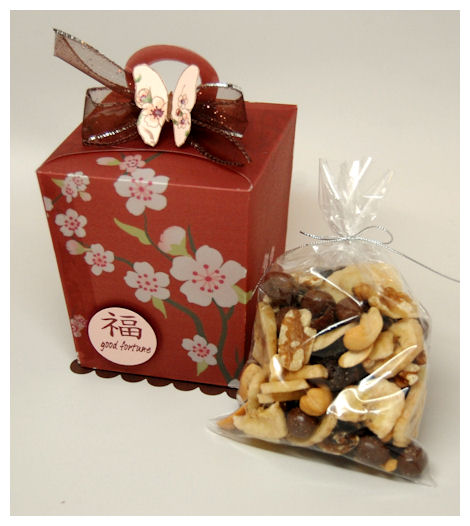
I decided to package up a trail mix that I LOVE, and love gifting. It has chocolate, banana chips, walnuts, peanuts, and some other amazing yumminess!! Can you say YUM!
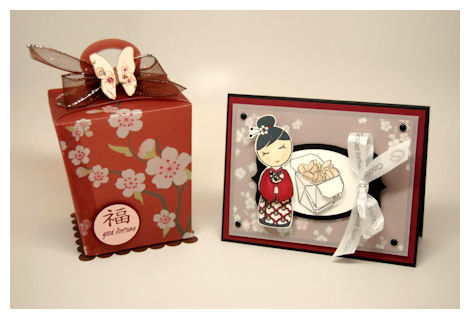
Now for the card 😀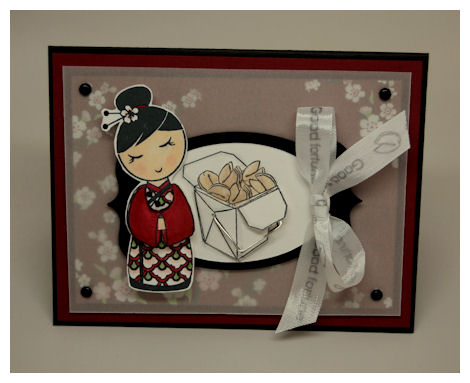
I LOVE this card! The Geisha Girl is just my favorite 😀 (Her arms were made 3 dimensional on this one). I printed the same Blooming Cherriespaper, this time on cardstock, and overlayed that layer with some vellum.
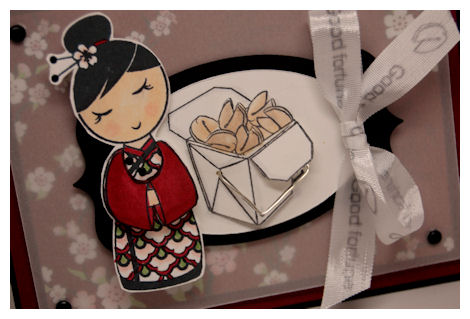
I used the Trendy Tags 2 for my main layer with the take out box.
OK I have to say that I LOVE the takeout box! LOVE! I made 3 of the cookies inside 3 dimensional. I then made the front of the box pop out as well, where I then bent some wire to make it look like a real take out box.
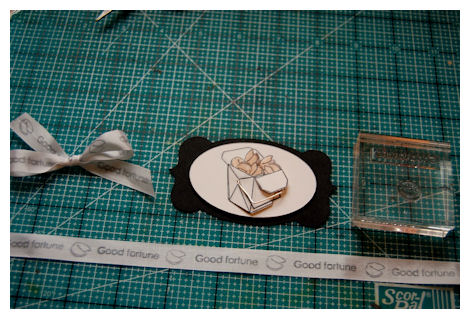
OH! Did you notice the ribbon? It is stamped with the “Good Fortune” sentiment and the mini fortune cookie image! Cute eh?? It was so easy and awesome effect.

I really love coordinating my projects! Having cards, and tags to match whatever I am gifting 😀 It couldn’t get any easier.
Supplies from My Time Made Easy ™ LLC
Pretty Packaging Templates: So Fortunate
Pretty Impressions Stamp Set: So Fortunate, All A Flutter
Pretty Printable Digital Paper: Blooming Cherries printed on Vellum Cardstock
Pretty Pieces Cut File: Flutters and Flowers, Trendy Tags 2
Thanks so much for stopping by!! Come on back tomorrow for more ideas and inspiration 😀
Good Fortune in the New Year!
Dec 31, 2010 Author: mytime | Filed under: Cards, My Time Made Easy, UncategorizedHappy New Year!!
I want to wish you all a happy & healthy 2011!!
Today we ring in the New Year with a new release from My Time Made Easy ™ LLC!!
You can view all our new products —-> HERE!
We have:
1 New! Pretty Packaging Template: So Fortunate
1 New! Pretty Pieces Cut File: What’s My Fortune? Cookie
1 New! Pretty Impressions Stamp set (acrylic & digital): So Fortunate
3 New! Pretty Printables Digital Paper Collections
The new release wouldn’t be fun without several great ideas, so be sure you visit the team for an amazing BLOG HOP, packed with inspiration for the New Year!
|
|
You will also want to VISIT THE GALLERY for loads of ideas using our products, new & old!
Now let me share the first of the samples today, using our new products!
This month’s release theme is Good Fortune in the New Year!
Good Fortune!
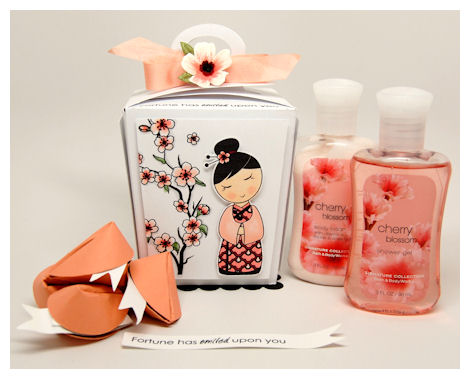
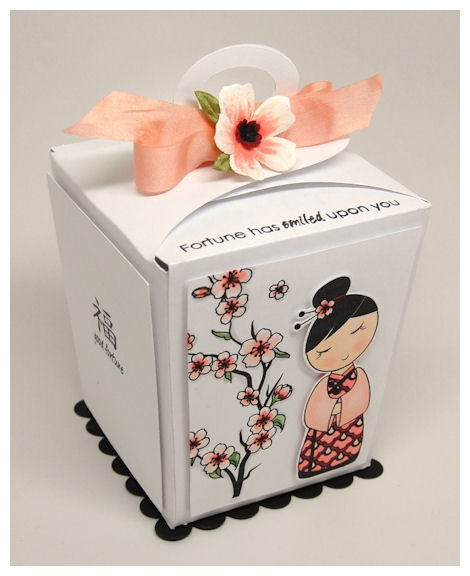
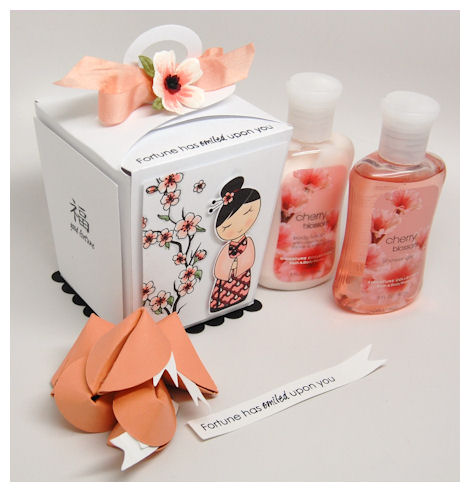
How fortunate will someone feel when they receive such a sweetly wrapped treasure, full of surprise! This is a modernized version of a Chinese”take out” box, that also has a coordinating stamp set: So Fortunate, and a 3 dimesional “fortune cookie” cut file (sold separately) to help further the gift giving possibilities and excitement!!
About the So Fortunate template:
3 3/4 Inches Wide
Available in PDF, SVG,GSD, DXF, WPC
This template coordinates perfectly with the So Fortunate Pretty Impressions stamp set, as well as the What’s My Fortune? Cookie Pretty Pieces Cut File.
The template also includes the decorative mat layers. I could have just stamped direct on the box, but I wanted some dimension, keeping my focus on the stunning images that Catherine designed.
I stamped the sentiment along the top of the template. I love how it came out. There are so many sentiment “building” possibilities within the set, as well as many other useful sentiments, to enhance just about any gift.
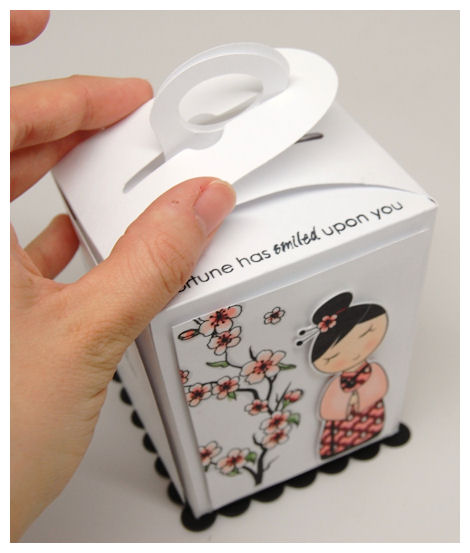
As you can see it has a wonderful, and functional handle. The side panels just slip over the handle for a unique way to unwrap your gift! Fill this with any arrangement of treats!!
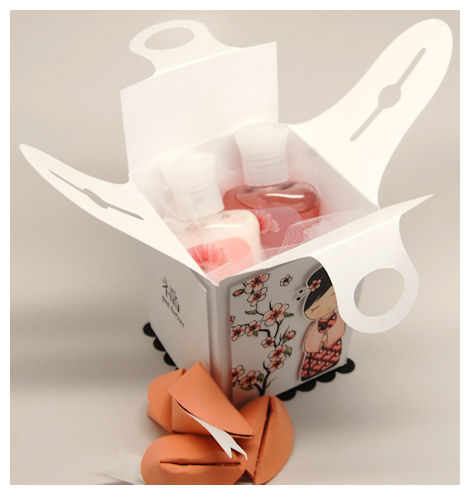
Here you can see I have a Cherry Blossom scented travel size Lotion, and Body Wash from Bath & Body Works!
Or use our So Fortunate Pretty Impressions stamp set, as well as the What’s My Fortune? Cookie Pretty Pieces Cut File.
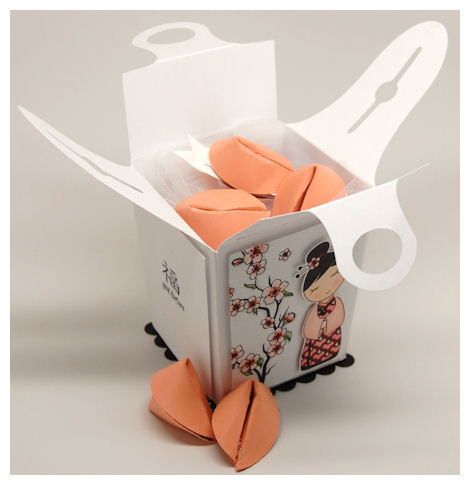
You can use the What’s My Fortune? Cookie Pretty Pieces Cut File to customize your very own fortune filled paper surprises by using the So Fortunate Pretty Impressions stamp set. Can it get any more FABULOUS? Nope. I don’t think so! LOL!
 Ever wish you could take that adorable edible version of a fortune cookie, and make your own personalized fortunes filled treats, from cardstock or patterned paper? Now you can! This fantastic cut file will allow you to quickly and easily make your own fortune filled treats for everyone on your gift list!
for Valentine’s Day!possiblities UNIQUE twist on the nd even puts a FUN andThis coordination of products is such a fun idea for EVERY occasion, a
Images were designed by Catherine Doucette-She was really able to take my vision and turn it into a tangible work of art! I LOVE the Chinese girl she designed, and all the other elements that were pulled together into this set. It is my favorite set yet!!
This stamp set coordinates perfectly with the So Fortunate Pretty Packaging Template ,as well as the What’s My Fortune? cookie Pretty Pieces Cut File.
This is a charming set of images that is sure to bring the feelings of good fortune to any receiver! This set has MANY amazing images, as you will see, that can have unlimited possiblities for ALL YEAR ROUND! They will step up your gift giving ideas a notch or two. Designed with the idea that you can use the sentiments to fill the What’s My Fortune? cookie Pretty Pieces Cut File, it is the perfect set for any occasion when well wishes are in order.

I love the Chinese symbols in the set, paired with their meaning. They really add to the design possibilities!
Pair this with our So Fortunate Pretty Packaging Template, and you have a complete gift packaging set that is unique and full of character!
Sentiments include:
Symbol for Happiness
Symbol for Love
Symbol for Good Fortune
Fortune has smiled upon you
A surprise is in store for you
Happiness is on its way to you
thank you
You will have many birthday wishes
Chinese takeout is in your future
A small blessing with soon arrive
Good Fortune
in your marriage
in your new home
to have a friend like you
Using our NEW! products, what a great gift set this made!
This is just the beginning of possibilities.
Supplies from My Time Made Easy ™ LLC
Pretty Packaging Templates: So Fortunate
Pretty Impressions Stamp Set: So Fortunate
Pretty Pieces Cut File: What’s my fortune? cookie
I hope you enjoy what you’ve seen so far! We have several more days of amazing eye candy for you, to spark those creative juices.
We are also going to be doing a monthly “year in review“, so stay tuned for details on that! If you’ve purchased any of our past releases you will be very happy with this addition to line up, as we continue to share NEW IDEAS with our OLD products!
Until tomorrow, May Good Fortune Smile Upon You!
My Etsy

Who I Designed For
Blogroll
- Alicia
- Alli Miles
- Ally Blankenship
- Amber
- Andi @ crafts on a whim
- Angel R
- Angie Z
- Anne Kranitz
- Becky O
- Bee
- Beth Silaka
- Bethany Paull
- Beverly Nash
- Bobbie
- Cambria
- Cammie
- Card of the Week
- Card Positioning System (CPS)
- Cards for Cancer
- Catherine Doucette
- Charmaine
- Cheryl Sims
- Chriss Rollins
- Christina
- Christine Ewing
- Christine Wooden
- Colleen Schaan
- Craft Critique
- Craft Gossip
- Crystal
- Dawn Easton
- Emily Giovanni
- Geny
- Holly
- Igne Groot
- Inspirational Craft Blogs
- Irene
- Jami Sibley
- Jeanne Streiff
- Jen del Muro
- Jeni Bond
- JenMarie
- Jenn Balcer
- Jenn Diercks
- Jenn O
- Jennifer E
- Jennifer Mick
- Jennifer Pereda
- Jennifer-Sweet Treat
- Joanne Basile
- Jodi Collins
- Julia Stainton
- Julie Masse
- Karen
- Kathryn Berthiaume
- Katie Cotton
- Kelley Holland
- Kendra
- Kim Scholfield
- Kris’s Color Stripes! Get inspired here
- Kristen Dubosque
- Kristin Eberline
- Kristine
- Laura @ Sunshine Stamper
- Laura Turnmire
- Laurie Schmidlin
- Lesa Rapp
- Linda Duke
- Linda-LSN
- Lindsey Botkin
- Lisa (lakind scs)
- Lisa Kind
- Lori Craig
- Maggie
- Mara Campbell
- Maria
- Maria Levine
- Mary
- MaryJo
- Melanie M
- Monique Hansen
- Moxie Fab World
- Pam Imholz
- PaperCrafts Connection
- Peppers and Pollywogs Kids party site
- Rebecca Grohall
- Rita
- Robyn
- Rose Ann
- Sarah Vrolyk
- Sharon Harnist
- Sharon Johnson
- Sharon Rivera (a chemisrty with paper)
- Sherrie
- Sophia Landry
- Storage Units, Ink, & More Blog
- Sue Berker
- Susan (Rainy)
- Tangii Crane
- Tracy
- Tricia Traxler
- Trudee
- Velta
- VivLyn
- Zena
MTME Pretty Palette Color Team
MTME Pretty Patterns Sketch Team
My Time Made Easy TM LLC
Shop till you drop!
Lauren Meader
About Me
Copyrighted material
Subscribe To My Blog
Pages
- About me
- Alexa’s Story!
- My Crafty Corner!
- My Time Made Easy™ LLC
- Our Make A Wish Trip to Disney!
- Resume/Publication List
Calendar
| M | T | W | T | F | S | S |
|---|---|---|---|---|---|---|
| 1 | 2 | 3 | 4 | 5 | ||
| 6 | 7 | 8 | 9 | 10 | 11 | 12 |
| 13 | 14 | 15 | 16 | 17 | 18 | 19 |
| 20 | 21 | 22 | 23 | 24 | 25 | 26 |
| 27 | 28 | 29 | 30 | 31 | ||
Archives
- August 2013
- July 2013
- June 2013
- May 2013
- April 2013
- March 2013
- February 2013
- January 2013
- December 2012
- November 2012
- October 2012
- September 2012
- August 2012
- July 2012
- June 2012
- May 2012
- April 2012
- March 2012
- February 2012
- January 2012
- December 2011
- November 2011
- October 2011
- September 2011
- August 2011
- July 2011
- June 2011
- May 2011
- April 2011
- March 2011
- February 2011
- January 2011
- December 2010
- November 2010
- October 2010
- September 2010
- August 2010
- July 2010
- June 2010
- May 2010
- April 2010
- March 2010
- February 2010
- January 2010
- December 2009
- November 2009
- October 2009
- September 2009
- August 2009
- July 2009
- June 2009
- May 2009
- April 2009
- March 2009
- February 2009
- January 2009
- December 2008
- November 2008
- October 2008
- September 2008
- August 2008
- July 2008
- June 2008
- May 2008
- April 2008
- March 2008
- February 2008
- January 2008
- December 2007
- November 2007
- October 2007
- September 2007
- August 2007
- July 2007
- June 2007
- May 2007
- April 2007
- March 2007
- January 2007
Categories
- About Me
- All That Scraps
- blogger challenge
- camera/photo play
- Cards
- Contests
- family stuff
- FOR SALE
- Home decor/3-D items
- How to FAKE it!
- Introduction
- JUGS Challenge
- JustRite Stampers
- Lizzie Anne Designs
- My family stuff
- My Stamping Space
- My Time Made Easy
- My Time To Color Challenge
- My Time to Create Challenge
- My Timeless Template Challenge
- My Timeless Templates
- Mytime Mail
- MYTIME MOVIE/VIDEOs
- Papertrey Newsletter
- Pink Cat Studio
- Pretty Palette Challenge
- Pretty Patterns Sketch
- Product Opinions and Must haves
- Recipe's
- Saturday Sketch
- Smilebox Creations
- Stampavie
- Tutorials
- Uncategorized
- videos
Most Popular
- Create your own Onesie Card Tutorial-and important NOTE! PLEASE READ (2529)
- Saturday Sketch-Boxed bag holder (2333)
- Going GREEN! Fancy Flower Flourish-Closure Video (1478)
- Fabulous Favorite - Giveaway! (1336)
- a Prayer Request (1232)
- QUICK-Easter Baskets from Nestabilities-PTI style-and blog challenge (1063)
- Teaser Sketch (999)
- February Release Giveway! (and a little peek) (996)
- Group Post and Rambling Rose Video Tutorial (985)
- GIVEAWAY! Who wants it all?! (895)
Recent Comments (RSS)
- Daya Sons: Daya Sons, a renowned manufacturer
- 첫충사이트: 완전히 흥미로운 블로그 게시입니다. 저는
- sarah: Wow, Lauren, what a stunning
- hedie: خرید راهبند
- 야동: Love to read it,Waiting For
- 야동: This seller is in a
- 바카라사이트: 여기 처음 왔어요. 나는이 게시판을
- 야동티비: I was surfing the Internet
- 바카라사이트: 비슷한 주제에 대한 흥미로운 정보를
- 바카라사이트: "여기에 제공해 주신 귀중한 정보와
Copyright © 2007 - My Time, My Creations, My Stampendence - is proudly powered by WordPress
This blog has been Tweaked and Designed by Sara Williams