Archive for the ‘Cards’ Category
For the Birds: March Release Blog Hop!
Feb 28, 2011 Author: mytime | Filed under: Cards, Home decor/3-D items, My Time Made EasyALL PRODUCTS ARE NOW LIVE!!!
YEAH! Finally the March Release is here!
In honor of the release we always have an amazing Group Post!
Today we are each featuring a gift set which features a set of 4 cards using our New! Singing Silhouette set, packaged up in a Pretty Packaging Template of their choice!!
Check out the design team here:
Please check out all our NEW! Products HERE!
We have many NEW! Products that coordinate together! So don’t miss out ![]()
View our GALLERY HERE, for lots of ideas and inspiration using ALL our products!
My shipping is VERY affordable and I ship WORLDWIDE ![]()
2 NEW! Pretty Packaging Templates
2 NEW! Pretty Impressions Stamps Sets
4 NEW! Pretty Printables Paper Collections
8 NEW! Pretty Pieces Cut Files
1 NEW! Perfect Package Collection <—Check it out!!
If you haven’t yet you may want to sign up for our NEWSLETTER on our Website or join us on Facebook!
Detailed information about our products can be seen on the ABOUT PAGE
Do not forget to READ DOWNLOAD INSTRUCTIONS prior to checking out, and be SURE you selected the correct file type!!!!
Also do NOT let your download expire before you have a change to download it.
If you have *any* customer service questions or issues please contact me at:
So now I will share my gift set using the New! Singing Silhouette set , packaged up in the Caged Template!
For the birds…
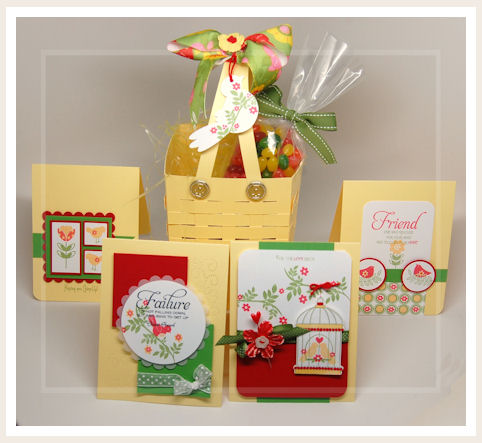
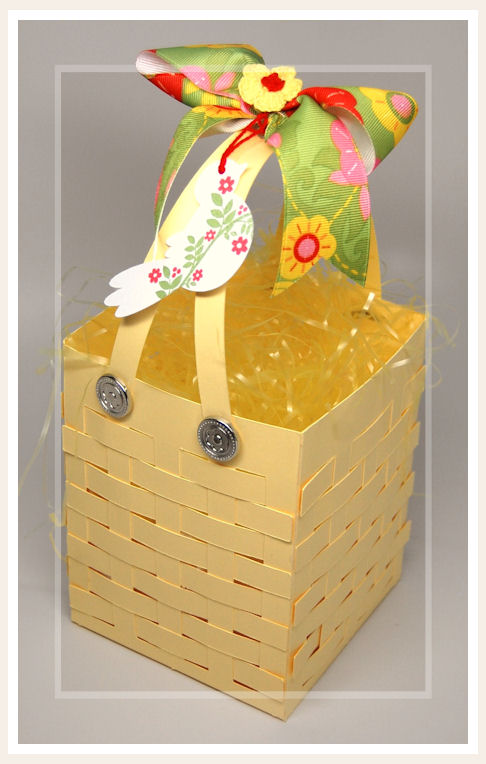
Here is the entire set laid out for you to see 😀 It was all inspired by the ribbon on the handles of my project.
You may be wondering what template you are looking at to package up my cards…..I turned the Caged Template into a BASKET!!!
![]()
Is this not crazy amazing?! Talk about 2 templates in one.
TO MAKE THE CAGE INTO A BASKET:
All you have to do is take the cage “cut-outs” and “weave” them in between the cage “rails”, ensuring you alternate the weaving pattern with EACH strip. They are a perfect fit. Once you used the one’s you automatically get when you create your template, you would then want to cut an additional 16 strips 1/2 inch wide X 4 1/2 inches long.
You will have 32 strips total. 8 Strips on each side. OR you can use less for a more whimsical look, with a less tight weave.
TIP: It is easier to weave the panels BEFORE assembling the template. Just ensure you adhere the ends with glue dots. Also ensure as you weave your panels, that you alternate the weave on the panels to ensure you get an complete weaved look all around!!
More details…here is the bow that inspired the SPRING colors!
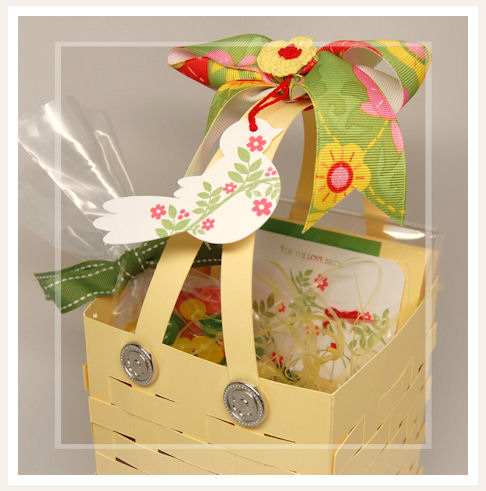
Hanging from the bow, I cut my choice of one of the birds from the A Little Birdie Cut File, which I enlarged a little, and stamped it using the branch and flowers from the New! Singing Silhouette set. I thought it made a nice accent to the basket, without COVERING the woven details.
I cut some handles (I wanted 2) so I cut them 1/2 inch wide X 11 inches long. I attached them with pretty flower brads.
The cards all fit perfectly inside the “basket”! Inside I also have a frosting bag filled with Starburst Jelly Beans, which matched my color scheme.
Now for the cards!
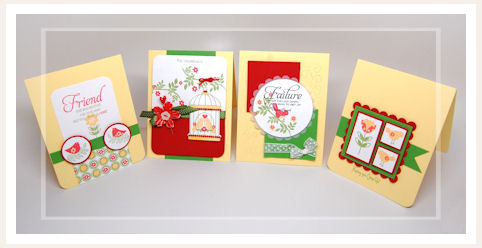
I created 4 cards, using the same color combination: Red, Leaf, White, and Yellow.
Each card features a different bird from the set.
For the LOVE birds:
This is my favorite of the 4 cards I made. I adore the 2 birds facing each other in this set (you can stamp one or the other if you choose)
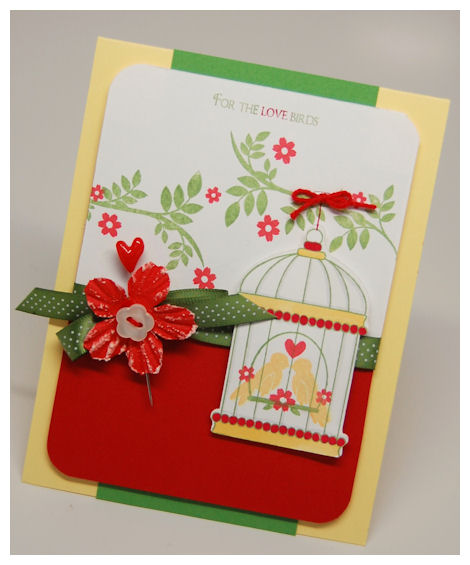
I used the Caged Cut File to cut my bird cage, which I then stamped my cage image onto. I stamped the swing image as well, for my “love birds” to perch on. I added a bow to the card so it appears to hang from the tree branches.
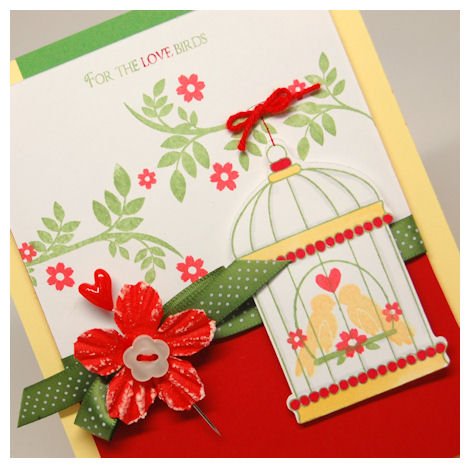
I added some flowers to the swing. I added a heart image from the Bringing Home Baby set.
Perfect for the happy couple, or for the hubby 😀
Now my 2nd favorite from the set!
Failure….
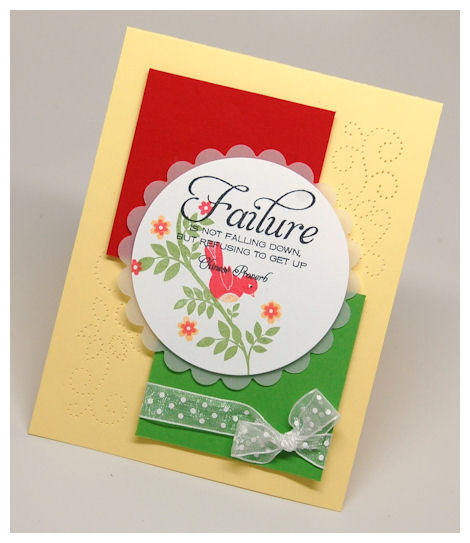
is not falling down, but refusing to get up.
I used the sentiment from the Keep Strong set. Perfect for someone going through a difficult time.
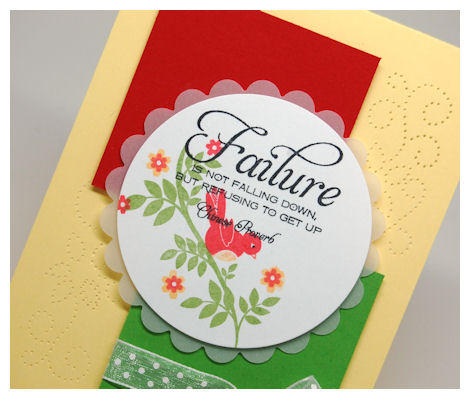
I loved the paper piercing details I put on this. The bird in the set is one of my favorite. I just used a marker to color the textured belly, and dotted the eye with a black fine tip marker.
Chirp-Up!
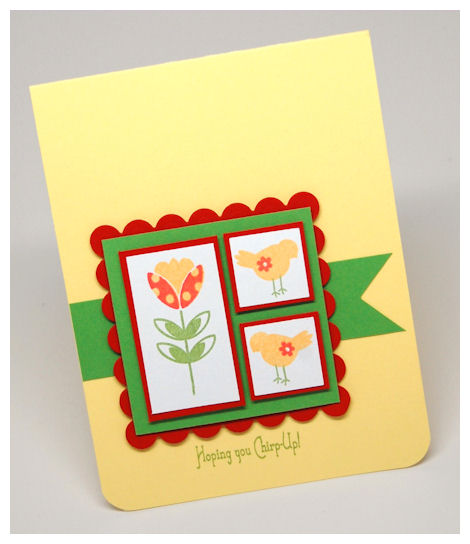
I LOVE this sentiment.
This card is SO simple, but I LOVE it.
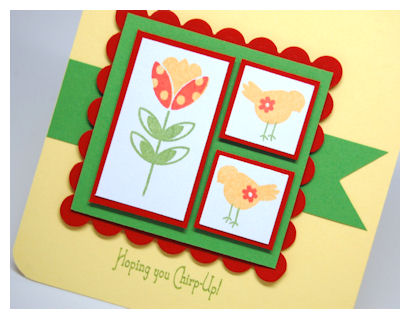
I used the tulip image from the Sensational Stems Set. The bird silhouettes are SO CUTE! I added a little flower detail to them for some added WOW! I love having the ability to do that.
Friend…
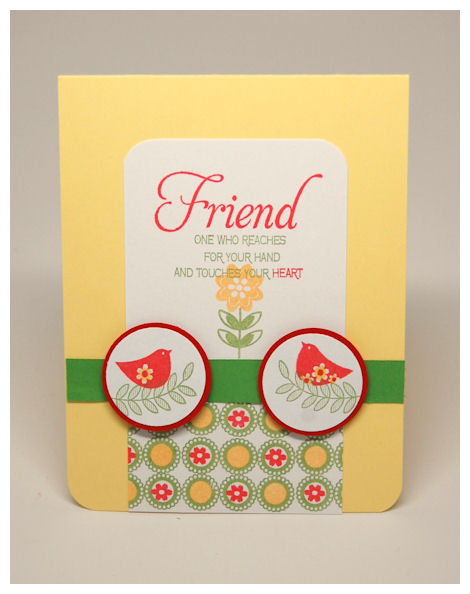
One who reaches for your hand, and touches your heart. ( sentiment also from the Keep Strong set)
The stamped my bird silhouettes in red, and colored the centers with some yellow. I stamped the leaf frond from the Tending The Garden set.
Once again I used the stem and flower image from the Sensational Stems Set.
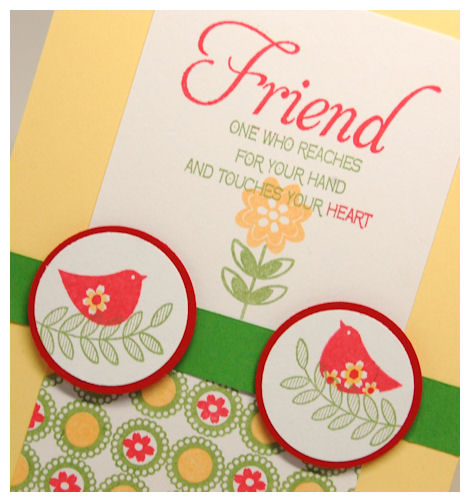
I them used a border building set Paper Pattern Pieces, to create my own patterned paper along the bottom. I love how it turned out!
Supplies from My Time Made Easy ™ LLC
Pretty Packaging Templates: Caged
Pretty Impressions Stamp Set: Singing Silhouette, Keep Strong, Sensational Stems, Tending the Garden, Bringing Home Baby, Paper Pattern Pieces
Pretty Pieces Cut File: A Little Birdie, Caged Cut File
I guess I said I “love” a lot in this post. But I really do. I was really happy with how this complete set turned out 😀
I hope our group post today inspires you all to try out our new products to make you own gifts, cards and tags.
Happy Shopping!
Perfect Peek Day #2: What’s Your Angle?
Feb 26, 2011 Author: mytime | Filed under: Cards, Home decor/3-D items, My Time Made EasyOk here we are with the Day 2 peeks for the upcoming March 1st Release!!
Today you will want to visit:
This month is FULL of amazing products that are sure to make your jaw hit the floor. The best part is YOU can recreate these projects on your own.
We have 2 templates this month! I think you will agree they are BOTH amazing 😀
Now introducing the What’s Your Angle? Template – $5
This box is an amazing size and will fit so many gifts and treatlets!
Available in PDF, SVG, GSD, DXF, WPC
Completed Project Size
3 1/2 Inches Wide
3 1/2 Inches Deep
6 1/2 Inches Tall
When you need a great gift box, this takes the idea of a “box” from ordinary to extraordinary!
The angles on this wonderful sized gift box make this the perfect presentation when ordinary won’t do !

This box starts with a 4 sided bottom, then angles up to have 8 angles! The box file comes with the decorative layers for all the angles on this, making the design process SIMPLE!
You will have them wondering HOW you made a seemingly regular gift so interesting.
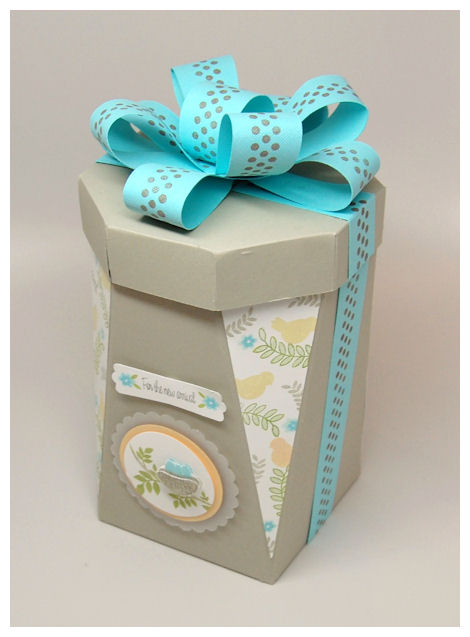
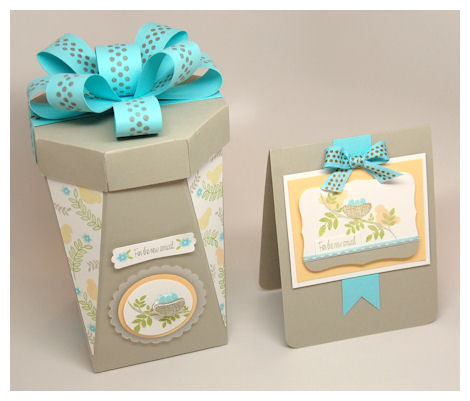
Now for the details on my packaging…
First I have to say I LOVE the colors on this. Very chic and unexpected in my opinion 😀
I created the What’s Your Angle? Template in a Sahara Sand cardstock.
I then created a 8 1/2 X 11 sheet my own patterned paper, by stamping some of the bird silhouettes from the Singing Silhouette © Set in yellow pigment ink, then the larger leaf frond from Tending the Garden Set in green, and the solid smaller leaf frond in Sahara Sand. I added the mini flowers from the Singing Silhouette © Set, and layered the largest flower and the smallest flower.
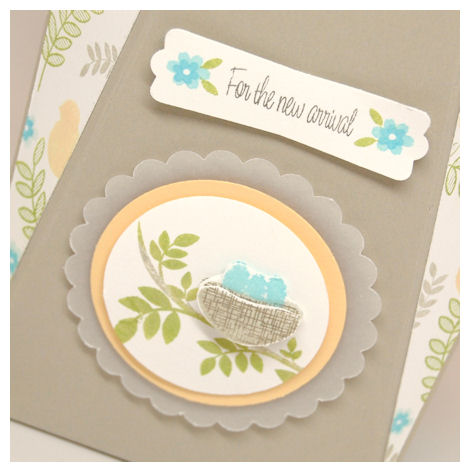
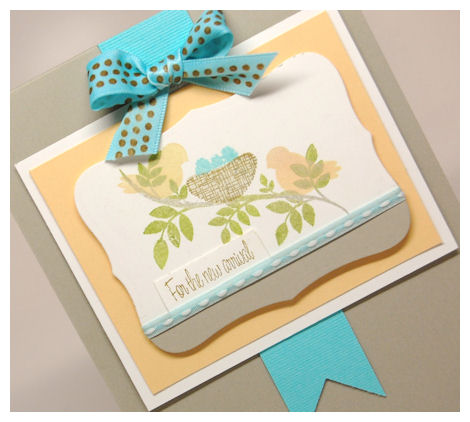
Now for the front label…
The sentiment is from Bringing Home Baby. Flowers from the Singing Silhouette © Set.
I stamped my branch from Singing Silhouette © Set,then stamped my nest and eggs. I restamped, and cut out the nest and eggs for dimension. I love how it looks.
Singing Silhouette © Set of 24 images $12
*also available in digital download $8*
This set has a coordinating Caged Pretty Pieces Cut File for the cage/cage door in the set.
This is a charming set of bird silhouettes that will make your creativity sing with possibilities!
Set comes complete with a “build your own” bird cage, which has a separate cage door that fits perfectly on the front/center of the cage image. Included is also a “swing”, as well as a branch for your bird silhouette to perch themselves on. You can add your own “flowers” or berries to the branch as well. You will also find the bird nest, with additional eggs the perfect addition to the set!
Image Sizes:
Birds: about 1 inch each
Cage: 1 3/4 Inches Wide X 2 3/4 Inches Tall
Branch: 2 1/2 Inches Long
Swing: 1 Inch Wide X 1 Inch Tall
Nest: 1 Inch Wide X 1 Inch Tall
Sentiments include:
Hoping you chirp-up
They say it’s your bird-day!
Just Hatched!
For the love birds
Also be sure to check out the A Little Birdie & Branching Out Pretty Pieces Cut File, which are perfect to decorate using this set!
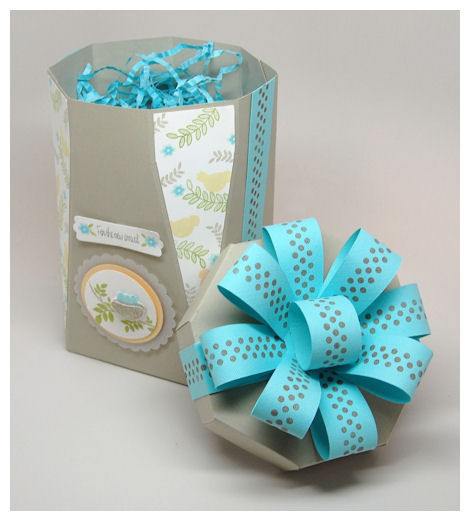
Now to further compliment my What’s Your Angle? box top, I used the NEW! Abra-Bow-Dabra Pretty Pieces Cut File !!
This is the top view of the Abra-Bow-Dabra Pretty Pieces Cut File!
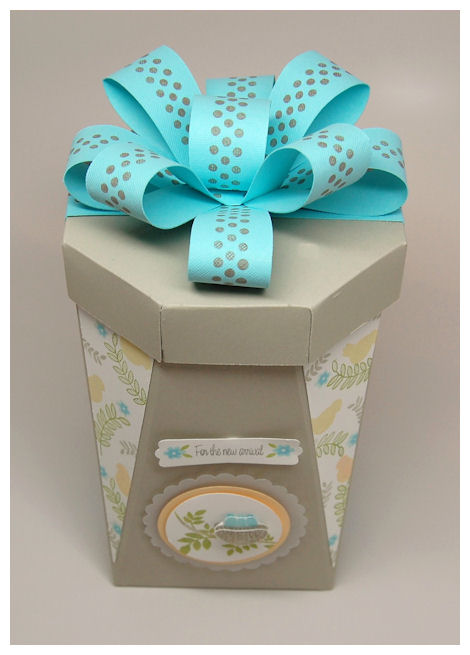
I have LONGED for an amazing paper bow cut file. This one is simply stunning, and fits atop this box perfectly! You can even resize it for any occasion!
I used the Fancy A Cuppa set to create the polka dot pattern on my paper bow and cardstock “bow” that is on my box.
Available in PDF, SVG, GSD, DXF, WPC
This is the ULTIMATE 3 dimensional bow made from 100% paper! Add this to ANY Perfect Packaging Template!

Now you can customize your cardstock or patterned paper to get a perfect “bow” every time.
This paper bow has those perfect loops, and adds dimension to your projects, without using your ribbon. With the option to resize the possibilities for dressing up any gift package are endless!
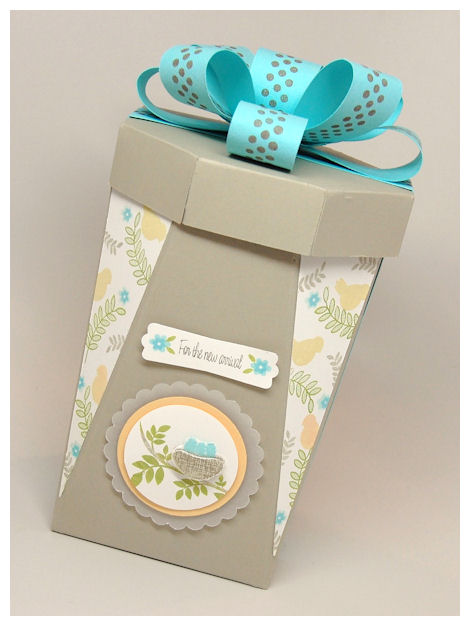
Time for the card!
For the new arrival
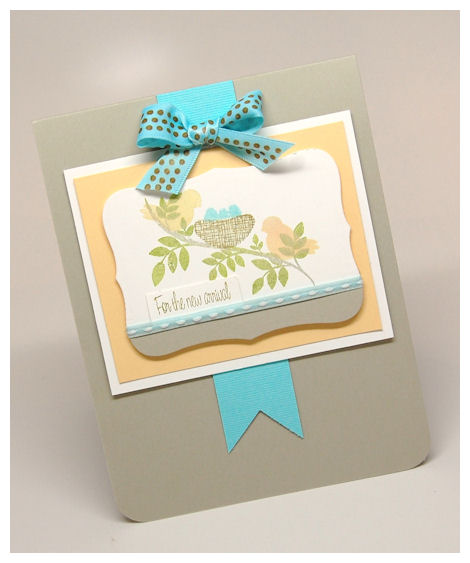
I absolutely love this stamp set to pieces. There are SO MANY possibilities with it, including the new arrivals, or new nest occasions in one’s life.
I used the same image, and sentiment as on my template, but this time, it was on my coordinating card.
As you can see the bow on my card inspired the stamping of the Abra-Bow-Dabra cut file bow, made to match my project.
I love the sweet simplicity this card has with the gender neutral colors.
This will soon bear a gift for my brother and his girlfriend, once they have their ultrasound to see the sex of their baby. For the record I think it will be a girl 😀 Although she has been pretty “morning sick”, and I only got that with my son. So we shall see 😀 I just pray for HEALTHY for the two of them!
Supplies from My Time Made Easy ™ LLC
Pretty Packaging Templates: What’s Your Angle?
Pretty Impressions Stamp Set: Singing Silhouette, Bringing Home Baby, Fancy a Cuppa, Tending the Garden
Pretty Pieces Cut File: Abra-Bow-Dabra
Well what do you think? Are you excited or what? Can you envision the amazing gifts you can make year round?
OK one more day of peeks until the offical MTME March Release.
See you back here tomorrow.
Perfect Peek Day 1: Aviary Amazement
Feb 25, 2011 Author: mytime | Filed under: Cards, family stuff, Home decor/3-D items, My Time Made Easy, TutorialsI’m BAAAACCCCKKK!!! Did you miss me?
(Get ready to brace yourselves with your favorite beverage! I have tons to share, including a tutorial! You won’t want to miss a thing-I swear)
WOW! It’s been so long since I’ve posted. Trust me I’ve been BUSY! It will all be worth it.
Family life is insane as my mom continues her Chemo & Radiation treatments, with an impending surgery. I have had to work nights to keep her commercial cleaning company going (exhausting after spending my days in the hospital with her), then there has been some custody drama regarding my 2 year old niece (long story), school meetings,doctors visits, and a bug that has gone around the house twice :C NOT FUN! Despite all that I’ve been squeezing in what I can for the business, and my sanity!!
So that being said let me kick off the first day of peeks for our AMAZING March Release!!
With aviary themes being so popular, I think and HOPE you all will be excited about this next release. I’ve made something seemingly IMPOSSIBLE, now possible for ALL skill levels.
So without further delay let me get sharing.
Today you will want to stop by and visit several members of our talent design team, as they share NEW! projects with you.
OK now it’s my turn! What you are about to see is 100% made from paper!!!!!!!! If you love aviary themes then this is sure to knock you out of our seat 😀
I made this template SO LONG ago. Almost a year now. I have been waiting for the perfect moment to release it, and with Spring on the horizon, it is now time.
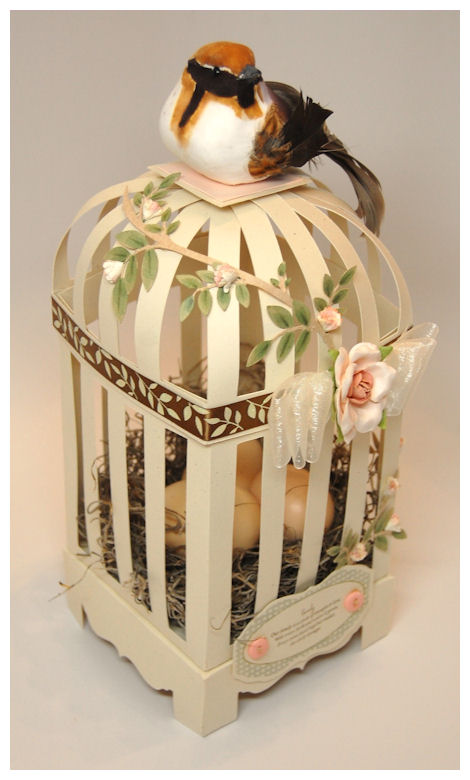
Introducing our NEWEST Template: Caged
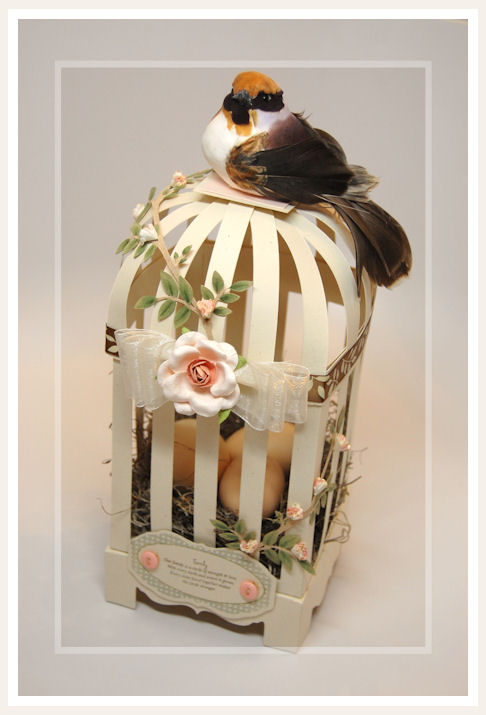
Can you believe how amazing this is? Talk about a WOW! gift holder, or table centerpiece.
It is really large too. I think we all had a hard time properly photographing it because it is such a wonderfully large template.
The bird on the top was purchased at Michael’s Craft Store. The bird itself is about 3 inches tall, and with the tail almost 5 inches long.
Here are some template details:
Available in PDF, SVG, GSD, DXF, WPC
Completed Project Size
4 1/2 Inches Deep
10 Inches Tall
Have you ever longed to create and customize your own “Bird Cage”from cardstock and/or patterned paper? Well we now have the PERFECT “bird cage” template. This is the epitome of unique and stunning! This is the perfect packaging for display. Use for a table setting, centerpiece, or as a creative and unique gift holder. Makes the perfect wedding centerpiece, or party favor too.
No detail was spared in the creation of this, and it was made FOOL PROOF! I love the detailed base the cage sits on as well. Stunning detail.
You can fill this with a variety of gifts such as bird themed items, floral arrangements: real or artificial, candles (especially battery operated), homemade/handcrafted treats of all kinds, bath & body products, stuffed animals, drink mixes…endless possibilities.
Inside my cage here, since it is a centerpiece I put some floral moss (in the floral section of Michael’s Craft Store) in the bottom, and create a “nest”. Inside I added some plastic eggs (also from Michael’s Craft Store).

Note: You can weave through cardstock pieces and create a unique “basket” as well! You will see more of that another day! VERY COOL!! I can’t wait to share.
No matter what gets “caged” up in here, the packaging itself is sure to be used and displayed long after the gift is gone.
The top is separate, so you can take it off to retrieve the gift you wish to package inside.
This template coordinates with the Singing Silhouette Pretty Impressions Stamp Set, as well as the Branching Out, and the A Little Birdie Pretty Pieces Cut File.
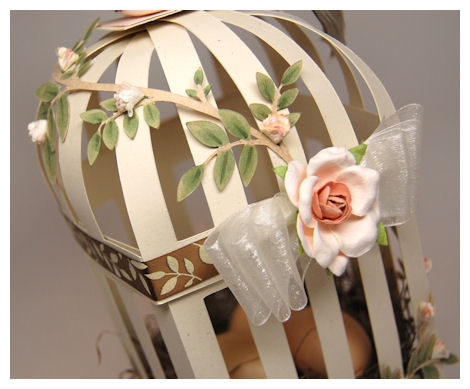
Here you can see there is a leaf/branch applied to the cage. That is from our Branching Out Cut File! I think you will find it AMAZING to add to any card, tag, template or project! I just used glue dots to adhere it to my template. Very simple!

I cut my Branching Out Cut File in Kraft cardstock. Once cut out I used my Copic markers to color the leaves in 😀 You could also re-cut the file, in whatever leaf color you chose, and cut just the leaves off, adding them to the base. I would fold them in half for added dimension 😀 Just a tip
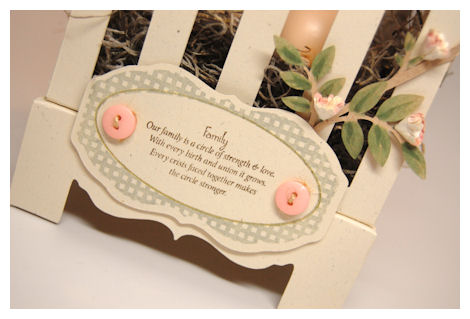
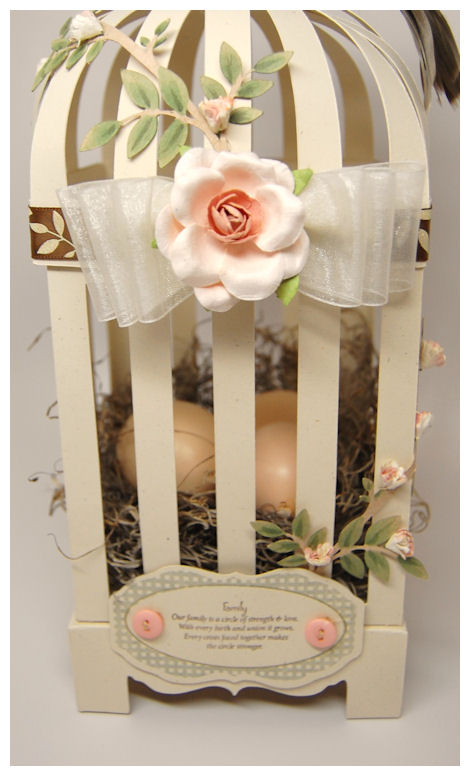
For my sentiment I used the So Sentimental set.
It reads:
Family
Our family is a circle of strength & love. With every birth and union it grows. Every crisis faced together makes the circle stronger.
I felt it went perfectly for the message I wanted the centerpiece to have, given our recent trials, and the fact we had our bird with her little nest. The label and cut file are an early peek at what is to come next month 😀 Sorry I couldn’t resist adding it!
Now the little flowers…I made those too 😀 Read more on that further down, once you get to the card!!

This was made specially for my mother, to use as a centerpiece on her dining table. I asked her specifically what she wanted for colors, and I went to it. She hasn’t seen the final product yet, but I will present it to her within the next week or so.
Now for her card …and a peek at the new stamps and paper!

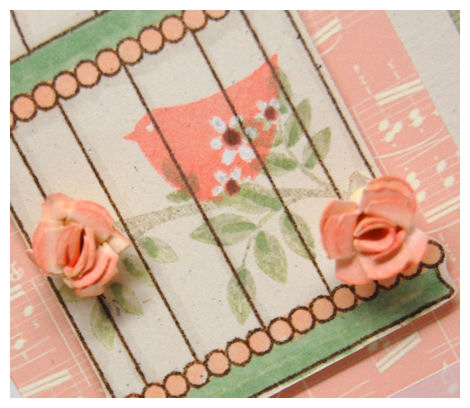
Keep strong and carry on.
I love this card, that I made to coordinate with the bird cage. There will be a tutorial below on how I made those little roses 😀
The cage, branch, and bird are from an upcoming set called: Singing Silhouette. More details on that set tomorrow. Obviously it will have a bird theme to it 😀
The cage image was cut using the Caged Cut File. This cut file was designed to allow you to have a cut out of the cage/cage door image (not shown) from the Singing Silhouette stamp set. I added some additional color to the leaves using a marker, once stamped.
The paper is from our latest collection called Whistful Wonder & Whistful Music Magic.
This sentiment is of particular significance at this point in my mom’s life. It feels great to have the ability to create such meaningful gifts for such a time in one’s life.
The sentiment is from a new set called Keep Strong.The set was a collaboration of sentiments, between Catherine Doucette and I. We will release it in March, as March 8th is International Women’s Day , for awareness on domestic violence against women.
More details on that set will also follow soon.
Since my mother was almost murdered by her husband(now almost a year ago-this April) I wanted to create something in honor of her!!! She continues the court battle to help prosecute her husband (who is in jail) for the brutal attack on her. He is fighting for 50% of all their assets, and for her to PAY HIM alimony once he is released from jail! Lord, if there is a justice system in the world, please help my mother with this uphill battle, that is so draining on her.
OK now how about we get the the tutorial part?
Check out these AMAZING mini roses, and the flowers that are on the template in this post. I made them in under 2 minutes!!
Want to know how?
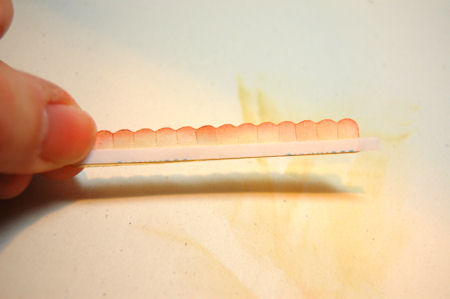
I used the or you could use the Border Builders Open Scallop Cut file (the plain scalloped one) for this project. Or you could use the Rosey Posey Rosettes too.
Directions:
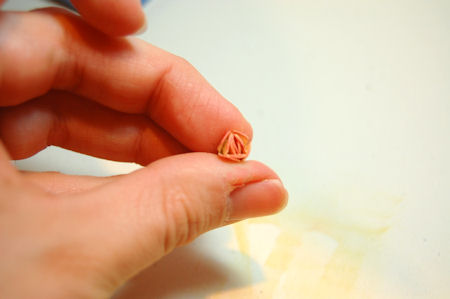
1) Resize the plain scallop border to 1/2 inch wide (select maintain proportions prior to resizing)

Use a THIN cardstock, or even printer paper!
2) I then sponged on my color. A darker pigment ink on the scallops.
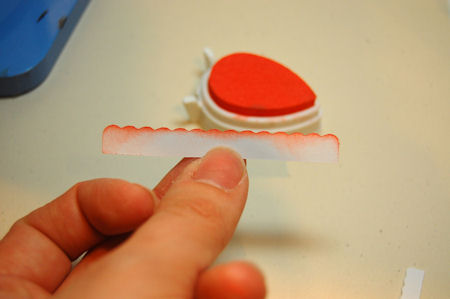
A lighter ink on the bottom.
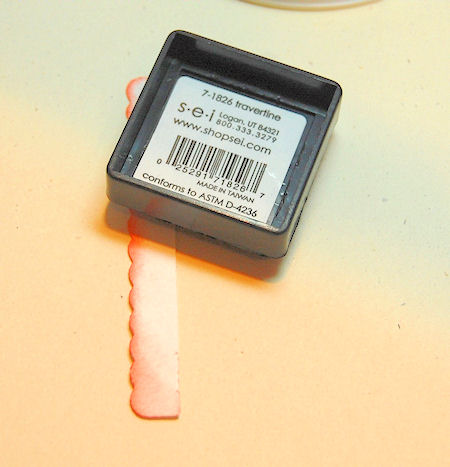
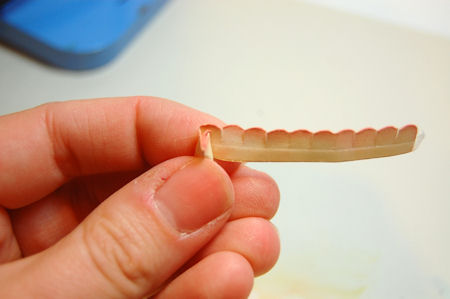
3) I then use my scissors, and snip between each scallop.
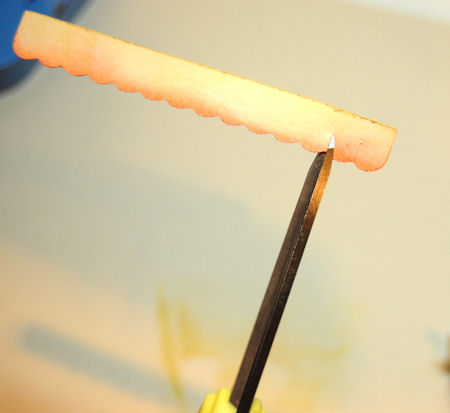
4) Add a THIN strip of double sided adhesive.
5) Take my craft pliers to begin to roll the scallop strip.
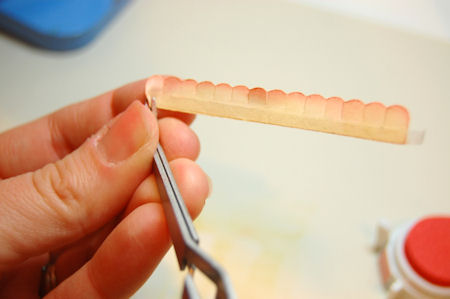
6) Carefully roll the strip, ensuring you pinch the bottom tightly.
7) Keep carefully rolling…
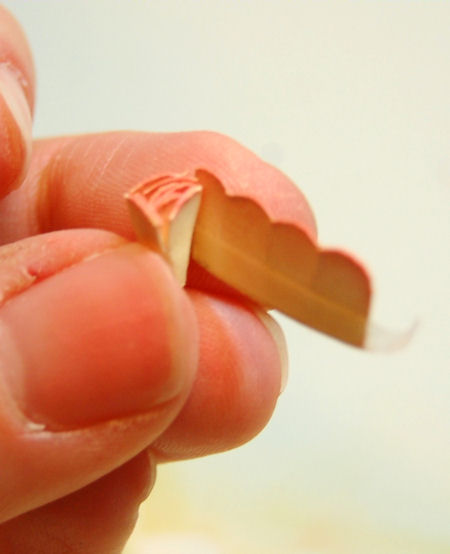
8) Done rolling!
Once it is all rolled, because you used the sticky adhesive it will be all set 😀
9) You then want to take your fingers, and pull back/roll down the snipped petals. You can then pinch some of just leave them alone!
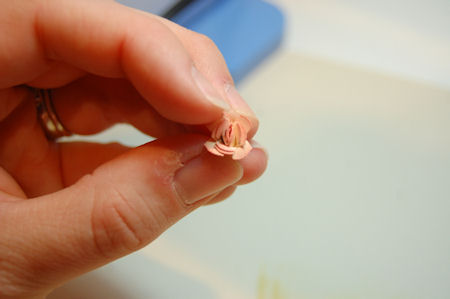
10) To adhere to a project, apply a large clear glue dot to the bottom.
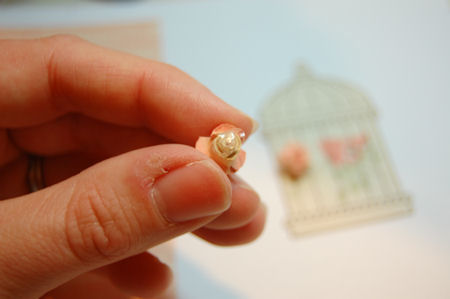
The bottom is flat so it sits nicely on any project!

Now the possibilities truly are endless, and in NO TIME at all!
TIP: For the first template sample I used copy paper, and didn’t really fold the petals back! A whole new look!
Supplies from My Time Made Easy ™ LLC
Pretty Packaging Templates: Caged
Pretty Impressions Stamp Set: Singing Silhouette, Keep Strong
Pretty Printable Digital Paper: Wistful Wonder, Wistful Music Magic
Pretty Pieces Cut File: Branching Out, Caged Cut File, Border Builders Open Scallop Border
Well I think that is all I can cram into one day. I hope you are as excited as I am about this next release!
There is SO MUCH more to share, so come back tomorrow OK!
PMS VIP Blog Hop
Feb 7, 2011 Author: mytime | Filed under: Cards, Home decor/3-D items, My Time Made EasyPaper Makeup Stamps is turning 2 years old!
To celebrate the occasion, they are having a super fun VIP blog hop with the theme “the things we love”. The entire design team invited special crafters to play along in this hop.
To see everyone involved, please go back to the Paper Makeup Stamps company blog for a master list as well as to enter your self to win a super fabulous prize!
As for the master list, you can check them out at
https://pmsbloghop.blogspot.com/2011/02/blog-post.html
Powered by Linky Tools
Click here to enter your link and view this Linky Tools list…and remember if this is your first stop go to Paper Make Up Stamps <—CLICK ME
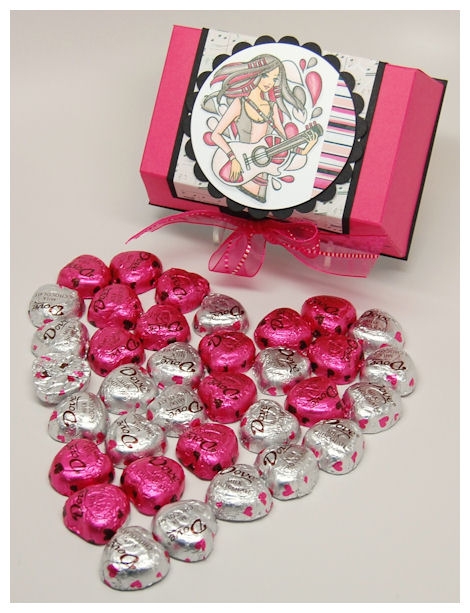
Now let me share what “I” love with you all for my part in the hop!
So here is what I love in black, and why is shared in pink!
Templates/gift packaging -obviously! LOL!
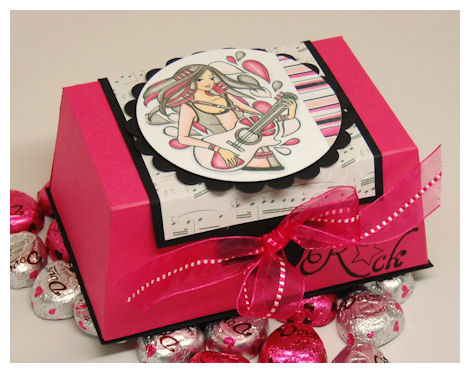
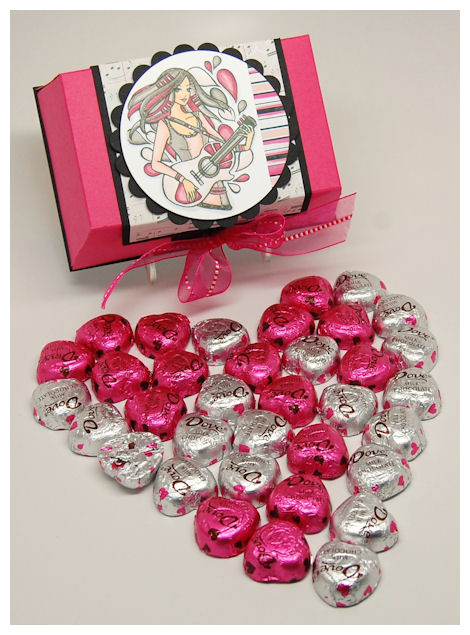
I used a favorite Pretty Packaging Template of mine called The Flapper for today’s project.
This gift is for my 11 year old daughter Alexa for Valentines Day!
Chocolate! Eating, packaging and gifting it!

Here I used Dove Milk Chocolates that are a perfect match to my packaging!
Any images/stamps that benefit a cause
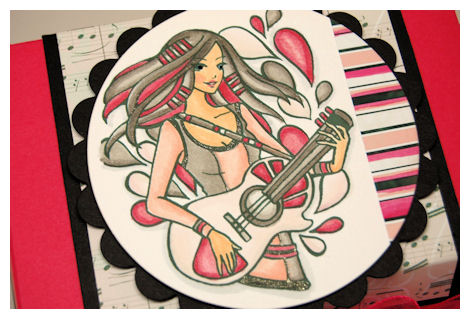
Here I used Moody for Rock-Digital Download Procceds benefit the Arriaza family. I love when I can purchase something that I LOVE, and make a difference at the same time! Feels wonderful.
Girly images-I can never have enough
I love all the Fairy images from PMS Stamps!
Using white, black and pops of pink
As you can see I chose these colors for my project, and they are HOT!
Coloring with my copic markers
I haven’t gotten to do that nearly enough and I so enjoyed it!
Mixing and matching patterned papers
Here I used the Warm Serenity paper collection. I used the music note pattern, and the stripes!
Coloring my patterned paper to match my projects
I added the fushia color to the stripes, using my Copic marker! So quick, fun and easy!
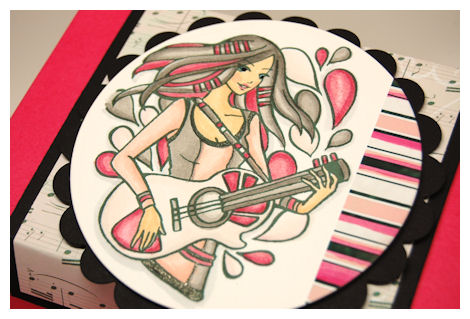
Add some bling, no matter how subtle.
I used a black Copic Spica pen in black to add a little bling where needed! Often subtle but a WOW in person!
Sharing it all with any and everyone!!!
So thanks for stopping by!!!
We are getting ready to wrap up the February Release projects and still have yet another day to share after today.
Get your creative fix today by visiting:
I have yet another card for you. Over the last 3 days I’ve share a unique card using each of the flowers in the Bold Botanicals set.
As you all know, I have been affected by Cancer through my own daughter who was 6 at the time, and now 11 celcbrating 3 years in remission, and now my mother 54, who is fighting her battle right now.
Cancer has no prejudice. It see no age, no race. It doesn’t discriminate. It can happen to anyone. I truly love this set, as it was put together in honor of my mother, and my daughter.
The Bold Botanicals set was designed for those who need encouragement and are grateful for second chances. I didn’t want “CANCER” to be the main focus, just soft images (and my favorite the butterfly for so many personal reasons to me) and an inspiring sentiment you see on bracelets and Cancer Awareness article everywhere.
People who have cancer don’t want that to be their defining quailty or the main focus of thier life. At least that has been my expireince with it.
Today my card is for a friend who is battling ovarian cancer. Her Cancer color is teal.
Faith Hope Courage Strength

This is a simple design that I can easily duplicate, and that the colors can be changed based on need.
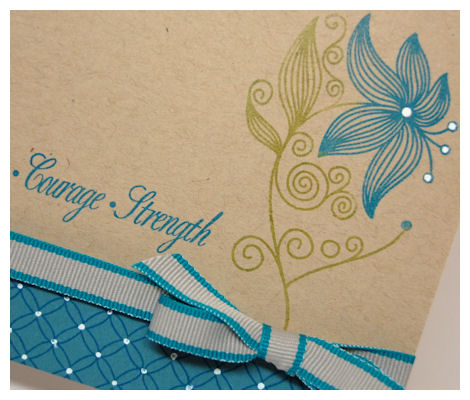
I used a pigment ink in teal for my flowers, and olive for my stem. I added some white details using a singlo gel pen.
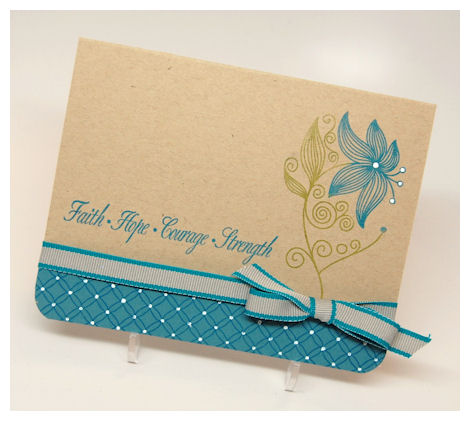
The detail along the bottom, is once again Puckered Up Patterns. I love it.
This is the perfect card for mass production, or just because.
Each Cancer is represented by a color. So when making a card or gift set it may be helpful to keep this in mind. It make personalizing the gift that much more meaningful.
Here is a color chart for you to view, should you need to make a card in honor of someone!
| All Cancer Survivors | Lavender | |
| Bladder Cancer | Yellow | |
| Bone Cancer | White with Gold Outline | |
| Brain Cancer | Gray | |
| Breast Cancer | Pink | |
| Childhood Cancer | Gold | |
| Colon & Colorectal Cancer | Brown | |
| Esophageal Cancer | Periwinkle Blue | |
| Gynecological Cancer | Lavender | |
| Head & Neck Cancer | Red with White Stripe | |
| Hodgkins Disease | Violet | |
| Hospice Care | Burgundy | |
| Kidney/Renal | Kelly Green | |
| Leimyosarcoma | Purple | |
| Leukemia | Orange | |
| Lung Cancer | Pearl | |
| Lymphoma | Red | |
| Male Breast Cancer | ½ Blue and ½ Pink | |
| Melanoma | Black | |
| Mesothelioma | Royal Blue | |
| Multiple Myeloma | Burgundy | |
| Ovarian Cancer | Teal | |
| Pancreatic Cancer | Purple | |
| Prostate Cancer | Light Blue | |
| Renal/Kidney | Kelly Green | |
| Retinoblastoma | White | |
| Testicular Cancer | Orchid/Violet | |
| Thyroid Cancer | Light Blue | |
| Transplant | Green | |
Well I thank you for letting me share today.
I pray you and yours will be well this new year.
Come back tomorrow for a group post that is sure to WOW you.
Welcome back!
I hope your February is off to a creative start.
If you need some ideas and inspiration today be sure to stop by and visit:
I have another card creation for you! I am IN LOVE with it, and hope you will be too.
Every Occasion
Well what do you think? Pretty isn’t it?
I used the large blossom cluster from the Bold Botanicals set as my focus of the card.
I used the frame from Killer Curves. I stamped it in olive ink, onto the white card base. I used the Killer Curves Cut Filefor my flower layer. I stamped the blossom in versamark, then I embossed it with White Embossing Powder.

Once it was embossed I used a sponge dauber to add some pigment ink to the petals. I took a Fantastix stick to the ink, and used it aid in adding color to select places (without a mess) of the flower/leaves. The Fantastix stick acts as a sponge marker, allowing me this soft, and colored effect.
I used some more stick pins in my ribbon. One is a orange flower (similar to my stamp) and the other is a green leaf 😀
Along the bottom I needed something, but didn’t want whatever I added to overtake the design. So I turned to the Argyle Amazement set, where I built my pattern along the bottom, then scored 2 lines above and 2 lines below the argyle border. That is one of my favorite pattern building sets to date!
Yes, I left this card BLANK! That’s right. No occasion assigned. Now I have a card on hand that I can assign for just about ANY occasion. You don’t always HAVE to assign a card to an occasion. It’s great to keep some blank canvas’ on file!
Well, thanks for stopping by and letting me share my ideas. Maybe you will try coloring with pigment ink, and or embossing white on white too!
The ideas aren’t done yet, so we will see you back here tomorrow.
Well we have had our official February Release and the ideas keep rolling in.
For more you will definitely want to stop by and visit:
Today I thought I’d share a card I designed using the Bold Botanicals set.
Now all our sets are designed to be used for EVERYTHING papercraft related. Be it packaging, cards and/or tags. I personally LOVE making gift packaging. Actually I prefer it. I know MANY of you out there love cards and want to see more ideas for use with those, so that is something I have been focusing on this release. See, I listen to you all 😀 I’ve shared several card gift sets, and now I want to share a more “involved” card idea with you.
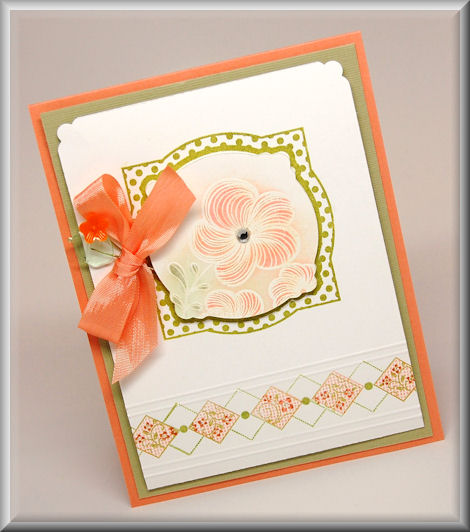
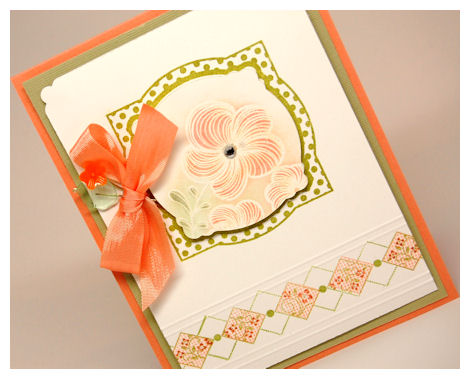
So here is my favorite (you know Tulips are my favorite flower) card from the release:
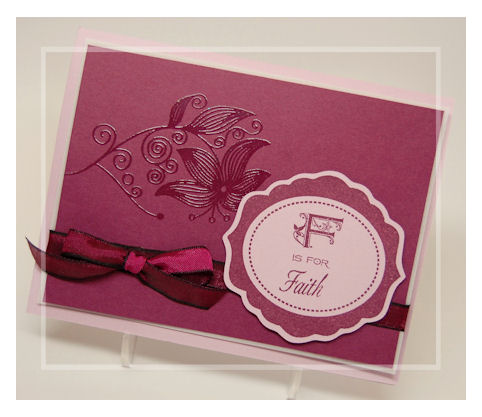
F is from Friend
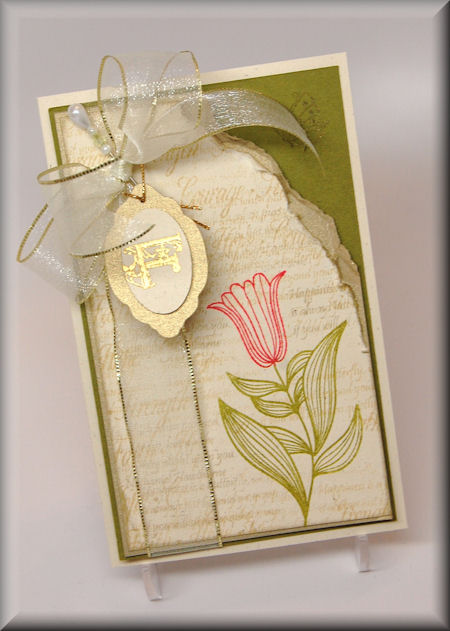
I wanted a “vintage botanicals” look, and this is what I came up with.
I stamped my tulip image from Bold Botanicalsusing a pigment ink in a Rose and Olive color, onto some ivory cardstock. I love that you can EASILY do this and the image is still amazing looking.
I half-heartedly masked the image, then stamped the Faith*Hope* Courage* Strength sentiment in a tea dye ink all over the card layer.
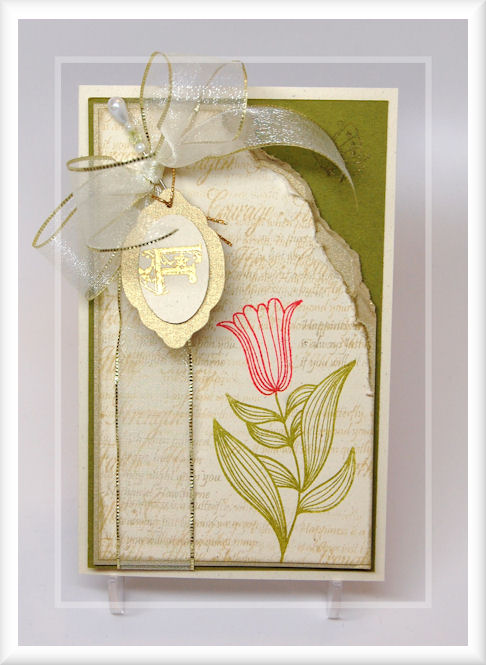
From there I used the Irish Blessing sentiment from the All A Flutter Sentiments set, and randomly stamped the text in a gold ink onto the main card layer. This gives a vintage text look and a slight shimmer to the card!
I then tore the corner, and layerd the card over some gold cardstock, also torn, which was also layered onto some olive cardstock. Some gold trimmed ivory ribbon was tied around the layers, into a bow, in which a pearl stick pin adorns it.
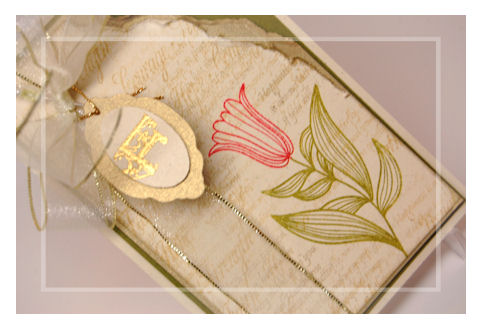
I used the Trendy Tags 3 cut file, resized to about 1 3/4 inches, cut from a shimmery gold cardstock. I then stamped the F from Monograms Defined, and embossed it with Gold EP. It really adds to the card design. It also brings out the shimmer on the card base.
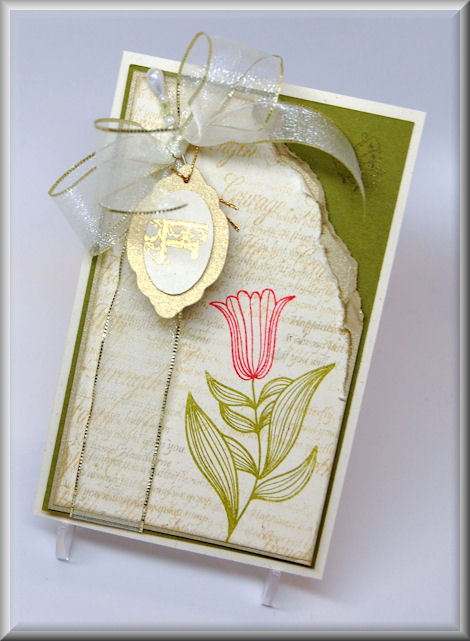
In the upper right corner I stamped the butterfly from Tending the Garden, in gold. A subtle detail.
This card is about 3 1/2 inches wide, by 5 1/2 inches tall.
I had fun using a non standard or expected size! Give it a try.
Well I had a blast making this card. I hope it sparked some design ideas for you too. I have several more card ideas to share over the next few days, so come back tomorrow OK!
Till then
Make It Personal: February Release
Jan 31, 2011 Author: mytime | Filed under: Cards, Home decor/3-D items, My Time Made EasyWell today is February 1st, which means it is FINALLY Release Day at My Time Made Easy ™ LLC!
In honor of the release we always have an amazing Group Post! Today we are each featuring a “personalized” gift set!!
Check out the design team here:
Please check out all our NEW! Products HERE!We have many NEW! Products that coordinate together! So don’t miss out ![]()
View our GALLERY HERE, for lots of ideas and inspiration using ALL our products!
My shipping is VERY affordable and I ship WORLDWIDE ![]()
1 NEW! Pretty Packaging Templates
3 NEW! Pretty Impressions Stamps Sets
5 NEW! Pretty Printables Paper Collections
3 NEW! Pretty Pieces Cut Files
1 NEW! Perfect Package Collection <—Check it out!!
If you haven’t yet you may want to sign up for our NEWSLETTER on our Website or join us on Facebook!
Detailed information about our products can be seen on the ABOUT PAGE
Do not forget to READ DOWNLOAD INSTRUCTIONS prior to checking out, and be SURE you selected the correct file type!!!!
Also do NOT let your download expire before you have a change to download it.
If you have *any* customer service questions or issues please contact me at:
OK that is enough of the blah, blah, blah…let me get to sharing MY gift set.
From the desk of….ME!

I love that this set uses ALL 3 NEW! Pretty Impressions Stamp sets!
When it came to making a personalized gift set, I have to admit, I got a little “selfish”. I decided to make one for MYSELF! Why not right? I mean really, It’s not often I make myself anything, or even have samples of the hard work I put into my craft to show others.
That being said immediately following the completion of this set I felt guilty for making it for ME! LOL! Typical woman/mommy feeling isn’t it? Why do we feel guilty for doing things for ourselves? Its so odd. We shouldn’t be we do. I may feel guilty, but admittedly I smile every time I see it. I don’t know that I’ll even have the heart to SEND the cards either. Another thing I have a hard time with, USING what I make. Crazy, I know. What good does it do collecting dust anyway. I’m trying to get better about that stuff. A New Year resolution that needs to be added to my ever growing list.
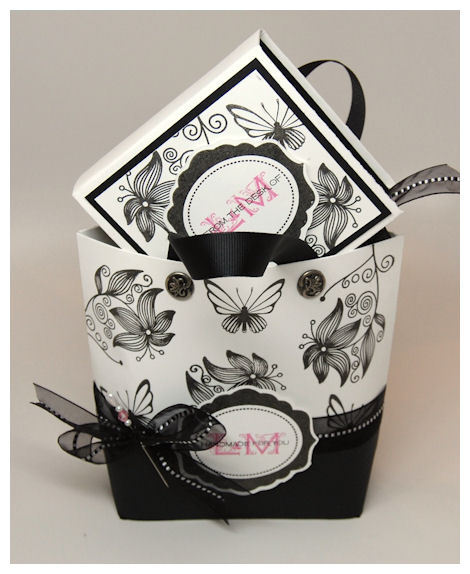
Black, white, and Pink is one of my most favorite color combinations, so it was a no brainer on what I was going to do for this set 😀
I love the “display” hanger. Kristin sent to me, since I have a lot of hanging projects, and never anything to hang them from. Thanks girl! Came into good use here. I’m using it to “display” this set now too.
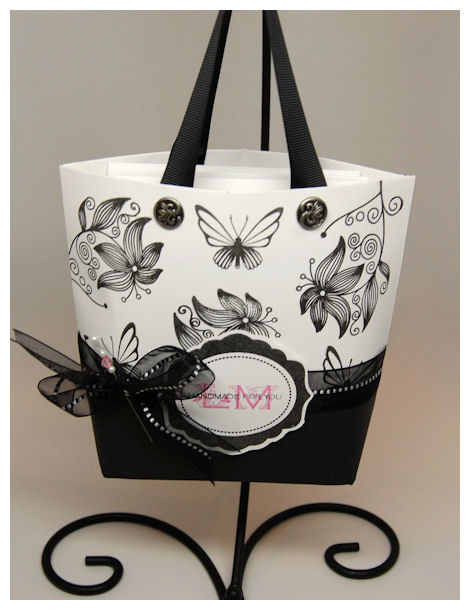
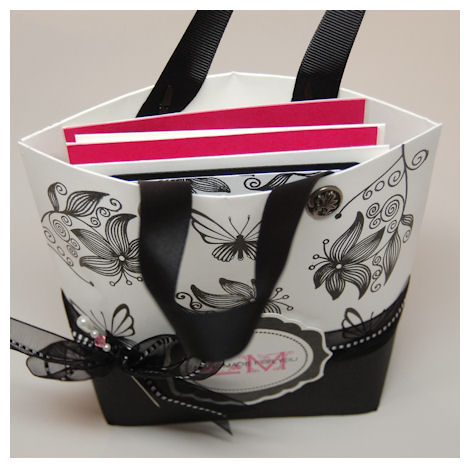
Every girl loves handbags, and the Tote-All Package is THE perfect gift bag/tote! So it was only natural for me to want to make one for myself.
For this I created my tote panels first, in white. I then strategically stamped the images from Bold Botanicals, in black, on the tote so that the butterfly was in the tote center between the handles. Both front/back panels look the same.
I love the brads used to hold the ribbon handle. A simple great touch that doesn’t overpower the design.

I lined the bottom of the bag with a black cardstock.
This tote was designed after the cards I made. The frame from Framed Elegance, is the continuing focus thoughout the set. I wanted the pop of pink to only be in the monograms (which are from the Monograms Defined stamp set), and the stick pin. I think the LM pops more that way.
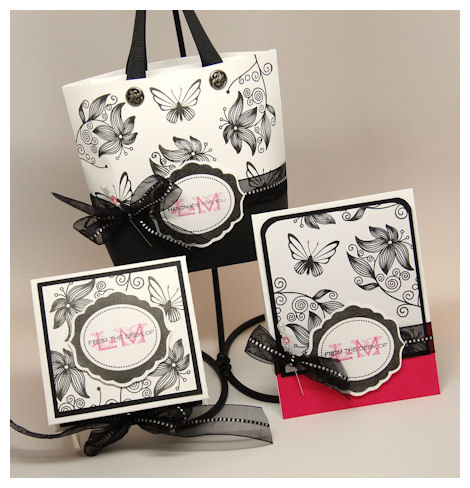
Now onto the cards.
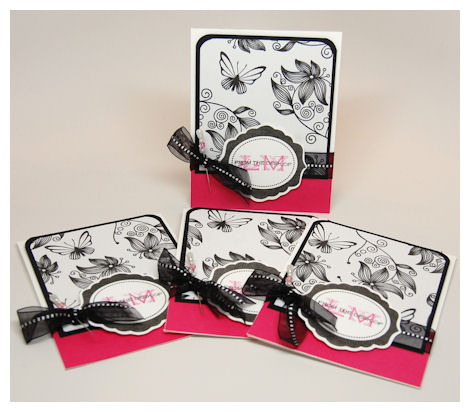
When mass producing, picking a simple layout is best.
I made a “One-Sheet Wonder” using the Bold Botanicals set, stamped in black. That is when you stamp all over a sheet of 8 1/2 X 11 then cut it up to make a card/gift set.
Once that was done, I cut it up to be able to make the designer panels for my 4 monogrammed cards. I rounded the top corners, and layered the panels onto a black panel. For some of that hot pink POP, I put a layer at the bottom of the card, which my stamped panels overlapped. I tied around a ribbon, and stuck a stick pin in the knot.
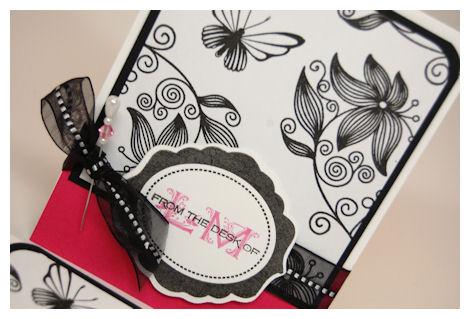
I then layered on my frame which was first cut using the Framed Elegance Cut File, then stamped using the Framed Elegance stamp set. Across the center of the label I stamped my initials from the Monograms Defined set, in pink. Over the initials I stamped the FROM THE DESK OF sentiment.
SO STUNNING, and simple. A gift set doesn’t have to be COMPLICATED to be amazing.
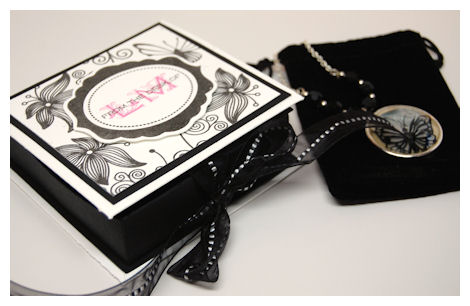
I had some left over paper after creating my OSW cards, so I used it to create my Creative Card Candy Mini box, which completed my gift set to myself 😀
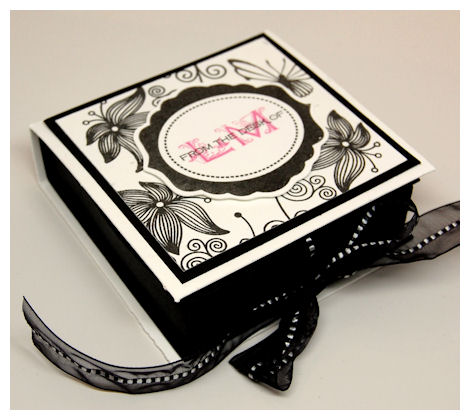
There is nothing more elegant than black & white. I love how this turned out.
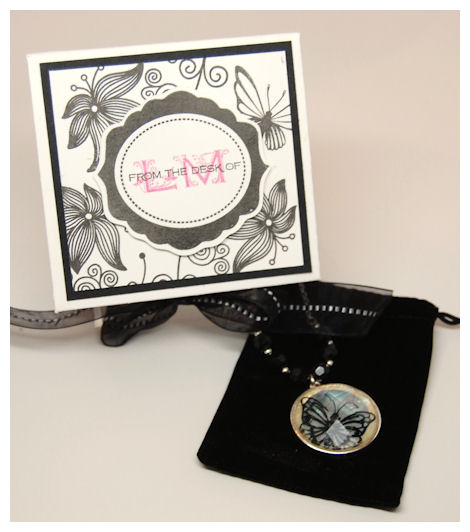
Now you may be wondering what I bought myself to put inside….
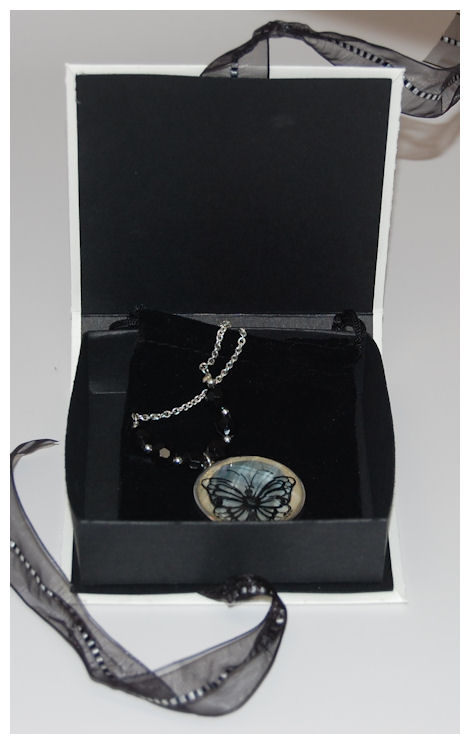
This is a velvet bag, with a butterfly necklace I found, and fell in love with!
It makes a great holder for any jewelry you make or purchase.
 I contemplated even buying the necklace, as I don’t wear a ton of jewelry because I forget to put it on, but the minute I have somewhere decent to go, I am scouring my jewelry box! Now this is another addition, and another guilty pleasure 😀 Again I guess we deserve these little splurges now and again.
The Creative Card Candy Box tucked perfectly inside the Tote-All Package. (I left it out a bit for the photo purposes! LOL!)
It really came out better than I hope for. You can use this SAME layout and gift idea to creat AMAZING gifts for EVERYONE! I think these are especially great for TEACHERS!! They love getting personalized gifts like this. Use the Creativer Cards/Envelopes 1 or 2 to make smaller versions so you can cover MORE people on your list.
Endless possibilties
I’ve REALLY enjoyed going back to older products and templates to continue to offer you new ideas with older supplies. This is a perfect example of that here.
Supplies from My Time Made Easy ™ LLC
Pretty Packaging Templates: Tote-All Package, Creative Card Candy Mini
Pretty Impressions Stamp Set:Bold Botanicals, Monograms Defined, Framed Elegance
Pretty Pieces Cut File: Framed Elegance
I hope you all enjoy the group post the team has pulled together, to inspire you to make your own personalized gifts of all kinds.
Make sure you let them know what you enjoyed. We love getting your feedback, and knowing you were inspired.
See you back here tomorrow for even MORE idea and inspiration.
Day 3: February Peeks
Jan 30, 2011 Author: mytime | Filed under: Cards, Home decor/3-D items, My Time Made EasyWell in just a few short hours the NEW! Products for February will be available for purchase! WOOT WOOT!! I can’t wait to see what you all create with everything 😀
To get some more ideas please pay a visit to:
There have been some amazing ideas already, with even more to come! It’s all very exciting, don’t you think?!
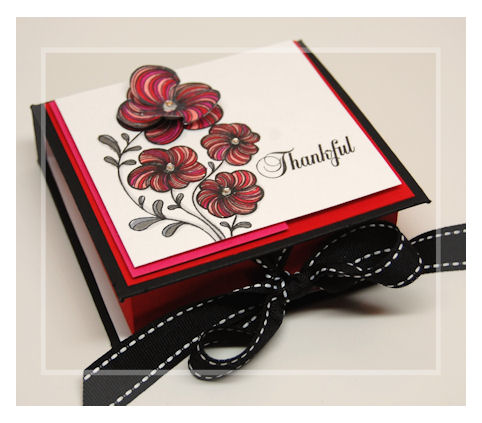
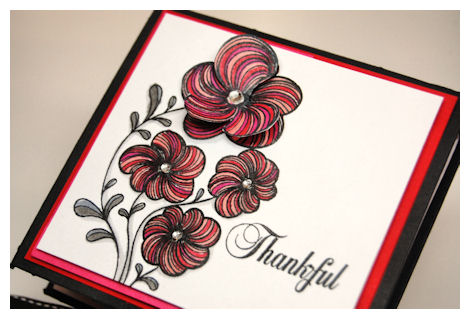
Today I want to share a quick creation using the NEW! Creative Card Candy template and the new stamp sets: Bold Botanicals (the large flower cluster) and Framed Elegance (for the Thankful Sentiment).
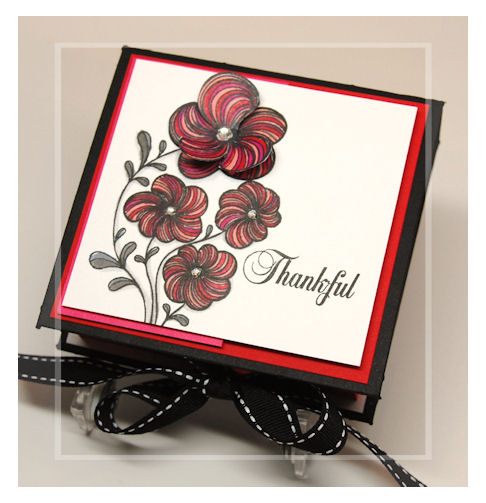
I LOVE this box. I love the colors, and the WOW factor I was able to get with a very simple design. I knew I wanted to alternate the colors in the petals of the flowers, and using my Copic markers made it quick and simple.
I actually colored the petals light pink first, then I went in and used a darker pink, and red combination
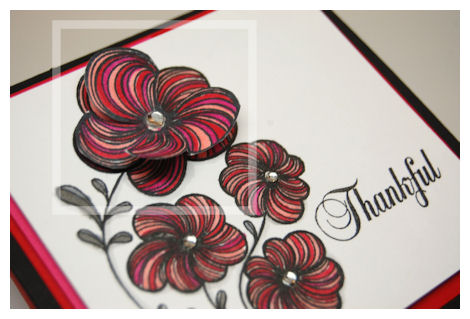
By cutting out, and popping up the petals on the largest flower it really kicked it up a notch! I added adhesive rhinestone to the centers for a subtle bling. I also used a Copic Glitter pen in black to outline my image, so the impact in person is jaw dropping, despite the CLEAN design.
If you are like me, you love giving (and receiving) gift cards. It is always a challenge to find new ways to package up these great gifts, to throw the receiver off from the trail that it is in fact a gift card, and yet make it fun to open.
Well, untie the ribbon and here you have it!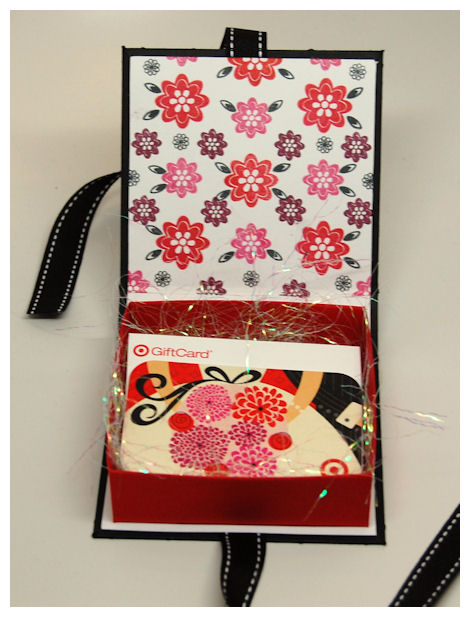
Isn’t this a fabulous gift card holder? Would you ever guess this was holding a gift card?!
I used the gift card itself to get inspired with my colors, and the “pattern” I stamped on the inside cover. I used the flowers from Sensational Stems, and the leaves from Fanciful Flourishes to complete the design.
Love it!
Supplies from My Time Made Easy ™ LLC
Pretty Packaging Templates: Creative Card Candy Mini
Pretty Impressions Stamp Set: Sensational Stems, Fanciful Flourishes, Framed Elegance, Bold Botanicals
Well that does it for today. We have an amazing group post that is sure to get those creative ideas flowing for anyone on your gift list.
See you then
Well we are back with Day 2 of our February Release projects!
Today you will want to visit:
They have put together some amazing project!
Yesterday I focused on our NEW! Pretty Packaging Template: Creative Card Candy Template, but today I thought I would share a sample and some information on the 3 stamp sets we are releasing, which ALL work so well together 😀
I wanted to package up a set of inspirational cards for a staff member at the Cancer Center where my mom receives treatment. I pondered over what Pretty Packaging Template to use, when it dawned on me, one of the best and most obvious choices would be the Slip Cover template!
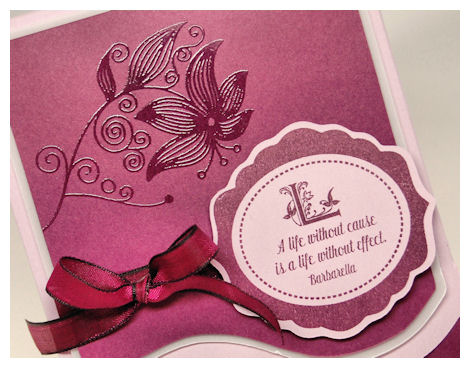
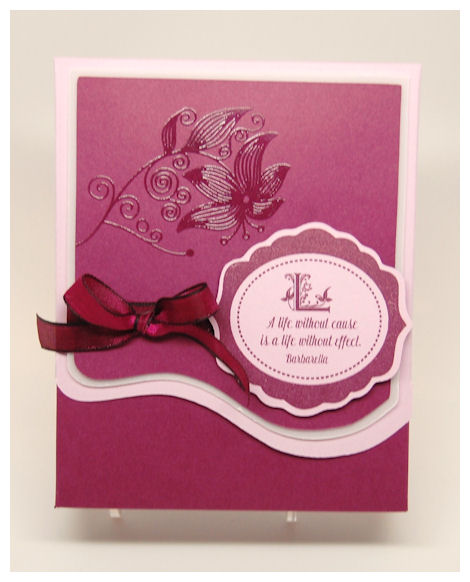
A Life without cause…
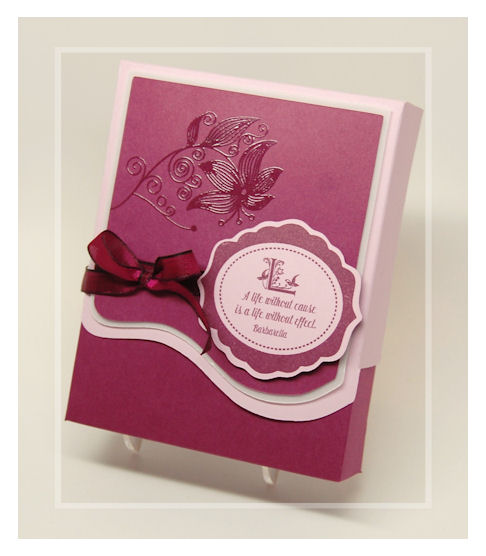
is a life without effect. (this sentiment is from our Sensational Sentiments set)
What better sentiment for a caretaker of those going through a difficult time. The staff really do help get you through these tough times, and truly make an impact on everyone they come in contact with. It takes a special person to be such a gift during this difficult time for families. I am happy to say my mother has many staff that I adore and respect immensely for what they do.
So this gift set uses all 3 of our NEW! Pretty Impressions Stamp Sets!
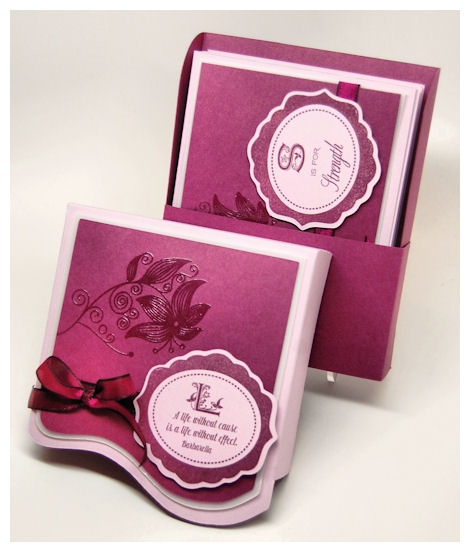
The main flower image you see, which is stamped and clear embossed, on the gift sets if from the Bold Botanicals set. Its simple and understated, but make a big impact, while allowing the frame to be the focus.
I packaged 4 different cards with envelopes into this template. I love how it turned out, and can’t wait to share the details of each card with you.

As you can see the cover of the Slip Cover template is designed to coordinate with the 4 cards. I used the Framed Elegance set for my frame. There is a coordinating Framed Elegance Cut File which makes creating these labels easier than ever!
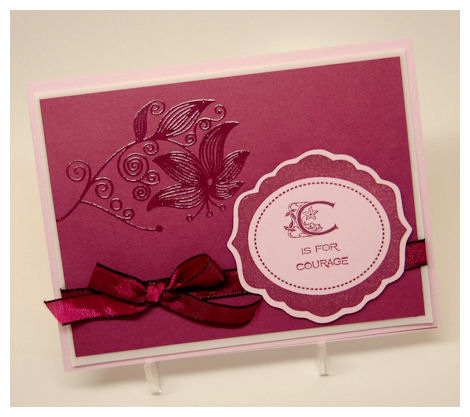
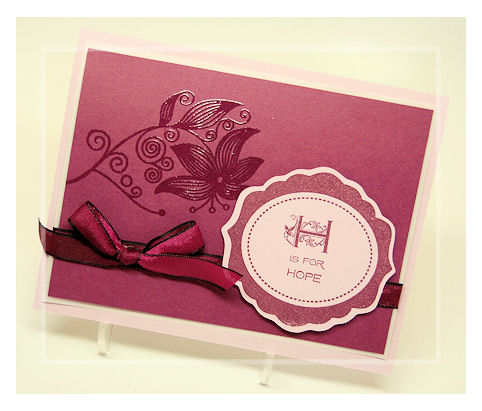
Each card has a different “monogram” which was stamped from the Monograms Defined set.
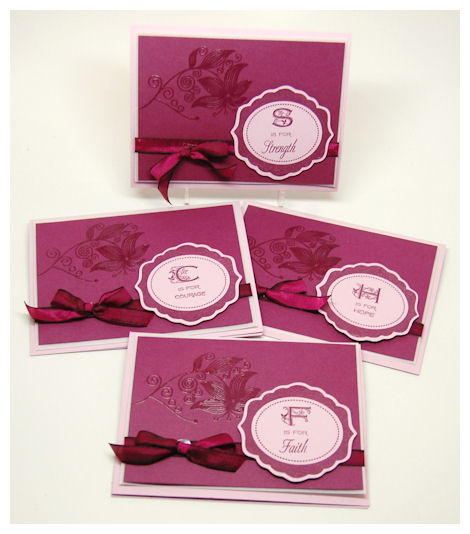
Here you see all 4 cards laid out.
We have the theme of S is for Strength

C is for Courage
H is for Hope
and F is for Faith
The “is for” sentiment is contained in the Monograms DefinedSet. Each letter has a defining adjective. For the faith & strength sentiments, I took those from the Bold Botanicals set. It is GREAT to mix and match things.
Supplies from My Time Made Easy ™ LLC
Pretty Packaging Templates: Slip Cover
Pretty Impressions Stamp Set: Monograms Defined, Bold Botanicals, Framed Elegance, Sensational Sentiments
Pretty Pieces Cut File: Framed Elegance
About the stamps:
#1 Bold Botanicals © Set of 6 Images $20
This is a stunning set of 3 bold, yet whimsical styled flowers, that are perfect for coloring, or just using their elegant yet bold lines as the design focus. This set also pairs perfectly with our Monograms Defined © Set.
This set was designed in honor of my mother, as she battles her Cancer. All proceeds from this month’s sales will be donated to the Cancer Center where she receives her treatments. That was her wish.
More about the set:
Flower images are about 3 1/4 inches tall, and about 2 inches wide
Butterfly is about 1 1/2 inches wide, and 1 1/4 inches tall
Sentiments read:
Faith * Hope * Courage * Strength
Gratitude is the flower blossom which springs from the soul. – Henry Ward Beecher
I love the simplicity this set offers, and the cause it benefits.
The frame which is repeated on our entire packaging set is from Framed Elegance.
#2 Framed Elegance © Set of 7 Images $6
Frame Designed by Kristin Bueter
This set coordinates perfectly with the Framed Elegance Pretty Pieces Cut File.
This is a simply stunning set when you want to really focus in on simple elegance! The frame is perfect for so many sentiments/images. The “so very” sentiment within the set goes with the Thankful and/or the Thoughtful sentiment. It is a perfect “frame” for our Monograms Defined © Set as well.
Frame in the set measures 2 3/8 inch tall, 2 1/2 inches wide.
#3 Monograms Defined © Set of 57 Images $20
This is a stunning set of monograms, letters letter A through Z, that is perfect for personalizing any card, tag, or gift package for anyone on your list! Each letter has a coordinating “definition”, and other various sentiments to make your personalization of gifts even easier.
Monogram letters are 3/4 of an inch tall
Definitions include:
always
believe
courage
dream
ever-after
friend
giving
hope
inspire
love
memories
kindness
joy
now & forever
one & only
patience
queen
remember
sublime
thankful
unique
very special
wonderful
x-traordinary
you
zealous
Coordinating sentiments include:
is for
from the desk of
just a note
handmade by
for you
Now doesn’t this set make you want to start making gift sets for everyone?
As you can see there is a lot to be excited about with this release 😀
I look forward to sharing more with you over the next week.
Until tomorrow.
My Etsy

Who I Designed For
Blogroll
- Alicia
- Alli Miles
- Ally Blankenship
- Amber
- Andi @ crafts on a whim
- Angel R
- Angie Z
- Anne Kranitz
- Becky O
- Bee
- Beth Silaka
- Bethany Paull
- Beverly Nash
- Bobbie
- Cambria
- Cammie
- Card of the Week
- Card Positioning System (CPS)
- Cards for Cancer
- Catherine Doucette
- Charmaine
- Cheryl Sims
- Chriss Rollins
- Christina
- Christine Ewing
- Christine Wooden
- Colleen Schaan
- Craft Critique
- Craft Gossip
- Crystal
- Dawn Easton
- Emily Giovanni
- Geny
- Holly
- Igne Groot
- Inspirational Craft Blogs
- Irene
- Jami Sibley
- Jeanne Streiff
- Jen del Muro
- Jeni Bond
- JenMarie
- Jenn Balcer
- Jenn Diercks
- Jenn O
- Jennifer E
- Jennifer Mick
- Jennifer Pereda
- Jennifer-Sweet Treat
- Joanne Basile
- Jodi Collins
- Julia Stainton
- Julie Masse
- Karen
- Kathryn Berthiaume
- Katie Cotton
- Kelley Holland
- Kendra
- Kim Scholfield
- Kris’s Color Stripes! Get inspired here
- Kristen Dubosque
- Kristin Eberline
- Kristine
- Laura @ Sunshine Stamper
- Laura Turnmire
- Laurie Schmidlin
- Lesa Rapp
- Linda Duke
- Linda-LSN
- Lindsey Botkin
- Lisa (lakind scs)
- Lisa Kind
- Lori Craig
- Maggie
- Mara Campbell
- Maria
- Maria Levine
- Mary
- MaryJo
- Melanie M
- Monique Hansen
- Moxie Fab World
- Pam Imholz
- PaperCrafts Connection
- Peppers and Pollywogs Kids party site
- Rebecca Grohall
- Rita
- Robyn
- Rose Ann
- Sarah Vrolyk
- Sharon Harnist
- Sharon Johnson
- Sharon Rivera (a chemisrty with paper)
- Sherrie
- Sophia Landry
- Storage Units, Ink, & More Blog
- Sue Berker
- Susan (Rainy)
- Tangii Crane
- Tracy
- Tricia Traxler
- Trudee
- Velta
- VivLyn
- Zena
MTME Pretty Palette Color Team
MTME Pretty Patterns Sketch Team
My Time Made Easy TM LLC
Shop till you drop!
Lauren Meader
About Me
Copyrighted material
Subscribe To My Blog
Pages
- About me
- Alexa’s Story!
- My Crafty Corner!
- My Time Made Easy™ LLC
- Our Make A Wish Trip to Disney!
- Resume/Publication List
Calendar
| M | T | W | T | F | S | S |
|---|---|---|---|---|---|---|
| 1 | 2 | 3 | 4 | 5 | ||
| 6 | 7 | 8 | 9 | 10 | 11 | 12 |
| 13 | 14 | 15 | 16 | 17 | 18 | 19 |
| 20 | 21 | 22 | 23 | 24 | 25 | 26 |
| 27 | 28 | 29 | 30 | 31 | ||
Archives
- August 2013
- July 2013
- June 2013
- May 2013
- April 2013
- March 2013
- February 2013
- January 2013
- December 2012
- November 2012
- October 2012
- September 2012
- August 2012
- July 2012
- June 2012
- May 2012
- April 2012
- March 2012
- February 2012
- January 2012
- December 2011
- November 2011
- October 2011
- September 2011
- August 2011
- July 2011
- June 2011
- May 2011
- April 2011
- March 2011
- February 2011
- January 2011
- December 2010
- November 2010
- October 2010
- September 2010
- August 2010
- July 2010
- June 2010
- May 2010
- April 2010
- March 2010
- February 2010
- January 2010
- December 2009
- November 2009
- October 2009
- September 2009
- August 2009
- July 2009
- June 2009
- May 2009
- April 2009
- March 2009
- February 2009
- January 2009
- December 2008
- November 2008
- October 2008
- September 2008
- August 2008
- July 2008
- June 2008
- May 2008
- April 2008
- March 2008
- February 2008
- January 2008
- December 2007
- November 2007
- October 2007
- September 2007
- August 2007
- July 2007
- June 2007
- May 2007
- April 2007
- March 2007
- January 2007
Categories
- About Me
- All That Scraps
- blogger challenge
- camera/photo play
- Cards
- Contests
- family stuff
- FOR SALE
- Home decor/3-D items
- How to FAKE it!
- Introduction
- JUGS Challenge
- JustRite Stampers
- Lizzie Anne Designs
- My family stuff
- My Stamping Space
- My Time Made Easy
- My Time To Color Challenge
- My Time to Create Challenge
- My Timeless Template Challenge
- My Timeless Templates
- Mytime Mail
- MYTIME MOVIE/VIDEOs
- Papertrey Newsletter
- Pink Cat Studio
- Pretty Palette Challenge
- Pretty Patterns Sketch
- Product Opinions and Must haves
- Recipe's
- Saturday Sketch
- Smilebox Creations
- Stampavie
- Tutorials
- Uncategorized
- videos
Most Popular
- Create your own Onesie Card Tutorial-and important NOTE! PLEASE READ (2529)
- Saturday Sketch-Boxed bag holder (2333)
- Going GREEN! Fancy Flower Flourish-Closure Video (1478)
- Fabulous Favorite - Giveaway! (1336)
- a Prayer Request (1232)
- QUICK-Easter Baskets from Nestabilities-PTI style-and blog challenge (1063)
- Teaser Sketch (999)
- February Release Giveway! (and a little peek) (996)
- Group Post and Rambling Rose Video Tutorial (985)
- GIVEAWAY! Who wants it all?! (895)
Recent Comments (RSS)
- Daya Sons: Daya Sons, a renowned manufacturer
- 첫충사이트: 완전히 흥미로운 블로그 게시입니다. 저는
- sarah: Wow, Lauren, what a stunning
- hedie: خرید راهبند
- 야동: Love to read it,Waiting For
- 야동: This seller is in a
- 바카라사이트: 여기 처음 왔어요. 나는이 게시판을
- 야동티비: I was surfing the Internet
- 바카라사이트: 비슷한 주제에 대한 흥미로운 정보를
- 바카라사이트: "여기에 제공해 주신 귀중한 정보와
Copyright © 2007 - My Time, My Creations, My Stampendence - is proudly powered by WordPress
This blog has been Tweaked and Designed by Sara Williams