Archive for the ‘Cards’ Category
Day 1 Perfect Peeks:A whole latte fun
Sep 28, 2010 Author: mytime | Filed under: Cards, My Time Made EasyToday is Alexa’s 11th Birthday!
Words cannot say how ever more thankful (than the usual) I am to be celebrating it this year. After our BIG Pediatric ICU scare I know I am ever thankful she is here with us. Alexa ALWAYS teaches me about how important each moment is and how precious LIFE really is. We had quite the emergency and everyone was amazed at how well (and quick) she pulled through. We were given NO guarantees and it was one of the scariest times I’ve had with her to date. THAT says a lot in itself. I was once again reminded of what is truly important in life.
So I want to wish her a VERY Happy Birthday, with MANY, MANY more to come. I can’t get as emotional as I feel about this because I would just fall apart, so I’m trying to keep it upbeat and happy. I am so thankful to God for all he has done in her life (and my family), and allowing me to celebrate another year with her. I’ve really been able to keep life in perspective and stay grounded to my family. I’ve never ever felt more blessed and in God’s presence! He has truly blessed our family, once again. I cannot begin to list the many blessings we have been given.
OK moving forward before I get REALLY mommy mushy! LOL!
Are you ready for some NEW! Release Projects?! I have done my best to pull this release together, so I hope you get some inspiration from it, and get creating with our NEW! products soon!!!!!
I have to say I LOVE what I do! Especially as the holidays approach, this is my favorite time of year. October is our biggest release yet!
This month we have some amazing coordinating products to get you all warmed up to make your own packaging and treats/cards/tags this holiday season!
Grab your favorite hot beverage and be ready to get inspired, as we share an plethora of amazing gift ideas centered around the “hot beverage” theme.
As October approaches we hit PRIME gift-giving season!! With all the template/packaging ideas we have in store, you are able to take the simplest of gifts and make them that much more heartfelt, special and meaningful, and do that in an affordable way.With the economy being what it is, it is very important that we all get back to the focus of homemade gifts from the heart.
This month we have a group of stamps, paper and packaging that supports gifts that warm you heart & soul!! I am talking about the hot beverage kind!! If you like to give, package, or receive “hot beverage” themed gifts like coffee, tea, latte, cocoa, soup and whatever else warms you up, then you will love some of this month’s products!! If the “hot beverage” theme isn’t YOUR cup of tea (:D) then we will soon share some “all occasion” gift giving products, soon to follow!!
This month we are sharing the same amount of amazing samples, full of inspiring ideas, but in a shorter amount of time!
Today’s focus is going to be on our 4 hot beverage themed stamp images/sentiment sets: Grab a Cup, Grab a Cup Sentiments, Fancy a Cuppa & Fancy a Cuppa Add On set!
We are combing these 4 amazing sets with two of our latest & greatest templates that were designed to uniquely package up those hot beverage items in the funnest ways possible!!
To start, 2 of the templates being shared today are On the Go! which is awesome by itself, but is even better when combined with the Fancy a Cuppa?template!! Lookie at the amazing samples today!
Be sure you stop by and visit:
Our Guest Designer: Debbie
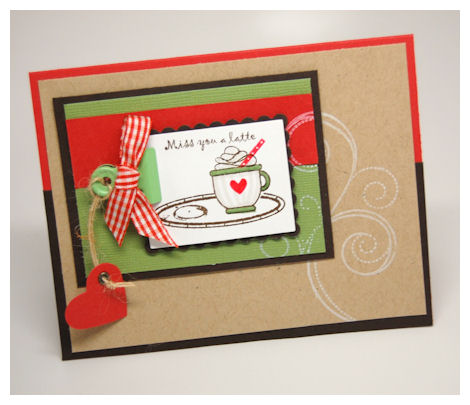
My sample today uses the Grab a Cup set as the main focus, along with the Grab a Cup Sentiment, and Fancy a Cuppa! I am excited about this project, and hope you are too! You can easily put your own twist on it.
YOU ARE LOOKING AT 100% MTME Templates! (ALL CARDSTOCK, ALL HANDMADE!)
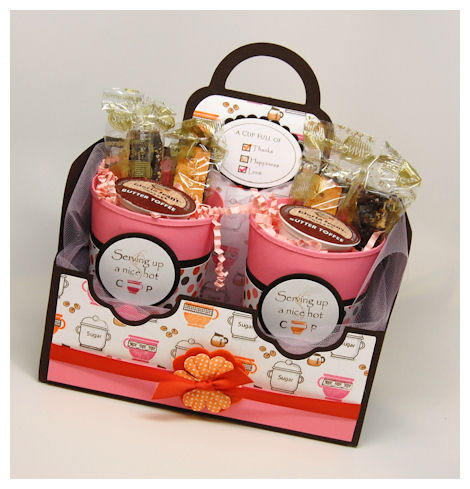
Serving up a nice hot cup
This is ALL My Time Made Easy ™ LLC!! All products will be available Oct 1st
Is this not an amazing gift presentation, with limitless possibilities?!!! The colors were inspired by my favorite coffee company, Dunkin Donuts.
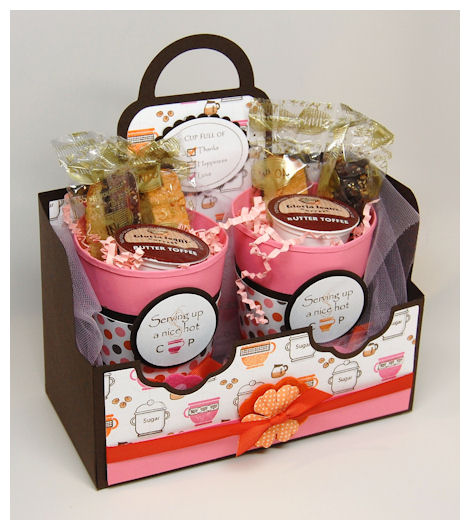
There is PLENTY of room to stuff this with all sorts of goodness, and it could also be resized. I made this one from a chocolate cardstock, and accented it with my own hand-stamped “patterned paper”.
So let me share some template info first.
Fancy a Cuppa? Template $5
7 3/4 Wide 4 Inches Deep
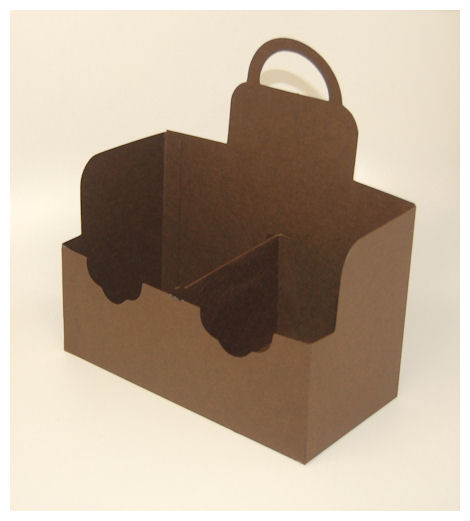
This is the unfinished version. Divider insert is optional.
This template is quite versatile. It can be used as it was designed, to coordinate with the To Go! template. But, it can also be used to hold a variety of other amazing treats too! The possibilities are truly endless. To Go! cups, or when adhered back to back, it can hold 4 of these To Go! cups. HOW FUN?!
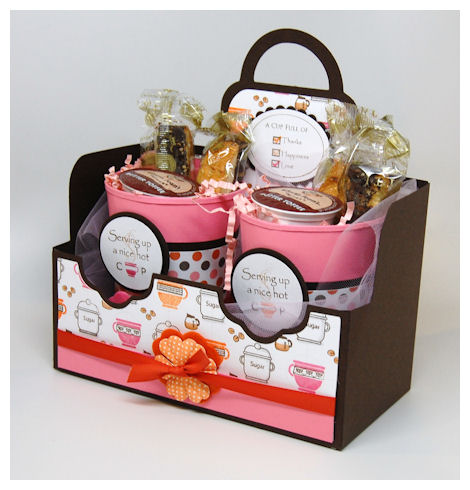
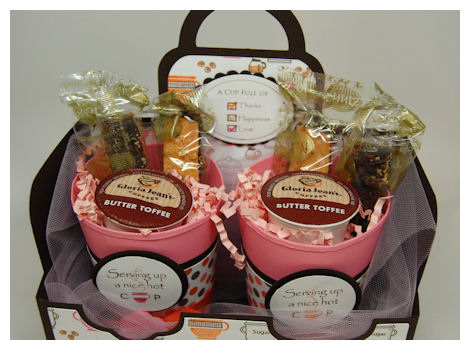
Biscotti is 0.25 cents each, and the K Cups are 0.19 cents each. The cost of this gift is $1.76, but was made to seems so much more expensive 😀
Here is the cup/carrier front close-up.

My cup decor lets the receiver know just what to expect! I love this sentiment from the Grab a Cup Sentiment set. I love that the cup makes the “u” in the word “cup”.
I have to say I LOVE this template combination.
Here I used the Fancy a Cuppa? (the cup carrier) with the Grab a Cup (the 3 D travel like cup).
Yes!! That pink cup is a NEW! Pretty Packaging template called Grab a Cup , designed to fit perfectly within the Fancy a Cuppa? template, or used alone. It even has a warmer wrap to go with it.
This template makes your very own cup, or can even be used to WRAP/Cover a 12 oz. coffee cup. As I will repeat below.
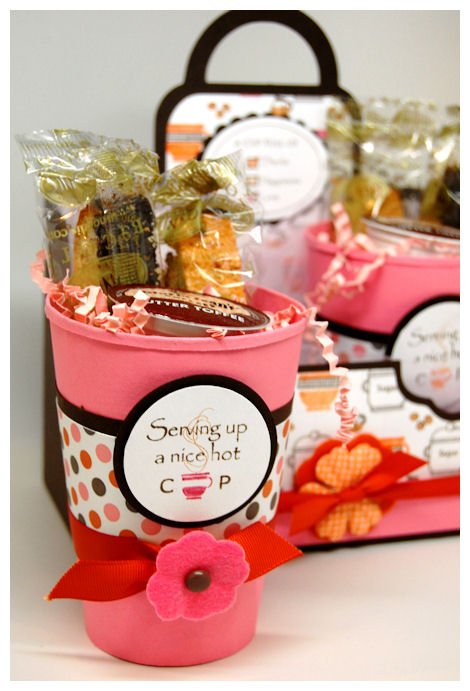
I made my template from a regal rose cardstock. Quick & easy. As I said above I used the Grab a Cup Sentiment set for my cup design. I added the steam from th Grab a Cup set.
This is a (STURDY) 12 oz size cup, all from cardstock, and it fits the 12 oz coffee lids you can purchase!! Read on.
This template fits the lids of those 12 oz. To Go! cups that you can purchase at the store, or will want to save from your latest hot beverage purchase! To Go! cup that is perfect on its own, but we stepped it up a notch by having it fit the lids. Fancy a Cuppa © Template! The template can perfectly hold 2 of these To Go! cups, or when adhered back to back, it can hold 4 of these To Go! cups. Grab a Cup ©, Grab a Cup Sentiments ©, Fancy a Cuppa ©, Fancy a Cuppa Add On © , and the A Spot of Tea © stamp sets!
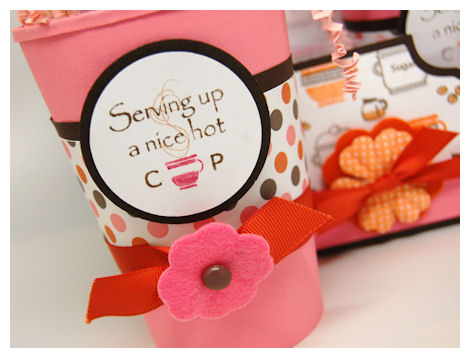
I cut my “warmer sleeve” using the polka dot patterned paper from the Shutt-erfly collection!
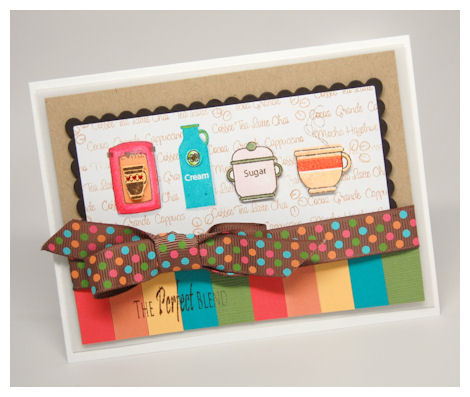
Here is a close up view of the pattern that I created using the 2 solid cup images (and cup border stamps) with the sugar jar, coffee beans from the Grab a Cup set, and the little cute coffee pot from the Sign It set!!

Wait until you see this set. It was such a quick and cute pattern to make!! I did color in some “shadowing”.
Now for my tag!!

On this I combined the “A Cup Full Of”, “Thanks”, “Happiness” and “Love” sentiments from the Grab a Cup Sentiment set, with the boxes and check marks from Fancy a Cuppa? set. I used my oval nestabilities for the label, and trimed around the inside of my frame.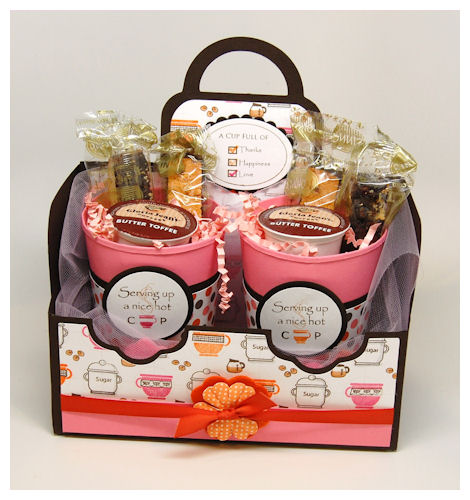
Pretty Impressions Stamp Set: Grab a Cup, Grab a Cup Sentiments, Fancy a Cuppa?, Sign It
Pretty Printable Digital Paper: Shutt-erfly Collection
Now how about the info on the NEW! Grab a Cup & Sentiments sets?
There are several cups with additional items that allow you to create your own unique cup each and every time!

Cup size is: 3/4 inch tall X almost 1 inch wide. There are both open & solid images
Creamer is: 1 1/4 inch tall
Sugar bowl is: almost 1 inch tall by almost 1 inch wide
Coffee maker image is 1 3/4 inch tall
The sentiments read:
Coffee (a large and small version of the sentiment)
Soup
Cocoa
Tea
Sugar
This set features a sentiment that reads: “Let’s grab a C_P” the “U” in the word CUP is missing, so that you can put one of the coffee cup images in its place!
You will also see a hot beverage sentiment block that allows you to easily make your own patterned background!
Beverages listed are: Coffee, Tea, Latte, Chai, Cocoa, Grande, Cappuccino, Mocha, and Hazelnut
Grab a Cup Sentiments set too! Or the Fancy a Cuppa and Fancy a Cuppa Add Ons! For the total tea lover you may want to view our A Spot of Tea set! Grab a Cup, Oh K Dokey, To Go!, Fancy a Cuppa, and of course our Pretty Printables digital papers!
let’s get together and
grab a cup!
Serving up
a nice hot
C_ P
Warmest Wishes
Miss you a latte
Made with Love
friend
You are a tea-riffic
Happiness
Love
Stir, Sip and Enjoy!
May your cup overflow
with love and happiness
Just expressing my thanks
You sweeten my day!
Well the kids are in school, and already got nasty colds! SHOCKING! LOL!
How is your September going? Can you believe we are almost MID month?! Goodness gracious.
Wow is this ever a crazy time of year! I know once mid August hits (usually Amber’s birthday week) I go pretty crazy from then until January, and that was before I started my own company, so it will be even more so! Time just FLIES.
Anyway, just wanted to pop in quick with a card I made using the On Display 1 set., and some of the coordinating paper!
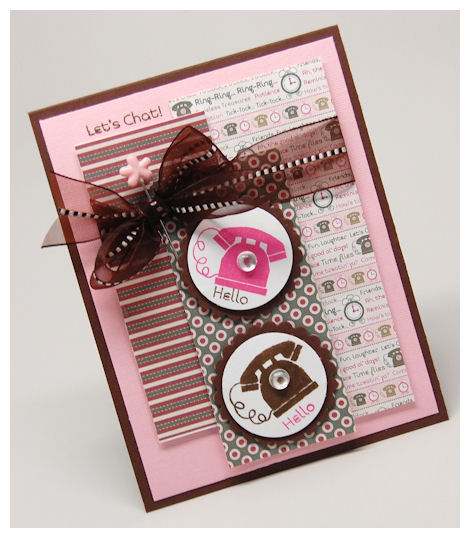
The paper was a mix of patterns-something I love doing 😀
I used the Pretty Printables: Cherry on Top and Sweet & Sour Sweethearts Paper bag
I love telephone images. I am a “talker”, not a text-er! LOL! The two sentiments “Let’s Chat!, and Hello are perfect for this.
I have a few friends I don’t talk to nearly as much as I would like these days, so I’m sending a few of these out, to let them know, I AM here, just been crazy busy. As I’ve said juggling things isn’t always easy….and sometimes other things fall to the back-burner, and that has been some of my dear friends.
So I hope this lets them know I’m thinking of them today.

I love these little phones. I added a dew drop to the center of the phone, to make it 3D
I used a blending paper on the chocolate phone, so my ink bled a little :C I won’t use that again unless I am coloring!
Supplies from My Time Made Easy ™ LLC
Pretty Impressions Stamp Set: On Display 1
Pretty Printable Digital Paper: Cherry on Top and Sweet & Sour Sweethearts Paper bag
Thanks for stopping by!
I hope you have a great week!
Group post today!
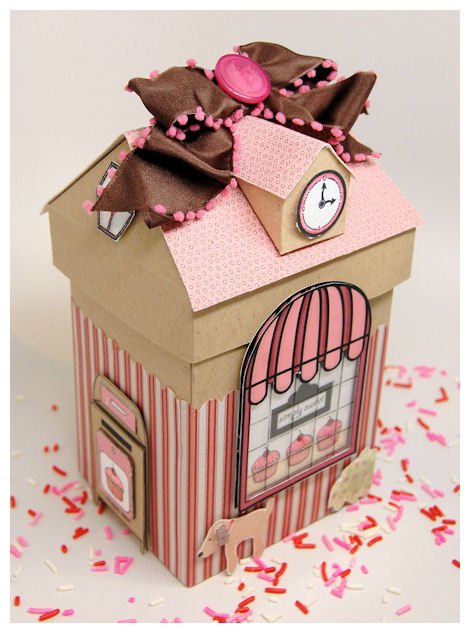
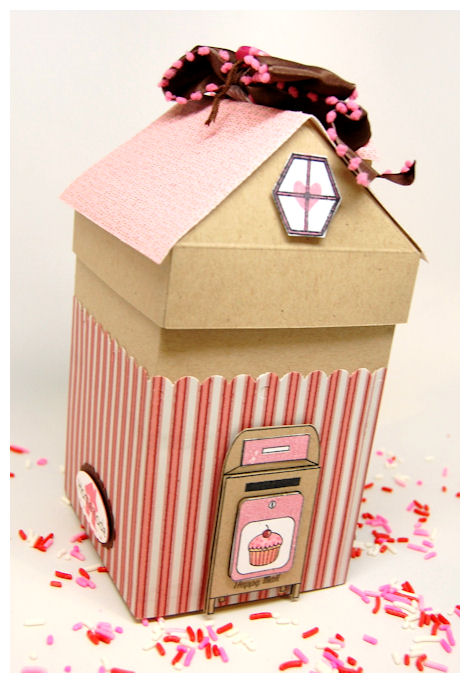
Sep 8, 2010 Author: mytime | Filed under: Cards, Home decor/3-D items, My Time Made EasyWell today is the last of our “official” September Release projects.
By now you’ve seen well over 32 ideas/possibilities for using the NEW! Shop Around & Accessories Mega Template in coordination with our 4 NEW! Stamp Sets *also available in digital*: Home Improvement, Shoppe Window, On Display 1, and Sign it!
Today we all have MORE ideas using these great stamps so I hope you will HOP around.
I of course, have a matching set!
This used the NEW! Shop Around & Accessories Mega Template, along with the coordinating Homemade Card & Envelope Cut File
Fashioned after my own home (minus the purple flowers)
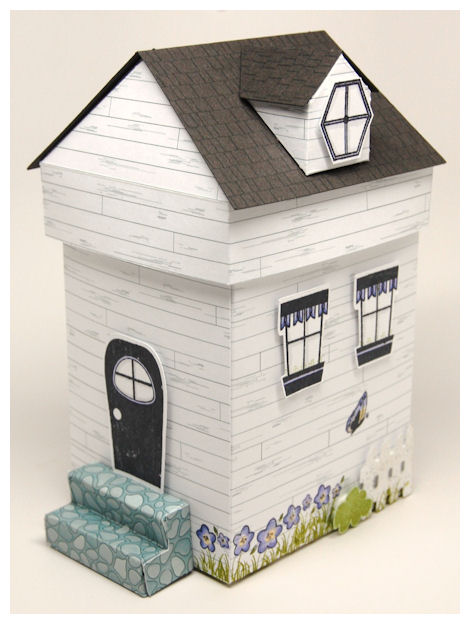
My house is white with black shutters.
I made this as a gift to my Realtor. I’m certain I am driving her insane, and I’m praying this will be a replica of the next house she SELLS! HA!HA!HA!HA! A girl can dream right?!
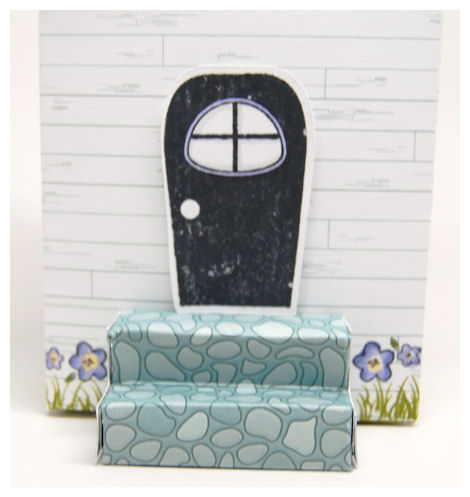
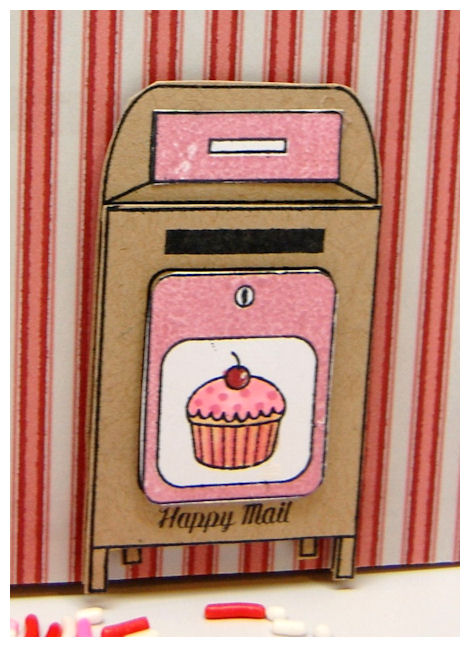
For my house I used the door, windows, curtains, flowers, grass, mailbox,and bush images from the Home Improvement set! The butterfly you see if from Tending the Garden set.
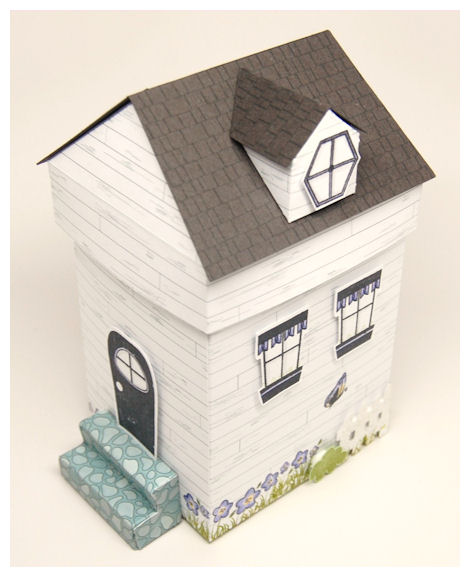
I used the Custom Construction Materialsfor my “vinyl siding” and my “wood shingles” on my roof. The look like architectural shingles I have on my home now.
I then used the Construction Materials for my 3 D stairs.
It is great when you are in a rush and want a colored in pattern, already done.
My door, and windows were all cut out using the Home Improvement: Coordinating Cuts file
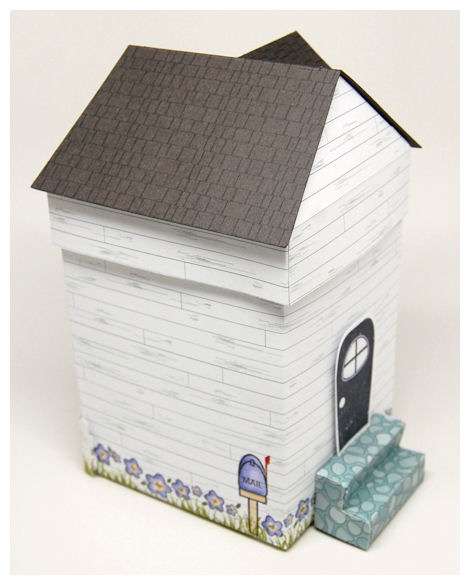
Here is the side with the mailbox. You can see I stamped the grass all around the bottom, and colored my flowers.
TIP: Do all this prior to assembling your house
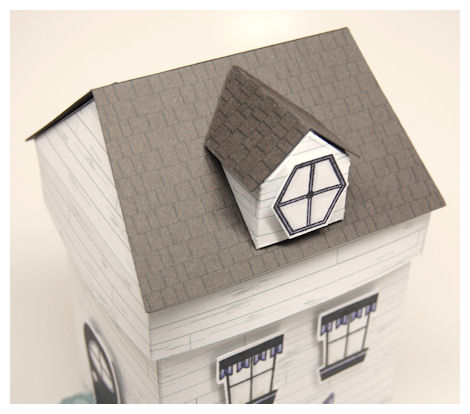
Now we go around to the back
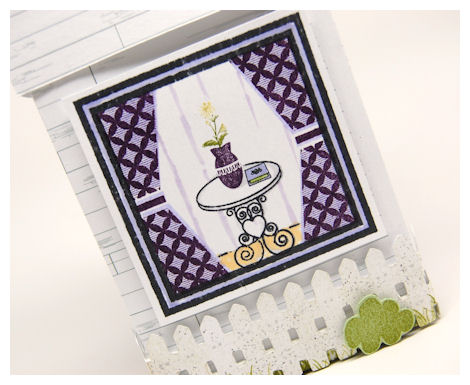
You may be confused…..you recognize the window, and the curtains (which I stamped the solid curtain in amethyst, and the patterned one over it, in eggplant), but WHERE is that table, and vase from??
Well that is a little peek, that I couldn’t resist sharing. More on this one next month!!
Anyway, I drew in my carpet and wall paper.
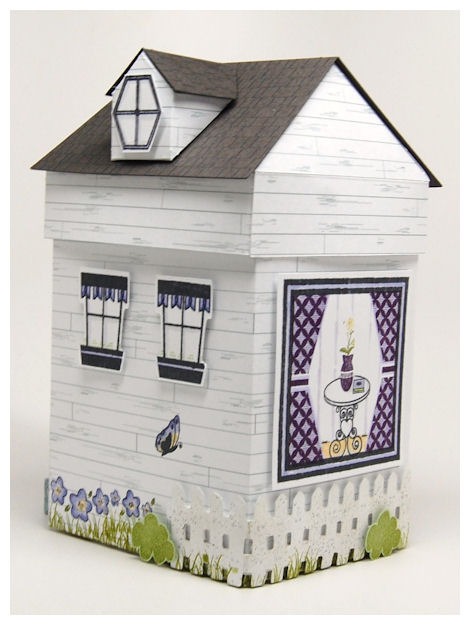
Notice the fence along the house….that was made using the fence from the Home Improvement: Coordinating Cuts file! I just welding a bunch of the fence image together! I stamped the wood-grain pattern on the fence, and even used a silver pen to mock the look of “nails” in the fence.
I used the same Home Improvement: Coordinating Cuts file for the little shrub. It can also be a cute cloud.
Now how about that card?
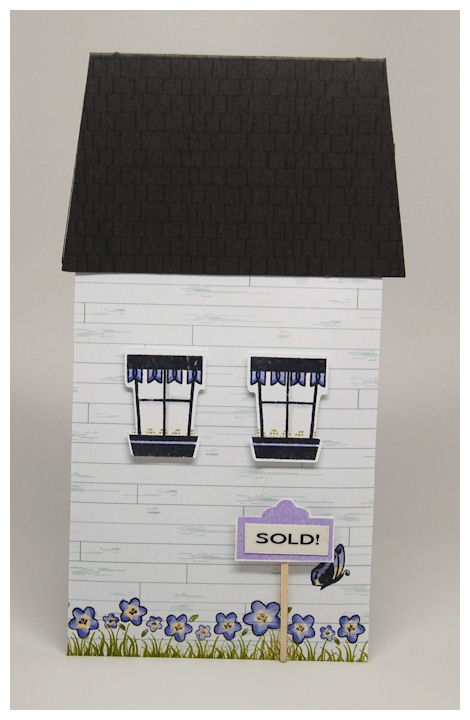
I used the coordinating Homemade Card & Envelope Cut File for this. It really makes the coordination of the card so much more fun and easy!
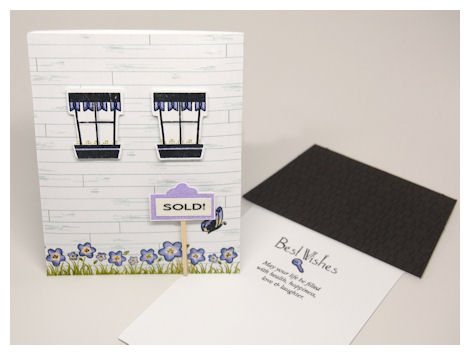
I decorated this to look *just* like the side of my house (above), because that is the side that faces the street. Our door is facing our driveway, which runs along side of the house. Currently there is a big’ole FOR SALE sign sitting in our yard, and I’m hoping that will soon be replaced with this SOLD sign instead!
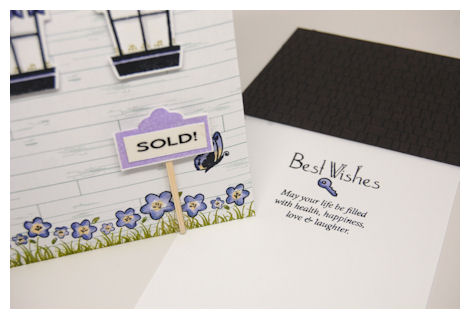
I used my label maker and the boutique sign from the Shoppe Window set. The key image is from the Sign It set. I loved having that as part of this collection! The Best Wishes with verse is from the ever popular So Sentimental set.
Can’t you see Realtors giving these out to their clients?!
If my house sells before Christmas I will make my Realtor a bunch of these 😀
Pray for us that happens quickly! I have a house I dream about but we can’t make any moves until someone wants our home.
Supplies from My Time Made Easy ™ LLCPretty Packaging Templates: Shop Around & Accessories Mega Template
Pretty Impressions Stamp Set: Home Improvement, Shoppe Window, Sign It, So Sentimental, Tending the Garden
Pretty Printable Digital Paper: Constructions Materials, Custom Constructions Materials
Pretty Pieces Cut File: Home Improvement Coordinating Cuts, Homemade Card & Envelope
Stop by tomorrow as I share who our NEW! Guest Designers will be over the next 3 months. In the meantime you can still apply for a permanent team position 😀 See our ad —> here
For Permanent Design Team: Deadline Sept 20th
Thanks for stopping by all this week. I have a few more porjects I will share, here and there as the days move forward. I’m already gearing up for October! LOL!
See you tomorrow.
Video: How to use Simply Sensational Shoppe Digital Paper
Sep 7, 2010 Author: mytime | Filed under: Cards, Home decor/3-D items, My Time Made Easy, MYTIME MOVIE/VIDEOs, Tutorials, videosI am hoping you all get some creative time in today 😀
I’ve been quite busy here.
As promised I have a video tutorial for you today, so I can show you how easy it really is to utilize the Simply Sensational Shoppe Digital Paper. This collection was created specifically to be used with our NEW! Shop Around & Accessories Mega Template. The paper package features 10 different complete Shoppe designs in both a PNG and JPEG format.
You will want to grab a cup of your favorite beverage, and really take the time to view the video I have to share today, and read the post.
Kristin Bueter has a card to share today!
Also your newest design team member: Lisa Kind has her first solo Release project to share today too!
Here is what she says about her peek today
“A teacher I work with just got married in August and our team wanted to get her a gift card, and we needed something to present the gift in. I decided to make a wedding/bakery shoppe using the Shop Around Mega Template in her wedding colors. She wore an ivory gown with a pretty blue sash, so I went with those colors.”
—
Onto the videos!
This crazy 2 part series took almost 4 days between creating, attempting to download, then having to retake the videos, so I could create 2 separate NEW videos. Anyway, if it helps or inspires you I’d love to know that it was worth the effort. I feel like I never want to do another video again at this point! LOL!
Video Part 1
Video Part 2
In this video I will have showed you how to use this amazing Simply Sensational Shoppe Digital Paper, and I will answer some popular questions about the paper pack in my video.
This video will explain:
* the difference between a PNG and JPEG format, and how each is used.
* Why there are dual colors in the paper images, and how to change them.
* How to use your digital image in coordination with your digital stamp images and/or other patterned papers!
* How to cover/remove unwanted pieces
* How to use your favorite patterned papers to add those same colors to your design Simply Sensational Shoppe Digital Paper
There *may* be an additional tip or two I am forgetting to mention, but you will know everything after watching the video.
Now how about sharing my samples?!
There are so many amazing possibilities when you purchase this pack! I will show you just some ideas for how it can be used, so if you
You can mix and match Shoppe elements, digitally color them in, and save for future use, OR use them in black and white, so you can hand color! (a great project for the kids) You can even use our Digital version of our Pretty Impressions images to further add some designs to this paper collection. OR use the Digital versions to make you own.
This template & digital paper combination is sure to allow you to QUICKLY and EASILY make these stunning themed Gift Shoppe for any occasion, all year long!
We are happy to say we are going to offer even more Shoppe themes in the way of stamps and digital papers, as the holidays come around, and may even add a few must have “accessories” to the NEW! Shop Around & Accessories Mega Template! So stay tuned.
So that lead me to the projects featured in my video!
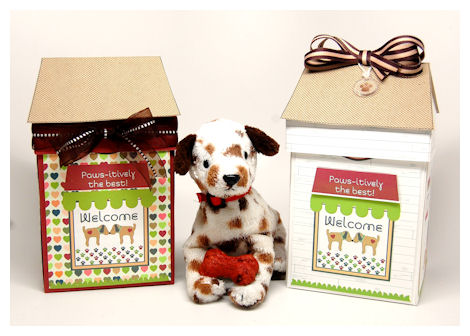
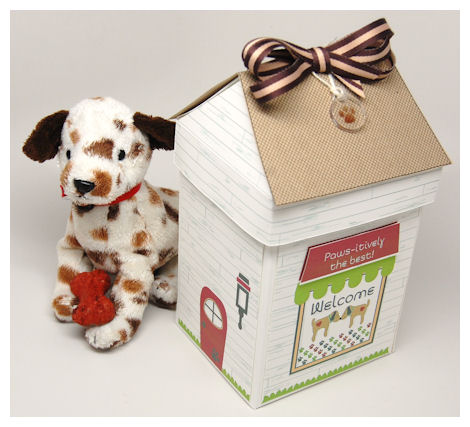
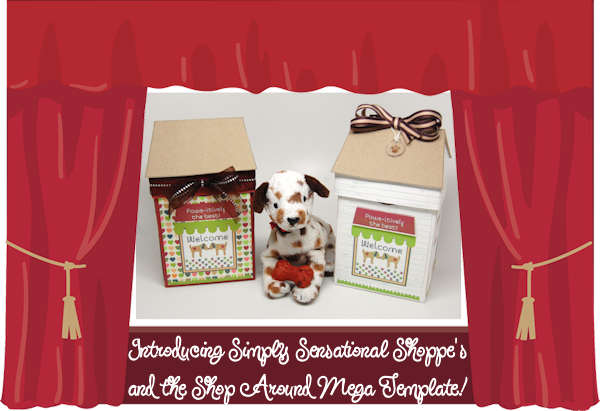
Aren’t these the CUTEST Pet Shoppe boxes ever?
Amber’s friend got a BAD case of poison ivy, and she bought her this little dog to cheer her up! Of course we had to create a home for it, so we made these. (I had to make two because Amber then got mad her friend was getting one, and she wasn’t :C)
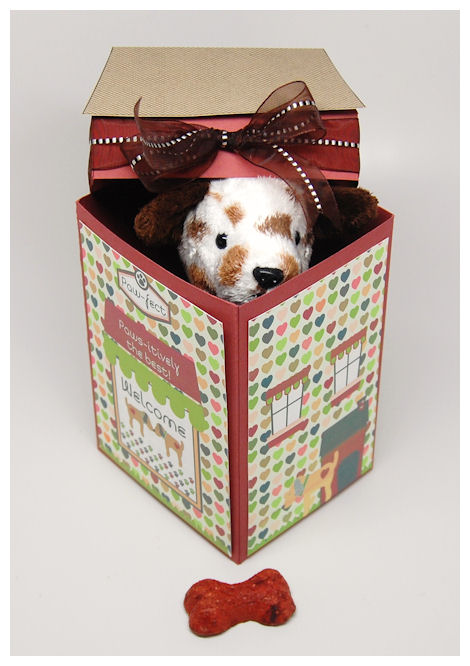
SO this is the lil’ pup that her friend will receive. If I were a child getting this I would have been over the moon!!
As you can see each Shoppe theme comes with 4 decorative panels for all 4 sides of your Shoppe to be designed.
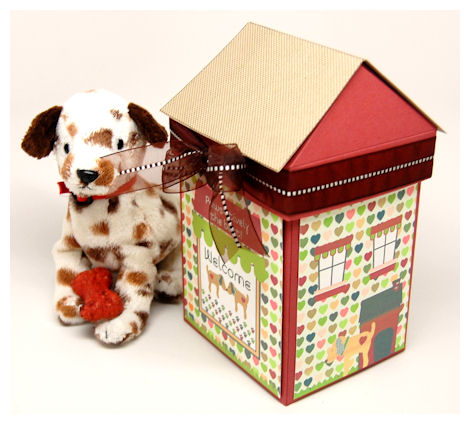
As seen in the video, I customized mine even further! Added a dog house with the dog, on this side.
Paw print on the door here. Flowers in my flower-box!

All around this is simply cute!
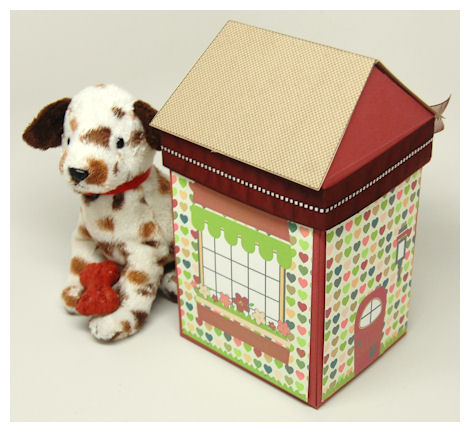
Now I took this same design, and layered it over the Custom Construction Materials instead.
On this one I made the top of my awning 3D
This is the back/other side
ALL the same design, just layered onto a different background! It makes it look like a whole NEW! house!
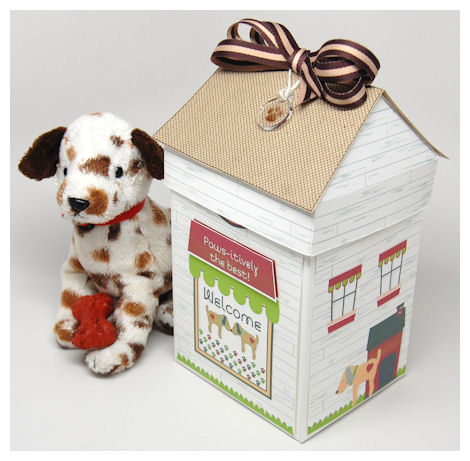
Now I should share the card that inspired my Pet Shoppe themed gift!
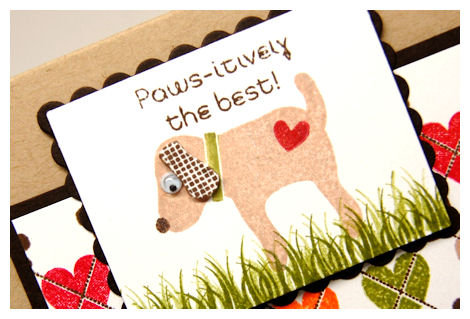
Paws-itively the best!
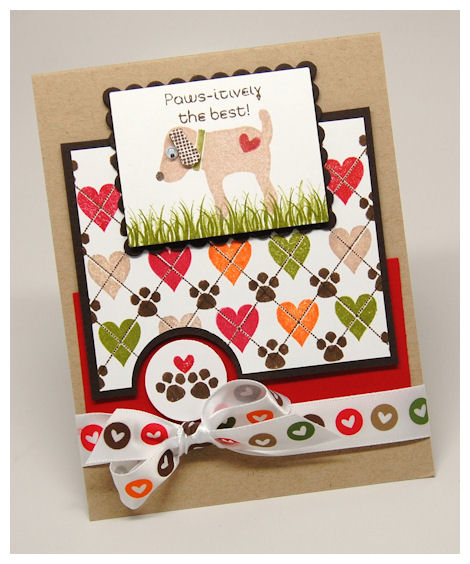
The dog image is from the On Display 1 set, and was stamped in a shimmery beige ink. I then stamped the grass from Home Improvement. The addition of the heart on the dog bottom is from Bringing Home Baby.
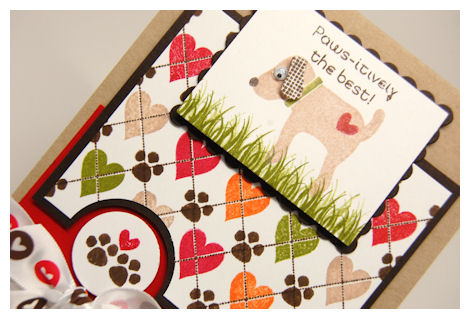
I made my own patterned paper using the paw prints are from the Sign It Set, and the heart/argyle pattern I created using the Argyle Amazement set! SUPER SIMPLE, and SUPER CUTE huh?
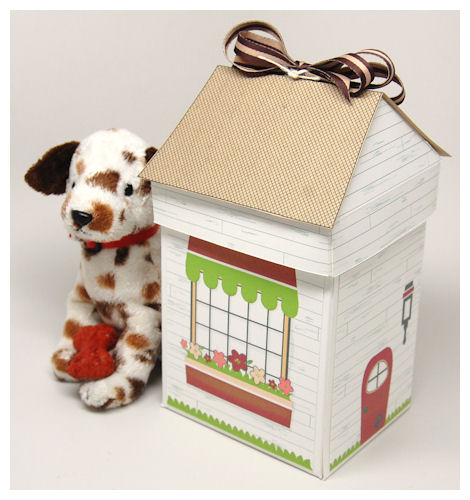
I love the little dog in this set. It was actually designed after the lil dog shaped colorful purse my daughter Amber carried around!
I loved the silhouette so much that I drew this one for me to have in stamp format 😀
As you can see I stamped colored and cut the ear, and put it on a dimensional. I added a googlie eye too. The dog nose was stamped using the dot image from the Argyle Amazement set!
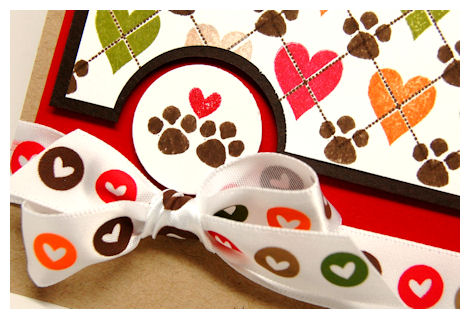
I love the little paw prints I stamped at the bottom adding the little heart that is also on the dog 😀 This ribbon actually inspired this entire creation.
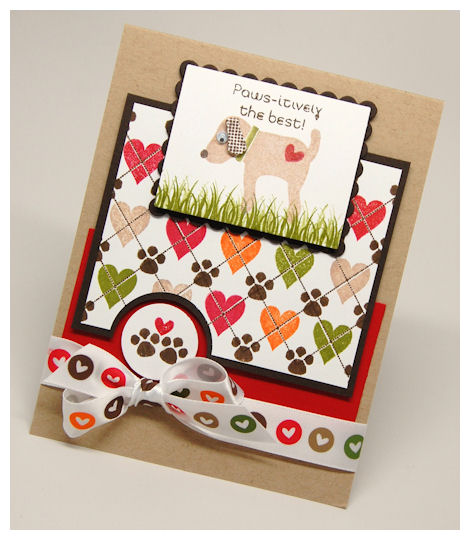
Supplies from My Time Made Easy ™ LLC
Pretty Packaging Templates: Shop Around & Accessories Mega Template
Pretty Impressions Stamp Set: Digital version of Sign It, On Display 1, Home Improvement Stamp version: On Display 1, Argyle Amazement, Bringing Home Baby, Home Improvement
Pretty Printable Digital Paper: Simply Sensational Shoppe, Custom Construction Materials, Cute Critters: Multi Hearts (color changed)
I hope this video was helpful and the projects inspired you to try your own! Don’t be afraid to try something NEW! It can be so fun and rewarding!!!!
I’ll be back tomorrow with even more projects and ideas as the team and I share a group post!
So Simply Sweet
Sep 6, 2010 Author: mytime | Filed under: Cards, family stuff, Home decor/3-D items, My Time Made EasyWell its back to the hustle and bustle of the regular work week.
If you haven’t be sure you submit your projects for our Guest Designer Contest! We are also looking for 2 permanent team members. See our AD on SCS for details! –> HERE!
Did you have an enjoyable holiday? Feels like summer is officially over once Labor Day comes and goes.
Today I’m feeling sentimental and a bit long winded. So bear with me here!
Today you will want to visit Tracey Cuccia for a super sweet project.

Here is what Tracey has to say.
“Here in NY, it’s back to school time. In fact, today is my daughter’s first day back. I started last year, getting her a little ‘something’ to start off the school year. A treat just for her…now to most it may not be a big deal, but she loves all sorts of yummy smelling goodies, so I got her a thing or two to take to school, and some for use at home…see how I packaged them up to mark this special day…”
Make sure you stop by to visit Tracey
The kids are back at school, ALL full time, and I can’t even believe how much I can accomplish with a 6 hour block of time. My house is spotless and I’m creating up a storm! Next month’s release will be HUMONGOUS, because my mojo is in FULL SPEED AHEAD. I really start gearing up for the holidays once the 2nd week of September comes.
The kids (Noah & Amber) started Soccer season, and Alexa is starting dance class again. She use to dance a log time ago, but once she got Cancer, that came to an end. She is finally feeling better enough to start again.
I haven’t posted photos in a while….so here you go!
Alexa Grade 4
Age: 10 (almost 11)

My miracle. I can never get over how amazing she is, and her personal growth in all areas, year after year! She is not a baby anymore. It is hard to try and remember that.
Noah 2nd Grade
Age: 7

He looks *just* like his dad. He is becoming quite sweet & charming. SO tall too.
Amber 1st Grade
Age: 6

My baby. Enough said.
Amber also got glasses this summer…..

I think she looks REALLY cute in them, even if she hates them.
How time flies! All 3 of my “babies” off to school. Soon it will be college, then their own apartments. I tear up at the thought.
I took them to the park yesterday, and as I watched them play, I tried to burn that memory into my head. My children, still young enough and full of innocence, yet old enough to be independent in so many ways. I want to remember the images of them running through the park, trying to do the monkey bard, and sliding down the slides. I want to remember their little dirty faces, and thier little voices. I want to remember the energy and excitement they have, the sounds of their laughter. I sat there watching, and remembering when they couldn’t play in the park with out the help of my hand, or a push on the swings. Now every now and again I get a glance over the shoulder, and a smile with a wave! Or a look at me! Oh how I cherish those days.
So as I try to settle back into a routine, which is new to me, with the quiet that come with the week, I am hoping to re-do my special video tutorial. Its been absolutely crazy here this week, as I am sure you can all relate. I have SOOOO much I want to get done, and am hoping I can actually achieve all I have on my to do list this week.
OK, sorry about getting side tracked!
How about a SWEET project?
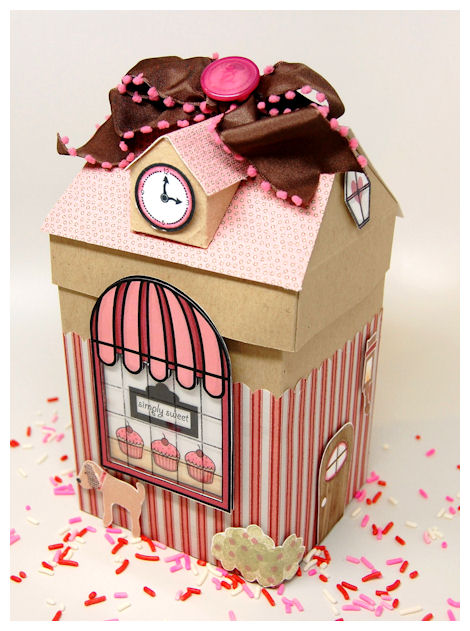
Now use your imagination……I used the Shop Around Mega Template, to create a Cupcake Themed Sweet Shoppe.
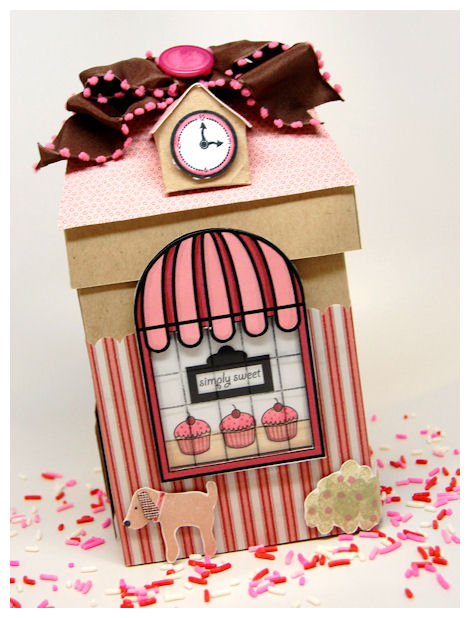
Now I say use your imagination because this was designed to look just like a CUPCAKE. When I showed my husband he said’ That’s suppose to be a what? Its doesn’t looke LIKE a cupcake, but it IS cute.”. SO he didn’t see the cupcake idea at all. So use your imagination. My kids “got it”. Oh well!
So, while I failed miserable at that, I still think its’ adorable. Here is how I tried to get it to look like a cupcake……

See my base of the Shop Around Mega Template was made from Kraft (to be like a chocolate cupcake-without the overpowering brown of a chocolate cardstock), and then I used the Picket Fence paperto print my pattern on some vellum cardstock to imitate the look of a cupcake wrapper, complete with scalloped border.
For my roof…..again going with the CUPCAKE theme, I printed the polka-dot pattern from the Shopping Shirley’s Candied Thistlestalk collection. onto CANVAS cardstock. Yes it looks and feels like canvas! I wanted some obvious “texture” for my “frosted with sprinkles” look.
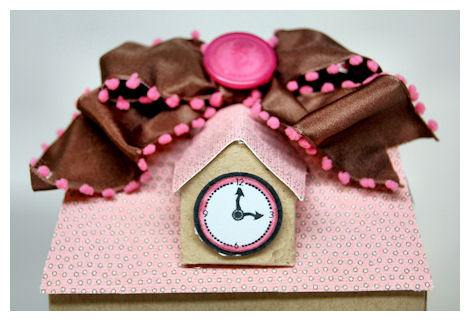
I added the bow-with a Button to imitate a cherry on top! You can’t really see it, but I used some embroidery floss to even make a “stem”.
In the Pop Up Window I used the face of the clock image (punched out with a inch circle punch) from the On Display 1 set so it looked like a real Shoppe with the clock at the top! I think its a super cute option instead of a window!
Anyway……my Shoppe Window is of course 3 D! I stamped the window panes on a acetate layer for the realistic look of an actual Shoppe window.
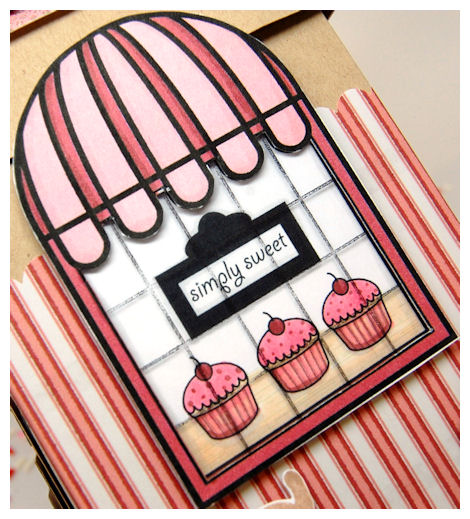
As you see IN the window I have my Shoppe Counter (made using the wood grain image from Home Improvement), where I stamped 3 cupcakes from the On Display 1 set, and colored them to match.
My Boutique sign has the sentiment “simply sweet” instead of the “boutique. That was done with the digital version of Shoppe Window & the On Display 1 set.

For some more details I stamped colored and cut out the dog from On Display 1 .
Now my lil’ bushel in the corner was created my stamping the smaller bush image from the Home Improvement, multiple times, then using the solid gumball iamge from On Display 1, as my “flower/berry” buds.
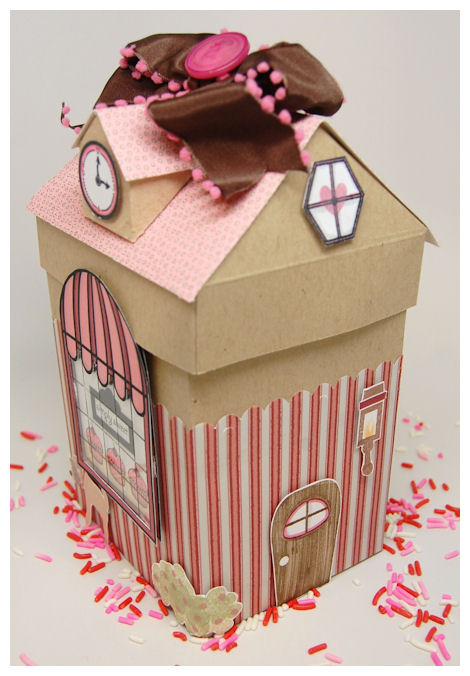
The right side of my box had the Shoppe door from Home Improvement.

I made sure I DRAGGED my ink across the door so it appeared to be a woodgrain pattern. I stamped/colored/cut the lantern.
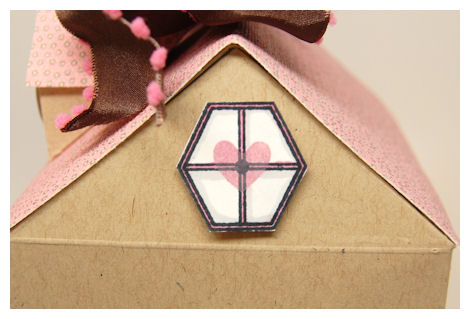
In the “attic” windows I stamped a heart from You’ve Got Mail stamp set. I love that little touch!
On the left side of my Shoppe I used the main image from the You’ve Got Mail stamp set!!
I just used that same cute cupcake from the On Display 1 set on my mailbox! It personalized it even further, and I think it’s a super cute addition to this template.
Now for the back.
The simplest part, but it may be my favorite! LOL!

I just stamped my Homemade sentiment from the Sign It set, and back to the You’ve Got Mail stamp set, I used the little house image to create my label! I love it. Sometimes its the little details that make a BIG deal.
I love using older sets with newer ones! If there is anything I can tell you it is to ALWAYS go back and try to mix, match and coordinate! It feels great! You really feel like you got your monies worth. I was even thinking that this could be SUPER SWEET as a Jam/Jelly Shoppe using the Well Preserved set, for wrapping your jams and jellies, or fruit flavored/scented/themed gifts! Basically ANY older image set would be a great Shoppe!!!!!!
When I say this Shop Around Mega Template had limitless possibilities I MEAN IT!
If you are tight on time check out our super cute Simply Sensational Shoppes! They are amazing. You can quickly and easily color, print, and cut. Perfect for mass producing gifts too.
Video coming SOON!!!
Supplies from My Time Made Easy ™ LLCPretty Packaging Templates: Shop Around Mega Template
Pretty Impressions Stamp Set (digital & acrylic): Shope Window, On Display 1, Sign it, Home Improvement, You’ve Got Mail
Pretty Printable Digital Paper: Shopping Shirley’s, Picket Fence
Pretty Pieces Cut File: Home ImprovementWell thank you again for stopping by!
I hope you are feeling inspired to create your own little “homes” or a village of Shoppes for gift this upcoming holiday season. You really can’t BUY the feelings these will give to those you make them for!
See you again tomorrow.
OK I know it seems like Im slackin here, but I’ve honestly been hard at work on my video. After almost 3 days, I am throwing in the perpetual towel and need to totally re-record the video into several segments :C That means I have to wait until Tuesday when my children return to school, otherwise you’ll hear lots of “Mom!! She won’t share with me!”, “It’s my turn!”, “That’s not fair!”, Can I have a snack?”, “He’s copying me!”……you get the idea!
This whole video drama totally sucked up my life ,on top of me getting ready for our NEXT release, and of course doing the “family” thing this holiday weekend. So once again I’m keepin it sweet & simple, until I get the rest of my projects completed.
But hey, you can never have too many card ideas right??
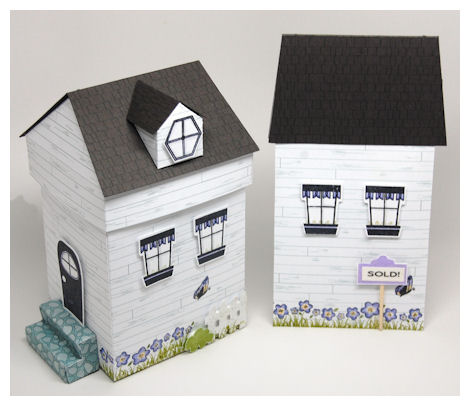
So for an amazing template project please check out Lesa Rapp
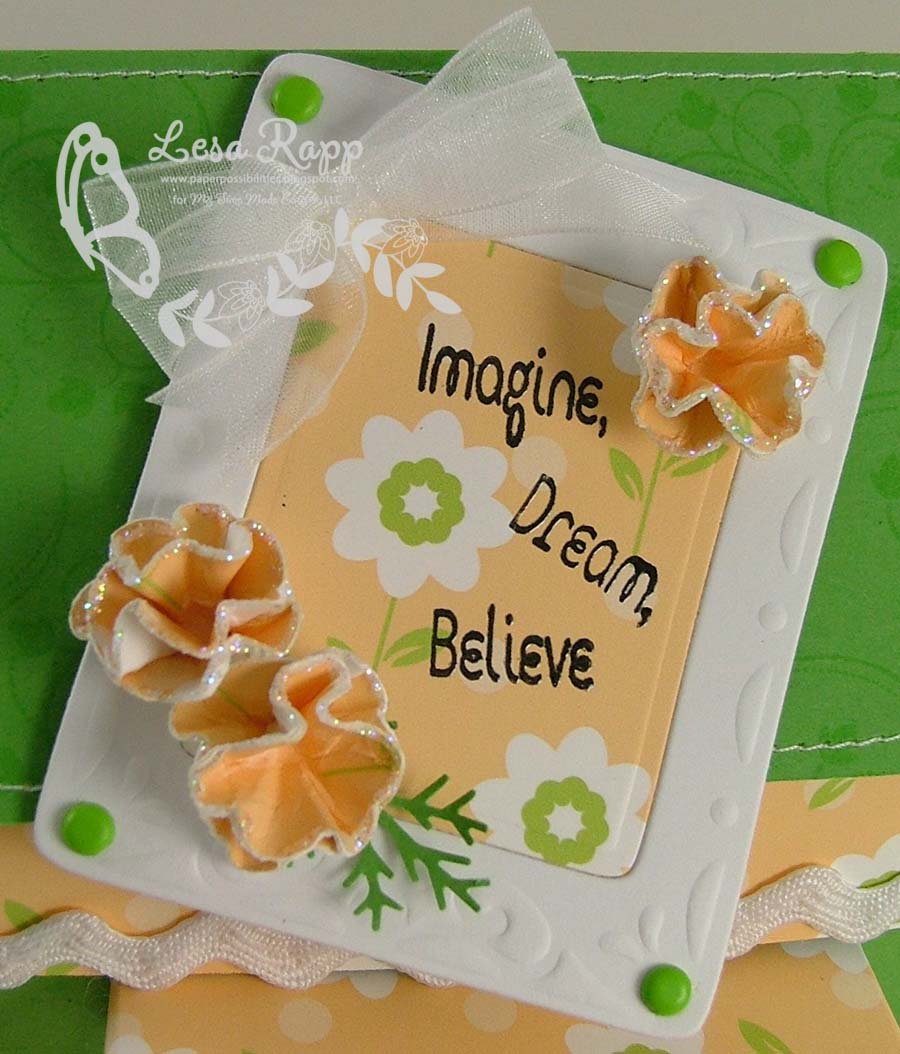 <—Click to enlarge
Here is what Lesa has to say
The super cute digital paper was the jumping point for this fun little house. Lesa took the colors and ran with it. She had a wonderful time imagining what it would be like to have a cute house like this. OK my turn to share!
My FAVORITE coffee is Dunkin Donuts. I have one daily (I buy the grounds and brew it in my Keurig —->HEAVEN!) So I got totally inspired by their color combination of pink, pumpkin & chocolate for my card creation.
You Perk Me Up!-
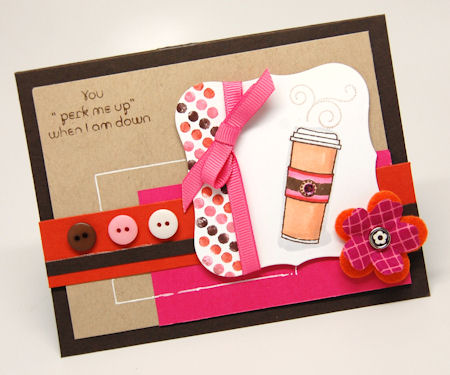
I LOVE Coffee! LOVE! So of course it was inevitable that I would have a “to go” coffee cup! I LOVE this image from On Disply 1 to pieces. Its a super cute size too-measures 1 3/4 inches tall.
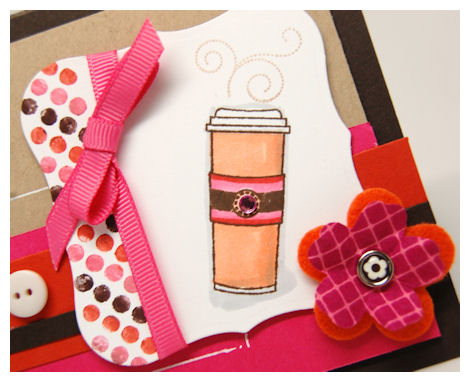
Here I used that Fanciful Flourishes set, in a beige ink for my “steam”.
The polka dot border was created using the dotted border image from Home Improvement for that.
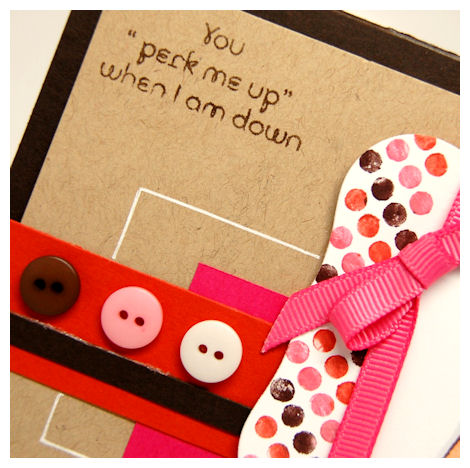
Here is my sentiment close-up! It is also from the On Disply 1 set.
I drew an outlined layer, since I wanted an additional LOOK of a layer, but not the actual bulk of it.

Doesn’t it make you want to grab a cup?
I love the layout if this one too.
Supplies from My Time Made Easy ™ LLC
Pretty Impressions Stamp Set: On Display 1, Home Improvement, Fanciful FlourishesOK I must “run”! I do have some pretty amazing stuff to share, I promise. I just need to get it together for you. I really want/need to get that video done, so expect that for Wednesday-ish. MAYBE Thursday.
So come on back tomorrow because we aren’t done sharing some amazing project ideas with you.
Till then.
Sadly my video is STILL a bust. It took all day/night to load, and as I type this its very late. Im not sure if it will actually properly load and save, but I am certainly praying. I held off till the last minute to type this up, just in case! So keep those fingers crossed.
Anyway, maybe hopefully tomorrow it will be ready to post! Who’d of thunk that a 20 minute video would take 2 days to process! Ridiculous!
TodayPam Imholz has a wonderful project for you! So don’t miss it 😀 I’m still making projects to share, so who knows what else is up my sleeve.
Today my focus is going to be on the Homemade Card & Envelope Cut file.
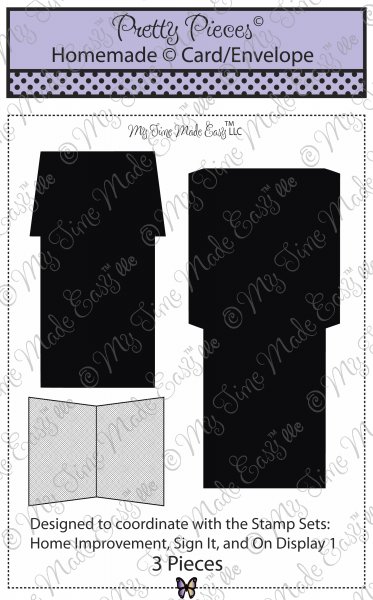
Available in PDF, SVG, GSD, DXF, WPC
Completed Project Size
- 4 1/2 Inches Wide
- 7 3/4 Inches Tall
Fashioned after the Shop Around © Template, this coordinating cut file is a super sweet and rather large Shop/House shaped card & envelope file, that was created so you can further utilize the images from Home Improvement ©, Shoppe Window ©, On Display 1©, and Sign It © stamp sets.
How cute and perfect would this be for:
Holiday card from your family-feature a photo inside!
a special themed party (be it birthday, brunch/lunch/dinner, little girls invite)
welcome to the neighborhood
new home
bringing home baby
bridal shower
open house
school /store/shop themed gift card holder
home Improvement
moving/just moved
House warming card or invite
or other card/invitation?!
No matter what the occasion, just the fact that this card is homemade, is sure to grab the admiration and attention of the receiver, no matter what the occasion!
This time the occasion is a birthday celebration!

This card is SO super cute-really. You can’t go wrong with pink & black-ever!
Think PARTY!
I love this cake image from On Display 1©!! Its so perfect for so many occasions.
Wedding, Bridal Shower, Bachelorette, Anniversary, or Birthday. Basically ANY party, where you *may* have a cake and this is the perfect “Shoppe” shaped card invitation for you.
I used the Shoppe Window ©, set as the main focus of this Shoppe.
I stamped the sign from Sign It ©, in black ink, and colored the open line of the label with a pink Copic marker.
The sign was cut using the Home Improvement Cut File.

The flower is also from the Sign It © set, and it matches the roses on my cake!
Note the roof of my template was made scalloped by adding/welding the Border Builders Open Scallop to the bottom of my roof pattern
The “Party Time” sentiment is perfect for *any* party, but it is yet another sentiment that can be used with the Clock image from On Display 1©! Now how fun would that be?
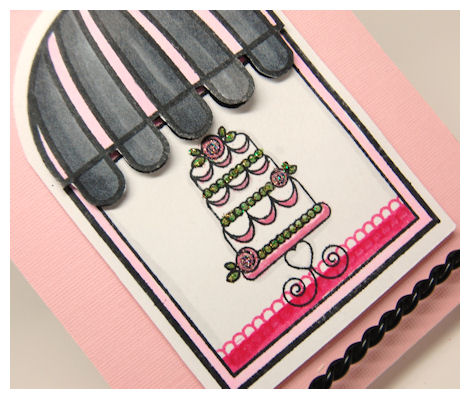
See the awning from Shoppe Window ©, is stamped, colored and cut twice, for some dimension.
The cake is full of sparkly stickles. For my “counter” I stamped the lace border from Paper Pattern Pieces.
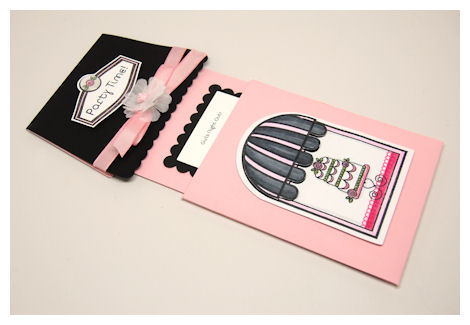
The Shoppe envelope slides right off!

You can decorate the slide-on style envelope, to look *just* like a customized Shop/House and put your message on the house/shop shaped insert card!!
Here I posted some party details for a friends 7th celebration of her 29th birthday! LOL! YOU do the math 😀 I think it’s a fun and sweet way to invite people to a party!
Supplies from My Time Made Easy ™ LLC
Pretty Impressions Stamp Set: Paper Pattern Pices, On Display 1, Sign It, Shoppe Window
Pretty Pieces Cut File: Homemade Card & Envelope, Home Improvement, Border Builders Open Scallop
Once again thanks for stopping by. Hopefully I have a JAM packed post for you tomorrow!
I DID have a video to share with you today. In fact that is why Im a bit late posting.
After trying to save, then load it ALL day yesterday, it lost connection at the last 4%. Trust me its been a long process that Im ready to ditch. Essentially I have ditched it for today-which is sad because it is one that would be so helpful. Cross your fingers I get it to work. I already spent far too long on it, not too.
Right now my dream would be that my video would actually PROPERLY save and upload to the hosting site I need it to!!
Here I am typing up another post because I simply can’t get it work. It is a long video-like 20 minutes, and it keeps timing out and not connecting, taking like 12 hours.
Anyway…..let me get to sharing something else.
First up, today Stephanie Kraft has a sample for you. (yesterday I accidentally linked her so also check out Silke Ledlow)
Here is a peek!
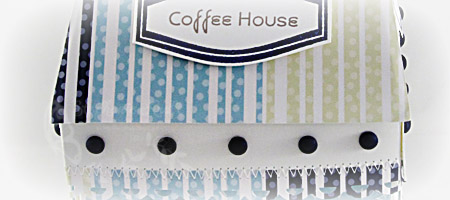
Here is what Stephanie Kraft had to say:
When I first saw the Shop Around © and Shop Around Accessories © Mega template, I immediately thought Coffee House, so I knew that one of my projects would be to create a one in honor of my favorite TV show, Friends. Yes, I know they have been off the air for over 6 years, but I still miss it.. : ( My house doesn’t exactly look like Central Perk, but that is where my inspiration came from!
To see more go visit Stephanie today!
Now my projects….
I’m going to share two cards today because again time is tight and I need to get that video loaded!!
Soar
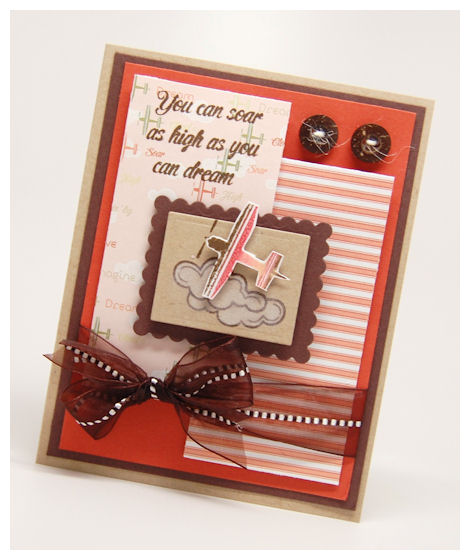
I adore this card. It looks like the airplane is going to soar right off the card, and into infinity!
I knew I wanted some sort of airplane in the On Display 1 set. I love how this one turned out.
I think it can be used for a variety of things: Toy shoppe, travel agency, and of course cards! Cards for men, boys and anyone else! This sentiment is one that I truly love and had to add it in there. I tell this to my own children all the time.
I think what I really love is the colors of the paper, which inspired my creation. I usually use some sort of paper as a starting point. It is much easier to match your design to your paper, than try to match the paper to your design.
The collection I used is the Sweet & Sour Sunflower Squash, and the Picket Fence collection, for my stripes. All our collections are great for easy mixing and matching. I really love the airplane pattern paper Sara made. Really cute.
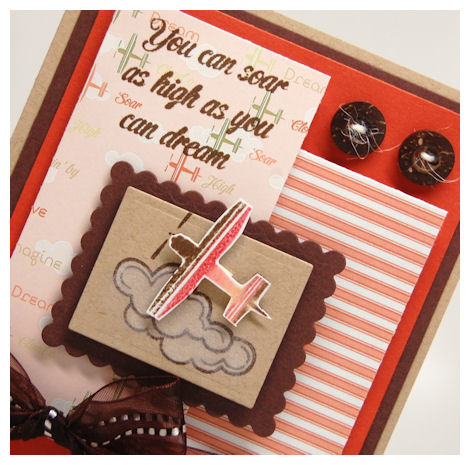
I colored my clouds with white pigment ink, and a Fantasix stick. Its quick and easy and givses you that POP of color against a dark base.
Every image within the On Disply 1 set has a sentiment to match! This set is perfect for cards, and tags, and also perfect for use as a “window display” for our new Shop Around Mega Template, with coordinating stamp set: Shoppe Window and/or Home Improvement and Sign it!
Just Flyin’ by
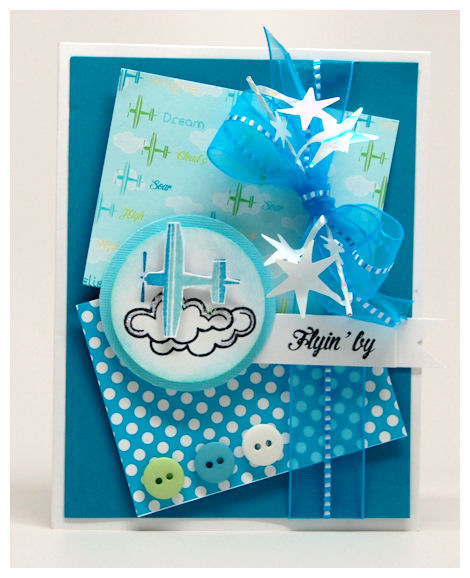
I love how this turned out. I used the colors from my Sweet & Sour Nomads Teal Leaf collection for my colors of inspiration. I wanted it to be bright, and cherry, and just like colors from the sky. The polka dot pattern is from the Darling Dots collection.
This is the perfect everyday kind of card, or the perfect card to send when you want to add your message inside! The sentiment is stamp on a “flag” like image that is meant to look like it is flying behind the tail of the airplane (in a way! LOL!)
This one could be Flyin’ by…..to wish you a happy birthday, or say I’m Sorry…just to say hi. You get the idea.
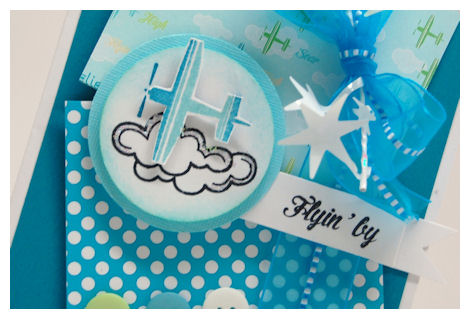
The airplay in re-stamped, and cut out on dimensionals. I added some glitter to the clouds. The shimmery stars are a wired confetti I had in my stash!! I love finding and using unexpected embellishments, that serve other purposes!
Supplies from My Time Made Easy ™ LLC
Well thanks for stopping by. HOPEFULLLY tomorrow my video will be all set! Sorry about the delay. We are off to the fair today wth the kids 😀 Should be fun!
Enjoy your holiday weekend!
Time is ticking!!
Sep 2, 2010 Author: mytime | Filed under: CardsHi all!!
Thanks for stopping by again today, as we have a ton more to share. I have to say the team has really done an amazing job at presenting the MANY ideas and possibilities using the September Release items!
I hope you are ready for the holiday weekend, and those of you in hurricane Earl’s path, stay safe. My prayers are with you!
I will actually announce the winner of the GIVEAWAY later today. I am in the process of completing a video for you, and really want to get it done first 😀 That being said this post will be simple, so I can do that for you. I think if will really be helpful, so stay tuned!
IF there is something you want me to share here, in video or tutorial format, please feel free to ask, and I will do my best to share. In the meantime I have done several videos/tutorials that you can find on our website—>HERE!
Today Silke Ledlow has a peek project for you!
(My error I had linked Stepahie originally :C She will post tomorrow!)
Now my turn to share. I thought I’d share a card or two today.
First up-Time of you life
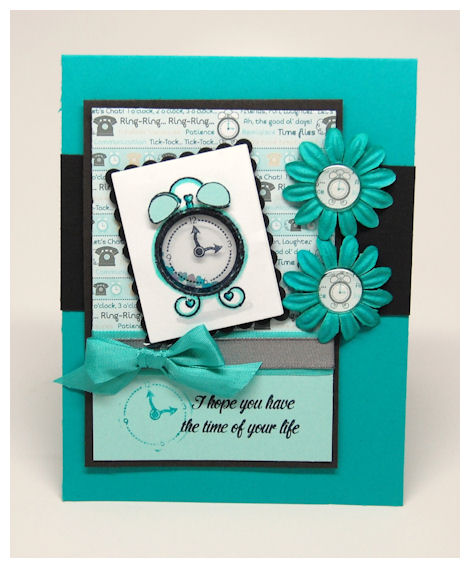
What a cute card! I make this into a SHAKER card! See the shimmery heart confetti in the clock face?
The clock image & sentiment are both from On Display 1! On Display 1 is a FAB set that has many possibilities! Not only is it great for those Shoppe windows, but it is an inspirational set with several fun and versatile images and sentiments combined!
OK back to the card.
As you can see I partially stamped the clock face next to my sentiment.
I used the Sweet & Sour Ganache Sprinkles paper as my inspiration for color choice! (I punched the little clock image from my paper and added a page pebble over it, to create my flower centers too. I was just over the moon with this once it was done.
Now my screen name for Splitcoast Stampers has always been mytime.
I actually put a lot of time and effort into choosing that name I’ve become known by for so many years now. I even put it into my company name!! I knew I wanted it to reflect what this amazing hobby was to me. Obviously as a busy stay at home mom, any/all crafting time was MY TIME.
MY TIME to de-stress, unwind, and do something for myself. A little creative outlet, that allowed me to escape the everyday life of giving and doing for everyone else. MY TIME was something I so cherished, and every second counted.
Time is significant to me because I know first hand that in an instant, it can ALL change. Time is important. It should be cherished. I personally do my best to enjoy every moment I can. Live for today, with no regrets.
So, that being said, for my own sentimental reasons, I designed the clock image in the On Display 1 set.
Its a cute lil’ clock, and I love it.
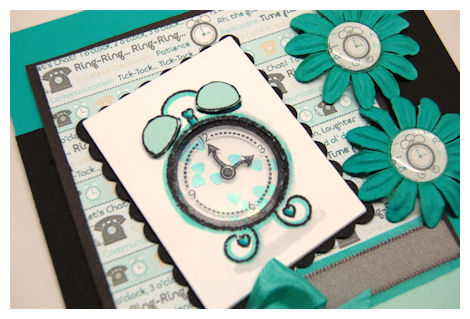
I love hearts so I included those in my clock too (and that is why I chose HEART confetti!) The time on the clock says 3 o’clock because I like the number 3. It is significant to me since May 3rd is my birthday, I have 3 kids, I was married on August 23rd, began this business venture at 30. I put a lot of little personal details into some of my designs, and this is one of those.
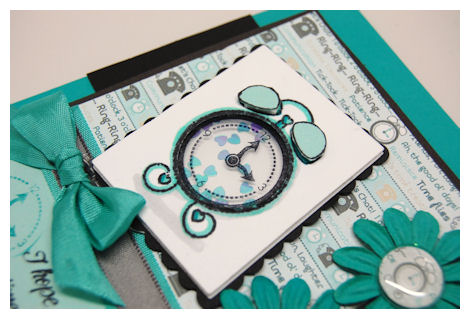
To make my shaker, I used a 1 inch circle punch to punch out the face of my clock, which was stamped/colored on my white cardstock layer. I then stamped the clock face on acetate, and layered it behind the clock image. I then lined all 4 sides with some foam take and added my heart confetti to make it into my shaker card! I added an additional layer of white cardstock, which was layered onto my scallop mat layer. Easy peasy, and OH! SO CUTE!
Supplies from My Time Made Easy ™ LLC
Pretty Impressions Stamp Set: On Display 1
Pretty Printable Digital Paper: Sweet & Sour Ganache SprinklesI have much more to say and much more to share, but as I said I’m cutting it short do I can get some killer stuff done. PROMISE.Don’t forget to check our NEW! Galleryfor a ton of new ideas. I have a bunch of samples loaded (with more to come, and some more oldie but goodie stuff too).
Be back in no time!!
September Release Blog Hop GIVEAWAY!!
Aug 31, 2010 Author: mytime | Filed under: Cards, Home decor/3-D items, My Time Made EasyToday is the My Time Made Easy ™ LLC Release and to celebrate we have a BLOG HOP with some hidden treasure!
Each design team member is featuring a different themed house/Shoppe! You won’t want to miss anyone!!
Be sure you leave a comment on each design team member’s blog today because TWO of the design team members are going to be picked to have someone from their blog comments WIN a $50 Gift Certificate to My Time Made Easy ™ LLC!
NO ONE knows which two designers are hiding the treasure, so don’t forget to stop by each design team members blog and leave a little love there. Include your email address-so you can be contacted if YOU are one of the lucky winners!
Winners will be drawn September 3rd, and announced on HERE!
Don’t miss viewing all our NEW! Release items—> HERE!
Stop by and view our NEW! Gallery!!
Now today the team and I are ALL using the NEW! Shop Around & Accessories Mega template to create a different themed a Shoppe and we are each using the Homemade Card & Envelope Pretty Pieces Cut File to make a card project to match our theme.
Here is what I have come up with for today 😀
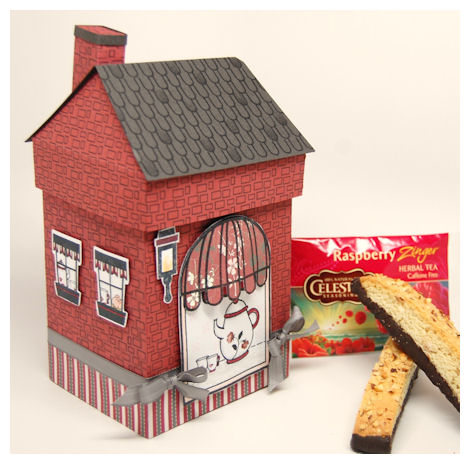
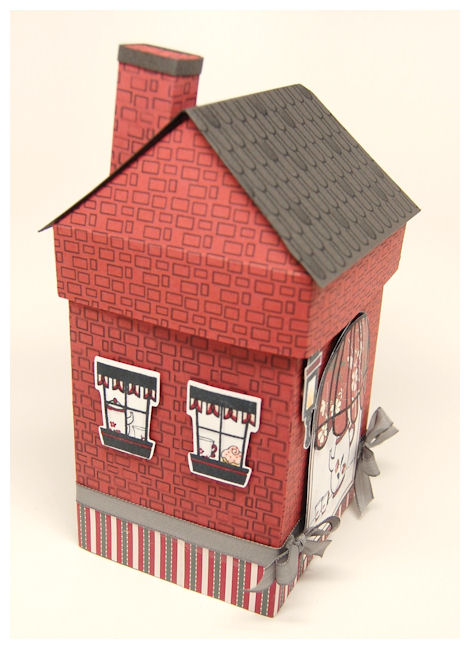
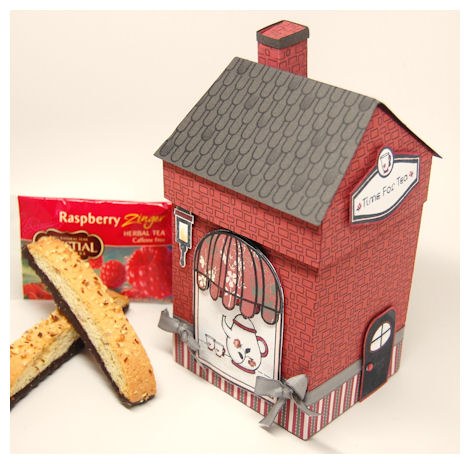
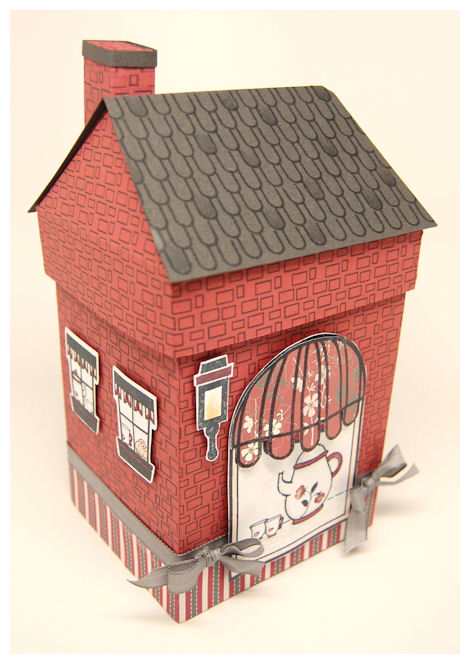
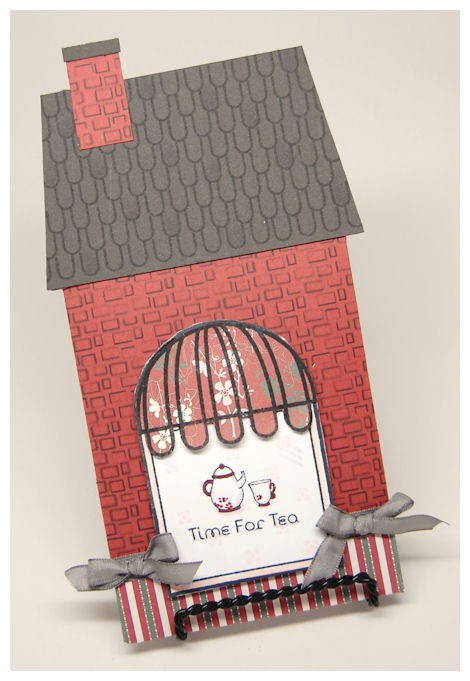
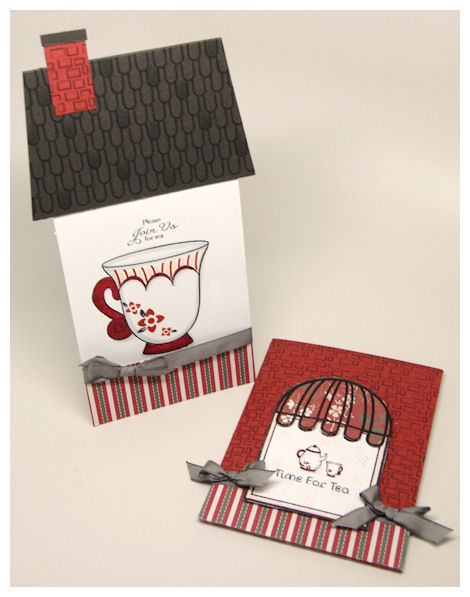
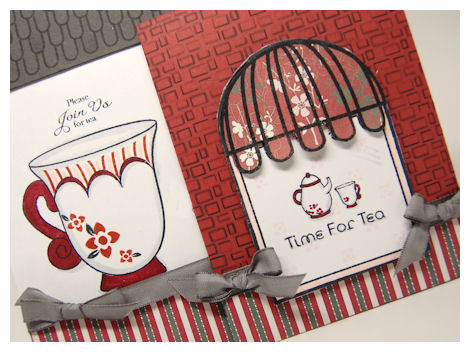
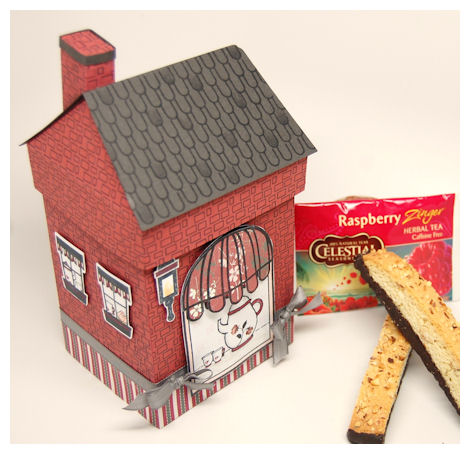
Time for Tea!
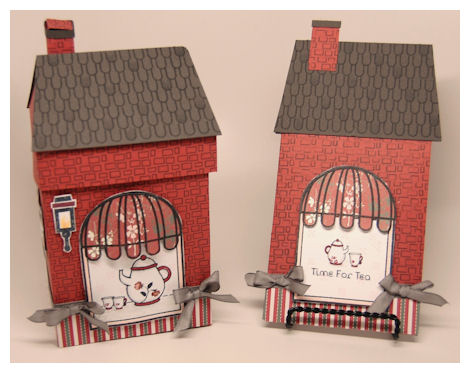
Well if you don’t like coffee, but you love tea – or someone you know does, this Tea Parlor my be just the gift you are looking for!
This gift set is simply stunning and full of interesting details. You can rest easy knowing this will most likely be displayed by the recipient for a long time to come, or re-gifted with style!
I used the NEW! Shop Around & Accessories Mega template, with the Homemade Card & Envelope Pretty Pieces Cut File to create a matching tea themed gift set. I designed both to match each other. As you can see it was VERY easy, and lots of FUN!
I wanted to package up some Biscotti and Raspberry Tea, to go along with my tea invitation.
I used the NEW! Shoppe Window for my main focus of this gift set.
I began by printing the Brick pattern from the Color Me Pretty Digital Paper: Constructions Materialson my Cherry cardstock. I LOVE this collection of paper because it allows you to QUICKLY and EASILY create realistic looking house patterns!!
There are 9 different patterns: Bricks, Stone, Vinyl Siding, Wood Planks, Wood Siding, Wooden Shingles, Scallop Roof /Siding, Square Roof Tiles, and Spanish tiles!
The patterns print horizontally and vertically so no matter what your project, your pattern can suit the needs of it! Now you can have these fun patterns in any/every color of the rainbow with a few clicks of a button. SO FUN.
I then cut and assembled my Shop Around & Accessories Mega template, and the envelope slider from the Homemade Card & Envelope.
I added the stripe pattern from the Pretty Prinatbles Digital Paper: Cherry On Top Collection Cherry On Top.
To avoid BULK on this I used printer paper for this one!! It works like a nice lightweight cardstock, only much easier to use when wrapping around the base of my template. I then wrapped around my ribbon.
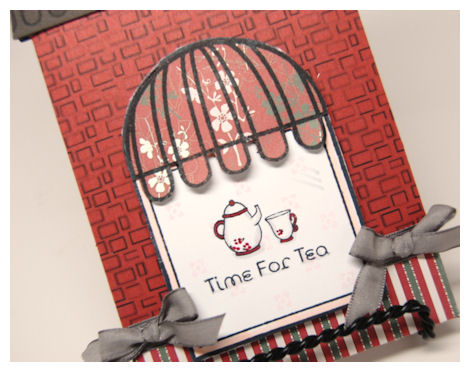
For my Shoppe Window, I printed the Cherry Floral pattern from Cherry On Top Collection , then cut out my awning top! Looks so pretty doesn’t it? I also stamped/colored/cut my lantern image.
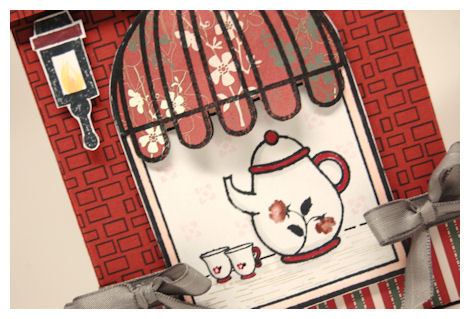
In the window I created a “scene”. I stamped the tea pot image from On Display 1, I then stamped the mini tea cups from the Sign It set. On those I used a marker tip to create mini flowers on them. The wood grain pattern from the Home Improvement set fites perfectly in the window, so I used to make the display table. I then doodled the table end.
For the look of wall paper I used the small flower image from the Fanciful Flourishes set, lightly in the background! I love that little touch.
Now as we go towards the side, you can see my two side windows. They are from the Home Improvement set (as is the door).
I used the Home Improvement Cut File to trim out my windows. Makes it SO much easier 😀 I love saving TIME.
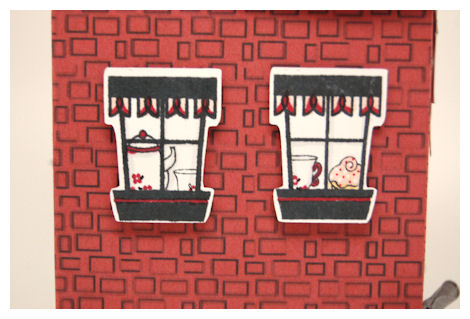
As you can see they are stamped and colored to match my Tea Parlor. I love creating little peeks into the house, through the windows! The possibilities are endless. I used the small tea pot from the Just For You set, and again doodled flowers on it. The tea cups from the Sign It set, are the same as the ones I used in front window, and cupcake image is also from the Sign It set.
Now lets move on to the other side…..
Looks just like the side of an old fashioned store.
I have my door, offset to the right, towards the back of the Tea Parlor

I used the Home Improvement Cut File to trim out my door, then colored around the “trim”. I added a little brad for my door knob.
Here is my sign
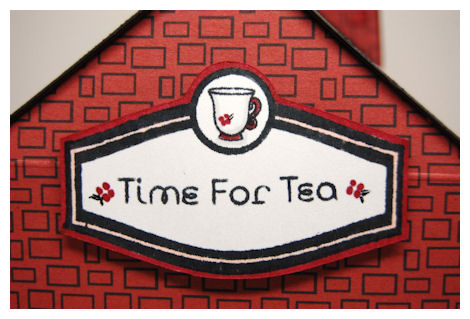
This label is from the Sign It set. This set has images and coordinating sentiments to match.
I LOVE being able to create coordinating signs to display what your Shoppe theme is! The sign was also cut using the Home Improvement Cut File, and the trim also colored, like the door. I stamped the tea cup, and again made little flowers to add to the design.
I used the same Brick pattern from the Color Me Pretty Digital Paper: Constructions Materials to create my chimney. Easy peasy.
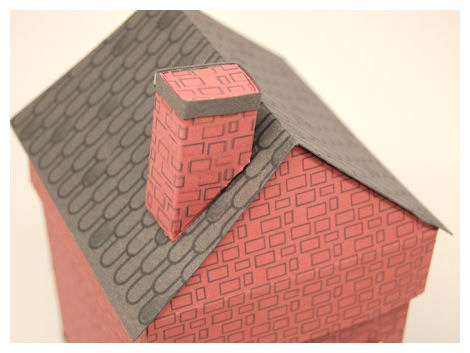
For the roof, I decided to use the scallop border building image from Home Improvement set to create my shingles. Once stamped, I used a gray copic marker to quickly add some color/dimension to the shingles.
This easily fits my Biscotti and tea, as you can see here. This template is quite large and can hold a ton!
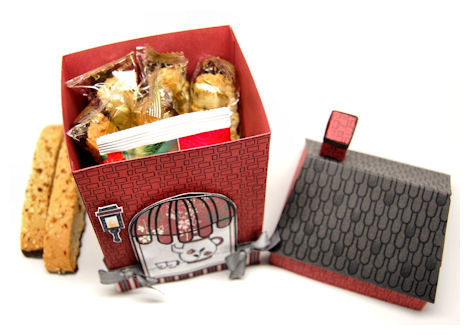
I could have fit an entire package of the Biscotti, but I ate some of it while taking my photos! LOL!
If you have a personal cutting machine you can alter the size too 😀 Now how fun is that?
Now how about that invitation?
Pretty Pieces Cut File : Homemade Card & Envelope $2.50Available in PDF, SVG, GSD, DXF, WPCCompleted Project Size4 1/2 Inches Wide7 3/4 Inches Tall
Fashioned after the Shop Around Template, this coordinating cut file is a super sweet and rather large Shop/House shaped card & envelope file, that was created so you can further utilize the images from Home Improvement, Shoppe Window, On Display 1, and Sign it stamp sets.
You can decorate the slide-on style envelope, to look *just* like a customized Shop/House and put your message on the house/shop shaped insert card!!How cute and perfect would this be for:Holiday card from your family-feature a photo inside!
a special themed party (be it birthday, brunch/lunch/dinner, little girls invite)
welcome to the neighborhood
new home
bringing home baby
bridal shower
open house
school /store/shop themed gift card holder
home Improvement
moving/just moved
House warming card or invite
or other card/invitation?!
No matter what the occasion, just the fact that this card is homemade, is sure to grab the admiration and attention of the receiver, no matter what the occasion!
Today mine serves as an invitation to tea!
Just like the Tea Parlor I created I made this to match.
This time I used that mini tea pot from the Just For You set, with the little tea cup from the Sign It set.
Now the envelope on this was meant to slid over the card, and it’s purpose is to also serve as the card FRONT in the fact that you decorate it like you would your card front, then as you slide it off, it reveals the INSIDE of your card.
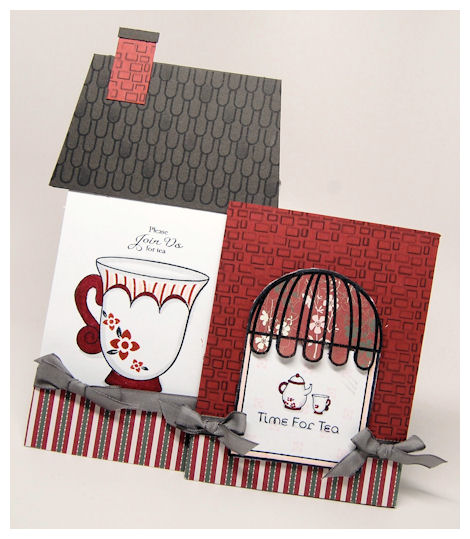
So the envelope is to the right, and the tall house shaped note card is to the left! This template comes complete with the roof pattern which covers the card top.
I chose to use the A Spot of Tea set to really tie in this theme! It was the perfect addition!

I just colored and stamped the pattern to match! The flowers I stamped are from the Fanciful Flourishesset. I stamped them because they are the larger version of the flowers that are in my “wall paper” and look like what I doodled on the mini tea cups! The sentiment is also from the A Spot of Tea set
Supplies from My Time Made Easy ™ LLCPretty Packaging Templates: Shop Around & Accessories Mega template
Pretty Impressions Stamp Set: On Display 1, Sign it, Home Improvement, A Spot of Tea, Just for You, Fanciful Flourishes
Pretty Printable Digital Paper: Color Me Pretty: Construction Materials, Cherry On Top
Pretty Pieces Cut File: Home Improvement, Homemade Card & Envelope
I hope you enjoy the plethora of ideas you pick up as you HOP along, and view the gallery! The ideas don’t stop there though! We still have another week of daily ideas to share, so come back tomorrow.
Happy Shopping!
My Etsy

Who I Designed For
Blogroll
- Alicia
- Alli Miles
- Ally Blankenship
- Amber
- Andi @ crafts on a whim
- Angel R
- Angie Z
- Anne Kranitz
- Becky O
- Bee
- Beth Silaka
- Bethany Paull
- Beverly Nash
- Bobbie
- Cambria
- Cammie
- Card of the Week
- Card Positioning System (CPS)
- Cards for Cancer
- Catherine Doucette
- Charmaine
- Cheryl Sims
- Chriss Rollins
- Christina
- Christine Ewing
- Christine Wooden
- Colleen Schaan
- Craft Critique
- Craft Gossip
- Crystal
- Dawn Easton
- Emily Giovanni
- Geny
- Holly
- Igne Groot
- Inspirational Craft Blogs
- Irene
- Jami Sibley
- Jeanne Streiff
- Jen del Muro
- Jeni Bond
- JenMarie
- Jenn Balcer
- Jenn Diercks
- Jenn O
- Jennifer E
- Jennifer Mick
- Jennifer Pereda
- Jennifer-Sweet Treat
- Joanne Basile
- Jodi Collins
- Julia Stainton
- Julie Masse
- Karen
- Kathryn Berthiaume
- Katie Cotton
- Kelley Holland
- Kendra
- Kim Scholfield
- Kris’s Color Stripes! Get inspired here
- Kristen Dubosque
- Kristin Eberline
- Kristine
- Laura @ Sunshine Stamper
- Laura Turnmire
- Laurie Schmidlin
- Lesa Rapp
- Linda Duke
- Linda-LSN
- Lindsey Botkin
- Lisa (lakind scs)
- Lisa Kind
- Lori Craig
- Maggie
- Mara Campbell
- Maria
- Maria Levine
- Mary
- MaryJo
- Melanie M
- Monique Hansen
- Moxie Fab World
- Pam Imholz
- PaperCrafts Connection
- Peppers and Pollywogs Kids party site
- Rebecca Grohall
- Rita
- Robyn
- Rose Ann
- Sarah Vrolyk
- Sharon Harnist
- Sharon Johnson
- Sharon Rivera (a chemisrty with paper)
- Sherrie
- Sophia Landry
- Storage Units, Ink, & More Blog
- Sue Berker
- Susan (Rainy)
- Tangii Crane
- Tracy
- Tricia Traxler
- Trudee
- Velta
- VivLyn
- Zena
MTME Pretty Palette Color Team
MTME Pretty Patterns Sketch Team
My Time Made Easy TM LLC
Shop till you drop!
Lauren Meader
About Me
Copyrighted material
Subscribe To My Blog
Pages
- About me
- Alexa’s Story!
- My Crafty Corner!
- My Time Made Easy™ LLC
- Our Make A Wish Trip to Disney!
- Resume/Publication List
Calendar
| M | T | W | T | F | S | S |
|---|---|---|---|---|---|---|
| 1 | 2 | 3 | 4 | 5 | ||
| 6 | 7 | 8 | 9 | 10 | 11 | 12 |
| 13 | 14 | 15 | 16 | 17 | 18 | 19 |
| 20 | 21 | 22 | 23 | 24 | 25 | 26 |
| 27 | 28 | 29 | 30 | 31 | ||
Archives
- August 2013
- July 2013
- June 2013
- May 2013
- April 2013
- March 2013
- February 2013
- January 2013
- December 2012
- November 2012
- October 2012
- September 2012
- August 2012
- July 2012
- June 2012
- May 2012
- April 2012
- March 2012
- February 2012
- January 2012
- December 2011
- November 2011
- October 2011
- September 2011
- August 2011
- July 2011
- June 2011
- May 2011
- April 2011
- March 2011
- February 2011
- January 2011
- December 2010
- November 2010
- October 2010
- September 2010
- August 2010
- July 2010
- June 2010
- May 2010
- April 2010
- March 2010
- February 2010
- January 2010
- December 2009
- November 2009
- October 2009
- September 2009
- August 2009
- July 2009
- June 2009
- May 2009
- April 2009
- March 2009
- February 2009
- January 2009
- December 2008
- November 2008
- October 2008
- September 2008
- August 2008
- July 2008
- June 2008
- May 2008
- April 2008
- March 2008
- February 2008
- January 2008
- December 2007
- November 2007
- October 2007
- September 2007
- August 2007
- July 2007
- June 2007
- May 2007
- April 2007
- March 2007
- January 2007
Categories
- About Me
- All That Scraps
- blogger challenge
- camera/photo play
- Cards
- Contests
- family stuff
- FOR SALE
- Home decor/3-D items
- How to FAKE it!
- Introduction
- JUGS Challenge
- JustRite Stampers
- Lizzie Anne Designs
- My family stuff
- My Stamping Space
- My Time Made Easy
- My Time To Color Challenge
- My Time to Create Challenge
- My Timeless Template Challenge
- My Timeless Templates
- Mytime Mail
- MYTIME MOVIE/VIDEOs
- Papertrey Newsletter
- Pink Cat Studio
- Pretty Palette Challenge
- Pretty Patterns Sketch
- Product Opinions and Must haves
- Recipe's
- Saturday Sketch
- Smilebox Creations
- Stampavie
- Tutorials
- Uncategorized
- videos
Most Popular
- Create your own Onesie Card Tutorial-and important NOTE! PLEASE READ (2529)
- Saturday Sketch-Boxed bag holder (2333)
- Going GREEN! Fancy Flower Flourish-Closure Video (1478)
- Fabulous Favorite - Giveaway! (1336)
- a Prayer Request (1232)
- QUICK-Easter Baskets from Nestabilities-PTI style-and blog challenge (1063)
- Teaser Sketch (999)
- February Release Giveway! (and a little peek) (996)
- Group Post and Rambling Rose Video Tutorial (985)
- GIVEAWAY! Who wants it all?! (895)
Recent Comments (RSS)
- 첫충사이트: 완전히 흥미로운 블로그 게시입니다. 저는
- sarah: Wow, Lauren, what a stunning
- hedie: خرید راهبند
- 야동: Love to read it,Waiting For
- 야동: This seller is in a
- 바카라사이트: 여기 처음 왔어요. 나는이 게시판을
- 야동티비: I was surfing the Internet
- 바카라사이트: 비슷한 주제에 대한 흥미로운 정보를
- 바카라사이트: "여기에 제공해 주신 귀중한 정보와
- 온라인홀덤: 유익한 웹 사이트를 게시하는 데
Copyright © 2007 - My Time, My Creations, My Stampendence - is proudly powered by WordPress
This blog has been Tweaked and Designed by Sara Williams