Archive for March 6th, 2010
Don’t forget to enter our giveaway! —>CLICK HERE FOR DETAILS
Today Catherine Doucette has a super cute and amazing project for you…..
Words from Catherine:
One of the many things I love about Lauren’s templates, is how you can create many different things with the same template…you just need to use your imagination! Hop on over and take a peek at what I thought the “Cute Lil Chick” cut file looked like :0)
Be sure to stop by and visit Catherine Doucette
Now it is my turn to share…….
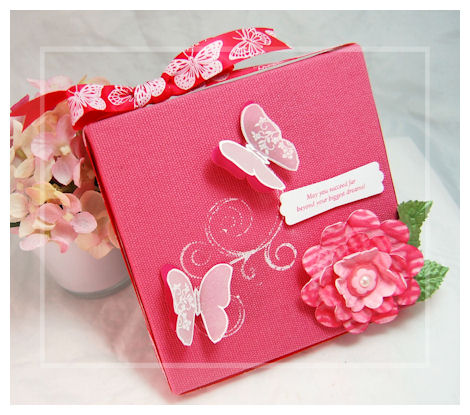
Big Dreams Canvas
Now how about creating your own canvas? Something inspirational that makes you smile.
Your stamps and papercrafting supplies can be used for SO many amazing creations! Don’t limit your creativity to just cardstock.
There is nothing like taking your materials and making some amazing wall art! It can be SO SIMPLE and still be a WOW!
It is so fun to personalize your home and or workspace or make something inspirational. I love creating “wall art”.
I recently found this pink plain canvas at Michael’s. I fell in love with the color, and knew it wouldn’t take much to create some wall “art”.
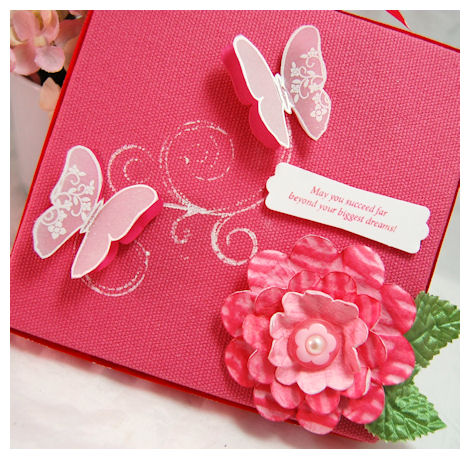
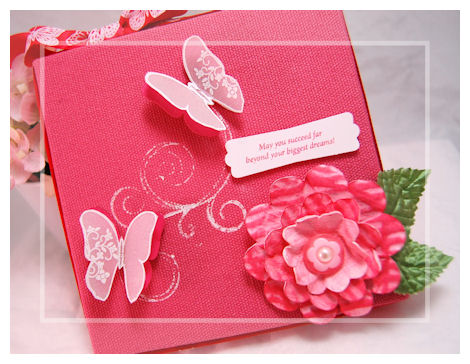
“May you succeed far beyond your biggest dreams”
This sentiment is from the So Sentimental © set. I love it! Now talk about inspiring.I stamped it in pink ink, onto a punched label.
I used some Making Memories paint and “painted” on my large swirly flourish from Fanciful Flourishes ©.
I then cut some sweetheart colored cardstock using the Flutters and Flowers Cut File © and layered it onto my canvas, where I wanted my butterflies.
For my butterflies I used the outlined butterfly image from the All A Flutter © set. I stamped it in versamark onto vellum cardstock. I then used some detail white embossing powder and heat set it. I also used the small flourish image from the So Sentimental © set, and stamped it on one side of the butterfly wing on either butterfly. Once cooled, I cut out the butterflies and adhered them to my canvas over the cardstock butterflies, using a clear glue dot
My flowers were created using the NEW! Fanciful Flowers Cut File © I used one of the scallop flowers in the set. I love making my own flowers.
I cut them from white cardstock. I cut each set of petals (3 total) resizing to 75%. I used some paint to “paint” my paper. Once dry, I ran them through my crimper in various directions for a fun texture, and distressed look. To complete the look I sponged on some ink. Each one is layered with dimensionals.
Once the flower was complete I added it to my canvas!
I tied on some butterfly ribbon I purchased at Michael’s a few months back. Just that little something extra
This project took about 25 minutes in all.
This will look so amazing on the wall of my girls room. To think it cost me only $2.50 to make!
I hope you give this a try some time 😀
Supplies:
Pretty Impressions stamp set: So Sentimental, Fanciful Flourishes, All A Flutter
Pretty Pieces Cut Files: Flutters and Flowers, Fanciful Flowers
cardstock: Couture Cardstock sweet heart and vellum
button, pearl, label punch by SU!, paint, canvas
Come back by tomorrow because our entire team has some more samples for you to keep you drooling and get those creative juices flowing!
A Happy Life
Mar 6, 2010 Author: mytime | Filed under: Cards, Home decor/3-D items, My Time Made EasySorry this is late.
I had much to do and I am caring for my 1 yo niece! I forgot how much they fill up the day and that you can’t turn your back for a SINGLE second! Thank goodness I have 3 of my own helpers! It has been a while since my own children were that small. I often wonder how I got anything done. I so enjoy having her. She is just the sweetest thing on 2 lil feet.
OK projects for today…..you need to go and see Tracey’s project! You are sure to be inspired. Also check out her projects from earlier in the week 😀

Words from Tracey:
“Even though I have girls, I do have LOTS of nephews, and I enjoy making things for them as well, though I think I’m naturally inclined towards girl stuff, lol. Today I have a twist on an old favorite, and something new…”
You won’t want to miss it—-> Visit Tracey Cuccia <—-click there
Now for my project.
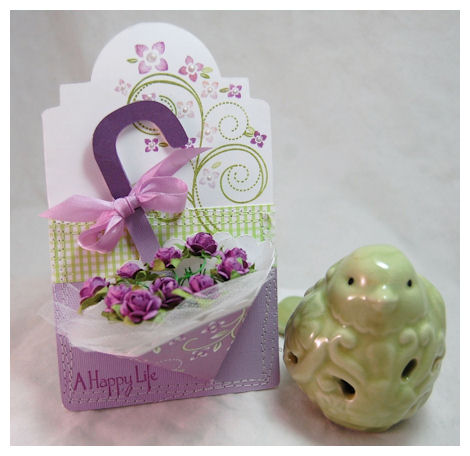
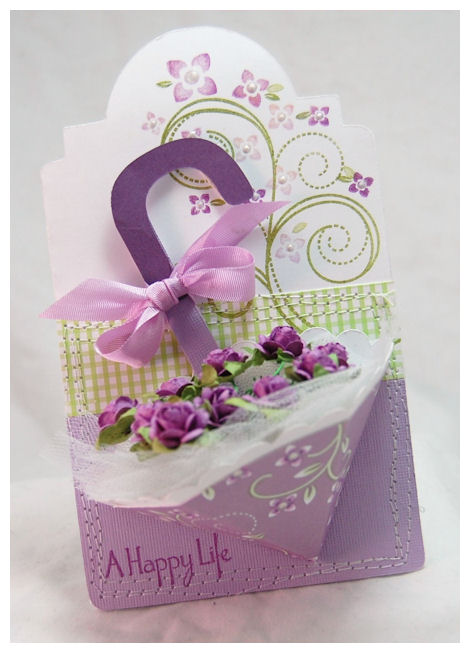
A Happy Life
Now that saying says it all doesn’t it?
This is a sentiment that I have personally always wanted. I feel that it is a wonderful “wish” for someone and is perfect for a few occasions such as New Home, Marriage, Wedding Shower, New Baby, even a promotion….any new beginning. So Sentimental © is sure to have something to suit every occasion.
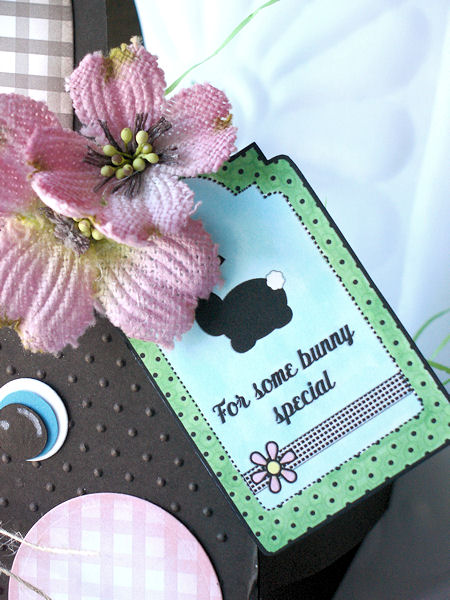
I have a bridal shower to attend in a couple of weeks and knew that was just the sentiment for my card. I am giving a gift card to one the the places that they registered. Since it is a bridal shower I decided that the It’s A Shower © template would make the perfect focal point for my card.
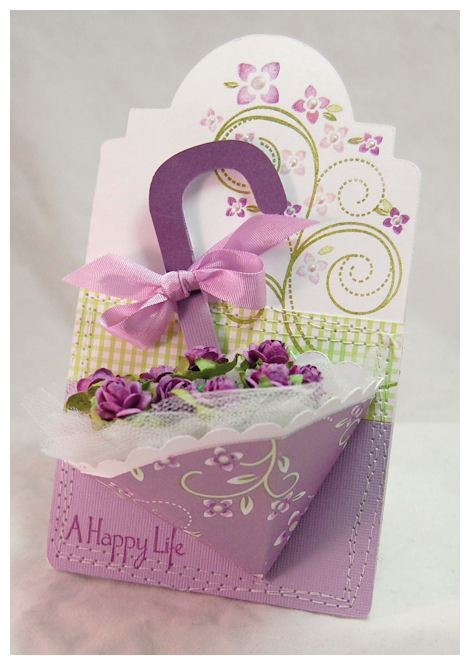
I used one of the tag shapes from the Tag You’re It © Cut File (also available in PDF) and welded it to another tag to create my tag card! That is something that is fun and easy to do. I really love the shape of this too. I resized this one to be about 4 1/2 inches wide (and whatever that converted to tall! LOL! Just click “maintain proportions”). Normally I like to resize by percent to ensure all my pieces are the same scale. For this, since I was doing a card with the same shape it was easy to just use “inches”.
I layered on my Ga Ga for Gingham ©paper and Carousel cardstock layer. I then stamped my flourish from the Fanciful Flourishes ©stamp set. I added liquid pearls to the flower centers. I then got to sewing! I just went around it 3 x’s in a whimsical pattern. Then I stamped my “A Happy Life” sentiment from So Sentimental©.
Now for the umbrella…
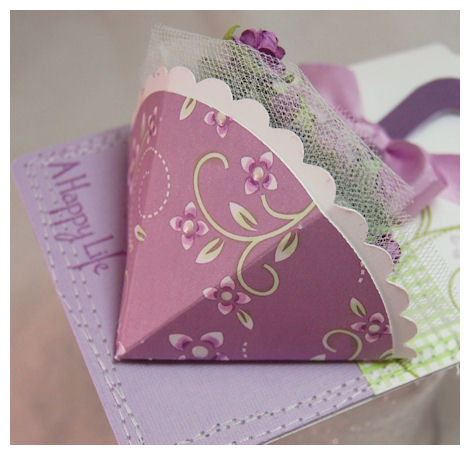
I resized my It’s A Shower © Umbrella and all the pieces to 60% the original size. I mentioned when this 3D It’s A Shower © Umbrella was released that it could also be used on cards, so here it my sample!
I created my umbrella from the Fanciful Flourishes © paper in Fortune Teller. Prior to assembling, I added the scallop layer in white. I used my copic markers to lightly color in some of the white in flower pieces on the paper! It was PERFECTION!!! Then I added some liquid pearls to the flower centers. Once dry, I assembled my umbrella template, making my back piece flat, so it would adhered flat on to my tag card.

I then filled my umbrella with tulle, and some tiny Prima roses I had. Then attached to my tag shaped card base.
I think this looks so stunning! It is perfect for my gift card.
I am wrapping this in a gusset cello bag, and tying with some lavender floss. DONE!

I really loved how this turned out, and think it will be much appreciated. It isn’t your typical card.
BRIDAL SHOWER TIP:
To accompany my gift card….I am making the larger 3D version of this template for the actual shower as well. The idea for it is that each guest is filling out a slip of paper with either their marriage wishes for the couple, or marriage advice! Once everyone has thier slipped filled out, I will wrap the tuelle around it (like in the store sample) and they can treaure all the advice for many, many years to come.
Supplies:Pretty Packaging © template: It’s A Shower
Pretty Impressions stamp set: So Sentimental, Fanciful Flourishes
Cardstock from Couture Cardstock:OSW white, Carousel
Matte Photo Paper (super for printing digital paper :D) Printworks Matte Photo Paper (Target)
Pretty Impressions Digital Paper: Fanciful Flourishes, GaGa For Gingham
Pretty Pieces Cut Files: Tag You’re It
Tulle, Prima Flowers, Liquid Pearls, Ribbon from MS, sewing machine
Thank you for coming by and seeing another day of projects! I still have much to share too 😀
Please return tomorrow for even more ways to use the products from our latest release at My Time Made Easy ™ LLC
My Etsy

Who I Designed For
Blogroll
- Alicia
- Alli Miles
- Ally Blankenship
- Amber
- Andi @ crafts on a whim
- Angel R
- Angie Z
- Anne Kranitz
- Becky O
- Bee
- Beth Silaka
- Bethany Paull
- Beverly Nash
- Bobbie
- Cambria
- Cammie
- Card of the Week
- Card Positioning System (CPS)
- Cards for Cancer
- Catherine Doucette
- Charmaine
- Cheryl Sims
- Chriss Rollins
- Christina
- Christine Ewing
- Christine Wooden
- Colleen Schaan
- Craft Critique
- Craft Gossip
- Crystal
- Dawn Easton
- Emily Giovanni
- Geny
- Holly
- Igne Groot
- Inspirational Craft Blogs
- Irene
- Jami Sibley
- Jeanne Streiff
- Jen del Muro
- Jeni Bond
- JenMarie
- Jenn Balcer
- Jenn Diercks
- Jenn O
- Jennifer E
- Jennifer Mick
- Jennifer Pereda
- Jennifer-Sweet Treat
- Joanne Basile
- Jodi Collins
- Julia Stainton
- Julie Masse
- Karen
- Kathryn Berthiaume
- Katie Cotton
- Kelley Holland
- Kendra
- Kim Scholfield
- Kris’s Color Stripes! Get inspired here
- Kristen Dubosque
- Kristin Eberline
- Kristine
- Laura @ Sunshine Stamper
- Laura Turnmire
- Laurie Schmidlin
- Lesa Rapp
- Linda Duke
- Linda-LSN
- Lindsey Botkin
- Lisa (lakind scs)
- Lisa Kind
- Lori Craig
- Maggie
- Mara Campbell
- Maria
- Maria Levine
- Mary
- MaryJo
- Melanie M
- Monique Hansen
- Moxie Fab World
- Pam Imholz
- PaperCrafts Connection
- Peppers and Pollywogs Kids party site
- Rebecca Grohall
- Rita
- Robyn
- Rose Ann
- Sarah Vrolyk
- Sharon Harnist
- Sharon Johnson
- Sharon Rivera (a chemisrty with paper)
- Sherrie
- Sophia Landry
- Storage Units, Ink, & More Blog
- Sue Berker
- Susan (Rainy)
- Tangii Crane
- Tracy
- Tricia Traxler
- Trudee
- Velta
- VivLyn
- Zena
MTME Pretty Palette Color Team
MTME Pretty Patterns Sketch Team
My Time Made Easy TM LLC
Shop till you drop!
Lauren Meader
About Me
Copyrighted material
Subscribe To My Blog
Pages
- About me
- Alexa’s Story!
- My Crafty Corner!
- My Time Made Easy™ LLC
- Our Make A Wish Trip to Disney!
- Resume/Publication List
Calendar
Archives
- August 2013
- July 2013
- June 2013
- May 2013
- April 2013
- March 2013
- February 2013
- January 2013
- December 2012
- November 2012
- October 2012
- September 2012
- August 2012
- July 2012
- June 2012
- May 2012
- April 2012
- March 2012
- February 2012
- January 2012
- December 2011
- November 2011
- October 2011
- September 2011
- August 2011
- July 2011
- June 2011
- May 2011
- April 2011
- March 2011
- February 2011
- January 2011
- December 2010
- November 2010
- October 2010
- September 2010
- August 2010
- July 2010
- June 2010
- May 2010
- April 2010
- March 2010
- February 2010
- January 2010
- December 2009
- November 2009
- October 2009
- September 2009
- August 2009
- July 2009
- June 2009
- May 2009
- April 2009
- March 2009
- February 2009
- January 2009
- December 2008
- November 2008
- October 2008
- September 2008
- August 2008
- July 2008
- June 2008
- May 2008
- April 2008
- March 2008
- February 2008
- January 2008
- December 2007
- November 2007
- October 2007
- September 2007
- August 2007
- July 2007
- June 2007
- May 2007
- April 2007
- March 2007
- January 2007
Categories
- About Me
- All That Scraps
- blogger challenge
- camera/photo play
- Cards
- Contests
- family stuff
- FOR SALE
- Home decor/3-D items
- How to FAKE it!
- Introduction
- JUGS Challenge
- JustRite Stampers
- Lizzie Anne Designs
- My family stuff
- My Stamping Space
- My Time Made Easy
- My Time To Color Challenge
- My Time to Create Challenge
- My Timeless Template Challenge
- My Timeless Templates
- Mytime Mail
- MYTIME MOVIE/VIDEOs
- Papertrey Newsletter
- Pink Cat Studio
- Pretty Palette Challenge
- Pretty Patterns Sketch
- Product Opinions and Must haves
- Recipe's
- Saturday Sketch
- Smilebox Creations
- Stampavie
- Tutorials
- Uncategorized
- videos
Most Popular
- Create your own Onesie Card Tutorial-and important NOTE! PLEASE READ (2529)
- Saturday Sketch-Boxed bag holder (2333)
- Going GREEN! Fancy Flower Flourish-Closure Video (1478)
- Fabulous Favorite - Giveaway! (1336)
- a Prayer Request (1232)
- QUICK-Easter Baskets from Nestabilities-PTI style-and blog challenge (1063)
- Teaser Sketch (999)
- February Release Giveway! (and a little peek) (996)
- Group Post and Rambling Rose Video Tutorial (985)
- GIVEAWAY! Who wants it all?! (895)
Recent Comments (RSS)
- 첫충사이트: 완전히 흥미로운 블로그 게시입니다. 저는
- sarah: Wow, Lauren, what a stunning
- hedie: خرید راهبند
- 야동: Love to read it,Waiting For
- 야동: This seller is in a
- 바카라사이트: 여기 처음 왔어요. 나는이 게시판을
- 야동티비: I was surfing the Internet
- 바카라사이트: 비슷한 주제에 대한 흥미로운 정보를
- 바카라사이트: "여기에 제공해 주신 귀중한 정보와
- 온라인홀덤: 유익한 웹 사이트를 게시하는 데
Copyright © 2007 - My Time, My Creations, My Stampendence - is proudly powered by WordPress
This blog has been Tweaked and Designed by Sara Williams