Archive for 2008
Papertrey Ink November Release-and Saturday Sketch!
Nov 15, 2008 Author: mytime | Filed under: Cards, My Timeless Templates, Papertrey Newsletter, Saturday SketchWOW! How can it be the MIDDLE of November ALREADY? Jay’s grandmother already called with confirmation of Thanksgiving Dinner plans! CRAZY!
Tomorrow is my son Noah’s birthday party so Im going to be working like a mad woman to get his party things done today. I am NEVER a last minute type of person so this is a KILLER for my OCD! We have about 18 kids total! Should be a total blast.
I hope you all enjoyed thePapertrey Ink release with all the countdown’s and design team samples. I really hope you are also loving the latest My Timeless Templates ©. I also hope if you have not already, that you try the 2 FREE templates we have for you! There is NO EXCUSE not to TRY one! You can’t get any better than FREE 😀
I have to say a huge THANK YOU to all of you who get so excited right along with me, and enjoy this new venture of gift crafting 😀 Preparing for that each month keeps me REALLY busy. I LOVE it. I really put in a lot of time to think of great ways to present these templates to you. Now while you are all downloading the newest of templates, I am getting started on next months! LOL! I know I find these templates REALLY useful, especially with the holidays approaching, and I hope that I have helped some of you save some $, creative time, and ideas this holiday season, making home-made holiday gift giving that much easier.
Now speaking of templates, I was holding out ONE more sample for you, just for today! It is my favorite project for this release!
I would LOVE to hear YOUR feedback on what you enjoyed here, and why. Im always amazed at what I love vs what YOU love 😀
OK the projects-
Teacher’s Apple- LOVE this set.
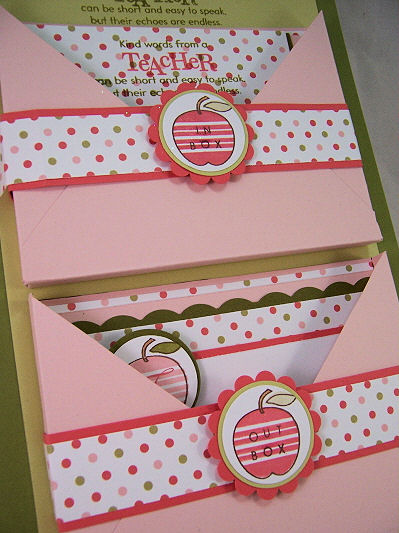
This uses the All Boxed Up © template in a fun and new way! It also uses Teacher’s Apple which I am TOTALLY in LOVE with! LOVE! You have no idea. For those of you wanting to mix up teacher gifts this year, you may just fall in love with this idea 😀
I mentioned before that the pretty pockets make a great base to many gifts on their own! So here is another example of that .
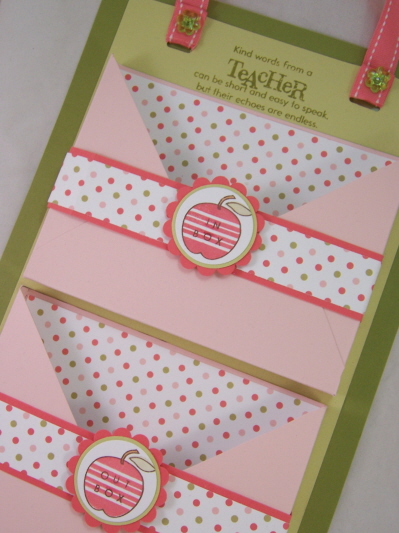
In & Out Hanging Mailbox

This holder hangs in the classroom, either by the desk, or by the door. You can even put it ON the door knob. It helps the teacher keep organized with letters IN, that need to be read, and letters OUT, that need to go home! This isn’t just stylish but its also practical.
I think its a super cute gift idea useful for ANYONE, not just teachers! Alter the design to suit receiver’s favorite colors or decor.
stamps-Teacher’s Apple, Simple Alphabet
paper-Polka Dot Parade, Olive, Spring Moss, Sweet Blush, Berry Sorbet, white
ink-Spring Moss, Sweet Blush, Berry Sorbet, Ripe Avocado
other-Spring Moss Stitched ribbon, making memories flower brads, making memories ribbon slot, circle punches, corner rounder
Now insert your Teacher appreciation card into the INBOX, and some monogram notecards, as a gift for her to send out, and place them in the OUT box.
View from the side-cards IN
View from the other side-no cards. I like to line the inside of my pockets. It makes it look a little more finished, don’t you think? It’s the littlest details that make you say WOW!
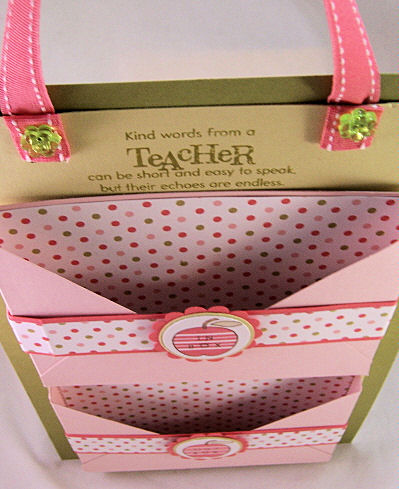
This is the view from the top
Now for the gift to go with the In & Out box
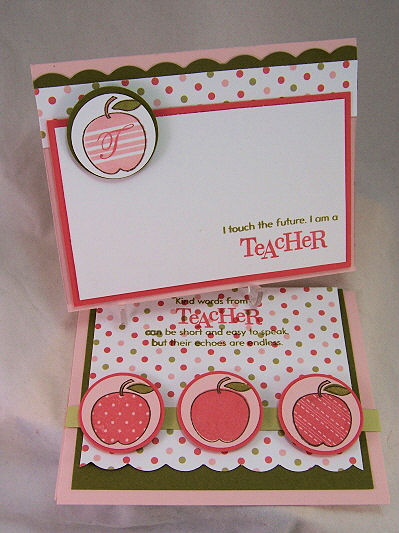
Well upon presenting this gift, I think a nice Teacher Appreciation card is in order!

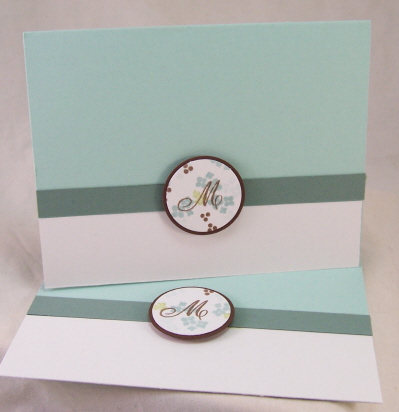
This is the card that I created to write my appreciation to the teacher. I love the layout, and message it reads. I created some monogrammed note cards, to include as a gift, with a SIMILAR layout to match.

For Ms. Trefrey
This note set is for Noah’s new reading teacher! She is over the top AMAZING! I called the Principal just to tell him how much Noah has enjoyed his reading program with her. She has gotten him excited about reading in a way I could not. How can you thank someone for that? I hope this gift set will cover it 😀 Alexa is my “reader” and Noah is my Math wiz, but now I have hope 😀
I think a NICE set of monogrammed notecards would be PERFECT for the teacher! I have this simple design, PERFECT for nice notes home to parents, and I would put a set of 8 (with envy’s) in the Out Box, for the teacher to be able to send out notes 😀
Isn’t that so cute?
PS-Don’t forget when you purchase ANY of our My Timeless Templates ©, that you get an idea catalog of 5 EXCLUSIVE (full color photo) project ideas with step by step instructions, and supplies.
Before I begin the rest of the peeks, let’s share today’s Saturday Sketch, and my 2 designs for that! (using new release stuff)

Saturday Sketch
KEYWORD mytimess12
I love this sketch 😀 I interpreted it in 2 ways.
I am TRYING to spend more time getting creative with my photos. it is the part I loathe about this whole stamping thing. I think it makes a difference though. I take the time to MAKE the project, may as well make it LOOK as good on screen right? I think Santa needs to bring me a new camera! I think I could even have him write it off as a business expense 😀 Oh Santa…………if you read this, I need a new camera 😀
So here we have a card titled Every Happiness.
It used the New! Heartfelt Basics, and an older set-Flower Garden. I LOVE that sentiment set. I am a sentiment JUNKY, and this set is ROCKIN my world.
I love the colors, and the way the sketch worked for this design. The tag is such a cute touch. Not sure you can clearly se the vellum butterfly, but its a pretty, subtle touch.
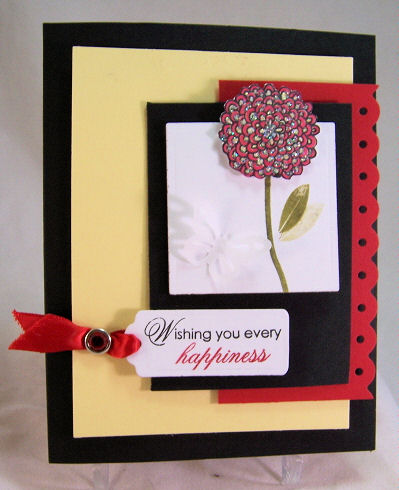
Close up of Every Happiness

Stamps- Heartfelt Basics, Flower Garden
Cardstock- lemon tart, pure poppy, black, vellum cardstock
Ink- black, ripe avocado, pure poppy, lemon tart, red marker
other- poppy satin ribbon, nestabilities square & tag punch, Martha Stewart butterfly punch, treading water punch by Fiskars
Now I have card #2 with the sketch! (I know Im over achieving this weekend! LOL!)
Ships Ahoy-
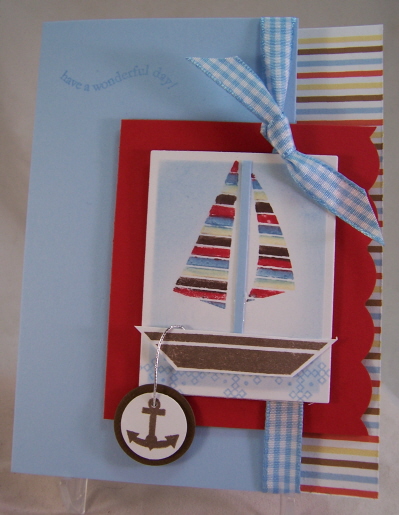
I love this little boat! Men of Life is awesome. Its great for those masculine cards, boy cards, or baby cards. I used my patterned paper as my inspiration for my sails. I didn’t follow my sketch EXACT, but this creation was certainly inspired by it. I’m loving the little anchor!
Here is yet another view of the details

The sentiment is from the Out of the Box sentiment.
Stamps- Men of Life, Out of the box (snetiment)
cardstock- white, pure poppy, dark chocolate, bashful blue, Ship to Shore stripe
Ink-markers from SU!
gingham from PTI, corner rounder, silver cord
I made the “ocean waves” use a stitched square image in the set. LOVING the colors and desings of the new patterned paper. LOVE!
Be sure to check out the Sketch Team for their samples with the Sketch!
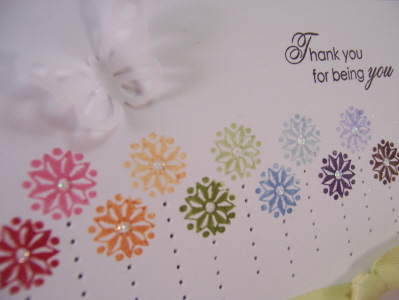
Background Basics Stars set:
I love the bkgd set. I am a HUGE fan of Polka Dot basics, and this is another great set. I really wanted to use it as a MAIN focus on my creation here, and rather than seeing STARS, I saw posie’s!
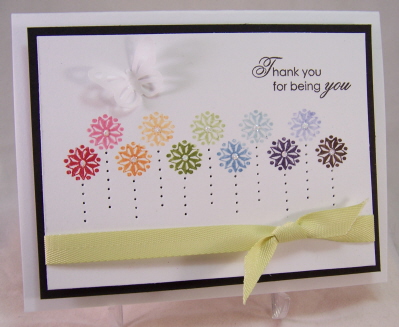
Pretty lil posie stitched stems
I think this was my favorite card! I love the black & white, with the contrast of a rainbow of colors from my “star” flowers. The spring moss ribbon is my “grass”.This is one of those under 10 min. cards. By simply piercing the “stems” you get a whole new look.
I also see PINWHEELS! Really cute.
Stamps- Background Basics, Heartfelt Basic
Ink-black, various markers for direct coloring on stamp
cardstock- vellum, white, and black
Other- Spring moss twill ribbon, butterfly punch by martha stewart, paper piercer for stems
You know me & my butterflies! This is the latest punch from Martha Stewart. Its perfect!
I used my glue pen to add some glitter to my flower centers.
I also used Heartfelt Basics. Let me tell you that set is a MUST OWN!!!!!!!
Next up we have Lisa’s set Out of the Box.
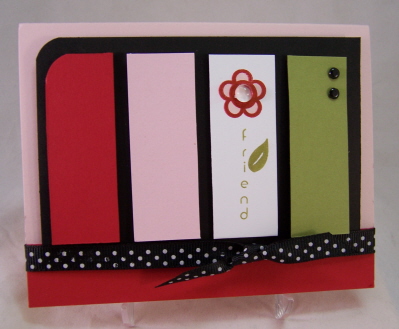
Stem of Friendship
Stamps- out of the box
Cardstock-sweet blush, pure poppy, ripe avocado, black, white
ink-sweet blush, pure poppy, ripe avocado
other-black brads, corner rounder, polka dot ribbon, clear bead
What stood out to me was the single flowers (of course) and vertical sentiments. I decided to create a simple color blocked style card, that really stuck out to me due to the colors I chose.
The little Robin’s Nest bauble was a nice little touch to the flower center.
I like making smaller images the main focus of a design. I had fun working with all the images (more to come!).
Well I am truly wiped now. I always have my Papertrey Ink “hangover” as I call it. I go into creative overload for like 3 days. This month I can’t afford that! I have Noah’s party to get things done for.
So there you have it for me.
Scroll down to the other posts through the last few days if you missed some stuff.
Thank you all again for taking time to check in! I appreciate being one of your “stops” on a busy weekend!
Enjoy.
My Timeless Template © Talk/Help!!
Nov 14, 2008 Author: mytime | Filed under: My Timeless TemplatesHi everyone-this is going to be a chat for the My Timeless Templates © be it thoughts, comments or questions.
I hear many of you have tried the free download -Stocking Stuffer, as well as purchased the templates. SO exciting-thank you for giving it a try!!!
I am flooded with emails (thank you for the support :D) and some are with questions.
I would like to ask if we can TRY to keep the questions/answers here so if someone else has the same one Im not sending 5o emails (no joke) with the same info. I’m not saying don’t feel like you can’t contact me! Of course you can, and I love hearing from you (that is why I allow my email to be public :D) but am just getting some of the same ?’s so lets keep it all in one place if we can!
I will update here with more Q & A as I get them.
If you find something helpful PLEASE share 😀 and I ask that people read your fellow stampers comments as they may help you!
This process actually IS simple, but it being the new thing for everyone, Im certain we are all unsure we are doing everything right! When treading in new waters there are always questions.
We provided the WORLD with a free template to not only see the value of what you get for your money but so that you can get all the kinks worked out, and get printing up some fabulous creations. I am sure once you get going you will see that this is a real time saver, the fun this has to bring, and how easy it is.
OK now we will start with the basics!
PLEASE keep in mind since this is the first time PTI and myself are doing this sort of thing we had no idea what was to come as far as questions as whatnot. We did out best to cover basic questions re: downloads and whatnot as well.
DIRECTIONS FOR YOU DOWNLOAD FOUND HERE! Many of you said “Hey Lauren I don’t speak french! Can you explain that better to me?”
Well I can try my best! LOL! I don’t understand “directions” well either. Im a hands on kind girl.
OK now “I” am very computer challenged, and am not the technical person here. I just create the basic template and description write ups and the rest is out of my hands. All the fabulous graphics and template stuff was all the fabulous work of Nichole & the people at Papertrey Ink.
BUT I will do my very best to answer the questions YOU have in the easiest way possible!!!
DOWNLOADING YOUR TEMPLATE
Downloading-we will take the FREE template as an example since EVERYONE can get that FREE!!
When you “buy” your template, you open the WinRAR file. Once the file loads you will see a box with the files in it. At the top of this box are some ICONS.
Hit the EXTRACT TO ( file folder looking button) option.
When you do that it brings you to your OWN computer files, and you them need to choose WHERE you want the file kept for future downloads!
Example-I created a file for myself under Lauren’s Card Stuff, in that file I have a category that says My Timeless Templates. I go through, and select that. Once I hit the OK button, it saves the files, where I told it to put them.
Then you are done.
Question:I printed up my Music Makeover and the calendar is missing a few months in the file.
Answer: See this tread here
Question: I have Windows Vista. I can download the stocking on the computer that runs Windows XP, but I cannot get it to download on my laptop that runs Windows Vista. I am not a computer expert, so it could be me, but I just cannot figure it out. What am I missing? TIA!
Then later her ANSWER: There is no Extract Files option provided on my computer (which really makes no sense, but its not there). So, DH downloaded a 45 day free trial of WinZip (an extractor program) https://www.winzip.com and now I have the files. I did find that I could not get them from the download now ‘button’ on the page with all the templates. I had to click on the pic/icon to go into the description and click on the download ‘button’ there. I first saved the files and then went into my documents file and attempted to open them from there. When I clicked on them, winzip automatically opened and I went through that (just before it actually unzips them, it tries to put them in some bizare location on my computer, so I clicked browse, and selected the desktop as a location for them to unzip to and later put them in the file I want them stay in), and several clicks later, I had all of the files for both templates!
Thank you to Karen (aka TiikkiStars on the PTI forum)
RETRIEVING YOUR DOWNLAOD
Now I want to play! So I would go find Lauren’s Card Stuff, and open it. Then I find my category “My Timeless Templates”. I open that file and I should be able to find THREE files.
Stocking Stuffer is a 2 page print out so you have your stocking on one, then the additional box & elements on another. Don’t forget EVERY My Timeless Template © also comes with a Project Idea Pamphlet, with full color photos, supply list and instructions for 5 exclusive projects!!
Basically just like you see with your Stocking Stuffer download, that is what you can expect with the for purchase templates as well, every month.
These are all listed in your file separately. So you have to find each file and download.
Another example is the Music Makeover, that is only ONE page for the printer, then you have your Project Idea Pamphlet.
PRINTING YOUR DOWNLOAD
Lots of questions for this part! LOL!
First and foremost-PRINTER SETTINGS!!! This can really impact your template! So here is what you need to do to make sure you are getting the accurate printout-very easy!
Question-I printed my Music Makeover template, and it doesn’t fit my CD case! What am I doing wrong?
Answer: When you go to PRINT your template, most printers automatically set the page scaling to ” FIT TO PRINTABLE AREA”. You DO NOT want that setting! Simply click your selection box, and make sure PAGE SCALING is set to NONE! This way say your Music Makeover box, will print to appropriate size.
Your lines for this template go to the end of the cardstock.
Question: No you are doing everything fine. The templates will not print to the edge-hence the “arrows” telling you to go to the edge. THat is part of the software we use to create the templates.
Answer: No you are doing everything fine. The templates will not print to the
edge-hence the “arrows” telling you to go to the edge. That is part of the
software we use to create the templates.
Question:My cardstock won’t go through my printer! Help!
Answer:This is where you PRINTER MANUAL comes in handy! Or your hubby! My printer is pretty cheap-its a Canon (something or other! LOL!) and it takes PTI cardstock like a DREAM!!
What I learned from this whole printable template thing is that SOME printers need to be put on a setting if you are using something thicker than Copy paper! So check your settings, and then you should be good to go!
What if it REALLY isn’t going to go through?
Well as I saw suggested (by Debbie Stampin CPA-thank you!!) before Print your template onto your copy paper. Apply the template over your cardstock with REMOVABLE adhesive tape. Then cut, and score JUST the copy paper that is ON your cardstock, as directed. When done with all the steps remove the copy paper, and you have the same exact thing!
Each time you want to make another print another template. It is virtually the same thing since you would always be printing a new one on your cardstock!
TIPS:
Print on the BACK of your cardstock!
If you have a pattern or a stamped piece, you want to print on what you want the INSIDE to be! So patterns go FACE DOWN!!
PUTTING TEMPLATE TOGETHER
Question : How do I know where to cut, and where to score?
Answer: The SOLID lines arr for cutting, and —– are for scoring.
TIP:
On some of the templates, like for KEEP{sake} it will say “Print two” that means you need to printouts to put your box together!
OTHER
Question: CAN WE HAVE A KEYWORD FOR THE TEMPLATES?
Answer: Great Idea How about MyTT(insert template name here) Stands for My Timeless Template Example: for the Keep{sake}
MyTTForKeep{sake}
Sound OK?
Comment: I hope you will share a ton of ideas for these templates with all of us every month! I need ideas.
Reply:Well as stated above there will ALWAYS be a EXCLUSIVE Project Idea Pamphlet with 5 projects with the SALE of every template! Those will NOT be shared anywhere else.
I of course will be sharing peeks here on my blog up to the countdown, and ideas with you.
This next comment I thought about not addressing, since it is a personal choice, but if several hundred people really want to ask, then here is my OPINION
Generalized Comment: Can you convince me WHY I should buy your template, when I can try to make these myself?
Reply: I don’t think I should have to convince anyone. Thats not what its about. I helped create a product line that I would love to have, and use. I thought it would be so helpful to many other people 😀 Sharing what I love, and making it faster and easier.
I think the idea book alone is worth the $5! LOL! However, to each person what you want to spend your money on is a personal choice. I am just here to provide you with a TIME SAVING option!
I know I PERSONALLY have spent $8 on ONE plastic traceable template for ONE project! No ideas, nothing, just the plastic piece! By the time I trace it all (and the score lines) you are done printing, and cutting, maybe even scoring your My Timeless Template!
I also have spent $12 on a package of pre-die cut boxes, that I didn’t use too many of since I was limited to the colors it came in :C
To me proudcts that make my crafting faser, easier, and better are priceless.
I take the work and guess work out of you having to get the PERFECT template! Over time you will see the diverse templates I have created. Really it doesn’t get any easier than what we have for you here. I MAKE these templates from scratch, ALL the time, and I am finding the printable versions FABULOUS, and for me, so much easier. That is my opinion and this project is like my baby! It is like asking McDonald’s why you should eat there! LOL!
Bottom line- I love this product and I believe in it 100%. I poured every ounce of my being into it. You also get my PERSONAL support to help with anything you may need for the templates as well. Here I am answering questions and emails and giving a ton of ideas to get you started 😀
Making sure something is perfect can take HOURS. Now you don’t have to bother, unless you really want to. You get to do what you love- and the rest is taken care of. The choice of purchasing it is your own. Another reason we are providing you with a FREE template. Try it out.
Those of you who do workshops, now don’t have to bother with coming up with cool ideas. You can whip up an EASY project with EVERYONE in minutes! No fuss. Then you are focusing on the stamping, and making them feel like THEY CAN DO IT TOO!! There really isn’t a ton of prep work either! If you are a demo you know what I am talking about. I was a demo for several years and would have KILLED to have my ideas to print! I use to go through the hassle of making all my customers make it with me step my step! When you have a room full of 20 people, that is not an easy takes to keep everyone doing the same thing at the same time!!
Also to put it into perspective, think of the things you have TRULY wasted $5 on! That drive thru lunch-one value meal costs over a $1 more than my templates, that you can use OVER AND OVER with not guess work.
How about that specialty coffee? One or two of those adds up to cost my template.
Just some thoughts of mine on that question. If you like a template you saw, then you may want to purchase it. Maybe one month you won’t like something, maybe every month you will.
No matter what your opinion, I truly want to thank everyone for their love & support. Im still recovering from all the excitement here, and HOPE I have helped you with any questions you have! This has been quite the journey.
Please feel free to comment and ask more questions if they arise, or let us know if this Q & A helped answer a issue for you!
I am here for you, so whatever you need I will do my best to help you to the best of my ability. If I don’t know Ill try to find out!
THANK YOU AGAIN!! Enjoy the templates! Can’t wait to see what you do.
Tomorrow I will have a actual project to share 😀
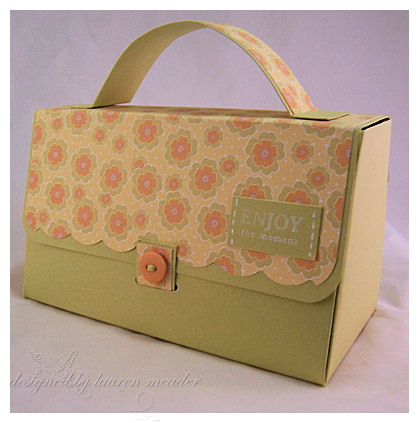
Box of Beauty Purse-onality Clutch
Nov 13, 2008 Author: mytime | Filed under: Home decor/3-D items, My Timeless TemplatesThis is POST #2 for today! Make sure you view the other one.
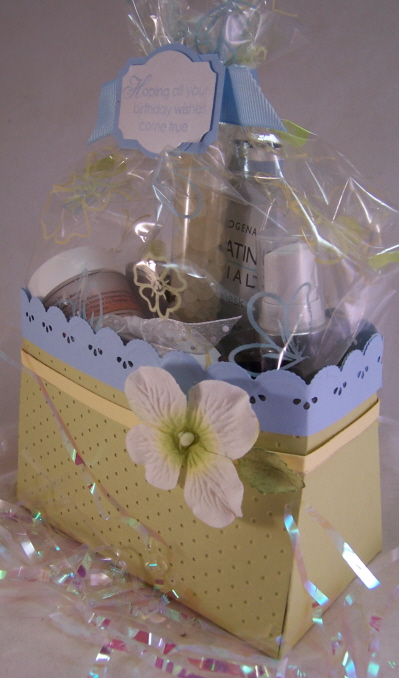
Here we have a Box of Beauty! Made in MINUTES!
I made this cute little gift item using my NEW! My Timeless Templates ©(available HERE on the 15th-release party tonight! 9pm EST HERE! ) Purse-onality Clutch template 😀 Just omit the top flap closure and you have a really pretty and practical gift box!
I hope you get a good feel for the angle of this box by the top photo.
This is filled with some wonderful bath products I received from my PSF Sonia! I have become addicted to her bath product line. She has an Etsy Shop called Essential Goodies. I am in LOVE (in case you want to know what I recommend :D) with her whipped body butter in fresh pear, love spell, and clean cotton!! LOVE!! I also enjoy the body oils.

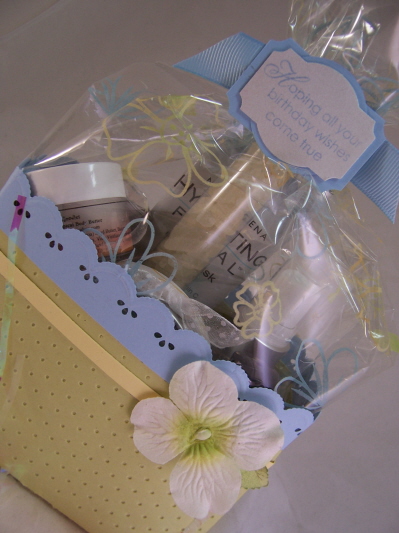
Peeky Peeky inside
BEFORE putting your clutch together, just stamp your cellophane and use my Poppin Acetate technique. I used my Flower Garden set for my cellophane (which can be found in most gift wrapping sections on a roll) with green, yellow, blue and apricot colored shimmery pastels for this creation. Then adhere your stamped cellophane to the inside of the top front & back panels (leaving some excess to wrap around sides of assembled clutch), then tie closed! My tag was created using the Heartfelt Basics, also being released on the 15th.
Anyway, while preparing this for my post sample :D, I thought this little Purse-onality Clutch of bath essentials would be a GREAT idea for a new mom/mom to be :D. You should NEVER forget the new MOM!!! The only thing not from her was the face mask by Neutrogena. You can get several gifts from one box of face masks! Again-think Christmas/ Holiday/Teacher………anyone really! Who doesn’t LOVE pampering?
Front view
So if you are wondering………….I printed my Purse-onality clutch on spring moss cardstock. I then ran the front & back panel through my swiss dots cuttlebug folder (I wanted the dots debossed (pushed IN), not puffed out. I embellished it simply with a Martha Stewart border punch of blue, and a simple Hygrangea flower. I think the colors are SO calming! Perfect for my theme of beauty & relaxation.
So there you have yet ANOTHER idea for what can be done with this template! Don’t forget that you also get an idea book with 5 exclusive (full color photo) projects, with instructions and supplies with every template purchase 😀
I hope to see you at the release party!
Id love to hear your thoughts on the peeks shared so far 😀 and anything you may want to see in the future 😀 You never know……………
See you tonight!
Template Peek-Momogrammed One Sheet Wonder
Nov 13, 2008 Author: mytime | Filed under: Cards, Home decor/3-D items, My Timeless TemplatesOK if this post doesn’t get you excited about making monogrammed cards, holiday gifts, and of course the All Boxed Up© template, then I truly give up! (OK maybe not totally! I do have more to share tomorrow 😀 but I’m hoping you are already drooling) This is sure to make these types of gifts a BREEZE!
Here we go!

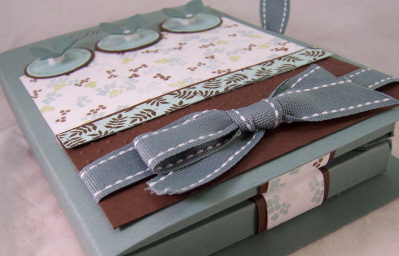
Out on a limb- All Boxed Up cover
I am over the moon for this next gift set I have to share with you! The template I am using today is peek of a new release template called All Boxed Up © from my line of My Timeless Templates. Available on the 15th.
Its ALL stamping and super easy.
View from the bottom
I am sharing a SUPER project that will save you all so much time with those gifts that WOW! Even if you stamp it ALL.
Who doesn’t LOVE monogrammed notecards? Seriously HOT, right? Well to resolve my own personal dilemma, since I DESPISE mass producing the SAME thing over and over, was to make my teacher’s monogrammed gift sets, but make the sets with different cards, to sway my pure boredom! What better way to do that than create a ONE SHEET WONDER set!
Basically what this means is you either cheat BIG time, and use an 8 1/2 X 11 sheet of patterned paper, OR (start now :D) and get back to your roots of stamping your own patterned paper, which is not only more fun, but then you LOOK even MORE crafty to people! LOL!
Many people have asked in the past if I had ever designed something they could save like this. Until now, the answer was NO! I have done my own OSW but never kept track of what I was cutting, I just went with it. Now I did keep track, just for you.
So here is the OSW guideline that I personally designed and used for my cards here today. Further cutting instructions below. You will get a set of 8 notecards from this sheet!
PS BEFORE anyone even brings it up-I am aware I forgot the “e” at the end of envelope. TOO LATE! I designed this template at 2am so bear with me OK! It won’t affect your OSW!

I hope you find it useful 😀 You can get started on your monograms while you wait for the 15th to order the All Boxed Up! Remember you get it right away! No waiting or paying for shipping, so you could have a majority of your teacher/holiday gifts DONE BY Thanksgiving!
So onto the monograms! You will make 2 of each card. I love the different layouts this OSW offers! It doesn’t have that mass produced look, or the feel you had to scrounge for cardstock to come up with nice layouts.

This gift set is going to be for Alexa’s teacher Ms. Mahanes. I think she has been fabulous for Alexa this year, and I am so thankful for all her help and guidance. Her 1:1 aid will get her own set too, and a few other goodies 😀
Supplies:
My Timeless Templates-All Boxed Up ©
For my set I used the flower & berry elements from Out on a Limb Rev., and Out on a limb additions (the little leaf). Limitless labels for my leafy border. Box sentiment is from the Remember set. I also used borders & corners circle set with the Ambassador monogram.
I used coordinating ink and cardstock in : white, dark chocolate, aqua mist, and ocean tides. I also used the ocean tides/dark chocolate twill ribbon on my cards, as well as the stitched grosgrain ribbon in ocean tides. I also stamped the flaps of my envelopes to match!
I used my 1 3/8 circle punch, a layering circle punch, the SU! Scallop circle, a Martha Stewart flower punch, cuttlebug swiss dots embossing folder
SO I just randomly stamped my entire sheet of 8 1/2 X 11 cardstock with my flowers in aqua mist, then again in ocean tides. I went on to add the berry dots in chocolate. When that was complete I randomly added the SINGLE leaf image where I needed it. Cut as listed above.
My envelope pockets wraps
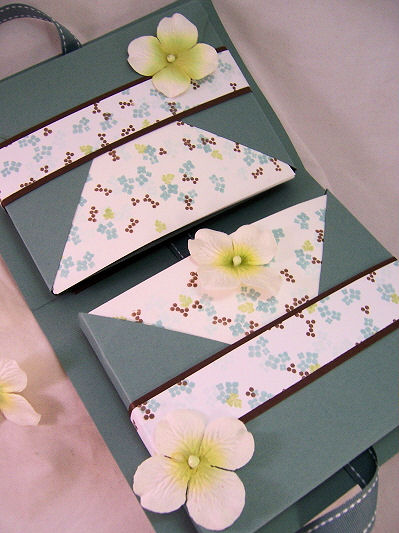
Blossoms box cover opened
This uses the (2) 1 X 11 strips. Layer onto 1 1/4 X 11 chocolate strips and adhere around pockets.
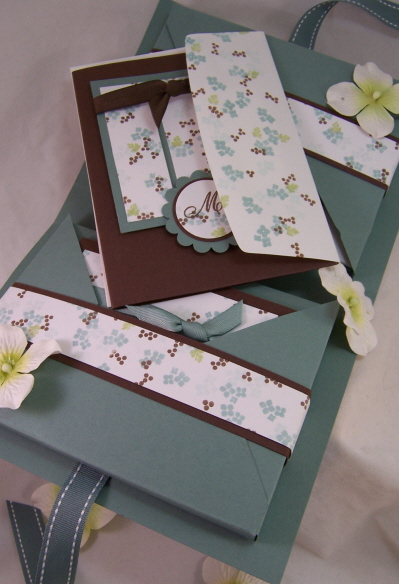
In the top photo, you are seeing my envelope’s in the front of my cards, in the holder . Flaps stamped to match. By putting them first, the completed cards slide in easier, and it-looks very clean and professional.
Card 1

White base
Embossed strip is 2 1/4 X 4 1/4
Each of these cards uses the (2) 2 X 4 strip. Layer on a 2 1/2 X 4 1/4 piece of dark chocolate cardstock for your main panel. Stamp your monogram on a scrap white piece of cardstock, and punch with 1 3/8 circle. Layer with chocolate circle.
Card 2
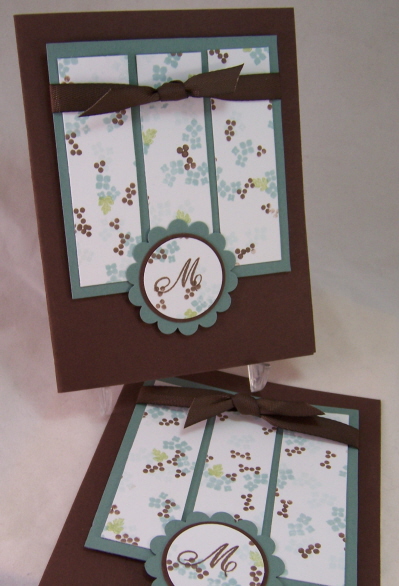
Chocolate base
This card set uses the (3) 1 X 6 1/2 inch strips. Each strip is cut at 3 1/4. This gives you 6 strips of paper size 1 X 3 1/4.
Layer onto 4 X 3 3/4 piece of Ocean Tides cardstock.
Use (2) of the punched patterned 1 3/8 circles for the monograms. Layer onto chocolate circle, and then add a scallop circle in Ocean Tides.
Card 3
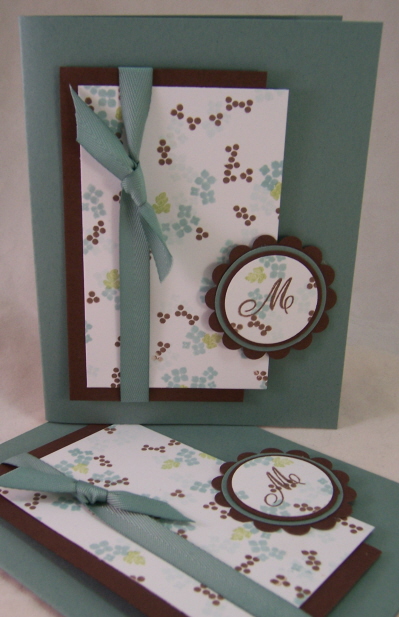
Ocean Tides base
This card uses the 2 X 8 strip. Cut that piece in 1/2. So you now have (2) 2 X 4 inch pieces. Layer onto a chocolate piece that is 4 1/2 X 2 1/2.
Use 2 of the 1 3/8 punched circles for your monogram. Layer onto chocolate, and ocean tides circles, then onto a larger scallop circle.
Card 4
By now we are getting low on patterned cardstock! So we are keepin it simple! NOTHING wrong with that.
Card base is Aqua mist.
Cut (2) 1 1/2 X 5 1/2 inch strip of white cardstock, and layer at bottom.
Cut (2) 1/2 X 5 1/2 inch strips of Ocean Tides cardstock, and layer above white strip.
Use last (2) 1 3/8 punched circle for monograms. Layer onto chocolate circle.
Now you are done your set of 8 monogram notecards! Each one as pretty as the last, with little to no waste of cardstock!
I hope you enjoyed today’s peek with my template. I know I had fun making it. All this template work is helping me get holiday gifts done early, and better yet, keeping it all handmade. Not only is that special, but it saves me $$, which makes Jay VERY happy! LOL! For the cost of ONE $5 printable template you can make unique endless gifts over & over 😀 That is PRICELESS!
Thanks for checking in here.
More to come…………..tomorrow!
Teacher’s Gifts Galore
Nov 12, 2008 Author: mytime | Filed under: Cards, Home decor/3-D items, My Timeless TemplatesThis is post # 3 for today so be sure to go to the 2 others so you don’t miss anything! All template samples 😀
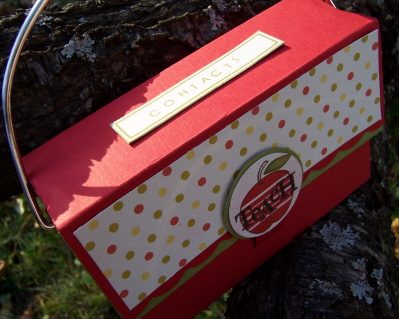
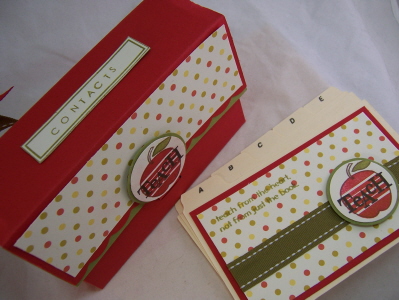
Teacher Contacts Clutch- a modern version rolodex!
With a Timeless twist
Nichole has challenged her design team to come up with some great Teacher gift ideas for you to use this holiday season. She has an AMAZING set releasing called Teacher’s Apple. Its the CUTEST set-ever! Let me just tell you I had to make a concious decision to STOP using it. I kid you not. What a GREAT time of year to release a teacher set!!! The images, and especially the sentiments are A-M-A-Z-I-N-G!!!
I know this is the time of year I focus on teachers, and make teacher gifts. I never make anything at the start of the school year, and by Christmas, anything I did buy is long forgotten. So yes, November is a great month to release this set IMO.
I loved the challenge because it made me get started on my teacher gifts early this year-YEAH!
Given the fact I have 3 kids, and each has NUMEROUS teachers, I try my best to make each one something every year, never repeating the same gifts. Always gotta top last year! LOL! I hope they like what I have planned, and you do as well!
Ever go shopping and see something, and the light-bulb goes off?
Well that is what happened to me!
I was at Staples, and I knew I needed some “stuff”. (I always need stuff) I walked by one section and came across these “Rolodex” type of index card inserts. Cost a WHOPPING $2.99!!!!!!!!!!
Well there went the light! I checked the size on them and YES! not only would they fit in my NEW! Purse-onality Clutch, but they would fit PERFECTLY!!! HAPPY DANCE!!
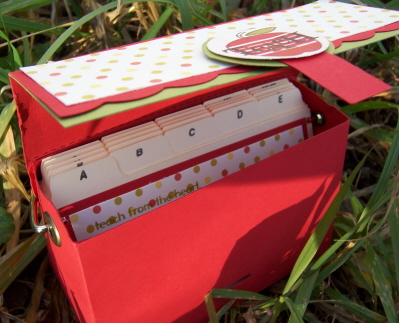
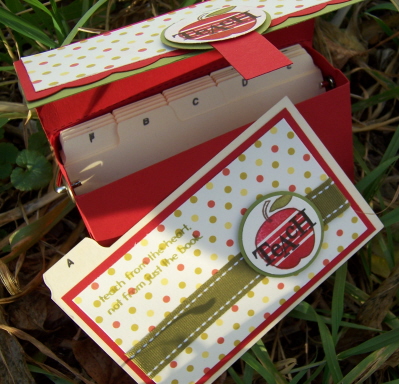
Contact’s Clutch open
So I flew home, printed my template, cut and score, and YEAH!! They DID fit in my Purse-onality Clutch © In just a few minutes, this is what I had done.
This little beauty is going to be able to sit right on every teachers desk, every year! The teacher’s can file their parents or other personal contact info and keep it handy. Remove and change out what need’s to be, yearly.
Isn’t it cute? I loved the idea, and the fact I can use my own template is a HUGE bonus and TIME SAVER 😀
Supplies:
My Timeless Template-Purse-onality Clutch
Stamps- Teachers Apple, Recipe Box Label, Simple Alphabet
Cardstock– Pure Poppy, White, Ripe Avocado
Ink-dark chocolate, black, pure poppy, ripe avocado
ribbon- stitched ripe avocado
other- paint can handle, large brads, Rolodex cards
Be sure to check in on the design team.
Papertrey Design Team
- Niki Estes
- Nichole
- Michelle Wooderson
- Melissa Phillips
- Lisa Johnson
- Lauren Meader
- Heather Nichols
- Geny Cassady
- Debbie Olson
- Dawn McVey
- Betsy Veldman
- Becky Oehlers
I am sure you will find your light-bulb moment!
Thanks again for reading! Feel free to share your thoughts 😀
Happy 6th Birthday Noah! Template activity
Nov 12, 2008 Author: mytime | Filed under: Cards, My Timeless TemplatesPOST 2 FOR TODAY! Be sure to check the other entries!
WOW! I cannot believe my baby boy is 6 today! That means he needs 2 hands to show his age. Where has the time gone? Before I know it he’ll be driving.
Oh boy I get teary just thinking about it. He is already so “old” for his age to me. Its like he is the oldest child most times.
I have SO much to say about him and his day, but will save all that for his actual birthday party post (YIKES! I still have Amber’s to do-bad mommy!), which I am also trying to get the favors and stuff for that done in between everything else.
Anyway, before I go WAY off on a tangent of emotion, not meant for this entry, I have to move on. I have shared before that my kids and I always do an afternoon craft. I have to say My Timeless Templates have been a great part of that!! Making my planning for the craft SO much easier. No, Im not just saying that 😀 Its true.
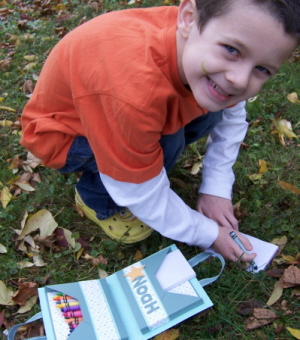
Noah draws
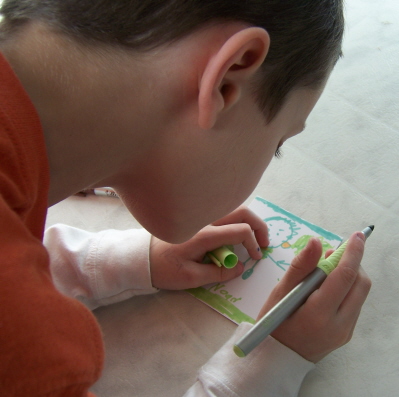
So we are all (me & the 3 kids) crafting in my stamp room, and I’m whipping up samples for my templates to share with you all, and Noah says to me “Hey mom, can I make one of what you are making?” I told him that I wasn’t sure what we were doing yet. He then told me “But mom I have a super duper cool idea for you” (yes just like that! LOL! He really cracks me up) I said “Oh yeah?! What’s this idea?” Not thinking he actually DID have an idea besides coloring it, let along a cool one. Then Noah said “I can decorate that thing with my pictures, and in that little thing inside (the pockets), I can put my crayons and my notebooks to take with me in the car when we go far away” Now where we live even the food store is about a 1/2 hour so that “far away” is every place we go! LOL!
SO I listened to his idea and this is what we did!
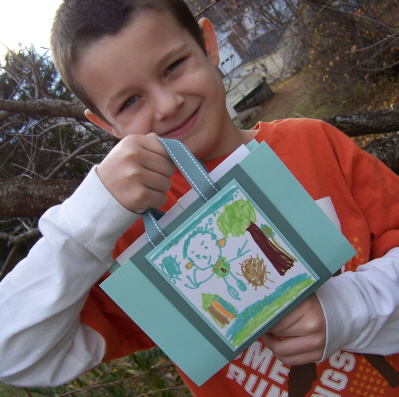
Noah and his All Boxed Up tote
(love the drawing)
WOW! Was I ever floored! I need to ask my kids opinions MORE. That WAS a cool idea!! So we did it!! Noah picked the colors, paper, and the fact he wanted his name and a star. I put the All Boxed Up together (I had to have it perfect since he was actually using it!), and Noah helped with the whole thing! Gluing and deciding where things would go! He was SOOOOOO excited my his project, it was really cool to see.
Side 2 of his tote
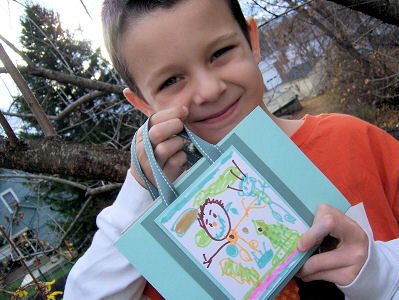
Yes that is a Christmas tree in the lower right corner! LOL!
Now here is the open view
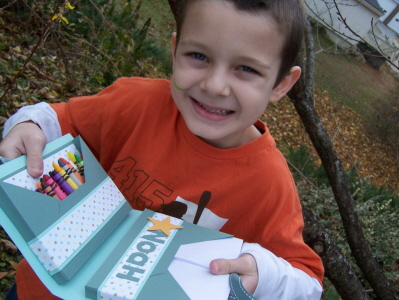
Marker on his face from his labor of love.
He couldn’t even wait for a car ride. He started using it as soon as I told him we were done getting photos.
What mom wouldn’t be proud?!
I had a nice mommy moment and he had a creative epiphany! It was a good day. One I will cherish always.
We have a full day of fun things to do for his day. One which includes playing hookey!!
I love you Noah! Happy Birthday my sweet, amazing boy! I hope you always want to spend time with me, even when you grow up, and Im no longer “fun” 😀
My Timeless Template FREEBIE :D
Nov 12, 2008 Author: mytime | Filed under: Cards, My Timeless TemplatesTHIS IS POST # 1 of 3 for today!! Each post is for a template sample, so you will definitely want to scroll down to the next post!!!
Well I am sure you are all DYING to know what the FREE My Timeless Template © is going to be this month. I received many emails and guesses. Your excitement is just awesome!!! It truly makes my day. This time of the month is CRAZY for me, but in a fabulous way. So thank you for making it awesome! ♥
If you are wondering what the template it you may want to Check this out!
After literally HUNDREDS of emails (awe you make a girl feel special) Nichole and I decided that you may be pretty happy to have the Recipe Wrap Up© as your FREEBIE!
NOTE: The newest templates and NEWEST FREE download aren’t available unil the 15th!
Now if the whole “recipe” idea is not your thing I’m sure the idea catalog that you get to download with the template (remember the idea book comes with EVERY download, is in full color with 5 EXCLUSIVE projects, supplies and instructions) will fill your brain with many creative ideas!
But before then, I want to share another idea for the template download. Don’t let yourself get limited by the original name of the first few samples! The hardest part of these projects is DONE! You just have to print , cut, score and go! The rest is up to your creative imagination 😀
This projet uses ONE of the printable wrap up’s (for the original wrap up you would print 2 templates) and one of the envelope’s from the template (original project uses 6).
How many times do you wish you had a unique money holder? For maybe a pretty wrap up for some notecards? Well now you can whip them up, every time.
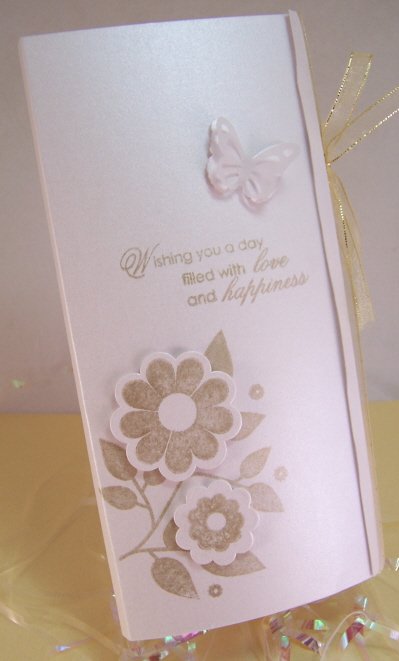
Wedding Wrap Up-Money Holder
I love simple and elegant wedding cards. This template makes this style of card so easy!
I printed my wrap, and scored. I then added another little score, and what is normally the side seam, attaching the 2 wrap up panels. This little extra score makes the little lip you see on the right, that helps hold this closed.
I secured it closed with my gold ribbon
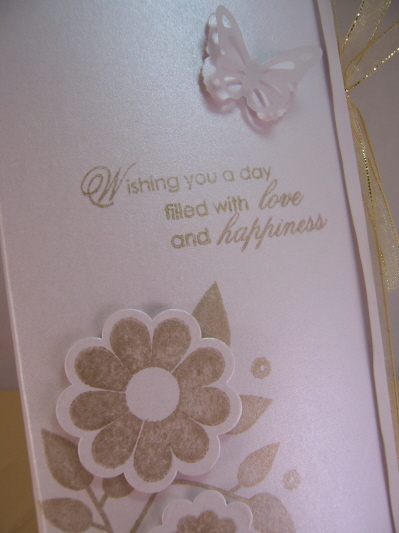
This sentiment is PERFECT! It is from the upcoming release on the 15th Heartfelt Basics. It really conveyed the perfect message for the newlyweds!
I used a shimmery white cardstock as my base. Now that really say’s elegance to me.I stamped my Beautiful Blooms in Encore Gold Ink. I used my cuttlebug flowers #1 die to die cut my flowers.
The butterflies are both Martha Stewart Punches. I LOVE those punches!!
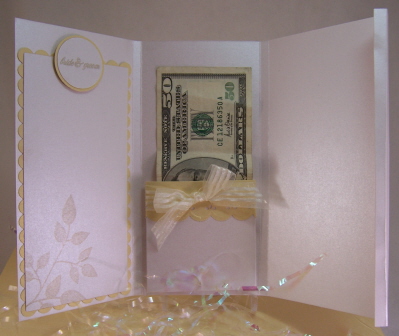
Now when you unfold it…………….

Wa-La!
You see this.
Isn’t it just the prettiest money holder (I know my $50 isn’t “pretty”. I used what I had for my photo purposes. This is actually going in Noah’s new wallet as part of his birthday gift today! Yes its his bday!!) ever . I told you I love simple!
I also chose to use Wedding Day for my “bride & groom” sentiment-it was the perfect touch.
The panel on the right is plain, but a photo of the happy couple would be REALLY nice to add without BULK! Don’t you think? I should have dug one up! Oh well.
Now on the notecard, you can attach our written wishes/advice for successful & happy marriage for the newly wed couple. You should use remove-able adhesive for that panel so that they can save it in a book 😀 OK that is just what I would do-you don’t HAVE to.
SO that is just ONE other idea for the Recipe Wrap Up!
You will have to let me know what you think! I know I’m pretty excited with this template, and giving you another shot at a FREEBIE!!!
Template Talk-
If you are NEW to my blog and have NO IDEA what I am speaking about-read this!
My templates are for various gift packaging, and they are SO EASY! Just download once, print, cut, score and assemble. Done in minutes. EASY PEASY! You can make great gifts over and over again for the purchase of one template.
If you want to see our other templates (we just started this product line last month) then click here! You can also try a FREE template there as well ![]() Also see my sidebar. I have a My Timeless Template category that you are able to click and view any past projects I have created here, for some ideas.
Also see my sidebar. I have a My Timeless Template category that you are able to click and view any past projects I have created here, for some ideas.
———————————————
Be sure you check in with Nichole for more peeks, and links, as well as Melissa & Lisa!
Thanks for reading
My Timeless Template © Peek #2 Purse-onality Clutch
Nov 11, 2008 Author: mytime | Filed under: Home decor/3-D items, My Timeless TemplatesToday I have a FUN peek for you 😀 It uses my NEW! Purse-onality Clutch template that is being released on the 15th. I cannot tell you how much I LOVE this particular template. (OK well I guess I love them all, but you get the idea)
I KNOW when you read “purse” you thought GIRLY right?! Well think again!
I am making it MASCULINE!
Just because it is called a “Purse”-onality clutch doesn’t mean its just for girls! Not that it isn’t adorable, but it can be masculine too. Each “purse” can take on a whole new look when you put your very own personal touch to it. Males can be some of the toughest gifts for we papercrafters! Why not try a little briefcase?
By making your cardstock look a bit like a “leather” or textured fabric you can change the entire project.
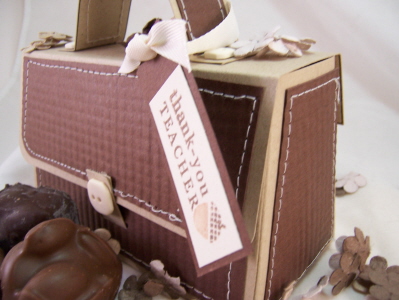
Here we have “Let’s Be Brief!”
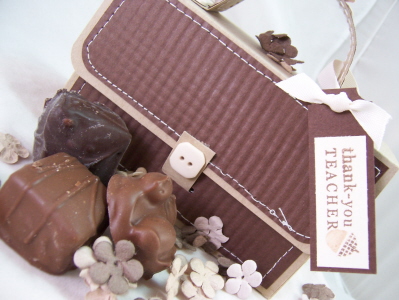
There is nothing feminine about this bag. With a little texture you have a super cute briefcase that makes any guy beam with delight. Fill’er up with his favorite box of chocolates, truffles, turtles, peanuts, cookies, or a great gift card, and he is sure to be happy!
I have some MALE teachers for my kids that are generally neglected in the “handmade” gift department. Well, not this year!
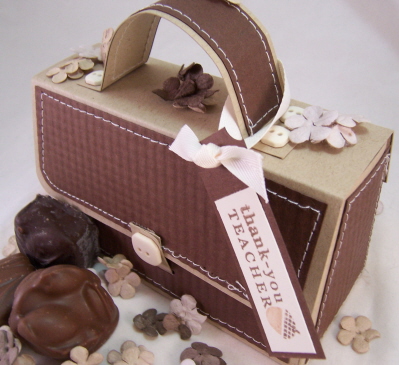
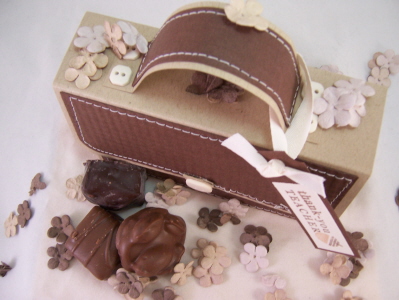
I hope you can see that this clutch is very different. It has a nice double angle to it on the sides, making it super fun to make, and even better to receive!
More ideas will follow!
The tab fits into a perfect little slot, and holds the lid closed. Its a nice touch that finishes it off.
Supplies:
stamps-Limitless Labels
paper-Kraft, Dark Chocolate, Vintage Cream
ink- Dark Chocolate, Creamy Caramel
other-Vintage Cream twill, Paper Crimper, cream buttons, sewing machine
Instructions:
1. Print purse-onality clutch template onto Kraft cardstock.
2. Cut, and score per template guide.
3. Cut layers for each panel from dark chocolate cardstock.
4. Run each panel piece through your paper crimper, going in opposite directions, to give it a textured look of leather.
NOTE: DO NOT over squeeze your crimper handle as you go in the opposite direction. It will crimp out the other lines is you do, and we don’t want that!!
5. Sew panels using method of your choice. I sewed mine directly onto my template prior to assembly. Didn’t even think to sew the panels FIRST, then adhere! A huge DUH! moment. YOU get to benefit from my mistakes! LOL!
OPTIONAL METHODS: You can faux sew using a white gel pen, and paper piercer. OR you can sew your panels prior to adhering them to the purse-onality template. OR after they are adhered, sew them on.
6. Once faux leather panels are adhered, assemble template. Add buttons or other embellishments of your choosing.
7. Create a tag to suit the receiver. In this case a MALE teacher!

6. Fill with something delicious.
In this box we have the Mrs. Fields chocolate trio’s that sell for a $1 at the Target $1 spot!
Cute and inexpensive too 😀
Template Talk-
If you are NEW to my blog and have NO IDEA what I am speaking about-read this!
My templates are for various gift packaging, and they are SO EASY! Just download once, print, cut, score and assemble. Done in minutes. EASY PEASY! You can make great gifts over and over again for the purchase of one template.
If you want to see our other templates (we just started this product line last month) then click here! You can also try a FREE template there as well ![]() Also see my sidebar. I have a My Timeless Template category that you are able to click and view any past projects I have created here, for some ideas.
Also see my sidebar. I have a My Timeless Template category that you are able to click and view any past projects I have created here, for some ideas.
————————————————–
SO that is all for this template for today! Tomorrow I will share what our FREE download will be for this month, and MORE samples that you won’t want to miss. TRUST ME, I can barely contain myself.
Be sure you check in with Nichole for more peeks, as well as Melissa & Lisa!
My Timeless Template © Peek #1 All Boxed Up!
Nov 10, 2008 Author: mytime | Filed under: Home decor/3-D items, My Timeless TemplatesYIPPEE!! I am so very excited to share my first peek at my next round of My Timeless Templates © I lose sleep over sharing this stuff with you all, so I hope you are inspired in some way over the next few days here. A lot of time and planning goes into everything we have done for the templates so that you get so many ideas and inspiration. Most importantly, you are able to re-create your own gifts!
This month we have THREE templates! Two available for purchase (ONLY $5 each) and ONE for FREE!!! Yes we are doing ONE more freebie 😀 It was a popular request, so I hope you will be happy when you see what it is.
Today I kept the project SIMPLE. I have lots of other behind the scenes stuff to complete for the countdown. You don’t need a ton of time to make this project. In fact typing everything up takes WAY longer than the actual project. Hence why I’m keeping today simple.
If you are NEW to my blog and have NO IDEA what I am speaking about-scroll down for all the details 😀
This one is called All Boxed Up ©!
It is THE perfect card box/holder, just in time for the holidays 😀 (yes I do have other amazing holders coming out for your cards-we are afterall CARD makers right?!)
When you use patterned paper this project looks so detailed but comes together so quickly! I decided that the Au Chocolat paper line was PERFECT for my first peek. This project took LESS than 15 minutes to make, and like an hour to type (since Im tired).
I designed my cover to look like a book. I used the stem from my Flower Garden set, stamped in white Craft ink. I used my flower punch for the bloom. I made the leaves pop forward, and layered with dimensionals. The center is from Text Boxed. Sentiment is from Beautiful Blooms
View from the side-tied closed

View from the bottom
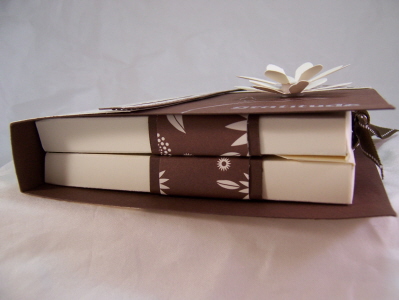
I know many of you wanted some nice card packaging so I hope you are as happy with this as I am 😀 It can easily hold 8 A2 sized, embellished cards, and 8 envelopes 😀 I have an over the top AMAZING gift set to share with you during my peeks here, using this template. You are going to want CASE it for ALL your Christmas/ Hanukkah gifts this year 😀 I swear.
I am also certain you can find other uses for this handy holder once you get it into your hot little hands.
Here is a view, opened up-with cards and envelopes in the pockets
I really love the angle at which the card pockets come together. They alone are a great template (you’ll see more on that later :D)
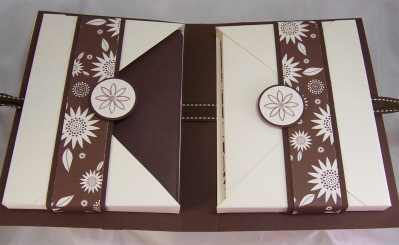
Now we have my simple cards to match- out of the holder

I lined my inner pocket for a quick detailed, and finished look.
Not to get you drooling, but wait until you see my other projects I created for the countdown! A real WOW!!
Template Talk
If you are NEW to my blog and have NO IDEA what I am speaking about-read this
My templates are for various gift packaging, and they are SO EASY! Just download once, print, cut, score and assemble. Done in minutes. EASY PEASY! You can make great gifts over and over again for the purchase of one template.
If you want to see our other templates (we just started this product line last month) then click here! You can also try a FREE template there as well ![]() Also see my sidebar. I have a My Timeless Template category that you are able to click and view any past projects I have created here, for some ideas.
Also see my sidebar. I have a My Timeless Template category that you are able to click and view any past projects I have created here, for some ideas.
——————————————————–
Be sure you check in with Nichole for more peeks, as well as Melissa & Lisa!
I’ll be back tomorrow for MORE peeks!
Thanks for taking the time out of your busy day, to check in and see what I have for you. All the comments, emails and support ( I read every single thing you send me) make every minute I have invested in this, worth every second. You all truly make my day. I really want to thank you for the bitty bottom of my heart ♥ (<—–YEAH! I *just* figured out how to do that! LOL!)
Well, till tomorrow.
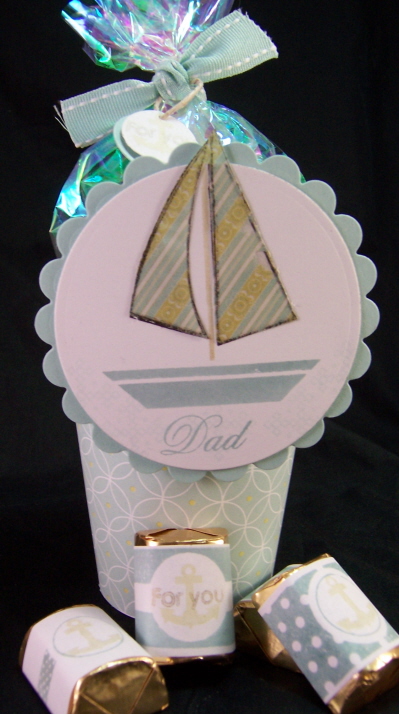
#1 Men of Life-Stained Glass Dixie Cup Cover
Nov 9, 2008 Author: mytime | Filed under: Papertrey Newsletter, TutorialsToday is the 10th. That means its my mother-in-law’s birthday (Happy Birthday Mom!) and its Day #1 of thePapertrey Ink peeks!
(Tomorrow we will start peeks for My Timeless Templates© too-so check back in OK!)
My peek today uses Men of Life, designed by Melissa Bickford. It will be released on the 15th.
I love this set, and all the different images for the sails of the boat. When coming up with what I should share with you, I figured a technique would be fun. Its one of my favorites for open line images and it is called Stained Glass. I hope something I share today is new to you.
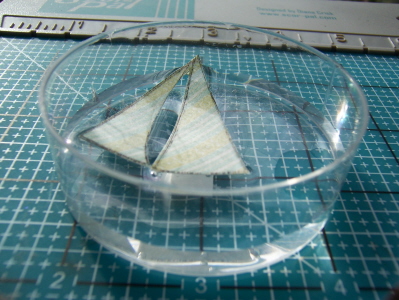
I wanted to use the sailboat image, and wrap up some Toffee Hershey nuggets for my dad. Having no more nugget tins (which I neer use for nuggets! LOL!) I figured a little altered Dixie Cup favor would be a cute variation to share too.
So here we go!
With the holidays approaching and 3 kids, I strive for crafts that they can do themselves, and are fast, fun & easy 😀 I remember making these in 5th grade, so I thought it would be fun to revisit in my adult years. Its not only a kid friendly activity, but its pretty cheap too 😀
I hope you like it.
HONESTLY think how cute these would be for a BABY SHOWER ! Add a little ribbon handle! Oh so cute. LOL! Make it baby colors…………oh boy!
Dixie Cup Cover
Make a template for your dixie cup cover. To do this just cut apart one cup as a sample.
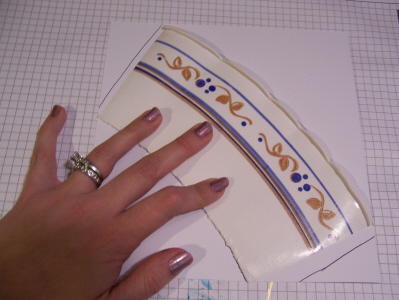
Then trace, leaving a little extra for a seam allowance
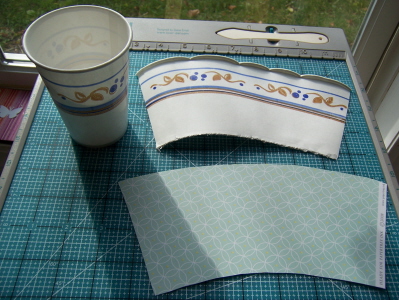
Cut out from patterned paper. I used Everyday Blessing for my creation here.
Then wrap the cup!
I decided to line to top portion with some pretty cellophane, that I attached at the inner top of my cup using redline tape.
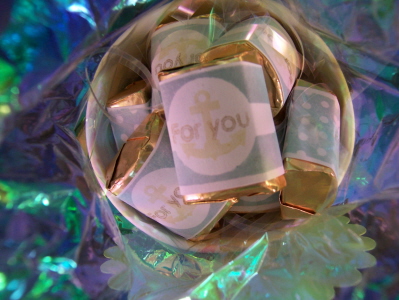
I then put in some pretty filler, and added my stamped nuggets, to match!
(I used the anchor image and sentiment from the Men of Life set, and Limitless Labels and Holiday Treats, for my candy labels) I also used Spring Moss, Aqua Mist & Ocean Breeze and Encore gold ink.
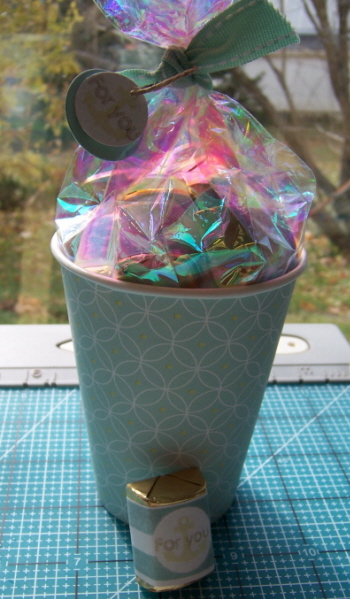
View of inside, from top of Dixie Cup.
I then tied it closed, with a little tag.
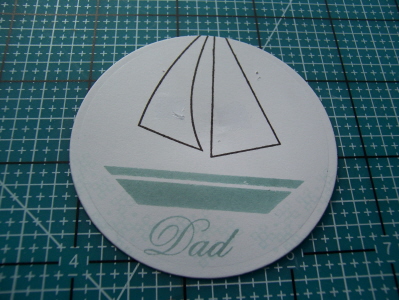
Now all I need to do is make my sailboat designer label.
Stained Glass Technique-
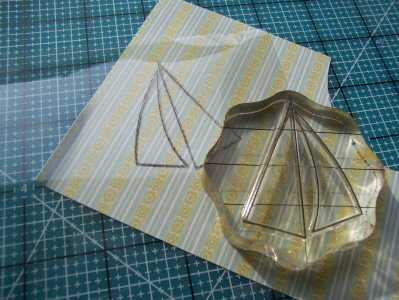
Stamp open line sail image onto acetate, using Pallette black ink. Heat set carefully.
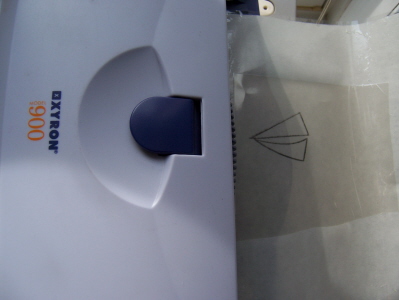
Run acetate sheet through Xyron sticker machine.
Peel off paper backing
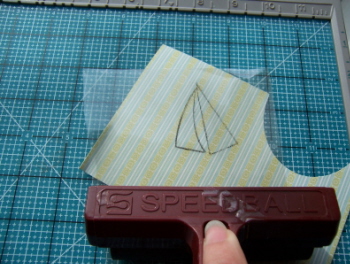
Place where desired on patterned paper. Use a rubber brayer to ensure a good stick.
Trim out sails
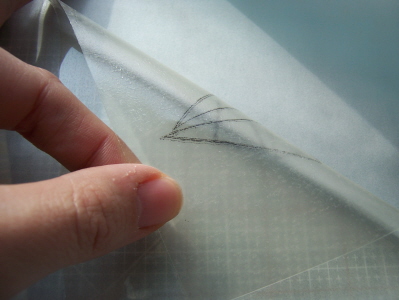
Soak image in water for several minutes.

Remove from water, then GENTLY rub off the paper backing. Don’t rub off too much!
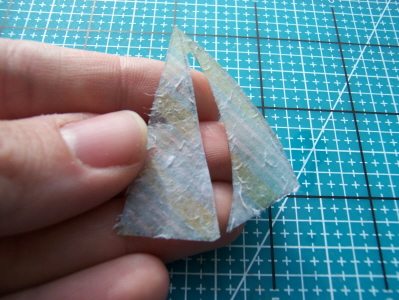
Be sure you still have a light paper coating on the acetate when done. This layer will get re-sticky! Now you have a SHEER pattern that appears on the front of your acetate sails!
Let dry.
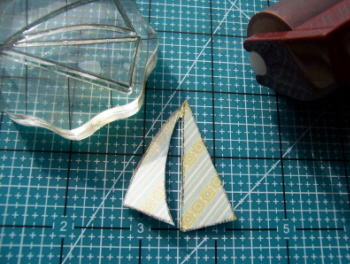
Now layer onto stamped main layer image-apply a little bit of adhesive for extra stick.
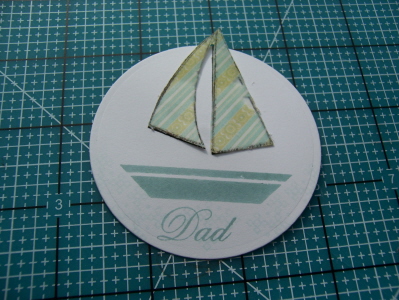
I wanted my sails to pop out over the circle, so I die cut mine to be a bit smaller. I then layered onto a scallop circle.
DONE!
This will then get adhered to my Dixie Cup front!
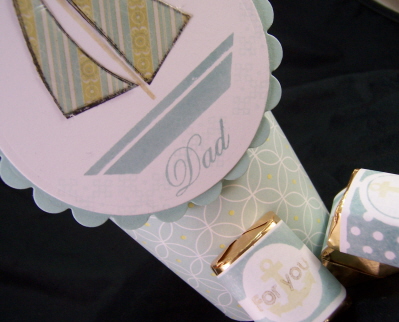
Can you see the lightly stamped “water” on my label? A subtle touch.
There you have it! A super cute and easy favor or little treatlet idea for any occasion!
Be sure to check Nichole’s blog for more peeks, and stop in tomorrow for the start of My Timeless Template© peeks!! It’s going to be a BUSY, and AMAZING next couple of days here! Each post will be jam packed with creative ideas, just in time for the holidays, using my newest release of templates!!
Let me know what you think 😀 and ALWAYS thanks for checking in with me 😀 You all make my day.
Till tomorrow.
My Etsy

Who I Designed For
Blogroll
- Alicia
- Alli Miles
- Ally Blankenship
- Amber
- Andi @ crafts on a whim
- Angel R
- Angie Z
- Anne Kranitz
- Becky O
- Bee
- Beth Silaka
- Bethany Paull
- Beverly Nash
- Bobbie
- Cambria
- Cammie
- Card of the Week
- Card Positioning System (CPS)
- Cards for Cancer
- Catherine Doucette
- Charmaine
- Cheryl Sims
- Chriss Rollins
- Christina
- Christine Ewing
- Christine Wooden
- Colleen Schaan
- Craft Critique
- Craft Gossip
- Crystal
- Dawn Easton
- Emily Giovanni
- Geny
- Holly
- Igne Groot
- Inspirational Craft Blogs
- Irene
- Jami Sibley
- Jeanne Streiff
- Jen del Muro
- Jeni Bond
- JenMarie
- Jenn Balcer
- Jenn Diercks
- Jenn O
- Jennifer E
- Jennifer Mick
- Jennifer Pereda
- Jennifer-Sweet Treat
- Joanne Basile
- Jodi Collins
- Julia Stainton
- Julie Masse
- Karen
- Kathryn Berthiaume
- Katie Cotton
- Kelley Holland
- Kendra
- Kim Scholfield
- Kris’s Color Stripes! Get inspired here
- Kristen Dubosque
- Kristin Eberline
- Kristine
- Laura @ Sunshine Stamper
- Laura Turnmire
- Laurie Schmidlin
- Lesa Rapp
- Linda Duke
- Linda-LSN
- Lindsey Botkin
- Lisa (lakind scs)
- Lisa Kind
- Lori Craig
- Maggie
- Mara Campbell
- Maria
- Maria Levine
- Mary
- MaryJo
- Melanie M
- Monique Hansen
- Moxie Fab World
- Pam Imholz
- PaperCrafts Connection
- Peppers and Pollywogs Kids party site
- Rebecca Grohall
- Rita
- Robyn
- Rose Ann
- Sarah Vrolyk
- Sharon Harnist
- Sharon Johnson
- Sharon Rivera (a chemisrty with paper)
- Sherrie
- Sophia Landry
- Storage Units, Ink, & More Blog
- Sue Berker
- Susan (Rainy)
- Tangii Crane
- Tracy
- Tricia Traxler
- Trudee
- Velta
- VivLyn
- Zena
MTME Pretty Palette Color Team
MTME Pretty Patterns Sketch Team
My Time Made Easy TM LLC
Shop till you drop!
Lauren Meader
About Me
Copyrighted material
Subscribe To My Blog
Pages
- About me
- Alexa’s Story!
- My Crafty Corner!
- My Time Made Easy™ LLC
- Our Make A Wish Trip to Disney!
- Resume/Publication List
Calendar
| M | T | W | T | F | S | S |
|---|---|---|---|---|---|---|
| 1 | 2 | 3 | 4 | 5 | ||
| 6 | 7 | 8 | 9 | 10 | 11 | 12 |
| 13 | 14 | 15 | 16 | 17 | 18 | 19 |
| 20 | 21 | 22 | 23 | 24 | 25 | 26 |
| 27 | 28 | 29 | 30 | 31 | ||
Archives
- August 2013
- July 2013
- June 2013
- May 2013
- April 2013
- March 2013
- February 2013
- January 2013
- December 2012
- November 2012
- October 2012
- September 2012
- August 2012
- July 2012
- June 2012
- May 2012
- April 2012
- March 2012
- February 2012
- January 2012
- December 2011
- November 2011
- October 2011
- September 2011
- August 2011
- July 2011
- June 2011
- May 2011
- April 2011
- March 2011
- February 2011
- January 2011
- December 2010
- November 2010
- October 2010
- September 2010
- August 2010
- July 2010
- June 2010
- May 2010
- April 2010
- March 2010
- February 2010
- January 2010
- December 2009
- November 2009
- October 2009
- September 2009
- August 2009
- July 2009
- June 2009
- May 2009
- April 2009
- March 2009
- February 2009
- January 2009
- December 2008
- November 2008
- October 2008
- September 2008
- August 2008
- July 2008
- June 2008
- May 2008
- April 2008
- March 2008
- February 2008
- January 2008
- December 2007
- November 2007
- October 2007
- September 2007
- August 2007
- July 2007
- June 2007
- May 2007
- April 2007
- March 2007
- January 2007
Categories
- About Me
- All That Scraps
- blogger challenge
- camera/photo play
- Cards
- Contests
- family stuff
- FOR SALE
- Home decor/3-D items
- How to FAKE it!
- Introduction
- JUGS Challenge
- JustRite Stampers
- Lizzie Anne Designs
- My family stuff
- My Stamping Space
- My Time Made Easy
- My Time To Color Challenge
- My Time to Create Challenge
- My Timeless Template Challenge
- My Timeless Templates
- Mytime Mail
- MYTIME MOVIE/VIDEOs
- Papertrey Newsletter
- Pink Cat Studio
- Pretty Palette Challenge
- Pretty Patterns Sketch
- Product Opinions and Must haves
- Recipe's
- Saturday Sketch
- Smilebox Creations
- Stampavie
- Tutorials
- Uncategorized
- videos
Most Popular
- Create your own Onesie Card Tutorial-and important NOTE! PLEASE READ (2529)
- Saturday Sketch-Boxed bag holder (2333)
- Going GREEN! Fancy Flower Flourish-Closure Video (1478)
- Fabulous Favorite - Giveaway! (1336)
- a Prayer Request (1232)
- QUICK-Easter Baskets from Nestabilities-PTI style-and blog challenge (1063)
- Teaser Sketch (999)
- February Release Giveway! (and a little peek) (996)
- Group Post and Rambling Rose Video Tutorial (985)
- GIVEAWAY! Who wants it all?! (895)
Recent Comments (RSS)
- Daya Sons: Daya Sons, a renowned manufacturer
- 첫충사이트: 완전히 흥미로운 블로그 게시입니다. 저는
- sarah: Wow, Lauren, what a stunning
- hedie: خرید راهبند
- 야동: Love to read it,Waiting For
- 야동: This seller is in a
- 바카라사이트: 여기 처음 왔어요. 나는이 게시판을
- 야동티비: I was surfing the Internet
- 바카라사이트: 비슷한 주제에 대한 흥미로운 정보를
- 바카라사이트: "여기에 제공해 주신 귀중한 정보와
Copyright © 2007 - My Time, My Creations, My Stampendence - is proudly powered by WordPress
This blog has been Tweaked and Designed by Sara Williams