Archive for the ‘Home decor/3-D items’ Category
Embellish It
May 31, 2009 Author: mytime | Filed under: Home decor/3-D items, Papertrey Newsletter, TutorialsIts the first! So this post is all about facing a Challenge! Keep reading.
Before I begin I have NO IDEA what is up with my photos running into the sidebar. I resized a few times with little success. I honestly don’t have time to resize each one for the 5th time, then reload! GRR This post ended up taking several hours because of it, and I am over it. I hope you get the general details of it all. SORRY!
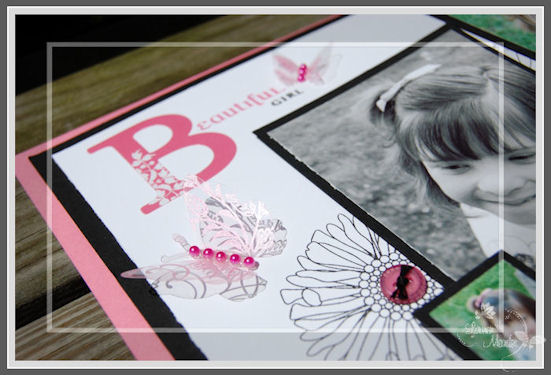
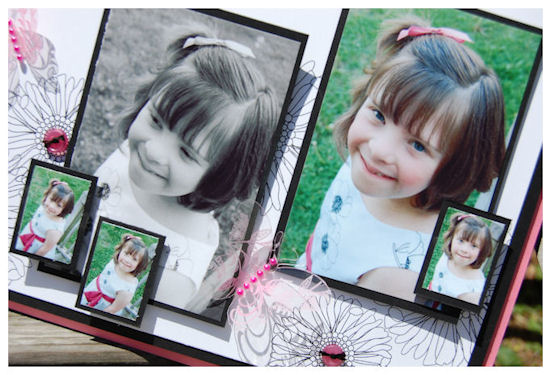
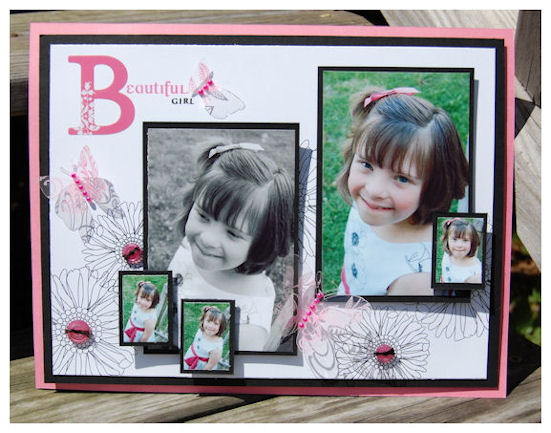
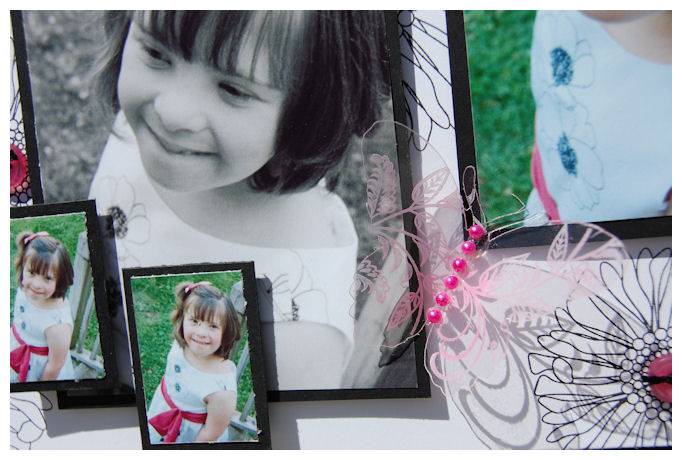
Alexa-Beautiful Girl

It is NOT often I do a “scrapbook page”.
I have to be REALLY inspired by something to even THINK of it. I had a particularly inspiring “photo shoot” with my daughter Alexa. She is ALMOST 10!
She was in a Spring Concert at School a week or so ago. She looked ADORABLE in her new dress that she picked out. We curled her hair, and got her ready- all pretty, so we had a photo session outside before the Concert.
To me, these are some of the BEST photos I have ever gotten of her! She was SOOOO “Alexa” when she is NOT in front of the camera. She usually can’t pose or makes funny faces, when you tell her to smile. She just contorts her face so unnaturally! LOL! So I just tried to let her be natural, herself. Cracking jokes while I took photos. THAT actually worked!!
I KNEW I wanted to capture them in a special way-forever!
This page just FLOWED out of me so easily. I’m beyond proud of it-especially my SUBJECT-Alexa :D)
She, to me, is like a butterfly. Hence my page. It is more than just a pretty page to me. It is capturing my thoughts, feelings and journey with my little girl, who has changed so much over the last few years.
This seemingly fragile human being, that started with so many odds against her, and despite it all, has morphed from the caterpillar (who avoided getting eaten by the “birds”-aka all her life obstacles) into a BEAUTIFUL butterfly. Spreading her wings, and taking flight. Never did I think I would have such a blessing in my life 10 years ago. Many times I thought I would lose her sweet little life. I always cry when I type these posts about her. I hate that!
I could go on and on, but will end it there. I get very emotional when I think of Alexa and her journey through life. I already know I will ALWAYS be so proud of her and where she will be in life. I am now! And Im so thankful for our journey. ALL OF IT. Thankful that God chose me, off all the people in the world to take her journey with her. What a blessing she is.
Now I switch my emotional gears to the project challenge.
That then lead me to the challenge that Nichole posed for her design team.
We were to create our own embellishments, inspired by some embellishments on the market, that you could purchase. Our goal was to share how much more affordable-and even how EASY, it is to create your own.
I was inspired by Heidi Swapp Butterfly Ghost Shapes, that I had for like a year, and couldn’t bare to use up, since you only get 6 in a package for $3.99 and UP! That is INSANE.
See photo:
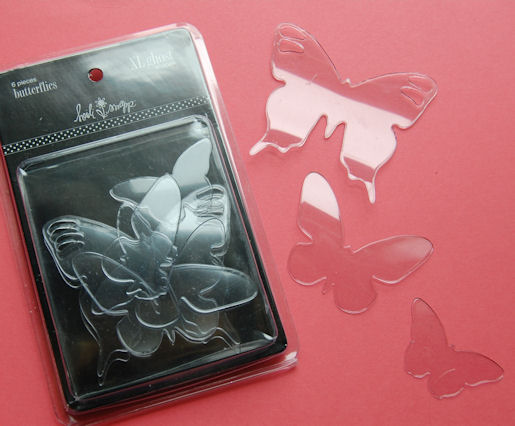
This is what comes in the package -these are the 3 shapes
You receive : 2 large, 2 medium and 2 small acetate butterflies as shown.
So I figured I could EASILY make my own, for FAR LESS! Maybe even BETTER 😀
I began my venture with Papertrey Ink’s Clearly Creative Cardstock
You get 10 sheets for $6.00. That means MY cost per sheet is 0.60 CENTS!

THIS receipt is the breakdown of the cost for making my OWN!!
Its actually CHEAPER than that! LOL! Read on.
So I used my Cuttlebug butterfly die for my largest butterflies.
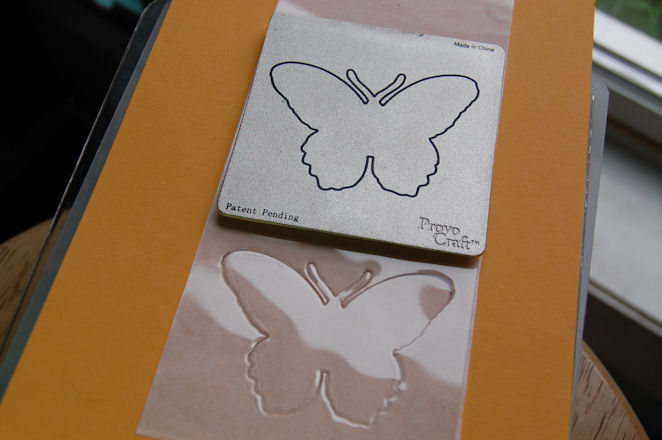
You can get 15 of the LARGE butterflies from ONE sheet costing ONLY 0.60 cents. You’d have to buy 7 or 8 packages of the Ghost Shapes to get that many of the largest butterfly shapes-costing upwards of $28-$32! What a savings!!
For my Med. size I used a Whale Butterfly punch by EK Success

I always keep the paper backing on till I’m done so I don’t LOSE anything I punch/die cut!
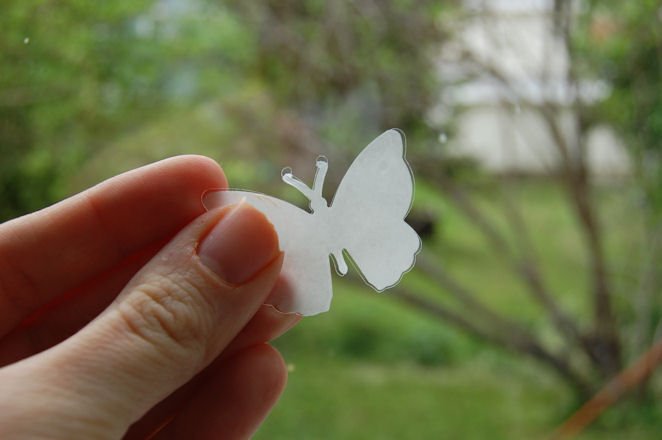
Now I can get 16 medium butterflies from one HALF sheet-or 32 per full sheet of acetate.
I the used a Martha Stewart Butterfly punch for my smallest butterflies.
I got 28 per half sheet of acetate, or 56 per full sheet!!!
Here are a few of the shapes I got from ONE piece of acetate-and I could have gotten even more!
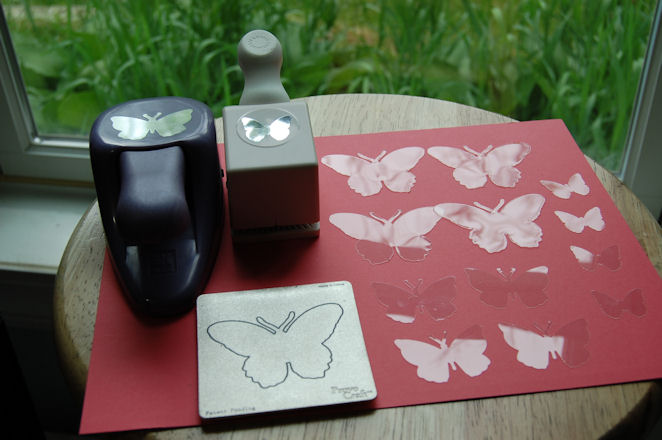
I just figured getting even 4 each per sheet is WAY more for your money ( UNDER 0.60 cents) as oppose to the $3.99 and up for ONLY 6 shapes that are store purchased.
That is where the recipt total came in
I then recycled the package that the Heidi Swapp Ghost Shapes came in, and put MY own butterflies inside!
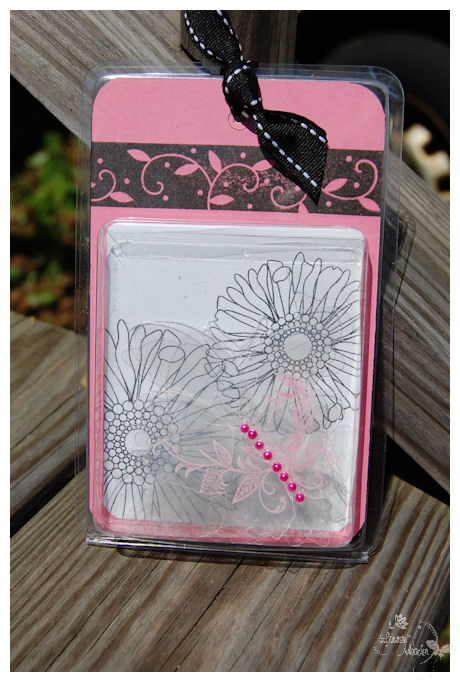
This is actually FULL of various shaped butterflies for a FRACTION of the cost!!!
I used one butterfly that I decorated for embellishing the front.
This is the product with my finished scrapbook page, that utilizes my embellishments: one of each size butterfly ON my page

Here is how I designed my own embellishment further by getting inspired by ANOTHER product
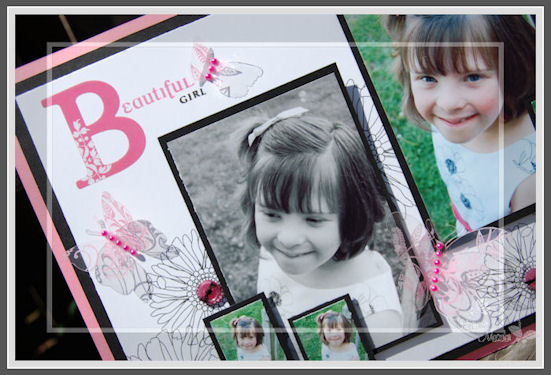
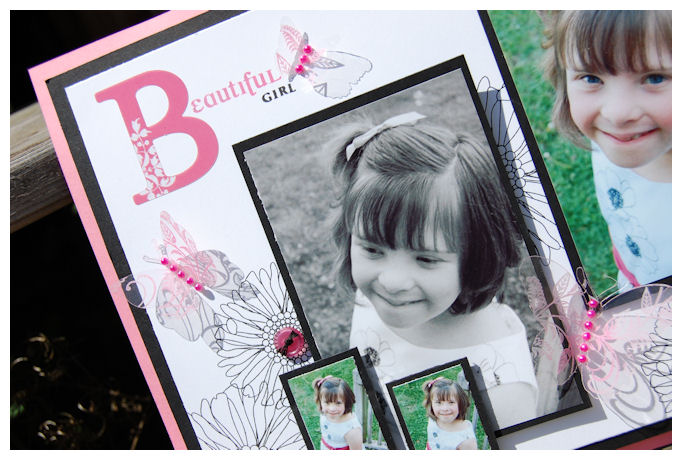
Notice my “B”.
Now here is what inspired my butterfly design
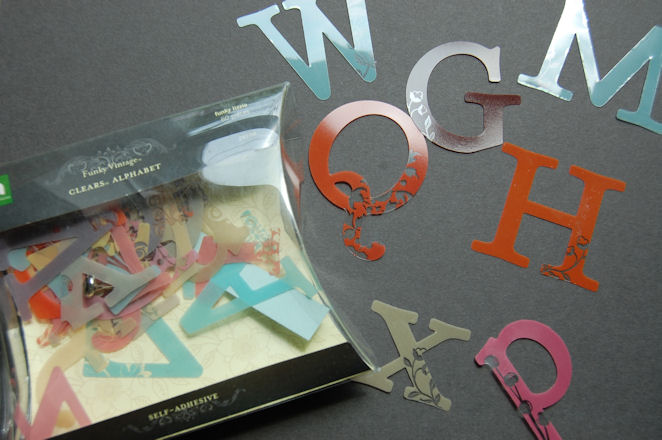
These are self adhesive acetate letters by Making Memories that sell for about $6 each
I used the “B” on my page. I loved the addition of the COLOR and FLOURISH on each letter, so I used that to further inspire yet another embellishment option for my plain acetate butterflies 😀
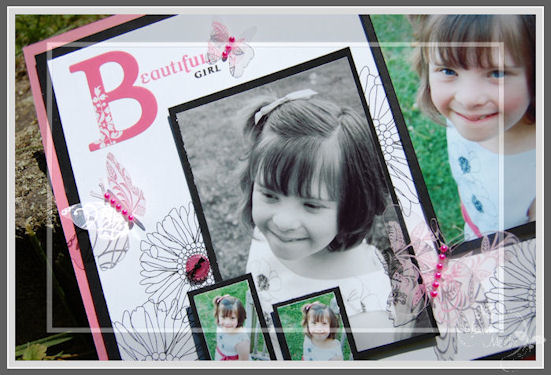
Here is a bit of a closer look at the B and the dimension my butterflies gave to my project.
Here is what I did:
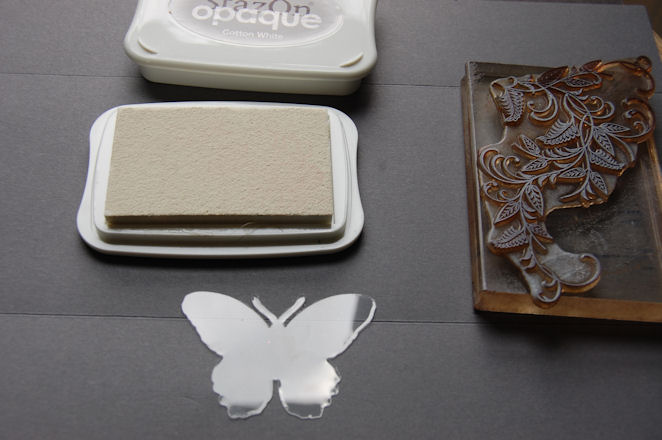
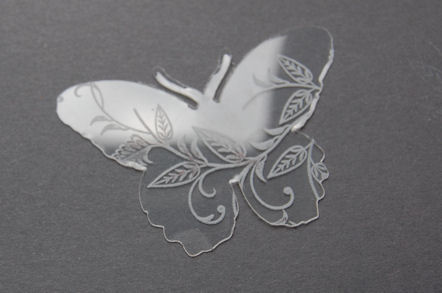
I just stamped my acetate butterflies using the flourish from With Sympathy, and White StazOn
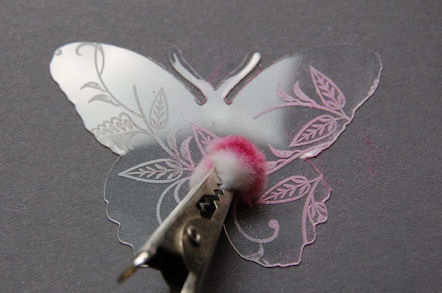
I added my color by using my own technique-Poppin Acetate with Jewel Tones Pastels
In SECONDS-a gorgeous butterfly embellishment!
I added some adhesive pearls to my butterfly centers, and was DONE!!

one more photo
So there you have it!
Now I can make SO many various embellishments JUST like these to suit ANY project!
I can die cut or punch ANY shape from the acetate I want or need, and I can embellish it without worry if I ruin one!
Supplies:
Stamps: With Sympathy (Flourish on butterflies), Friends til the End (flowers on white layer), Beautiful Blooms (sentiment)
Cardstock: Clearly Creative, White, True Black, Hibiscus Burst
Ink:True Black, Hibiscus Burst, White StazOn
Pebbles Pearlescent Pastels
Vintage Buttons , adhesive pearls, Making Memories Adhesive letter B
Cuttlebug butterfly die, EK Success butterfly punch, Martha Stewart punch
Now be sure to check out the design team!
Im sure this will get you making your own embellishments in no time, while saving yourself some money and using what you have! WIN! WIN!!
I hope you enjoyed my project 😀
Thanks for stopping by. I’d love to hear your thoughts, or if you give this a try too.
My Time to Color Challenge
May 23, 2009 Author: mytime | Filed under: All That Scraps, Home decor/3-D items, My Time To Color ChallengeAre you ready for a color challenge?!
Get ready because we have 6 colors!
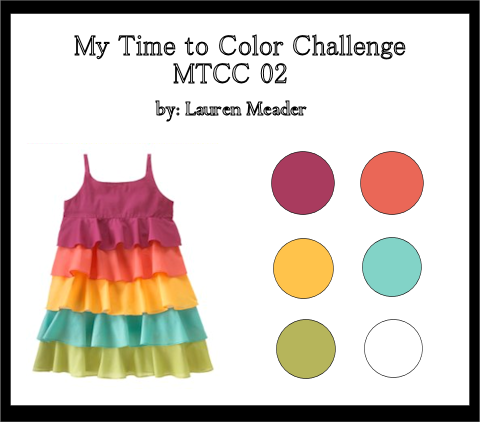
Keyword: MTCC 02
This challenge was inspired by this dress found at the Children’s Place. I LOVE the rainbow of colors, and thought it would be a super challenge! Plus very SPRINGY! If that’s a word.
Be sure to link your challenge here:
I decided to do ANOTHER MDF image from Say it with Letters

-a Mushroom 😀 This is on my Etsy Shop as well!
Can you tell Im having too much fun with them?
It all began with the mushroom, then the paper by Sassafrass Lass-Sunshine Lollipop-in which I mixed the patterns for my mushroom, then I saw this image…….sitting on my desk……………sooooooo………..I got special permission to share this so you get a SUPER DUPER EARLY peek at new sets being released from C.C. Designs–
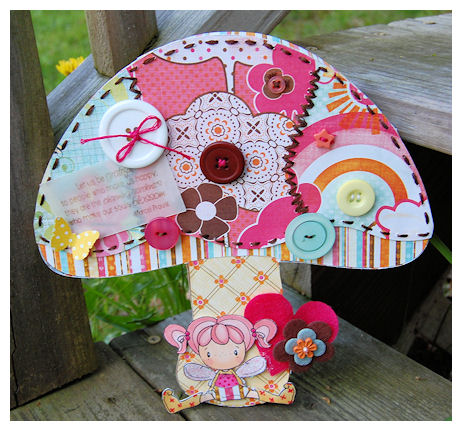
This adorable girl image is a NEW! LINE called Swiss Pixies! This is Heidi!!
You won’t see previews for her until May 30th and she will be available for purchase on June 1st! I KNOW!!!! Its a LONG time to wait-SORRY! But I HAD to use her ASAP!
Seriously look how CUTE she is
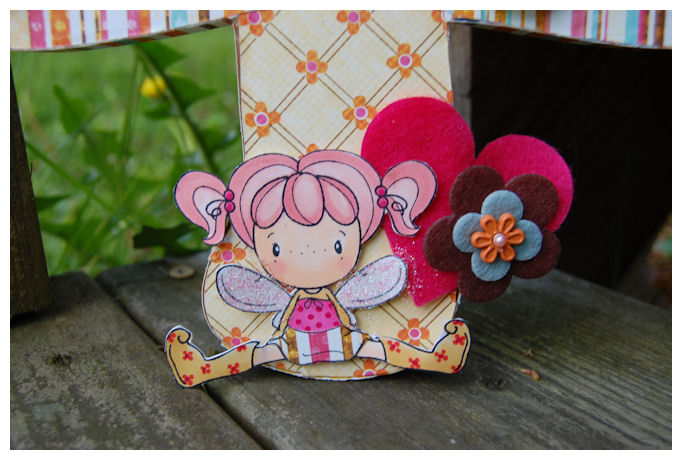
Just sitting UNDER the mushroom-all happy and fun.
I couldn’t help but color her hair pink 😀 I like it that color.
I glittered her wings. Doodled her shirt and boot, and paper pieced her skirt.
I added some felt flowers, and a heart that I die cut.
I STITCHED around the mushroom-BY HAND, and well as all the paper “patchwork” !!
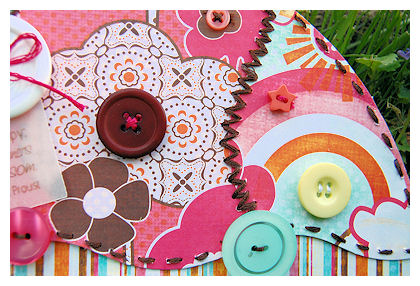
TOTALLY INSANE! ME-hand stitching something!
I did this while watching Ellen on TV! She makes the time go by fast.
I added LOTS of buttons for my mushroom spots, and interest. I love them!
Here is my sentiment: another peek at a new set by AmyR-previews begin the 29th I believe
The sentiment can be removed easily-as its tucked into the buttons
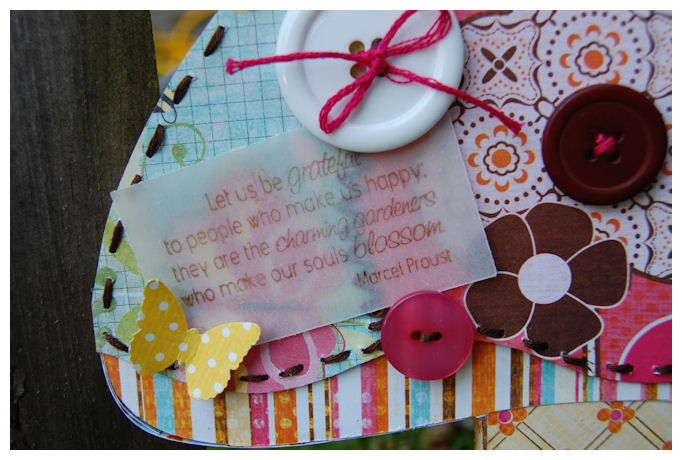
I thought it was PERFECTION!
Here is the final view-from the top
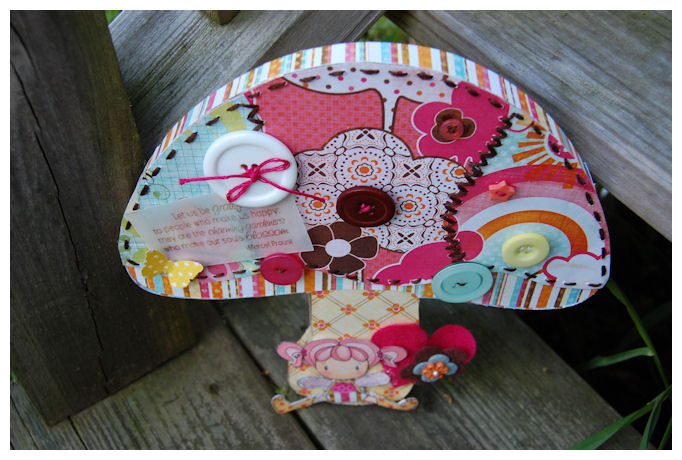
I like to make sure its ALL decorated nicely! I think this is so FUN and FUNKY!! Not my typical style-but I’m lovin it. Feels good to stretch the comfort zones sometimes.
Wait until you see what the team came up with! Here is a PEEK!

Now here are the links to the players :
Have fun getting inspired!
Thanks for stopping by. I cannot wait to see what YOU do.
An Apple for Teacher-and Stamp Out Alzheimers!
May 22, 2009 Author: mytime | Filed under: Home decor/3-D items, Papertrey NewsletterTeacher gifts can be so hard sometimes. The point is to let them know we appreciate them!
I mean seriously, I have hard enough time doing HOMEWORK with my kids, let alone HOME SCHOOLING! Teaching is a very tough job and takes a very special person! If YOU are a teacher I personally want to say THANK YOU! I truly don’t know how you do it. Oh and if you do home school I think you are a saint! LOL!
I had to “home-school” Alexa with the help of her aid a few hours a day when she was home sick for a year, and let me tell you….. I was CLUELESS, and still remain so. I can’t even do most of Alexa’s 2nd grade math homework! I actually ran into a local town mom who home schools her kids, and does a fab job. She was a teacher for man years before staying home with her own. We talked about Alexa and her math issues, and she offered to tutor her! I need to see what is in my budget, but figure since I won’t be paying for Amber to go to school next year, that frees up some money. She also uses a better Math program that focuses on repetition, which is what Alexa THRIVES on, as oppose to the Everyday Math program they currently use in school which bounces around from money, to fractions, then graphs. You don’t get a handle on one concept then you are pushed into the next, then back to the other. We have adapted the math as much as possible but I still think its ridiculous!!! This one is very confusing (to me anyway! LOL!) So I really hope I can afford her. She didn’t know what she charges yet. Fingers crossed. We need ALL the help we can get, and honestly I don’t know HOW to approach it all.
Anywho-point being I admire teachers greatly, and am thankful for all they do!
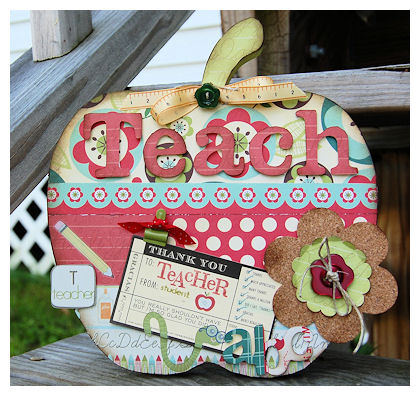
That being said Thank you Teacher wall decor
This is at my Etsy Shop!
I have to say I had a BLAST altering thisMDF Apple shape I got at Say it with Letters. I had the shape for over a month and FINALLY got around to altering it.
I spent quite some time on it, but it was a LOT of fun for me. I think the end result shows how much I enjoyed it 😀
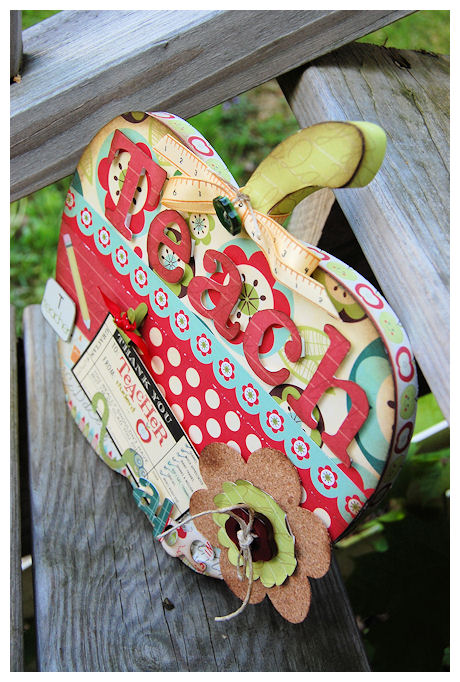
I think this is ONE apple themed gift that I Teacher won’t want to toss or loathe!
I layered lots of patterns for this using Cosmo Cricket-Early Bird collection, and paired it with Imaginesce Teacher’s Pet(A MUST HAVE!). I used the worm and pencil rub-on from the set, and the ribbon is from that Teachers Pet collection too 😀 HAPPY DAYS!

I FINALLY used my Slice, with the newest cartridge I picked up-Fall/ School cartridge to make my T E A C H letters, as well as the “abc” in the lower right corner.
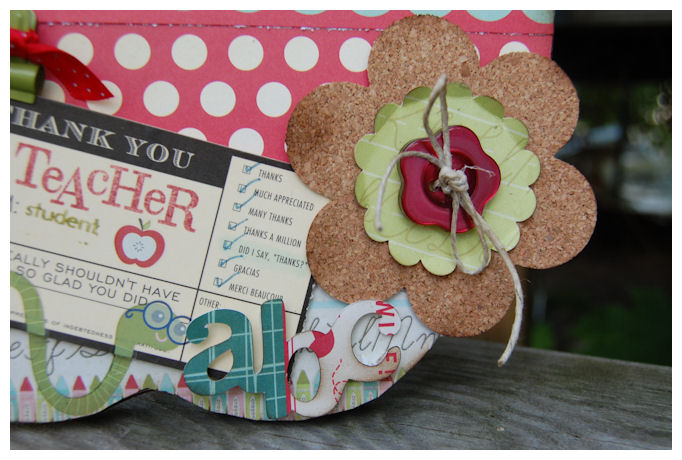
I used a thin cork sheet to punch my flower with the GIGA flower punch. I layered the scallop punched from patterned paper, with a flower shaped button that I just LOVE!!!!!!!!!!!!!! I think its a nice touch 😀
My thank you tag is from 7 gypsies
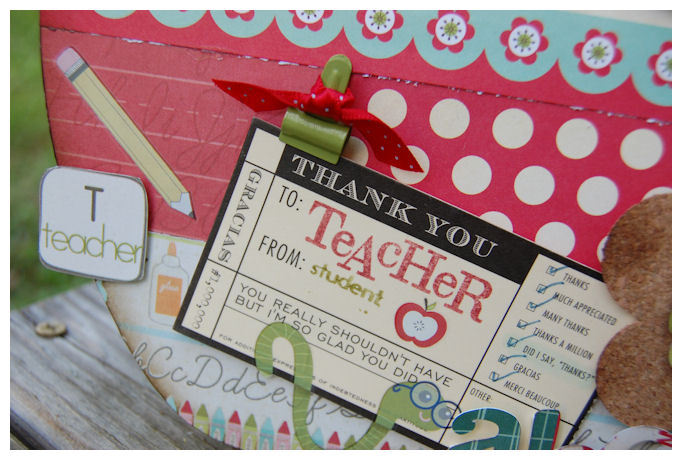
I used the stamp set Teacher’s Apple for this, and love the result! Ink is Pure Poppy, and Ripe Avocado.
Last photo:
Supplies:
Stamps: Teachers Apple
Paper: Cosmo Cricket Early Bird, Imaginesce Teachers Pet-with rub-ons
Ink, Tim Holtz distress ink, sponge Ripe Avocado, Pure Poppy
MDF Apple: Say it with Letters
Slice: Fall/School cartridge
Tag: 7 Gypsies
cork, buttons, hemp, Zip Dry
My friend is a teacher and she says she get overwhelmed with APPLE stuff-unless its food, then NO APPLES! I showed her this and she said she would love to have something like it for her classroom, or home 😀 Mission accomplished.
Now, another note! More serious-
My friend Jen Tapleris co-hosting BIG event for a cause! Stamp Out Alzheimer’s! You can view her post here!
What is SOA you might ask?
SOA is an exciting “pay to play” virtual papercrafting event to benefit the Alzheimer’s Association.
Jason just lost one of his grandmothers due to Alzheimer’s. It is a terrible progressive disease. I worked in an Alzheimer’s/ Dementia unit for 3 years while I was a nurse and saw the debilitating effects it had on the people and families it affected. His grandmother suffered for over 4 years before losing her battle.
A large group of generous sponsors and challenge hostesses (myself included), have teamed up to create a temporary online community where members can take part in a variety of challenges, contests, classes and workshops, and download several free products (a special digital kit, a printable 3-d template, tutorials, etc) in different papercrafting categories (stamping, cardmaking, paperscrapbooking, digi scrapping, hybrid, etc). All this for a suggested donation of $5. 100% of these funds will be donated to the Alzheimer’s Association to help with their efforts to provide and enhance care and support for all those affected by this heartbreaking disease.
I have donated some money, and personally donated 4 My Timeless Template downloads of winners choice, the stamp set Handwritten Notes, and a $25 gift certificate to Papertrey Ink.
I am hoping to host a challenge as well.
I hope you will join us in raising money for the cause, and having fun at the same time! Its a WIN! WIN!!!!
Thanks for stopping by! Let me know if you are joining in the fun!! I think its important to support one another 😀
Home-Made Recipe Box
May 21, 2009 Author: mytime | Filed under: Home decor/3-D items, JustRite Stampers, Recipe's, UncategorizedI have promised myself I would clean my house-in its entirety top to bottom today, before I got ANYTHING recreational/work related done. I have been neglecting that duty far too long. Due to all my hustle and bustle for release after release I notice a nice layer of FUZZ growing on my nick knacks! Its no wonder I feel like I have allergies this year-my house is a DUSTY mess!! So not like me. I also notice things creeping into corners that don’t belong. In other words-SPRING CLEANING is in need. My mom owns a cleaning company. Maybe I should hire her to come to help me get my life back together! My closets look like someone ransacked it! Not good :C
You know its getting unkempt when your HUSBAND notices! LOL! Granted I do a quick clean daily, but my house really needs a scrubbin. Now I don’t want it to sound like my house is a disaster! Its always picked up and my bathroom is ALWAYS clean, but the BIG cleaning hasn’t been done. So I’m decaffeinated up and on a mission before the holiday weekend.
Now here is the FUNNY part. Thinking of cleaning my house, got me into creating a house! LOL! See what the mind can do when you are trying to subconsciously AVOID something?! I somehow ALWAYS manage to get distracted. I really do have stamper ADD.
Now I really AM cleaning today, but wanted to share this first 😀
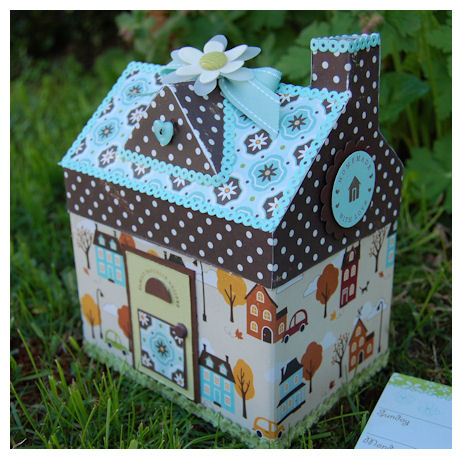
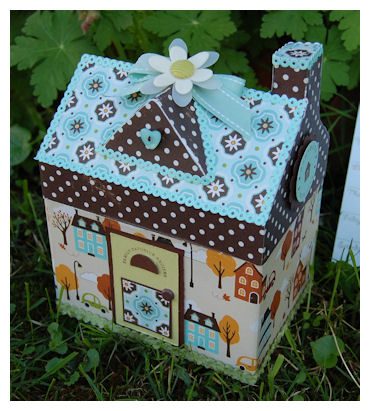
It is a House Box I altered, filled with recipes inside!
I about did a cartwheel for this project! I swear 😀 Lots of time and love went into this
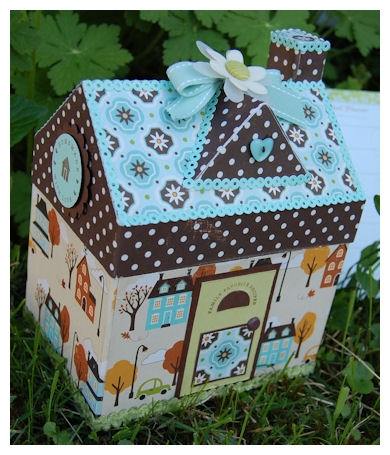
I just fell in love with this paper from October Afternoon-Weathervane. I did a little distressing too.
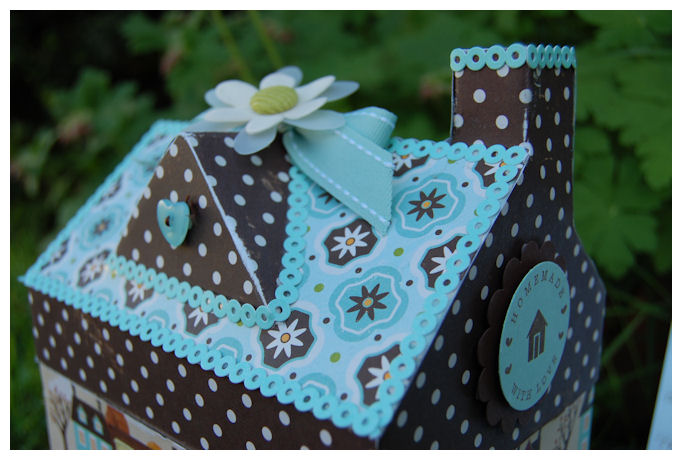
I lined the edges of my chimney, roof, and peak with Doodlebug Paper Frills. Makes is all nice and neat.
Having new paper is just the BEST feeling. See it applied to a project like this is SO rewarding.
I love the colors and everything about this box! LOVE! I am parting with it though-its going up on my Etsy Shop!
I purchased the Recipe Borders and Centers and have been DYING to make my own version of a recipe box!
I love all the little recipes that can be punched with the 1 1/4 circle OR the 1 3/8 circle-which is what I used 😀
I used the “Homemade” border sentiment for the sides of my box 😀 I love the “pun”. The little house in the center is from Papertrey Ink Holiday Treats set, as is the ribbon, and button in Aqua mist. Flowers are May Arts. Also found atPapertrey Ink
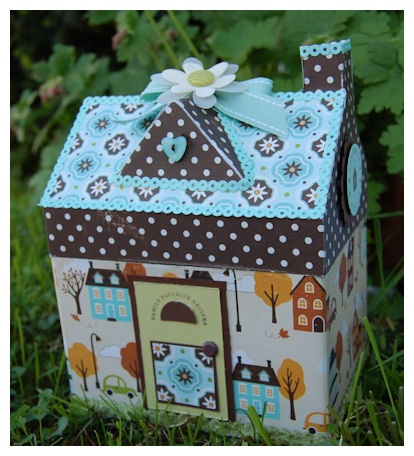
On the door I used the “Family Favorite Recipe” border! I thought it was wicked cute 😀
You can also get this set as ATS–>HERE!
I also used some May Arts velvet ric rac in Sweet Pea along the bottom for my “grass”. You can’t see it in the photo, but its a sweet touch I think!
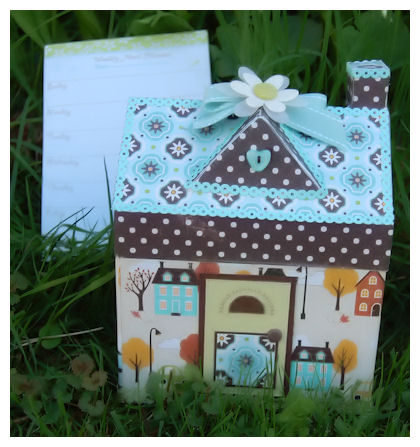
The top peak comes off and reveals the recipe cards inside.
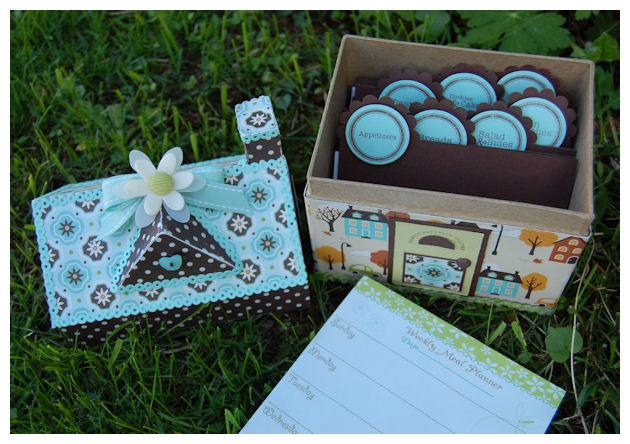
I also found a Weekly Meal Planner magnetic note pad to match!
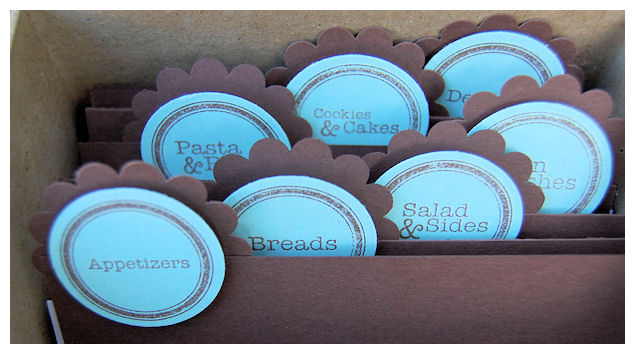
I had no real recipe cards (EEK! I have some on order though!), so I used blank index cards, and then made my dividers.
This went together easy peasy!!
OK now I can’t go on and on like my usual-I need to get back to cleaning!!
I hope you have a great day, and THANK YOU for stopping by to visit. I know first hand how busy everyone is, and to think YOU took time out of YOUR busy day, to visit me, makes me so happy!! I myself rarely get “out on the net”. I’m in my own little crafting world here, caring for the kids, and “working”! So I want you to know I appreciate you! With ALL the amazing blogs and talent out there, I’m just amazed anyone ever stop by here :D) So thanks again!!!
Till tomorrow……..
My take on my challenge
May 19, 2009 Author: mytime | Filed under: Home decor/3-D items, JustRite Stampers, My Timeless Templates, Papertrey NewsletterYES! I really did have a project for My Timeless Template Challenge <—–click there to see challenge details. My team totally ROCKED out the templates! I’m in awe.
Another short and sweet post since I feel like the WALKING DEAD, and I have that field trip to go one. Its a LONG nature hike-GOOD TIMES! (NOT!)
For my project today I used my newest template Ready, Set, Wrap! I really love that one. Gets a great gift wrap done in a jiffy 😀
I was just seriously delayed in photographing and editing it 😀 SO I apologize for that. Sometimes LIFE gets in the way.
Anywho……
Here is my gift item:
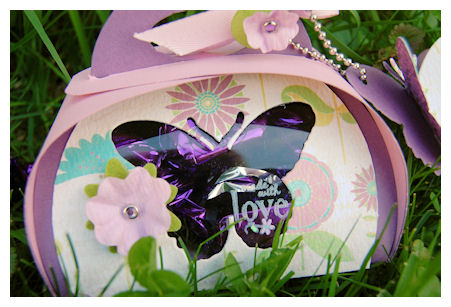
Made with love
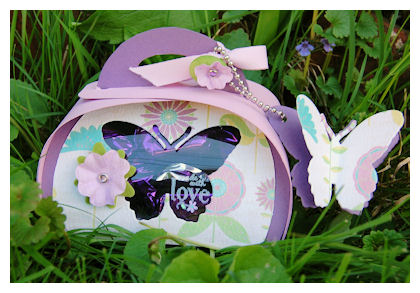
This is a large cuttlebug die. It has 3 or 4 matching embossing folders with it. I NEVER use it (insert shocked face here!) but now is the perfect time! I love how I was able to make a window in my Ready, Set, Wrap box!
I love purple AND butterflies so this was EASY PEASY for me. Once I saw that paper I KNEW that it was perfect.
So there was NO waste here either. I used the die cut pieces-that were left over from creating my window butterfly, and layered them together to use as a keytag! I love that 😀
Here is the closer view of the stamped window.
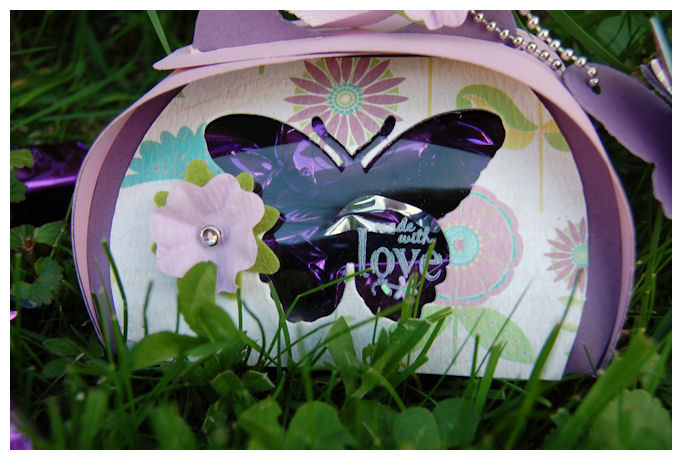
It reads: Made with love, and has a flower that I colored using my Singlo Opaque pens.
I used the JustRite Stampers set: Tiny words & Borders in white StazOn to make it. Its so sweet and subtle! You can also get them here
Inside are some Raspberry chocolates from Seattle something. All I knew was they matched my project, so I was happy. Can you tell Im sick! Im totally brain dead these days! YIKES! Can’t remember ANYTHING. Oh and too lazy to go find the info! LOL! SORRY :C
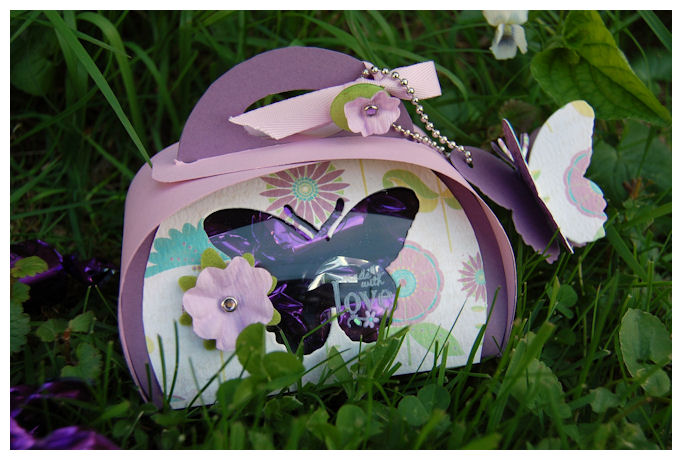
The paper is PTI pale plum, and Lavender moon, and the patterned paper NEW! to me. NO IDEA who makes that-sorry. I chopped it all up :D) Feels good to not HOARD it. Sorta!
The flowers are by American Crafts. I think they are a nice touch.
Well that is it for me.
Wish me luck on the field trip 😀
I have been uber busy creating so I hope to share LOTS more soon!
Thanks for stopping by, and I hope you play along with the challenge!
Stamps as Stencils-Painted Glass
May 14, 2009 Author: mytime | Filed under: Home decor/3-D items, MYTIME MOVIE/VIDEOs, Papertrey Newsletter, Product Opinions and Must haves, Tutorials, videosHi everyone!
Thanks for joining me for my Papertrey Ink Newsletter Post!
I have to admit I was pretty TAPPED for ideas. So I went to Michaels and browsed the ENTIRE store, to find something FUN AND NEW to share! I get bored easy, in case you can’t tell! LOL! I love trying new things, and every so often I find something extra cool.
So, that being said I hope you like what I came up with 😀 I really enjoy expanding my uses for my stamps!
There really are so many ways they can be used! This is just ONE more!
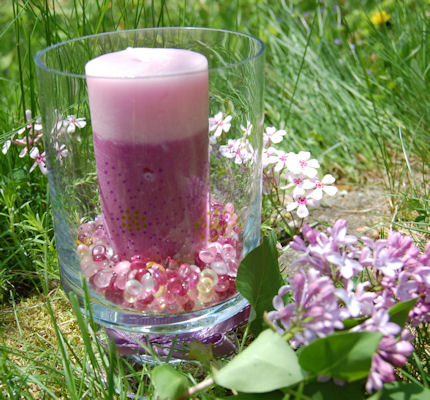
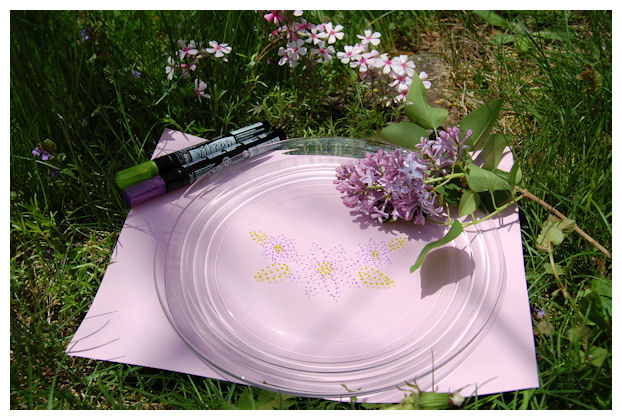
This is a dinner plate (I created a matching set of 4) with a candle holder-as seen in the photo.
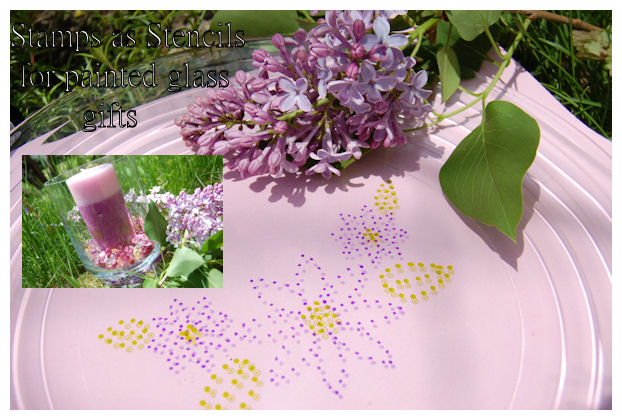
How about using your stamps as stencils for making decorative glass gifts?!
I made a video to show you just how easy this really is!
So grab some coffee and get planning on making some affordable painted glass items-no art lessons needed!
This is a photo of the finished candle holder. More photos can be seen in the video!
Now more on what you need to make your own painted glass gift items!
Obviously something GLASS, that YOU want to decorate.
Stamp set of choice.
I found (in the paint/stencil) section-some marker/pens that are meant to be use on glass and ceramics!
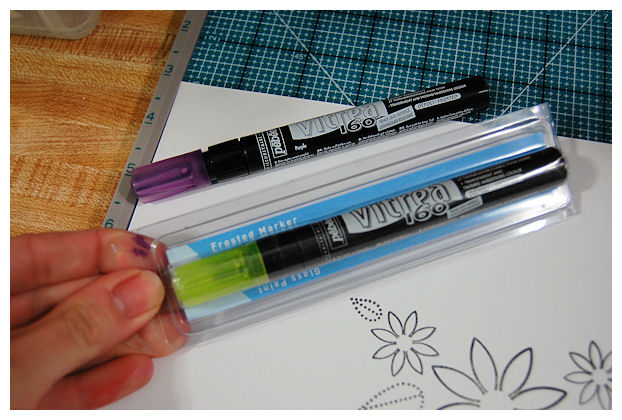
They are by Vitrea 160-cost $2.99 each, and come in a large variety of colors! You can get opaque or transparent colors.
Follow instructions for use on package!
Well I thought they looked SUPER cool, but my problem-I can’t paint or draw a simple stick figure to save my life!!
While there in the store they had stencils and stuff too. I thought-well I have stamped ON GLASS, why not use a stamped image as a stencil with my markers?!
Now I didn’t want to TRACE. I wanted a fun, new look! So I went with dots! Fun, easy and no stress if you drank too much coffee 😀
I used Beautiful Blooms for my project! You can use whatever you wish.
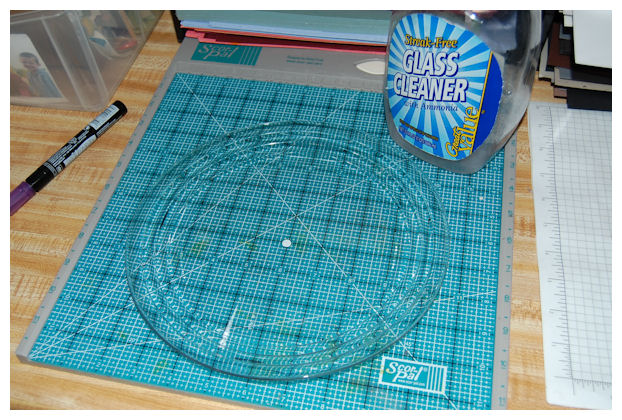
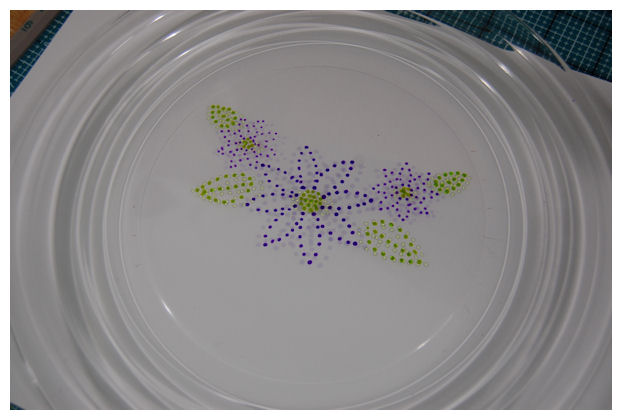
Step 1:
Clean your glass with glass cleaner. If using something that needs to be centered-Mark center on back with eclipse tape.
Step 2:
Stamp you image onto cardstock/copy paper-cut to size.
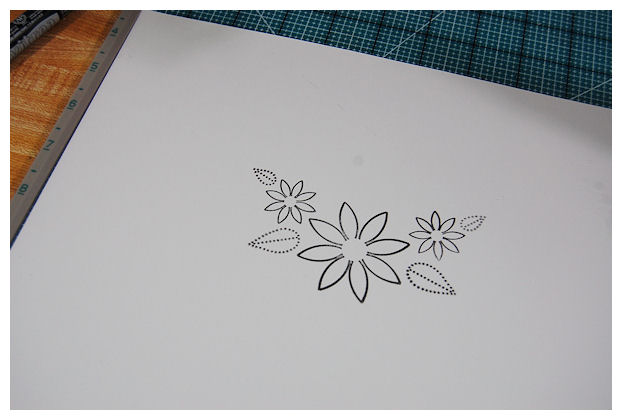
Step 3
Layer stamped paper where needed. Lay your plate or other item over stamped image.
Mark dots on flower center, and outer petals first!
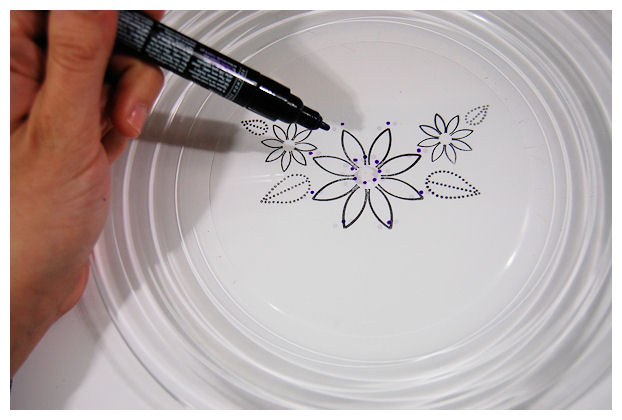
Step 4
Count number of dots on each petal to ensure even spacing and nice even look on project!
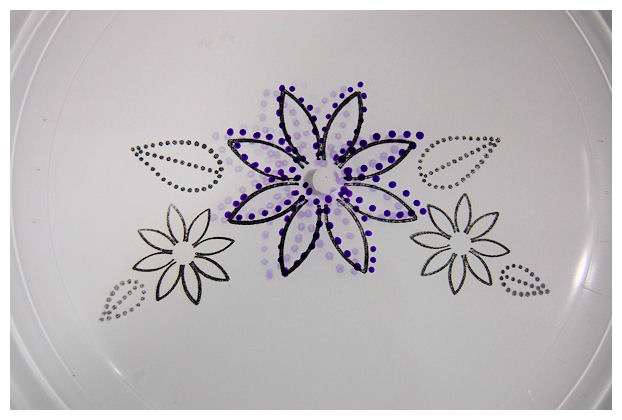
Repeat for leaves, and flower centers-using green marker!
Take out your stamp stencil and VIOLA!
Not too shabby for a newbie glass painter, now is it?!
I have to admit, it was very fun to make this. I wil wrap up the set with a pretty bow and tag to match. Should be a nice gift for someone, right?
I especially like that I don’t have to be a true ARTIST to pain on glass now! I have stamps for that 😀
Well thanks for stopping by!
I hope you enjoyed the video, and visual tutorial for those who need it 😀
Thanks for stopping by
When boy, meets girl…
May 13, 2009 Author: mytime | Filed under: Home decor/3-D items, My Timeless Templates, Papertrey NewsletterHOLY MOLY am I exhausted! I know-WHO CARES!!
(on a side note I HAVE to share that Alexa has hit her 2 year post-chemo (remission) marker! Now we go every other month for check ups! But she has to have her port-a-cath flushed monthly still> Im excited and scared to death all at the same time. Talk about emotionally draining)
TONIGHT is THE night!! Papertrey Ink has their release! I’m so excited 😀 I hope to see you tonight 😀 I’ll be back later to share my Papertrey Ink newsletter project too.
I also hope you have enjoyed the peeks I have shared here this week using My Timeless Templates 😀 Each one is labor of LOVE! I have to say they do inspire lots of great gift ideas 😀
Speaking of ideas………………I have 2 more samples to share till the BIG DAY! When YOU can buy your newest My Timeless Templates : Let’s Do Lunch and Ready, Set, Wrap!
So without further delay……………..I have samples for a girly event, and boy themed too!
Are you looking for something ELEGANT? Maybe a Wedding gift, of favor?
Well you just might LOVE this!
Using Ready, Set Wrap!
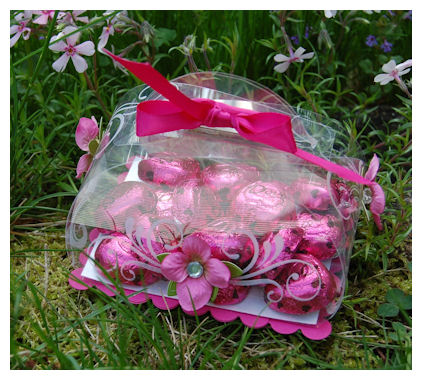
Seriously-how stunning is that?
It was exactly as I had envisioned it to be in my head.
I filled this with Raspberry Dove chocolates, but truffles or wedding cake would be darling in here too! Any favor item actually. OH! How about a Cinderella Slipper for a Fairy Tale themed princess party!! OH BOY! Maybe a piece of jewelry?? This list goes on and on.
I printed my template onto copy paper. I then used the Clearly Creative Cardstock, and cut out/scored my template.
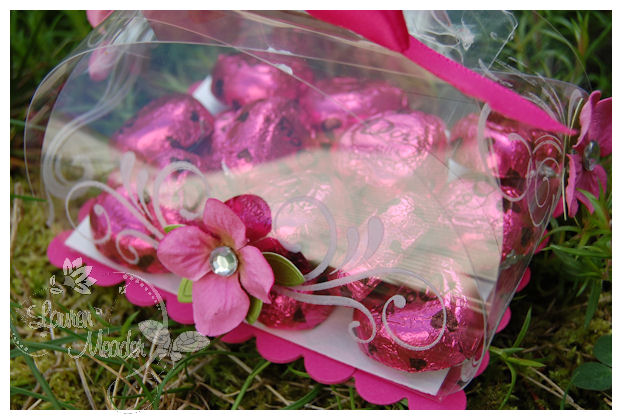
I stamped my Fancy Flourishesonto the front, and side panels using white StazOn. Using glue dots I added Prima Hydrangea flowers, with adhesive rhinestone centers.

I added a shimmery white cardstock panel to the bottom inside, then a scallop rectangle bottom to the bottom of the assembled template.
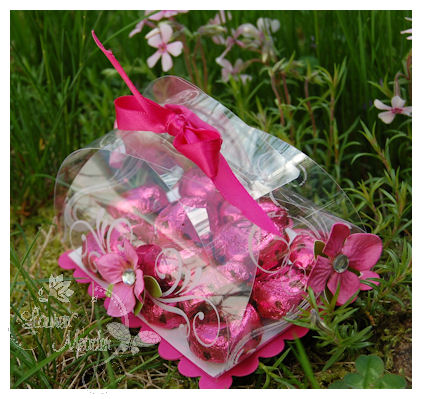
Tied the top with a Satin ribbon to match.
I think this is just gorgeous!
Supplies:
My Timeless Template: Ready, Set, Wrap!
Stamps: Fancy Flourishes
Cardstock: Acetate, shimmery white, Raspberry Fizz
Ink: White StazOn
Ribbon: Satin Raspberry Fizz
Other: Prima flowers, adhesive rhinestones
Scallop nestabilities
OK moving on to an entirely different direction…..BOY!
Owly-a gift for a boy!
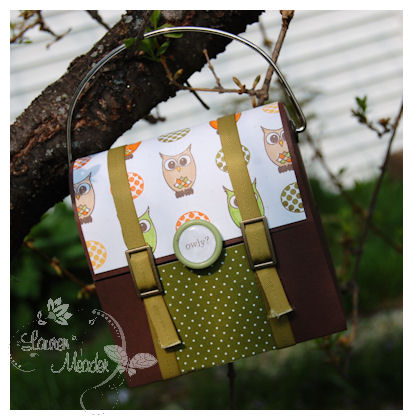
MANY of you have boys out there! I’m with you. Many of you ask me WHY I don’t make ANY boy samples using my templates?! Well, I heard ya. Its not that I CAN’T do boy stuff, I just find GIRL stuff so much more fun, easy and pretty 😀
So that being said- I made a boy gift. I used Let’s Do Lunch for this one .
I used a paint can handle, and large eyelets for the handle.
I LOVE Wise Owl 😀 so I made my own patterned paper using Guidelines 2 cardstock with the owl and bellies 😀 I think its super cute. You can’t see that each row of owls is colored differently-but thats OK
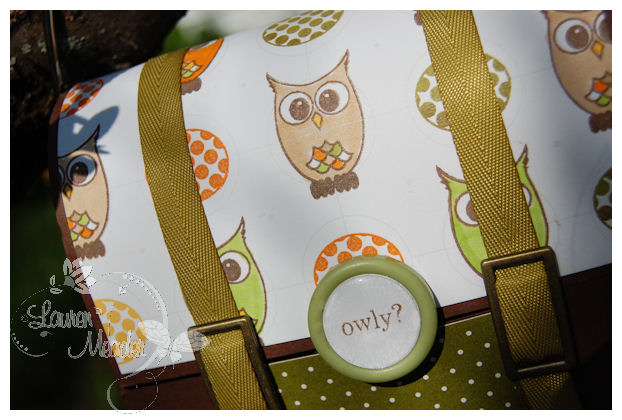
I added the sentiment to a button center, and covered it with a page pebble.
It is held closed with buckles-from a hodge podge hardware kit I had.
Just unbuckle the ribbon-
Now INSIDE……………
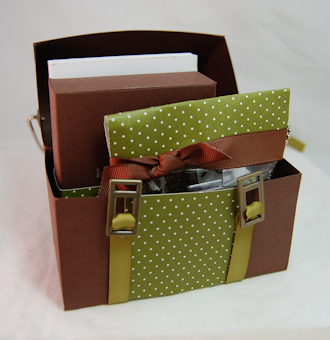
I added a notebook, some crayons-

which I designed my own box for, as well as a “office” set I got a Michaels Craft Store for $1!
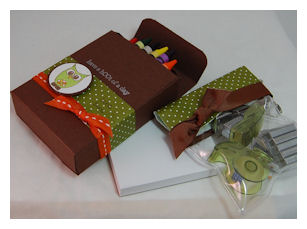
I think this is a super adorable BOY themed art box, don’t you?
Supplies:
My Timeless Template: Lets Do Lunch
Stamps: Wise Owl
Cardstock: dark chocolate, white, Ripe avocado
Paper: Bitty Dots 2008
ink: Copic Markers, Ripe Avocado, Dark Chocolate, Pumpkin
Ribbon: Twill Ripe Avocado
Vintage button in new leaf
Paint can handle, brass large eyelets, brass hodgepodge hardware
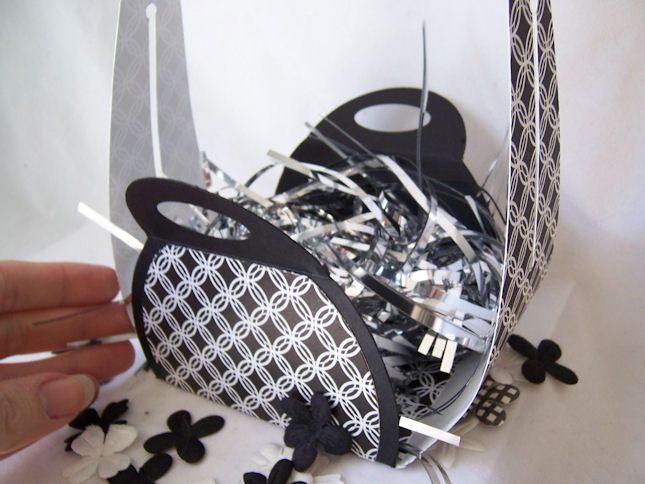
Now if you want to go EASY PEASY-this is the sample for you:

Just use patterned paper, and a SIMPLE tag-done in under 5 minutes!
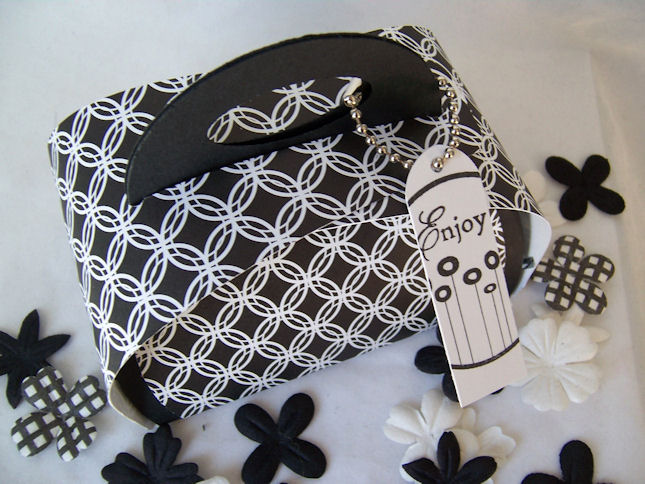
I shared a peek of this during the Blog Hop
This was my concept sample when I created the template. The concept samples are the finished template idea samples, that go to Nichole for approval 😀
This is the back

This is the side
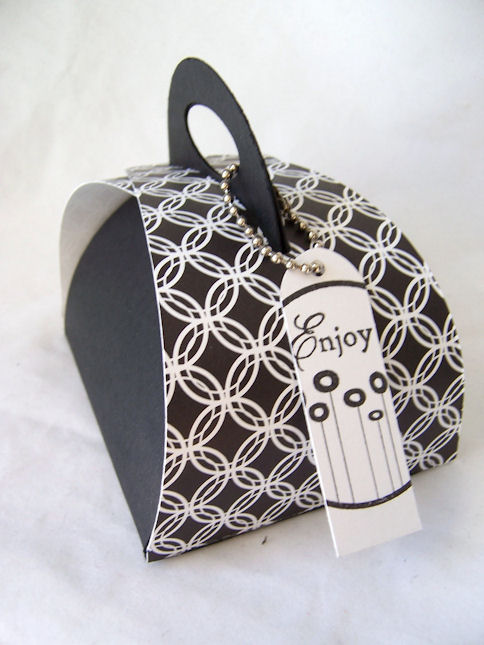
This one was so cool and retro!
yes, like many said-almost like a bowlers bag 😀
No matter what it reminds you of-its cute, fun and has so many possibilities 😀
I cannot tell you how much I adore this specific template. It took quite some time getting the idea to work, but in the end I am so happy with the result.
Template: Ready, Set. Wrap!
Stamps Spring tags 2008
Cardstock: Black, white
Ink: Black
paper Black and white basics
Alrighty-that is all for me for now.
Tonight is the release party. I have my newsletter project due, and this weekend I am off to shop at CKC in Manchester with friends. I can’t wait. I need a day for ME!!
Thanks for stopping by
Now for more peeks be sure to check out Nicholes blog, Becky, Melissa, Lisa and Candice.
😀 See ya later!
Video: Bath and Body……made beautiful
May 12, 2009 Author: mytime | Filed under: Home decor/3-D items, My Timeless Templates, MYTIME MOVIE/VIDEOs, Papertrey Newsletter, videosOne of the best gifts to give is bath and body products!!
I LOVE packaging these items because:
1) They are fun-and generally pretty
2) They look awesome in my templates :D)
3) They really dress up a simple, and inexpensive. yet thoughtful gift
4) EVERYONE loves to smell good (right?)
5) SAVES YOU MONEY!
Seriously, you can spend SO MUCH (or so much MORE) when you get a bath set already wrapped up in something somewhat “fancy”. They KNOW that presentation is EVERYTHING! I could say that till I’m BLUE in the face, but think about it!
WHAT attracts you to certain things? OK basically everything in life-is the advertisement!
The packaging of a product, the store sign, the advertisement logo or jingle! Its all about presenting something in a attractive way. Even when you go for a job interview. You try to look your best, right? People notice that stuff, and as far as advertising its all in your subconscious but it totally works.
Today I will show you how you can use BOTH templates from this months release to make a great gift set for UNDER $12!! Actually, you can obviously get even less expensive stuff and do it for far less, but this is what my sets would cost.
Now I did MORE of making my own patterned paper. Both gift sets use my newest template releases
Let’s Do Lunch and Ready, Set Wrap!
I’m totally in LOVE with both for very different reasons.
I thought I would show you SIMILAR designs using both templates, and packaging the same items too, so you can see just how cute they BOTH are!
I used Everyday Classics (the anniversary set, not available for purchase :C SORRY!) to make my OWN patterned papers. If you can’t tell I’m LOVING that these days, and saving myself from BUYING paper too 😀 Use what you have! Making your own patterned paper is taking you BACK to the BASICS!
OK first up-Ready, Set, Wrap!
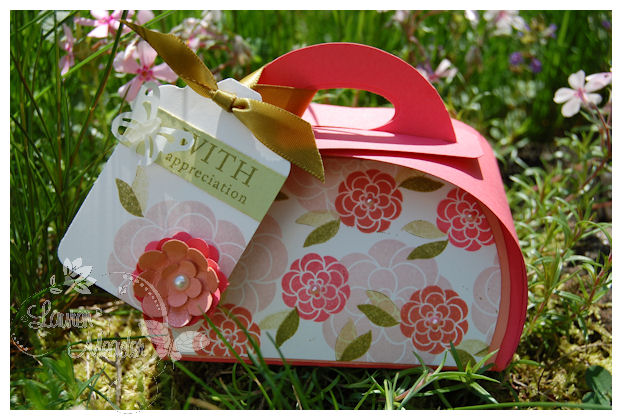
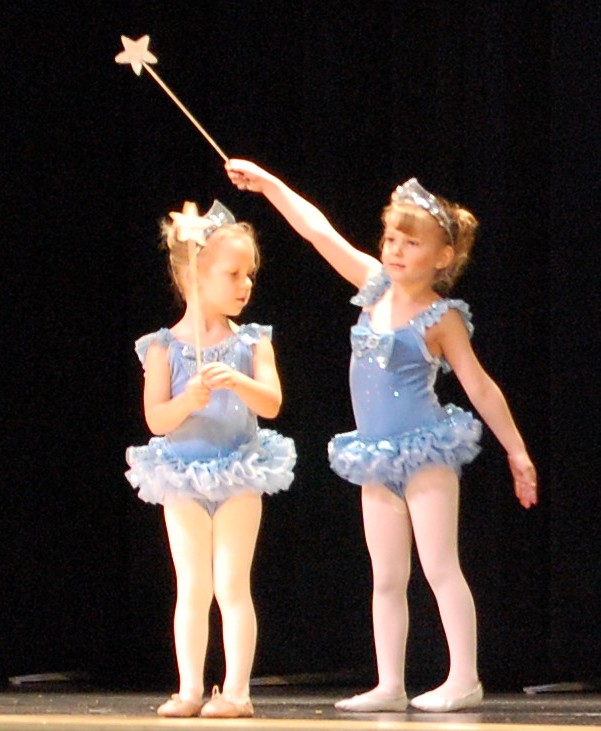
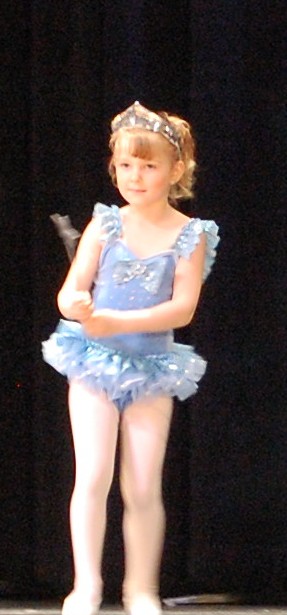
I needed a QUICK gift for Amber’s dance teacher.
I used Berry Sorbet, Melon Berry, Sweet Blush, and Spring Moss with Ripe Avocado ink for these colors-stamped onto vintage cream.
I added little pearls to the flower centers.
Side view
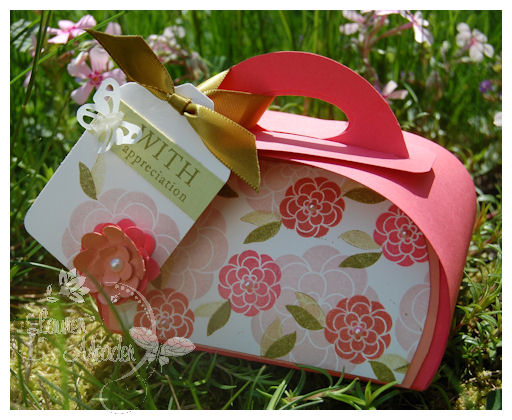
I LOVE the look.
Now this template comes with the decorative curved layer.
I used my technique for making an additional mat layer. As seen in this video
I hope this video is helpful for you to try even more layering options, for those of you who love lots of layers! Now you don’t need to be intimidated to try it.
Now for the tag-
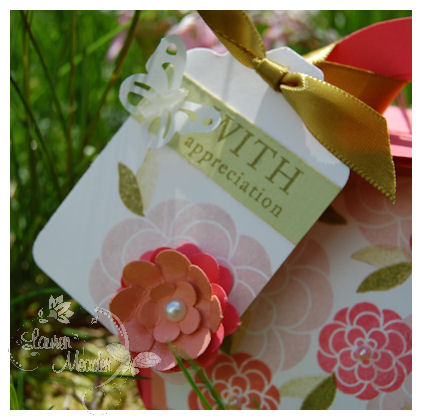
I love the touch of this flower I punched/layered to be like what I thought this flower would look like in 3D form!
It was a quick and simple touch, but I felt it really made the gift a WOW! Amber signed her name to the back (I was very tight on time and didn’t make a card! GASP!)
Now here is what is inside
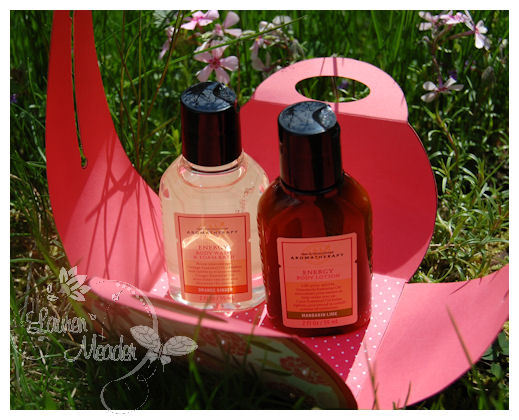
These are aromatherapy body wash/body lotion from Bath & Body Works.
I just laid them down, side by side, and they were a perfect fit.
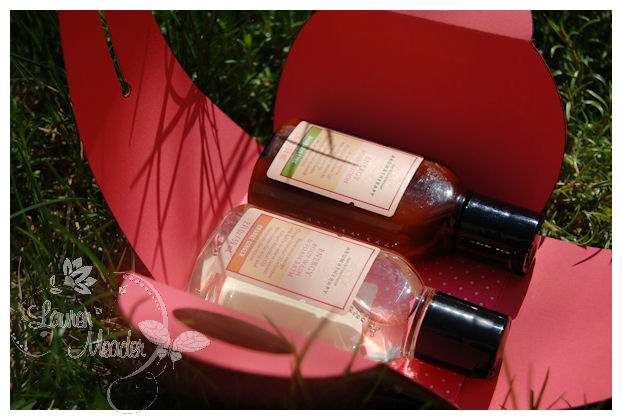
I then just folded in the sides, and Amber was off to dance rehearsal with a pretty and easy gift for her teacher!
Supplies:
My Timeless Template: Ready, Set, Wrap!
Stamps: Everyday Classics, Mega Mixed Messages, Garden of Life
Cardstock: Sweet Blush , Berry Sorbet, Melon Berry, Vintage Cream, Spring Moss, Vellum cardstock, Bitty Dots 2008
Ink: Berry Sorbet, Melon Berry, Spring Moss, Ripe Avocado
Ribbon: Ripe avocado
Other: Flower punch, butterfly punhc, adhesive pearls, tag punch
Now we move on to another gift-using Let’s Do Lunch!

I used the same stamp set:Everyday Classics in Soft Sky, Blue Bayou, River Rock, and Ocean Tides for this paper creation.
I love the colors in this.
I am using no handle. No fancy closure. This is presenting as just a gift box! Now imagine it on a desk somewhere?! Love it.
I went to Bath & Body Works and purchased some small body wash/body lotions for about $5 each.You could totally catch a SALE and stock up, but I bought full price.
The Sea Island Cotton is my FAVORITE!! So I went with that for this box.
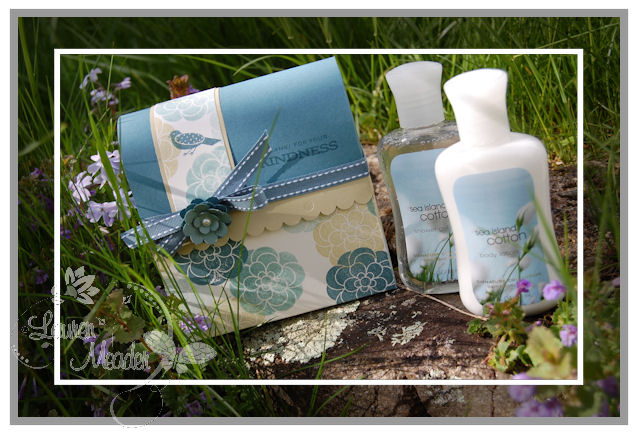
There are two in this gift set. Just a nice, simple gift.
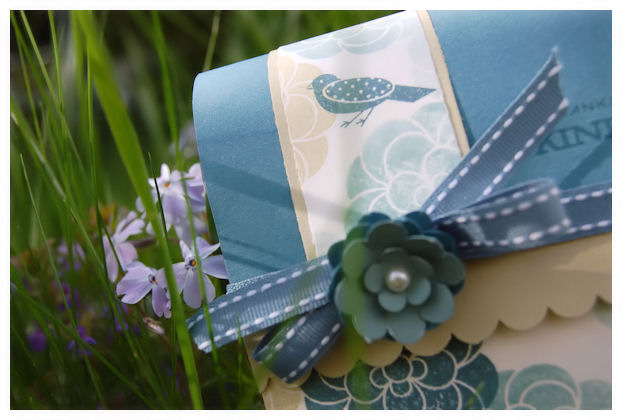
Now for the detail flower on the ribbon-just like the other creation above.
You can fit 4 of the small size body wash/lotions in the Let’s Do Lunch template! But for today I used 2.
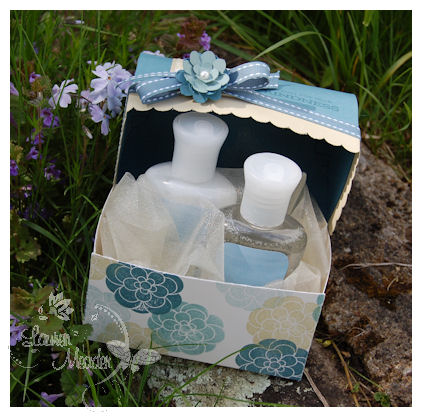
I had some really pretty tulle to set inside.
If you laid them side by side-4 would fit.
Seriously look how pretty and elegant these are-without TONS of work or MONEY invested!
Supplies:
My Timeless Template: Let’s Do Lunch
Stamps: Everyday Classics
Cardstock: Vintage Cream, River Rock, Blue Bayou
Ink: River Rock, Vintage Cream, Blue Bayou, Soft Sky, Ocean Tides
Ribbon: SU! Blue Bayou
Flower punch, adhesive pearls
So that is my fun peek for today! I have so much more to share, but need to get my other projects done!
Tomorrow is another day 😀
I hope you like seeing the same idea for the 2 separate templates. I had fun with this one.
Thanks for stopping by.
Now for more peeks be sure to check out Nicholes blog, Michelle, Melissa, Lisa and Candice.
Star Prints
May 10, 2009 Author: mytime | Filed under: Cards, Home decor/3-D items, My Timeless TemplatesI hope you all had a great Mother’s Day!! I know I did. Amber did AMAZING at her dance recital!!! I was SOOOOOO proud of her. She looked adorable and knew every step. I’ll share photos soon. We spent the day doing all sorts of fun stuff. It was great.
Anywho…..
OK another day of PEEKS! YIPPEE!
If you like Stars, you are going to LOVE Star Prints!
I had so much fun with this set this month. What I TOTALLY love is the co-ordination of Star Prints with the punch 😀 I don’t like CUTTING stuff like that out, and having this quick & simple option is fabulous for me. Makes great star themed projects easy peasy.
Nichole had the girls all use Star Prints to create a variety of cards/gift ideas!
My Timeless Templates to the rescue 😀 I used my newest-to be released in the 15th-template Ready, Set, Wrap! (No worries you will see the next template tomorrow!! Trust me its worth the wait!! Im in love it :D)
Like always, I NEVER know what I am going to do until I get to work. I usually start with ONE idea and somehow that becomes obsolete, and turns into a totally different idea!
I WAS going to do a Teacher theme (I did do a teacher theme project-but that ended up being used for the Idea Book for the other template I am peeking tomorrow :D) then had a MALE family friend have a BIG birthday-he turned 40! So, my idea turned ended up changing, to be used to create this set, for the PERFECT (in my humble opinion) MALE gift set.
I am trying to make MORE male/boy themed stuff with my templates for you all to see! I know I so lack in creating for that group! Sorry, I just LOVE GIRLY!! But, hey, guys/boys need gifts too!
Me, LOVING gift giving, had a BLAST adding a masculine twist-so show you that ALL my templates REALLY are GENDER NEUTRAL!
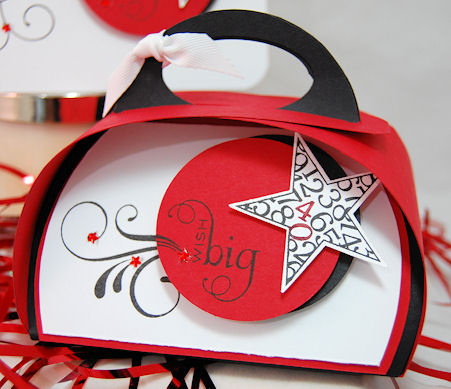
The BIG 4-0! Set
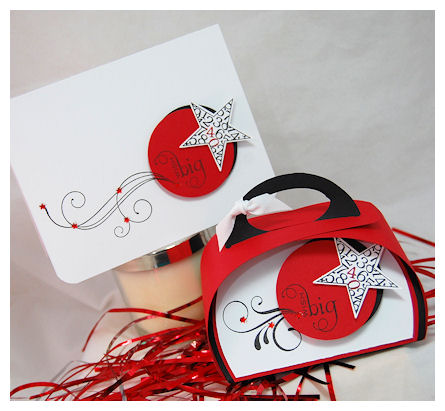
Here is what I made him. Kept is clean, simple and FRILL FREE :O) That is easier said than done. I did add some bling STARS, but felt that was acceptable!
I used the Star Print with the numbers, and colored JUST the 4-0 RED for some POP! Lucky for me they were RIGHT next to each-other! YEAH!! Gotta love when things just work like that.
Here is the card

Crisp, clean and as I said FRILL free!
(the swirl is a little peeky at another set you will LOVE-coming out on the 15th)
Since it was the BIG 4-0, I thought the sentiment was perfect too.
Honestly my photographs took WAY longer than the MAKING of this gift set.
I had this DONE in 15 minutes!
The Ready, Set, Wrap! is my newest template! It is SO fast and EASY! You are going to LOVE it.
Making a card/gift box set has never been easier! I swear! I used the largest SU! oval punch for this one.
Now I made this literally one hour before the dinner. So my GIFT was bought ON THE RUN! I got him a $40 (because he was turning 40 :D) gift card to his favorite sporting goods store! Gift cards are ALWAYS the perfect option for me, especially for MEN!

So, I popped it inside here!
I have to admit stuffing in the filler wasn’t easy, without having pieces try to POP out of it! LOL! But it looked cool when you open it, so I made it work. My trick-pull out the pieces that pop out! LOL! OR snip them with scissors. This is the foil kind, not the paper-which is much easier to manage.
Supplies:
My Timeless Template: Ready, Set, Wrap!
Stamps: Star Prints, Fancy Flourishes
Cardstock: Pure Poppy, White, True Black
Ink: Black and a red marker
Punches: 2 inch circle, XL Twinkle Twinkle Star Punch by Fiskars
other: Adhesive Rhinestones
Be sure you check out the entire team for their gift ideas using this set and their choice of My Timeless Templates!
- Becky Oehlers
- Betsy Veldman
- Dawn McVey
- Debbie Olson
- Geny Cassady
- Heather Nichols
- Lisa Johnson
- Melissa Phillips
- Michelle Wooderson
- Nichole Heady
- Niki Estes
Tomorrow I will share the peek at my second template for this month!
HINT: Lets just say Lunch is the theme 😀 HAHAHAHAHA
I think you will all really be excited for it 😀 (Or I HOPE you will be.)
I’m loving it.
Thanks for stopping by and sharing my excitement. You all make my day:D
I also hope you like that more masculine stuff I will be sharing this release.
Till tomorrow :D)
#1 Ready, Set, Wrap………….Video
May 9, 2009 Author: mytime | Filed under: Home decor/3-D items, My Time to Create Challenge, My Timeless Templates, MYTIME MOVIE/VIDEOs, Papertrey Newsletter, TutorialsHi everyone! If you are tuning in Happy Mother’s Day!!
I’ll share more on that at the end!
Today is day one, of a jam packed post, filled with excitement! AS ALWAYS :D)
As you know the Papertrey Ink countdown is here, and I always GUSH each month over and over at how excited I am. I know it may get old, but I REALLY am. Each month I fall in love the newest releases, and latest and greatest templates! Plus it makes me get a head start on my gifts.
I now get to FINALLY share a peek at my newest Timeless Template called Ready, Set, Wrap!
This one is SOOOOO cool and fun. Seriously. It is so super adorable, fun and easy to make TONS of gifts for just about anyone you can imagine. Perfect size for SO many treats.
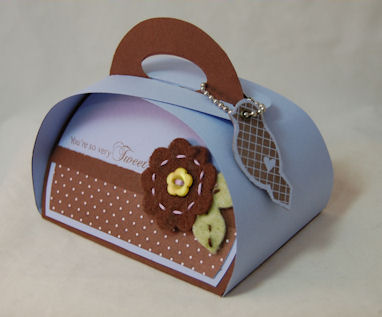
READY, SET, WRAP!
Looking for the perfect way to WRAP up something? Then this is the template for you!Ready, Set Wrap! will have you whipping out the perfect packaging for every occasion! Use it as a party favors or a fun project with the kids too.This is just the cutest box you could ever make! Perfect for that special something you want “un”wrapped in a fun way!The curves of this fun box will have the receiver in complete awe! You will be amazed at how fast this one comes together.
Go get READY, get SET-WRAP something special!
I also get to give you a peek at a NEW! stamp set called Bird Watching from Papertrey Ink.
NOTE: These items will not be released until the 15th ![]()
Today I am sharing a video that will HOPEFULLY help you maximize the use of your stamps, and view them in a whole new way, save you MONEY, and add great embellishments to those My Timeless Template gifts you create for EVERYONE!!
This video shows you how EASY it is to use your stamps to make your OWN chipboard embellishments!!
SOOOOOO, the focus of my tutorial today used a large bird from Bird Watching.
When I saw Bird Watching I fell in love. I immediately KNEW it had to be by Melissa Bickford! I LOVE her stuff!! LOVE!
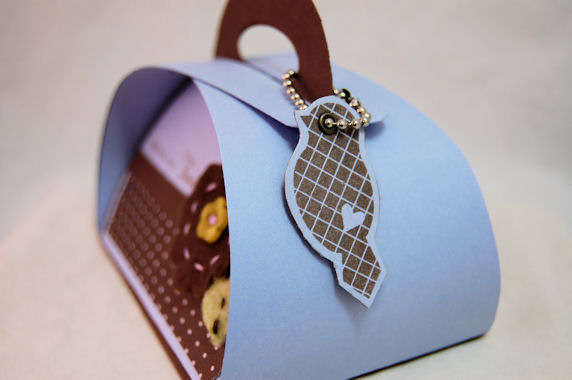
I knew the bird would make the CUTEST Keychain toggle for my Ready, Set, Wrap! template.
I like to use lightweight coasters for my projects. Usually you get 20 coasters for $2.00. That is ONLY 0.10 CENTS each-and you can get several images per coaster-HELLO!!! So affordable!
If you were to PURCHASE chipboard pieces or stickers, they would cost upwards of several dollars with only a few in each package-and NOT always in your color scheme! Now you can use images you already purchased for your projects instead.
Now you can use your STAMPS and make you own in MINUTES! AND it will MATCH any project! (like you needed another excuse to BUY MORE STAMPS?! :O)
Plus, lets face it, these chipboard pieces not only add a fun element, but dimension and interest to everything you put them on as well. Remember its the LITTLE details.
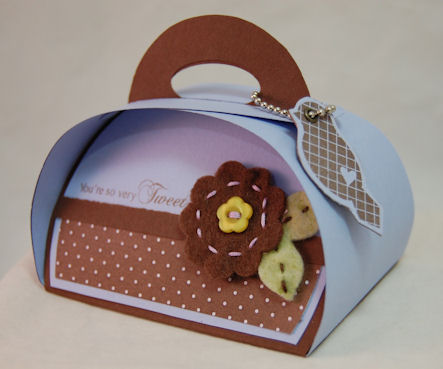
Sentiment reads: You’re so very tweet
Don’t you LOVE the chipboard bird addition to this project?! Perfect!
Now I got the little keychain toggle thingy from Michaels Craft store. They are in the back in the LEATHER section. 20 chains for $2! Not too shabby 😀
The cardstock is amethyst. I used Dark Chocolate Bitty Dots 2008 collection for this. I colored in the dots on the paper to match my project-so they are amethyst dots 😀 LOVE IT!
I began my project using my Inspiration Challenge—>HERE It was just what I needed to get started.
My felt flowers were made by me 😀 I die cut them from felt. Watch my video —-> HERE Button is from Vintage Buttons
I used the Cuttlebug Flowers #1 die for the flower, and another cuttlebug flower bundle die for the leaves.
Now to un-wrap it
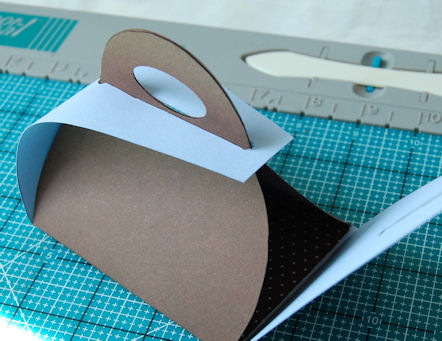
Slide off one side, then the other………………..
You’ll get the idea, as I share more ideas throughout the week 😀
Supplies:
My Timeless Template: Ready, Set, Wrap!
Stamps: Bird Watching/Additions
Cardstock: PTI Dark Chocolate, Almost Amethyst
Patterned Paper: Bitty Dots 2008 Collection
Ink: Dark Chocolate
Copic Markers: BV00
Vintage Buttons in New Leaf
Punch: Small oval by SU!
Other: Lightweight coaster board, eyelet, key chain toggle, Felt, Cuttlebug Flowers #1 die 2X6 Flower Bundle, crop-a-dile, hobby blade, sm corner rounder
Now for more peeks be sure to check out Kelly’s blog for another template peek, as well as Nicholes blog, Melissa, Lisa and Candice.
I am spending the day baking cookies from scratch with my kids! (Hopefully NOT cooking anything else for the day)*I know I can’t believe it either!* But Alexa sent me a letter in the mail about wanting to bake cookies with me ![]() Made me cry! It was SOOOOO sweet. I’ll also have to share the card/ poem she wrote me ALL by herself! She loves writing poems. I’m so proud of her writing and reading skills. She wants to write books/stories when she grows up! How cool is that?! A very good goal I think.
Made me cry! It was SOOOOO sweet. I’ll also have to share the card/ poem she wrote me ALL by herself! She loves writing poems. I’m so proud of her writing and reading skills. She wants to write books/stories when she grows up! How cool is that?! A very good goal I think.
Amber made me couple things, that were REALLY cute. One saying she loves me because I take her shopping! LOL! And give lots of hugs and kisses.
Noah made me a card and puzzle-but told me he really wanted to make one for daddy! Um, thanks! LOL! So he took mine out of the envelope and made something for Jay instead! He is mad at me because he lost his XBOX for a week, after being TERRIBLE to my mother while she watched him, when we were at the funeral.
Oh well. He will get over it eventually!! I hope. It hurt my feelings for him to be so angry with me. I know I need to stand my ground, but its so hard to be a mom sometimes.
Thanks for stopping by!
I’d LOVE to hear what your thoughts are for todays post and my newest template!
Enjoy your day.
Make sure you come back tomorrow for MORE peeks and endless ideas 😀
My Etsy

Who I Designed For
Blogroll
- Alicia
- Alli Miles
- Ally Blankenship
- Amber
- Andi @ crafts on a whim
- Angel R
- Angie Z
- Anne Kranitz
- Becky O
- Bee
- Beth Silaka
- Bethany Paull
- Beverly Nash
- Bobbie
- Cambria
- Cammie
- Card of the Week
- Card Positioning System (CPS)
- Cards for Cancer
- Catherine Doucette
- Charmaine
- Cheryl Sims
- Chriss Rollins
- Christina
- Christine Ewing
- Christine Wooden
- Colleen Schaan
- Craft Critique
- Craft Gossip
- Crystal
- Dawn Easton
- Emily Giovanni
- Geny
- Holly
- Igne Groot
- Inspirational Craft Blogs
- Irene
- Jami Sibley
- Jeanne Streiff
- Jen del Muro
- Jeni Bond
- JenMarie
- Jenn Balcer
- Jenn Diercks
- Jenn O
- Jennifer E
- Jennifer Mick
- Jennifer Pereda
- Jennifer-Sweet Treat
- Joanne Basile
- Jodi Collins
- Julia Stainton
- Julie Masse
- Karen
- Kathryn Berthiaume
- Katie Cotton
- Kelley Holland
- Kendra
- Kim Scholfield
- Kris’s Color Stripes! Get inspired here
- Kristen Dubosque
- Kristin Eberline
- Kristine
- Laura @ Sunshine Stamper
- Laura Turnmire
- Laurie Schmidlin
- Lesa Rapp
- Linda Duke
- Linda-LSN
- Lindsey Botkin
- Lisa (lakind scs)
- Lisa Kind
- Lori Craig
- Maggie
- Mara Campbell
- Maria
- Maria Levine
- Mary
- MaryJo
- Melanie M
- Monique Hansen
- Moxie Fab World
- Pam Imholz
- PaperCrafts Connection
- Peppers and Pollywogs Kids party site
- Rebecca Grohall
- Rita
- Robyn
- Rose Ann
- Sarah Vrolyk
- Sharon Harnist
- Sharon Johnson
- Sharon Rivera (a chemisrty with paper)
- Sherrie
- Sophia Landry
- Storage Units, Ink, & More Blog
- Sue Berker
- Susan (Rainy)
- Tangii Crane
- Tracy
- Tricia Traxler
- Trudee
- Velta
- VivLyn
- Zena
MTME Pretty Palette Color Team
MTME Pretty Patterns Sketch Team
My Time Made Easy TM LLC
Shop till you drop!
Lauren Meader
About Me
Copyrighted material
Subscribe To My Blog
Pages
- About me
- Alexa’s Story!
- My Crafty Corner!
- My Time Made Easy™ LLC
- Our Make A Wish Trip to Disney!
- Resume/Publication List
Calendar
| M | T | W | T | F | S | S |
|---|---|---|---|---|---|---|
| 1 | 2 | 3 | 4 | 5 | ||
| 6 | 7 | 8 | 9 | 10 | 11 | 12 |
| 13 | 14 | 15 | 16 | 17 | 18 | 19 |
| 20 | 21 | 22 | 23 | 24 | 25 | 26 |
| 27 | 28 | 29 | 30 | 31 | ||
Archives
- August 2013
- July 2013
- June 2013
- May 2013
- April 2013
- March 2013
- February 2013
- January 2013
- December 2012
- November 2012
- October 2012
- September 2012
- August 2012
- July 2012
- June 2012
- May 2012
- April 2012
- March 2012
- February 2012
- January 2012
- December 2011
- November 2011
- October 2011
- September 2011
- August 2011
- July 2011
- June 2011
- May 2011
- April 2011
- March 2011
- February 2011
- January 2011
- December 2010
- November 2010
- October 2010
- September 2010
- August 2010
- July 2010
- June 2010
- May 2010
- April 2010
- March 2010
- February 2010
- January 2010
- December 2009
- November 2009
- October 2009
- September 2009
- August 2009
- July 2009
- June 2009
- May 2009
- April 2009
- March 2009
- February 2009
- January 2009
- December 2008
- November 2008
- October 2008
- September 2008
- August 2008
- July 2008
- June 2008
- May 2008
- April 2008
- March 2008
- February 2008
- January 2008
- December 2007
- November 2007
- October 2007
- September 2007
- August 2007
- July 2007
- June 2007
- May 2007
- April 2007
- March 2007
- January 2007
Categories
- About Me
- All That Scraps
- blogger challenge
- camera/photo play
- Cards
- Contests
- family stuff
- FOR SALE
- Home decor/3-D items
- How to FAKE it!
- Introduction
- JUGS Challenge
- JustRite Stampers
- Lizzie Anne Designs
- My family stuff
- My Stamping Space
- My Time Made Easy
- My Time To Color Challenge
- My Time to Create Challenge
- My Timeless Template Challenge
- My Timeless Templates
- Mytime Mail
- MYTIME MOVIE/VIDEOs
- Papertrey Newsletter
- Pink Cat Studio
- Pretty Palette Challenge
- Pretty Patterns Sketch
- Product Opinions and Must haves
- Recipe's
- Saturday Sketch
- Smilebox Creations
- Stampavie
- Tutorials
- Uncategorized
- videos
Most Popular
- Create your own Onesie Card Tutorial-and important NOTE! PLEASE READ (2529)
- Saturday Sketch-Boxed bag holder (2333)
- Going GREEN! Fancy Flower Flourish-Closure Video (1478)
- Fabulous Favorite - Giveaway! (1336)
- a Prayer Request (1232)
- QUICK-Easter Baskets from Nestabilities-PTI style-and blog challenge (1063)
- Teaser Sketch (999)
- February Release Giveway! (and a little peek) (996)
- Group Post and Rambling Rose Video Tutorial (985)
- GIVEAWAY! Who wants it all?! (895)
Recent Comments (RSS)
- 첫충사이트: 완전히 흥미로운 블로그 게시입니다. 저는
- sarah: Wow, Lauren, what a stunning
- hedie: خرید راهبند
- 야동: Love to read it,Waiting For
- 야동: This seller is in a
- 바카라사이트: 여기 처음 왔어요. 나는이 게시판을
- 야동티비: I was surfing the Internet
- 바카라사이트: 비슷한 주제에 대한 흥미로운 정보를
- 바카라사이트: "여기에 제공해 주신 귀중한 정보와
- 온라인홀덤: 유익한 웹 사이트를 게시하는 데
Copyright © 2007 - My Time, My Creations, My Stampendence - is proudly powered by WordPress
This blog has been Tweaked and Designed by Sara Williams