Archive for the ‘Cards’ Category
February Release is HERE!
Jan 31, 2010 Author: mytime | Filed under: Cards, Home decor/3-D items, My Time Made EasyI am so excited! I feel like I could just jump out of my own skin (in a very good way of course).
I’ve been called a workhorse all my life. It’s so true. Especially when it is something I LOVE or believe in. I pour every ounce of myself into everything I do, and I hope in some way it inspires you.
Seriously, this release was SO beyond FUN for me, that I think you will clearly see just by the projects/samples I have to share this week. My children even had fun creating, as you will see as the week progresses.
So let me shout it from the roof tops-My Time Made Easy ™ LLC February Release is here!!
There is a LOT to share, so grab that extra large cup of coffee and prepare to be inspired! I have been a creating machine, so come by every day this week for posts FULL of ideas. You can also browse the projects in the store. I will have more details on those this week. This could EASILY be the post that never ends if I share everything at once! LOL!
I hope you are looking forward to a load of inspiration! I am just over the moon for this release! If you like cutesy, you’ll LOVE this release. We have an entire line of unique coordinating stamps, templates, digital paper, and cut files (which this month are available in PDF format too!)
Those of you who are terrified the the words “digi paper”, “digi stamps” and even the templates….. no worries! Don’t be! Don’t forget we offer FREE Digital paper, a free templates and now even a free digital stamp for you to try so you can ensure that you are able to work with everything, and ask ANY questions you may have, before even ever making a purchase!
This collection of coordinating items is perfect for ANY time of year!! It is all about staying to touch with with ones you love!
Now it is easier than ever to send that something special for any occasion. Whatever you send, it is sure to suit the occasion and warm their heart. Near of far, sending something special to the one you love is so important!
Be sure to check out the Design Team: (Each one is sharing a various template/stamp project combo for you! You are sure to be wowed)
Just click the highlighted linked words, for a direct link to the store category! Once you are there, you can click on the products of interest-and that will give you more complete information about it.
For example, if it is a template, it will tell you the completed project size, and some information about the template like what is may coordinate with.
For example: You’ve Got Mail © stamp image coordinates perfectly with the You’ve Got Mail © template.
Let’s get started.
February Release:
3 NEW! Pretty Impressions images: and 3 NEW! Digital Pretty Impressions images
Argyle Amazement ©
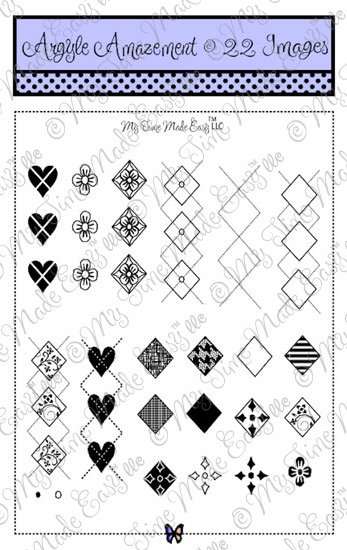
As it’s name states: This is an amazing argyle background building set!! Argyle is one of the hottest pattern trends, so this is a MUST have set! Creating numerous argyle themed backgrounds has never been more fun, or easy.
You’ve Got Mail © (It is a little large so click it to view)
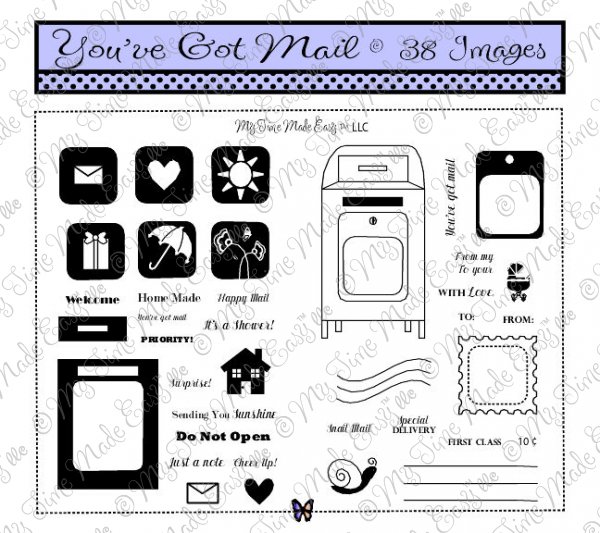
Nothing is better than sending or receiving something in the mail to let someone special you know, that you are thinking of them. This stamp set was designed to be an adorable take on the large postal box that sits outside your post office, or on the street, has perfect images for sending that special message! Coordinates perfectly with the You’ve Got Mail © template!
Critters with Heart © (available in BOTH acrylic and digital images)
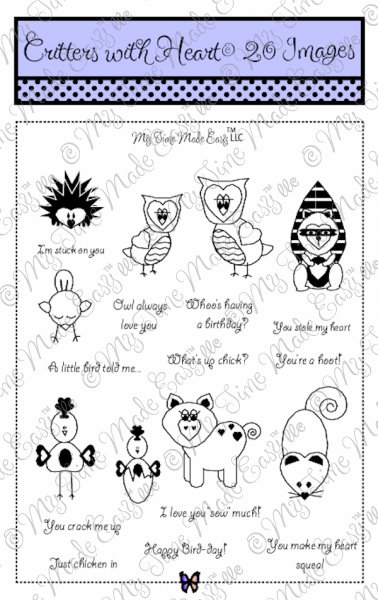
These images are sure to steal your heart!! These CUTE little critters all have something in common-each was designed based on a heart! Add a punny sentiment and you are sure to warm the heart of anyone who receives something created with this set. Make sure you see the Cute Critters © Cut File and digital paper too!
FREE! Walter and Waverly Wiggles © Digital Image
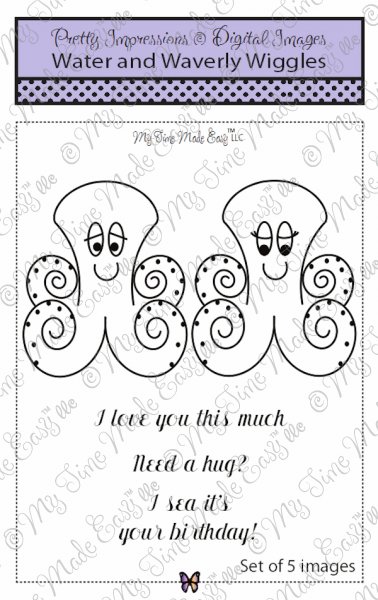
Can the usually ugly underwater sea creature, the octopus, get any cuter? I don’t think so! This is a super cute, and whimsical octopus couple, that was designed so that you can give our digital images a try, risk free!
All A Flutter ©- Our first release of butterfly images is now available in the Digital format too! This was our very first stamp release. These butterfly images were in high demand for being offered in digital format!
——————————————————————————————
4 NEW! Pretty Packaging © templates
You will want to go to the website for a complete view of these.
You’ve Got Mail ©
This is an amazing 3D version of the postal box featured in our You’ve Got Mail stamp set! You’ve Got Mail © has a whole new meaning when you package something in here 😀
Happy Mail ©
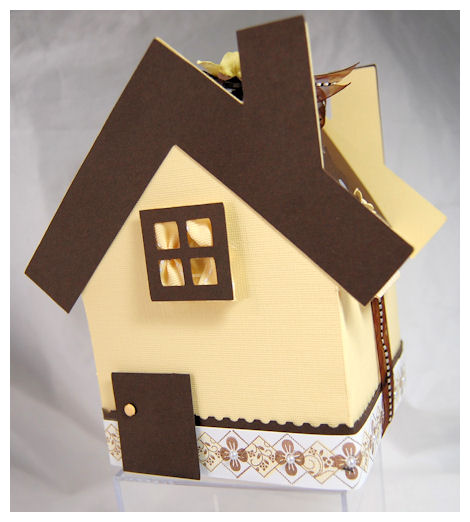
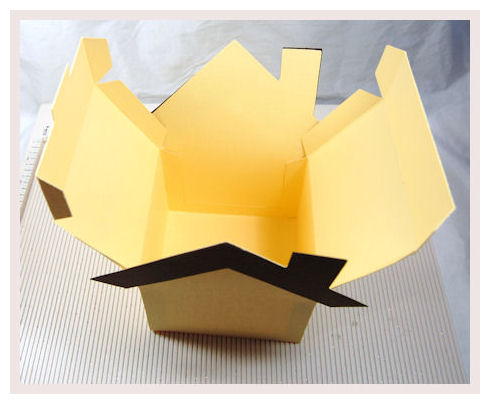
This is the cutest 3D “mail box”. There is nothing like getting “happy mail”! We all love going to the mailbox and getting a unexpected surprise. Well, now you can GIVE the surprise IN the mailbox itself! Could getting “happy mail” be any cuter, or EASIER!Welcome Home © This is an adorable house shaped template that can be used over and over again!!Be it for holidays, or every day. Welcome Home © is an ADORABLE house shaped box, with a fun tabbed tuck in closure.Those of you with personal cutters, this can really extend the possibilities of this template for sure! Use the front and back panels as a shaped card, tag or scrapbook embellishment. Under Cover © This is a super simple, yet simply sweet slider box, that you will want to recreate over and over again! So many possibilities.
Welcome Home ©
This is an adorable house shaped template that can be used over and over again!!
Be it for holidays, or every day. Welcome Home © is an ADORABLE house shaped box, with a fun tabbed tuck in closure. Those of you with personal cutters, this can really extend the possibilities of this template for sure!
Use the front and back panels as a shaped card, tag or scrapbook embellishment.
Use it as a gift box for any occasion such as Welcome Home, Welcome to the Neighborhood, from our house to your house, get well, cheer up, thinking of you……you get the idea.
Fill it with a small house planter, flower seeds, coffee, tea, candles, bath products, a stuffed animal or doll, maybe some art supplies for a child to “decorate” it (perfect for a little party too!! VERY inexpensive party favor-turned party project). Endless uses and EASY to assemble.
Sometimes we just need a quick and cute shaped box! Nothing that takes too long to assemble, but still says “I care” so I made this for you. This one certainly fits that description.
All there is to decide is what project idea using this template will you “welcome”?
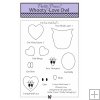
Under Cover ©
This is a super simple, yet simply sweet slider box, that you will want to recreate over and over again! So many possibilities. Perfect for any party, event, or a project for a rainy day. When you want something to WOW them, but have little time, this is the template for you. The box insert simply slides out to reveal whatever treasure you tucked in there.
*This template was created to coordinate with the Heart Stealer Raccoon © and the Whooty-Love © Pretty Pieces Cut Files ©*
This transforms this template into a Whooty-Love Owl, or a cute Heart Stealer Raccoon! You don’t want to miss out on those possibilities. Whether you use the template as is, combine it with our Pretty Pieces Cut Files ©, or add a window……they hide the perfect treat inside! Design it to be large, or small, no matter what, it will leave people asking “What is under this cover?”
——————————————————————————————-
3 NEW! Pretty Pieces Cut Files (also available in PDF format)
Love Notes ©

Creating little love notes have never been more fun and easy! This file makes the most adorable love notes with matching slide-in heart shaped pocket for any occasion. These were designed to coordinate with, and fit inside the You’ve Got Mail © and Happy Mail © template. This file includes a heart shaped template to create a quick and cute pocket to hold the heart shaped card, with larger scallop mat layer, along with several layered decorative hearts. You will be making Love Notes of all sizes when you purchase this cut file. Now it is time to send a little love!
Whooty-Love © (See website for sample)

Whooo doesn’t love an adorable owl? Well how about an adorable owl box? We took our Whooty-Love owl image from the Critters with Heart © Pretty Impressions© stamp set, and made him into an adorable coordinating 3D box! This goes together in minutes. So easy, the kids can do it too! Heart Stealer Raccoon ©
Heart Stealer Raccoon © (See website for sample)
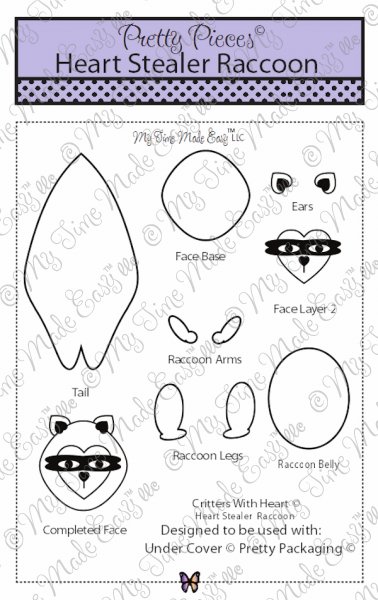
This 3D raccoon is sure to steal any ones heart! Imagine the look on the face of the loved on who receives this!Perfect to hold that something special. We took our Raccoon image from the Critters with Heart © Pretty Impressions © stamp set, and made him into an adorable coordinating 3D box! You will want to see it to believe it.
———————————————————————————————
5 NEW! Pretty Printables © Digital Paper:
Cute Critters ©
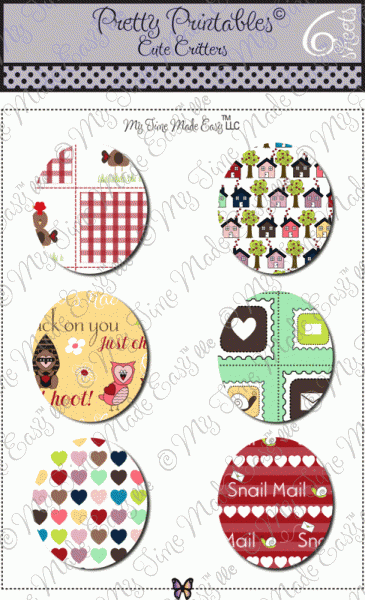
This cute paper pack features 6 designs with fresh, fun and colorful patterns. It was designed to coordinate with the Critters with Heart © as well as the You’ve Got Mail © Pretty Impressions © stamp set! Cute doesn’t even begin to describe the adorable arrangement of patterns! You will be using it over and over again. Add it to ANY of the Pretty Packaging templates for an easy coordinating gift set that is sure to melt someones heart!
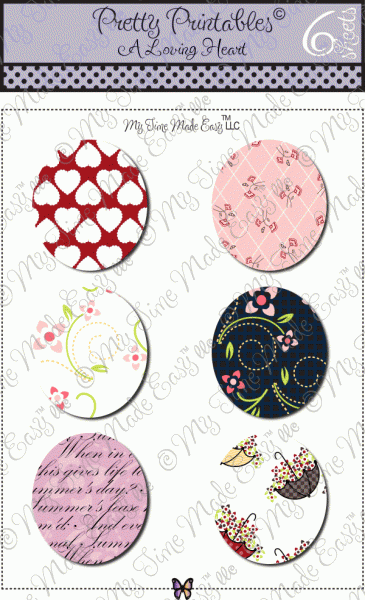
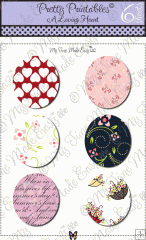
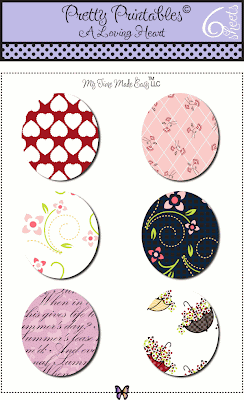
A Loving Heart ©
This package of patterned paper appeals to the more elegant yet whimsical side of designer paper lovers. We used colors that coordinate with our Darling Dots ©, and GaGa for Gingham © Pretty Printables © digital paper collections. This collection is sure to add that needed touch of elegance to any project.Darling Dots ©
Darling Dots ©

This has an amazing arrangement of colors in one of the hottest pattern trends : Polka Dots!!There will be no lack of color choices with the darling pack of polka dot patterned paper! This collection of polka dot paper was designed to coordinate with the GaGa for Gingham ©, as well as A Loving Heart © and the Cute Critters © Pretty Printables © digital paper collections.
GaGa for Gingham ©

Well, just like it’s name-this collection of Gingham paper, in a amazing variety of 12 colors will certainly have you going GaGa for it!
This collection of gingham was designed to coordinate with the Darling Dots, as well as A Loving Heart © and the Cute Critters © Pretty Printables © digital paper collections. There will be no loss if inspiration once this collection gets in hand.
Last but not least the Color Me Collection ©
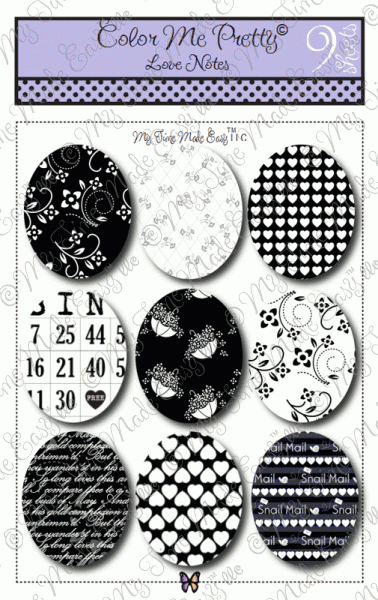
Love Notes ©
This is a collection of 9 black and white patterned pieces of designer paper!
Each page can be used for printing on your white cardstock to allow you to use whatever color medium you choose to “color” in the images. This collections give you quick and cute patterns that YOU can choose the color combination for. Or you can even choose to print it on colored cardstock.
Love Notes © is from our Color Me Pretty collection of totally customizable black and white patterned paper! Let your creativity take the lead – whether you color the images by hand, print on them on colored cardstock or layer them over your favorite patterned paper and then print, the possibilities are endless!Our Love Notes© paper is designed to coordinate with the Cute Critters© and A Loving Heart© collections.
—————————————————————————————–
So now let me share my samples for the day.
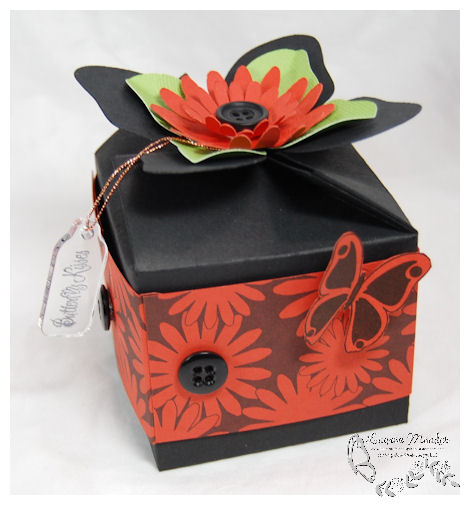
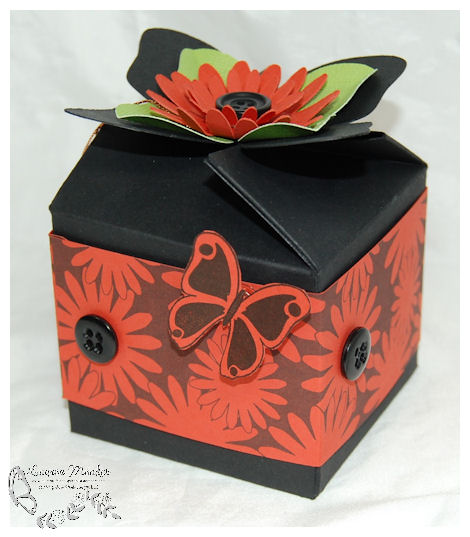
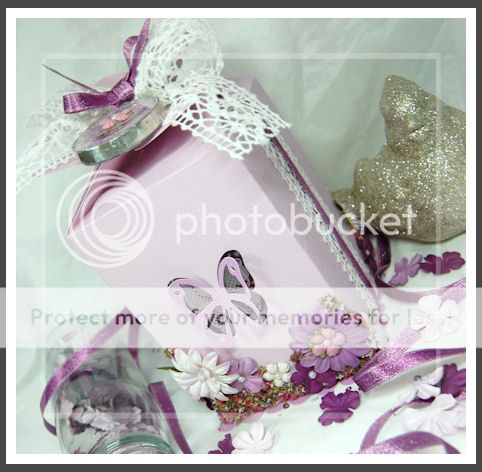
Today the focus will be on You’ve Got Mail ©- both the template and set of images.
This is a coordinating Pretty Impressions © stamp set, and Pretty Packaging template ©, for you guessed it: sending something special via mail theme.
Never have I ever seen a stamp set, or template like the one I am about to share. It makes the PERFECT card and gift packaging for ANY occasion-which I think we ALL love. The idea was an interchangeable image for a mailbox.
So let me share more about the stamp set: You’ve Got Mail ©
This set has 38 images! The image pieces are used to layer elements on a mail box (or the postage stamp). Sample can be seen on website.
Now for this set there are a bunch of “everyday” images, with coordinating sentiments, that can be placed on the FRONT of each mailbox. You can change it up to suit whatever occasion you choose. The images are also wonderful on their own too (as you will see).
When you look at an actual USPS postal box, this is the place where you usually see the post office schedule for pick up, and often the bird icon appears on the side or the front as well. I thought it would be fun to be able to create some images just like this, and of course, how cute would a 3D template to match be??
The stamps are also able to be used on the template too! Wait until you see 😀
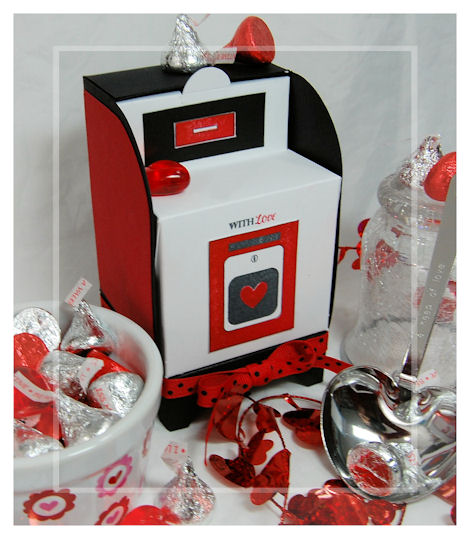
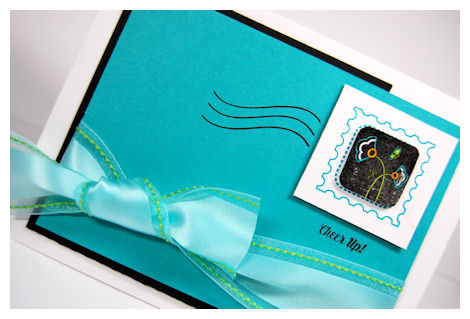
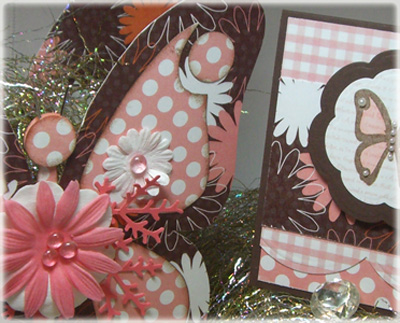
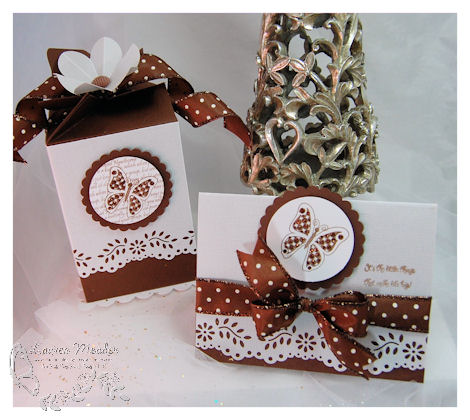
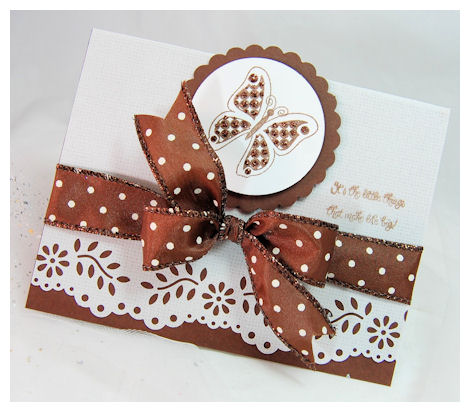
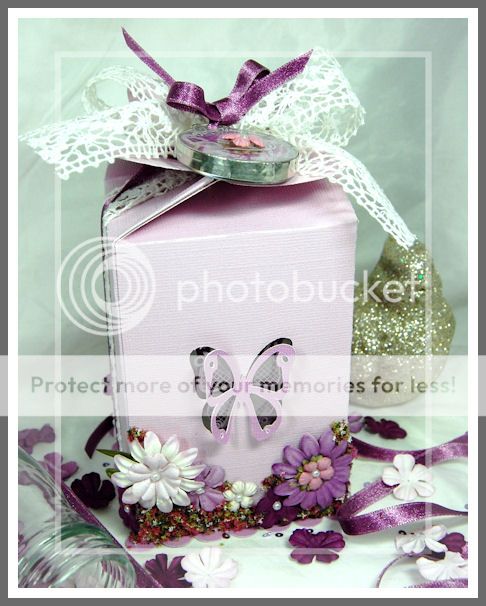
Here is a sample of the card:With Love

Isn’t this so cute? I went with a “love” theme in honor of Valentines Day. I love red, black and white together.
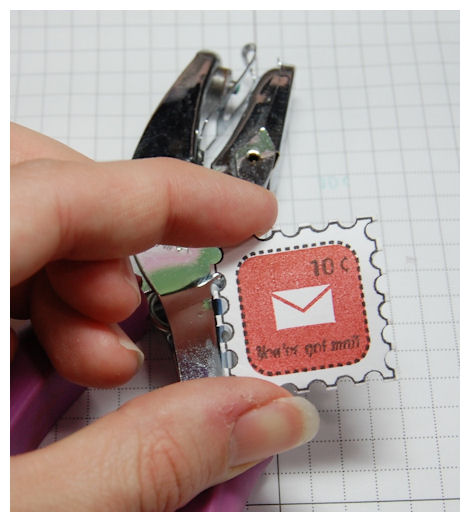
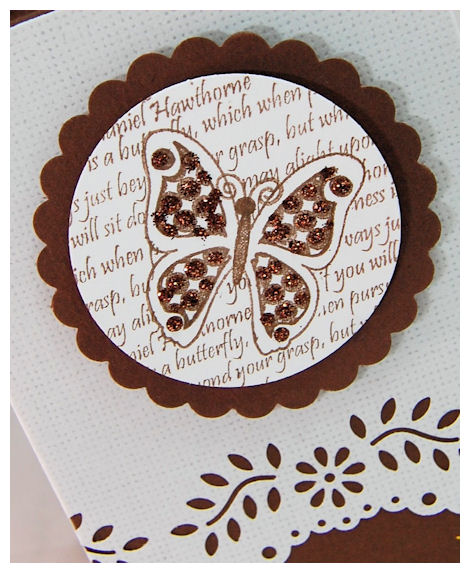
I made my actual card look like a large postage stamp. I simply punched 1/2 circle around the black mat layer.
This post office box was stamped in black. I used the layering images within the set to color the letter door. That door was cut “open” using my hobby blade. I then popped it open and put one of the little letter images popping out, and scattered across the card. TOO FUN!
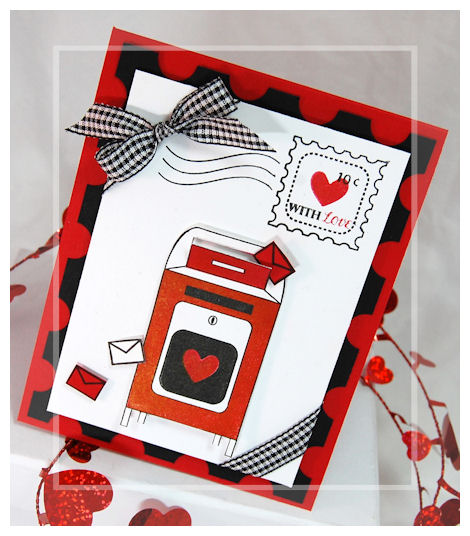
I also stamped the front of the mailbox red, using the additional layer in the set. This makes it SOOOO easy. You can also color the entire box, or paper piece with patterned paper.
For the image center on my mailbox, I used the solid heart block stamped in black, and stamped the smaller single heart in red, inside that.
There is a “postage stamp” image in the set that you can build upon. You can easily layer any of the images and sentiments within the set to create all sorts of “stamps”.
Can it get ANY cuter?
In this creation I used the postage stamp, and the heart for my “stamp”. I added the 10 cent sentiment, and the “with love”. I adore the possibilities this set has.
Now I knew upon creation of this stamp set that I would HAVE to figure out a way to create a cardstock version. C’mon does it get any better than that?
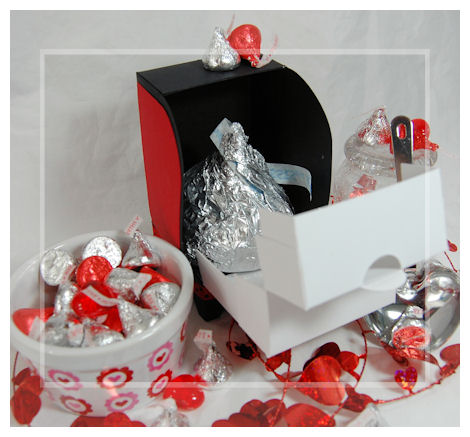
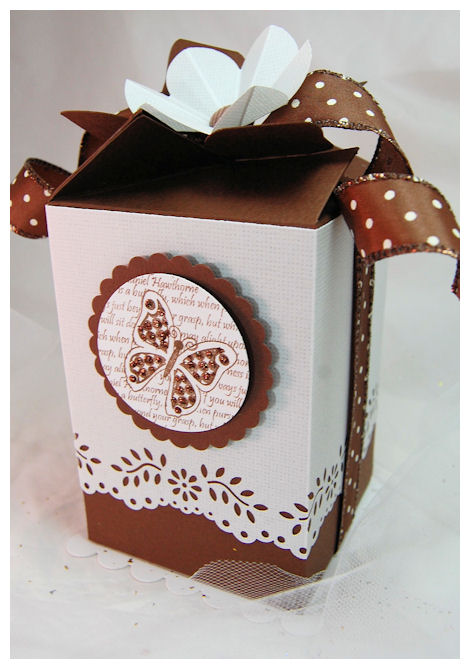
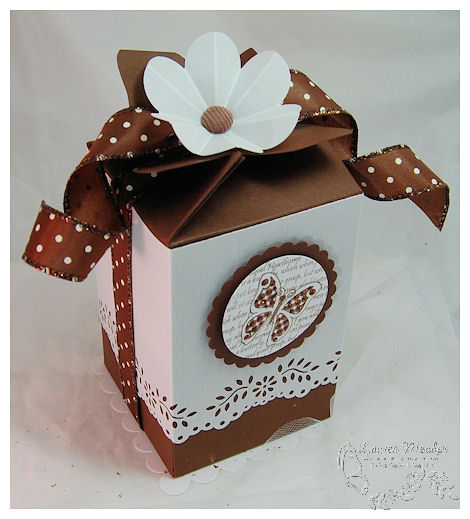
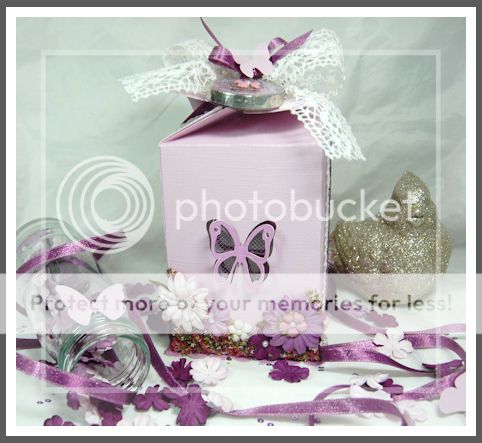
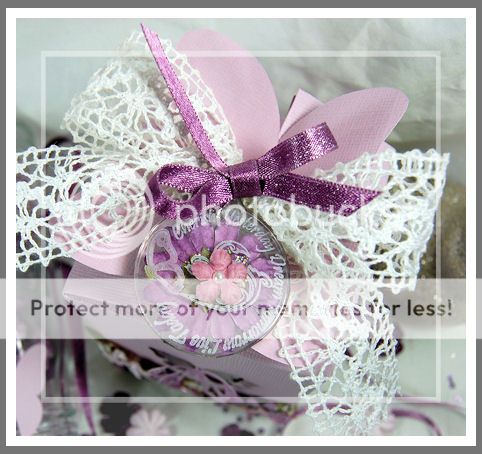
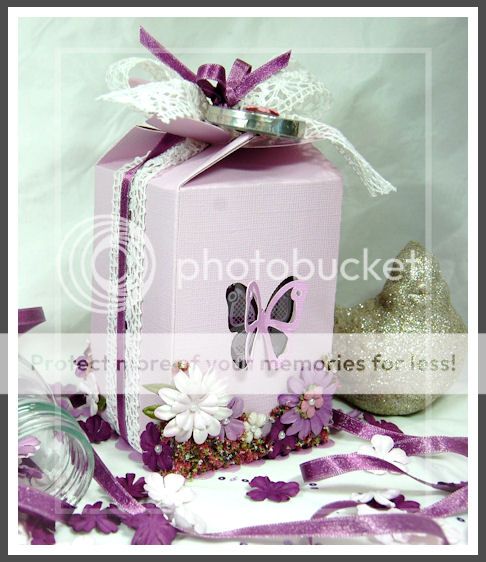
You’ve Got Mail © template (with more to come!)
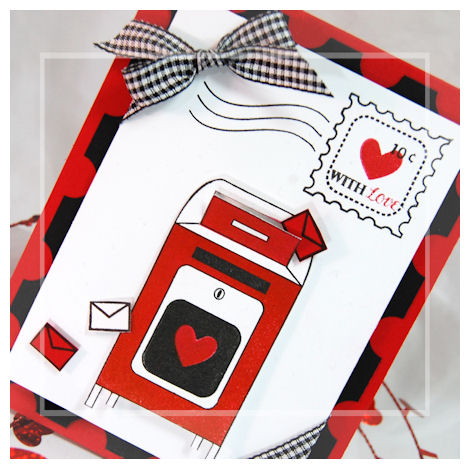
Sending Love
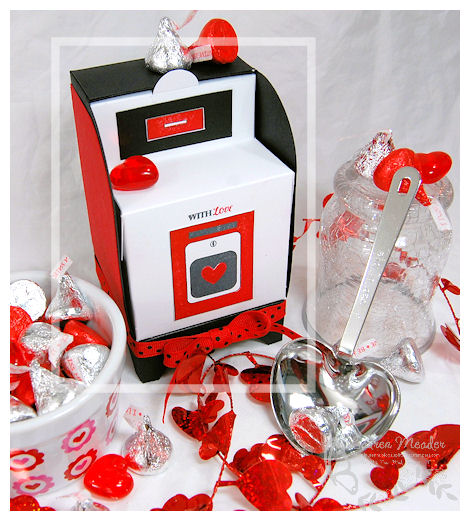
Those of you who said it was going to be like a USPS mail box were correct!! There are many things you can do with this template, and it is a wonderful size for adding so many wonderful treats!
I designed it to be similar to my card above.
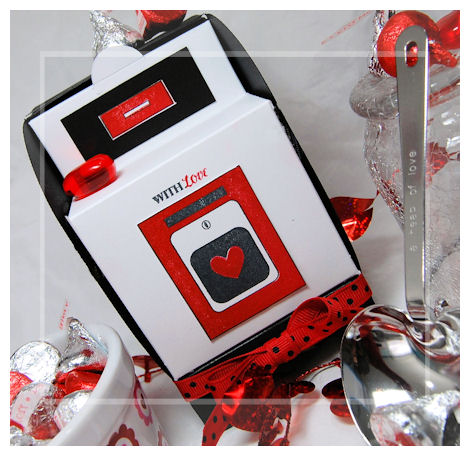
I stamped my door image, and the front image too. Perfect for the template. I love matchy matchy!! Now it is EASY PEASY.
We even have some pretty mat layers for you to easily dress up the template
It is SO much like the real thing. It even has the cute leg base 😀
No detail was spared. Best part is, like EVERY template I have ever designed, it is EASY for YOU (no matter what skill level you are) to assemble.
We have full color, step by step photos , with clear written directions and now that you can get these to work with every cutting machine on the market, easy to whip out too! Plus let’s not forget the ability to resize with the click of a button.
You can now afford to give treats to anyone, near of far. That is the best part 😀
Now you may be wondering….what are you going to put in there?
How about this
Do you not LOVE it? This is a JUMBO Chocolate Hershey Kiss! Fits right inside.
Now that is what I call sending LOVE! That is definitely the kind of kiss I want to get in the mail 😀 Of course the mini versions are a diet friendly option too 😀
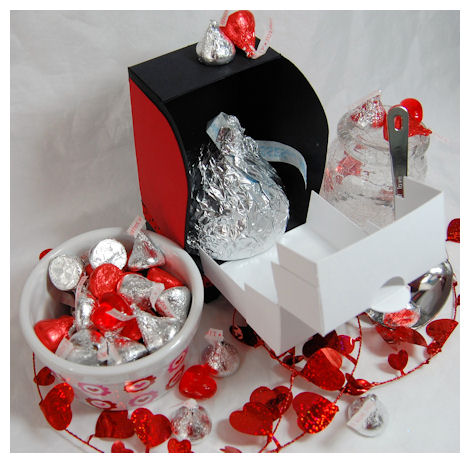
Who wouldn’t feel loved if they got this?
Are YOU in love with this stamp/template combo yet?
Well, I have even more to share…..
How about seeing some CARDS? I told you that this set makes some REAL great images for cards…..so let me share that.
Cheer Up!
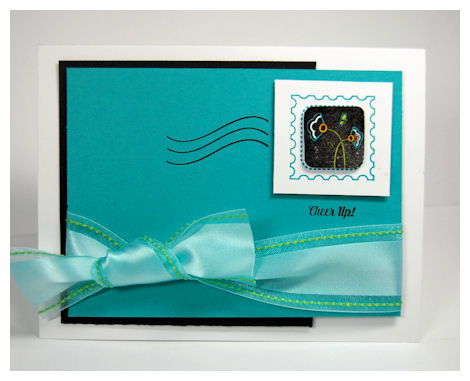
How cute can a SIMPLE card be?
This one was made in under 5 minutes!
You could use this layout and create a gift set with EVERY image block in the set for an amazing assortment of cards for a gift. You can also just change out the colored layer for a new color each time.
I stamped the postage stamp image in teal. Then I stamped the flower block (lightly for a distressed look) in black ink. Colored in my flowers, with copic marker, cut out and layered it.
Simple,
This is sure to cheer up anyone!
Speaking of cheering up…how about sending some sunshine?
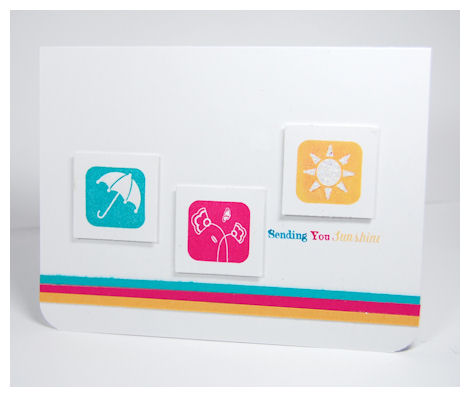
Another under 5 minute card using some more image blocks from the You’ve Got Mail © set.
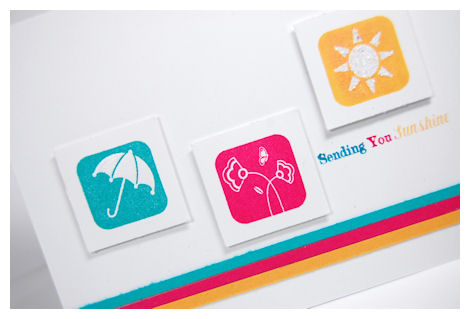
I love the bright colors. Each image is popped out on a dimensional.
The sun has glitter on it-naturally 😀
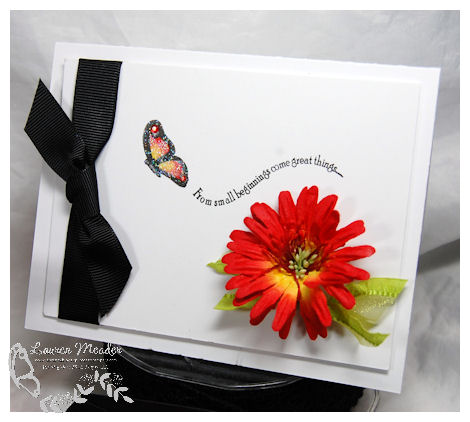
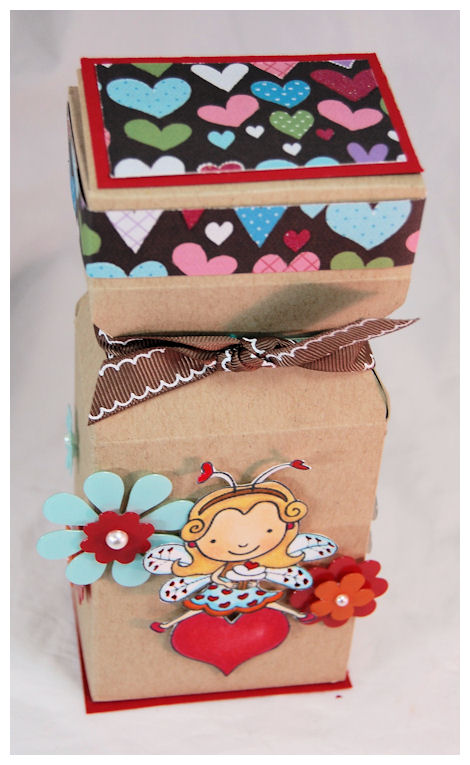
Now let me move on to a favorite of mine-the little house image.
From my To your
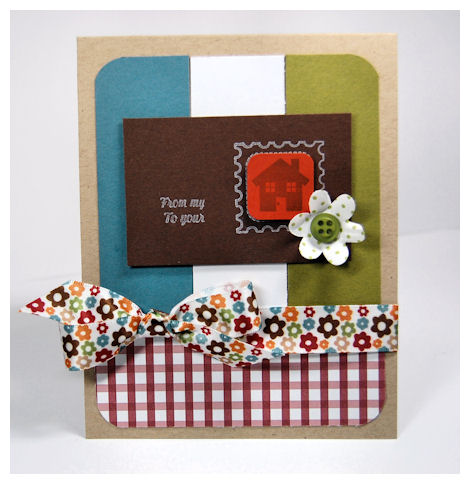
This little house is the image that spurred me to design the super cute (and quick to assemble) Welcome Home © Pretty Packaging template. I just fell in love with its simplicity.
This sentiment is suppose to mean : From my ” house” To your “house”. It can also be used with the heart image above as well!

(The red gingham paper is our GaGa for Gingham paper collection :D)
My design team member Tracey suggested this sentiment in honor of a PSF name Pam. She said that everyone has sentiments that states ” from “our” house”. Well what if there is no OUR. What about SINGLE people, or if it is just from you? So I agreed and added this sentiment to the set, just for Tracey and Pam 😀
There is also a WELCOME (perfect for the baby carriage in the set (as is special delivery) and HOME MADE sentiment for the house image too.
Speaking of the house (you will see more on the template VERY soon! I promise)
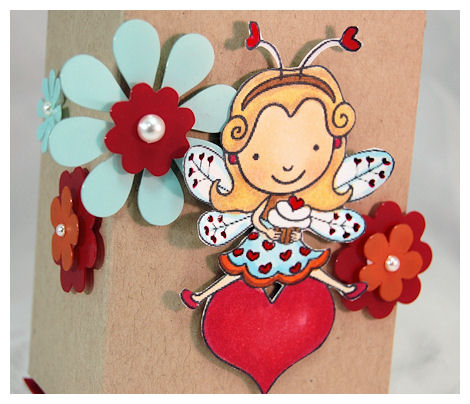
I designed a card using the house and the little snail (which I also ADORE!)
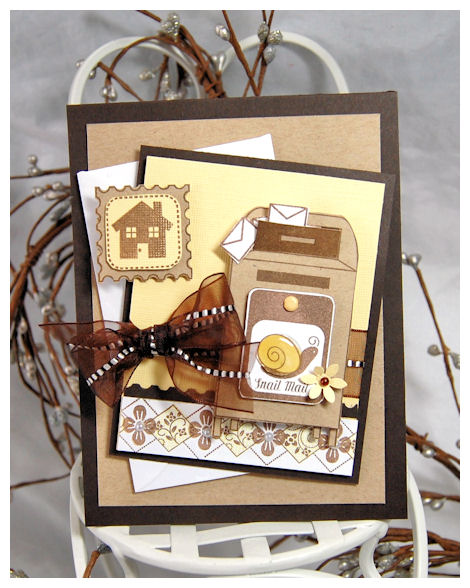
Snail Mail
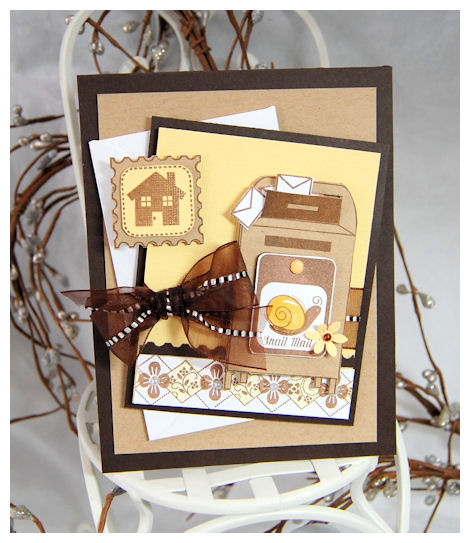
I LOVE the snail and the sentiment. Heck, I LOVE this card!
LOOK very detailed but was actually quite simple. This has a Welcome Home © project to match too (see below)
I stamped the mailbox on Kraft cardstock, in chocolate ink. I cut out, and once again cut my door to pop some “mail” in to. I layered on my stamped snail layer. The snail has a page pebble in the “shell”. Just a cute, easy and simple WOW factor.
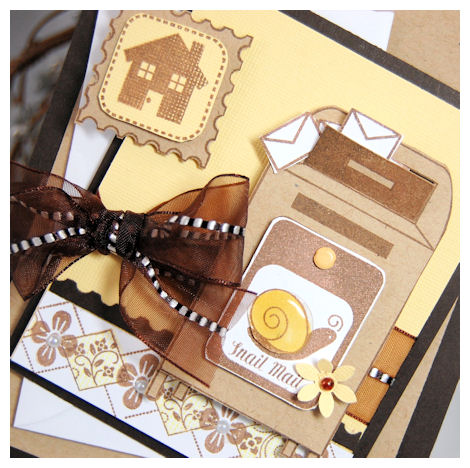
How cute is the house “stamp”.
You *may* think that cutting this out is a grueling task, but it is actually quite easy.
Let me share a “quick” trick with you.
Punch out your “stamp” with a 1 1/4 square punch.
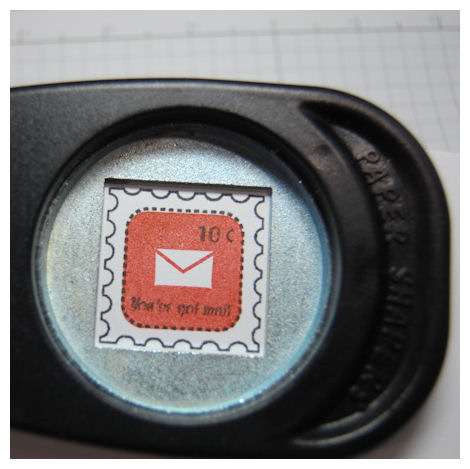
Then take your 1/8 hole punch and punch the 1/2 circle pieces.
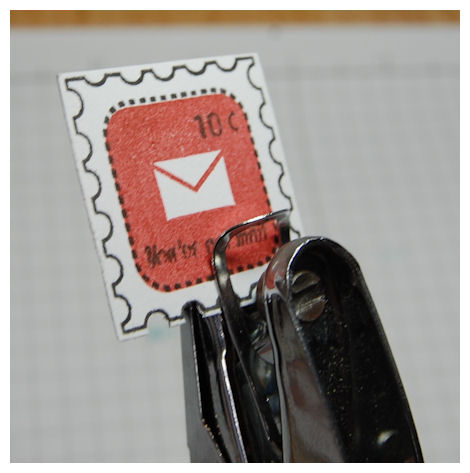
SUPER quick and trims perfectly!
Cute eh?
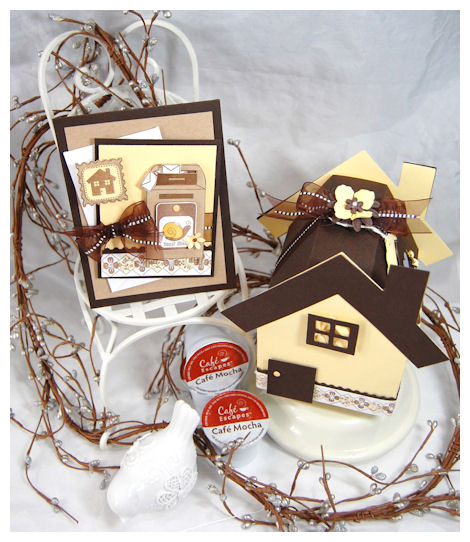
Here is the Home Made © Project to match
From my To your
I love NOTHING more than creating coordinating projects (obviously!)
You will see this on the Website sample.

This Welcome Home © template is meant to be quick and cute. I truly adore its simplicity.
I used this to package up my newest favorite item: Cafe Escapes Mocha K Cups for the Keurig. (can you say YUM-A-LICIOUS) Certainly a wonderful gift to give anyone this cold, and blustery season.
While this project ISN’T the focus of today’s post I just had to share it, since it is matchy matchy.
It was designed after the house image in the You’ve Got Mail © stamp set.
It has an amazing tab, tuck in that is hidden by the optional roof.
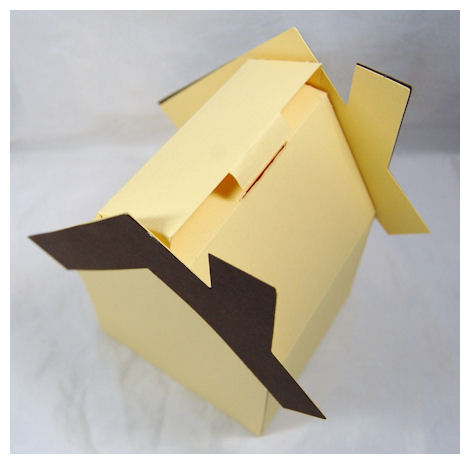
This is the box prior to any decorative elements, all opened up.
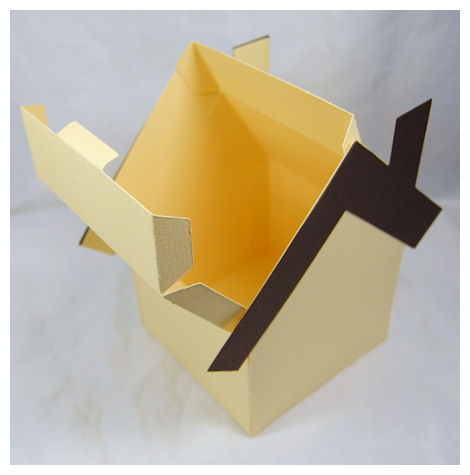
It can open on both sides…depending on how YOU want to make it 😀 You will be taken with this one I am certain.
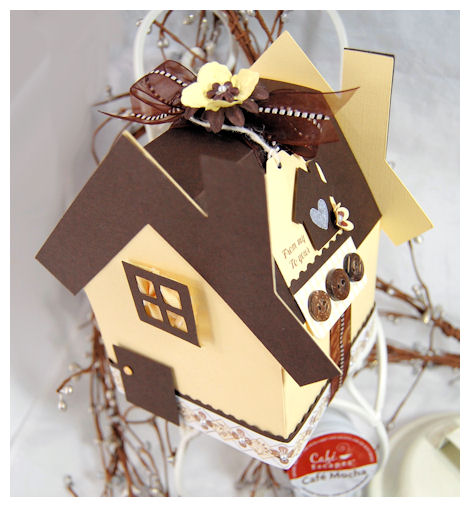
Then with the decor….
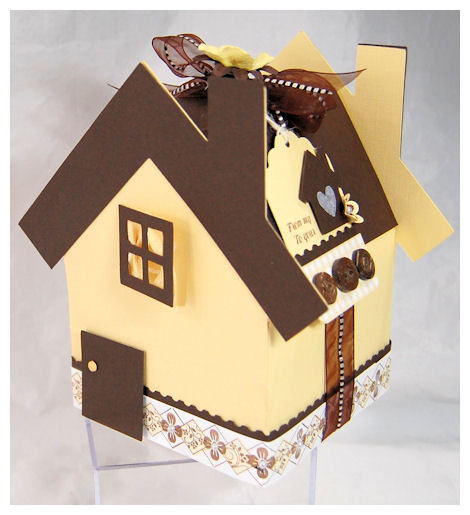
AH! What a difference.
This is the side view, in all its GLORY. Super quick and cute.
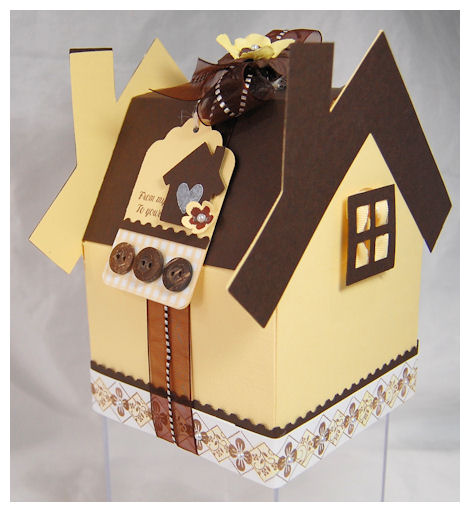
Now we move to the back. I added some tied ribbon behind the windows, so they look like curtains. Just in case you were wondering. Looks super adorable in person.
How about that tag you say?
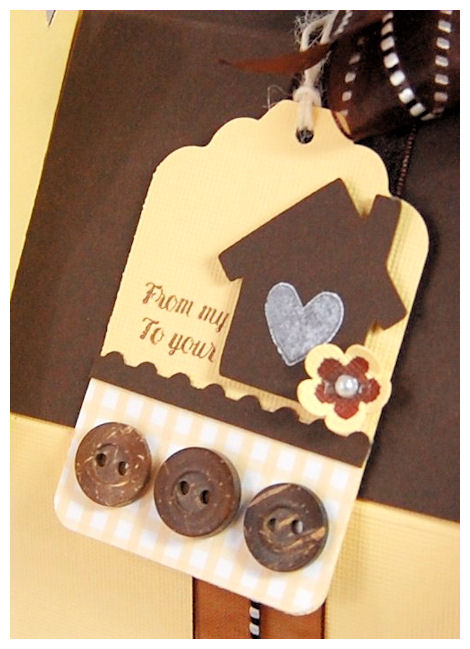
How cute is that? I put the heart image in the center of the house.
Would you believe I SHRUNK down the Home Made © template to be 1 1/2 inches, for my tag? Now that is cool.
You also see some GaGa for Gingham paper too 😀
Wait until you see more with this template. You will be over the moon.
You are *also* looking at the Argyle Amazement © stamp set on the bottom of this (and the card too). Is it not delicious? You can build all sorts of wonderful patterns with this set. Create a simple and quick border, or an entire background, there are ENDLESS possibilities for that set-ENDLESS! I’m totally in love with it, so be prepared to see it LOTS!
Trust me when I tell you I have LOADS more to share, as does my amazing design team, which if you didn’t know them before, you will want to know them now! They are amazing, and have each designed some wonderful stuff.
WHEW! Are you with me still? How many cups of coffee did that take you through? I drank 3 just typing it all up! LOL!
I’m dying to hear your thoughts on the NEW! Release and any of the projects by myself or anyone on the design team shared 😀
Thank you for your support, and keeping me inspired to keep pushing my own creative limits.
Come back tomorrow for lots more 😀
Supply List
With Love/Sending Love
Pretty Impressions © stamps: You’ve Got Mail
Pretty Packaging template: You’ve Got Mail
Cardstock: Couture Cardstock: Candied Apple, One Sheet Wonder White, Slate (black)
Ink: Pallette black, red
Ribbon: Black & White Gingham from Michaels, Red & Blakc polka Dot by May Arts
1/4 inch circle punch, Hobby Blade
————————————————————————-
Cheer Up
Pretty Impressions © stamps: You’ve Got Mail
Cardstock: Couture Cardstock: Slate, One Sheet Wonder White SU! teal color
Ink: Black, Copic Markers
Ribbon from a chocolate box
——————————————————————————-
Sending You Sunshine
Pretty Impressions © stamps: You’ve Got Mail
Cardstock by SU!
Ink by SU!
1 1/4 square punch
—————————————————————————
From my house card
Pretty Impressions © stamps: You’ve Got Mail
Pretty Printables © Digital Paper: GaGa for Gingham
Cardstock: Couture Cardstock: Bran, Tranquility, Dill, One Sheet Wonder White, Ganache
Ink, chocolate, white craft ink
Ribbon by American Crafts
flower by American Crafts
————————————————————————–
Snail Mail/From my To Your box
Pretty Impressions © stamps: You’ve Got Mail, Argyle Amazement
Pretty Packaging © template: Welcome Home
Pretty Printables © Digital Paper: GaGa for Gingham
Cardstock: Couture Cardstock: Nomad, Bran, One Sheet Wonder White, Ganache
Ink: Pallette Brown, Copic marker
Punch: Postage Stamp border by EK Success, 1 1/4 square, flower, 1/8 hole punch, tag by Marvy, mini flower EK success
Brad-flower/ yellow by SU!
Buttons by Foo Fa La
Ribbon by May Arts, twine
Prima Flowers-hydrangea
Other: Page pebble, adhesive pearls
Guest Designer for Character Cafe and a challenge!
Jan 21, 2010 Author: mytime | Filed under: Cards, Home decor/3-D itemsOH boy I am busy as a bee these days!!
The next release from My Time Made Easy ™ LLC is ALMOST here!! I can’t even wait. I have a ton of stuff to share soon. My creativity is on OVERDRIVE!
Plus doing daily activities with the kids has kept me busy.
I know many of you are wondering what I am up to these days, and right now……….. business stuff! I’m so enjoying every moment and have never felt so liberated or creative!! Sadly I’m still in “tight time” mode so I have been absent here-sorry!
If it makes you feel any better SCS has been having blog issues anyway! I also didn’t realize just how much I would have to do too! LOL! I guess you never really do.
SO I have a post today and tomorrow <—which will be a HUGE early peek at SOME of what is to come from MTME in February!!
I cannot say thank you enough for the huge hit my first release has been and all the love and support. You helped make my dream a reality! The emails have been especially wonderful 😀 Thank you!
OK let’s get to the eye candy!
A few months ago I was asked by Kendra from Character Cafe if I would guest design for them in January.Of course I was happy to oblige!! Granted life got very hectic but it was refreshing to take a break from all work, no play, to get INKY again.If you have yet to hear of the Character Cafe , they sell Digi Stamps, which I am getting more familiar with as time goes on 😀 Today they are hosting a Digi stamp/template challenge-so be sure to check it out—> HERE! You can see ALL the details! They have until next Thurs. 10pm EST to enter.
The winner will receive the Character Cafe new Valentine Releases (there are 3 of them) as the prize.
They’ll also receive a 15% off Discount Coupon for The Character Cafe Store, a winner’s badge for their blog and they’ll be featured on our website with a link to their blog/gallery.
The Design Team is playing along too
Piali, Rachel, Sara, Meredith and Billie!
Now here is my contribution
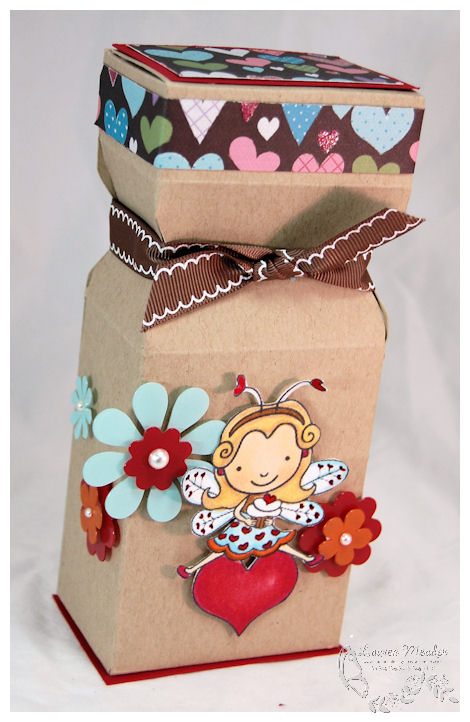
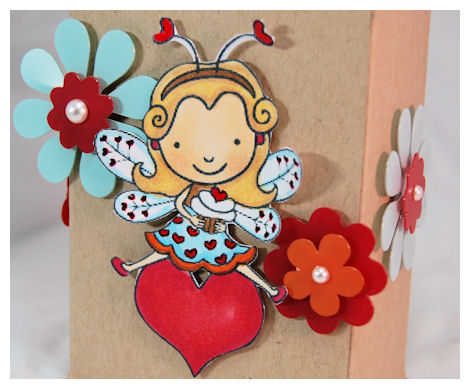
My daughter Amber has a birthday party to attend next weekend. The girl is turning 6. She got her a gift card, and we thought we’d package it up all pretty and girly, and add some candy to it too! So for my guest spot (and the challenge) I thought I’d use the In a Pinch © Pretty Printable template 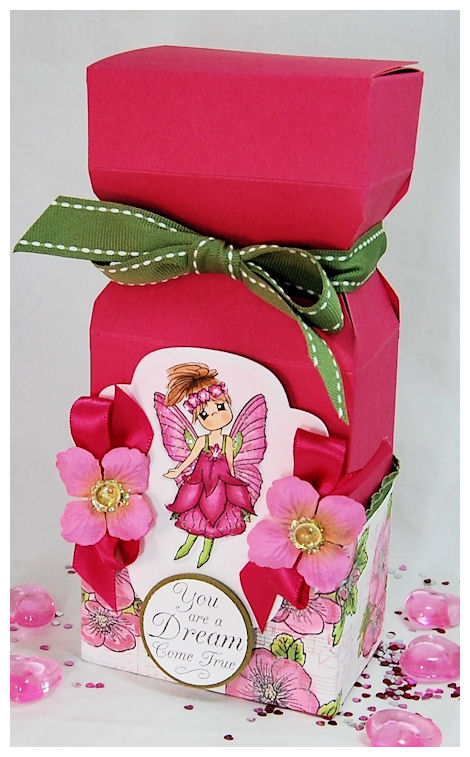 This is a close up of what we came up with Dream Come True
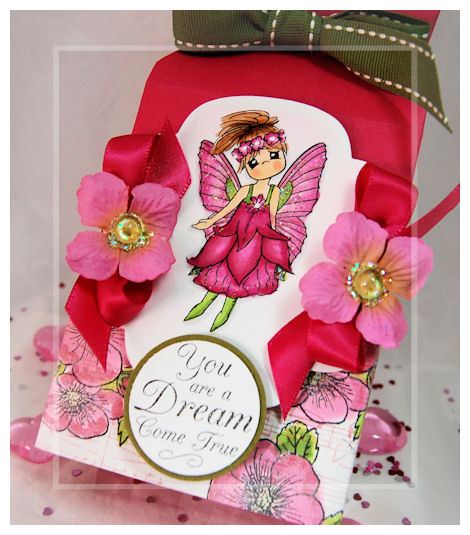 Amber helped me browse the store and chose Fairy Belle for the gift image. She was definitely perfect for the Fairy themed party.I colored her to look like her friend.
 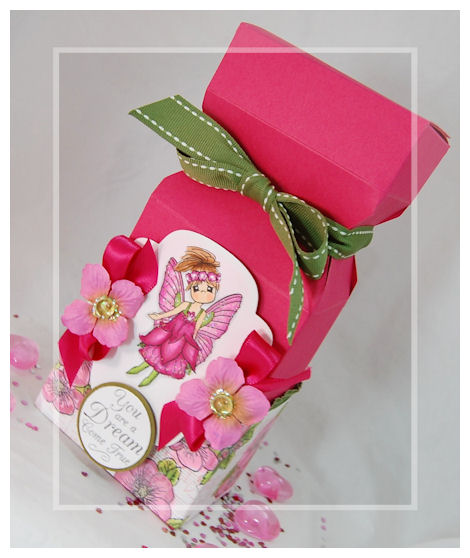 I stamped her on a nestabilty tag, colored her with Copic markers and added some Stickles!
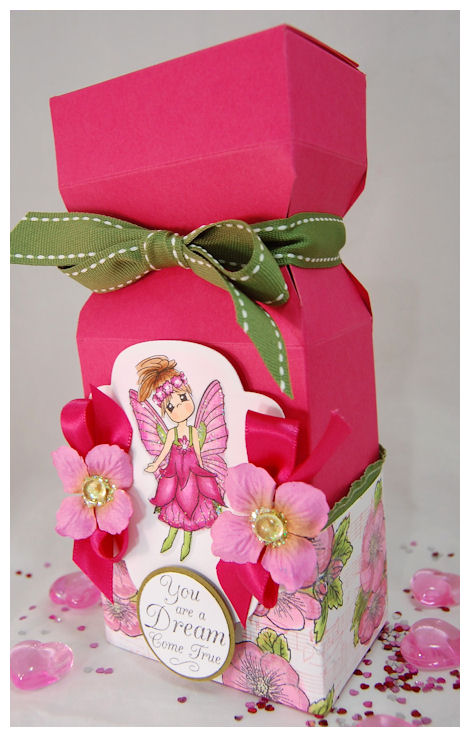
The sentiment is by JustRite Stampers January Release Loving Thoughts Centers 1-5/8″
“You are a dream come true”. I thought that was perfection!
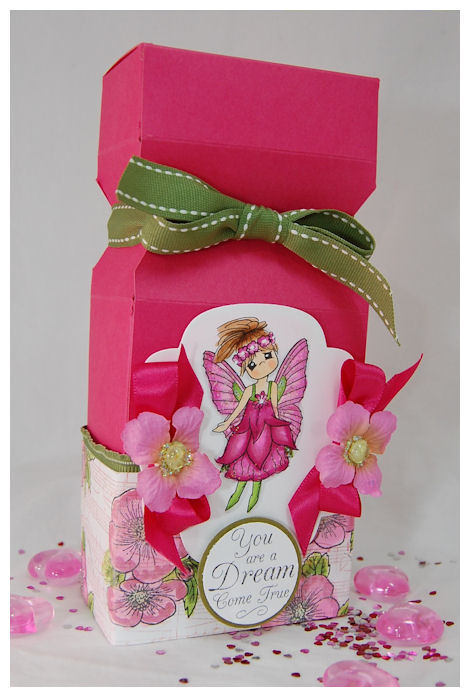
I added the patterned paper to the bottom and trimmed it with some American Crafts ribbon.
I went on to use another new release
Plant a Little Love Borders & Centers Round to make my own patterned paper. I just randomly stamped then colored it, adding some Shimmerz to them in the end.
Well I was on a mini roll….so I went and created a card too!
I didn’t have time to do what I planned, but at least I got the card created!
Sunflower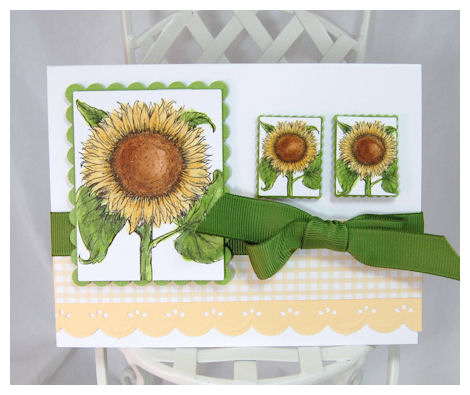 When I saw that particular image I was so drawn to it! I love flowers!I just re-sized the same image to create this one.Clean and simple. Just my style 😀 I used a glitter pen on the sunflower petals, but it didn’t show up-sorry. Trust me though, pretty in person!Makes me FEEL Spring! The gingham paper is a SOON to be released pattern 😀 Stay tuned!I want to thank the team at Character Cafe for trying out the templates, and having me play along! It was fun. Thanks for stopping by Tomorrow I have a sneak peek at ONE of our next stamp releases and a template!! You won’t want to miss it!
Hi everyone
Our design team has even more to share with you!!
Katie did a wonderful tutorial—>CHECK IT OUT!
Mona posted a stunning gift set—>HERE!
and Krisitn also has a SUPER FAB card using an upcoming CUT File (wink) 😀 —>HERE
Now if you didn’t know…. My Time Made Easy ™ LLC is sponsoring the Color Throwdown #74 —–>DETAILS HERE
Make sure you enter for your chance to WIN!!
So, I obviously I wanted to play along too!!!
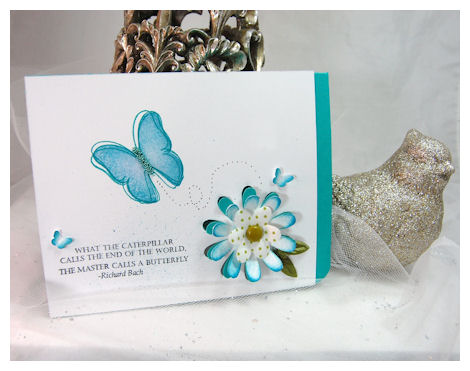
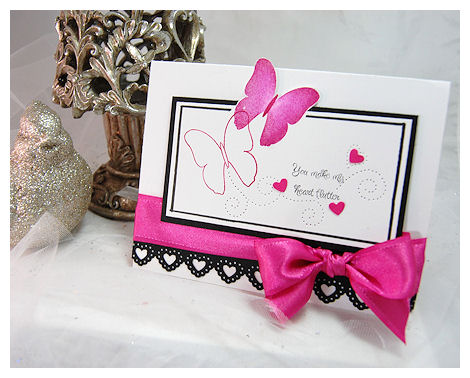
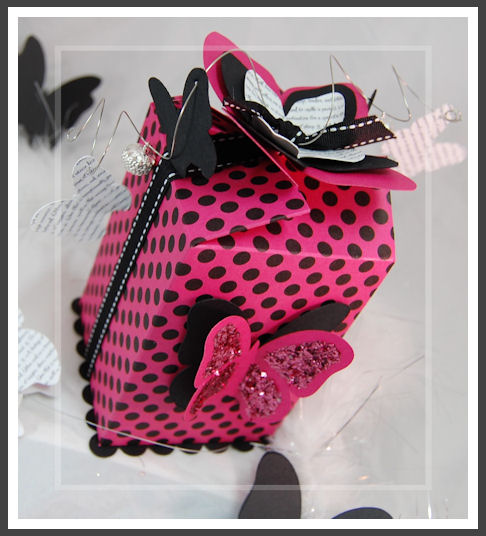
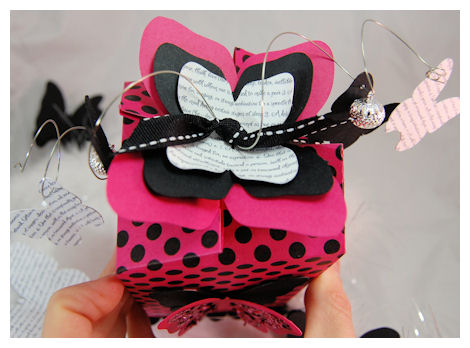
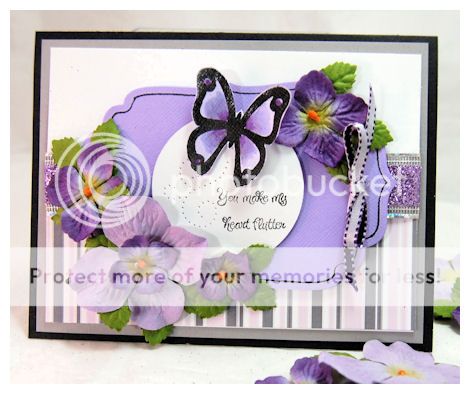
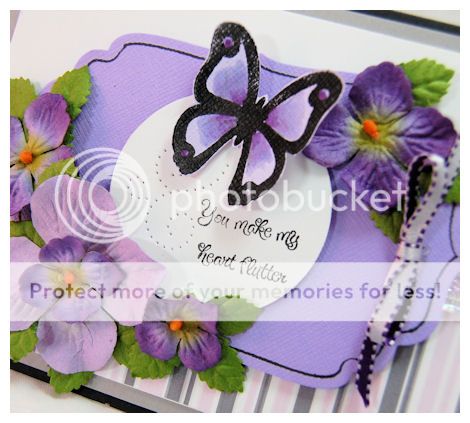
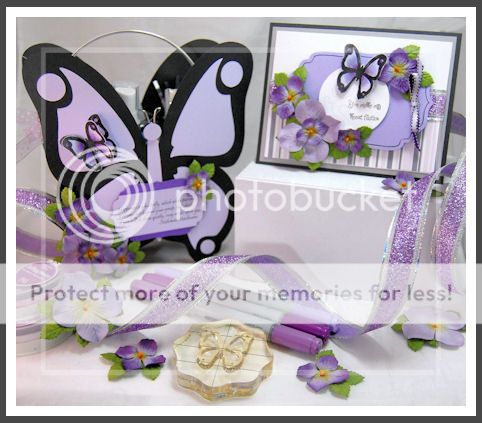
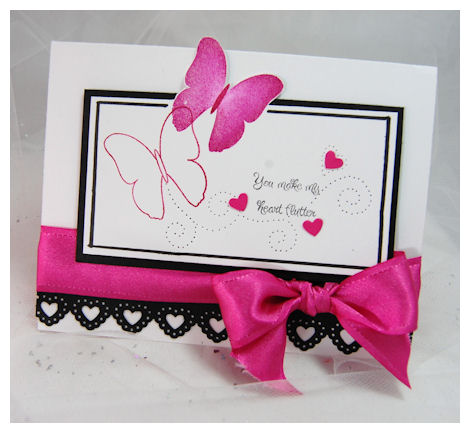
Quick and simple…Fluttering By …
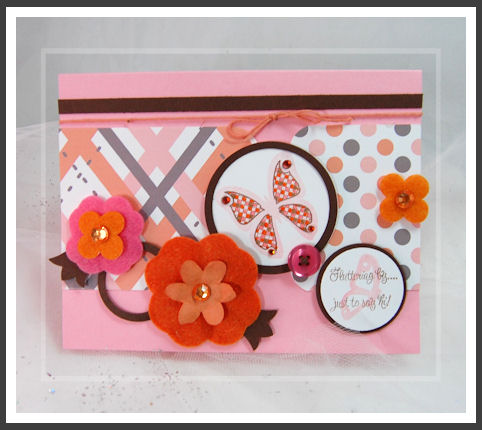
So I used the All A Flutter © image set, combined with the NEW! Pretty Printables digital paper in Shutt-erfly © (not at top quality for a muted tone-so my butterfly POPPED!) for the color challenge.
Perfection!
I stamped my solid butterfly in pink,then added the wing print in chocolate. I used my copic markers to color each of the diamonds in alternating colors. Fun and easy. I had some pretty felt flowers from American Crafts that added to the design. I used a tulip punch to create my leaves. I wanted something FUNKY for leaves, to go with the “feel” of the card. I think it was perfect accent.
The sentiment in the corner was stamped in chocolate ink, with the half fluttering butterfly behind it.
Supplies:
Pretty Impressions ©: All A Flutter ©
Pretty Printables © Digital Paper: Shutt-erfly
Cardstock: Blending White, pink
ink: pink, chocolate, copic
Felt flowers by American Crafts, buttons, adhesive rhinestones, tulip punch
OK I have lots to do today, so I’m keeping it quick.
Thank you for stopping by.
Simply Sweet
Jan 7, 2010 Author: mytime | Filed under: Cards, Home decor/3-D items, My Time Made EasyI am back with more samples to share!
I think I’ve done a good job attempting to contain my excitement, and not making everything be too long winded, but it is SOOO hard to not get on a chatter spree! (All this said as I type up a NOVEL! LOL!)
I’m just so excited about everything that is, and everything to come. I have never had such a frenzy of ideas spin around in my head before. There is a constant whirlwind going on. The concept of having everything coordinate just gets me giddy, and makes me feel even more creative, knowing I have a WORLD of possibilities. NO LIMITS!
Being the person to pull my visions together to create one harmonious product line is beyond my wildest dreams. If 5 years ago you would have told me what I’d be doing today I would have died of laughter! I barely knew how to stamp or even EMAIL. Forget it if I needed to ATTACH something to an email! LOL!
Now, I have been a “stamper/customer” for SOOOOO long that I find it so inspiring to be able to sit there, while designing and think….”If I were stamping with this, what else would I want in the set?” (This is also where it gets hard to edit out certain images I may still love! LOL!)
” What would make it easier and faster the get that end result.” (this one has a large variety of interchangeable pieces)
“What would make this set a MUST have for me?” (For example this set has interchangeable wing prints, solid and open lines, as well as every piece a an open/solid image. Whatever you could want for stamping/layering. Maybe a particular sentiment.)
“Can this set be versatile?” (Such as 2 step stamping, can it be colored, used for more than ONE occasion or purpose, is it unique)
As you can imagine it can be both exhausting and inspiring. I find it a constant struggle to shut my brain off sometimes.
I have created so many thing with my first Pretty Impressions © release that my head is just spinning with more ideas.
Now before I start Pam Imholz had 2 samples to share with you today using All A Flutter © and Shutt-erfly ©
Here is a bitty peek at one….
Make sure you take a look at her blog to see BOTH amazingly fabulous projects she has to share.
And Mona Pendleton has been busy all week long making some amazing samples too! So be sure to check her out too!!
Today thought I thought I’d share some SIMPLE WOW! Projects with you, that you can create in just a few minutes.
Simply Sweet Butterfly
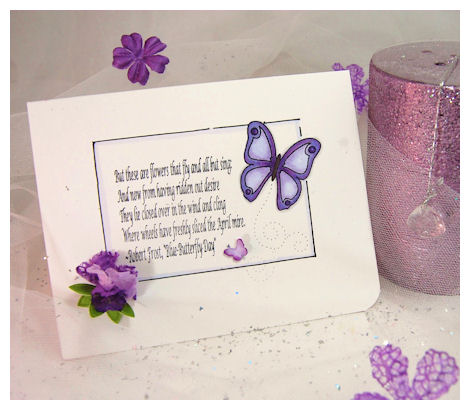
You have seen the solid outlined butterfly used many times . It is honestly my favorite one in the set 😀 ( in case you can’t tell by my website and logo! LOL!) so today I thought I’d use the open line butterfly-totally alone. No wing prints, no fancy paper, just the butterfly.
I wanted to put my Copic markers to work! So I did just that. I used the One Sheet Wonder cardstock from Couture Cardstock. You can color it with copic markers with NO BLEEDING onto the other side! Love that. Nice crisp white, that is heavy. For just coloring projects being used the a may layer they have a Blending Paper that I love to use instead.
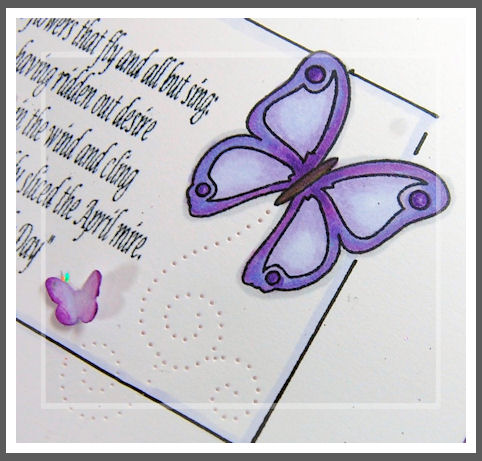
I kept it really simple, by stamping the open lined butterfly from All A Flutter © at an angle in the upper right corner of my card. I then just enjoyed laying various color of purple. I think it looks really pretty. I added a crunched up Prima to the corner of the card. Now I decided to use the open line butterfly image, combined with the solid image.
I used a template to pierce my flutter trail. I then used a ruler and pen to create a virtual layer. I also traced that layer with a pale purple marker. As I said in a previous post, the All A Flutter Sentiments © are perfect as the main focus of a project.
A Fluttering Butterfly
This time I chose to use the open outline image with the solid base image.
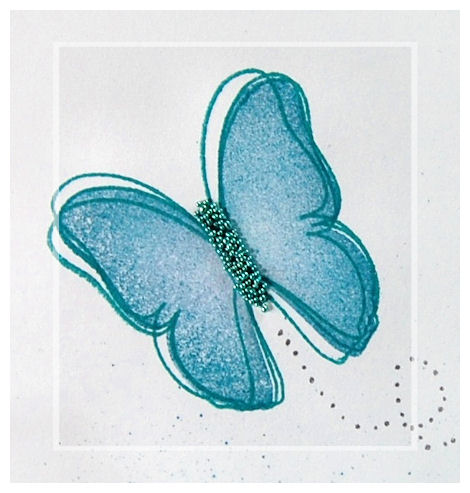
By stamping the outline 3 different times, moving it ever so slightly it appears to be “fluttering”. I love the shape of this butterfly. LOVE!! In case you didn’t notice that yet either! LOL!
I added some micro-beads to the “body” to match.
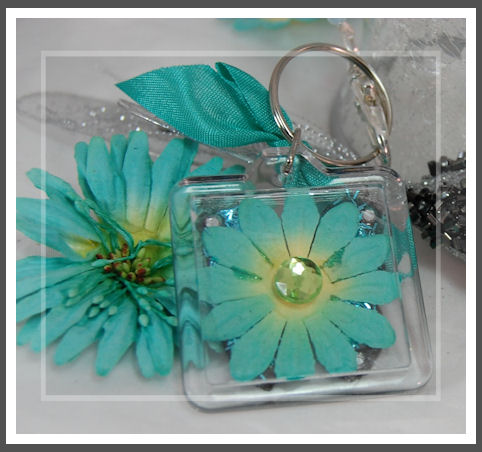
I wanted this clean and simple. I am on a teal/aqua kick these days.
I punched a double layer daisy from Martha Stewart. The punch is meant to ONLY punch the petals up, not out. So I layered the white base, onto the teal base, then took the ink to the flower petals. added a Prima flower.
I stamped my sentiment from All A Flutter Sentiments © in the corner. I also spritzed on some color too.
I wanted a gift to match……so I created this key-chain in like 5 minutes!
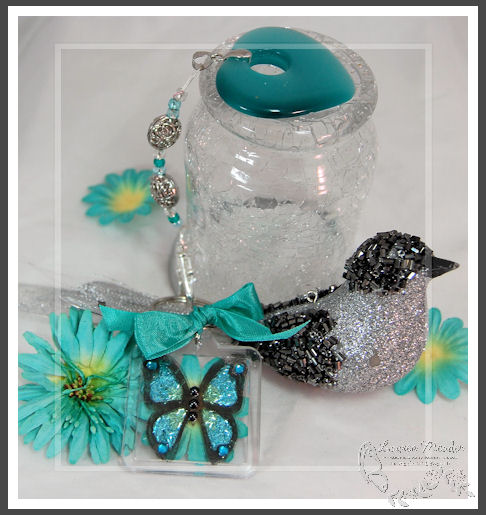
This keychain was a kit I got for my children.
You are suppose to scratch off the black stuff to create a picture, then insert it into the keychain.
So me being the great mom I am, I took the keychains to use for my crafting! LOL! (Yes I am a little ashamed of myself, but they haven’t noticed yet!)
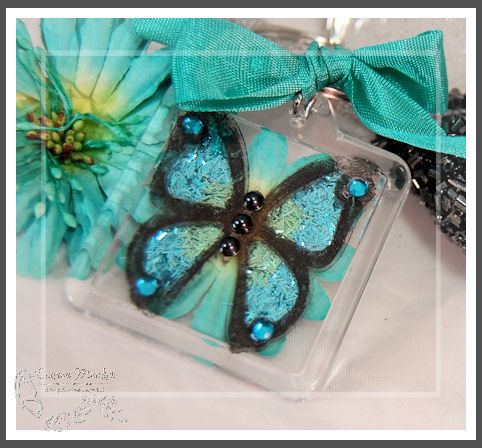
I stamped the solid outline butterfly onto the keychain front, in black staz on. I added adhesive black pearls to the body, and adhesive rhinestones to the wing dots
INSIDE the keychain I used a clear liquid glue, and sprinkled on some tinsel glitter from Martha Stewart. Once dry I added a Prima flower to the inside. I attached the backing then added some BLING to finish it off.
This is the back view
I tied on my ribbon, then added the beaded chain I created a month or two ago!
DONE!!
Supplies:
Pretty Impressions © acrylic stamp sets: All A Flutter © image set, All A Flutter Sentiments © set
Cardstock from Couture CardstockRibbon from May Arts
Flowers by Prima
Adhesive rhinestones & pearls, keychain, daisy punch & tinsel glitter by Martha Stewart
So that is all for today.
Thank you again for stopping by! I’ll be back in a bit with some information about our release.
See you later 😀
Versatility
Jan 6, 2010 Author: mytime | Filed under: Cards, Home decor/3-D items, My Time Made EasyOne thing I LOVE about paper-crafting is VERSATILITY!
I love when one thing can have MANY uses.
I think all of the products we have to offer at My Time Made Easy™ LLC are very versatile.
I remember when I first started stamping/paper-crafting. The hardest part was having “it all”. Or having everything match or coordinated. Usually when I did find “something” like that, it would have cost me one arm and my first born to purchase the entire collection. Let’s be frank….while this hobby is so exhilarating, it can get expensive. I have far more money invested in my stamping supplies that any amount of jewelry or anything else I can think of! LOL!! My goal for my store was to be able to put the tools to create amazing, coordinating projects in your hands, and make it as easy and affordable as possible. Whether you are a stamper, paper crafter, scrapper, or somewhere in between, I think our products will help guide you in trying out the many areas of this art!
OK that leads me back to the versatility part…..
I am going to show you 3 projects that showcase how our products can be used for all areas of this industry.
1) The Scrapper
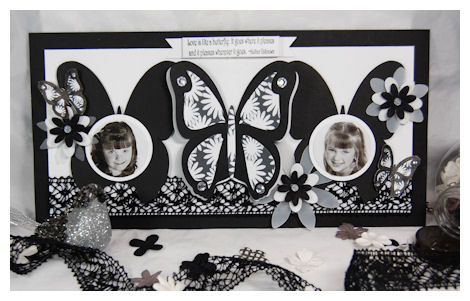
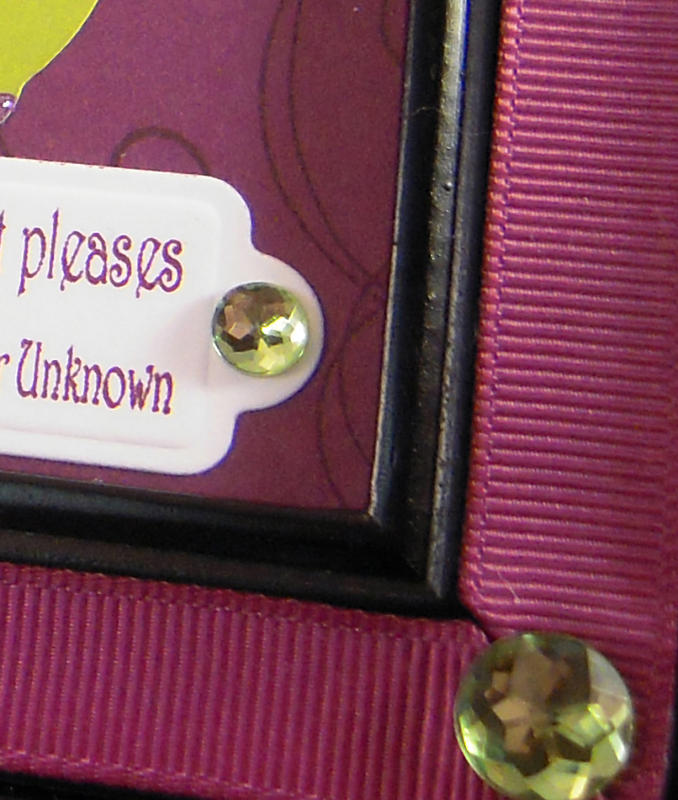
This is a 12 X 6 piece of “wall art”. I consider this to be a scrapbooking sort of project.
I am taking this to get framed next week, to put in my front hall-which is ALL butterflies.
I wanted to create something with my recent favorite photos of my two daughters Alexa 10, and Amber 5. They are growing SO fast.
I used the All A Flutter © Pretty Packaging template, to create a connected butterfly trio, in black cardstock, as my main focus. I could have used the Flutters and Flowers © cut file, but I wanted the wider base on my finished image.
I LOVE that you can re-size all the Cut files to suit any project, with the simple click of a button.
The sentiment flag reads: Love is like a butterfly: It goes where it pleases and it pleases wherever it goes. ~Author Unknown
This is from the All A Flutter © sentiments set.
I took the All A Flutter © Pretty Packaging template, and in my Cricut Expression -and in SCAL put 3 of these butterflies together(front/back pieces of the template) and interlinked them at the tops of the wings. Once they were aligned I clicked the “merge” button. It cut them out just perfectly!
The butterfly sizes were 3 1/2 inches.
I went on to cut a single 3 1/2 inch butterfly from black and white cardstock so I could layer them.
I used the STUNNING Color Me Pretty © Flutters and Flowers paper collection and printed the daisy pattern on my white cardstock. I then cut out my wing prints, using my Circut Expression. I applied the wing prints to my black 3 1/2 inch butterfly(using dimensionals), which I then layered onto the white one, and adhered to my butterfly trio.
Here is Alexa’s side
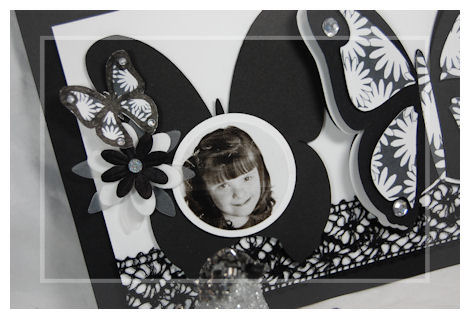
You can see that I have used the All A Flutter © image set in the upper right corner. I printed the same paper, in a smaller scale, used my Flutters and Flowers Cut file to cut it out, then stamped my solid butterfly outline to create a 3D butterfly. I applies adhesive rhinestones to the dots on the wings.
Here is Amber’s side
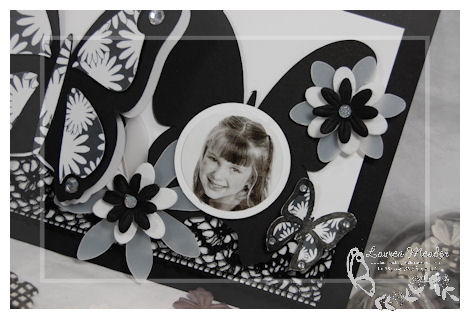
I love showcasing my daughters in this fashion. It is wall art, yet almost like a hybrid scrapping page too since some elements are printed.
More butterflies, and a few flowers I had laying around.
Honestly I do NOT consider myself a “scrapper” but I was able to create this project in less than 45 minutes. Now if I had any idea what I was going to do…it may have gone quicker. I am not use to creating projects like this, but this “wall art” of my 2 daughters just flowed.
SO here we had a scrappy project, that incorporated stamps, and even a Pretty Packaging ©template, used in a unique way!
2) The Paper-crafter
To me, the “paper-crafter” is someone who mainly only likes/uses PAPER for their projects, be it just die cuts, creating boxes, bags, tags an or other “stuff” solely from paper. Even some scrappers use just die cuts, or stickers…..etc.
So for the Paper-crafter’s our Pretty Packaging © templates are PERFECT!
This project uses the Shutt-erfly © template, only I cut it into 2 pieces!!
I cut down the top to 1 1/2 inches from the top score, and the bottom piece-2 inches from the bottom score.
So it is about 3 1/2 inches (without the flowers) tall.

I used the mat layers in Shutt-erfly © to create my “leaves” on the top of my box. I then used Pretty Pieces © Flutters and Flowers Cut File to create my flower.
I then stamped an acrylic tag with the sentiment “Butterfly Kisses”.
I took the SAME Daisy print patterned paper, as on my first project, and instead of printing it on white cardstock, I printed it onto Spitfire cardstock. It gives it a totally new look! Think of how many options you now have for paper! If you own the color cardstock, you have a pattern in that color! SO cool!
I created a wrap that is 2 inches wide. It also conceals the fact the the box is 2 pieces
I used the open line butterfly from All A Flutter © (see just a little stamping to ease you into it!), and stamped the solid wing prints in black, then added a few buttons to select flower centers.
EASY PEASY!!
3) The Stamper
It is pretty obvious that stamping can be incorporated any/everywhere!
This card matches our packaging, and used both the All A Flutter © image and sentiment set.
I just layered a white mat, onto a white base. It offers some dimension, with a very clean, classic look.

I kept this card simple for the beginner, but even a seasoned stamper enjoys simplicity at times.
I just colored the half butterfly image with my Copic markers and added some glitter.
The flower is a Prima flower, and the leaves are some cut ribbon from May Arts.
Here is the gift set together.
Now we have the same set, but the box topper is off, and it reveals some delicious DOVE Promises.
How simply elegant.
Supplies:
Pretty Impressions © acrylic stamp sets: All A Flutter © image set, All A Flutter Sentiments © set
Pretty Packaging © templates : All A Flutter © and Shutt-erfly ©
Pretty Printables © digital paper in Color Me Pretty ©: Flutters and Flowers ©
NEW! Pretty Pieces © Cut File : Flutters and Flowers ©
Cardstock from Couture Cardstock
Ribbon from May Arts
Flowers by Prima
Adhesive rhinestones, copper cord, acrylic tag by Tim Holtz, buttons by Foo Fa La
SO see! No matter what your “specialty” there is something for everyone! One area of this craft can easily slide into the other. All these projects use the same elements, and coordinate together perfectly. By changing up your colors you can get a wide variety of looks!
Now we have MORE!!
My design team member Tracey Cuccia has more projects to share today.
She also used All A Flutter © template to create some art work too.
Mona Pendleton has even more to share too!! Everything is stunning 😀
So that is all for today. More to come tomorrow 😀
Hope you can check back in then.
Pinch Me! It’s time for a Pink Cat Studio Release
Jan 6, 2010 Author: mytime | Filed under: Cards, Home decor/3-D items, Pink Cat Studio, UncategorizedI can always count on Melissa at Pink Cat Studio to come up with the CUTEST images.
She is my cutesy fix 😀
It feels like forever since she has had a release (and it has been about a month or so) so it was overdue! She has some really sweet images for Valentines Day, some in rubber, and others in Digi downloads so be sure you check it out —> HERE! SO much variety

Today I am working with a NEW! Lily Valentine Fairy
She is just the sweetest thing.
I have missed using her stuff. I’ve gotten so busy….its just fallen to the wayside. But Lily is my FAVORITE so it was nice to se aside some time to just play.
I knew I wanted to package up some candy in the In a Pinch © Pretty Packaging template. I also knew I wanted to use RED and some other non-traditional Valentine colors, so I got inspired by the heart paper, and added some flowers from American Crafts.
Admittedly this was created during a MOJO lacking moment, and when I was completely exhausted. No excuses though, but now I’m thinking (with a clearer head and some creativity) I could have totally omitted the heart paper! LOL! Oh well…..
I had to cut her all out. I so love the coloring and colors (of this portion anyway)
Be sure you go to the BLOG to see what all the team members have out together to get yourself inspired.
Thanks for stopping by
A little glitz, a little glamour, and a little love…..
Jan 4, 2010 Author: mytime | Filed under: Cards, Home decor/3-D items, My Time Made EasyI hope you are all enjoying the week, and all the project samples myself and the My Time Made Easy™ LLC design team have been sharing. We had our official opening on the 3rd, and I have been steadily packaging orders!
I can’t wait to see what you all start creating with the all our coordinating products.
We have released : Pretty Impressions © acrylic stamp sets: All A Flutter © image set and All A Flutter Sentiments © Pretty Packaging © templates : All A Flutter© and Shutt-erfly © Pretty Printables © digital paper collections : Fluttering By© and Shutt-erfly © and we have a NEW! Addition to the digi paper line: our EXCLUSIVE Color Me Pretty © Collection.
Today
have some projects to share! Be sure to stop by their blogs!!
Now I have some things to share with you.
I love Valentines Day. Probably because I LOVE pink, and I love hearts! I also LOVE “hot” colors and monochromatic projects 😀 So I have another card/gift set to share with you.
I love the All A Flutter © image set because it has SOOOOO many possibilities for creating a variety of butterflies. For my sample I had fun coordinating the open line, and solid butterfly from the set.
The various pieces allows you to quickly create a variety of butterflies. No two will be the same 😀
I love how the 2 images are intertwined, and the solid image seems to be flying off the card.
I pierced a flutter trail, and added some hearts around the sentiment. I adored the punched border, and satin ribbon.
I love the colors. LOVE. So much POP.
Now we have a gift set using Shutt-erfly ©

I was definitely thinking POP, Glitzy…and HOT!
I think I got it!
I printed the large dot pattern from the Color Me Pretty © Flutters and Flowers collection. I love that you can have about ANY color of polka dotted paper, in seconds, without having to line up stamps or anything too time consuming! Its all about time saving, and creating great projects simply.
Now we all know that TEXT is all the rage! Text on everything!! Now with our Pretty Printables© paper I was able to use the black text from the Color Me Pretty collection! I printed my paper and used the front/back butterfly from All A Flutter © template (resized to various sizes) to cut several pretty TEXT printed butterflies!
No need to feel guilty about wasting paper, or ruining an old book. It was quick and easy and I can get a pretty text pattern at the click of a button!!
I just spiraled some wire, and added the butterflies and hanging beads. I think it looks so fun and funky!

For the front I just added some chunky glitter to another butterfly I cut using my Cricut.
I also layered on a scalloped rectangle, to the bottom. Just gives it that last minute “finished” look. This is a perfect TEEN style gift. I love all the butterflies on the wires!

Supplies:
Pretty Impressions © acrylic stamp sets: All A Flutter © image set
Pretty Packaging © templates : Shutt-erfly ©, All A Flutter© (for the butterfly pieces on template!)
Pretty Printables © digital paper collections : Color Me Pretty ©Collection (text pattern and polka dots printed on pink cardstock)
Cardstock: Devotion fromCouture Cardstock
Ink: Versamagic
Other: Border punch by Martha Stewart, Glitter by Martha Stewart , Satin/stitched ribbon by May Arts, Paper piercer, wire, hanging beads
So I hope you enjoyed today’s projects. There is so much more to come over the next few days, so I hope you can come back tomorrow!
There have also been 2 customers who wrote some very nice reviews
Check them out if you have time
Go see—>TED
and —> Katie
If you have a project or review you want to share, feel free to link your post in our comments section. I know myself and other want to see what you have been doing!
See you tomorrow
My Time Made Easy ™ LLC Opening Day 2
Jan 3, 2010 Author: mytime | Filed under: Cards, Home decor/3-D items, My Time Made EasyWOW! I’m overjoyed at the response to our first release yesterday!
If you didn’t know My Time Made Easy™ LLC is now officially open ☺
We have released :
2 Pretty Impressions © acrylic stamp sets: All A Flutter © image set and All A Flutter Sentiments ©
2 Pretty Packaging © templates : All A Flutter© and Shutt-erfly ©
2 Pretty Printables © digital paper collections : Fluttering By© and Shutt-erfly ©
and we have a NEW! Addition to the digi paper line: our EXCLUSIVE Color Me Pretty © Collection.
NEW! Pretty Pieces © Cut File : Flutters and Flowers ©
This is SO exciting to get such a warm welcome into the industry. Thank you to all of you who have supported me from the beginning. I have to say there have been quite a few people who told me that I would not be able to do this on my own, and while I’ve had my share of learning experiences (with many more to come), here I am!
This shows everyone, you can do anything you set out to do! Goals big or small, nothing is out of grasp.
So without further delay, let’s get to what you came for! More samples!
I have 2 samples for you and today my Design Team member Katie Cotton has 2 projects to share with you as well!
Here is a PEEK at her 2 projects.
All A Flutter ©
I believe Katie has a gift tutorial for you too!
Here is a peek at her second project
Shutt-erfly ©
HMM! I like what I see so far ☺
Now it is my turn!
First I will share a SIMPLY elegant gift set that uses our All A Flutter © image and sentiment set, in coordination with the Pretty Packaging template: Shutt-erfly ©. This template is flying off the virtual shelf!!! I simply can’t wait to see your take on projects made with it.
I wanted to share a SIMPLE coordinating gift set with you.
I LOVE chocolate and white. A monochromatic color scheme always looks so clean, fresh and elegant.
So for my box, I made it as large as I could to fit 12 X 12 cardstock. I cut my template from a Ganache cardstock.
What goes better with butterflies than this punched border?! Simple WOW!
I was inspired by the wired polka dot ribbon for this gift set. It reminded me of the dotted wing prints from the All A Flutter © set.
I kept this as simple as possible. I used my nestabilities for my circle layers.
I stamped the butterfly first, then masked it. I stamped a sentiment from the All A Flutter Sentiment set © to fill the background. LOVE the look!
The shimmer in the wing prints, matched the shimmer in the ribbon. I brown stickles to the dots, and it was perfect!
I love the look of the wired ribbon too.
Now for the top…I view the “butterfly/flower” shaped closure as the “leaves” for my vellum flower, which I scored to add more POP and interest.

Take note of the bottom. There is a scalloped square layer. I used the largest scallop square nestability. Fits perfectly!
I decided that I would make a card to match my Shutt-erfly © box
“It’s the little things that make life big” I adore that sentiment, and enjoyed finally having it in this fun and whimscial font.

Supplies:
Pretty Impressions ©: All A Flutter ©, All A Flutter Sentiments ©
Pretty Packaging ©: Shutt-erfly ©
Cardstock: Ganache, White Vellum, White
Ink: Chocolate
Other: Martha Stewart border punch, polka dot wired ribbon, chocolate stickles, circle nestabilities, flower punch
NEXT UP!!
Now I have a sample utilizing the All A Flutter © Pretty Packaging.

When I created this I knew I wanted to create a gift package with this template where the wings flutter forward!
I think it looks amazing in person! And it’s filled with an assortment of DOVE chocolates.

I created the main All A Flutter © template in the standard size, and assembled it as directed. I then resized the wing front/back, and wing prints to be about 2 inches smaller.

As you can see I also used the NEW! Pretty Printables Paper in Shutt-erfly © for my wing prints. I switched out the circles for buttons. The body cut out was created using my oldie but goodie paper crimper!
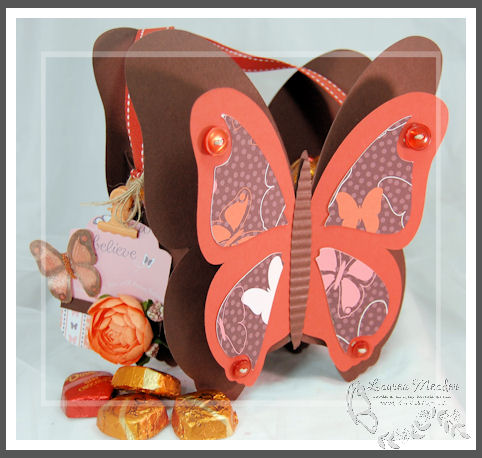
I added a simple ribbon handle, that is attached using some cute flower brads, to match (from Making Memories).
I knew I wanted to add a tag
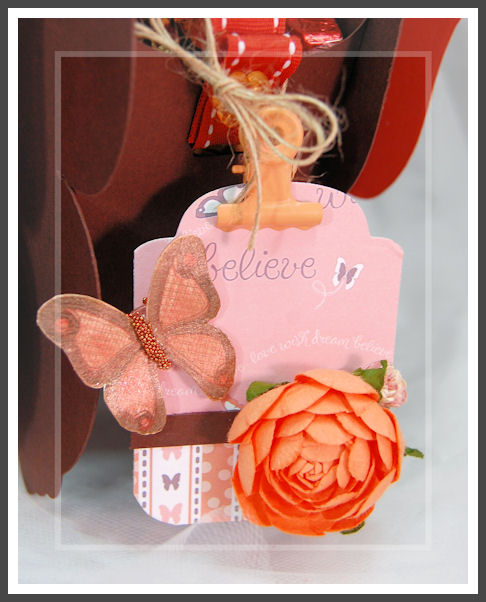
So I created one using some of the Flutter-By Pretty Printables paper.
I tied a tag with some twine, then added a clip to adhere a tag.
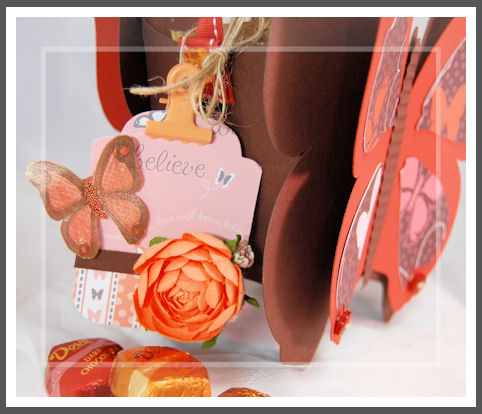
I stamped my solid butterfly in chocolate ink, the solid center in a rust ink, then stamped the grid like wing prints, repeating in a copper in. To ADD to that, I painted the butterfly with pumpkin Shimmerz. For the body, I added some copper micro-beads.
DONE!
Supplies:
Pretty Packaging ©: All A Flutter ©
Pretty Impressions ©: All A Flutter ©
Pretty Printables ©digi paper in Shutter-Fly ©, and Flutter-By ©
Cardstock: Ganache, white
Ink: Chocolate, Rust, Copper
Other: ribbon, nestabilities, Prima Flower, Pumpkin Shimmerz, Micro beads, twine, desk clip, buttons, making memories brads
Well, I hope you feel inspired to give all the coordinating products a try! The *key* is to have FUN, get creative, and enjoy what you are doing!
I know I am enjoying the chance to finally share things I have been working on that I had to keep quiet!
Well it’s back to the daily grind! The kids go back to school and life goes back to a schedule!
Enjoy your Monday
I hope you come back tomorrow for more ideas!!
My Time Made Easy ™ LLC is OPEN
Jan 3, 2010 Author: mytime | Filed under: Cards, Home decor/3-D items, My Time Made EasyI’m sorry this post is SOOOO late! Splitcoaststampers Blogs are technically “down” leaving me unable to load any photos :C Its actually been 3 days, and I have yet to hear when the issue will be resolved! Anything I had posted that included photos, was from before the site went “down”.
Thankfully my web girl (and savior!) Sara found a way to help me load my projects! I stayed up till 5:15 am (almost 24 hours!) just to get this done for the opening. Better late than never!
I’m over the moon to announce the Grand Opening of My Time Made Easy™ LLC !
![]()
Now you can purchase an entire collection of coordinating products! Customizing your own creative gifts, cards and tags couldn’t be more easy and affordable! Plus MOST of what we have is an INSTANT download, so if you order any stamps, you can start on your projects while you wait 😀
For detailed information about all our products please read —> here
Also each product contains a description when you click to view it.
We have released :
2 Pretty Impressions © acrylic stamp sets: All A Flutter © image set and All A Flutter Sentiments ©
2 Pretty Packaging © templates : All A Flutter© and Shutt-erfly ©
2 Pretty Printables © digital paper collections : Fluttering By© and Shutt-erfly ©
and we have a NEW! Addition to the digi paper line: our EXCLUSIVE Color Me Pretty © Collection.
NEW! Pretty Pieces © Cut File : Flutters and Flowers ©
*Now this is the first we have mentioned the NEW! Pretty Pieces ©*
We are happy to be able to also offer something to further extend our coordinated line of products called Pretty Pieces ©
This product line is NOT available in PDF format.
These are additional shaped CUT files, formatted to be used in your cutting machine. These shapes will often be a cut image that is designed to layer our stamped images, so you won’t have to manually “cut out” your images! Just have your machine do it, then STAMP! This will be a great resource, as you will save $$ and space on purchasing ONE size punches or dies!! Not only can these Pretty Pieces © be used for stamps, but we will offer a variety of images for you to add to your library that you can also RESIZE! This gives you a multitude of options!
These will be offered whenever possible, to add to the coordination of our Pretty Packaging ©, Pretty Impressions © acrylic stamp images ©, and of course the Pretty Printables © digital paper.
All our Pretty Packaging © templates come in the following formats: PDF, .SVG, .WPC, .GSD, and .DXF.
Please —> read here <— for more information.
Now how about some samples?
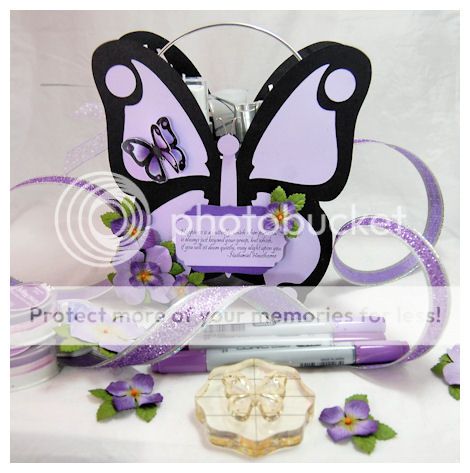
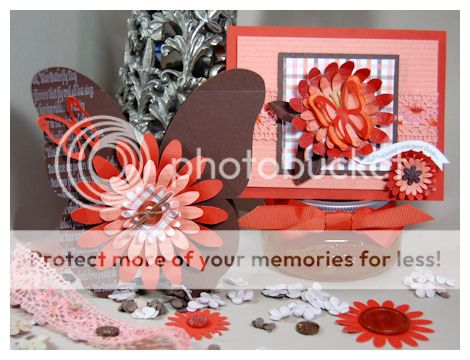
This is a STUNNING 3 dimensional butterfly shaped gift box, designed using an enlarged version of our All A Flutter © Pretty Impressions ©stamp set. You have so many design possibilities. Now you can create gift packaging and card/tags to match perfectly. This box is a super fun size, and if you own a personal cutter, can be resized to suit your gift giving needs. OR just use the butterfly shape pattern, and resize to make a plethora of layered butterfly accents for any project you can dream up!
Obviously I have a slight obsession with butterflies. They have so much significance to me. They signify time, change, life, new beginnings and endings. They are so carefree, and amazing to watch as they flutter along.
When I started to design my own stamp images, naturally butterflies were my first set. I always wanted a butterfly set that I could build upon, and have various wing options.
I loved the stamp design SO MUCH that I designed the All A Flutter © template to match! All my butterfly dreams and obsessions were really able to be brought to life through this release!
Another obvious point, I LOVE lavender. It is my favorite color. I think you can see that through my website, and packaging!
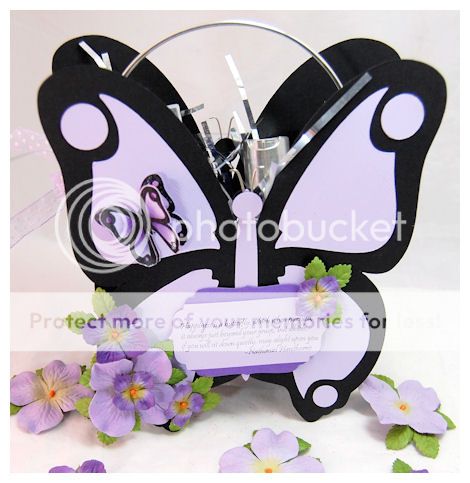
So here is my first gift set I created using my Pretty Packaging © All A Flutter, and Pretty Impressions © All A Flutter and All A Flutter Sentiments
I stamped my butterflies on the lavender cardstock, in black ink, then colored them with my Copic markers. I also did some multi-layering
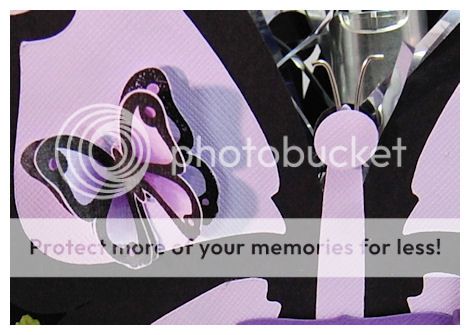
I created my base to match my stamped image by cutting it in a black cardstock, and used the purple wing prints. The antennae were created using a simple BINDER CLIP!! Loved that idea. Just sandwich it behind the body/head cut out.
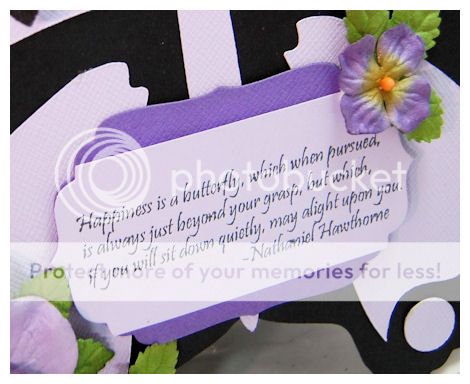
I added a sentiment to the front, on a nestabilities label. I applied the Prima flowers for that something extra!
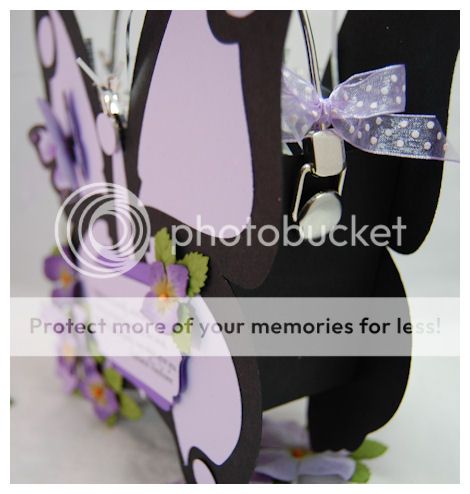
I used a metal purse handle for the side. They are attached with some large brads. I feel like it looks so elegant. A touch of May Arts ribbon and it was PERFECT!
I don’t think I can ever part with this box!!
Then it was time to create my card to match.
Using the same elements, and adding some of the patterned paper, this card compliments the All A Flutter template perfectly!!
Here is a closer view.
Using the textured paper provides a really nice look too! I stamped my sentiment, then pierced a flutter trail.
Its definitely a very feminine gift set! Who wouldn’t love something like this?
Inside I put some bath and body works lotion, shower gel, and body spray-in Lavender scent!
Supplies:
Template- Pretty Packaging ©: All A Flutter ©
Stamps-Pretty Impressions © : All A Flutter, All A Flutter Sentiments
Paper- Pretty Printables ©: Throw Me A Line © (purple/ gray)
Cardstock- One Sheet Wonder, Raven, Carousel
Ink- Momento Black, various Copic Markers
Ribbon: May Arts, Glitter ribbon from Michael’s
OTHER: Prima Flowers, Labels nestability, Purse Handle, Silver Brads
This is a very unique box due to the way it folds “shut”. The top flaps fold in together to create a “butterfly” like (or flower) shape, hence the name combination- “Shutt-erfly” © There is also a layering “Shutt-erfly” © template so you can easily layer and create a butterfly or flower like accent for the top! This is yet another perfect Pretty Packaging © template to use with our Pretty Printable © All A Flutter digital paper as well as our Pretty Impressions © acrylic images – All A Flutter © image/ and or All A Flutter Sentiments ©
This is a REALLY nice sized box, and the top folds in a unique fashion, with the end result forming a butterfly or flower-like shape!
I folded the template closed, as directed in instructions. Tied it closed with a lace and purple shimmer ribbon.
I wanted to adhere a special tag, to really dress it up, so I decided to use some acrylic tags from Michael’s. I stamped the circle sentiment from All A Flutter Sentiments ©, in white Staz On. I decided to make what appears to be like a dried flower, pressed in glass. To do this I sandwiched a Prima flower in between the 2 tags, and added a silver foil.
Now for this project I pulled the Shutt-erfly © template into my SCAL program. Once it was in place I used the Pretty Pieces © Flutters and Flowers Cut File © to create a butterfly shaped window in my box front/back! Once the template was cut, I stamped the Criss Cross pattern from the wing prints of All A Flutter © on a piece of acetate in White Staz On. I then used my Pearlescent Pastels to make them a shimmery purple. I layered the acetate window to the inside of the box, then assembled.

I took a darker shade of lavender to then cut the open wing cut file, and layered it into the center of my butterfly window on the front/back.
I decided to make the “garden” on the bottom of both the front/back of the template using Prima flowers with adhesive pearls and some Flower Soft to complete the butterfly “garden” feel.
You can’t really tellbut th dark purple and colors in the Flower SOft is a really nice match. It really completed this project!
This is one of those projects that is FAR more attractive in person. Lots of wonderful details.
Supplies:
Template- Pretty Packaging ©: Shutt-erfly
Pretty Pieces ©: Flutters and Flowers
Stamps- Pretty Impressions ©: All A Flutter Sentiments
Ink: White Staz On
Cardstock-Carousel, Fortune Teller
Ribbon: Lace and leaf ribbon by May Arts, Shimmery purple
Other: Pearlescent Pastels,Prima Flowers, Flower Soft, adhesive pearls, Tim Holtz Acrylic Tags, Silver tape
Now this was a FUN project!
By now its is more than obvious that I LOVE butterfly any/everything!
I used the Pretty Pieces © Flutters and Flowers Cut Files to cut 2 butterflies, in Ganache cardstock and create a card base!
You could also do this using the front/back portion of the All A Flutter template 😀
I resized the solid butterfly template, and layered the 2 cut butterfly patterns together, scored a 1/2 inch from the top, and added some adhesive tape along the inside of the score lines.
Adhered the 2 pieces together and you have a FLAWLESS butterfly shaped card!
I stamped one of the sentiments from All A Flutter Sentiments, along the left side of the card in white. I love the simple addition of the outlined butterfly (also resizable!) on this creation.
I added my cut Darling Daisies, which were created from the Pretty Printables © digi paper! I used the text pattern in Red Clay onto a berry cardstock for a pretty printed flower, in which I then layered on my multi-plaid cut flower! They look so pretty together.

The paper collections are REALLY amazing! We used some very unique color combinations to freshen things up! Printing your own patterns and creating so many Darling Daisy combinations ALONE is worth it! You’d spend far more on ONE bottle of paper flowers, that get used up and come in select sizes! Now you can create your OWN patterned flowers in any size and pattern YOU want!
Plus having RESIZABLE butterfly shapes! That is CRAZY AMAZING! That file is ONLY $2.50!! What can you buy for that?
This card is definitely one you can whip out. I’m totally thinking TEEN girl, but could easily be new baby, new beginning, wedding…..get well……love it!
Supplies:
Pretty Pieces ©: Flutters and Flowers
Stamps- Pretty Impressions ©: All A Flutter Sentiments
Cardstock: Ganache, Rusty Hinge, Melon Berry
Pattern Paper-Pretty Printables ©: Flutter-by & Shutt-erfly collection
Ink: White Craft
Other: Twine by Martha Stewart, Buttons by Foo Fa La
Next up a card using similar elements!
This time I used the butterfly cut file for the center of the flowers. SO PRETTY!
I also cut the daisy and the leaves, and painted them with Shimmerz! That really added a subtle bling. You have to add it wherever you can!
I stamped my sentiment from All A Flutter, and hand cut a flag like tag. I think it came out so cute.
I’m LOVING the text bkgd found in the Fluttering-By © paper collection, as is this weave like plaid.
The ribbon was a lace from May Arts that I dyed in a rust ink. When dry, I colored some “flower-like” portions with my Copic markers to make sure it was a customized match.
Supplies:
Pretty Pieces ©: Flutters and Flowers
Paper-Pretty Printables ©: Shutt-erfly & Flutter-By
Stamps- Pretty Impressions ©: All A Flutter
Ribbon: May Arts Lace (dyed and colored with Copic markers)
Shimmerz in Pumpkin , Flower Stamens for antenna (idea from Kristin)
Each day for the next week you will get to see ideas from myself, and the Design Team for creating your own coordinating gifts, tags and cards, using supplies from our first release.
So please be sure to check out the Design Team blogs,as they each have 2 complete gift ensembles to share:
They each did an outstanding job!
I hope you get inspired by all the projects shared today! I cannot wait to see what you all do with the products, once they are in YOUR hands! This is a true dream come true for me, as I have never enjoyed working so hard in my life. Just knowing I can share what I love to do with the world, in this manner is amazing.
Being on my own is such a freeing feeling. I admit terrifying, but also amazing at the same time. This is a journey I never thought I’d have the courage to take. I have had SO many supportive people there to help me along this journey that I need to thank, and I will do that at the end of the week 😀
I want to thank each of you as well! You all encourage me to push myself further than I ever thought possible, and enable me to share what I love!
Thank you all for a successful beginning.
I hope you come back tomorrow for more ideas and inspiration!
Super Easy Super CUTESY Snowman
Dec 24, 2009 Author: mytime | Filed under: Cards, family stuff, Home decor/3-D items, My Time Made EasyWell I wanted to stop in ultra quick and wish you all Happy Holidays and a very Merry Christmas! If you are of another faith then I wish you the happiest of celebrations!
I’ve never had SO much to do on Christmas Eve! Goodness.
I want to thank you all for a wonder response to the “re-opening” of the store My Time Made Easy™ LLC
I have never gotten more emails with happy and excited people. Many of you shared how you were able to get some last minute gifts done too! Amazing. You warm my heart. What a great venture this is going to be, and all because YOU motivate me, support me in my crazy ideas, and encourage me to do more and make it the very best I can.
Thankfully we have had little issues! WHEW! The *only* thing was some people didn’t clear their cache, and were using the site on the “old” host (yes it is still there), so PLEASE follow instructions in my previous post and reset your cache!! Otherwise it’s going pretty smooth.
I will be heading out to spend time with my family and will not be answering/checking my emails until the day after Christmas. I have been working around the clock to get everything set for the unofficial opening as well as our FIRST official release, and my family deserves 100% of my attention! I appreciate your understanding.
Now before I go I need to share a quick ( and I mean QUICK ) project I did for my children’s teachers.
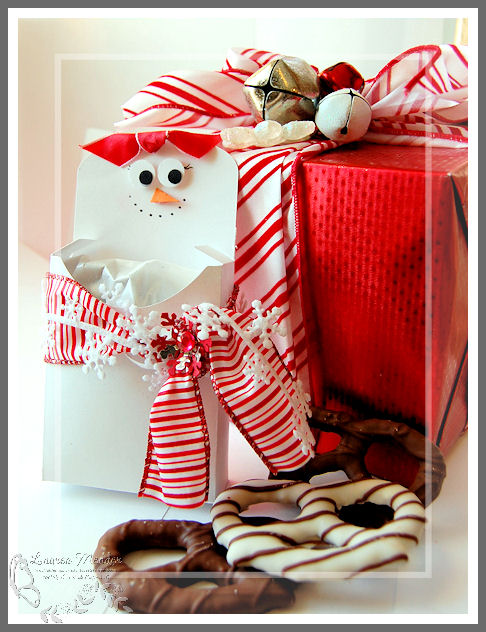
I used the Cutesy Cover © Pretty Packaging template to make a snow man themed pocket!
This one was designed to accompany this gift ) Alexa’s one to one aid always gets something more from me-I LOVE her!). A super fun and simple project that the KIDS can do!
I didn’t score the lid, I kept it open to create the head, then the opening is where I was able to take 3 chocolate covered pretzels:
one milk, one dark and one white chocolate-to package up in a frosted bag then inserted inside the pocket for all the teachers.
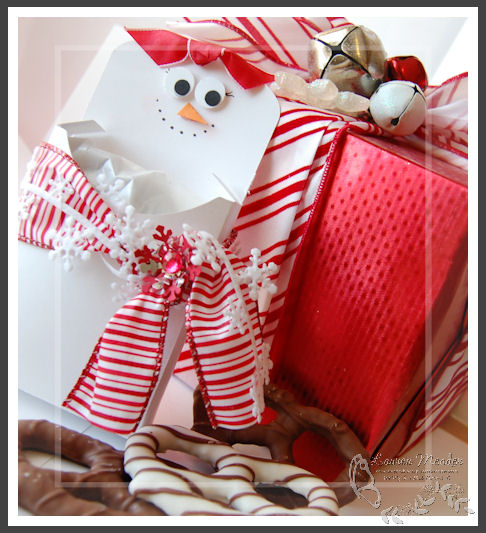
It wasn’t much, but it was something!
I was SO consumed with all the business stuff that I really put off getting their gifts together. I had 12 gifts that I needed to get done, and yes, my children expected it to be a HOMEMADE gift! LOL! I have set a precedence with them and they of course deserve that. I was really tight on time. I’m talking 1 1/2 hours before school started, to get these all done.
I was the ONLY mom to show up for Noah’s party and he was beyond excited (last year I got the Thanksgiving party date messed up and I think it traumatized him!) So, seeing me show up with the gifts I promised for his teachers made his day. Alexa was also excited, and of course Amber was too, she helped a little on a couple, but I didn’t have time to let her do too much.
So I turned to the Pretty Packaging template: Cutesy Cover © to whip out what everyone seemed to thing was a cute gift!
Just took 12 sheets of white cardstock….and 12 snow pockets were created
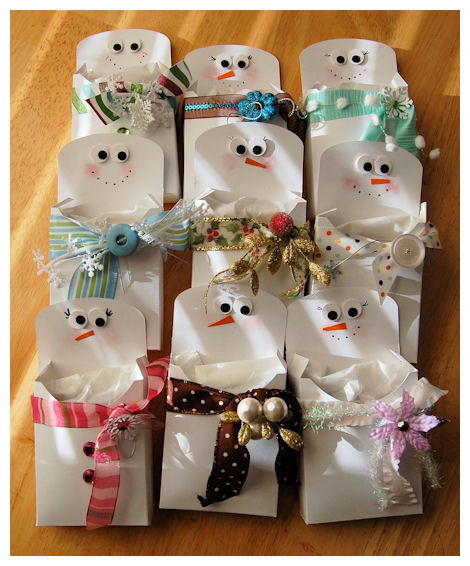
Having had more time I’d of fancied them up a bit, but I finished like 3 minutes before the bus came.
Since I used my Cricut Expression I was able to cut, score, and assemble the 12 templates, in about 40 minutes. The other 40 were spent decorating! Not too bad for creating 12 gifts in a short time.
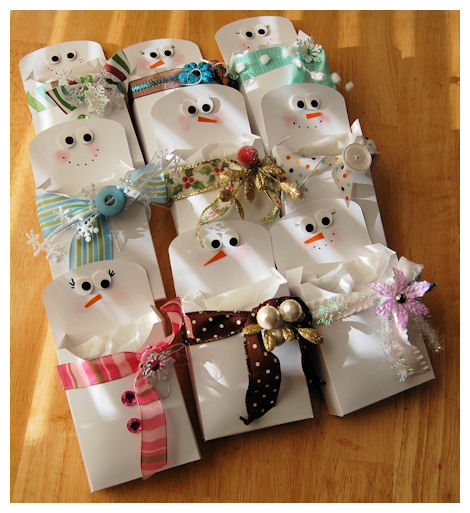
(only 9 are here because I had to give them out before getting photos of the rest)
I ALMOST didn’t get ANY photos, but I knew I’d kick myseld if I didn’t!
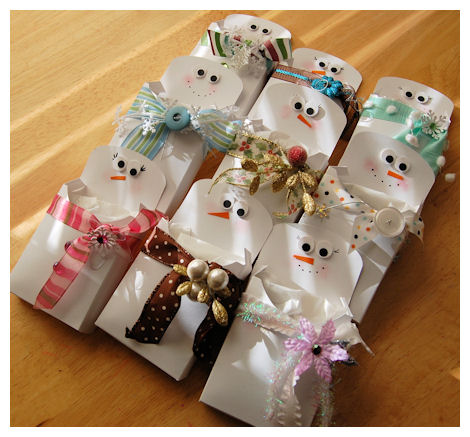
Amber wanted a googlie eye girl (in the lower left corner-so no its not a mistake! LOL!)
I kept it easy, using punches for the eyes (large googlie eyes would have been better but I didn’t have ANY! EEK!) a marker for the eyelashes, and coal smile, and pastels for the pink cheeks
My ribbon scraps were used for all the scarves!
Each snow person is different. Plus I was able to use my scraps!
SO there you have an EASY idea, if you are like me and need to really WHIP out something cute, fun and handmade!!
Well it is time for me to go be with my family! I promised Amber we’d get the gingerbread cookies made, and she waited patiently while I typed this post.
Thank you for stopping by, and Merry Christmas!
My Etsy

Who I Designed For
Blogroll
- Alicia
- Alli Miles
- Ally Blankenship
- Amber
- Andi @ crafts on a whim
- Angel R
- Angie Z
- Anne Kranitz
- Becky O
- Bee
- Beth Silaka
- Bethany Paull
- Beverly Nash
- Bobbie
- Cambria
- Cammie
- Card of the Week
- Card Positioning System (CPS)
- Cards for Cancer
- Catherine Doucette
- Charmaine
- Cheryl Sims
- Chriss Rollins
- Christina
- Christine Ewing
- Christine Wooden
- Colleen Schaan
- Craft Critique
- Craft Gossip
- Crystal
- Dawn Easton
- Emily Giovanni
- Geny
- Holly
- Igne Groot
- Inspirational Craft Blogs
- Irene
- Jami Sibley
- Jeanne Streiff
- Jen del Muro
- Jeni Bond
- JenMarie
- Jenn Balcer
- Jenn Diercks
- Jenn O
- Jennifer E
- Jennifer Mick
- Jennifer Pereda
- Jennifer-Sweet Treat
- Joanne Basile
- Jodi Collins
- Julia Stainton
- Julie Masse
- Karen
- Kathryn Berthiaume
- Katie Cotton
- Kelley Holland
- Kendra
- Kim Scholfield
- Kris’s Color Stripes! Get inspired here
- Kristen Dubosque
- Kristin Eberline
- Kristine
- Laura @ Sunshine Stamper
- Laura Turnmire
- Laurie Schmidlin
- Lesa Rapp
- Linda Duke
- Linda-LSN
- Lindsey Botkin
- Lisa (lakind scs)
- Lisa Kind
- Lori Craig
- Maggie
- Mara Campbell
- Maria
- Maria Levine
- Mary
- MaryJo
- Melanie M
- Monique Hansen
- Moxie Fab World
- Pam Imholz
- PaperCrafts Connection
- Peppers and Pollywogs Kids party site
- Rebecca Grohall
- Rita
- Robyn
- Rose Ann
- Sarah Vrolyk
- Sharon Harnist
- Sharon Johnson
- Sharon Rivera (a chemisrty with paper)
- Sherrie
- Sophia Landry
- Storage Units, Ink, & More Blog
- Sue Berker
- Susan (Rainy)
- Tangii Crane
- Tracy
- Tricia Traxler
- Trudee
- Velta
- VivLyn
- Zena
MTME Pretty Palette Color Team
MTME Pretty Patterns Sketch Team
My Time Made Easy TM LLC
Shop till you drop!
Lauren Meader
About Me
Copyrighted material
Subscribe To My Blog
Pages
- About me
- Alexa’s Story!
- My Crafty Corner!
- My Time Made Easy™ LLC
- Our Make A Wish Trip to Disney!
- Resume/Publication List
Calendar
| M | T | W | T | F | S | S |
|---|---|---|---|---|---|---|
| 1 | 2 | 3 | 4 | 5 | ||
| 6 | 7 | 8 | 9 | 10 | 11 | 12 |
| 13 | 14 | 15 | 16 | 17 | 18 | 19 |
| 20 | 21 | 22 | 23 | 24 | 25 | 26 |
| 27 | 28 | 29 | 30 | 31 | ||
Archives
- August 2013
- July 2013
- June 2013
- May 2013
- April 2013
- March 2013
- February 2013
- January 2013
- December 2012
- November 2012
- October 2012
- September 2012
- August 2012
- July 2012
- June 2012
- May 2012
- April 2012
- March 2012
- February 2012
- January 2012
- December 2011
- November 2011
- October 2011
- September 2011
- August 2011
- July 2011
- June 2011
- May 2011
- April 2011
- March 2011
- February 2011
- January 2011
- December 2010
- November 2010
- October 2010
- September 2010
- August 2010
- July 2010
- June 2010
- May 2010
- April 2010
- March 2010
- February 2010
- January 2010
- December 2009
- November 2009
- October 2009
- September 2009
- August 2009
- July 2009
- June 2009
- May 2009
- April 2009
- March 2009
- February 2009
- January 2009
- December 2008
- November 2008
- October 2008
- September 2008
- August 2008
- July 2008
- June 2008
- May 2008
- April 2008
- March 2008
- February 2008
- January 2008
- December 2007
- November 2007
- October 2007
- September 2007
- August 2007
- July 2007
- June 2007
- May 2007
- April 2007
- March 2007
- January 2007
Categories
- About Me
- All That Scraps
- blogger challenge
- camera/photo play
- Cards
- Contests
- family stuff
- FOR SALE
- Home decor/3-D items
- How to FAKE it!
- Introduction
- JUGS Challenge
- JustRite Stampers
- Lizzie Anne Designs
- My family stuff
- My Stamping Space
- My Time Made Easy
- My Time To Color Challenge
- My Time to Create Challenge
- My Timeless Template Challenge
- My Timeless Templates
- Mytime Mail
- MYTIME MOVIE/VIDEOs
- Papertrey Newsletter
- Pink Cat Studio
- Pretty Palette Challenge
- Pretty Patterns Sketch
- Product Opinions and Must haves
- Recipe's
- Saturday Sketch
- Smilebox Creations
- Stampavie
- Tutorials
- Uncategorized
- videos
Most Popular
- Create your own Onesie Card Tutorial-and important NOTE! PLEASE READ (2529)
- Saturday Sketch-Boxed bag holder (2333)
- Going GREEN! Fancy Flower Flourish-Closure Video (1478)
- Fabulous Favorite - Giveaway! (1336)
- a Prayer Request (1232)
- QUICK-Easter Baskets from Nestabilities-PTI style-and blog challenge (1063)
- Teaser Sketch (999)
- February Release Giveway! (and a little peek) (996)
- Group Post and Rambling Rose Video Tutorial (985)
- GIVEAWAY! Who wants it all?! (895)
Recent Comments (RSS)
- 첫충사이트: 완전히 흥미로운 블로그 게시입니다. 저는
- sarah: Wow, Lauren, what a stunning
- hedie: خرید راهبند
- 야동: Love to read it,Waiting For
- 야동: This seller is in a
- 바카라사이트: 여기 처음 왔어요. 나는이 게시판을
- 야동티비: I was surfing the Internet
- 바카라사이트: 비슷한 주제에 대한 흥미로운 정보를
- 바카라사이트: "여기에 제공해 주신 귀중한 정보와
- 온라인홀덤: 유익한 웹 사이트를 게시하는 데
Copyright © 2007 - My Time, My Creations, My Stampendence - is proudly powered by WordPress
This blog has been Tweaked and Designed by Sara Williams