Archive for 2010
OK I know it seems like Im slackin here, but I’ve honestly been hard at work on my video. After almost 3 days, I am throwing in the perpetual towel and need to totally re-record the video into several segments :C That means I have to wait until Tuesday when my children return to school, otherwise you’ll hear lots of “Mom!! She won’t share with me!”, “It’s my turn!”, “That’s not fair!”, Can I have a snack?”, “He’s copying me!”……you get the idea!
This whole video drama totally sucked up my life ,on top of me getting ready for our NEXT release, and of course doing the “family” thing this holiday weekend. So once again I’m keepin it sweet & simple, until I get the rest of my projects completed.
But hey, you can never have too many card ideas right??
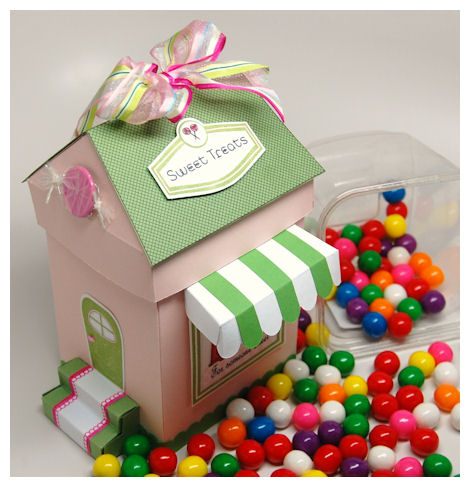
So for an amazing template project please check out Lesa Rapp
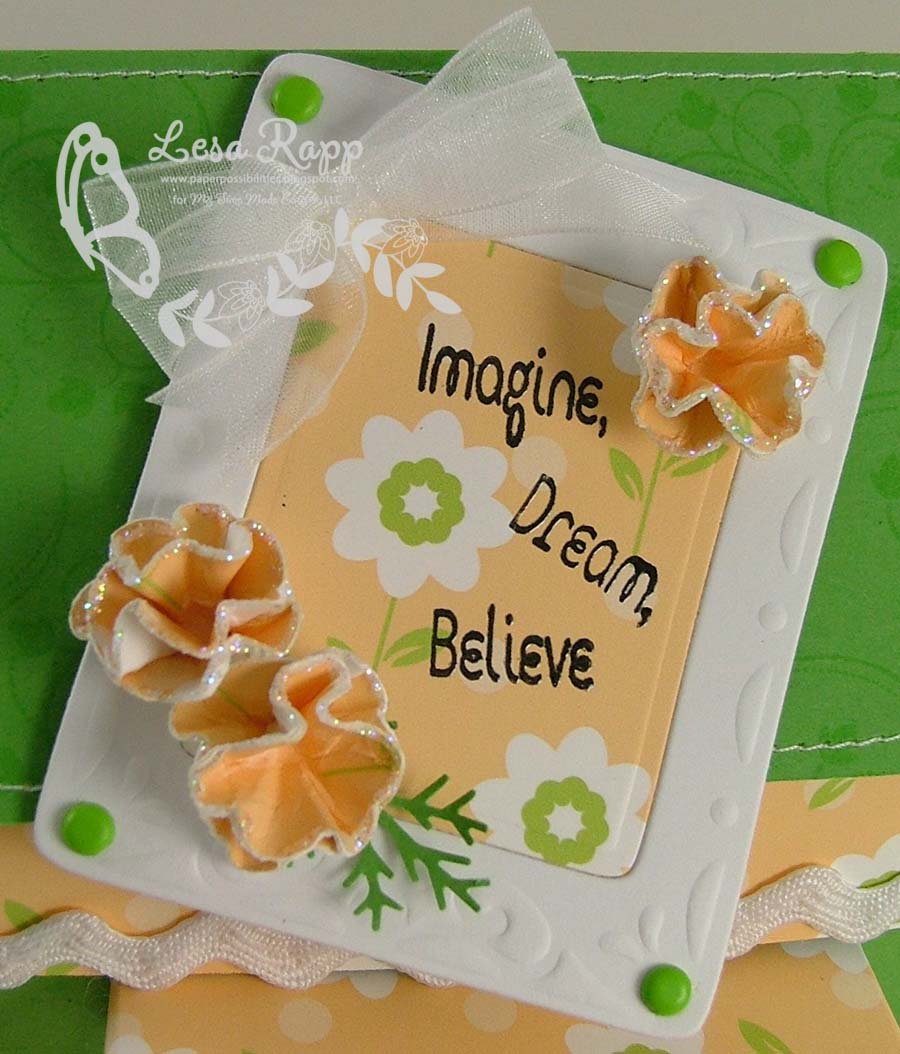 <—Click to enlarge
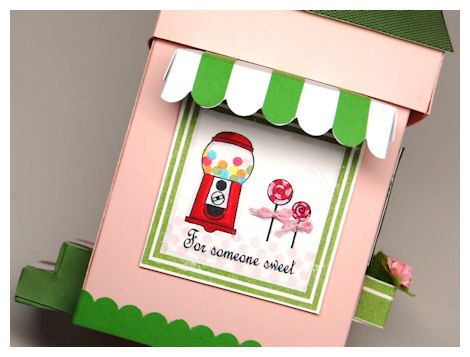
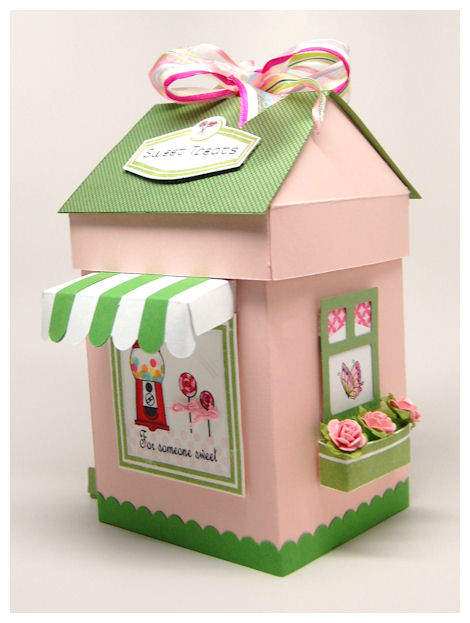
Here is what Lesa has to say
The super cute digital paper was the jumping point for this fun little house. Lesa took the colors and ran with it. She had a wonderful time imagining what it would be like to have a cute house like this. OK my turn to share!
My FAVORITE coffee is Dunkin Donuts. I have one daily (I buy the grounds and brew it in my Keurig —->HEAVEN!) So I got totally inspired by their color combination of pink, pumpkin & chocolate for my card creation.
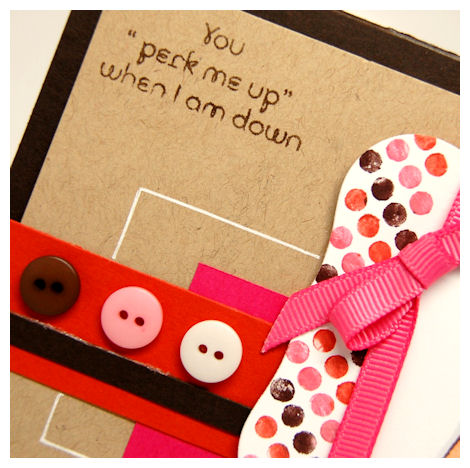
You Perk Me Up!-
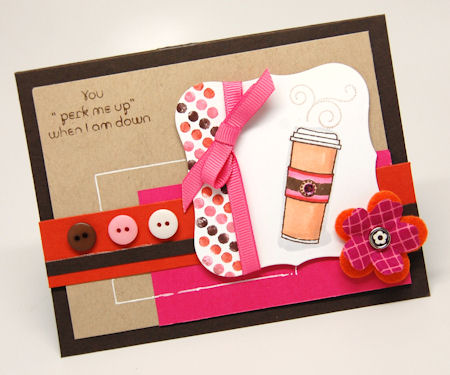
I LOVE Coffee! LOVE! So of course it was inevitable that I would have a “to go” coffee cup! I LOVE this image from On Disply 1 to pieces. Its a super cute size too-measures 1 3/4 inches tall.
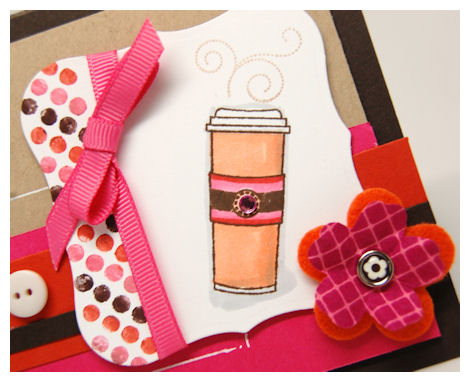
Here I used that Fanciful Flourishes set, in a beige ink for my “steam”.
The polka dot border was created using the dotted border image from Home Improvement for that.
Here is my sentiment close-up! It is also from the On Disply 1 set.
I drew an outlined layer, since I wanted an additional LOOK of a layer, but not the actual bulk of it.

Doesn’t it make you want to grab a cup?
I love the layout if this one too.
Supplies from My Time Made Easy ™ LLC
Pretty Impressions Stamp Set: On Display 1, Home Improvement, Fanciful FlourishesOK I must “run”! I do have some pretty amazing stuff to share, I promise. I just need to get it together for you. I really want/need to get that video done, so expect that for Wednesday-ish. MAYBE Thursday.
So come on back tomorrow because we aren’t done sharing some amazing project ideas with you.
Till then.
Sadly my video is STILL a bust. It took all day/night to load, and as I type this its very late. Im not sure if it will actually properly load and save, but I am certainly praying. I held off till the last minute to type this up, just in case! So keep those fingers crossed.
Anyway, maybe hopefully tomorrow it will be ready to post! Who’d of thunk that a 20 minute video would take 2 days to process! Ridiculous!
TodayPam Imholz has a wonderful project for you! So don’t miss it 😀 I’m still making projects to share, so who knows what else is up my sleeve.
Today my focus is going to be on the Homemade Card & Envelope Cut file.
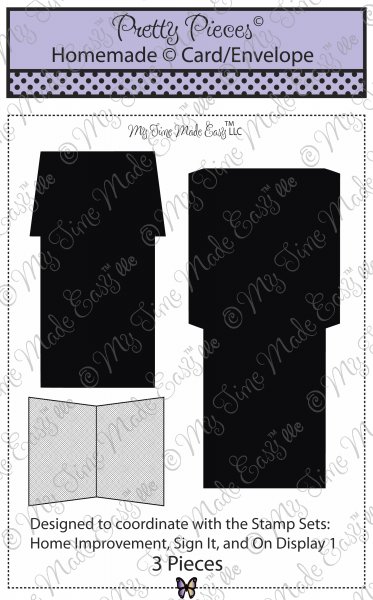
Available in PDF, SVG, GSD, DXF, WPC
Completed Project Size
- 4 1/2 Inches Wide
- 7 3/4 Inches Tall
Fashioned after the Shop Around © Template, this coordinating cut file is a super sweet and rather large Shop/House shaped card & envelope file, that was created so you can further utilize the images from Home Improvement ©, Shoppe Window ©, On Display 1©, and Sign It © stamp sets.
How cute and perfect would this be for:
Holiday card from your family-feature a photo inside!
a special themed party (be it birthday, brunch/lunch/dinner, little girls invite)
welcome to the neighborhood
new home
bringing home baby
bridal shower
open house
school /store/shop themed gift card holder
home Improvement
moving/just moved
House warming card or invite
or other card/invitation?!
No matter what the occasion, just the fact that this card is homemade, is sure to grab the admiration and attention of the receiver, no matter what the occasion!
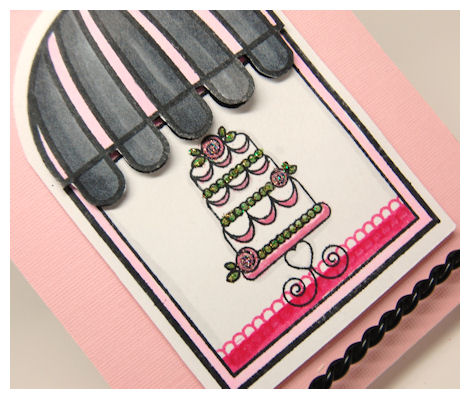
This time the occasion is a birthday celebration!

This card is SO super cute-really. You can’t go wrong with pink & black-ever!
Think PARTY!
I love this cake image from On Display 1©!! Its so perfect for so many occasions.
Wedding, Bridal Shower, Bachelorette, Anniversary, or Birthday. Basically ANY party, where you *may* have a cake and this is the perfect “Shoppe” shaped card invitation for you.
I used the Shoppe Window ©, set as the main focus of this Shoppe.
I stamped the sign from Sign It ©, in black ink, and colored the open line of the label with a pink Copic marker.
The sign was cut using the Home Improvement Cut File.

The flower is also from the Sign It © set, and it matches the roses on my cake!
Note the roof of my template was made scalloped by adding/welding the Border Builders Open Scallop to the bottom of my roof pattern
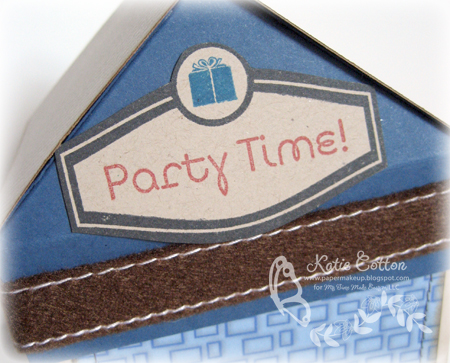
The “Party Time” sentiment is perfect for *any* party, but it is yet another sentiment that can be used with the Clock image from On Display 1©! Now how fun would that be?
See the awning from Shoppe Window ©, is stamped, colored and cut twice, for some dimension.
The cake is full of sparkly stickles. For my “counter” I stamped the lace border from Paper Pattern Pieces.
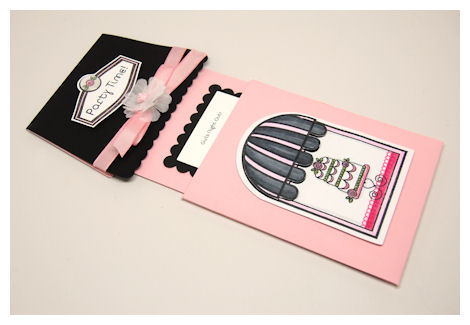
The Shoppe envelope slides right off!

You can decorate the slide-on style envelope, to look *just* like a customized Shop/House and put your message on the house/shop shaped insert card!!
Here I posted some party details for a friends 7th celebration of her 29th birthday! LOL! YOU do the math 😀 I think it’s a fun and sweet way to invite people to a party!
Supplies from My Time Made Easy ™ LLC
Pretty Impressions Stamp Set: Paper Pattern Pices, On Display 1, Sign It, Shoppe Window
Pretty Pieces Cut File: Homemade Card & Envelope, Home Improvement, Border Builders Open Scallop
Once again thanks for stopping by. Hopefully I have a JAM packed post for you tomorrow!
I DID have a video to share with you today. In fact that is why Im a bit late posting.
After trying to save, then load it ALL day yesterday, it lost connection at the last 4%. Trust me its been a long process that Im ready to ditch. Essentially I have ditched it for today-which is sad because it is one that would be so helpful. Cross your fingers I get it to work. I already spent far too long on it, not too.
Right now my dream would be that my video would actually PROPERLY save and upload to the hosting site I need it to!!
Here I am typing up another post because I simply can’t get it work. It is a long video-like 20 minutes, and it keeps timing out and not connecting, taking like 12 hours.
Anyway…..let me get to sharing something else.
First up, today Stephanie Kraft has a sample for you. (yesterday I accidentally linked her so also check out Silke Ledlow)
Here is a peek!
Here is what Stephanie Kraft had to say:
When I first saw the Shop Around © and Shop Around Accessories © Mega template, I immediately thought Coffee House, so I knew that one of my projects would be to create a one in honor of my favorite TV show, Friends. Yes, I know they have been off the air for over 6 years, but I still miss it.. : ( My house doesn’t exactly look like Central Perk, but that is where my inspiration came from!
To see more go visit Stephanie today!
Now my projects….
I’m going to share two cards today because again time is tight and I need to get that video loaded!!
Soar
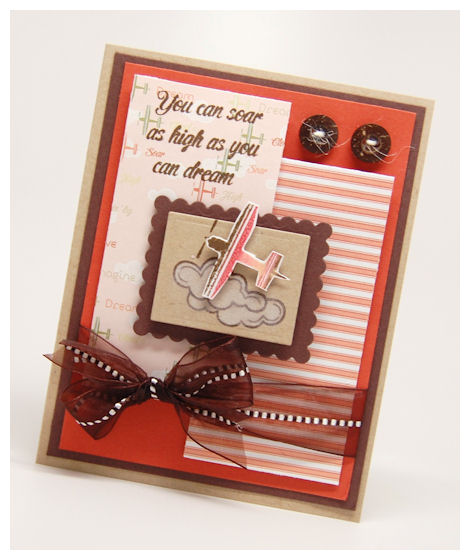
I adore this card. It looks like the airplane is going to soar right off the card, and into infinity!
I knew I wanted some sort of airplane in the On Display 1 set. I love how this one turned out.
I think it can be used for a variety of things: Toy shoppe, travel agency, and of course cards! Cards for men, boys and anyone else! This sentiment is one that I truly love and had to add it in there. I tell this to my own children all the time.
I think what I really love is the colors of the paper, which inspired my creation. I usually use some sort of paper as a starting point. It is much easier to match your design to your paper, than try to match the paper to your design.
The collection I used is the Sweet & Sour Sunflower Squash, and the Picket Fence collection, for my stripes. All our collections are great for easy mixing and matching. I really love the airplane pattern paper Sara made. Really cute.
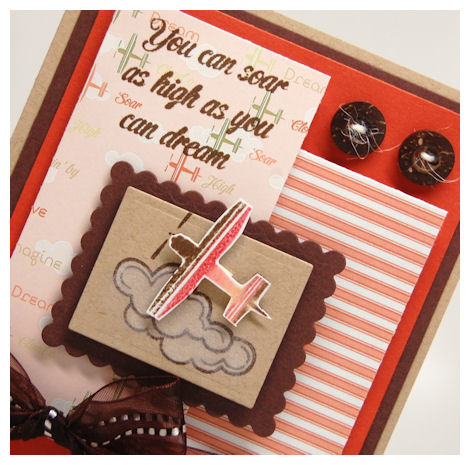
I colored my clouds with white pigment ink, and a Fantasix stick. Its quick and easy and givses you that POP of color against a dark base.
Every image within the On Disply 1 set has a sentiment to match! This set is perfect for cards, and tags, and also perfect for use as a “window display” for our new Shop Around Mega Template, with coordinating stamp set: Shoppe Window and/or Home Improvement and Sign it!
Just Flyin’ by
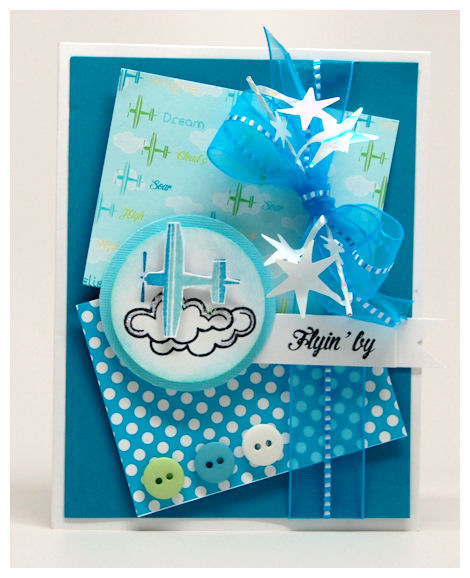
I love how this turned out. I used the colors from my Sweet & Sour Nomads Teal Leaf collection for my colors of inspiration. I wanted it to be bright, and cherry, and just like colors from the sky. The polka dot pattern is from the Darling Dots collection.
This is the perfect everyday kind of card, or the perfect card to send when you want to add your message inside! The sentiment is stamp on a “flag” like image that is meant to look like it is flying behind the tail of the airplane (in a way! LOL!)
This one could be Flyin’ by…..to wish you a happy birthday, or say I’m Sorry…just to say hi. You get the idea.
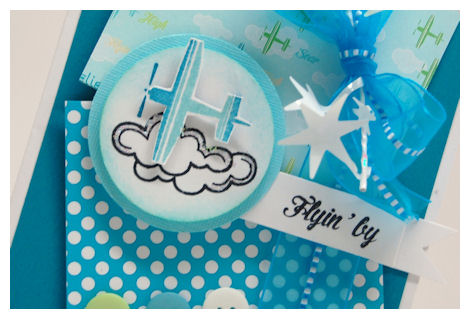
The airplay in re-stamped, and cut out on dimensionals. I added some glitter to the clouds. The shimmery stars are a wired confetti I had in my stash!! I love finding and using unexpected embellishments, that serve other purposes!
Supplies from My Time Made Easy ™ LLC
Well thanks for stopping by. HOPEFULLLY tomorrow my video will be all set! Sorry about the delay. We are off to the fair today wth the kids 😀 Should be fun!
Enjoy your holiday weekend!
Random Winners of the $50 Gift Certificates
Sep 3, 2010 Author: mytime | Filed under: UncategorizedHi everyone
Sorry I’m a bit late!
I am posting the 2 Random winners from the MYSTERY Design Team Members blogs!
The MYSTERY gift certificate was on #1 Pam & #2 Tammy’s Blog!
The 2 random winner (chosen via www.random.org)
Random Integer Generator
Here are your random numbers:
79 14
Timestamp: 2010-09-04 00:01:11 UTC
So Pam’s winner is Romaine
and Tammy’s Winner was Ginny!
Contact me to receive your Gift Certificates!!
Congrats and thank you all for taking the time to look around at all the great ideas the design team had!!
Time is ticking!!
Sep 2, 2010 Author: mytime | Filed under: CardsHi all!!
Thanks for stopping by again today, as we have a ton more to share. I have to say the team has really done an amazing job at presenting the MANY ideas and possibilities using the September Release items!
I hope you are ready for the holiday weekend, and those of you in hurricane Earl’s path, stay safe. My prayers are with you!
I will actually announce the winner of the GIVEAWAY later today. I am in the process of completing a video for you, and really want to get it done first 😀 That being said this post will be simple, so I can do that for you. I think if will really be helpful, so stay tuned!
IF there is something you want me to share here, in video or tutorial format, please feel free to ask, and I will do my best to share. In the meantime I have done several videos/tutorials that you can find on our website—>HERE!
Today Silke Ledlow has a peek project for you!
(My error I had linked Stepahie originally :C She will post tomorrow!)
Now my turn to share. I thought I’d share a card or two today.
First up-Time of you life
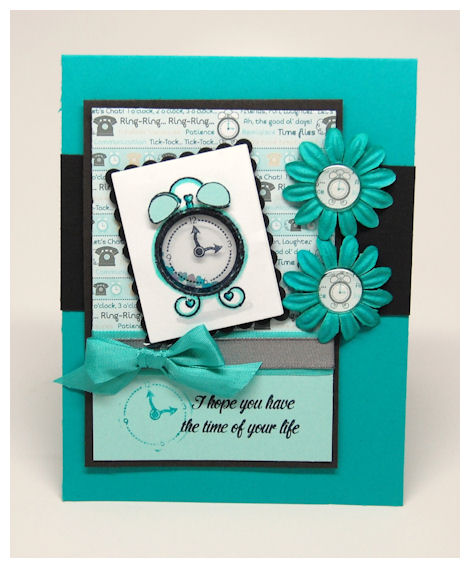
What a cute card! I make this into a SHAKER card! See the shimmery heart confetti in the clock face?
The clock image & sentiment are both from On Display 1! On Display 1 is a FAB set that has many possibilities! Not only is it great for those Shoppe windows, but it is an inspirational set with several fun and versatile images and sentiments combined!
OK back to the card.
As you can see I partially stamped the clock face next to my sentiment.
I used the Sweet & Sour Ganache Sprinkles paper as my inspiration for color choice! (I punched the little clock image from my paper and added a page pebble over it, to create my flower centers too. I was just over the moon with this once it was done.
Now my screen name for Splitcoast Stampers has always been mytime.
I actually put a lot of time and effort into choosing that name I’ve become known by for so many years now. I even put it into my company name!! I knew I wanted it to reflect what this amazing hobby was to me. Obviously as a busy stay at home mom, any/all crafting time was MY TIME.
MY TIME to de-stress, unwind, and do something for myself. A little creative outlet, that allowed me to escape the everyday life of giving and doing for everyone else. MY TIME was something I so cherished, and every second counted.
Time is significant to me because I know first hand that in an instant, it can ALL change. Time is important. It should be cherished. I personally do my best to enjoy every moment I can. Live for today, with no regrets.
So, that being said, for my own sentimental reasons, I designed the clock image in the On Display 1 set.
Its a cute lil’ clock, and I love it.
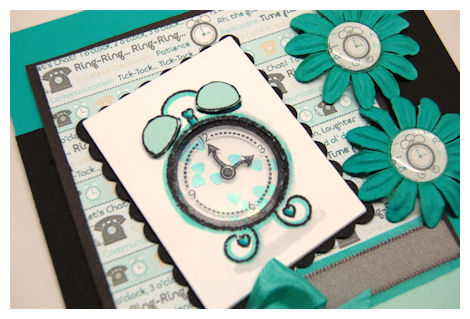
I love hearts so I included those in my clock too (and that is why I chose HEART confetti!) The time on the clock says 3 o’clock because I like the number 3. It is significant to me since May 3rd is my birthday, I have 3 kids, I was married on August 23rd, began this business venture at 30. I put a lot of little personal details into some of my designs, and this is one of those.
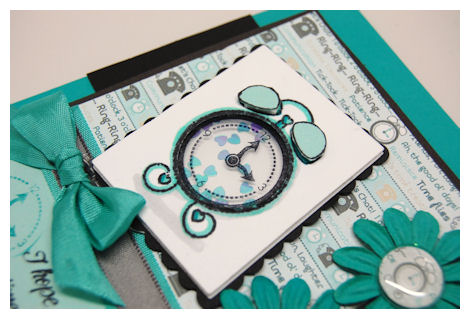
To make my shaker, I used a 1 inch circle punch to punch out the face of my clock, which was stamped/colored on my white cardstock layer. I then stamped the clock face on acetate, and layered it behind the clock image. I then lined all 4 sides with some foam take and added my heart confetti to make it into my shaker card! I added an additional layer of white cardstock, which was layered onto my scallop mat layer. Easy peasy, and OH! SO CUTE!
Supplies from My Time Made Easy ™ LLC
Pretty Impressions Stamp Set: On Display 1
Pretty Printable Digital Paper: Sweet & Sour Ganache SprinklesI have much more to say and much more to share, but as I said I’m cutting it short do I can get some killer stuff done. PROMISE.Don’t forget to check our NEW! Galleryfor a ton of new ideas. I have a bunch of samples loaded (with more to come, and some more oldie but goodie stuff too).
Be back in no time!!
For the birds…..
Sep 1, 2010 Author: mytime | Filed under: UncategorizedI’m so happy to say that all our September products are ready for purchase! I’ve been over the moon to see the response!
I can hardly wait to see all the new little Shoppe themed projects that people all over the world create! I have customers in Italy, England, Australia, Germany, Mexico, Ireland, Japan, Hawaii, and Alaska….to name a few.
You can view ALL the new goodies here! <—-there are 2 pages worth so look around! Most of our products are an INSTANT download, so that is instant gratification.
Also our GALLERY is now LIVE! <—-We have a few tweaks to make to make it as user friendly as possible-like a NEW! Release folder, so that everyone can see all the latest and greatest projects each month 😀 So be on the look out for that as well.
Also, the design team and myself will be catching up and adding all our photos from the last 10 months, from now till Oct. 1st. So keep checking in for so much inspiration 😀
Don’t miss our GUEST DESIGNER CALL!
To enter our contest:
You must create a card using the Digital Paper and Images from My Time Made Easy ™ LLC. We offer several FREEBIES!! So no excuses ![]() If you order now your order should arrive in time to use NEW! goodies too 😀
If you order now your order should arrive in time to use NEW! goodies too 😀
Become a friend of MTME on Facebook–> HERE!
Then submit a link to your creation on our FACEBOOK page < —-CLICK ME! under Guest Designer Contest Entry!!
OR your submissions can be sent to [email protected]
I will choose 3 designers on the 10th of September! Winner will be announced here on my blog, and on Facebook! Details will follow to the winning contestants.
*If you aren’t picked don’t worry! You can try again in 3 months!*
I am excited to see what you enter.
Submissions /Any & all questions can please be sent to [email protected]
OK lets get to the projects for today.
You will want to stop by and see Katie Cotton today!! She has a fabulous project for you!
Here is a peek
Here is what Katie had to say
From the moment i laid my eyes on the stamps being released this month, one caught my eye! A plane in the clouds! And with my youngest turning 2 in just a couple short weeks, i also knew that i wanted to create a boy party themed shoppe. To find out more visit Katie Cotton !Now it is MY turn to share.
When I released my first little peek for the September Release, MANY of you speculated to the fact that this release was a “bird” theme. Many thought that the peek was a sweet little birdhouse. Obviously your inital thought was wrong, but still possible. I thrive on ideas, and you all got my creative wheels turning so no one would be disappointed.
Home Tweet
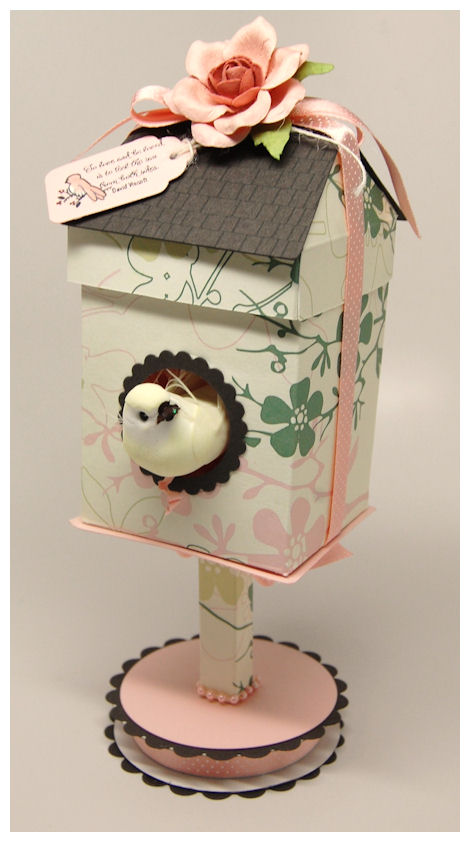
This was one of my SIMPLEST projects ever!
Now you know that the Shop Around & Accessories Mega Template was designed so that you can make it into endless themed shoppe/house ideas, as our NEW! products will show you, and while none of them were specific to birds, you can still use the Shop Around & Accessories Mega Template to create your own stunning birdhouse gift box or home decoration!
When creating my birdhouse I printed my Down to Earth paper first. I so love the design-which was created based on the Killer Curves flowers! So that set is a perfect match to this!
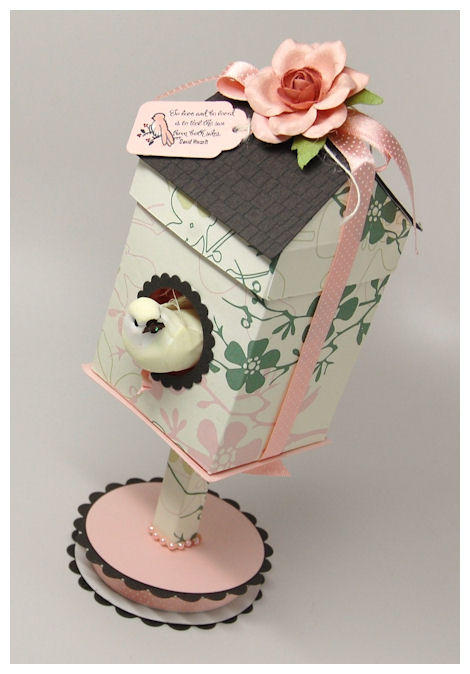
I then resized the file to 65%. I didn’t want it to be too big for my bird 😀 I also used my Cricut ot cut my hole too 😀
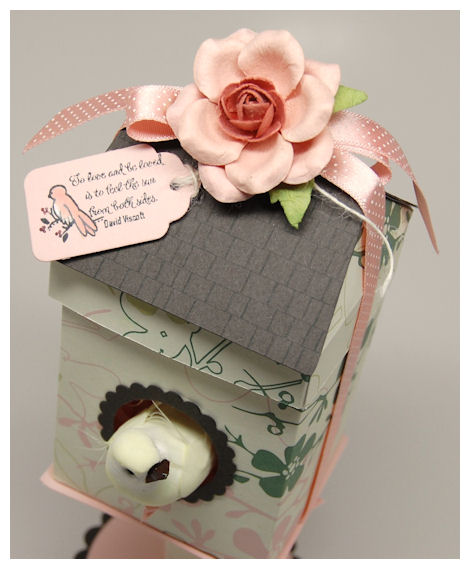
I used the Custom Construction Material paper to create my roof pattern. The tag was cut from my Cricut. On it I used the Tending the Garden Stamp set, with the little bird from the Just For You set. My ribbon is from May Arts.

The little bird peeking out is from Michael’s Craft Store! Isn’t is so pretty? Really makes this bird house theme a WOW! I even added little plastic bird eggs to the inside!

Now for my birdhouse base, I recycled an old spool of ribbon!! I just covered it, and kept a piece of the ribbon on the sppol to coordinate my project 😀 (and hide the cardboard base!).
I made a stand I simply scored some of the patterned cardstock every 1/2 inch, until I had a square “tube”. It is quite sturdy!!
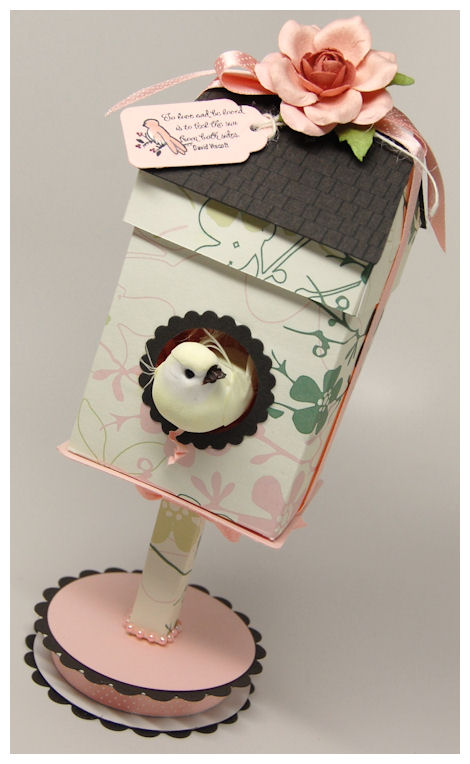
I can see this sitting as a centerpiece on tables at a Wedding all over the world!
Supplies from My Time Made Easy ™ LLCPretty Packaging Templates: Shop Around & Accessories Mega TemplatePretty Impressions Stamp Set: Just for you, Tending the Garden
Pretty Printable Digital Paper: Down to Earth, Construction Materials
Well I hope you enjoyed the projects today. I have MUCH MUCH more to share so I hope you stop by again tomorrow. We still have a week of ideas left to share :DSee you then.
September Release Blog Hop GIVEAWAY!!
Aug 31, 2010 Author: mytime | Filed under: Cards, Home decor/3-D items, My Time Made EasyToday is the My Time Made Easy ™ LLC Release and to celebrate we have a BLOG HOP with some hidden treasure!
Each design team member is featuring a different themed house/Shoppe! You won’t want to miss anyone!!
Be sure you leave a comment on each design team member’s blog today because TWO of the design team members are going to be picked to have someone from their blog comments WIN a $50 Gift Certificate to My Time Made Easy ™ LLC!
NO ONE knows which two designers are hiding the treasure, so don’t forget to stop by each design team members blog and leave a little love there. Include your email address-so you can be contacted if YOU are one of the lucky winners!
Winners will be drawn September 3rd, and announced on HERE!
Don’t miss viewing all our NEW! Release items—> HERE!
Stop by and view our NEW! Gallery!!
Now today the team and I are ALL using the NEW! Shop Around & Accessories Mega template to create a different themed a Shoppe and we are each using the Homemade Card & Envelope Pretty Pieces Cut File to make a card project to match our theme.
Here is what I have come up with for today 😀
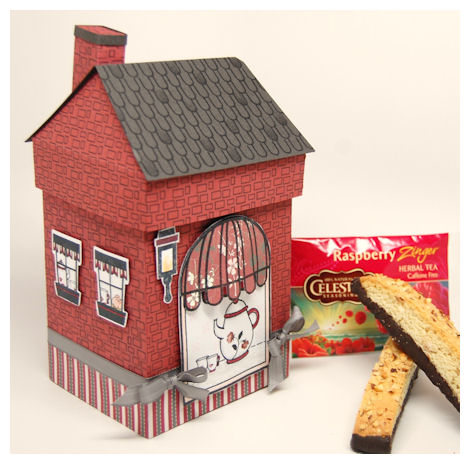
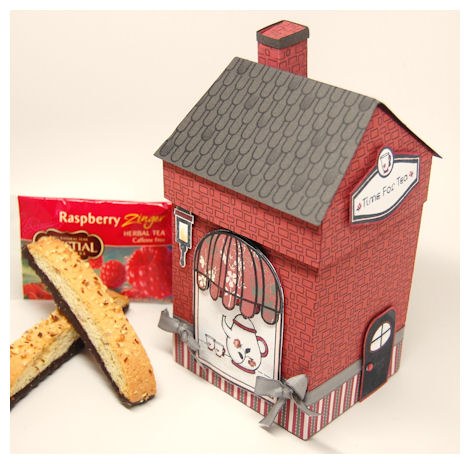
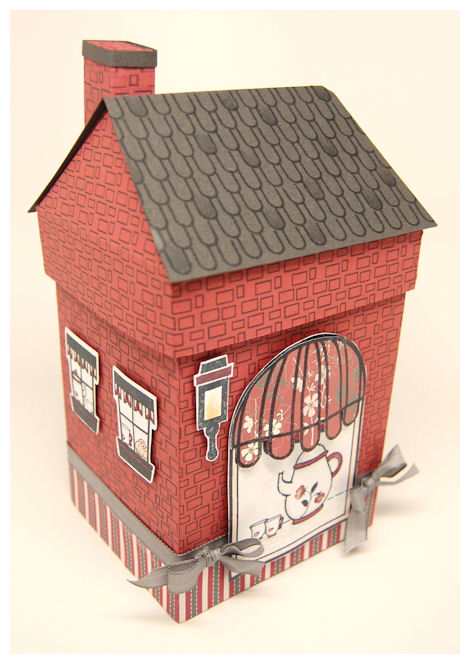
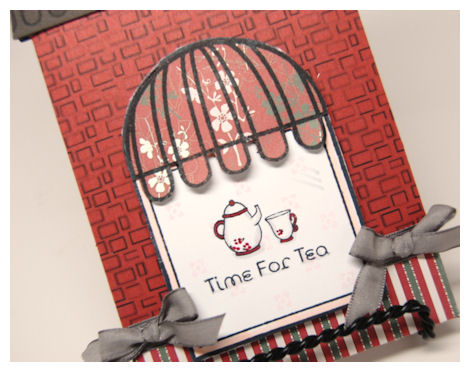
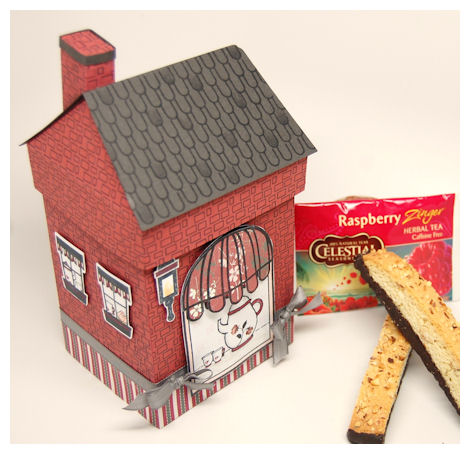
Time for Tea!
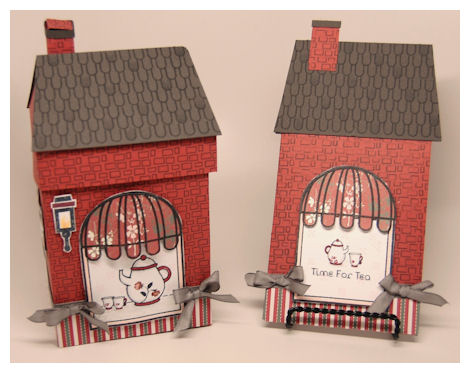
Well if you don’t like coffee, but you love tea – or someone you know does, this Tea Parlor my be just the gift you are looking for!
This gift set is simply stunning and full of interesting details. You can rest easy knowing this will most likely be displayed by the recipient for a long time to come, or re-gifted with style!
I used the NEW! Shop Around & Accessories Mega template, with the Homemade Card & Envelope Pretty Pieces Cut File to create a matching tea themed gift set. I designed both to match each other. As you can see it was VERY easy, and lots of FUN!
I wanted to package up some Biscotti and Raspberry Tea, to go along with my tea invitation.
I used the NEW! Shoppe Window for my main focus of this gift set.
I began by printing the Brick pattern from the Color Me Pretty Digital Paper: Constructions Materialson my Cherry cardstock. I LOVE this collection of paper because it allows you to QUICKLY and EASILY create realistic looking house patterns!!
There are 9 different patterns: Bricks, Stone, Vinyl Siding, Wood Planks, Wood Siding, Wooden Shingles, Scallop Roof /Siding, Square Roof Tiles, and Spanish tiles!
The patterns print horizontally and vertically so no matter what your project, your pattern can suit the needs of it! Now you can have these fun patterns in any/every color of the rainbow with a few clicks of a button. SO FUN.
I then cut and assembled my Shop Around & Accessories Mega template, and the envelope slider from the Homemade Card & Envelope.
I added the stripe pattern from the Pretty Prinatbles Digital Paper: Cherry On Top Collection Cherry On Top.
To avoid BULK on this I used printer paper for this one!! It works like a nice lightweight cardstock, only much easier to use when wrapping around the base of my template. I then wrapped around my ribbon.
For my Shoppe Window, I printed the Cherry Floral pattern from Cherry On Top Collection , then cut out my awning top! Looks so pretty doesn’t it? I also stamped/colored/cut my lantern image.
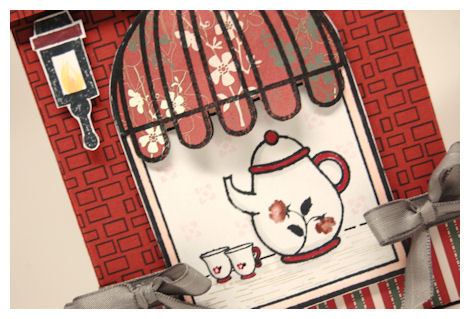
In the window I created a “scene”. I stamped the tea pot image from On Display 1, I then stamped the mini tea cups from the Sign It set. On those I used a marker tip to create mini flowers on them. The wood grain pattern from the Home Improvement set fites perfectly in the window, so I used to make the display table. I then doodled the table end.
For the look of wall paper I used the small flower image from the Fanciful Flourishes set, lightly in the background! I love that little touch.
Now as we go towards the side, you can see my two side windows. They are from the Home Improvement set (as is the door).
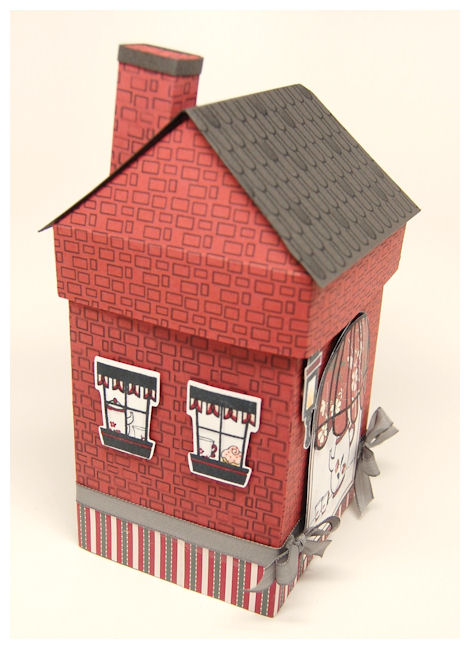
I used the Home Improvement Cut File to trim out my windows. Makes it SO much easier 😀 I love saving TIME.
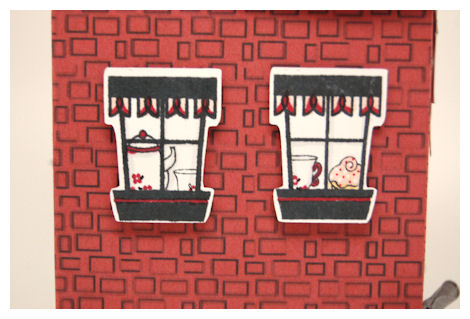
As you can see they are stamped and colored to match my Tea Parlor. I love creating little peeks into the house, through the windows! The possibilities are endless. I used the small tea pot from the Just For You set, and again doodled flowers on it. The tea cups from the Sign It set, are the same as the ones I used in front window, and cupcake image is also from the Sign It set.
Now lets move on to the other side…..
Looks just like the side of an old fashioned store.
I have my door, offset to the right, towards the back of the Tea Parlor

I used the Home Improvement Cut File to trim out my door, then colored around the “trim”. I added a little brad for my door knob.
Here is my sign
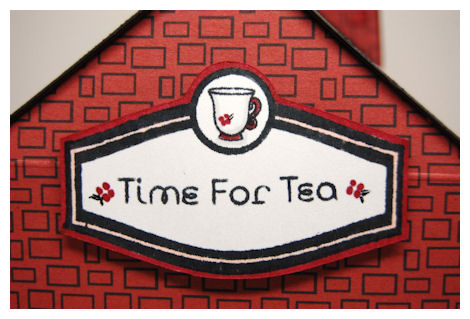
This label is from the Sign It set. This set has images and coordinating sentiments to match.
I LOVE being able to create coordinating signs to display what your Shoppe theme is! The sign was also cut using the Home Improvement Cut File, and the trim also colored, like the door. I stamped the tea cup, and again made little flowers to add to the design.
I used the same Brick pattern from the Color Me Pretty Digital Paper: Constructions Materials to create my chimney. Easy peasy.
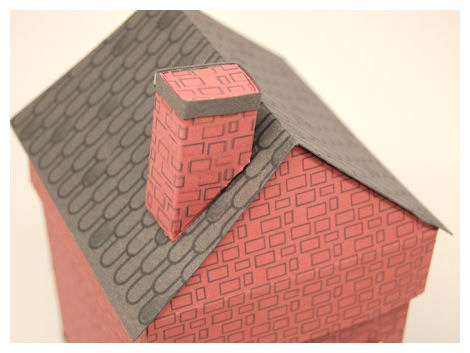
For the roof, I decided to use the scallop border building image from Home Improvement set to create my shingles. Once stamped, I used a gray copic marker to quickly add some color/dimension to the shingles.
This easily fits my Biscotti and tea, as you can see here. This template is quite large and can hold a ton!
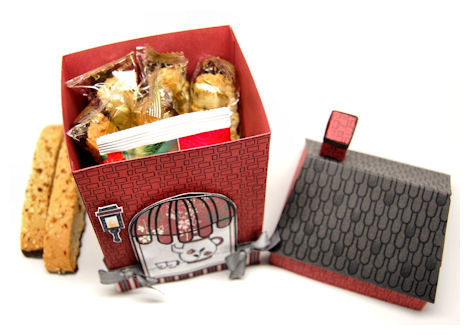
I could have fit an entire package of the Biscotti, but I ate some of it while taking my photos! LOL!
If you have a personal cutting machine you can alter the size too 😀 Now how fun is that?
Now how about that invitation?
Pretty Pieces Cut File : Homemade Card & Envelope $2.50Available in PDF, SVG, GSD, DXF, WPCCompleted Project Size4 1/2 Inches Wide7 3/4 Inches Tall
Fashioned after the Shop Around Template, this coordinating cut file is a super sweet and rather large Shop/House shaped card & envelope file, that was created so you can further utilize the images from Home Improvement, Shoppe Window, On Display 1, and Sign it stamp sets.
You can decorate the slide-on style envelope, to look *just* like a customized Shop/House and put your message on the house/shop shaped insert card!!How cute and perfect would this be for:Holiday card from your family-feature a photo inside!
a special themed party (be it birthday, brunch/lunch/dinner, little girls invite)
welcome to the neighborhood
new home
bringing home baby
bridal shower
open house
school /store/shop themed gift card holder
home Improvement
moving/just moved
House warming card or invite
or other card/invitation?!
No matter what the occasion, just the fact that this card is homemade, is sure to grab the admiration and attention of the receiver, no matter what the occasion!
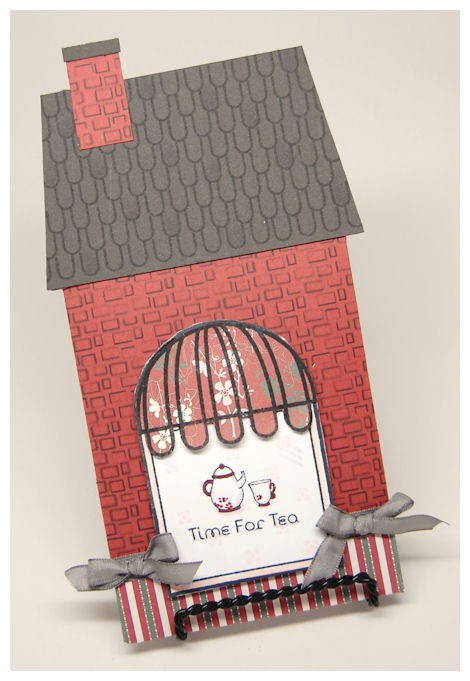
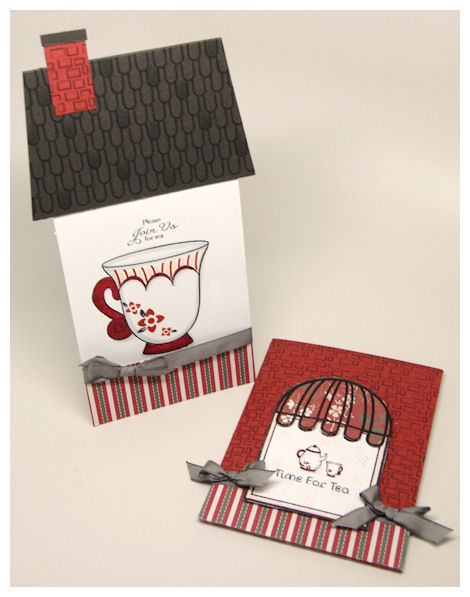
Today mine serves as an invitation to tea!
Just like the Tea Parlor I created I made this to match.
This time I used that mini tea pot from the Just For You set, with the little tea cup from the Sign It set.
Now the envelope on this was meant to slid over the card, and it’s purpose is to also serve as the card FRONT in the fact that you decorate it like you would your card front, then as you slide it off, it reveals the INSIDE of your card.
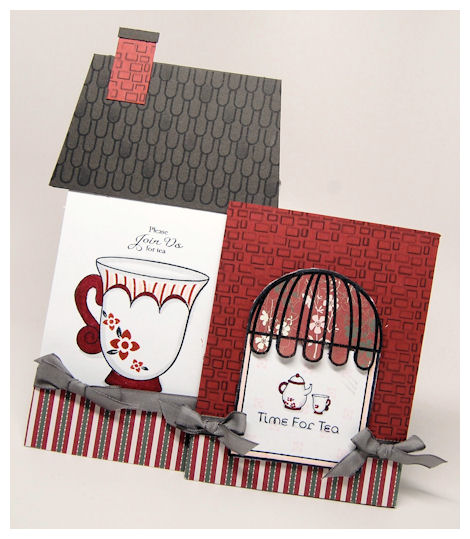
So the envelope is to the right, and the tall house shaped note card is to the left! This template comes complete with the roof pattern which covers the card top.
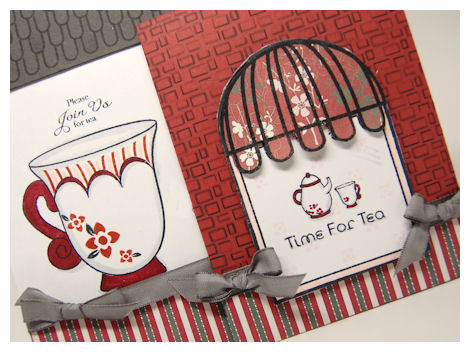
I chose to use the A Spot of Tea set to really tie in this theme! It was the perfect addition!

I just colored and stamped the pattern to match! The flowers I stamped are from the Fanciful Flourishesset. I stamped them because they are the larger version of the flowers that are in my “wall paper” and look like what I doodled on the mini tea cups! The sentiment is also from the A Spot of Tea set
Supplies from My Time Made Easy ™ LLCPretty Packaging Templates: Shop Around & Accessories Mega template
Pretty Impressions Stamp Set: On Display 1, Sign it, Home Improvement, A Spot of Tea, Just for You, Fanciful Flourishes
Pretty Printable Digital Paper: Color Me Pretty: Construction Materials, Cherry On Top
Pretty Pieces Cut File: Home Improvement, Homemade Card & Envelope
I hope you enjoy the plethora of ideas you pick up as you HOP along, and view the gallery! The ideas don’t stop there though! We still have another week of daily ideas to share, so come back tomorrow.
Happy Shopping!
Perfect Peeks Day #4!
Aug 30, 2010 Author: mytime | Filed under: Cards, Home decor/3-D items, My Time Made EasyToday is the LAST day of PEEK projects before you can purchase the AMAZING NEW! Release items for September! Now just because our product are releasing on the 1st, doesn’t mean our projects end! We still have over a WEEK of inspiring projects that are sure to jump start your own creative juices!!
As of the 1st, our Gallery will be live too! This will be a very exciting new feature that will definitely enable you to view so many projects, new and old, in one place. I can’t wait until YOU the customer has a chance to upload soon too!
Today our newest Design Team Member: Lisa Kind has a super cute project for you!! Be sure to check her out as she shares her first peek with MTME!
Yesterday I totally spaced and forgot to link Dawn and Tammy! So check our their creations!
Now as you know My Time Made Easy ™ LLC prides itself on coordinating products that are designed to make your papercrafting and gift giving easier than ever!!
I am happy to announce that we are offering an amazing set of 10 different pre-designed stores for our Color Me Pretty Digital Paper Collection called: Simply Sensational Shoppes
Today I want to share a super fun TOTALLY digital project using the NEW! Shop Around & Accessories Mega Template and a NEW!Color Me Pretty Digital Paper Collection called: Simply Sensational Shoppes
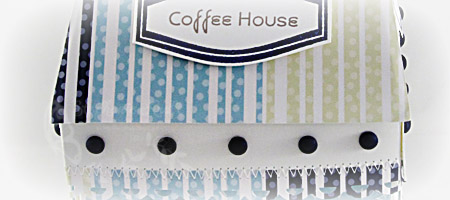
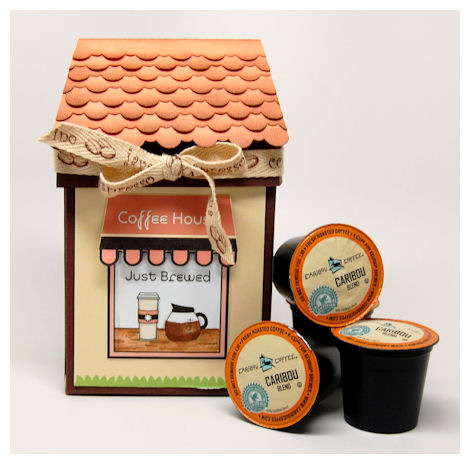
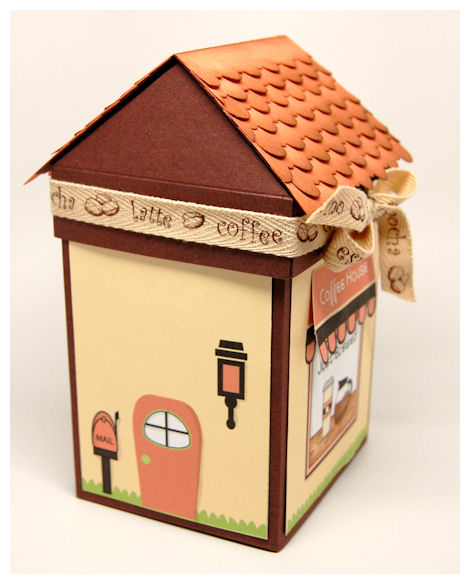
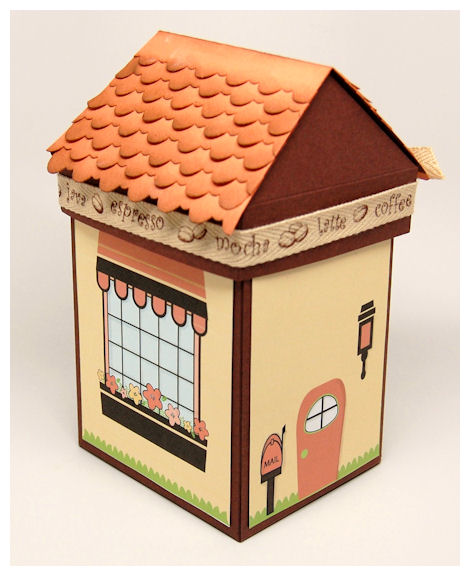
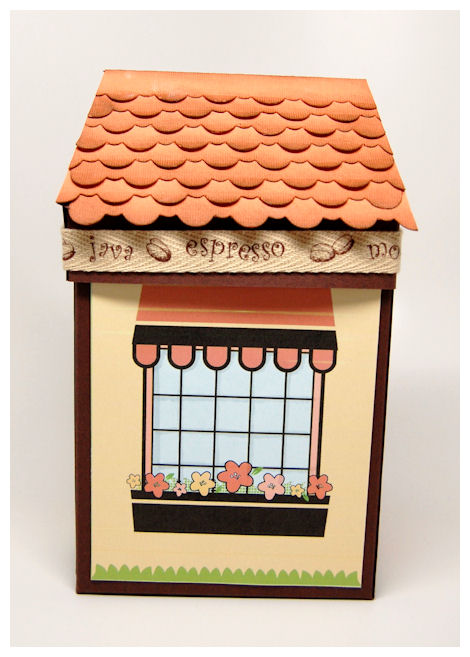
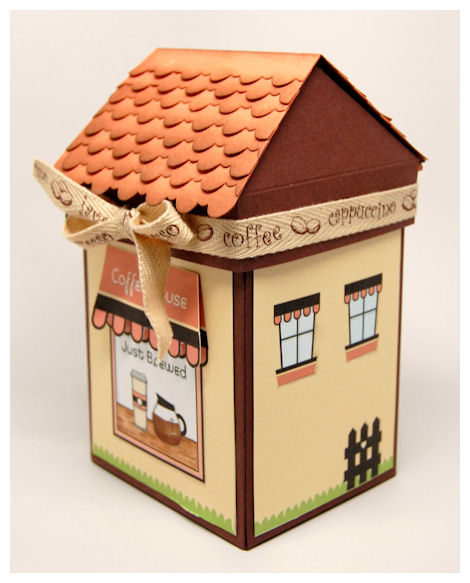
You read it right! This is TOTALLY digital.Coffee House

My colors were fashioned after this gift, and a collection of papers being released by Kristin called Citrus Peel.
One of my most favorite things in the world is coffee!! Who wouldn’t LOVE this? A gift of K-Cups.
I am personally addicted to my Keurig, but you could put ANY coffee themed gift in here too! Or heck, just the idea of a Coffee House sitting on the counter-CUTE!
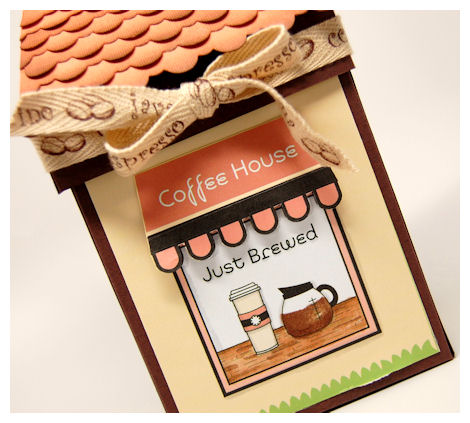
This is the Coffee House – Shoppe Window! (the coffee pot image is from Sign It, and it is SOOOOOO cute! I love it)
Would you believe me if I told you I made this in about 20 minutes (Including the time it took to “color” my design-and MINUS the roof-that took about 15 minutes)? Ok so it was actually almost 40 minutes, but once the coloring was done, I could just print and cut a ton of these for gifts. That wouldn’t take long at all. This template is a snap to put together.
The shoppes designs were put together by Sara, using all our NEW! images.
They include the following themes:
Antique Store
Baby Boutique
Bakery
Candy Store
Coffee House
Flower Shoppe
Hardware Store
Pet Store
Tea Parlor
and a Travel Agency!
That is only the beginning to the themed shoppe designs you can create.
All 4 sides of the Simply Sensational Shoppes are pre-designed, all you need to do is add the color, print and cut!!! It couldn’t get any easier. It is especially great for those mass production of gifts, just in time for the holidays 😀 Now don’t get me wrong-we all LOVE to get INKY, and the 4 NEW! sets: Home Improvement, On Display 1, Sign It & Shoppe Window (all available in digital too!) are ALL fabulous to aid you in the creative process, but sometime we need QUICK and even EASIER way of getting things made-like around the holidays!
You just go ahead and digitally “color” your sheet (simply follow the same instructions you would for coloring the digital stamp images ), then print! BAM! All 4 Shoppe sides are completed in minutes. LOVE IT!
PS We do plan on adding to this line as we add more elements to our upcoming release of coordinating products for the NEW! Shop Around & Accessories Mega Template. Your holiday projects will be so fun and easy.
So let me share the 360 degree view of these amazing Simply Sensational Shoppes
Front:
Side 1:
Side 2 (A)
Side 2 (B)
Side 3
As you can see I printed my store front twice, so I could cut a little 3 D awning!
Now how about those shingles??? Aren’t they fabulous?!
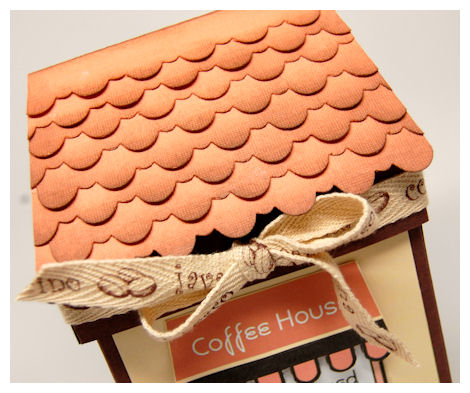
My 3 dimensional roof layer was made by cutting 14 of the Border Builders: Scallop Dot (resized to be about 5 inches long-then trimmed to fit my roof layer!) and one of the Border Builders: Scallop Dot that I made by welding 2 together for my top piece.

I just sponged each layer, and pulled the larger scallops forward for some dimension.
They really add to the WOW factor!
Now INSIDE this neat little Coffee House, I easily fit 9 K-Cups! (with room to spare)
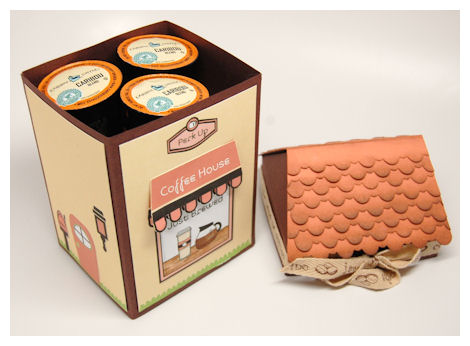
What a great way to package up a sampler of coffee for a friend. Done in no time.
Supplies from My Time Made Easy ™ LLCPretty Packaging Templates: Shop Around & Accessories Mega Template
Pretty Impressions Stamp Set: Home Improvement Digital set <—Use to ADD elements to your pre-designed paper, or make your own shoppe’s!
Pretty Printable Digital Paper: Simply Sensational Shoppes
Pretty Pieces Cut File: Border Builders: Scallop Dot
Well it won’t be long now until YOU can place your order and start whipping up sample after sample of these amazing homes and shoppe themes!
I hope you enjoyed today’s project.
Please come back tomorrow for a BLOG HOP! ONE of my talented design team members is holding a $50 gift certificate! Details to follow tomorrow.
Thanks for stopping by!
Perfect Peek Day #3
Aug 29, 2010 Author: mytime | Filed under: Home decor/3-D items, My Time Made EasyWell here we are with day #3 of the My Time Made Easy ™ LLC September Release peeks, and the ideas/samples are just getting started! I have TONS to share, but am pacing myself for what I am sharing daily. We have so many amazing coordinating products coming out that it is hard to hold back and decide what to share and when!
Today you will definitely want to see what both Pam Imholz and Tracey Cuccia have created using the NEW! Pretty Impressions stamp sets that are being released with the NEW! Shop Around & Accessories Mega Template!!
You will have SO many possibilities for projects using any/all of the NEW! items. We are *only* releasing this template for September because of ALL the amazing possibilities that this ONE template has to offer. I wanted the team and myself to be able to take the time to show you just how amazing each and every creation can be!
We already have 3 ADDITIONAL stamp sets that are going to be released VERY SOON to coordinate with this template! These additions will allow you to easily further maximize the use of your Shop Around & Accessories Mega Template design/gift options.
OK enough of the blah, blah, blahing!!! Let me share a project that went from a simple, idea to reality, and turned out exactly as planned-which we all know that more often than not, usually doesn’t happen!
The colors and concept came from Kristin Bueter, where when we were rolling over this idea (of what we thought impossible), and in the conversation she was trying to get me away from creating the cake image using the colors PINK or RED! LOL! She challenged me to “Tiffany & Co.” like colors, along with the idea of this Shoppe. You know I can’t resist a challenge 😀
This was the result-

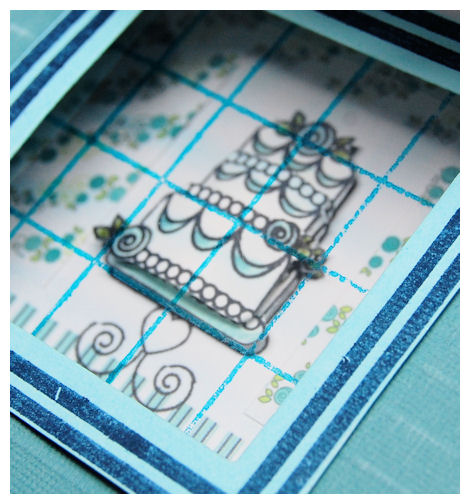
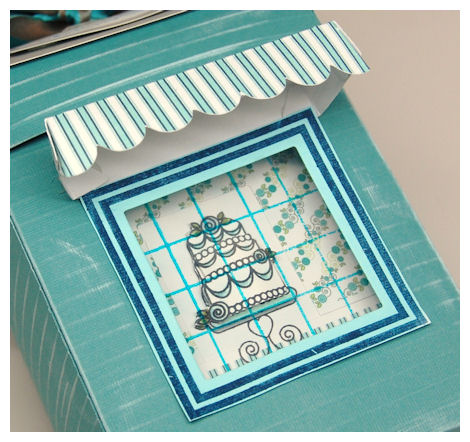
To the Happy Couple!
I made this themed shoppe, with the stunning cake image in the window to convey the look of a Wedding Cake in the window of a Bakery! I know I ALWAYS stop and stare when I see cakes in the bakery!
I kept the design of the Shop Around & Accessories Mega Template VERY SIMPLE!! I wanted the FOCUS to be on the window scene, and create something conceivable to give someone at a Wedding or Bridal Shower. The cake is from the On Display 1 set. I love the design of it. Since the cake is a MAIN attraction at Weddings what better Shoppe theme?
When creating this I used a textured cardstock, then scored the lines on the box every 1/2 inch, then brushed it with white craft ink! I think it looks neat. Like a old fashioned baker of sorts.
Once I again I digress….getting a super photo of this was very challenging because of the shadow cast by the awning. In person these stores look so amazing, but getting the photo is a bit problematic.
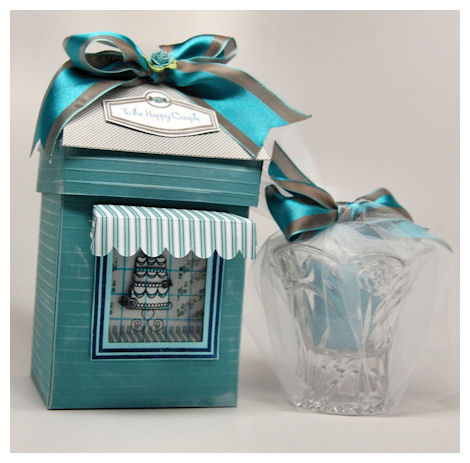
The cake actually looks like it is sitting on the shelf of a store, and the cake itself is in a ROUNDED 3 dimensional version.
This really is a MUST SEE in person to get the full effect!

To do this I made a box like “room”, that I adhered into the Shop Around template. That way it appears as if you are actually looking INTO a shoppe!! Because it is a enclosed “box/room” it stays safe from harm, not matter what gift you add inside!
I printed rose pattern from the Tea Parlor collection, so it looked like wall paper, and Picket Fence for the counter! That same pattern was used for the stripped awning.
When I made the Shop Around template, I used the Home Improvement Cut File, to create the cut out for my window. I then stamped my window frame from the Home Improvement set, cutting out the center first. I then layered some acetate behind it, which was stamped the with window pane image from the Shoppe Window set. I used a Teal Pallette ink for that, to match my project.
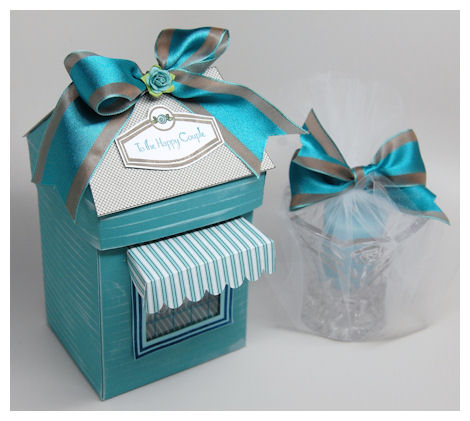
My roof is printed on the Sarah Sand since I wanted a subtle look, and picked up the gray from the satin ribbon which was my biggest starting point. I think its so luxurious and elegant looking!
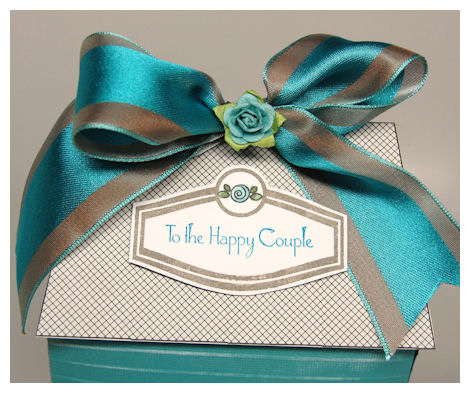
The sign and coordinating rose are from the NEW! Sign it set. The sentiment is from the So Sentimental set. I love this sentiment, and it really tied in my gift/theme!
Supplies from My Time Made Easy ™ LLCPretty Packaging Templates: Shop Around & Accessories Mega TemplatePretty Impressions Stamp Set: On Display 1, Sign It, Shoppe Window, Home ImprovementPretty Printable Digital Paper: Picket Fence, Tea Parlor
Pretty Pieces Cut File: Home Improvement Cut File
Ribbon by May Arts, Prima FlowersQuite honestly I have no one to give this to, so my “prop” is a crystal candle/votive holder from Princess House. Not sure if they are still in business but they were a DSA that I use to constantly purchase crystal any/everything from over a decade ago, pre-kids time. Since having children most of my precious crystal is carefully packed away from clumsy feet, and dirty curious hands 😀 I want my house to be a HOME, where my children could LIVE and grow and not be told “NO! Don’t touch that” constantly. I didn’t get rid of everything when I had children, just some of the stuff I felt I wanted to have once they moved out someday! LOL!
Well that does it for me today!!
Return for even more amazing ideas from myself and the team tomorrow. The first is approaching quickly and you will get to see all the amazing new goodies!
Until then!
How sweet it is! Project Peeks Day #2
Aug 28, 2010 Author: mytime | Filed under: Cards, Home decor/3-D items, My Time Made EasyI’m here with Day #2 of the My Time Made Easy ™ LLC September 1st Release peek projects!
So many SWEET sets, and so little time! I feel like I could create about 100 different projects with this release. While I actually won’t be making 100, you all will receive OVER 40 different project ideas between myself and the team using these new release items over the next 10 days! Our Gallery will be LIVE on the 1st, so make sure you keep checking in as the team and I load new projects daily!
Today, some of the team and I have some SUPER SWEET projects for you to drool over 😀 Hop on over to:
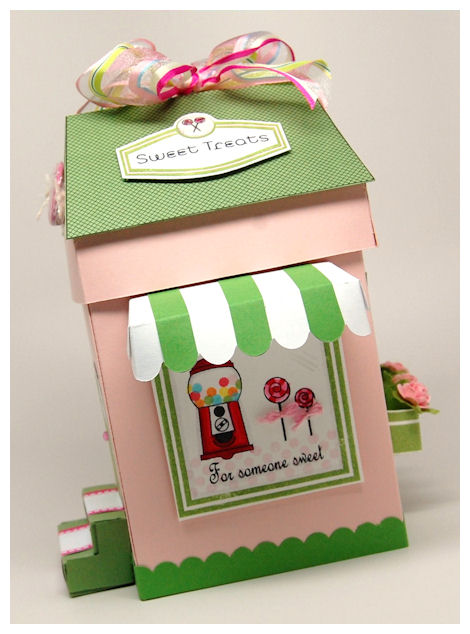
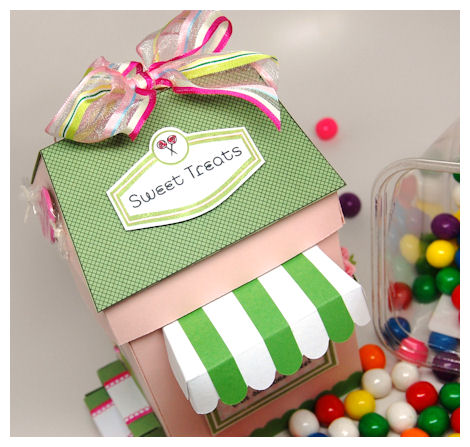
For someone sweet!
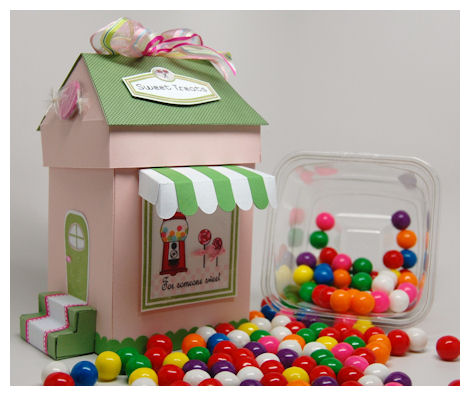
My kids love candy, and what better way to present it than in a Sweet Treat candy store?!! When I think sweets- I love the color combination pink, red, and green!
Today I chose to create a Sweet Treats themed store using the NEW! Shop Around & Accessories Mega Template and the On Display 1, Sign it, and the polka dot border from the Home Improvement set.
This is the “front” or side of my themed Sweet Shop!
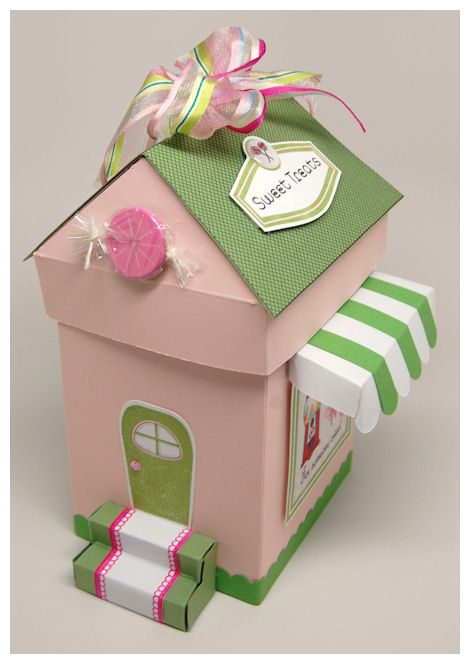
I stamped my door from the Home Improvement set. I used the Home Improvement Pretty Pieces Cut File for the door, sign and shop window.
I wrapped a fancy brad (tabs cut off) I had on hand, in cellophane to create a pink peppermint candy! Super fun and simple! You could also use cardstock, buttons, or REAL candy!!
I used the stairs template from the NEW! Shop Around & Accessories Mega Template. I stamped my stairs using a border image from the Paper Pattern Pieces for some WOW! factor. To complete the scallop design I used the Border Builders Open Scallop for my trim along the bottom.
NOTE: It is very difficult to get a good photo of your shop window, when your awning is casting a shadow! LOL!!! I wanted to get an additional light source to light up under the awning, but all my bulbs were burnt out (I always drop/knock over my photo lights! GRR!).
Our NEW! Pretty Impressions stamp sets (releasing Sept 1st) really allow you so many options for creating some amazing THEMED shops and window displays (hence the name :D)!
From a candy store, ice cream parlor, flower shop, pet shop, coffee or tea house, new home/home improvement, welcome baby and bakery…..the possibilities don’t even end there!
To create my theme sign, I stamped the sign, “sweet treat” sentiment, and mini version of the lollipops from the Sign It set!! The images in the Sign It set coordinate perfectly with the On Display 1 set.
In my window from the Home Improvement set, I stamped one of my FAVORITE images from the On Display 1 set that takes me back to MY childhood-the Gumball Machine! It has a “gumball” image that allows you to easily stamp a rainbow of gumballs with ease. I also used the CUTE lollipop image too! I LOVE IT!
The think what I LOVE most about On Display 1 is that not only is this set perfect for the Shop Around & Accessories and the Home Improvement set, but it features great images and sentiments that are perfect on their own!
As you can see I stamped the images IN the window, and even added a sentiment to it-just like you’d see on an actual store window.
I used the Shop Around & Accessories to create my awning! I simply cut the template from both white, and green cardstock. I cut the green awning into strips (using the scallop as my guide) to make my dual colored, realistic, 3 dimensional store awning. I think it looks *just* like an old fashioned shop from back in the early 1900’s! They just don’t typically have these types of stores around anymore like they use to.
Now for the side window
This is part of the Shop Around & Accessories. This is the window, and the window box.
The flower box stamp image from the Home Improvement set stamps perfectly on the Shop Window Box Accessories!! I love the idea of a 3 dimensional window box. Some people don’t actually stamp so I wanted this Mega Template to be as complete, and user friendly as possible! Oh and as I mentioned a million time, and I am certain is blatantly obvious by now-I LOVE 3 dimensional details.
I added some “grass” (aka wool roving) to my flower box, and popped in some petite Prima flowers!
The curtain valance was made using the patterned curtain from the Home Improvement set, stamped horizontally 😀 I HAD to add the butterfly from the Tending the Garden set. It looks like it is enjoying fluttering over the roses in the window box.
It just completed the entire look for me.
Supplies from My Time Made Easy ™ LLCPretty Packaging Templates: Shop Around & AccessoriesPretty Impressions Stamp Set: Home Improvement, On Display 1, Sign It, Paper Pattern Pieces and Tending the Garden set
Pretty Pieces Cut File: Home Improvement Pretty Pieces Cut File
Well thank you for checking in today! There is MUCH, MUCH more to come, as you can imagine 😀
I will be sharing more and more home/shop samples with our new papers, and the Homemade Card & envelope cut file! I will also share some ideas for using these new products on *just* cards too!
See you back here tomorrow!
My Etsy

Who I Designed For
Blogroll
- Alicia
- Alli Miles
- Ally Blankenship
- Amber
- Andi @ crafts on a whim
- Angel R
- Angie Z
- Anne Kranitz
- Becky O
- Bee
- Beth Silaka
- Bethany Paull
- Beverly Nash
- Bobbie
- Cambria
- Cammie
- Card of the Week
- Card Positioning System (CPS)
- Cards for Cancer
- Catherine Doucette
- Charmaine
- Cheryl Sims
- Chriss Rollins
- Christina
- Christine Ewing
- Christine Wooden
- Colleen Schaan
- Craft Critique
- Craft Gossip
- Crystal
- Dawn Easton
- Emily Giovanni
- Geny
- Holly
- Igne Groot
- Inspirational Craft Blogs
- Irene
- Jami Sibley
- Jeanne Streiff
- Jen del Muro
- Jeni Bond
- JenMarie
- Jenn Balcer
- Jenn Diercks
- Jenn O
- Jennifer E
- Jennifer Mick
- Jennifer Pereda
- Jennifer-Sweet Treat
- Joanne Basile
- Jodi Collins
- Julia Stainton
- Julie Masse
- Karen
- Kathryn Berthiaume
- Katie Cotton
- Kelley Holland
- Kendra
- Kim Scholfield
- Kris’s Color Stripes! Get inspired here
- Kristen Dubosque
- Kristin Eberline
- Kristine
- Laura @ Sunshine Stamper
- Laura Turnmire
- Laurie Schmidlin
- Lesa Rapp
- Linda Duke
- Linda-LSN
- Lindsey Botkin
- Lisa (lakind scs)
- Lisa Kind
- Lori Craig
- Maggie
- Mara Campbell
- Maria
- Maria Levine
- Mary
- MaryJo
- Melanie M
- Monique Hansen
- Moxie Fab World
- Pam Imholz
- PaperCrafts Connection
- Peppers and Pollywogs Kids party site
- Rebecca Grohall
- Rita
- Robyn
- Rose Ann
- Sarah Vrolyk
- Sharon Harnist
- Sharon Johnson
- Sharon Rivera (a chemisrty with paper)
- Sherrie
- Sophia Landry
- Storage Units, Ink, & More Blog
- Sue Berker
- Susan (Rainy)
- Tangii Crane
- Tracy
- Tricia Traxler
- Trudee
- Velta
- VivLyn
- Zena
MTME Pretty Palette Color Team
MTME Pretty Patterns Sketch Team
My Time Made Easy TM LLC
Shop till you drop!
Lauren Meader
About Me
Copyrighted material
Subscribe To My Blog
Pages
- About me
- Alexa’s Story!
- My Crafty Corner!
- My Time Made Easy™ LLC
- Our Make A Wish Trip to Disney!
- Resume/Publication List
Calendar
| M | T | W | T | F | S | S |
|---|---|---|---|---|---|---|
| 1 | 2 | 3 | 4 | 5 | ||
| 6 | 7 | 8 | 9 | 10 | 11 | 12 |
| 13 | 14 | 15 | 16 | 17 | 18 | 19 |
| 20 | 21 | 22 | 23 | 24 | 25 | 26 |
| 27 | 28 | 29 | 30 | 31 | ||
Archives
- August 2013
- July 2013
- June 2013
- May 2013
- April 2013
- March 2013
- February 2013
- January 2013
- December 2012
- November 2012
- October 2012
- September 2012
- August 2012
- July 2012
- June 2012
- May 2012
- April 2012
- March 2012
- February 2012
- January 2012
- December 2011
- November 2011
- October 2011
- September 2011
- August 2011
- July 2011
- June 2011
- May 2011
- April 2011
- March 2011
- February 2011
- January 2011
- December 2010
- November 2010
- October 2010
- September 2010
- August 2010
- July 2010
- June 2010
- May 2010
- April 2010
- March 2010
- February 2010
- January 2010
- December 2009
- November 2009
- October 2009
- September 2009
- August 2009
- July 2009
- June 2009
- May 2009
- April 2009
- March 2009
- February 2009
- January 2009
- December 2008
- November 2008
- October 2008
- September 2008
- August 2008
- July 2008
- June 2008
- May 2008
- April 2008
- March 2008
- February 2008
- January 2008
- December 2007
- November 2007
- October 2007
- September 2007
- August 2007
- July 2007
- June 2007
- May 2007
- April 2007
- March 2007
- January 2007
Categories
- About Me
- All That Scraps
- blogger challenge
- camera/photo play
- Cards
- Contests
- family stuff
- FOR SALE
- Home decor/3-D items
- How to FAKE it!
- Introduction
- JUGS Challenge
- JustRite Stampers
- Lizzie Anne Designs
- My family stuff
- My Stamping Space
- My Time Made Easy
- My Time To Color Challenge
- My Time to Create Challenge
- My Timeless Template Challenge
- My Timeless Templates
- Mytime Mail
- MYTIME MOVIE/VIDEOs
- Papertrey Newsletter
- Pink Cat Studio
- Pretty Palette Challenge
- Pretty Patterns Sketch
- Product Opinions and Must haves
- Recipe's
- Saturday Sketch
- Smilebox Creations
- Stampavie
- Tutorials
- Uncategorized
- videos
Most Popular
- Create your own Onesie Card Tutorial-and important NOTE! PLEASE READ (2529)
- Saturday Sketch-Boxed bag holder (2333)
- Going GREEN! Fancy Flower Flourish-Closure Video (1478)
- Fabulous Favorite - Giveaway! (1336)
- a Prayer Request (1232)
- QUICK-Easter Baskets from Nestabilities-PTI style-and blog challenge (1063)
- Teaser Sketch (999)
- February Release Giveway! (and a little peek) (996)
- Group Post and Rambling Rose Video Tutorial (985)
- GIVEAWAY! Who wants it all?! (895)
Recent Comments (RSS)
- Daya Sons: Daya Sons, a renowned manufacturer
- 첫충사이트: 완전히 흥미로운 블로그 게시입니다. 저는
- sarah: Wow, Lauren, what a stunning
- hedie: خرید راهبند
- 야동: Love to read it,Waiting For
- 야동: This seller is in a
- 바카라사이트: 여기 처음 왔어요. 나는이 게시판을
- 야동티비: I was surfing the Internet
- 바카라사이트: 비슷한 주제에 대한 흥미로운 정보를
- 바카라사이트: "여기에 제공해 주신 귀중한 정보와
Copyright © 2007 - My Time, My Creations, My Stampendence - is proudly powered by WordPress
This blog has been Tweaked and Designed by Sara Williams