Archive for the ‘videos’ Category
Pretty Printables Digital Paper Perks!
Mar 17, 2010 Author: mytime | Filed under: My Time Made Easy, MYTIME MOVIE/VIDEOs, videosI have received numerous questions about our Pretty Printables © digital paper (be sure to click each category to view it all!).
PS Don’t miss out because today is the LAST day of our 15% OFF your ENTIRE purchase sale! (see prev. post)
Many of you out there are nervous to give it a go. Many skeptical as to WHY it is so much better than patterned paper you get in the store, or is it TRULY a good deal. All that is up to the individual, but if you haven’t tried it, you should!
We have a FREE 12 Days of Snowflakes © pack for you to try RISK FREE too!
Like anything, there are going to be those who LOVE it and those who DON’T! It is totally OK to be on one side or the other. I found for the most part this is uncharted territory for most of you. I decided I would dedicate a post about digital paper and let those of you on the fence make a decision about what side you fall on.
Here is a quick video to show you how easy it really is to get started using the Pretty Printables Digital Paper.
I hope this was somewhat helpful in letting you see that it really isn’t scary at all! REALLY! If you can edit photos you can use digital paper.
To me is the Pretty Printables digi paper is one of best things since sliced bread 😀
WHY?
It is affordable-YES! It really is! You pay far less per sheet of digital paper than you do for actual patterned paper in the store (or online-don’t forget the SHIPPING charges!)
You pay ONCE for the digi files (which our Pretty Printables © digi paper is a steal priced @ about 0.50 cents per design (and some will be cheaper!!) and you get UNLIMITED use!
Here is how you can figure your cost:
Look into your particular printer ink statistics as to how many sheets you print per cartridge. Range is from 100-500 (maybe a few more than that). Some ink cartridges for the same printer will have ink cartridges that print an arrangement of pages so do some research and ensure you are getting the best price! (also keep in mind you aren’t needing to print FULL sheets)
Then the cost of your ink cartridge (usually $10-$40 MAX)
Add the cost of your cardstock, which usually at the HIGHEST 0.20 cents per sheet. (Another perk! You can choose what cardstock you want to use! I also LOVE using Matte Photo Paper (super for printing digital paper :D) Printworks Matte Photo Paper (Target)
SO (going with everything being the MOST expensive)
Say your ink costs $40 (max) you get only the min. of 200 prints for your ink and your top quality cardstock is the MAX price at 0.20 That means to print one sheet of patterned paper it cost ONLY 0.40 cents to print a full 8 1/2 X 11 sheet of cardstock!
Now to buy it is usually more per sheet! You can research your favorite paper packs (which usually only have a few sheets you LOVE but you pay for several others you may never use just to get them) and do the math on those yourself, as those will vary company to company. Also factor in the SIZE of the paper you are getting. Some may be smaller than a project you want to do :C
Even if you add the fact that you pay 0.50 cents a sheet for the digi file (which you get to use FOREVER ) it still only costs you 0.90 cents (and that is saying you will only use ONE digi page ONCE!!)
So obviously the choice of whether that is “cost effective” enough for you, is up to you.
But that is how you can figure it out 😀
Here are some more perks!
No actual storage-I don’t know about you, but I don’t have a huge crafting space. When you get digital paper you get have as many patterns of paper you want without needing to store it! We all already have white or colored cardstock as a staple to store, now I don’t need the storage for all the digital paper patterns I can have! They stay in a folder on my computer and I can pick and choose what I want, then just print!
Unlimited use– this means actually using the patterns I love without having to repurchase them, or hoard them for fear of running out, to only find if I want more the pattern is retired! UGH! OR if I make a MAJOR mistake I can print another one, without running to the store! THAT alone is priceless.
Resizablitly-(if that isn’t an actual word it is now :D) You don’t have to print an entire sheet of patterned paper! If you only need a 2X 2 square, print that! No more waste, and endless little scraps to find use for. You can even put several snippets of patterns on one sheet! (depending on your software) You can also enlarge, or decrease the “scale” of the print. You can crop and focus on a portion of the pattern too!
How cool you don’t have to wast an entire sheet of cardstock or worry about too much/not enough scrap pieces. OR how often does a company carry a cardstock slab that is too small for what you want to use it for? Those 8 X 8 or 6 X 6 paper pads don’t always cut it, or go far.
Mix and Match– ever wish your paper was dual sided, or this pattern was with that pattern rather than the way it was purchased? Now I can choose what pattern is on either side of my cardstock if I’m creating a project! OR use all my designs to create a customized pattern! You can even print on colored cardstock. No limits. The choice is all yours.
Layering!! You can print one pattern over another! For example, a text print over a floral prints! As stated above, mix and match, or create your own NEW pattern by layering designs you have.
These are the perfect match for any of our templates and card creations.
So there you have it!
If you have any questions let me know.
I hope this was helpful, and I’d love to hear your thoughts. I’d especially love to know if it helped you realize you CAN do this too.
I honestly had to tape this clip 18 times (you can STILL hear my kids in the background! LOL!) because my kids were jabbering away loudly in the background, and playing in the other room. I finally said enough is enough because this is my reality! I’m a mom. I have 3 kids. So it is what it is. My house is never quiet, and I’m far from perfect. My children are active and often a little “energetic” but that is what I love about all of it. So I did what I could without making my kids something they aren’t- quiet! LOL! I’ll miss that “noise” someday.
Anyway, I wish I just said that after “take #2”! LOL! A short clip turned into over an hour of trying to quickly get everything done in silence! LOL!
OK I’m back to busy life and family.
Enjoy the day and thanks for stopping by.
Cut it out! Easy guide to using Cricut with SCAL software: VIDEO and PDF download
Feb 5, 2010 Author: mytime | Filed under: My Time Made Easy, videosYou asked, I listened.
That is my goal as a fellow papercrafter, and store owner.
I spent some time making a video to show you the step by step process for the basic things you need to know when using your Cricut and SCAL for the Pretty Packaging © templates or Pretty Pieces © Cut Files!
VIDEO:
PLEASE NOTE: I had to hold the video in hand, type and record. SORRY!! I hope my camera base gets fixed so I can put it in the tripod next time.
[veoh v19775489cxMTpTXY#]
If you want to safely view ALL the videos I published on Veoh, please CLICK HERE!
NOTE: DO NOT CLICK ON THE THUMBNAILS !If you click ON the thumbnails AFTER the video it takes you to the Veoh site. Some of the content there I am told is “R” and even “X”rated (EEK!) and you may not want to do that around young children. So if you just watch the video here on my blog, and avoid the thumbnails you should be OK. Not sure WHY they don’t have ONLY stamp related videos pop up, but I guess some aren’t.
Bottom line: Click at your own risk!
I am not responsible for content that links to the videos from the Veoh site.
Thank you ![]()
I also put together a step by step PDF download with the instructions for the basic steps that are covered in the video, so you can utilize your Cricut and SCAL. Now you have both a text and visual reference.
If you for some reason cannot view the video, no worries! All the needed info is attached below.
PDF:
my-time-made-easy-guide-to-using-cricut-with-scal-software.pdf <—-Click that to download/print/save a PDF of the general instructions for what you will want/need to know to get started in MINUTES!
There are SO many various things you can do with your Cricut. This was made to serve as a quick reference! Play around and have fun with it. Now you can print it out and keep it next to your computer as you get ready to download your Pretty Packaging © template or Pretty Pieces © Cut File!
Since many of you are so nervous, feeling technically challenged, or may be on the fence about learning how to use the Pretty Packaging © templates in our fabulous cut file versions, I want to tell you to CUT IT OUT! (I mean that literally :D) Put down the scissors……and keep reading.
I should make it known that all our Pretty Packaging © templates or Pretty Pieces © Cut Files come in files for just about every cutting machine available!
We offer our files in PDF-for those of you with a home printers, as well as SVG, WPC, DXF, and GSD.
For more details please read —>HERE.
I want all of you to know that YOU can accomplish ANYTHING. There are NO limits. If I can do something to help you achieve that accomplishment, then I am over the moon to do that for you. I take pride in especially helping you make AMAZING coordinating cards,tags and gifts EASIER and more affordable than ever!
There is no better feeling than learning something you thought impossible.
So with that being said I am here today to show you how to use the Pretty Packaging © template or Pretty Pieces ©Cut File with your Cricut and Sure Cuts A Lot software.
NOTE: The Cricut is the most popular type of personal cutter, and the one I get the most requests/questions about. It is also the cutting system that I personally use, so that is why I am using this cutter for my tutorial.
I do advise you to look in to ALL other personal cutting machine options before making the choice to purchase one, should you be considering that investment. We all have different prefernces/wants/needs, as well as budgets! Make a decision based on what is best for you.
You may not even want a personal cutter, as you enjoy our PDF version. That is perfectly wonderful. I ensure you that I will continue to always offer my products in that format 😀 No worries!
To get started:
You would need the Cricut, ANY Cricut Cartridge, Sure Cuts A Lot Software, and a USB cable
You can find the Sure Cuts A Lot software for the BEST price I have ever seen–> HERE! YES! There is a MAC version too.
I forgot to mention that they are offering a coupon code right now. The code will take an additional 10% off of the entire purchase. The code is FEB14 and it expires at midnight EST on 2/14/10.PS I don’t get a commission or ANYTHING from Cricut, or CandaCraft. I just enjoy sharing what I love and a great deal!
MANY of us are visual learners so that is why I put together a quick video for you! I knew once I was able to show you just how easy it is to download and use our Pretty Packaging © templates or Pretty Pieces ©Cut Files with your Cricut you would feel more confident in knowing YOU can do this.
You can access a FREE Pretty Packaging © template in our store —> Cutesy Cover. Now you can start with a great template RISK FREE!
All our template cut files come with a PDF version. Each template has full color photos, with step by step instructions. It is very clear and easy to understand, no matter what your skill level!
When you download your Pretty Packaging © template or Pretty Pieces © Cut File make a folder for JUST those types of files.
This keeps your files organized so you can easily access them. Then each time you go to obtain a file to cut, it will be readily available in that same folder you opened in the Sure Cuts A Lot program.
I’d love to hear your thoughts on this. I hope you found it informative and helpful.
Now if you are looking for actual eye candy you will want to see what Tracey Cuccia has in store for you!
Look what she did!
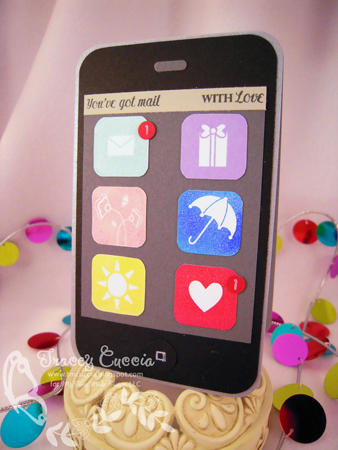
Some words from Tracey Cuccia
“Technology is great, isn’t it? I think back to even 10 years ago, and it’s AMAZING the things you can do from your PHONE now! I LOVE my iPhone, and would be lost without it. I don’t think I could ever go back to LBI (Life Before iPhone – lol). I can keep in touch with my friends via e-mail or facebook, get the latest news, play games, and even make my grocery list! So what on EARTH does this have to do with My Time Made Easy??? Let me show you…HERE”
Is that project not CRAZY??!!
I have some samples to share tomorrow ! I have to say creating the pdf document then all the video creating/editing wore me out! LOL! I’ve been busting my butt this release 😀 I actually need to purchase a new computer chair!! LOL!! I kid you not.
Well thanks for checking in!
I also have a very informative post all about the cost effectiveness and benefits of using our AMAZING Pretty Printables © digital paper! So be on the look out for that ( it may even be another video too! depends on the response to that)
I am spending some time with my niece Gabriella (or as we call her Gabba! LOL! OK her parents call her Gabby I call her Gabba) She turns ONE next Friday! OMG! Seems like yesterday…..I’m so looking forward to having her for the day 😀 I could just eat her up. I’ll have to get some photos! She is SO beautiful! She looks a lot like Amber. Reminds me of her too. OH! Where does the time go?
Till tomorrow.
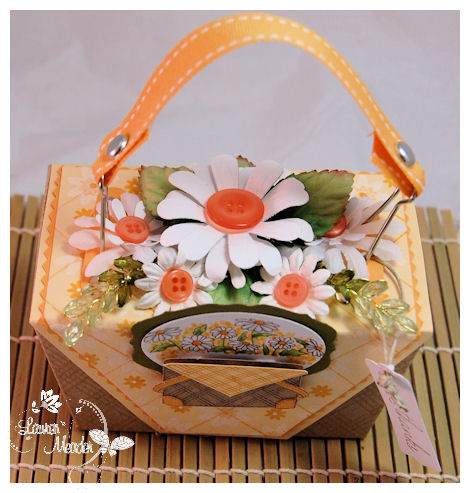
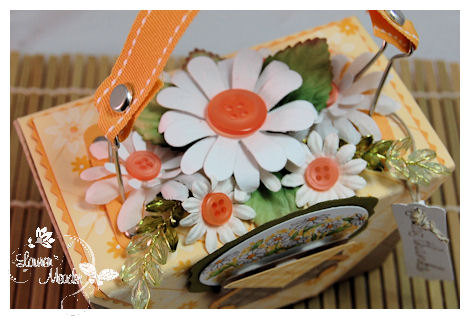
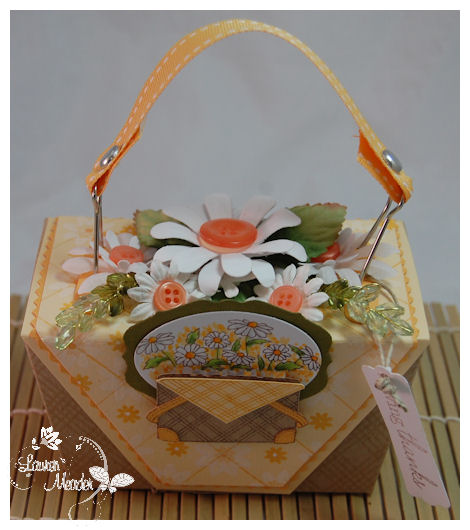
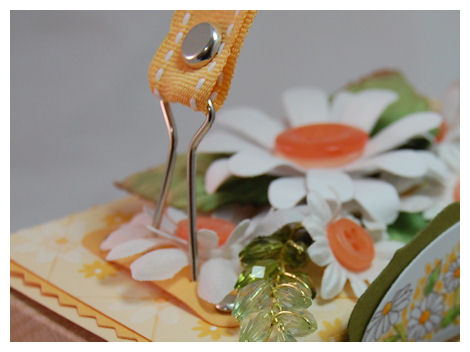
Video: How to make a handle using a binder clip
Aug 13, 2009 Author: mytime | Filed under: Home decor/3-D items, My Timeless Templates, MYTIME MOVIE/VIDEOs, Papertrey Newsletter, Product Opinions and Must haves, Tutorials, videos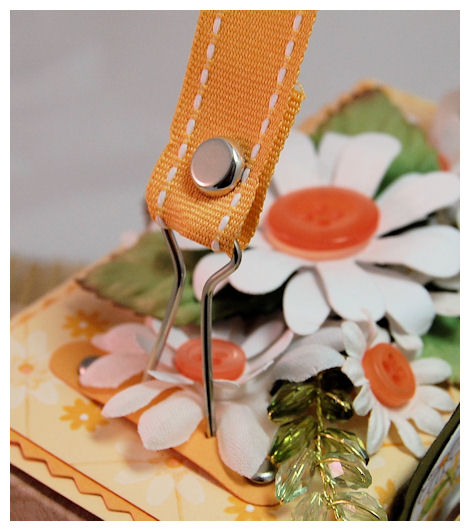
I love using all the My Timeless Templates ©. I am often looking for new ways to dress them up, and make each one more fun and different than the last! It really is ALL about the details.
Today, in a video, I am going to show you how ONE little binder clip, can make the cutest, inexpensive handle, for just about ANY My Timeless Template © you wish to put it on!
Now you have seen how easy it really is to make these handles, I’ll share some details about the project I designed.
Basket of Thanks
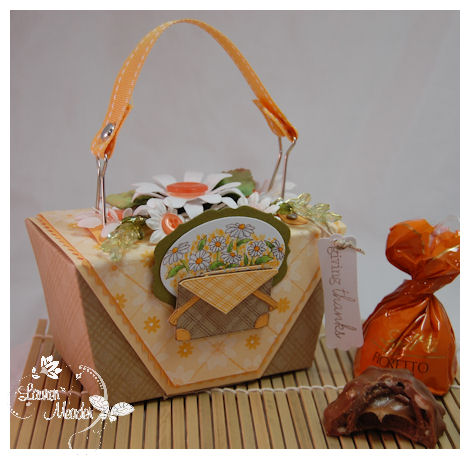
Today’s project, I utilized the NEWEST! My Timeless Template © Tucked Away.
This is the large version of the template.
I designed my box to look like a basket, with the fabric napkin overhanging, and flowers inside-*just* like the colored image from Vintage Picnic (a MUST have set-in my opinion!)
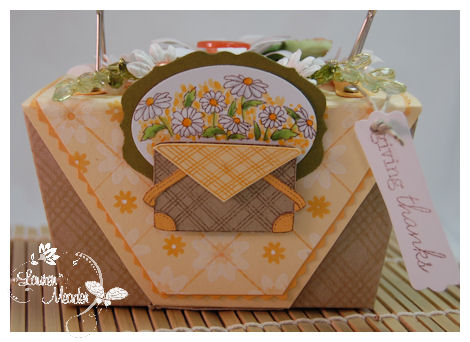
I stamped the Kraft bottom of Tucked Away © , to look similar to a basket weave by using the Tea Dye Duo ink, with Background Basics: Retro image.
I also created the “pattern” on my “napkin” (aka the template lid – mat layer), using Guidelines grid, and the flowers from Around and About, in white craft ink, and Summer Sunrise!
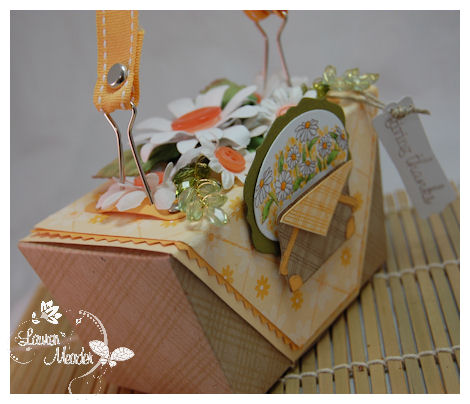
For the additional mat layer, I just adhered a layer of Summer Sunrise, to my stamped layer, then used my pinking edge scissors, to easily cut my decorative layer-perfectly.
Then, for the top-I used various punched flowers to create my “paper garden”.
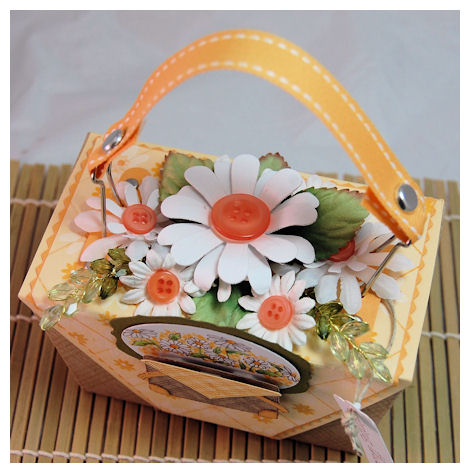
I added some beaded leaves, as well as Prima paper leaves to complete the “look”.
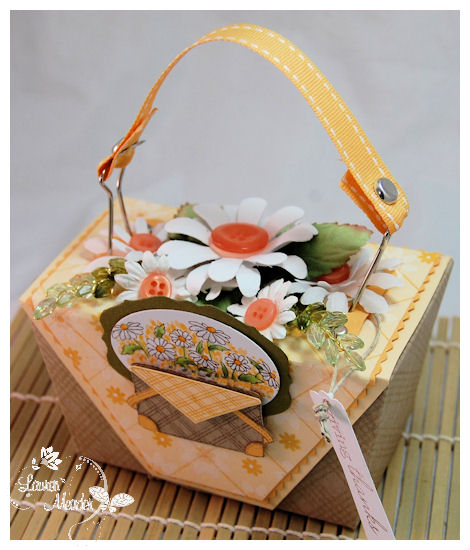
This made my basket look like it was filled with flowers! Just like the stamped basket image from Vintage Picnic.
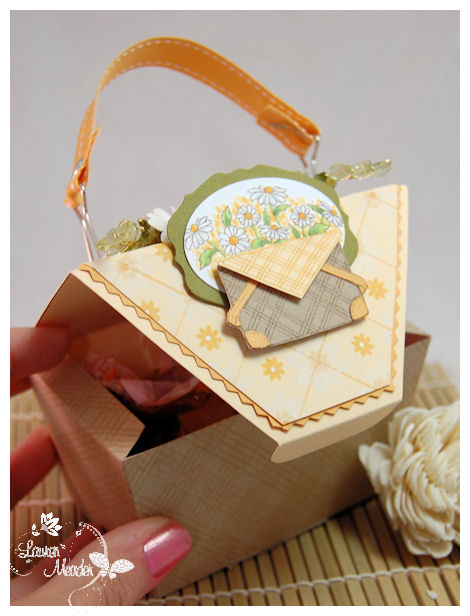
Once you “un-tuck” the top, inside there are 4 large, Lindt Chocolate Caramel Clusters inside!

Totally YUMMY!
As you can see the binder clip ribbon handle really adds a nice detail to the overall design! Now because this template “tucks” closed, you can use your handle to present such a pretty “basket” of thanks!
This project took less than a 1/2 hour total-and that was design concept included, and the MAKING of my own patterned papers! You now have a design idea, you could whip up numerous “baskets” in no time!
Supplies:
My Timeless Template © Tucked Away
Stamps:Vintage Picnic, Retro Bkgd, Guidelines, Around and About Sentiments
Cardstock: White, Kraft, Summer Sunrise, Lemon Tart, Ripe Avocado
Ink: Tea Dye Ink Duo, Dark Chocolate, Summer Sunrise, White
Ribbon: Stitched Grosgrain in Summer Sunrise
Buttons: Melon Berry
OTHER: Leaves by Prima, Brads by SU! ,Word Window Punch by SU! Pinking scissors, Various Flower punches by Marvy, Labels die by SU, Oval punch by SU! tag punch by SU! Singlo Gel pen, Beadded leaf cluster from Michaels Craft Store
Well that is all for me today! I hope you enjoyed today’s project/tutorial.
Tonight is the Papertrey Ink Release! I hope to see you on the forum 😀
In the meantime be sure to check out Nichole’s Blog for more samples & creative clicks, as well as Debbie’s post today (she is filling in for Becky :D) as she shares the last of the countdown peeks!
Till tomorrow
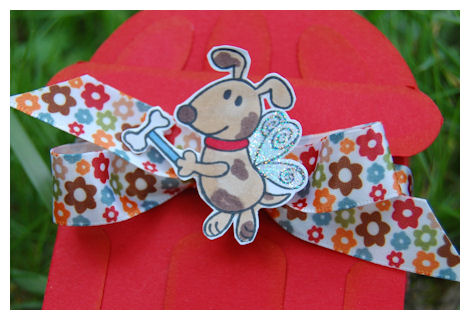
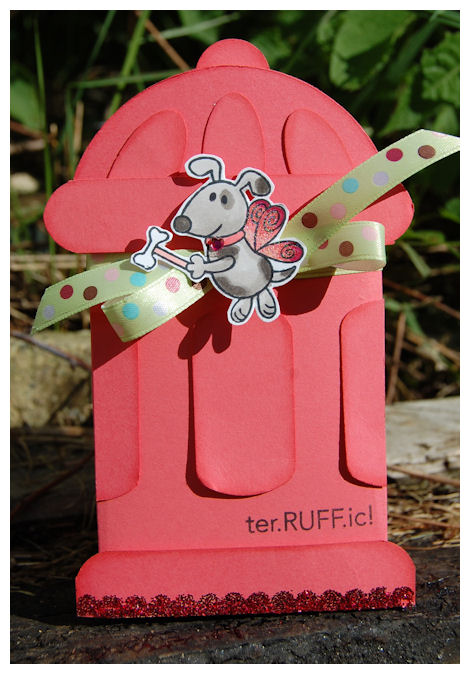
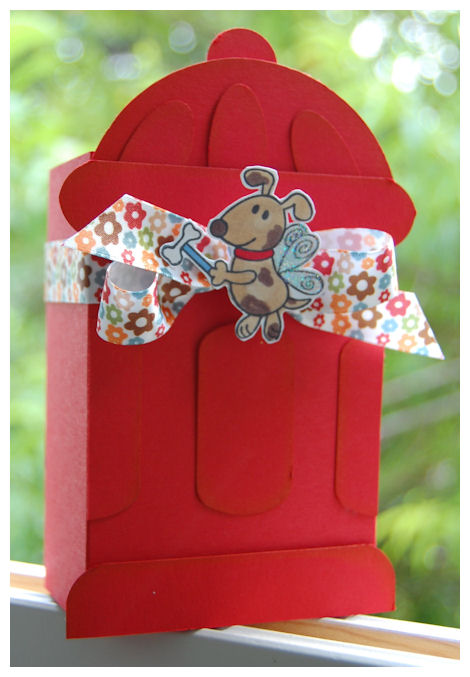
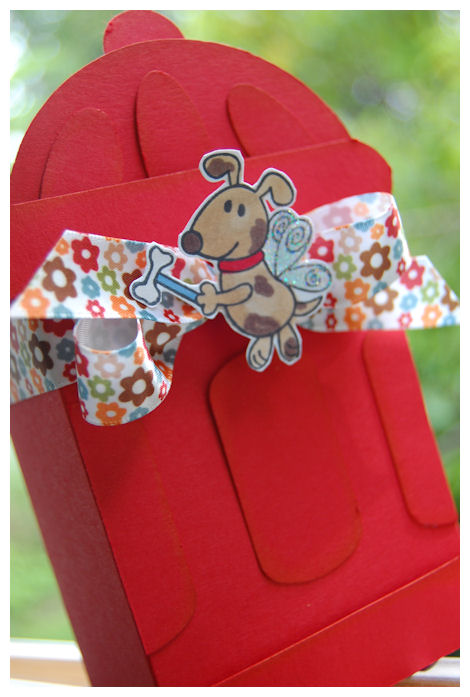
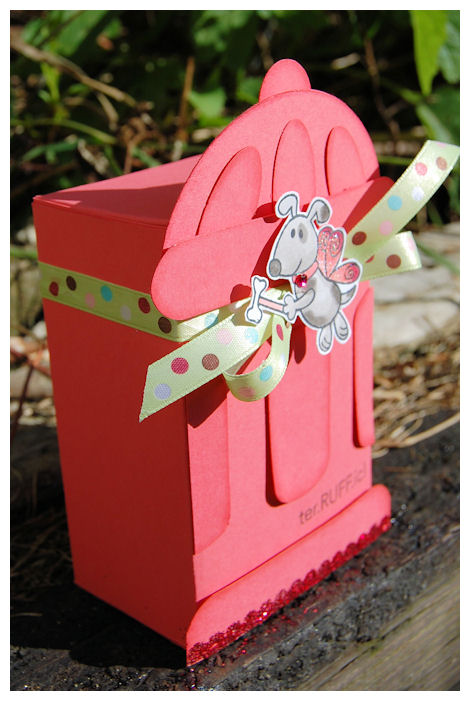
Video: Fire Hydrant Gift Box & PCS Fairy Friends Release
Aug 6, 2009 Author: mytime | Filed under: Home decor/3-D items, My Timeless Templates, MYTIME MOVIE/VIDEOs, Pink Cat Studio, Tutorials, videosI have a project, just for you 😀
What a fun filled day I have here.
Today is the release for Pink Cat Studio-Fairy Friends
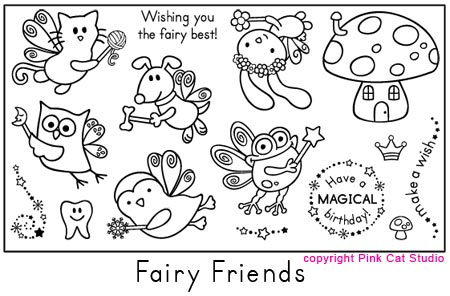
Isn’t it SO cute?!!
I had a blast using it.
I THINK I saved the best for last with this one!!
What I am really excited about are the 2 projects I created using it, and the fact that I ACTUALLY got a video done for you! (I know its been a while! But they are quite time consuming)
I did my best to keep it short and sweet, so that I could post it on YouTube! You all know how LONG winded I can be, so staying UNDER 10 minutes is a NIGHTMARE for me! :C But I got it done, and *just* under 10 minutes-WHEW! I had to cut out my banter that I often put as the intro to the video, to get it done. I know, you don’t need to see me blabbering on and on anyhow, so I’ll type some of what I said instead.
So let me tell you what is in store for ya!
A few weeks ago, I asked for any feedback you wanted to offer on My Timeless Templates ©. Well, all you animal lovers asked for PET specific templates, to package up stuff for our furry friends, OR furry friend lovers!
Now sure exactly WHAT type of market is out there for PET/Animal theme stuff, but I did have an idea to hold you over till I have the AH! HA! moment 😀 (which I am totally NOT promising will ever even happen :C)
The Dog Fairy was PERFECTION for executing this idea too.
I used The Perfect Match © Box template, to create an ADORABLE Hydrant themed gift box! This box was designed, based on a card I did —> HERE!
(OK while searching my blog I also found a cute 3D photo card I made of my own dog —->HERE! LOL!)
So here we go 😀
See how amazingly versatile the My Timeless Templates can be?!
Now here are some photos of the projects (those who are peeking in from work! LOL!) to hold you over until you view the video!
Now I did two of the same design-one girly and the other more boyish. I will post photos of each so you can see how easy it can be changed up.
Girly Ter*RUFF*ic front
Boyish Front
Girly Side View

Boyish Side View
Side 2
Now this is what I have packaged up-inside
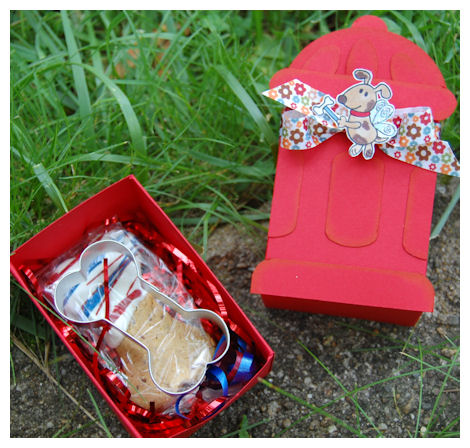
I put a homemade dog cookie, with the dog bone shaped cookie cutter, in this gift box 😀
You could also package up just the mix, and let the person make the cookies them-self!
You could put a personalized dog tag in there, for the new puppy owner……..or have a dog themed kids party (like Clifford or some other dog like Bolt!) and make these the “doggy bags” filled with “doggy treats”!
No matter what you do for this, its seriously, way cute! (Or at least I think it is :D)
Well that is it for me today! Im working feverishly on NEW! Templates for the PTI release! YIPEE!
See ya tomorrow.
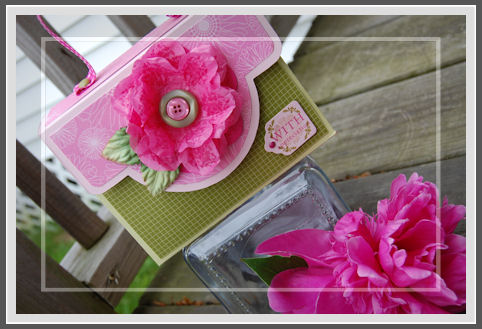
Going GREEN! Fancy Flower Flourish-Closure Video
Jun 25, 2009 Author: mytime | Filed under: Home decor/3-D items, My Timeless Templates, MYTIME MOVIE/VIDEOs, Papertrey Newsletter, Product Opinions and Must haves, Tutorials, Uncategorized, videos
I am very excited about today’s project!
Keeping up with the trends, Going Green is very HOT right now! Reusing items that we already have is not only great for our environment, but FUN!
I find, as a papercrafter, I save a LOT of things! Always with the HOPE of finding a great new use for it! One of them being the tissue paper that comes with many gifts we receive. It is so pretty and comes in a large variety of colors! I have always wanted to find a fabulous way to recycle it, and now I have!
I call it a Fancy Flower Flourish Closure
This idea came to me after a childhood memory. I remember going to the carnival and ALWAYS wanting one of those LARGE tissue paper flowers, on a stick! So expensive back then. I was never able to get one :C But, now I am grown so I can make my own mini version.
I decided to play around, and make this childhood memory a reality, but also with a little more FANCY FLAIR!
I wanted one of these flowers to be part of an elastic closure for my newest My Timeless Templates: Card Couture. I knew it would beautiful, and look so elegant, as the main focus of the template! I have to say it makes you say WOW! when you have it in hand!
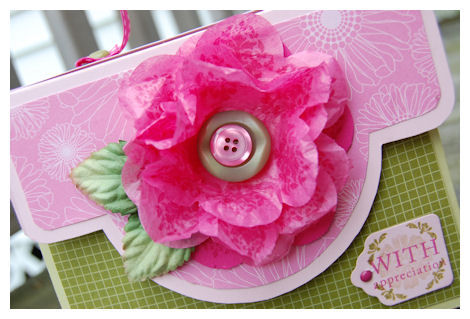
I began my quest by punching some tissue paper with my Giga Flower Punch by Marvy. While I was getting the EFFECT I wanted, I knew I wanted it to be a little more fancy, and stamp related!
I wanted to put a pattern on my flowers. Something elegant. Not just polka dots, or scripty writing. More like a pattern on EACH flower petal. I then pulled out Damask Designs! The small flourish fit PERFECTLY on EACH petal of a very elegant looking flower! I was over the moon when I figured this out!
Now let me show you how it works!
Making Fancy Flower Flourish
1) Stamp one cardstock flower base, and at least 4 tissue paper flowers, using Damask Designs.
You wil want to use ink that is a similar shade or darker than choice of tissue paper/cardstock.
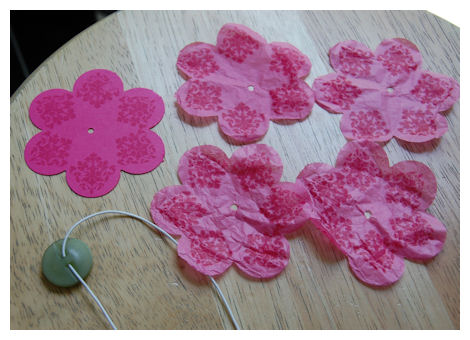
2) Punch holes in centers
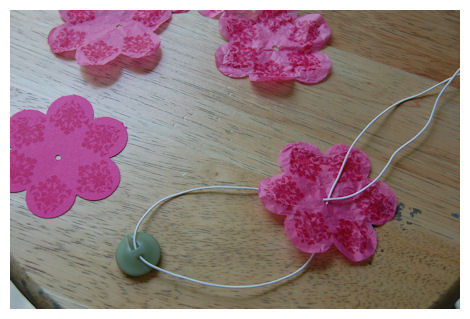
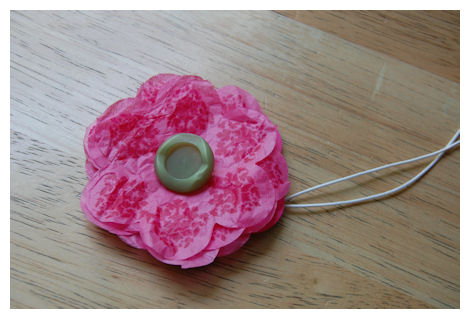
3) Using elastic cording, string on button, them put through the tissue paper flowers first.
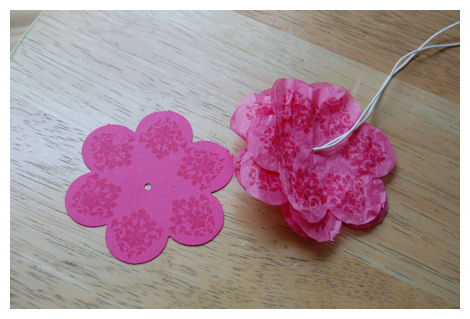
4) Now put trhough the cardstock flower, and pull though
This is the close up
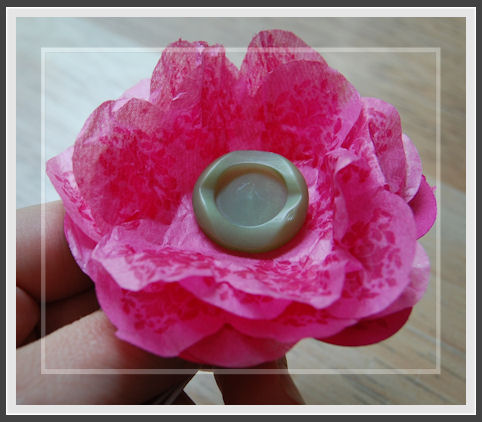
5) Pull petals up, each laer separately, and scrunch together!
NOTE: I added another button to the button center of my creation.
6) Optional: Adhere punched, stamped, or Prima Leaves to flower cardstock base.
For Attachment to Card Couture:
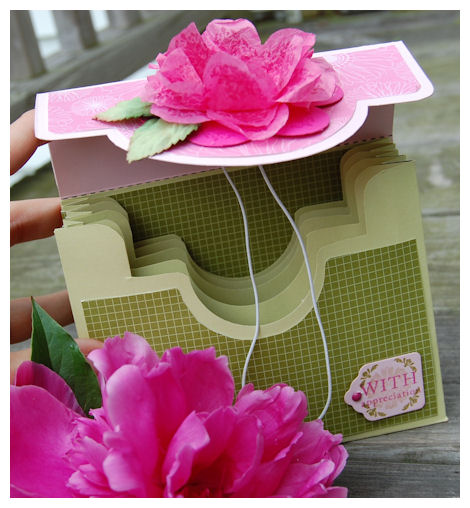
1) Punch hole in the lid of template.
2) Insert large eyelet.
3) Pull strings from Fancy Flower Flourish through the hole.
4) Close lid, and tie elastic closure, tightly around template. Knot elastic cording.
Now you have a beautiful, elastic closure for your Card Couture Template, or to use to embellish ANY project!
Supplies:
My Timeless Template: Card Couture ©
Stamps: Damask Designs, Mega Mixed Messages, Guidelines 2
Cardstock: Spring Moss, Raspberry Fizz, Sweet Blush, Hibiscus Burst
Patterned Paper: Friends Til the End, Bitty Box Basics
Ink: sweet blush, ripe avocado, raspberry fizz
Vintage Buttons, Raspberry Fizz stitched grosgrain
Recycled tissue paper, Crop a Dile, Giga Flower Punch, Elastic Cording, Large Olive eyelet by SU!, eyelet by SEI, Tag die cut by nestabilities
So there you have it!
I hope you enjoyed my tutorial today!
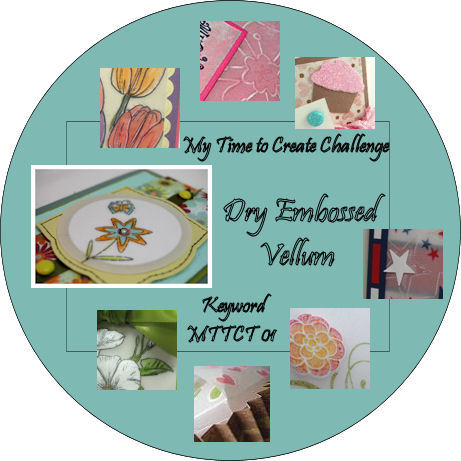
My Time to Create Technique Challenge
May 30, 2009 Author: mytime | Filed under: Cards, My Time to Create Challenge, Tutorials, videosWell today is the 5th weekend in the month.
I generally have 4 scheduled challenges a month for My Time To Create Challenge Team.
I let them opt to take a break this week! I should have taken one myself! LOL!
Anyway-I decided to do a technique challenge instead. I hope you find it fun and inspiring 😀
Dry Embossed Vellum
I LOVE using Vellum Cardstock. Today’s challenge is to DRY EMBOSS it!
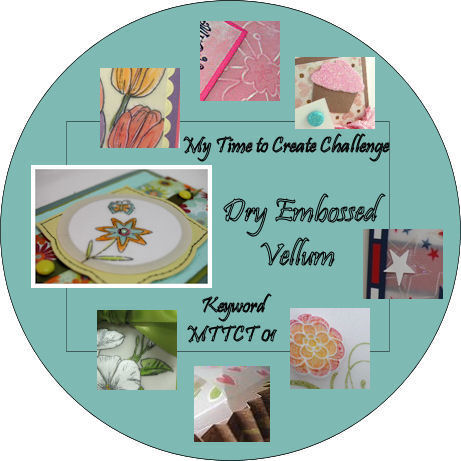
If you play link your creation HERE
Here is who is playing:
Me
Here is a quick video to give you the HOW TO! My card for this technique uses a stamp set from My Favorite Things Presents: Sara Williams Spring Sprouts.Bloomin vellum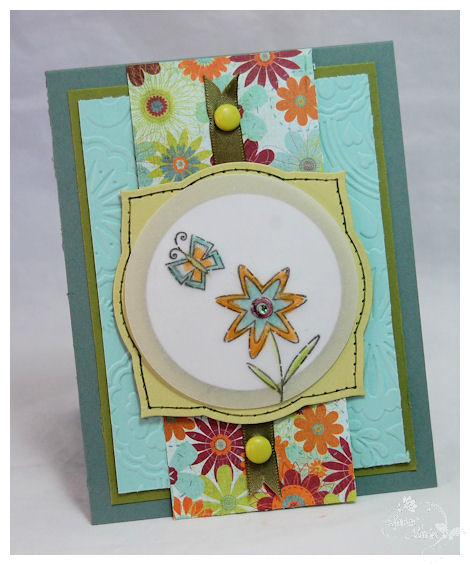
I had just picked up this fun and funky patterned paper. I felt that the flower and butterfly from this set not only MATCHED my paper, but showcased how fun and EASY this technique can be!
The open lines of the flower and butterfly are raised up. So cute in person.
All you need is:
An OPEN line image
Permanent ink
Vellum Carstock
Embossing Stylus with mouse pad/embossing/piercing pad
Copic or other markers
Close up dry embossed vellum detail
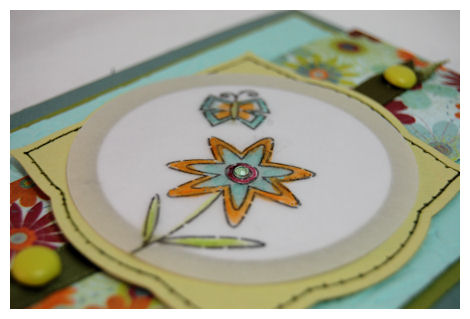
Obviously it is very difficult for you to get a visual of the actual effect this has on your creation, but trust me, its that little extra POP that makes it a WOW! The detail is raised up and pops out at you!
A fun and easy technique.
Just stamp you image in permanent ink.
Turn over
Dry emboss area/areas of choice (don’t press too hard!)
Flip over to front, and gently color!
Use glue dots to adhere to layer of choice-
and DONE!
Now its YOUR turn.
So have fun with it.
I cannot wait to see what YOU come up with.
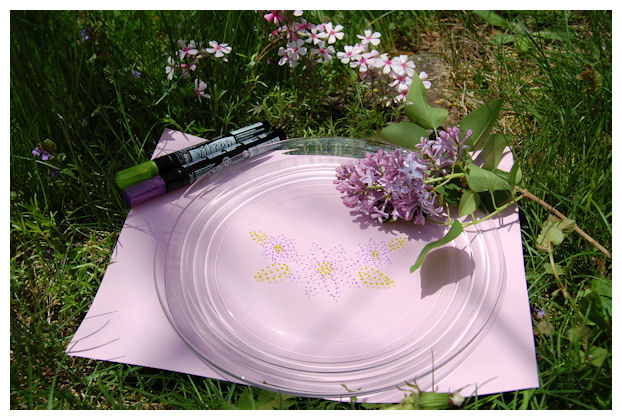
Stamps as Stencils-Painted Glass
May 14, 2009 Author: mytime | Filed under: Home decor/3-D items, MYTIME MOVIE/VIDEOs, Papertrey Newsletter, Product Opinions and Must haves, Tutorials, videosHi everyone!
Thanks for joining me for my Papertrey Ink Newsletter Post!
I have to admit I was pretty TAPPED for ideas. So I went to Michaels and browsed the ENTIRE store, to find something FUN AND NEW to share! I get bored easy, in case you can’t tell! LOL! I love trying new things, and every so often I find something extra cool.
So, that being said I hope you like what I came up with 😀 I really enjoy expanding my uses for my stamps!
There really are so many ways they can be used! This is just ONE more!
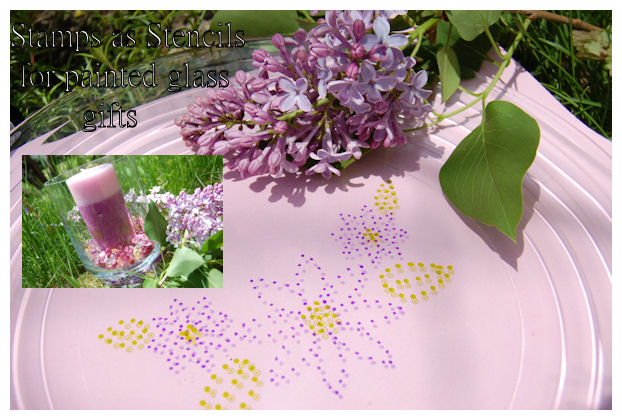
This is a dinner plate (I created a matching set of 4) with a candle holder-as seen in the photo.
How about using your stamps as stencils for making decorative glass gifts?!
I made a video to show you just how easy this really is!
So grab some coffee and get planning on making some affordable painted glass items-no art lessons needed!
This is a photo of the finished candle holder. More photos can be seen in the video!
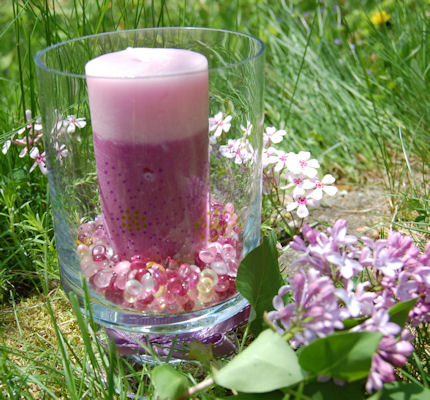
Now more on what you need to make your own painted glass gift items!
Obviously something GLASS, that YOU want to decorate.
Stamp set of choice.
I found (in the paint/stencil) section-some marker/pens that are meant to be use on glass and ceramics!
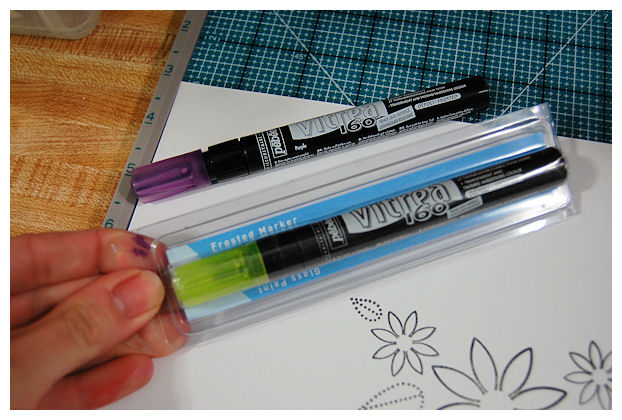
They are by Vitrea 160-cost $2.99 each, and come in a large variety of colors! You can get opaque or transparent colors.
Follow instructions for use on package!
Well I thought they looked SUPER cool, but my problem-I can’t paint or draw a simple stick figure to save my life!!
While there in the store they had stencils and stuff too. I thought-well I have stamped ON GLASS, why not use a stamped image as a stencil with my markers?!
Now I didn’t want to TRACE. I wanted a fun, new look! So I went with dots! Fun, easy and no stress if you drank too much coffee 😀
I used Beautiful Blooms for my project! You can use whatever you wish.
Step 1:
Clean your glass with glass cleaner. If using something that needs to be centered-Mark center on back with eclipse tape.
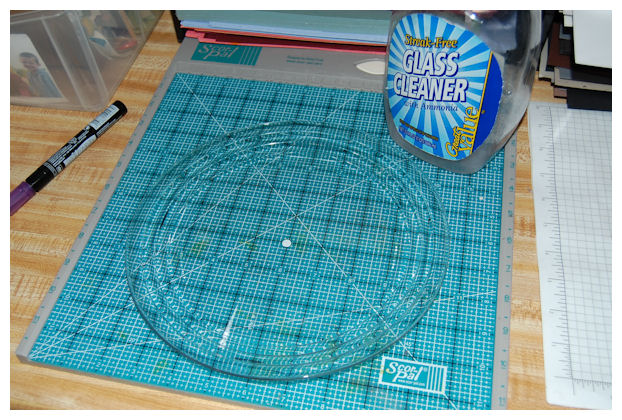
Step 2:
Stamp you image onto cardstock/copy paper-cut to size.
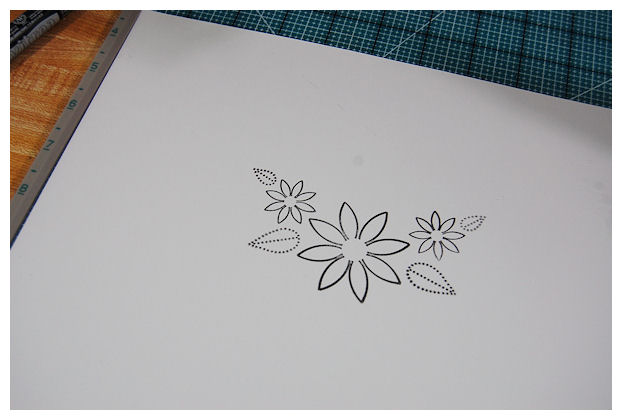
Step 3
Layer stamped paper where needed. Lay your plate or other item over stamped image.
Mark dots on flower center, and outer petals first!
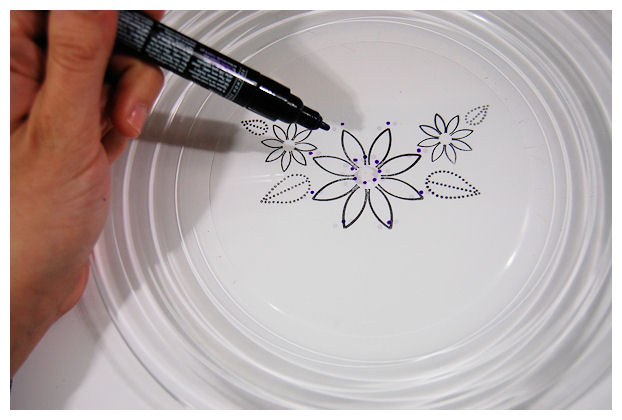
Step 4
Count number of dots on each petal to ensure even spacing and nice even look on project!
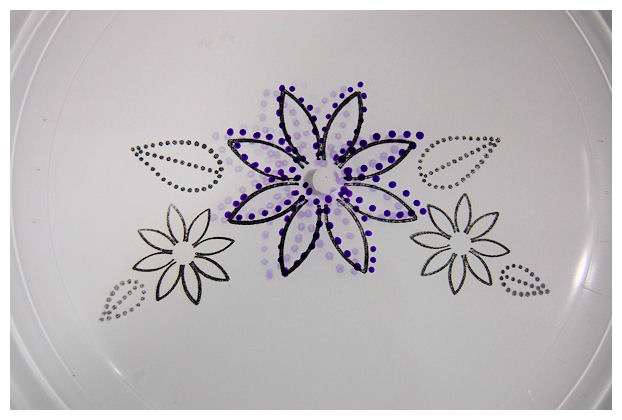
Repeat for leaves, and flower centers-using green marker!
Take out your stamp stencil and VIOLA!
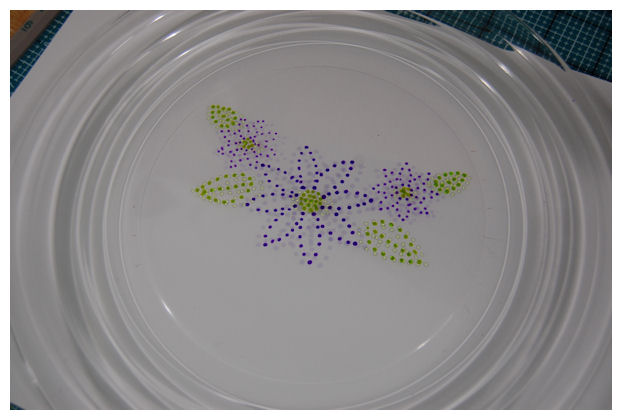
Not too shabby for a newbie glass painter, now is it?!
I have to admit, it was very fun to make this. I wil wrap up the set with a pretty bow and tag to match. Should be a nice gift for someone, right?
I especially like that I don’t have to be a true ARTIST to pain on glass now! I have stamps for that 😀
Well thanks for stopping by!
I hope you enjoyed the video, and visual tutorial for those who need it 😀
Thanks for stopping by
Video: Bath and Body……made beautiful
May 12, 2009 Author: mytime | Filed under: Home decor/3-D items, My Timeless Templates, MYTIME MOVIE/VIDEOs, Papertrey Newsletter, videosOne of the best gifts to give is bath and body products!!
I LOVE packaging these items because:
1) They are fun-and generally pretty
2) They look awesome in my templates :D)
3) They really dress up a simple, and inexpensive. yet thoughtful gift
4) EVERYONE loves to smell good (right?)
5) SAVES YOU MONEY!
Seriously, you can spend SO MUCH (or so much MORE) when you get a bath set already wrapped up in something somewhat “fancy”. They KNOW that presentation is EVERYTHING! I could say that till I’m BLUE in the face, but think about it!
WHAT attracts you to certain things? OK basically everything in life-is the advertisement!
The packaging of a product, the store sign, the advertisement logo or jingle! Its all about presenting something in a attractive way. Even when you go for a job interview. You try to look your best, right? People notice that stuff, and as far as advertising its all in your subconscious but it totally works.
Today I will show you how you can use BOTH templates from this months release to make a great gift set for UNDER $12!! Actually, you can obviously get even less expensive stuff and do it for far less, but this is what my sets would cost.
Now I did MORE of making my own patterned paper. Both gift sets use my newest template releases
Let’s Do Lunch and Ready, Set Wrap!
I’m totally in LOVE with both for very different reasons.
I thought I would show you SIMILAR designs using both templates, and packaging the same items too, so you can see just how cute they BOTH are!
I used Everyday Classics (the anniversary set, not available for purchase :C SORRY!) to make my OWN patterned papers. If you can’t tell I’m LOVING that these days, and saving myself from BUYING paper too 😀 Use what you have! Making your own patterned paper is taking you BACK to the BASICS!
OK first up-Ready, Set, Wrap!
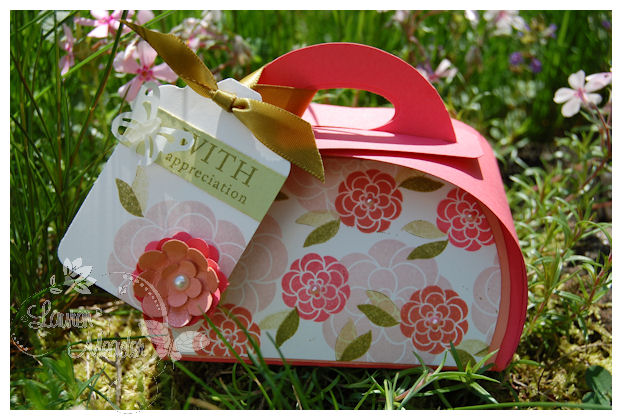
I needed a QUICK gift for Amber’s dance teacher.
I used Berry Sorbet, Melon Berry, Sweet Blush, and Spring Moss with Ripe Avocado ink for these colors-stamped onto vintage cream.
I added little pearls to the flower centers.
Side view
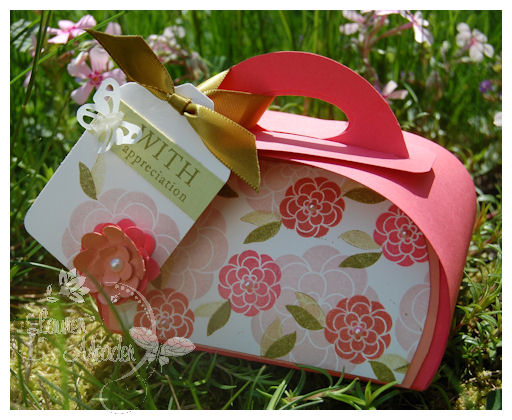
I LOVE the look.
Now this template comes with the decorative curved layer.
I used my technique for making an additional mat layer. As seen in this video
I hope this video is helpful for you to try even more layering options, for those of you who love lots of layers! Now you don’t need to be intimidated to try it.
Now for the tag-
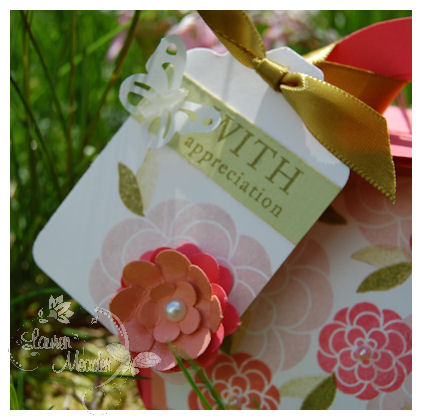
I love the touch of this flower I punched/layered to be like what I thought this flower would look like in 3D form!
It was a quick and simple touch, but I felt it really made the gift a WOW! Amber signed her name to the back (I was very tight on time and didn’t make a card! GASP!)
Now here is what is inside
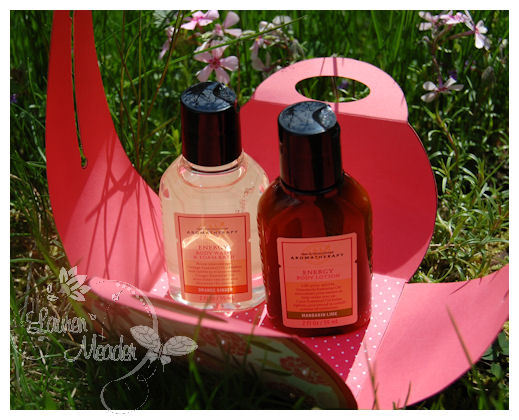
These are aromatherapy body wash/body lotion from Bath & Body Works.
I just laid them down, side by side, and they were a perfect fit.
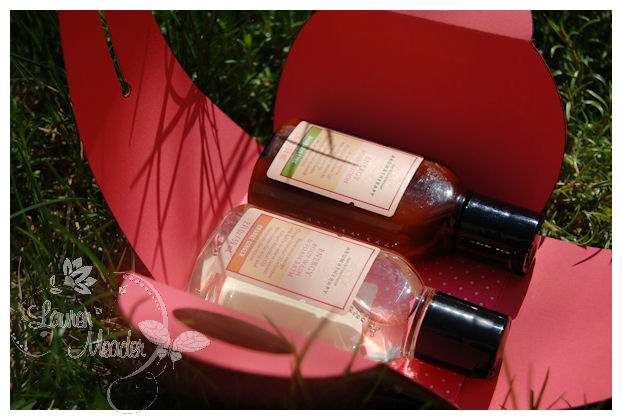
I then just folded in the sides, and Amber was off to dance rehearsal with a pretty and easy gift for her teacher!
Supplies:
My Timeless Template: Ready, Set, Wrap!
Stamps: Everyday Classics, Mega Mixed Messages, Garden of Life
Cardstock: Sweet Blush , Berry Sorbet, Melon Berry, Vintage Cream, Spring Moss, Vellum cardstock, Bitty Dots 2008
Ink: Berry Sorbet, Melon Berry, Spring Moss, Ripe Avocado
Ribbon: Ripe avocado
Other: Flower punch, butterfly punhc, adhesive pearls, tag punch
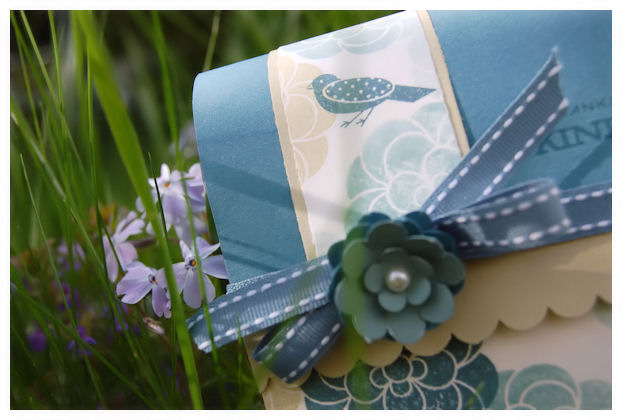
Now we move on to another gift-using Let’s Do Lunch!

I used the same stamp set:Everyday Classics in Soft Sky, Blue Bayou, River Rock, and Ocean Tides for this paper creation.
I love the colors in this.
I am using no handle. No fancy closure. This is presenting as just a gift box! Now imagine it on a desk somewhere?! Love it.
I went to Bath & Body Works and purchased some small body wash/body lotions for about $5 each.You could totally catch a SALE and stock up, but I bought full price.
The Sea Island Cotton is my FAVORITE!! So I went with that for this box.
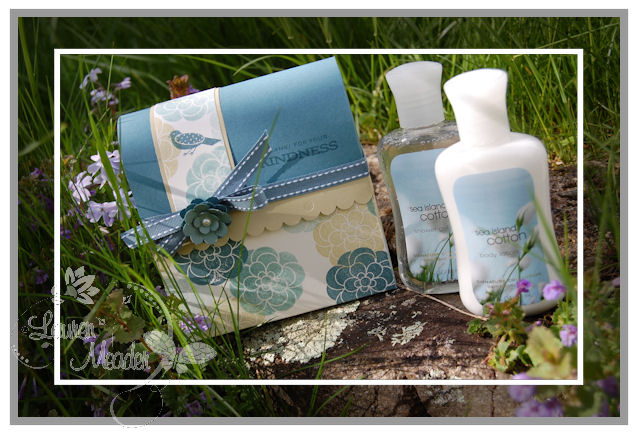
There are two in this gift set. Just a nice, simple gift.
Now for the detail flower on the ribbon-just like the other creation above.
You can fit 4 of the small size body wash/lotions in the Let’s Do Lunch template! But for today I used 2.
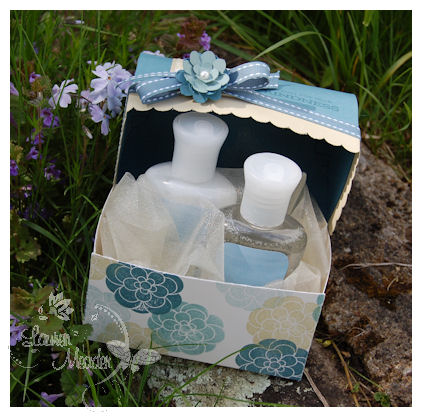
I had some really pretty tulle to set inside.
If you laid them side by side-4 would fit.
Seriously look how pretty and elegant these are-without TONS of work or MONEY invested!
Supplies:
My Timeless Template: Let’s Do Lunch
Stamps: Everyday Classics
Cardstock: Vintage Cream, River Rock, Blue Bayou
Ink: River Rock, Vintage Cream, Blue Bayou, Soft Sky, Ocean Tides
Ribbon: SU! Blue Bayou
Flower punch, adhesive pearls
So that is my fun peek for today! I have so much more to share, but need to get my other projects done!
Tomorrow is another day 😀
I hope you like seeing the same idea for the 2 separate templates. I had fun with this one.
Thanks for stopping by.
Now for more peeks be sure to check out Nicholes blog, Michelle, Melissa, Lisa and Candice.
Video: How to use Fantasy Film
Apr 20, 2009 Author: mytime | Filed under: Cards, MYTIME MOVIE/VIDEOs, Product Opinions and Must haves, Tutorials, videosI got a video done! YEAH!! AND for MONDAY!! DOUBLE YEAH!
Now I know its not he flower one you are ALL waiting on, but that one will take some time! I did have it filmed but had a mishap.
I have the intro done and editied , then when I went to find and edit the flower tutorial, the actual tutorial accidentally got erased, when I was video taping Amber riding her bicycle! I’d rather lose the flower thing which I can re-create, than my daughter’s video! I can recreate that moment.
You know whats funny si she is 4 and can ride a bike, but the other 2 won’t do it! Weird! Alexa is terrified (she has depth perception issues, where everything seems higher, and scarier) but Noah just isn’t interested.
Anywho…..this one uses a product called Fantasy Film. It is by Art Glitter
TRUST ME when I tell you, you don’t want to Google “fantasy film” OK! Just go to the site and look for where they sell it! LOL!
In the video I show you HOW to use, and I also share how I custom color my film 😀 Can you say LOVE IT!!
Here is the detail photo of the card sample using the Fantasy Film

Not the BEST photo-sorry! Bad lighting :C
My mojo is on a break :C My template release always sucks every last bit of mojo out of me for like a WEEK! On top of that Im always adding even MORE template ideas each month to the bunch we have. So, sometimes I can’t get out of TEMPLATE mode! I just love them SOOOOO much. I could make boxes ALL day 😀
OK back to the subject:
The butterfly is from a set called Butterfly Wings from CTMH that Katie sent me, since she KNEW I’d love it. It was the Stamp of the Month for March, and sadly I got sick and had my surgery so am JUST getting around to using it-SORRY KATIE!!
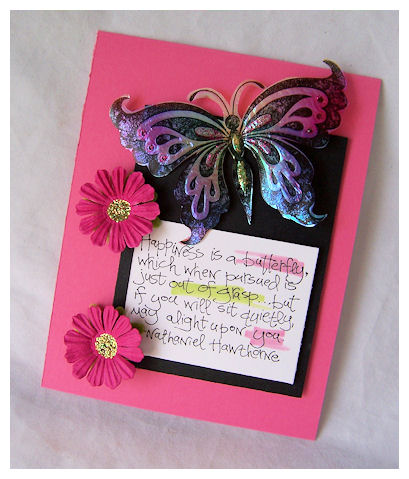
So I kept this SIMPLE! Plain actually. But with a STUNNING butterfly why over do it?!
Anyway, its a super set! I used my Sketch 31for it. Told ya I had a sample! LOL! I just wanted to share the video with it.
Sentiment is a SU! set. Butterfly of Happiness I believe.
I have tons planned for videos, but have just been SO busy! Kids are on vacation-CRAZY!! But I WILL somehow some way share it all eventually.
I have so much fun SHOWING you what Im doing as oppose to just typing it all up!!
I didn’t do an “intro” since its a basic technique. Why listen to me blabber on for 2 minutes! LOL! You know how I can talk! I spared you all my banter during one part, and fast forwarded myself too. I think its hilarious! I couldn’t figure out HOW to MUTE me! LOL! So I added some crazy music to it too. So be ready to turn down the volume. I love watching myself in fast forward! LOL! I wish I could actually work that fast, as I feel like my brain moves that quick, but my poor body can’t keep up. Thank goodness for notebooks. Pages of chicken scratched ideas, from my awakenings at 2 am-seriously!
I also wanted to let it be visible on YouTube for everyone-so I hope you like it. You have NO IDEA how long that simple 8 minute clip takes to edit! OYE!!
So I hope you enjoy it!
Tomorrow begins the peeks for Pink Cat Studio!!
Till then
My Etsy

Who I Designed For
Blogroll
- Alicia
- Alli Miles
- Ally Blankenship
- Amber
- Andi @ crafts on a whim
- Angel R
- Angie Z
- Anne Kranitz
- Becky O
- Bee
- Beth Silaka
- Bethany Paull
- Beverly Nash
- Bobbie
- Cambria
- Cammie
- Card of the Week
- Card Positioning System (CPS)
- Cards for Cancer
- Catherine Doucette
- Charmaine
- Cheryl Sims
- Chriss Rollins
- Christina
- Christine Ewing
- Christine Wooden
- Colleen Schaan
- Craft Critique
- Craft Gossip
- Crystal
- Dawn Easton
- Emily Giovanni
- Geny
- Holly
- Igne Groot
- Inspirational Craft Blogs
- Irene
- Jami Sibley
- Jeanne Streiff
- Jen del Muro
- Jeni Bond
- JenMarie
- Jenn Balcer
- Jenn Diercks
- Jenn O
- Jennifer E
- Jennifer Mick
- Jennifer Pereda
- Jennifer-Sweet Treat
- Joanne Basile
- Jodi Collins
- Julia Stainton
- Julie Masse
- Karen
- Kathryn Berthiaume
- Katie Cotton
- Kelley Holland
- Kendra
- Kim Scholfield
- Kris’s Color Stripes! Get inspired here
- Kristen Dubosque
- Kristin Eberline
- Kristine
- Laura @ Sunshine Stamper
- Laura Turnmire
- Laurie Schmidlin
- Lesa Rapp
- Linda Duke
- Linda-LSN
- Lindsey Botkin
- Lisa (lakind scs)
- Lisa Kind
- Lori Craig
- Maggie
- Mara Campbell
- Maria
- Maria Levine
- Mary
- MaryJo
- Melanie M
- Monique Hansen
- Moxie Fab World
- Pam Imholz
- PaperCrafts Connection
- Peppers and Pollywogs Kids party site
- Rebecca Grohall
- Rita
- Robyn
- Rose Ann
- Sarah Vrolyk
- Sharon Harnist
- Sharon Johnson
- Sharon Rivera (a chemisrty with paper)
- Sherrie
- Sophia Landry
- Storage Units, Ink, & More Blog
- Sue Berker
- Susan (Rainy)
- Tangii Crane
- Tracy
- Tricia Traxler
- Trudee
- Velta
- VivLyn
- Zena
MTME Pretty Palette Color Team
MTME Pretty Patterns Sketch Team
My Time Made Easy TM LLC
Shop till you drop!
Lauren Meader
About Me
Copyrighted material
Subscribe To My Blog
Pages
- About me
- Alexa’s Story!
- My Crafty Corner!
- My Time Made Easy™ LLC
- Our Make A Wish Trip to Disney!
- Resume/Publication List
Calendar
| M | T | W | T | F | S | S |
|---|---|---|---|---|---|---|
| 1 | 2 | 3 | 4 | 5 | 6 | 7 |
| 8 | 9 | 10 | 11 | 12 | 13 | 14 |
| 15 | 16 | 17 | 18 | 19 | 20 | 21 |
| 22 | 23 | 24 | 25 | 26 | 27 | 28 |
| 29 | 30 | |||||
Archives
- August 2013
- July 2013
- June 2013
- May 2013
- April 2013
- March 2013
- February 2013
- January 2013
- December 2012
- November 2012
- October 2012
- September 2012
- August 2012
- July 2012
- June 2012
- May 2012
- April 2012
- March 2012
- February 2012
- January 2012
- December 2011
- November 2011
- October 2011
- September 2011
- August 2011
- July 2011
- June 2011
- May 2011
- April 2011
- March 2011
- February 2011
- January 2011
- December 2010
- November 2010
- October 2010
- September 2010
- August 2010
- July 2010
- June 2010
- May 2010
- April 2010
- March 2010
- February 2010
- January 2010
- December 2009
- November 2009
- October 2009
- September 2009
- August 2009
- July 2009
- June 2009
- May 2009
- April 2009
- March 2009
- February 2009
- January 2009
- December 2008
- November 2008
- October 2008
- September 2008
- August 2008
- July 2008
- June 2008
- May 2008
- April 2008
- March 2008
- February 2008
- January 2008
- December 2007
- November 2007
- October 2007
- September 2007
- August 2007
- July 2007
- June 2007
- May 2007
- April 2007
- March 2007
- January 2007
Categories
- About Me
- All That Scraps
- blogger challenge
- camera/photo play
- Cards
- Contests
- family stuff
- FOR SALE
- Home decor/3-D items
- How to FAKE it!
- Introduction
- JUGS Challenge
- JustRite Stampers
- Lizzie Anne Designs
- My family stuff
- My Stamping Space
- My Time Made Easy
- My Time To Color Challenge
- My Time to Create Challenge
- My Timeless Template Challenge
- My Timeless Templates
- Mytime Mail
- MYTIME MOVIE/VIDEOs
- Papertrey Newsletter
- Pink Cat Studio
- Pretty Palette Challenge
- Pretty Patterns Sketch
- Product Opinions and Must haves
- Recipe's
- Saturday Sketch
- Smilebox Creations
- Stampavie
- Tutorials
- Uncategorized
- videos
Most Popular
- Create your own Onesie Card Tutorial-and important NOTE! PLEASE READ (2529)
- Saturday Sketch-Boxed bag holder (2333)
- Going GREEN! Fancy Flower Flourish-Closure Video (1478)
- Fabulous Favorite - Giveaway! (1336)
- a Prayer Request (1232)
- QUICK-Easter Baskets from Nestabilities-PTI style-and blog challenge (1063)
- Teaser Sketch (999)
- February Release Giveway! (and a little peek) (996)
- Group Post and Rambling Rose Video Tutorial (985)
- GIVEAWAY! Who wants it all?! (895)
Recent Comments (RSS)
- 첫충사이트: 완전히 흥미로운 블로그 게시입니다. 저는
- sarah: Wow, Lauren, what a stunning
- hedie: خرید راهبند
- 야동: Love to read it,Waiting For
- 야동: This seller is in a
- 바카라사이트: 여기 처음 왔어요. 나는이 게시판을
- 야동티비: I was surfing the Internet
- 바카라사이트: 비슷한 주제에 대한 흥미로운 정보를
- 바카라사이트: "여기에 제공해 주신 귀중한 정보와
- 온라인홀덤: 유익한 웹 사이트를 게시하는 데
Copyright © 2007 - My Time, My Creations, My Stampendence - is proudly powered by WordPress
This blog has been Tweaked and Designed by Sara Williams