Archive for the ‘Tutorials’ Category
Paper Garden Spring Out Card
Jul 31, 2008 Author: mytime | Filed under: Cards, Papertrey Newsletter, Tutorials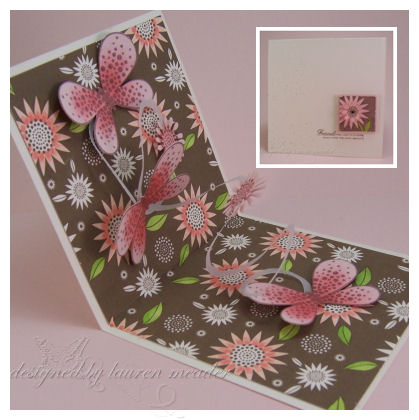
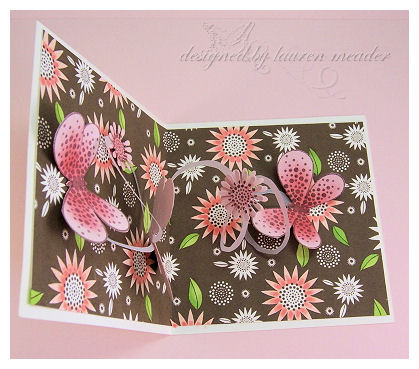
There is nothing better than getting a handmade card in the mail of from someone special, unless that card is interactive! The best surprise is when the unexpected happens! The receiver opens this creation to find a beautiful arrangement of butterflies and flowers, spring out, as it opens. You are sending a virtual paper garden! This style can open so many amazing possibilities.
Let me share how fun and easy this card really is! Then challenge YOU to give it a try!
The idea came to me after Jason and I took a trip to Maine. In one of the stores they had some really elaborate cards, and there was a card that had this swirly piece of paper with butterflies all over it. I told my husband when we get back I would try to re-create this. So I did.
Now I am not sure what the actual name of this style of card is, but I liked Spring Out, due to the way in which it was created.
First let me share my list of supplies. You should have most of these tools on hand.
SUPPLIES:
Stamps:Texted Boxed, Sentiment on card from Just Hatched, Butterflies stamped/cut from Butterfly Kisses
Patterned Paper: Chocolate Remix
Cardstock: Sweet Blush, Vintage Cream, Vellum Cardstock
ink: dark chocolate, berry sorbet
Other: Copic Markers, scissors, circle punch, glue dots, flower punch
 Paper Garden
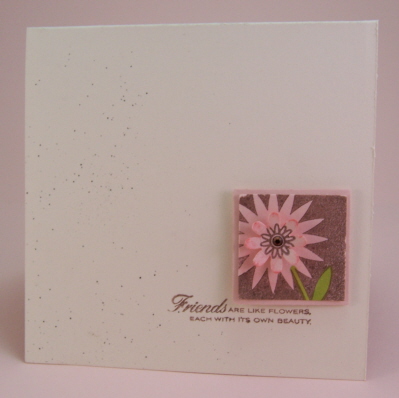
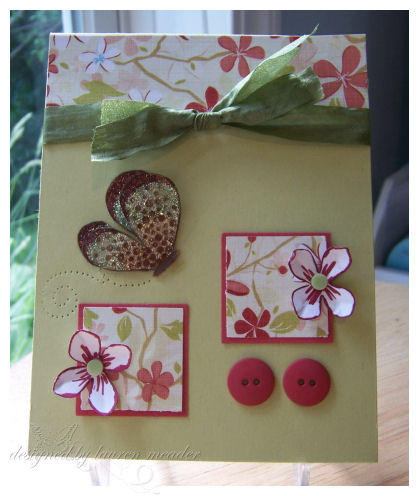
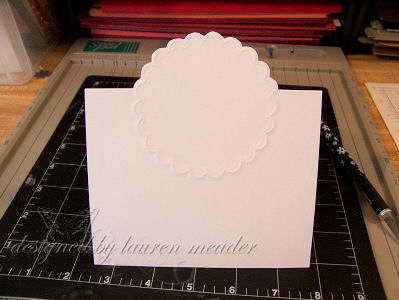
This card measures 4 1/4 squared. This is the front of my Paper Garden card.
I used vintage cream cardstock as my base. Sentiment stamped in dark chocolate ink.
I then stamped the flower from the Texted Boxed set, in dark chocolate ink, onto sweet blush cardstock. I used my 1 1/4 square punch, and punched out portion I wanted. I colored the stem, and punched a flower (stamping a smaller flower from Butterfly Kisses ), to layer in the center. Then layered entire piece onto 1 3/8 square punched from sweet blush cardstock. Used my color spritzer for a splash of color. Perfectly simple, which is what you want for the COVER! This inside is detailed enough.
Now for directions on the Spring Out
Step 1) I
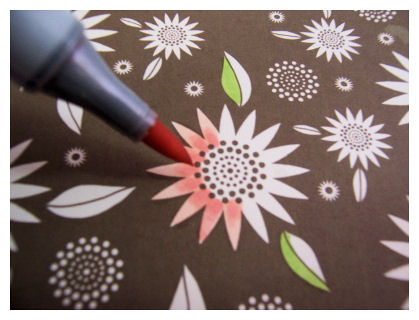
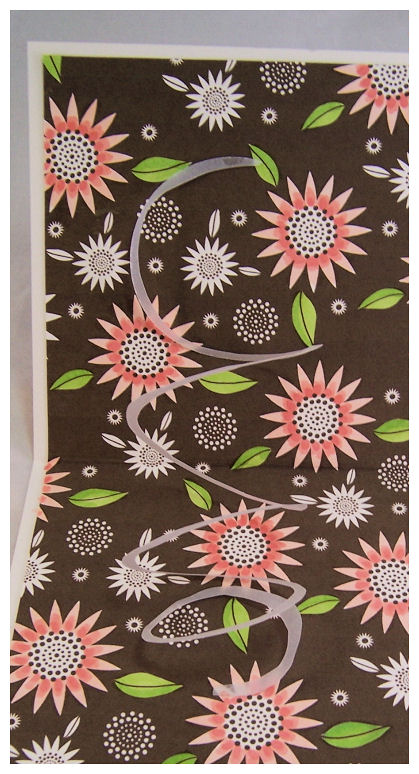
decided to add some color to my chocolate patterned paper, so I chose my colors and away I went. I decided to only color the large flowers and leaves for some POP, and to keep it from getting too busy. I then layered it into my card base.
For my butterflies I stamped them in chocolate, on sweet blush, and then sponged the center’s with Berry Sorbet ink. Then cut them out.
Step 2)
NOTE: This next step I used chocolate cardstock for my demonstration so you can easily see the steps. In my actual creation I used vellum cardstock.
 A
A 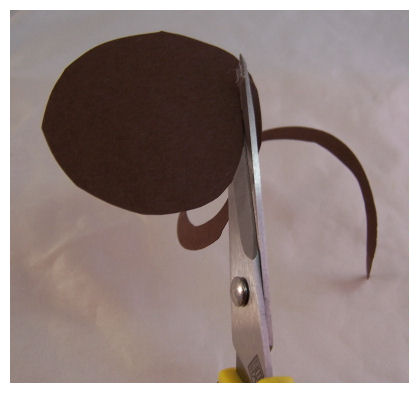 B
B 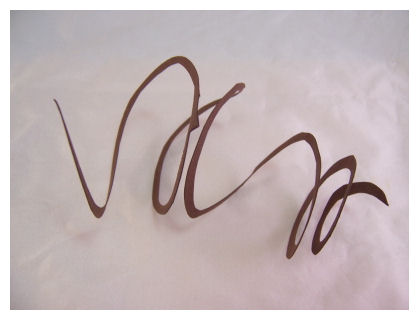 C
C
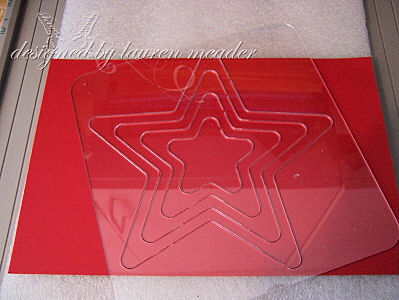
Choose the size of the circle spiral you want, and cut out circle (photo a). Next trim out the circle, into the center (photo B) to create a curly spring like circle (photo C) you can cut out some of the center so you don’t have too long of a curly spring. The larger the circle the more curls you have.

Step 3)
Collect the layers, and lay cut circle flat. Pick location in card where you want the spiral to be. Attach a glue dot on the back of the LARGEST tail end. This allows it to stick to the top of the card.
Then place a glue dot on the front of the smallest tale. Now close the card.
Step 4)
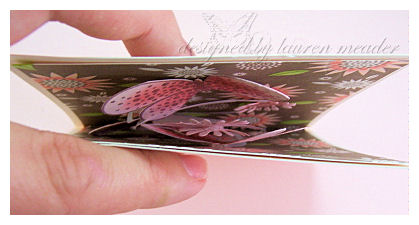
When you open the card, the spring will now be stuck to the bottom on the card, allowing you to have a spring that easily opens and closes FLAT when card needs to close. You don’t want the spring bending!!
See closed photo
Step 5)
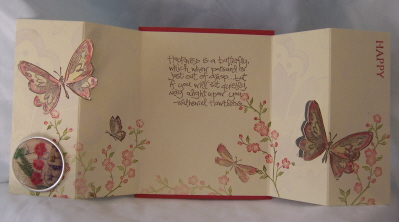
Now comes the FUN part. Adding your 3D elements. You will want to cover the glue dot’s with an item, and the rest is pure creative liberty!!
Imagine opening this up? Who wouldn’t have a HUGE smile? It is like the butterflies are fluttering over the paper garden!
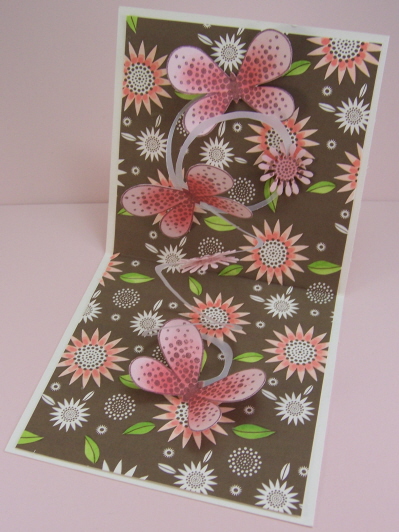
TIP: When using small images put them on both the front and back of the paper spring (see my layered punched flowers?). You don’t want the glue dots sticking to the layers or objects within the card. It would be ruined.
Here is the view from the top!
So that is all there is to it! I hope you enjoyed today’s newsletter project, and that you try to find the time to create your own! If you do, send me a link here.
I know many are going to say how do you mail it?
Well it does close, and lay relatively flat. The pieces may need to be lifted if you do mail it. I always recommend mailing them in out Papertrey Ink Clear Card boxes! It costs a little more to mail, but they are mail-able and it ensures your creation arrive more nicely-rather than SQUISHED! OR hand deliver 😀 Then you can see the reaction!
Simple Shimmer Card Wrap Set
Jul 3, 2008 Author: mytime | Filed under: Cards, Home decor/3-D items, Papertrey Newsletter, Tutorials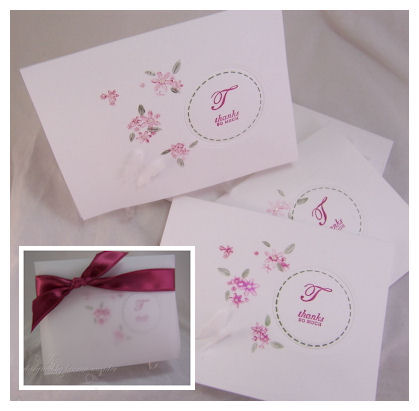
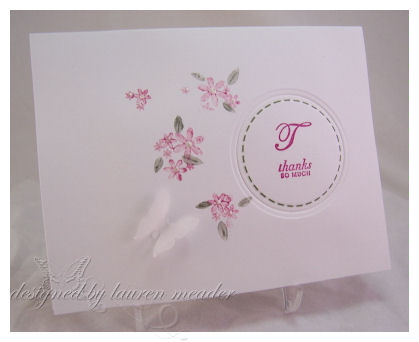
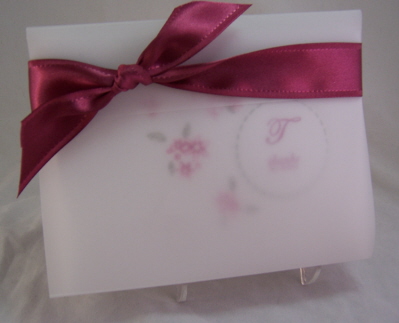
Simple Shimmer Card Wrap Set
I can think of so many occasions where a gift of Thank You notes would be the perfect gift. Maybe even elegant wedding favors. I will share a simple technique, that takes the “plain Jane” single layer set, and makes it a real “WOW”! The simple vellum card wrap will only add to the beauty, and give you a easy perfect package for you to present your set.
You will be amazed at how fast this set can come together. Another great idea for those who need to mass produce an elegant gift set.
Monogram sets are the hottest thing right now. Sometimes you aren’t sure “which” initial to use for your monogram, or WHO you are going to give the set to. Feel free to get creative, and use a sentiment in place of the initial.
What makes this set so beautiful is that by using the Pearlescent watercolors, you are adding a soft and subtle shimmer, that isn’t messy, and wont rub off. It has the effect of a watercolored image. It is another use for this type of coloring medium that is often forgotten and under-used.
Then, you add that embossed circle, and it really adds some dimension and interest, without over powering the soft shimmering flowers with a layer.
First you will need to assemble your supplies.
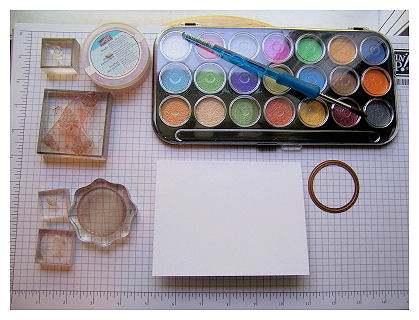
For this set I am using:
Papertrey Select White cardstock, Vellum Cardstock
The flower cluster from Piece of Cake, Borders & Corners Circle set, the “T” from Ambassador Monogram, and “thanks so much” from Mixed Messages.
Always Artichoke ink, and Purely Pomegranate ink.
Martha Stewart Butterfly Punch, glue dots.
Pearlescent Watercolors by Yasumoto, with water, and paint brush, White Opal Liquid Pearls, and the Circle Nestabilities.
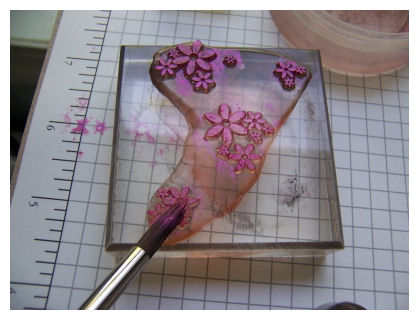
Step 1-Use only a little water, and your pink pearlescent watercolor, and create a “paste-like” mixture. Paint the pearlescent paste onto your flower cluster. Stamp onto card base
NOTE: Don’t use to much water, or your flowers will be runny, and unrecognizable.
TIP: When making a set-do each step on each card first, before advancing to the next step. This will make production of multiples of a card go much quicker. Example-do all the pink flowers on each card base, before starting the next step.
Step 2
Do the same thing for your leaves, using a green water color.

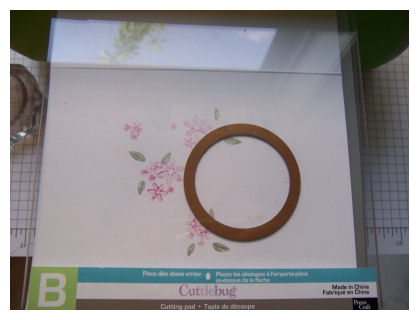
Step 3-
Emboss a circle into your card.
Step for this may vary depending on the machine you use. I am using my Cuttlebug.
To JUST emboss a layer I personally find this sandwich helpful for me.
A plate, B plate, black mat, tan mat, cardstock, nestability die (cutting side down), and B plate.
EDITED TO SAY: Or just 2 tan mats. I have an older mat set.
This gives me a nicely embossed circle
Step 4
Stamp the stitched circle onto the center of the embossed circle, in artichoke ink. It fits just outside the smallest embossed rim.
Then stamp the “T’ and sentiment, in pomegranate ink.
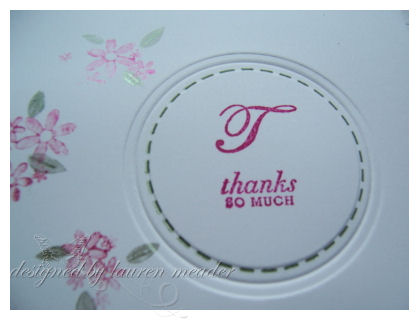
Step 5
Apply liquid pearls to the flower centers.
This gives a subtle 3D effect, and continues the subtle shimmer.
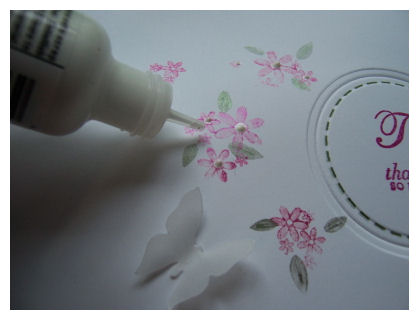
Step 6-
As you can see above, punch a butterfly out of vellum cardstock. Adhere with wings popped forward, using a clear glue dot.
Step 7-Creating the holder.
This holder is meant to house 4 cards with envelopes.
Take your vellum cardstock and cut 5 3/4 X 11
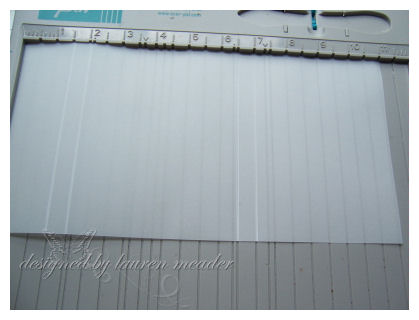
Along the 11 inches score at
1 1/2 –
2-
6 1/2-
7.
Score along lines. Put cards inside. Tie around a ribbon to hold closed.
Simple as that.
Thank you for taking a peek at my little set. I hope you take the time to try it out.
I’d love to hear your thoughts. Should you decide to make your own-send us a link!
Enjoy the day
Flower Fairy Party
Jun 26, 2008 Author: mytime | Filed under: Home decor/3-D items, Tutorials, UncategorizedGot little girls?
Need a party idea?
Well look no further!
How about a Flower Fairy Party? It is cute for a wide age group, it is interactive, and it isn’t an expensive party to have! You can do this right at home. All you need is some imagination (provided here :D), some cardstock, and a few other supplies you may already have.
My little Amber is turning 4 this August. I have been getting ready with Party Planning ideas (yes already-time is ticking). I LOVE planning my kids parties. That is part of why I got into rubber stamping ![]() And why I took cake decorating classes last year (only made one cake since LOL!).
And why I took cake decorating classes last year (only made one cake since LOL!).
I asked her what she wanted for her party theme-she said I want to make Flower Fairies. Read on to see where that idea came from.
In reality we are having a Spa party for Amber, but I LOVE sharing great ideas (and HELLO I have another daughter who I really may use this for instead-she will be 9) so figured I’d give it a go. You can see later what I pull together for that SPA party!! Im already so excited.
Even if you aren’t having a Flower Fairy Party this is still a super activity for when a friend comes over-or a fun activity to MAIL!!! You can print off the directions/photos here to send with a gift for those LONG distance birthday’s.
Here we go!
The best thing about this party idea is it is totally interactive. From age 3 and up your daughter can help with the entire process!! Let her do the punching paper, and putting the supplies together. Once you keep reading you will find all sorts of fun things she can help with (stress free). Amber helped with most of this party planning. She loves helping in my craft room.
Here is what you would do to plan ANY great party.
Pick the theme– well we already decided here it is a Flower Fairy theme. I would go one step ahead with this one and ask the girls to dress up like fairies!! Some sort of attire with wings 😀
Have your child pick a main color . With this particular party you could definitely do a different color for each guest-but the easiest thing would be to do ONE main color.
Amber changes her favorite color daily! Today it was red. She will be the perfect crafter since she loves ALL colors.
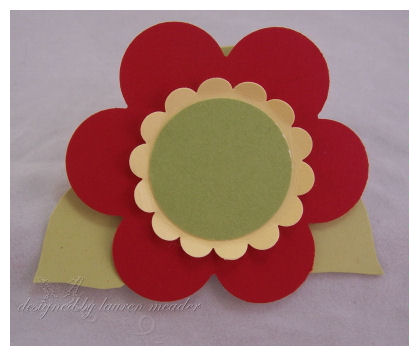
Choose a date, time, place. Once that is done you need to plan the invitation! For this party I thought a FLOWER shaped invite would be best! They are cute and simple.
Here is the back-
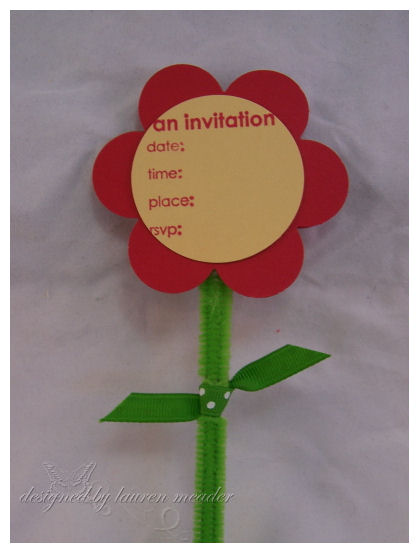
I used Lizzie Anne’s-It’s a Party set ( I ADORE this set for party invites!!! Its one of the ONLY party invite sets I own that I actually USE!) I also uses Papertrey Ink Simple Alphabet for Amber’s name (and would use to spell out party info). I have messy handwriting so would never write in the info. You can also print info on your computer.
I just punched the red cardstock with theMarvy Giga Flower punch. I stamped the party info in red ink onto lemon tart cardstock, and punched with a large Fiskars circle punch.
I then layered a green pipe cleaner , folded in 1/2 (tied with ribbon as leaves) in between the front and back of the invite.
Now your invitation should give people insight to the party theme, and what the party will be like! We decided to make it a much more fun invitation 😀 Your child would LOVE handing these out to friends. If mailing they can usually fit a buisness size envelope.
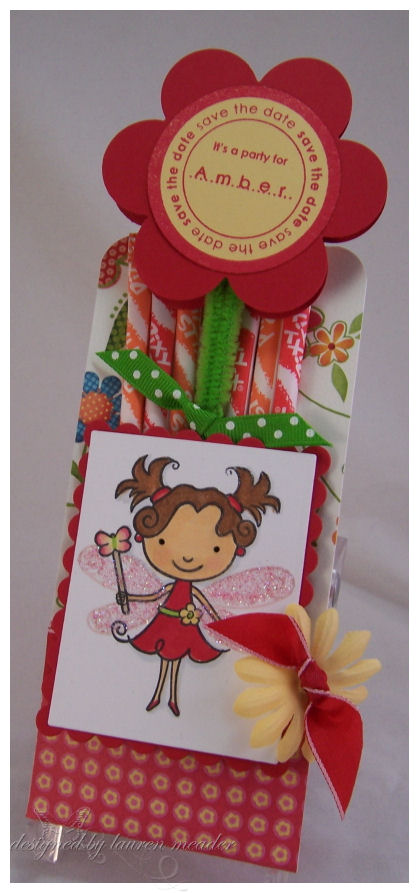
We put our flower into a home made Pixie Stixs holder! Now that is fun! AND EASY.
Just pick a double sided cardstock that coordinates with your theme.
Cut cardstock 12 X 3 1/2.
Score 2 inches from the bottom, round corners, and make pocket. Then decorate as desired!
For the main character we used Dress Up Lily (or Dress Up Amber in this case, since this set can be personalized with your child’s name!). This set is the perfect Fairy. We colored her to match our flower fairies we are making. You could even let the girls you invite do the coloring instead 😀 Just leave Lily blank.
Pick a cake theme-this one is pretty easy. I would do a flower shaped cake or a cake with a bunch of pretty flowers. Maybe stick the flower fairies in the cake for decoration.
Accessories-You would get Flower shaped plates, or plates with a garden theme, and colorful napkins.
Buy plastic/paper cups in the color of your flower theme. Punch a flower, to match the accessories, and put it on the front of each cup-labeled with the child’s name (so they know who has what cup :D). This is when a Label maker comes in handy!! Use the clear labels and you can print several at a time!
Decorate your napkins by wrapping your tableware in there, then rolling them up, and secure with flower rings. Add girls name to center to double as little flower place settings.
Here are the napkin rings:
I just punched out the Giga Flower in red cardstock. Layered with the SU! Scallop punched from Lemon Tart, them my flower center is Spring Moss.
I then cut a strip 1 1/2 inches wide by 8 1/2 inches long- from Spring Moss cardstock. I put the ends together, then secured it closed with a brad. I trimmed the ends to look like leaves, and bent them to the side. Added flower to front-DONE!
Another fun tip-for a party banner.
You could punch a row of flowers. Before assembling like above-string through ribbon in the flower centers, then assemble like above. Die cut letter to spell your child’s name or Happy Birthday!
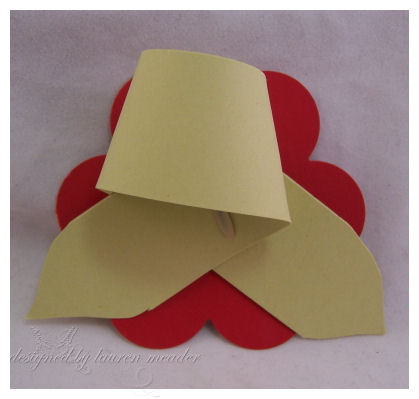
Party Favors-These are usually small thank yous to give out after the party. Don’t over do it.
These favors are fun, easy and inexpensive! They use just ONE sheet of cardstock. That is about 0.22 CENTS!! You can’t buy anything that looks like this for THAT price.
The box ties in the flower and color theme. It is also a fun way to present our party activity!
I created this using my scallop nestabilties (yes I did do other little baskets just like this at a class last month-see that HERE!).
Just die cut 4 layers of scallops. (2 large for the front/back), then 2 smaller layering scallops for flower basket front. Snip the scallop edges, layer, and put a flower center. Create the side by cutting a 8 X 3 pieces
Along 3 inch-score at 1/2 inch on either side.
Along 8 inch-score at 3-then 5. Snip sides then adhere.
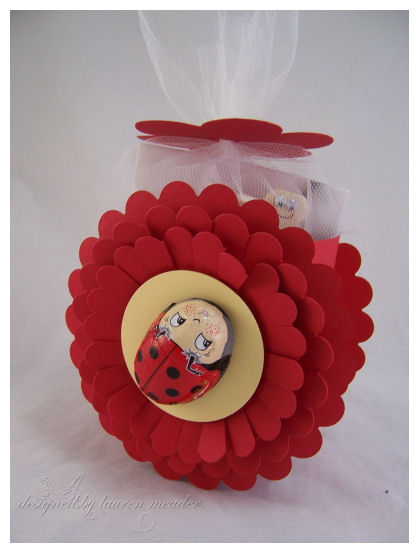
I got these FUN ladybug chocolates from Lindt, so I attached them to the front of the boxes with glue dots. Cute touch!
Pick an activity! This is very important when planning any party! What fun activity can you do, that not only ties in the party theme, but is fun?
Better yet, try to pick one to DOUBLE as your party favor. Often times we spend a lot on a party, then add too many $1 goodies that begin to really add up!
Flower Fairy Friends Activity
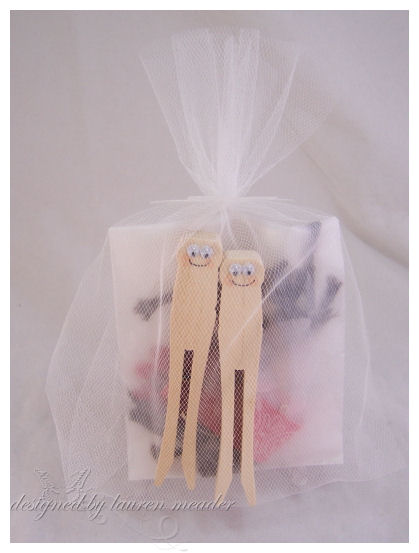
Above you can see the party activity (fits into the flower box) all gathered, and ready to go with all the supplies each child needs.
I just bought a roll of Tulle for a $1, Placed my little items in small glassine bags, wrapped my goodies in there. I used the same punched flower layers as my other projects for the closure. I just punched a hole in the flower center, and pulled through the tulle to keep pocket closed 😀 Cute, and easy.
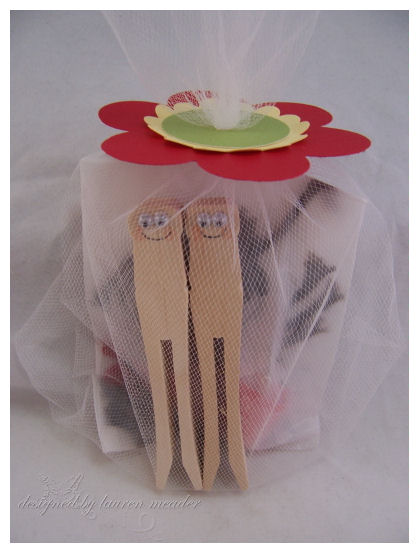
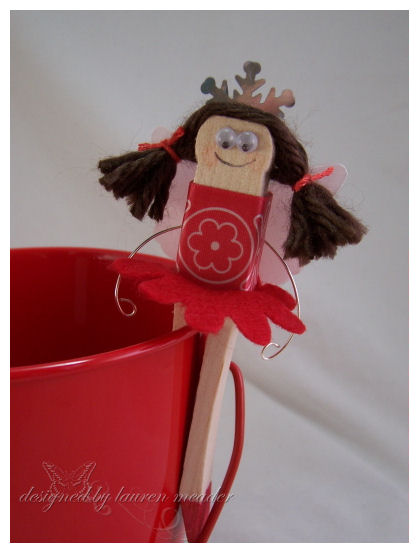
ACTIVITY-Make your own Flower Fairy Friends!!
Amber saw these little clothespin Fairy things in a upscale children’s store, and they were like $10 EACH!!! Needless to say we did NOT buy those. I looked at them and knew I could make my own, and I have to say they came out even better than the store ones-as theirs were mainly yarn.
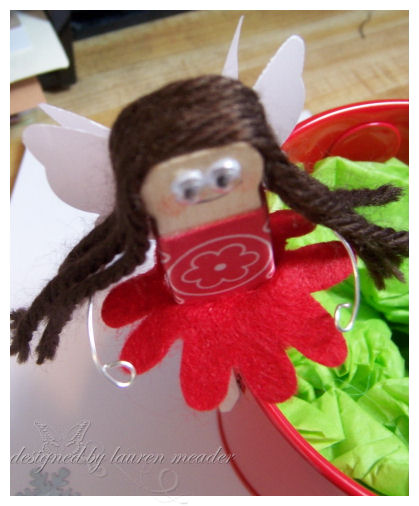
Flower Fairy
You want to assemble supplies for each girl to make 2 Fairies. Then they have Fairy FRIENDS!!!
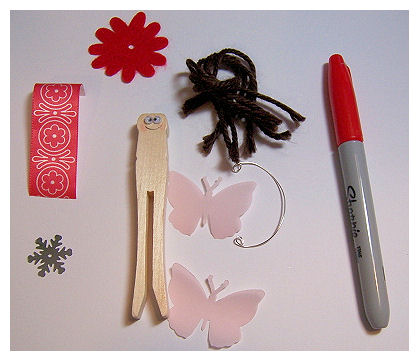
Here is what you need.
Redline tape. Mono multi, Sharpie marker in Fairy color of choice. Glue dots, and dimensional glue dots
2 wooden clothes pins (sold in a pack of 30 for $2.99)
Googlie Eyes (it is best for you to pre-glue the eyes, and make the smile face-depending on age) You can get a large bag for about a $1. You want the smaller eyes.
7 strips of yarn per clothes pin (so 14 for 2 fairies) You can get a large roll of $0.99
Bling-for the crowns. He we used silver snowflake (cut in 1/2 to get 2 crowns). You can use a variety of other things, or opt nor no crowns even.
Wire- ends bent in on both sides for the hands/arms (2 per kit)
2 pieces of wide adhesive ribbon. You can use a variety of things, this is what I found to be easiest. Especially for the younger girls. I used Martha Stewart adhesive ribbon for this since it matched Amber’s color theme. You don’t need much to get many fairies!!
EK Success giga butterfly punch. Punched 2 pink vellum butterflies per fairy (so 4 per kit) The head/tail will be trimmed off. Pink vellum from Martha Stewart.
2 Felt flowers or fabric flowers. These are usually sold several in a package. Mine are American Crafts.
(not shown) floss (thick thread for cross stitcher) in color to match to tie pony tails-that is optional
Photo of supplies for ONE fairy below:
Directions: Click to enlarge photos
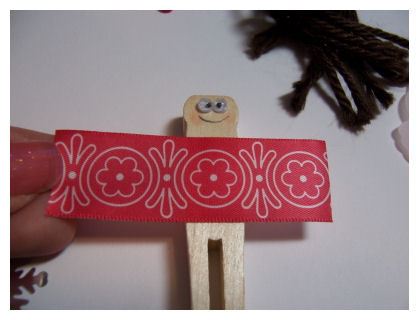
Step 1-remove backing from adhesive ribbon-wrap around clothespin body

Step 2-Place wire on back-cover with dimensional glue dot
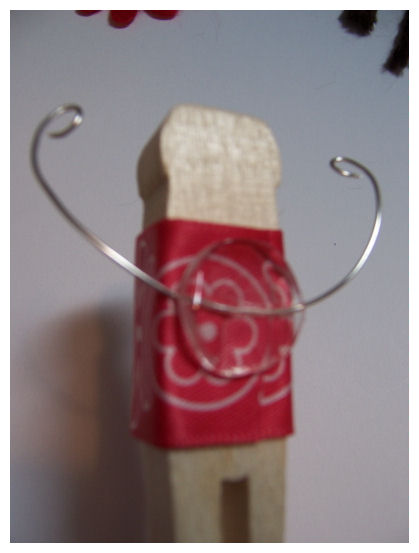
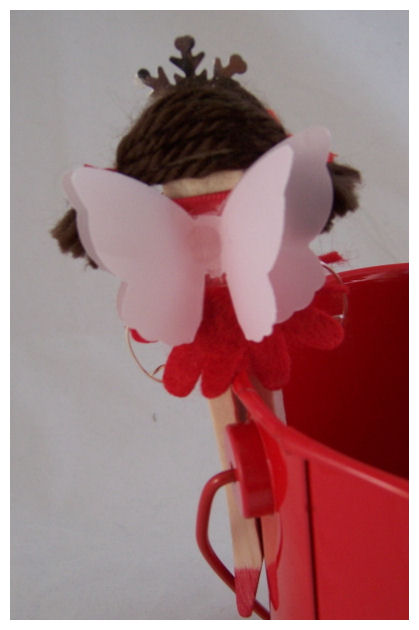
Step 3-Snip head/tail off vellum butterflies. Adhere to back. Layer second one.
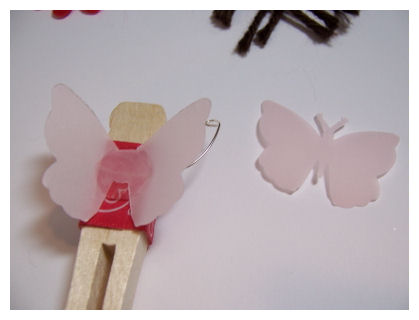
Step 4-Snip a larger slit into your flowers (you may pre-cut these), for your fairy to slide on skirt

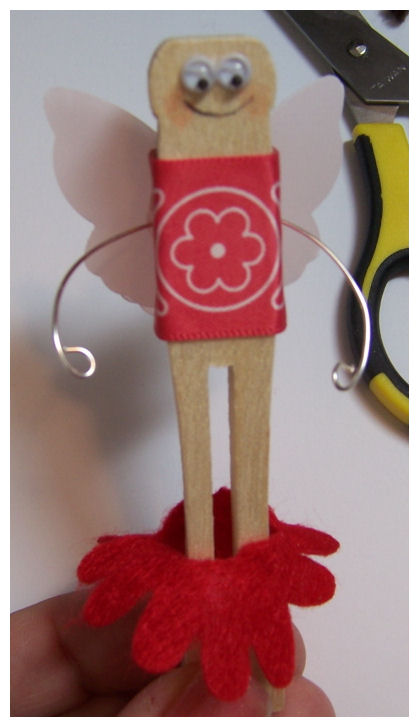
Step 5-Use redline tape, and put on front and back of clothes pin head. 4 strips of yarn for top of head, 3 for back (redline tape can be done ahead as well) May need help tying into pony tails. Then trim excess yarn
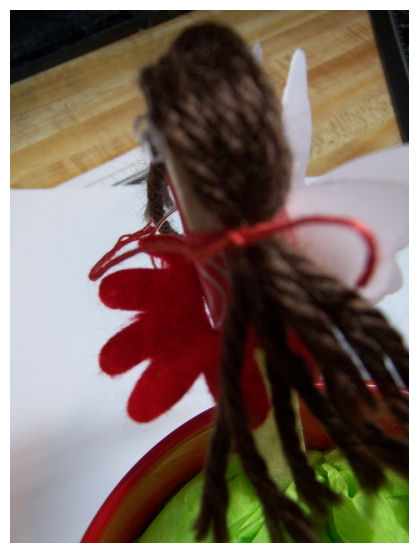
Step 6-Use sharpie marker to color on shoes.
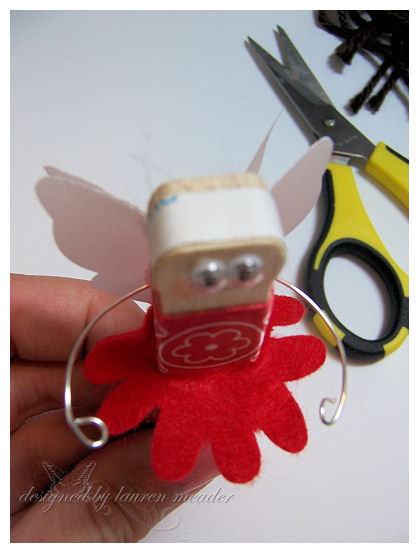
Step 7-Apply crown. Usually stick in between hair and the redline tape will hold it in place pretty well.
Back of fairy (clipped onto a bucket)
So there you have it. Everything you need to plan a Flower Fairy party!!
If you want a MILLION ideas check out this site—->Peppers & Pollywogs. Lots of amazing kid party tips & ideas. This kit idea will be featured there very soon 😀
I also ready Lisa’s book Dear Peppers and Pollywogs. It was awesome. More on that later.
I am on the run!
Well I have to make this quick because we are going to visit our friends who had their baby.
The Papertrey Blog Hop Challenge was to use Acetate!
You can see who is playing along by checking the forum–> HERE
I have gotten so many requests for the very simple acetate, art glitter glue and glitter technique that I thought this challenge was PERFECT timing.
 Butterfly Bling
For this card I used Butterfly Kisses. I then cut apart my butterfly to make it look like it was flying 😀
Step one-stamp image on acetate with StazOn
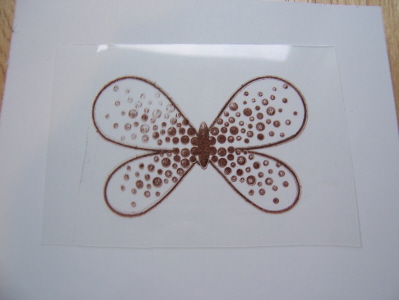
Step 2-Use the fine tip stainless steel adapter and apply glue where you want it.
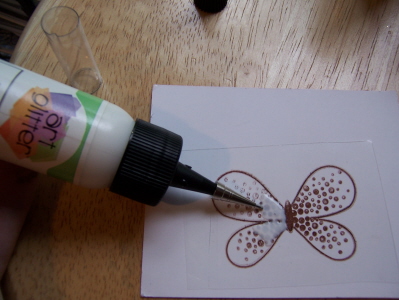
I am making my butterfly 3 colors. Usually you have finer details
Step 3-sprinkle on glitter of choice-tap off excess
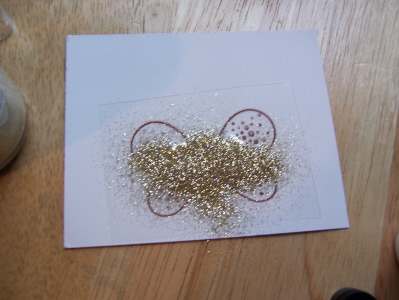
Repeat steps as needed for more glitter colors.
NOTE: you only want to do one area of glue-per color glitter at a time so glitter only sticks to wanted area
Step 4-Let dry.
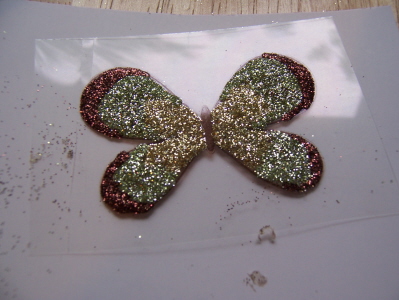
You will know it is dry as the glitter will be easily seen on front of acetate!
OK that is all for me. Better run.
See you later at the UNITY release party.
Thanks for looking!
Many of you asked just HOW to make—> THIS <—Seeds of Love packet I had done.
I told you it was VERY simple, and now you will all get to see for yourself. These would be AWESOME Wedding or Shower favors! Easy to whip out, and they can be very inexpensive!
Now I seriously don’t have a day that goes by that I don’t use my Scor-Pal! No lie! If you read my blog you will see it is invaluable to me-that and my ATG Gun! LOL! Anyway let’s get to the template tutorial shall we?
 Pretty Poppies seed packet coverlet
Supplies-Scor-Pal, terrific tape, Garden of Life, lemon tart cardstock, black cardstock, acetate, bazzill cardstock (flower), wasabi (leaf), black cardstock, butterfly punch by Martha Stewart, circle nestabilites, summer sunrise polka dot ribbon by PTI, various punches, The Paper Garden book.
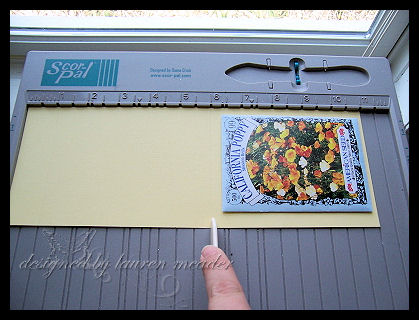
Step 1
Cut cardstock to 4 X 11. Using your Scor-Pal Score at 1 and 6 (see how seed packet will easily fit)
Step 2
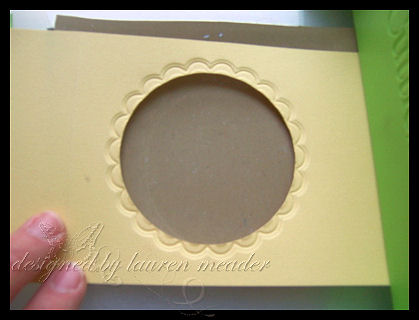
Choose die cut, and cut out, mid, lower portion of FRONT panel. See above photo. It is the panel the seeds are laying on.
(SEE NEXT PHOTO)
Step 3 OPTIONAL
OPTIONAL-then take larger nestability die, and JUST emboss border around cut out panel.
To JUST emboss-in your Cuttlebug-you take A plate, B plate, tan mats, cardstock, nestabilitily and then B plate.
Then it won’t cut.

This is what your panel will look like
Now you can choose which side you want to use on the front of your packet holder. I chose the opposite side to use as my front design.
Then use Scor-tool to bend score marks.
Step 4
Cut aceate layer 4 X 4, and adhere behind cut out, using terrific tape or redline tape (clear tape). Stamp if desired. I used Garden of Life for this sample. I bent the friends sentiment, to fit in the top half of the circle.
Apply a adhesive strip to the back panel, and place seed packet

Step 5
Fold closed. Secure with band of ribbon to tie shut. Then decorate as desired.
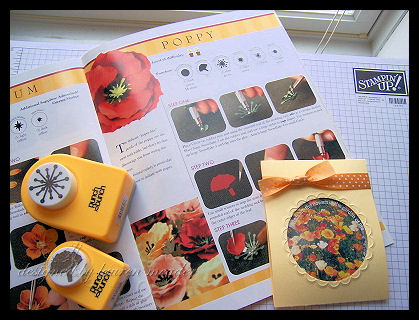 See finished packet at top
Since I used a Poppy Seed packet I am using my book The Paper Garden ( that and ALL the punches used in the book will soon be at All That Scraps!) to decorate the front of mine with Paper Poppy’s! If I don’t have an exact punch I try to improvise with what I do have. It’s all about creative liberty!
And that my friends is all there is to it! Just a very simple seed coverlet.
Hope you liked it. If you get to try it, send me a link! I’d love to see your version.
Till tomorrow.

Today I am running late for several reasons #1 my kids keep killing each other #2 my camera batteries died, and #3 I was putting together a post, jam packed with FUN ideas for you to try!
So grab your coffee and get ready for a FULL post of fun!
In this post you will learn to make a Moving Mermaid card, be reminded how to make your own cloud template and use fantasy film, make simple “starfish” and how to MAIL these interactive, or more 3D cards, in style!!!
MOVING MERMAID
Last August I made a Hula Kitty. You can find that —>here! I got many requests on “how to” do it. I did answer many of you privately. Well, now is the time to share it here.
When I saw this Mermaid from Lizzie Anne’s set By the Sea (FYI this is the “sister” set to Shore Thoughts which is where the Sun image is from on this card), I knew I had to make the Mermaid “swim”. That took me back to the Hula Kitty idea.
So here are two photos for you to view, the motion this Mermaid has!
Swimming to the right
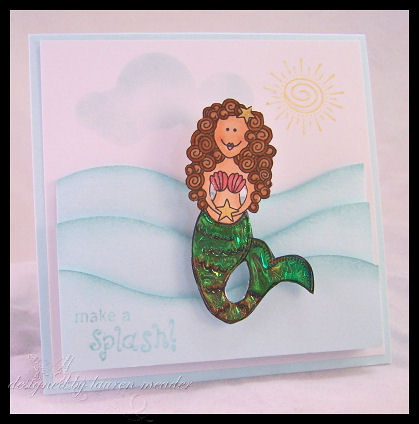
Now swimming the the left
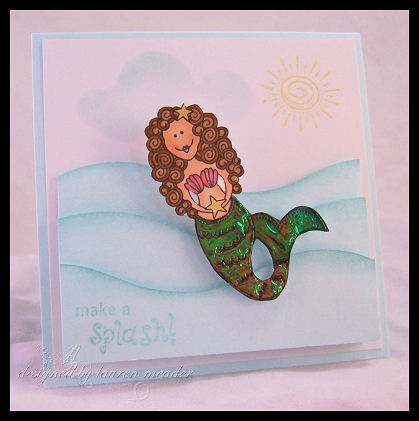
All you have to do is tilt the card from one side, to the other, and she is swimming side to side! Isn’t she so cute?
Moving Card-You need- one or two pennies, 1/2 inch Circle punch and Dimensional’s
QUICK DIRECTIONS-Punch 1/2 inch hole in cardstock. Layer 2 dimensionals stacked onto each-other on back of image, and place through hole in cardstock. Adhere penny to back of cardstock layer. It is important that is layer is on dimensionals so that the penny can rotate around!
I have another Make It Move <—-tutorial . If you like this one, but want a slider idea 😀
Here is a photo once the layer is complete-from side view

See 2 dimensionals-penny is behind wave layer. My waves were done using my Creative Memories Wavy cutter. I LOVE that tool!!! I sponged the wave edges, each on dimensionals for depth.
Now for the Mermaid! I colored her with Copic markers, and used a clear Atyou glitter pen for her seashells, star fish, and the sun!
I made her tail using Fantasy Film, in waterfall. You can see a tutorial on Fantasy Film–>HERE. I thought it was just PERFECT for the tail. Shimmery, and fin-like!
NOTE:If you “Google” Fantasy Film you will come up with some X Rated material! LOL! I was informed by one of my reader’s when she tried to hunt some down. You can purchase it at most Stamp stores, or online venue’s. I am going to be asking Christine at All That Scraps to get some in. Since it has a variety of colors, feel free to give some input on your faves, so I can “make a list” for her to place an order!
Now I made the cloud, making my own homemade template. It is my most favortie way to create them! And CHEAP!!
Tutorial for that can be seen ->here
Lastly the Starfish! I loved the Starfish from the Shore Thoughts set, but by this card’s end I was TOO lazy to stamp/color/cut out the one’s in the set! LOL!
I used my SU! Star punch, and used the little elements from the stamp set (the swirl, and sand stamp) to create my own EASY starfish! I stamped ALL the edges with the sand image (on this I only did 1/2 so you get the “idea”), then I rounded the tips with my paper snips, and curled the ends under.

Now this is for the LAST idea.
I get so many emails asking me HOW to mail interactive cards, of bulky cards without ruining them, or how to go about sending them”in style”.
SEE TOP PHOTO!!! My Mermaid card in a box.
I put mine in the Clearly Creative Card boxes! Just secure the ends with tape, and put the mailing and postage labels on the back! Isn’t this the cutest way to send a special card? I wanted to add a few more things to pretty it up, so that is where the starfish and filler come in.
Now it will cost a little more to mail, but can you imagine how cool this would be to see when you open your mailbox? AND you can bet the women at the PO will take extra care not to squish it-unless they keep it (YIKES! LOL!)
This is going to my friend Jenn in Canada who made me the most BEAUTIFUL address book with all my PSF’s info! It was just the sweetest thing to do for us. I wanted to send her a special TY note, and I think this should do it! Her gift was so amazing and thoughtful. I am going to send her a GC via email , to an online store. I dont want to send one IN this card package-just in case.
So that is all for today! I hope you enjoyed it.
Tomorrow I will FINALLY have my seed packet tutorial for you.
Till then-
Lauren
 Stacks of Cupcake Wishes
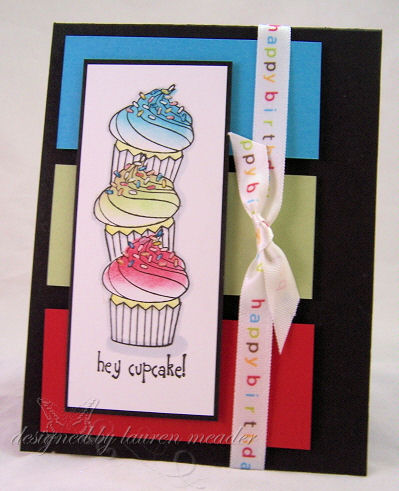
This card uses : Cupcake single, and ribbon from American Crafts (which inspired by colors). You can never have enough birthday cards, and I feel this is very gender/age neutral.
OK I know some of you may yawn at this post (SORRY), but many people have yet to try one the the best, and simplest techniques of all time-MASKING and REVERSE MASKING!!!
I know I personally love the technique, and the first time I tried it, I was floored. Yeah I know, so not revolutionary but I was excited just the same. We have all been “there”. Remember the first time you tried embossing powder? LOL! I know I do! LOL!
OK, well I thought to put together this little tutorial because many people wanted to know how I made—-> this <—- cupcake card. Many of you seem to be visual learners, and I am not the best at just explaining things. I’m hands on and can look at something and just figure it out. So when I have to “break it down” I’m just not that great at it. Its better to show you, for me anyway 😀
Any questions-just ask. Ill answer them for you.
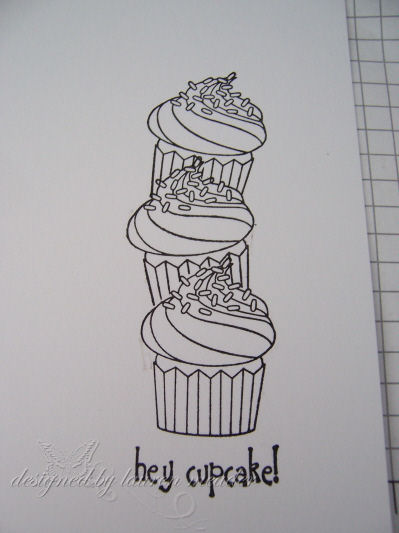
DIRECTIONS for masking-click to enlarge photos please
Step 1
Stamp your image on a sticky note or eclipse tape (making sure the sticky strip has part of the image stamped!). Carefully cut out the image.
Step 2
Stamp image on cardstock.

Step 3
Place cut out sticky note image, over stamped image-like photo. Then stamp another image over it. I repeated this process for a third cupcake.
 For this one I did NOT ink the sentiment for the next layer of cupcake.
THIS is what it will look like. I made a trio stack of cupcakes.
 cool huh? Now its like you bought a whole other stamp isn’t it?
Now this lets you make things look like they are layered behind each other with out stamping through the image and looking messy!
Next up-many people had no idea how I sponged on my color so neatly! Here you go-
REVERSE MASKING-another fun concept, often neglected. Not one you will use often, but fun all the same.
Step 1
Take the paper, that you had cut the main image out from, and place it around the stamped image you cut.
Step 2
Take a sponge dauber and rub into ink pad of choice. Now lightly pounce desired color, in area of choice.
 See that the mask prevents it from going outside the stamped edges.
Here is the stack all inked. Now you can also see how I began to color in the sprinkles with my Singlo white gel pen, which I then use my markers to color over, so the sprinkles have color that can be seen.

Then color and design card as desired!
That simple.
CRAFTY TIP -if I take the time to create a mask, I always out it in with the stamp so I remember I have it, and it is there if I want/need it again!!! No need to cut out a new one every time.
So that is it for today! Tomorrow is my Saturday Sketch! I hope you will come back to give it a try. I hope to get some stamp time in today. I haven’t gotten much done the last few days. Least not that I can share yet.
Till tomorrow-
Lauren
For the boy’s challenge
Apr 14, 2008 Author: mytime | Filed under: blogger challenge, Cards, Home decor/3-D items, TutorialsI have a fun post for you today! It is a “For the Boy’s Challenge”.
If you are a mom of a boy, then you agree there just isn’t enough CUTE stuff for boy’s. What you can find, that is cute, you must get immediately! LOL! Girls can be so easy for me, but boy’s, are much more challenging. Let’s not get into boy gift/favor idea’s. What is even more funny, even though they are challenging, I enjoy coming up with ideas for them.
Charmaine and I have become great PSF’s over the month’s.
As of late, we are both loving Lily from Pink Cat Studio. We also LOVE Billy!! After some behind the scene’s “chatter”, we decided it would be fun for us to give each other a challenge. I love doing a fellow blog challenge! It is always fun to see what other people come up with, using the same concept.
So here were the Challenge Rules!
1)We both had to use the Billy set
2) It had to be a party gift , or a party favor set. So I assumed a card, and gift/favor item.
Now in that set there are a few things we could choose from that would make our idea’s very different!You have a Pirate, Cowboy, Super Hero, and a boy with a frog.
We did NOT tell what each of us was planning on using. It was going to be a surprise!! I can’t wait to see what she decided on.
Here is my set-
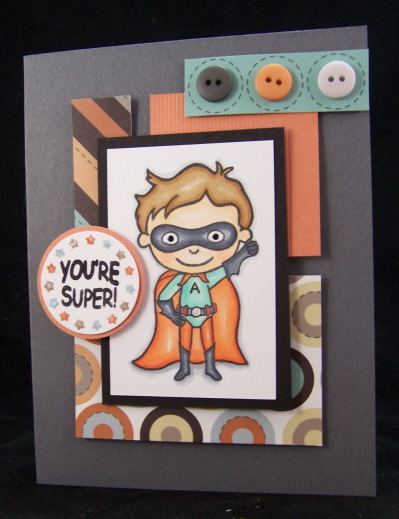
 Super Hero Party Gift Set
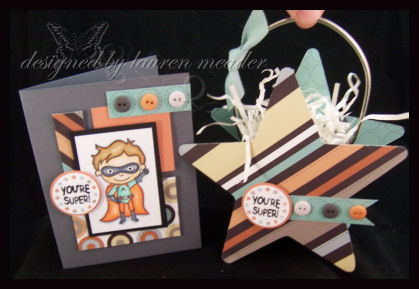
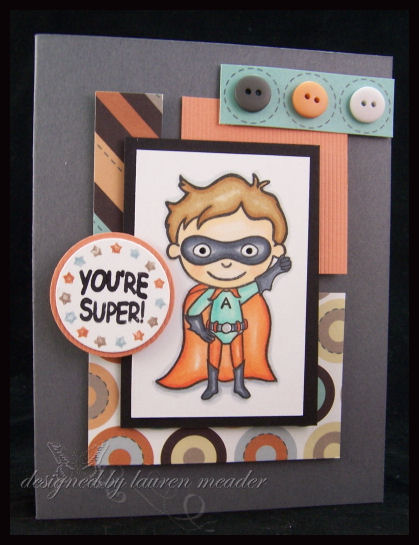
I had a hard time deciding what I would do. I was leaning towards the cowboy. Noah has a birthday party to attend this coming weekend. I got out my Billy set, and asked him what HE wanted me to make for his friend, Austin’s party. Afterall he should be the one picking out what to give right?
He said “I like the super hero best!” That was NOT what I thought he would pick, but I did give him full authority!
 A is for Austin.
So here is a close up of the card. I used the Simple Alphabet for the “A” on his chest. When in doubt color block!!
Inside I stamped a sentiment from Verve Visual (starlight starbright)-that says “SUPERSTAR, thats what you are”. I thought that was cute.
Noah also picked the paper after having several collections to choose from.
WOW! Talk about a challenge. The paper in this collection is by SEI–Such a Boy collection ( I LOVE that set, had it 2 years, and have never used it!!!). It is a great collection of unusal color’s I would not normally use. THIS is why I “collect” paper!
It is like a pumpkin, groovy guava, aqua mist, so saffron, choc. chip, gray, and black! I think I like it!
I colored him with various Copic Marker’s. I always have a scrap piece to practice my colors/blending on BEFORE I try them on my image 😀 I also like to test what colors work best with my paper.
Then it was the next deliemma, “WHAT do I do for a gift item?”
Well since he is a super hero, and there is a bit of a star theme, I decided to do a Star shaped gift bag!
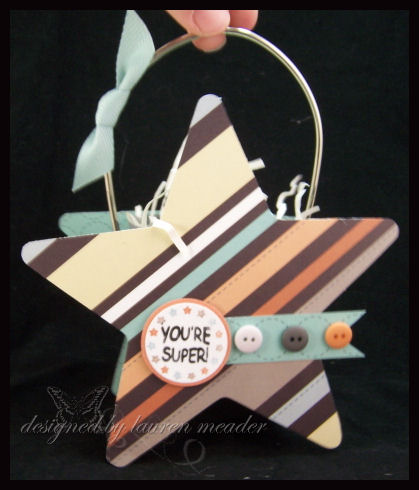
I wanted to do these for a while, and most likely would have done one similar for the Cowboy theme.
I liked the dual sided stripped paper for this, so I went with that.
I decided to decorate it like my card-the You’re Super! sentiment, then the 3 buttons going across. I am on this kick of making these little banner style tags that go off the ends. Don’t know WHY!
To create this bag : I used my star Coluzzle template. I cut 2 of the largest star panels, then made it onto a bag-by cutting a panel.
FROM MEMORY-The panel was 3 1/2 wide by 8.
Using my Scor-Pal–
Along the 3 1/2 side I scored it at 1/2 inch, then 3 inch mark
Along the 8 inch side- I scored it at 2 1/2, then 5 1/2.
That gives you a finished holder that is 2 1/2 inches squared. I adhered the 1/2 scored sides to the stars with redline tape.
Then I debated on my handles! Ribbon handles would be too girly. I was scouring my stamp room, when I saw an empty Prima’s Paint Can! SCORE!!!!! I knew there was a reason to save EVERYTHING!
So I put in 2 large brass eyelets, one on each side (just like on your prima paint can) then I put in the metal handle!!! I had to sqeeze the handle in a little, so the handle would not fall out of the eyelet holder’s.
It was so PERFECT!!! It looks SOOOOOO much more professional I think :D. I love it.
I added a snippet of twill ribbon from Martha Stewart.
This star bag will hold a gift card to Toys R’Us. I think it will be a hit. I hope it will be!
Now, you need to go check out Charmaine’s set!! I know she will love to hear what you think.
Tomorrow is the PTI release! So I will have my projects for that posted here, then.
Till then!

Oh YEAH! I am SO relieved my blog is back in order. I was in quite the panic over here. I had to re-post some of my prev. post’s, but that is NOTHING compared to what I might have had to do! I am so thankful for the blog guy over at SCS for all his hard work! BIG THANK YOU TO SCOTT!!!
NOTE: My spell check STILL isn’t working and Im NOT re-checking this post AGAIN! So if you ahve issue’s with my mistakes-SORRY!! I’m wiped.
I missed all my blog reader’s 😀 I do have the BEST blog PSF’s ever! (I know, you read other blogs, but I still feel you are mine :D, as you all make my day) The ONLY good thing is, I got SO much accomplished yesterday-WOW! Lot’s to share.
I have a nice long post for you today. I often “forget” that many people who come here are new, and learning. Well, I guess we are all still learning. That is the fun of it right? I get many questions, and I want you all to remember NO question is stupid.
That brings me to the post for today!
Almost a month ago I posted my Papertrey Ink projects—>HERE. I got many questions/emails about HOW to make the pop up.
I am sure these have been around forever. There are many different ways you can use the same idea, and I will share some of th one’s I have done with you today!
1) Use your nestabilities
2) Use a coluzzel or other template
3) Use your stamps!
4) The CHEATER pop out!
So first up I will show you how to make a pop out card-using your nestabilities.
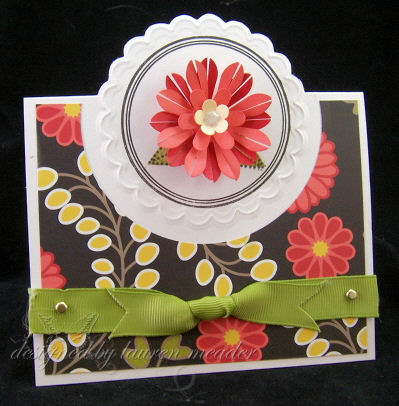 Popped out flower
This card uses Borders & Corners (circle), and Beautiful Blooms by PTI. Scallop circle nestability, paper by American Crafts, Punch Bunch flower’s, made by ME 😀
This card is made exactly like the Papertrey Ink card, linked above. Only that used a HEART.
Now it helps if you have a Scor-Pal (or other means of scoring) and a hobby blade (or other tool for cutting).
DIRECTIONS: click photos to enlarge please
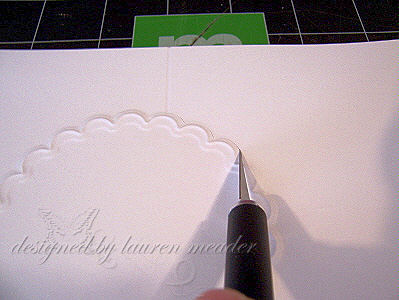
Step 1
Cut your card base, and very LIGHTLY, use your Scor-Pal to score where your fold will be-this one fold in the middle.
Step 2
Pick, your nestability. Run your cardstock through your machine to EMBOSS the desired frame you would like to use on your creation-making sure that it is placed to POP OUT where you want on your fold line.
NOTE: My card, only a small part of the top of the circle will pop out at the top.
Step 3
 Now firmly score ON the score line-up to, but not going through, your embossed frame.
Step 4
Use a hobby blade to cut around your frame, up to the score line.
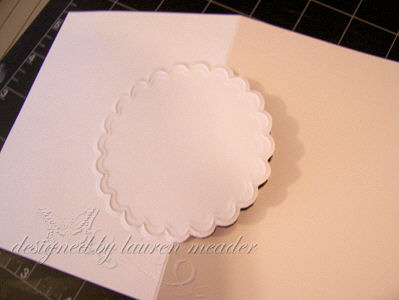 This is what the finished edge looks like.
Obviously straight edges are more easy to cut.
Step 5
 Now decorate as desired!
Second one- Using a shapes template, such as the coluzzle!
 Headed for Stardom
Since this Bella *IS* a star-I felt she would be perfect in this pop out card! Love her!!! I have been BUYING Bella’s and not using them so I made myself a promise! USE THEM!
This card uses my Oh So Pretty Bella (who I cut out), my border’s & corners (circle) set, starlight starbright for the sentiment and swirl, my star coluzzle template, a star eyelet, copic markers, and Scenic Route paper (which is my current fave paper line I think).
You want to follow the same steps as above, you are just using a plastic template!
So lightly score you fold, and place template in desired position, then cut! Careful NOT to cut OVER into paper, past the score line!
 Line up template along light score- cut
 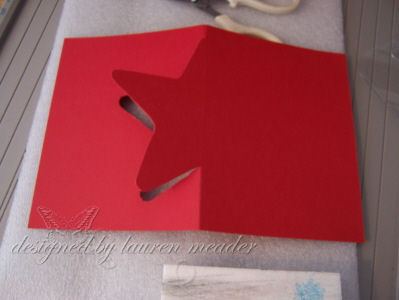 done!
done!
Now this card I did trim down the paper edge on the right after it was cut! For my patterned paper, I then used the size SMALLER template, on my coluzzle to make the outline of the star 😀 Cute huh?
Now we are going to do one using our stamps!!
 Wishing you Happiness
I LOVE butterflies, and this gatefold card has the butterflies interlock to hold it closed! I love this old SU! set called Butterfly of Happiness. Not sure if you can view it, but the Baroque bkgd is stamped in white on the base. The flowers are Stem Shilouettes I believe.
 Card open
Now this card can be seen on page 37, in the May issue of CARDMAKER magazine!! It was done for Scor-Pal!
So as you can see, the butterflies “pop out” from the fold. This is done the same as above! All you do is figure out WHERE you are scoring, then score LIGHTLY (you dont want a deep score going through your pretty image!!)
Stamp your image, then use your hobby blade to trim it out, on whatever side of the fold you choose.
When it is cut , you then score on either side, UP TO, but not through the image. DONE!
Make sense?
Now we have the cheater pop out, or so I like to call it that :D. You just take your image, then adhere it going over or outside the fold, or card line!
 Birds of Friendship
This card was made with Birds Galore by Inkadinkadoo, and was a sketch done by Kirsten 😀 You can view her’s –>HERE
Now many people have done these at the top and bottom of cards. They are the tent cards ( I think), and kickstand cards. Kirsten was the brain behind the kickstand cards, and you can view all of hers HERE <–
Its along the same idea, and defintely “easier” :D.
So that is it my friends! WHEW! Are you STILL reading.
I hope you get a chance to try one out, and found this somewhat helpful. If you do try it, Id love to see what you come up with!!! They are so much fun though.
I have another tutorial to post soon and tomorrow is a Saturday Sketch! YIPEE!! I am hoping to get to pre-post it, but we will see. I do need a shower, have kids to feed, a house to clean, dinner to cook (ugh second though Sub Way is sounding really good right now), a dog to walk, and games to be played.
Oh so much to share, so little time!
Have a great Friday, and check in again tomorrow!
Till then 😀
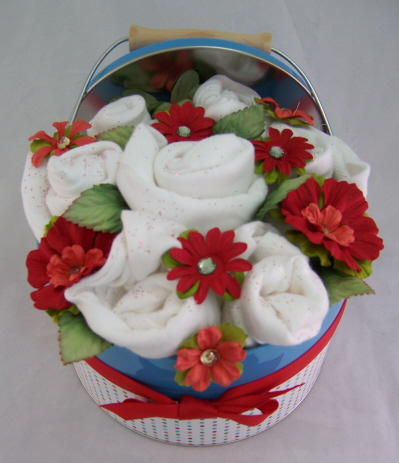
After making THIS Onesie Bouquet, I got hundreds (no joking) of emails/request’s asking me to share HOW I got the baby onesie’s to look like flower buds. Many people wanted to order them. It would be rather pricey for me to sell them, if you count the cost of the items, and MY TIME 😀
I was so overwhelmed, and flattered that SO many people liked it that much 😀 THANK YOU!
As I am going to share, it is actually REALLY EASY to make. It is however, somewhat time consuming if you are a little anal-like myself 😀 I need my onesie “buds” to be perfect. I do think I will make this for every new mom. It’s just a really FUN gift idea 😀
Let’s get to it!
My fellow PTI design team member Geny, is due to have a bouncin baby boy this June! So I promised her I would make her one for her son 😀 Now the “tin” part isn’t done being decorated yet, because I ordered THIS SET, the other day, and am waiting for delivery 😀 Then if she does see this here on my blog she will still be a bit surprised by the decoration on the tin itself.
NOTE: This is not for contest or publication
If you decide to create one-send me a link! I would love to see it 😀
 Bouncin Baby Boy Blue
So I decided that white onesie’s would be best for the boy project, since I wasn’t sure if I were going with yellow, blue or red accent flowers. I think I should always have a pack on hand now! You just never know. make one in yellow and you are golden for a last minute gift for any sex child 😀
You should get the 0-3 month size. a 5 pack is best!
I found this bucket at Michaels for $1.99, and it was just the PERFECT size! To me it screamed BOY! BUY ME! It has a cute handle, and I secured the top under the handle with a large glue dot.
In the girl tin I used the large heart tin from Papertrey Ink-I didnt want a heart for a boy though-needed to be more “rugged”.
I used some designer paper from SU! called the East Coast Prep collection (again-perfect!). I simply covered the bottom portion of the tin. Kept it simple. I plan on cutting out particular animals in the set I linked above, and adding them around the tin. I think it is pretty cute as is though.
WHAT YOU NEED
*Tin/container of choice* 5 pack of white onesies-size 0-3 months* White floral tape* Glue Dots* Leaves* Paper/Prima Flowers* Tin filler*
Decorate your container as desired FIRST! This will help determine what your flower theme will be.
Make sure your work surface is CLEAN!
If you want to see the photos closer-please click to enlarge!
DIRECTIONS
Step one
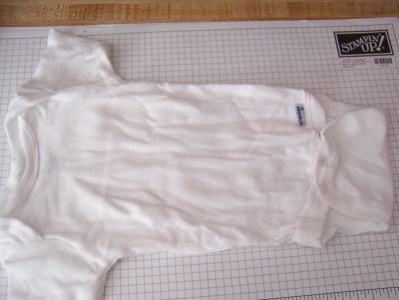
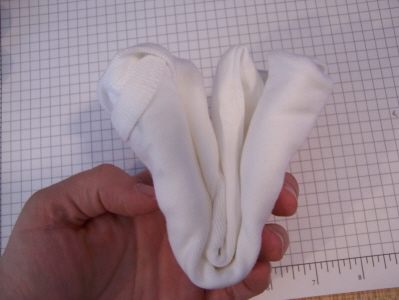
 Snap onesie bottom. Fold in either side.
Step two
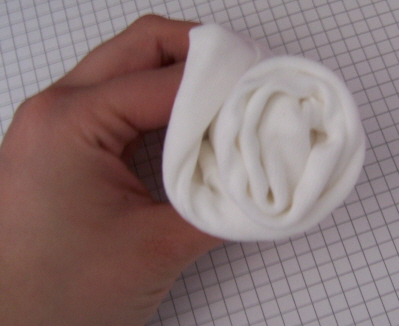
 From top end, roll neatly into a snug ball. Wrap mid-bottom oprtion tightly with floral tape. You do not want to use any other type of tape because should the mom-to-be decide to USE the onesie’s, it would get gooey and stick to the shirts-ick!
Step three
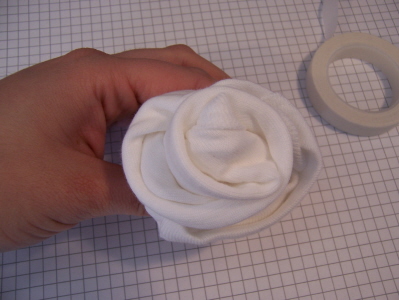 Now you want to fold back one of the edges, like a rose petal unfolding. It is also good to try to fold over the seam where the folded shirt ends to hide it.
Mini Dual Buds-Now if you look at my bouquet-I bought a 5 pk of onesie’s, but have 7 flowers. I did not do this with my last bouquet, but decided in order to fill this larger bucket I would make 2 of the onesies have double buds! So instead of 5-I have 7 buds!
Step one
 Fold in sides like above. Then fold up bottom.
Step two
 Now roll from the side, in.
Step three
 Now fold the “jelly roll” in half. So ends come together. Tape like in Step Two above. Unfold the edges a little as above in step three above.
Last but not least
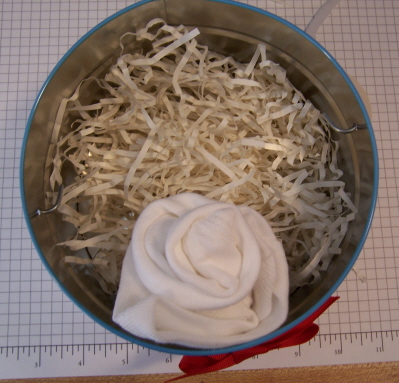 Now it is time to arrange the onesie’s in your tin! make sure you put some sort of filler in the bottom. Try not to get a tin that is too deep. You may want to arrange the set up of your bouquet. Place larger/taller onesie flowers in center.
After they are all set, now for the fun! I like to choose a variety of flowers ot add in between, and on top of my “bouquet” I place them first-then, if I am happy I use glue dots to secure them all in place.
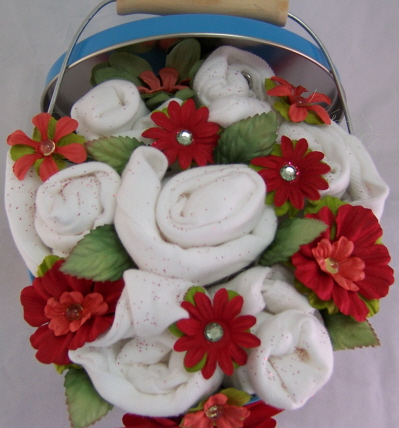 Close up view.
For this one (since I know the mom is NOT going to use the onesie’s) I sprinkled some red glitter to finish it off.
I will shrink wrap this, tie it all nice with ribbon, and send if off in the mail!
Now this beats the $60 bucks you’d spend on a bouquet of flower’s that will die in 5 days.
I really hope you enjoyed seeing HOW it comes together! Now for a perfect card to accompany a Onesie Bouquet , can be found ->HERE.
So that is it for today! Thanks for stopping by.
My Etsy

Who I Designed For
Blogroll
- Alicia
- Alli Miles
- Ally Blankenship
- Amber
- Andi @ crafts on a whim
- Angel R
- Angie Z
- Anne Kranitz
- Becky O
- Bee
- Beth Silaka
- Bethany Paull
- Beverly Nash
- Bobbie
- Cambria
- Cammie
- Card of the Week
- Card Positioning System (CPS)
- Cards for Cancer
- Catherine Doucette
- Charmaine
- Cheryl Sims
- Chriss Rollins
- Christina
- Christine Ewing
- Christine Wooden
- Colleen Schaan
- Craft Critique
- Craft Gossip
- Crystal
- Dawn Easton
- Emily Giovanni
- Geny
- Holly
- Igne Groot
- Inspirational Craft Blogs
- Irene
- Jami Sibley
- Jeanne Streiff
- Jen del Muro
- Jeni Bond
- JenMarie
- Jenn Balcer
- Jenn Diercks
- Jenn O
- Jennifer E
- Jennifer Mick
- Jennifer Pereda
- Jennifer-Sweet Treat
- Joanne Basile
- Jodi Collins
- Julia Stainton
- Julie Masse
- Karen
- Kathryn Berthiaume
- Katie Cotton
- Kelley Holland
- Kendra
- Kim Scholfield
- Kris’s Color Stripes! Get inspired here
- Kristen Dubosque
- Kristin Eberline
- Kristine
- Laura @ Sunshine Stamper
- Laura Turnmire
- Laurie Schmidlin
- Lesa Rapp
- Linda Duke
- Linda-LSN
- Lindsey Botkin
- Lisa (lakind scs)
- Lisa Kind
- Lori Craig
- Maggie
- Mara Campbell
- Maria
- Maria Levine
- Mary
- MaryJo
- Melanie M
- Monique Hansen
- Moxie Fab World
- Pam Imholz
- PaperCrafts Connection
- Peppers and Pollywogs Kids party site
- Rebecca Grohall
- Rita
- Robyn
- Rose Ann
- Sarah Vrolyk
- Sharon Harnist
- Sharon Johnson
- Sharon Rivera (a chemisrty with paper)
- Sherrie
- Sophia Landry
- Storage Units, Ink, & More Blog
- Sue Berker
- Susan (Rainy)
- Tangii Crane
- Tracy
- Tricia Traxler
- Trudee
- Velta
- VivLyn
- Zena
MTME Pretty Palette Color Team
MTME Pretty Patterns Sketch Team
My Time Made Easy TM LLC
Shop till you drop!
Lauren Meader
About Me
Copyrighted material
Subscribe To My Blog
Pages
- About me
- Alexa’s Story!
- My Crafty Corner!
- My Time Made Easy™ LLC
- Our Make A Wish Trip to Disney!
- Resume/Publication List
Calendar
| M | T | W | T | F | S | S |
|---|---|---|---|---|---|---|
| 1 | 2 | 3 | 4 | 5 | 6 | 7 |
| 8 | 9 | 10 | 11 | 12 | 13 | 14 |
| 15 | 16 | 17 | 18 | 19 | 20 | 21 |
| 22 | 23 | 24 | 25 | 26 | 27 | 28 |
| 29 | 30 | |||||
Archives
- August 2013
- July 2013
- June 2013
- May 2013
- April 2013
- March 2013
- February 2013
- January 2013
- December 2012
- November 2012
- October 2012
- September 2012
- August 2012
- July 2012
- June 2012
- May 2012
- April 2012
- March 2012
- February 2012
- January 2012
- December 2011
- November 2011
- October 2011
- September 2011
- August 2011
- July 2011
- June 2011
- May 2011
- April 2011
- March 2011
- February 2011
- January 2011
- December 2010
- November 2010
- October 2010
- September 2010
- August 2010
- July 2010
- June 2010
- May 2010
- April 2010
- March 2010
- February 2010
- January 2010
- December 2009
- November 2009
- October 2009
- September 2009
- August 2009
- July 2009
- June 2009
- May 2009
- April 2009
- March 2009
- February 2009
- January 2009
- December 2008
- November 2008
- October 2008
- September 2008
- August 2008
- July 2008
- June 2008
- May 2008
- April 2008
- March 2008
- February 2008
- January 2008
- December 2007
- November 2007
- October 2007
- September 2007
- August 2007
- July 2007
- June 2007
- May 2007
- April 2007
- March 2007
- January 2007
Categories
- About Me
- All That Scraps
- blogger challenge
- camera/photo play
- Cards
- Contests
- family stuff
- FOR SALE
- Home decor/3-D items
- How to FAKE it!
- Introduction
- JUGS Challenge
- JustRite Stampers
- Lizzie Anne Designs
- My family stuff
- My Stamping Space
- My Time Made Easy
- My Time To Color Challenge
- My Time to Create Challenge
- My Timeless Template Challenge
- My Timeless Templates
- Mytime Mail
- MYTIME MOVIE/VIDEOs
- Papertrey Newsletter
- Pink Cat Studio
- Pretty Palette Challenge
- Pretty Patterns Sketch
- Product Opinions and Must haves
- Recipe's
- Saturday Sketch
- Smilebox Creations
- Stampavie
- Tutorials
- Uncategorized
- videos
Most Popular
- Create your own Onesie Card Tutorial-and important NOTE! PLEASE READ (2529)
- Saturday Sketch-Boxed bag holder (2333)
- Going GREEN! Fancy Flower Flourish-Closure Video (1478)
- Fabulous Favorite - Giveaway! (1336)
- a Prayer Request (1231)
- QUICK-Easter Baskets from Nestabilities-PTI style-and blog challenge (1063)
- Teaser Sketch (999)
- February Release Giveway! (and a little peek) (996)
- Group Post and Rambling Rose Video Tutorial (985)
- GIVEAWAY! Who wants it all?! (895)
Recent Comments (RSS)
- 야동: Love to read it,Waiting For
- 야동: This seller is in a
- 바카라사이트: 여기 처음 왔어요. 나는이 게시판을
- 야동티비: I was surfing the Internet
- 바카라사이트: 비슷한 주제에 대한 흥미로운 정보를
- 바카라사이트: "여기에 제공해 주신 귀중한 정보와
- 온라인홀덤: 유익한 웹 사이트를 게시하는 데
- 홀덤나라: 나는 당신의 블로그를 정말 좋아합니다.
- lisa: Technology, too, has left an
- 주소모음: 흠 !! 이 블로그는 정말
Copyright © 2007 - My Time, My Creations, My Stampendence - is proudly powered by WordPress
This blog has been Tweaked and Designed by Sara Williams