Archive for the ‘Product Opinions and Must haves’ Category
I did it!!! I made a digi card!
Oct 14, 2007 Author: mytime | Filed under: Cards, Product Opinions and Must haves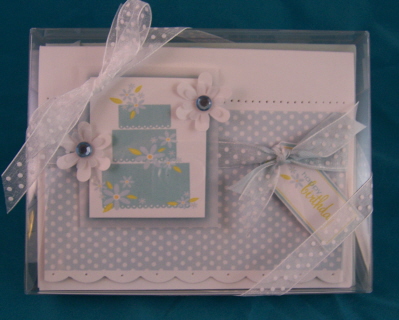
I cannot believe it!
“I” Lauren Meader, computer challenged paper crafter made my very FIRST Digi card! The photo at the top is of the set of 4 I did, boxed together). Individual cards are shown below.
What is SO great about that?
Well Im so computer challenged, that its a miracle I can email, let only use a digi kit!
After seeing the stamp set pre-view of Eat Cake on Nichole’s blog ——>here, I HAD to try it out.
She posted step by step directions for using these kits ——> HERE,
Let me tell you those visuals and everything were SO good even “I” could do it! Im a very visual person and often dont need/use directions I just pull it apart visually-so THANKS NICHOLE!! Your instructions were PERFECT!
I downloaded them all-after making sure I did the first one right.
Now MY PROBLEM!
I dont have a fancy editing software like Microsoft Word, but I DO have Word Pad. I know you can laugh-thats not even real editing software! LOL!
BUT you can still use these kits.
If you are like me and dont have it, just follow Nichole’s directions in Chapter 1
then for chapter 2 here is what I had to do.
1) Went into my files and opened them up. As reccommened, I had created a seperate file for the Digi kits to make it easier to find
2) Right clicked on image I wanted-clicked “Open with” , then went to PAINT.
3) Clicked on image in paint, then Ctrl a, Ctrl c. (this means the control button plus the letter)
4) Opened a window with Word pad. Clicked in there, then did CTRL v.
Now you can make duplicate images (move cursor and click CTRL v again), or make the images smaller or larger-whatever you need! WAY COOL! Prints in seconds!!
I used my Papertrey Ink-White cardstock in my printer.
I made FOUR cards using the downloads from this free kit-
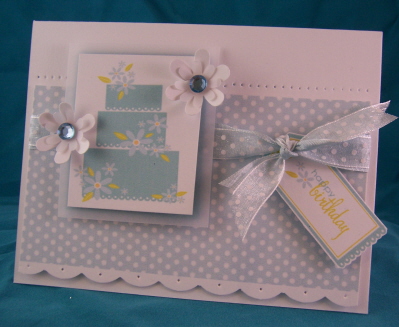
ALL supplies are from Papertrey Ink Eat Cake Download (including patterned paper).
The cardstock was also Papertrey Ink White. I used flower punches and ribbon for other accents.
Here they are!
 1
1 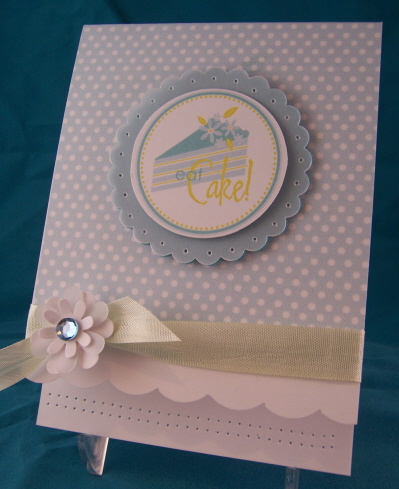 2
2  3
3 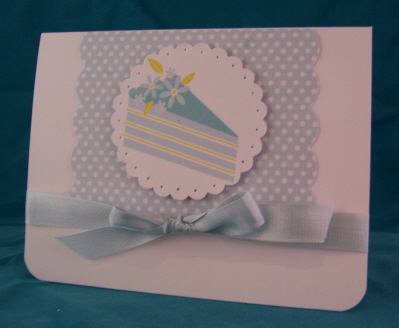 4
4
Just click on each photo for a larger view!
Pretty cool huh? I was quite proud. All 4 cards took 1 hour! That includes the printing and editing :D.
I had so much fun doing these.
Dont get me wrong -I still NEED my stamps! This was just a fun alternative. And since I want the new set-it tied me over a little bit till the 15th.
I made these for a friend who I bought a Digital Photo Calendar making kit. I thought I should make her cards digiatl too to show it can be easy. AND she can give them as gifts to everyone ;D
Thanks for looking. Let me know what you think-or if you tried it send me a link.
Did you see the Riendeer Kit? OMWord! I NEED that reindeer made into a stamp!!!
OK off to get the kids Christmas photos done.
Wish us LOTS of good smiles-at the same time!
Product Review-Cuttlekids Machine
Oct 11, 2007 Author: mytime | Filed under: Product Opinions and Must haves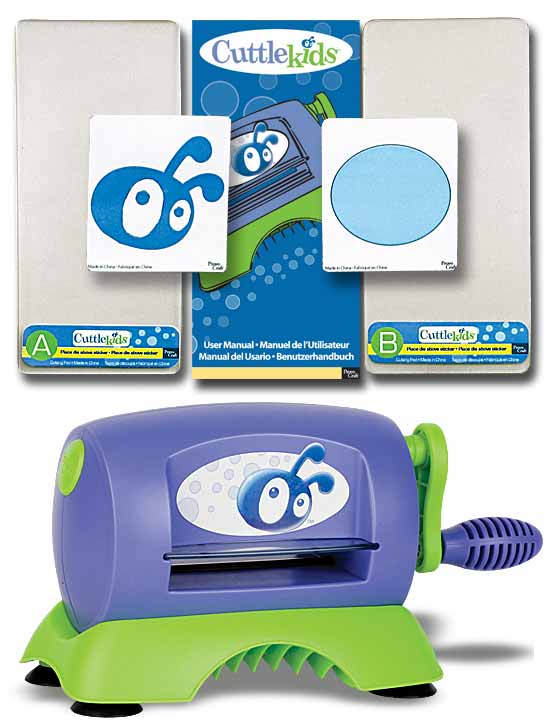 Cuttlekids Machine by Provo Craft contents. Click for larger view.
I am about to give is my personal opinion. If you have a question or need more specific information you may want to contact the creators here: Provo Craft
So I guess the main question is “Is it really kid friendly?” and ” Is it really JUST for kids?”
—————————————————————————————————-
SO I got my daughter Alexa the Cuttlekids machine and several dies for her 8th birthday.The dies I purchased were-Fairy and Tadpole alphabet, Flowers, and Flying bugs 4 set of dies. As you can see by the photo, it comes with everything you need to get started-including 2 die cuts.
I did NOT see a recommended age for this machine, but figured 8 would be appropriate. And in all honesty-I HAD TO HAVE IT, for me too! LOL! All three of my children have used this machine- ages Alexa 8, Noah 4 1/2 and Amber just turned 3. So here is my opinion based on watching my children use it-as well as several un-craft related adults.
First the Pro’s
This machine is really cute. Its lightweight, and the base is really sturdy. My 3 year old can pick it up NO PROBLEM! Easy to store.
It has little suction cups on the bottom to help it STICK to the surface! TRUST ME you will need them! And they really do stick well. Dont let them try it on the carpet like I did! I will rock side to side as they try to feed the dies through.
It measures 6 inches across, and 4 1/2 inches high.
It doesn’t have the fold out panels like the Cuttlebug does-which for kids is great! Nothing to break OFF! Has the feed opening and thats it! Pretty straight forward.
Its affordable-in my opinion, for a die cut machine-even if its listed for kids. It lists for $32 retail. Cuttlebug machine lists for $69.99. Both a great value.Its cuts very well. An adult could use this for their own machine. I know I am trying to not sneak it down to my craft room, cause they will NEVER see it again! LOL! Plus you can most likely get it with a coupon!The dies are also affordable. Compared to the cost of regular machine dies-primarily the alphabet sets, the dies are reasonably priced-see comparison below:
Cuttlekids price is to the LEFT / Cuttlebug price is to the RIGHT * 4 pack dies $10.50/ 2×2 4 pack in Cuttlebug $15.99
*Alphabets/numbers from $18 to $50 (large set ONE letter per square)/ Cuttlebug alaphabets $79.99
* 2 Step Dies-really cute assortments for only $5.50 / they are $6.50 for Cuttlebug 2 step
The dies are the same size, as far as the finished image, as the regular dies you would purchase. So they are a great deal.
I assumed the dies for the kids machine would be chincy and the finished die cut would be tiny. NOPE-great size! No tiny shapes here.
Another PRO-you can use the Cuttlekids dies in the Cuttlebug! WAHOOOO!!!!
***But you may need this little Sizzix Sidekick adapter biscut to give the right thickness for a crisp clean die cut in the Cuttlebug depending on what you use for cardstock/patterned paper. ***
Another PRO- after a few times demonstrating the SANDWICH needed to use the machine, even my 3 year old was able to do it-independently!
CONS
This is the description for Cuttlekids- copy/pasted from their website —————————————————————————————————-
*Meet the Cuttlekids™ Shape Maker, a fun way for parents to help get kids excited about crafting!
This colorful mini die cutter easily cuts adorable Cuttlekids dies in seconds, providing fun paper and craft foam shapes and letters to make toys, gifts, and decorations. School lockers, bedroom doors, and birthday invitations – just to name a few – will never be the same!
Check out this exciting new line, you’ll see there’s so much you can do with Cuttlekids*
———————————————————————————————————
The MAJOR thing I found to be difficult was the fact that my children had a hard time getting the handle to turn, as the die cut/cardstock passed through the center. They often got frustrated and needed me to jump in and help.
Unlike the advertisment states “This colorful mini die cutter easily cuts ”
Well , it does cut NICELY, but not EASILY. Even ‘I” had a hard time cranking it through the machine at times. I had some other adults at Alexa’s party try it, and while it was a hit, that was the big complaint. And we are talking a SINGLE layer of cardstock.
You cannot use your Cuttlebug dies/embossing folders in the CuttleKids machine! The Cuttlekids opening is sized ONLY for the Cuttlekids dies.
Cuttlekids dies are made with like a sturdy thin cardboard top. The foam layer also appears thinner than the cuttlebug dies. The Cuttlebug one’s are made with a metal top, and thicker layer of foam, simply would not fit.
Another CON-and not a biggie-but there are NO embossing floders for the kids to use! That is a bummer. Especially with all the Disney stuff coming out soon. I know I dont want my kids thouching MY Cuttlebug.
SOOOO-Overall I would totally recommend this product. I actually LOVE the dies, and think the alphabets are a phenomenal value, as they are quite similar to the larger/more expensive ones offered for the Cuttlebug. And since I can use the Cuttlekids in my Cuttlebug that ROCKS!!!
I also think if you are just getting into papercrafting and are working on building your supplies-this would be a great starting place.
I found it to be a great tool to help kids make their own paper crafted creations! Its also safe, and there is nothing visibly potentially harmful. I even crammed my own fingers in there and CRANKED the handle! No problems-no squeezing or squishing motions.
Another PRO-kids can crank through (even if its hard to-LOL) paper without supervision, and worry of them coloring themselves in ink!
My children had a great sense of accomplishment after cranking though some images. A great activity.
They got use to the difficulty they often faced trying to crank through cardstock, and found patterned paper and old scrap wrapping paper to work much easier for them! So that would be my fix for the con of cranking through cardstock!
So now I would love to hear YOUR opinion, or any questions you may have that I hope to be able to answer!
Product Review on Scor-Pal-and a cute coverlet gift!
Sep 11, 2007 Author: mytime | Filed under: Home decor/3-D items, Product Opinions and Must haves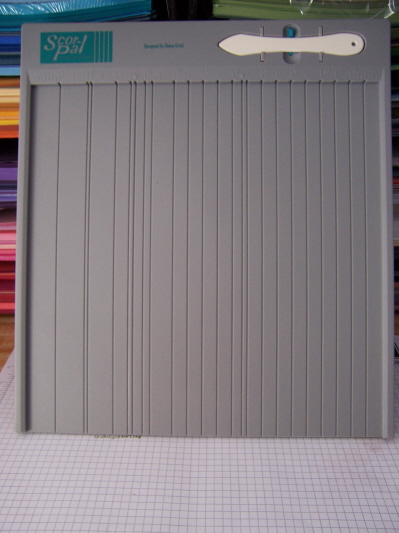 Its been a while since I posted a review and I’ve gotten alot of questions about the Scor-Pal since posting my Window Box Tutorial link , and my Make your own envelopes link.
What is the Scor-Pal?
Well in my own words, its a lightweight, heavy duty plastic board, with deeply etched grid lines, that enable’s you to make nice, deep, straight, crisp scores on the lightest weight paper, to the heavy duty cardstock without problems! You don’t even have to move your paper-unless you need to score going the other direction!
This tool was designed by Diana Crick, and can be seen HERE. It costs $39.95 plus S/H for US.
It arrives with instructions and a mini tutorial when you get it!
There are lots of great tutorials on the site, with photos, and step by step directions, which are very helpful. I myself an a very visual person! I often dont need directions but can figure it out by examining it. Must be my nursing skills shining through! LOL! More tutorials are planned in the future, which I think its neat for her to be so concerned that you get the maximum use from your Scor-Pal once its purchased! Alot of places dont care to continue to entertain uses for their product once its in your home.
Let me start by saying that before getting a Scor-Pal, I rarely scored my cards! I would often just fold them in half-then use a Pampered Chef stoneware scrapper (if even that) to get a crisp seam.
The result of that-due to heavy weight cardstock, would often be a cracked looking seam, sometime’s a bit crooked, and I would have to turn the card-inside out! NOT COOL!
The other way I would score my own designed boxes and whatnot was using my Fiskars Paper Trimmer
It had a scoring blade, that you could attach to the rail. While I didnt mind using that from time to time, it was annoying to change out the cutting blade, then keep sliding my paper along the the measurements I needed scored!
This is where the Scor-Pal comes in. I am now wondering HOW I made all that stuff I did without it! Since getting it, it has saved me time, and frustration, and gives me a real professional crisp line.
I planned on putting it under my desk after using it, but it hasn’t left my workspace since day 1.
I LOVE the fact that I dont have to even pick up my paper ONCE! I just score along the grid.
The grooves are deep, so no slipping out as you run your Scor-Tool down the line. I really like the little holder provided at the top of the Scor-Pal that holds that little Scor-Tool. I am one who would DEFINITELY “misplace” it if I didnt have that little holder! LOL!
It even had a button that allows you to POP it out of the holder! So no breaking those nails or getting annoyed that its “stuck” in there.
There is also a special slot under the Scor-Pal for another Scor-Tool! You can never have enough of those right? LOL!
The Scor-Tool in itself is cool because it’s shape makes it easy to grasp, and of course it fits perfectly in the grooves. It just has a nice “feel” to it, and isn’t made of anything that leaves those shiny marks on your paper like other tools might.
OK Now for the ONLY part Im not thrilled about. It really does need a few more scored grooves. Like at 1/4, 1/2 and 3/4 inch. You can of course start to score at the 1/2 inch mark, which you can find at the far end- 11 1/2 mark. This gives you that 1/2 groove. But there really is no beginning 1/4 or even 3/4 inch mark.
I have moved my cardstock along the Scor-Pal to get a groove where I need it, and at this point I’m OK with that.
I was told that a NEW Scor-Pal is in the works with MORE grooves! YEAH!!!
Diana is great about listening to what people think, and want.
At this point I use this tool EVERY time I stamp now! I feel like it was money well spent. Since I work on several design teams just mediocre work doesn’t cut it. Even if I weren’t I think we are always looking for ways to improve the overall appearance of our items.
I’m open to any feedback or questions you have!
Hope you get to try one out, or if you have one, lets hear your opinion on it!
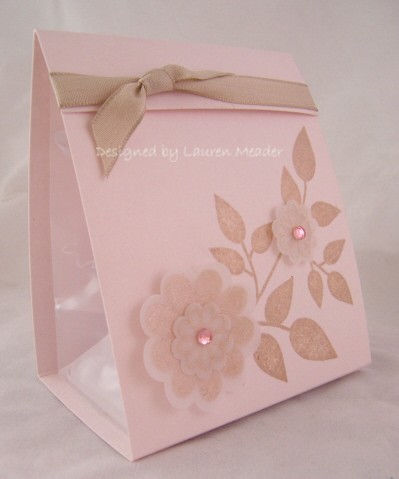
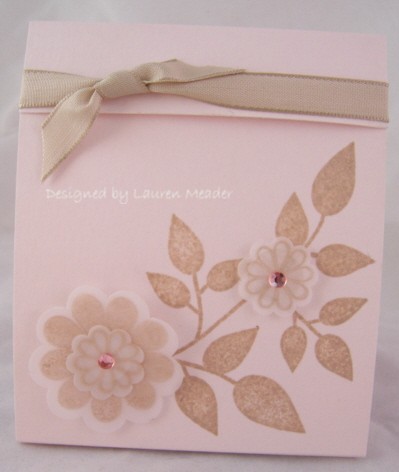
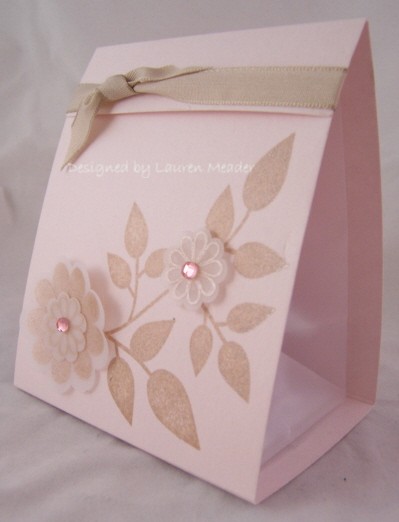
Here I would like to share a quick bag cover I made using the NEW! Paper Trey set Beautiful Blooms.
Click on photos to enlarge. I just cut the top off one of her frosted Tin Tie Top Bags, and made a cute coverlet. The top flap slides under the ribbon to keep it closed! How cute would these be for gifts or favors at a Bridal Shower or Wedding even!
Thanks for looking!
Don’t miss it!
Sep 2, 2007 Author: mytime | Filed under: Product Opinions and Must havesCheck out my article ———>HERE today on the Craft Critique!!!
Leave a comment there to let everyone know what you think. Id love to hear of you have one too!
A Tool WHAT?
Jul 23, 2007 Author: mytime | Filed under: Product Opinions and Must haves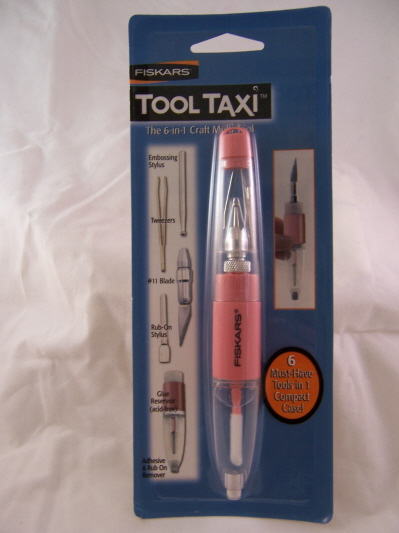
A Tool Taxi.
What is it? Its a 6 tools in one, made by Fiskars.
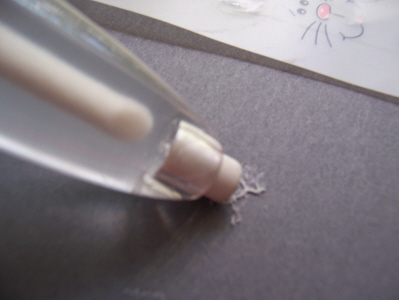
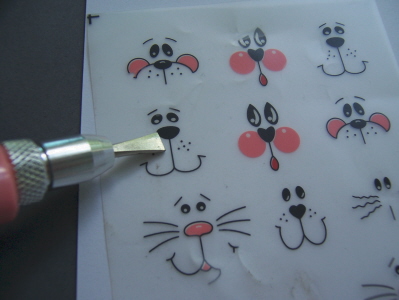
What you get-You get this pink tool, that has clear glue with applicator, a rubber adhesive eraser, tweezer attachment, hobby blade, embossing stylus, and a rub on stylus.
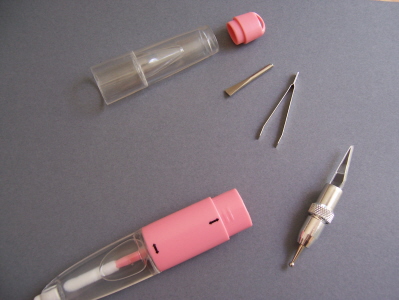
I tokk it apart to give you a visual of the pieces. The double ended attachment-easily twists on and off for easy exchange of tool.
Why is it called a tool taxi? Well, I honestly have NO idea. I think the name is strange considering its use, but hey, it works right.
How much did it cost? I got mine at Target for $7.99. Pretty good deal for ALL that in one item.
If you break down the “possible” cost of these items separately (averaged from my past purchases, not exact quotes)
embossing stylus-about $3+
adhesive eraser – $2 +
rub on stylus- HMMMM, never seen one to buy, but I guess a Popsicle stick is just about free.
hobby blade- can run $2-$8 depending on how fancy shmancy you go.
tweezers-again not entirely sure- we will go with $2
glue- again say $2
Bottom line-getting it all in one-PRICELESS! 😀 You could save a considerable amount of money I suppose.
Why did I decide to get one? Cause I’m all about consolidation. Plus it looked cool. If I can get 6 tool in one then it was worth trying out. It saves alot of space, and searching for what tool I need.
How does it work? Well its kind of cool. The attachments twist on and off. and store in the cap. Its a neat littel gadget.
What else do I like about it? Well I LOVE the stylus. I have the cheapo $2.50 wood stylus from Stampin Up! and have always liked it better than the Empressor stylus that costs about $10. I think the smaller head allows you to get into smaller spaces when dry embossing, and gives a crisper embossed image.
 (sneak peek at an upcoming set)
Hobby Blade-I absolutely LOVE this part of the tool, because again the handle style on this gives me the control I need when using this. (No Photo cause I really didnt feel like slicing anything today! LOL)
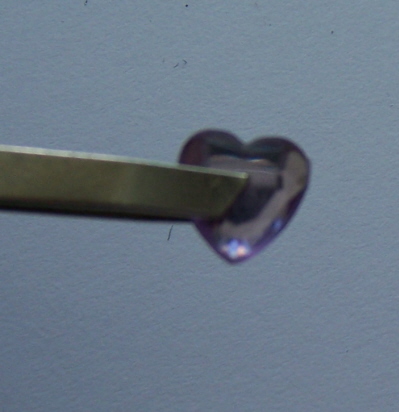
Tweezers-these work really well. Especially for placing the little rhinestones on things. These are however, not the type of tweezers you’d use to hold an image you are heat embossing because you have to pinch them closed. I dont generally use tweezer alot anyhow.
Adhesive eraser- I like this one because its smaller than the other honkin huge erasers I have. When you have that little bit of runover, it gets right into that small area much easier. Again that contoured handle is great.
Rub on stylus-HOLY MOLY! Let me tell you once you use this thing you will NEVER use a Popsicle stick again. My rub-ons just went on so easy using this stylus. Im in love!!!! Usually after applying rub-ons (an item Im getting more into), my fingers would kill from rubbing with the Popsicle stick-no longer my friend.
Glue-OK I could do without the glue! Honestly havent even tried it. Id rather stick with my Tombow mono-multi and other things like that. Im sure it could be cool in some way.
So, this tool sells me because I like the way it handles for use with all the attachments. I like the all in one feature, and feel its reasonably priced!
If you decide to get one Id love your feedback on it.
Here is a submission REJECT I’ll share using my stylus.

I used the rub-on, SU! Oval punch, and horizontal slot punch for the reindeer. Used wire for the antlers. I designed the box myself. The band wraps around the entire box.
The stamp you see on the tag is by Green Grass Stamps, and can be seen HERE. Its called Christmas Cards.
Thanks for reading.
Ribbons, Primas, Glitter OH MY!
Jul 9, 2007 Author: mytime | Filed under: My Stamping Space, Product Opinions and Must havesAs a crafter, we all accumulate so much of our favorite products. To maximize our use of them, its best to not only have them organized but easily accessible!
If you love it, have it, but can’t find it or easily get to it, then you arent likely to use it! Or WORSE- FORGET you even have it! Then, you waste your money on another one, when you could have purchased a NEW -insert product of choice.
Another thing about storage- it should be functional, pleasing to look at (in other words who want neon green anything in their eyes view, no matter how awesome it works, since its ugly and distracting) and CHEAP! I know I don’t want to waste my stamp money on ORGANIZING it!
That being said, while on a trip to my local hardware store, to buy paint for my new stamp space, I stumbled upon an item I already owned (in our kitchen closet) but saw it in a whole new light! Call it a LIGHTBULB moment.
NOTE: These are just thumbnails for space on my blog purposes. If you want to see the image larger click on the thumbnail
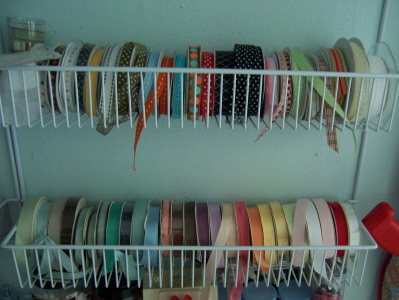
Wire racks Side view
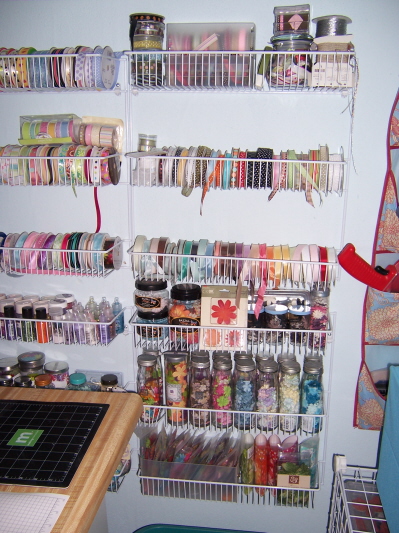
It is a wire food storage rack, with 3 shelves, meant to hold your canned goods! Upon trying to locate one for a photo (pre-filled up, and so you can buy them if you want one) I found this which is similar Wall Rack. Mine is larger than the one listed. Its 3 shelves, 17 inches across, 5 inches wide! BEST PART- ONLY COST $11.95! So I originally bought 2 then went back and bought 2 more! 😀 I ppurchased my racks at ACE Hardware. I believe Rubbermaid ? makes it.
Also on my google search, look what other cool items popped up HERE! I’m totally loving the soup can storage! Dont; know YET what I would do with it, but it sure looks cool.
So this is what I put in my racks.
I found it was an amazing source of ribbon storage for me! It holds lots of my ribbon. I especially love putting my most loved/used in reach! I can also easily take an empty roll out if I want.
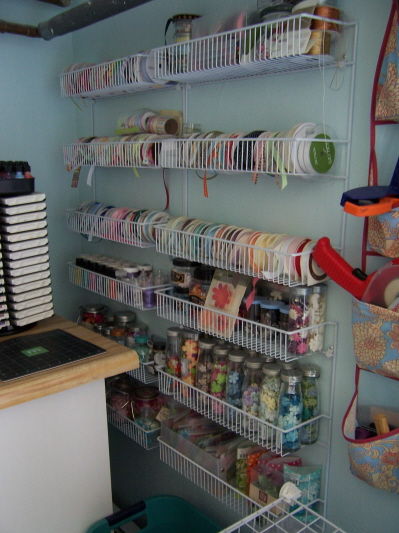
Closer view of ribbon in rack.
I also decided to put some other MOST used items on the racks.
Martha Stewart Glitter/Stickles/Liquid Pearls

So above you see one rack with all my glitter, and stickles, and liquid pearls. I use these products regularly as well, and like to have them handy. You can get a good idea how much the rack stores by the photo. It also helps me view my colors.
PRIMA’S of all kinds
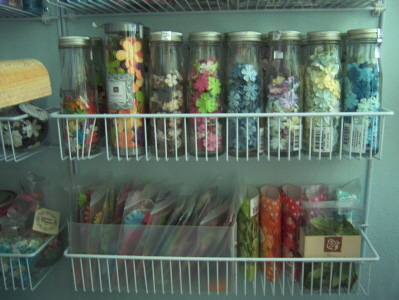
A couple of the racks house my beautiful collection of Primas! They are too pretty to hide in a cabinet! Plus having them in view not only inspires my color choices or design, but also reminds me “Hey look you have orange Sprite Primas!” LOL!
This rack holds 2 rows of the bottles of essentials, the Sprites, and it hold the paint cans of Prima’s or the rectangle boxes, as well. You may see those stored in the side view photo above.
My loosely packaged prima’s are stored on the bottom rack, in a card sorter container. Again easily accessible, and easily viewed. And NOT squished.
I love this rack because not only is my stuff, stored, sorted, and organized I think its pleasing to the eye. Well at least mine! 😀
Now for whats left-over………….
Cabinet of ribbon
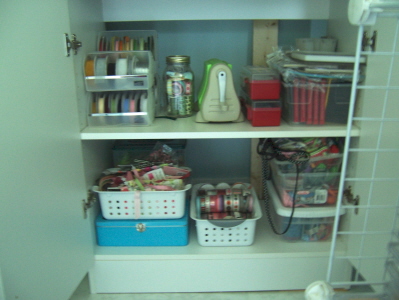
So this is the cabinet of what I had put my “loose” ribbon or backups in. There are 2 stackable ribbon storage containers from Stampin Up! As well as some clear rubbermaid containers. I also have some stackable ribbon storage containers I got during Christmas time, at Target for $4.99 each. I take out the bar that they slide onto and just put the rolls loosely in there. I HATE having to take every roll off to get an empty one out. I also dont put the ends through the ribbon slot. Its annoying to me, and they always fall out of the slot anyway. I just pop off the top and take what I need. This is also where I put my less used ribbon so that is OK for me.
I like to see whats in there! That is why my storage is CLEAR. Alot of my American Crafts ribbon is stored in here, since they are tiny spools. Still its all in ONE place and easily accessible. Not to mention ORGANIZED! May Arts ribbon in one container, SU!, duplicates, ribbon cards in another. All together.
My loose ribbon is wound on ribbon cards- seen HERE. That helps me keep it from getting wrinkled and tangled.
I also have my cuttlebug stuff there too. But thats another post, another day!
So there you have my SUPER cheap find. I see people spending all sorts of money for systems they aren’t happy with in the long term. I got tons of storage for a whopping $48.
I’d love to hear what works for YOU!
Who would have thought some food shelving could turn into a long winded article?
Thanks for reading!!!!
HOLY NEW ITEMS!
Jun 6, 2007 Author: mytime | Filed under: Product Opinions and Must havesOH BOY! Hold onto your wallets everyone!
Have you checked out www.allthatscraps.com lately? Go to new products at the bottom if you want to see it ALL!
Paper, punches, stamps OH MY!!!
She has gotten in a TON of new products!
She now has the PRISM paper that I have been in love with for a few months, and is selling it in a sample pack too if you want ALL the colors for a FAB-U-LICIOUS price. I bought 2!
Bazzill cardstock-new colors and textures, and my favorite the BLING!
Stamps!!!! She carries ALL the My Favorite Things stamps, has the new Gel-a-tins, and Gina K (ordered all the new ones myself), and is going to be carrying Lizzie Anne Designs soon too.
She has the Marvy punches, with the strong arm! Check those out.
Ink! Oh man she is now carrying the versmagic, and Pallette Hyrid ink in the large pad and SPOTS! She also had the Fantasix brushes I love, the NEW! Prismacolor pencil colors, oh boy.
PRIMAS! Need I say more?
May Arts ribbon OH! I could just get it all!
Dont get me started on Patterned Paper! All the new DCWV, KI memories, Piggy Tales and K &co to name a few.
OK I need to take a deep breath! Just go look. Tell her I sent ya! She has wicked fast shipping too! PLUS FREE shipping on orders over $25. HELLO!
You can get all your faves in ONE place. Have it on your door in just days. How cool.
I cannot wait till my goodies arrive.
HELP!
May 22, 2007 Author: mytime | Filed under: Product Opinions and Must havesHELP! Does anyone here know he cuttlebug “sandwich” to use for the Wizard die cut/embossing cartridges?
I bought these several weeks ago and also purchased the “kit” with it. Problem is it doesnt give the sandwich directions for use with the cuttelbug. I don’t need a tutorial just the sandwich.
I would really like to use them ASAP!
Thanks for any of you who can help me.
Mytime MUST HAVE’s-a product review! Random goodie giveaway! READ it.
May 18, 2007 Author: mytime | Filed under: Cards, Product Opinions and Must haves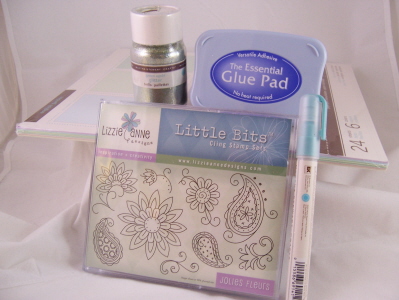
OK I love when people LOVE things, and you just just feel their excitement. So I want to share my excitement with YOU about a couple of products!
In return I WANT to be enabled! More about that in a minute.
I am in LOVE with the new Glue Pad. OMG! Its AMAZING! I recently discovered the beauty of this pad when browsing my friend Rebecca’s Blog. She did a blurb on it , with some samples. Well you know me. I HAD to have it! LOL! Now I see WHAT all the fuss is about.
Now I love using this pad with my new Lizzie Anne Designs set called Jolies Fleurs. I CANT stop using it! Seriously! It isnt released yet- May 28th! But Im SO IN LOVE – it its insane.
I can tell you that Lindsey (aka Jacksonbelle) is selling them in her EBay store NOW! All the NEW! yet to be released sets. She signed up with them as a wholesaler, to sell them. SO RUN!!!!!! And tell her I sent ya!
Now I know you want to see a million of the delicious samples I made BUT I cant share yet. They are for design team work and are going into Lizzie Anne’s Idea book OR possibly published elsewhere! So you have to wait! But I will share ONE!
Coral LeFleur
Are you drooling on that keyboard? I know I am! LOL!
I stamped the Fleur on white cardstock in versamark, then gold embossed it. I used my Fantastics brush tip (another favorite) and Versamagic ink dew drop pads (and another)to color the flower in. Cut it out, and added a jewel.
The flowers were stamped using the Glue Pad. I then used another FAVORITE product my Martha Stewart cardstock, AND her new Glitter! OMG! The colors are to DIE FOR!
So I stamped the sprinkled my glitter. DONE! Simple, and elegant!
So yes I LOVE the MS cardstock. The quality is great, as is the color selection. I am really in love with all her glitter!! I just cannot put it down.
Another great thing she sells is her Glue Pen (pictured above) OMW! Its really top quality. Oh I just cant stop gushing. I wish I got paid for this! LOL! Or a commission 😀
SOOOO, Do you love it yet?
NOW- I need you to respond to this thread with a few NEW products you LOVE.
I will randomly pick a winner on Sunday. This winner will receive their choice of glitter from Martha Stewart! Because I love it so much. If you are randomly picked email me your address and color choice and “I” will go pick it up for you.
That is my gift to YOU for enabling ME too.
So get me hungry for retail therapy. Im dying to know what all the RAGE that Im missing out on! If you provide a link that would be double awesome!
Oh and if you have any of these products I gushed over, let me know what YOU think about them too.
Can’t wait to read all about it!
Making Memories Tag Maker Review! With samples-
May 15, 2007 Author: mytime | Filed under: Cards, Product Opinions and Must havesSo people are always emailing me about what products I like/love and why. Should they buy this, or that. From here or there – and of course WHY? Or I bought this because I saw what you did with it.
SO I figure I would start to do more to help whom-ever by reviewing things here.
I love the fact that people trust my opinion, and personal taste. Now before I begin you need to keep that in mind! Its all about PERSONAL preference. What “I” like you may not (yeah right! LOL!). Seriously! These product opinions are JUST that. I am not compensated for any of this or affiliated with these companies, just want to share my findings for things that I like (or don’t) to help you make informed decisions or just plain ole see HOW it works!
First up-Making Memories Tag maker and rims!
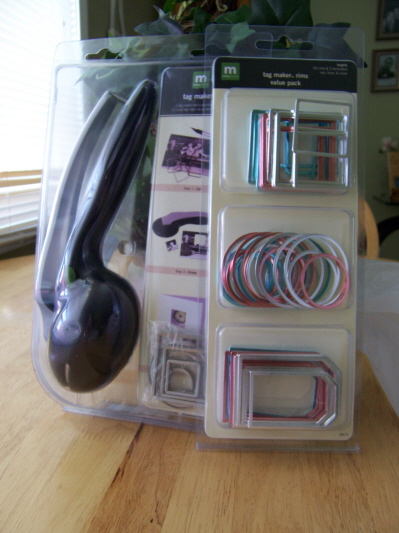
So the tag maker sells at Michaels for $24.95. I saved $10 by using a 40% off coupon. I wanted one of these for like 2 years! Finally on my Mother’s Day shopping adventure I decided to splurge! Couldn’t let that coupon go to waste!
I also got a package of the rims. There are 54 assorted tag rims, and 3 templates inside. It sells for $14.95. Now use a 40% off coupon and thats a pretty cool deal.
The tags I got are silver, pink, and blue way cool! That to me is already a plus. I get assorted metals, shapes AND sizes for $0.27 each! That is BEFORE using a 40% off coupon!
Now, buy the rims with the coupon, that would then bringthe cost to only $0.16 each! Now the other cool bonus for me- if you mess up your stamped image on a SU! tag you waste the tag! For this you can simply re-stamp the image BEFORE you make the tag yourself.
The other cool thing-you can use colored cardstock, photos, vellum, patterned paper-whatever YOU decide. Plus as I said before the size and shape variety is far greater!
So the cost for the Stampin Up! metal edge tags-12pk. Two sizes, ONE type of shape and ONE metal per pkg for $4.95-that is $0.41 each tag. Not as good a variety, no choice of paper selection, only 2 types of “paper”, 3 metals and 2 shapes to choose from the entire assortment sold by SU! This doesn’t include shipping, and there is NEVER a 40% off coupon!
Well ,you may now want to know “HOW DOES IT WORK?”
I thought the same thing! I was worried it would be difficult, or too long a process. I was told I could return it if I wasn’t happy!
Here is ALL you do-
Step 1 Step 2
Stamp/color your image Use templates that come in pkg.
or just use PP or image of choice Trace and cut out shape.

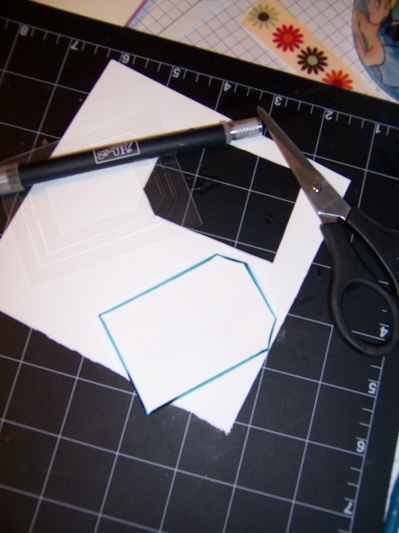
Step 3
Pop image into chosen rim.
Put inside tag maker, and gently squeeze handle!
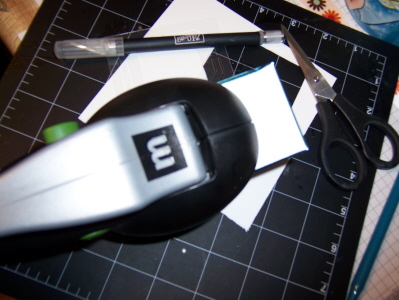
So here you have the steps! SO SIMPLE! Tookjust a minute to do! Plus your image is perfectly centered each time! I’m so lovin this tag maker! I felt it was well worth every penny! I wish I go one sooner. Now here are two card I did right away! LOL!
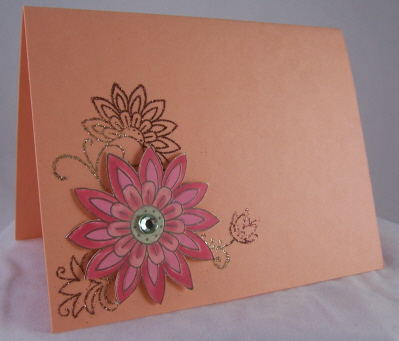
Bloom with Delight
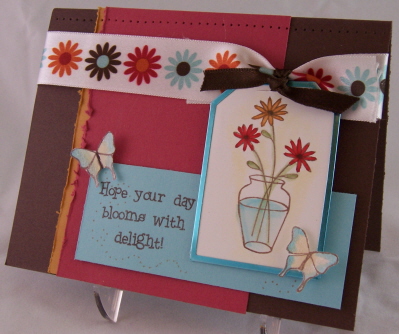
Both of the cards were done using the set Bundles of Bouquets by My Favorite Things Stamps.
This one has ribbon by American Crafts, which inspired my colors. The image was colored with my Prismacolor markers, and blending marker.
Of course used a blue tag for the image rim. Very cool!
I stamped the butterflies, colored then cut. The wings on top are popped forward. They also have a touch of fine shimmery glitter by Martha Stewart. Soft and sweet!
Dragonfly Hello
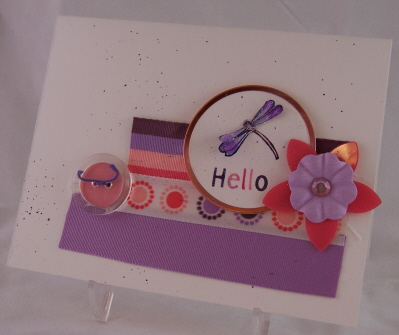
For this one I used a round pink rim tag! The colors were inspired by more American Crafts ribbon, and their Green House assortment of plastic and paper flowers. The ribbon was layered at the bottom. The button is clear and by Foof FaLa. I liked this card-Jason thought it was awful. Oh well! These are some of my favorite colors. The Dragonfly is stamped twice and the wings are not only glitterfied but popped forward as well!
Thanks for looking! I’d love to hear some feedback on what you think! OR what you want to see next!
Happy Stamping-
My Etsy

Who I Designed For
Blogroll
- Alicia
- Alli Miles
- Ally Blankenship
- Amber
- Andi @ crafts on a whim
- Angel R
- Angie Z
- Anne Kranitz
- Becky O
- Bee
- Beth Silaka
- Bethany Paull
- Beverly Nash
- Bobbie
- Cambria
- Cammie
- Card of the Week
- Card Positioning System (CPS)
- Cards for Cancer
- Catherine Doucette
- Charmaine
- Cheryl Sims
- Chriss Rollins
- Christina
- Christine Ewing
- Christine Wooden
- Colleen Schaan
- Craft Critique
- Craft Gossip
- Crystal
- Dawn Easton
- Emily Giovanni
- Geny
- Holly
- Igne Groot
- Inspirational Craft Blogs
- Irene
- Jami Sibley
- Jeanne Streiff
- Jen del Muro
- Jeni Bond
- JenMarie
- Jenn Balcer
- Jenn Diercks
- Jenn O
- Jennifer E
- Jennifer Mick
- Jennifer Pereda
- Jennifer-Sweet Treat
- Joanne Basile
- Jodi Collins
- Julia Stainton
- Julie Masse
- Karen
- Kathryn Berthiaume
- Katie Cotton
- Kelley Holland
- Kendra
- Kim Scholfield
- Kris’s Color Stripes! Get inspired here
- Kristen Dubosque
- Kristin Eberline
- Kristine
- Laura @ Sunshine Stamper
- Laura Turnmire
- Laurie Schmidlin
- Lesa Rapp
- Linda Duke
- Linda-LSN
- Lindsey Botkin
- Lisa (lakind scs)
- Lisa Kind
- Lori Craig
- Maggie
- Mara Campbell
- Maria
- Maria Levine
- Mary
- MaryJo
- Melanie M
- Monique Hansen
- Moxie Fab World
- Pam Imholz
- PaperCrafts Connection
- Peppers and Pollywogs Kids party site
- Rebecca Grohall
- Rita
- Robyn
- Rose Ann
- Sarah Vrolyk
- Sharon Harnist
- Sharon Johnson
- Sharon Rivera (a chemisrty with paper)
- Sherrie
- Sophia Landry
- Storage Units, Ink, & More Blog
- Sue Berker
- Susan (Rainy)
- Tangii Crane
- Tracy
- Tricia Traxler
- Trudee
- Velta
- VivLyn
- Zena
MTME Pretty Palette Color Team
MTME Pretty Patterns Sketch Team
My Time Made Easy TM LLC
Shop till you drop!
Lauren Meader
About Me
Copyrighted material
Subscribe To My Blog
Pages
- About me
- Alexa’s Story!
- My Crafty Corner!
- My Time Made Easy™ LLC
- Our Make A Wish Trip to Disney!
- Resume/Publication List
Calendar
| M | T | W | T | F | S | S |
|---|---|---|---|---|---|---|
| 1 | 2 | 3 | 4 | 5 | 6 | 7 |
| 8 | 9 | 10 | 11 | 12 | 13 | 14 |
| 15 | 16 | 17 | 18 | 19 | 20 | 21 |
| 22 | 23 | 24 | 25 | 26 | 27 | 28 |
| 29 | 30 | |||||
Archives
- August 2013
- July 2013
- June 2013
- May 2013
- April 2013
- March 2013
- February 2013
- January 2013
- December 2012
- November 2012
- October 2012
- September 2012
- August 2012
- July 2012
- June 2012
- May 2012
- April 2012
- March 2012
- February 2012
- January 2012
- December 2011
- November 2011
- October 2011
- September 2011
- August 2011
- July 2011
- June 2011
- May 2011
- April 2011
- March 2011
- February 2011
- January 2011
- December 2010
- November 2010
- October 2010
- September 2010
- August 2010
- July 2010
- June 2010
- May 2010
- April 2010
- March 2010
- February 2010
- January 2010
- December 2009
- November 2009
- October 2009
- September 2009
- August 2009
- July 2009
- June 2009
- May 2009
- April 2009
- March 2009
- February 2009
- January 2009
- December 2008
- November 2008
- October 2008
- September 2008
- August 2008
- July 2008
- June 2008
- May 2008
- April 2008
- March 2008
- February 2008
- January 2008
- December 2007
- November 2007
- October 2007
- September 2007
- August 2007
- July 2007
- June 2007
- May 2007
- April 2007
- March 2007
- January 2007
Categories
- About Me
- All That Scraps
- blogger challenge
- camera/photo play
- Cards
- Contests
- family stuff
- FOR SALE
- Home decor/3-D items
- How to FAKE it!
- Introduction
- JUGS Challenge
- JustRite Stampers
- Lizzie Anne Designs
- My family stuff
- My Stamping Space
- My Time Made Easy
- My Time To Color Challenge
- My Time to Create Challenge
- My Timeless Template Challenge
- My Timeless Templates
- Mytime Mail
- MYTIME MOVIE/VIDEOs
- Papertrey Newsletter
- Pink Cat Studio
- Pretty Palette Challenge
- Pretty Patterns Sketch
- Product Opinions and Must haves
- Recipe's
- Saturday Sketch
- Smilebox Creations
- Stampavie
- Tutorials
- Uncategorized
- videos
Most Popular
- Create your own Onesie Card Tutorial-and important NOTE! PLEASE READ (2529)
- Saturday Sketch-Boxed bag holder (2333)
- Going GREEN! Fancy Flower Flourish-Closure Video (1478)
- Fabulous Favorite - Giveaway! (1336)
- a Prayer Request (1232)
- QUICK-Easter Baskets from Nestabilities-PTI style-and blog challenge (1063)
- Teaser Sketch (999)
- February Release Giveway! (and a little peek) (996)
- Group Post and Rambling Rose Video Tutorial (985)
- GIVEAWAY! Who wants it all?! (895)
Recent Comments (RSS)
- 첫충사이트: 완전히 흥미로운 블로그 게시입니다. 저는
- sarah: Wow, Lauren, what a stunning
- hedie: خرید راهبند
- 야동: Love to read it,Waiting For
- 야동: This seller is in a
- 바카라사이트: 여기 처음 왔어요. 나는이 게시판을
- 야동티비: I was surfing the Internet
- 바카라사이트: 비슷한 주제에 대한 흥미로운 정보를
- 바카라사이트: "여기에 제공해 주신 귀중한 정보와
- 온라인홀덤: 유익한 웹 사이트를 게시하는 데
Copyright © 2007 - My Time, My Creations, My Stampendence - is proudly powered by WordPress
This blog has been Tweaked and Designed by Sara Williams