Archive for the ‘Product Opinions and Must haves’ Category
Video: How to use Fantasy Film
Apr 20, 2009 Author: mytime | Filed under: Cards, MYTIME MOVIE/VIDEOs, Product Opinions and Must haves, Tutorials, videosI got a video done! YEAH!! AND for MONDAY!! DOUBLE YEAH!
Now I know its not he flower one you are ALL waiting on, but that one will take some time! I did have it filmed but had a mishap.
I have the intro done and editied , then when I went to find and edit the flower tutorial, the actual tutorial accidentally got erased, when I was video taping Amber riding her bicycle! I’d rather lose the flower thing which I can re-create, than my daughter’s video! I can recreate that moment.
You know whats funny si she is 4 and can ride a bike, but the other 2 won’t do it! Weird! Alexa is terrified (she has depth perception issues, where everything seems higher, and scarier) but Noah just isn’t interested.
Anywho…..this one uses a product called Fantasy Film. It is by Art Glitter
TRUST ME when I tell you, you don’t want to Google “fantasy film” OK! Just go to the site and look for where they sell it! LOL!
In the video I show you HOW to use, and I also share how I custom color my film 😀 Can you say LOVE IT!!
Here is the detail photo of the card sample using the Fantasy Film

Not the BEST photo-sorry! Bad lighting :C
My mojo is on a break :C My template release always sucks every last bit of mojo out of me for like a WEEK! On top of that Im always adding even MORE template ideas each month to the bunch we have. So, sometimes I can’t get out of TEMPLATE mode! I just love them SOOOOO much. I could make boxes ALL day 😀
OK back to the subject:
The butterfly is from a set called Butterfly Wings from CTMH that Katie sent me, since she KNEW I’d love it. It was the Stamp of the Month for March, and sadly I got sick and had my surgery so am JUST getting around to using it-SORRY KATIE!!
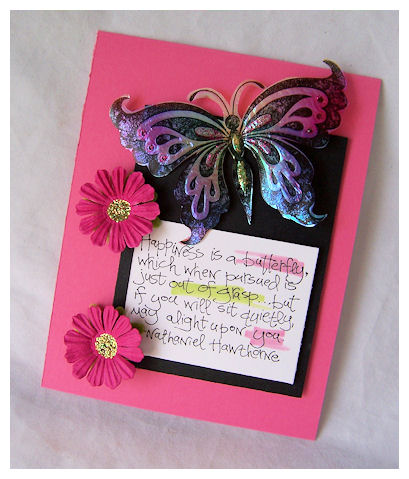
So I kept this SIMPLE! Plain actually. But with a STUNNING butterfly why over do it?!
Anyway, its a super set! I used my Sketch 31for it. Told ya I had a sample! LOL! I just wanted to share the video with it.
Sentiment is a SU! set. Butterfly of Happiness I believe.
I have tons planned for videos, but have just been SO busy! Kids are on vacation-CRAZY!! But I WILL somehow some way share it all eventually.
I have so much fun SHOWING you what Im doing as oppose to just typing it all up!!
I didn’t do an “intro” since its a basic technique. Why listen to me blabber on for 2 minutes! LOL! You know how I can talk! I spared you all my banter during one part, and fast forwarded myself too. I think its hilarious! I couldn’t figure out HOW to MUTE me! LOL! So I added some crazy music to it too. So be ready to turn down the volume. I love watching myself in fast forward! LOL! I wish I could actually work that fast, as I feel like my brain moves that quick, but my poor body can’t keep up. Thank goodness for notebooks. Pages of chicken scratched ideas, from my awakenings at 2 am-seriously!
I also wanted to let it be visible on YouTube for everyone-so I hope you like it. You have NO IDEA how long that simple 8 minute clip takes to edit! OYE!!
So I hope you enjoy it!
Tomorrow begins the peeks for Pink Cat Studio!!
Till then
FIRST Template Challenge! Cherry Blossom Gift Set
Apr 18, 2009 Author: mytime | Filed under: Home decor/3-D items, My Timeless Template Challenge, My Timeless Templates, Papertrey Newsletter, Product Opinions and Must havesInspiration is EVERYWHERE!!!
Its always great to start with an inspiration piece when you are creating something! So that brings me to my post tonight.
All your comments (and private emails :D) have truly inspired me to get it together!
Lots of great, fresh ideas. That is why I love you all. You totally energize me 😀
So here we go!

Truly Delicate Gift Set
All this talk about templates, and challenges, lead me to use one of my first My Timeless Template © releases called For Keep{Sake}!
I love the window cut out option! Lets you peek at what fabulousness is inside-awaiting you!
Cherry Blossom 2oz. body wash, body lotion, body spray, and loofah-fit in here perfectly
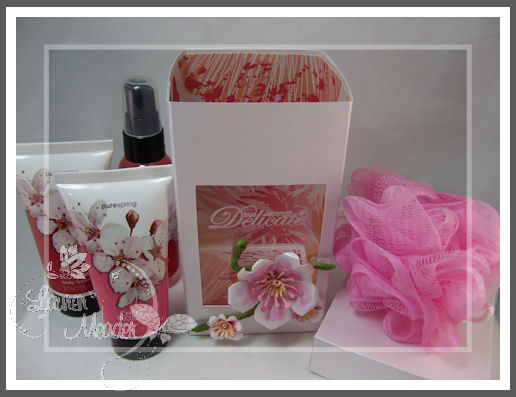
I was SO inspired by the Cherry Blossom bath set I purchased for a gift item, that I designed my packaging around it! I always say its ALL about the presentation!
Many bath and body products are just plain GORGEOUS! No need to cover them up! So let’s get inspired by them for our gift design.
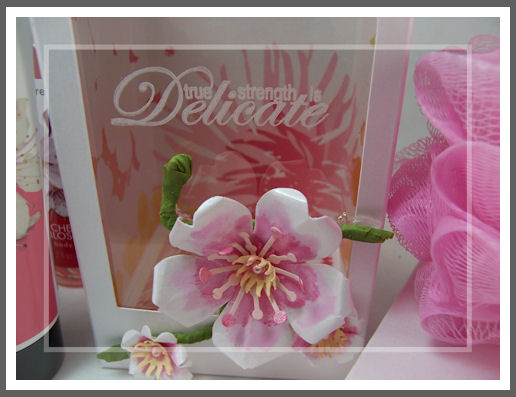
This is my handmade Cherry Blossom flower-inspired by my bath set.
Soooooo many of you said you want to see template challenges so here we go! Let’s see how many of you actually want to give this a go!
Based on the comments and MANY emails I think I figured out how to SPICE it up and keep in fresh and interesting!!
Depending on participation -I think I have decided WHAT I want to do on my blog now!
One week will be a template challenge, one week will be an inspiration challenge, another week will be a color challenge, then another week sketch challenge-not in that order! LOL! So something new each week.
Here is the first template challenge:
My Timeless Template Challenge 01 (keyword MTTC01)
Use ANY template YOU like. We have 2 FREE templates-so NO excuses!! You have a week to create something.
Like I did-Design your template/package based on the label of a bath product of your choice—> FROM HERE
(unless you have your own already)
Post the link to the inspiration piece WITH the photos of your finished template
Link your creation HERE
This should be so fun to see 😀
Now onto my package details…..
My For Keep{Sake} template was made from shimmer white cardstock.
I have long since wanted to line the INSIDE of my box, so I finally did that here today. LOVE the look.
NOTE: It is easiest to line it inside BEFORE assembling!
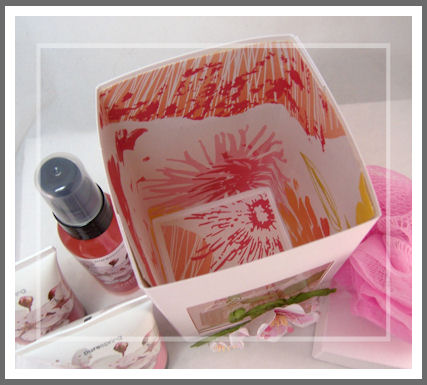
I used the Mimosa paper, which is shimmery by SEI. What a totally professional and finished look! Don’t you think? Remember its always the LITTLE details that give that WOW! factor.
You can see the little bath set in the window.
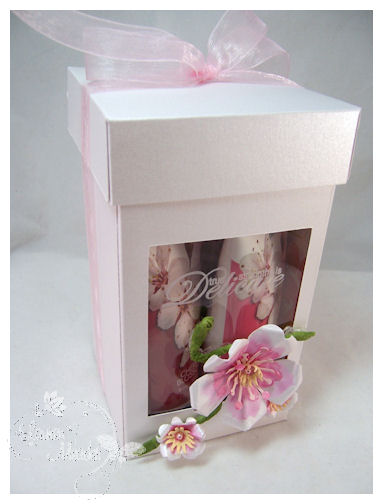
I love how the cherry blossoms came out!
My first time making them too-based on the ones on the bath bottles.

I do have a flower video planned-hopefully filming tomorrow. I just NEED a breather right now, and doing this was just plain FUN, which is definitely what I needed.
This gift set is now in my Etsy Shop!
The flowers are made by me, and painted with a Shimmerz paint! I love the look.
Think of what a FABULOUS gift JUST the BOX is, let alone the yummy smelling gift set inside!
The window is a sentiment from Remember set ” True Strength is Delicate”
Just love this.
OK! Now its YOUR turn!!
I can’t wait to see what YOU do.
Thanks for all the suggestions and emails. My head is spinning 😀
Papertrey Ink April Release
Apr 14, 2009 Author: mytime | Filed under: Home decor/3-D items, My Timeless Templates, Product Opinions and Must havesWell it is FINALLY here———> The Papertrey Ink Release!
Its crazy how much amazing stuff has gone on with the release this month 😀
My Timeless Templates ©-Get a Handle On It © , and From the Desk Of ©-are NOW available for purchase!
I am STILL working on some MORE samples 😀
As for my release projects this month-there is only ONE you haven’t seen :C YUP! One measly sample. Don’t forget I did share LOTS of eye candy over the last few days. A SAHM to 3 can only do so much ya know.
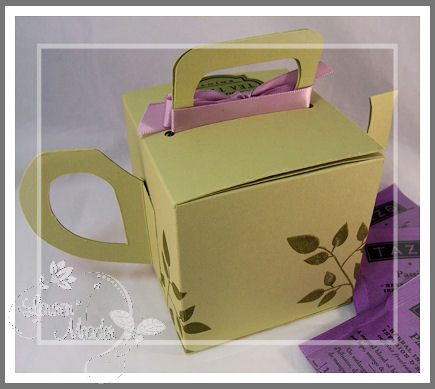
My last peek uses Tea for Two
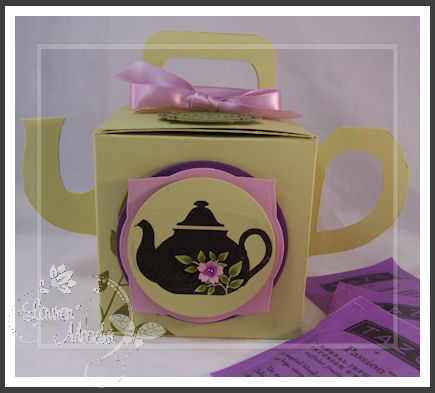
“I’m a little tea pot ” box

I seriously sang the “Im a little teapot” song while making this project, and typing this post! LOL! Its actually driving me INSANE!
This is the detail shot of my project focus. I punched and colored a mini flower, and colored in my leaves. This is my favorite tea pot image from the set. Maybe because Beautiful Blooms is my ALL TIME favorite flower set-to date! I also LOVE the layering of the nestabilities.
This is the best tea set EVER!!!! I’m beyond in love with it 😀 So many possibilities. For some reason I’m on a PURPLE kick this month! LOL! In case you didn’t notice. I think 3 of my projects used it. Maybe more. Whose counting right? As long as it all works.
OK so here is the TAH-DAH! moment…….
I used my Timeless Template- Get a Handle On It, to create a gift box that LOOKS like a tea pot.
Can you say LOVE IT?!!!!! (yes I am very excited over it)
How flippin cute is that?!
It was inspired by the tea pot on the box.
I am SOOOOOOO proud of it, because I free-handed the handle and spout template-which is double sided. I so stink at DRAWING-so I let my scissors be my guide.
Did you think this box could be a tea pot?
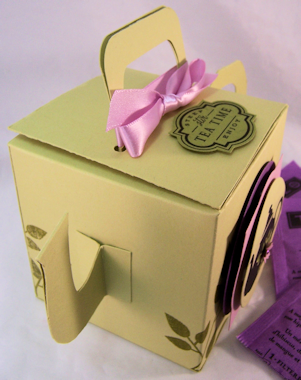
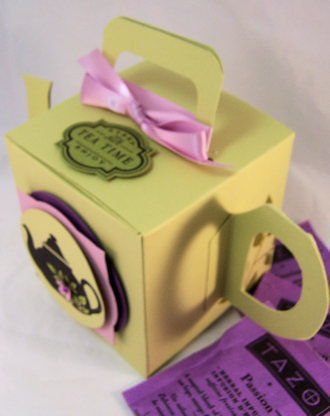
Tha handle and spout, adhere NEATLY to the box, which is the KEY!
EEK! Blurry photo ALERT! Sorry.
I did stamp the back too-can’t forget that.
I’m seriously IN LOVE! Thank goodness I had the right frame of mind to make another handle/spout “template” for myself BEFORE adhering it to my box, and attempting it again. These were perfect on the FIRST try! Not something that happens often-let me tell you.
Now here is the “label” on the box top.
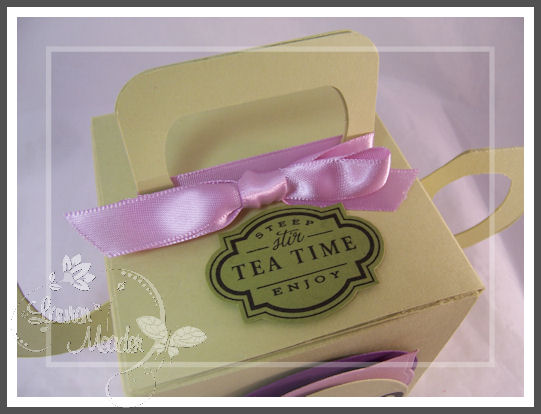
I think its just so darn purty. I used the Key Tag Punch to make my handle on the top.
Inside this Tea Pot Box-there is Passion Tea from TAZO. An entire box fits-with room on the sides.
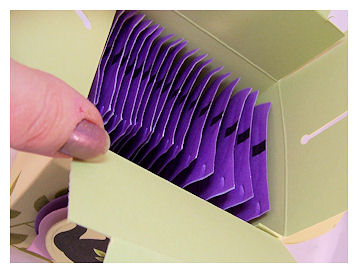
Despite the photo-it matched my project PERFECTLY!!!
Love packaging ever-day items, into special gifts 😀 I mean really. You package “tea” in wrapping paper and its *just* tea! You put it in this box, and its SO much more. Don’t you think?
For a whopping $5 this template offers so much variety! I really love it. Well I guess thats a lame statement! LOL! I wouldn’t do anything I didn’t LOVE! LOL!
Supplies all from Papertrey Ink
My Timeless Template: From the Desk Of
Stamps: Two for Tea, Beautiful Blooms
Cardstock: Spring Moss, Ripe Avocado, Lavender Moon, and eggplant
Ink: Black and copic markers
Satin ribbon in Lavender Moon
Labels 3 & circle nestability
Flower punch, adhesive pearl
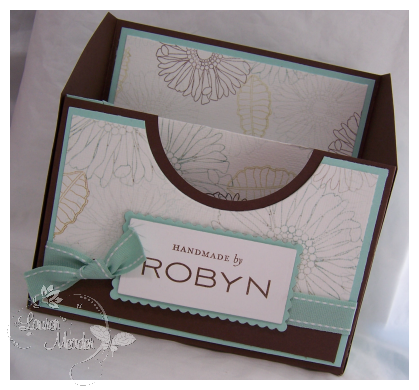
Lastly-this was the concept project for “From the Desk Of” template
For Robyn
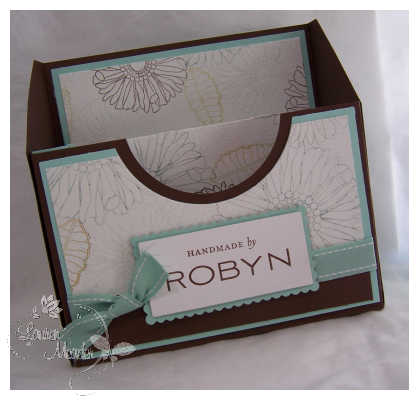
I made my own patterned paper using Friends Til the End. I also used Simply Stationery and Fresh Alpha!
We did re-enforce the “original” divider, from the original you see here, for a more STURDY box.
All the tweaking that comes after the original concept is put into production. Always lots more tweaking. Often times I just NEED to get it out onto cardstock-ASAP! Then when I know it “works” I tweak and tweak some more.
Now this box can definitely be given EMPTY and still produce a WOW!
This is a comment taken from Robyn (:D) The friend I made this for-on my blog yesterday
“Hey Lauren …. your two new creations are splendid 🙂 I hope all your ~peeps~ realize how beautiful and EASY your Templates are to print and recreate!
And I’m especially fortunate, as I am the proud owner of one of Lauren’s “From The Desk Of…” creations that she personally created for me with my name on it. I can’t tell you how many friends and family comment on it’s {{{WOW }}} factor and how stunning it is sitting on my desk :0) I’ve also have two requests to make this item already after seeing mine, from friends & family! It totally blows me away every time I see it, knowing that it’s made from paper, rubber & ink … but also because I know Lauren puts her Heart & Soul into all her creations 🙂
So make sure you download some ~*Timeless Templates*~ tonight, via PTI; you will fall in love with Lauren all over again =)”
Isn’t she sweet?! She always makes my day.
So there you have it! All my peeks are done!
I hope you enjoyed the items I shared here. I literally POUR every OUNCE of creative being I have into these projects each month-to ensure lots of creative ideas 😀 You are all so inspiring to me 😀 Your kind words and sharing YOUR creations, really keeps me going. Your my subliminal-energizer battery! LOL!
So once again-thanks for helping inspire me to better my best!
More to come tomorrow…………..
VIDEO-Monday’s with Mytime-Copic Coloring Tutorial
Jan 26, 2009 Author: mytime | Filed under: Cards, MYTIME MOVIE/VIDEOs, Product Opinions and Must haves, TutorialsQuite honestly this video has got to be the MOST intimidating thing I have had to do-to date!
That, and the fact I considered (for a very brief moment) sharing a video of me in my “before” jeans and “after” jeans! LOL! To hopefully motivate you all some more. That will not be happening! LOL! Just like a commercial-I could so be on with my clothing-too funny. The good thing is bathing suit shopping won’t be pure torture this year. I just can’t stand spending $40 on a suit. They are insanely pricey.
OK back to the subject.
So for today’s video’s I did the much asked for Copic Coloring Tutorial.
I am not a coloring expert. Nor do I claim to be. I honestly don’t even feel qualified, but you all wanted to see how I color, and some asked about making my scenery-so its my “job” to share it all with you! LOL! So be gentle! I do hope you gain something from it-even if its pure amusement.
This is the finished image I have colored to create my sample here
I used my Saturday Sketch #21-mytimess21
Now for the videos:
EDITING TO ADD! My videos are ON my site in the post above!
Kurtis DID enable them so we are all set, from here on out!
The rest of my babble below was my frustration with the video situation, but now its all smooth sailing!
—————————————————————–
GOOD NEWS!! My plug-ins will be enabled soon. I tried to do it myself, and only got a black box to work. That is huge progress.What that means is in the future you can ALL watch it here, on my blog-without going to Veoh! Just like the YouTube one’s I am able to feature.
Again I did post on Veoh. There are MANY reasons I like Veoh more.
Easy to upload, better video quality. No time restrictions, and the list goes on. I tried to do 2 parts so that I could post to YouTube. Obviously-of course, I went over! After MUCH editing too! So Im no longer breaking it up into segments, after this. Im uploading to ONE place, ONE video. It is too much more of my time to try to keep editing down, and then to split it up, save and load 2 or three segments. Stresses me out just reliving it in blog land! LOL! This is the part of the process that causes me the most duress-TIME! So I’m done with it.
I offer these videos for a fresh approach, and something fun. I won’t want to do them if I have to keep doing so much just to keep everyone happy. (Not that I dont want you to be happy )
I know YouTube is more “popular” but I don’t need to be popular, or use the most popular place. I want to use what site can best accommodate me, and right now that isn’t YouTube. I’m actually in PURE awe at the girls who can whip up an under 10 video. My personality and chatty nature just can’t handle it-sadly. I’m a talker, and a visual person. so I feel its all relevant
We are women-Its impossible for us to ALL be happy ALL the time! LOL!
I apologize if you cannot view it where you are from :C I do not know how you could view it otherwise. Once my plugin gets working everyone should be able to view it right here, no matter what Country you are from-so YEAH! Let’s cross our fingers shall we.
Now onto the details:
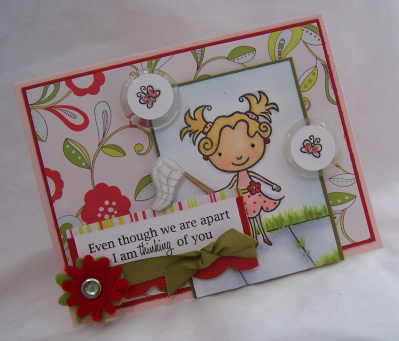
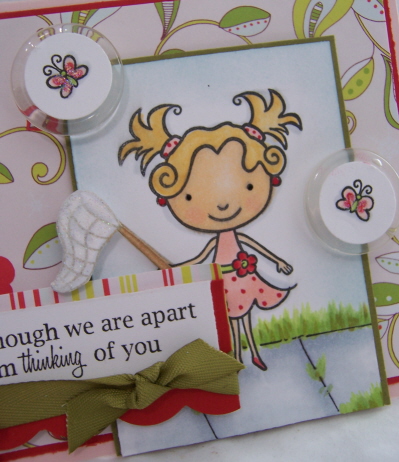
What better image to use than my Dress Up Lily Amber set from Pink Cat Studio? (remember you can personalize those! So I got Amber stamps!!) In this video I show you step by step (OK so severely edited steps in some parts) how to get Lily colored, and in this scenery!
She is so cute, I think.
My colors are Sweet Blush, Pure Poppy, Ripe Avocado, white, and some paper I got at Target a year ago! LOL!
The sentiment is from Papertrey Ink- Mailbox Greetings. That set has some rockin sentiments.
OK I hope you enjoy the video’s. You know I love hearing your thoughts on them. I think I improve a little each time.
Please don’t be harsh in judgement on my coloring-since I seriously have no claim to be a “professional”. Just a regular, self taught stamper, trying to show you some of what I do while playing around 😀
Thats the best way to learn-hands on.
OK I do enough blabbering in the video’s, so I’ll hush up now.
OK I need a nap. I have been up all weekend with the kids being sick so I need to take advantage of the quiet. I’m wiped out.
Enjoy!
And as always thanks for stopping by with a hello, the kind words and support 😀
Oh, and thanks for watching.
PS Yes I know I look exhausted in the video too-I was.
Mytime’s Top 10 things you need for Christmas -and poop garland
Dec 8, 2008 Author: mytime | Filed under: Cards, Product Opinions and Must havesI know-what a title right?
I am here to tell you that YEAH! my cat finally pooped out the 4 ft of balloon string. Oh! what a site that was! Poop-attached to some string, more poop, some more string…….you get the idea. Amber exclaimed “Its like a bunch of poopy Christmas garland! Do we hang it up on the tree now?!”
EW! No! Amber, we throw it away. Kids say the darndest things let me tell you. On her behalf it was quite the “garland” LOL!
As I reflect on this past year I have dealt with many poop issues! Not sure what is up with that, but I certainly hope this upcoming year doesn’t include any of that. I also don’t think I will ever have balloons at a home party again!
I am certainly thankful we didn’t TRY to come up with the $3,100 for the surgery since he was able to pass it. Crazy cat. How delicious can 4ft of balloon string actually be? Can you imagine choking that down? Geesh.
Now I know you don’t come here to read about poop garland, so let me find some to share shall we?
Top 10 things you NEED for Christmas:
Every year I am asked what should YOU ask for this holiday. This is a list of my TOP 10 must haves that “I” personally find useful and amazing. This is just my opinion, so feel free to chime in here with your opinions and must haves if you like.
NOTE: most of this is expensive. That is why you ask for it for a holiday! LOL!
1) Well you know I HAVE to list My Timeless Templates first! LOL! Seriously give them a try. They make gift giving fun & easy. Plus they are CHEAP! If you aren’t into 3D items yet, you will be. Cost $5 each! OR try 2 of them FREE! Even the kids can get in on the fun for an afternoon craft while mommy stamps 😀
2)SU Ink ink storage-I am loving mine! If you are in the market for a storage caddy this is really awesome. It holds so much, and is a pure dream if you own a lot of ink. Unlike the Stampin Up! Ink caddy (I own 2 of them) they don’t BEND/Buckle. Mine is like buckling under the pressure of all the ink. AND my SU ink one spins like a dream. Its all wood but not too heavy to lift and move. Recently my MIL borrowed ALL my SU! Craft ink and took the entire caddy with her to the battered woman’s shelter she volunteers at. So no problem with portability!
3) A Scor-Pal and Scor-Mat (oh and their adhesive Scor- tape and glitter cloth ROCKS the house too!!) I know I put this on the list every year, but that is because it really is THAT good!! You can make a bunch of scores on your cardstock without even moving the paper! And with the mat you never have to take it off your workspace! I LOVE IT!!
Oh and while you are at it buy the little Fiskars fingertip Craft Knife. I use my regularly and LOVE it! So cheap too! No more soar fingers from pressing down. Handles so easy too.
Shop @ ATS, Scor-Pal direct, or Papertrey Ink
4) A photo tent with lighting! HERE is my post a long time ago about my softbox photo set up. I got mine on EBAY-and this is just like the one I have. It comes with the lighting which is a fab deal!! This is a must for any of us in this papercraft industry! Photos day or night! I use mine as often as I can. I do recommend you getting a extra set of lighting bulbs immediately! That way when one goes out you can still use your tent. They last a while but I have dropped my lights on numerous occasions! LOL! Mine folds right up when I am done and goes in the closet of my stamp room. Seriously a MUST. Many of you out there wanting to get into design teams or move to a “professional” level-well photos is a BIG KEY to your work. I have been trying to take the time to take better photos as of late.
5) A good camera and printer. This is also vital to any papercrafter who wants to showcase their art! Bad photos don’t show the lovely details of all your hard work. The better the photos the more appealing the artwork. Think about your favorite crafters. How are their photos? This also helps with submissions to magazines!
The ONLY thing I NEED and want for Christmas is a Canon Rebel XT camera!I NED it it for my “work” don’t i? I can use it as a write off even. I’d be happy with that one OR I’m thinking the Canon 50D . Im certain AFTER Christmas maybe there will be a sale! Right now I have a Kodak EasyShare Z730? Its OK and does the job, but I would be over the moon with a professional grade camera. I do have a Canon printer, and it prints out on Papertrey Ink cardstock like a DREAM!!!!!!!!!!! Oh and my new love for Digi images.
6) Good photo editing software-one goes with the other right! I haveCorel PaintShopPro & love it. Its easy to use, and the “directions” are there as you try to use it, so you aren’t stumped or needing to look up every little thing in a book. I can edit, brighten, darken, add photos over eachother, remove any flaws, get watermarks, cool borders….stuff like that. Cool stuff. Granted its NOT stamping, but its cool.
7) Copic markers. SERIOUSLY people, they are a must have! I use mine everyday. I color A LOT. I enjoy it immensely. If you like to color-these are a MUST. Start with set A , then onto B etc. You need NO OTHER coloring medium if you have these-I swear. Love them.
8)ANY nestabilities! These all just rock. I also use these just about every time I stamp! How did the world survive before this? I am over the moon for these, and use them endlessly. Start with your favorite shape, and go from there. I would get anything scalloped FIRST since you can make your own straight cuts, like the square and rectangles, then Id get “shapes” like circles or ovals-then on from there. NOTE: I ONLY purchase the LARGER selection from ALL the shapes. I never use the smaller sizes, although I have the entire collection of rectangles, since its my most used shape.
While you are buying this PLEASE tell me you have Cuttlebug or some other die cut machine. If you don’t get that FIRST!!!!!!!!!!!!!
9) I still love my ATG 1/4″ Applicator Gun. Its the best adhesive gun-ever! IMO. I get 36yds of adhesive for only $2.54 each roll! OR the Gold for photo safe stuff for only $3.33 a roll.That saves you LOTS of $$ on adhesive!! This place ships uber fast too.
10)A good Paper Cutter! This is a very subjective topic- as each person is different, and something that is worth the investment. I think one that allows you to cut 12X12 is VITAL!!
I now have the Tonic Paper Cutter and it works fabulous (thanks Sonia!!) but I do still use my cheap Fiskars time to time 😀
BONUS : Anything organizational, and of course Gift certificates!! Looks like all our fave online stores carry them. Thats a great start! Then you can buy what YOU want, when you want it.
How about some eye candy now?
Got Snow?

This uses my photo tent, photo editing software, and my Copic markers! LOL!
I love this little image from SugarPlums Snowmen–
Here is my close up view
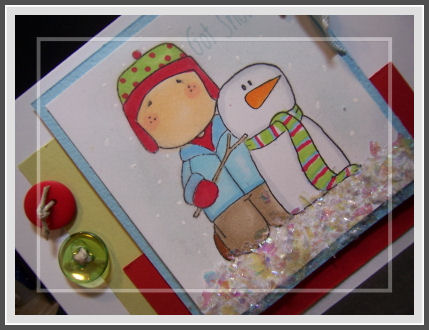
Added some chunky glitter too.
OK that is all for me. I need to run.
I hope whatever you do today you enjoy the day. Thanks for stopping by here
In with the New, and using the old.
Jan 22, 2008 Author: mytime | Filed under: Product Opinions and Must haves, TutorialsOK by my title you are probably thinking “WHAT on earth is Lauren blabbering about now?”
I am stepping out of the box a little (for me), trying a new technique, and doing a different style of card.
Just so you know, I AM capable of transforming my style into whatever I want, its just not often that I feel the need to mix it up! But today I mixed away.
Well, I have a NEW product to share with you all. New to me anyway.
I “showcased” the product by making my card all old, distressed, and collagey, with a REAL OLD set-Garden Collage. There is the ” old” part.
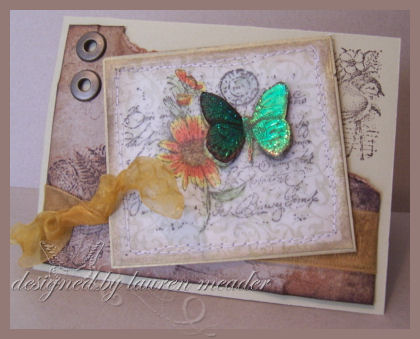 Beautiful Butterfly Collage
This was a SU! Sell-A-Bration set at least 2 years ago. So ANCIENT to me! LOL! I got it not long after I started stamping. It had a butterfly so I fell in love with it.
I heated my gold ribbon, to make it curl. I stamped the main image in vellum, and layered onto patterned paper by Prima. I used my sewing machine to stitch around the edges. I sponged the edges, and added some gold cardstock as well.
It picks up the gold in the butterfly.
Notice my GORGEOUS-POP OFF THE PAGE-GLIMMERY-3D butterfly of beauty?
How could you not right? The butterfly is popped off the page.
But what makes it have that special look?
Well I made the butterfly using a product called Fantasy Film.
It’s the coolest thing ever.
It was bought in place of what my friend thought was Bling paper. Can’t blame them, its very close looking.
After getting it I found I didn’t have the correct things to use it :C BUMMER! So off to the store I went, to get what I needed.
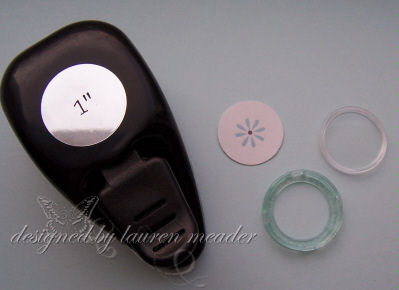
Here is what you need to do to use Fantasy Film
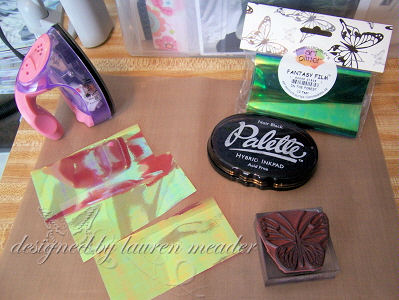
A stamp 😀
You need the Fantasy Film-DUH! It cost $7.00 for the roll you see here. Comes in several colors like clear iridescent white, pinkish, greenish—-and thats all they had. May come in other colors-not sure.
NOTE: You need to cut and layer the film over the stamped image, 3 times. (see the 3 pieces)
A permanent ink such as StazOn or Pallette ink.
A Iron. I use Heidi Swapp’s ribbon iron-works like a charm 😀
Most importantly, a nonstick layer! I got the non stick craft mat-shown in photo. It was $10. has many uses, especially if you use your heat gun frequently.
Here is what you do:
1) Ink your stamp with permanent ink. Place stamp ink side up.
2) Cut/layer film over stamped image 3-4 times.
3) Place non stick parchment paper or Craft mat over film that covers stamp.
4) Place iron on mat, and rub in circles for about 30+ seconds. Depending on your iron.
5) Take iron off image, remove mat, and now you have your inked/melted fantasy film image!
6) Trim out image, and design card as desired.
COOL huh?
The process is actually very fast-after you get it down.
The more solid the lines the image has the better the look you get.
I have a butterfly from a set, (not used yet) and it looks great.
AND I tested it on Acrylic stamps! Oh I was petrified!!!! But it worked. I am not saying I endorse YOU doing it, nor am I going to claim responsibility if it doesn’t work for you, but I personally had no problem using it with a Papertrey Ink set. You will see that sample soon.
Also the film mets, and morphs into a variety of colors. The more it mels the more it morph’s. Pretty cool look!
I hope you give me your feedback on this product if you get a chance!
Till tomorrow.
RUN! RUN!!! As fast as you can……
Jan 22, 2008 Author: mytime | Filed under: Product Opinions and Must havesto your nearest Michaels.
On a shopping excursion to M’s, I was browsing the dollar spot, and-right next to it, found these babies!
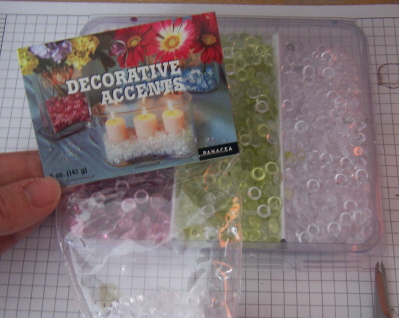
Look familiar?
Well, if you are saying DUH! Its says right on the package Decorative Accents-that obviously go in your candle holder/vase’s then you are SO WRONG!
These are JUST like the Robin’s Nest Dew Drops! I mean EXACTLY! same size and everything. Only for an entire bag of these you will only pay $3.99!!
I was tipped off to these during my blog browsing (which is not very often :C), so if you know who originally made this find-post it here!
I had to see for myself. YUP! They are exactly the same.
You see I got the pink/purple variety, green variety, and clear-so I can use my Copic marker’s to color them whatever color I want 😀 They also had a blue variety. No need for that.
Now the bag was rather big, and was NOT with the plant/vase stuff. It was near where you buy decorative home greenery, on an end cap!
So I wondered HOW I could store these.
As you can see in the above photo, I used a old SU! plastic stamp case. I didn’t want to mix them up, so I did this
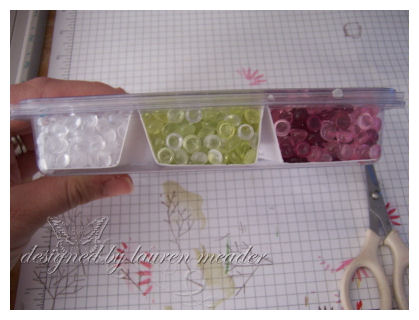
I simply measured my case size. Then cut cardstock a bit longer (about 4 inches longer) in length. Scored it, with my Scor-Pal, to make divider’s that fit it inside!
The dividers are scored at (for example) 2-3-4 then again at 6-7-8. This gives you the mountain you need to support the weight of the beads, and keep them separate! Your measurements will vary depending on case size and how many packages of bead thingy’s you purchase.
Just put a bit on adhesive on the bottom of the divider before you place it in. Add beads-DONE!
Cool huh?
I have an INSANELY busy day today, so hope to post some eye candy later.
I have alot to share this week, so stay tuned 😀
INCLUDING a cool product I NEVER heard of before. You are going to want to see it.
HINT-its shines, and changes color.
Now I know you want to know what it is 😀
Till then.
Got Spotz? Why you need to RUN to your toy store!
Jan 12, 2008 Author: mytime | Filed under: Cards, Product Opinions and Must havesOK Sorry, I’m SO late getting this Saturday Sketch post done!
I have been busy PLAYING, with my daughter’s new TOY. I also bought one to send out to my PSF Staci-for her “daughter’s” Becca and Rachel 😀 She may not give it to them either! LOL!
LADIES TOYS AREN’T JUST FOR KIDS ANYMORE!
This is a toy that is STAMPER APPROVED! A toy that I never should have given them, and saved for ME!
I did confiscate some of it though 😀 Does that make me a bad and selfish mommy? Maybe. Will I get more use from it then they will-Um YEAH!!! LOL!
Do you to try this-YES! YES! You do.
Trust me-you will be thanking me, when you see what WICKED AWESOME thing I have to share with all of you today!
I am using my own wording and experience to type up this post! No professional Spotz person here, so keep that in mind as I use my own ” valley girl, stamper mom, with a New England accent to review this product”
It is a product I found at Target called SPOTZ (be sure you click the link OK!). Now you Canadians, don’t fret. I did a search and theyare sold at Toys R Us, and Walmart! Although after this post, they may sell out.
This Spotz maker is so beyond COOL, for the paper crafter. Its a machine (you don’t need the actual machine though), that comes with printed vellum sheets (that gets cut into 1 inch circles), and get’s put into funky cool plastic rims (some have BLING!!!), where you can have them viewed through the clear plastic side, or just the pretty rim side.
Here is the photo of the machine/supplies. You can buy the Spotz accessories separately.

Now you don’t need the machine (as stated above)-unless your kids are using it for play. I did buy the machine, and found the purpose of it is so the girls canSAFELY cut a 1 inch circle-then seal the clear plastic case on their Spotz tags.
YOU will just want the accessories pack.
Click photo to enlarge
 1 inch circle punch-then the Spotz super cool rims, with clear window insert.
You can use/keep the printed vellum cardstock sheets or toss them. Some are pretty cool.
So upon viewing these and playing-as I said I found no machine necessary, I found you just put in your image, them pop in the clear layer. Pops in pretty easy. I will say you can’t really pop the clear lid off once it’s popped in. At least not without possibly injuring yourself! LOL!
I also wanted to find what ELSE these cool rims can do!
So here I will share my results.
NOTE: the MACHINE says to only use the Spotz images that come with it. I believe it says that because their Spotz MAKER, is only strong enough to cut through the vellum, not card-stock, patterned paper, or photos and whatnot.
The first card-uses my own vellum cardstock, and is this weekend’s Saturday Sketch! I hope you get to try it out.
Here is the Sketch 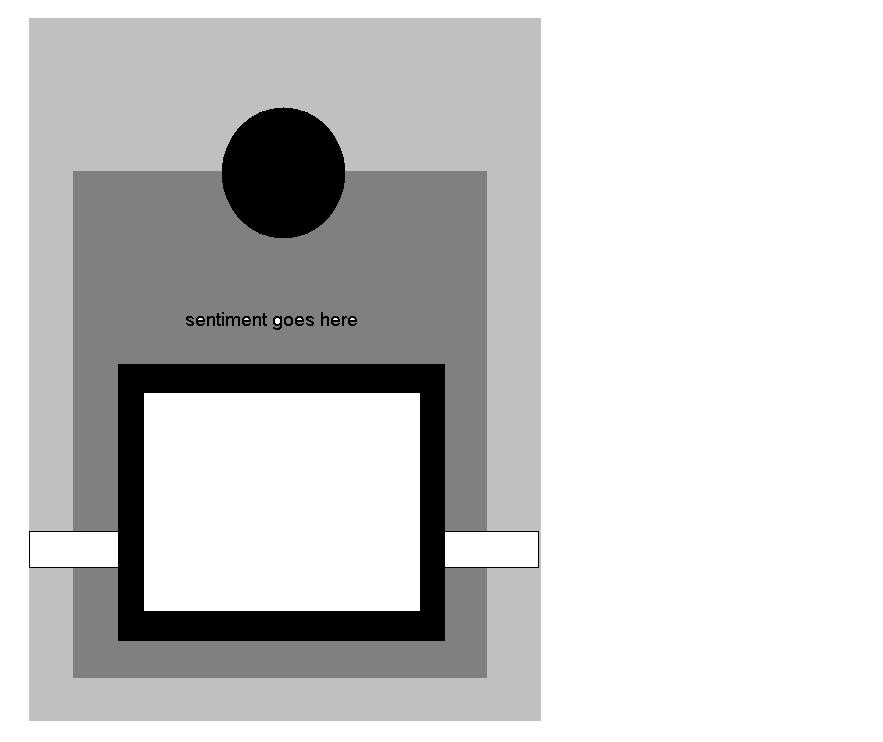 Click to enlarge. You know I LOVE circles!
 click photo to enlarge. Close-up view of Spotz
I stamped, then colored this butterfly (by Autumn Leaves from my Elf). Popped it into the rim, so that it would show through the plastic side. You can view it on both sides, since it is vellum card-stock. Adhered with a glue dot.
I had to combine these sets after seeing Lynda’s card, made with one of my sketches. I also had to get the paper, as you will see below!
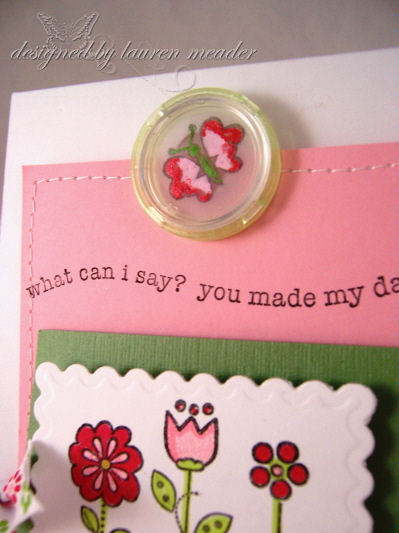
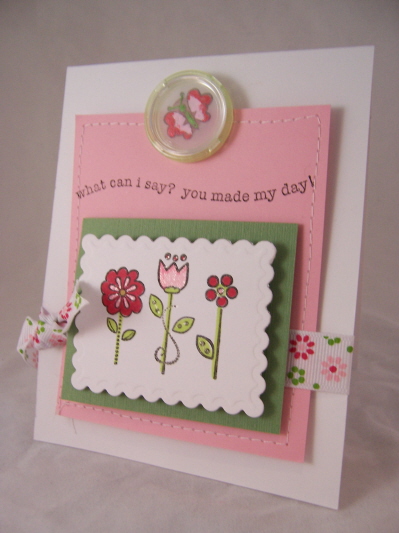
 You made my day
This card is for my Elf, who sent me this butterfly image, used in the Spotz. Colored with my Glitter pens from Sam’s Club.
The Snag’Em flowers are by Imaginisce, and were purchased—HERE. They are colored with my Copic markers, and die cut with my rectangle nestabilities. My Atyou glitter pens add more sparkle 😀
Sentiment is Stem Sayings, by Stampin Up! Ribbon is from Michaels. I stitched the pink layer with my $4 Rite Aid sewing machine (loving that).
So that card showed you can make your won VELLUM images, like what comes with it-not it was time to try something else out!
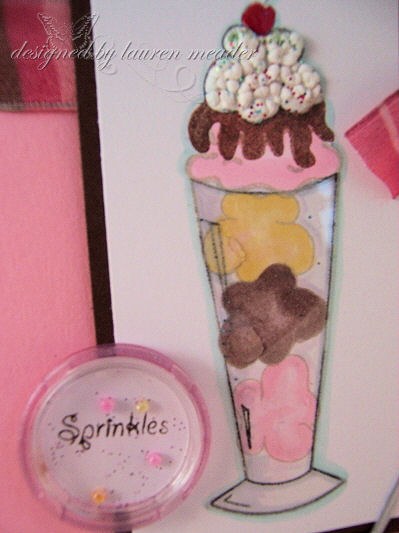
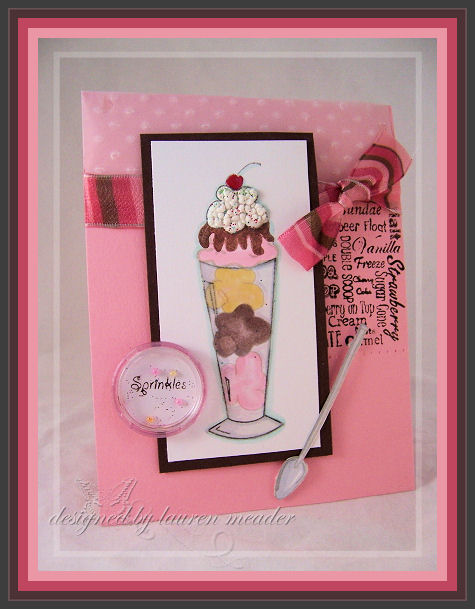 Sundae Sprinkles
Is this not the YUMMIEST of YUM? What a “sweet” card 😀
I decided I would try stamped CARDSTOCK-Papertrey Ink white (which is thick), and microbeads. Think SHAKER card. I also put in some glitter.
I will say the cardstock was an easy fit. So patterned paper would be a breeze. The beads won’t shake, but maybe if we used paper, or just glitter it would be perfect.
 Click for closer view
Now for the card-I used a favorite set of mine from ACWP-called Ice Cream Party! I stamped the “glass” sundae cup twice-once on my cardstock, then again on a window sheet (cut out, and layered over image) to look like glass.
Liquid applique for the -whipped topping, and liquid pearls for the cherry.
Ribbon is from Michaels, and the dotted embossed vellum bkgd was done using my Fiskars texture plate assortment #1.
I also loved this layout too. The side panel is the bkgd block from that stamp set.
Now, I wanted to try something else. Putting items in there.
Prima’s in the tags! They are enclosed, with the clear cover. A wicked cute look in person!
 A little note
Now how super cute is that? Told you I LOVE little birds too.
The Spotz, are fit into circles, which are popped out with my 1 1/4 circle punch.
This bird is from—HERE, as is the For Peep’s Sake paper. Just scored the edges of the bird layer with my Scor-Pal! Who says you NEED every size nestabilities?
The grass is by Doodlebug- paper Frills. Ribbon is American Crafts.
WHEW! Was that ever the post that NEVER ends. I hope you enjoyed it though, and it wasn’t all blah, blah, blah.
I am so hapy when I can share cool things with the world.
I hope you get yourself some Spotz!
I hope you have time to tell me what you think.
If you get to try the sketch, send us all a link so we can see what your take is OK!
I’m off to stamp the day away! (After Jason get’s back from food shopping)
So I hope YOU find some “mytime” today 😀
Till tomorrow.
PS I do have my blogger’s challenge to share, but an too tired now-so maybe tomorrow!
Not just a Stamp-a-ma-jig…………cool new use.
Jan 3, 2008 Author: mytime | Filed under: Cards, Product Opinions and Must haves, TutorialsGood morning (or night), depending when you pop on here. Either way, thanks for visiting me here 😀
Its absolutely FREEZING here in New Hampshire. We have gotten slammed with snow the last few weeks. Could that be why I’m so in a SPRING mode?
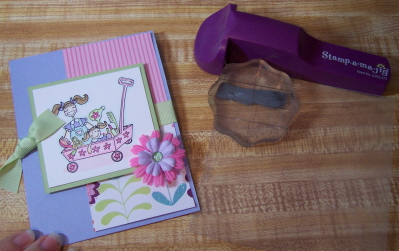
Anyway, I made the following card for my friend’s daughter. It was her birthday the other day. She just turned 4! I think she looks like this image 😀

This image is Miniwagonbella . I bought her at my LSS—>HERE.
It had to be VERY girly, so I used my favorite colors, and SEI paper Ally’s Wonderland. My dilemma came when it was time for WHERE to put the sentiment. Read on.
Yes, my card is going to be LATE! Big shock right? I’m over getting upset about sending a card too late. Its much better than not at all right? Besides, Amber has been ill , so I have not left the house. It will go postal Saturday when Jay is home, along with a few little Target Treats 😀 I’m sure Shannon won’t mind.
I wanted to share something with you that “I” find extremely helpful to use/do when I stamp.
I like to get alot of mileage out of my products, and this is one I’m sure most of you HAVE, but DON’T ever USE!
Its called a Stamp-a-ma-jig.
Now when I type, for some reason I always think people KNOW what I’m talking about. I tend to forget that some of you are new! I realize this when I get questions about the products. Please don’t EVER hesitate to ask me anything-OK! No questions is a bad/stupid question. How else do you learn? So ask away if you need too.
If you clicked the link (I just Googled one for a photo), it describes that it is a stamp positioner, and yadayadayada. I find it very helpful to line up images when I stamp-especially 2-step stamping. I am pretty OK with doing it on my own, but I do have some blocks that are mounted crooked or the image is really to tiny to figure where it lies on the block, and so on. Plus with the rise in acrylic images, you may not find you use yours much anymore.
Well I am going to change that! Here comes MY cool new use for it! It will save many cards for you I’m sure. Or it will save the after thought of “Oh I shoulda………”
Do you ever wonder if a card NEEDS something more? Or if a particular sentiment will fit in a certain spot? If it does, how will it look? Will it ruin it, orclutter the card all together? Will it be better in another spot? And the thinking goes on and on, right?
NOW here is the solution that helps me! After MANY ruined cards, I FINALLY figured it out (a while ago).
Not only will it show you HOW it will look, but it can help you place it, and get it right! It can also help you decide to NOT use it, before your masterpiece is ruined.
Click the following thumbnails for a larger view!
I use my stamp-a-ma-jig, line it up, and stamp my image/sentiment, on the plastic layer that comes with it.
You may also use a window sheet for this. DONT use StazOn!!!!
I then take the layer, with my image, and place in in different places on my card.
 place 1
 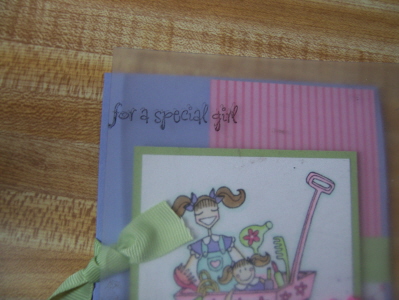 place 2
 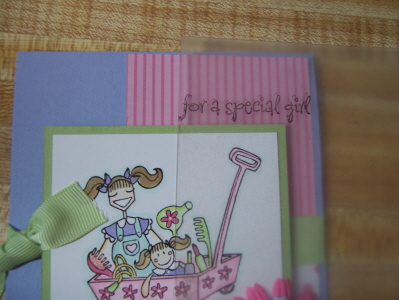 place 3-a winner!
This helps me see if it will look good where I THOUGHT I wanted it, which was originally place 1, or better elsewhere.
Sometimes I change what I originally thought, and go with something else-or nothing at all.
Now by lining it up on the Stamp-a-ma-jig, I can ensure that my image will end up exactly where I want. In this case, with the “girl” word at the edge of the corner.
So as you can see by my finished card above, it is exactly as I wanted it, but not where it was suppose to go. My card was saved, and all is good.
I hope you found this helpful and use it in the future! You can even do it with colored ink if you are undecided what may be better! So go for it!
Till tomorrow.
I have some Papertrey samples, MFT sneak peek’s, Lizzie Anne and more Bella’s to come! Not to mention our Saturday Sketch!
What you NEED for Christmas
Nov 24, 2007 Author: mytime | Filed under: Product Opinions and Must havesWell let me start by saying that I’d LOVE to hear what is on YOUR wish-list for Christmas. Maybe I can add it to mine. I’m having a hard time finding something AWESOME.
I think I have everything I could possibly want (GASP!!!!). So I need to think hard about what I want to get.
Since I get ALOT of emails asking my opinions on products and where to buy I am making a mini list of must have’s.
These are the top 5 things, in my personal opinion, that I think every paper crafter SHOULD own! If you don’ t, then you may consider adding it to your cart 😀
1) Scotch ATG 714 Gun www.framingsupplies.com
2) Scor-Pal- www.scor-pal.com
3) Copic Markers https://www.allthatscraps.com/index.php?main_page=index&cPath=388
Also see Atyou Glitter markers in category
4) Nestabilities- https://www.allthatscraps.com/index.php?main_page=index&cPath=551
5) Cuttlebug- https://www.allthatscraps.com/index.php?main_page=index&cPath=6&zenid=a31a55f975babb85388fc3a92554cdb4
Now I have reviewed some of the items, or other crafter’s before me have, and did a fabulous job, that I don’t feel the need to repeat it.
I would however like to tell you WHY you need the Scotch ATG 714 gun by 3M.
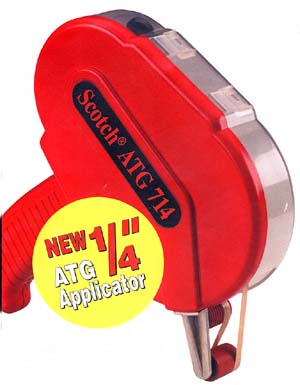 Here is my BABY!!!
I want to say that I’m not affiliated with them, nor am I getting compensated for this “plug” if you will.
I’m just a happy paper crafter who loves a great quality product, that is affordable, saves me money, and best of all, makes my projects easier to complete.
You may be asking what the heck you are looking at! Well, if you are familar with mono-adhesive dispenser’s, then you are looking at the MACK Daddy of all dispensers! Its the Scotch ATG 714 Adhesive Gun!
You can not only see the various options, but now they have a video about how to use it, and load it! So check it out.
It retails for $36.62 —–> HERE
If you own one-please chime in with your opinions 😀 Good or bad. This is what its all about-sharing an HONEST view. I welcome all of your opinions and experiences.
The thing with this tape dispenser is, it was originally used for framing. So the adhesive is really sticky!!! Unlike mono-adhesive your project wont pull apart or fall apart. We all know how frustrating that can be.
Each roll of adhesive( I get the GOLD due to its photo safe acid free) is 36 yards for ONLY $2.89!
Mono-adhesive is only 13 yards for $3.99 each! As seen —-> HERE
So, you are getting double the adhesive for a fraction of the cost-plus it holds better!!
I bought a 12 pack over a year ago and I still have 2 rolls, PLUS a fresh one in my gun!! I stamp just about daily, and really use my adhesive! That is phenomenal!!! I also love that I get great tape coverage-no flimsy trail of adhesive, like the mono adhesive.
They have a wide variety of tapes to choose from also.
I had heard the buzz over these ATG Guns about 2 years ago on SCS. I (like always) broke down and bought one. I tell you that place has cost me more money………………………..
Now, let me also tell you, it was to date, one of the BEST thing’s I have ever bought. I like this particular style because it is the 1/4 inch tape dispenser. There are many other options, and my opinion is to get what is right for you. I liked the size of the row of adhesive I would get from my mono-adhesive, so that was why I made that particular choice.
I also need to STRESS, that the gun is pretty large in size. People discussed that fact when they first got theirs, so I thought I prepared myself. BUT, when I unwrapped it I was still pretty shocked.
Now that I have been using it for 2 years I am SO use to the size and feel of the gun. I love it, and perfer it! I never use my mono adhesive anymore. Plus it doesn’t get lost 😀
So I hope you found this to be helpful and informative.
I’d love to hear your questions, opinions or comments!
—————————————————————
Stacy asked
Lauren, When you say that the gun is big just exactly how big are we talking about. Is it comparable to a staple gun or smaller than that? Thanx. Stacy
I measured it-
The top cartridge is 7 1/2 long 4 1/2 tall.
The handle is 4 1/2 inches as well.
Its only like 1 1/2 inches wide. Didnt measure that part! LOL! Just thought about including it as I type.
Seriously not bad. Just bigger than I had expected. I do LOVE it.
My Etsy

Who I Designed For
Blogroll
- Alicia
- Alli Miles
- Ally Blankenship
- Amber
- Andi @ crafts on a whim
- Angel R
- Angie Z
- Anne Kranitz
- Becky O
- Bee
- Beth Silaka
- Bethany Paull
- Beverly Nash
- Bobbie
- Cambria
- Cammie
- Card of the Week
- Card Positioning System (CPS)
- Cards for Cancer
- Catherine Doucette
- Charmaine
- Cheryl Sims
- Chriss Rollins
- Christina
- Christine Ewing
- Christine Wooden
- Colleen Schaan
- Craft Critique
- Craft Gossip
- Crystal
- Dawn Easton
- Emily Giovanni
- Geny
- Holly
- Igne Groot
- Inspirational Craft Blogs
- Irene
- Jami Sibley
- Jeanne Streiff
- Jen del Muro
- Jeni Bond
- JenMarie
- Jenn Balcer
- Jenn Diercks
- Jenn O
- Jennifer E
- Jennifer Mick
- Jennifer Pereda
- Jennifer-Sweet Treat
- Joanne Basile
- Jodi Collins
- Julia Stainton
- Julie Masse
- Karen
- Kathryn Berthiaume
- Katie Cotton
- Kelley Holland
- Kendra
- Kim Scholfield
- Kris’s Color Stripes! Get inspired here
- Kristen Dubosque
- Kristin Eberline
- Kristine
- Laura @ Sunshine Stamper
- Laura Turnmire
- Laurie Schmidlin
- Lesa Rapp
- Linda Duke
- Linda-LSN
- Lindsey Botkin
- Lisa (lakind scs)
- Lisa Kind
- Lori Craig
- Maggie
- Mara Campbell
- Maria
- Maria Levine
- Mary
- MaryJo
- Melanie M
- Monique Hansen
- Moxie Fab World
- Pam Imholz
- PaperCrafts Connection
- Peppers and Pollywogs Kids party site
- Rebecca Grohall
- Rita
- Robyn
- Rose Ann
- Sarah Vrolyk
- Sharon Harnist
- Sharon Johnson
- Sharon Rivera (a chemisrty with paper)
- Sherrie
- Sophia Landry
- Storage Units, Ink, & More Blog
- Sue Berker
- Susan (Rainy)
- Tangii Crane
- Tracy
- Tricia Traxler
- Trudee
- Velta
- VivLyn
- Zena
MTME Pretty Palette Color Team
MTME Pretty Patterns Sketch Team
My Time Made Easy TM LLC
Shop till you drop!
Lauren Meader
About Me
Copyrighted material
Subscribe To My Blog
Pages
- About me
- Alexa’s Story!
- My Crafty Corner!
- My Time Made Easy™ LLC
- Our Make A Wish Trip to Disney!
- Resume/Publication List
Calendar
| M | T | W | T | F | S | S |
|---|---|---|---|---|---|---|
| 1 | 2 | 3 | 4 | 5 | 6 | 7 |
| 8 | 9 | 10 | 11 | 12 | 13 | 14 |
| 15 | 16 | 17 | 18 | 19 | 20 | 21 |
| 22 | 23 | 24 | 25 | 26 | 27 | 28 |
| 29 | 30 | |||||
Archives
- August 2013
- July 2013
- June 2013
- May 2013
- April 2013
- March 2013
- February 2013
- January 2013
- December 2012
- November 2012
- October 2012
- September 2012
- August 2012
- July 2012
- June 2012
- May 2012
- April 2012
- March 2012
- February 2012
- January 2012
- December 2011
- November 2011
- October 2011
- September 2011
- August 2011
- July 2011
- June 2011
- May 2011
- April 2011
- March 2011
- February 2011
- January 2011
- December 2010
- November 2010
- October 2010
- September 2010
- August 2010
- July 2010
- June 2010
- May 2010
- April 2010
- March 2010
- February 2010
- January 2010
- December 2009
- November 2009
- October 2009
- September 2009
- August 2009
- July 2009
- June 2009
- May 2009
- April 2009
- March 2009
- February 2009
- January 2009
- December 2008
- November 2008
- October 2008
- September 2008
- August 2008
- July 2008
- June 2008
- May 2008
- April 2008
- March 2008
- February 2008
- January 2008
- December 2007
- November 2007
- October 2007
- September 2007
- August 2007
- July 2007
- June 2007
- May 2007
- April 2007
- March 2007
- January 2007
Categories
- About Me
- All That Scraps
- blogger challenge
- camera/photo play
- Cards
- Contests
- family stuff
- FOR SALE
- Home decor/3-D items
- How to FAKE it!
- Introduction
- JUGS Challenge
- JustRite Stampers
- Lizzie Anne Designs
- My family stuff
- My Stamping Space
- My Time Made Easy
- My Time To Color Challenge
- My Time to Create Challenge
- My Timeless Template Challenge
- My Timeless Templates
- Mytime Mail
- MYTIME MOVIE/VIDEOs
- Papertrey Newsletter
- Pink Cat Studio
- Pretty Palette Challenge
- Pretty Patterns Sketch
- Product Opinions and Must haves
- Recipe's
- Saturday Sketch
- Smilebox Creations
- Stampavie
- Tutorials
- Uncategorized
- videos
Most Popular
- Create your own Onesie Card Tutorial-and important NOTE! PLEASE READ (2529)
- Saturday Sketch-Boxed bag holder (2333)
- Going GREEN! Fancy Flower Flourish-Closure Video (1478)
- Fabulous Favorite - Giveaway! (1336)
- a Prayer Request (1232)
- QUICK-Easter Baskets from Nestabilities-PTI style-and blog challenge (1063)
- Teaser Sketch (999)
- February Release Giveway! (and a little peek) (996)
- Group Post and Rambling Rose Video Tutorial (985)
- GIVEAWAY! Who wants it all?! (895)
Recent Comments (RSS)
- 첫충사이트: 완전히 흥미로운 블로그 게시입니다. 저는
- sarah: Wow, Lauren, what a stunning
- hedie: خرید راهبند
- 야동: Love to read it,Waiting For
- 야동: This seller is in a
- 바카라사이트: 여기 처음 왔어요. 나는이 게시판을
- 야동티비: I was surfing the Internet
- 바카라사이트: 비슷한 주제에 대한 흥미로운 정보를
- 바카라사이트: "여기에 제공해 주신 귀중한 정보와
- 온라인홀덤: 유익한 웹 사이트를 게시하는 데
Copyright © 2007 - My Time, My Creations, My Stampendence - is proudly powered by WordPress
This blog has been Tweaked and Designed by Sara Williams