Archive for the ‘Papertrey Newsletter’ Category
Photo Finish Holiday Card Challenge
Sep 30, 2008 Author: mytime | Filed under: Cards, Papertrey NewsletterWell its another Senior Design Team challenge for the Papertrey Ink design team!
This month was a lot of fun! Nichole asked the team to create a Christmas/Holiday card that incorporates photos!
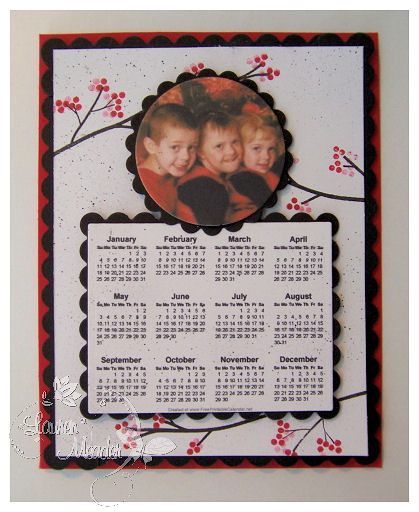
Well I ALWAYS do a photo card-ALWAYS! I love giving people a yearly photo update. This year I cringe at the thought that it may get tossed away after the holiday. So, my simple solution, I decided that this year I am going to do a magnetic photo calendar card!
Sending You Happiness Through the Year!
Instead of JUST a photo card, ours is a photo / calendar magnet card that you can stick right up on the fridge! Pretty cute huh?
This finished magnet is 5 3/4 X 4 1/2! The borders made it a bit larger than your standard A2 card. You could avoid the extra layers, or just change your own design.
I designed it so that while it represents the HOLIDAY, its not an obvious Christmas ONLY creation! Out on a limb was the PERFECT solution for this project! Given my children’s clothing colors-red & black, I went with that for my scheme. Now you could certainly use a black & white photo too, but I loved the POP the red “holly berries” (that what they are to me) brought to the project.
NOTE: This does use LAST years Christmas photo, so I will have to update with THIS year’s photo once I get them done. For the challenge I used what I had available. But I do really love this! Do you think people would notice if I used the same photo as last year?! LOL!
I did HOURS of hunting online for a FREE printable 2009 calendar. I have no clue how to make one, and found the PERFECT one! YEAH!!!
HEREis the one I used for my project!!! All my hunting will save YOU some time! LOL!
When I got the template I wanted, I then decreased the size by 50%, so it would fit on a card sized magnet. I didn’t want a very large calendar.
I printed walllet size photos of my children. Used my circle/tall /rectancle nestabilities to create this. I cropped the photo with the circle, and then the calendar with the rectangle. Using the next size up of the shape used, I made my scallop frames. For the large border I just used the tall scallop rectangles, using black cardstock, and I cut the scallop edges off, and adhered to the back of my white layer – Tip I found HERE! That was then layered onto a piece of Pure Poppy cardstock, that was sent through my Xyron 900, magnet maker!! So the entire back is magnetic! Pretty cool!
Now another part of our challenge was to create an envelope to match! I have a great system I came up with to create an envelope for ANY size card —>HERE!
So using that formula, I created my envelope for this project!
The ONLY difference was I decided to NOT put it together with adhesive, but rather make it a beautiful protective cover!
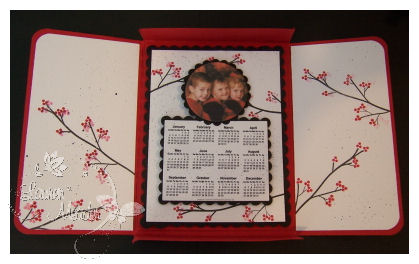
This is the cover opened. I decorated my inner panels by measuring each finished panel and subracting a 1/4 inch on the layering panel.
I then fold in the top/bottom flaps (what would have been my envelope sides if adhered) and fold closed.
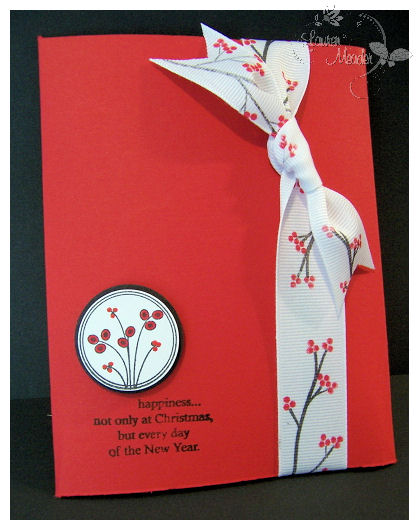
I had some wide white grosgrain ribbon, that I stamped to match my card. I then used an image from the Papertrey Ink Anniversary set (not available for purchase-sorry :C) since I thought it was a nice match.
I felt the sentiment from Snowflake Serenade was PERFECT for sending such a calendar creation!
So there you have it. This is my fresh approach to sending a holiday card! Why not a yearly calendar? I know its perfect for those close to you. I honestly would not go through the trouble of making such a treasure for those on my “have to send a card to X” list, but would certainly do it for my most loved ones 😀 It’s actually more of a GIFT, than a card, don’t you think? You could replace a photo with an image for a general magnetic/card/calendar gift!
The holiday season is upon us, so have fun! I hope you let me know if this inspires your holiday card this year 😀 Oh and if this project didn’t do it for you there is so much more to come 😀
Be sure to check out all the Senior Design team member’s blogs for MORE great cards using photos! I am sure you will run out to the nearest photo place!
Don’t miss the post below!
Till tomorrow!
My little contribution- a Box-ket. A what?
Sep 21, 2008 Author: mytime | Filed under: Home decor/3-D items, Papertrey Newsletter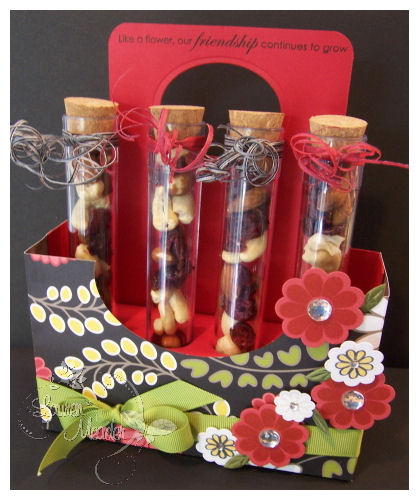
Box-ket of Friendship
A tisket, a tasket, tubes in a box-ket.
A what?!
A Box-ket.
Get it? Its like a bakset, but its really a box! OK so maybe not a box, maybe call it a Tube-et, since it holds tubes! LOL! I have to say I am over the moon for this set! TOTALLY!!
Isn’t it cute? Think of how this could be revised! Lots of cool ideas are FLOWIN through my head 😀 you have NO IDEA!!
Anyway, this is a small contribution of MANY, for a good cause. My dear friend Cammie contacted me to ask if I would like to help her for a cause dear to her heart. Check out her vision HERE
Of course I said YES! I am all about paying it forward 😀 So many people (I’m talking about ALL of you out there :D) have blessed my life in many different ways, so I like to do what I can to help others out too. If it involves stamping then that is a double bonus!
I designed this special holder just for the occasion! I used some PRETTY paper from American Crafts to begin my inspiration. The Poppy Red cardstock was a nice contrast. I thought that Beautiful Blooms was a PERFECT match!! I then paired it with a sentiment from another BIG favorite of mine-Floral Frenzy. The Flowers #1 cuttlebug die is a perfect match to popping out the flowers! I LOVE that aspect of the set.
You may be wondering WHAT THE HECK is IN the tubes!
That is a yummy snack mix by Archer Farms. It is Cashews, Cranberries and Almonds. I thought it matched the colors, was a “healthy” choice, and easily toss-able if someone didn’t like it. Chocolate could melt-YUCK! It also wasn’t going to be messy to ship to Cammie, if it opens- no big mess!! Unlike a bath lotion set-EEK!!!
So I used the tube from Martha Stewart. I buy the 8pk for $8 (although I got all these ON SALE for like $5 for 8!). They are SOOOOO fun to fill. I used some cool paper ribbon to tie at the tops, then shredded and curled them. A nice simple touch. The best thing is the little gift set is totally regiftable after you eat the contents, and wash the tubes out-replace with another YUMMY and pass it on!
SO my small contribution of this Box-Ket, mixed with many other contributions from others, becomes not so small after-all.
So, I say do what YOU can to pay it forward. Maybe a kind email or comment, maybe actually amil a card (note to self-MAIL SOMETHING!), maybe a nice gesture to make someones day……………..whatever you WANT to do. It shouldn’t feel like an obligation, but something that gives you warm fuzzies inside 😀 It really is the best gift. I know I have a few things I hope to get done to pay it forward this week 😀
OK so go check Cammies blog for details to enter! I know I am entering! LOL! THAT would be so cool to win 😀
Later!
This is the 2nd post for today! Don’t miss the Saturday Sketch below!!
Well it has been MONTHS since I have been able to participate in the monthly Dirty Challenge! I could not pass this one by.
Here are the details (and feel free to play along too!):
Challenge Focus: Create a NO LAYER card any size, any color. Your card base is it – no additional layers of cardstock or designer paper at all.
Required Element: Masking – use masking or reverse masking in some way to create your design
Restricted Element: No use of the color pink (any shade) – I can’t believe I just typed that – it might kill me.![]()
Keyword: DCNL908
So here is what I came up with
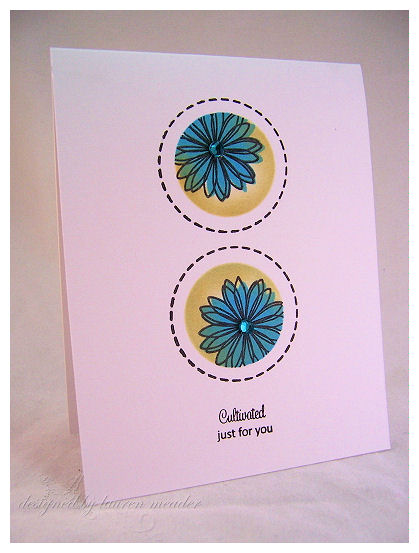
Cultivated just for you!
I love that little sentiment. Its like a punny way to say “Hey look! I amde this!!” I adore Garden of Life. It is one of my faves, and SO underused. Pair it with another HUGE fave-Borders & Corners Circles and I am in heaven!
This is Papetrey Ink white cardstock (of course!) with black pallette ink, lemon tart (using a dirty sponge dauber, and tempting turquoise ink, since the set is a 2 step stamp 😀 I had to add the bling 😀
I LOVE circles, and thought that masking for this would be great for the challenge, and I think I was right.
I just punched a circle from some sticky paper, and stamped the flower in black. I then stamped the solid flower to layer in the outline. I then sponged in the open part of the circle! This is a super card for a quickie! This took LESS than 3 minutes! I kid you not!
So give it a try!
Make sure you check out the other girls challenge cards by searching the keyword above!
Thanks for checkin in.
Family Traditions-Breakfast time!
Sep 15, 2008 Author: mytime | Filed under: Home decor/3-D items, Papertrey NewsletterToday I have a special post sharing one of my favorite family holiday traditions!
View Nichole’s blog for samples from all the Papertrey Ink design team members 😀
You may not know this but home-made waffles are BEYOND my most favorite breakfast food-ever! Last year Jason bought me an AMAZING Krups Waffle Maker. I was in HEAVEN! It seems like EVERY time we would go get breakfast they either didn’t have waffles or weren’t serving them any longer that day :C BIG BUMMER!
When I lived in Massachusetts, and was pregnant with Noah, I LIVED at the TD Waffle house. Now that we live in no man’s land, there is nothing like that “in these here parts” LOL!
SO, this is one of my favorite gifts ever. Every Sunday Jay makes me waffles for breakfast. Isn’t that sweet? Now I will share my favorite one. I guess that is alos yet another tradition we have! Big breakfasts every weekend 😀 YUM-O
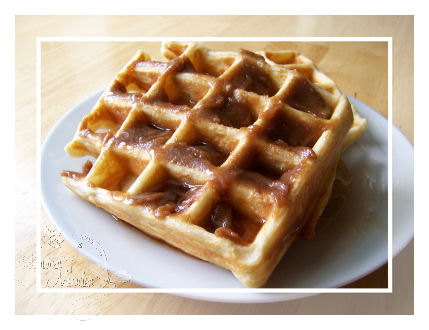
Apple Streusel Waffles
Archer Farms ( the products made by Target) have the most AMAZING Apple Streusel Waffle mix-ever! I am not an “apple” person but this is total heaven for me. If you read my blog you know how much I adore Archer Farms products, especially for the holidays, and gift giving. Its like affordable gourmet food, on a drive-thru budget! LOL!
OK so you are wondering WHY all this is so important.
Well, Nichole asked us all on the Papertrey Ink design team, to create a item that shared an important family tradition that we celebrate with out families. Now I have many of the same traditions most of you do. The special ornament for each child every year, making reindeer food, Christmas cookies for Santa, watching Its a Wonderful Life and A Christmas Story every year, and many many more things. I decided to share a new tradition we started with you that I just love, and hope lasts for years to come.
Well with my waffle maker last year, we began a new family tradition with my family. Every Christmas morning, bright and early, my family comes to house, to have a breakfast buffet! Each person brings their favorite breakfast item to get cooked up and share with the family! The grandparents get to watch kids excitement as they open their gifts, and share a relaxed family meal, before yet a another new year approaches. Its such a cherished time. Our kids are small only once, and this time will pass before we know it.
I hope this tradition continues long after that, into the time I will come to my own children’s home to watch my grandchildren open gifts Christmas morning.
It is just another day for family and sharing.
So that being said I know I will always be making waffles of some sort!
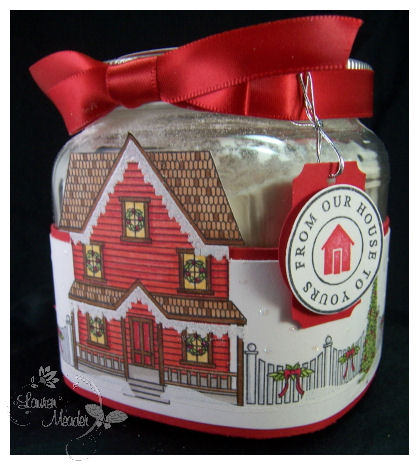
I also thought it would be nice to re-package up that mix (streusel topping is in a separate baggie inside), and decorate the jars of it, to be sent home with my family members, as a thank you, and so they can be reminded of this time on another day, when they have this for breakfast! Much prettier than a big ole green box of waffle mix, don’t you think? AND no cooking required for the gift (hehehe-perfect to me).
I stamped my Boards & Beams set, along with elements from Home for the Holidays to create a wrap for my jar! The fence, trees, and snowmen wrap all the way around 😀 It’s really pretty in person. The icicles are done in white embossing powder, then re-stamped and embossed with iridescent ice embossing powder. I also did a few snow drifts. Perfectly tied with a pure poppy satin bow!
I love the little tag I made using one of my most favorite gift giving sets-Holiday Treats
I think these make great teacher gifts too! It is after all APPLE Struesel! LOL! I know teachers hate the apple things, but this may be one stereotype they could fall in love with.
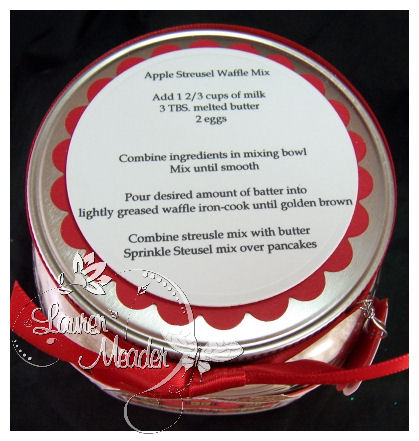
This is the top of the jar. It directs you on how to prepare the mix. This can also be for pancakes!
I just printed the info, and cut with my nestabilities.
AND YES I realize I put “pancakes” instead of waffles in my directions. I’m changing that! But hey thats what happens when you are up at 2am, typing directions for a project. It doesn’t matter as the recipe is the exact same for both versions of the mix.
I am really happy with how this turned out, and think they are just the cutest gifts for my family!
I got my jars at Target for $3.99 and the mix was also $3.99! SO, for a whopping $8, you have a super yummy gift 😀 too!
I hope you consider the family breakfast buffet as a new tradition for your family too. It doesn’t have to be JUST a Christmas thing. It could also be a random time of year, such as a Mother’s day thing.
Thanks for checkin in here, and letting my share more on my life 😀
I’d love to hear about some random tradition any of you have that you would like to share with us here! Maybe even a favorite family dish, that brings a smile to your face. You may hook me into a new recipe! Now that would be cool.
I’ll be back later with another post!
Its my dog Daisy’s birthday today 😀 She is off to the groomers, and I made her a card. I know, I’m lame, but I love her. I even got her presents! LOL! Be back with photos 😀
Papertrey Ink September Release
Sep 14, 2008 Author: mytime | Filed under: Cards, Home decor/3-D items, Papertrey NewsletterWell here we are with another amazing release from Papertrey Ink.
Every month I get so filled up with idea’s upon just glancing at the sets!! Every month I fall in love. This month is no different!! We have all shared many projects with you on the days leading up to today. I hope you were inspired to get some home-made holiday gifts done-EARLY!!
I have another special post for tomorrow, but today I will share my projects used for the release!
I love hearing your feedback on what was your favorite. It always makes my day 😀 We all work so hard to give you fresh and innovative ideas, that are practical and easy to do.
I am going to share my thoughts that went into each project. I hope you like them 😀
NOTE: ALL ITEMS used in my descriptions can be purchased at Papertrey Ink
Made of Snow
I LOVE this set!! Its my favorite from this months release. The many faces and ways you can get that snowman to look is just awesome. Each one has a new personality, just like the real thing. Really cool.
I case you missed it, check out my Cocoa To Go! set My #1 fave from the release!
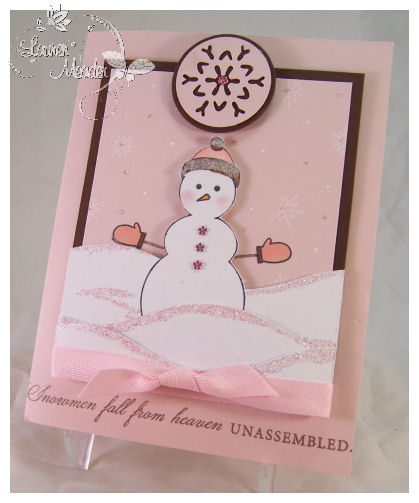
Pretty in Pink
Who says snow”men” have to be blue? I went with non traditional colors for this one and just LOVE it. I think this is my favorite color combo and to combine it with this winter set is great. I think she is just perfect in pink. The snowy hills are all layered and 3D! She is just so soft and cute.
I plan on doing many more things with this set, so stay tuned 😀
Pretty in Pink Snow Girl
Supplies:
Stamps- Made of Snow, Merry & Bright (the little snowflakes in bkgd)
Cardstock- PTI select white, Dark Chocolate, Sweet Blush
Ink- Palette black, Dark Chocolate and copic markers
Ribbon- Sweet Blush Twill
Tools- CM wavy cutter, circle and snowflake punch
Other- pink glitter by stampendous, 2 way glue pen, fun flock, adhesive rhinestones, shimmery pastels for cheeks
Merry & Bright
OH man! Did Melissa ever make an awesome tree set. I so love this set!! Seriously fabulous. Everything comes together so easily, and I love the retro look it has.
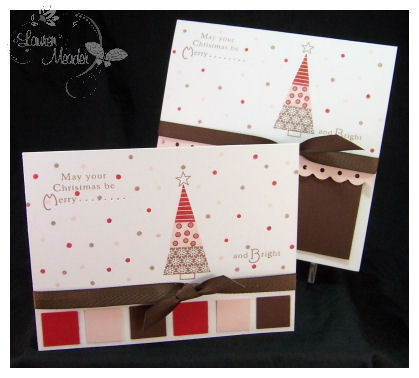
I decided to use elements form 3 different trees for this.
Retro Christmas CD Gift Set
What is better than popping on a CD full of your favorite Christmas songs? Spreading the joy that gives you by sharing a CD of your favorite songs with someone special as they prepare for the holidays! I love listening to Christmas music with the kids as well decorate the house and the tree! I decided that a card and CD holder would be a great gift for anyone 😀
Retro Christmas CD Gift Set
Supplies:
Stamps- Merry & Bright
Cardstock- PTI select white, Pure Poppy, Sweet Blush, Dark Chocolate
Ink- Pure Poppy, Sweet Blush, Dark Chocolate
Ribbon- Dark Chocolate twill
Tools- Scor-Pal, Martha Stewart border punch, coluzzle circle cutter
other- CD
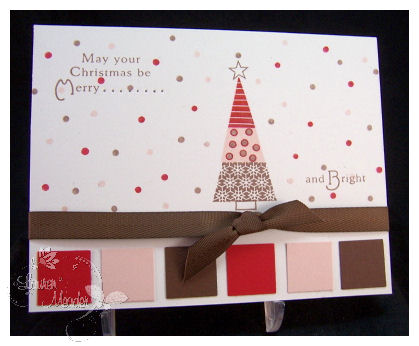
I have to say I think these colors are going to be in my very own Christmas cards this year! Better get the kids photos done soon!
LOVE-Pure Poppy, Sweet Blush and Dark Chocolate! So cool. I also loved this simple retro card. Its high on my faves list!

So here we have the CD case I made-to match.

Unfold and here you go! The ribbons tie the top closed, and prevent the CD from sliding out. A super project for when you are tight on time, and want to mass produce a gift.
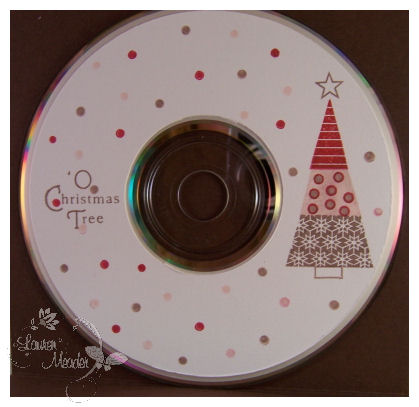
Here is my completed CD 😀 Isn’t it cute?
Mazel Tov
Well you may have seem my gift ensemble with this set found HERE.
I think Nichole did an amazing job collaborating for this set. While I am not Jewish and I am so happy to have a set like this to create items for those who are! I am sure many will appreciate her efforts for this set.

The image is called the Tree of Life. I think it is my favorite symbol from the set. It is so pretty and elegant! I wanted a card for “anytime” to send to my Jewish friends. I felt this was perfect. I gold embossed this image, then colored with shimmery pastels. I added some adhesive rhinestones to tree centers. I think they make it look elegant. I used the dotted border of the image to inspire my piercing in my design. I am very happy with the end result of this.
Tree of LifeTree of Life Supplies: Stamps- Mazel Tov |
Rustic Snowflakes
Despite its “rustic” name, I wanted my design to be soft and subtle.
I made this little gift set that is sure to brighten up someone’s winter blue’s away!
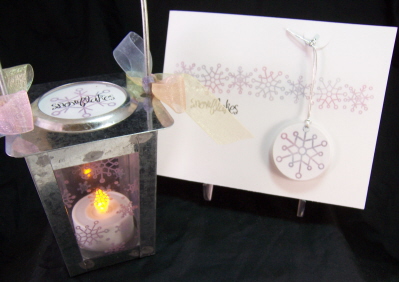
I LOVE matchy matchy stuff, and I think this is apparent with this release! LOL! It really just ties it all together and shows people the thought you put into their gift.
Soft Snowflakes Lantern Gift SetSoft Snowflakes Lantern Gift Set Supplies: Stamps- Rustic Snowflakes |
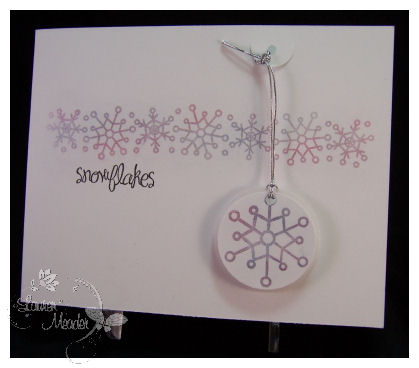
The card-
I used versamark and shimmery pastels in my favorite non-traditional Holiday colors-pink, purple, and pale blue! I used a simple layout with the snowflakes border stamp for a quick and easy card.
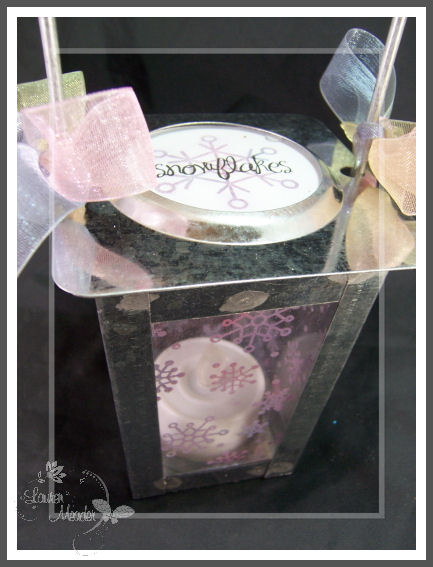
This lantern was purchased at Target 2 years ago, in the $1 section! I bought like 12 of them! LOL! I am so happy I did. See hoarding CAN pay off! LOL! For this lantern I stamped the glass window panes, using white stazon, then brushed on my shimmery pastels!! Isn’t it stunning?
I found this rainbow ribbon for a perfect match. I wanted the hole in the top closed, so I stamped a matching panel to fit inside, and dress it up a bit, as I decided a battery operated tea light would be best for this project! No worries about FIRE with this project! Plus the kids could make these!! SO EASY!
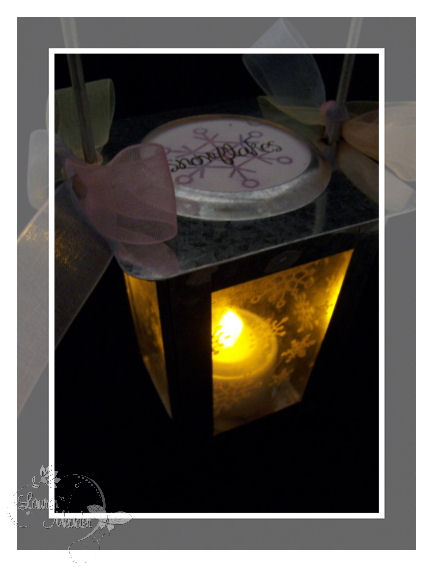
Here it is all lit up! Isn’t it just so pretty. Image this on a table or hanging up. maybe line up several for a nice ambiance. You can usually find lanterns like this in the Home & Garden section of your hardware store! Winter usually means a nice discount!
Now Home for the Holidays-
I do have a special project, but that has to wait for tomorrow. I can tell you that the set (along with boards and beams) is just AMAZING!!!!!!!!!!!!!!!!!!!!!!!!!!!! I love it.
Well I am wiped. Its been a crazy week. We had some tight deadlines but we did it 😀 I hope you leave here with some sort of inspiration 😀 I really LOVE what I do. You have no idea the joy it brings me. I don’t know what I would do without my stamping!!! Most likely my brain would explode!
I do usually make more than shared here, but like to spread it out a bit so you don’t go into overload!! Be sure to check in on all the design team members for their amazing creations!
Stay tuned tomorrow!!!!!!!!!!!!
Papertrey: Etched Glass Canister
Sep 11, 2008 Author: mytime | Filed under: Home decor/3-D items, Papertrey Newsletter, Tutorials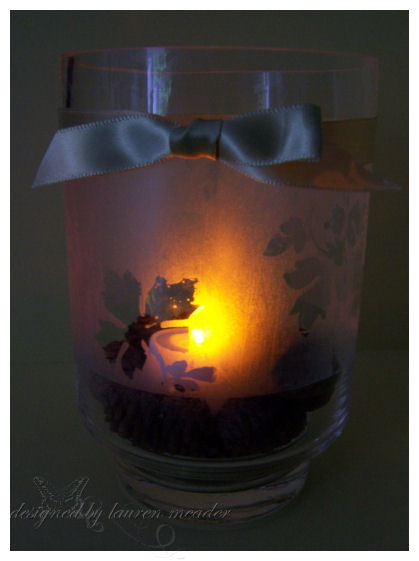
This is a gorgeous technique, that is SUPER easy to do : Etched Glass -using stamps!
Over the months I have received many emails asking for a how to, on this technique. Today I will show you just how simple it really is, with step by step instruction/ photos.
To start, this was a simple, round candle canister. I bought this for $4.99, and turned it into a pretty candle holder that would look fabulous anywhere in the house! If you purchased an etched glass canister it would cost triple that! Now you can make your own. With the holidays coming up, these would make fabulous inexpensive gifts for family, friends and teachers.
The possibilities for the items you can alter with this technique is limitless. So I hope you enjoy learning.
Supplies:
Stamp of choice-First Fruits, Glass container of choice (or mirror!), versmark ink, clear embossing powder, embossing buddy, heat tool, Armour Etch cream, sponge brush, Eclipse Tape (optional)
EDITED TO ADD: Etching cream can be found at Michaels in the section near the soap/candle isle. It took me an hour to find it because I did not think it was in that isle 😀

Before we get started there some things you should consider:
If you are heating glass, make sure is it a heat safe glass. Many times glass will crack or even explode when exposed to extreme heat!
Do not hold glass while heating. It gets very hot, and you could burn yourself.
Use a heat safe surface when heating your item. You don’t want to burn your work area.
IMAGES:
Carefully examine the images you want to use. You don’t want to choose too finely detailed of an image because it can be hard to define what the image was. You need a nice balance of bold, and detailed. Consider the overall look of the completed project.
Step 1)
Clean glass with windex, and dry well! You don’t want ANY finger prints anywhere. They will show up!
Step 2) OPTIONAL
If necessary you may want to mask the glass. I use Eclipse Tape. It is sticky enough, and leaves no residue when removed.

Step 3)
Rub embossing buddy all over glass. This prevents embossing powder from sticking to unwanted areas, and ruining your etching. It will also show you if you do have finger prints on your glass, and need to re-clean it.

Step 4)
Carefully stamp the image in versamark ink. Because Papertrey Ink uses clear acrylic images you can see the image pressing into the glass! Since they are acrylic, they are also easier to stamp onto round surfaces.
Sometimes this take PRACTICE! Glass is slippery. So take your TIME stamping the image.
(NO photo for this step since it is hard enough stamping, let along photographing too! LOL!)
Step 5)
Apply a generous amount of embossing powder.
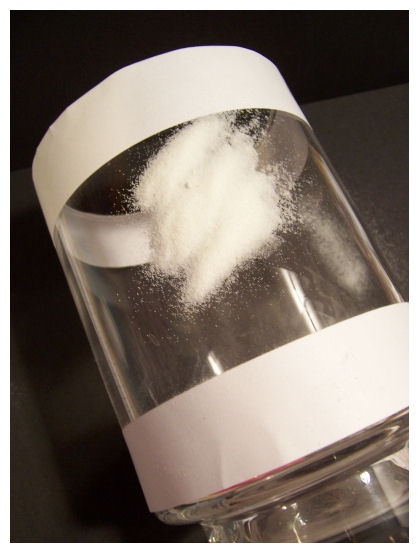
Tap of excess.
Step 6)
Heat set the image.

You will need to heat it until the powder turns SMOOTH-just like the glass.

CAUTION: Glass will get very hot! Don’t handle while heat setting, it is best to heat it on a heat safe surface.
NOTE: Also when doing more than one image on a surface, it is easier to heat set each one as you go. Keep in mind that the glass stays hot, and the melted powder remains warm, so you want to avoid smudging it, and avoid squishing it onto the table or getting more embossing powder on it, until the glass is cooled. Just be careful.
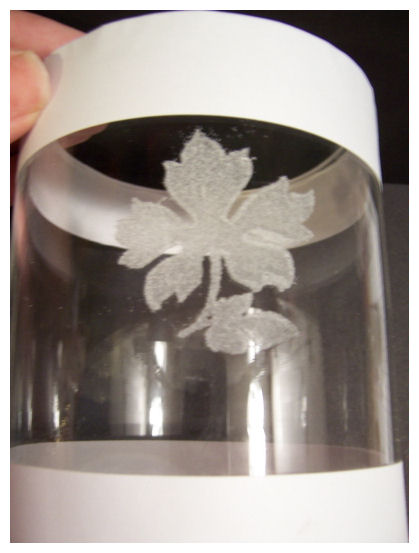
Step 7)
Once glass is COOLED-then apply a nice thick layer of etching cream.

Make sure you coat it thick and evenly!
The directions say leave on for 5 minutes. DON’T LISTEN TO THAT! LOL!
It really takes at LEAST 20 minutes to get a nice etched coating. If you don’t let it sit long enough it will hardly looked etched.
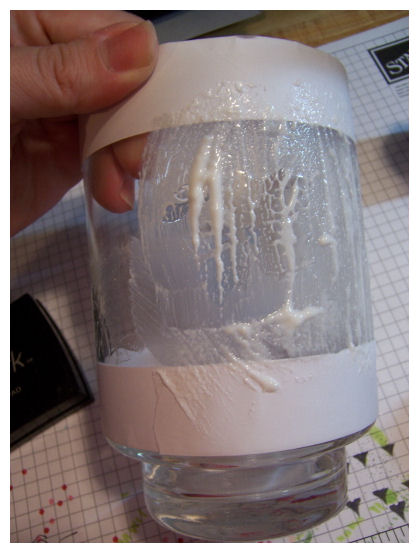
Step 8)
After you let it sit, go rinse the cream off under cold water. Take your fingernail, and scrap off the clear embossing powder. It will peel off.
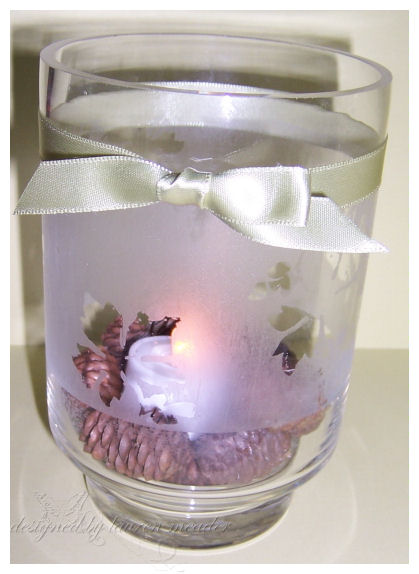 Here is the finished glass.
Sorry for the photo. I wanted you to see the detail, and it is very difficult to get a nice picture of something like this so you see the detail.
I tied a Spring Moss satin ribbon around the top, then filled the bottom with pine cones and bought a battery tea light to put inside. No flame to worry about.
Now here it is lit up from the top view
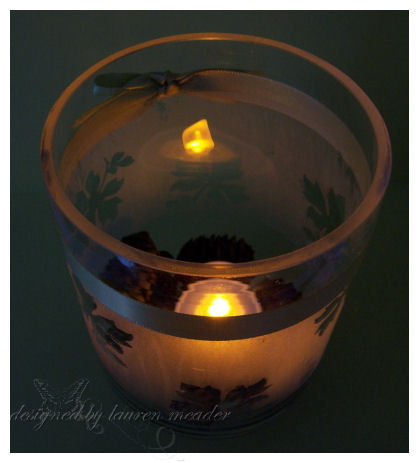
Isn’t that so pretty?
Now it is your turn! Send me a link here if you decide to try it.
I hope you enjoyed learning all about etching cream here. I’d love to hear your thoughts.
As always, thank you for reading, and I hope you are inspired in some way to get an early start on those holiday gifts.
1-Papertrey Ink Countdown-Cocoa to go
Sep 9, 2008 Author: mytime | Filed under: Home decor/3-D items, Papertrey NewsletterWOW! Was I ever FREAKIN out. I lost my Internet/email ALL day yesterday, and did not know when I was going to get it back. This is the post that almost wasn’t!! There is nothing like working hard to prepare a project, to then have something go wrong! Well it is back so I can share my project for today (only after a mini panic attack!!). I have been working hard on releases and have much catching up to do, so bear with me OK!
I am so excited to share a peek at my favorite set from this upcoming release from Papertrey Ink! Be sure to check the senior design teams blogs for more peeks this week.
The set featured in todays post will go LIVE on the 15th! Be sure to check Nichole’s blog for detailed instructions on the how-to’s. SO EASY!!
The set is named-Made of Snow
What is more fun than building a snowman in the winter? Well how about staying warm and creating your own with stamps!!! YES!! Build a snowman. Nichole designed this set that allows you to EASILY create your own snowman!! All the accessories and faces are perfect. Just wait till you see it.
I had way too much fun with this set let me tell you! I am in LOVE!!
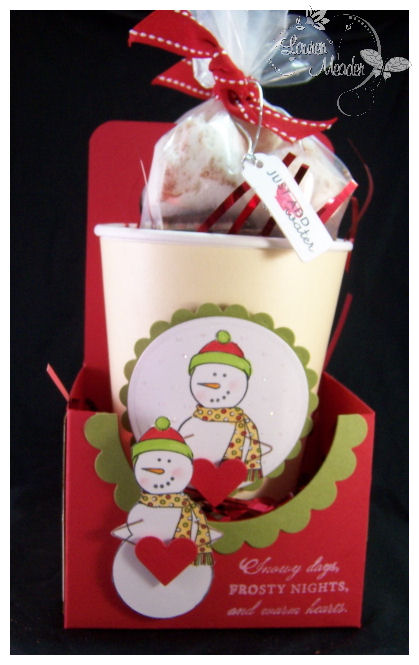
Cocoa To Go!
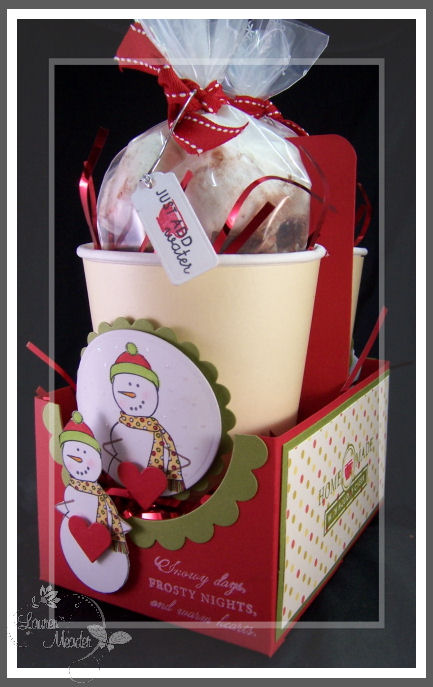
Is this not adorable?! I was just bouncin when it was all finished. It turned out better than I thought it would.
The items used to create this Cocoa To Go-carrier are linked throughout the post. Just click on the highlighted words!
I never created any of those coffee carriers that were popular about 2 years ago. So I decided that would be a fun 3D project for this month. You know me and my boxes 😀 I LOVE making packaging. I hope you like my version, which I felt was just perfect for this months theme. We all love “snowman soup” and this is just a great way to present those types of gifts! AND why reinvent the wheel of a great gift?!
Here are my very own “Cocoa to go” instructions.
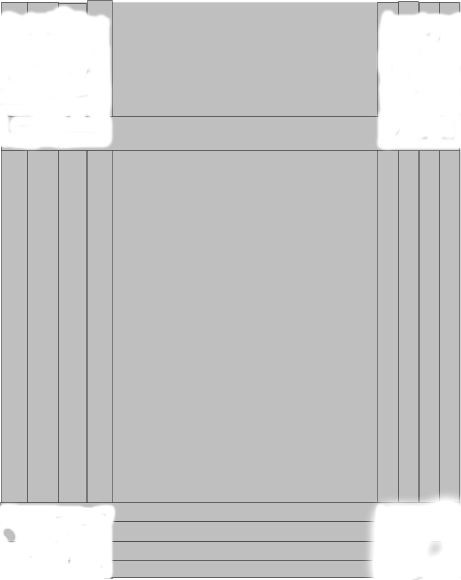
1-Cut 2 strips of Poppy cardstock size 4 X 11
2-Score along the 11 inch side at 3 inches, on both pieces. This creates the bottom of each panel
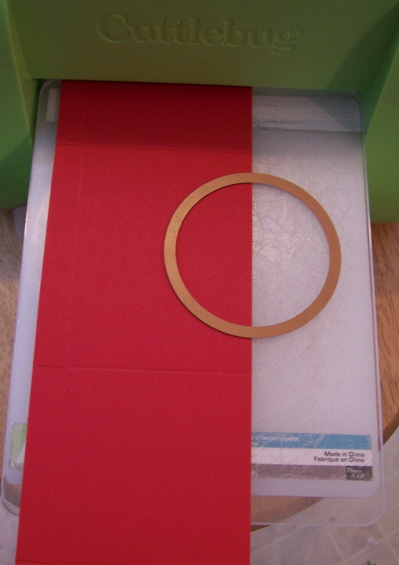
3-Use your oval nestability to make 2 handles in the top portion of the strips. You may also round top corners if you wish.
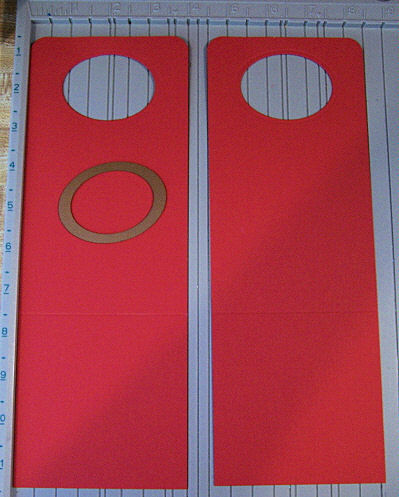
Photo above of completed steps 1-2-3
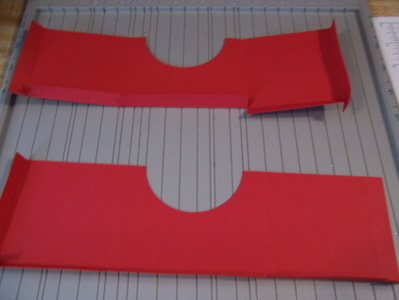
4- Now cut 2 pieces of poppy cardstock 3 1/2 X 11
5- Along the 3 1/2 inch side, score at 1/2 inch ( do this on both)
6-Along 11 inch side score at 1/2 * 3 1/2 * 7 1/2 * 10 1/2 (do this on both)
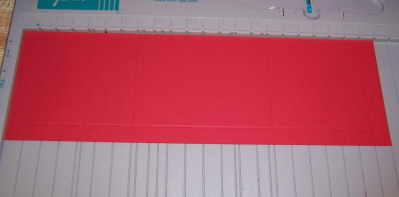
Photo above of completed steps 4-6
7- OPTIONAL STEP : Use a 1/2 circle nestability to create a cut out in the front panel. (do this on both)
NOTE: This is done on the panel front that measures 4 inches across
8-See photo below. Snip bottom score pieces up to score line. Score all folds. (do this on both)
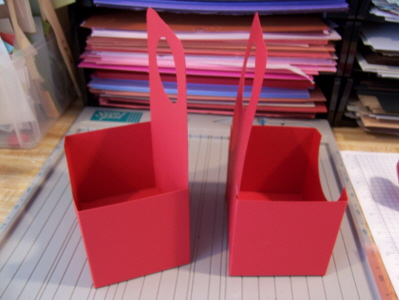
Now it is time to assemble!
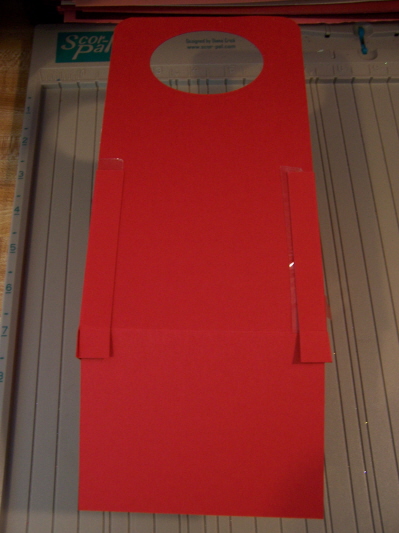
9- See photo above. Adhere the 3 ends of your box, and adhere them to the BACK of your tall piece with the handle, at the bottom. (do this on both)
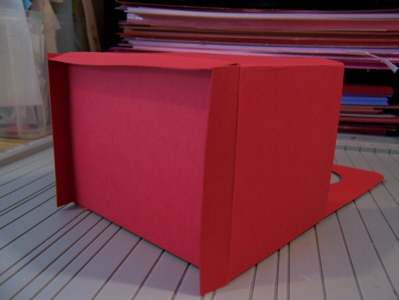
10- Fold bottom in, and adhere edges of front panel to the bottom. See above photo (do this on both)
Then this is what you have! 2 complete To Go pieces.
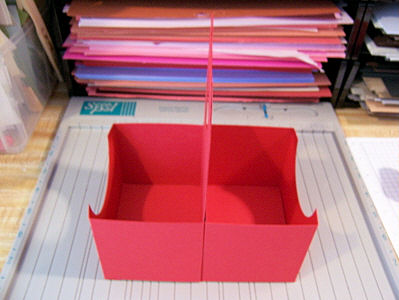
Now adhere the 2 pieces together-back to back! I use a good redline tape. Be generous with your adhesive!!

I find it easiest to lay them on their sides, and line up from the bottom 😀 Then put your hands inside the To Go carrier, and rub side panels together. This is done to ensure a good seal.
Now you have the FUN part! Designing it!!
Another note: I did add a decorative panel to the bottom of my carrier to finish it off. I hate messy projects.
First things first- You need some disposable coffee cups! You can find them at a variety of places, for some great prices. I purchased mine at Target, set of 12 (?) for $3.99. They are by Archer Farms. I personally LOVE this line of products Target carries.
I then decorated them with my little snowmen
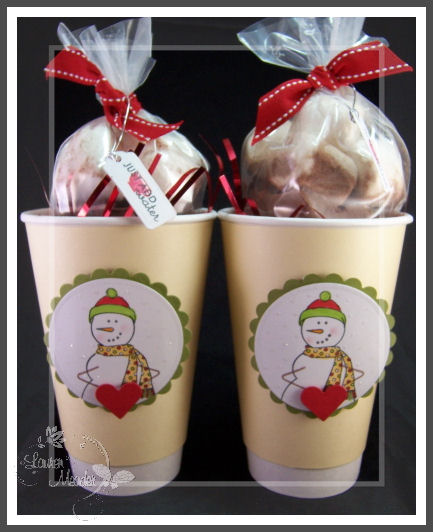
This is a very simple part of the project, but you can go all out if you like that. I just stamped my snowman pieces and colored with Copic markers. I then die cut them with my circle nestabilities. I thought if the snowmen held hearts it would go SUPER with my sentiment (see below). Once that was done I added “snow with a glue pen, and glitter, then adhered to my cups, to cover the Archer Farms logo!

For my snowman in the front-I stamped him just like the one on the cup-but cut his entire body out instead. Don’t you LOVE him? Look at the sentiment! SO cute!
Now for the cocoa cones!
I love using disposable frosting bags to fill with fun goodies in all year. I made the cocoa cones using them. I just stamped the top with some snowflakes (cannot see well in photos-sorry) with white StazOn, then filled with an Archer Farms Hot Cocoa powder. I then crushed up some peppermint Ghirardeli chocolates, and layered in some jumbo marshmallows!! (can you believe I didn’t even taste a niblet of a single piece of chocolate?!) Those are the best because they don’t melt so fast. Tied the bags closed with my saddle stitched poppy ribbon. I then added a little tag that says “just add water”. That is from a MUST HAVE set called Holiday Treats. I proceeded to put then into the cups which were also filed with some shiny bag filler, which I adore!! I used the same filler in the holder to take up some space 😀

The side panels use a new-to be released- Holiday Vintage Prints patterned Paper collection in Polka dot petite. I was what inspired my snowman’s scarf colors!! Just perfect! I stamped the Holiday Treats image on the sides to dress it up a little more as well. That pretty much completed my project! A very clean and simple gift set for ANYONE!!
Switch it up with coffee, or tea…………..maybe put CANDY in the cups instead. Endless ideas.
Well that is all for now!! I do have yet ANOTHER Papertrey post tomorrow night :D, and more release things to share as we are allowed. This release will definitely get you ready for the holidays! I swear!
Later!!
Trim the Tree Challenge- and a giveway!
Aug 31, 2008 Author: mytime | Filed under: Home decor/3-D items, Papertrey NewsletterCan you believe it is already September 1st? Where did the summer go?
Well I guess it is time to begin to accept that it is over and embrace Fall, along with all the holidays to follow. One super perk to being on a design team is that it puts you in the holiday mood early!!
You may have noticed every month, on the first, that Nichole gives her Senior Design Team a special challenge. This month was to create a special holiday ornament, with packaging. Now we are talking! You know how much I LOVE creating packaging!!
She asked we try to incorporate any “other” hobbies/crafts we my have in our repertoire to create a unique ornament. ALL the ornaments on my family tree are special. Each has it’s very own story. Many are handmade, usually from the kids. Their little artwork FILLS out tree. No glass ornaments for me. I feel our Christmas tree becomes more and more special each year because of our decorations. The kids get so excited to see that I saved their little handprints Christmas tree, of felt mouse/candy cane holder.
So I went back to those summer days at my grandmother’s, back when I was about 9, and she taught me cross stitching! I spent the summer making several pillowcases, for everyone! They came out awesome too. My mom still has a couple I believe.
I learned cross stitching with a pattern, which was where you have a pre-printed pattern of X’s to follow, with a photo for color suggestions. I also learned how to do french knots, and the lazy daisy stitch! Later in life I learned counted cross stitch, where you just have a pattern in a book, and you count it out onto your fabric. Not a good idea for those who have poor eye sight. Oh, and if you had good eyesight BEFORE, you won’t after! LOL!
So I decided that would be a great place to revisit.
I was “re-freshed” on the how-to-do’s to create these stitches by Googling them!! I found great instructions/photos at the following place: Primrose Design! She has amazing step by step photos and instructions 😀 She has already done all the hard work, why attempt to recreate what is already perfection?! Seriously check it out!
French Knot-HERE! -for my holly berries
Lazy Daisy-HERE!-for my leaves
Satin Stitch-HERE!-for my tree trunk
I really want to thank Janet McCaffrey at Primrose Design, because her tutorials, I was able to just pick this old past time right back up, and go! I just plucked myself in front of my computer, and began following her instructions 😀
Now I have to say, even if you have NEVER cross stitched in your life, you should try it. It’s truly easy. HELLO, me at age 9 was able to do it, so YOU can too.
Another great thing is you don’t need a bunch of expensive items to start!
A large needle, some embroidery floss, and the embroidery cloth to stitch on, as well as an embroidery ring. All really cheap!
So enough of my blah, blah blah. You know how much I babble when I get excited about something.
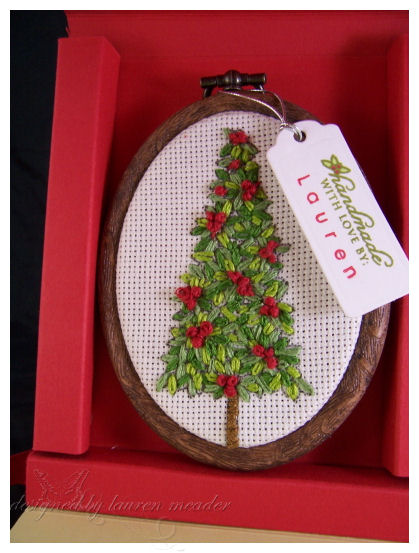
So lets start by sharing my ornament and gift box!

Supplies: Believe set, Rustic Branches, simple alphabet, Pure Poppy cardstock, Spring Moss cardstock, Pallete Black ink,Old Olive ink by SU!, Pure Poppy ink, white craft ink by CTMH, polka dot ribbon & satin ribbon in pure poppy, Circle nestabilities, tag nestabilities, Scor-Pal, Cross stitch fabric, wide eye needle, embroidery hoop, embroidery floss, decorative ring, silver cord
I got my concept of my box, from the many engraved ornaments I purchase every year. They are often placed in boxes, with a clear cover. So I measured my finished ornament, and using my Scor-Pal, came up with this box, that is my own different take on what you’d get in a store ! Don’t you love paper-crafting?! Limitless possibilities.
Here is the template I created for my box. Click to enlarge.
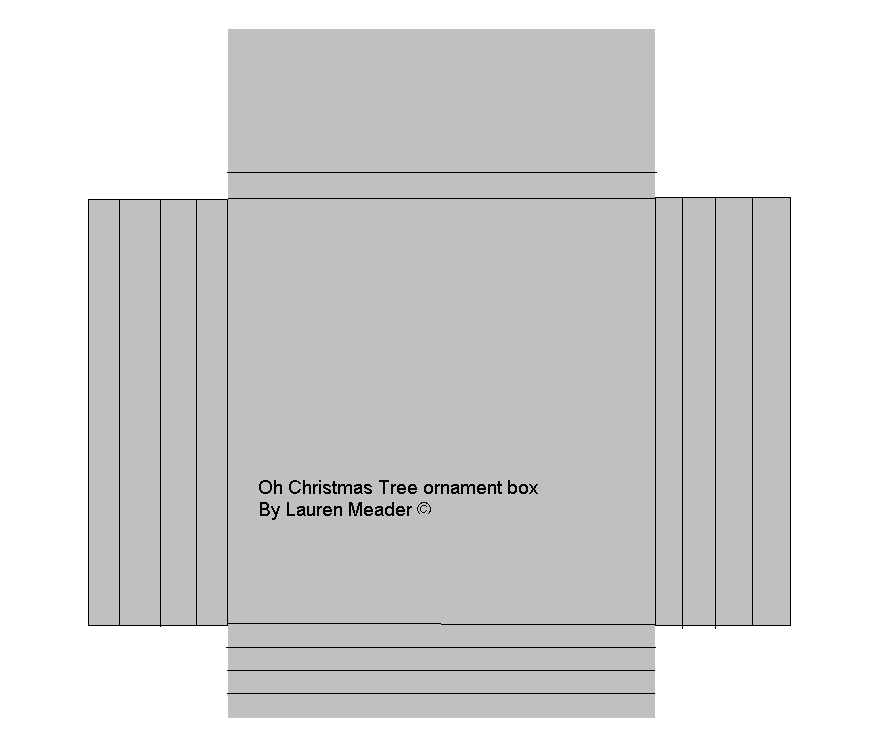
It is NOT to size, it serves as a guideline so you can see how my box came together. Obviously your ornament may be of a different size, so your measurements would be different.
I measured the width of my ornament, then added 2 inches on either side. I scored every 1/2 inch, 4 times-to create the borders, which fold in. I did the same for the bottom flap. I then measured how tall my ornament was, and then scored for my lid. making sure it all fit snuggly. There was room for a little flap. I then made a bottom flap to fold up from the bottom.
My finished box measures 4 inches across, by 6 1/2 inches tall, by 1/2 inch deep.
This is the outside of my ornament box.
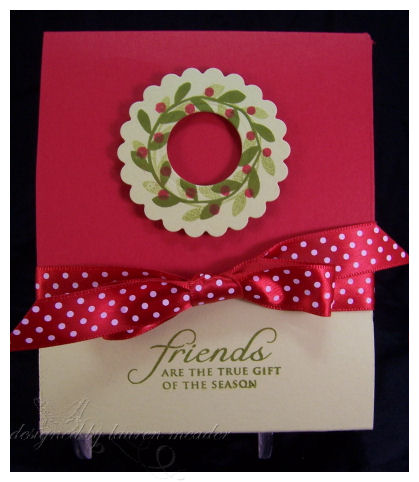
I LOVE Rustic Branches. Its a super set, and I love how quickly I can create a Holly wreath. I just stamped my wreath in Olive ink, onto spring moss cardstock, then -without re-inking, moved, and re-stamped. I stamped my berries in Poppy Red. I used my scallop nestabilities to die cut my wreath, then used a smaller circle to to take the center out.
Here is how the ornament box opens:
Remove the ribbon
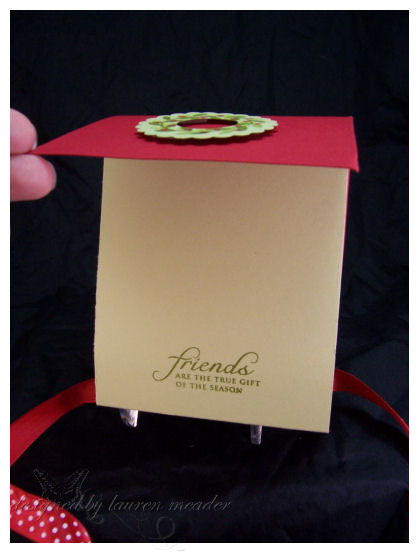
Open the flap
Here you go.
Now you have your ornament sitting snugly in this great box, that will serve as stylish, and treasured storage for the ornament from one year to the next!
It doesn’t have to end there though. you could create a little wall hanging for any time of year, and present it in the same manner!
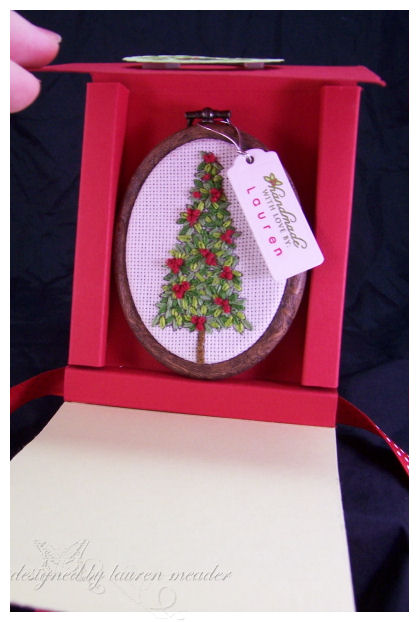
As you will see I used the tree from the Believe set. It was absolutely PERFECT for this challenge!!
I stamped the tree with my Pallette Black ink, onto my cross stitching fabric. Now seriously HOW COOL is it to think that your stamps have a whole new use, and can take you into yet another fun hobby?!! I know I was super excited that it actually worked!
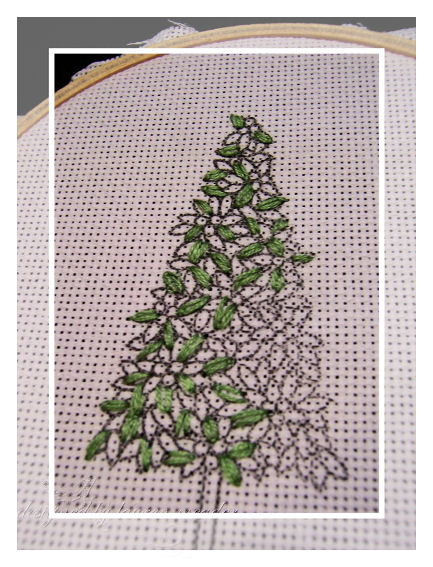
I picked 3 different colors of green embroidery floss for my leaves. I wanted dimension. Not just every leaf to be the same! So I stitched one color of green leaves randomly, on my pattern, staying in the lines. Then onto the second, and the third. Then it was time for my Holly Berries, an my trunk (that uses a silk stitch).
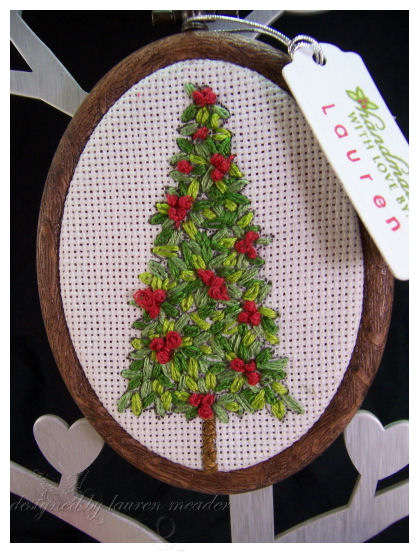
The finished product 😀
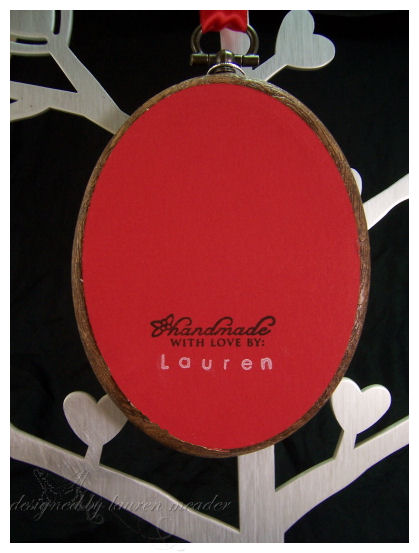
I found this faux wooden oval frame at Michaels for about $1.50. I put my finished tree into place, then trimmed off the excess fabric, once I was CERTAIN it was exactly as I wanted it! I created a tag with the “handmade by” and added my name using the simple alphabet set.
The “problem” with cross stitching is your back is a little “messy”. So I used my oval nestabilities to create a cover for the back, and keep it neat and clean! This allowed me to also put my creative info there as well! I just adhered it with redline tape. It is going NO WHERE!
Now you are most likely wondering HOW LONG DID THAT TAKE? It only took me 1 1/2 hours. I know you are thinking that is crazy, bu it really wasn’t THAT long if you consider HOW LONG some of our card creations take us. Oh, and the fact that my embroidery skills are rusty. That does NOT include the ornament box I created. That took me about the same tp figure out WHAT I wanted, and HOW to get my idea to work. Now you have it done for you!
Now for the FUN part! WHO WANTS IT?!
I would love to give this away to someone! I so appreciate each of you, so it’s my turn to give a little something back. Simply leave me a comment here, telling me what your favorite holiday tradition is! No matter WHAT the holiday, share something your family does together every year!
I will pick a random winner on Wednesday via www.random.org!
I hope you enjoy all the projects today!
Be sure to check out all the folowing Papertrey Ink design team member blogs :
I am sure you will be inspired to start creating those holiday ornaments!
Till tomorrow 😀
SKETCHY Time
Aug 30, 2008 Author: mytime | Filed under: Cards, Papertrey Newsletter, Saturday SketchWell as you know every Saturday I host a sketch challenge. I know I have made mention before………but just in case you are new here-There is NO time limit. Just play when you can. I just want you all to get motivated! There are no real “rules”, just go with what inspires you!
This weeks sketch uses the KEYWORD mytimess03. So if you upload somewhere-like www.splitcoaststampers.com that would be great to use. Just send us a link here, so we can view your creation!
I am having fun using the Corel PaintShop Pro for these.
Hope you like it.
This week my sketch allowed me to seriously WHIP OUT, a card for my friend’s 30th birthday. I didn’t want to FOCUS on the fact she just turned 30, and I was late (of course) getting her, her gift :C by like OVER a month. I HAD the gift, I just didn’t SEE her. So I went with “3”.
So here it is
 Thirty
THE SUPPLIES:
Cards is typical A2 size
I used Papertrey Ink Floral Frenzy, and Border’s & Corners square set.For cardstock I chose Papertrey Ink white (there is NOTHING better!) , Aqua mist, vellum cardstock(for the butterfly -a Martha Stewart punch) along with a weave patterned paper by Martha Stewart. Ribbon is Also Martha. Buttons SEI,and Martha cardstock/ink in tealish color. Lets not forget my square punches.
Details:
Do you see the little gifts in the back? They are wrapped with Martha Stewart wrapping paper. They totally inspired me to create this card “to match”.
I began by randomly stamping/overlapping my squares. I used a hobby blade to make slits, for my ribbon to pass through. That is one of my favorite things to do.
I then stamped my flowers, on my weaved paper, and layered punched out. I made sure they weren’t all “centered”. I then adhered each one onto the tealish cardstock. LOTS of dimension to this. I LOVE my dimensionals 😀
Be sure you check out the team! I am certain they will inspire you further!
As always thanks for stopping by.
My class kits will be available on Monday! I’ll post photos Sunday, so you can see some details!
Later
Our anniversary! Oh, yeah and a sketch today.
Aug 23, 2008 Author: mytime | Filed under: Cards, Papertrey Newsletter, Saturday SketchToday is our wedding anniversary!! (and the sketch, but Ill get to that!)

Jason and I eloped, and got married IN Hawaii, on the beach. (Fun times getting that dress there in ONE piece!)
My dress was BEAUTIFUL!!! You cannot see in the photo,but there are little purple rhinestones all over it! See I told you I LOVE purple!!! Jay didn’t want to wear a purple shirt, but it was the beginning of him having little say! LOL! OK Just kidding. He gets enough say! LOL! No, seriously he agreed it would look nice to match, even though he wasn’t that thrilled.
I tell the ENTIRE story and have a Smilebox photo album for those of you who may want to see more ——>HERE!
Wow has time past so quickly. Back then I never thought I could love Jason anymore than I already did. Boy was I wrong. Sappy I know! But if you knew him, you’d love him too. He is the most amazing person. Truly.

We had a traditional Christian/Hawaiian Wedding. It was SO amazing. Part of our wedding vows were taken from a card Jason gave me while we were dating! It was beautiful. We both got all teary. I’ll never forget it. PERFECT DAY.

We got married on a private beach in Turtle Bay, Maui. Just him and I! More details are on the other page.
I guess I am just happy to celebrate that we have made it through some of the toughest times, in a couple’s life.
A child with daily special needs, which he happily took on once we starting dating. I knew he was amazing when we were at a birthday party with 16, 3 year olds, and he was playing right there with them. It was hot, and Alexa doesn’t do well in the heat. Suddenly she threw up a TON of Cheese Curls in my hair! Mind you, it is down to my waist at that point. He didn’t even hesitate, he grabbed some napkins and began cleaning her and my hair! I KNEW that day, that he was a real keeper. Then when Alexa got hospitalized for a bad croup./pneumonia, we had to hold her down to put in IV’s (this I normally did alone, as Alexa’s “father” would not even come to the hospital, let alone help), he was right next to me. I began singing to her “How much is that doggy in the window?”, then Jason quickly chimed in and sang “ruff ruff” It was the cutest thing. He stayed the entire hospitalization, as I encouraged him to go to work. But he wouldn’t leave. When we got discharged he had come home to make sure the house was clean, fridge was stocked, and had balloons for Alexa, and flowers for me. Laundry all caught up. I just felt so blessed to be with someone so thoughtful.
A unplanned pregnancy with Noah. Yes, thats right, Noah was not “planned”. But he turned out to be an amazing blessing (as are all my children). Jason could have walked away, but he was happy! He had Noah’s name all picked out and everything within 3 hours of finding out. He was so amazing to me everyday of my pregnancy telling me how strong, and beautiful I was. He was the BEST labor coach. When I had Noah, he presented me with a “book”. It was a typed up diary he started the day he found out I was pregnant. Each week he would type up what was going on, how he felt, funny things about the pregnancy or appointments. He then printed it up, after his past entry about the birth of our son, and put it in a bound folder. He brought it to the hospital after going to get my Dunkin Donuts coffee! LOL! It was to date the most amazing gift he ever gave me. I BALL when I read it. To have a man take the time to document his feelings and whatnot and do that was amazing. I couldn’t read the entire thing for months. My hormones were crazy.
Buying a home that needs to be totally re-done! Those have been FUN times, and still going.
Dealing with my EX. Who is no walk to the park. We are forever taking the high road. Its hard for Jason to see him ditch Alexa all the time. He loves her like his own, and he doesn’t understand how a man could do that to a child.
Then dealing with Alexa’s Cancer. We were told right away, that this could destroy our marriage if we weren’t strong enough. I was scared for that. Alexa’s father bailed on us because he never wanted to deal with anything that wasn’t 100% perfect and happy. He was very selfish that my attention was not on him all the time. He went and got a whole new life. Jason assured me we were strong, and would work together, no matter what. We promised to be honest and talk about everything everyday. He is my rock. He really helped pull me through that, an now we are so much stronger. Our love is deeper. We can make it through anything.
There are of course many more things, but I was just reflecting on how blessed I am to have a man like that. I cannot say enough about him. I am so happy to have him love ME, every-bit as much as I love him. He is the kind of guy who makes you feel like you are the ONLY woman on the planet. I always feel loved. He treats me as good today, as he did when we were dating.
I am just so lucky, and every thankful.
So I know no one really cared to hear all that, Im just in a sappy mood I guess.
Moving on…………..
Here is the sketch!

Use the Keyword mytimess02 if you upload anywhere, since people seem to want to have a code 😀 Send us a link back here so we can see your take. I always do my best to comment on every challenge player 😀
People have asked about elements of the sketches.
For example: Can the image be a flower instead of a circle?
YES!! WHATEVER YOU WANT! Whatever YOU see. Whatever inspires you in the sketch. Go for it. There are NO rules here. Well one, and that is to have fun!!
I made two today!!! One for the sketch, then another for my card to Jay for our anniversary.
Poppy remembering……….
I LOVE this Poppy set by Lisa called Remember. I have 2 other cards I whipped up after this one, to share soon. I just love any set that has open and solid images. Papertrey is PERFECT for that. This was inspired by my card in the PTI reveal. Sometimes you need a PUSH for the mojo, and that inspiration is exactly what helped me get warmed up.
The Poppy Red is just a gorgeous color. I love it against the black. I also love monochromatic combos 😀 Its great for lack of mojo-which was me, after not stamping for a week!! The satin ribbon makes any card look luxurious!
Then I took the sketch, and I flipped it!!
The flower became my circle.
I made a wish
This is the card I made Jay for our anniversary!! Isn’t it ADORABLE?!!!
Boy loves girl, girl loves boy 😀
They are images from Magnolia. Sentiment is a SU! one -Stem Sayings
I get my Magnolia from here –> [email protected] Just email Diana and she can email you the catalog. She ships to US and Ca if you are wondering. She also has some of the newest images 😀 I need to get some of those now too.
The shame is you cannot see the dimension :C He is cut on, and sitting on the bench, and she is cut out, popped out more than him, and her sneakers are popped out too! Really cute. I LOVE dimension. I love them popping past the layer 😀 I love that I didn’t have to color an entire “scene” to get a cute card! LOL!!!
I also love the flower buttons, and the pierced butterfly trail. You know I always have to use a butterfly if I can. I went with more “masculine” colors, and NO RIBBON!! I think he will like it. Jay loves my more “embellished cards”. You know 50 layers, and lots of stuff. I like clean. I think its a happy medium here.
I also hope this helps you visualize the ways a sketch can inspire you 😀 Don’t forget to check out my FABULOUS team of girls who also post with the sketch!
Thanks for reading!
Later
My Etsy

Who I Designed For
Blogroll
- Alicia
- Alli Miles
- Ally Blankenship
- Amber
- Andi @ crafts on a whim
- Angel R
- Angie Z
- Anne Kranitz
- Becky O
- Bee
- Beth Silaka
- Bethany Paull
- Beverly Nash
- Bobbie
- Cambria
- Cammie
- Card of the Week
- Card Positioning System (CPS)
- Cards for Cancer
- Catherine Doucette
- Charmaine
- Cheryl Sims
- Chriss Rollins
- Christina
- Christine Ewing
- Christine Wooden
- Colleen Schaan
- Craft Critique
- Craft Gossip
- Crystal
- Dawn Easton
- Emily Giovanni
- Geny
- Holly
- Igne Groot
- Inspirational Craft Blogs
- Irene
- Jami Sibley
- Jeanne Streiff
- Jen del Muro
- Jeni Bond
- JenMarie
- Jenn Balcer
- Jenn Diercks
- Jenn O
- Jennifer E
- Jennifer Mick
- Jennifer Pereda
- Jennifer-Sweet Treat
- Joanne Basile
- Jodi Collins
- Julia Stainton
- Julie Masse
- Karen
- Kathryn Berthiaume
- Katie Cotton
- Kelley Holland
- Kendra
- Kim Scholfield
- Kris’s Color Stripes! Get inspired here
- Kristen Dubosque
- Kristin Eberline
- Kristine
- Laura @ Sunshine Stamper
- Laura Turnmire
- Laurie Schmidlin
- Lesa Rapp
- Linda Duke
- Linda-LSN
- Lindsey Botkin
- Lisa (lakind scs)
- Lisa Kind
- Lori Craig
- Maggie
- Mara Campbell
- Maria
- Maria Levine
- Mary
- MaryJo
- Melanie M
- Monique Hansen
- Moxie Fab World
- Pam Imholz
- PaperCrafts Connection
- Peppers and Pollywogs Kids party site
- Rebecca Grohall
- Rita
- Robyn
- Rose Ann
- Sarah Vrolyk
- Sharon Harnist
- Sharon Johnson
- Sharon Rivera (a chemisrty with paper)
- Sherrie
- Sophia Landry
- Storage Units, Ink, & More Blog
- Sue Berker
- Susan (Rainy)
- Tangii Crane
- Tracy
- Tricia Traxler
- Trudee
- Velta
- VivLyn
- Zena
MTME Pretty Palette Color Team
MTME Pretty Patterns Sketch Team
My Time Made Easy TM LLC
Shop till you drop!
Lauren Meader
About Me
Copyrighted material
Subscribe To My Blog
Pages
- About me
- Alexa’s Story!
- My Crafty Corner!
- My Time Made Easy™ LLC
- Our Make A Wish Trip to Disney!
- Resume/Publication List
Calendar
| M | T | W | T | F | S | S |
|---|---|---|---|---|---|---|
| 1 | 2 | 3 | 4 | 5 | 6 | 7 |
| 8 | 9 | 10 | 11 | 12 | 13 | 14 |
| 15 | 16 | 17 | 18 | 19 | 20 | 21 |
| 22 | 23 | 24 | 25 | 26 | 27 | 28 |
| 29 | 30 | |||||
Archives
- August 2013
- July 2013
- June 2013
- May 2013
- April 2013
- March 2013
- February 2013
- January 2013
- December 2012
- November 2012
- October 2012
- September 2012
- August 2012
- July 2012
- June 2012
- May 2012
- April 2012
- March 2012
- February 2012
- January 2012
- December 2011
- November 2011
- October 2011
- September 2011
- August 2011
- July 2011
- June 2011
- May 2011
- April 2011
- March 2011
- February 2011
- January 2011
- December 2010
- November 2010
- October 2010
- September 2010
- August 2010
- July 2010
- June 2010
- May 2010
- April 2010
- March 2010
- February 2010
- January 2010
- December 2009
- November 2009
- October 2009
- September 2009
- August 2009
- July 2009
- June 2009
- May 2009
- April 2009
- March 2009
- February 2009
- January 2009
- December 2008
- November 2008
- October 2008
- September 2008
- August 2008
- July 2008
- June 2008
- May 2008
- April 2008
- March 2008
- February 2008
- January 2008
- December 2007
- November 2007
- October 2007
- September 2007
- August 2007
- July 2007
- June 2007
- May 2007
- April 2007
- March 2007
- January 2007
Categories
- About Me
- All That Scraps
- blogger challenge
- camera/photo play
- Cards
- Contests
- family stuff
- FOR SALE
- Home decor/3-D items
- How to FAKE it!
- Introduction
- JUGS Challenge
- JustRite Stampers
- Lizzie Anne Designs
- My family stuff
- My Stamping Space
- My Time Made Easy
- My Time To Color Challenge
- My Time to Create Challenge
- My Timeless Template Challenge
- My Timeless Templates
- Mytime Mail
- MYTIME MOVIE/VIDEOs
- Papertrey Newsletter
- Pink Cat Studio
- Pretty Palette Challenge
- Pretty Patterns Sketch
- Product Opinions and Must haves
- Recipe's
- Saturday Sketch
- Smilebox Creations
- Stampavie
- Tutorials
- Uncategorized
- videos
Most Popular
- Create your own Onesie Card Tutorial-and important NOTE! PLEASE READ (2529)
- Saturday Sketch-Boxed bag holder (2333)
- Going GREEN! Fancy Flower Flourish-Closure Video (1478)
- Fabulous Favorite - Giveaway! (1336)
- a Prayer Request (1232)
- QUICK-Easter Baskets from Nestabilities-PTI style-and blog challenge (1063)
- Teaser Sketch (999)
- February Release Giveway! (and a little peek) (996)
- Group Post and Rambling Rose Video Tutorial (985)
- GIVEAWAY! Who wants it all?! (895)
Recent Comments (RSS)
- 첫충사이트: 완전히 흥미로운 블로그 게시입니다. 저는
- sarah: Wow, Lauren, what a stunning
- hedie: خرید راهبند
- 야동: Love to read it,Waiting For
- 야동: This seller is in a
- 바카라사이트: 여기 처음 왔어요. 나는이 게시판을
- 야동티비: I was surfing the Internet
- 바카라사이트: 비슷한 주제에 대한 흥미로운 정보를
- 바카라사이트: "여기에 제공해 주신 귀중한 정보와
- 온라인홀덤: 유익한 웹 사이트를 게시하는 데
Copyright © 2007 - My Time, My Creations, My Stampendence - is proudly powered by WordPress
This blog has been Tweaked and Designed by Sara Williams