Archive for the ‘MYTIME MOVIE/VIDEOs’ Category
Video: How to use Fantasy Film
Apr 20, 2009 Author: mytime | Filed under: Cards, MYTIME MOVIE/VIDEOs, Product Opinions and Must haves, Tutorials, videosI got a video done! YEAH!! AND for MONDAY!! DOUBLE YEAH!
Now I know its not he flower one you are ALL waiting on, but that one will take some time! I did have it filmed but had a mishap.
I have the intro done and editied , then when I went to find and edit the flower tutorial, the actual tutorial accidentally got erased, when I was video taping Amber riding her bicycle! I’d rather lose the flower thing which I can re-create, than my daughter’s video! I can recreate that moment.
You know whats funny si she is 4 and can ride a bike, but the other 2 won’t do it! Weird! Alexa is terrified (she has depth perception issues, where everything seems higher, and scarier) but Noah just isn’t interested.
Anywho…..this one uses a product called Fantasy Film. It is by Art Glitter
TRUST ME when I tell you, you don’t want to Google “fantasy film” OK! Just go to the site and look for where they sell it! LOL!
In the video I show you HOW to use, and I also share how I custom color my film 😀 Can you say LOVE IT!!
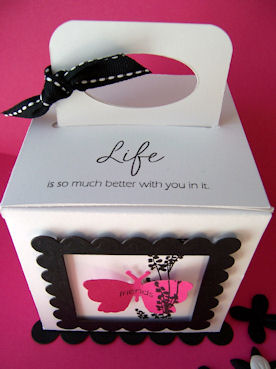
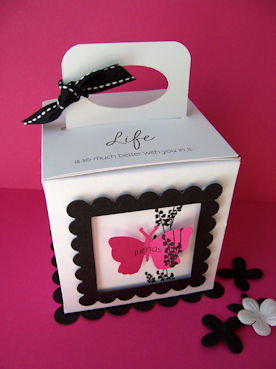
Here is the detail photo of the card sample using the Fantasy Film

Not the BEST photo-sorry! Bad lighting :C
My mojo is on a break :C My template release always sucks every last bit of mojo out of me for like a WEEK! On top of that Im always adding even MORE template ideas each month to the bunch we have. So, sometimes I can’t get out of TEMPLATE mode! I just love them SOOOOO much. I could make boxes ALL day 😀
OK back to the subject:
The butterfly is from a set called Butterfly Wings from CTMH that Katie sent me, since she KNEW I’d love it. It was the Stamp of the Month for March, and sadly I got sick and had my surgery so am JUST getting around to using it-SORRY KATIE!!
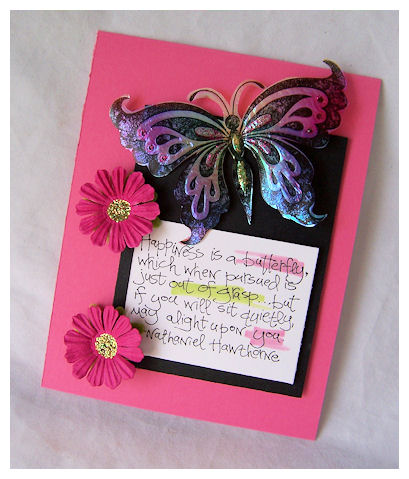
So I kept this SIMPLE! Plain actually. But with a STUNNING butterfly why over do it?!
Anyway, its a super set! I used my Sketch 31for it. Told ya I had a sample! LOL! I just wanted to share the video with it.
Sentiment is a SU! set. Butterfly of Happiness I believe.
I have tons planned for videos, but have just been SO busy! Kids are on vacation-CRAZY!! But I WILL somehow some way share it all eventually.
I have so much fun SHOWING you what Im doing as oppose to just typing it all up!!
I didn’t do an “intro” since its a basic technique. Why listen to me blabber on for 2 minutes! LOL! You know how I can talk! I spared you all my banter during one part, and fast forwarded myself too. I think its hilarious! I couldn’t figure out HOW to MUTE me! LOL! So I added some crazy music to it too. So be ready to turn down the volume. I love watching myself in fast forward! LOL! I wish I could actually work that fast, as I feel like my brain moves that quick, but my poor body can’t keep up. Thank goodness for notebooks. Pages of chicken scratched ideas, from my awakenings at 2 am-seriously!
I also wanted to let it be visible on YouTube for everyone-so I hope you like it. You have NO IDEA how long that simple 8 minute clip takes to edit! OYE!!
So I hope you enjoy it!
Tomorrow begins the peeks for Pink Cat Studio!!
Till then
#1-Video Window Treatment
Apr 9, 2009 Author: mytime | Filed under: Home decor/3-D items, My Timeless Templates, MYTIME MOVIE/VIDEOs, Papertrey NewsletterCan I get a WAHOO!!!
Im so not ready, but I’ll do my best to keep up this week. Having 2 weeks “off” from stamping, KILLED my time and assignments schedule. Oh, yeah, and my MOJO! Not too happy about that.
Its S-L-O-W-L-Y making a come back.
Every month- during this week, I feel like Tigger from Winnie the Pooh! LOL! Just bouncin with excitement! Seriously. This usually gets me motivated to kick my own butt! We shall see.
Time to share a sample using a My Timeless Template© , and of course, a new stamp set called Scattered Showers, with you all!
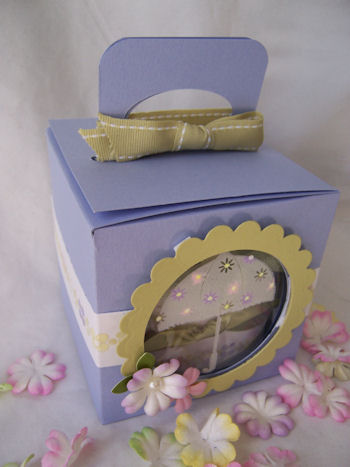
You have had a view of this template a few weeks ago-it is called Get a Handle On It ©
This is due for release on the 15th.
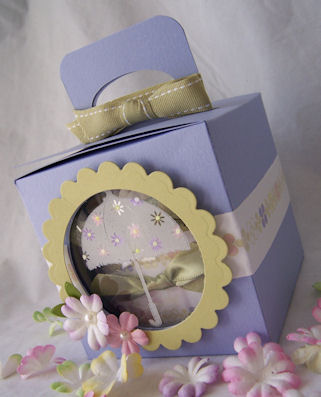
Get a Handle On It © is the perfect box for SO MANY great gift ideas-as you will SOON find out for yourself!
Its a SUPER cute box, that has fun, cut out side panels, in which the box handle pops through.
I can’t tell you enough how much I love this particular template! LOVE!
Its cute, and perfect size. I love that the largest square nestability PERFECTLY layers on the bottom of this too, for great finishing touch.

Looks can be deceiving. You may think this is a SMALL box.
Well, NO! Its actually quite a nice size-measuring 3 1/2 inches squared.
This allows you to fit some awesome stuff in there. When we used this box at Stamp New England, we were all able to fit over 38 bite size chocolate candy bars/pieces. Now that ROCKS!
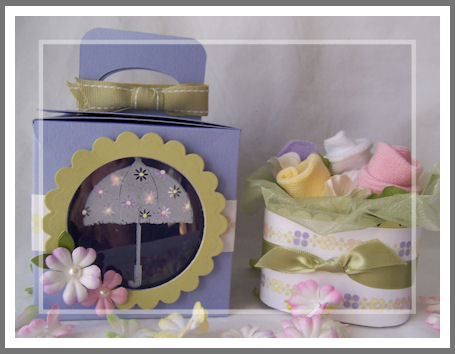
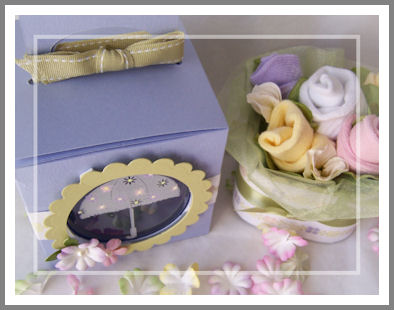
Wait till you see the box of beauty that I put in this creation! The little umbrella makes the perfect image since we are using this box/gift to brighten someone’s day. You will want to start making one for anyone you know- weather they are celebrating something, or not feeling well. Any excuse will do!! It is sure to make someone’s day-rain or shine 😀
So today I am sharing a video that shows the SIMPLE technique I used for my Get a Handle On It © project
I’m calling it the “window treatment” because it allows us to add interest, and color to the windows of our boxes, or other projects, that may use acetate. Getting a small peek at what is IN your gift is so fun! Now you can make your “window” even prettier.
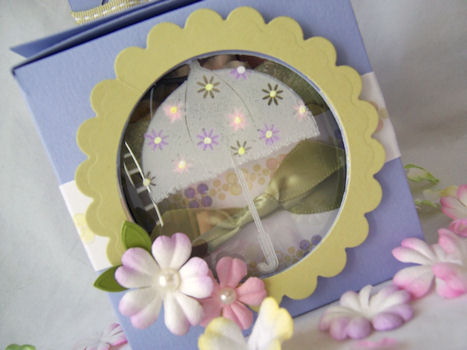
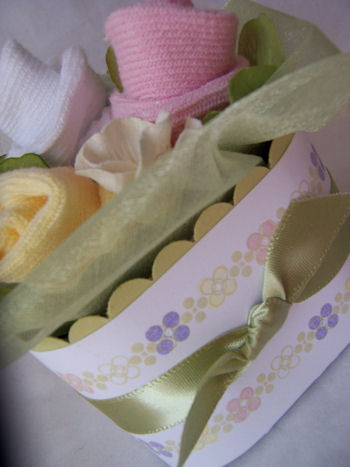
Here is the close up view of my “window treatment”.
This is where the Scattered Showers Stamp set comes in. It was PERFECT for this technique of dressing up the window of my box.
I used Papertrey Inks Clearly Creative Cardstock for my window.
You just stamp your image with White Stazon.
Then use your Souffle Gel pens, to color the acetate, from the back.
This gives you nice color on your window, and a great fresh look! Cute eh?
Now when you OPEN the box, this is the SURPRISE inside 😀
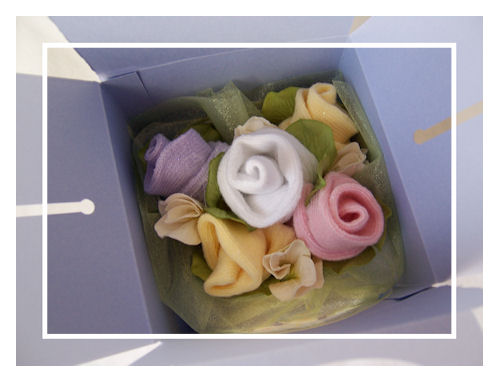
Now we take it out……..
This is what you are getting IN the box!
A bitty baby booty blooms box-(say that 5′x fast).
Its a nice little gift, instead of giving FRESH flowers, that wilt and die, you can give them this.
I decorated the large square tin, that I made 5 baby booty flowers for.
A sprinkle of glitter-and VIOLA! A gorgeous gift, or party favor-completely perfect in the gift box-which is a gift in itself.
The large square tin fits perfectly into the Get a Handle On It box.
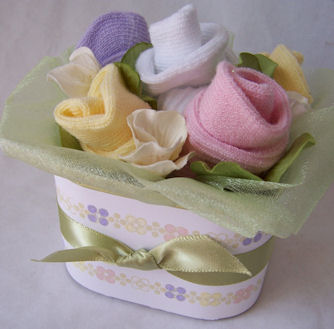
Isn’t it so pretty? Simple and elegant.
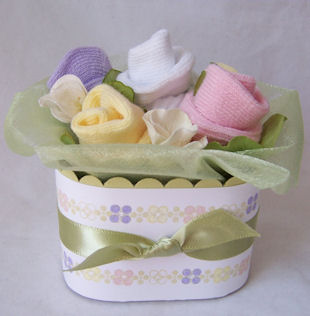
Perfect size to keep on a desk!
Did you think that something like this could fit in the box?! Well it DOES!
Here is the close up of the little booty buds I made 😀
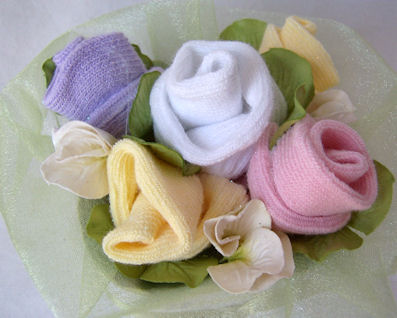
Aren’t they just adorable?
I put this up in my Etsy Shop, along with another version I created 😀 I hope someone finds it a good home 😀
Supplies used:
Get a Handle On It © template-due for release the 15th
Stamps: Scattered Showers and Background Basics Dots & Spots-also being released on the 15th
Cardstock: Clearly Creative cardstock, Spring Moss, white, amethyst
Ink: Amethyst, spring moss, sweet blush, lemon tart
Ribbon: Spring moss collection
Spellbinders circle nestabilities, Prima Flowers, Souffle Gel Pens
Tomorrow I have another great sample using this template. I will share the FIRST peeks at the other template on Sunday-the 12th. You will love it 😀
In the meantime, check out Kelly’s blog for her peek at this template 😀
Also check in on Nichole, Dawn , Heather and Lisa,as they are all sharing samples too! If this stuff doesn’t get the creative juices flowing I don’t know WHAT will 😀
As always I love to hear your thoughts-so let me know what you think!
Thanks for stopping by.
Till tomorrow……………………..
Video: Custom color it with Copic Markers and a winner
Apr 2, 2009 Author: mytime | Filed under: My Stamping Space, MYTIME MOVIE/VIDEOs, TutorialsHi everyone!
Guess what! Im featured on the Moxie Fab World BLOG! How fun and exciting is that? It only added to how I feel today!
I don’t know if its the meds or just life, but I’m in a super happy mood today. SO thankful, and just plain HAPPY.
LIKE I’m bouncin off the walls ( in my head -not physically! LOL!) with excitement. I honestly feel like CRAP, but the weather is warm-like the kids can PLAY OUTSIDE warm, I got a NEW TOOL that is BEYOND fabulous (share a video on that another time :D) and my dress fits!
What is there to be upset about?
Yesterday was a BAD day. I hurt worse than ever!! My first day on my own. Can you say OUCH!! They have switched my pain meds 4 times! Basically everything except Motrin make me feel like I’m on the Tilt a Whirl ride, still in motion. I end up getting every possible “adverse effect” listed, so I’m done with it. Just say NO to drugs! LOL! So now Im just resting and relaxing, no meds. I can see HOW people get addicted because they are quite quick to dish out OODLES of stuff. I have a virtual pharmacy going in my bathroom cabinet right now. Maybe that is because I don’t have a history of going to the doctors, let alone abusing meds! LOL! I actually refused most of it, Im the type of girl that won’t take so much as tylenol for a headache, let alone the BIG GUNS.
Anyway, yesterday: I was very upset because my dress before surgery fit like a glove: AKA no room to GROW! N-O-N-E
Well since my surgery I was definitely BLOATED! I measured! I added an INCH to my waist! There was NO ROOM for an inch in the dress-if I sneezed it would BUST! LOL! Not kidding.
I was upset because I haven’t eaten anything that would warrant the BULGE. If Im going to gain an inch it would have been nice if it were “worth it”. Meaning CHOWING lots of sinful goodness. But I hadn’t done that. Quite the opposite. Im living on cereal and fruit. If I eat “food” I feel like a swallowed a fire ball.
Anyway-I woke up today and felt “skinny” again, and low and behold lost 1 1/2 inches! YEAH! So I tried on the dress, and it fits! With room to sneeze! LOL! no SPANX for me!
I have NO IDEA how Im going to walk in HEELS (Im so not a HEEL girl!) let alone dance at the Wedding Saturday (belly is NOT feeling good-driving feels like everything is PULLING-let alone dancing), but Im going to that wedding, and I’m going to have a BLAST!
On a FAT note:
I also have someYUM-A-LICIOUS cupcakes coming to my house tomorrow, and me and my friend Paulette are going to gossip over cupcakes and all sorts of frozen big girl drinks 😀 I know I was just complaining about being bloated, but I haven’t eaten anything worth talkin about in a LONG time-especially with the surgery-week before, now on my second week. I think I can afford a sinful delight-or two! LOL! I’m sure I’ll go into sugar overload, but Im OK with that.
On a stamping note:
YIPPEE!!!! I have another video for you!! Just a quick one I did, while still doped up on pain meds-see same horrible hair, and you can kinda tell I’m a little loopy! LOL! At the time I thought I was “fine” obviously NOT! LOL! I watched it today! YIKES!!
I think its a great, informative video (despite my lack clear thinking) on how to custom color ALL your embellishments, which allows you to SAVE money!
Anyway enjoy it! Its at least good for a laugh.
[veoh v18132313wSRDT6K3]
If you want to safely view ALL the videos I published on Veoh, please CLICK HERE!
NOTE: DO NOT CLICK ON THE THUMBNAILS !If you click ON the thumbnails AFTER the video it takes you to the Veoh site. Some of the content there I am told is “R” and “X”rated and you may not want to do that around young children. So if you just watch the video here on my blog, and avoid the thumbnails you should be OK. Not sure WHY they don’t have ONLY stamp related videos pop up, but I guess some aren’t.
Bottom line: Click at your own risk!
I am not responsible for content that links to the videos from the Veoh site.
Thank you ![]()
I still haven’t been able to STAMP or create anything. Even sitting here too long KILLS me. But it felt good just to SMELL my craft room 😀
I also have to announce the winner of the My Timeless Template Class Kit
Chosen Via random.org
———————-
Random Integer Generator
Here are your random numbers:
311
Timestamp: 2009-04-02 18:37:34 UTC
311. Stacy |
Hi Lauren, I hope you continue to get feeling better. I love all of your fun projects. I think we all have a wonderful friend that got us into stamping / cardmaking. Thank you Annette! You were always there to help me and loan me stamps or stamp pads until I was able to create on my own. I love all of the PTI products.
——————————
So thats it for me.
Don’t worry i’ll get pics of the cupcakes in a jar!
Thanks for stopping by
Video:PEEK! Give away! Stamp New England Template packet
Mar 31, 2009 Author: mytime | Filed under: Cards, Home decor/3-D items, My Timeless Templates, MYTIME MOVIE/VIDEOsWOW! Brace yourselves with at least 2 cups of coffee to keep up with me on THIS post today. Im long winded (as usual) and ahve so much to share.
Well as you know we had Stamp New England about 2 weeks ago! It was a BLAST!!!!!!!
You may have missed the event but you don’t have to miss my project. Keep reading.
It was wicked awesome to finally have a event in NEW ENGLAND!! Granted I got to CKC, but that is for shopping not stamping! LOL!
I was first up to teach that day, and was happy about getting it over with, then I was a little nervous as I looked around and it seemed like every single person was intently listening to my every word! I don’t get nervous about public speaking easily, since Im definitely NOT a shy person, but I have to say I was a little intimidated! LOL! All of the sudden a room of people who “know me” is in front of me waiting to see what I am going to do!
I was scared I would let them down! LOL! Then I got a grip, once I started talking, and felt right at ease. I just knew I had to do what I do,be myself, and not worry about what flies out of my mouth! LOL!
I had so much fun meeting and getting to know everyone, even though it was a bit busy.
It was SUPER amazing of Nichole, Jane and Julie to donate a Life Stamp set to every attendee, and for Nichole to take the time to put together the My Timeless Template I made special for the class called Get a Handle On It.
It will be released this month on April 15th. I was very excited to share it with everyone early, and get feedback on it right away.
I got new video editing software with our new computer ,which had tons of problems at first, but my sweet hubby hung in there to get it to work! Its called-Windows Movie Maker.
So I laid in bed doing this yesterday! It was SO much more fun than the other one. I love the options more. I think it looks more professional. Although I do need practice I think this first one was FUN, and not too bad! LOL! Now I have a list of tutorials to do using this new process, and I can FINALLY do High Def!! YEAH!
I put the template intro video into a clip, and then all the photos I have of everyone. I was just playing around. I hope you enjoy it! I was also able to get MUSIC onto the pictures in the end! Let me know how you like that part too.
Forgive the song! It was the only one I had ready. I do love it and think its pretty catchy, it makes watching photos much more fun-so if you have your volume up, you may want to adjust it a bit. I need to purchase more songs on my computer for future use.
Enjoy the video:
Now for MORE fun!!!!!!!!!!!!!
So who wants to win my class kit from Stamp New England?
One pre-printed My Timeless Template © (not due for release till April 15th) called Get a Handle On It © with the Stamp set Life.
Here is the project
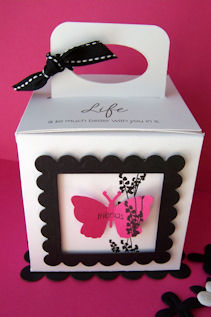
This is a SUPER sized box, that will fit many gifts!
This box EASILY held at least the 38 bite size chocolates that we swapped at the event! WITH room to spare! Looks deceiving doesn’t it? I put my Lauren touch on this and have to say one of my favorite projects to date.
Top view
The flap closure on this is SOOOO fun-you will see more details as we get to the countdown! The sides fold over the handles, so the handles POP though, letting the box flap closed.
Trust me, really cute. Not just a square box.
Side
Just a simple, stunning box, that can fit so many wonderful gifts!! Even the bottom is decorated with a scallop panel. Who wouldn’t love this?
I put the ORIGINAL box, made by me, and signed on the back, on my Etsy Shop! (Also ALL this months template countdown projects will FINALLY have a home there! )
SO leave a comment here, and I will enter you to win the same packet the girls at Stamp New England got!
That means you win the printed version of the template-so you can put it together at home, and give it a try before it’s even released, and you get it with with the cut supplies to make this project as seen here, and the Life Stamp set too!! YIPEE!!!
Now let me chat a bit
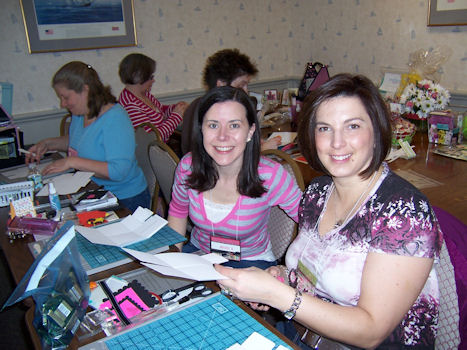
This is my dear friend Paulette!
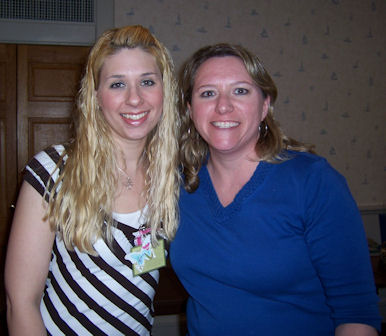
(OK I look so tired in this photo! EEK! It was the END of the day!!)
Everyone always wants to know WHO is that mysterious person I alway talk about, that is usually on the other end of the phone, when my life is upside down or I have a problem! Aside from my mom who listens but probably doesn’t understand how BIG it is (if you don’t stamp HOW can you GET IT really! LOL! Or know the who, what, when, and where)—the only person who COMPLETELY gets my stamp insanity, and why I do what I do—-that would be Paulette.
She is THE ONE who got me so into stamping in the first place! She was a SU! demo when we met, and after a few months convinced me to become a demo. Its been a whirlwind every since. So we can all thank her for really getting me into this INSANE hobby. My husband may not feel so nostalgic! LOL!
I was just truly happy, after so much hobby hopping, to feel like I finally found something I LOVE to do.
I had to BEG her to take a photo with me! GRR! I’m like” you are my friend!! For goodness sake we NEED a photo together!” FINALLY she agreed, after much begging.
Whats a girl gotta do?!

She is the unfortunate one who listens to all my complaining, and never seems to mind! God bless her soul.
She is just the sweetest person ever! Everyone needs a Paulette! She is the friend that is always there when you need an ear, or a favor, like die cutting 40 scallop nestability squares for YOUR class! LOL! Or who calls into work because she is sick with a migraine, then comes to take your kids so you can have surgery earlier.
Just so fun, funny and genuine. I can’t say enough about her.
Trust me, anyone who can listen to me several days a week is a SAINT. You see how I type, imagine me on the PHONE. All my conversations start: “OK! I won’t keep you long I just had to tell you……” then 2 hours later……still going. Then I suddenly realize my banter and say “OH! MY! GOSH! I kept you way too long. OK I’m going to let you go. Sorry for chewing your ear off.”
Jason doesn’t know why she answers the phone! LOL! He’s like she has caller ID right? Thanks Jay!
Here is a group shot of all the “teachers” at Stamp NE! This is on the video too.
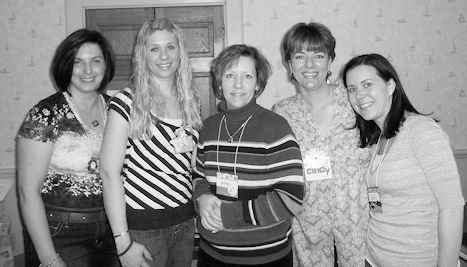
Its Karen, me, Julie, Cindy, and Joanne.
Everyone did great projects.
The GENEROSITY of ALL the vendors was astounding. Thank you to all of them. I went home, online and placed SEVERAL orders! LOL!! It was very enabling.
Karen won tons of awesome stuff! LOL! She was ONE LUCKY girl!
Julie was UBER sweet, and was so great to me during the entire planning of the event. So wonderful to work with
Cindy has a HUGE SU! down-line, and following! I can see why. She is a sweet as pie. I had no idea!
Joanne I always KNEW she was sweet. we worked for Kim from My Favorite Things together (who I love!) and she is always so cute, and funny. She is just adorable and sweet in person. She even called me to offer to help with my last minute stuff after my gall bladder attack! That is just amazing when she had her OWN stuff to do too.
Everyone was totally amazing. Made me feel at home. Like I knew the entire room of people for years. I did have some familiar faces. It was so great to meet people who interact with me here on my blog, finally in person.
Now one more person I can’t forget that isn’t in the photo is Kim-she was a big planner for this event and you can see it is in her blood! She is just so darn purty in person too! LOL!
Kim Scholfield, Joanne B. and Julie Masse worked so hard on this event and it really showed!! Everything was well organized and AMAZING!
I would definitely teach or go to another event these girls plan, let me tell you! Count me IN!
I was like the AMAZON of the entire class! I’m 5’10 so that put me WAY taller than most people. It was AWFUL! Between that and my ZEBRA shirt! LOL! I wanted to shrink-and burn every photo. Jason told me to wear that shirt, and I KNEW I shouldn’t have looking back. Oh well.
I am actually slouched down in most of the photos if they are a close up! LOL!
So that is it for now.
Jay is STILL home letting me recover. Im doing my best and I know you THINK I’m doing stuff, trust me Im not. I feel SOOOOOO LAZY its insane. I slept for like the past 3 days. I want to take a marathon run around my block! LOL! I’m getting antsy. But trust me I CAN’T move like I want, so no worries.
I have a wedding to attend on Saturday, and I have a SATIN dress-that shows every curve (or cellulite bump) so I better not be bloated for it. I LOVE my dress!! Its pretty hot. It took me forever to find one that I liked, let alone LOVED.
I find I’m in between ages at this point in my life. I want to look nice, but not too young, and not too old. Its a fine line.
After much searching WHERE is that typical hot little black dress? It doesn’t exist anymore!
The dresses were either too young, too old or too PROM! OR there is HUGE bold print in bright colors that I don’t want splashed across my garment. A card-yes! My dress-NO!
Whats a girl to do.
I had a super hard time finding something SEXY but not HOOCHIE! I work hard to get my flat stomach so Im not wearing a SACK……
Im not 17 anymore so not into super short, you better not bend over, or the world will see what your mama gave you…….
or the I think I need sunglasses that woman has so much bling on her dress……
or the “how YOUNG does she THINK she is” dress………
Or OH MY WORD! Look what Lauren is actually wearing dress……
I wanted the “WOW! You look great!” dress. The kind that your husband has you on his arm and won’t let you out of his sight dress! LOL!
The on that just makes you FEEL good about yourself. Not one you have to wear SPANX to get into, but you are just comfortable in your own skin in.
I think I got it.
I’ll share photos of that when we come back. Jay and I get a night out, overnight! WAHOO!! Finally. We don’t ever get time away. This will be nice.
WOW! Can you tell I’ve been COOPED up?! Holy first chapter to the novel Im writing!
Anywho-thanks for stopping by! If you read this you must have been as bored as I have been!
Video: Hippity Hop Bunny Box
Mar 16, 2009 Author: mytime | Filed under: Home decor/3-D items, My Timeless Templates, MYTIME MOVIE/VIDEOs, Papertrey Newsletter, TutorialsMonday’s with My Time © is here!
I have a UBER cute idea for a gift box using the Newest My Timeless Template © release of Bun in the Oven ©
A you know I think the templates are full of endless possibilities! I so enjoy sharing more and more, even after the releases!
Here is another idea.
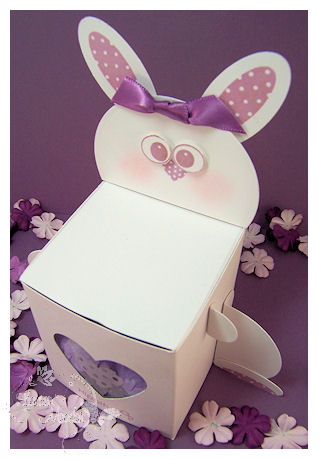
Hippity Hop Bunny Box
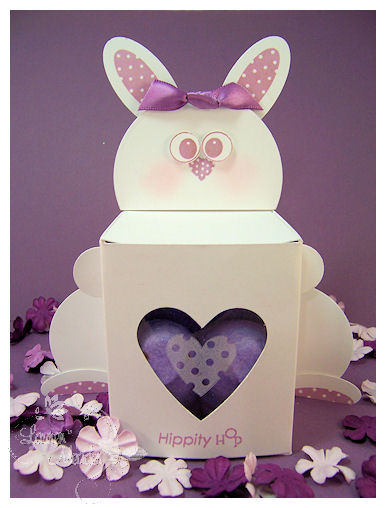
This is a photo of what we will be making today!
Complete with tail!

Is it not ADORABLE??!!!
More photos are included in video. As are the directions.
Think Easter, Spring, Baby-or ANY TIME just plain adorable box! Change it up just a smidge and it can be a teddy bear, skunk, cat, dog, and as seen yesterday- even a turtle. Just by switching the colors, and the ears!!! Oh and the TAIL!
All you need to get started is the Bun in the Oven template!
Cardstock of choice
with Ink of choice-along with some acetate
I used-Pond Life, Wise Owl, Everyday Classics, Heart Prints, Borders & Corners Hearts
Punches: I used
2 inch circle, 3/4 and 1/4 inch circle, large heart punch, large & small oval punch
I don’t know what to say, other than I feel like I’m on a rollercoaster of creativity with that particular template. SO many things to be made. Way fun!!
So let the video begin!
[veoh v18011091ceGsSnrN]
NOTE: DO NOT CLICK ON THE THUMBNAILS !If you click ON the thumbnails AFTER the video it takes you to the Veoh site. Some of the content there I am told is “R” and “X”rated and you may not want to do that around young children. So if you just watch the video here on my blog, and avoid the thumbnails you should be OK. Not sure WHY they don’t have ONLY stamp related videos pop up, but I guess some aren’t.
Bottom line: Click at your own risk!
I am not responsible for content that links to the videos from the Veoh site.
Thank you ![]()
I had so much fun making this, and I hope YOU do too.
I like to think that these videos on Monday are a bright start to everyone’s week ![]()
As you know on Monday’s I have started my weekly video feature, and I think its going well. I “think” most of you are enjoying it as much as I am. I like making them-just not the other stuff-like editing! LOL! Same as card making. Thats the BEST part-the photographing and stuff is the icky part for me.
I LOVE teaching. Love it. Videos for me, are better than actual classes because there is NO prepping 20 things for anyone.
Since Im such a TALKER its much easier for me to express everything that way, rather than type a journal here. I could talk paint off a wall if you let me, I swear. I think many of you clearly realize that by now.
I also find that most of you “get it” more than my blah blah blah, step by step photo stuff.
Am I right?
I do want to spice up some of my videos and have some funny ideas for that in the future ![]() So Ill save that, for then.
So Ill save that, for then.
Thanks for watching the video. I love hearing what you thought, and of course if it inspired you to actually TRY it!!
So thanks for stopping by, and making my day with your words 😀
Till tomorrow
#1-Video: Wishing you Captured Card Case © envelope tutorial
Mar 9, 2009 Author: mytime | Filed under: Cards, My Timeless Templates, MYTIME MOVIE/VIDEOs, Papertrey Newsletter, TutorialsHi everyone!
Let the excitement begin!
Before I go on & on in my usual BLABBER, I truly-from the bitty bottom of my heart, want to thank ALL of you. I am always in true awe by the love and support you offer to me, and so many in the stamping community. You know everything about me and my family (much to my husbands dismay! LOL!) You all let me blabber, and offer so much support! You laugh with me, cry with me-all of it. All over the world! You share a piece in my life, every time you check in. When I get ready to post my peeks every month, you all share the joy and excitement too! Its always amazing. I love when YOU all get personal with me too, and leave funny comments-the longer the better(wink), and I crack up. Some of you get me crying too! Anyway-I just really appreciate each and every one of, for all you give to me during my time spent here. I think YOU are all amazing, and YOU inspire me to keep sharing, and just plug along, everyday.
Seriously-huge hugs and THANKS!
Day 1 of the Papertrey Ink sample peeks 😀 I have lots to share daily for the next few days, so don’t miss a day 😀
I’m so beyond excited for today’s post! You have NO IDEA!
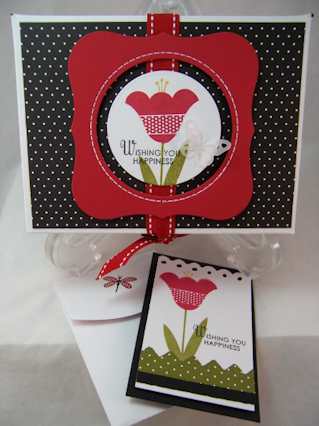
I am peeking a set by Melissa Bickford called Wishing You. It is FABULOUS! My new favorite MUST HAVE set ever!
I LOVE tulips-LOVE! My favorite flower 😀 This set is ALL super cool, fun and funky, inter-changeable tulips that are to die for. The sentiments alone ROCK the house. I kid you not! I had to make myself STOP using it.
Normally, monthly Nichole emails us peeks of the release, then posts our assignments. When I saw this set I couldn’t BARE the thought of NOT peeking it! A total Lauren set! LOL! So I immediately begged to let me peek it (this is not a usual occurrence at PTI! LOL!) Im usually a good girl and use what I am assigned, but this had to be an exception.
I also get to share a template peek 😀 We are releasing 3 templates this month 😀 Can I get a YAHOO!! One that I have been begged to do for almost a year!
Any guesses?
Well, you will see that one tomorrow.
I can’t wait to show you all the samples I have worked on! I’m just bouncin over here.
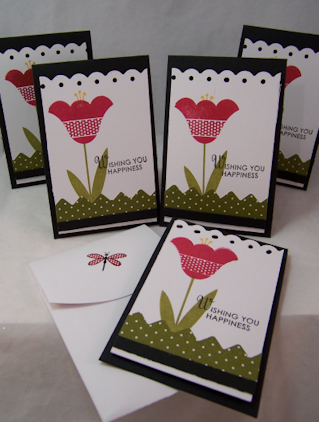
But, today I will share a video that features a great project using my FAVORITE set: Wishing You, and my newest My Timeless Template © Captured Card Case ©.
[veoh v17963042FhazMysw]
NOTE: DO NOT CLICK ON THE THUMBNAILS !If you click ON the thumbnails AFTER the video it takes you to the Veoh site. Some of the content there I am told is “R” and “X”rated and you may not want to do that around young children. So if you just watch the video here on my blog, and avoid the thumbnails you should be OK. Not sure WHY they don’t have ONLY stamp related videos pop up, but I guess some aren’t.
Bottom line: Click at your own risk!
I am not responsible for content that links to the videos from the Veoh site.
Thank you ![]()
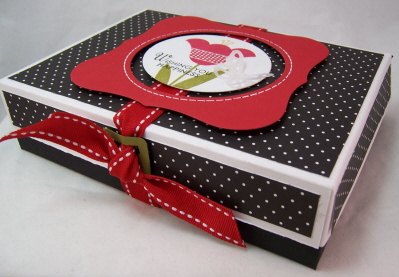
Captured card case is a template that easily holds your standard, A2 size cards and envelopes. It is a hinge style box, that is perfect for so many treats! The way this template folds together allows you to use two colors of cardstock, giving you a striking look by having one color for the base, and another for the lid 😀
Here my base is done in True Black, and my lid is done in White

Again, don’t get stuck in the rut of thinking of it as JUST a card case! After today you will see many other uses for it. It will be a go to template for sure. Especially when mass producing gifts, like around the holidays, or for a class, maybe and event?
Now, speaking of “cards” and A2 size, I think we ALL get stuck in the A2 size card RUT!
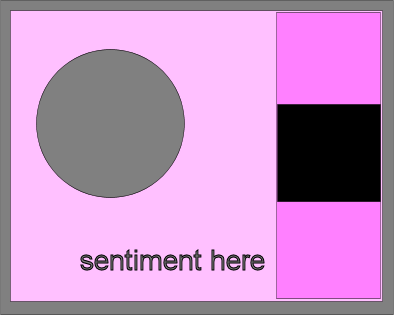
So today’s video I will show you how to EASILY mass produce a UBER cute set of cards (THAT ARE NOT A2 size!) in not time, using the Wishing You set.
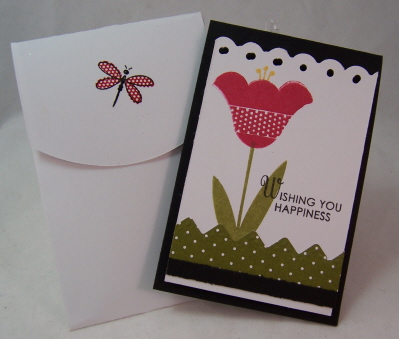
I also did a step by step tutorial, for my formula, for making your very OWN envelopes (ANY size!) to match your card creations. Includes a “liner” tutorial too.
You can see my “formula” —> here. I have had MANY requests for the VISUAL 😀
I really hope this helps you want to custom make your own envelopes more often. Better yet, try this version to give as a gift in my Captured Card Case ©! How much more fun are little note cards?
Today’s Captured Card Case easily fits my unusual sized cards and custom made envelopes! I think you will love it. Well I hope you do because it took me FOREVER to get this done. My computer deleted my first 2 videos, so I had to re-shoot, re-edit, and the whole nine yards of it. I just don’t have “luck” with this stuff KWIM?
OK onto the project!!
This is the close up of the box top

So I printed, cut, scored and assembled my Captured Card Case, as directed. I then decorated it to match what will be my card/envelope set.
(All this info is on the video, but for written reference) It is a bit overwhelming if you LOOK at the typed up version, but if you watch the video, you will see how SIMPLE it really all is 😀
CARD DIRECTIONS:
My finished cards are 2 3/4 X 4 1/4 (fold at top)
You need 2 sheets of 8 1/2 X 11 cardstock in True Black
Score along the 8 1/2 inch side at 4 1/4
Then along the 11 inch side-cut 4 pieces size 2 3/4 (do that for both pieces-giving you 8 card bases total)
——————————————————-
1 sheet of white cardstock 8 1/2 X 11
Cut 2 strips (along the 8 1/2 inch side) at 4.
This gives your 2 4 X 11 strips.
Punch a scallop border, along one side of each strip.
Cut strips at 2 1/2. You will get 4 per strip (8 total)
——————————————————
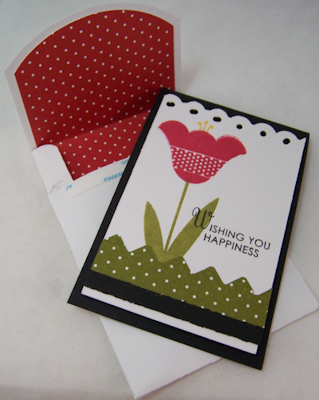
Stamp flower bud in Pure Poppy Ink
Flower buds in Summer Sunrise
Stamp stem in Ripe Avocado
————————————————-
Now punch a zig zag border from Bitty Dots 2008 paper in Ripe Avocado.
Cut down to 3/4 X 8 inches. You will need 4 strips.
—————————————————————–
Now cut 4 – 1/8 of an inch X 8 1/2 inch strips from true black cardstock, and layer onto bottom of zig zag “grass” border.
Layer these pieces, onto bottom of stamped layer, trimming excess.
————————————————————-
Stamp sentiment in True Black ink
————————————————
Layer completed mats onto black card bases using dimensionals
DONE! In MINUTES!!! *
8 Uber cute cards 😀
—————————————————————–
ENVELOPE TUTORIAL
Now for the mini envelopes-made using my formula
Envelope Paper Size Formula
1. Measure size of your finished card
2. Length of card plus 1 1/4″ = Width of Paper
3. Width of Card x 2 plus 1/2 of the width = Length of paper
——————————————————————————————–
I like to use PrintWorks photo paper in Matte finish (30 sheets for $4.99=0.16 a sheet=0.66 for our project envy cost!)
Cut photo paper 4 X 11 ( I left excess due to the type of curvy cut at the top)
Along the 4 inch side score at 1/2 inch then 3 1/2
Along 11 inch side score at 3, then 7 1/2.
Trim off excess on side from top and bottom panel.
Use corner rounder to round top sides of middle panel.
Placing the broken border part of the coluzzle ON the top flap score line-Use largest curve of coluzzle to round top flap.
For patterned paper insert-cut 2 3/4 X 4
Along 2 3/4, align coluzzle to top of patterned piece, Cut 2nd largest circle curve.
Mat into envelope, leaving even border.
Apply adhesive to bottom side flaps.
Fold in side panels, and adhere bottom flap to sides.
Apply Scor-Tape to end of closure (leaving protective layer on) for future use.
———————————————————————————
Insert cards and envelopes into the Captured Card Case-perfect fit
Now they are ready to be presented to someone special 😀

Aren’t they adorable?!
DETAILS:
Now the stamp set, and template will not release until the 15th at Papertrey Ink
Be sure to check out Nichole & Melissa’s Blog for more samples!
Tomorrow I will share MORE template samples, and reveal the other 2 templates we are releasing!
I’d LOVE to know what you thought of today’s post/video!
I get so excited this time of the month 😀
Also, let me know if you give any of it a go-OK!
Video: Saturday Sketch Start to Finish
Mar 2, 2009 Author: mytime | Filed under: Cards, MYTIME MOVIE/VIDEOs, Saturday Sketch, TutorialsWell its Monday!
That means its time for another Monday’s with My Time Video!
If you use a Google reader or other program you will have to watch it here, on my blog. SORRY! Not sure HOW that all works.
All I can say is due the vacation and sickness, then my new video editing (which I was UNABLE to use :C GRR!) I had one heck of a time making this one today! I’ll spare you the details, but I think the end result was worth it, and hope you do too.
My goal for today is to help you learn some photo software so you can create your own sketches and such. That is something I get asked about a lot.
I was leery about continuing videos, but I will move forward since so many asked I don’t quit! I have my disclaimer-that I will include with every post!!
NOTE: If you click ON the thumbnails AFTER the video it takes you to the Veoh site. Some of the content there I am told is “R” rated and you may not want to do that around young children. So if you just watch the video here on my blog, and avoid the thumnails you should be OK. Not sure WHY they don’t have ONLY stamp related videos pop up, but I guess some aren’t.
Bottom line: Click at your own risk!
I am not responsible for content that links to the videos from the Veoh site.
Thank you 😀
[veoh v17882157wGFngpTj]
I hope you enjoy today’s video!
This is the Sketch that I will show you how to make from the beginning drawing (and the inspiration source), to creating it on my computer, to the making of the actual sample, as seen here!

No Lion, you are the best!
This is card I will create on the video, utilizing the sketch above.
This card uses Life’s a Jungle by CTMH.I got mine HERE. I think its SOOOO adorable. I needed MORE boy stuff. I got rid of most of it, then when its time to MAKE a boy card I cringe! LOL! Granted it can be used for ANY theme with the sentiments.
I also do MORE Copic coloring, and use Fun Flock in the video.
I decided to make yet ANOTHER boy card (for my stash!) for all of you out there who beg for more BOY themed ideas 😀 This is an area I promise to work on more!
Genuine Boy
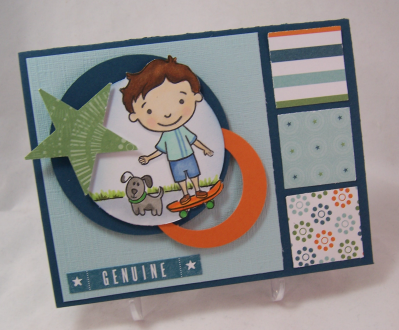
I love Dress Up Billy for Boy stuff! The dog is from the Lily & Billy accessories set (a must have!).
I think he looks so cute, skateboarding off the card!
Used MORE Stampin’ Up! patterned paper. Feels good to actual SUE what I have instead of BUYING more stuff I really DON’T need (right?).
I had fun with the layering of it all.
I hope you get to try the sketch OR if you can make your own!
Should be fun! The entire video is PACKED with info.
Well that’s all fore me now. I talk enough on the video to last a lifetime 😀
I love to hear your feedback.
Thanks for visiting me here.
Till tomorrow.
Video-Versatility Box
Feb 16, 2009 Author: mytime | Filed under: Home decor/3-D items, MYTIME MOVIE/VIDEOs, Tutorials, UncategorizedI hope you all enjoy today’s video.
NOTE: If you click ON the thumbnails AFTER the video it takes you to the Veoh site. Some of the content there I am told is “R” rated and you may not want to do that around young children. So if you just watch the video here on my blog, and avoid the thumnails you should be OK. Not sure WHY they don’t have ONLY stamp related videos pop up, but I guess some aren’t.
You won’t want to miss this one, let me tell you 😀
I had SO much fun making this box. I’m definitely getting the hang of this I think 😀 I’m so excited that the editing process is getting so much easier!
You’ll have to let me know what you think. I work really hard to get these done, so I hope they are helpful. All in all they are still time consuming, but I have enjoyed it.
I’m also wide open to things you want to see in the future 😀
NOTE: This is the type of project you need to SEE, so you get HOW it goes together. Too hard to “explain”, so I am not providing instructions here. They are all on the video. Write down the steps/measurements. The hard work has already been done for you-the design part!
I have been REALLY busy with my family, so thank you for understanding, and I hope the video provides you with all you need to make this. It’s nice to be busy for a “good” reason. Not due to illness. My brother and I have grown closer as we grow older and the birth of his daughter has made us closer than ever. I feel so blessed to have him in my life and his little addition. Valerie has been an amazing mom too. She’s a natural. Gabriella is a REALLY good baby so far too. I would love to just take her home with me and keep her for myself 😀 Guess this is the next best thing! LOL!
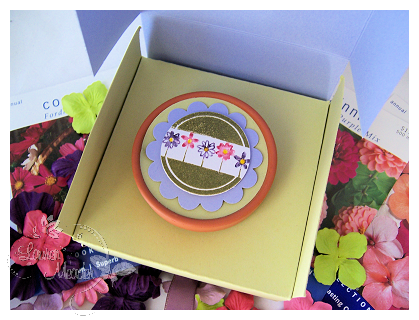
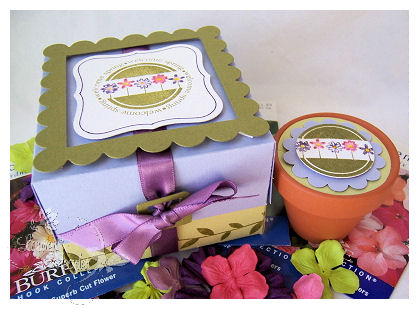
Versatility Box
I was very excited by this one 😀 The finished size is 3 1/2 squared by 2 1/2 inches tall.

I call it the versatility box due to the opening you can create to fit a variety if items!
This one will hold a little $1 flower pot!
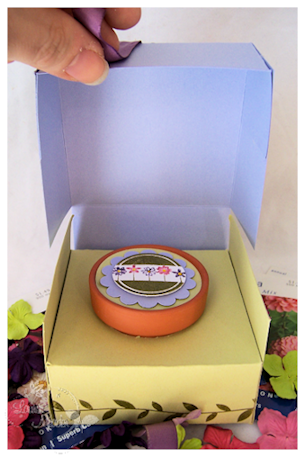
Did you think a little gift could be so cute?
Here is a closer view of the little pot!
Many would like to think of it as a “cupcake” style box. I develop my own idea of this style and shared it via video just for you.
I HOPE you give it try!
SUPPLIES:
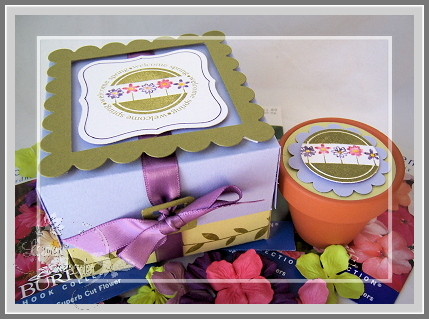
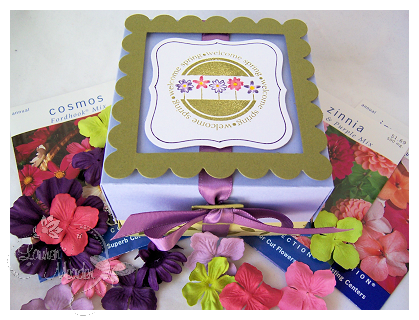
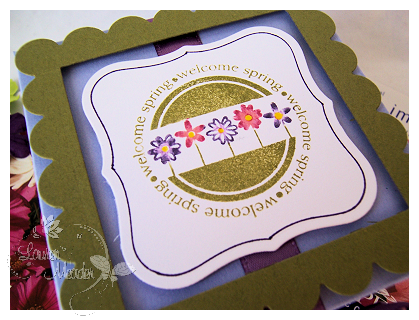
Welcome Spring Flower Pot Box-label close up
Supplies:From Papertrey Ink
Stamps : Tags for Spring, Beyond Basic Borders
Cardstock : Almost Amethyst, Ripe avocado, white
Ink- Various markers, Ripe avocado, eggplant marker
Ribbon-Plum pudding satin
Other-nestabilities lable 1, square nestability, buckle punch, coluzzle, 2 inch circle punch, scallop circle punch
INFO!
The following info is being provided for you due to the MANY comments and emails I have received. I am not affiliated with this company AT ALL (in other words I get nothing for promoting them! LOL! Although I wish I did get some adhesive) but I love their prices and SPEEDY service!! Seriously top notch. The shipping is a bit high, but I try to order as much as I can afford up front to make it worth it.
SOOOOOO FYI-the large tape runner you see in my videos is called an ATG Gun. I have the Red 714.
I purchase mine HERE for ONLY $41.69 (Don’t choke! Its SOOOO worth the $ you save on adhesive, and that is the cheapest place ever found.)
I used the GOLD 1/4 inch adhesive with my gun found HERE! Its photo safe. You get 36yds of tape for ONLY $3.49! You can’t beat that.
So that is all for today.
I hope to get back into the swing of things after this release.
Thank you ALL so much for the kind words, comments and support here and for my Timeless Template line. You all make every minute I spend doing ALL of this so worth my while! Just knowing you can inspire ONE person is amazing!
SO SMOOCHES to you all!
#1-Meet the Moon’s-video
Feb 9, 2009 Author: mytime | Filed under: Home decor/3-D items, My Timeless Templates, MYTIME MOVIE/VIDEOs, Papertrey NewsletterMeet the Moon Family
OK I have the first peek at ourPapertrey Ink countdown AND My Timeless Templates ©
All I can say is I am just over the moon for today’s post!! I hope you will be too.
That is a HUGE hint 😀
The stamp set I am peeking today is from a new sentiment set called Handwritten Notes. It has handwritten sentiments from EACH design team member.
I am sharing one of MY contributions of the sentiment set –>”I’m over the moon”
If you read my blog you know I say this A LOT. I think it comes from my watching the movie “It’s a Wonderful Life” a million times with my mom, since I was a little girl. When Mary gives George the picture of him lassoing the moon for her. I loved that.
Anyway-its a cute set, that we all hope you will enjoy.
Now comes my project!!!
[veoh v17412221edFGthbs]
When I think of “moon’s” I also think OWLS! I don’t know why I just do.
Anyway, Amber came home from school the other day with a paper-bag owl project that was just the cutest thing ever!! I fell in love with it. (You will see the owl in the video :D) When looking at it I thought “How can I make my own version of this cute owl?”
Well, wouldn’t you know I was ALSO working on my newest My Timeless Template © peeks for this week when I “saw” it!! My Rounded Wrap Up! boxlet would be PERFECT! So I went to work.
Now this template will be releases on the 15th. It’s a super cute and versatile template.
If you are new to the templates you may want to watch THIS VIDEO. It takes you through the HOW TO on how the templates work.
Details about the TEMPLATE itself will be provided with tomorrows post. Today I want to focus on the step by step of this project.
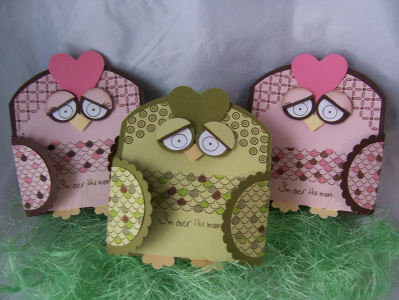
Meet the Moon Family!
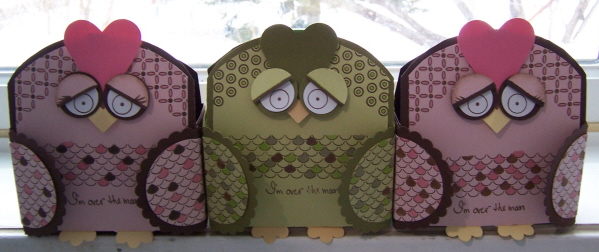
There is Owlette the “mommy”-named by Amber. Whootie-the “daddy” named by Alexa
and little baby Owlivia named by me ![]() (and Noah approved)
(and Noah approved)
Once upon a time there was a little pink owl named Owlette Branch. She was lonely and needed someone to love.
One moon lit night, in her favorite Oak tree, she met a stunning mate name Whootie Moon!
They shared some mice for dinner, and have been together ever since.
They were just “over the moon” for each-other!
They fell in love, and before you know it, one starlit night, then came Owlivia.
They are such a happy little family!
They bring smiles and treats where ever they go!
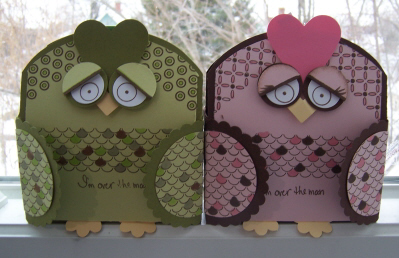
Now for some detail photos of Owlette Moon

Supplies
Rounded Wrap Up! © (available on the 15th)
Printed on dark chocolate, and copy paper (or back of sweet blush cardstock)
Stamps: Handwritten Notes, Border Basics: Retro (released on the 15h)
Cardstock: Sweet Blush, Berry Sorbet, Lemon Tart, Dark Chocolate
Ink-Dark Chocolate and copic markers
Photo of punched pieces needed
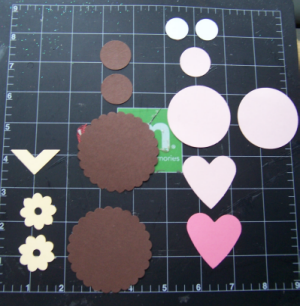
1- photo corner punch to create beak
2- little scallops or scallop flower to create the feet (here is a cute one)
3- 2 Giga scallop circlesfrom dark chocolate cardstock-for wings
4-2 sweet blush 2 inch circles for wing centers
5- 2 (large) hearts punch in sweet blush (makes a tail-optional) and berry sorbet (makes front piece)
6- 2- 1 inch circles from dark chocolate-makes eye base
7-1-1 inch circle from sweet blush (will be cut in half) to make eyelids
8- 2 3/4 inch circles-for eyeballs
DIRECTIONS (for those who can’t view the video)
BODY
Print your Rounded Wrap Up! ©on dark chocolate cardstock.
Cut score and assemble per instructions. Set aside
On copy paper print the Rounded wrap up again. You will cut out JUST the front portion of the template onto sweet blush cardstock. This creates your owl body.
Stamp the scallop border pattern from Border Basics: Retro in dark chocolate ink x2, onto belly, and again on 2 of the punched 2 inch round circles. Color with markers.
Stamp sentiment from hand written notes-under belly using dark chocolate ink.
Stamp choice of other border pattern on sides of box to create head/face. Color as desired
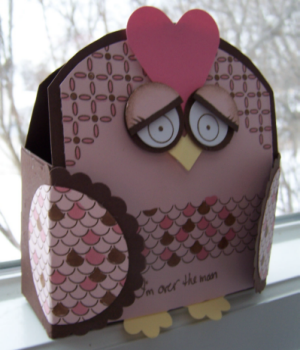
EYES / BEAK
Stamp circle from border set onto 3/4 white circles.
Layer near bottom of dark chocolate 1 inch circle.
Cut/punch 1 inch circle from sweet blush. Cut in half. Draw on lid and eyelashes with marker. Layer on eye lids with dimensionals.
For beak use photo corner punch from lemon tart cardstock. Layer onto face with dimensional, then layer on eyes.
Apply heart punched from Berry Sorbet cardstock to top of head, between eyes.
FEET
Use scallops or flowers for feet. Score bottoms so they bend forward, and layer behind owl body. Adhere body to Rounded Wrap Up! © box template.
WINGS
Layer 2 inch stamped circles (that you stamped/colored in steps above)onto dark chocolate giga scallop circles.
Score from between scallops to other side, and adhere stamped pieces to center.

Adhere to sides of Rounded Wrap Up! ©
Now fill with choice of candy or other treat! Use paper clip or item of choice to hold top closed (if you choose)!
So there you have it!!
This takes about 25 minutes to make, but that is for a tutorial!! If you go and mass produce these Im sure its much quicker with practice. My 3 came together in well under an hour.
That is HOW you make my Owlette!!!
This is the “boy” version–> Whootie done in green for my son Noah.

He loves green and told me that was what I had to use for his owlette treat holder! He actually thought this was a parakeet! LOL! I guess it COULD be!! I also see making bunnies, and chicks with the box template 😀
Now don’t think this template is JUST for character boxes! Oh! NO!! So much more to come. Just wait and see what the peeks bring OK. This was just one of those “ideas” that popped into my head. This would be a super cute party project for kids even. Its really that easy! You just pre-stamp it. They can color and assemble-maybe?
I love to hear your thoughts on today’s post and the template peek!
Thank you for reading.
Don’t forget to check in with Nichole and see what she has to share, as well as other creative clicks for today.
Thanks for all the kind words and support!
Owl Hugs from the Moon Family!!
Video-Time for Tea MFT Blog Hop! Giveaway
Feb 3, 2009 Author: mytime | Filed under: Home decor/3-D items, My Timeless Templates, MYTIME MOVIE/VIDEOs[youtube]https://www.youtube.com/watch?v=LzIdsrjt3ik[/youtube]
Hey girls!!
Time for theMFT Blog Hop!
If you *just* got here check in with KIM first-
If you are hopping along, next you will want to head on over to Michele
I got some stamp time in AND got some videos done 😀 I am trying to get ahead, so if you see me in the SAME outfit just know that YES, I do own other clothes! LOL! I just filmed a few on the same day.
This time was definitely EASIER! So YEAH!! I’m getting the hang of this now. Now don’t go getting HIGH standards 😀 I just feel I improve each time. I’d LOVE to offer MORE videos each week, so someday it MAY be possible.
I was so inspired by the newest release from MFT called Tea for Two that it inspired my project for today! I hope you like it.
Time for Tea
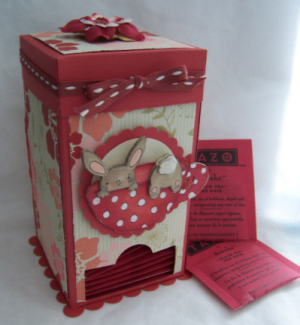
Today’s video I have to share with you will show you how to take the My Timeless Template-For Keep{sake} and turn it into a PRETTY tea holder, that can be proudly displayed anywhere!
If you want a chance to WIN -just leave me a comment 😀 and if you want to, tell us What drink or item/activity comforts you when you are upset, or sick, had a bad day…….
I LOVE my coffee ♥
OK more photos……..
Top view of the tea in the For Keep{sake} (turned tea) holder.
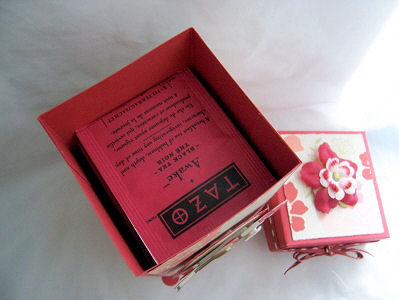
Here is a close up detail of the ADORABLE little bunnies in the tea cup!

The cup is colored and cut out.
I made the bunnies in the cup 3D as well. The tail is on an additional layer, and had fun flock on it.
Now here is a close up view of the slot that I teach you to easily make, and convert your For Keep{Sake} template into the Tea Box!
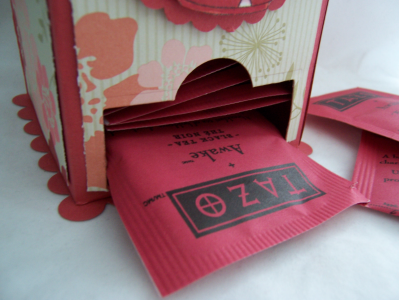
Now also note, that you can die cut a scallop square from the large set of square nestablities to give you a nice decorative bottom to your holder 😀
The paper is an OLD SU! pattern. The cardstock I believe is Cranberry Crisp-with the matching ribbon (also SU! but retired).
I just loved how quick and simple this project is 😀 It would be a great treat for someone!
OK now onto the release stuff.
DETAILS FOR THE RELEASE!
My Favorite Things (www.mftstamps.com) is having a New Release Cocktail Party on Wednesday, February 4th (TONIGHT!) from 9-10 p.m. EST. This month there are THREE new sets being released including a Who’s that Girl set that is GOING DIGITAL!
New releases for this month include:
Digital Girl (Who’s That Girl set for Feb)
Bling’ Bet
Tea For Two
Head over to the MFT forum on www.splitcoaststampers.comto find out all the details and to find out how YOU can be the next MFT Guest Designer. We hope to see you there on Wednesday (tonight).
OK I have lots of loose ends to tie up. My brother’s baby is due ANY day, so I’m “on call”! LOL!
Later!
My Etsy

Who I Designed For
Blogroll
- Alicia
- Alli Miles
- Ally Blankenship
- Amber
- Andi @ crafts on a whim
- Angel R
- Angie Z
- Anne Kranitz
- Becky O
- Bee
- Beth Silaka
- Bethany Paull
- Beverly Nash
- Bobbie
- Cambria
- Cammie
- Card of the Week
- Card Positioning System (CPS)
- Cards for Cancer
- Catherine Doucette
- Charmaine
- Cheryl Sims
- Chriss Rollins
- Christina
- Christine Ewing
- Christine Wooden
- Colleen Schaan
- Craft Critique
- Craft Gossip
- Crystal
- Dawn Easton
- Emily Giovanni
- Geny
- Holly
- Igne Groot
- Inspirational Craft Blogs
- Irene
- Jami Sibley
- Jeanne Streiff
- Jen del Muro
- Jeni Bond
- JenMarie
- Jenn Balcer
- Jenn Diercks
- Jenn O
- Jennifer E
- Jennifer Mick
- Jennifer Pereda
- Jennifer-Sweet Treat
- Joanne Basile
- Jodi Collins
- Julia Stainton
- Julie Masse
- Karen
- Kathryn Berthiaume
- Katie Cotton
- Kelley Holland
- Kendra
- Kim Scholfield
- Kris’s Color Stripes! Get inspired here
- Kristen Dubosque
- Kristin Eberline
- Kristine
- Laura @ Sunshine Stamper
- Laura Turnmire
- Laurie Schmidlin
- Lesa Rapp
- Linda Duke
- Linda-LSN
- Lindsey Botkin
- Lisa (lakind scs)
- Lisa Kind
- Lori Craig
- Maggie
- Mara Campbell
- Maria
- Maria Levine
- Mary
- MaryJo
- Melanie M
- Monique Hansen
- Moxie Fab World
- Pam Imholz
- PaperCrafts Connection
- Peppers and Pollywogs Kids party site
- Rebecca Grohall
- Rita
- Robyn
- Rose Ann
- Sarah Vrolyk
- Sharon Harnist
- Sharon Johnson
- Sharon Rivera (a chemisrty with paper)
- Sherrie
- Sophia Landry
- Storage Units, Ink, & More Blog
- Sue Berker
- Susan (Rainy)
- Tangii Crane
- Tracy
- Tricia Traxler
- Trudee
- Velta
- VivLyn
- Zena
MTME Pretty Palette Color Team
MTME Pretty Patterns Sketch Team
My Time Made Easy TM LLC
Shop till you drop!
Lauren Meader
About Me
Copyrighted material
Subscribe To My Blog
Pages
- About me
- Alexa’s Story!
- My Crafty Corner!
- My Time Made Easy™ LLC
- Our Make A Wish Trip to Disney!
- Resume/Publication List
Calendar
| M | T | W | T | F | S | S |
|---|---|---|---|---|---|---|
| 1 | 2 | 3 | 4 | 5 | 6 | 7 |
| 8 | 9 | 10 | 11 | 12 | 13 | 14 |
| 15 | 16 | 17 | 18 | 19 | 20 | 21 |
| 22 | 23 | 24 | 25 | 26 | 27 | 28 |
| 29 | 30 | |||||
Archives
- August 2013
- July 2013
- June 2013
- May 2013
- April 2013
- March 2013
- February 2013
- January 2013
- December 2012
- November 2012
- October 2012
- September 2012
- August 2012
- July 2012
- June 2012
- May 2012
- April 2012
- March 2012
- February 2012
- January 2012
- December 2011
- November 2011
- October 2011
- September 2011
- August 2011
- July 2011
- June 2011
- May 2011
- April 2011
- March 2011
- February 2011
- January 2011
- December 2010
- November 2010
- October 2010
- September 2010
- August 2010
- July 2010
- June 2010
- May 2010
- April 2010
- March 2010
- February 2010
- January 2010
- December 2009
- November 2009
- October 2009
- September 2009
- August 2009
- July 2009
- June 2009
- May 2009
- April 2009
- March 2009
- February 2009
- January 2009
- December 2008
- November 2008
- October 2008
- September 2008
- August 2008
- July 2008
- June 2008
- May 2008
- April 2008
- March 2008
- February 2008
- January 2008
- December 2007
- November 2007
- October 2007
- September 2007
- August 2007
- July 2007
- June 2007
- May 2007
- April 2007
- March 2007
- January 2007
Categories
- About Me
- All That Scraps
- blogger challenge
- camera/photo play
- Cards
- Contests
- family stuff
- FOR SALE
- Home decor/3-D items
- How to FAKE it!
- Introduction
- JUGS Challenge
- JustRite Stampers
- Lizzie Anne Designs
- My family stuff
- My Stamping Space
- My Time Made Easy
- My Time To Color Challenge
- My Time to Create Challenge
- My Timeless Template Challenge
- My Timeless Templates
- Mytime Mail
- MYTIME MOVIE/VIDEOs
- Papertrey Newsletter
- Pink Cat Studio
- Pretty Palette Challenge
- Pretty Patterns Sketch
- Product Opinions and Must haves
- Recipe's
- Saturday Sketch
- Smilebox Creations
- Stampavie
- Tutorials
- Uncategorized
- videos
Most Popular
- Create your own Onesie Card Tutorial-and important NOTE! PLEASE READ (2529)
- Saturday Sketch-Boxed bag holder (2333)
- Going GREEN! Fancy Flower Flourish-Closure Video (1478)
- Fabulous Favorite - Giveaway! (1336)
- a Prayer Request (1232)
- QUICK-Easter Baskets from Nestabilities-PTI style-and blog challenge (1063)
- Teaser Sketch (999)
- February Release Giveway! (and a little peek) (996)
- Group Post and Rambling Rose Video Tutorial (985)
- GIVEAWAY! Who wants it all?! (895)
Recent Comments (RSS)
- 첫충사이트: 완전히 흥미로운 블로그 게시입니다. 저는
- sarah: Wow, Lauren, what a stunning
- hedie: خرید راهبند
- 야동: Love to read it,Waiting For
- 야동: This seller is in a
- 바카라사이트: 여기 처음 왔어요. 나는이 게시판을
- 야동티비: I was surfing the Internet
- 바카라사이트: 비슷한 주제에 대한 흥미로운 정보를
- 바카라사이트: "여기에 제공해 주신 귀중한 정보와
- 온라인홀덤: 유익한 웹 사이트를 게시하는 데
Copyright © 2007 - My Time, My Creations, My Stampendence - is proudly powered by WordPress
This blog has been Tweaked and Designed by Sara Williams