Archive for the ‘My Timeless Templates’ Category
Tags Two Ways
Aug 11, 2009 Author: mytime | Filed under: Home decor/3-D items, My Timeless Templates, Papertrey NewsletterWell today the Papertrey Ink Design Team has a special group post for you!! I always love these posts and challenges.
Papertrey Ink is releasing 2 tag sets this month called 2009 Autumn Tags and 2009 Halloween Tags!
They are both fabulous, and must haves! Especially when you are creating gifts and using any of the My Timeless Templates ©! LOL!
So part of our group challenge was to focus on the versatility & ease of use that these types of designs allow. Our assignment was to use the 2009 Halloween set, then turn around and create a second version of the same project substituting image(s) from the 2009 Autumn Tags set.
The second project should feature a different color scheme and show how easy it is to repeat the same design and end up with two different looks.
The first project should definitely be for Halloween, while the other should clearly be for celebrating Autumn/Thanksgiving.
Does that sound fun or what?!!
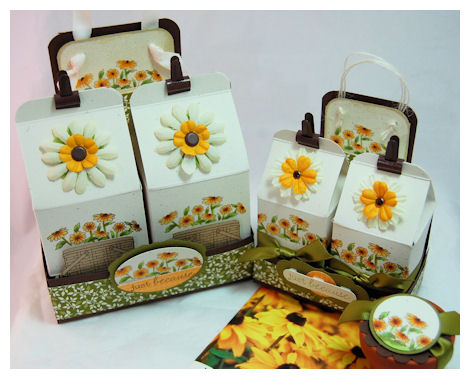
So here is what I came up with using the 2 new 2009 Tag sets, combined with my newest My Timeless Template: Fold n’ Go
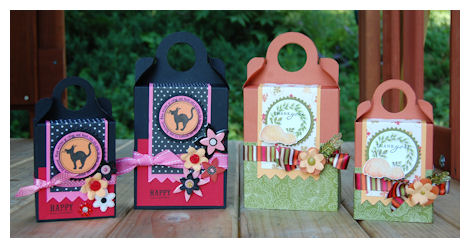
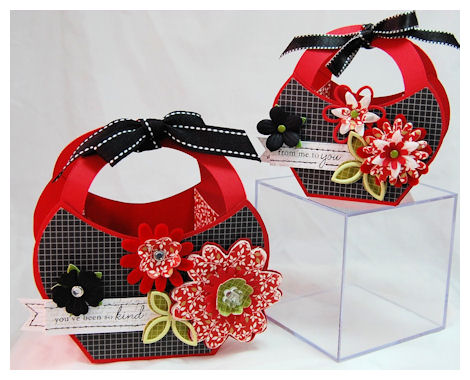
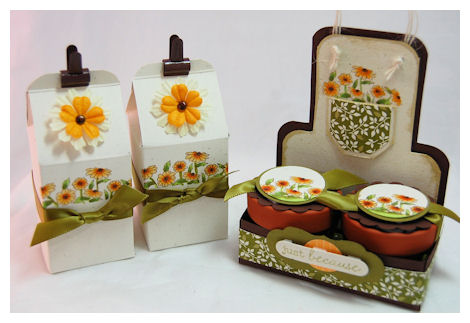
This is my Halloween & Fall set, photographed together. Both have the same layout, but different color schemes and my embellishments reflected the “holiday” design as well.
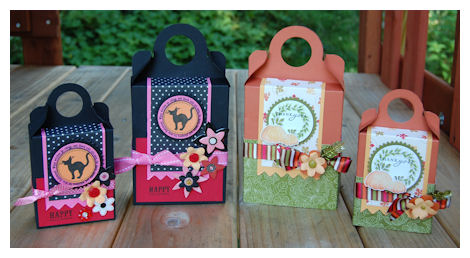
I decided to further show the versatility by repeating the design on the standard Fold n’ Go! template, as well as the Pretty Petite version too!
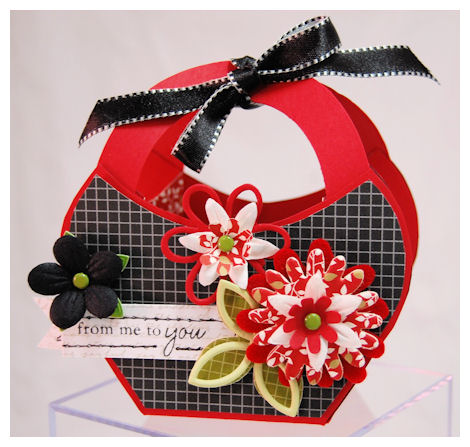
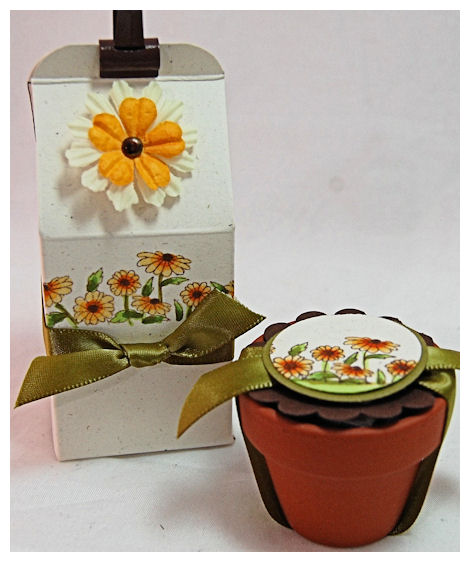
Here is my 2009 Halloween Tags Treat Box set
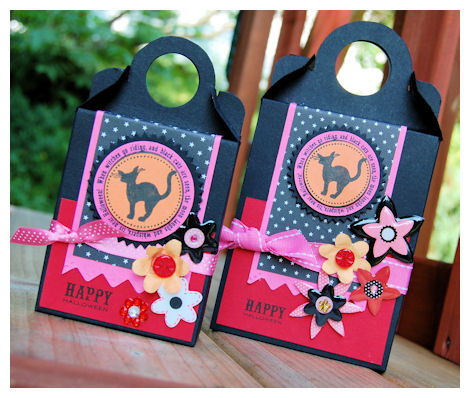
I have to say I LOVE this non-traditional Halloween color combination of Black, Summer Sunrise, Hibiscus Burst and Pure Poppy! Because of the black & orange it still works-yet adds a pop of a few other fun colors!
Close up of the tag
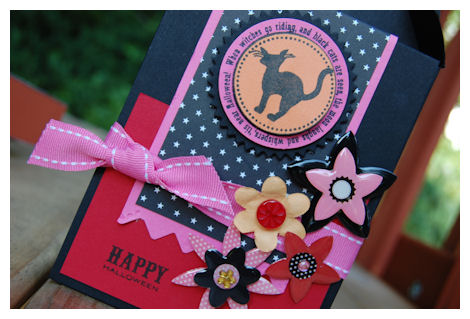
So for my tag-I stamped it onto a tangerine cardstock, then punched out-so it appeared to be the “moon”
The tag is re-stamped and punched out onto hibiscus cardstock, then layered onto a pinking edge circle tag!
I adore the flowers on it too! A fun and unexpected embellishment,which also tied in my color combo.
Sentiment on tag reads: Witches go riding and black cats are seen, the moon laughs and whispers, ’tis near Halloween!
Supplies for 2009 Halloween Tags Set
My Timeless Template: Fold n’ Go!
Stamps: 2009 Halloween Tags
cardstock: black, pure poppy, hibiscus burst, summer sunrise, pumpkin
patterned paper: bitty star basics
Ink: Black
Ribbon: stitched & bitty dots in hibiscus burst
Other: EK success pinking border punch, pinking circle nestabilties, circle punches, adhesive rhinestones, Epoxy flowers by Making Memories, corner rounder
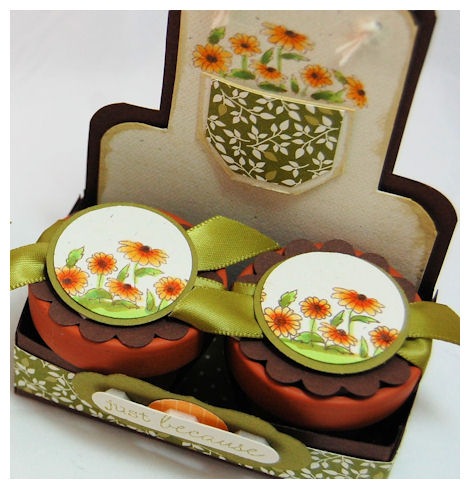
Now we move on to our 2009 Autumn Tags Set
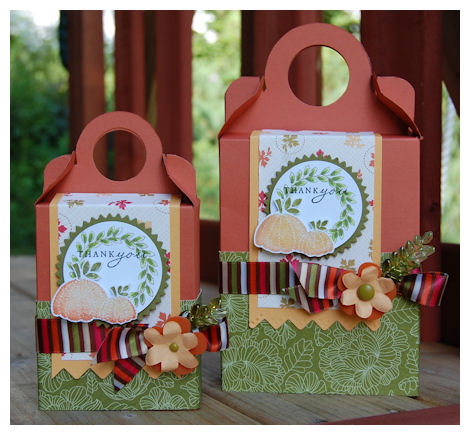
Again same exact layout as project above, and both sizes of the boxes are designed the same as well!
This used more traditional and expected fall colors. I was able to really do some fun mixing and matching of patterned papers for this one. The ribbon really made it all come together and just POP!
I think its a very elegant looking box, as oppose to the first box, which was more “cutesy”.
I loved the stitched pumpkin image, as well as the leaf ring! They were just made to go together to me.
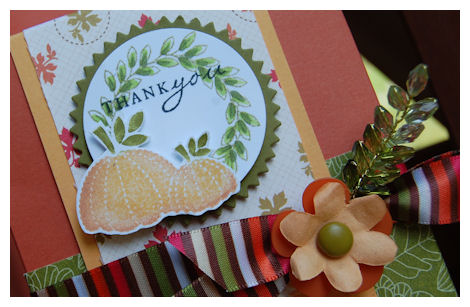
I found a beaded leaf sprig at the craft store that matched that leaf ring, and looked PERFECT with my flower embellishment!!
It really just tied the entire project together, don’t you think?
Supplies for 2009 Autumn Tags Set
My Timeless Template: Fold n’ Go!
Stamps: 2009 Autumn Tags
Cardstock:Really Rust (SU!), white, Ripe Avocado, Summer Sunrise
Patterned Paper: In Bloom, First Fruits
Ink: Versamagic, black, Copic Markers
Other: Circle & pinking circle nestabilities, EK success pinking border punch, circle punches, corner rounder, flowers by American Crafts, beaded leaf sprig by Michael’s, brads by SEI
Ribbon by American Crafts
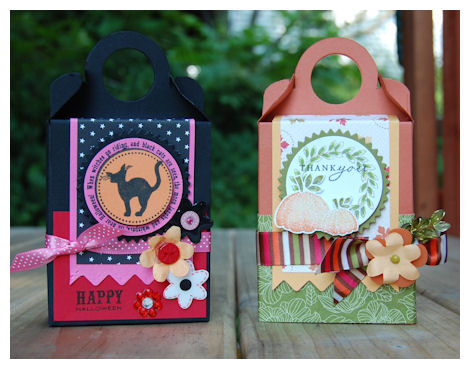
As you can see, same layout, but the different colors really make each look so completely unique 😀 Gotta love that!
Now this is suppose to include treats of some sort, right?
So here is what I packaged-keeping with my colors for BOTH projects, and keeping in mind the theme:
In the Pretty Petite version
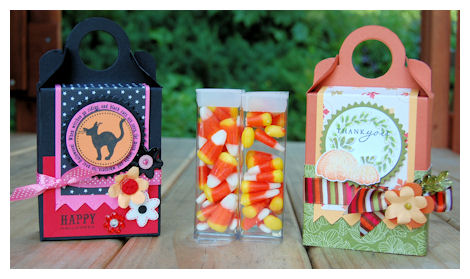
I cut down (to fit) 2 large trendy tubes, and filled them with Candy Corn!
For the Standard Fold n’ Go! template

A bag of red licorice in each!
I am BEYOND addicted to this new Australian soft red licorice (OH! MY WORD! AMAZING!), that I found at Target (RUN!! and get some! You will be in heaven!), so I packaged it up in a seal-able large clear envelope! One bag of the licorice will fill the standard template, and one bag will fill 2 pretty petite versions, and you can *maybe* sneak a couple!
So there you have my take on the challenge for use of the 2 newest 2009 tag sets!
Check out Nichole’s blog for all the designers peeks and clicks to each project!
As you know tomorrow I have even more gift ideas and samples with My Timeless Templates-so stay tuned!
#2 Tucked Away-Template Peek and another Giveaway
Aug 10, 2009 Author: mytime | Filed under: Home decor/3-D items, My Timeless Templates, Papertrey Newsletter, UncategorizedDay #2
That means it is time for the next peek at the 2nd My Timeless Template © (template will be released Aug. 15th!)
Thank you for sharing the excitement of yesterday’s template peek too!
I am very excited about this next one as well, and I hope you will be too!
This new template is called Tucked Away © and will also include the Pretty Petite version! ( LOVE the Petite size!)
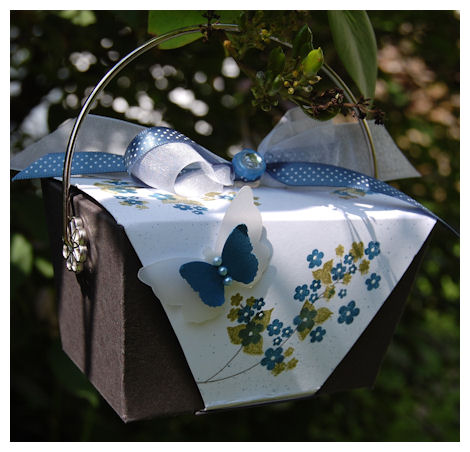
Enchanting Elegance
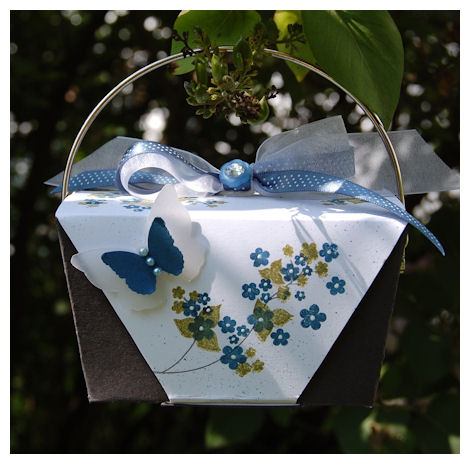
This is the standard size version of the template.
About Tucked Away ©
Now it is about time we had a perfectly cute box to “tuck away” so many treasures, be them gifts like homemade candy, treats or everyday items. But, the name doesn’t come from its adorable convenience, it comes from the front flap closure, which has a perfect little tab, that tucks into the bottom, keeping it closed.
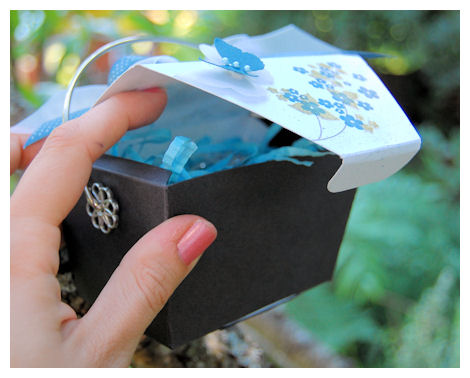
It is simply un-tucked to reveal the little treasure you put inside.
That same flap really adds to the design possibilities for this box . You will love to “tuck away” so many treatlets in this template! It also has a layering decorative panel to make design ideas endless!
Now by printing the front portion of the template in one color, then the lid/flap closure in a patterned paper or another color you get a dual colored design, that is EASY to achieve, weather you add additional layers or NOT! You choose how simple or complex your design becomes! Another great thing! No matter WHAT your creative style YOU get to personalize these templates to YOUR style or occasion! Love that 😀
The KEY to the My Timeless Templates © is in the name-Timeless!
Each template goes together quickly and is made to be put together as easily as possible. My goal is to make gift packaging EASY, but with a WOW! I think this template certainly does that.
Now about today’s sample……
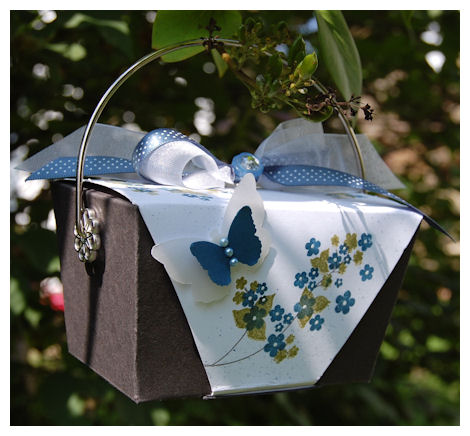
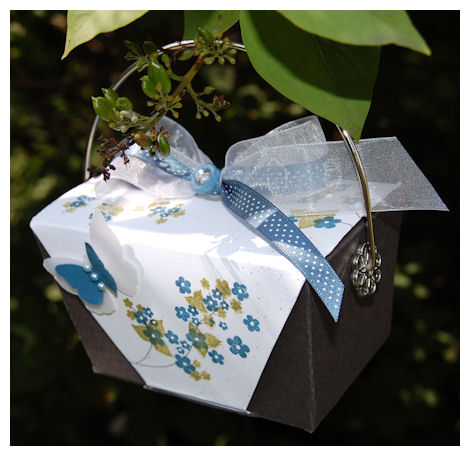
I am just in LOVE with White, Smokey Shadow, and Enchanted Evening with touches of Ripe Avocado! LOVE I tell you 😀
As you can see this is a very SIMPLE version of the template. I can see this as Wedding Favors all over the world, in choice of colors 😀 It is just such an elegant design!
Yes, this stamp was the CHA exclusive (sorry! I couldn’t help but use it :C) Floral Fusion.
BUT! Don’t despair if you don’t have it! I feel that Out on a Limb is just as FAB (and readily available for purchase) as an alternate, and could achieve the same simple elegance, OR you could also substitute Beautiful Blooms, With Sympathy, or Sprial Bouquet😀 Heck, for a total wedding look you could even use another fave of mine: Piece of Cake!
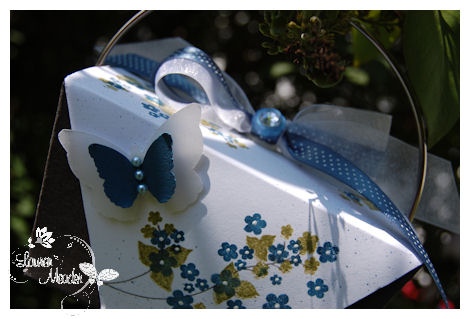
I added a layered butterfly-the large one done in vellum, and the smaller done in Enchanted Evening.
Both are Punches-large by EK Success and smaller by Martha Stewart
The bow was simply tied, with an Enchanted button, to which I added an adhesive rhinestone to the center
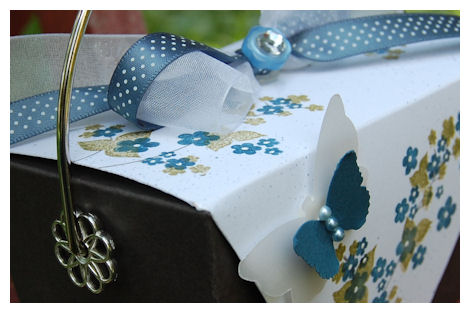
Now trust me, this box doesn’t NEED a fancy schmancy handle, but boy it did ADD to the beauty of it 😀
I used a paint can handle (I got it from a purchased paint can!) and a filigree metal flower (from SU!) to dress up the site of insertion 😀 Easy Peasy! The TUCK IN style of the lid allows the handle to be used and for it to stay CLOSED! Love that too.
Supplies:
My Timeless Template © Tucked Away
Stamps: Floral Fusion
Cardstock: White, Enchanted Evening, Smokey Shadow, Vellum
Ink: Smokey Shadow, Enchanted Evening, Ripe Avocado
Ribbon: Bitty Dots Enchanted Evening, Wide white organdy (other source)
Vintage Button in Enchanted Evening
Adhesive Rhinestone, and pearls, filigree metal accent by SU!, paint can handle
Butterfly punch (large) by EK Success, Butterfly Punch (small) Martha Stewart
Here is a Pretty Petite version of Tucked Away ©
NOTE: I almost didn’t share this gift, as it is PERSONAL! Since MANY of my reader’s are pet lover’s, I figured it may help someone know what to do for someone during a difficult time like this.
Paw-prints on your heart

With Sympathy and Loss of a Pet was absolutely PERFECT!
One of my best friends lost her dog Bailey. She was just shy of 15 years old. Unless you have loved a pet like that, you cannot imagine the loss. I thought it would be nice to do something for my dear friend to let her know I hurt for her and her family, so I used the Pretty Petite version of the template to hold something special.
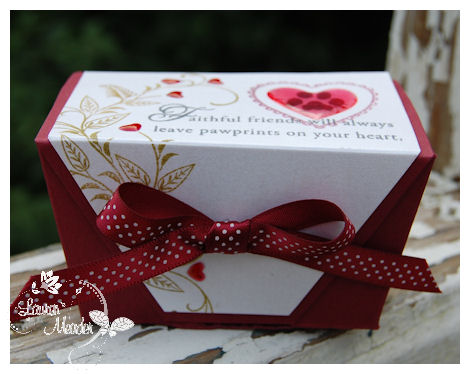
On the design I used some epoxy heart stickers for the “blooms”. The mat layer is made from Shimmery White cardstock
I knew they were having her cremated. As soon as I heard, I ran out to Things Remembered (a favorite store of mine when you want an engraved gift! I spend a LOT of $ there! LOL!) and purchased a placard engraved with their dog Bailey’s name, and the date, so they could put it with her ashes.
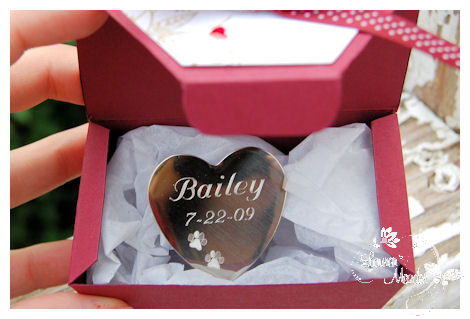
This placard is adhesive, so it should be easily attached.
It is just something simple and understated, but totally from the heart.
I think she liked it.
Supplies:
My Timeless Template © Tucked Away
Stamps: With Sympathy, Loss of Pet, Heart shaped borders & corners
Cardstock: Shimmer white, Scarlett Jewel
Ink: Scarlett Jewel, Ripe Avocado, black
Ribbon: Scarlett Jewel bitty dot
other: Epoxy heart stickers
Well, that is all I have to share today!
Don’t worry, there is SOOOOO much more to come this week 😀 I think the ideas will really get you in the template mood 😀 (OK I HOPE they do! :D)
TIME for a GIVEAWAY: Leave a comment on today’s post for your chance to win Tucked Away © on release night (the 15th)!
Winner will be listed August 13th (my daughter Amber’s 5th Birthday!)
(PS- NO! I didn’t find HELLO KITTY roller skates for her :C But I did get some Barbie ones that I think will pass)
So in the mean time……………
Lots more countdown peeks going on, so visit Nichole for more ideas and creative clicks!
Also Melissa, Heather, Dawn and Tiffany, will have some FAB eye candy as well using their own releases this month.
Kelly has a project today using Tucked Away, as does this months My Timeless Template Guest Designer-Mona, so be sure to pay them a visit too!
So once again, thank you for taking the time to stop by 😀
Till Tomorrow 😀
#1- Template Peek: Fold N Go Gift for a New Home and a Giveaway!
Aug 9, 2009 Author: mytime | Filed under: Home decor/3-D items, My Timeless Templates, Papertrey Newsletter, TutorialsHi everyone!!!
I’m beyond excited to get the Papertrey Ink countdown started!
Now please note that most items featured in today’s post are NEW! (to be released) items from Papertrey Ink. Items will be released August 15th!
It’s the 10th so that means the samples begin, and I get to start sharing peeks of my NEWEST! My Timeless Templates © (releasing the 15th as well)
We have 2 great and practical templates this month! Each one has a standard template size, and the Pretty Petite version, also included in ONE download, for only $5! Remember you not only get unlimited use of the printable template, but the Idea Booklet, which includes 5 exclusive project ideas ONLY published for the download 😀 The idea book comes with a complete set of supplies and step by step instructions, for completing the samples in the book! Download also includes step by step photos/instructions for assembling your template. EASY PEASY!!
I have the honor of peeking one of Melissa Bickford’s new stamp sets called Sign Language😀 The minute I saw it the ideas just flooded my brain! One idea that stuck out the MOST though, was the idea to combine it with the lastest My Timeless Template © Fold n’ Go!
Now before I share my first peek, let me tell you about the first template being revealed!
Sometimes you just want a box with a fun closure! One where the top requires no fancy ribbon or anything else to hold it closed (unless you WANT to add it!), and opens with ease. I have always LOVED Gable style boxes, so I decided to gain some inspiration from that, to make another variation, that is funktified and modernized with a sleeker, less bulky look, and a cool handle. Now to package up a gift, all you have to do is Fold n’ Go!
Now, you may recall I gave you a little (early) peek at this template—> HERE! This project was inspired by a VERY early creation I made called a Boxed Bag Holder—> HERE! My Boxed Bag holder which was done almost 3 years ago! LOL!
This really is a fun template, that can hold so many amazing and fun gifts for ANYONE, which I will share over the next few days.
Now, on to the sample 😀
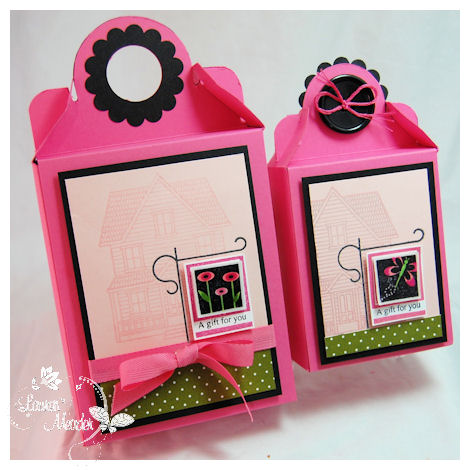
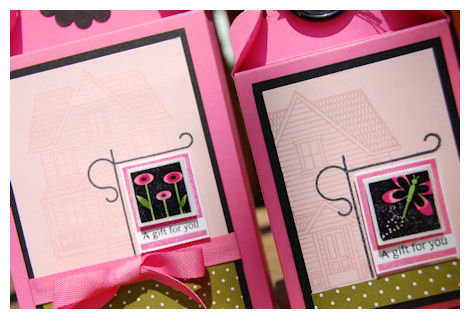
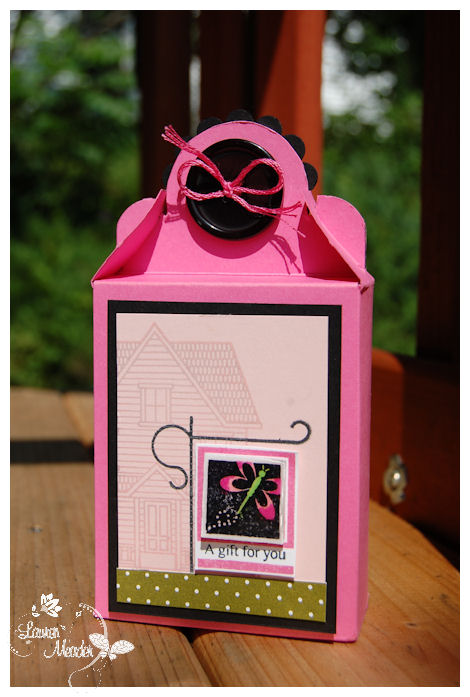
A gift for your New Home
The idea for this particular gift, was for to hand deliver, OR hang on the door of our friends, who just moved to their very first NEW home!
I thought that using the Sign Language set, with house image from Boards & Beams was obviously perfection-since the sign is just like some of the yard signs in our neighborhood!
I wanted the SIGN itself to be the MAIN focus, so I stamped the house image in the new formula of Sweet Blush ink (its awesome!), onto sweet blush cardstock. The flag itself usess a fun technique that I’ll share further down this post.
I adore the ability to mix and match all the “flags” with sentiments for EVERY holiday! There are SO many cute ones too.
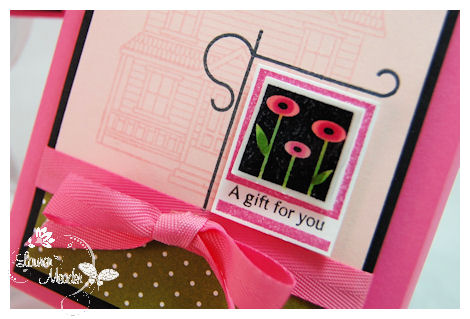
I of course chose to use my 2 favorite images for my “yard signs” to convey the message for these house warming gift packages.

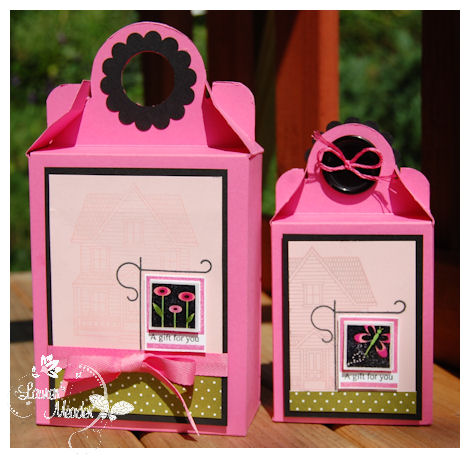
I made similar designs-one using the standard template size, and the other using the Pretty Petite version! This just shows you have versatile everything can be, and weather you decide to decorate a standard Fold n’ Go! template or the Pretty Petite version, both are FAB!
Now you may be wondering WHAT I put inside these gift boxes!
I didn’t get to get photos, as I was stopping off to pick up the gifts ON MY WAY to their house warming party, but in the Large version is a Door Knocker that is engraved with their last name, and in the other we put in a gift card to Lowe’s Home Improvement store! Owning a home you will need lots of stops to the home improvement store! LOL!
Now onto the details of my flags…………….
I always enjoy the look of the Epoxy like sticker embellishments you can buy in stores. Problem, they don’t generally suit my project, or MATCH what I want to do!
So I made my own
This is a VERY simple embellishment you can make, that packs a big punch!
1) Stamp your image in a permanent ink.
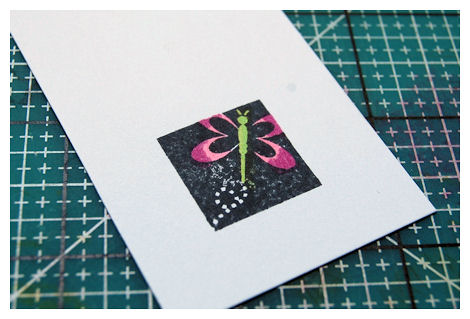
Color if needed or desired (Use a smudge-proof marker-like Copic’s)
2) Apply a liberal amount of Crystal Effects
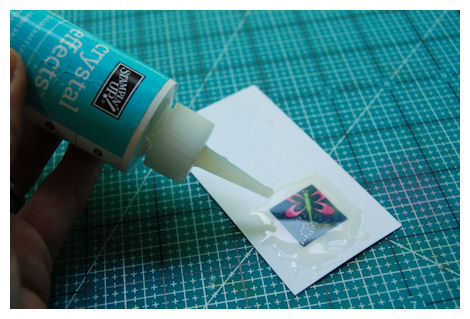
3) Allow sufficient time to dry. (My project was dry within an hour)
4) Use a punch or die cut that fits your image
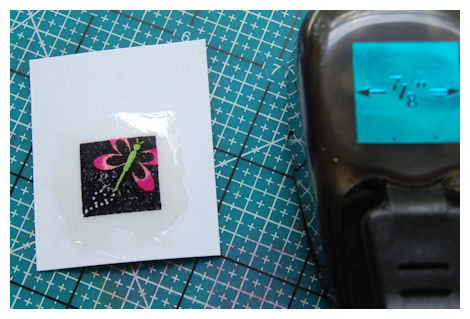
and punch out
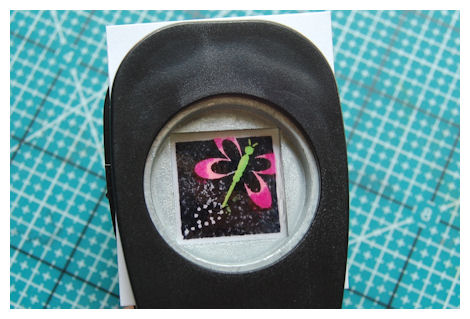
NOTE: The 7/8 square punch fits the flag images from Sign Language perfectly! It even gives you a perfect little border too!
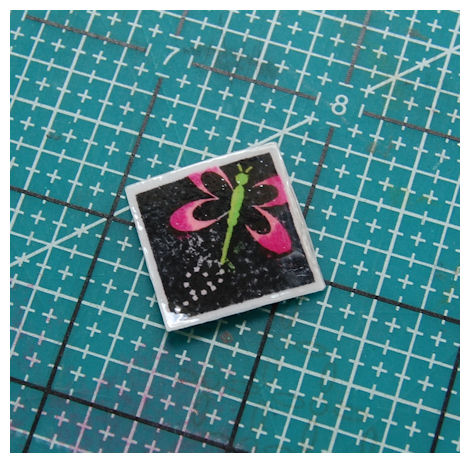
5) Once image is cut-layer onto project

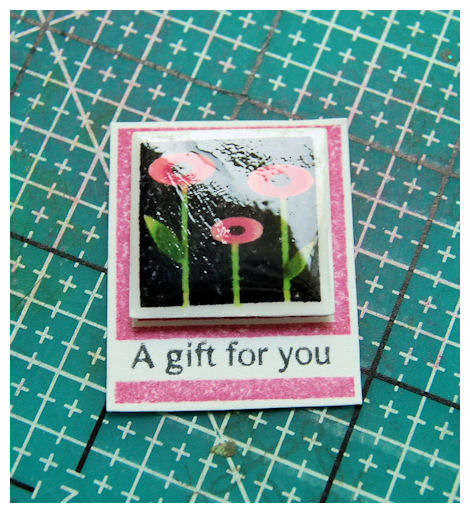
In this case, it is the hanging part of my sign, in which I stamped the border in Hibiscus Burst ink, and my sentiment in black ink, then trimmed out.
Then I added both of the Epoxy embellishments I made, to my completed projects
They really make a simple sign POP!
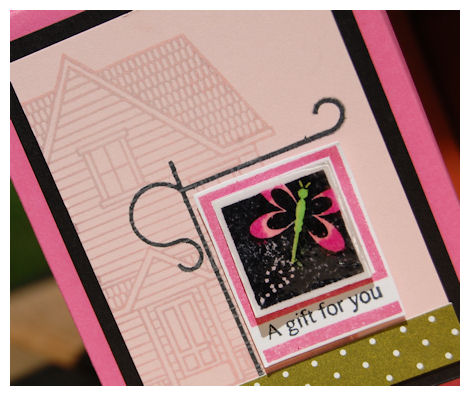
This is the butterfly on the Pretty Petite version of the Fold n’ Go! template
Now we have the flower flag image on the completed standard version of the Fold n’ Go! template
Together they make a real WOW! presentation for the perfect gift for those NEW! Home owners.
Now there is NO limit to the size of the epoxy like embellishments you can make! You are also saving so much money too 😀 Those sticker sheets can cost upwards of $3 for only a couple of images, that aren’t tailored to YOUR project!
Another option would be taking a page pebble, and add it over your image! Only “problem” would be that you are limited to the shape & size of your page pebble, and it does cost more to use them.
This is just a fun and easy way to really add another WOW! element to your completed template or card projects!
Well that is it for me. I’m excited to hear your thoughts about today’s projects!
Giveaway: Just leave me a comment here, and enter to win the Fold n’ Go template on Release night!
Winner will be posted on the 13th (my daughter Amber’s birthday!)
Lots more countdown peeks going on, so visit Nichole for more ideas and creative clicks! I also believe Melissa, Heather, Dawn and Tiffany(her first stamp set debut for PTI!) will have some eye candy as well! (I hope I’m not forgetting anyone :C)
Kelly has a *peek* at her project using Fold n’Go! today, as does this months My Timeless Template Guest Designer-Mona, so be sure to pay them a visit too!
More to come tomorrow as I reveal my next template for the month of August! Oh and have a giveaway for that one as well!
Supplies:
My Timeless Template: Fold N’ Go!
Stamps: Sign Language, Boards and Beams
Cardstoock: Hibiscus Burst, Sweet Blush, White, Black
Patterned Paper: Bitty Dots 2008
Ink: Black , Hibiscus Burst and Copic Markers
Ribbon: Hibiscus Burst
Vintage Buttons: Black
other: corner rounder, 7/8 square, crystal effects, scallop punch, 1 1/4 circle punch
Video: Fire Hydrant Gift Box & PCS Fairy Friends Release
Aug 6, 2009 Author: mytime | Filed under: Home decor/3-D items, My Timeless Templates, MYTIME MOVIE/VIDEOs, Pink Cat Studio, Tutorials, videosI have a project, just for you 😀
What a fun filled day I have here.
Today is the release for Pink Cat Studio-Fairy Friends
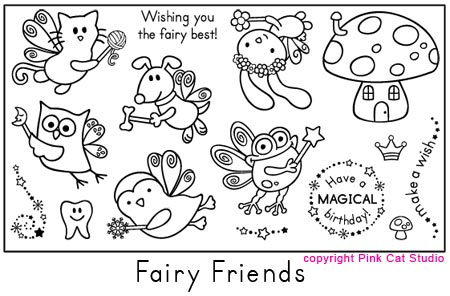
Isn’t it SO cute?!!
I had a blast using it.
I THINK I saved the best for last with this one!!
What I am really excited about are the 2 projects I created using it, and the fact that I ACTUALLY got a video done for you! (I know its been a while! But they are quite time consuming)
I did my best to keep it short and sweet, so that I could post it on YouTube! You all know how LONG winded I can be, so staying UNDER 10 minutes is a NIGHTMARE for me! :C But I got it done, and *just* under 10 minutes-WHEW! I had to cut out my banter that I often put as the intro to the video, to get it done. I know, you don’t need to see me blabbering on and on anyhow, so I’ll type some of what I said instead.
So let me tell you what is in store for ya!
A few weeks ago, I asked for any feedback you wanted to offer on My Timeless Templates ©. Well, all you animal lovers asked for PET specific templates, to package up stuff for our furry friends, OR furry friend lovers!
Now sure exactly WHAT type of market is out there for PET/Animal theme stuff, but I did have an idea to hold you over till I have the AH! HA! moment 😀 (which I am totally NOT promising will ever even happen :C)
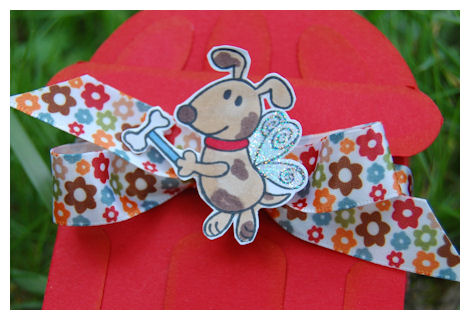
The Dog Fairy was PERFECTION for executing this idea too.
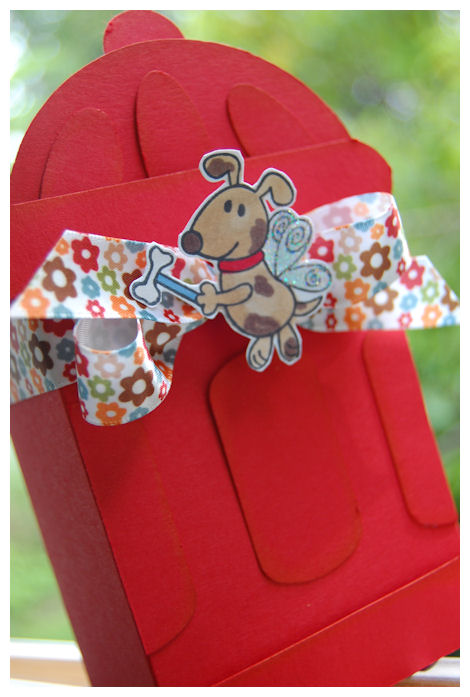
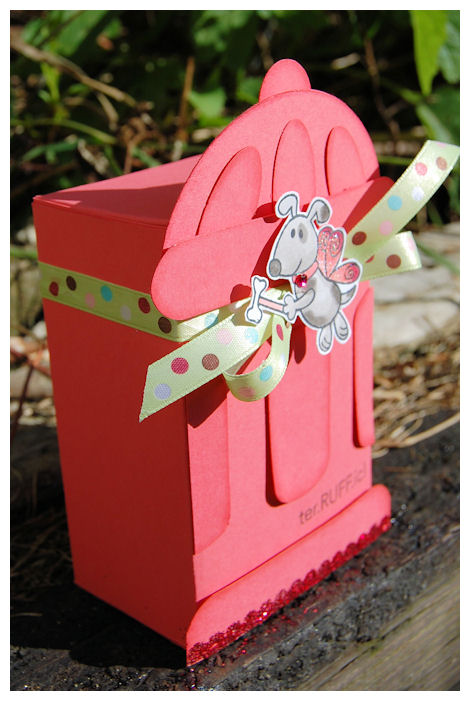
I used The Perfect Match © Box template, to create an ADORABLE Hydrant themed gift box! This box was designed, based on a card I did —> HERE!
(OK while searching my blog I also found a cute 3D photo card I made of my own dog —->HERE! LOL!)
So here we go 😀
See how amazingly versatile the My Timeless Templates can be?!
Now here are some photos of the projects (those who are peeking in from work! LOL!) to hold you over until you view the video!
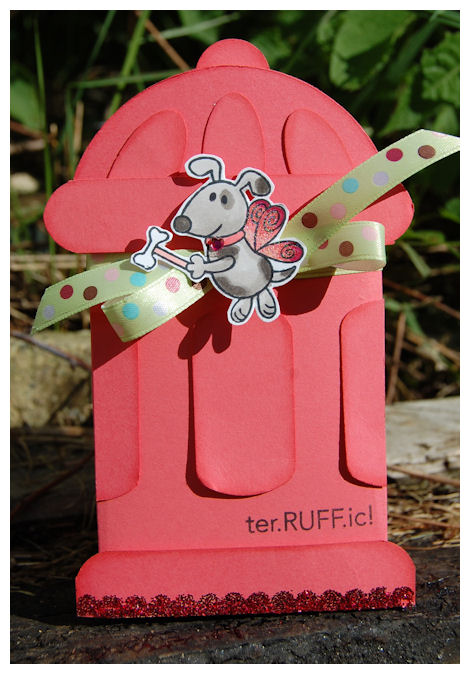
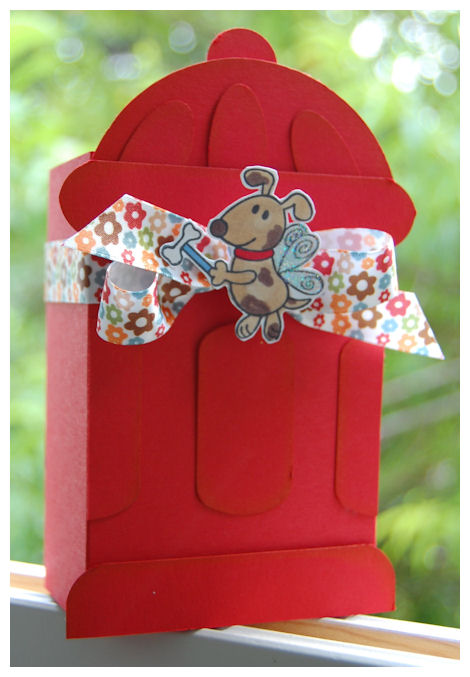
Now I did two of the same design-one girly and the other more boyish. I will post photos of each so you can see how easy it can be changed up.
Girly Ter*RUFF*ic front
Boyish Front
Girly Side View

Boyish Side View
Side 2
Now this is what I have packaged up-inside
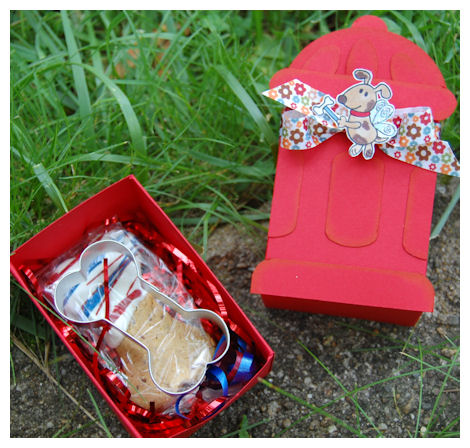
I put a homemade dog cookie, with the dog bone shaped cookie cutter, in this gift box 😀
You could also package up just the mix, and let the person make the cookies them-self!
You could put a personalized dog tag in there, for the new puppy owner……..or have a dog themed kids party (like Clifford or some other dog like Bolt!) and make these the “doggy bags” filled with “doggy treats”!
No matter what you do for this, its seriously, way cute! (Or at least I think it is :D)
Well that is it for me today! Im working feverishly on NEW! Templates for the PTI release! YIPEE!
See ya tomorrow.
Life is challenging-update
Jul 25, 2009 Author: mytime | Filed under: Home decor/3-D items, JustRite Stampers, My Timeless Template Challenge, My Timeless Templates, UncategorizedWell by now its Saturday evening, and the day has just FLOWN past me, as has the week!
You can see my blog had taken a HUGE back seat, as my family needing my time more 😀
I can honestly say my life is ANYTHING but boring!
Its been an emotional roller coaster here this week, as Jay and I prepare for his Discectomy on Monday! EEK!
We weren’t even positive it was a go, until Thursday night!
The doctor repeated the MRI because he was convinced Jay’s disc got “better” and was most likely, then un-operable! So he had another MRI and it showed the herniation is twice as bad as it was previously, so definitely NEEDS the surgery. Good grief! We had then mentally prepared for a surgery that got cancelled due to office error, then we plan for surgery again, then mentally plan AGAIN for a possible cancelled surgery, now we are back to yes, needs surgery. I have a headache just thinking about it all. AND its not even MY body! Poor Jay.
Anywho, when I get stressed I clean-a lot! Like for several days, I dust, organize, sort, purge…..you name it. No inch untouched. I am not sure WHY this helps. Granted my house is pretty clean in general but it gets a real bleaching! LOL! These are times for me, when creativity becomes hard and stressful, and the ideas DON’T flow. So I clean and clear my house, and my head.
So, I spent the week cleaning my entire house top to bottom. Then took it upon myself to re-decorate the girls room! They got this UBER CUTE comforter set—> HERE! With all the fixins! Then I moved into their huge walk in closets, and did tons of re-org. on them too. Oh and I did the clean out of Noah’s room too. He got new bedding but kept everything else the “same” decor, but more organized! He didn’t want to change anything really. I got him a huge art board for his pictures and stuff too! YEAH!
Took the kids to the mall, and did some fun stuff with them. Planning Amber’s Dress Up Princess party too, so that has me BUSY! Boy you’d be shocked at the party this lil, to be 5 year old, has planned! LOL! Im in BIG trouble the older she gets! But I love every second of it.
We got her a GORGEOUS, insanely pretty, Sleeping Beauty “Gown”, for her party! No joke this thing is AMAZING! It was on sale too! WAHOO!! Wait till you see it 😀 Oh yeah and ALL the fixins for that too.
Sooooo that all helped me get ready for Monday, which we are having quite the time getting people to take the kids. Its insane.
Anyway-all this is my excuse as to WHY Im so late posting My Timeless Template Challenge for this week!
If you are new to my blog, every Sat. I post a challenge, that HOPEFULLY inspires you to get creating 😀 Each week is something new!
Soooo, the challenge is to use ANY My Timeless Template © —–> Found Here! and I decided this would be a great source of inspiration
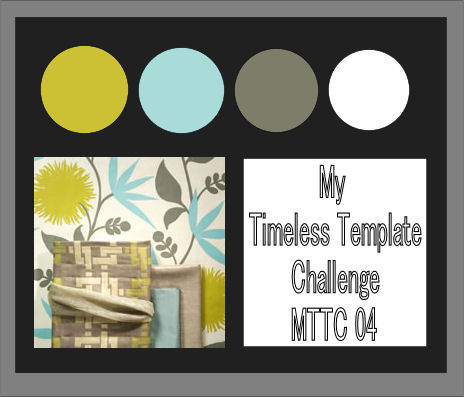
Keyword MTTC04
Use the pattern, colors, whatever!
ADDITONAL CHALLENGE!! Use HARDWARE on your template 😀
Basically ANYTHING metal 😀 So dig out those embellishments girls.
Pam is hostessing for me this week, since Im running like a chicken with her head cut off! Thanks Pam!!
Go to her blog —->HERE, to link your creation to Mr. Linky 😀
I decided I would use on “oldie” but goodie My Timeless Template called Music Makeover.
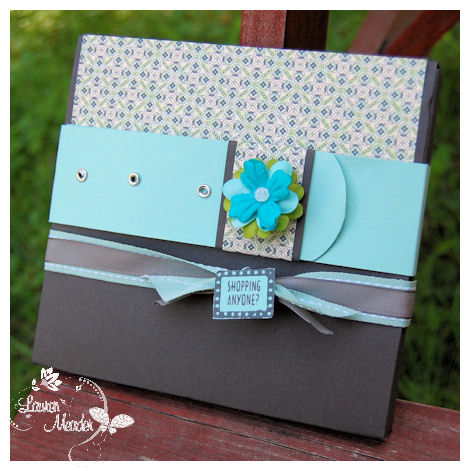
This template is designed to hold a CD, but it can do so much more —-> Music Makeover Ideas. That is some alternative ideas I posted on my blog, utilizing that template. You also get 5 exclusive ideas in the template Idea Book, when you purchase the printable template for only $5! Template has unlimited uses, and you can print as many times as you like 😀 Forever!
Now MY template this time, holds a Gift Card that is in a CD case (that I forgot to get a photo of-DUH!)
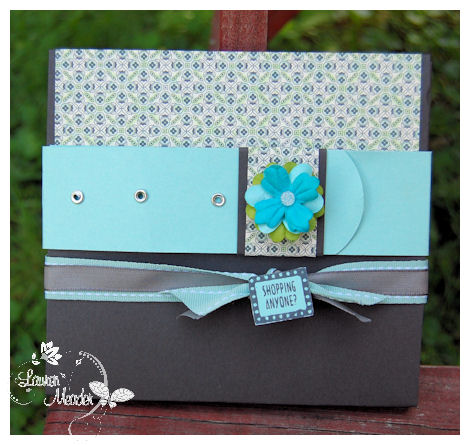
Going with the “hardware” challenge, I designed this to look like a belt buckle! Its a belly band, that goes around the top flap seam of the template, and you “un-buckle” it to open it up!
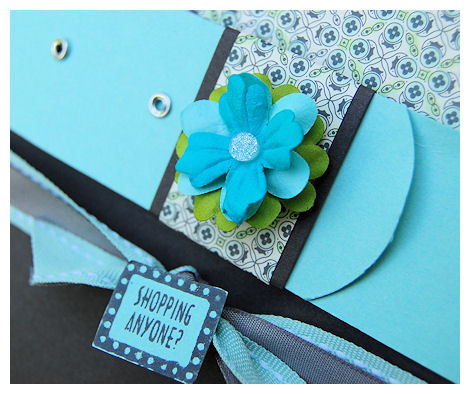
Just attached some silver eyelets, to my “buckle”. Easy peasy.
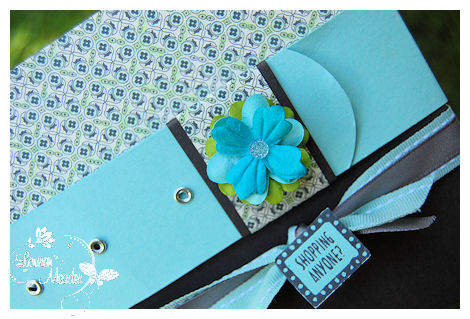
I think its so pretty, and subtle!
The Shopping anyone is from JustRite Stampers Girl Time Borders & Centers Set 2″ . The image in the set that has the shoes! I cut out the sign 😀 Its was PERFECT for my gift card holder.
I used some Gray patterned paper by Stampin Up! and used my Copic markers to colored it match the challenge!! Good stuff!!
Trust me, the paper took longer to color, than the template took to print, cut and assemble! LOL!
Now (if you haven’t already!) check out the designers blogs for MORE templates and the designers inspiration 😀
OK your turn!
Im off to the food store to stock up on EASY meals to make for the family! CRAZY!
Tomorrow I hope to post the card I made for Jay for his surgery. Its really cute
Thanks for stopping by.
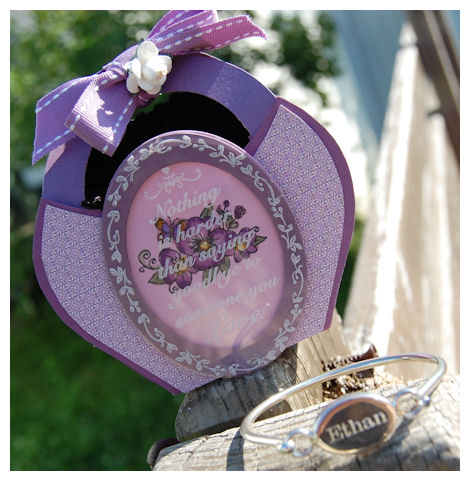
“Nothing is harder…
Jul 22, 2009 Author: mytime | Filed under: Home decor/3-D items, JustRite Stampers, My Timeless Templatesthan saying goodbye to someone you love”
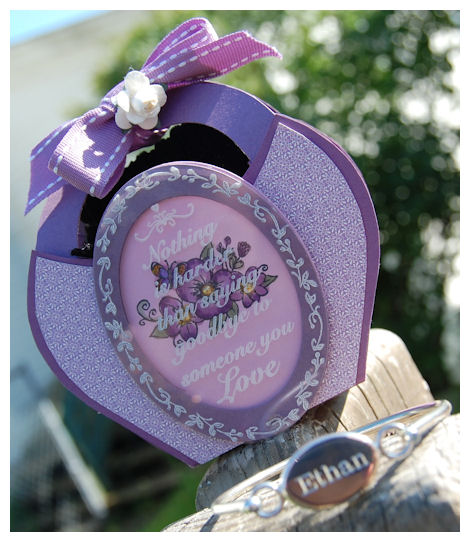
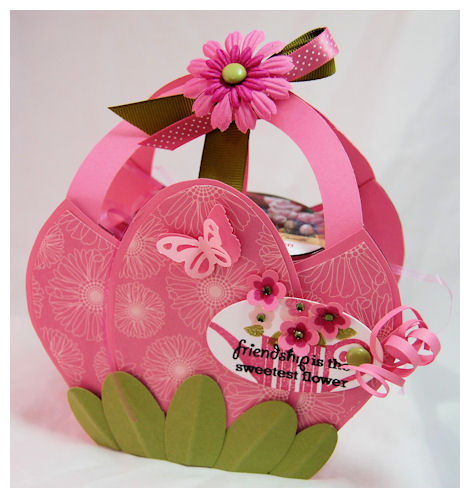
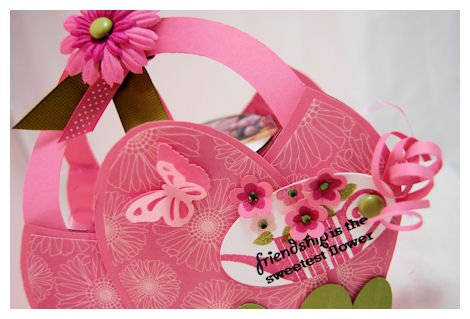
This is what the sentiment on this Pretty Petite version of the Pretty Petal Pocket box says.
What do you put on a gift for someone who loses a child? I struggled with this for several weeks, before I saw that particular sentiment, and felt, in my heart it was right.
This box was part of a gift for my dear friend Alicia, who lost her 4 year old son, Ethan, in June.
I wanted to make a special box to hold the engraved bracelet I got, with her son’s name on it. I didn’t want to just throw it together. I put much heart, time and thought into this, and in the end I was happy with the result.
This the close up of the silver bracelet I got engraved with Ethan’s name.

Ethan was such a little cowboy, and I thought the the two “O” that loop the bracelet were SIMILAR to horseshoes, like a little cowboy. I know that sounds like a stretch, but I truly did think that! LOL! There were so many different bracelets to choose from, so this one stood out to me.
I know Ethan will always be in Alicia’s heart, and in some way “with her” everyday, but I figured it would be nice to have something with his name on it. I guess I got that for her because that is something “I” would want. Weather she wears it, or keeps it with some of Ethan’s special things, is up to her.
Now here is how I decided upon my design elements. Often when there is a particular feel, or message I want conveyed I will GOOGLE meaning for the things I am considering using. It helps guide me.
I chose the Pretty Petite version of the Pretty Petal Pocket box, because it was perfect size for the bracelet.
I chose the pansy flower on the petal front because:
The name pansyis from the French word pensée, meaning thought or remembrance. The pansy is a delicate looking flower often with a “face.” The pansy is quite durable and a “flower for all seasons.”
The pansy image is from Wood Stamper Oval 1-3/4” x 2-5/16” with Bonus Pansy Center & 15 pt Special Occasions Font
I stamped just the Pansy onto some Lavender Moon cardstock, then colored it, adding some adhesive pearls
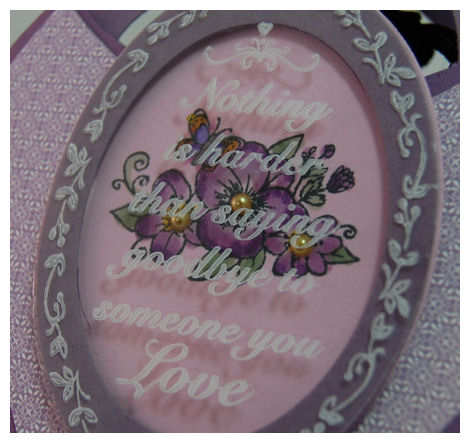
The sentiment is from Thinking of You Borders & Centers Oval 2-1/4” x 3-1/16” I said already why I chose it. I just felt, in my heart, it was perfect for the gift and conveyed the message I wanted to send. I don’t think there are any real perfect words for something like that, but this was as close as I could get.
I cried the entire time I made this! LOL! My eyes were little slants for 2 days.
I stamped the sentiment onto clearly creative cardstock, in white stazon, then layered over my oval frame-which was on dimensionals for a “3D window” effect.I used clear mini glue dots to adhere it to the frame so you couldn’t SEE how it was attached.
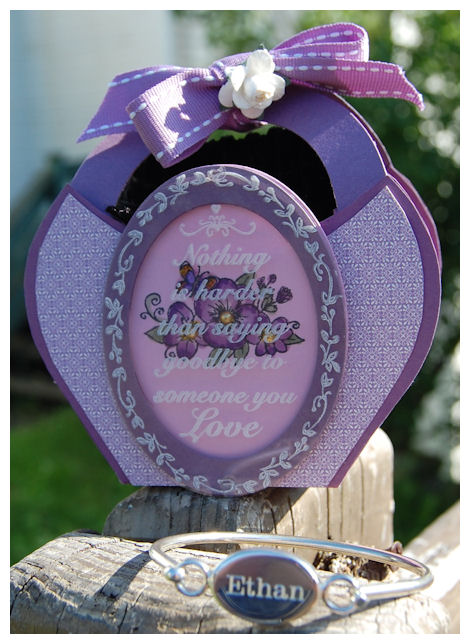
I chose the color purple because:
Nature of Purple:
Purple has a special, almost sacred place in nature: lavender, orchid, lilac, and violet flowers are often delicate and considered precious. Because purple is derived from the mixing of a strong warm and strong cool color it has both warm and cool properties. A purple room can boost a child’s imagination or an artist’s creativity. Too much purple, like blue, could result in moodiness.
Culture of Purple:
The color of mourning for widows in Thailand, purple was the favorite color of Egypt’s Cleopatra. It has been traditionally associated with royalty in many cultures. Purple robes were worn by royalty and people of authority or high rank. The Purple Heart is a U.S. Military decoration given to soldiers wounded in battle.
————————————————————————
I personally have a silver bangle that reads “The journey of a 1,000 miles” on the front, then on the inside reads “Begins with a single step” I saw it the LAST day of Alexa’s chemo, and it just spoke to me about our long journey, and to remember we can and will get through ANYTHING, but it is ONE STEP at a time. This bracelet brings me much comfort. My friend Paulette got it for me 😀 I never take it off.
I also have a purple rubber bracelet for Cancer Awareness that reads Courage, Strength, Hope , Faith. I had special made right when Alexa got diagnosed. Inside the band reads”Faith in healing Alexa”. Purple is also the color of Cancer Survival. I never take it off! Even when I’m all dressed up! That also reminds me to appreciate EVERY moment with my family, and not take ANYTHING for granted.
I need more wrists! LOL!
Also my friend Sonia sent me a necklace (by Jennifer Cassady-who is currently expecting, and is on a short medical leave)with my 3 children’s name on it! That is another personalized gift I cherish. I get LOTS of compliments on it too 😀
Dave and Alicia are so strong. I know God blessed their lives with Ethan because no one else could have been better parents to him. While his time on earth was brief, he impacted so many. He had a big purpose. The Weimans were blessed to have an angel amongst them. To have had the love of Ethan and many wonderful memories that they will forever cherish.
If you didn’t know of Ethan, this is his story—>Ethan’s Caring Bridge site
Also in honor of Ethan we had a Digi Stamp set called the –> Weiman Wranglers <—made in honor of his precious life! All proceeds were to benefit the Make A Wish foundation of IL, in honor of Ethan. We have raised over $ 2,000 so far!!
The Weiman family asked if ANY of you purchased the images, and created anything you are willing to part with, his mom Alicia would love to include it into a special memory album she is working on, to preserve Ethan’s memories!
Please email me for their address if that is something you can or would like to do.
On a lighter note I have to say I got so much enjoyment from the kid stories you all shared on THIS POST!!
I am going to be redecorating my children’s rooms AGAIN. We are getting new carpeting put in, so since I have to move everything out of their rooms anyway, it is the perfect time! I am going to get a big bulletin board for him to put his artwork on, thanks to the MANY suggestions 😀 I will do this for the girls room too. Oh and the play room! LOL!
Make sure you check out the JRS blog! Lots if ideas.
Well thank you for stopping by! I have a TON of emails to go over from like the past 2 weeks or so! Sorry! If you emailed me Ill be in touch soon.
Supplies:
My Timeless Template: Pretty Petal Pocket (petite version)
Stamps:Thinking of You Borders & Centers Oval 2-1/4” x 3-1/16” , Thinking of You Borders & Centers Oval 2-1/4” x 3-1/16”
Cardstock:Lavender Moon, Plum Pudding, Clearly Creative Cardstock
Patterned paper: Guide Lines
Ink: White Stazon, Black, Copic Markers
Ribbon: Stitched Plum Pudding
Oval Nestabilities, adhesive rose, adhesive pearls
JustRite Stampers July Release Blog Hop!
Jul 16, 2009 Author: mytime | Filed under: Cards, Home decor/3-D items, JustRite Stampers, My Timeless Templates, Papertrey NewsletterI am excited to be participating in this months JustRite Stampers Summer Release Blog Hop!
After you leave be sure to check out the JRS Blog 😀
I have to say I LOVE the new direction I am seeing their newest releases going in (and what is to come!). There are super border selections, with center images! IMAGES! I love that! That makes me SOOOOOO happy! I have been a fan of JRS for over a year now! I have quite the collection 😀 I’m happy to add the latest and greatest to that lineup 😀 I enjoy mixing and matching not just the borders, but all the set selections I have.
Funny thing about my project today though……despite my love for the “images” I decided to use the NEW! Calendar Borders & Centers Oval 1-3/4” x 2-5/16”
I have been asked by NUMEROUS people to make another month by month card organization box!
PS Yes! This will go up in my Etsy Shop, along with my other stuff most likely tomorrow 😀 or over the weekend.
Now if you “know me” I despise repeating ANY designs I create! I always have to do something NEW! When I make something it is a ONE of a KIND! LOL! Never repeat!! When I saw the size of the Calendar Borders & Centers Oval 1-3/4” x 2-5/16” I was VERY excited!! I thought they would look FAB in the My Timeless Template: From the Desk Of: ©
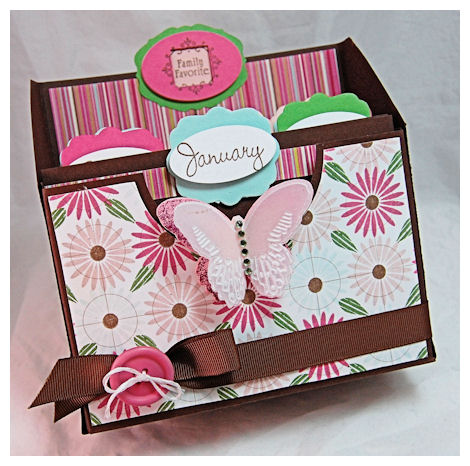
A Year of Celebrations Desk Organizer
This will look SO pretty sitting out on your desk! Don’t you think? That is the KEY! Pretty and organized 😀
The font size for this project was beyond perfect!!
Front detail

My butterfly is a Tag Team Butterfly Cuttlebug Die. I die cut the sweet blush layer, added some glitter 😀 and then die cut and embossed the vellum butterfly layer. I HAD to add that butterfly to the front 😀
I stamped my own patterned paper using Floral Frenzy and Guidelines II paper
My colors are Hibiscus Burst, Sweet Blush, Aqua Mist, New Leaf and Dark Chocolate. I paired it with some stripped paper by K& Co.
Side view
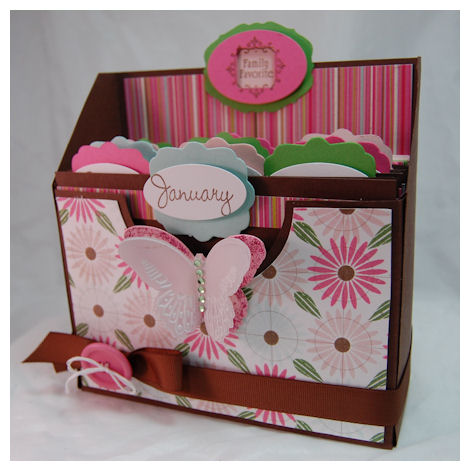
Now notice the top?
More mixing and matching going on. The “family favorite” is from What’s Cookin’ Borders & Centers 1-5/8″ I think it was a cute addition to the From the Desk Of: template!
(sorry this was taken outside since I broke my tent lights during photographing-GRR!)
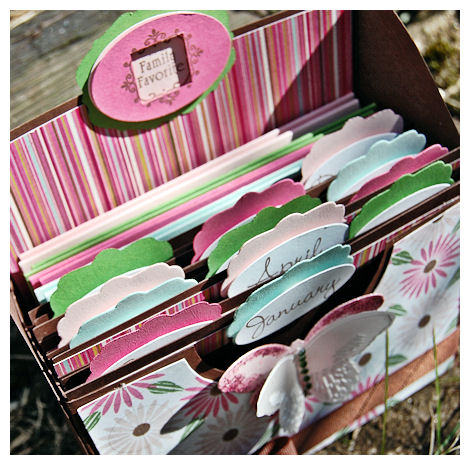
Also: This template has a divider additon if you choose to use it. I did for ths project, as you can see.
I didn’t use the borders, just the month’s. I stamped each one on white cardstock, then punched out with my Wide Oval from SU! I layered those ovals onto die cut labels, also from SU!
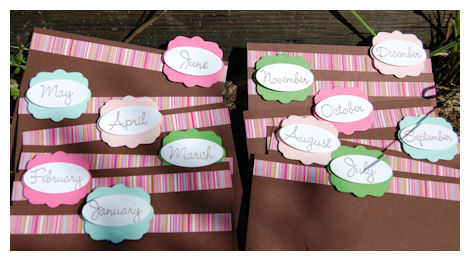
Here are the file dividers, grouped together. Aren’t they pretty?!
I just staggered each month so you can easily see what is where.
I would just make an index card, and put the date of friends and family birthday days and file it into the appropriate month section 😀 Quick and easy organization 😀
Now here is what else is included IN my organizer……
I made a QUICK set of 12 cards.

There are 3 of each design/color combo
I used the color combo that is on my From the Desk Of: Organizer paper, that I designed, for my color combo here!
I LOVE the little gift image and border from the Favorite Occasions Borders & Centers Set 1-5/8″
I wanted QUICK and EASY cards that match, no fuss!!
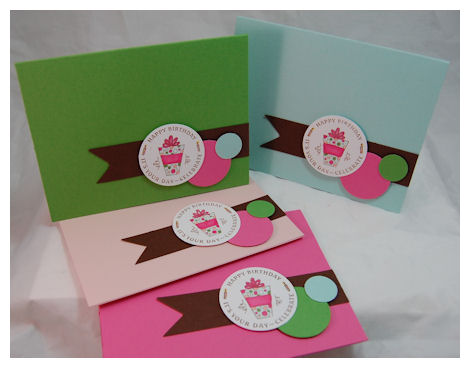
I just stamped my image in dark chocolate ink, then via assembly line, I colored them in with Copic markers, then punched out each one with my SU! 1 3/4 circle! I then used my 1 3/8 circle and 3/4 circle to punch additional circles 😀 I used dimensionals to layer and POP the circles.
Quick, cute and easy!
Now when you look in your Calendar month section, you can just GRAB a card and pop it in the mail!
On a personal note……
Alexa’s appointment went well (still Cancer Free! YIPPEE!!!) I’m so happy about that. Every time we get labs drawn I hold my breath. I don’t think the fear of return will EVER leave me. Any time she complains anything hurts I FREAK OUT! I have also had poor Amber tested for Leukemia 4 times! She gets a lot of growing pains, and when it happens too often I go into a complete PANIC! Those “leg pains” were Alexa’s #1 symptom!! It took 3 months or me taking her to numerous doctors to get an actual diagnosis! So to say I am a bit paranoid, is a complete under-statement.
Now we have to see the plethora of other doctors for other issues!
I have to take her to-dentist (she needs braces! LORD HELP ME! LOL! I can’t imagine she will do well with that) a Dermatologist, Endocrinologist, Dietitian and ENT! LOL! Then a port flush.EEK! Can we extend the hours in a day please? I’m seriously NOT complaining about her other visits. Im truly grateful for her health! Im just feeling a little overwhelmed these days, to say the least.
WORSE yet, and this is a HUGE complaint: BEWARE!!!
Jay was suppose to have surgery on his back this morning. He is to have a discectomy. He was mentally prepared and everything was set to go!
BUT, get this………… the OR scheduler FORGOT to book the OR for him! So he can’t have it! They are now scheduling 3 weeks out, and then his doctor is on VACATION!!!!!!!!!!!!!! So we are at the least a month and a half away!
Words cannot even tell you how MAD I am about that! We waited for this date for several months.
FINALLY got his work stuff organized (he is in a management position so getting 6 weeks off is NOT an easy task) and short term disability was all set, and we actually had CHILD CARE set up for the kids (which our families are ALWAYS too busy to help so that was a feat in itself), to have THAT happen! OMW! Im sorry, I’m just FUMING mad. Worse yet, poor Jason is in a TON of pain everyday. He has a desk job and commutes an hour each way to work, so that KILLS his back.
I wanted to tell the OR scheduler “Well ,until Jay does have his surgery, let me hit you in the back with a bat, every minute, until then!” That is what Jay tells me the pain feels like. Plus it travels down his leg, which often gives out when he walks.
I just feel SO bad for him. This has been going on for 6 months. He has had PT, cortisone shots and everything else they suggested before resorting to surgery. NONE of it helping.
OK that just put a HUGE damper on this post. I’m sorry! I’ll keep you all posted!
On that note though, I truly believe EVERYTHING happens for a reason! So we are just keeping the faith that it wasn’t meant to be then. It was just very strange that something like that would happen, so I truly believe that it was just not meant to be, yet.
In the meantime, thanks for stopping by and sending up prayers for my family!
Now head over the the —> JRS blog <— for a list of people playing along 😀
Last minute peeky, and a template winner
Jul 14, 2009 Author: mytime | Filed under: Home decor/3-D items, My Timeless Templates, Papertrey Newsletter, UncategorizedOK I know this is LATE!
Sorry, family first. We have had a very rough and busy day here, so I am sorry for the delay. I will also take a day soon to post answers to some commonly asked questions about the My Timeless Templates. Also note we do take all suggestions into consideration, so thank you.
I hope to see you on the PTI chat forum soon 😀
OK first is the winner of the 2 My Timeless Templates © called Milk Made © and Pretty Petal Pocket ©
Winner picked via www.random.org
Random Integer Generator
Here are your random numbers:
361
Timestamp: 2009-07-15 01:12:55 UTC
Vicki # 361
Oh my gosh — I can NOT wait for the 15th!!! Those little milk cartons are the cutest darn things EVER! And thank you for offering them in two sizes for the same price – a great value. And these days, a great value is just what we all need.
I have been busy making homemade jam this summer. I am planning on using it for Christmas gifts for the teachers, hostess gifts, etc. I’m thinking that the larger milk cartons are going to be the perfect package for a sweet little jar of jam. Can’t wait to try it out!!
————————————————–
Congrats to Vicki!!
Now I have my last minute sample! (I so hoped to squeeze out ONE more with the Pretty Petal Pocket!-SOON!)
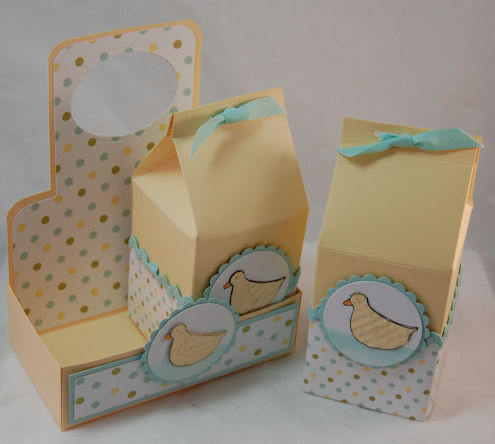
Baby Ducklings
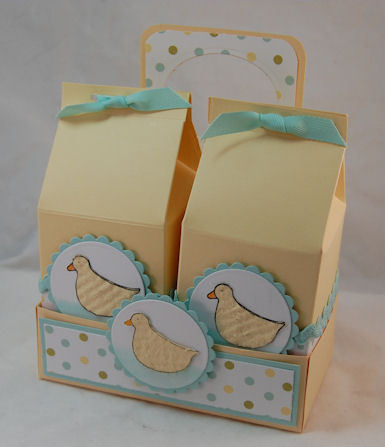
Well those of you thinking baby ideas, you are so right!!!
This was my concept project for the Milk Made template. I love baby gifts, and packaging up some baby wash cloths, baby wash and lotion or other “baby” items was just too cute to me. I really love being able to make the SIMPLEST, most inexpensive gifts seem not only RICHER but more thoughtful, all due to the packaging!
It really does step it all up! Plus these are things you can KEEP and utilize .

Mom can save it and put in first onesie, or hat. Maybe hair clippings and hospital card? Just a great keepsake option.
This is a really cute, gender neutral gift set. Perfect for that special something! I think it looks like a packaging you’d find in a high end children’s boutique!
Given the fact that this Large version of the template uses ONLY 3 sheets of cardstock, at 0.18 cents a sheet, that is quite the price difference!
Lets not forget personalization 😀
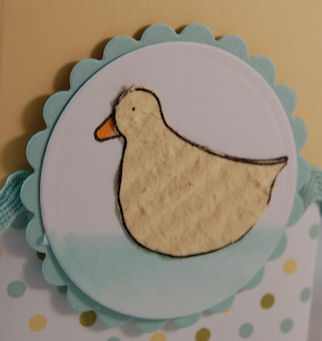
I LOVE the faux suede texture the duckies have to them 😀
They feel SO soft too!!
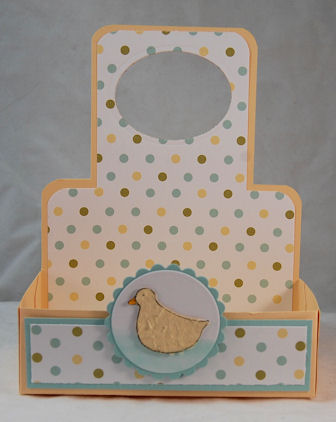
This is the front of the Milk Made © Crate
This crate is very simple, but so many uses!
Supplies:
My Timeless Template © : Milk Made ©
Stamps: Bitty Baby Blessings
Cardstock: white, aqua mist, lemon tart
Ink: Black & copic markers
Ribbon: Aqua Mist twill
Ric Rac ribbon, nestabilities, paper crimper
So there you have it. Another fun countdown.
I will be back with my release samples soon!!!
PS YES! I will be posting to my Etsy soon! I just hadn’t yet because I honestly don’t have time to ship this week. I like to get it out the door asap, when I do get orders.
Thanks again for stopping by
Projects with pop
Jul 13, 2009 Author: mytime | Filed under: Home decor/3-D items, My Timeless Templates, Papertrey Newsletter, Product Opinions and Must havesTonight is the release night at Papertrey Ink!
I hope you are just as excited as I am. I’m just dying to see what you all do with the new goodies 😀
Also a HUGE thank you! I am so excited about all the amazing comments reguarding My Timeless Templates ©! I appreciate the emails I get with samples too! You all are rocking them out! You are all truly amazing, and your words really and truly brightened my day.
I have a crazy week coming and needed the lift 😀 Jay is having his back surgery on Thursday (he is starting to FREAK out) and will be there overnight, my grandfather (who has always been like a father to me growing up) is suddenly seriously ill, Alexa has her post Chemo check up Wednesday (which ALWAYS freaks me out!) and I have some other “worries” going on that are just weighing me down. So I want to thank you for lifting me up with your sweet words! Oh and if you can throw in a prayer for my family please! I’m really just stressed about the weeks events.
I will be announcing a winner for the 2 My Timeless Templates ©later today. As I post this, its too early! LOL!
As I promised yesterday, I have my Pretty Petal Pocket © template in the standard and Pretty Petite version! I hope you like seeing the same design, just different sizes,side by side.
I will answer questions about the templates in my contest winner post! I have to scroll through and see what people are interested in knowing! I know dimensions was one question!
Please note ALL our templates give the finished sizes on the website when you click to view the actual template 😀
In the mean time……here we go!
Pretty Poppy Pockets Duo

I think Poppy and True Black have an amazing POP together! A bright color combination that I just adore together!
I wanted a dramatic, and elegant look, so that is exactly what I feel I got here!
View from the top

I also lined the inside, side panel! I love the finished look taking that extra step has 😀
Pretty Poppy Pocket

This is the larger template, decorated.
I used a large chipboard shape that is from Maya Road. I just covered it with my Green Tea Leaves paper.

For a more dramatic appeal, I covered the back of the chipboard with Pure Poppy cardstock, amking it a bit larger than the chipboard layer. I then distressed the layered edge for a cool look! I never did that before and I really enjoy the way it appears in real life 😀
I also did lots of flower layering, by using some paper punched flowers, felt flowers from American Crafts, and Prima flowers!
The leaves are a Cuttlebug long die, that I felt was PERFECT for this project!
Pretty Petite Poppy Pocket
This is the smaller pocket. It may be smaller but is just as cute, and still holds a great number of ideas for gifts!
I made my own chipboard flowers using the same flowers cuttlebig die.
The sentiment flag was stamped with Text Style bkgd, in gray ink, then the sentiment from the NEW! Everyday Button Bits was stamped in black ink. I did some faux stitches as well to add to the look!
I think they are a very cute set!
I love making the matchy match stuff, and making my own chipboard embellishments was a fun challenge for me today! I get bored with the same ole, same ole, and I have to say my mojo is in FULL gear! I love when that happens!
Supplies:
My Timeless Template: Pretty Petal Pocket ©
Stamps:Everyday Button bits, Text Style bkgd
cardstock: Pure Poppy, Spring Moss
Patterned Paper: Green Tea Leaves, Bitty Box Basics
Ink: Smokey Shadow, Black
Ribbon: Saddle Stitched black, May arts satin
Chipboard: Maya Road
Now for another WOW! Where a color duo takes center stage……dark chocolate & berry sorbet (YUM!)
You’re so very Tweet (using Milk Made ©)
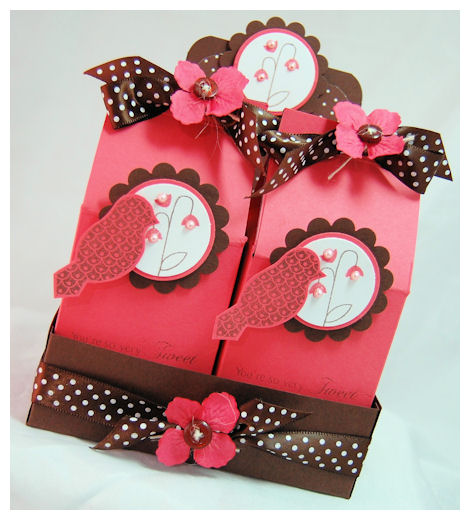
Can this get any sweeter?
This was made to hold 2 bags of Dove Chocolates! Isn’t it PERFECT for that?! I LOVE Dove Chocolate!
I’m in love!
I love the little flower image from Bird Watching, and SO wanted to use it since it’s release. I finally got the opportunity this time 😀
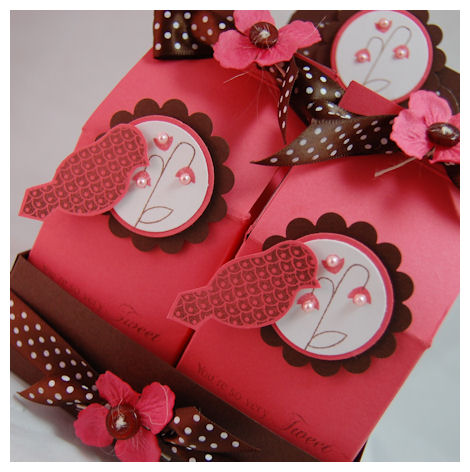
I just added some adhesive pearls to the lil tulip like flower centers. such a EASY addition, that packs a big WOW! factor.
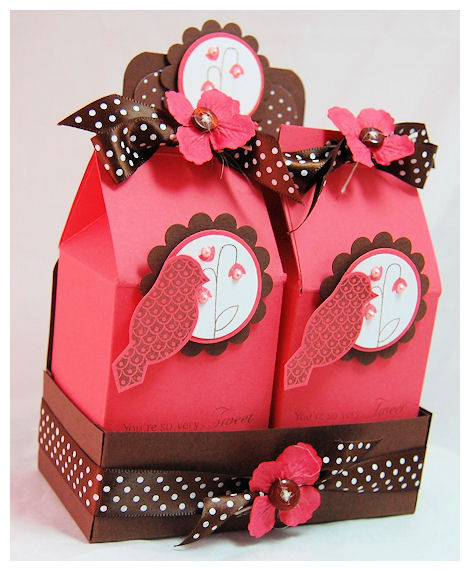
One last side photo

Now we can move on to the very SIMPLE Milk Made © Crate.
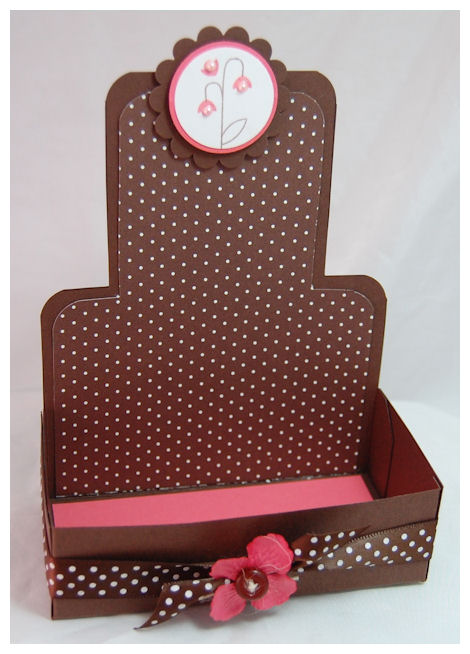
This template ALONE can be used to house a wide variety of items, in itself! Its just SOOOOOO cute.
Add dividers, and sort your desk stuff……as I did the other day put note cards or flower pots……recipe cards………altered chocolate bars 😀 YUM! Smores mix carrier! OH! That sounds yum-o!
As you can see I also lined the bottom of the Milk Made © Crate. Sometimes its that LITTLE extra step that completes a project 😀
Obviously kept this one UBER simple, and I think that adds to the beauty.
Supplies:
My Timeless Template: Milk Made ©
Stamps: Bird Watching
Cardstock: White Dark chocolate, Berry sorbet
Patterned paper: Bitty dots 2008
Ink Dark Chocolate, berry sorbet
Ribbon dark chocolate polka dot ribbon & twine
vintage buttons
adhesive pearls, circle punches
Well, it is very late, and I have things to wrap up, so I’m keeping it short and sweet! ( I know! When am I ever short and sweet! LOL! SORRY!)
Today is Becky’s day to share a peek with you! Also be sure to check in on Nichole’s blog , Dawn and Lisa, as they share even MORE amazing samples too!
I will return with some questions answered and a template winner! YEAH!
Thank you again for taking the time to stop by and/or comment. Makes all the hours I put into my pure LOVE for this hobby worth while.
Be back soon!
Gardening Apron, a Petal in Bloom and a Template Duo Giveaway!
Jul 12, 2009 Author: mytime | Filed under: Home decor/3-D items, My Timeless Templates, Papertrey Newsletter, Product Opinions and Must havesA new day! That means MORE NEW samples! WOOT! WOOT!
It also means its time for a Giveaway! All you have to do is leave me a comment! You can make a template suggestion, ask a question, list your fave project or template, tell me what you think about the template samples I’ve shared so far…whatever you decide to share!
Winner to be drawn tomorrow (July 14th) with my newest template peek post!
I love hearing your feedback! I will draw one winner, and they will get BOTH the templates being released this month: Milk Made © and Pretty Petal Pocket ©!
I had some MORE AH!HA! Moments while creating 😀 So I hope they get YOUR creative ideas using the newest templates flowing 😀 OH! and wait till you see the idea book! WOW!
NOTE: Templates shared today release July 15th! They are linked to main template page for future blog viewers 😀
Well I don’ know if you recall, but last month we had “smaller versions” of the templates we featured! I like to call them Pretty Petites. I have had numerous emails this month asking if we will have that same option with this months release and the answer is……
YES!!!! I really hope to hear what you think about the typical size templates as well as the inclusion of the Pretty Petites! I try my best to make all My Timeless Templates © as large as possible!!! I personally love some of them being offered in a Petite version because 1) They are CUTE! 2) If you have a lot to make they take a little less time 3) They are less expensive to FILL 😀
So let me share the Template, with a matching Pretty Petite version!
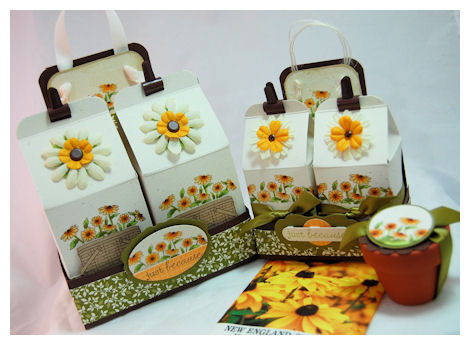
Gardening Apron Set
I decided it would be nice to show you both versions, side by side, and design them exactly (for the most part) the same! This gives you an idea of how large and small they are! Even the Pretty Petite version is a FAB size!
So, if you are wondering, that means that you not only get the LARGE/Standard template versions, but the Pretty Petite versions too!! ALL for ONE price $5!
Here is the side by side Milk Made © Carton comparison
Cute eh?
Again stamped the same! Decorated a bit differently. I think they are both adorable!
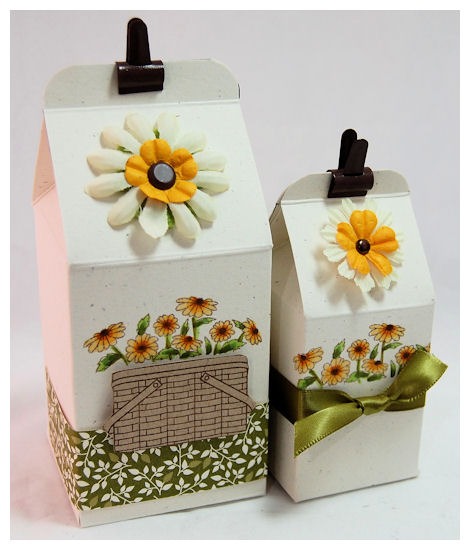
Large Milk Made © Gardener
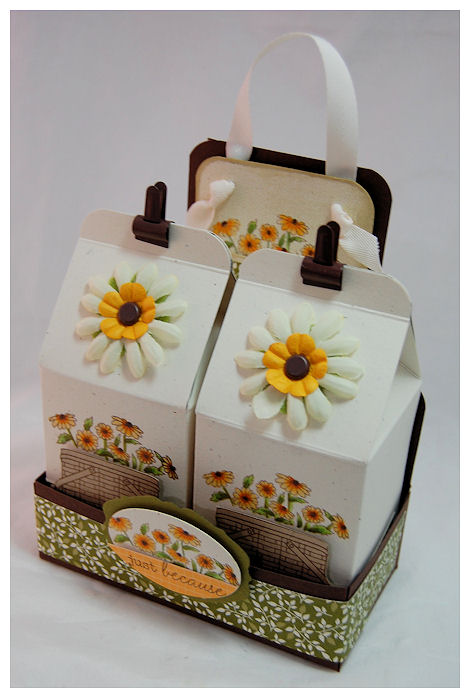
This is the standard My Timeless Template Milk Made ©
You can put so many various items in these! I used clips on the top! Just un-clip to open! Easy peasy.
Front view large
I love this project!
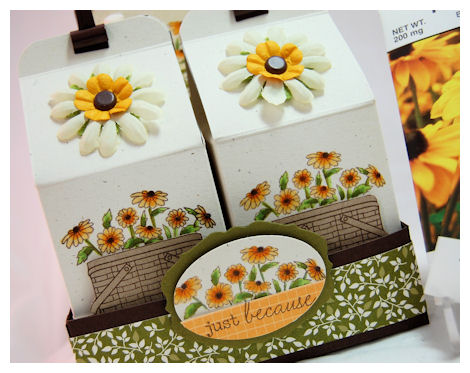
Inside the large cartons hold these seed packets
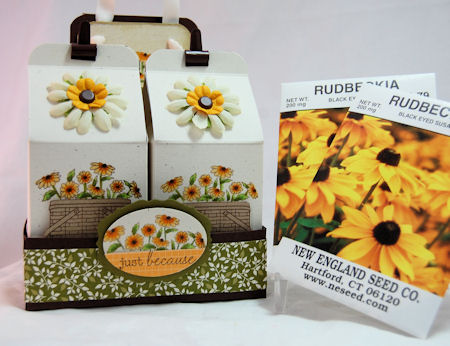
Which also inspired my design!
Now for my BIG AH! HA! moment 😀
I used the Milk Made © Crate as a Gardening “Apron”

When looking at the template it just looked like an apron to me! So I ran with the idea.
View from the top

I think adding some sort of patterned paper to the Milk Made © Crate bottom is a nice finishing touch 😀
Here is the “pocket detail”
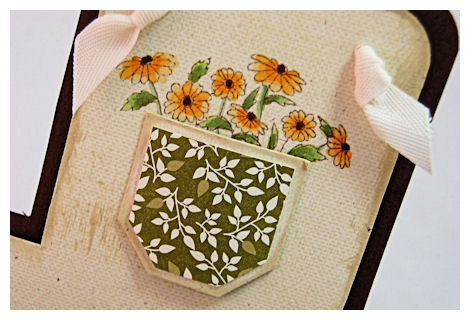
I used my large and small Tag punch from Stampin Up! to create the “pocket” in my apron box! The flowers are just peeking out of the top! I used a Linen bkgd stamp to add a textured look to my apron, and the Tea Dye ink duo to “dirty” up my gardening apron!
Now for the Pretty Petite version
Just as cute!
I purchased these mini flower pots (which have herbs in them) at the Target $1 spot over a year ago! LOL!
They fit nice and snug into the Petite version of the Milk Made © Carton

How cute is this set, seriously?!!
I used Vintage Twine for my Apron stings on the smaller version.
You could buy little flower pots and make party favors!
Fill with potpourri, or seed mix.
You could make “mud” cups for a kids party-just use Chocolate Pudding, gummy worms, and crushed Oreo cookies!
Now those would be the talk of the town!
You can even put the little post in the Milk Made © Crate template!
Seriously, how cute is that?
I love this gift set to pieces!
Now you could use larger pots for the standard Milk Made template too, if you like!
Pretty fancy 😀
Supplies:
My Timeless Template: Milk Made © large and small template
Stamps: Vintage Picnic, and a linen bkgd from SU!
Cardstock: Dark Chocolate, Ripe Avocado, Rustic White
Ink: Tea Dye duo, dark chocolate ,ripe avocado, Copic Markers
Patterned Paper: Green Tea Leaves
Ribbon: Vintage cream twill, rustic twine
punches: corner rounder, scallop/layering circles, labels, word window, layering tag, 3/4 circle all by SU!
Prima flowers
brads, seed packets, mini flower pots
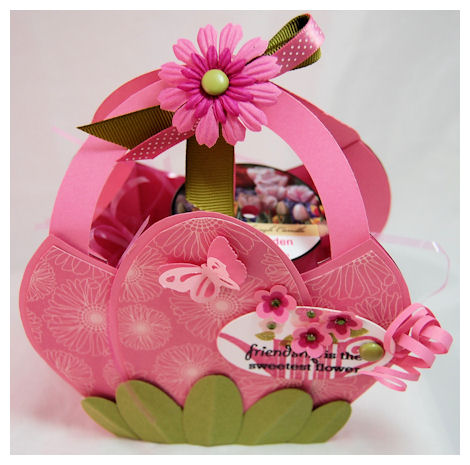
Now we well go on to Pretty Petal Pocket ©
Given its name I designed this version to look similar to that of a blooming flower!
The Friends Til the End patterned paper was perfect!
For the greenery I just used my SU! large and small oval punch, scored down the center, for the leafy greens!
Inside there is a scented glass candle! Its called Spring Garden.
A sweet presentation to a simple gift. I was very happy with it. Its ALMOST like the Lily pad flowers, now that I stare at it! LOL!
I loved the little tag. It used the watering can image from Green Thumb.
The 3D flowers make the gift tag just POP! Along with the “curled” cardstock pieces. So fun.
This was ANOTHER done in under 15 minutes project, I am proud to say!
This template goes together so easy! Also the way it folds the handles are very secure, and you dont’ see any seams! I love CLEAN LINES!
Supplies:
My Timeless Template : Pretty Petal Pocket
Stamps: Green Thumb
Cardstock: Hibiscus Burst, Ripe Avocado, white
Ink: spring moss, ripe avocado, hibiscus burst, raspberry fizz
Patterned paper: friends till the end
ribbon Ripe Avocado grosgrain, bitty dots hibiscus
oval punches, nestabilities tag die, prima flowers, brads, flower punch, adhesive rhinestones, butterfly punch
I will have a large and Pretty Petite version for this template tomorrow 😀 or maybe later today! Depends how my day goes.
I will SOON be updating my Etsy Shop to put all my release peek items up for sale 😀 Sorry, deadlines have to come first 😀 I know some of you are waiting on certain items 😀
I can’t wait to hear your feedback 😀 Thank you for taking the time to visit me here. I enjoy every minute of my time creating and sharing with you all!
Today is Mish’s day to share a peek with you! Also be sure to check in on Nichole’s blog , Dawn and Lisa, as they share even MORE amazing samples too!
Till tomorrow…….
My Etsy

Who I Designed For
Blogroll
- Alicia
- Alli Miles
- Ally Blankenship
- Amber
- Andi @ crafts on a whim
- Angel R
- Angie Z
- Anne Kranitz
- Becky O
- Bee
- Beth Silaka
- Bethany Paull
- Beverly Nash
- Bobbie
- Cambria
- Cammie
- Card of the Week
- Card Positioning System (CPS)
- Cards for Cancer
- Catherine Doucette
- Charmaine
- Cheryl Sims
- Chriss Rollins
- Christina
- Christine Ewing
- Christine Wooden
- Colleen Schaan
- Craft Critique
- Craft Gossip
- Crystal
- Dawn Easton
- Emily Giovanni
- Geny
- Holly
- Igne Groot
- Inspirational Craft Blogs
- Irene
- Jami Sibley
- Jeanne Streiff
- Jen del Muro
- Jeni Bond
- JenMarie
- Jenn Balcer
- Jenn Diercks
- Jenn O
- Jennifer E
- Jennifer Mick
- Jennifer Pereda
- Jennifer-Sweet Treat
- Joanne Basile
- Jodi Collins
- Julia Stainton
- Julie Masse
- Karen
- Kathryn Berthiaume
- Katie Cotton
- Kelley Holland
- Kendra
- Kim Scholfield
- Kris’s Color Stripes! Get inspired here
- Kristen Dubosque
- Kristin Eberline
- Kristine
- Laura @ Sunshine Stamper
- Laura Turnmire
- Laurie Schmidlin
- Lesa Rapp
- Linda Duke
- Linda-LSN
- Lindsey Botkin
- Lisa (lakind scs)
- Lisa Kind
- Lori Craig
- Maggie
- Mara Campbell
- Maria
- Maria Levine
- Mary
- MaryJo
- Melanie M
- Monique Hansen
- Moxie Fab World
- Pam Imholz
- PaperCrafts Connection
- Peppers and Pollywogs Kids party site
- Rebecca Grohall
- Rita
- Robyn
- Rose Ann
- Sarah Vrolyk
- Sharon Harnist
- Sharon Johnson
- Sharon Rivera (a chemisrty with paper)
- Sherrie
- Sophia Landry
- Storage Units, Ink, & More Blog
- Sue Berker
- Susan (Rainy)
- Tangii Crane
- Tracy
- Tricia Traxler
- Trudee
- Velta
- VivLyn
- Zena
MTME Pretty Palette Color Team
MTME Pretty Patterns Sketch Team
My Time Made Easy TM LLC
Shop till you drop!
Lauren Meader
About Me
Copyrighted material
Subscribe To My Blog
Pages
- About me
- Alexa’s Story!
- My Crafty Corner!
- My Time Made Easy™ LLC
- Our Make A Wish Trip to Disney!
- Resume/Publication List
Calendar
| M | T | W | T | F | S | S |
|---|---|---|---|---|---|---|
| 1 | 2 | 3 | 4 | 5 | 6 | 7 |
| 8 | 9 | 10 | 11 | 12 | 13 | 14 |
| 15 | 16 | 17 | 18 | 19 | 20 | 21 |
| 22 | 23 | 24 | 25 | 26 | 27 | 28 |
| 29 | 30 | |||||
Archives
- August 2013
- July 2013
- June 2013
- May 2013
- April 2013
- March 2013
- February 2013
- January 2013
- December 2012
- November 2012
- October 2012
- September 2012
- August 2012
- July 2012
- June 2012
- May 2012
- April 2012
- March 2012
- February 2012
- January 2012
- December 2011
- November 2011
- October 2011
- September 2011
- August 2011
- July 2011
- June 2011
- May 2011
- April 2011
- March 2011
- February 2011
- January 2011
- December 2010
- November 2010
- October 2010
- September 2010
- August 2010
- July 2010
- June 2010
- May 2010
- April 2010
- March 2010
- February 2010
- January 2010
- December 2009
- November 2009
- October 2009
- September 2009
- August 2009
- July 2009
- June 2009
- May 2009
- April 2009
- March 2009
- February 2009
- January 2009
- December 2008
- November 2008
- October 2008
- September 2008
- August 2008
- July 2008
- June 2008
- May 2008
- April 2008
- March 2008
- February 2008
- January 2008
- December 2007
- November 2007
- October 2007
- September 2007
- August 2007
- July 2007
- June 2007
- May 2007
- April 2007
- March 2007
- January 2007
Categories
- About Me
- All That Scraps
- blogger challenge
- camera/photo play
- Cards
- Contests
- family stuff
- FOR SALE
- Home decor/3-D items
- How to FAKE it!
- Introduction
- JUGS Challenge
- JustRite Stampers
- Lizzie Anne Designs
- My family stuff
- My Stamping Space
- My Time Made Easy
- My Time To Color Challenge
- My Time to Create Challenge
- My Timeless Template Challenge
- My Timeless Templates
- Mytime Mail
- MYTIME MOVIE/VIDEOs
- Papertrey Newsletter
- Pink Cat Studio
- Pretty Palette Challenge
- Pretty Patterns Sketch
- Product Opinions and Must haves
- Recipe's
- Saturday Sketch
- Smilebox Creations
- Stampavie
- Tutorials
- Uncategorized
- videos
Most Popular
- Create your own Onesie Card Tutorial-and important NOTE! PLEASE READ (2529)
- Saturday Sketch-Boxed bag holder (2333)
- Going GREEN! Fancy Flower Flourish-Closure Video (1478)
- Fabulous Favorite - Giveaway! (1336)
- a Prayer Request (1231)
- QUICK-Easter Baskets from Nestabilities-PTI style-and blog challenge (1063)
- Teaser Sketch (999)
- February Release Giveway! (and a little peek) (996)
- Group Post and Rambling Rose Video Tutorial (985)
- GIVEAWAY! Who wants it all?! (895)
Recent Comments (RSS)
- 야동: Love to read it,Waiting For
- 야동: This seller is in a
- 바카라사이트: 여기 처음 왔어요. 나는이 게시판을
- 야동티비: I was surfing the Internet
- 바카라사이트: 비슷한 주제에 대한 흥미로운 정보를
- 바카라사이트: "여기에 제공해 주신 귀중한 정보와
- 온라인홀덤: 유익한 웹 사이트를 게시하는 데
- 홀덤나라: 나는 당신의 블로그를 정말 좋아합니다.
- lisa: Technology, too, has left an
- 주소모음: 흠 !! 이 블로그는 정말
Copyright © 2007 - My Time, My Creations, My Stampendence - is proudly powered by WordPress
This blog has been Tweaked and Designed by Sara Williams