Archive for the ‘My Time Made Easy’ Category
Welcome back everyone!
Today will wrap up the samples using our *NEW* products, but tomorrow we have another group post making new projects with older products. You won’t want to miss it!
Please stop by today and visit the following designers:
Today I have a quick and simple project to share and then I want to discuss the value in the actual products we provide. I still receive many questions, and while we have an about page on our site, sometimes it is easier to address some of the common information here, where people tend to find products and ideas.

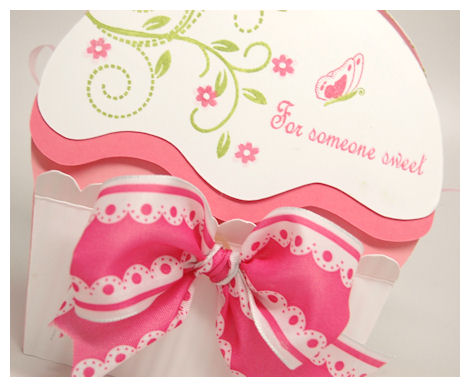
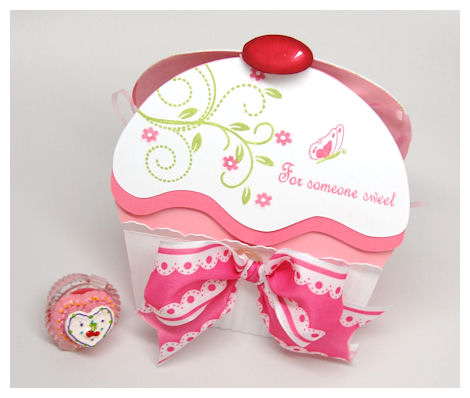
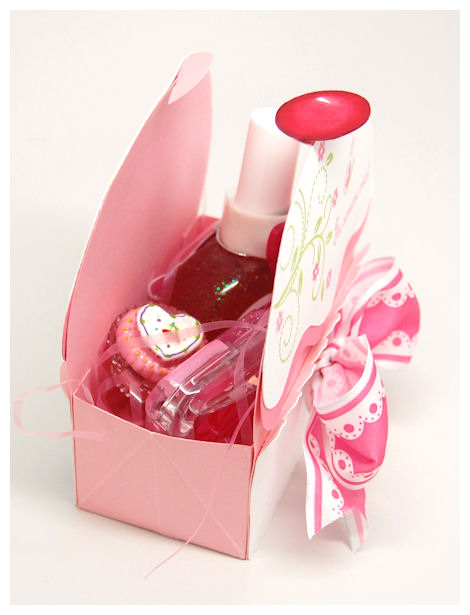
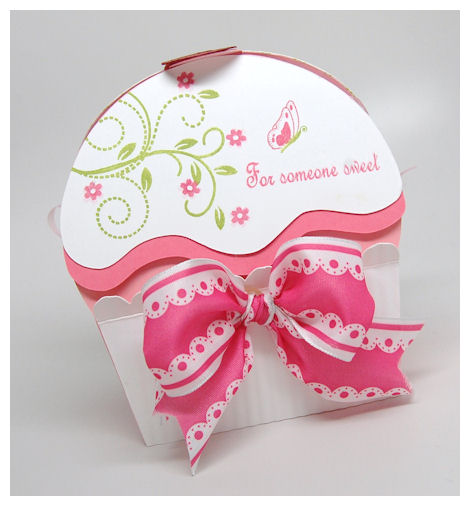
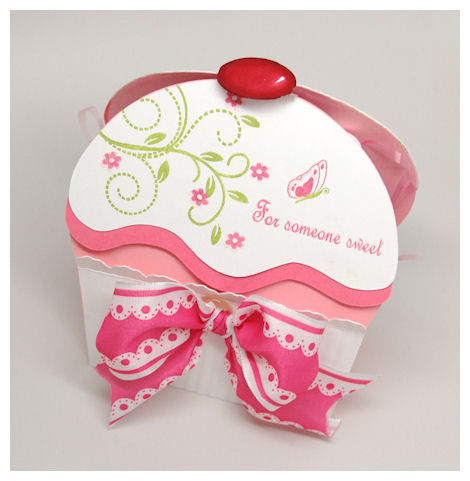
Here is a super simple project using the *NEW* Ribbon Card © cut file.
I personally have purchased several cardstock versions in the past, and they generally aren’t big enough, so I designed my own! I love that I can re-size it, and make them pretty by printing them in a patterned paper first, like I did here!
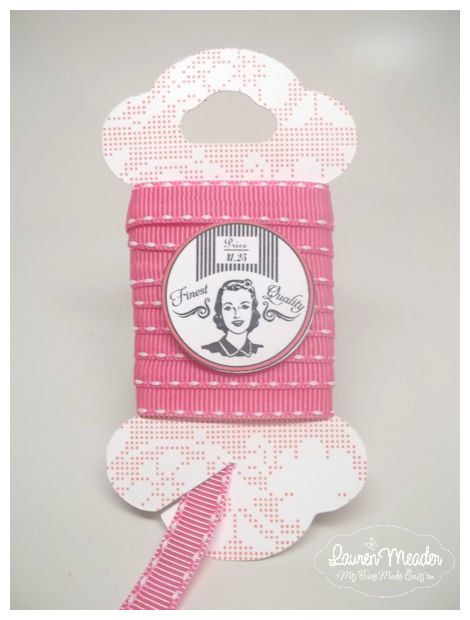
I used the lace pattern from Grammy’s Pretty Patterns © for my Ribbon Card ©, tghen wrapped my ribbon of choice around it. If you want to gift some ribbon or you sell it, this can be a great way to present it! I used some of the images from Grammy’s Sewing Kit © to simply embellish it.
ABOUT THE PRODUCTS
The best part about our products is the versatility. You can really take one product and use it over and over again, and each time it looks new! There is significant value in the fact you get unlimited use by ALL our products, and with them being a download, there is NO WAIT to receive them! You can begin creating your own projects instantly.
You don’t need much to get started. All you need is a home printer, and photo editing software. There is a link to FREE software on our website called GIMP. So no purchase neccessary!
We offer our cut files, and templates in a printer friendly version (PDF) but we also have formats that work with over 18 cutting systems on the market too! This allows you to quickly and easily resize your projects too! My personal favorite is the Silhouette Cameo. You can print your images onto your templates, and have it places exactly where you need it to be, you can cut out your digital images using your machine, and you can clip your digital papers to your projects too! SO MANY POSSIBILITES! Plus it is very user friendly 😀 Just my opinion.
There is innumerable value in our templates and cut files. For a one-time purchase you get unlimited use and endless possibilities. You can’t get a decent giftbag for that, let alone re-use it, and/or customize it!
Our Digital Images are fabulous because you can mix and match, make certain images or sentiments work together, whereas if they were acrylic they would be a fixed size! Now there are no limits! Use the dropper tool in your photo editing software and pick the colors up from your digital paper and you now have an EXACT match for your images, to your paper!
Our Digital Papers are fabulous because you can re-size them, re-color them (so they can suit any project, or occasion) and they never RUN OUT on you! I personally use to covet certain patterns for fear I would use it up! Not anymore.
If you are new to crafting or don’t feel like you have any good ideas we have a GALLERY for our store, in which you can view ideas in numerous way, including by specific products!
All our designers samples are in one place 24/7 so you don’t need to search around. This is an invaluable resource!
So please feel free to poke around
So we are at day 1 after our August Release, and as always we love to follow up our releases with several days of ideas for ways to use our new products! You can never get too many gift ideas or inspiration. We have developed a team of talented crafters who each have a unique style that is sure to get you motivated!!
So here is who you will want to visit today:
Well as you all have read this release is near and dear to my heart.
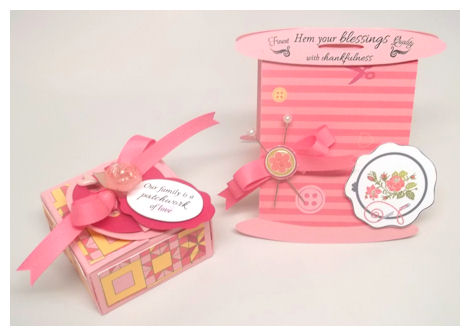
Between my design team and I we all agreed that in coordination with the templates we had we’d need to have a Ribbon Spool/Fabric Bolt shaped card, and a simple sweet, easy to assemble button box would be perfect. So here is my idea of the two, given as a gift!
Sewn with Love
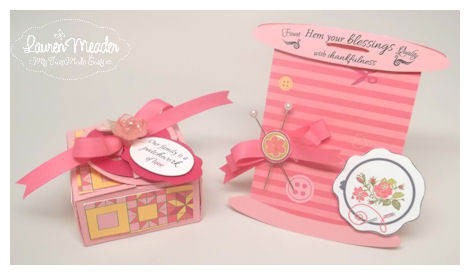
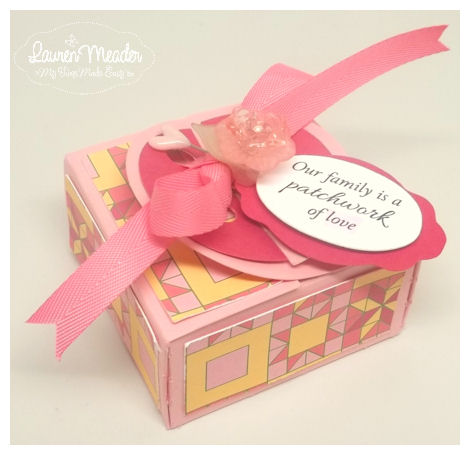
This gift set uses the *NEW* All Buttoned Up © box, and the Spool of Thread Card ©.
They are quite the perfect pair don’t you think?!
I used the Buttons-N-Bits © paper collection, and then Grammy’s Sewing Kit © to embellish both items.

For the box I cut it from a coordinating pink cardstock, then used the quilting patchwork pattern for the decorative layers.
On the top interlocking “button” closure I used a dark pink so it would really stand out.
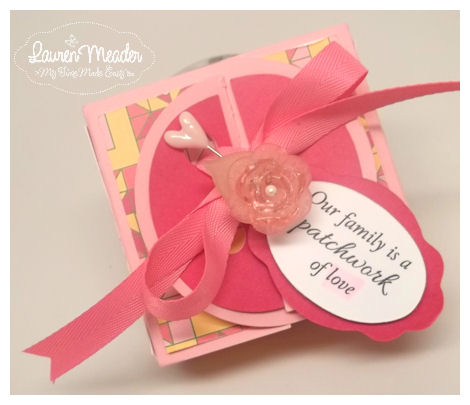
Note: you can choose to not use the button holes in this box for a round top closure instead!
My ribbon is strung through the button holes, and tied into a bow, which I accentuated with some acrylic flowers I bought in the jewelry section of a local craft store. I also added a heart topped stick pin.
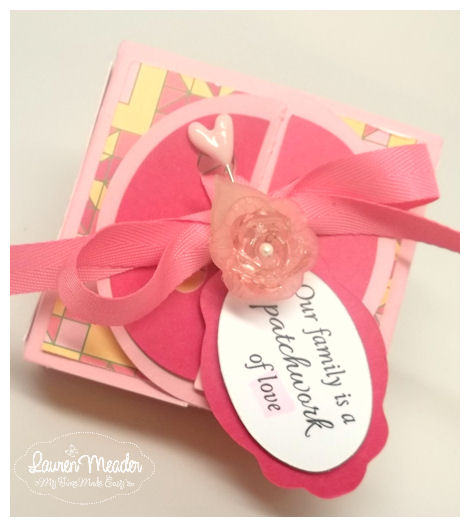
I printed my sentiment, which was perfect for my paper choice, from the Grammys Sewing Kit © , and cut it out using the Fine Finish © tag. I used a pale pink marker to highlight the word “love”.
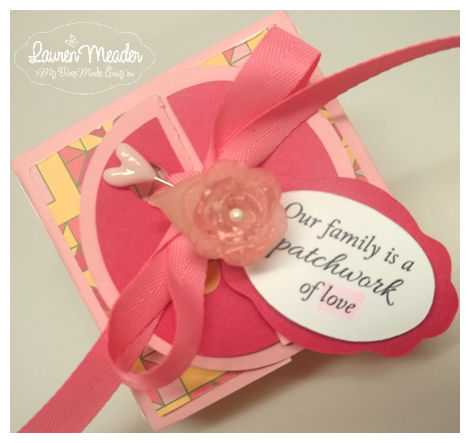
The tag is tied in with some embroidery floss.
Speaking of that, we now get to the card!
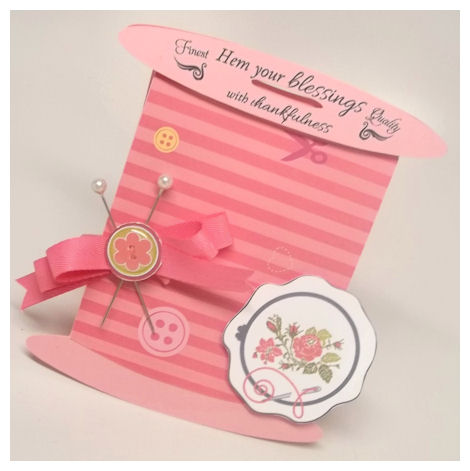
I love how this turned out. The pattern in the Buttons-N-Bits © paper collection makes this look like it is a spool of thread!! So that was EASY!! You can wrap real twine, embroidery floss, yarn, or ribbon around this too if you want. This can also be a bolt of fabric too 😀 So any pretty patterned paper would be perfect!
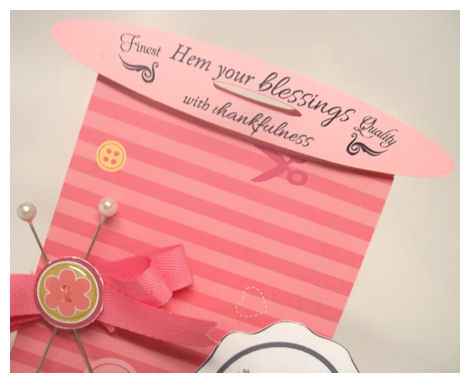
For the top of my spool I just took some of the sentiments from Grammy’s Sewing Kit © and printed then cut them out onto my spool top. My Cameo Silhouette makes that super easy for me 😀 I love how vintage spools of thread look, and while I’m not one who can go “all authentic “vintage” like many of my talented designers, I love that I was able to channel that here. No matter what your style you can make the products work for you!
Now towards the bottom…
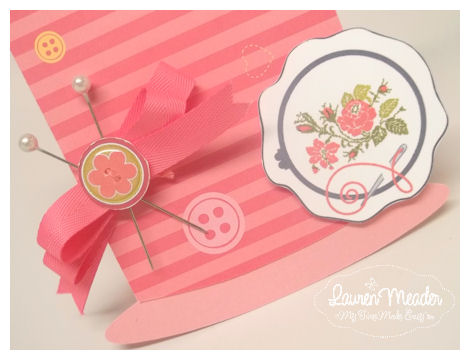
I used one of the buttons in the Grammy’s Sewing Kit © to create my own coordinating button. I added a page pebble over it to make it more 3 dimensional! Stuck in some pearl topped stick pins so it looked like they were stuck into the spool. The very first craft my Grammy taught me was cross stitch. I loved it!! I spent that Summer making several pillowcases. My mom has a similar rose patterned pillow case I made when I was like 8 years old, so the embroidery hoop, and cross stitched rose pattern was so important to me.
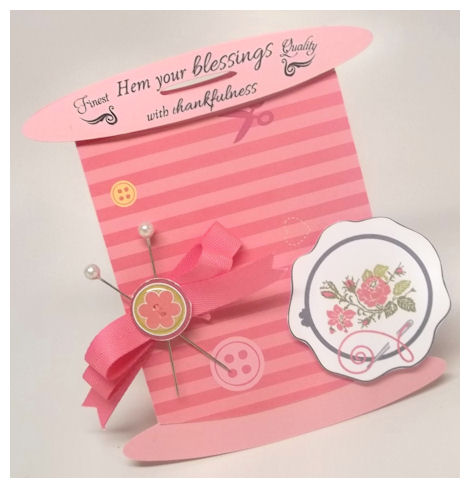
So I added the embroidery hoop, with the rose pattern, and the needle & thread to the hoop, and layered it onto my card.
That is one thing that I love about paper crafting! You can really create and customize gifts for anyone, and when they know you made it for them it is all that much more special.
As I said this release is a true tribute to my grandmother, who would have had a birthday this month. She taught me so much from a young age. I hope to pass that love onto my children, and hope that my work inspires them someday to eventually carry on what I teach them to their children’s children.
My grandmother and I didn’t just craft together, we built a strong bond and memories that will last a lifetime. I also learned an appreciation for people, as well as any artist who can tap into a creative part of their soul and share their heart through their work. Artist of all mediums are special people.
One thing I know is that my grandmother was so proud of me and where I have been able to take my love for crafting. I owe that to her.
Love you and miss you Grammy-May you finally be at peace.
It’s August 1st and that means all our NEW! Products are available for you to purchase! We have all had such a great time working with all the new products, and will continue to share samples through the next few days.
Be sure you check out our NEW! Products <—HERE!
We have released:
2 NEW! Pretty Packaging Templates
2 NEW! Pretty Impressions Stamp Set
3 NEW! Pretty Printable Digital Paper Collections
4 NEW! Pretty Pieces Cut Files
and an amazing Pretty Package Collection, where you save 25%!
Check out our NEW! Perfect Package Collections!
Please view our Gallery for project samples, and alternative ways to use all our amazing coordinating products!
You may also want to check out our blog for weekly challenges, and even more amazing ideas.
Today we have an amazing group post using our NEW! Products
As you may have come to know my company focuses on the “complete package”. We work hard to offer coordinating products that are easily interchanable with previously released products. We really enjoy being able to share the ideas and versatility each product holds.
That being said here is WHO you should visit today for some amazing projects:
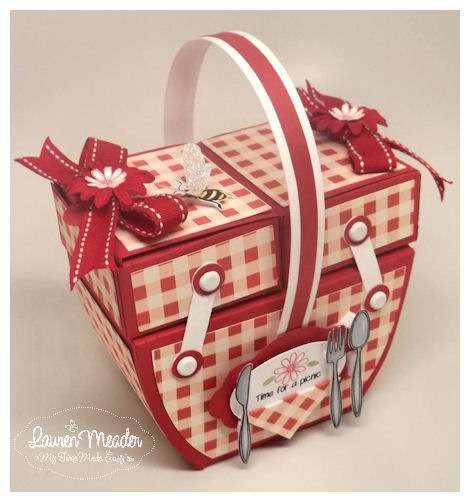
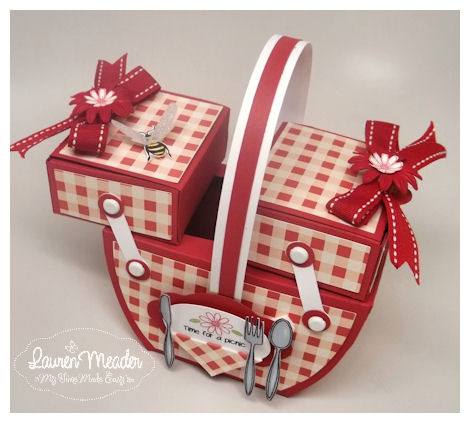
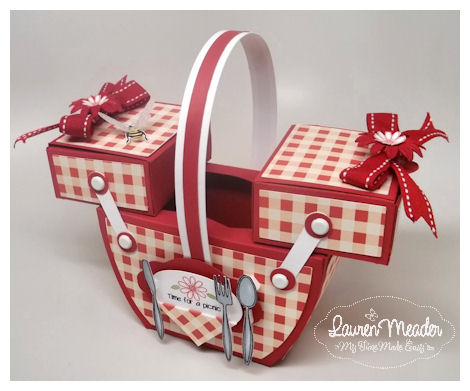
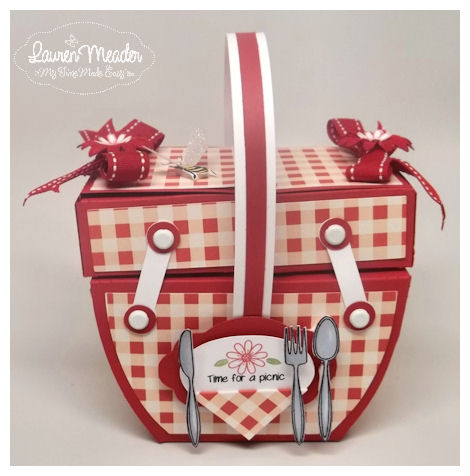
Upon creating the Grammy’s Sewing Kit ©, it was obvious that it could be a picnic basket! Another fun activity that I am so fond of 😀 I think you can really do so much between this template, and many of our Pretty Impressions Stamp Sets.
So with any Picnic, or outing you need 1) an invitation, and 2) a great centerpiece or favor!
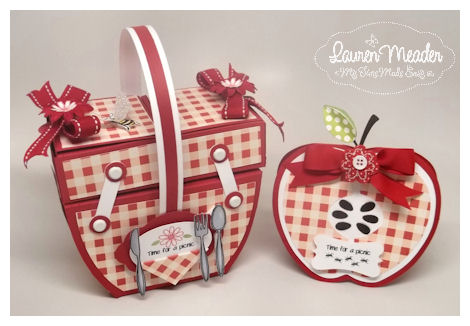
I love how this little set turned out.
So since it was a picnic, and I needed an invite, I created this super sweet Apple invitation using the *NEW* An Apple a Day Slice ©. I think it is adorable, and was perfect for the invite.
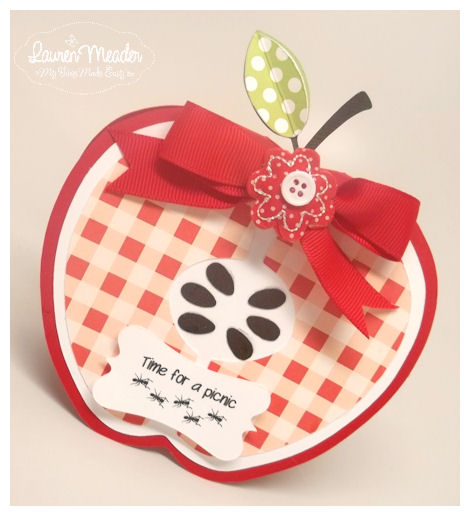
I cut my apple card in red, layered the large slice in white, then the slices in the red gingham pattern from the Picnic of Patterns © paper collection. My seeds and stem were cut from a chocolate cardstock, with my polka dot leaf print coming from the Grammy’s Pretty Patterns © paper collection. I then embellished it with a ribbon and fabric flower I had on hand.
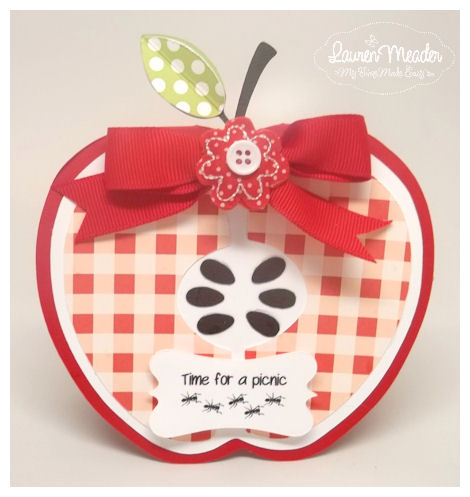
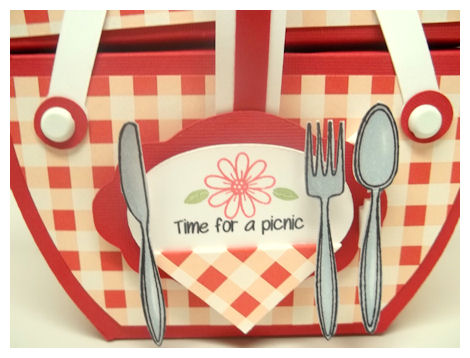
My sentiment “Time for a picnic” and the ants came from the *NEW* Tooty Fruity © set. The label it is printed on was cut from the Fine Finish © label cut file.

On the inside of the card I printed my Let’s Do Lunch! sentiment, with the gingham ribbon pattern from the Tooty Fruity © set, and my RSVP information was from the Happy Camping © set. I love mixing and matching stuff! So once it was printed, I cut the apple layer and placed it inside my card.
So for the actual picnic basket….


August Preview: Tooty Fruity
Jul 30, 2012 Author: mytime | Filed under: Cards, Home decor/3-D items, My Time Made EasyAre you ready for some more sizzling’ ideas from the team using our *NEW* Products?! I know I have been blown away by what they are sharing, and I think you will be too.
All our *NEW* products will be available for purchase on August 1st.
Today the team is sharing a peek at a fun and whimsical template that can be used all year long, as it truly is simply sweet!

Available in PDF, SVG, GSD, DXF, WPC
Completed Project Size:
6 Inches Long
3 Inches Tall
2 Inches Wide
How about a little SLICE of heaven?
Simply sweet and looks good enough to eat, this template is sure to be a hit all year long. Designed to look like a fruit wedge you can create your own fruit slice to look just like your very favorite fruit! Use this to package up fruit flavored, themed or scented items for every occasion from teas to candy.
Turn this sweet wedge into a orange, watermelon, lemon, lime, coconut, tomato, or even an apple whatever slice of happiness you can dream of!
You may also want to check out our amazing set of fruity images called Tooty Fruity, & the Well Preserved © sets, as well as our NEW! An Apple a Day Slice card cut file for a sweet accent to this template!
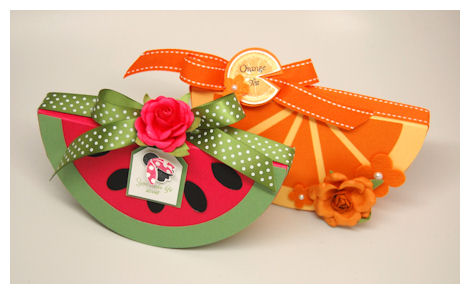
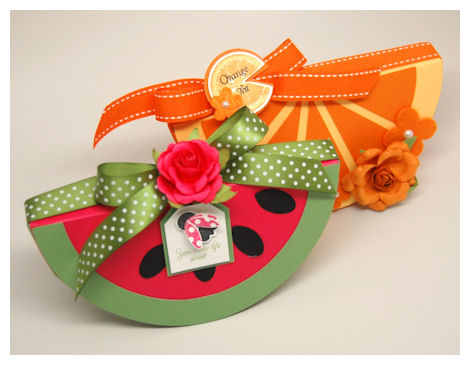
I had a blast making these two fruit wedges!
I give a ton for fruit themed gift items, so I am in heaven with this template 😀
First I will share the details on what I used the create the orange wedge!
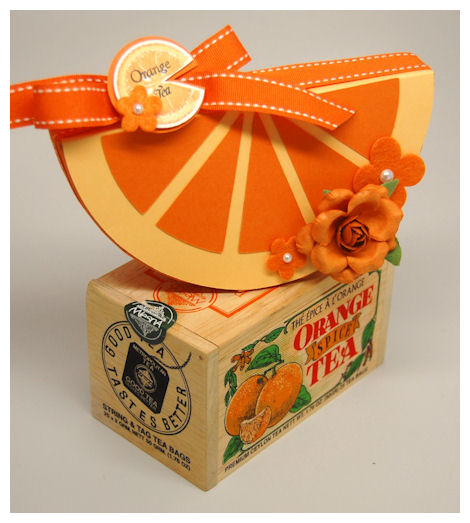
I love to give Orange Spice Tea, and sometimes I don’t have the time to create the Tea for You template, or I know my brother (or whomever) won’t display the Tea Tabbed Box, so I don’t want to spend any more time than neccassary ton package it up, yet I do want to make SOMETHING, so this was a fabulous option!
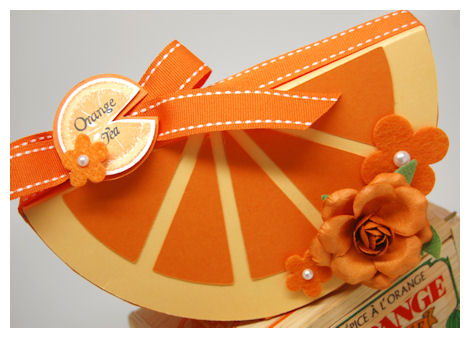
I simply layered the fruit slice(and “tea” sentiment) image from the A Spot of Tea © , with the combination of “orange” sentiment from the Well Preserved © set for my label. I then just cut it out, and layered it to the center of my ribbon along with some flowers I had in my craft stash!
This could be perfect for lemon tea too 😀

Simply sweet! You can see how this can easily be made into many of your favorite fruity wedges 😀
I wish I had the Tooty Fruity set when I was creating this, but sadly I didn’t.
Another personal fave, and a popular one at that is the watermelon!
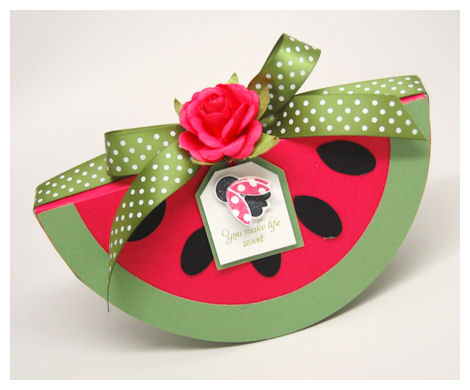
So instead of the fruit wedges I used the seeds in this template for this design.
So simple and easy.
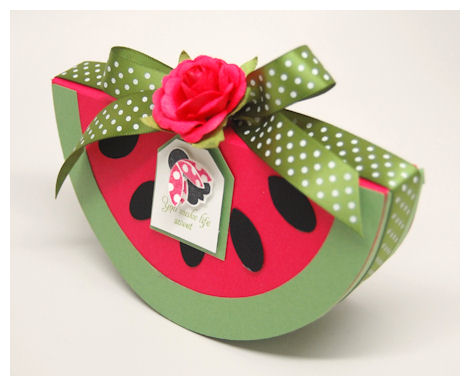
I created the box in the pink cardstock, then embellished the layers with the green for the “rind”. You could really get fancy and add the stripes for the rind, or used patterned papers, but I was thinking QUICK, and quick is definitely do-able with this one ♥
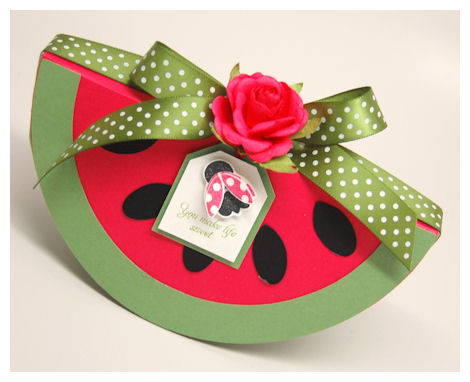
The tag has a cute lil’ ladybug from our Sensational Stems © set, which I made the wings 3 D. The sentiment “You make like sweet!” comes from the Well Preserved © set. I love that our sets are interchangable with our templates! It really adds to the versatiltiy 😀
Now don’t forget the BACK!
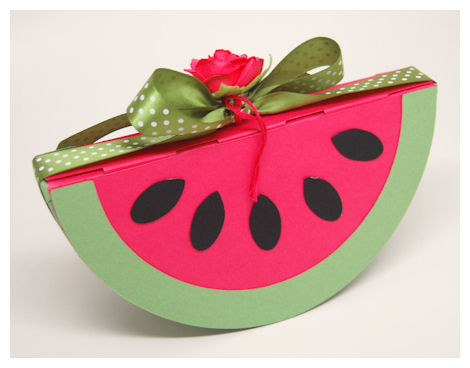
You always want to finish all sides of a Pretty Packaging Template! That is what kicks it up a notch from an amateur to professional look!!!
Thank you all for stopping by, and visiting our team. Tomorrow is Release Day so come back to see all our *NEW* products, and what we’ve made to further inspire you!
August Preview:Grammy’s Sewing Kit
Jul 29, 2012 Author: mytime | Filed under: Home decor/3-D items, My Time Made EasySummer is quickly passing as we are almost into August already. As August approaches, we get ready to celebrate yet another release! We have a plethora of amazing NEW! products to share so I hope you will keep checking back in as the week progresses.
Please visit our design team for your first peek at what is being released August 1st:
- Lauren Meader
- Debbie Marcinkiewicz
- Farida Rone
- Lisa Kind
- Tina Hale <—Welcome her to the team!
We have a new designer joining us-Tina Hale. Please welcome her to the team!
Have you ever wanted to be a part of the MTME team? We have several opening for our Pretty Palette and Pretty Pattern teams!
I am so excited to share the first Pretty Packaging Template with all of you, as it has been a design I have loved since I was about 7 years old. Back in March I lost my Grammy to Cancer. We were very close my entire life, until she moved to Kentucky when I was in my early 20’s. She was very into crafts of all kinds, and I credit her with the passion that has been instilled in me at such a young age, through her.
She will be greatly missed, and many of the items being released are a tribute to her and the memories I will cherish forever.
Available in PDF, SVG, GSD, DXF, WPC
Completed Project Size:
5 1/4 Inch Long
4 1/4 Inch Tall
3 Inches Wide
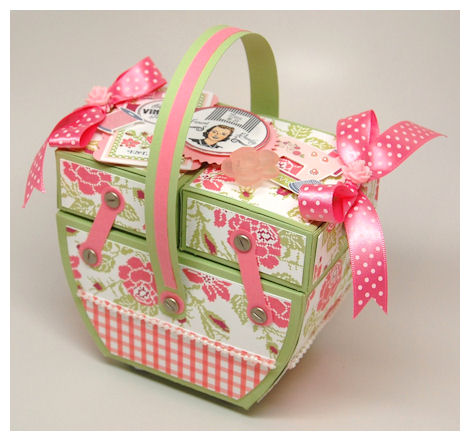
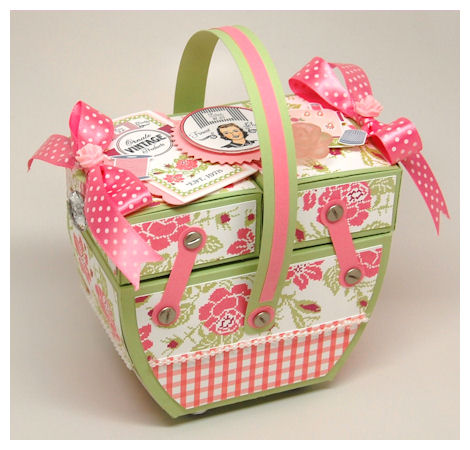
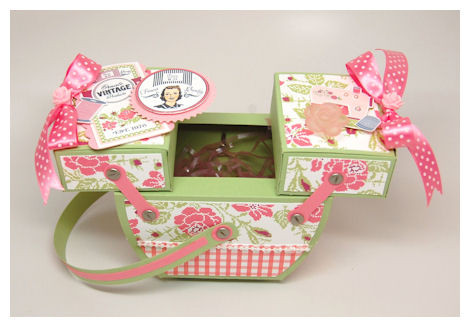
This templates was designed to replicate the cantilever sewing box given to me by my grandmother, when I was seven. The wooden box was so fun! I was in complete awe at how it opened, and all it held! Sadly I no longer have the box. Over time it had broken during one of our moves. Now I have this version that I consider a tribute to my dearest grandmother Shirley Anne, who I called Grammy. She taught me all about crafting and encouraged me to get creative by teaching me from a young age to sew, embroider, and quilt amongst many other things. I owe my creativeness to her. I enjoyed many long summers at her house, and numerous weekends with her as I grew up. This packaging template was designed in her memory as a way for me to remember her, and pass on the feeling of love and happiness that her sewing kit gave me through the years as I think of our time together.
Here are some photos to show you some details, and how this amazing box works!
I used the NEW! Grammy’s Pretty Patterns paper collection for the design on this box.
This is a set of 4 patterns that were inspired by colors and patterns in my grandmother’s apron and sewing box. You will fall in love with the stitched like patterns in the Stitched Garden, the Lace pattern. Having it be accompanied by the timeless accents of the gingham, and polka dot pattern also offered in this collection.
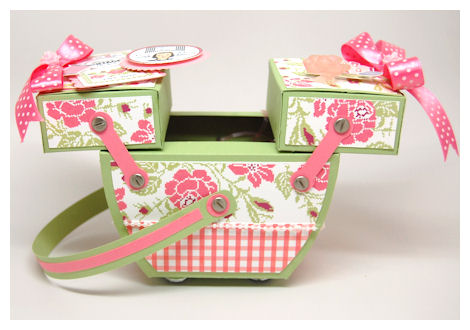
On the sides of the cantilever boxes I added a large bling embellishment to replicate the knob on the original, which was a spool rod to allow you to insert your thread, to be stored in the top side boxes.
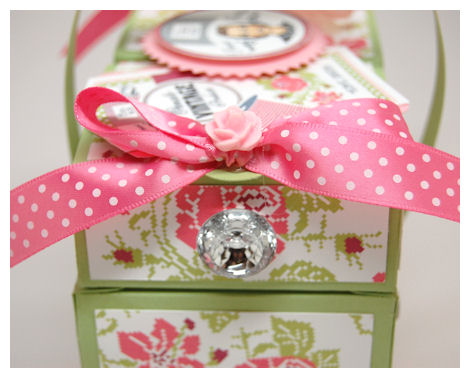
I also added some ribbon and an acrylic rose to futher accent the knobs. I think it is a nice touch that she would have loved! My grandmother’s favorite color was pink 😀
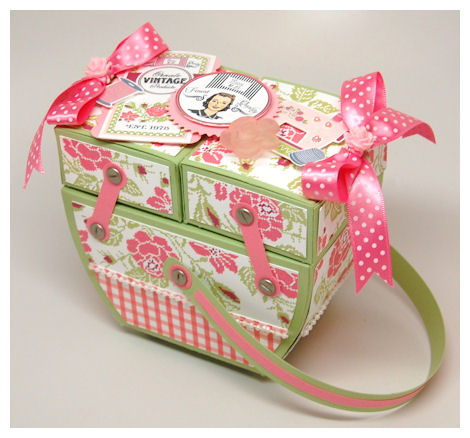
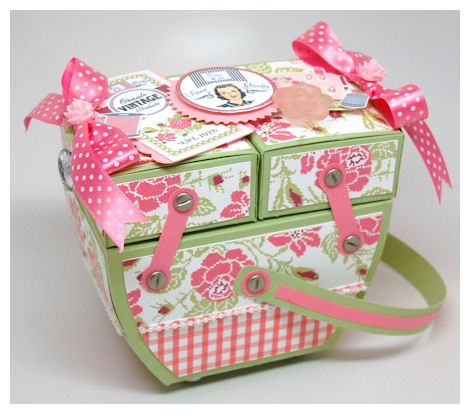
All the “joints” on this a movable! The handle is now down on the side so you can further view the details.
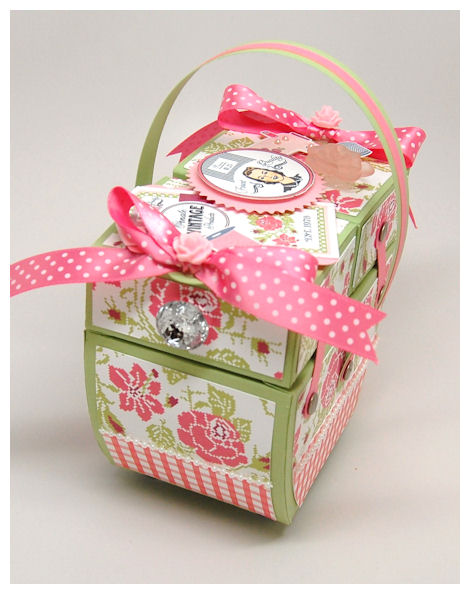
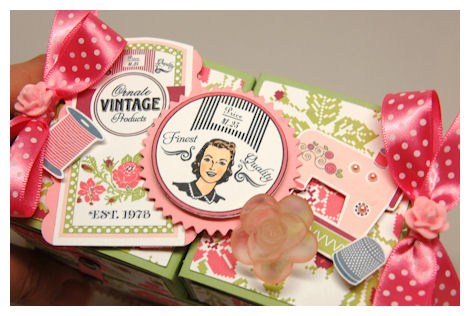
I really went all out on the top decor by using the images/sentiments for the NEW! Grammy’s Sewing Kit
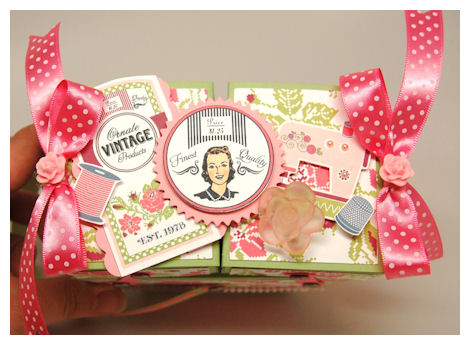
I used the spool of thread, the “pattern” element which I built up with other images to suit my project needs, the “Finest Quality” label, the sewing machine, and thimble.
You may also want to check out As you can see, our Grammy’s Sewing Kit Pretty Packaging Template, as it is the perfect product for this amazing set of images! We also have several coordinating cut files, such as the Ribbon Card, Spool of Ribbon and the All Buttoned Up box! In addition to all these coordinating products, we have a variety of Pretty Printables Digital Papers that are sure to accent your project perfectly!
I used some screw top brands for my joints to replicate the one’s on my original box, but you can use any style of brad you choose. I love the realistic look!
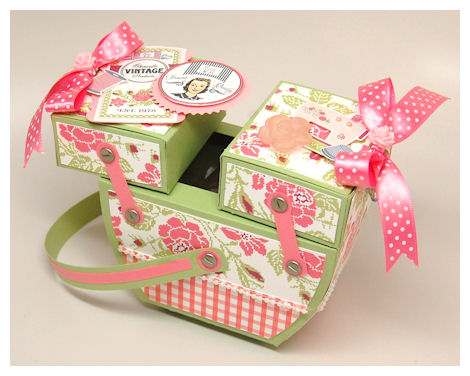
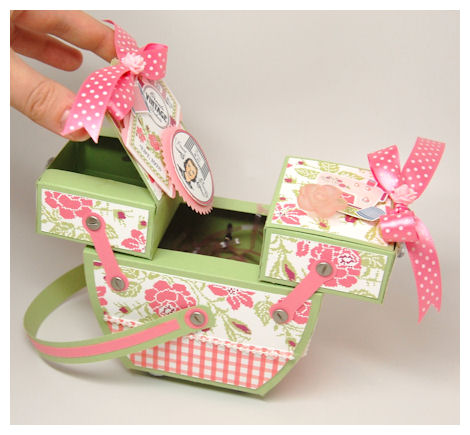
As mentioned above, the two boxes on the top of the main box slide open!
How fun is that? Now you have one large compartment, and 2 smaller compartments to gift a plethora of items in.
Obviously when gluing my top embellishments I took into consideration how the boxes slide open, so I adjusted how it was glued to allow for that, and not have it interfere with opening the template, smaller boxes, and putting gifts in either compartment.
There are these little tabs on the lid of the smaller boxes so you can easily open the flaps.
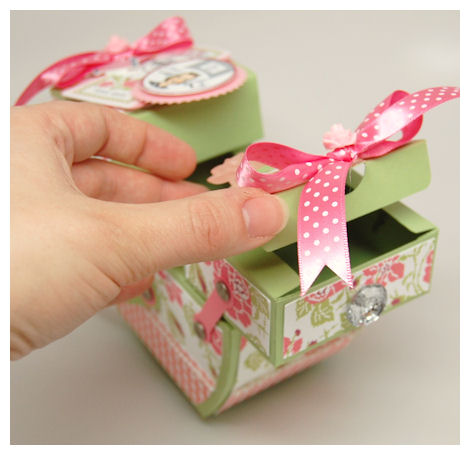
Easy peasy!
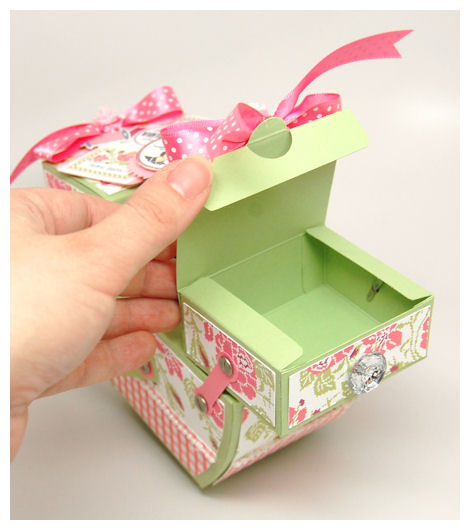
Now the bottom is also embellished! I used the same bling knobs to add to “feet” to the bottom.
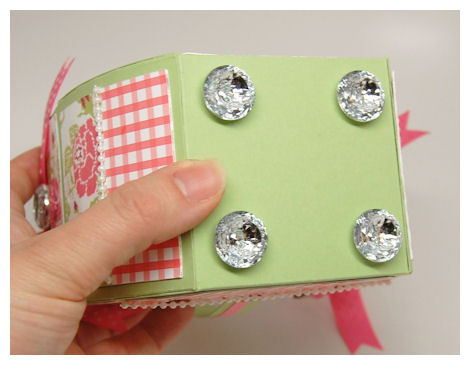
It is all about the details!

I used some bling, brads, pearl string, ribbon and acrylic flowers to accentuate the vintage feel.
You can find all sorts of cool supplies to further embellish this template in the wood section of a craft store too! They have spools, knobs, hinges….you get the idea!! Limitless possibilities!
This package is sure to bring on the same happiness I cherish now, as it gets created from cardstock and passed along from person to person. The top two boxes open, and slide over to the side to allow you access to the large rounded box. You can package up so many wonderful items in here for someone special to remember you by, and to enjoy!
This can also be used an a Picnic Basket, or a Tackle Box!
There is no limit to what this can be designed for 😀
Thank you for joining us for the first preview 😀 Be sure you visit the team because they too have some AMAZING ideas to share with our new products!
See you back here tomorrow!
(NOTE: This was a OLD post I found never published!)
Today I am featuring my samples using the NEW! On the Mark, which is a book marker cut file.
On the Mark $2.50
Available in PDF, SVG, GSD, DXF, WPC
On the Mark is a fabulous take on the good ole’ fashioned book mark!!
Its design allows you to easily “mark” your page, while you get the fun of creating a customized book marker for everyone who loved to read!
I made a book mark for each one of my children, using the NEW! On the Mark cut file.
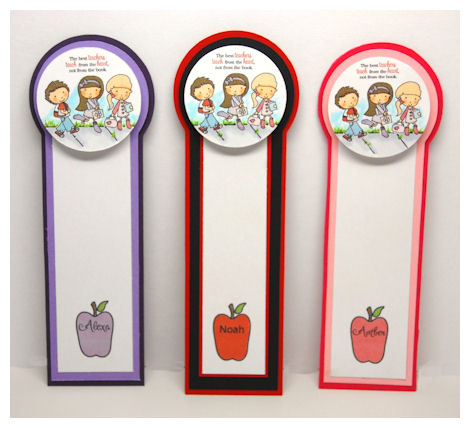
I think they turned out so cute!
Now they can keep track of their reading all Summer long. They each have to read daily for a half hour (at least) during the Summer so they keep up their reading skills. Each time they finish a book I let them go pick out another new one at the local library. It’s funny their favorit things are the non-fiction books. They like learning about catepilars, bees, sharks and other topics like that. They get a monthly subscription from National Geographic Kids, that my dad bought them for Christmas. They look forward to that coming every month!
This is Alexa’s 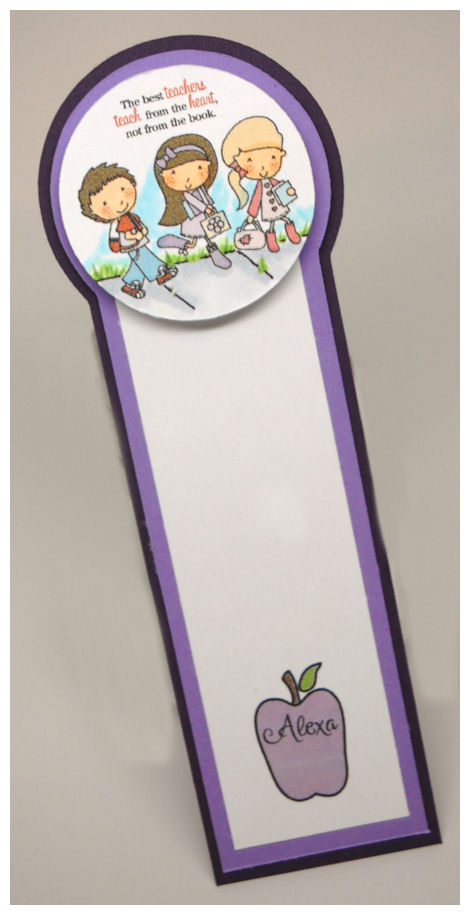 The maker was designed for the book lover in your life. It’s perfect for kids, and grown-ups alike. The rounded top tab has a slot so that it can attach to top top of your page, to keep your place.
So the orchid layer has the slit in it, and the decorative circle “covers” up the slit, so it looks pretty 😀
Just slip the page into the slit, and it holds snuggly in place.
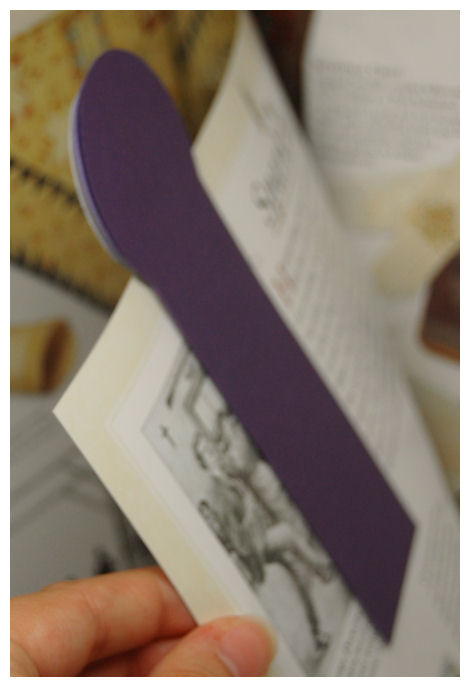
The perfect book mark!

The toppers were made using the Back to School set.
Here is Noah’s Marker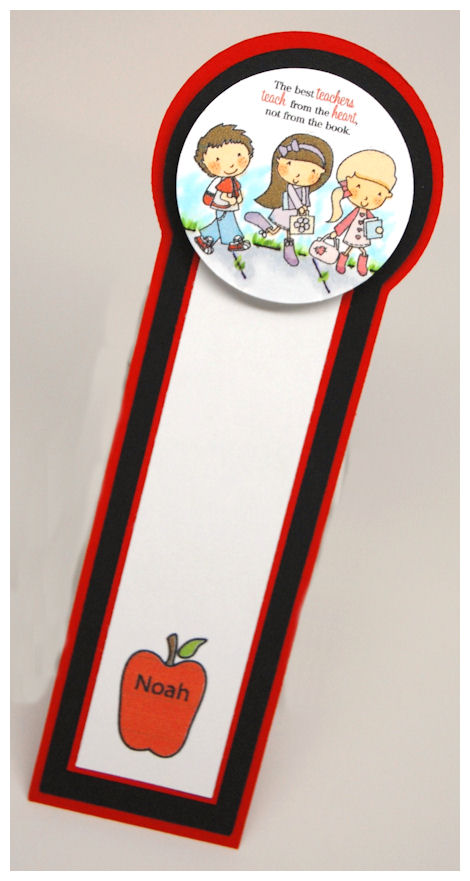
I digitally colored the kids, then hand colored the faces, drew in the sidewalk & grass on each. Cute eh?

This is Amber’s
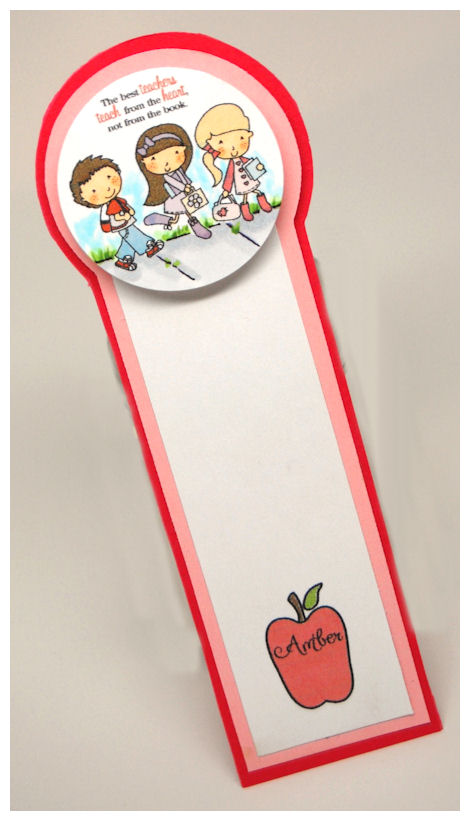
It’s great to be able to customize/personalize each one for the person you are gifting it to!
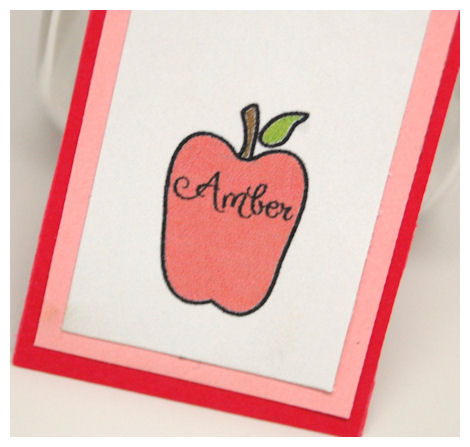
I went a little further with personalzing mine by using the apple image from the Back to School set, and adding their name to it.
Some gift ideas:
Let your children create their own, and keep track of all the books they read on the marker!
Give one with a gift card to your local/online book store for that special someone who loves to read.
Insert one into a new book as a gift
Gift one to all the school staff, like a reading teacher or librarian
Book Club members will love a handcrafted one!
OR…..add a candy cup to the top (filled of course) and give them out as party favors, or at Halloween!
A Year in Review: Red White & Blue
Jul 3, 2012 Author: mytime | Filed under: Home decor/3-D items, My Time Made EasyI hope you all have plans for a safe, happy and healthy holiday, and you get to celebrate our freedom with loved ones. Those of you serving our country, a huge heartfelt thank you for your continued service protecting our Country!
Today is also my grandfather’s birthday 😀 Happy Birthday Grandpa
It is our monthly Year in Review Group Post. Time to share something new with something old. To celebrate the holiday I asked the team to share some projects that are Red, White & Blue.
I actually have a totally different project I planned on sharing, as it is Christmas themed, but since it is 4th of July I felt this project was much more suitable! This is actually a project I made this time LAST YEAR, but forgot to share it! LOL!
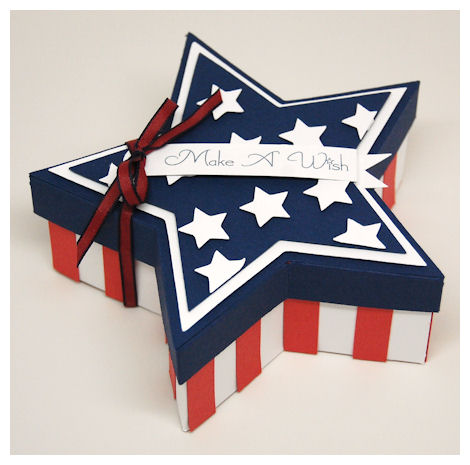
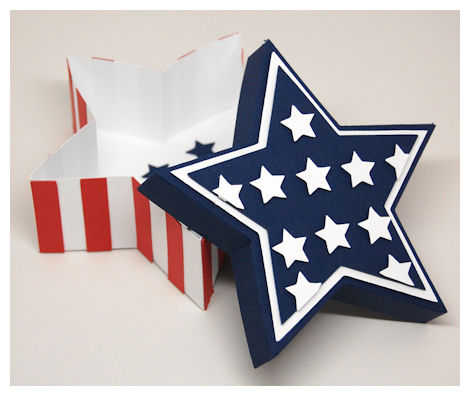
Stars & Stripes Flag
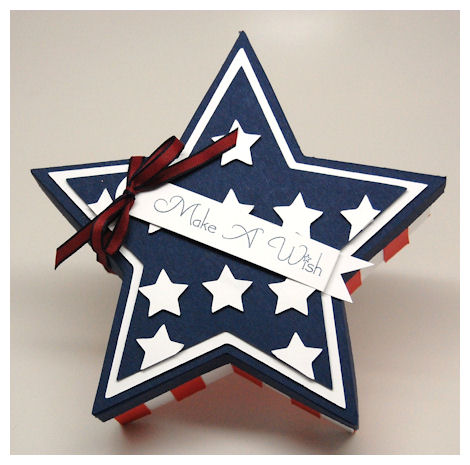
I made this star shaped, flag themed gift box using the Star of the Show © template for my grandfather.
Since his birthday is the 4th of July a patriotic themed gift is inevitable 😀
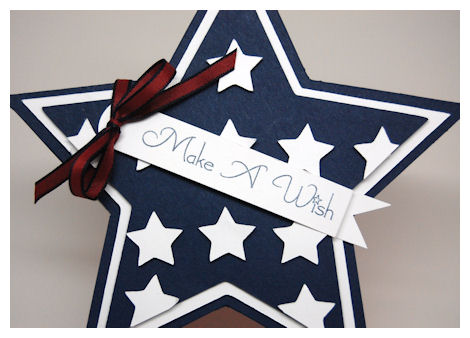
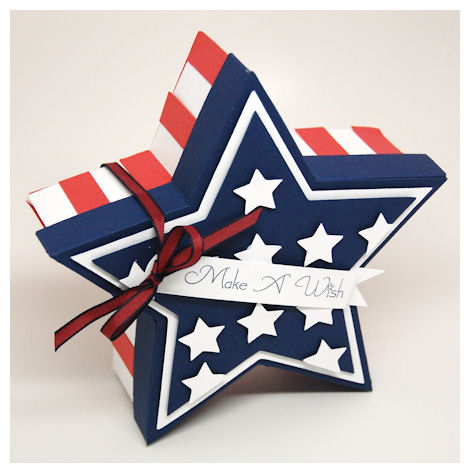
The sentiment was printed using the Rainbow of Wishes ©set.


For the New Nest (or arrival)
Jul 2, 2012 Author: mytime | Filed under: Cards, Home decor/3-D items, My Time Made EasyI cannot believe it is almost the 4th of July!
Feels like Summer is half over, yet we are just getting started. The weather here hasn’t exactly screamed Summer, but more maybe Spring. It IS getting warmer each day and I look forward to less rain and more SUN.
I’ve been so inspired by nature lately and am dying to share my project today. Before I do so, let me link our team members who also are excited to share projects today!
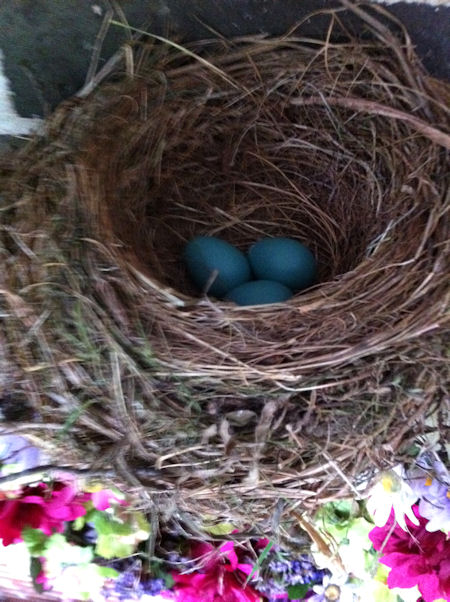
I was inspired by nature with my project today, as I’ve recently received an email from my brother, that had a photo of the wreath I had made for his Mother in Law. Making silk wreaths, and floral arrangements is a new passion of mine 😀 In the photo a robin had loved my wreath SO MUCH that it built a HUGE nest, right on top of it!
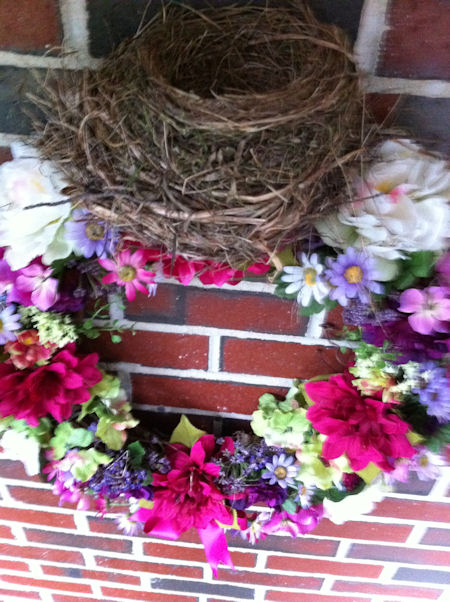
Inside the bird laid three eggs in there! How sweet 😀
I love the nest! I wish I would have it after, and use it in a large cage I just bought for decor in one of the rooms in my house. Not sur
Sadly I never got any really good photos of the wreath myself, so these will have to do!
So upon getting the email, I just had this nest on my brain! So between that, and having friends who just got married and are buying their first home, I thought it would be great to make a gift for “the new nest”.
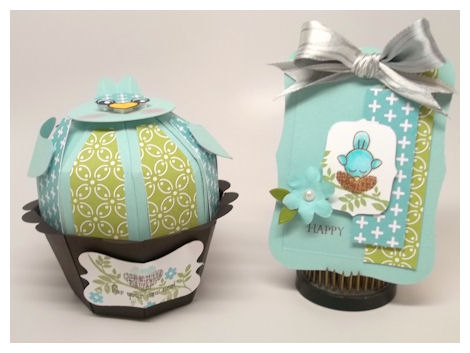
Here is my take on that idea, inspired by my wreath
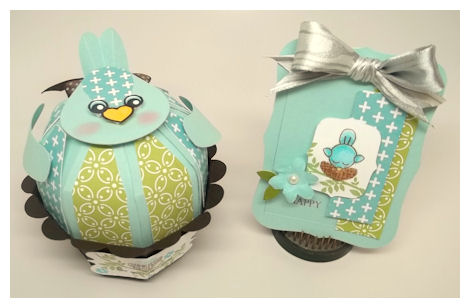
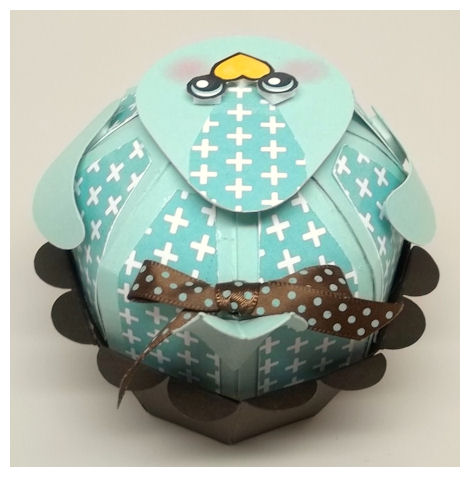
I used the NEW! Cuppy-Cake © Template for this gift to be made into a little blue bird, in a nest, and a coordinating card.

My Cuppy-Cake © template was a “cupcake” turned “bird in a nest” by simply using the Cute Lil Chick © cut file! It was quick and simple, and I thik we can all agree OH! SO CUTE!
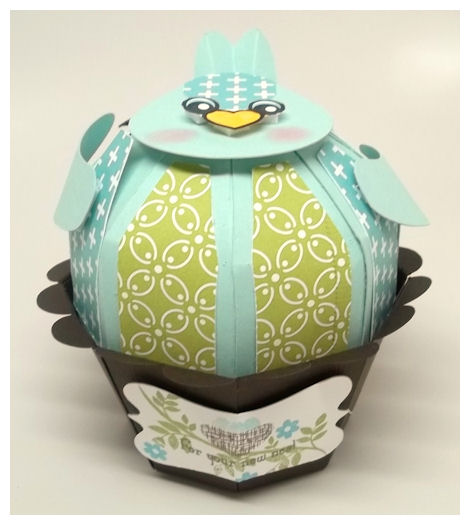
For the little bird body I cut my “cupcake” top from a pale aqua cardstock.
I then layered on the aqua pattern from the Vintage Flourishes – Bright © paper collecion, onto 6 of the panels for the body, and then the green pattern on two of the panels so it would look like the bird’s belly!
I added one of the aqua decorative panels from the Vintage Flourishes – Bright © paper collecion to the face, and trimmed the excess.
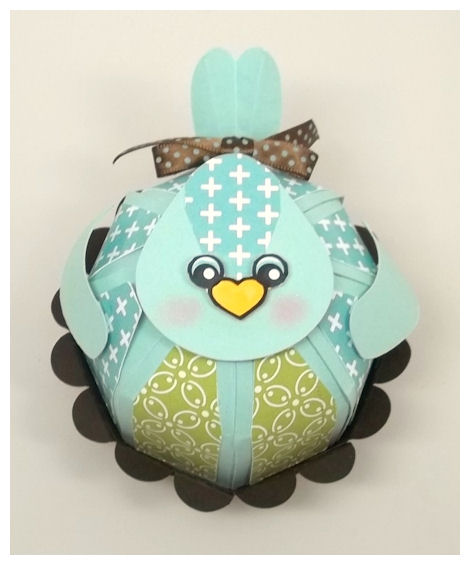
For the bird’s face I had used the “Belly” as the face, and just used the PDF version of the Cute Lil Chick © cut file for the eyes and beak! Sponge on some rosey cheeks.
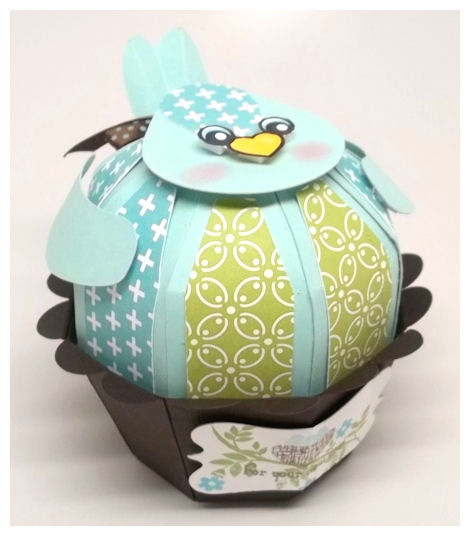
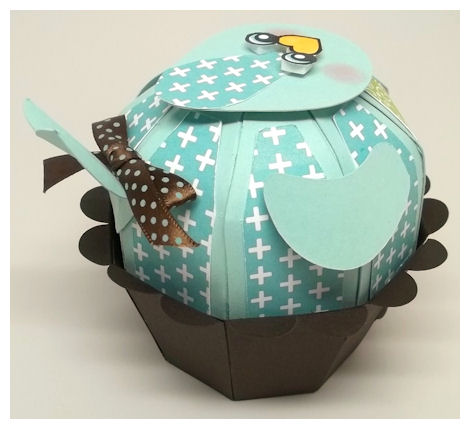
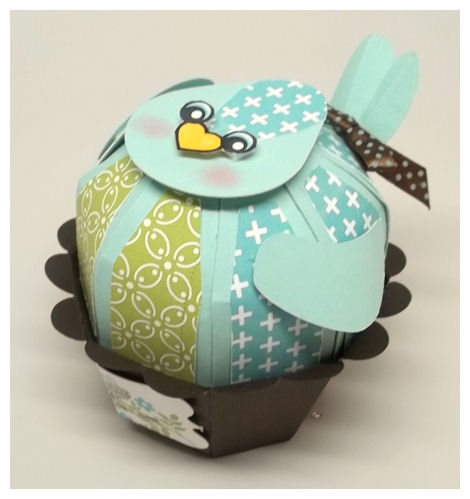
As you get to see a 360 degree view of this you will see that I then used the wing, and tail from the Cute Lil Chick © cut file to complete my little bird!

I cut the Cuppy-Cake © bottom (aka “the nest”) from a texturedchocolate cardstock .

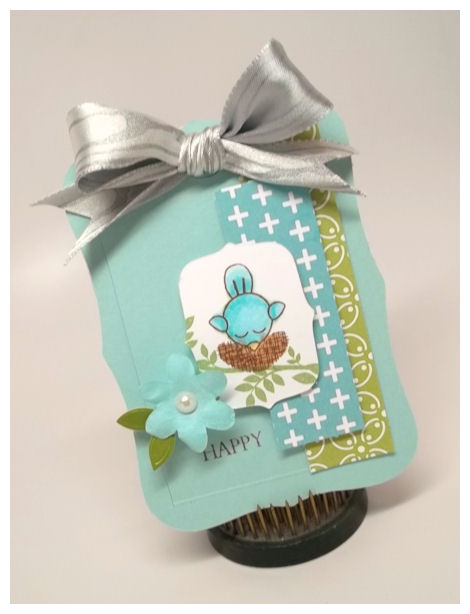
To accentuate the fact that this is a nest I created a tag using the Fine Finish © tag collection.
On the tag I stamped my nest (of course) branch, flowers and sentiment reading “For your new nest”, using the Singing Silhouette © set.
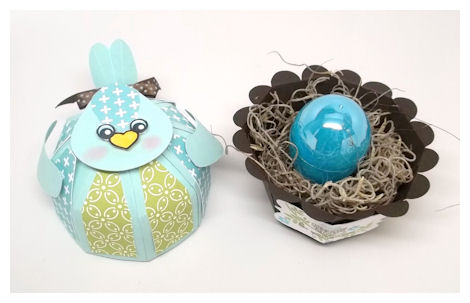
Now when you have a new home we all like to have a little “nest egg” in case of home repairs, or for that special something you may want for your new home.
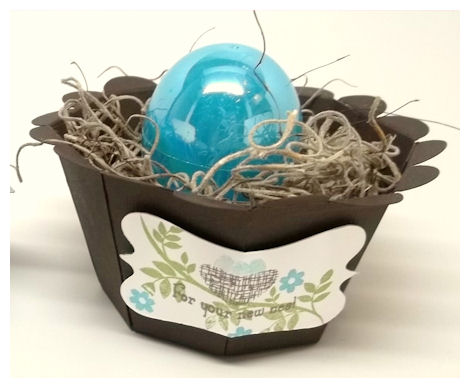
So going with that theme, Jay and I put some cash into a little egg, and placed it in the nest.
Well those ae the details on my little bird, now time for the card!
A Magical Birthday!
Jul 1, 2012 Author: mytime | Filed under: Cards, Home decor/3-D items, My Time Made EasyI hope you have been feeling those creative juices flow as the team and I have beensharing projects for our July Release. We still have several days left of inspiring gifts and ideas, so I hope you have a moment to check everyone’s projects today!
Stop by and pay a visit to:
I really enjoyed this release as many of these projects I had whipped up last minute. I had surgery some time ago and hadn’t created anything in months! Most of what you’ve seen for the last 3 months or so was designed well in advance.
It has been a very busy few months for me. I haven’t had time to keep up on my blog, sharing all my family life and happenings but trust me when I say it’s been NON-STOP!
Today’s share was a project I designed just yesterday! My first project getting back into the swing of things.
When the Magical Birthday Wishes © set was designed Sara had discussed wanting a Magician’s Hat template to go with it. I PROMISED her that I could EASILY turn the 3-Tier © template into one, in time for our release.
A Magical 8th Birthday!

This bunny is my gift, the “hat” is the gift “box” and there is a coordinating card to match!
I have to say I was quite excited by not only the Magical Birthday Wishes © set, but the coordinating paper (I used the Birthday Bonus Paper © and the Birthday Banner ©, Magical Birthday Numbers ©, Magical Birthday Wishes © cut files too! So much so, that I incorporated ALL OF IT, into ONE project with ease!
YOu too can get it all in the Magical Party Package!
My daughter Amber is turning 8 in August and I thought this would be a fun party theme for her as she loves magic!
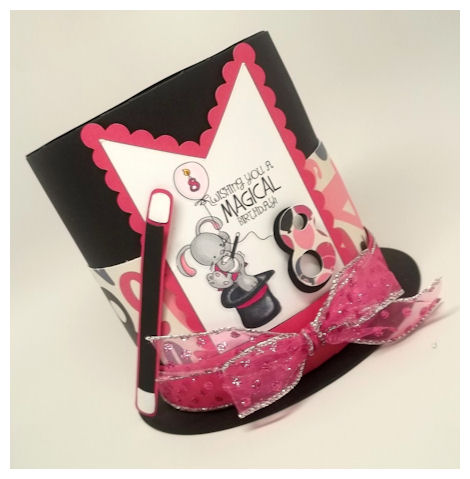
I used the “Large” box version of the 3-Tier © template to make hat. I just made the box sides taller (5 3/4 Inches High) to make it a HAT instead of a box/cake. SO the box is technically up-side-down.
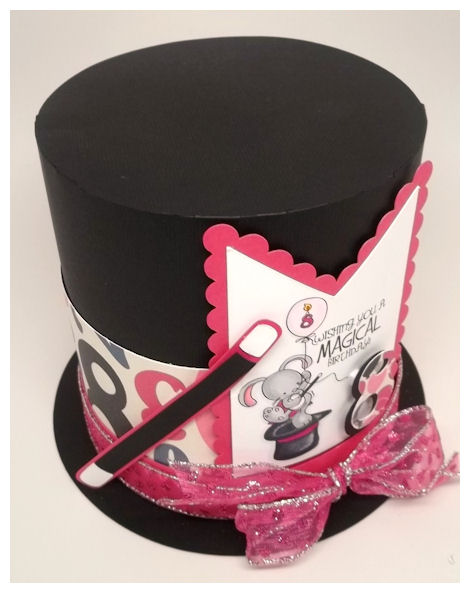
Around the base of the hat I used a re-colored version of the number pattern in the Birthday Bonus © paper collection from the Magical Party Package to wrap around the hat. Imade all the number 8’s black, so they stood out. That was too fun!
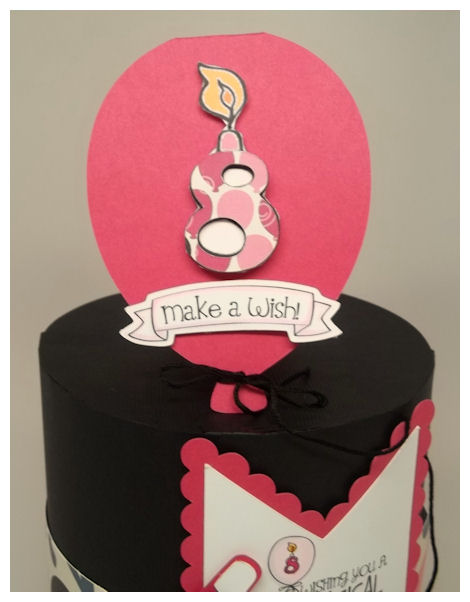
I was channeling the Mad Hatter from Alice in Wonderland when I went for the hat tag, which was created using the Birthday Banner ©. I knew it would be perfect for accenting my hat.
I love the Magical Birthday Wishes © set, and all the building possibilities it offers.I printed the adorable Bunny Magician from the Magical Birthday Wishes © set, and chose to use the round balloon from him to hang from.

On the balloon I layered the #8 candle image, and chose my “flame” too! I then colored it all in.
I really wanted to use the sentiment and I was able to fit it ALL on my Birthday Banner © hat tag due to the beauty of digital products! Since I was using digi images, and cut files I could re-size everything to suit my needs on my project! I love that that much versatility!
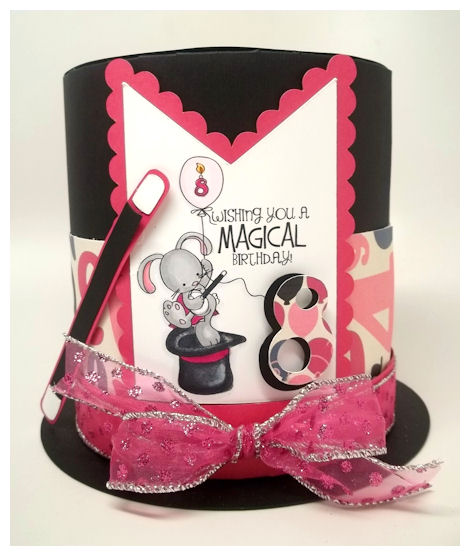
In addition to fitting all that on my tag I wanted to use the #8 from the Magical Birthday Numbers ©cut file. Again re-sizing I was able to cut the 8 from black cardstock first, then overlapping, I cut an 8 from the balloon pattern paper (re-colored) for some more color and interest. I love it.
Once my tag was added I also chose to use the Magic Wand from the Magical Birthday Wishes © cut file. It really made it a WOW!
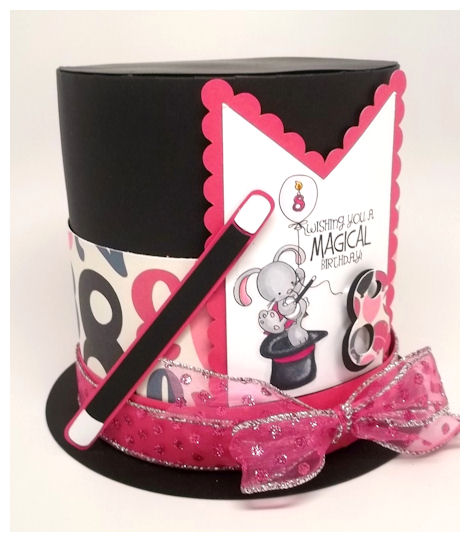
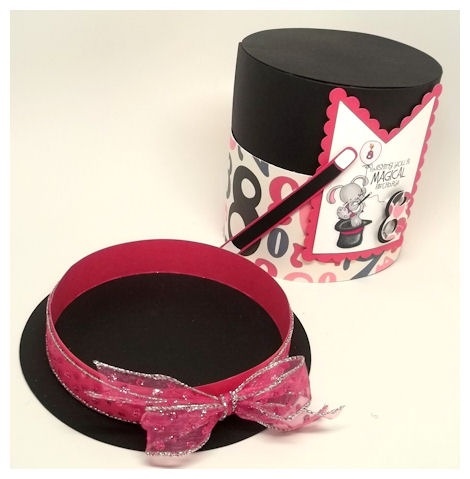
I used the top of the box as my box bottom instead, making the hat rim fuchsia, as enlarging the box bottom to be 6 1/4 inches around. So fun and easy.
I wrapped the hat rim with a glittery polka dot ribbon.
As you can see in the photos the template makes everything looked “finished”! The bottom of the box, and even the inside of the lid is clean and nicely detailed.
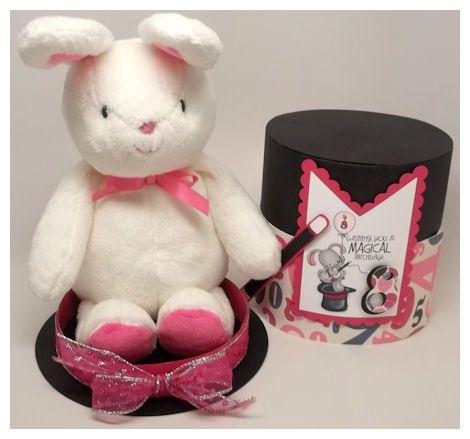
My sweet little bunny folds right up and fits into my Magician Hat perfectly!
Now for the card…
Given the image, that was easy peasy!
The card was made using the Magical Birthday Wishes © cut file. I just tied some embroidery floss around the balloon bottom to make it appear to be look like the balloon in the image.
I enlarged the 8 image and cut it out to put onto my balloon. I also loved the banner and sentiment, all from the Magical Birthday Wishes © set.
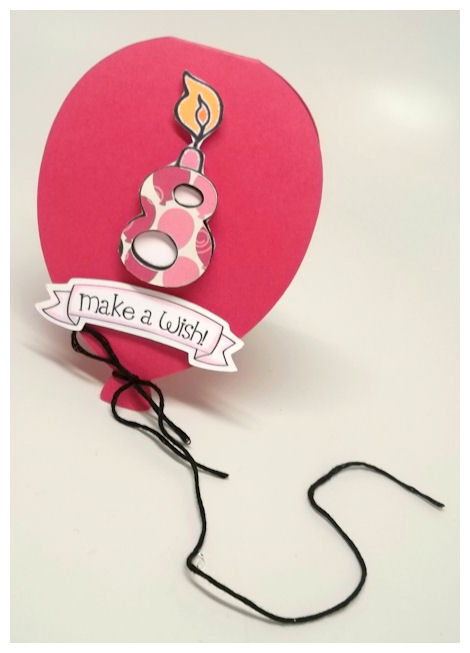
As you can see the 8 in the balloon on hat tag image, is the same image I chose to use for the card. I again used the #8 from the Magical Birthday Numbers ©cut file. Again re-sizing I was able to cut the 8 from the balloon pattern paper (re-colored) just like on my hat! I layered it over the 8 image.
You could also use this as a great invitation too!
Well as I have said before, with a little imagination and a speck of creativity you can get so much versatility from our products. I think today’s project proved that. The team and I are always here to share new ways to use our products, so if you fall short on creative ideas you can always find some inspiration from us!
Our GALLERY is full of ideas so use it as a resource if you ever get “stuck”!
Join us for more tomorrow 😀
July Release: Birthday Bash
Jun 30, 2012 Author: mytime | Filed under: Cards, Home decor/3-D items, My Time Made Easy
It’s July 1st and that means all our NEW! Products are available for you to purchase!
Our theme this month is BIRTHDAY, or any celebration really 😀
Be sure you check out our NEW! Products <—HERE!
We have released:
4 NEW! Pretty Packaging Templates
1 NEW! Pretty Impressions Stamp Set
3 NEW! Pretty Printable Digital Paper Collections
4 NEW! Pretty Pieces Cut Files
Check out our
NEW! Perfect Package Collections!
Please view our Gallery for project samples, and alternative ways to use all our amazing coordinating products!
You may also want to check out our blog for weekly challenges, and even more amazing ideas.
Today we have an amazing group post using our NEW! Products
As you may have come to know my company focuses on the “complete package”. We work hard to offer coordinating products that are easily interchanable with previously released products. We really enjoy being able to share the ideas and versatility each product holds.
That being said here is WHO you should visit today for some amazing projects:
3 Tier
Cuppy Cake
Lil’ Cupcake
Since our theme is Birthday Bash, I get to share my idea of a super sweet birthday party favor for any age!
For someone sweet!
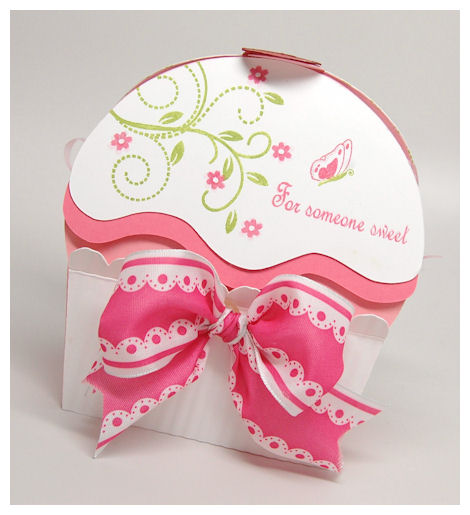
Sweet indeed. I created this cute cupcake party favor for an upcoming birthday I was asked to make favors for.
These cupcake favors are for a 8 year olds party, and they are actually decorating 2 cupcakes as part of the party activity. After they are decorated they will eat one, then bring the other home (if it makes it!) in a coordinating Cuppy Cake box, that I will design to match 😀 I haven’t got that far yet!
How seriously cute would these cupcake themed favor boxy-bags be, when used for a party rather than the standard goodie bag?
I cut my template from a pink cardstock and then made my frosting layers.
You can customize each one in a different color, and design it to suit the guest too!
The white layer is stamped using our vines from Fanciful Flourishes © , flowers from Singing Silhouette © , and the sentiment from On Display 1 © . My cupckae liner was cut and then crimped using my paper crimper, for a realistic effect 😀
Lil’ Cupcake $5
Available in PDF, SVG, GSD, DXF, WPC
Completed Project Size:
5 Inches Tall
3 1/2 Inches Wide
2 1/2 Inches Deep
The top closure comes together to create a “cherry” closure! The perfect topping for *any* cupcake! You can use the cardstock piece or use a button, large brad or maybe some BLING!
In here I will be packaging some cupcake themed lipgloss, scented glittery lotion, and cupcake themed makeup all from the $1 bin at various stores.
Supplies from My Time Made Easy ™ LLC
Lil’ Cupcake
Fanciful Flourishes, Tending the Garden, Singing Silhoutte, On Display 1
So there you have it! A super sweet party treat for any age 😀
Come back tomorrow for more ideas.
My Etsy

Who I Designed For
Blogroll
- Alicia
- Alli Miles
- Ally Blankenship
- Amber
- Andi @ crafts on a whim
- Angel R
- Angie Z
- Anne Kranitz
- Becky O
- Bee
- Beth Silaka
- Bethany Paull
- Beverly Nash
- Bobbie
- Cambria
- Cammie
- Card of the Week
- Card Positioning System (CPS)
- Cards for Cancer
- Catherine Doucette
- Charmaine
- Cheryl Sims
- Chriss Rollins
- Christina
- Christine Ewing
- Christine Wooden
- Colleen Schaan
- Craft Critique
- Craft Gossip
- Crystal
- Dawn Easton
- Emily Giovanni
- Geny
- Holly
- Igne Groot
- Inspirational Craft Blogs
- Irene
- Jami Sibley
- Jeanne Streiff
- Jen del Muro
- Jeni Bond
- JenMarie
- Jenn Balcer
- Jenn Diercks
- Jenn O
- Jennifer E
- Jennifer Mick
- Jennifer Pereda
- Jennifer-Sweet Treat
- Joanne Basile
- Jodi Collins
- Julia Stainton
- Julie Masse
- Karen
- Kathryn Berthiaume
- Katie Cotton
- Kelley Holland
- Kendra
- Kim Scholfield
- Kris’s Color Stripes! Get inspired here
- Kristen Dubosque
- Kristin Eberline
- Kristine
- Laura @ Sunshine Stamper
- Laura Turnmire
- Laurie Schmidlin
- Lesa Rapp
- Linda Duke
- Linda-LSN
- Lindsey Botkin
- Lisa (lakind scs)
- Lisa Kind
- Lori Craig
- Maggie
- Mara Campbell
- Maria
- Maria Levine
- Mary
- MaryJo
- Melanie M
- Monique Hansen
- Moxie Fab World
- Pam Imholz
- PaperCrafts Connection
- Peppers and Pollywogs Kids party site
- Rebecca Grohall
- Rita
- Robyn
- Rose Ann
- Sarah Vrolyk
- Sharon Harnist
- Sharon Johnson
- Sharon Rivera (a chemisrty with paper)
- Sherrie
- Sophia Landry
- Storage Units, Ink, & More Blog
- Sue Berker
- Susan (Rainy)
- Tangii Crane
- Tracy
- Tricia Traxler
- Trudee
- Velta
- VivLyn
- Zena
MTME Pretty Palette Color Team
MTME Pretty Patterns Sketch Team
My Time Made Easy TM LLC
Shop till you drop!
Lauren Meader
About Me
Copyrighted material
Subscribe To My Blog
Pages
- About me
- Alexa’s Story!
- My Crafty Corner!
- My Time Made Easy™ LLC
- Our Make A Wish Trip to Disney!
- Resume/Publication List
Calendar
| M | T | W | T | F | S | S |
|---|---|---|---|---|---|---|
| 1 | 2 | 3 | 4 | 5 | 6 | 7 |
| 8 | 9 | 10 | 11 | 12 | 13 | 14 |
| 15 | 16 | 17 | 18 | 19 | 20 | 21 |
| 22 | 23 | 24 | 25 | 26 | 27 | 28 |
| 29 | 30 | |||||
Archives
- August 2013
- July 2013
- June 2013
- May 2013
- April 2013
- March 2013
- February 2013
- January 2013
- December 2012
- November 2012
- October 2012
- September 2012
- August 2012
- July 2012
- June 2012
- May 2012
- April 2012
- March 2012
- February 2012
- January 2012
- December 2011
- November 2011
- October 2011
- September 2011
- August 2011
- July 2011
- June 2011
- May 2011
- April 2011
- March 2011
- February 2011
- January 2011
- December 2010
- November 2010
- October 2010
- September 2010
- August 2010
- July 2010
- June 2010
- May 2010
- April 2010
- March 2010
- February 2010
- January 2010
- December 2009
- November 2009
- October 2009
- September 2009
- August 2009
- July 2009
- June 2009
- May 2009
- April 2009
- March 2009
- February 2009
- January 2009
- December 2008
- November 2008
- October 2008
- September 2008
- August 2008
- July 2008
- June 2008
- May 2008
- April 2008
- March 2008
- February 2008
- January 2008
- December 2007
- November 2007
- October 2007
- September 2007
- August 2007
- July 2007
- June 2007
- May 2007
- April 2007
- March 2007
- January 2007
Categories
- About Me
- All That Scraps
- blogger challenge
- camera/photo play
- Cards
- Contests
- family stuff
- FOR SALE
- Home decor/3-D items
- How to FAKE it!
- Introduction
- JUGS Challenge
- JustRite Stampers
- Lizzie Anne Designs
- My family stuff
- My Stamping Space
- My Time Made Easy
- My Time To Color Challenge
- My Time to Create Challenge
- My Timeless Template Challenge
- My Timeless Templates
- Mytime Mail
- MYTIME MOVIE/VIDEOs
- Papertrey Newsletter
- Pink Cat Studio
- Pretty Palette Challenge
- Pretty Patterns Sketch
- Product Opinions and Must haves
- Recipe's
- Saturday Sketch
- Smilebox Creations
- Stampavie
- Tutorials
- Uncategorized
- videos
Most Popular
- Create your own Onesie Card Tutorial-and important NOTE! PLEASE READ (2529)
- Saturday Sketch-Boxed bag holder (2333)
- Going GREEN! Fancy Flower Flourish-Closure Video (1478)
- Fabulous Favorite - Giveaway! (1336)
- a Prayer Request (1232)
- QUICK-Easter Baskets from Nestabilities-PTI style-and blog challenge (1063)
- Teaser Sketch (999)
- February Release Giveway! (and a little peek) (996)
- Group Post and Rambling Rose Video Tutorial (985)
- GIVEAWAY! Who wants it all?! (895)
Recent Comments (RSS)
- 첫충사이트: 완전히 흥미로운 블로그 게시입니다. 저는
- sarah: Wow, Lauren, what a stunning
- hedie: خرید راهبند
- 야동: Love to read it,Waiting For
- 야동: This seller is in a
- 바카라사이트: 여기 처음 왔어요. 나는이 게시판을
- 야동티비: I was surfing the Internet
- 바카라사이트: 비슷한 주제에 대한 흥미로운 정보를
- 바카라사이트: "여기에 제공해 주신 귀중한 정보와
- 온라인홀덤: 유익한 웹 사이트를 게시하는 데
Copyright © 2007 - My Time, My Creations, My Stampendence - is proudly powered by WordPress
This blog has been Tweaked and Designed by Sara Williams