Archive for the ‘My Time Made Easy’ Category
Perfect Peeks Day #1 & a Giveaway!
Apr 27, 2010 Author: mytime | Filed under: Contests, Home decor/3-D items, My Time Made EasyHi everyone! Grab your coffee because I have a TON to share today, and all of it worthy of a good read!
Thank you to all of your for the kinds words and emails about my sharing of my mother’s story. As I said it was so difficult to do, but it has proven to be a positive thing to have shared with others. Quite honestly it was a little rough for my mother, and emotionally set her back a bit, reliving some of what has gone on. Many of you have been able to relate, have been there, or know someone else who has been there or is there. So thank you for allowing me to open up and hopefully help someone else.
Catherine Doucette and I are working on a special stamp set for victims of abuse! I’ll keep you posted! We want some proceeds to go towards the special cause 😀 Details will follow.
Now I need to get back to business!
Time for the May Release at My Time Made Easy ™ LLC
I’ve been crazy busy trying to balance my family and work (as you can imagine-and NOTHING went well this month! LOL! Go figure). I think I did a good job somehow pulling it all together, so I hope you all enjoy what I have in store the next 2 weeks!! I was going to get it done if it killed me 😀
Today is day #1 of our release peeks! Our actual release is May 1st.
I am sad to say that Mona Pendleton will be leaving our team after this month. Be sure to wish her well in her endeavors. I wish her the best! She has a full plate, and is focusing her talents elsewhere. While we were miss her, and her very talented hubby Scott (who has helped me on many occasions), I am very happy to say that Silke Ledlow will be joining our amazingly talented line up of fabulous designers! Be sure you check her out! She will begin next month!
Now time for some of our FIRST peeks of what is to come!
As you know the end of the school year is approaching, and it is just about that time to start thinking TEACHER gifts! I hope this release inspires you to get REALLY creative in your end of the year gifts this time! (and even if you don’t have children, you just might still fall in love-and we have some other REALLY cool stuff, so don’t miss it!)
All of us will be sharing samples using the Pretty Packaging © template Boxed Lunch! as well as our coordinating Pretty Impressions © stamp sets: Lunch Box Love Notes © and Additions set
First up with some YUM-azing card creations is Geny Cassady, and Dawn Easton!!! They are both going to WOW! you, I swear it.
Now making her first debut project for the MTME team is Lesa Rapp!
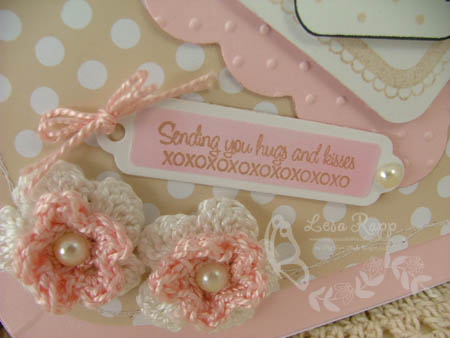
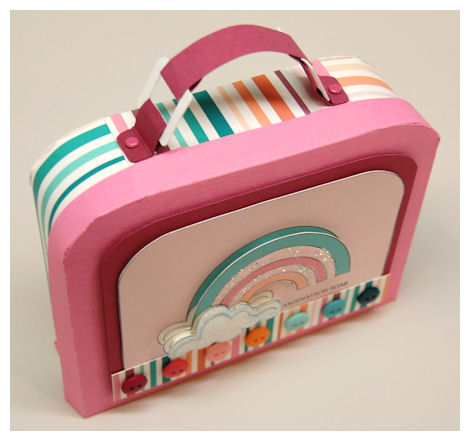
Lesa saw this adorable lunch box and pictured it without the handles as a vintage box to keep notecards in. Pink just speaks softness and beauty. She hand crocheted the matching flowers to go on this one. It would be a perfect gift for someone special. A couple pieces of chocolate added in would be the perfect addition.
Also be sure to check out Katie!! She has another FAB project using the Boxed Lunch © template 😀
Now for my project!
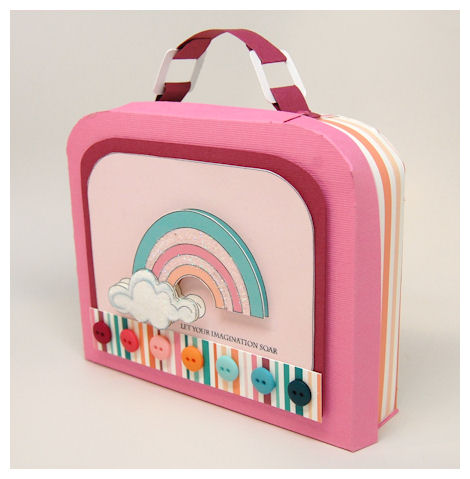
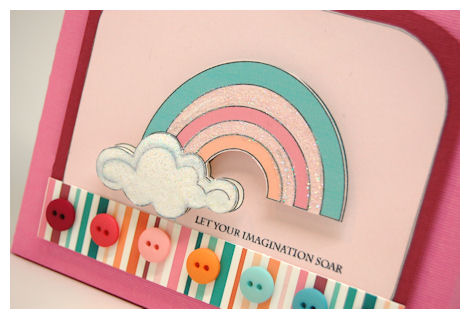
Let your imagination soar
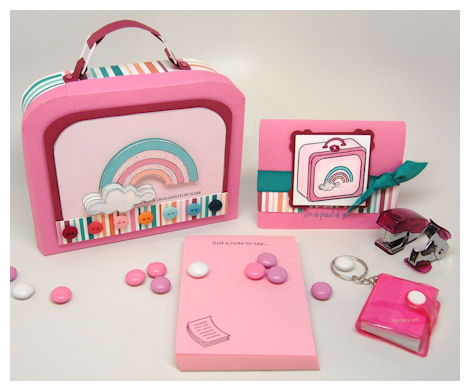
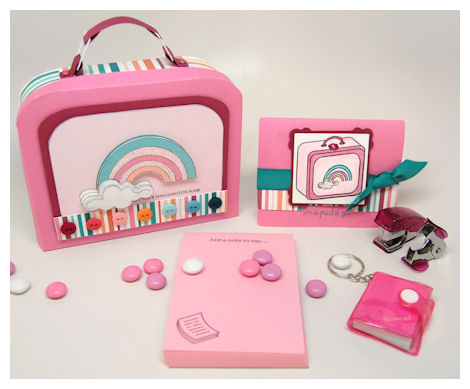
How is this for a coordinating gift set?
It was all so quick and easy. Let me tell you about all the details for this part of the release!
About Boxed Lunch –
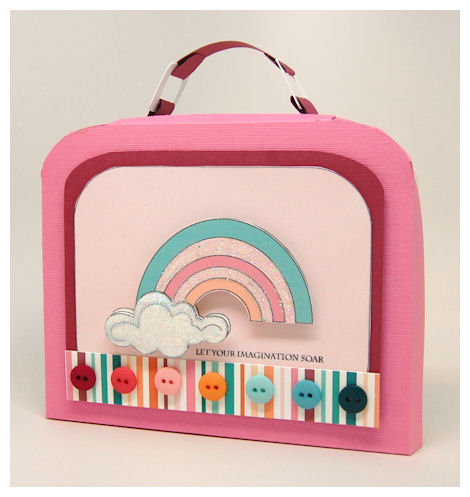
Completed Project Size 5 3/4 Inches Wide4 3/4 Inches Tall
1 1/2 Inches Deep
This template was designed to coordinate with the Lunch Box Love Notes © and Lunch Box Love Notes Additions © Pretty Impressions © stamps (available in both acrylic and digital download). This template also coordinates with a Lunch Box Love Note © Pretty Pieces Cut Files © too! (more on that further down)
This template will really take you back in time, and is sure to put a smile on someones face!
Do you remember those adorable metal lunch boxes we all carried as children? They are absolutely timeless! Well now we have a 3 D version that we can make for all our children, significant other, teachers, boss, co-workers, friends or family!
Now look at the handle details!
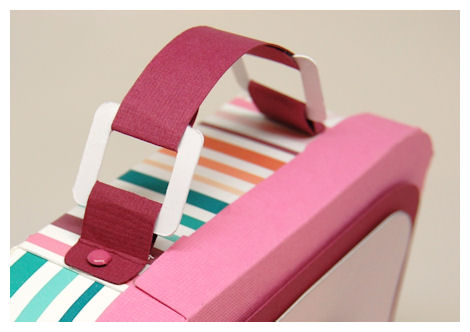
ALL CARDSTOCK!!
So no need to find, or purchase ANY expensive metal embellishments! This template has every piece you need to create this Oldie but Goodie Lunch Box in ONE great template! EASY PEASY (as are all our templates :D) Each one COMPLETE with step by step photo instructions.
This is the perfect template to give all sorts of gift in. You can put some notes in there, maybe some school essentials for student or teacher, homemade baked goods (especially for school fundraisers), put in gift cards, candy, stationary, and is even perfect for the office! Gift it to your boss or co-workers (any time of year!) Also perfect for a new grad, off to college, end of year teacher gifts, teacher appreciation, first or last day of school…..make it into some luggage instead! That adds even MORE possibilities.

Whatever you box up in this lunch box, it is a guaranteed you will also be boxing up the feeling of them being special!
Today my Boxed Lunch contains a note pad, stamped using the note paper and sentiment from Lunch Box Love Notes ©
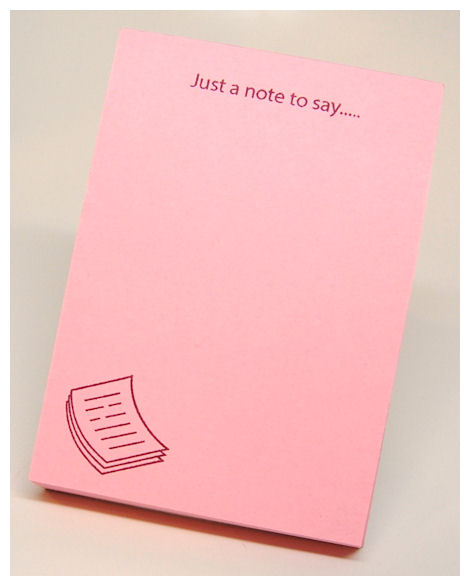
Now cute is the notepad? This in itself is a simple, yet practical gift! You can easily stamp each page while watching TV! No brain power needed.
I also included some JUMBO Smarties candy, a jumbo Sour Lollipop (all candy faves from when I was a lil’ girl), a mini stapler, and staple puller, travel keychain notepad, and a fun fold out ruler.
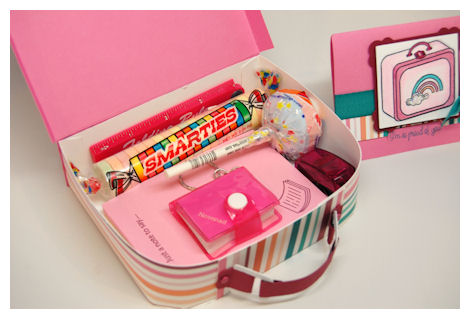
This is for my daughter Alexa who loves sweet tarts and loves to write and draw!
There are MANY things this can be filled with, as you will see with all our samples over the next week or so!!
Now for my project details today…….I printed my base from the Pretty Printables © Digital Paper- Just Perfect For my cover I used the Lunch Box Covers © for a quick & easy coordinating design!
This is a collection of 8 printable lunch box patterns that are ready to PRINT N’ GO! They are based on the SAME images you find in our amazing Lunch Box Love Notes © and Additions set! Now making a complete coordinating gift set couldn’t be easier! Everything can match.
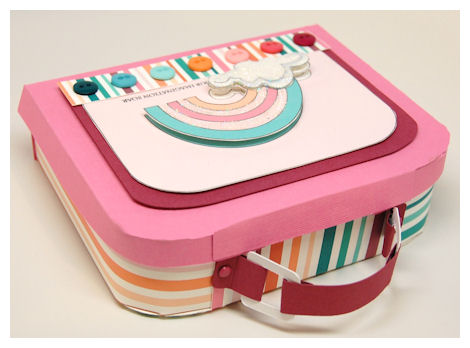
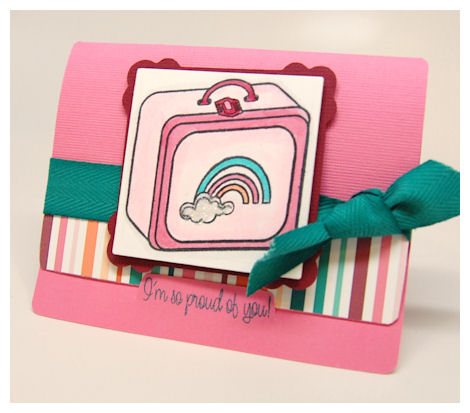
I used the rainbow printable image to create my decorative panel on my lunch box. Adding the rainbow was my 5 yo daughter Amber’s idea 😀 So I HAD to do it so I could make HER love notes to tuck in her school bag 😀 (I need to make her one too!)
But think how fun it could be if you just let your kids decorate thier OWN!!!!!!!!!!!!
I was able to utilize my photo editing software to digitally COLOR it in for me too!
I replicated it 3 X’s.
1- for my lunch box panel
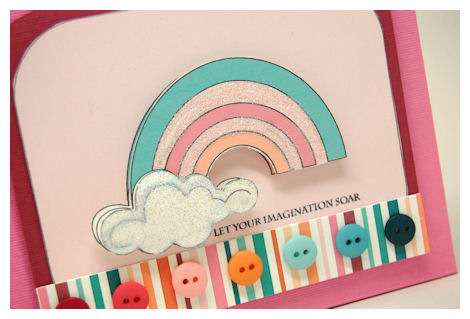
2- for the 3D rainbow/cloud

3-for the cloud only.
Adding glitter was not only easy but the perfect, simple touch!
I used the sentiment from the Lunch Box Love Notes© Additions stamp set to stamp my image exactly where I wanted it on the panel.
Perfectly easy peasy!
Now another FUN addition to the collection is a Pretty Pieces © Cut File called Lunch Box Love Note!

This is a cut file for $1.50
Available in PDF, SVG, WPC, DXF, GSD. About Lunch Box Love Note Completed Size when folded is 4 Inches W 3 Inches H This is the perfect folded note card, with easy tuck in tab! No envelope needed!
Perfect for creating some quick “love notes”.
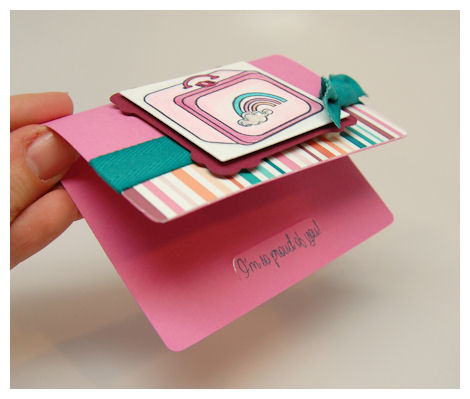 Here the sentiment is stamped ON the tuck in tab, but you can add it to the sentiments to the inside too!
This was designed to work perfectly with the Lunch Box Love Notes © & Additions © Pretty Impressions © Stamp Set (available in acrylic & digital), and work perfectly with the Boxed Lunch © Pretty Packaging © Template!
But it is totally amazing on its own too!
Now creating simple note cards (or gift card holders!) has never been more fun and easy.
Now yet another AMAZING additon to our Pretty Pieces © Cut File is the additon of a set of 4 shaped files called All Tied Up ©.
Available in SVG, GSD, DXF, and WPC
(in my project the lunch box is stamped on the square version)
These were designed by Kristin Bueter. She did a FAB job on them 😀
We have a complete unique collection of 4 shapes: Circle, Oval, Square and Rectangle. All a must have.
This is the perfect collection of 6 shaped frames/tags/ribbon sliders! Each shape having a single and dual ribbon slider feature, in plain as well as scalloped.
You will also receive the frame, and mat layer for these as well! All in one perfect package!
Designed to be the perfect “cut n’ go” tag shapes, you will want to use these over and over again. Perfect for cards, scrapbook pages, gifts and of course our Pretty Packaging © Templates! You can never have too many options.
These fit many of our Pretty Impressions © stamp sets, so check them out!
Circle: 1 3/4 inches round Mat Layer: 1 1/2 inches
Oval: 2 1/2 inches tall X 1 3/4 wide Mat Layer: 2 1/4 inches tall X 1 1/2 inches wide
Square: 1 3/4 inches Mat Layer: 1 1/2 inches
Rectangle: 2 1/2 inches long, by 1 1/4 inches high
Now you MUST be dying to hear MORE about the stamps right? I’m dying to share it all with you.
I put a lot of thought into this set :D, and had my own children in mind. There was a HUGE lack of anything like this on the market, in my opinion.
Lunch Box Love Notes © Package Set of 25 images $20
Also available in digital download: Set of 37 images for $18 (combination of the Lunch Box Love Notes © & Additions)
Be sure you check out the Lunch Box Love Notes Additions © that coordinate with this set!
There are more add on’s and sentiments to match!
This stamp set has a template that coordinates with it called: Boxed Lunch ©
Do you remember those adorable metal lunch boxes we all carried as children? They are absolutely timeless! Well now I have designed a set with those amazing lunch boxes, with interchangeable patterns and interchangeable sentiments to match! There are even little food additions that fit this theme. You will certainly fall in love with all the punny sentiments.
This set is perfect for sending little notes in their “lunch box”, or for making fun cards, gifts and tags for friends, family, teachers, co-workers, and anyone in between! You now have so many possibilities for sending little love notes to those we care about.
As a child, my mom would always stick a little note in my lunch box, wishing me a good day. In turn I have done the same for my own children and husband. I’ve always longed for such a set that make sending these types of notes or gifts more fun and easier than ever. This set will be one that you pull out over and over again.
Sentiments include:
I’m so proud of you!
A special treat for you to eat
Packed with Love
Sending you hugs and kisses
XOXOXOXOXOXOXOXOXO
just PEAR-FECT !
I love you bunches!
Hope your day is (to be used in coordination with some of the sentiments)
Just a note to say….. (to be alone or used in coordination with some of the sentiments:)
you are so special!
do your best!
a piece of cake !
as sweet as you are !
Lunch Box Love Notes Additions © Set of 12 images $12
This set is the perfect add on set to Lunch Box Love Notes © with interchangeable lunchbox patterns and sentiments to match!
Sentiments include:
Let’s Do Lunch
You made the Grade
My Lil’ Cupcake
Star Student
Apple of my eye
Reach for the stars
Let your imagination soar
For a Special Teacher
———————————-
WHEW! What do you think?
Here is another photo of one of the completed gift sets.
Now here is where the GIVEAWAY comes in!
Leave a comment and you will be entered to win the following:
Boxed Lunch Template
Lunch Box Love Notes © & Additons (stamp or digital images-your choice)
Lunch Box Love Note Cut File (in your choice of file)
Lunch Box Cover © Digital Paper
Winner to be announced on the 30th!
You can share whatever you wish. You can say what you do for end of year gift ideas, kid projects, what your favorite things to gift are….anything!
Supplies:
Pretty Packaging © template – Boxed Lunch
Pretty Impressions © Stamps- Lunch Box Love Notes © & Additions
Pretty Printables © Digital Paper- Lunch Box Cover, Just Perfect
Cardstock by Couture Cardstock: OSW White, Bow Bells, Brandenburg
Ink: Momento
Pretty Pieces © Cut File- Lunch Box Love Note!, All Tied Up: Square
Buttons by SEI
Ribbon by May Arts
Copic Markers
Note Pad
Thanks for hanging in there!
I’ll be back tomorrow with MORE peeks and exciting stuff to share!
Group Post and Rambling Rose Video Tutorial
Apr 7, 2010 Author: mytime | Filed under: Home decor/3-D items, My Time Made Easy, MYTIME MOVIE/VIDEOs, Product Opinions and Must haves, Tutorials, videosWHEW! What a release!! If you haven’t yet be sure to check out all our NEW! Products <—Click here
Today is our Group Post! So there will be LOTS of eye candy!!
Please be sure to visit each of our design team members today for even MORE ideas and inspiration.
I am happy to say that our OUT OF STOCK items will be BACK IN STOCK this afternoon! Anyone who had something “back-ordered”, your order will ship today too!
I am even MORE happy that I was able to actually get the Rambling Rose © Cut File Video Tutorial done, as promised!
Here is my card sample
This card used the Rambling Rose © Cut File, Fanciful Flowers © Cut File (for the leaf), Tag You’re It © (tag layer), Fanciful Flourishes © & So Sentimental © Pretty Impressions stamp sets.
So for all of you out there curious as to WHY the Rambling Rose © Cut File makes creating your own paper roses fun and easier than ever…take a look!
Here is a close up of the completed Rambling Rose © Cut File

How stunning does that look?
Think of all the amazing flowers YOU can make too!! You can even resize the cut files to tailor them to YOUR projects! Endless possibilities.
Also there has been an updated version of SCAL released that should fix the problem many of us were having with our SVG files. Here is a link if you haven’t already downloaded it: https://store.candacraft.com/Page-Download_5.aspx!!
I really want to say thank you to my team for their amazing projects, to all of YOU who have stopped by and left a comment, sent and email, or placed an order 😀 You make my “job” so fun for me to keep doing! I get so inspired and truly run off the excitement you all share with me each day and month after month!
That being said, my family needs my attention the next week or so, so I may be quiet, but I’ll be back shortly. If you can say a prayer for my mom on Monday. We have something important that day that could use your prayers. She just needs peace in her heart, and strength to do all she has to, to make it through some tough things. I would do it for her if I could, and I am doing my best to block the wind from knocking over her sails. I have faith that everything will work out.
Thank you all again for everything, even listening to me “share” what I can.
Cupcake anyone? Family update
Apr 6, 2010 Author: mytime | Filed under: Home decor/3-D items, My Time Made EasyHi everyone!
I know I’ve been cut short this week, but as I said I do have some family responsibilities to tend to with my mother. I don’t want to share too much about my mom, but she still needs me in so many ways right now. We have a lot coming up with her and all I can tell you is that it is very physically and emotionally draining. I am finding the hardest part about owning your own company is the inability to “call in sick” or take some time off! LOL! So I’m running frazzled.
Any-who….let’s just get to the eye-candy!! (I am praying my day goes as planned so I can have my video up for tomorrow!)
Today is the first exclusive project post for our newest design team member Stephanie Kraft
I’m sure you are falling in love with her style already!
Here is what Stephanie Kraft did

Stephanie Kraft added
When I first saw the Take Time Pocket © I thought of all of the spa gifts that I like to give away and how wonderful it would be to package them using this template! I was browsing in Target, looking for some of bath and body products, and instead I found this end-cap full of Hello Kitty products… my 6-year-old DD loves the Kitty as much as I do, so I bought a few of these girly items and transformed this into a little Easter gift for her.
Now it is my turn to share!
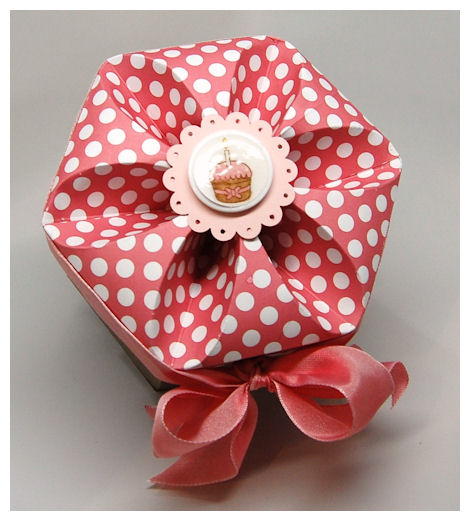
Upon speaking with one of my design team members, Mona Pendleton – she mentioned how cute the Pick of the Petals © would be as a CUPCAKE!! ( Now if you see her blog name you will know WHY she thinks this way :D) I thought it was a fabulous idea, and was so dying to see her take on it! Well, as you know sometimes you just have to go where the mojo leads, and Mona didn’t get to create the cupcake she mentioned, so I asked her if it was OK for me to give a try! She agreed, so away I went (OH! and when I saw that Katie and I did almost the exact same thing I had to chuckle! Great minds….)
Without further delay…..here is my take on the idea
A Lil’ Cupcake

How cute can this get?
I kept it pretty SIMPLE since I kept envisioning birthday party favors!! I plan on adding 2 Bangerang Cupcakes in a Jar to this!
I created my bottom from some Brown Paper Packages cardstock (it has a lined texture to it (unseen in photos), making it perfect for a chocolate cupcake!
I stamped my sentiment from the Just For You © set on the “cupcake” bottom. I love it!
PS: Stamp your sentiment PRIOR to putting this together! (I did mine AFTER! DUH!!)
Now the TOP
I printed my lid using the polka-dots from the Shutterfly © collection of Pretty Printables Digital Paper. Made it super easy and fun!
Most cupcakes have a cheery on top….I made this
I just stamped the cupcake from the Just For You © set. Colored it and added crystal effects to the top. Once dry, I punched it out and layered it to a super large white button center, then again onto a scallop layer! BAM! My own epoxy embellishment. I think it is way cuter than the traditional cherry on top 😀
Super simple, super sweet!
Sure to make SOMEONE happy on their birthday.
Pretty Packaging © template: Pick of the Petals ©
Pretty Impressions © stamps: Take Time ©
Cardstock from Couture Cardstock: OSW white, Brown Paper Packages
Pretty Printables Digital Paper: ShutterFly
Ink: Momento, Copic
Ribbon: May Arts
Other: Button, scallop punch, crystal effects
Well come back tomorrow for our BIG group post day, as we wrap up over a week worth of samples!
Whoever is happy…
Apr 5, 2010 Author: mytime | Filed under: Cards, Home decor/3-D items, My Time Made Easywill make happy too!
Well today is yet another day of AMAZING samples!
There has been SO many ideas flowing, I hope you are all inspired to try something new!
Now we SOLD OUT of Take Time © & Fanciful Flourishes © – they will both be back in stock the end of the week!
Today Tracey Cuccia has a peek for you! Wait until you see it 😀
Here is what Tracey has to say
“My friend just had her FOURTH boy, and I figure she needs something SUPER girly to take over all that testosterone, lol. Here’s a little ‘pampering’ gift set just for her…”
I have had some very serious family issues to tend to, and thank you for all the prayers. I have much more to share but due to my need to tend to them I need to keep this brief. My family has to be first.
Today I decided that this Slip Cover © project would be a good one to share!
I’ve had so much going on, and I needed something “happy”.
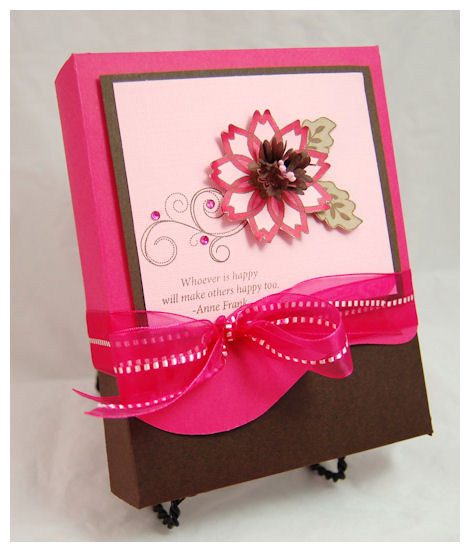
Whoever is happy will make others happy too. Anne Frank
I love that sentiment (it is from So Sentimental ©) . I really wanted to share the option of NOT making your mat layers with the curvy layer! You can easily use other layers, like rectangles and circles.
Here is a close up view
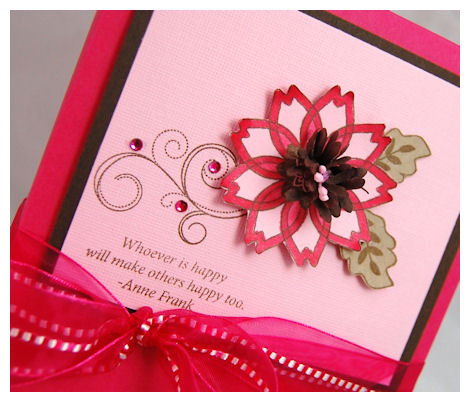
I took a prima flower and scrunched it up, and put it in the center for a cool effect!! I stamped it on pink cardstock and colored parts of it with the Copic markers. The leaves stamped in brown ink.
The flowers are from Petal Perfection ©, the swirls are from Fanciful Flourishes ©.
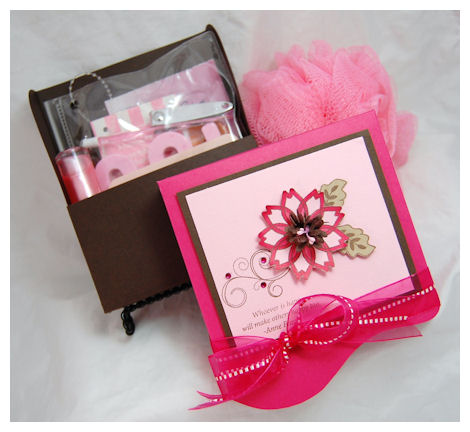
When you slip the cover off you will see a pedicure/facial kit inside (along with some lip-gloss)!
This would be the PERFECT Spa party in a box.
Supplies:
Pretty Impressions © stamps: Petal Perfection ©, So Sentimental ©, Fanciful Flourishes ©
Pretty Packaging : Slip Cover ©
Cardstock from Couture Cardstock: OSW white, blessings, Sweet heart, ganache, sunflower
Ink: Momento, Copic Markers
Ribbon: May Arts
Other: adhesive rhinestones
Thanks for stopping by!
I will be back tomorrow with more to share 😀
Mind * Body * Soul
Apr 4, 2010 Author: mytime | Filed under: Home decor/3-D items, My Time Made EasyHi all! I hope you had a great Easter. We had a WONDERFUL time with my family. I made up a basket full of my mother’s Mary Kay products! (I hoped to stamp them but somethings just didn’t get to happen sue to family issues)The kids were amazing and each year the egg hunt gets more and more fun!
Today I was going to have a video for you on how to make our Rambling Rose © cut file, and I do apologize for having to put that off, but I have had some family issues to tend to. I will do my best to get that done by the end of our release week though.
Today both Pam and I are sharing some ideas for the Slip Cover © template! This really a MUST HAVE!
Here is a peek from Pam Imholz
Words from Pam:
Administrative Assistant’s Day is the 21st of this month – I make sets of cards for the gals in the office and then I do a little something extra for the gals who work more closely with me (you’ll see that later this week). Come see a simple card set featuring the beautiful new Slip Cover box, the new Just for You stamps and the new Pretty Printable papers. Quick and easy but delightful gift set.
Make sure you stop by Pam Imholz blog!
Today I thought I’d share a fun project with you all!
I have a “smaller version of the Slip Cover © template to share.
I knew I wanted a smaller box so that I could use it as a SPA Gift Card holder. After some figuring, if you resize the template to be at 60%, it becomes the PERFECT size for such a gift!
Mind * Body * Soul
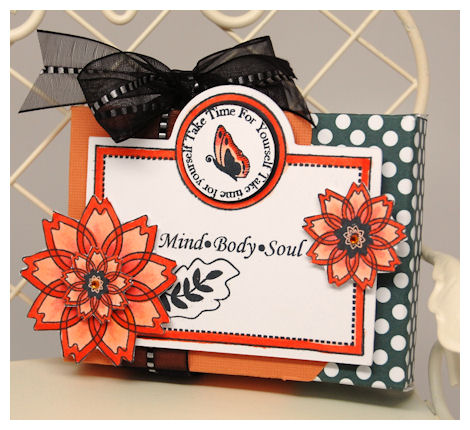
I think this came out really pretty! I love the vibrant colors!
This design uses the template in a horizontal fashion. I love that you can use it both vertically and horizontally!
I combined both the Take Time , Petal Perfection & Just For You sets for this beauty.
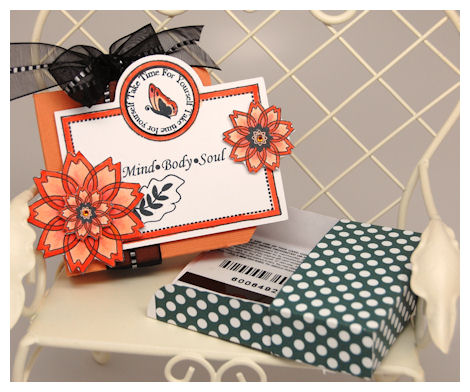
As you can see a gift card fits perfectly! You could fold a gift certificate in there too.
The label from Take Time © was used as my “tag”/focal point. I cut the tag using the label from the Take Time © template. I colored the frame with my markers. I had to FINALLY color the flowers from Petal Perfection ©. I used my copic markers, and added some jewels to the centers.
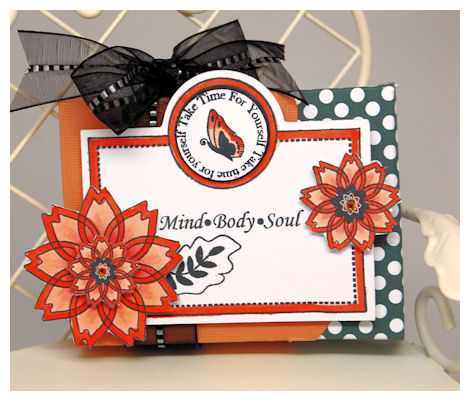
Going with the amazing colors of a Monarch butterfly as my inspiration, I printed my base for the Slip Cover © template using the Flutters & Flowers © Pretty Printables Digital Paper. The “take time for yourself” sentiment was stamped around the circle. My “monarch” butterfly in the center. I love the look of all these combined.

I think the ribbon was a perfect touch.
SUPPLIES:
Pretty Impressions © stamps: Just for You © , Petal Perfection ©, Take Time ©
Pretty Packaging : Slip Cover ©, Take Time ©
Pretty Printables Digital Paper: Flutters & Flowers ©
Cardstock from Couture Cardstock: OSW white, Acorn Squash
Ink: Versamagic, Momento, Copic Markers
Ribbon: May Arts
Thanks for stopping by today! I hope you are enjoying the release and samples so far. We still have a few more days of inspiration to go!!
Be back tomorrow!
Happy Easter!
It is a suppose to be a gorgeous day today.
I am obviously spending time with my family today. We have a lot of plans for the kids, such as a BIG Egg Hunt and Easter activities, and also to celebrate my mom’s birthday!! We had a very upsetting family emergency with my mom yesterday. I was with her most of the day. Now I know everything will be OK, but after that we are especially thankful for today. I am constantly reminded how precious life is.
If you are the type who believes in prayer, my mom is going through a very tough time, so please send up a quick pray for her strength, and peace of mind and heart, as she overcomes some very difficult obstacles the next few months. She is strong woman and I know everything will work out. Sorry to be so vague, but I need to be. Just always remember everyday is a gift.
Today I am keeping it short and sweet.
Speaking of sweet…. Geny Cassady has her first peek with us today!!! I am excited to work with her again!
Make sure you show her some LOVE!
Here it is
This is what Geny has to say:
“Just for you isn’t merely a sentiment set, it is full of fun versatile little images. Pop on over to my blog and see how I used one to create a fun background.”
Now time for my peeks!
I decided since Geny is sharing 2 cards, that I would too!
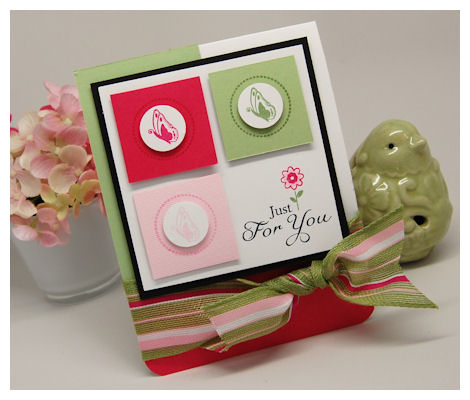
Just For You
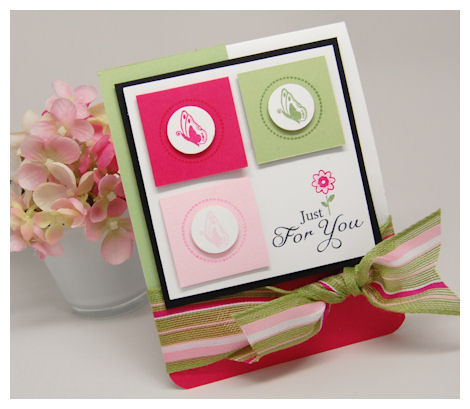
Is this not the perfect Spring like card?
I am in total LOVE with this card! LOVE! Its so simple, bright and cheery. I will be sending this to my mom at some point this week. I think she will need a pick me up.
I used the “Just For You” sentiment from the Just For You © set. I love it! Its perfect for so many reasons. Between the sentiments and the images, the uses and versatility are limitless!
I really liked the idea of having the flower “pop” up from the sentiment. I used my markers to color the stamp itself, then colored the center pink.
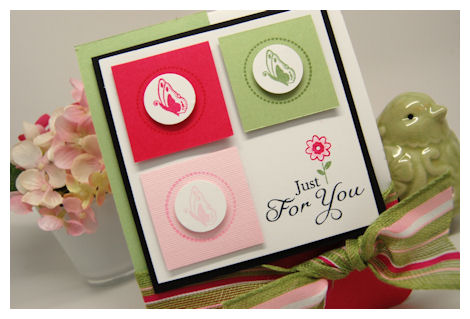
The butterfly in this set is just so PRETTY! You know me and butterflies 😀 I will definitely be using the Digital version of this set to create a larger one! OR even flip it! I stamped them in the 3 colors on white, punched with a 3/4 circle, all matching the cardstock base color. Then, using the dashed circle border in the set really made it POP by stamping it on the cardstock squares. They are all on dimensionals.
Did I say I love this card?
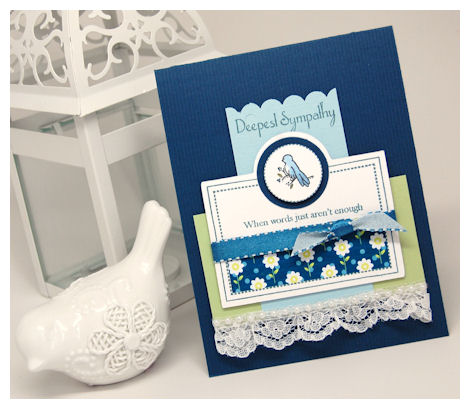
OK, now we have one more!
When words just aren’t enough
Sadly we all need a sympathy card at some point. I like to keep a few on hand, not to be pessimistic, but because when I NEED to make one, I can’t! Its too upsetting and my mojo leaves! Anyway, for me, the best time to make them is when I don’t need it.
I used the label image from the Take Time © set as my main focus of the card. I have always made “tags” that look like this, and was always bummed to never actually have one!! Now I do. This is a perfect example of how it can work for cards too!
I love the bird on a branch image from this set. Personally I think it is perfect for a sympathy card.
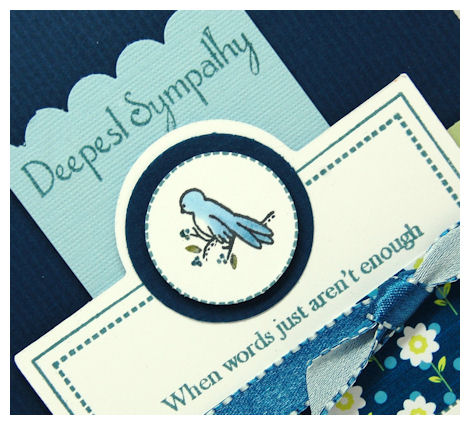
I layered the bird onto a circle for more POP. It is of course on a dimensional.
Now the “Deepest Sympathy” is from the So Sentimental © set. (there is a larger sympathy sentiment in the Just For You © set, but I didn’t want that one to be the focus of my creation this time).
I have always wanted a sentiment that says “When words just arent enough”.
You can use that to go with:
Thank You
I love you
Deepest Sympathy
Thinking of you
I’m sorry
You name it!!!
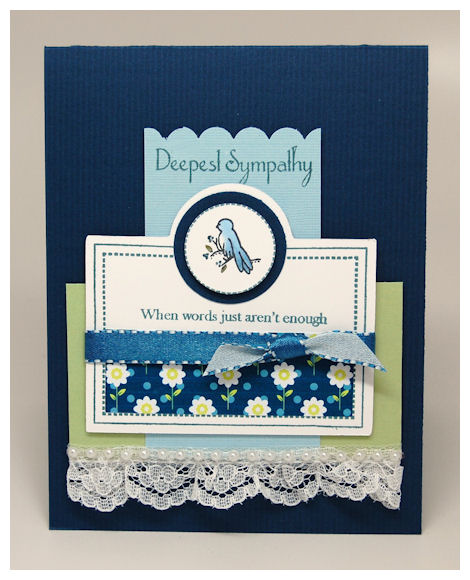
I also added a little bit of Fun Flowers © digital paper so the smaller sentiment didn’t get lost. I think it adds a lot to this card! Had I wanted the sympathy sentiment to be the main focus I could have used the one from the set.
I think it is clean, pretty simple and solemn.
Supplies:
Pretty Impressions © stamps: Just for You (acrylic), So Sentimental
Pretty Printables Digital Paper: Fun Flowers
Cardstock from Couture Cardstock: OSW white, Silent Night, Rain Drop, Cricket, blushing, sweetheart, slate
Ink: Versamagic, Momento, Copic Markers
Ribbon: May Arts
Well I really want to wish you ALL a Happy Easter! Thank you for stopping by.
Let me just say that while a little crazy, this release has been amazing so far. Again we have SOLD OUT of Fanciful Flourishes © (it will be back in stock the end of next week), and are whipping through the latest and greatest! I cannot wait to see everyones projects!
After all the Hoop-ala from the release I am wiped. Ironic that the main theme is “Pamper Yourself”! SO that being said….
Mona Pendleton has a super project today, so don’t miss it.
Mona says: Take Time To Relax…
I took my own advice and soaked in a SMOKIN HOT bath for almost an hour to de-stress from all the events and excitement. Then I remembered I had a project to share! LOL!
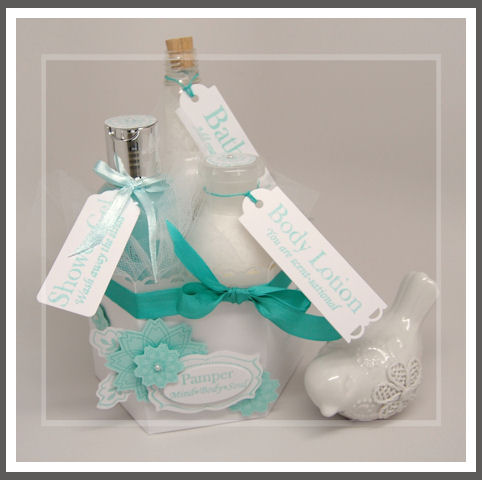
Pamper Mind * Body * Soul
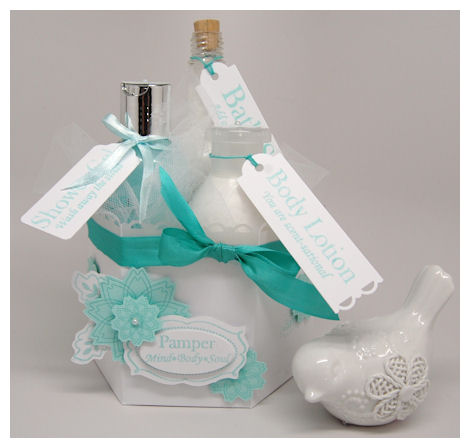
I decided I better post one that is suitable to relaxation!
Is this not jaw dropping? I mean so soft, peaceful & serene. Reminds me of a beach.
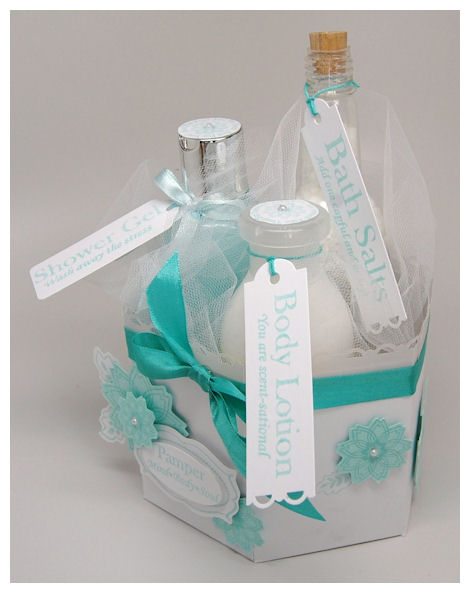
As I said in a previous post, the base to Pick of the Petals © can be used on it’s own! That makes it super versatile!!

The flowers go all the way around this gift! Using the Petal Perfections © cut file, made that SUPER EASY! I just cut my flowers, then stamped the Petal Perfection © images in an aqua ink! Easy Peasy
It also makes another great holder for all those bath & body essentials! On this one created the base in the STUNNING lineal white cardstock. It is elegant, sturdy, fresh and crisp. I used the Border Builders: Scallop Dot © to cut my vellum cardstock for a subtle elegant trim!
Here is the top view of the goodies I have packaged
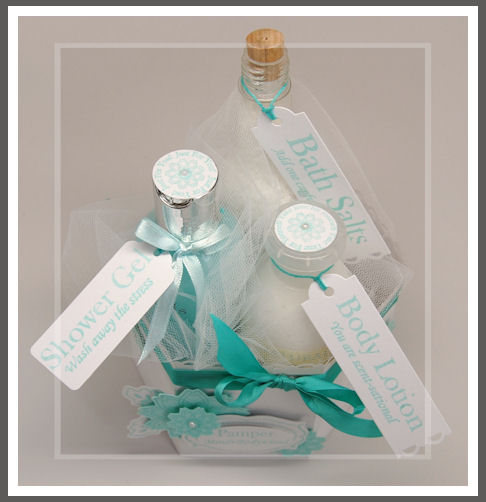
I just put them in the Pick of the Petalsbase, and tucked in some tulle! I could have added labels to the bottles, but wanted to share another idea of simply tying them on.
We have Bath Salts
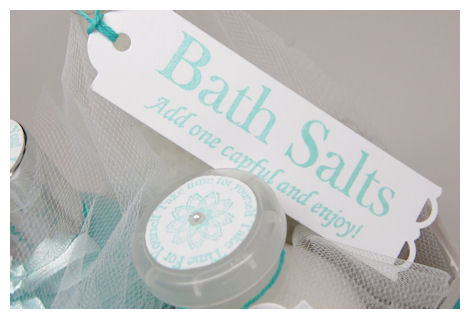
(see I stamped my labels on the bottle toppers!)
I actually have a bag of homemade bath salts and scented oils. I found a “message in a bottle” clear plastic bottle set so I could make this! So easy and fun.
Then Shower Gel

and some Body Lotion
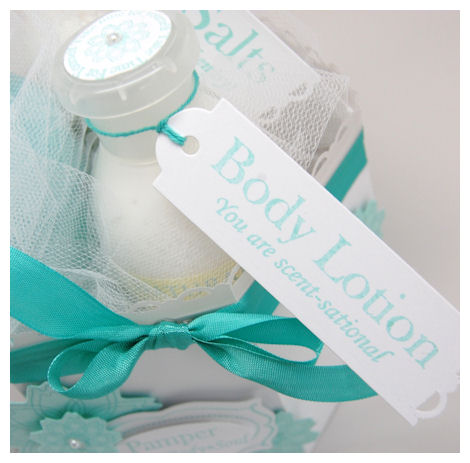
These are all in my favorite scent: Clean Cotton! I love the fresh clean smell!! AHH!!!
I love that there is a variety of sentiments that coordinate with each type of pampering present! You can totally mix and match or just pick and choose the larger or smaller sentiments to be used alone!

I used the So Sentimental Frame © for my sentiments. They fit nicely! You can never have too many options. As I said above I used the Petal Perfections © cut file, so making a bunch of 3D cut/layered flowers was SUPER EASY! I just stamped the Petal Perfection © images in an aqua ink!
This flower is just amazing.
Supplies:
Pretty Packaging © template: Pick of the Petals ©
Pretty Impressions © stamps: Petal Perfection ©, Take Time ©, So Sentimental
Cardstock from Couture Cardstock: Lineal White, Day at Sea
other: vellum, adhesive label sheets
Pretty Pieces © Cut File: Border Builders: Scallop Dot, So Sentimental, Petal Perfections
Ink: Versamagic
Ribbon: May Arts
Other: Adhesive Pearls
Thank you all for stopping by for a visit! I am just giddy thinking about what all you will create with this latest release! Tomorrow is Easter, but we will still have some samples!!
See you then!
Well as you all know the My Time Made Easy ™ LLC Release way yesterday!
That doesn’t mean the samples end! We still have a WEEK of daily inspiration 😀
Today you will want to visit Katie Cotton for a YUMMY treat!
Here is a peek

Here is what Katie has to say:
At first when i was going to put together the Pick a Petal template, i was PETRIFIED. The top while stunning, looked complicated, and here I am supposed to be showing people what it’s supposed to look like! Well let me tell you, it is NOT hard! It came together easy peasy into this ADORABLE little box that would be great for SO many things! I decided to make into a cute little cupcake holder! And i will teach you how i did it!Now, day one after the release…….Pick of the Petals © template & Rambling Rose ©
I have received MANY emails about our Rambling Rose © Cut file! I have to tell you that YES! I will be showing just HOW EASY it is to utilize the cut file to create your own roses!! There will be a video done to show you exactly how fun, quick , and EASY it really is. I swear!
It was THIS cut file that made my friend Paulette FINALLY cave in and get a Cricut! She was at my house shorty after the store sample was created. Once she saw it she said THAT IS IT! I’m getting one! 😀

The Rambling Rose © sample, featured above, was created to be a bit bolder than one of the other samples in the store. The store sample is to be made to look realistic.I painted this with a Shimmerz ink for another look. It actually ends up making it be like a lacquered flower. I made it this way because I wanted my packaging to be that similar to a ceramic canister, that holds tea! The leaf is store bought (unlike the store version-handmade! I’ll share that too!) is from the bridal section of Michael’s.
Time for Tea
OH! Yet another item I love to gift others with! TEA!!! Hence my NEED for a teapot image! Funny how such a small image can stand out on a project huh? Its just eye catching.
So SIMPLE, yet stunning.
I used my lil tea pot image from Just For You © to create what appears to be a “tea tag”. Even stapled the twine! I just dotted my flowers and leaves.
Kristin Bueter and I had brainstormed over that file for sometime. Myself having made innumerable paper roses over the years, from scratch! Many taking close to an hour to perfect! I KNEW they type of file we needed to make this process TIMELESS!! Kristin is a good listener, and she “gets me”. I often can’t always explain things the way I should but she knows what I mean. After me describing the type of file I wanted to create, one that is UNIQUE and like no other……she went to work and was able to get my vision into tangible form. The MINUTE I saw it I knew it was perfect!
The top was created using Santa’s Beard cardstock. Its a textured medium weight off white color. Using a medium, or even light weight paper for the lid of this template is really beneficial because it allows you to get PERFECT petals! Honestly you will have a harder time with heavier weight cardstock. The top serves NO specific “function” so you don’t need to use a HEAVY duty cardstock. You can use that on the bottom if you wish 😀 I used the same Santas’s Beard, and printed my flourish pattern from A Loving Heart.
This template holds quite a bit, as you will soon see from me later this week. There is no argument that this is a STUNNING box! (I know I keep saying that word”! Guess I’m bad at adjectives!) This will match my mom’s home perfectly! She collects Tea Pots with roses on them 😀 I hope she likes this unconventional addition I am giving to her this weekend with her birthday Easter basket of goodies 😀
Supplies:
Pretty Packaging © template: Pick of the Petals ©
Pretty Impressions © stamps: Just For You ©
Pretty Printables Digital Paper: A Loving Heart
Cardstock from Couture Cardstock: Santas Beard, Thistle Stalk, Blushing
Pretty Pieces © Cut File: Rambling Rose ©
Ink: Pallette & Copic Markers
Ribbon: May Arts
Other: Shimmerz, Leaf from wedding section, stapler, Twine
Well once again thank you for stopping by! I hope to get that video set to go for Monday! A great way to start the week! For now I hope you all have a WONDERFUL weekend, and if you get a sec, stop by for a peek at all the ideas we will all be sharing as the week progresses.
If you want to see all the products we rleased this month go to the NEW PRODUCTS PAGE!
Today is our big Group Post!! In honor of the My Time Made Easy ™ LLC release day we always have the team feature some projects for you to get the wheels spinning.
Get a pen handy so you can start writing down all the ideas these creations spark for you!
All of you cardmakers out there will be bouncing for joy over this assignment! I challenged each of the design team members to create 4 cards! I thought it would be so fun and cool for you to see such a wide variety of ideas, using this months release, in one day!
As I said before, all our products are designed to coordinate! That means they are perfect for cards, tags, templates or any other project you have in mind. I really hope you enjoy what each of us has put together.
You will definitely want to visit each one of the following members:
Now for my 4 cards I decided that it would be REALLY fun to show you how awesome it can be to have BOTH the Acrylic version of the images and mix it up with the Digital version! You may be confused by what I mean, so I will show you.
I chose to use the Just For You © set to share just HOW versatile it is, and so fun to use. If there was ever a set to get in the digital version, this one is IT! This set was designed with all sorts of gifting giving and occasions in mind. I also used a similar “element” in each. That being 2 circles to the left of the main object! Each layout is different, but the ideas the same!!
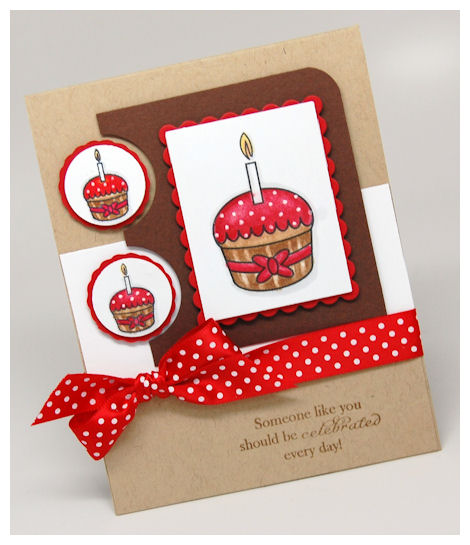
1) Happy Birthday Cake
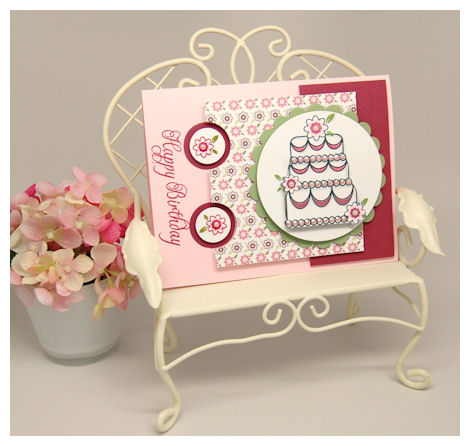
On this card I used the Digital version of the cake from the Just For You © set.
Note: ALL our digital sets come with complete step by step photo instructions on HOW to use digital stamps!
I used the acrylic version of the set for my Happy Birthday sentiment, and the little flowers in the circle. Perfect example of how fun it can be to have BOTH!
I adore the cake image in the Just For You © set! I designed it to fit within the circular sentiments that are in the set. Upon designing it I WANTED to add the flowers (that are also in the set) to it. Having it be a smaller image, I chose NOT to. I knew the details would get lost. Plus I designed it knowing that I would offer the digital version, so the options would be open! I also wanted to keep the design open to being colored for boys/men, or allow YOU to add whatever YOU want! Not everyone WANTS flowers on a cake. (shocking I know!)
SO……using my photo editing software, I resized my cake. I then added the flowers from the set to my cake image, layering them where I want! I used the paint to color the leaves, and could have computer colored my cake, but opted for copic coloring instead! I LOVE my markers, and coloring is so therapeutic to me 😀 Reminds me of being a kid again, only I’m doing a “grown up” activity. Now if I were in a swap, or were using this image for invitations/favors I certainly would go for the computer colored version (makes mass production a BREEZE!).
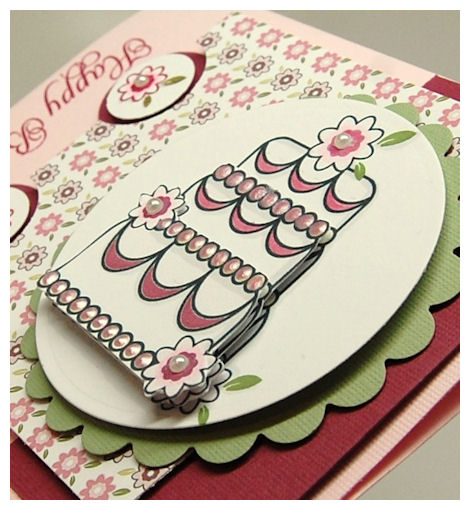
OK once I have everything where I wanted it, I printed the image 3 times.
Why?
Because I knew I wanted the look of a TRULY tiered cake!

Look at that dimension! AMAZING!
I also added some liquid pearls to the border. I love the elegance this has. My mom’s birthday is next week so I made this just for her. As you may notice the flowers in the Fresh Flowers © digital paper coordinate with the images in the Just For You © set too!
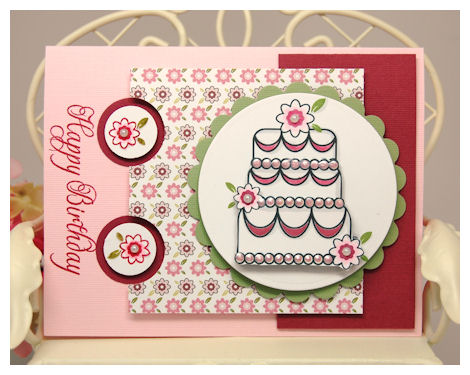
Now this card doesn’t count as my set of 4! I want to share a card using the paper and colors, even the SAME image, only using the ACRYLIC version of the Just For You © set.
Mr. & Mrs.

(First let me say I SWEAR the ribbon matches my paper! LOL! Something with the lighting reflected a hue…so it looks off but I swear its not!)
Isn’t this a stunning Wedding card?
OK! Now here is the acrylic version of the set! The cake image, dashed circle, and sentiment, all stamps.
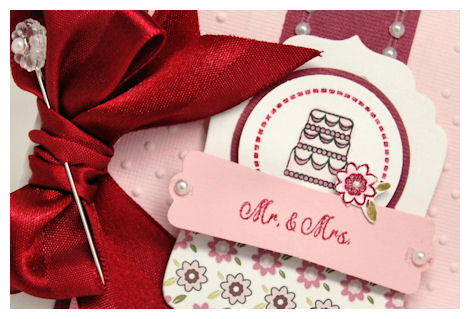
I colored my cake with my copic markers. I used the dashed circle in the set around the cake for an elegant look. I then punched it out of a circle. I used the same Fresh Flowers © digital paper, and cut a tag. My Mr. & Mrs. were stamped on a punched tag, then added to the layered label. I them stamped, colored and cut a flower for the perfect lil touch!
OK back to the 2nd of the 4 cards…….
2) Celebrate You
Another great example of the acrylic version of the set, combined with the stamp version.This also uses the same principal of having 2 circle images to the left of the main image.
I adore the sentiment. That is stamped on the bottom of the card. You can never have too many sentiments! When a set combines both it is a WIN! WIN! for me.
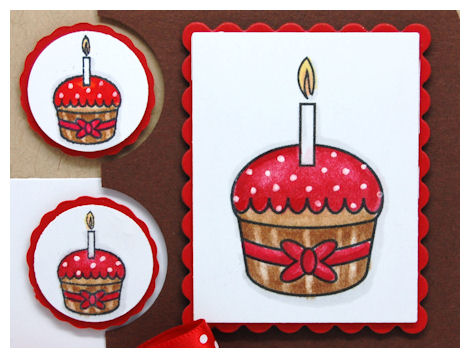
I love the little cupcakes in this set. ( we also have paper to match them in the Just Perfect © digital paper collection). Sometimes you want a BIGGER cupcake. Heck, you could make this HUGE and cut it out as a party invite or add it to a gift bag, or template! (OH! Giving myself ideas as I type :D) It was so fun to combine these too.
I colored them all the same and used my Copic markers. Easy peasy. I don’t know who will get this but I know I love red & brown together. What do you think? Cute having the same image in a various sizes right?
OK now we go on to card #3
3) A little something
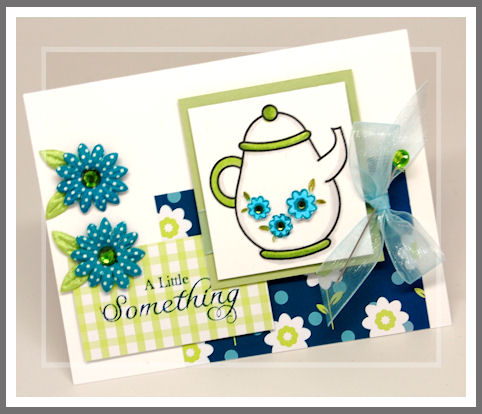
I LOVE the teapot from the Just For You © set. I knew I’d want to make it larger (yesterday I used it in actual size on a gift/tag). So, I did just that using the digital version!
I used another one of the paper collections called Fun Flowers ©, and an older set GaGa for Gingham © (I use that one a LOT!). It helped me with my colors and gave a fresh look!
I stamped my sentiment to match.
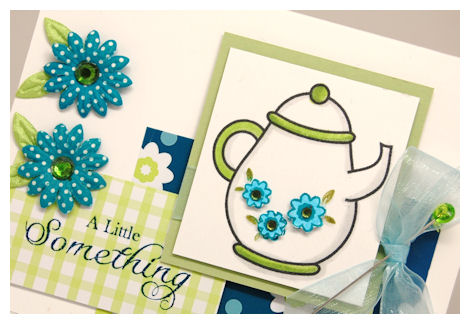
I found that the flower images from the acrylic version of the set fit perfectly into my digitally enlarged tea pot! Now I also could have used the digital flowers, like in my cake but I decided to go for stamps instead. I stamped them twice, and popped them up on dimensionals. They match my flowers too 😀
Now we have card 4
4) You mean the world to me
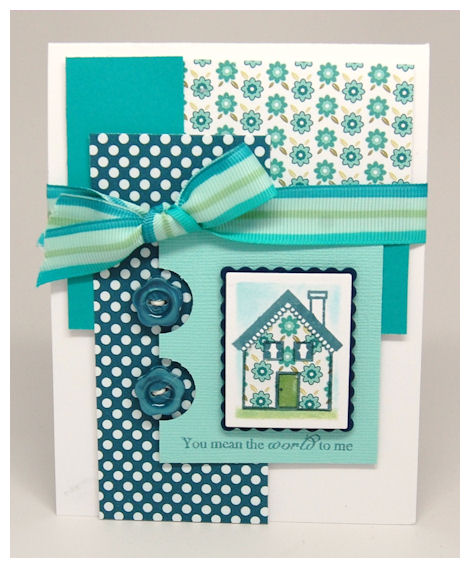
A sentiment I have LONG loved, and never had!
When I see a house image I think “home” and home to me is love, and where everything I hold dear is in reach.
OK so this one doesn’t combine ANY digital images with acrylic, but it does fit my layout of the 2 circles to the left of the main image idea, so bear with me. Would you believe me if I told you that the concept of that all happened purely by accident? I guess I was somehow mentally in that mindset, and until I edited all my photos saw this pattern! A very cool accident!
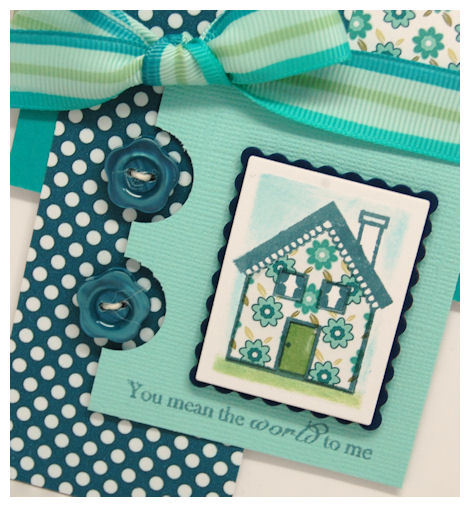
I love this quirky lil house. Its the perfect size. I stamped this onto white cardstock in a not quite navy ink. Used a nestablitly label, and sponged my grass & sky.
Now for this one I took some scrap left over from the Fresh Flowers © digital paper, stamped my house, and paper pieced it over my main image (cutting out the windows and door in the pattern so the base image pops through!). I felt the the Darling Dots © patterned matched my scallop house trim 😀
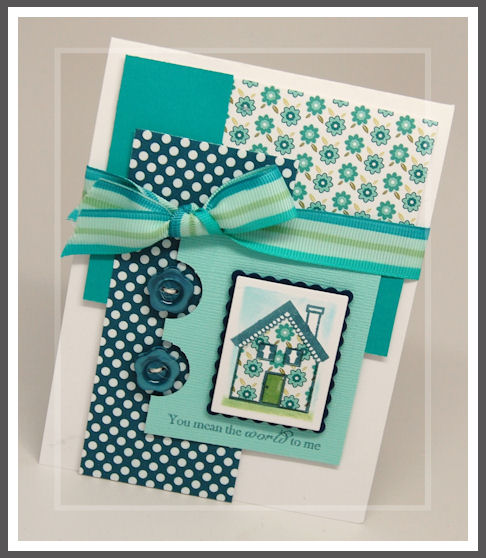
My ribbon…..well I took some white grosgrain ribbon, then colored it with my Copic markers to match! Sometimes we have to improvise!
Well there you have it! Now I do have some more card I made too, that I will share as the days pass on, so keep checking in. I hope this team post will be helpful to you all in some way.
We still have over a WEEK of daily inspiration and samples to share, so come back tomorrow!
Supplies: Happy Birthday Cake
Pretty Impressions © stamps: Just for You digital & acrylic
Pretty Printables Digital Paper: Fresh Flowers
Cardstock from Couture Cardstock: Blushing, Tuber, OSW white, Thistle Stalk
Ink: Versamagic, Copic Markers
Other: Liquid Pearls
Supplies: Mr & Mrs.
Pretty Impressions © stamps: Just for You acrylic
Pretty Printables Digital Paper: Fresh Flowers,
Cardstock from Couture Cardstock: Blushing, Tuber, OSW white
Ink: Versamagic, Momento, Copic Markers
Ribbon: May Arts
Other: adhesive pearls, Nestability label, SU! Punch
Supplies: Celebrate You
Pretty Impressions © stamps: Just for You acrylic & digital
Cardstock from Couture Cardstock: OSW white, Oat, Gancahe, Macintosh
Ink: Momento, Copic Markers
Ribbon: May Arts
Other: singlo gel pen
Supplies: A Little Something
Pretty Impressions © stamps: Just for You acrylic & digital
Pretty Printables Digital Paper: Fun Flowers, GaGa for Gingham
Cardstock from Couture Cardstock: OSW white, Cricket
Ink: Versamagic, Momento, Copic Markers
Ribbon: May Arts
Other: Prima Flowers, adhesive rhinestones
Supplies: You mean the world to me
Pretty Impressions © stamps: Just for You acrylic
Pretty Printables Digital Paper: Fresh Flowers, Darling Dots
Cardstock from Couture Cardstock: OSW white, Sprinkle, Lagoon
Ink: Versamagic, Momento, Copic Markers
Ribbon: May Arts
Other: Buttons
Well thank you for stopping by! I hope you enjoyed what you’ve seen so far, and what is to come!
See you back here tomorrow.
My Time Made Easy ™ LLC NEW! April Release
Mar 31, 2010 Author: mytime | Filed under: My Time Made Easy, UncategorizedToday is the day of the My Time Made Easy ™ LLC April Release!
We have released: (click the highlighted link to be directed to that area of the store)
3 NEW! Pretty Impressions © stamp sets
In our large sets you receive two 4 X 6 sheets of acrylic stamps
In our smaller sets you receive one 4 X 6 sheet of acrylic stamps
*Each set this month is also available in a digital format!*
Take Time © Set of 21 images – $20
Petal Perfection © Set of 8 image-$12
Just For You © Set of 38 images- $20
3 NEW! Pretty Packaging © Templates
Pick of the Petals ©
Slip Cover ©
Take Time Pocket ©
7 NEW! Pretty Pieces © Cut Files
5 of the Border Builders ©: Elegance, Open Scallop, Scallop Dot, Scallop Hole, Zig Zag
Rambling Rose ©
Petal Pefection (matches Petal Perfection stamp set)
7 NEW! Pretty Printables © Digital Paper Packages
Just Perfect
Perfect Petals
Fun Flowers
Fresh Flowers
Fresh Fabric Collection 1
Fresh Fabric Collection 2
Fresh Fabric Collection 3
1 FREE! Pretty Printables © Digital Paper Packages
Free Style Florals
1 New! Perfect Package © Collection
Take Time Package
So happy shopping!!!
My Etsy

Who I Designed For
Blogroll
- Alicia
- Alli Miles
- Ally Blankenship
- Amber
- Andi @ crafts on a whim
- Angel R
- Angie Z
- Anne Kranitz
- Becky O
- Bee
- Beth Silaka
- Bethany Paull
- Beverly Nash
- Bobbie
- Cambria
- Cammie
- Card of the Week
- Card Positioning System (CPS)
- Cards for Cancer
- Catherine Doucette
- Charmaine
- Cheryl Sims
- Chriss Rollins
- Christina
- Christine Ewing
- Christine Wooden
- Colleen Schaan
- Craft Critique
- Craft Gossip
- Crystal
- Dawn Easton
- Emily Giovanni
- Geny
- Holly
- Igne Groot
- Inspirational Craft Blogs
- Irene
- Jami Sibley
- Jeanne Streiff
- Jen del Muro
- Jeni Bond
- JenMarie
- Jenn Balcer
- Jenn Diercks
- Jenn O
- Jennifer E
- Jennifer Mick
- Jennifer Pereda
- Jennifer-Sweet Treat
- Joanne Basile
- Jodi Collins
- Julia Stainton
- Julie Masse
- Karen
- Kathryn Berthiaume
- Katie Cotton
- Kelley Holland
- Kendra
- Kim Scholfield
- Kris’s Color Stripes! Get inspired here
- Kristen Dubosque
- Kristin Eberline
- Kristine
- Laura @ Sunshine Stamper
- Laura Turnmire
- Laurie Schmidlin
- Lesa Rapp
- Linda Duke
- Linda-LSN
- Lindsey Botkin
- Lisa (lakind scs)
- Lisa Kind
- Lori Craig
- Maggie
- Mara Campbell
- Maria
- Maria Levine
- Mary
- MaryJo
- Melanie M
- Monique Hansen
- Moxie Fab World
- Pam Imholz
- PaperCrafts Connection
- Peppers and Pollywogs Kids party site
- Rebecca Grohall
- Rita
- Robyn
- Rose Ann
- Sarah Vrolyk
- Sharon Harnist
- Sharon Johnson
- Sharon Rivera (a chemisrty with paper)
- Sherrie
- Sophia Landry
- Storage Units, Ink, & More Blog
- Sue Berker
- Susan (Rainy)
- Tangii Crane
- Tracy
- Tricia Traxler
- Trudee
- Velta
- VivLyn
- Zena
MTME Pretty Palette Color Team
MTME Pretty Patterns Sketch Team
My Time Made Easy TM LLC
Shop till you drop!
Lauren Meader
About Me
Copyrighted material
Subscribe To My Blog
Pages
- About me
- Alexa’s Story!
- My Crafty Corner!
- My Time Made Easy™ LLC
- Our Make A Wish Trip to Disney!
- Resume/Publication List
Calendar
| M | T | W | T | F | S | S |
|---|---|---|---|---|---|---|
| 1 | 2 | 3 | 4 | 5 | 6 | 7 |
| 8 | 9 | 10 | 11 | 12 | 13 | 14 |
| 15 | 16 | 17 | 18 | 19 | 20 | 21 |
| 22 | 23 | 24 | 25 | 26 | 27 | 28 |
| 29 | 30 | |||||
Archives
- August 2013
- July 2013
- June 2013
- May 2013
- April 2013
- March 2013
- February 2013
- January 2013
- December 2012
- November 2012
- October 2012
- September 2012
- August 2012
- July 2012
- June 2012
- May 2012
- April 2012
- March 2012
- February 2012
- January 2012
- December 2011
- November 2011
- October 2011
- September 2011
- August 2011
- July 2011
- June 2011
- May 2011
- April 2011
- March 2011
- February 2011
- January 2011
- December 2010
- November 2010
- October 2010
- September 2010
- August 2010
- July 2010
- June 2010
- May 2010
- April 2010
- March 2010
- February 2010
- January 2010
- December 2009
- November 2009
- October 2009
- September 2009
- August 2009
- July 2009
- June 2009
- May 2009
- April 2009
- March 2009
- February 2009
- January 2009
- December 2008
- November 2008
- October 2008
- September 2008
- August 2008
- July 2008
- June 2008
- May 2008
- April 2008
- March 2008
- February 2008
- January 2008
- December 2007
- November 2007
- October 2007
- September 2007
- August 2007
- July 2007
- June 2007
- May 2007
- April 2007
- March 2007
- January 2007
Categories
- About Me
- All That Scraps
- blogger challenge
- camera/photo play
- Cards
- Contests
- family stuff
- FOR SALE
- Home decor/3-D items
- How to FAKE it!
- Introduction
- JUGS Challenge
- JustRite Stampers
- Lizzie Anne Designs
- My family stuff
- My Stamping Space
- My Time Made Easy
- My Time To Color Challenge
- My Time to Create Challenge
- My Timeless Template Challenge
- My Timeless Templates
- Mytime Mail
- MYTIME MOVIE/VIDEOs
- Papertrey Newsletter
- Pink Cat Studio
- Pretty Palette Challenge
- Pretty Patterns Sketch
- Product Opinions and Must haves
- Recipe's
- Saturday Sketch
- Smilebox Creations
- Stampavie
- Tutorials
- Uncategorized
- videos
Most Popular
- Create your own Onesie Card Tutorial-and important NOTE! PLEASE READ (2529)
- Saturday Sketch-Boxed bag holder (2333)
- Going GREEN! Fancy Flower Flourish-Closure Video (1478)
- Fabulous Favorite - Giveaway! (1336)
- a Prayer Request (1231)
- QUICK-Easter Baskets from Nestabilities-PTI style-and blog challenge (1063)
- Teaser Sketch (999)
- February Release Giveway! (and a little peek) (996)
- Group Post and Rambling Rose Video Tutorial (985)
- GIVEAWAY! Who wants it all?! (895)
Recent Comments (RSS)
- 야동: Love to read it,Waiting For
- 야동: This seller is in a
- 바카라사이트: 여기 처음 왔어요. 나는이 게시판을
- 야동티비: I was surfing the Internet
- 바카라사이트: 비슷한 주제에 대한 흥미로운 정보를
- 바카라사이트: "여기에 제공해 주신 귀중한 정보와
- 온라인홀덤: 유익한 웹 사이트를 게시하는 데
- 홀덤나라: 나는 당신의 블로그를 정말 좋아합니다.
- lisa: Technology, too, has left an
- 주소모음: 흠 !! 이 블로그는 정말
Copyright © 2007 - My Time, My Creations, My Stampendence - is proudly powered by WordPress
This blog has been Tweaked and Designed by Sara Williams