Archive for the ‘My Time Made Easy’ Category
You make life sweet-Video
Jun 1, 2010 Author: mytime | Filed under: Home decor/3-D items, My Time Made Easy, MYTIME MOVIE/VIDEOs, Tutorials, videosWell I hope you are ready for some SWEET projects today!!
Today Katie Cotton has a peek to share with you!
Katie says:
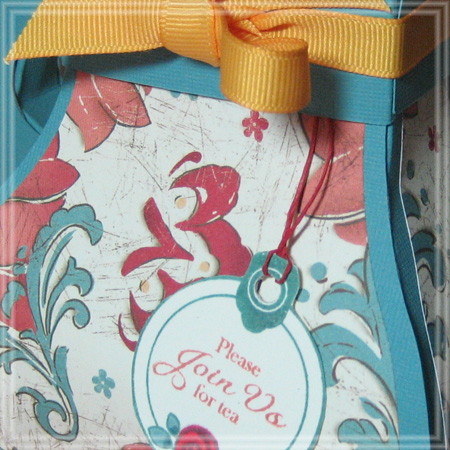
Who knew you could make something like this out of paper?! Well, Lauren did obviously! This makes the perfect gift for the tea drinker in your life! Just think of the goodies you can put inside, but also what an adorable little decoration it would make for any table! I knew exactly who I had in mind when making this sweet little …stop by Katie Cotton‘s Blog and see!
You will also want to look in on Catherine Doucette! She has a project using the Well Preserved set!!!
On that note, I decided I would share a project with you that incorporates the Well Preserved set-in a non “canning fruit” sort of way. I told you I’ll make you see it for other uses, if it KILLS me 😀 In reality the set and images are just “scent-sational” and I have TONS of ideas that I hope to share with you, using it. Bottom line: it is NOT just for people who make preserves and other canned goodness OK!
Now once I previewed the Jam Packed © Pretty Packaging templateI told you all that is isn’t *just* for jams and jellies. You CAN alter it to be used for so many other treats! I figured it would be far easier to SHOW you how with this quick video:
Well what did you think? Easy peasy right?
You “CAN” do this too you know!
Now let me share my project details with you.
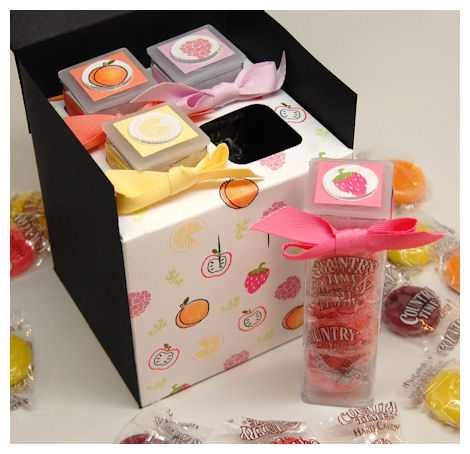
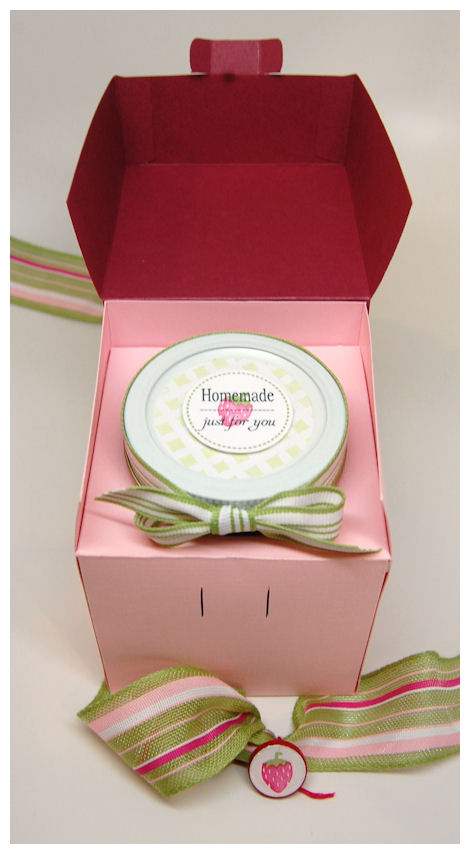
You make life sweet-(love the pun on this gift!)
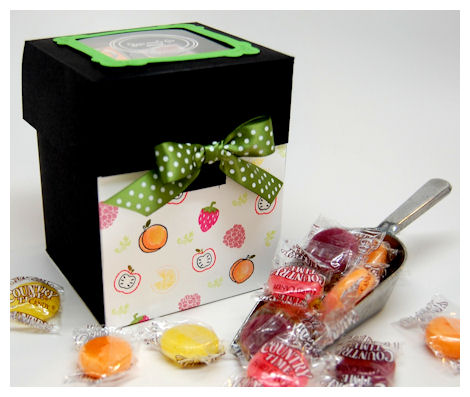
My colors and “flavors” in this design came from my “candy”. I found some Country Time Lemonade hard candies in the store! Not only are they colorful, but they are delicious! There is Peach, Pink Lemonade, Raspberry, and Strawberry. YUM-E!
Now some details
Did your ever think to cut a window in the top of the Jam Packed template? Or anything for that matter!
Well, you can! I have my Cricut do mine for me, but even you PDF users can do this too.
I think it looks STUNNING!
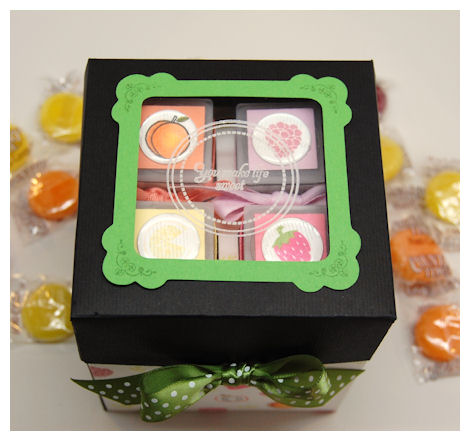
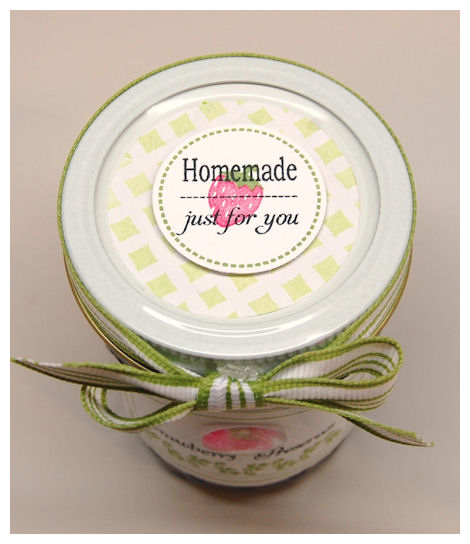
Here is my window!
I used a rounded square for my top cut out, in my lid.
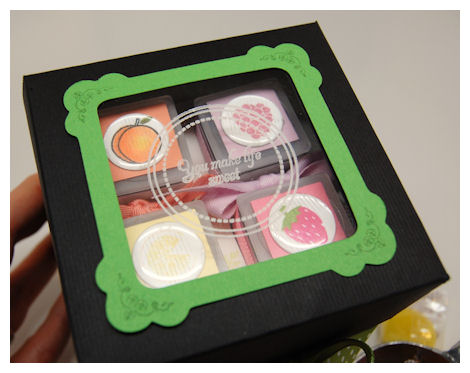
I decided to use a Meadow cardstock, and enlarged my All Tied Up: Square to mat my template lid. Then using my cricut, I cut out the same size rounded square from the center of the All Tied Up: Square frame.

Once my frame was cut I used the Killer Curves: Fancy Frames to stamp my borders.
I then cut some acetate to fit behind my open frame. I stamped the rounded tag from the Well Preserved set in center , along with the “you make life sweet” sentiment, using white stazon. Adhered this over the cup out in my lid and DONE!
A simply sweet design.
Going with the SWEET theme, and based on my treats……..
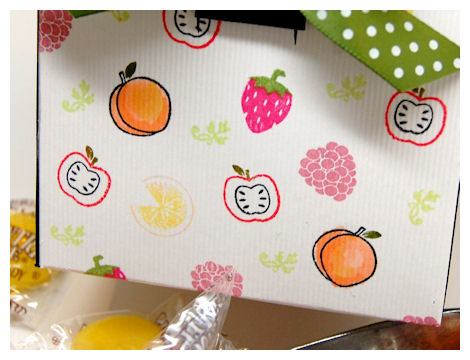
I was able to quickly create my own patterned paper using some of the fruit images from the Well Preserved set. I just randomly stamped them all over. So fun. I was able to avoid “unnecessary” work by cutting my base panel in white lineal cardstock first, then stamping it.
I love the FRESH look I was able to achieve in just 2-3 minutes!!
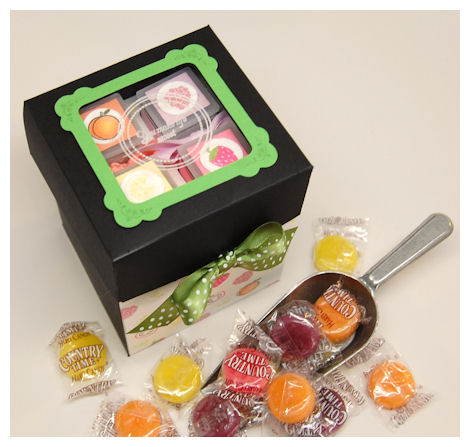
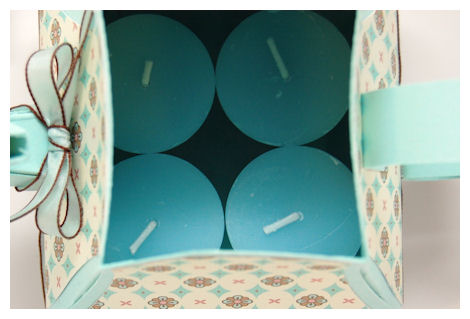
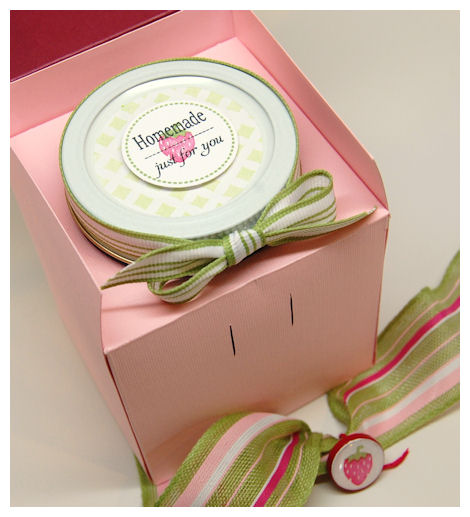
Now let’s open that lid shall we?
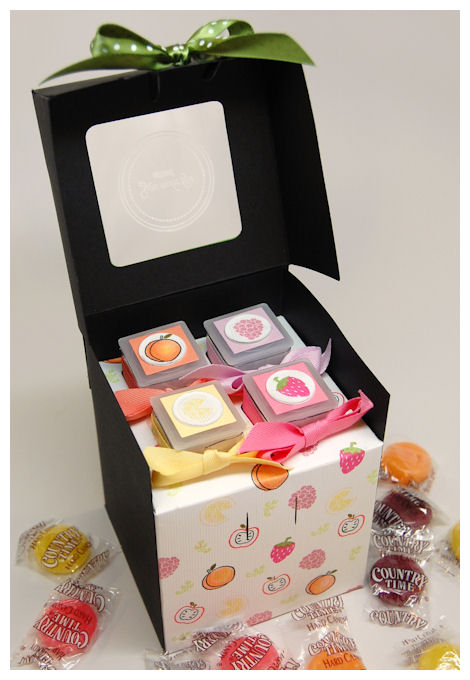
WOW! Doesn’t that look SWEET!
Inside this Jam Packed © I “jammed” in some Clear Square Tubes. They come taller than I needed them so I used a hobby blade to cut them down to 4 inches tall 😀
Now if you are like me, and you like to AFFORDABLY make and package your own gifts then SKS BOTTLE is the place to buy all the additional items you use for your Pretty Packaging templates It is like you are buying wholesale and saving yourself $! There are many other companies out there who purchase these SAME tubes from this company, then just mark up the cost (naturally). I prefer to share the info with you. I’ve been buying from them for years how and an always pleased with how fast I receive things (Im not affiliated with them, nor do I get anything for promoting them-just a happy customer)
Each candy tube top has a stamped coordinating fruit on the lid, that way they know which flavor is what. (I personally don’t like candy flavor surprises! LOL!)
Plus is looks so pretty and colorful!
How literally SWEET did this project actually turn out? This is a great gift packaging for a SIMPLE treat.
I know alot of people who enjoy hard candies. How perfect would this be for a co-workers desk, or anyone in an office or school setting? Simple & affordable, yet looks well thought out 😀 I remember my Meme use to always have hard candies by her bed when she was alive.
This is the tube out of the box. The Clear Square Tubes. come taller than I needed them, so I used a hobby blade to cut them down to 4 inches tall 😀 It was really neat to be able to make this a perfect fit 😀
I did toss some green Easter grass in the bottom so it looked “festive” when the tubes were taken out. I have issues with NEATNESS everywhere!! It makes a huge difference I think.
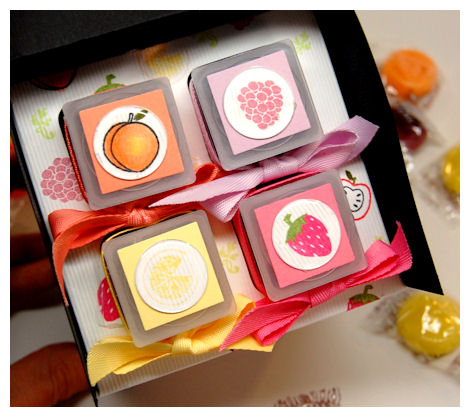
Here is a close up of one of the tube tops

As you can see I used a clear page pebble on top to make it POP!
The best part is that the tubes can EASILY be refilled!
Supplies:
Pretty Packaging © template – Jam Packed
Pretty Impressions © Stamps- Well Preserved,Killer Curves: Fancy Frames
Cardstock by Couture Cardstock: Lineal White, Lineal Black, Meadow
Other: Acetate sheet
Ink: Momento & Copic
Pretty Pieces © Cut File- All Tied Up! Square
Cricut, Clear Square Tube, page pebble
Well thank you for stopping by.
I hope you enjoyed the projects we all had to share today. There will be even more tomorrow!
I’ve had an absolute blast with all of this (although the several hour blog posts are KILLING ME! LOL!) so I hope you have found some inspiration from it.
Until tomorrow!
Release Day Group Post! One Layout….10 Different Cards
May 31, 2010 Author: mytime | Filed under: Cards, My Time Made EasyYEAH! The My Time Made Easy ™ LLC June Release is FINALLY here!
Check out our release details: HERE!
or VIEW ALL OUR NEW PRODUCTS HERE!
I have to say thank you to all my design team, for thier hard work. They are KILLING the samples this month. I am very blessed to have such a wonderful team. I also want to thank Sara Williams, as she loads all my stuff and does a TON of other things, amongst designing paper for me too. I also want to thank Kristin as well for all her hard work and design contributions this month, despite her busy schedule! She not only has the paper, but also designs some of the cut files with me, one in which inspired 2 stamp sets!
Now as you have seen ALL our new products coordinate! They always make the perfect items for gift giving 😀 I like showing you that what we have is very versatile and perfect for the “card-maker” or scrapper! So today my design team and I are ALL sharing some CARD ideas with you, using the NEW! Pretty Impressions stamps from the June Release.
Once you are done here, be sure to hop along for some amazing ideas:
Now the ideas do NOT end today! We have a week left of sharing more and more projects with you. I am so proud to have a company that offers THIS MANY projects over an extended period of time 😀 Endless ideas.
If time allowed I personally could make a 100 projects with everything we put out monthly! LOL! My brain gets running, but so does the clock.
Any-who…..
I really wanted to show you all just how fun and versatile the Well Preserved stamp set actually is! I also think it will help you to visualize just HOW MUCH you are getting in just one set 😀
Between all the fun various fruit images, and the “everyday” fruity sentiments I knew I could make a bunch of cards for any occasion.
So to share with you the different looks you can achieve, and prove just how easy it CAN be…….I used the same layout, along with every fruit image in the Well Preserved set: Apple, Blueberry, Cherry, Grape, Orange which can also be a Lemon/Lime/or Grapefruit) , Maple Leaf, Peach (can be apricot, or plum too), Pear, Raspberry (can be blackberry or other berry), and the Strawberry-to create 10 cards!
Here is the MTME Sketch 01:
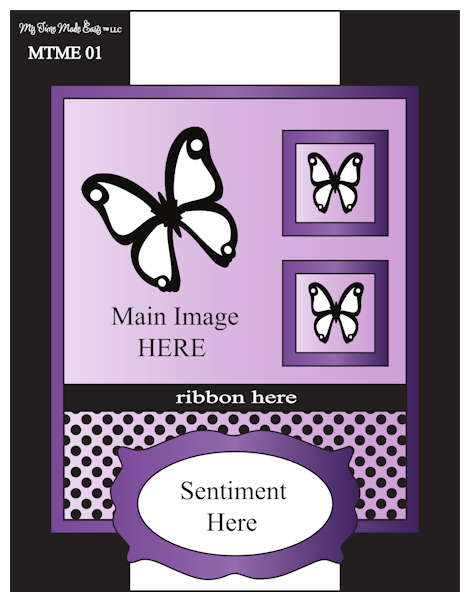
I created a special PDF document of the Sketch for you to download! It has the sizes of the layers, as well as the sketch photo for you to use as a reference!
MTME Sketch PDF<—-Click that to download/print/save a PDF
(Send me a link if you decide to give this sketch a try :D)
Between the 10 cards, I made sure to use the 2 jar styles 5 times each.
I utilized the Well Preserved Cut file to make this process of mass production go quickly too. CLICK HERE TO SEE VIDEO
Some of you may prefer one jar style over the other, but either way both are seriously cute and are well served in the set. I was also sure to make each card a little special and unique by doing something to make it a little different than the others.
When creating my designs I decided I wanted to use all the various sentiments, and found they would all fit in various “ovals”. I was also able to use both of the little leaves in the set, stamped on either side of the sentiments. NO SENTIMENT IS REPEATED!! How cool is that?
I also used the various patterns from the NEW! 5 Preserve It © Collections, the Vintage Plaid ©, Fruit Medley, and Vintage Stripes, and the Flower Fusion (last month) Pretty Printables Digital Paper collections. Since everything coordinates my “job” was made SUPAH easy peasy. (said in my Massachusetts accent)
So let me get started! I will break my creations down per collection.
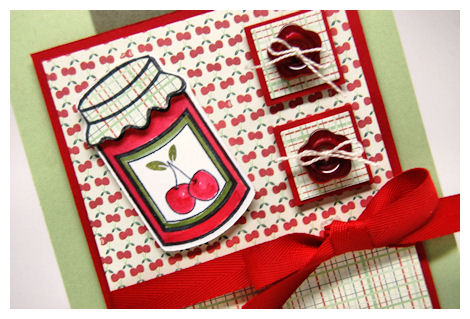
First collection Preserve It © : Cherries & Peaches
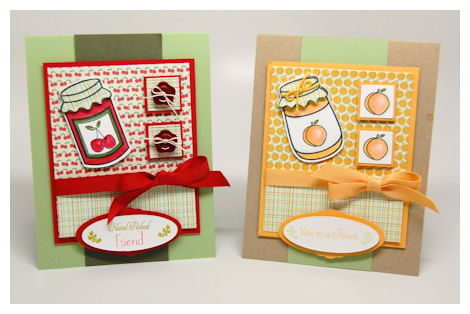
As you can see I used two different jars, used fruit paper on the top panel, and plaid paper on the bottom.
I also paper pieces both lids, one having a bow, the other not. One card used buttons, and the other the fruit image in the side squares.
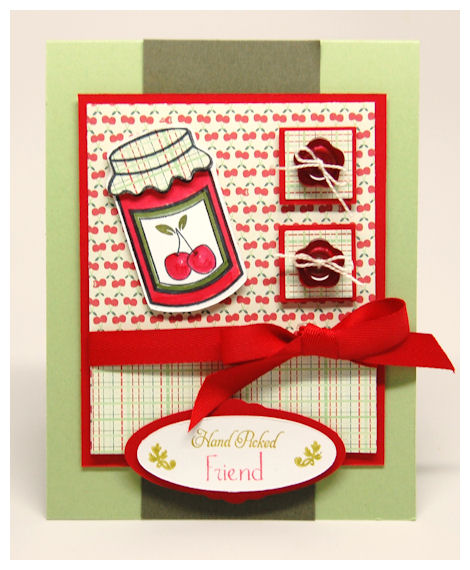
1) First up we have Hand Picked Friend
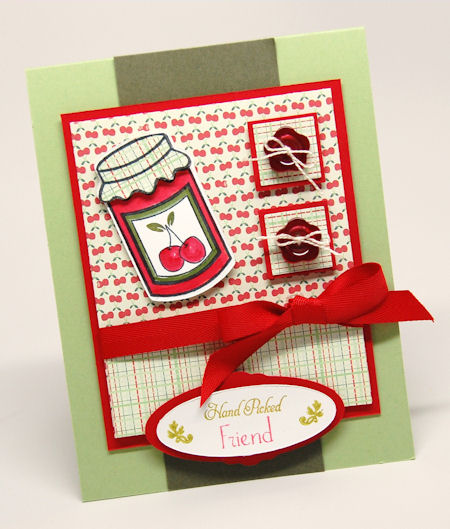
How simply country sweet is this layout?
I altered the All Tied Up: Oval for my sentiment. The Hand Picked is part of the Well Preserved set. The “friend” is from So Sentimental (expected to be back in stock next week).
I love how this turned out. I used the cherry patterned paper, and thought that it would be fun to mix it up by using some flower buttons on my side blocks.
I *just* noticed that my cherry paper is up-side-down! LOL!!! Oh well! I’ll give it to someonw with “bad eyes” and pray they don’t notice!
I used the same plaid paper to paper piece the lid of my cherry jar.
Now we have 2) Peachy Keen
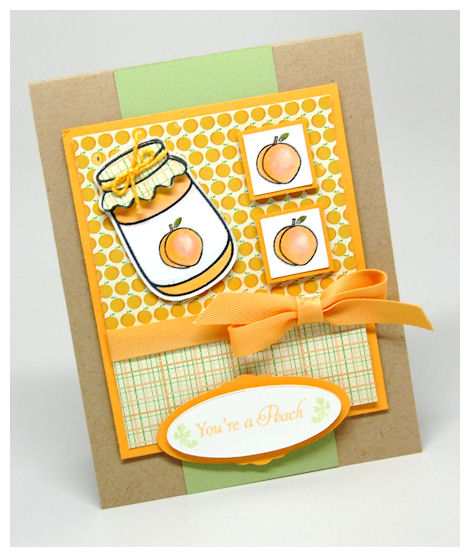
I loved coloring my peaches! The peach paper is cute. I love how Sara made all the half eaten fruit!
The sentiment is PERFECTION!
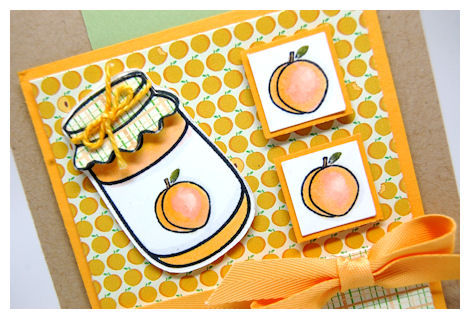
On this card I used the rounded jar, and again paper pieced my lid, using the plaid paper, tied with some embroidery floss. I love that.
Next set of cards is the Preserve It © : Apples & Pears
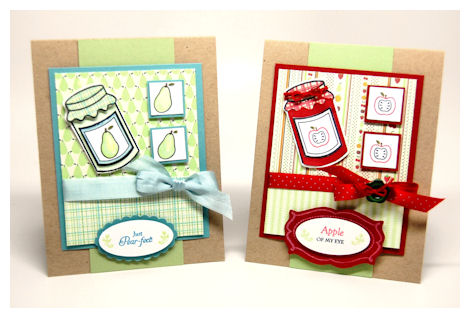
For this collection I made each different. I LOVE the colors, and the use of Sunflower cardstock as the main layer!
I can’t believe how different each card ACTUALLY looks.
3) Just Pear-fect
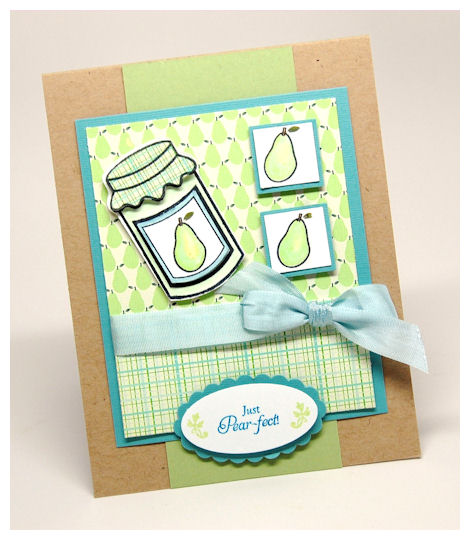
I LOVE having the blue & green on my pear card. I wouldn’t have thought to add the touch of blue, had I not printed my vintage stripped paper! For the oval I used a scallop cut file I had in my files, but the SU! Scallop/Oval would work too 😀
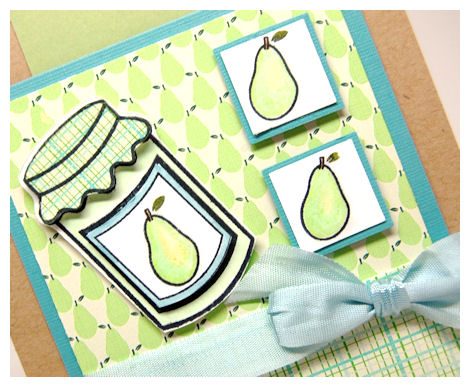
I love pears and the “Pear-fect” sentiment. The paper makes this POP. My pear “jam” is colored in a pale green, and again my lid is paper pieced. What stands out to me is the colors. Again, I love them.
4) Apple of my eye
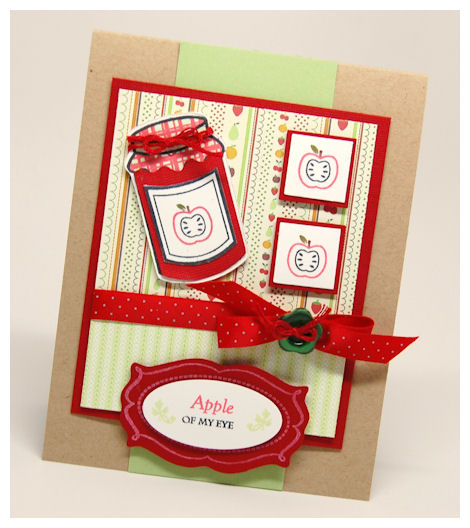
I love this. Every detail.
I used the Apple sentiment from the Well Preserved set, then for the “of my eye” sentiment, I used the Lunch Box Love Notes Add On’s . Mixin and matchin!!
My “oval” is from So Sentimental (expected to be back in stock next week). I also used the So Sentimental Frame to cut it out.
I love the fruit medley of paper! Its such a great option. I went to an older release, and used Flower Fusions for my leafy patterned paper!
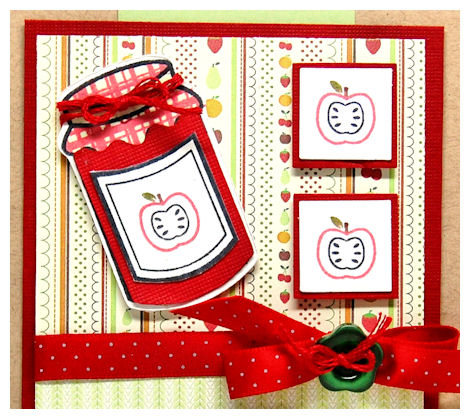
The Apple image in the set can be colored in, but it also has a separate “core” image that you can choose to stamp in the center! I think that makes it SO much more fun and versatile!
My lid is colored and stamped with the plaid image for my lid. The base of the jelly jar is paper pieced with colored patterned paper.
Next collection: Preserve It © : Blueberries & Grapes
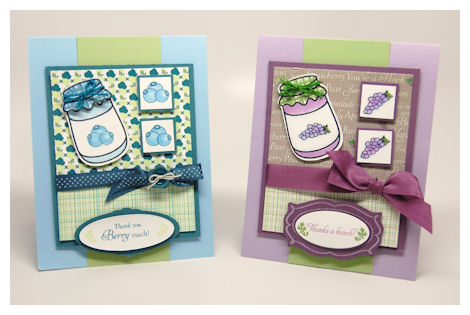
Both of these are so full of color! What is NOT to love?
I used the rounded jelly jar for both. Then the fruits on the square panels.
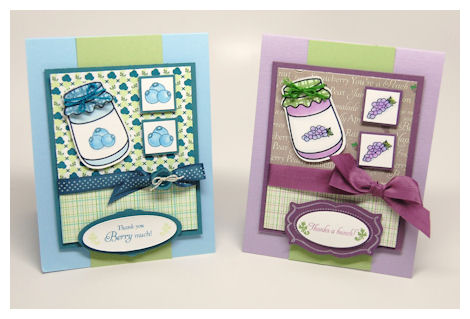
5) Blueberry thank you
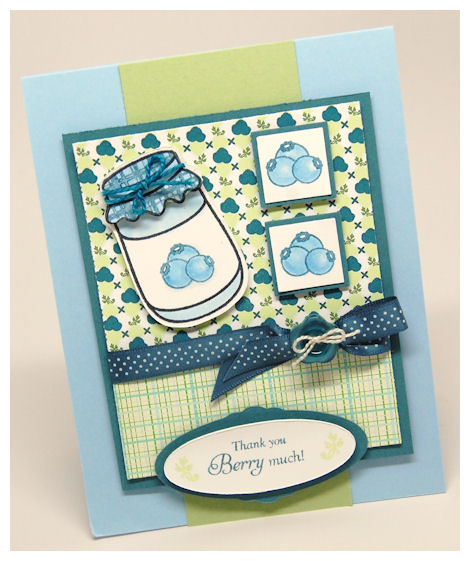
I was ecstatic over the blueberry image when it was done! I think its perfectly perfect 😀
I used the Fruit Medley paper on it, and my frame was from the All Tied Up: Oval
My children, hubby and I go blueberry picking every year! So this has happy thoughts attached for me.
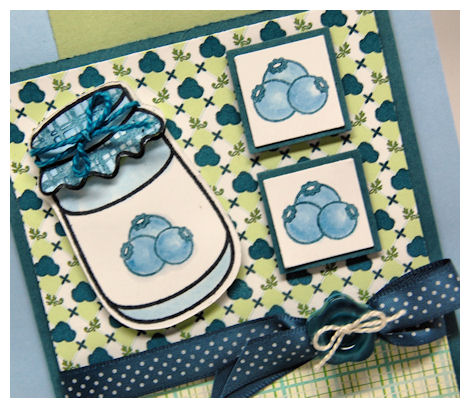
I found stamping them in a blue ink, then coloring was best. It’s so simple, and I love that.
Now we have 6) Thanks a bunch
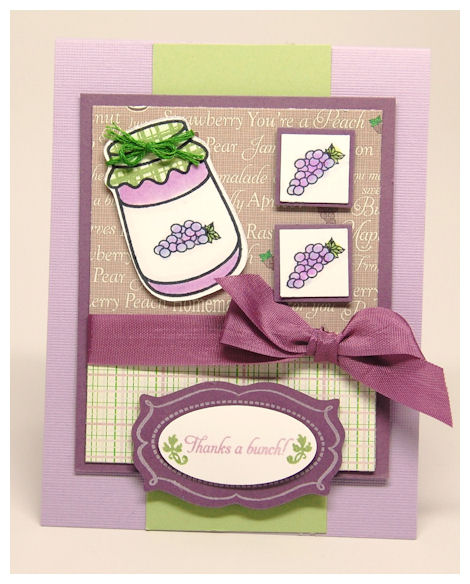
I love the text/fruit bkgd paper on this one! LOVE IT! So elelgant looking.
This card is possibly my fave from the set. Maybe because its purple?! LOL!
I went back to the So Sentimental set for the frame, and I also used the So Sentimental Frame cut file.
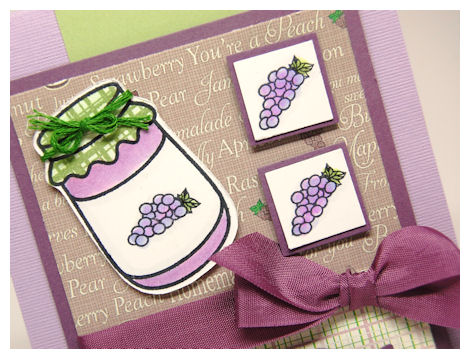
The grapes can be ANY color, and even used for WINE! Endless possibilities. My jar was handcolored, as was my lid , which was also stamped with the plaid image.
I just enjoyed this one.
Next up we have another sweet collection: Preserve It © Oranges & Strawberries
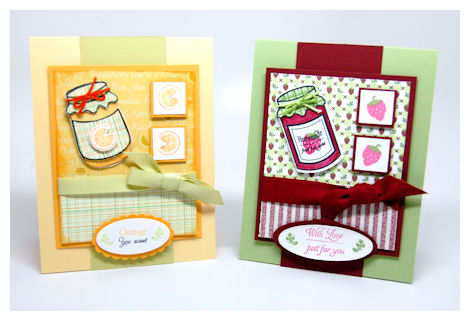
I love the colors of ALL these collections. I had WAY too much fun, in case you can’t tell.
Having a layout is GREAT! Makes the process FLOW.
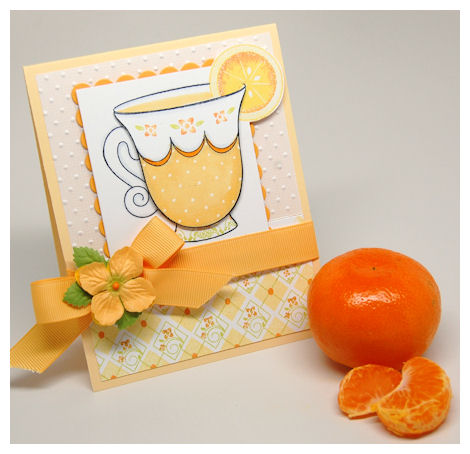
7) Here is the “Orange you sweet”
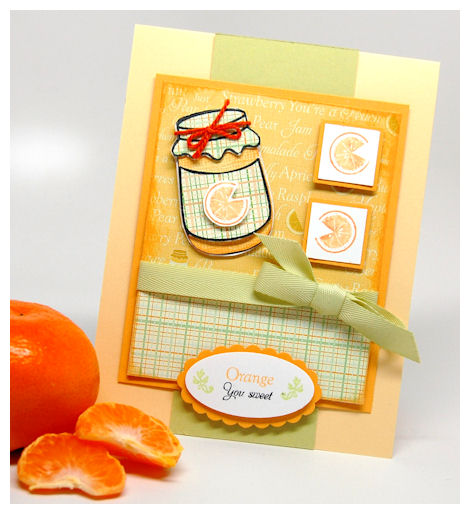
I have to admit I felt SO CLEVER thinking up this one! I inked up my “orange” sentiment, then I used markers to ink up the “you” and “sweet” from the “You make life sweet” sentiment.
I actually wanted to KICK myself for NOT putting it IN the set originally, but I didn’t even THINK of it until I made the card!
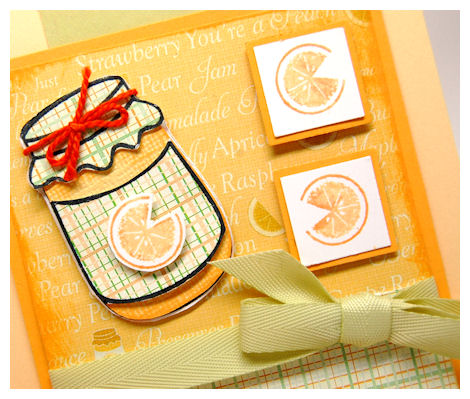
I adore the orange/lemon/lime/grapefruit wedge immensely! Makes me think of Iced Tea in the summer. I know sounds weird, but I have fond memories of my mom and I, sitting out on the porch all summer sipping ice tea with fresh lemons and having girl talk.
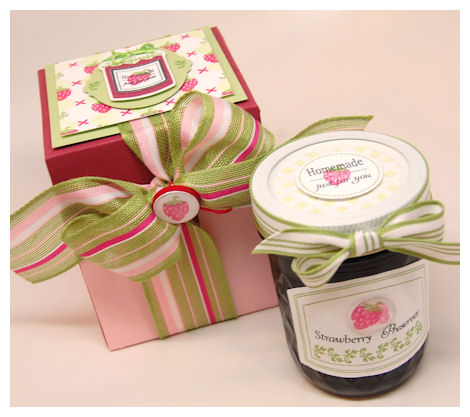
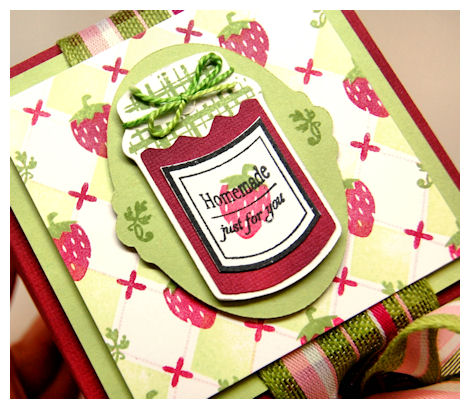
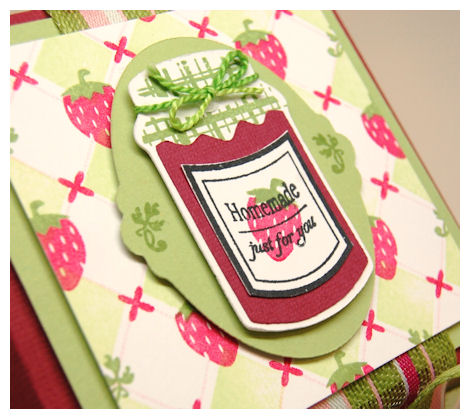
8) Homemade Just For You
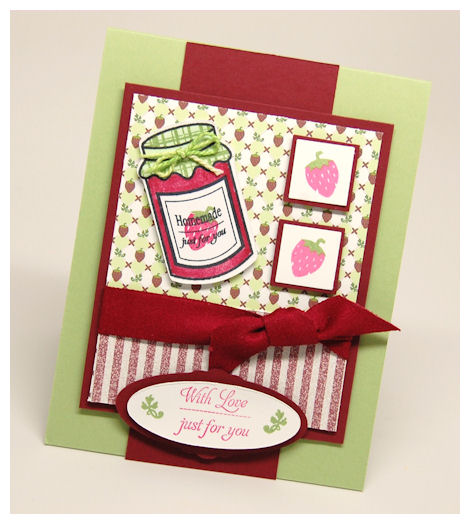
OH! I do love that sentiment label that fits right IN the label jar!
I also love that there is a larger version for your creations too!
On this one I used the Fruit Medley paper, and some Vintage Stripes paper. So summery to me! My ribbon is suede, and is just to die for. I enjoyed coloring my jelly jar!
Now we move onto the next collection: Preserve It © Lemon & Raspberry
OK so I didn’t make ANY lemon anything for this post! Instead I took the Maple Leaf in the set to complete my need to use ALL the images within the set!
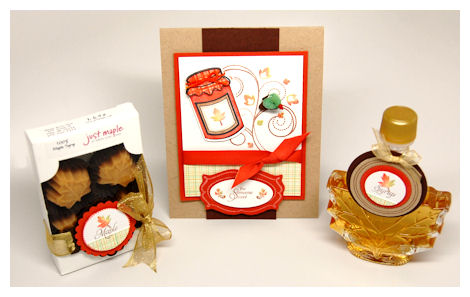
9) Maple Sweet
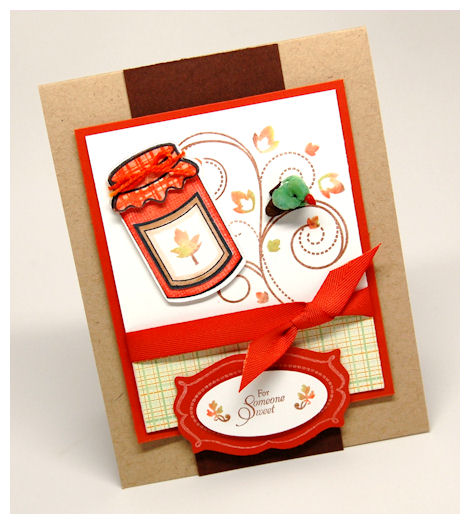
Could you just die for this one? I love that is seems masculine, and so fall. Living in NH Fall leaves, and of COURSE Maple Syrup is a BIG part of our State! I love fresh Maple Syrup and of COURSE Maple candy! So I had to include my own version of a Maple Leaf.
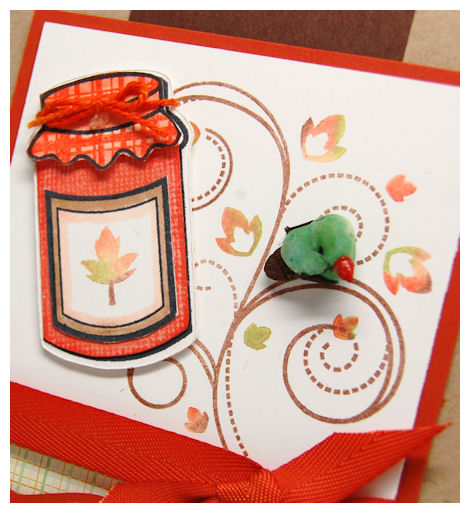
Now my favorite part! (aside from the textured jelly jar and awesome multicolored leaf)….
I was able to incorporate my Fanciful Flourishes set, and after doing so, I remembered this MINI bird I bought some time ago in Michael’s.
He is just sitting there. I LOVED how this one turned out. Being I’m not big into masculine, this one was my top favorite from the set of 10!
Now we have yet another! Last but NOT least
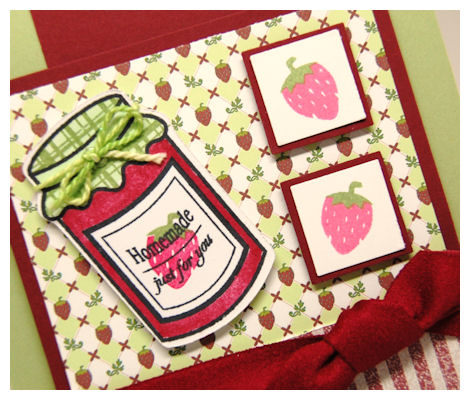
10) Sweet Raspberries

How fun is this one? This time I used the Vintage Plaid paper on top, and my leaf prints on the bottom
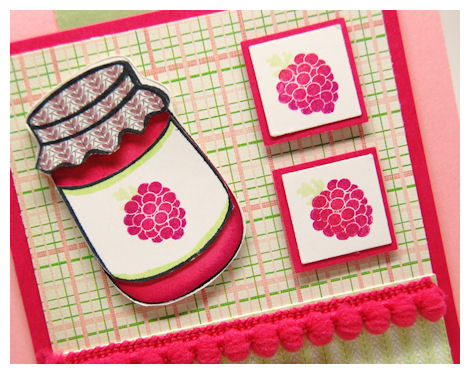
The FUN detail, my pom pom ribbon!! I felt it went perfectly with the Raspberries!
Then I used the leafy paper for my lid. I was SO proud of myself for NOT using another plaid (although admittedly I love it).
Supplies:
Supplies
Pretty Impressions © Stamps- Well Preserved, So Sentimental, Fanciful Flourishes, Lunch Box Love Notes
Pretty Printables Paper ©- Preserve It Collections, Vintage Plaid Collections, Vintage Stripes, Floral Fushion and Mini Leafy stripes
ALL my cardstock Cardstock by Couture Cardstock
Ink: Momento
Pretty Pieces © Cut File- Well Preserved, All Tied Up! Oval, So Sentimental Frame
Buttons by SEI, Ribbon by May Arts, DMC embroidery floss
WHEW! I hope you are STILL with me here!
I also hope that whether you “CAN” fruit or not (personally I don’t can! LOL!) you can see the value and use within this set 😀 It is really cute 😀
No matter, I will do my best to continue to convince you WHY you need it, as the week progresses 😀 But in the meantime, It is time for me to move on to the next project!
I hope you enjoy all the projects. I have killed myself trying to pull out some extra stuff to better share with you all the possibilities! I have even more to come, so I hope you stop by again 😀
Till tomorrow!
MTME June Release is HERE!
May 31, 2010 Author: mytime | Filed under: My Time Made EasyI’m so very excited that the My Time Made Easy ™ LLC JUNE release is finally here!
You can view * ALL NEW PRODUCTS HERE *
We have many NEW! Products that coordinate together! So don’t miss out 😀
My shipping is VERY affordable and I ship WORLDWIDE 😀
3 NEW! Pretty Packaging Templates
3 NEW! Pretty Impressions Stamps Sets
A Spot of Tea © 20 Images – Digital
Killer Curves: Fancy Frames © 7 Images
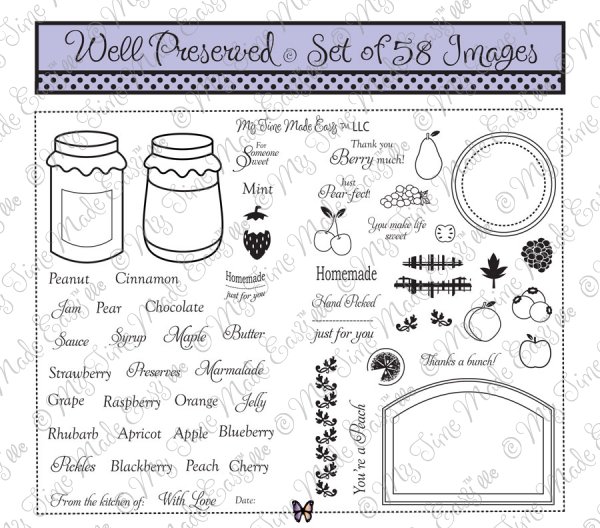
Well Preserved © 58 Images – Digital
18 NEW! Pretty Printables Paper Collections
TOO MANY TO LIST! So check them out.
4 NEW! Pretty Pieces Cut Files
1 NEW! Perfect Package Collection <—Check it out!!
If you haven’t yet you may want to sign up for our NEWSLETTER on our Website.
Detailed information about our products can be seen on the ABOUT PAGE
Do not forget to READ DOWNLOAD INSTRUCTIONS prior to checking out, and be SURE you selected the correct file type!!!!
Also do NOT let your download expire before you have a change to download it.
If you have *any* customer service questions or issues please contact me at:
#3 Perfect Peek -Tea Tabbed Template & Video
May 30, 2010 Author: mytime | Filed under: Home decor/3-D items, My Time Made Easy, MYTIME MOVIE/VIDEOs, Product Opinions and Must haves, Tutorials, videosHappy Memorial Day!
Thank you to all our Military for serving our great Country.
My friend and fellow design team member Kristin is in the Air Force. I have so much respect for people and families who give so much of their life for our Country, so a big thank you to them.
I have a SIMPLE post for you today, just before our release on June 1st!
No worries I have TONS to share 😀
The WINNERS of the last 2 posts will be drawn later today. So stop back by later. There is still time to enter so don’t miss out!
NOTE: All products shared are from My Time Made Easy ™ LLC! The items you are previewing will not be available until June 1st!
After cramming so much in to the last two days I figured I’d keep it a bit lighter, if that’s OK! I’m so excited by you sharing my excitement! I have so many more wonderful things in the months to come too, it can be hard WAITING 😀
Now after yesterday’s project this *may* seem a bit inferior, but I promise you that this post is just as packed full of wonderful products for everyone! I am just so excited by all the possibilities with this release, and there is just so much more to come 😀
Today, when you are done here, you will want to check in with:
They both are featuring cards using the NEW! Well Preserved set as well as A Spot of Tea ©. ALL our products are versatile. You can use them for packaging as well as CARDS, tags and even scrapbook pages. The sky is the limit.
You will also want to see what
and of course Catherine Doucette have created using the newest template, previewing today: Tea Tabbed Box!
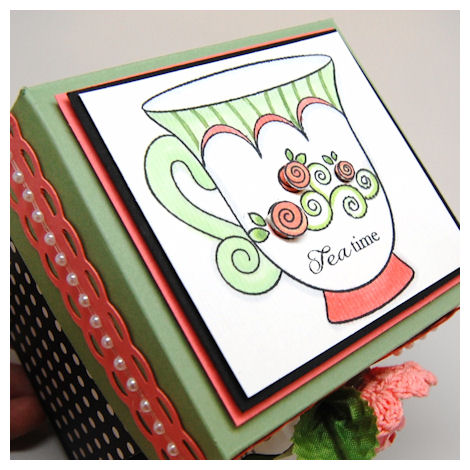
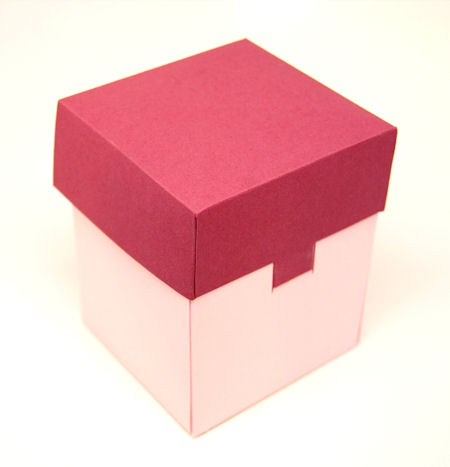
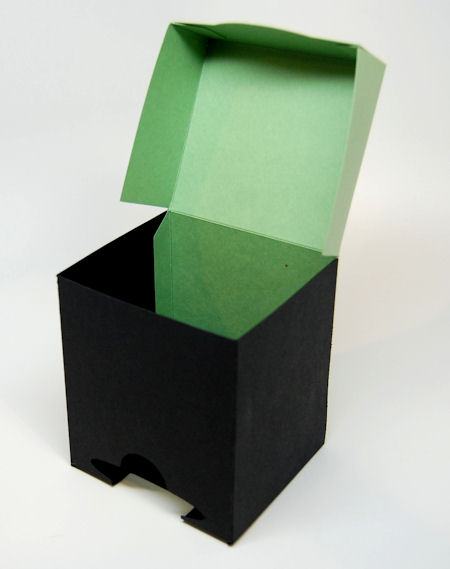
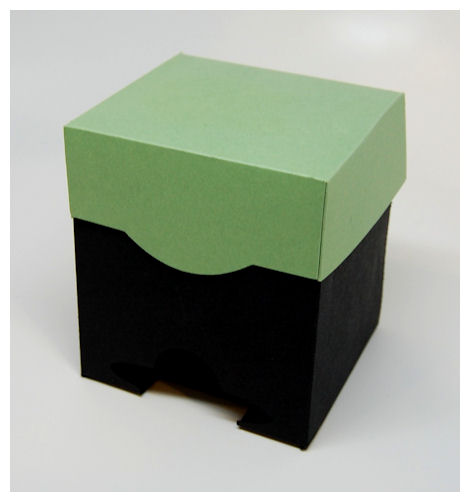
This is the Tea Tabbed Box! before…..
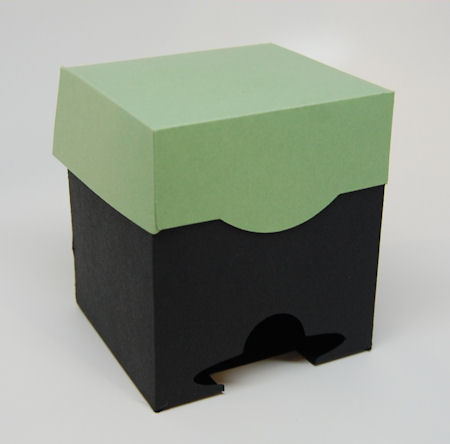
My box base was cut utilizing the tea cut out from Raven cardstock.
My lid was created using Meadow cardstock.
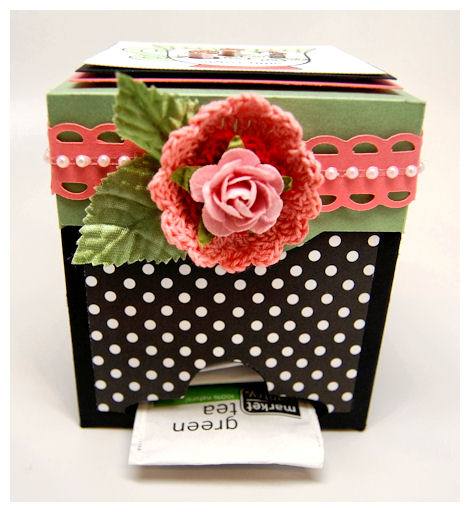
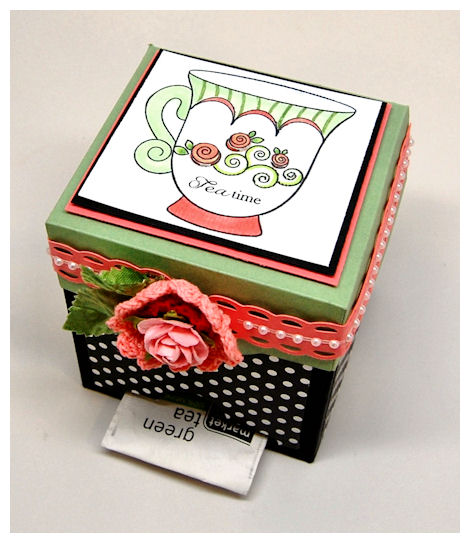
A little embellishing, and this is the after!
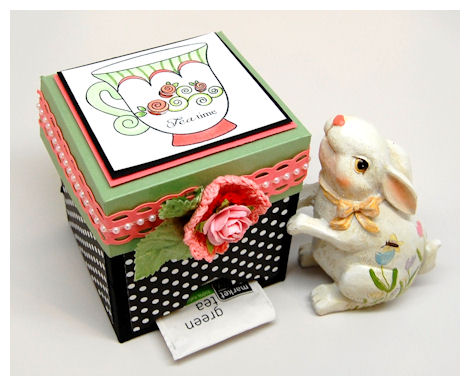
What a difference 😀 It doesn’t take much to turn this into a complete WOW!
Available in PDF, SVG, WPC, DXF, GSD
Completed Project Size
4 Inches Tall
3 1/2 Inches Wide
3 1/4 Inches Deep
This is a template you are really going to want to check out!
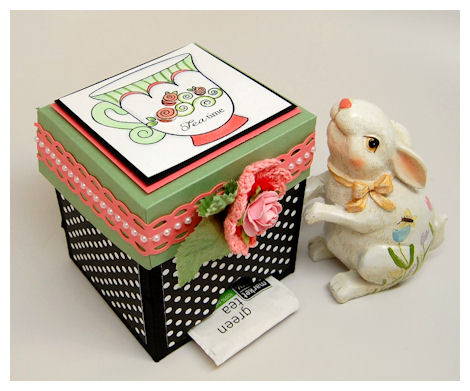
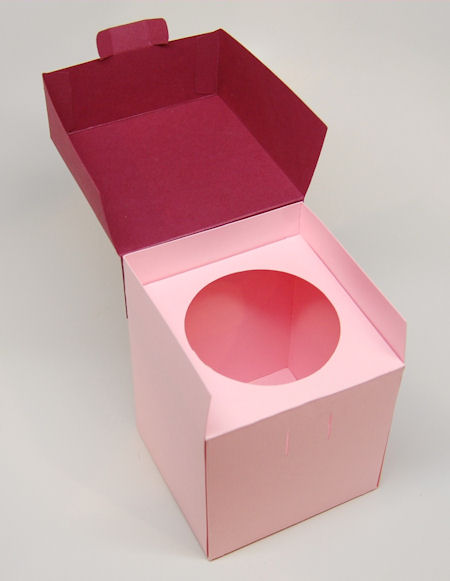
The name for this template came from the fact that it has the ability to sweetly store your tea bags in style, OR you have the option of using the front panel that is solid, so you can use to to hold a variety of other sweet treats! Now that is something great that will help you to make this template VERSATILE…..you can opt to use the solid front panel, which is included in the template for even MORE use. You will see details for that soon 😀
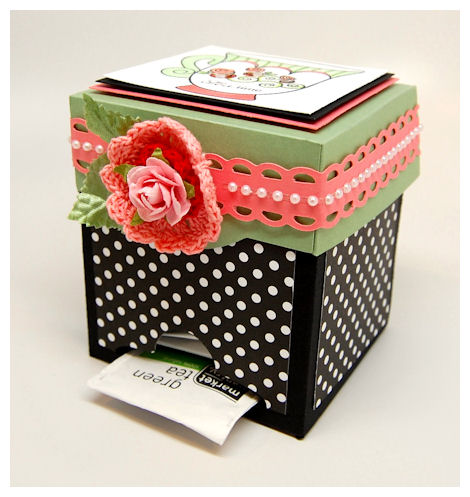
Finally a template the give and even proudly display your tea, but the choice is yours. Tea cut out, or no tea cut.
Either way the presentation will be stunning. (I will share versions of this template without the cut-out as the week progresses)
The cut out portion was designed so that tea bags fit out of the front slot, and can easily be pulled out. Just open the lid, and refill. Now your favorite tea can always be at your fingertips, and proudly displayed or gifted 😀
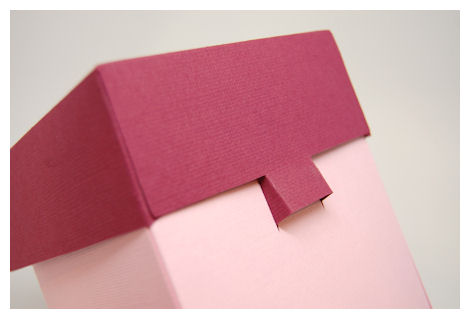
Front before….
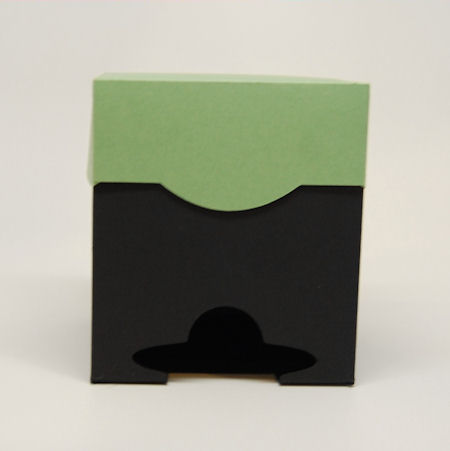
I love the tab design! There are so many possibilities for decoration.
after….
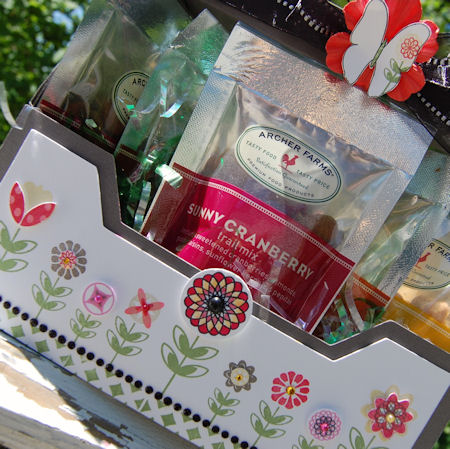
This was decorated SO simply. I just layered on my Flutters and Flowers (polka dot) paper for the bottom panels.
HANDY TIP: You get a MUCH richer BLACK patterned cardstock if you chose to print using your BLACK ink ONLY.
The scallop trim was done by using the Pretty Pieces © Cut File- Border Builders Open Scallop. I was able to line it up to create the dual scalloped trim around my lid, which I adorned with adhesive pearls, and a crochet flower from American Crafts. The center of the crochet flower is by Prima. The leaves are from the bridal section at Michael’s.
Here is the top/side view
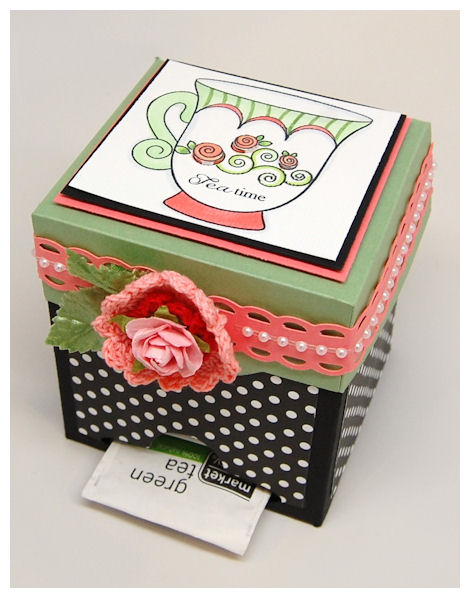
The A Spot of Tea © tea cup fits perfectly atop this box creation. ( A happy accident?? No :D)
I could have made a million “tea” themed cut files or templates, but decided to pick my favorites.
I can definitely see this sitting out on a counter ANYWHERE! Pretty & functional all in one. There is a sweet decorative tabbed closure, and the dual functionality of it being a box that is as wonderful, as it is versatile, makes this a MUST have!
You may want to check out the A Spot of Tea © Pretty Impressions stamp set that coordinates perfectly with this!
As I said in a previous post, there are MANY tea cut building options for the A Spot of Tea © set.
Here is a video sharing some with you:
There are SO many pattern options for this set! You can make so many different tea cups!
 .
.
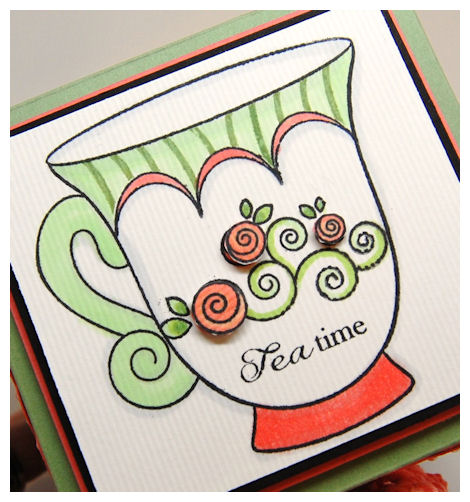
Here I chose to build my cup using the scallop trim, then stamping the stripped pattern. That pattern is so elegant and pretty, and is a perfect fit to my cup too.

For my bottom portion of the cup I used the swirly rose pattern, which I took the rose “buds” and colored/cut and put on dimensionals for some POP! There are some punches out in the market that fit perfect too! So no hand-cutting.
There you have it!!
The perfect Tea Tabbed Box!
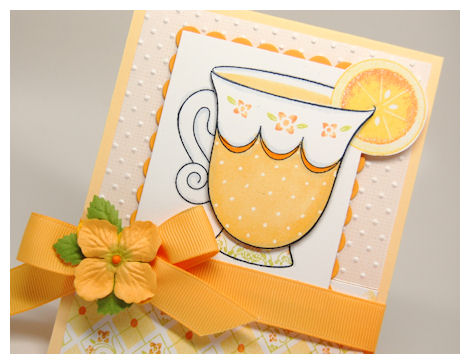
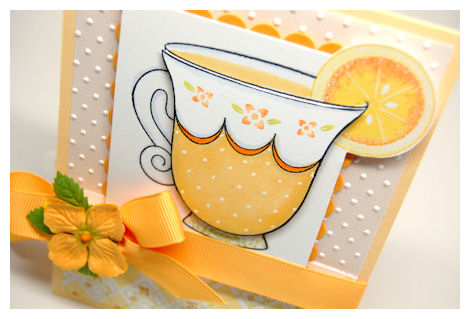
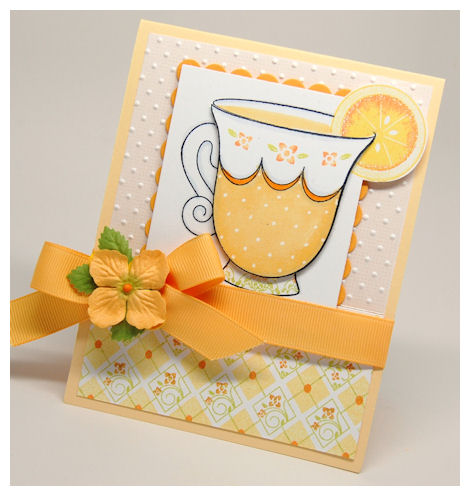
Now how about a card?
I figure since I completed a video about creating your own tea patterns a card would be a nice additon
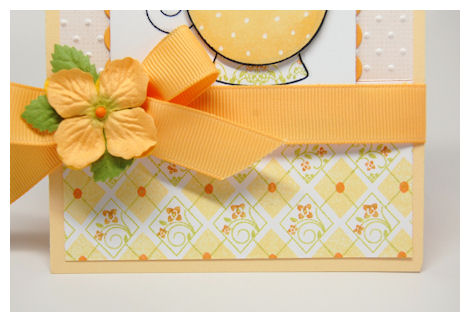
You make life sweet
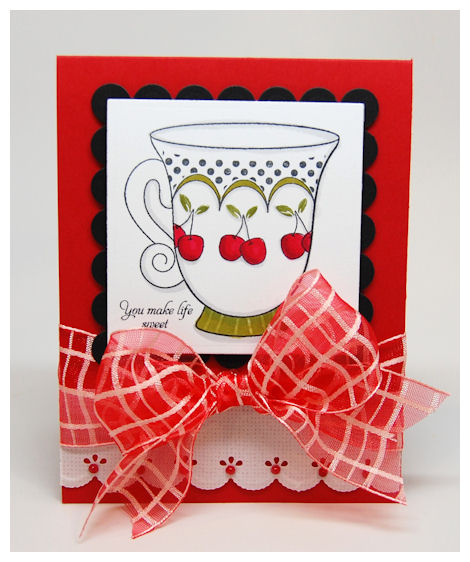
You may recognize this one from the video! Simple but oh so SWEET.
I LOVE Cherries! Cherry flavored ANYTHING, and Cherry images. I also LOVE red, black, white & olive, so this card is SO pretty to me 😀
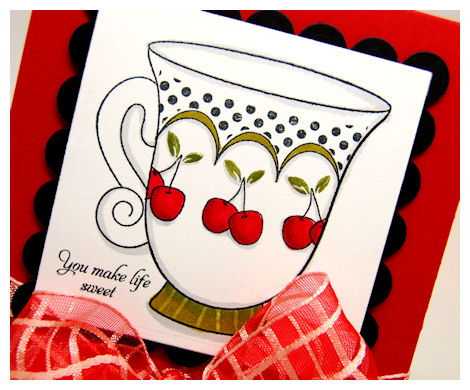
For this pattern on my tea cup which is from A Spot of Tea ©, I combined the patterns in that set, with the cherry image from the Well Preserved set!
I really adore the cherries from this set. The sentiment from Well Preserved was a perfect fit too 😀
How perfectly cute. You can use any of the fruit images on thier own, or on your tea cup! I’ve always been a big fan of mixing and matching sets.
Supplies:
Pretty Packaging © template – Tea Tabbed Box
Pretty Impressions © Stamps- A Spot of Tea, Well Preserved
Pretty Printables Digital Paper: Flutters and Flowers (polka dot)
Cardstock by Couture Cardstock: OSW White, Raven, Meadow, Spitfire
Other: SU! Regal Rose
Ink: Momento, Copic Markers
Pretty Pieces © Cut File- Border Builders Open Scallop
flower by American Crafts, leaves from bridal section of Michael’s, adhesive pearls
So that it that-for now. There is a FAB “time for tea bag” Pretty Pieces Cut File that accompanies our tea theme, but I will save that for another day.
Thanks for the feedback and kind comments. I hope you all have enjoyed the videos too. I busted my hiney making sure I got them done for you 😀
Tomorrow is our official release, and we have a fabulous group post 😀
So be sure you can stop by for a visit! You won’t want to miss the teams project ideas for you.
I know I am counting down the hours till the clock strikes midnight!
#2 Video Perfect Peek- A Spot of Tea Giveaway
May 29, 2010 Author: mytime | Filed under: Home decor/3-D items, My Time Made Easy, MYTIME MOVIE/VIDEOs, Product Opinions and Must haves, Tutorials, videosHi all!
I’m back with day #2 of peek projects. Today is just as exciting as yesterday, so grab that cup of coffee (…..or tea :D) because I have 2 videos to share today, and a TON of project ideas!!!
You will CLEARLY see why I take some days off from posting! It isn’t because I’m doing “nothing”. I cram more into each hour than I sometimes think possible.
I have TWO videos (insert shocked face-sorry I took all of them on the wrong settings, so I swear next release they will be better quality-its NOT my camera, but user error! Story of my life), and a Giveaway-so keep reading! I’m just praying I don’t forget to include something!
NOTE: All products shared are from My Time Made Easy ™ LLC! Now the items you are previewing will not be available until June 1st!
When you are done here, you will want to be sure to stop by and visit :
Catherine Doucette She is debuting her very first stamp concept today ! So pay her a visit and congratulate her! This girl is a wealth of ideas 😀
Here is what she had to say:
I love tea! And I am so thankful that Lauren loved my vision for the tea set I wanted to design…a tea cup almost true size! Well, at least large enough to paper piece, or stamp with a bunch of different patterns, so you can create any tea cup you want! Perfect for get well cards, just thinking of you projects, birthday parties, baby shower…or come take a peek at the complete set I designed for a bridal shower!Don’t forget to stop by and see Pam Imholz
and Silke Ledlow -she debuts her FIRST project today!! Give her some love too! We are so excited to have Silke aboard 😀
Now you know we have a fruit/jam/jelly set with template combination for you (as seen yesterday). You all had me searching for recipes and items I never heard of before! YUM!! I will be sharing much more soon, for uses of the Well Preserved set.
Don’t miss out on that giveway—> HERE! It is valued at $70
What else goes great with such fruity treats?
Let me tell you!
Today I have a very special Pretty Packaging Template & Pretty Impressions stamp set combination for you!
I have LONG been asked to design something for you “tea lovers” out there!
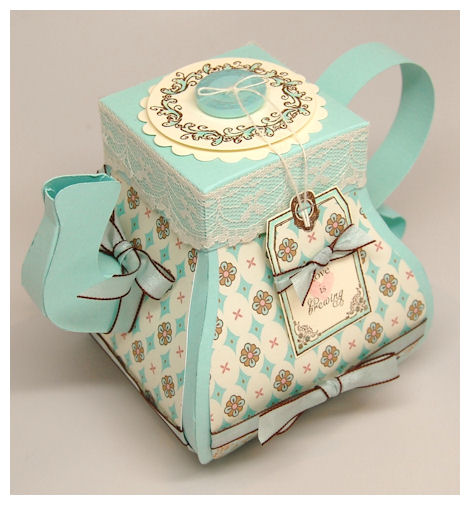
So if that describes you, then I think love is brewing…..
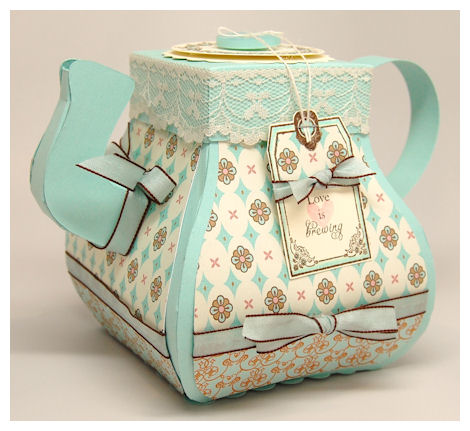
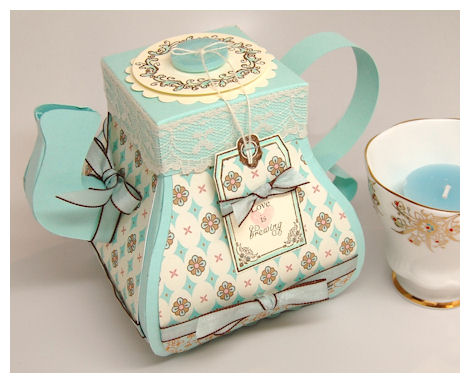
No! Your eyes do NOT deceive you.
Yes! You are looking at a curvy tea pot, all designed from cardstock!
BEFORE I get to the template, let me address the stamp set.
Now I have definitely had some ideas about doing a tea set. I even designed a CUTE tea pot for the Just For You © set a few months back. I knew I’d get to doing a “tea themed” set, someday. One day I got an email from my design team member: Catherine Doucette.
We had previously spoke about her doing some concept/design work. This is partially why she left the creative part of the team. We’ve rolled over some ideas for future sets, in which there is a huge gap in the market, and would make for some GREAT coordinating gift packaging. Catherine sent me some of her sketches/ideas for the perfect tea set!
I have to say that Catherine’s take may have made this become a favorite for me. I don’t think I personally would have gone the route she wanted to take, but it all worked out so beautifully that I am glad she did.
So based on her concepts, and sketches, and my hand in the design we worked together to create A Spot of Tea ©!
Orange Zinger (one of my favorite tea flavors from Celestial Seasonings inspired this creation)
This set is about to become my favorite!! I can’t get enough of it. Actually everything this month is just over the top amazing to me 😀 Wait until you see for yourself.
A Spot of Tea © Set of 20 Images $20
*set will also be available as a digital download for ONLY $12*
Concepts by Catherine Doucette, images designed by Lauren Meader.
This set is perfection for the tea lover! Making tea themed gifts, favors, cards, tags and other packaging couldn’t get any easier! Your cup will be overflowing with ideas and inspiration. We have a stunning tea cup, with the ability for you to use our several border pieces to create your own unique tea cup, each time you stamp!
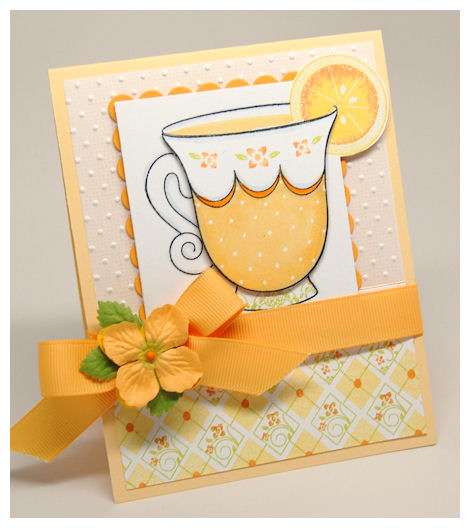
For my tea cup I used the technique that you will see in the video below for my orange wedge.
I then cut out my cup layer, ensuring the orange would overhang my mat.
For my actual cup (which the front layer is on dimensional) I used one of the border images in the set (you will see a video on all the possibilities for that tomorrow!) and stamped my scallop layer. I then used my Copic markers to color in the scallops, and the bottom section of my cup. I created polka dots using my white Singlo gel pen. I also colored my cup, I also “colored” my “tea” in the cup too.
For my delicate floral border I took the flower/leaf images from the Fanciful Flourishes set to create my pattern! That is another thing I love about this cup! It is sized so nicely that you can incorporate all sorts of images from other sets to make so many various patterns on your tea cup! Limitless possibilities.
(Wait until you see what I did using the digital version of the set later this week!)
As you can see here is even a fruit wedge, that can rest perfectly on the edge of our tea cup.
Here is a video to show you how quick and easy that is to use!
The tea cup is about 2 1/2 inches tall, and 2 1/4 inches wide. This allows you to ability to use a variety or other stamps inside it, color it, or easily paper piece it too 😀 SO MANY OPTIONS!!
In this set you will also find a beautiful floral border, 2 beautiful tags, and several must have sentiments!
Sentiments include:
A spot of tea
Please join us for tea
Baby is brewing
Love is brewing
Tea Time
Thinking of you
Feel better soon
This set was designed to coordinate with the Tea For You © and Tea Tabbed © Pretty Packaging Template.
You will also see a coordinating Pretty Pieces © Cut File called A Spot of Tea ©. Now you don’t have to hand-cut those tags, or the adorable tea cup! You can even use it to create tea shaped place cards, tags, or invitations!
You may also want to see the Time For Tea Bag © Pretty Pieces Cut File! (more on that tomorrow)
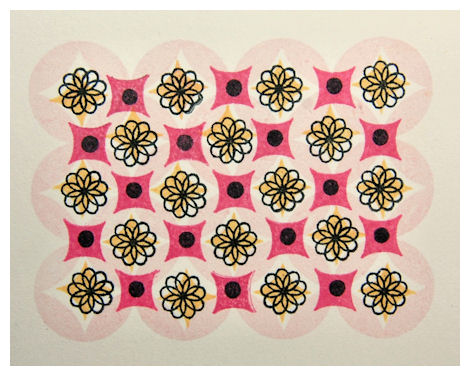
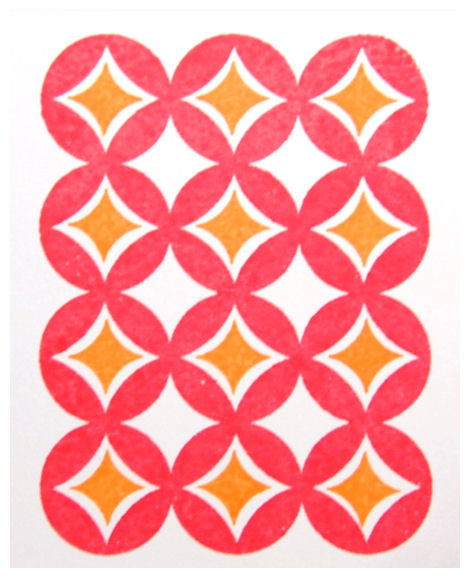
Now on my sample I created my own patterned paper to match!
Note: I stamped one of the floral border in the set along the bottom of my tea cup 😀 A elegant touch!
Once again I turned to Argyle Amazement for the ability to create yet another stunning pattern.
I just inked up my flourished argyle pattern in a green pear ink, then used my pumpkin SU! marker to color the “flowers” in the pattern. Once stamped I stamped the solid diamond pattern in a cantaloupe ink, then added a tangelo ink to dot my connecting centers! Easy peasy.
OK moving on…….
As I stated about this set also has a coordinating cut file! (also used in the sample above for the 3 D effect.)
A Spot of Tea Cut File $2.50
Available in SVG, WPC, DXF, GSD
This file was designed to coordinate perfectly with the A Spot of Tea set, but can be used on it’s own as well. Now you can make your own tea cup shaped cards, tags, favors, and place cards in minutes!
The tea cup base in this file was made so the the “mat layer” fits the border images of the A Spot of Tea stamp set. The MAT layer is the exact size of the actual tea cup. The “tea cup” from the set wasn’t designed to stamp direct on the tea cup layer.
Tags in the set are the perfect mat layer to tag images.
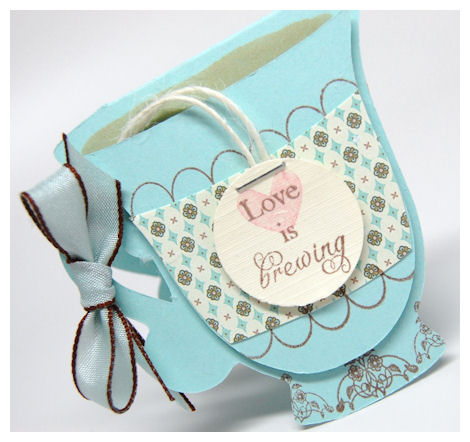
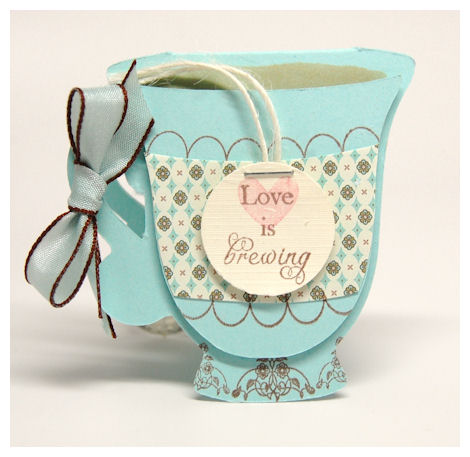
In this sample I stamped the dual scallop border using the A Spot of Tea © , then using the Tea Parlor: Sunflower Sprinkles paper collection, I scaled down the version of the paper used on the tea pot (samples below) to design my cup border to match!!
I stamped my sentiment from A Spot of Tea ©. The little heart was stamped using the You’ve Got Mail set. I cut it to look like a tea tag. I also used the A Spot of Tea © floral border to stamp the bottom of my tea cup!
Here is a video on how to use the file to create a tea cup shaped card/place-card!
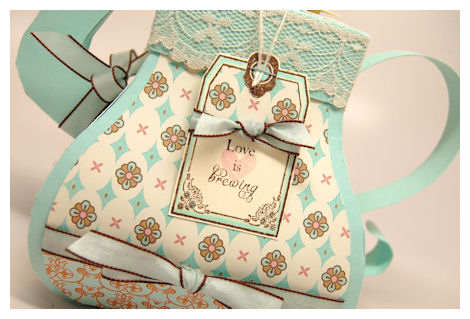
Now what better compliment to a tea cup set, than a tea pot template?!
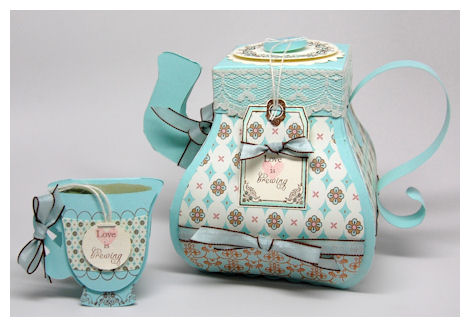
I know! It’s CRAZY!! I think I am the most proud of this one, out of anything I have made to date 😀 It turned out far better than imagined. Plus I made it EASY for YOU to be able to make it yourself 😀
That is the most important part: USER FRIENDLY for ALL Skill levels!
Each template comes with step by step photo instructions.
Available in PDF, SVG, WPC, DXF, GSD
Completed Project Size
Top Opening 2 1/2 inches squared (so you can fit some great treats in the top opening!)
4 3/4 Inches Tall
4 1/2 Inches Wide
4 1/2 inches Deep
One word to describe this curvy tea pot shaped template: “Tea-riffic”!
Now you can WOW! any and everyone with this beauty. My template makes you being able to create this easier than ever imagined.
In this sample I used the Tea Parlor: Sunflower Sprinkles paper collection for my decorative panels. I LOVE the way it turned out.
My design team member (the web guru and ever in demand) Sara Williams designed an entire collection of Tea themed papers this month called Tea Parlor. Each collection is AMAZING.
There are 6 collections in all. Each collections is ONLY $6 and features 12 different designs.
Her color collections are Tea Parlor:
Tea Parlor: Candied Apple Jack
Tea Parlor: Acorn Squash/Ganache
Tea Parlor: Teller’s Fallen Leaf
Tea Parlor: Nomad’s Warm Apple Cider
Tea Parlor: Sunflower-Sprinkles
The colors from all our paper colors are based on colors from my favorite cardstock company Couture Cardstock.
(Last month Sara (and her DD Lily) designed some of our paper too-which you can see Sara’s post about HERE)
We also have a few amazing collections offered this month by the ever talented Kristin Bueter! More on those tomorrow 😀 Kristin is going on a short hiatus for military training, so we will miss her ( A LOT ) the next few weeks while she is gone :C
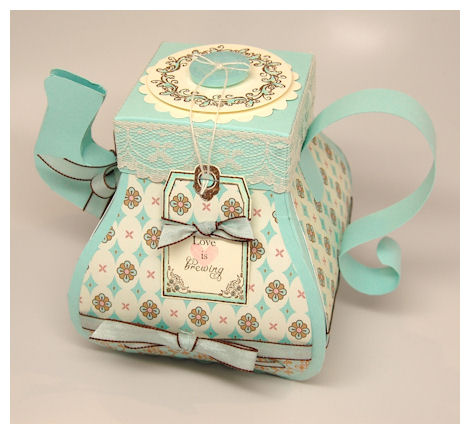
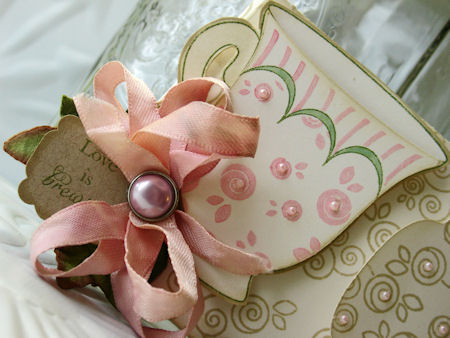
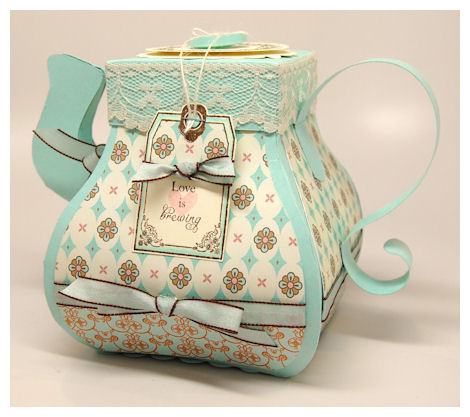
Every detail is included in the template: The handle, 3 dimensional spout, lid, and decorative panels.
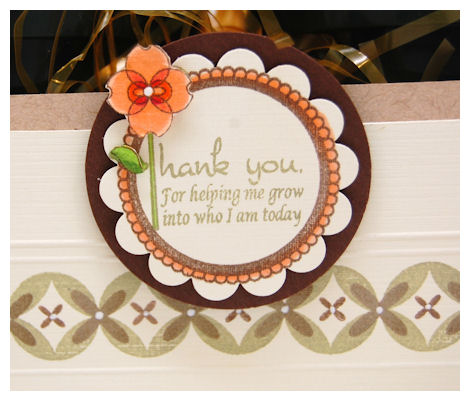
Here is the lid top
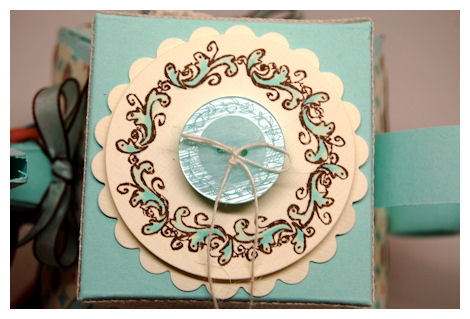
I used the NEW! Pretty Impressions stamp set called Killer Curves: Fancy Frames! (this set also has a coordinating Pretty Pieces Cut File called Killer Curves) for the top decoration of my tea pot lid. I stamped the frame in a chocolate ink, then colored it in with my markers. I added a decorative button, in which my tag hangs from.
About Killer Curves: Fancy Frames Set of 7 images $20 This is an amazing collection of 4 large frames (with more to come) that work beautifully on their own, but were designed to coordinate with a Pretty Pieces Cut File called Killer Curves Label! You will fall in love with the Killer Curves labels, which was designed by Kristin Bueter! Each of the 4 large frames are about 2 1/4 inches around. The set features 3 corner pieces that were designed to perfectly fit the 4 corners of the Killer Curves Cut File or on ANY corner of your card, tag or template creation! A beautiful, yet simple addition! Be on the look out for even more frames in the future! (WINK)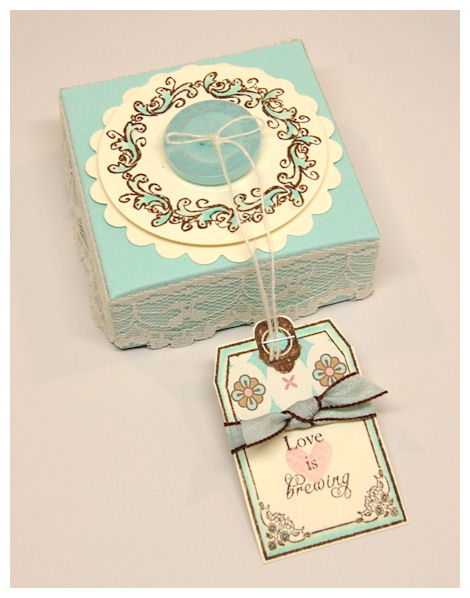
The tag creates the designer element on the front of my tea pot. Its such a pretty & elegant tag. I stamped it in a chocolate ink, onto Santa’s Beard textured cardstock, then colored the border to match. I paper pieces some of the Sunflower Sprinkles paper to to tag top.
This tag, and sentiment are both part of a coordinating stamp set called A Spot of Tea ©. The little heart was stamped using the You’ve Got Mail set. (as stated above: This set has a coordinating cut file also called A Spot of Tea.)
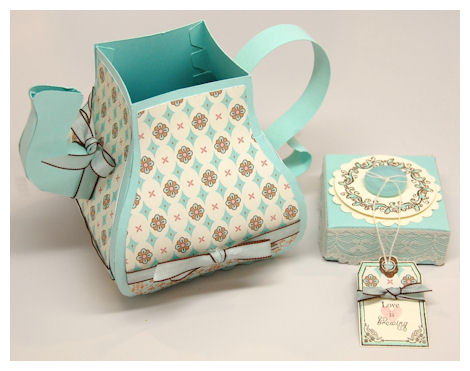
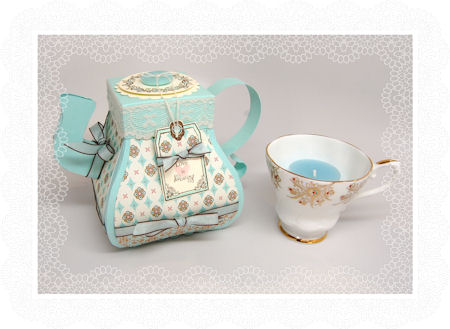
Would you believe it easily holds OVER 40 packaged tea bags?! It doesn’t end there!
You can fill it with all sorts of teas, tea accessories, treats like sugar cubes, after dinner mints, chocolates….whatever you choose.
I decided some “tea” lights would be perfect to gift in this tea pot shaped template!
A great shower favor idea too!
You can package a variety of items in your tea pot!
Here are a few examples:
A variety of tea’s, or tea items such as having it be the sugar cube holder, or maybe gift a tea diffuser
Scented candles or “tea lights”
Tea biscuits, cookies, or other mini pastry
After dinner mints
Any type of chocolate, or candy
For a get well-add tea, cough drops, and tissues.
A small doll/plush toy for a child to have their own “friend” for a tea party!
Don’t miss our AMAZING A Spot of Tea © Pretty Impressions set, as well as our matching A Spot of tea Pretty Pieces Cut file so you can complete your “tea party” ideas with tea cup shaped cards, tags, place-cards, and more!
Supplies:
Pretty Packaging © template – Tea For You
Pretty Impressions © Stamps- A Spot of Tea, Killer Curves: Fancy Frames, Fanciful Flourishes, Argyle Amazement, and You’ve Got Mail
Pretty Printables Digital Paper: Tea Parlor: Sunflower Sprinkles
Cardstock by Couture Cardstock: OSW White, Bohemian,Sanata’s Beard, Liquid Sunshine
Ink: Momento
Pretty Pieces © Cut File- A Spot of Tea
Buttons by SEI, Ribbon by May Arts, DMC embroidery floss, Cuttlebug embossing folder, Prima flower
WOW! Are you still with me? That was quite the NOVEL! This post took me like 3 + hours ALONE!! Good grief. I hope at least ONE person read it! LOL!! I need a nap now! :O
OK the GOOD stuff…..
Now its time for the Giveaway! Valued at $81!!!
Pretty Packaging template: Tea For You
Pretty Impressions Stamp Set: A Spot of Tea © and Killer Curves: Fancy Frames
As well as The ENTIRE collection of 6 Tea Parlor themed Pretty Printable Digital Papers!
Simply leave a comment telling us your thoughts about the new products, projects, or share with us your favorite tea flavor, and/or your favorite cookie/treat/dessert to accompany tea! (or if you even read the whole thing-that would be nice to know! LOL!)
Winner will be announced Monday May 31st!
Now believe it or not, we have a few more “tea themed” items, but that will be saved for tomorrow 😀
Until then.
#1 Video Perfect Peek-Jam Packed! Giveaway
May 28, 2010 Author: mytime | Filed under: Contests, Home decor/3-D items, My Time Made Easy, MYTIME MOVIE/VIDEOs, Product Opinions and Must haves, Tutorials, videosI hope you are as exited as I am for today’s first peeks at our June Release at My Time Made Easy ™ LLC!
Now the items you are previewing will not be available until June 1st!
(Note: So Sentimental has been out of stock-it is expected to be back IN STOCK next week-sorry!)
Today will be literally JAM packed with inspiration and ideas 😀 I’m very excited about this release, and have been on a creative streak after my medical hiatus! Wait until the days unfold with all the things I have in store for you. I may have been “away”, but I’ve been hard at work.
SO grab your coffee and get ready for some great ideas, a video, and a GIVEAWAY!
Well Preserved
Today I am excited to share a peek at a NEW! Pretty Impressions stamp set called Well Preserved, as well as one of our NEW! Pretty Packaging templates called Jam Packed © .
After you are done here, you will want to be sure you visit Stephanie Kraft and Katie Cotton!
They both have additional samples with these NEW! products as well.
You also won’t want to miss some card projects from Dawn Easton and Geny Cassady as they are both using a NEW! Pretty Impressions stamp set called Killer Curves: Fancy Frames! (this set also has a coordinating Pretty Pieces Cut File called Killer Curves.)
I don’t even know where to begin with all the things that can/will be done with both the Well Preserved set (which also has a coordinating Well Preserved © Pretty Pieces Cut File) and coordinating Jam Packed © Pretty Packaging Template!
For starters I made a video to explain a little about the Well Preserved stamp set, and share with you some quick possibilities when you use the Well Preserved stamp set and coordinating Well Preserved © Pretty Pieces Cut File!
NOTE: I had a new camera and photo editing software-sorry for the BLUR. I need to figure out what happened.
Now I figured it be best, before getting to the AMAZING Jam Packed © template, to share some info about the stamp set.
Well Preserved © Set of 58 Images $20 This set is *also available in digital download* $12!
(Wait until you see all the amazing images in this set, and what I made for the June 1st release day!)
This set is designed to coordinate with the Jam Packed © Pretty Packaging Template, as well as the Well Preserved © Pretty Pieces Cut File.
You may also enjoy the variety of other Pretty Packaging templates! Don’t miss out on our All Tied Up! tag/ribbon frame collections too!
Well Preserved is an amazing collection of sentiments and images! You will fall in love with the fruit and sentiment co-ordinations and possibilities.
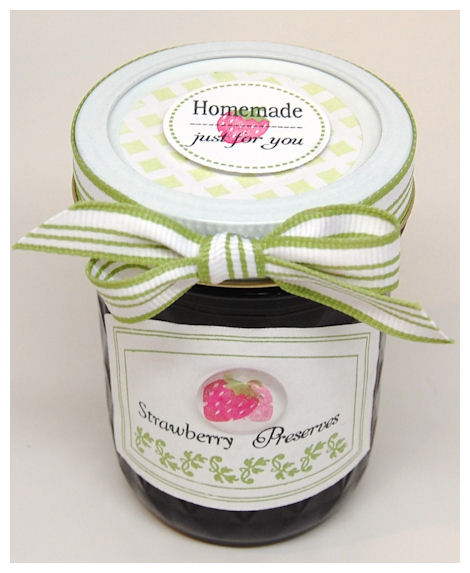
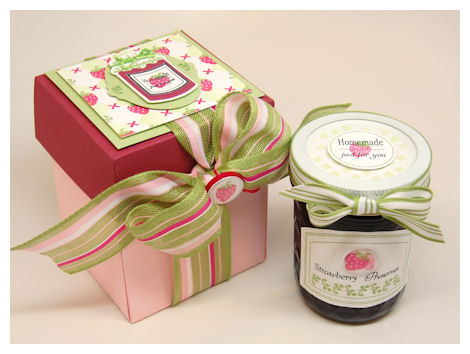
For this jar of strawberry preserves I used an adhesive sticker to cover my jar lid. I stamped it with the “lattice” image from the Puckered Up Patterns set, in a pear ink. The label is from the Well Preserved stamp set.
You will find so many wonderful uses for this set! Now personalizing your own homemade or (my personal choice) store bought jars of yumminess couldn’t get any more easy, affordable, and fun. I included just about every sort of fruit you can preserve, with many images and sentiments to match!
There are 2 style of canning jars. All the fruit images were made to fit within the canning jar stamp labels! As you can see by my sample above.
There are 2 great labels that can have many uses, like decorating your own canning jars, or for cards, tags, and other gift packaging, or they can be used for everyday occasions and gifts!
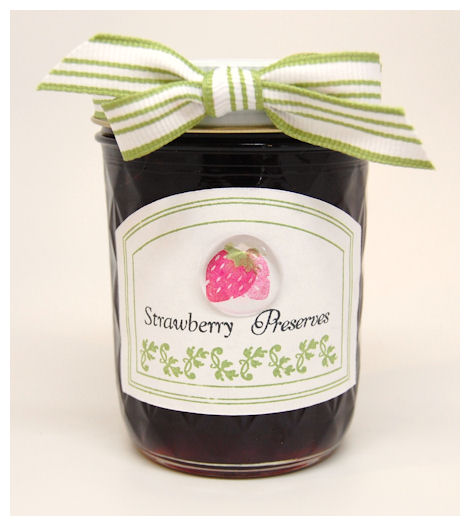
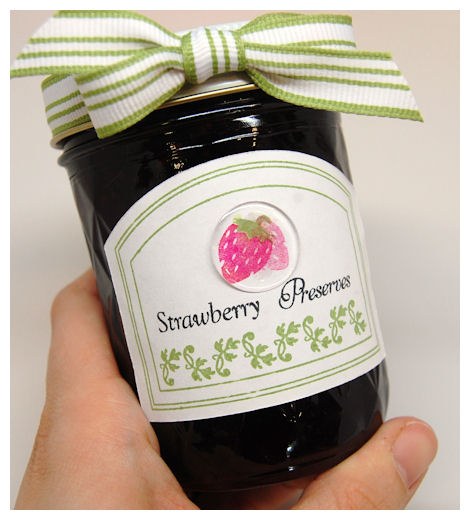
This is the front of my jar. I used the Well Preserved © Pretty Pieces Cut File to cut an adhesive label sheet for my sticker. SO quick & easy. You could EASILY mass produce a bunch of labels. I stamped the label onto the cut label, then stamped the leafy border along the bottom. The 2 strawberry images were done by stamping one strawberry, then without re-inking, restamping the second strawberry. I added a page pebble over them for an additional touch. I then used the sentiment building images in the set to create the “Strawberry Preserves” for my label. Easy Peasy!
Sentiments in this set include:
For Someone Sweet
Thank you Berry much!
Just Pear-fect!
You make life sweet!
Homemade
Hand Picked (great for store bought items! LOL!)
just for you
You’re a Peach!
Thanks a Bunch!
With Love
From the kitchen of:
Homemade just for you (designed to fit the label of jelly jar)
Date:
———————————————–
Jam
Jelly
Preserves
Marmalade
Butter
Syrup
Sauce
———————————————–
Strawberry
Apple
Orange
Pear
Grape
Blueberry
Raspberry
Rhubarb
Apricot
Peach
Cherry
Maple
Blackberry
Chocolate
Peanut
Cinnamon
Pickles
Mint
Now upon first look you *may* think this set is only good for canned fruit items, when it is really great for so much MORE!
Here a few examples of items you can use these images and sentiments with!
The obvious canned fruits
Fresh picked fruit
Fruit pies, pastry, breads, dry mixes, or other baked items using fruit.
Any fruity scented bath/body product (you can combine it with the Take Time stamp set!)
Fruit scented candles/tea lights/oils
Fruit flavored drink mixes, or tea’s.
Fruit flavored candies
OR for a FUN scratch & sniff effect, use these images with scented embossing powder!
Now how about learning about the Well Preserved © Pretty Pieces Cut File
Well Preserved Cut File $2.50 Available in SVG, WPC, DXF, GSD
This file was designed to coordinate perfectly with the Well Preserved © Pretty Impressions stamp set! Now you don’t have to cut out the jelly jars or the amazing tags from the set! These can be used WITH The set, or totally on their own!
Now that FINALLY brings me to the Jam Packed © Pretty Packaging Template
Available in PDF, SVG, WPC, DXF, GSD
Completed Project Size
4 1/2 Inches Tall
3 3/4 Inches Wide
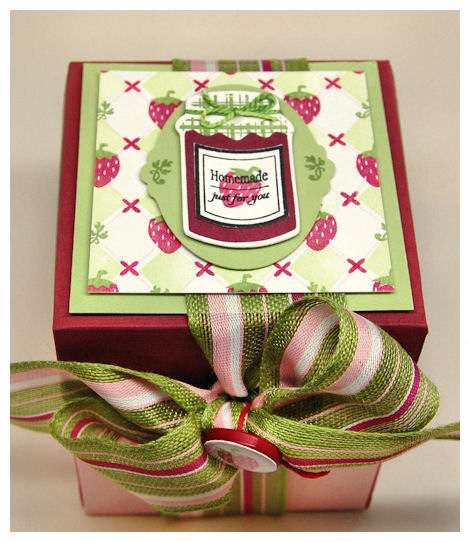
3 1/2 Inches Deep Another amazing and versatile template! 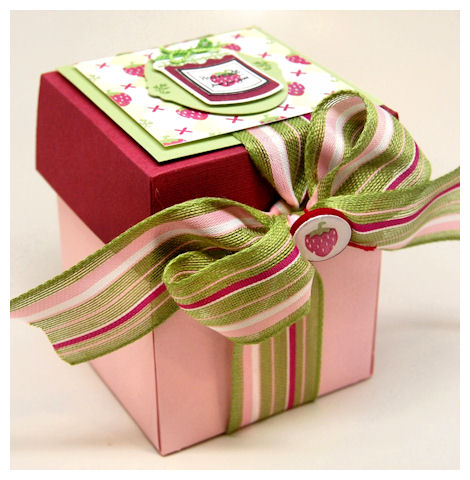 This is the decorated version! There has never been a better way to package up your “jam, jelly, preserves” or other canned goodness!! But it doesn’t stop there, I promise. You will be presented with a variety of uses/ideas as the week progresses.This is a super gift box, with a unique and fun tab tuck in closure! No more floppy lid!
This template was designed to coordinate with the Well Preserved © Pretty Impressions Stamp Set, and Well Preserved Pretty Pieces Cut File ©.
This was designed to hold your traditional 8 oz. (half pint) Ball Canning Jar, but it can be used for so much more!

Here is the view with the preserves inside!
Now for this template to become even MORE versatile you can simply cut off the jar holder panel and it becomes a great gift box, with a fun closure, OR change the size and shape of the cut out, prior to assembly, to allow you to gift all sorts of various treats!
NOTE: There WILL be a video HOW TO for that later this week 😀 NO WORRIES!
Whatever you “jam” in here, it is sure to be packed with love and surprise anyone!
Well that isn’t all of it. (I know! So much to share!! Think how long this took to TYPE)
Now the HOW TO for the “patterned” paper I made for my box top.
This is an awesome pattern that YOU can make with ANY of the images from the set, to coordinate with any project, tag, or card creations.
Simply change the fruit, and color options for a fresh and amazing new look each time.
Step 1
Stamp the dashed argyle pattern from Argyle Amazement, in a pale version of your fruit ink color. Build your entire background panel.
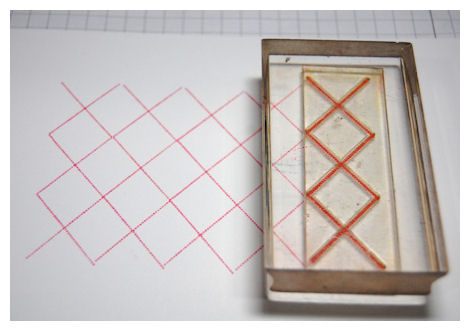
Note: a darker ink was utilized for photo purposes on this tutorial sample.
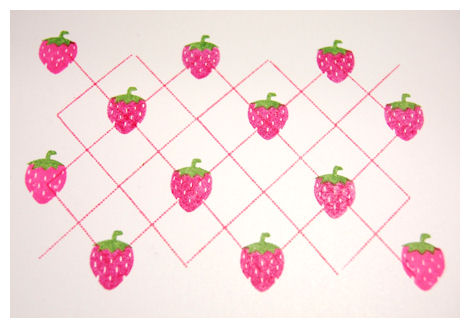
Step 2
Stamp whatever fruit image in the set you wish to use, in the center of every other meeting point section.
Photo A
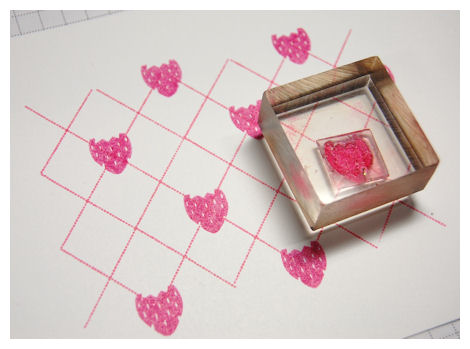
Photo B
Step 3
Stamp your leaves in between the fruit images, alternating the direction, in each row.
Photo A-Leaves going to the left- in every other row
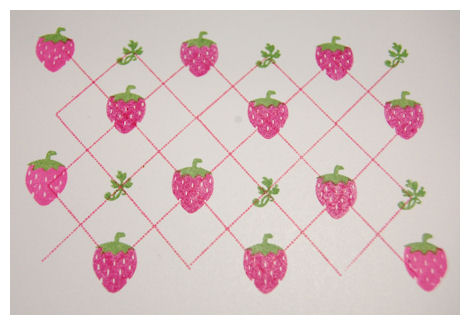
Then stamp the leaves going to the right- in every other row
Step 4
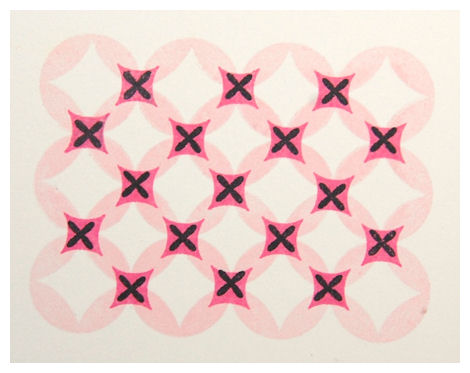
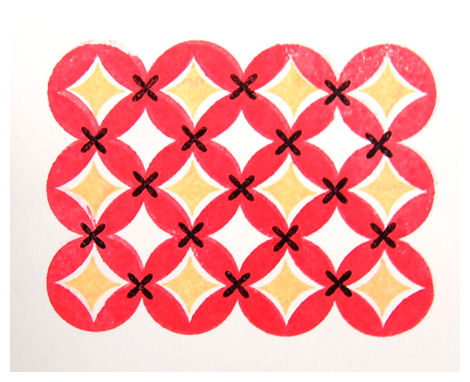
Use your puckered X from Puckered Up Patterns to stamp all the remaining meeting points.
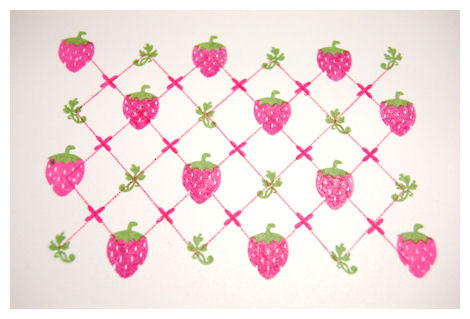
Step 5
Using a coordinating ink stamp the solid diamond pattern in the same rows as your fruit, remembering to skip a row, as seen in photo.
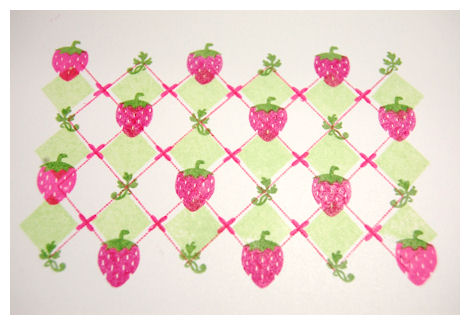
Now you are done!
Simply mix it up for a different look each and every time.
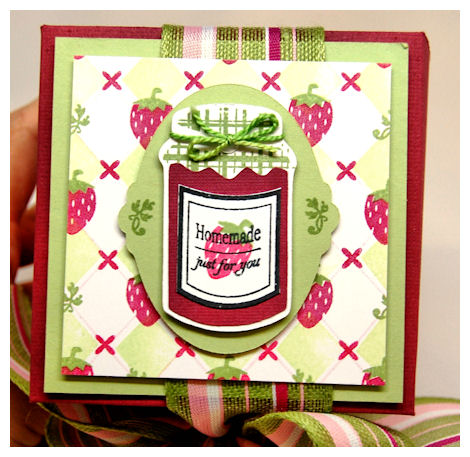
Here is the top of my box.
I used the All Tied Up: Oval as my main layer for my jelly jar! The leaves from the Well Preserved set were a perfect fit!
Supplies
Pretty Packaging © template – Jam Packed
Pretty Impressions © Stamps- Well Preserved, Puckered Up Patterns, Argyle Amazement
Cardstock by Couture Cardstock: OSW White, Bow Bells, Blushing, Cricket
Ink: Momento
Pretty Pieces © Cut File- Well Preserved, All Tied Up! Oval
Buttons by SEI, Ribbon by May Arts, DMC embroidery floss
Other: Avery Adhesive Label sheets, page pebble
WHEW!!! You still with me?
Now it is time for the Giveaway! A $70 value!
Simply leave me a comment here, and tell me your favorite fruit flavored treat, to be entered to win:
Pretty Packaging © template – Jam Packed
Pretty Impressions © Stamps- Well Preserved, Argyle Amazement & Puckered Up Patterns
Pretty Pieces © Cut File- Well Preserved, All Tied Up! Oval
That is everything I used to create this FAB project 😀 Winner will be announced Monday May 31st.
Thanks for taking the time to read through all this. I’ve really enjoyed creating all these projects so I hope you have gained some inspiration. I’m really excited to hear your thoughts as I share my projects with you this week.
Tomorrow I will return with yet another giveaway and more peeks.
Until then!
Hi everyone!
Hope you are all having a great week as we head into the holiday weekend. I have a ton of loose ends to wrap up, but it will all get done somehow. The beginning of the week I was REALLY ill. The doctors thought my appendix may be ready to rupture, but it turned out to be a ruptured ovarian cyst. OUCH! Needless to say that put me out of commission a few days. Something I DO NOT have time for!! Plus my children have a ton of school related festivities that require my attention too! Busy, busy week. One thing I can say is my life is ALWAYS far from BORING!!
Update on my mom: Yesterday she had to sit before a jury of 20 where they read the reports, heard her/her husbands side of the story, and got to ask her questions. The point of all this was to determine if the charges her husband is facing is appropriate for the crime. They agreed to the initial (5 or so ) charges which include Attempted Murder, then the jury decided it appropriate to add a kidnapping charge since he held her in the office and in thier home for several hours, not allowing her to leave. We have his next hearing in 2 weeks. This is where they will decide if he can go free until his actual TRIAL, or if they will hold him until that time. Obviously whatever time he has served counts towards his sentence, but we are PRAYING that he is held until his trial, which isn’t for like 2 more YEARS (I think my mom said that long). My mom is on an emotional roller coaster and the endless reliving of the even is just draining. Everything she is having to do on her own is often overwhelming. So we are all doing what we can to keep her positive and focused. Take ONE DAY at a time.
I remind her of my most favorite saying: The journey of a 1,000 miles, begins with a single step.
OK back to it.
I am gearing up for the JUNE Release! Peeks projects will begin on the 29th. I may do a LITTLE peek tomorrow, to get you all guessing! This month is going to REALLY get you inspired for all sorts of cards, tags and gift giving. ESPECIALLY some great ideas for the end of year teacher gifts! You can never have too many ideas for those!
But, before I get into all that I have another sample that I had yet to share with you!
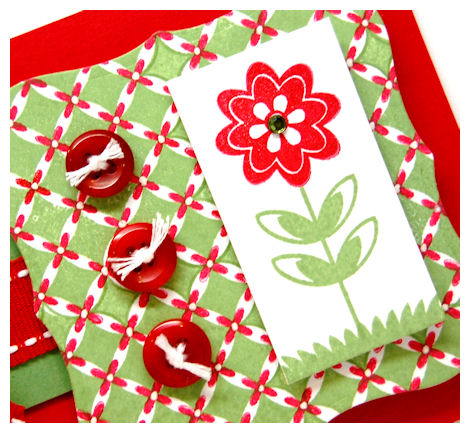
Simply Stamped
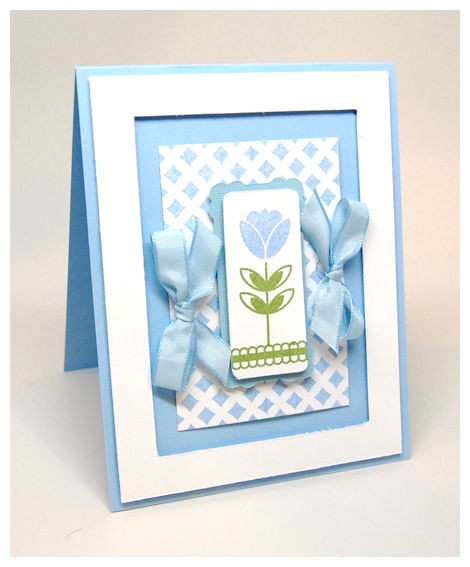
Tulips are my favorite flower. I think in the future (like next Spring) I will devote an entire set to tulips!
Any-who, as you may guess the tulip image image from Sensational Stems is my favorite, so I wanted to use this for my main focus. I stamped it using the All Tied Up! Rectangle cut file. It was a perfectly pretty layer for my flower. My “grass” was stamped using the scallop border from Paper Pattern Pieces.
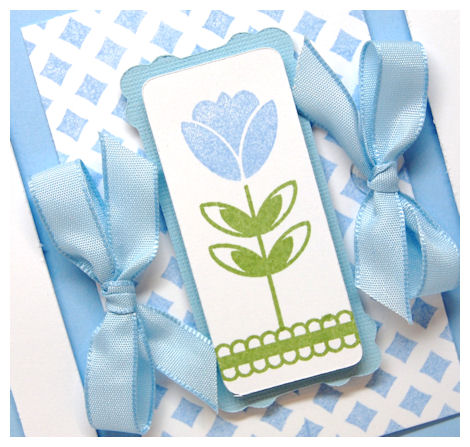
The bkgd you are seeing (that looks like a lattice work) is the Puckered Up Patterns. I loved the quick effect I was able to achieve.
I wanted to keep in clean and simple.
When mass producing or tight on time often we need a SIMPLE, and it’s always nice to keep a card on hand for any occasion.
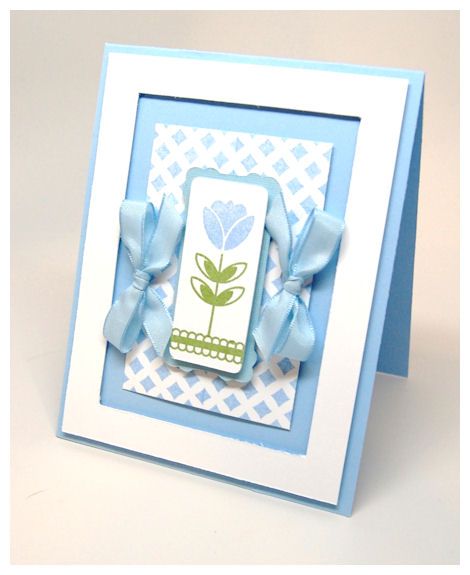
This has a blue base, with the white OPEN frame is the perfect setting.
I left it blank. I think it could be great for a get well, sympathy, cheer up….you name it kind of occasion.
Supplies:
Pretty Impressions Stamps: Sensational Stems, Puckered Up Patterns, Paper Pattern Pieces
Pretty Pieces Cut Files: All Tied Up: Rectangle
Couture Cardstock: OSW White, Rain Drop
Ink by Momento
Well thanks for poppin in.
Check back tomorrow for a LITTLE peek, and maybe even a give away.
Till tomorrow.
Piercing your pattern!
May 22, 2010 Author: mytime | Filed under: Cards, family stuff, My Time Made EasyWell I hope you are enjoying what is left of the weekend.
I hope you were able to take advantage of the SALE!
My Time Made Easy ™ LLC is having a SUPER SALE!
DON’T WAIT! LIMITED TIME ONLY!Enter the coupon code –> PATRN2420 to get $4 OFF your purchase for BOTH the Puckered Up Patterns and Paper Pattern Pieces © .Details: Coupon is good from NOW until MIDNIGHT (Eastern Time) May 24th . Supplies are limited. No rain checks. Limit: one use per customer.Coupon not valid on previous purchases, and/or the purchase of any other Pretty Impressions stamp sets. Offer does not include shipping charges.
Now how about another sample using the Puckered Up Patterns and Paper Pattern Pieces ©
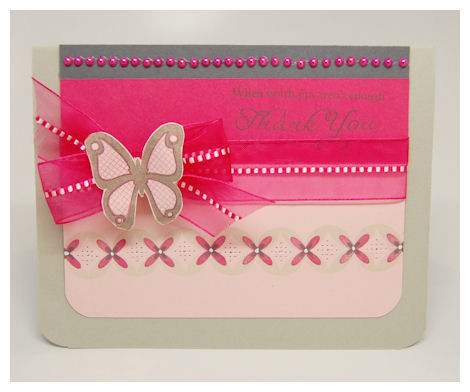
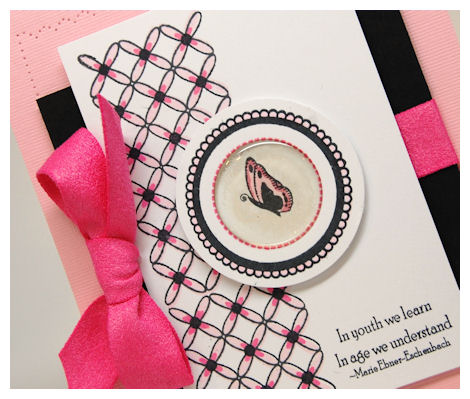
When words just aren’t enough
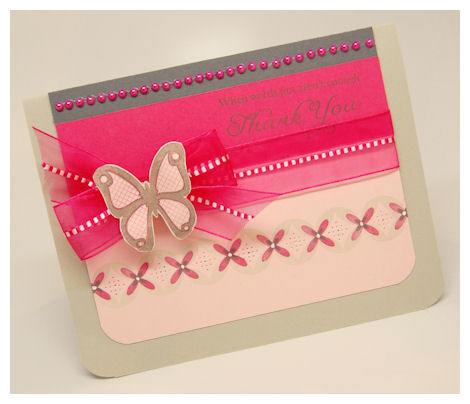
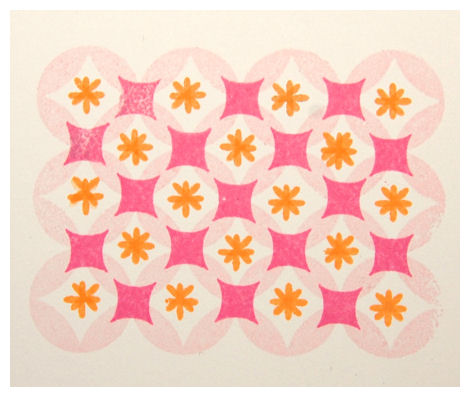
Here are some colors I LOVE! Gray, Sahara, pink and fuchsia. A very striking combination, that I RARELY ever use. This is also a very simple and clean layout.
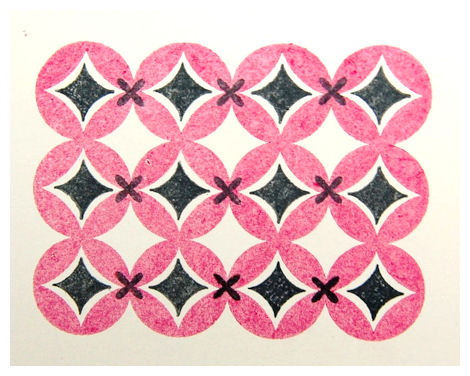
I used the single circle pucker pattern from Puckered Up Patterns to create my border image. I layered the largest pucker X in between, so mimic a flower.
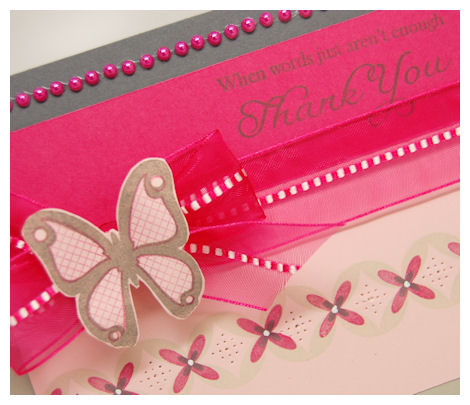
In between the puckered pattern, where it creates a diamond, I pierced a diamond in the center! I very simple touch that is sure to WOW! I really love the effect it has. You can do faux stitching in so many ways to get a whole nother variety of looks.
The pattern in particular reminds me of these little dresses my mom would put me in. They were called smock dresses I believe. They had a gathered and stitched pattern in the top. They were so cute (some of them). She ALWAYS put me in a dress! Usually a huge poofy dress. One day, I was maybe 5, I put my foot down. I said NO! I don’t want to wear that big poofy dress to school, I don’t like it, and I;m not wearing it. I really felt so strongly about it, and I remember sitting in the doorway of my closet crying and pleading with her to not make me wear it. All I wanted was some jeans and a shirt! Well, after what seemed like an eternity, there I was marching to school in my poofy dress. I was a strong willed little girl, and my mom was determined to win that fight.
I was so mad at her, that once I was in school, I went into the bathroom, then I took the laces out of my shoes, and tied them around my waist! LOL! To make like a “belt”, so my dress wouldn’t be so poofy. I can ONLY imagine what I looked like, but I was at least happy that the POOFY dress was now more “fitted”, if I HAD to wear it. I looked/felt like a umpaloopma every single day. Once I came out of school with my shoelace belt, I think that was the day my mom finally realized how much I hated them. I swear that is why I RARELY wear dresses or skirts! I’m a jeans girl all the way.
She also use to make me put curlers in my hair everyday! I think that is why I hate curly hair! LOL! It was pure torture. She would also use “rags”. You cut up your hubby’s old t-shirt, and roll and tie the hair in those. I think they did this in the 20’s? Anyway, while I look back on photos I always looked adorable, and I applaud my mother’s efforts, now that I have my own girls it’s a lot of work keeping up with that stuff. I think that is why I’m more willing to not MAKE my girls wear their hair certain ways (even when they look SO cute-unless its for a very special occasion) was because the years of “torture” hair curling, and frilly dresses.
Ah, the things we do to our children sometimes! LOL!
Sorry I got off subject, I just got taken back to the “old days”.
Back to the card….
The butterfly is my fave 😀 It is from the All A Flutter set. I stamped the solid butterfly onto pink cardstock, then stamped the grid wing print in the fuchsia ink. My sentiment is from the Just For You © set. Lots of great sentiments in there.
Its a SIMPLE yet striking card. I like when things go together quickly!
Well I am off, thanks for stopping by!
Until next time.
Happy Saturday!
Don’t miss your chance to take advantage of my sale!
My Time Made Easy ™ LLC is having a SUPER SALE!
DON’T WAIT! LIMITED TIME ONLY!Enter the coupon code –> PATRN2420 to get $4 OFF your purchase for BOTH the Puckered Up Patterns and Paper Pattern Pieces © .Details: Coupon is good from NOW until MIDNIGHT (Eastern Time) May 24th . Supplies are limited. No rain checks. Limit: one use per customer.
Coupon not valid on previous purchases, and/or the purchase of any other Pretty Impressions stamp sets. Offer does not include shipping charges.
We have a graduation party to attend today. I hope I get a cash card made in time (EEK!) I will share it *if* I do!
I feel like the shoemakers family-you know what they say, the shoemakers family has no shoes! Well my family never gets a card! LOL! I HAVE to create something FOR someone. I can never just use what I have in my stash. It’s not even possible. I’ve tried and tried to get over it, but I can’t.
It doesn’t help that I have been in a HUGE card rut! That often happens with me designing so many templates, stamps and cut files! It can be hard to switch gears sometimes.
Any-who I wanted to share a card I made the other day with the 2 sets that are on sale 😀
Sometimes you just need a sweet lil’ hello card. Well that is IF you actually give/send cards, unlike ,myself who hoards them for months! I do later donate a huge box each year, so they go to a good cause…….
Hello there.
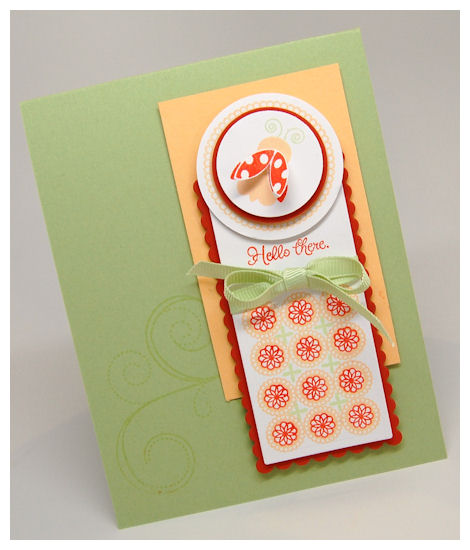
The ladybug from Sensational Stems is SOOOOO supah cute. I love it to pieces-LOVE! Sentiment is from Sensational Sentiments ( a must have set!). The ladybug parts make creating the dual colors, quick, fast and easy. I HAD to cut out the wings, and make them “open”. The ladybug circle is layered onto a stamped scallop circle from the Paper Pattern Pieces(on sale) set (the ink is Momento cantaloupe)
I adore these fresh summer colors!
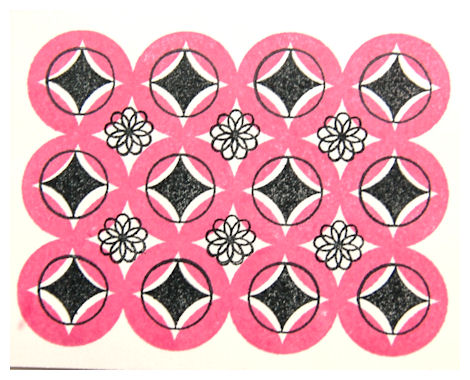
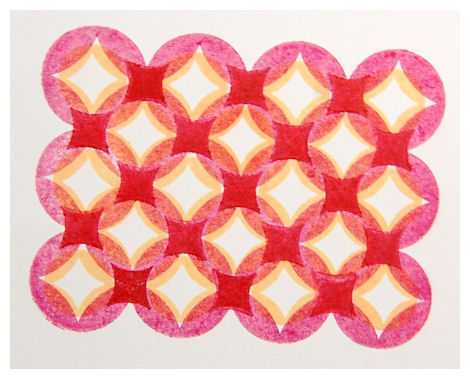
Then I made my pattern. The BEST part eh? 😀
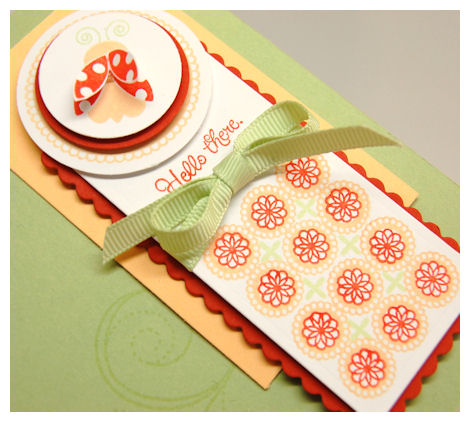
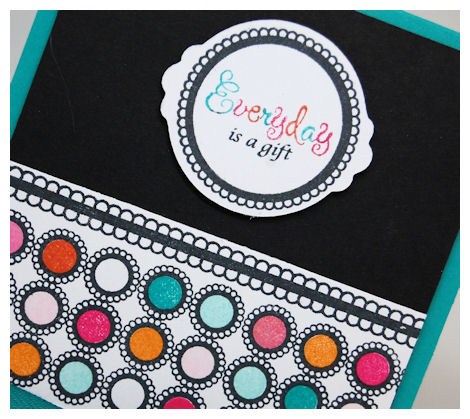
Seriously-how pretty is this??!! I want to make this pattern in like very color combination known to woman.
I stamped the 6 circle cluster twice in cantaloupe ink, so it became a 12 pk block. I then added the AWESOME spiral flower centers in Tangelo (by momento) from the Puckered Up Patterns (on sale)set. It makes the prettiest scallop-y patterned flowers. In between the “flower clusters” I stamped the X pucker pattern in green ink-which is in pear, I believe (also momento)
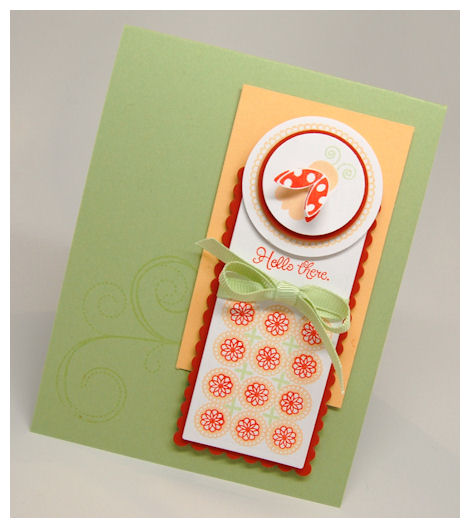
To add to the “ladybug flying around the flowers look” I used a large flourish from Fanciful Flourishes. A perfect touch, don’t you think?
Now that I keep looking at this, the *only* thing missing is some glitter, which I AM going to add to the “dots” on the wings.
Supplies:
Stamps:Puckered Up Patterns , Paper Pattern Pieces, Sensational Stems, Sensational Sentiments and Fanciful Flourishes
Cardstock by Couture Cardstock: OSW white, burning ember, new leaf
Ink by Momento: Cantaloupe, Tangelo, Pear
Well thanks for stopping by. I have another card creation to share tomorrow, so I’ll see you back here then! Enjoy the weekend and time with your family or crafting.
Until next time.
Inspiration: Patterns O’Plenty and a coupon
May 21, 2010 Author: mytime | Filed under: Cards, Home decor/3-D items, My family stuff, My Time Made EasyHi everyone!
Are you enjoying the nice weather?
I know we are.
I have LOTS to share! First some family stuff, then some fun stamping stuff!
As always I have tons going on, but cannot complain because my children are happy & healthy (I remind myself of that as they are fighting with each-other like cats and dogs these last few days!).
Alexa is celebrating her 3rd year going into remission from Leukemia! She is just growing before my very eyes into a young lady. It’s actually freaking me out a bit 😀 She is ALMOST 11 now! She got cancer shortly after turning 6. You can read her story HERE!
Any-who, I won’t get into the emotional roller-coaster that I get on this month each and every year, but I am so grateful she is alive and well 😀 Time has truly flown by.
Here is a recent photo of her, taken on Easter

I made a donation in Alexa’s honor to the Relay for Life 😀 It is the LEAST I can do to support ongoing research.
My friend Tracey is participating in the relay-if you decide to make a donation, you can view her site —> HERE!
Now I have to share a photo of the other 2 kids too, before moving on 😀
Here is Noah-

He is doing great since I shared about him last. He is SO tall. Just a couple inches shy of my shoulder (and I’m 5 ’10!).
Here is Amber (after Easter Egg hunting!-very messy)

I can’t believe she is going into first grade soon! MY BABY! How is it possible?
Now here is my 4th child Gabriella!
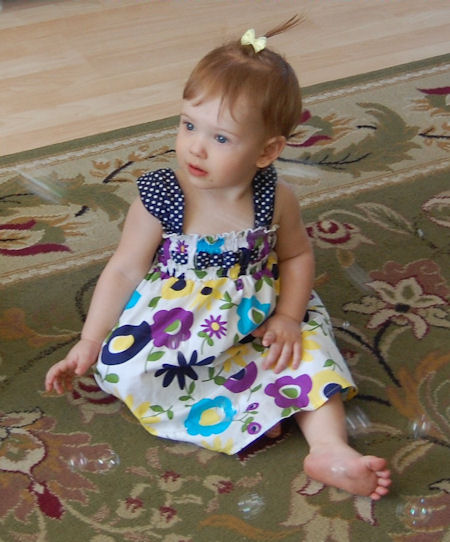
OK actually she is my niece-but since I was around her mom’s entire pregnancy (they lived with us) and I was there for her birth she feels like she is one of my own (kinda like I’m a dad! LOL!). I love her to pieces. She is now 15 months old! She is so funny, and full of energy! She just runs all over the place. I bought her a bubble machine for Easter, and she LOVES it-hence the bubbles in the photo 😀 I bought her that dress too! As I look at I’m getting inspired!
OK back to the creative reality!
I know I’ve been MIA, and said I’d be “around” more, but I have SO much to do in time for the next release 😀 I have SEVERAL videos done, and a few more to go! (So see I invested my time away wisely :D) I think it will be helpful with what we have to come 😀 I *was* going to do a video on how quick and easy it is for you all to use the latest Puckered Up Patterns ©, but it turns out there were SO many pattern combinations that it would be a very LONG video! So I thought I’d share a few photos instead, since I already made several videos for the next release, and I’m wiped! Plus it will allow you to better VISUALIZE them completed project.
So here is the set that is the MAIN focus of inspiration…

Puckered Up Patterns is a FABULOUS set of 14 images with ENDLESS possibilities. I love that.
The set sells for only $12!
You receive this set on a 4 X 6 acetate sheet. All our images are printed on the acetate that the photopolymer stamps (clear images) are sandwiched between.
You really need to just take some fun color combinations and P-L-A-Y!!! If you mix this set with the Paper Pattern Pieces © you will have a BLAST!
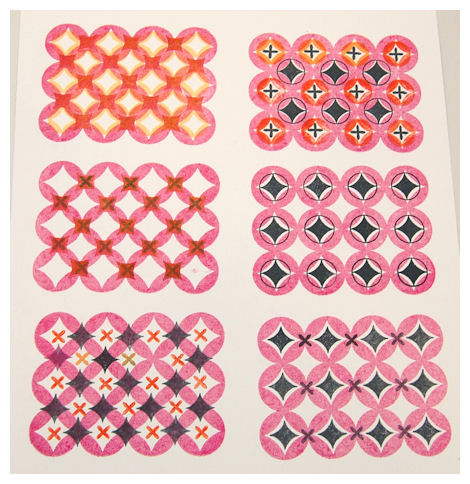
I know MOST of you are visual, and you like SEEING ideas, so I quickly stamped out a few patterns (these took like 30 minutes) to get you started! There are some more completed project samples below too-so SCROLL down!
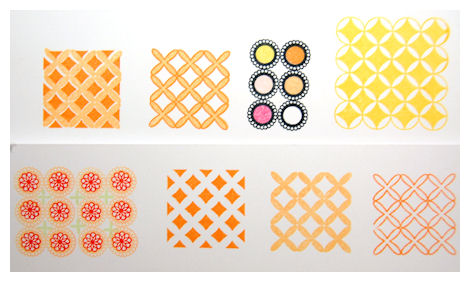
Just some ideas for you…..
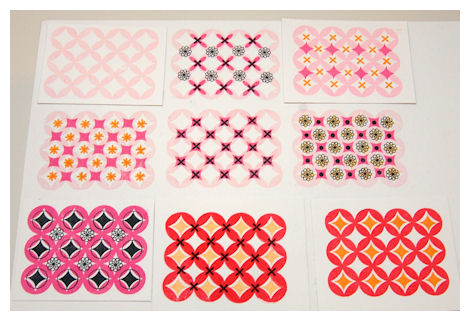
Top left is the main pattern from the set that I used to create all these combinations! There are 14 total-but I am certain YOU can think up even more! Now keep in mind that is using *just* the large pattern as my MAIN focus! There are 4 other large building “block” patterns in the set, as well as several FABULOUS accents that can also create AMAZING borders, or group patterns!
The large pucker pattern measures: 2 X 2 3/4 inches!
*Keep in mind you can also use the single pucker circle (large or small version) to make a ROW just like the grouped patterns I created in the samples to follow*
Now for some CLOSE UPS!
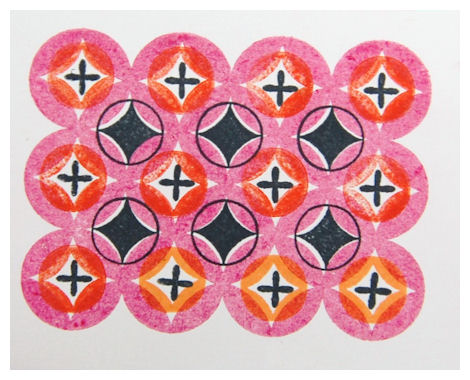
PS I just wanted to get the pattern ideas out-don’t mind the HORRID color choices! LOL!)
1) STUNNING pattern possibilities in a variety of colors!
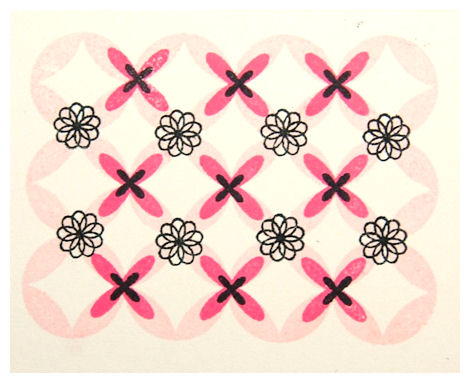
Now remember you can stamp the main block several times to cover a large area 😀
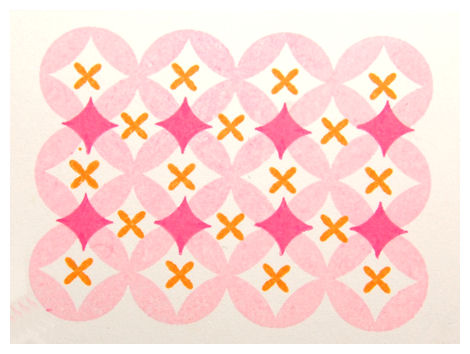
2) This design has a ton of possibilities
3) This one I used the X like flower/image and rotated it. I couldn’t see I THING since it was dark and rainy! OH! WELL! You get the idea! Plus it add character right?
4) SO cute!! Imagine this as a backgrounder!
5) LOVE this one!
6) Another one I LOVE! (I think its the flowers 😀 -that image alone can do great things!)
7) Check out Kristin’s Blog! She used this pattern below on her card today! I love it.
8) Simple, yet striking!
Now here we have 6 more patterns for you, using the SAME block as above!
9) OK my colors are awful, and my cardstock has a smooth coating which kept resisting the ink (grr) but all that aside-very cool possibilities.
10) Again-same coated cardstock, awful colors, but you can get the idea! JUST PLAY AROUND OK!
That is what I was doing 😀
11) Think how cool this could be….
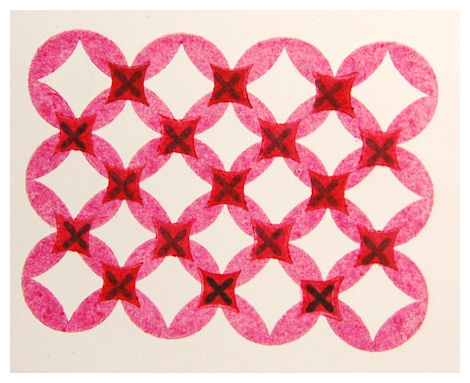
12) I so love this one
13) Another great possibility!
14) I totally loved this one most.
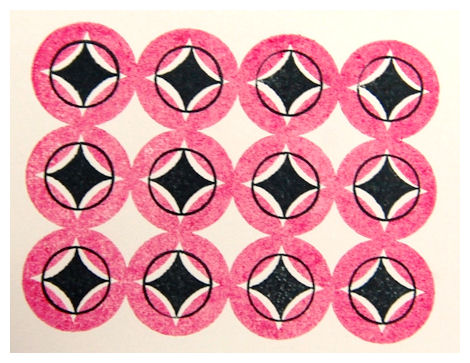
Now we move on to the other patterns which have a TON of possibilities that I didn’t even have the time to cover (but have plenty of samples further down to share)
This one shows you how the bottom 3- Lattice, Pucker Cluster Solid, and Pucker Cluster Open- can all be used to create a pattern ALONE, or layer perfectly together, as seen in the above top 2 to the left!
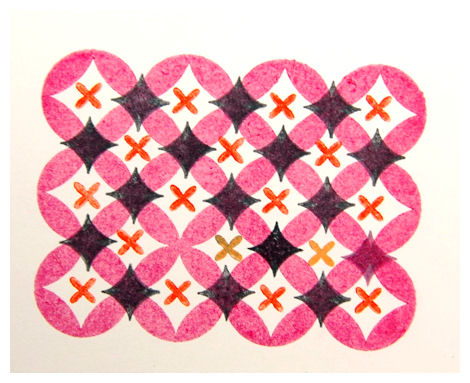
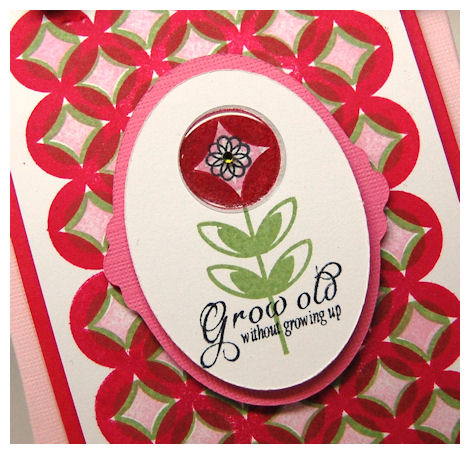
Now I want to share some completed samples that utilize the Puckered Up Patterns © as well as the Paper Pattern Pieces ©

Paper Pattern Pieces © is another AMAZING set that was used in conjunction with the Puckered Up Patterns to create the following samples.
You may recognize the snippets from our past release, but having them all in one place can be helpful for you to visualize the truly endless possibilities.
1)
The lattice pattern made up the “grass” and several of the flowers used elements in the Puckered Up Patterns set!
2)
Puckered Up Patterns was used to create a cool background, and a flower bud!
3)
The smaller circle block on the left, from Puckered Up Patterns was used to create this stunning bkgd
4)

The open line pucker pattern makes a quick, easy & subtle bkgd!
5)

This one used *just* the Paper Pattern Pieces ©
6)
Here is an example of how just the large (or small) circle pucker can be used to make the same style patterns, but in rows!
7)
This used ONLY Paper Pattern Pieces © I love making various colored DOTS! EASY PEASY!
8)
This one used the outline, and solid pucker cluster-combined with the smaller single pucker flower to create a pretty feminine background!
Well, I do have 3 more (never before seen) cards to share using these pattern builders, but I will wait on those, so I have *something* to post about the next 3 days!!
I hope this got you inspired to try these sets out! They will become a welcome addition to your stamp collection 😀
Now I decided that I would create a special coupon in honor of BOTH these FABULOUS patterns! (Since I love using them together!)
My Time Made Easy ™ LLC is having a SUPER SALE!
DON’T WAIT! LIMITED TIME ONLY!Enter the coupon code –> PATRN2420 to get $4 OFF your purchase for BOTH the Puckered Up Patterns and Paper Pattern Pieces © .Details:
Coupon is good from NOW until MIDNIGHT (Eastern Time) May 24th .
Supplies are limited. No rain checks. Limit: one use per customer.
Coupon not valid on previous purchases, and/or the purchase of any other Pretty Impressions stamp sets. Offer does not include shipping charges.
Happy Shopping! And while you are there don’t forget to check out ALL our other amazing products 😀
I’m off to go prepare for our June Release!
My Etsy

Who I Designed For
Blogroll
- Alicia
- Alli Miles
- Ally Blankenship
- Amber
- Andi @ crafts on a whim
- Angel R
- Angie Z
- Anne Kranitz
- Becky O
- Bee
- Beth Silaka
- Bethany Paull
- Beverly Nash
- Bobbie
- Cambria
- Cammie
- Card of the Week
- Card Positioning System (CPS)
- Cards for Cancer
- Catherine Doucette
- Charmaine
- Cheryl Sims
- Chriss Rollins
- Christina
- Christine Ewing
- Christine Wooden
- Colleen Schaan
- Craft Critique
- Craft Gossip
- Crystal
- Dawn Easton
- Emily Giovanni
- Geny
- Holly
- Igne Groot
- Inspirational Craft Blogs
- Irene
- Jami Sibley
- Jeanne Streiff
- Jen del Muro
- Jeni Bond
- JenMarie
- Jenn Balcer
- Jenn Diercks
- Jenn O
- Jennifer E
- Jennifer Mick
- Jennifer Pereda
- Jennifer-Sweet Treat
- Joanne Basile
- Jodi Collins
- Julia Stainton
- Julie Masse
- Karen
- Kathryn Berthiaume
- Katie Cotton
- Kelley Holland
- Kendra
- Kim Scholfield
- Kris’s Color Stripes! Get inspired here
- Kristen Dubosque
- Kristin Eberline
- Kristine
- Laura @ Sunshine Stamper
- Laura Turnmire
- Laurie Schmidlin
- Lesa Rapp
- Linda Duke
- Linda-LSN
- Lindsey Botkin
- Lisa (lakind scs)
- Lisa Kind
- Lori Craig
- Maggie
- Mara Campbell
- Maria
- Maria Levine
- Mary
- MaryJo
- Melanie M
- Monique Hansen
- Moxie Fab World
- Pam Imholz
- PaperCrafts Connection
- Peppers and Pollywogs Kids party site
- Rebecca Grohall
- Rita
- Robyn
- Rose Ann
- Sarah Vrolyk
- Sharon Harnist
- Sharon Johnson
- Sharon Rivera (a chemisrty with paper)
- Sherrie
- Sophia Landry
- Storage Units, Ink, & More Blog
- Sue Berker
- Susan (Rainy)
- Tangii Crane
- Tracy
- Tricia Traxler
- Trudee
- Velta
- VivLyn
- Zena
MTME Pretty Palette Color Team
MTME Pretty Patterns Sketch Team
My Time Made Easy TM LLC
Shop till you drop!
Lauren Meader
About Me
Copyrighted material
Subscribe To My Blog
Pages
- About me
- Alexa’s Story!
- My Crafty Corner!
- My Time Made Easy™ LLC
- Our Make A Wish Trip to Disney!
- Resume/Publication List
Calendar
| M | T | W | T | F | S | S |
|---|---|---|---|---|---|---|
| 1 | 2 | 3 | 4 | 5 | 6 | 7 |
| 8 | 9 | 10 | 11 | 12 | 13 | 14 |
| 15 | 16 | 17 | 18 | 19 | 20 | 21 |
| 22 | 23 | 24 | 25 | 26 | 27 | 28 |
| 29 | 30 | |||||
Archives
- August 2013
- July 2013
- June 2013
- May 2013
- April 2013
- March 2013
- February 2013
- January 2013
- December 2012
- November 2012
- October 2012
- September 2012
- August 2012
- July 2012
- June 2012
- May 2012
- April 2012
- March 2012
- February 2012
- January 2012
- December 2011
- November 2011
- October 2011
- September 2011
- August 2011
- July 2011
- June 2011
- May 2011
- April 2011
- March 2011
- February 2011
- January 2011
- December 2010
- November 2010
- October 2010
- September 2010
- August 2010
- July 2010
- June 2010
- May 2010
- April 2010
- March 2010
- February 2010
- January 2010
- December 2009
- November 2009
- October 2009
- September 2009
- August 2009
- July 2009
- June 2009
- May 2009
- April 2009
- March 2009
- February 2009
- January 2009
- December 2008
- November 2008
- October 2008
- September 2008
- August 2008
- July 2008
- June 2008
- May 2008
- April 2008
- March 2008
- February 2008
- January 2008
- December 2007
- November 2007
- October 2007
- September 2007
- August 2007
- July 2007
- June 2007
- May 2007
- April 2007
- March 2007
- January 2007
Categories
- About Me
- All That Scraps
- blogger challenge
- camera/photo play
- Cards
- Contests
- family stuff
- FOR SALE
- Home decor/3-D items
- How to FAKE it!
- Introduction
- JUGS Challenge
- JustRite Stampers
- Lizzie Anne Designs
- My family stuff
- My Stamping Space
- My Time Made Easy
- My Time To Color Challenge
- My Time to Create Challenge
- My Timeless Template Challenge
- My Timeless Templates
- Mytime Mail
- MYTIME MOVIE/VIDEOs
- Papertrey Newsletter
- Pink Cat Studio
- Pretty Palette Challenge
- Pretty Patterns Sketch
- Product Opinions and Must haves
- Recipe's
- Saturday Sketch
- Smilebox Creations
- Stampavie
- Tutorials
- Uncategorized
- videos
Most Popular
- Create your own Onesie Card Tutorial-and important NOTE! PLEASE READ (2529)
- Saturday Sketch-Boxed bag holder (2333)
- Going GREEN! Fancy Flower Flourish-Closure Video (1478)
- Fabulous Favorite - Giveaway! (1336)
- a Prayer Request (1232)
- QUICK-Easter Baskets from Nestabilities-PTI style-and blog challenge (1063)
- Teaser Sketch (999)
- February Release Giveway! (and a little peek) (996)
- Group Post and Rambling Rose Video Tutorial (985)
- GIVEAWAY! Who wants it all?! (895)
Recent Comments (RSS)
- 첫충사이트: 완전히 흥미로운 블로그 게시입니다. 저는
- sarah: Wow, Lauren, what a stunning
- hedie: خرید راهبند
- 야동: Love to read it,Waiting For
- 야동: This seller is in a
- 바카라사이트: 여기 처음 왔어요. 나는이 게시판을
- 야동티비: I was surfing the Internet
- 바카라사이트: 비슷한 주제에 대한 흥미로운 정보를
- 바카라사이트: "여기에 제공해 주신 귀중한 정보와
- 온라인홀덤: 유익한 웹 사이트를 게시하는 데
Copyright © 2007 - My Time, My Creations, My Stampendence - is proudly powered by WordPress
This blog has been Tweaked and Designed by Sara Williams