Archive for the ‘Cards’ Category
Un-Wined for the Holidays
Dec 2, 2012 Author: mytime | Filed under: Cards, Home decor/3-D items, My Time Made EasyI am so enjoying all the ideas the team has conjurred up in me after viewing everything they’ve been making! My head is literally ready to bust with new projects I want to try!
We have MORE to share today, and then if that wasn’t enough a great group post tomorrow!
Take a peek:
Bring someone some REAL holiday cheer this season!
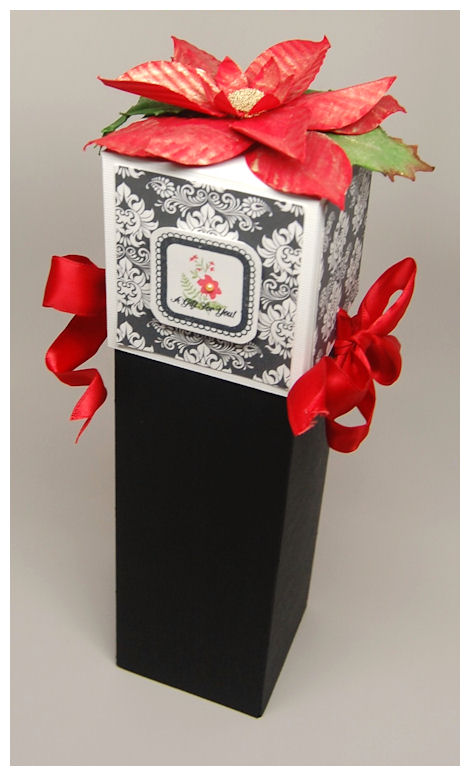
A gift for you
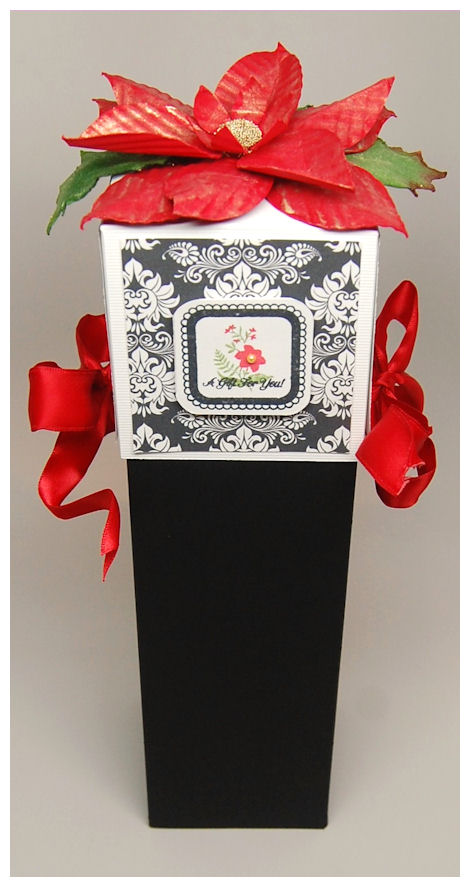
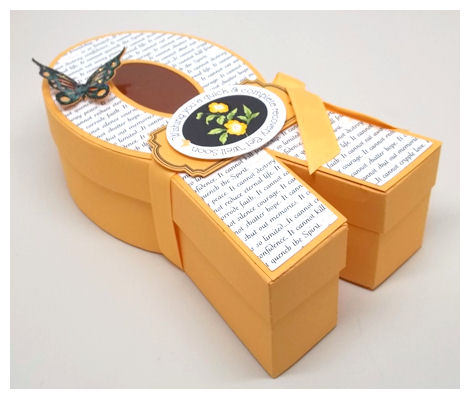
Design Details: The tag was made using the scalloped window from the Lovely Labels 1 © set, the flower is from the Sentimental Occasions Labels © and the sentiment from Timed Write © set.
This could be filled with just about anything! Hence my post tite Un-Wined. I chose to create a tall gift box using the new Wine & Dine template, that was inspired by my card set I posted yesterday (scroll down to view). I think there are MANY times we can use a tall box, and NOT just for giving wine, as the name suggests!
I was thinking about packaging up some homemade chocolate dipped biscotti, with some gourmet cocoa packets from Starbucks in here, or I could use this to stack a vareity of homemade cookies, or raspberry linzer squares (my fave), blonde brownies….etc instead of the using the standard rectangle box, why not stack them up?!

Maybe some bath salts on the bottom, and lotion. body spray on top? Some chocolate dipped pretzels, Candy canes, Pirouette sticks…you get the idea.
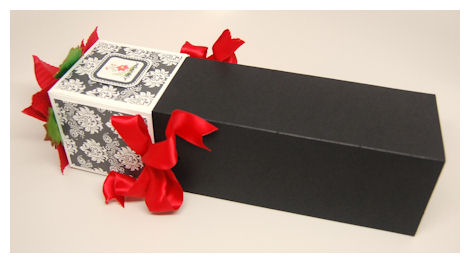
I made the base from black cardstock, and the top from whtie cardstock. I layred on some Dainty Damask © paper, recolored to black.
To adorn the top and ring the the holday’s with a little elegance I used the Perfect Poinsettia © cut file, ran it through my crimper and them brushed on some gold Shimmerz. I had some holly leaves that I also brushed with the Shimmerz.
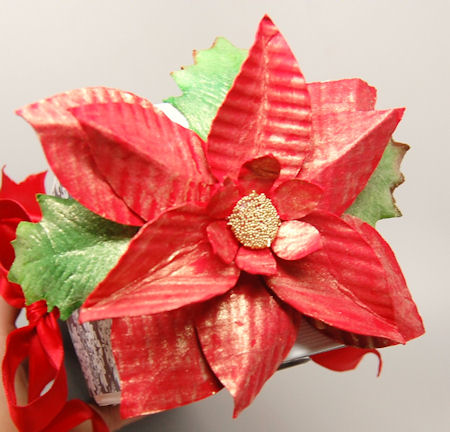
For the Perfect Poinsettia © cetner I used a large dimensional glue dot, and I added some gold seed beads.
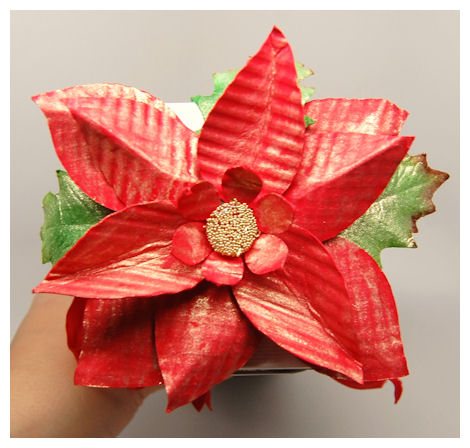
I think it turned out really pretty, but it is far better loking in real life!
The bottom line of today’s post is to look at ANY of our Pretty Packaging Templates, and try to see the uses and possibilities in each one. If you are “stuck” for ideas most times the descriptions list the many possible ideas for filling them or creating things with them, and don’t forget we have an amazing gallery of already made projects to help you SEE what you too can create. You will find the direct galler link to projects made for the product of your
Customized Gifts for Under $1
Dec 1, 2012 Author: mytime | Filed under: Cards, Home decor/3-D items, My Time Made EasySo here we all are, and I am still in disbelief that it is DECEMBER?!
Even though Christmas is coming soon, I know many of us are literally wrapping up our holiday gift making/shopping, sometimes up till the last minute. Well if that is you, we aren’t ever done providing you all with more and more gift ideas each month.
No matter what time of year, I am sure you can find the ideas useful and inspiring.
Check out the following designers today:
Thankfully I did get all my holiday shopping done, and am almost done all my gift making for those special people in our lives, such as my children’s teachers.
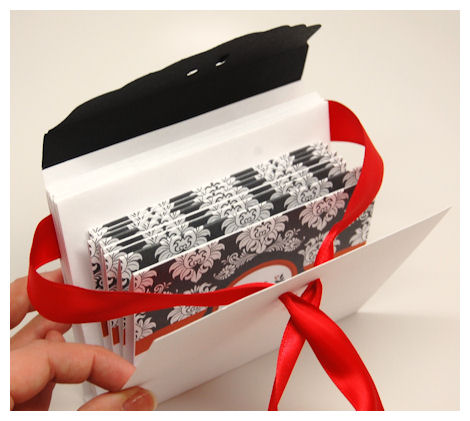
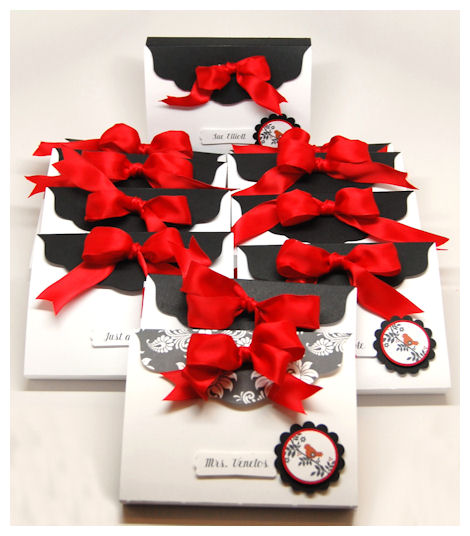
I used the Card Wrapper template to keep costs down and limit the time it would take for me to create all of them.
Group 1 (Set of 12)
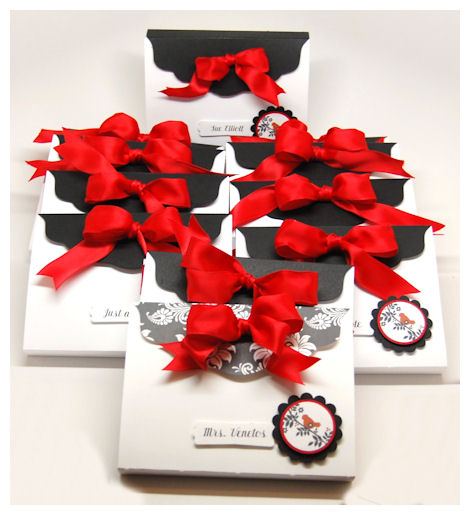
I made each of my children’s teachers a set of 8 customized cards/envelope, complete with their name, and then wrapped to perfection! Teachers can never have too many cards!
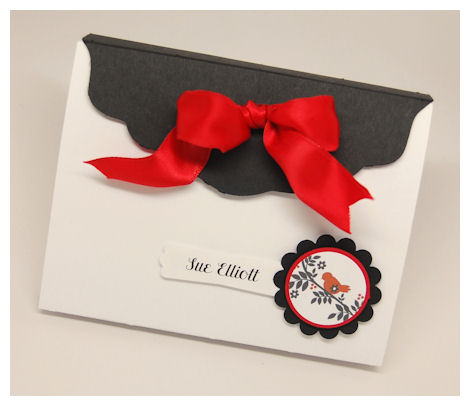
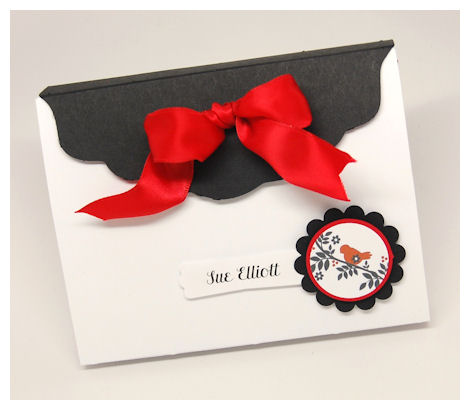
The circled layerd in the lower right hand corner was cut/layered using the Well Rounded Tag ©.
I love using black, white and a pop of red!
Each card set only cost about 0.65 CENTS (not including the cost of the ribbon)!
I made 19 gift sets (featured here) for a whopping $12.35!! Then add 2 rolls of ribbon at $1.99 each (on sale), that is still ONLY $16.33!
What can you BUY for under a $1 that looks better than this, AND is customized? Not much!
Super quick, and simple because I created the actual card design ONCE then changed one minor detail. My printer did far more work than I did 😀
Wonder if printing your own paper/images is afforadable? READ THIS!

These are single layer cards that I created digitally. By doing this I could easily whip up a bunch, and just change the teacher’s name along the bottom! I used the Dainty Damask Paper Collection, and recolored a pattern to be black, for the top layer of the cards I created.
I added a strip of red along the cropped edge of the card.

The frame on the cards is from the Framed Elegance ©set , then my bird and branch images used on both the Card Wrapper template and the cards, are from the Singing Silhouette © set. Each set has the specific name of the teacher along the bottom, and they can use them at their discretion.
A truly personal gift, made with lots of ♥
Group 2 (set of 7)
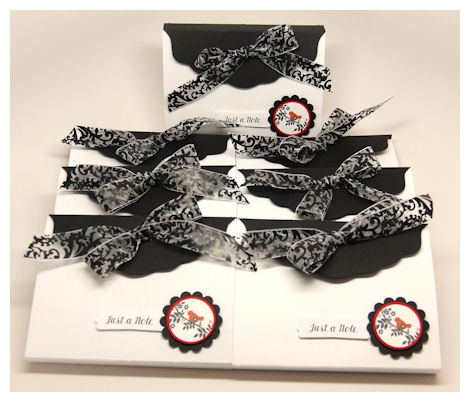
This group is similar, I just used a damask patterned ribbon instead and in this group the design is the same, but instead of having personalized cards, I did some “general” cards for other people who may be on my list, and to have on hand. I titled these “Just a Note” hence the bird 😀
I kept the cards general putting in (2) With Appreciation (2) Just a Note (2) Just Because (2) For Your Kindness.
Not too shabby huh?!
Thank you again for stopping by, and your continued support, which allows me to share what I love with all of you!
Return for more ideas tomorrow from myself and our amazingly talented design team.
See you then!
December Release-Let’s Celebrate!
Nov 30, 2012 Author: mytime | Filed under: Cards, Home decor/3-D items, My Time Made EasyIt’s December 1st and that means two things!
1) All our NEW! Products are available for you to purchase! Be sure you check out our NEW! Products <—HERE!
2) We have another amazing group post that shares many ideas using those NEW! Products
Today you will want to visit the team to check out our ideas for Crazy for Creativity:
- Lauren Meader Card Wrapper
- Debbie Marcinkiewicz Wine
- Farida Rone Wine
- Kimberly Morrow Chair-ish
- Lisa Kind Chair-ish
- Lori Hairston Chair-ish
- Lori Kalus Card Wrapper
- Pattie Goldman Card Wrapper
- Tangii Crain Wine & Dine
- Tina Hale Wine & Dine
We have released:
3 NEW! Pretty Packaging Templates
5 NEW! Pretty Impressions Stamp Sets
3 NEW! Pretty Printable Digital Paper Collections
4 NEW! Pretty Pieces Cut Files
This month we released 3 *NEW* Pretty Package Collections, where you will save 25%!
Please view our Gallery for project samples, and alternative ways to use all our amazing coordinating products!
You may also want to check out our blog for weekly challenges, and even more amazing ideas.
Also if you haven’t already, you can follow us on Pinterest, as we have 16 pinboards full of ideas, we are also on Facebook-so LIKE US there, and follow us on Twitter!
As you may have come to know my company focuses on the “complete package”. We work hard to offer coordinating products that are easily interchangeable with previously released products. We really enjoy being able to share the ideas and versatility each product holds.
Today we are each sharing some creative ways to use the *NEW* product for December.
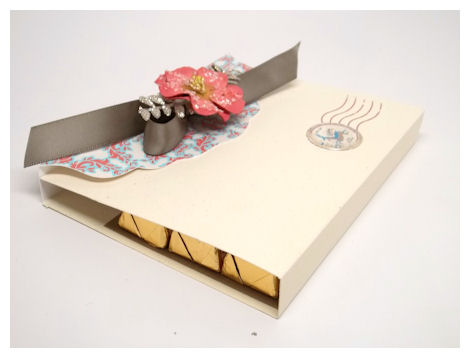
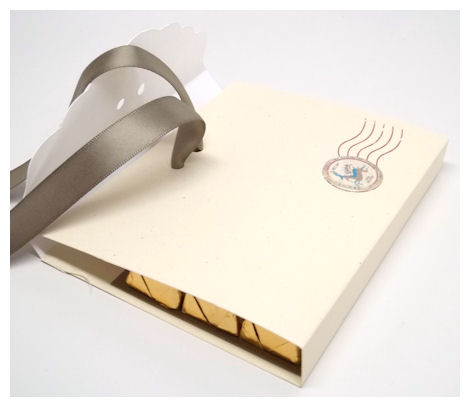
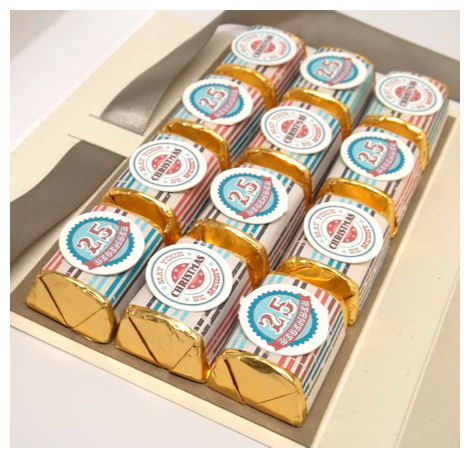
My project today will show you some ways to use the Card Wrapper!
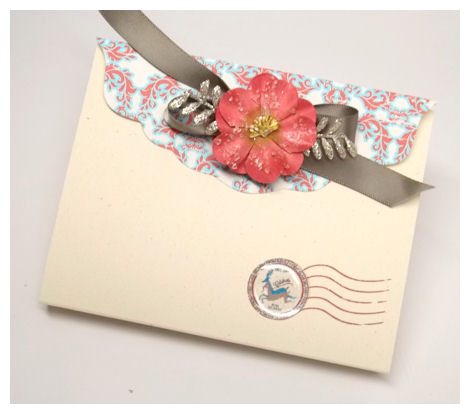
The *obvious* would be for it to hold a set of cards, but my gift today holds something a little more…..yummy!
Can you guess what it is?
Let’s unwrap it and take a peek!
Do you know now?
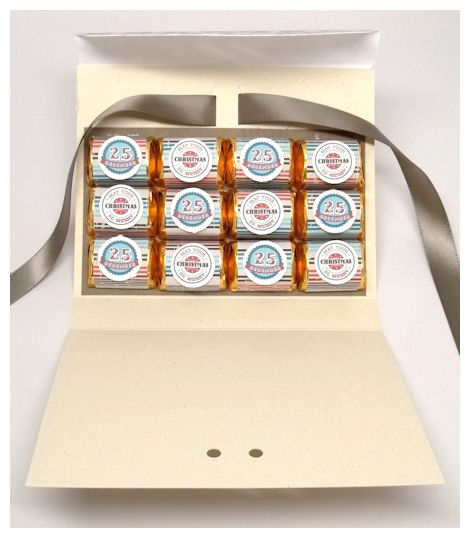
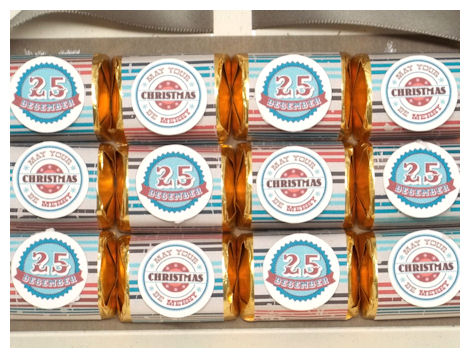
Yes, that’s right! Hershey’s Nuggets! These are the milk chocolate & toffee kind.
This idea came about because one of our designers, Tina Hale had asked me to consider a fun new way to wrap up the ever popular Hershey Nuggets, for those who like the “nugget tins”, but feel like those can end up being a more expensive option, when trying to keep costs DOWN in a tough economy, but still want to give something special.
Now you can put these candies in just about *any* template we sell, but we DO have several viable options that would work that are in similar fashion to a tin.
You can use ie:
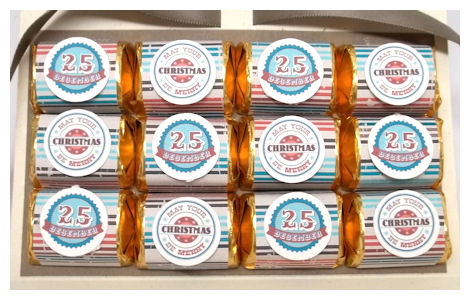
I printed the coordinating stripe pattern paper from the Christmas Patina Papers onto my sheet of my 8160 Avery Mailing Labels. I then wrapped the nuggets in the labels. They are adhered to a piece of cardstock using removable adhesive so they don’t fall out or slide around.
I used the images in the Christmas Swagset to create two different labels to adorn my nuggets. I resized them, then cut them out using my Cameo Silhouette.
Then they are wrapped up to perfection!
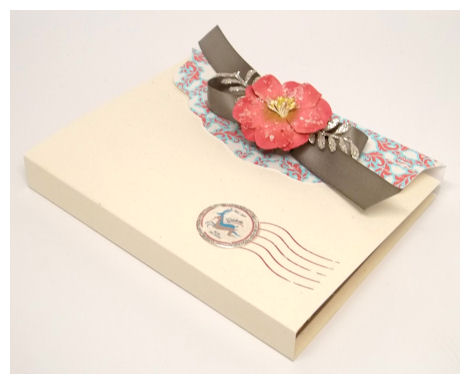
I had to use the *new* Christmas Patina Papers for the lid. I loved the postal mark from the Christmas Swagset. I put the reindeer, which were resized, into the center of the post mark.

This is the back of my gift

Seriously SO quick and simple, and the cost of the wrapper itself is about 0.16 cents!! That is an INSANELY inexpensive way to wrap ANYTHING!
This would make a great gift to send off with guests at your holiday event, or just because, any time of year. A great standby to keep on hand in case you get a gift from someone you weren’t expecting and you want to be able to reciprocate!
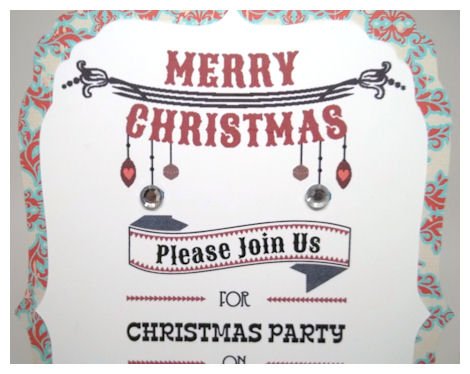
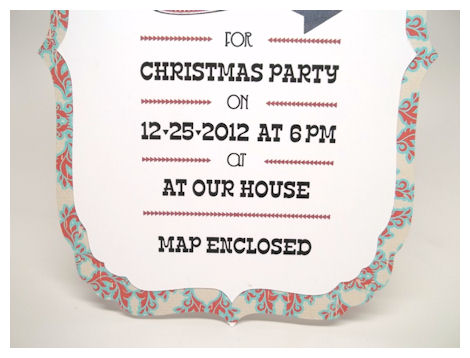
Lastly let me share with you an Christmas party invite 😀
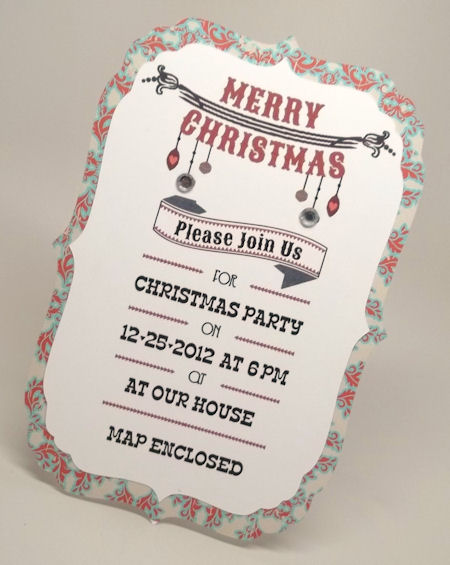
This was created using the You’re Invited cut file.
We are almost done sharing new prjects for this release, but you can always get ideas 24/7 by viewing our Gallery!
Be sure you visit the team today:
No Bones About It
- Kimberly Morrow
- ME!
Crazy for Candy
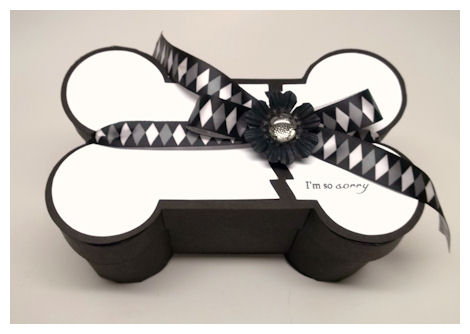
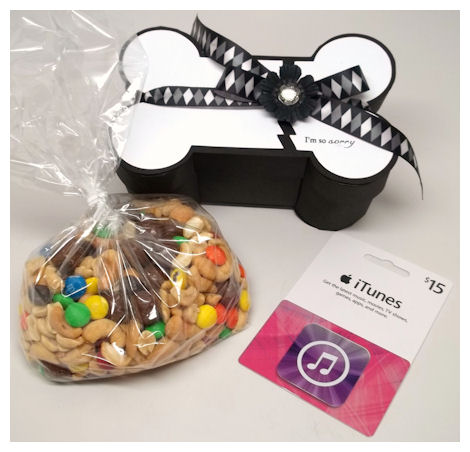
I cannot tell you how many people in my life have broken a bone or two at one time or another. It can be hard to think of what you can make for someone when that happens. Recently (like a week ago) my Sister-In Law’s dad fell off a ROOF while cleaning the gutters! Yes, a roof!
Thankfully he is OK but he broke a few bones, cracked some ribs, punctured a lung… but in the grand scheme of things, he is lucky to be alive. I wanted to make something for him to say I’m sorry, and I think this fit the bill.
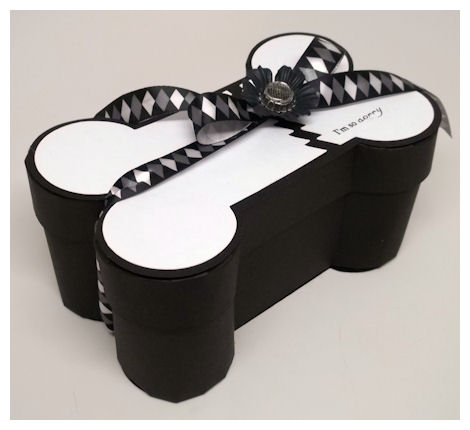
I made the No Bones About It © box in black cardstock, and the “bone” in white, which I cut to be jagged, so it looked broken. I thought it looked like a view on an x-ray! LOL!
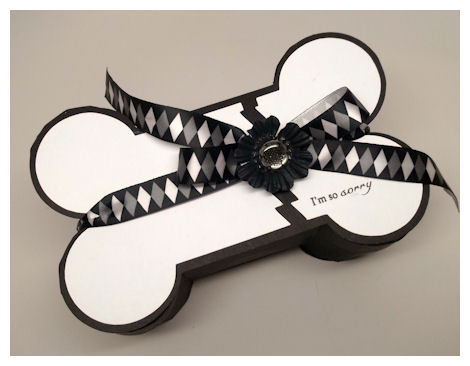
I love it. It’s super simple, yet thoughtful and it fits the “cause”.
I wanted it to be masculine, so I used this argyle ribbon. It looks like it is literally tying the broken bone together, in my opinion 😀

My sentiment is from the Sensational Sentiments © set. I couldn’t resist adding a flower, but it IS black 😀 The flower center is from the flower center in the Be Dazzled © set, which was printed on acetate, then cut out and layered onto a mini bottlecap.
Tomorrow we share our Year in Review group post. This is one day that you will not want to miss what the team has whipped up. We all offer NEW ideas with OLD products 😀 You can never have too many ways to use what you have, or maybe something you didn’t think twice about will be on your must have list.
See you tommorrow.
Welcome back everyone 😀
I hope you have really enjoyed all the samples you’ve seen so far by the team using our *NEW* products. We each have so much fun coming up with new ideas to help inspired you and hope will kick start your own creative ideas for party favors, and homemade gifts this year!
So please pay a visit to the following designers:
No Bones About It
Crazy for Candy
- Lori Hairston
- me!
Of course I always make samples for each day of the release week. It’s something I really love to do and look forward to sharing the ideas I think of as each product is created. When I created this company I was really focused on being able to share what I love to do, and making it easy for ANYONE to replicate. I love the fact that our products are user friendly for all skill levels, and that you don’t need a ton of craft supplies to create some amazing gifts. If you have a printer, some cardstock, scissors and glue, you can create almost everything we share! Even better is that we always offer products that not only coordinate together, for those of you not knowing what to put together or don’t want to think too much, but also that all these products can be mixed and matched together, and each template offers much versatility. I love to share the ways each product can be used in a different way, and I hope you all enjoy that as well.
That being said, let me share my project for today! It used a mix of older products to create a new gift ♥
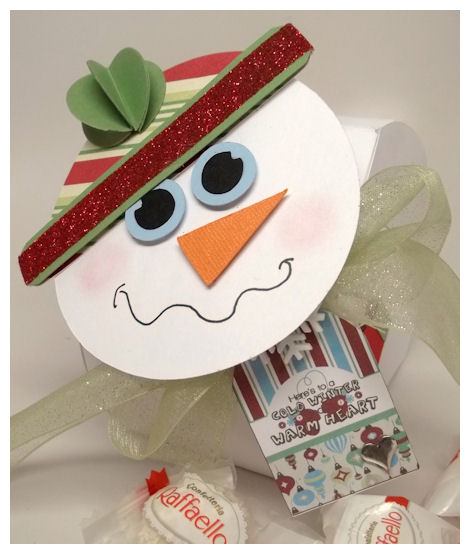
Cold Winter, Warm Heart
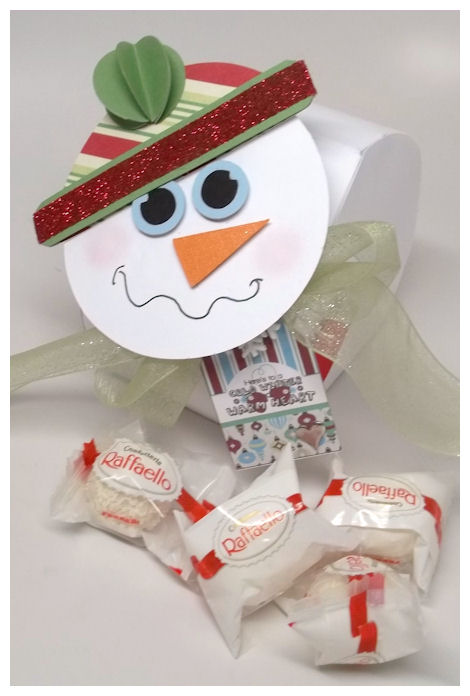
If you want to really WOW people with a super simple project this Winter, then you will love this one.
I love giving Rafaello’s! They are these white chocolate truffle like treats, with crispy wafer-like shell, rolled in coconut, with an Almond in the center. They look like yummy snowballs.
Hence my snowman creation.
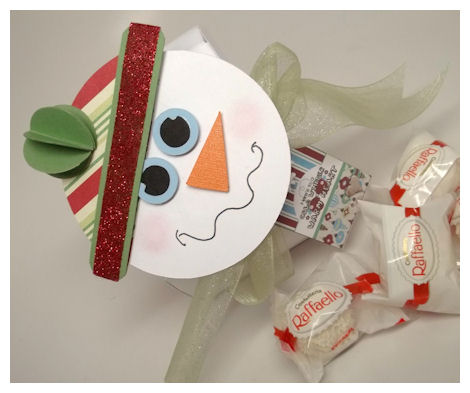
I created the Crazy for Candy © template from white cardstock. Then I took the snowman pieces from the Topped Off © template. to make my candy jar just like a snowman. Obviously the pieces were enlarged to fit, but this is an idea that can be used even if you don’t have that template. I used the eyes from the Crazy for Candy © template, and hand-drew my mouth. Sponged on some rosey cheeks 😀
You can use some simple shapes to make your own snowman, or don’t forget that you can use *ANY* of the characters from our Pretty Impressions Setsto make your own character such as a penguin, snowman, Santa, Elf, fairy, gnome, woodland creature….to name just a few possibilities.
The hat was cut from the strip pattern in the Candy Claus © collection. I added a 3 D snowball to the top of the hat, and some glitter to the hat trim.
NOTE: The tag actually DOES match the hat in person. I don’t know if its my photo software or the shadow from the template, but it doesn’t match in photos. WEIRD! Its red, green and blue. Just had to point that out because it’s making me CRAZY!! I took a million photos with the SAME result. I’m over it.
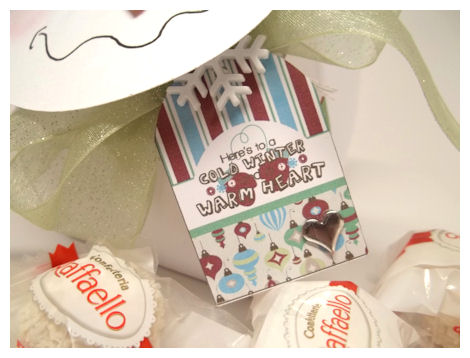
I tied some pretty glittery green ribbon around the “neck” of my snowman, to be like a scarf. For my tag I used the Well Rounded © set for my tag, and clipped some ornament patterned paper along the bottom from the Candy Claus © collection . The mittens on the tag were from the Homemade Holiday © set, and the sentiment is from the Warm Sentiments © set. It was just perfect for my snowy sweet treat-box. The tag was cut out using the Well Rounded Tag © cut file. I added a heart sticker to the lower right hand corner too!
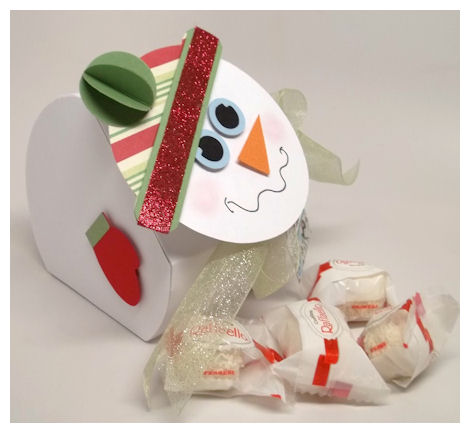
You can see the mittens from the Topped Off © template were also used. You could use some twigs, or make your own mittems from felt as well. It’s all about creativity. There is NO right or wrong way to create something, There are NO limitations either. Use what you want, to make something into your own creation. These are great projects for kids to do too. They could DRAW on the face and mittens! Just have FUN with it.
We will return with more tomorrow, so please come back, as we share more projects! You never know when you just might find the perfect idea for something you’ve been wanting to give.
See you then.
November Preview Day 1: Crazy for Candy!
Oct 29, 2012 Author: mytime | Filed under: Cards, Home decor/3-D items, My Time Made EasyWelcome back to my blog everyone. I know it’s been a while since we last shared some samples, but it seems like only yesterday! Of course, as usual I am always pretty busy between things with my family and running a company. I do at least get to enjoy release week by posting any samples I get time to create. I always wish I had MORE time to do more, and share more, but until we have MORE than 24 hours in a day, I just can’t.
Here in new Hampshire we are battling Hurricane Sandy, and I am hoping everyone affected is able to remain safe!
I’m so excited to announce that despite the storm, I have become an Auntie again! My brother Robert W. Vigeant the III and my sister-in-law (and of my best friends) Heather Dwan welcomed a healthy baby boy into the world today during Hurricane Sandy!! (Photos to come soon I hope :D)
Welcome Robert W. Vigeant IV … He arrived yesterday morning October 29th 2012 at 0849am. 21 Inches Long and 7lbs. 13 oz. He is quite handsome ♥ and all are doing well despite the storm.
OK so back to the first previews of our upcoming release….here is who you want to visit!
Keep in mind if you don’t see anything NEW, it could be the awful weather we are having so check in againa t a later time.
- Lauren Meader <–you are here!
- Debbie Marcinkiewicz
- Farida Rone
- Kimberly Morrow
NOTE: Many items you see in samples are previews for the November 1st Release
I’m quite excited to share with you the latest template we have for this release!! It is called Crazy for Candy!
Look at all you can make using ONE template!
Available in PDF, SVG, GSD, DXF, WPC
Completed Project Size:
3 Inches Wide
4 1/2 Inches Tall
5 Inches Long
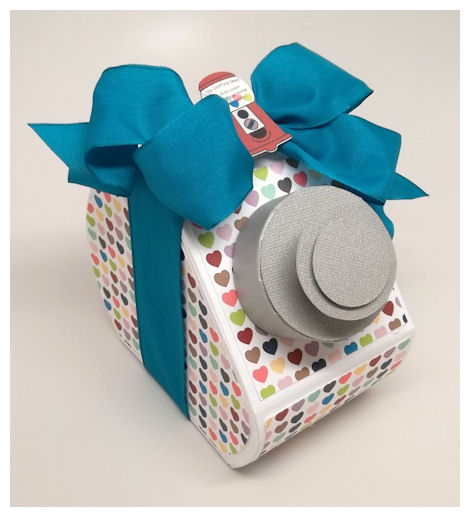
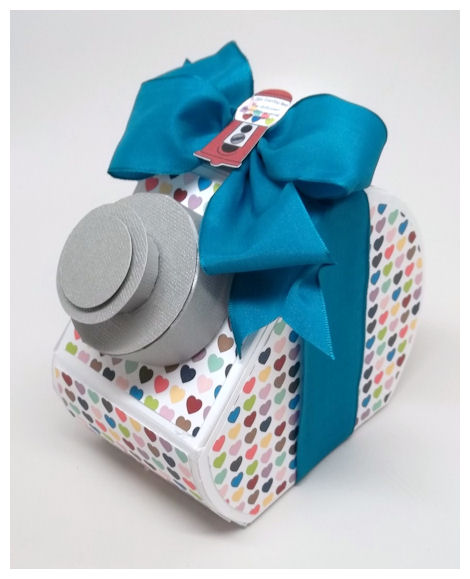
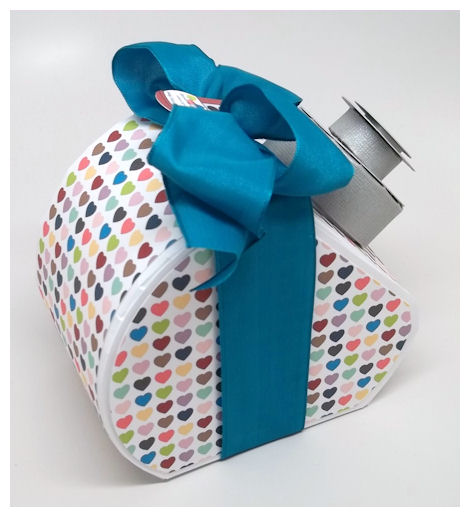
If you’re crazy for candy then you will flip with excitement over this new template! The Crazy for Candy was created after the old fashioned glass candy jar that you’d find the sweetest of treats displayed in. That recognizable circular body, with the silver lid, floods me with many wonderful memories of my childhood.
Here is the “original” version
I remember big gumballs, penny candy, rock candy, sour lollipops that are like big sweet tarts, wax bottles with juice inside, licorice by the foot, gummy candy in all shapes, colors and flavors…to name a few.
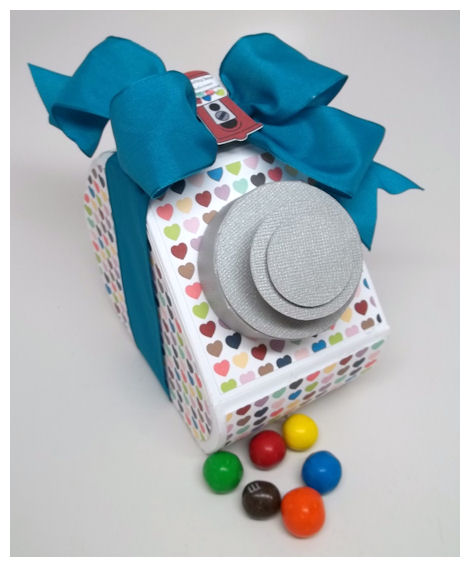
Here I packaged up a bag of pretzel M&M’s! They were a perfect match to my pretty Cute Critters © paper collection
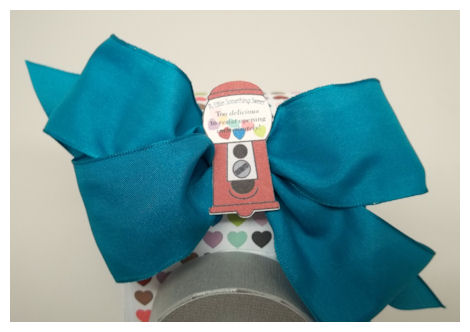
So I used the gumball machine image from the On Display 1 © set, and the sentiment from the ApothecaryLabels© set. I used the hearts for gumballs, using the colors from my paper 😀
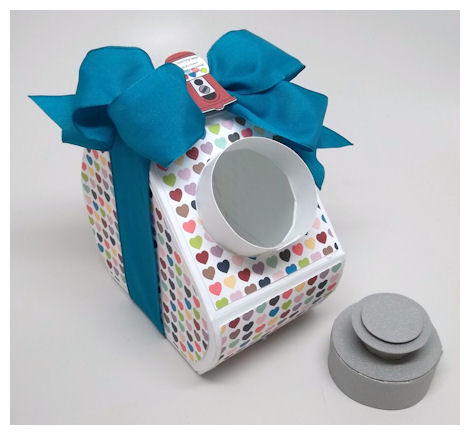
See, the lid pulls off just like the glass version! How fun is that?!
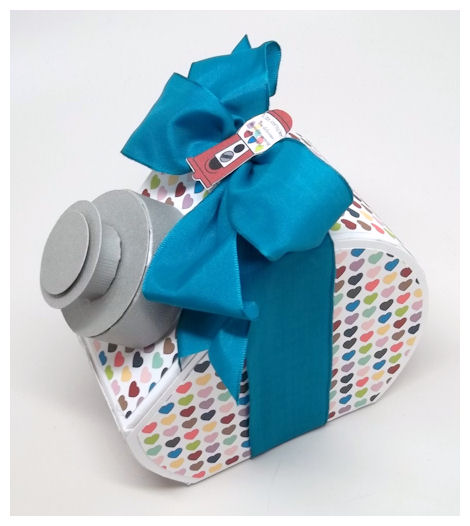
You can package just about anything delicious in here.
I wanted to be able to bring such amazing memories to my own children as I package up my own sweet treats for any event, all year long. Now I can do just that with an affordable, and versatile cardstock version, which lends itself to endless possibilities. There is no end to what you can package up in your candy jar.
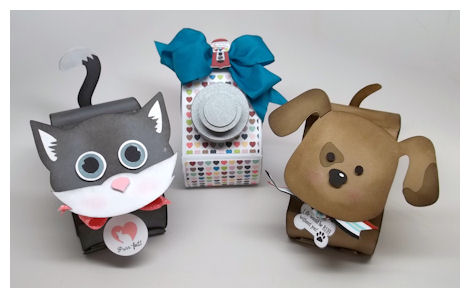
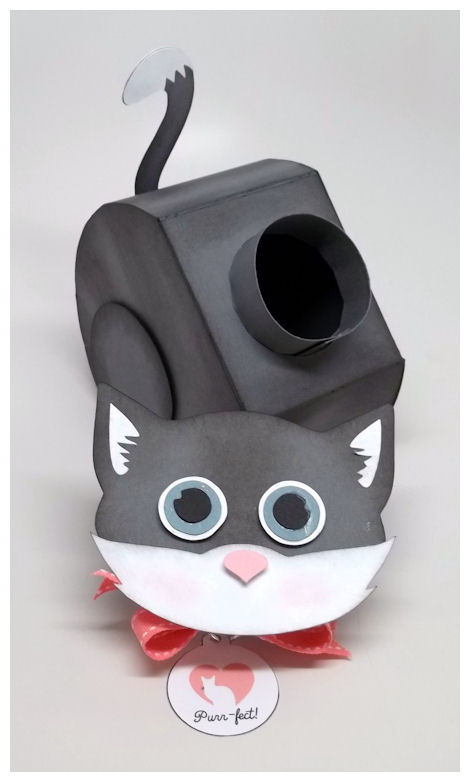
To “sweeten” the candy pot, I have also included (2) special files called the Crazy Cat, and the Adorable Dog. The contents of these files allows you to quickly and easily turn this candy jar into a dog or cat in just minutes! Perfect for gifting something to a new pet such as treats, collar/leash, gift card, something fun for the pet lover, or for a animal organization, or how about an animal themed party?!
With a little creativity you can change the candy jar into any animal you want! You’ll go crazy with all the many ideas for this one template.
First up is our feline friend…
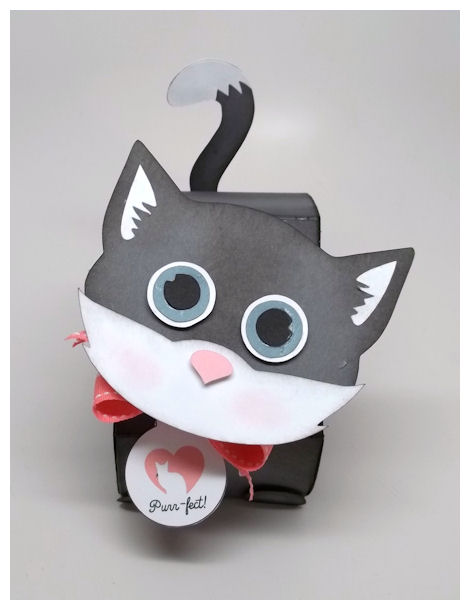
This is the Crazy Cat! She is definitely a cutie! Love those big eyes! Just like the REAL thing 😀
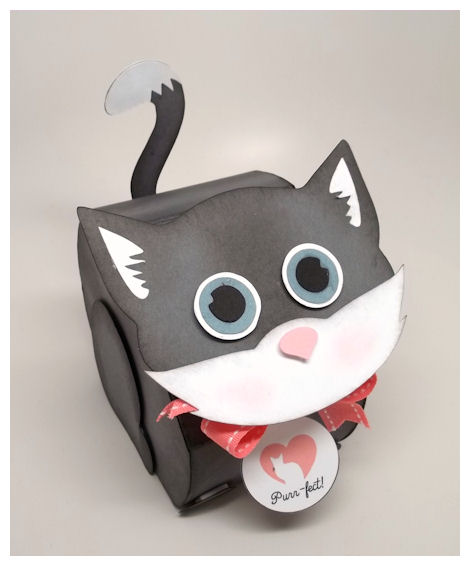
His tag was made using the images from the *NEW* Paws-itively Sweet Stamp Set!!
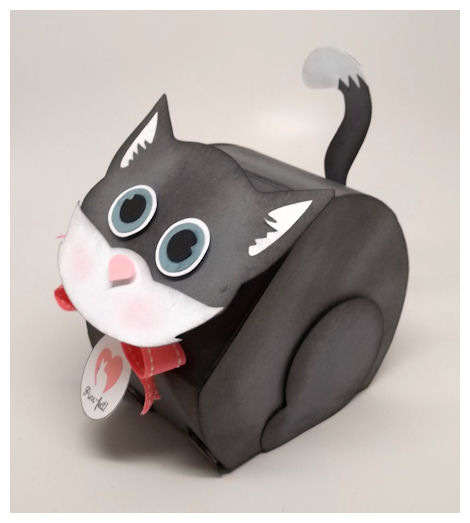
I made this one from gray cardstock, and sponged on some "stripes", for a more realistic look.
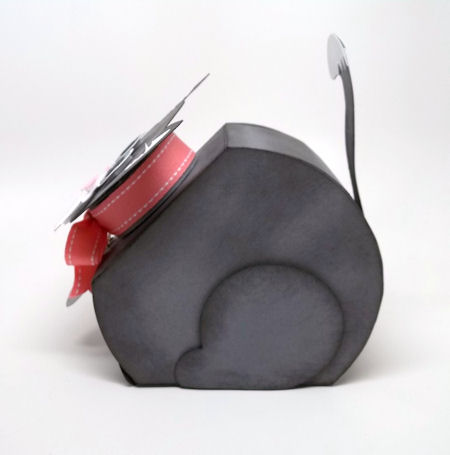
Easy Peasy!
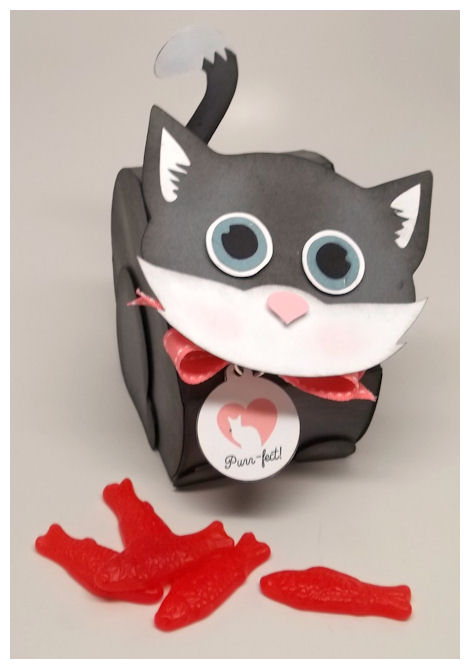
You could package up a variety ot feline friendly items like cat treats, toys, collars etc….or as I did here, Swedish Fish 😀 Since I am giving them as a gift to someone special who just loves all our furry friends 😀
Whether you love cats, or dogs, or just candy, this is a fabulous template!
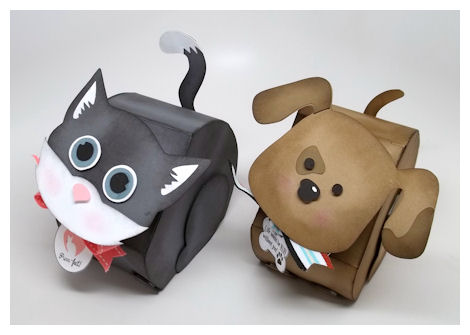
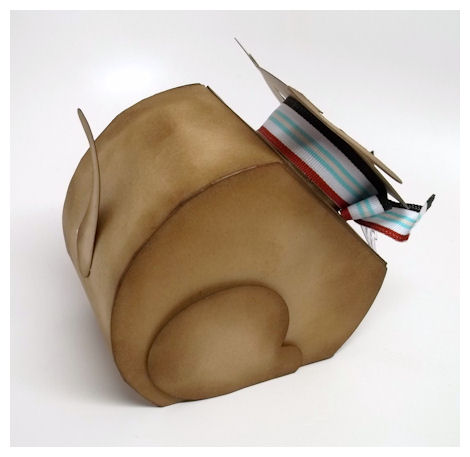
So here is my Adorable Dog…
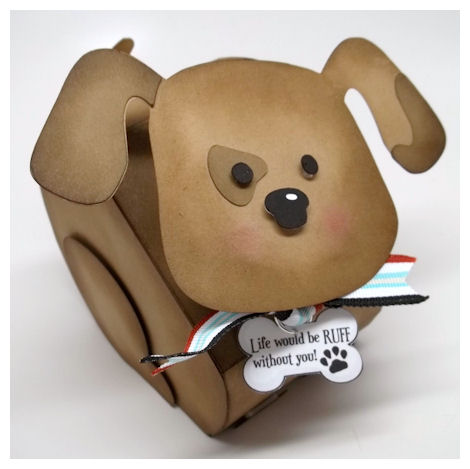
Is he not adorable?!! I just cut the entire template in Kraft cardstock, sis a little sponging, and got this *uber cute* puppy! It didn’t take much to make this puppy perfect!
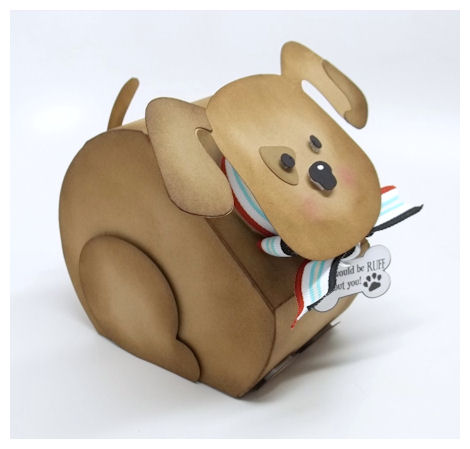
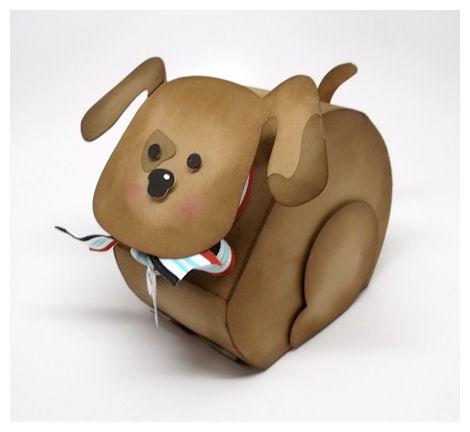

His tag was made using the images from the *NEW* Paws-itively Sweet Stamp Set!!
It was super quick, fun and easy.

Perfect for the pooch lover in your life, or a child who just loves dogs 😀

You can package up a variety of items in this dog jar. You can make your own bone shaped cookies, package up real dog treats, buy a name tag or collar for the new pet, or give a gift card to a local pet shoppe, or to a local groomer for the new puppy owners too! Really the possibilities are endless for this.
The bottom line is, it doesn’t take much effort to get a whole lotta cute!

You may want to view our amazing collection of Pretty Impression image, and Pretty Printables papers for a variety of ways to decorate this template. We also have a special set called the Paws-itively Sweet Stamp Set, for the perfect accent to this super fun template, as well as many treat themed sets!
As you can see I used the Paws-itively Sweet Stamp Set for my samples here!
Here are some details about that set:
Paws-itively SweetDigital Stamp Set of 23 Images $8 By Chrissie Tobas
This is a paws-itively adorable pet themed set for that dog or cat lover! The uber cute images, and super sweet sentiments will make you fall in love with creating some pet themed gifts for your little furry friends, or those who love them.
Sentiments Include:
Fur Baby
WOOF!
Kitty
Puppy
Fishie
Love
Until one has loved an animal, a part of one’s soul remains unawakened.
You’re paws-itively purr-fect
Life would be RUFF without you!
Pets leave pawprints on your heart
You will want to check out the Crazy for Candy template, and the No Bones About Ittemplate for some sensational projects to use with this set. We also have several other products you may find to be the purr-fect companion for this set if images.
Thanks for stopping by today!
Weather pending I will be back tomorrow! I am typing stuff up in this dreadful hurricane, and am not sure HOW far I’ll get before losing power :C
I hope you all stay tuned, and stay safe!
Tis’ the Season
Oct 3, 2012 Author: mytime | Filed under: Cards, Home decor/3-D items, My Time Made EasyWe are ready to literally “wrap up” our samples for the October Release. Each of the team members have some great gift ideas for the impending holiday seasons to share today. We always have our monthly Year in Review, and today is a little different. Since we had SO MANY items to share this month, our designers are mixing older products with new templates.
Here is what you can find on our design team’s blogs:
Gifted
Candy Wrapper
Wreath of Wishes
Now I know I should be sharing something with one of our NEW templates, but I sorta went backwards!! I designed something using our new images, and cut files, with an older template. When the idea hit, I couldn’t resist. As you all know, sometimes you just have to go exactly where creativity takes you.
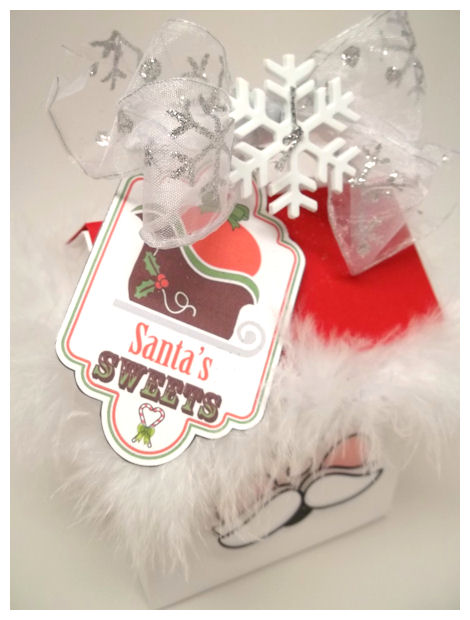
Santa’s Sweets

Here is used the Carry It © template to create a Santa Box!
I wanted this to look just like Santa, complete with the red hat and maribou trim.
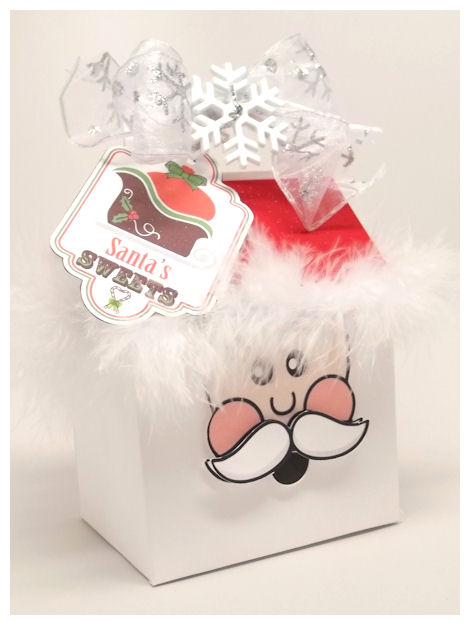
I cut my base template from a white cardstock, and the lid from red, to create the “hat”.
I printed an enlarged version of the Santa face from the Homemade Holiday set! Ah! The beauty if digital image!!! They really do lead to endless possibilities.
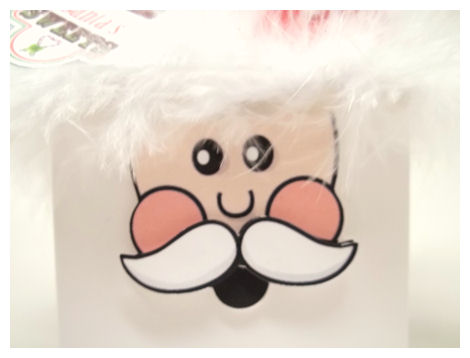
I actually printed it twice so I could create a 3 D moustache.
For his pom pom top, I went with some glittery snowflake printed ribbon, and a homemade tag.
This was easy peasy!!
I colored, printed my tag from the Homemade Holiday Labels set, which was cut out using the Homemade Holiday Labels cut file. The sleigh, Santa sack, and candy cane image are from the Homemade Holiday set. Santa’s Sweets sentiment are from the Homemade Holiday Sentiments set.

Imagine all the gifts you could package up in here! The *BEST& part is, once you spend your time making your tag, or printing the face on a gift box, you only need to to the “work” once! You can save it, and then remake it over and over again. Need to change colors? No problem! Just a click of a button in your photo editing software.
Don’t forget we have a link on our store website to GIMP! It’s FREE 😀 So NO excuses!!
You actually SAVE money when you make your gif
As we wrap up, remember that the ideas are never over just because we end the release projects. You can quickly and easily find ideas for any of our products in our gallery, or go to the item in the store and select the Gallery Tab in the product description page. It can’t get easier. Or if you have NO IDEA what you want to do, just browse around. There are endless ideas there that is sure to spark that creativity you may need to jump start.
I’ll see you back here next time!
Ornamental Gift Ideas
Oct 1, 2012 Author: mytime | Filed under: Cards, Home decor/3-D items, My Time Made EasyAre you enjoying all the *NEW* Products we’ve released for October?!
If you are looking for something, and want something specific we’d love to hear from you!
Contact [email protected] today ♥
Today we have many more samples for you, so please take a moment and visit the following designers:
- Debbie Marcinkiewicz Candy Wrapper
- Kimberly Morrow Wreath of Wishes
- Lisa Kind Gifted
- Lori Hairston Gifted
Today I wanted to share a project I made using the Ornamental cut file
(Available in PDF, SVG, GSD, DXF, WPC)
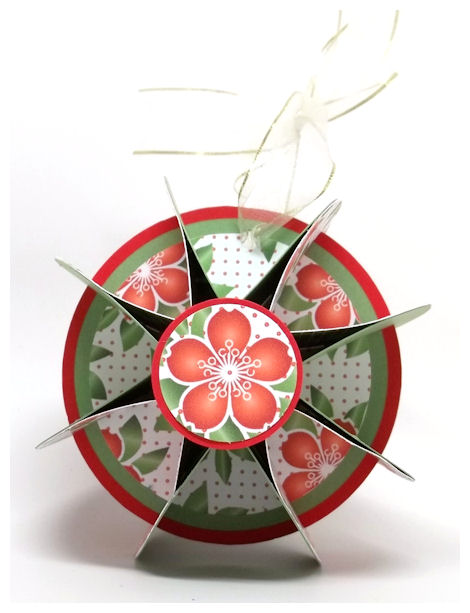
This is a super fun, easy to assemble, three dimensional hanging ornament.
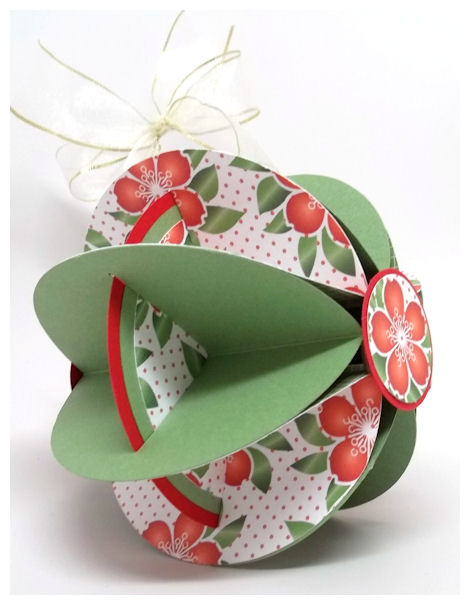
This cut file DOES include a quick step by step guide for assembling.
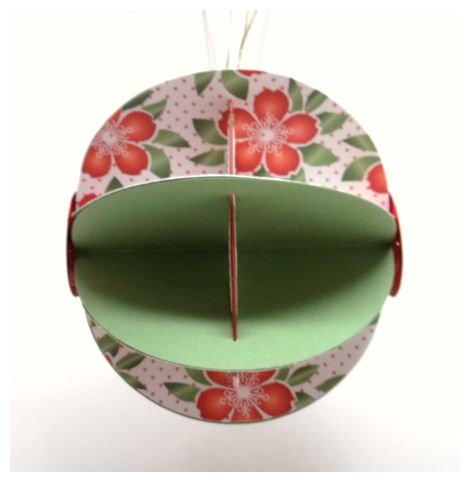
You can make this as SIMPLE of complex as YOU want.
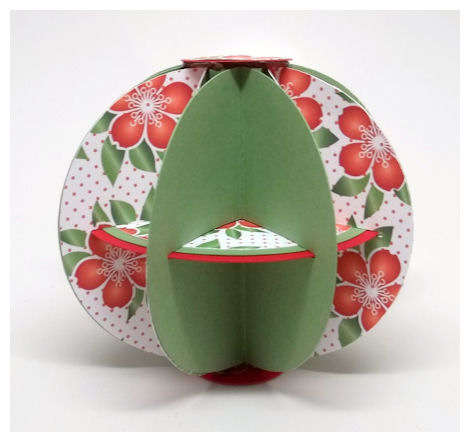
I kept my sample here simple using ONLY the Tis’ the Season paper on one side and the grid pattern from the Homemade Holidays Paper Collection on the other, and some colored cardstock.
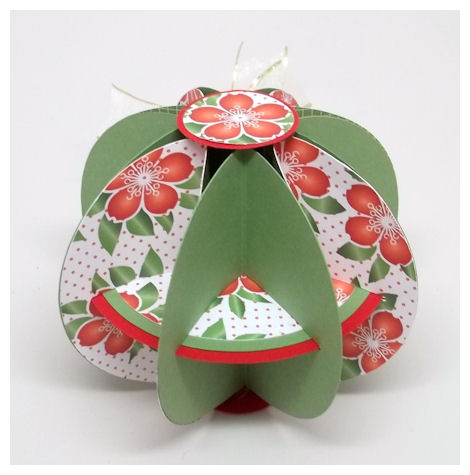
I just punched out a flower from the paper and adhered it to some circle layers, and adhered them to the center of the ornament.
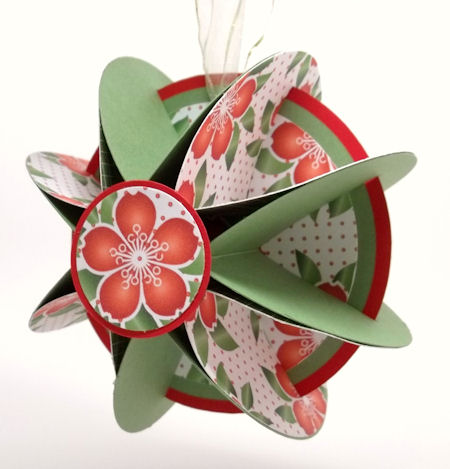
I actually designed this ornament last year, after my 8 year old daughter Amber came home with a special ornament she made using recycled cards. It proudly hangs on our tree!
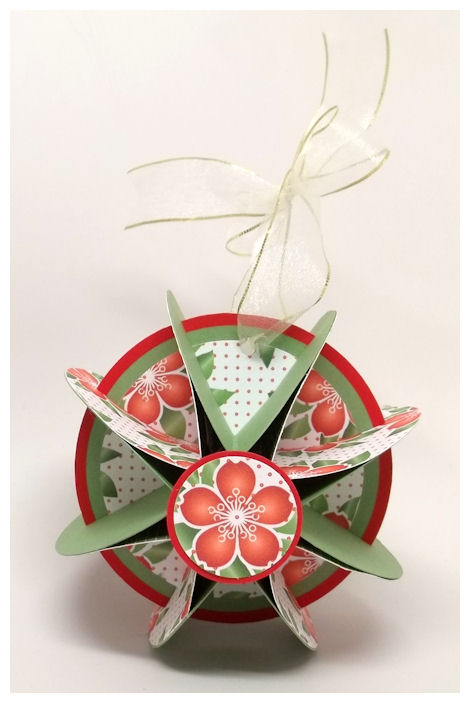
You can use family photos, old letters, book pages, wrapping paper. or any of our Pretty Printables Digital Papers, or Pretty Impressions Images to really make this ornament SHINE! This ornament goes together in minutes, and makes a great addition to any Pretty Package Template, or gift!
Now you can change it up a bit and put a hole in the center of the main layer, and get a whole new ornament look!
These make a great gift or a fun project for the kids to do too! It’s really fun and easy, and people will love getting something homemade to keep for years to come.
Well that is all for me today. Be sure you check out our team, and return for more fun ideas tomorrow.
October Release: Ribbon of Awareness!
Sep 30, 2012 Author: mytime | Filed under: Cards, Home decor/3-D items, My Time Made EasyIt’s October 1st and that means two things!
1) Happy Birthday to my best friend and husband Jason! You truly do only get better with age ♥
2) All our NEW! Products are available for you to purchase!
We have all had such a great time working with all the new products, and will continue to share samples through the next few days.
Be sure you check out our NEW! Products <—HERE!
We have released:
4 NEW! Pretty Packaging Templates
5 NEW! Pretty Impressions Stamp Sets
2 NEW! Pretty Printable Digital Paper Collection
4 NEW! Pretty Pieces Cut Files
1 NEW! Pretty Package Collection called Ribbons of Support
and we have an amazing variety Pretty Package Collections, where you will save 25%!
Please view our Gallery for project samples, and alternative ways to use all our amazing coordinating products!
You may also want to check out our blog for weekly challenges, and even more amazing ideas.
As you may have come to know my company focuses on the “complete package”. We work hard to offer coordinating products that are easily interchanable with previously released products. We really enjoy being able to share the ideas and versatility each product holds.
Today we have an amazing group post using our NEW! Products. All our designer are using elements from the NEW! Ribbons of Support Collection!! While the elements of this collection can be purchased separately, you can save 25% off when you purchase the collection.
Each designer made a project to raise awareness to a cause that has touched their heart, and impacted their family.
There are so many causes out there that touch our lives. I have many that I like to support, and have long waited to finally have something to show my support in a way that give to others too.
So let me share my first sample using the NEW! Ribbons of Support Collection!
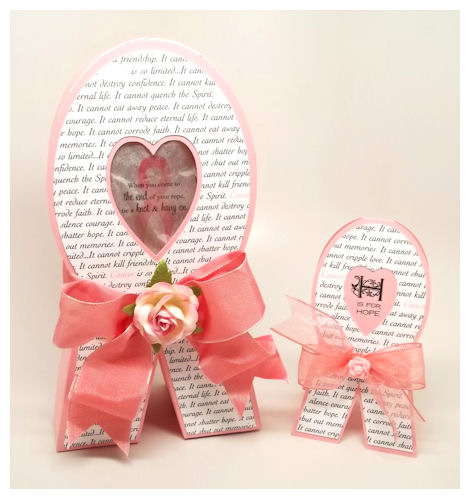
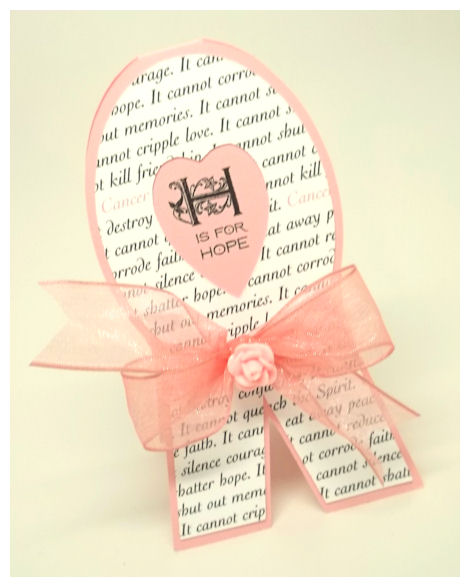
Holding onto Hope
As you know October is Breast Cancer Awareness month. So in honor of that I created a gift set in Pink!
I Support You Template $5
Available in PDF, SVG, GSD, DXF, WPC
Completed Project Size:
2 1/2 Inches Deep
4 I/2 Inches Wide
8 1/2 Inches Long
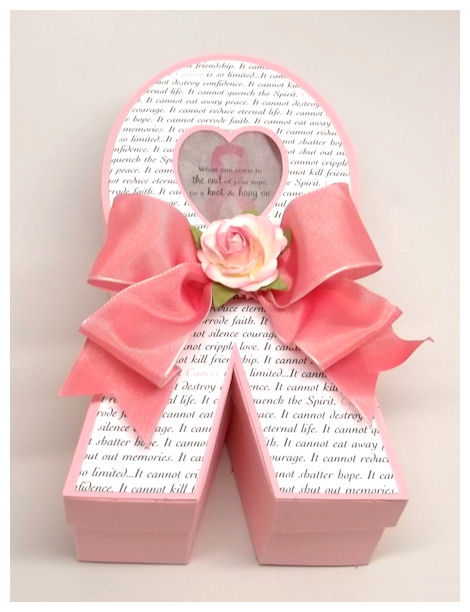
I have long wanted to design a box to represent the Awareness Ribbons that we see everywhere. Awareness ribbons, due to their ubiquitous nature, have come to symbolize various concerns, and symbolize our support for a specific cause.
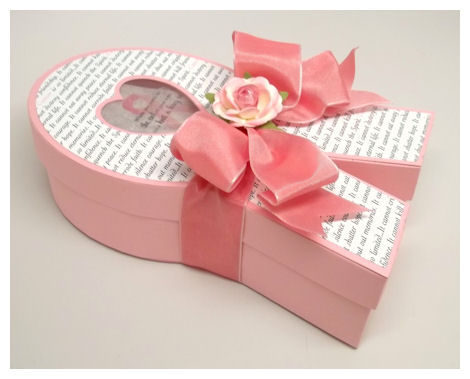
The meaning behind the awareness ribbon depends on its color or colors. Many groups have adopted ribbons as symbols of support or awareness, and as a result, many causes often share each color.

Now I have created an amazing gift box, in the shape of those awareness ribbons, appropriately named I Support You, so you can create an amazing, heartfelt box, in the color of the cause you support, that may be near and dear to your heart!
The box top has an optional window panel. You can choose the standard oval, or use the heart shape.
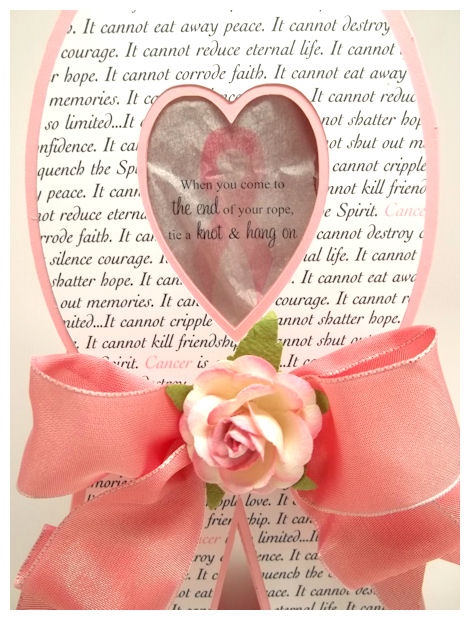
I chose to use the heart window here for my project!
On the window of my I Support You box I printed the ribbon image and the sentiment “When you come to the end of your rope, tie a knot & hang on” from the Be Supportive set onto my acetate sheet. I so love the sentiment!! You can buy acetate that you can print on using your home printer at Staples, and other office store 😀 Works like a dream.
*As a added bonus* We have included a sheet of Pretty Printable Digital Paper named Cancer Cannot for FREE!
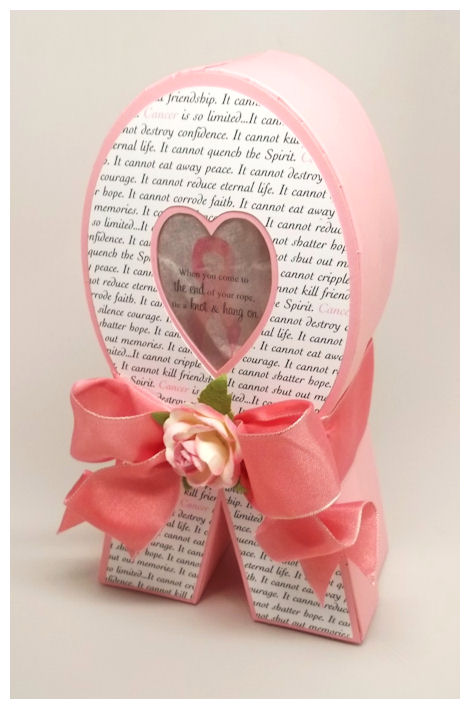
You can quickly and easily change the color on the font, to represent the color of your I Support You template, to suit your cause! Also check out our amazing set of sentiments called Be Supportive. It offers a variety of sentiments that help you say just the right words, to be supportive when someone special is going through a difficult time.
Please see our website for a list of colors and the cause they represent, to help you in choosing the appropriate color for the creation of your own “I Support You” gift box.
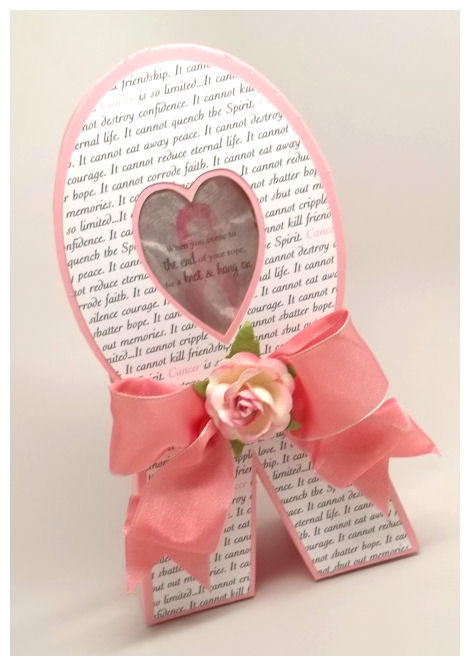
Now the Awareness Ribbon Card Cut File
Available in PDF, SVG, GSD, DXF, WPC
Completed Project Size:
2 3/4 Inch Wide
5 1/4 Inch Tall
This stunning Awareness Ribbon Card Cut File will help you send messages of love and support, or even thanks. No matter what the cause this ribbon card is sure to be an amazing showcase of support to anyone or their cause. Ribbon center cut outs include a oval and a heart.
I also used the Monograms Defined © set for the H is for HOPE sentiment. You can print any of the amazing sentiments from the Be Supportive set on the front or on the inside of this card!
Now it’s time for a ribbon color near and dear to my heart….
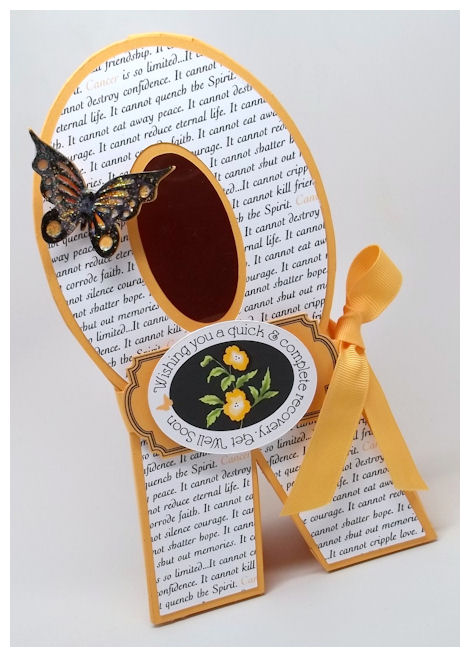
Orange: Leukemia/Pediatric Cancer Awareness
Many of you may know that my now 13 year old daughter had Leukemia at age 6. She is now celebrating 5 years of remission, which is a HUGE milestone! Words cannot even begin to describe the journey we’ve been on. I am truly grateful for every day that myself, my children and loved ones have their health. I don’t think things ever go back to bei

I wanted to create a gift idea for any child, going through a chemo, so I created this gift box, in orange, in honor of my own daughter!
The butterfly represents new beginnings, and to me, hope in the future. The butterfly is from the Bloom Builders © file. I cut a plain layer in the orange, then the cut out layer in black to appear similar to a Monarch butterfly. I added some glitter to it too.
I changed the color on the font of the paper that comes with the template *FREE* to match.
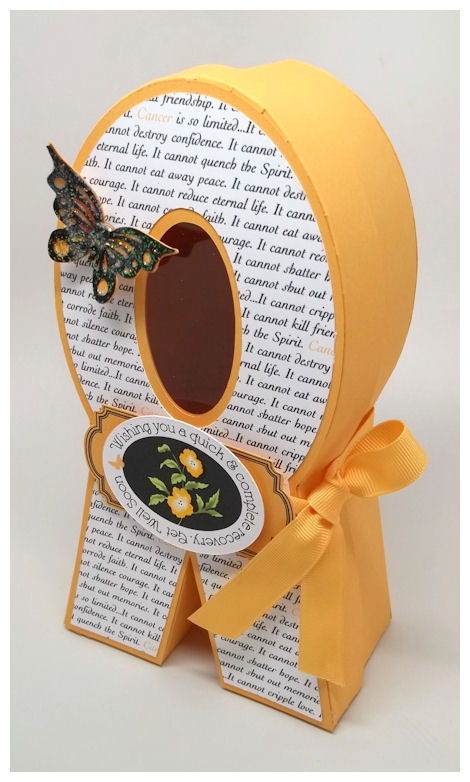
I chose to use the oval cut out on this one, to coordinate with the tag.
For the tag orange layer, I used the frame image from Homemade Holiday Sentiments set, which was cut out using the Homemade Holiday Labels cut file. It was a really nice, and simple accent to the template. The ribbon tied on the side was tied to look like the awareness ribbons.
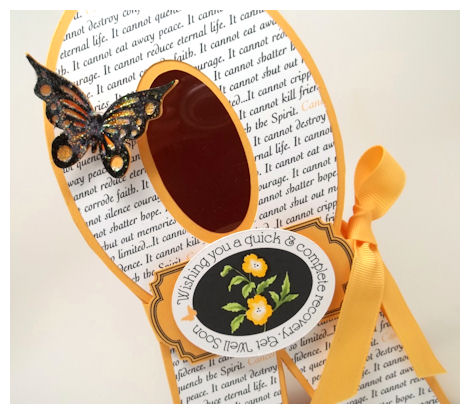
The oval frame was created using the Sentimentally Yours set. I think this is a cheery sentiment, and I loved the addition of the flowers in the center. I used my Copic markers to hand color them.
9/11 We Remember
Sep 10, 2012 Author: mytime | Filed under: blogger challenge, Cards, Home decor/3-D items, My Time Made Easy9/11
Today is a day of remembrance, and a time to thank all of those who have served our country. Past and present, and future, the word thank you doesn’t seem to be enough. Many people have given so much of themselves, to work tirelessly to preserve our freedom and protect our country. Saying thank you doesn’t seem to be enough.
Today on 9/11 we take a moment to remember those at the World Trade Center NY in 2001, who lost their lives that day, and the families they left behind. We take another moment to honor all of the individuals who helped that day, and who are, or who have served our country. Today we remember.
In honor of all these individuals and their families My Time Made Easy ™ LLC and Paper Sweetieshas organized a Blog Hop with *NEW* products & projects to inspire you to create gifts for our Troops, or that special someone!
Please see what all the following designers have made using the *NEW* products:
Additional designers:
Now you are probably excited to see what was released in honor of this special occasion!
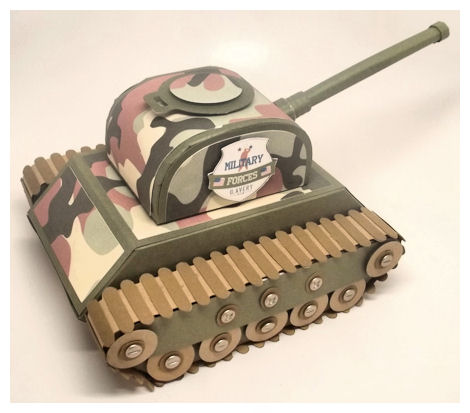
*NEW* at My Time Made Easy ™ LLC is an amazing package collection called Made in the USA!
Made in the USA Package $10
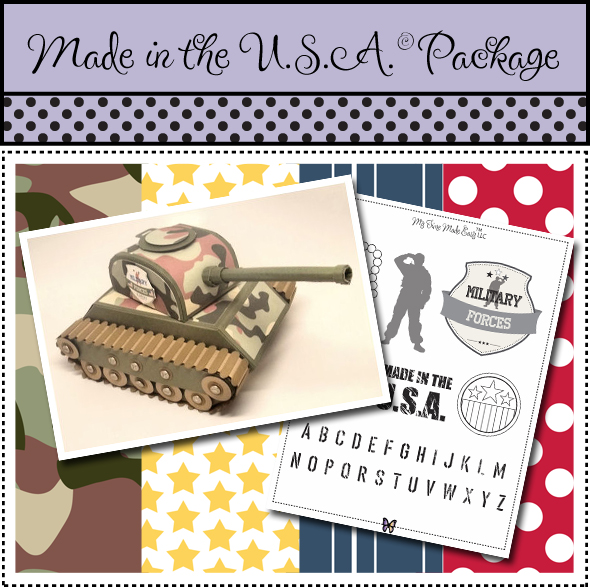
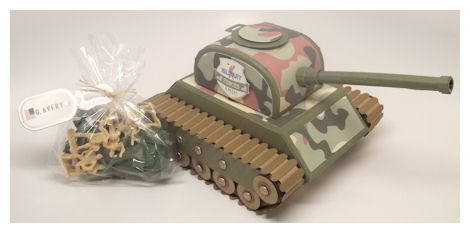
As mentioned above, this collection was created in honor of those who have, or who are currently serving our country! This package includes everything you need to create your own amazing gift package! Contents in this collection are the Tough Tank Template, a sheet of Camouflage Digital Paper, and an additional three sheets of patterned paper in red polka dots, yellow stars, and blue stripes, as well as a Set of 31 Digital Images called Made in the USA.
About: Made in the USA Digital Stamp Set: includes a Military Forces tag that can be customized, a saluting soldier silhouette, a Dog Tag, circle flag tag, alphabet for you to create your own tag, as well as a Made in the U.S.A. sentiment.
Tough Tank Pretty Packaging Template
Available in PDF, SVG, GSD, DXF, WPC
Completed Project Size:
4 3/4 Inches Tall
6 1/2 Inches Wide
7 1/2 Inches Long
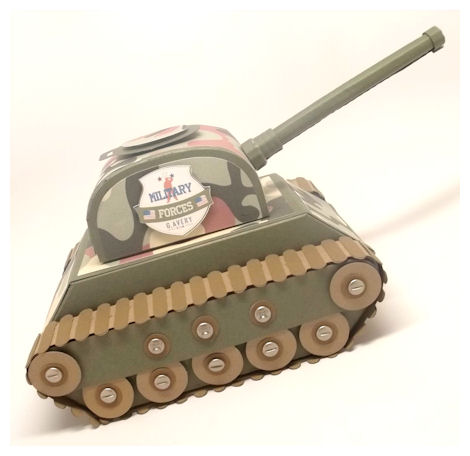
This was designed at the request of, and in the honor of my brother Craig, who served many years in the U.S. Army! He wanted a realistic version of the “real deal” to honor his time spent serving our country!
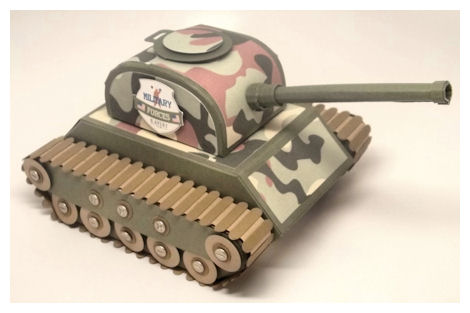
Of course I was up for the challenge, as I think it is an excellent way to honor our troops.
This truly makes the perfect personalized package 😀
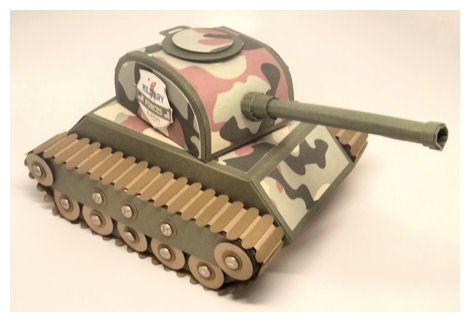
How fun is this?! Note: The top of the tank rotates 360 degrees!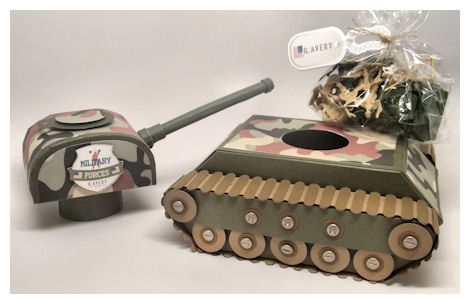
The top also comes off the tank, so you can package all sorts of gift items inside the tank.
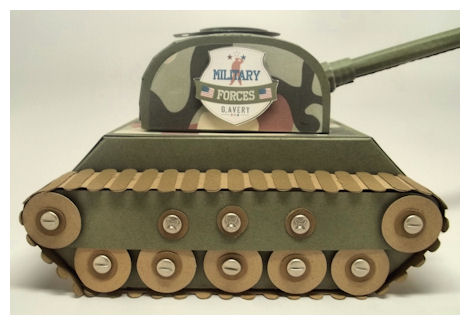
Details: I designed this collection and used the Tough Tank Template as seen here, with the Camouflage paper. I added the tag from the Made in the U.S.A. Digital Stamp Set, all included in the Made in the USA. It was customized with the name G. Avery, using the alphabet in the set. It is for my brother’s son. I actually made two, one for each of his sons.
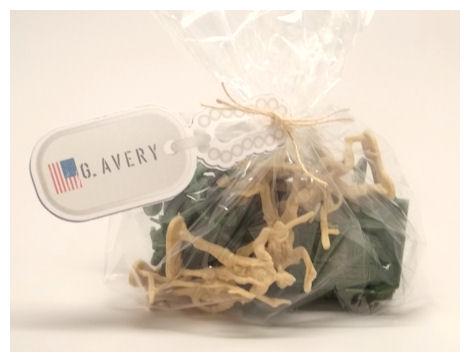
I also did the name on the Dog Tag image in the set, which I used to wrap up the Army Men I am sending his boys. They are so into them of course 😀 I am adding some water grenade balloons and of course candy 😀
Now you too can easily re-create this Tough Tank to create your own customized gift package. The perfect container to package up gifts for any of our Troops, maybe for sending a special care package, a great gift option for someone who served, or is serving in the military, or maybe that special child in your life who enjoys playing with Army men, and things of similar nature. Makes an excellent party favor or centerpiece too!
Be sure you see what all the designers have done for you, and the *NEW* goodies Debbie has created for her new company Paper Sweeties!
I hope that you take a moment to thank someone for their service to serving our country! There are SO MANY organizations that you can send cards and care packages for our troops, so I recommend you find one to support or in your area 😀
I have found this one A Million Thanks, but you can find your own, or if you know of an organization please link it here or on our Facebook Page!
My Etsy

Who I Designed For
Blogroll
- Alicia
- Alli Miles
- Ally Blankenship
- Amber
- Andi @ crafts on a whim
- Angel R
- Angie Z
- Anne Kranitz
- Becky O
- Bee
- Beth Silaka
- Bethany Paull
- Beverly Nash
- Bobbie
- Cambria
- Cammie
- Card of the Week
- Card Positioning System (CPS)
- Cards for Cancer
- Catherine Doucette
- Charmaine
- Cheryl Sims
- Chriss Rollins
- Christina
- Christine Ewing
- Christine Wooden
- Colleen Schaan
- Craft Critique
- Craft Gossip
- Crystal
- Dawn Easton
- Emily Giovanni
- Geny
- Holly
- Igne Groot
- Inspirational Craft Blogs
- Irene
- Jami Sibley
- Jeanne Streiff
- Jen del Muro
- Jeni Bond
- JenMarie
- Jenn Balcer
- Jenn Diercks
- Jenn O
- Jennifer E
- Jennifer Mick
- Jennifer Pereda
- Jennifer-Sweet Treat
- Joanne Basile
- Jodi Collins
- Julia Stainton
- Julie Masse
- Karen
- Kathryn Berthiaume
- Katie Cotton
- Kelley Holland
- Kendra
- Kim Scholfield
- Kris’s Color Stripes! Get inspired here
- Kristen Dubosque
- Kristin Eberline
- Kristine
- Laura @ Sunshine Stamper
- Laura Turnmire
- Laurie Schmidlin
- Lesa Rapp
- Linda Duke
- Linda-LSN
- Lindsey Botkin
- Lisa (lakind scs)
- Lisa Kind
- Lori Craig
- Maggie
- Mara Campbell
- Maria
- Maria Levine
- Mary
- MaryJo
- Melanie M
- Monique Hansen
- Moxie Fab World
- Pam Imholz
- PaperCrafts Connection
- Peppers and Pollywogs Kids party site
- Rebecca Grohall
- Rita
- Robyn
- Rose Ann
- Sarah Vrolyk
- Sharon Harnist
- Sharon Johnson
- Sharon Rivera (a chemisrty with paper)
- Sherrie
- Sophia Landry
- Storage Units, Ink, & More Blog
- Sue Berker
- Susan (Rainy)
- Tangii Crane
- Tracy
- Tricia Traxler
- Trudee
- Velta
- VivLyn
- Zena
MTME Pretty Palette Color Team
MTME Pretty Patterns Sketch Team
My Time Made Easy TM LLC
Shop till you drop!
Lauren Meader
About Me
Copyrighted material
Subscribe To My Blog
Pages
- About me
- Alexa’s Story!
- My Crafty Corner!
- My Time Made Easy™ LLC
- Our Make A Wish Trip to Disney!
- Resume/Publication List
Calendar
| M | T | W | T | F | S | S |
|---|---|---|---|---|---|---|
| 1 | 2 | 3 | 4 | 5 | 6 | 7 |
| 8 | 9 | 10 | 11 | 12 | 13 | 14 |
| 15 | 16 | 17 | 18 | 19 | 20 | 21 |
| 22 | 23 | 24 | 25 | 26 | 27 | 28 |
| 29 | 30 | |||||
Archives
- August 2013
- July 2013
- June 2013
- May 2013
- April 2013
- March 2013
- February 2013
- January 2013
- December 2012
- November 2012
- October 2012
- September 2012
- August 2012
- July 2012
- June 2012
- May 2012
- April 2012
- March 2012
- February 2012
- January 2012
- December 2011
- November 2011
- October 2011
- September 2011
- August 2011
- July 2011
- June 2011
- May 2011
- April 2011
- March 2011
- February 2011
- January 2011
- December 2010
- November 2010
- October 2010
- September 2010
- August 2010
- July 2010
- June 2010
- May 2010
- April 2010
- March 2010
- February 2010
- January 2010
- December 2009
- November 2009
- October 2009
- September 2009
- August 2009
- July 2009
- June 2009
- May 2009
- April 2009
- March 2009
- February 2009
- January 2009
- December 2008
- November 2008
- October 2008
- September 2008
- August 2008
- July 2008
- June 2008
- May 2008
- April 2008
- March 2008
- February 2008
- January 2008
- December 2007
- November 2007
- October 2007
- September 2007
- August 2007
- July 2007
- June 2007
- May 2007
- April 2007
- March 2007
- January 2007
Categories
- About Me
- All That Scraps
- blogger challenge
- camera/photo play
- Cards
- Contests
- family stuff
- FOR SALE
- Home decor/3-D items
- How to FAKE it!
- Introduction
- JUGS Challenge
- JustRite Stampers
- Lizzie Anne Designs
- My family stuff
- My Stamping Space
- My Time Made Easy
- My Time To Color Challenge
- My Time to Create Challenge
- My Timeless Template Challenge
- My Timeless Templates
- Mytime Mail
- MYTIME MOVIE/VIDEOs
- Papertrey Newsletter
- Pink Cat Studio
- Pretty Palette Challenge
- Pretty Patterns Sketch
- Product Opinions and Must haves
- Recipe's
- Saturday Sketch
- Smilebox Creations
- Stampavie
- Tutorials
- Uncategorized
- videos
Most Popular
- Create your own Onesie Card Tutorial-and important NOTE! PLEASE READ (2529)
- Saturday Sketch-Boxed bag holder (2333)
- Going GREEN! Fancy Flower Flourish-Closure Video (1478)
- Fabulous Favorite - Giveaway! (1336)
- a Prayer Request (1231)
- QUICK-Easter Baskets from Nestabilities-PTI style-and blog challenge (1063)
- Teaser Sketch (999)
- February Release Giveway! (and a little peek) (996)
- Group Post and Rambling Rose Video Tutorial (985)
- GIVEAWAY! Who wants it all?! (895)
Recent Comments (RSS)
- 야동: Love to read it,Waiting For
- 야동: This seller is in a
- 바카라사이트: 여기 처음 왔어요. 나는이 게시판을
- 야동티비: I was surfing the Internet
- 바카라사이트: 비슷한 주제에 대한 흥미로운 정보를
- 바카라사이트: "여기에 제공해 주신 귀중한 정보와
- 온라인홀덤: 유익한 웹 사이트를 게시하는 데
- 홀덤나라: 나는 당신의 블로그를 정말 좋아합니다.
- lisa: Technology, too, has left an
- 주소모음: 흠 !! 이 블로그는 정말
Copyright © 2007 - My Time, My Creations, My Stampendence - is proudly powered by WordPress
This blog has been Tweaked and Designed by Sara Williams