My Crafty Corner!
Hi everyone!
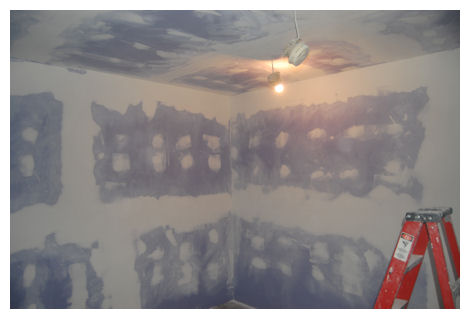
I thought I would share some photos of my newest stamp room, AKA my Crafty Corner of the world! Upon our move to our new home, I needed a new space to call my own, where I could playwork! We took up a 15 X 15 space in our basement (which since it was a new home was already nice in the bare bones aspect)and totally un-creepy!) to create the space I needed.
I’m excited to finally have this new space and have spent much time making it fun and functional! I thought you may enjoy me sharing some of my tips that make it so. Obviously organization was a MAJOR factor. My home office is also now in my creative corner, which will allow me to do my design work, use my printer & cricut (without running up & down the stairs). Previously my office was on another floor making me waste time and creative energy running around. Another good thing is that my company supplies are in another room, all in one place, and nicely organized! It is also away from the family, so interruptions should be minimal 😀
So here is my Crafty Corner! I hope you like it as much as I do!
View from the door before:
View after
My brother (who framed in the room with drywall/mudded/sanded/sub floor etc) thought it would be nice to give me a shelf around 2 walls of the room, under the windows. This was also done due to the cement that was at the bottom. It was a GREAT idea, that I wasn’t sure would be a good one, until now! I’m glad I let him make the decision because it became a favorite part of the room for me.

Lined up on the shelf are these AMAZING glass jars that I got from Target. They are in the holiday section right now (near kitchen dishes) for ONLY $5 each! CLICK HERE <—Heritage Hill Jar
I put all my GORGEOUS Prima flowers in them! It is a shame to hide them in a drawer! Now I can see what I have. I organized each my color collection 😀 I love it! So inspiring.
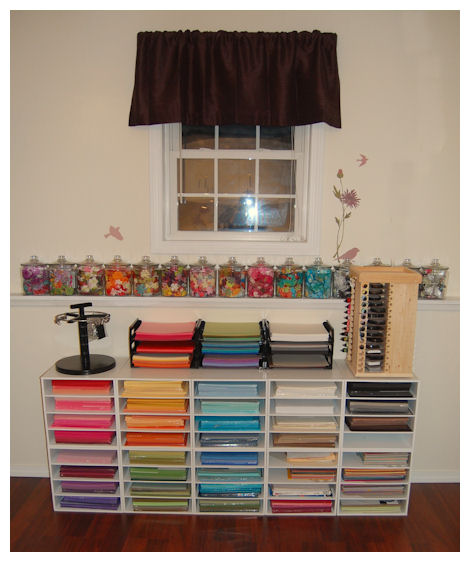
Here is that far wall to the left, when you walk in. You can see I have all my cardstock organized by color, in these white stackable shelves. I got them at Michaels ON SALE 😀
There are 10 total on the bottom. They hold all my 12 X 12 and 8 1/2 X 11 cardstock that is wrapped. The black stackable units on top hold my open stock of cardstock.
To the left is a large Clip it up <—Click to view
On the right is a super duper ink/reinker/marker/ribbon storage unit:
The Ultimate Plus <— Click here to view
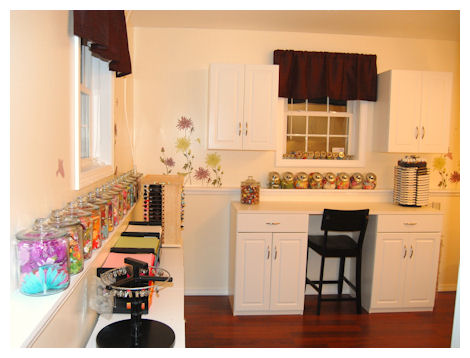
Now here is the window corner unfinished:

Window corner after:
Now I have my work station under the window. In case I want to actually sit. My cabinet is counter height, as I usually prefer to stand, unless I decide to color, design, or mass produce something.
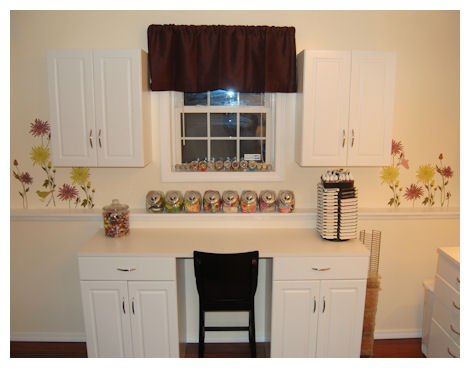
The window above my work station looks right out onto the swing set in our yard, for perect view of the kids 😀 On my window I have some small Prima flower jars filled with various small items I like to use. Under my window, on the shelf I have my Penny Jars filled with even more various Prima Flowers.
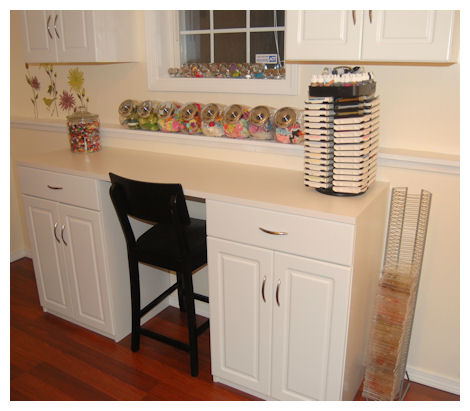
On the far left of my desk is a HUGE jar of buttons, and a scooper 😀 I love having them displayed there! On the left is my Stampin Up! ink caddy with reinkers. I have a DVD rack for some of my acrylic stamp sets that are in CD cases.
My drawers on either side hold my paper cutter, and Scor-Pal! No clutter on the counters 😀
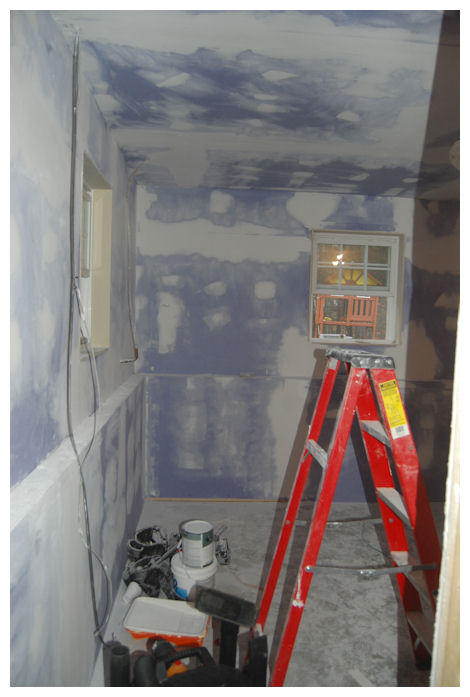
Right back corner before:
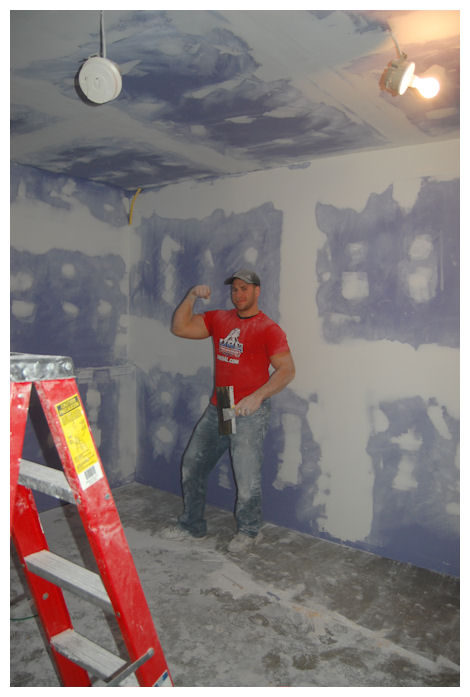
This is my brother Rob, who made the room for me 😀 Flexin for the ladies! LOL!
I feel like this room is out of the pages of a magazine! I fond it so pretty, calming, functional, and inspiring. All the things a space SHOULD be, to me.
I love all the lighting in here under the cabinets! Task lighting is very important!! As is plenty of workspace. I spent about $40 on all the lighting. Not bad!!
My hubby put together all the cabinets, did all the painting, the wood flooring and installed all the lighting for me. What a labor of love 😀 I’m so blessed to have him. He is very supportive-as you can see.
I went with a Linen paint color, so I could EASILY change the color, but I KNEW I wanted a eggplant/lavender, with touches of olive/celery, but HATE painting, so decided to use them as my accent colors instead. It also went with the rest of our home. We also installed a Brazillion Cherry floor too, as that is what is throughtout the main floor of the house.
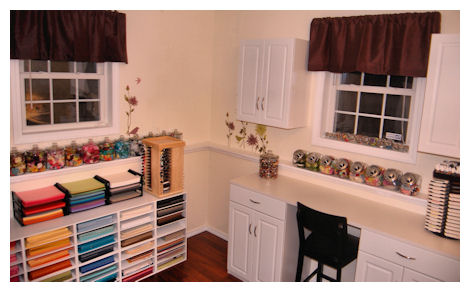
The corner view

I was able to find eggplant colored curtains, and some amazing wall decals from Target to accentuate my room. I needed to purchase like 6 of them, and I use some creativity to cut them and alter them to suit my needs and make my own “garden” around my room, in the areas I wanted.
This is my big workspace!
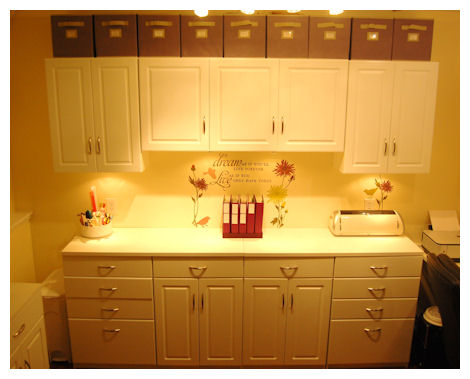 All our cabnietry came from Home Depot 😀 They were HALF the cost of other cabinets as we had to assemble each one, but so worth it! They are really nice quality too. You don’t have to spend a fortune to get a nice space. may take more WORK but its worth it. Did you know they have CRAFT cabinets there? Perfect for others like us!
I bought all these fabric storage cubes, that match my decor at Home Depot.
They are by Martha Stewart <–Click here for a view
They maximized my storage space in my cabinets by putting my least used items up above. This allows to to utilitze my space for my most used items. The items stored above are tissue papers, alterable tins, felt, patterns, bags etc.
![]()
Over my work area I have this quote that I just fell in love with! You can also get a better view of some of the wall decals I used 😀 You can also see my new storage for all the Pretty Impressions Stamp sets I have!

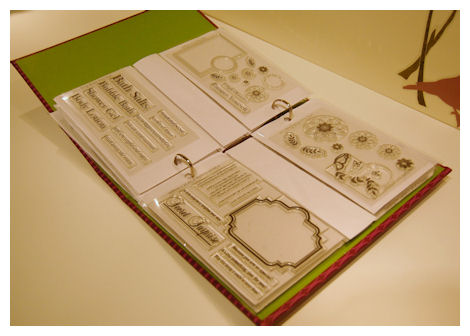
I purchased several photo albums (from Target-they match my room and were only $7 each) that hold 4 X 6 photos! Now all our acetate sheets for our stamps are that size too! I put a label (soon to be a professional typed label-but this worked for now) of all the sets that are within the album.
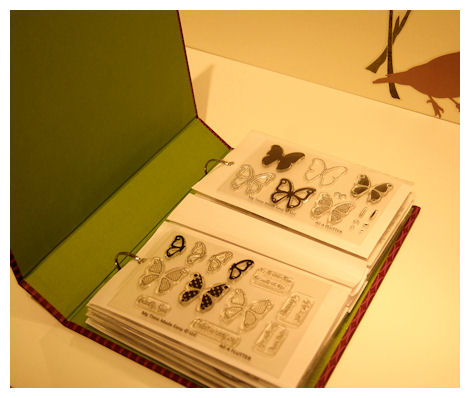
Look how perfectly our stamp sets fit inside! You can also add information to the band in the center.
Perfect organization. Can you belive it! Only $7 an album. Now THAT is awesome! This one has 12 stamp sets inside.
Now I actually got this idea from Tangii! View hers here! Her idea is a bit different, but I altered her idea to suit my own needs. My albums are held together my using the lid of a photo box. All my photo boxes match my room colors eggplant and olive, and are used throughout the inside of my cabinets to store all my supplies, in an labeled and organzied fashion. My photo boxes were also from Target and were like $5 each. A great affordable way to customize and organize your space!
Now lets talk ribbon! OH! BOY!
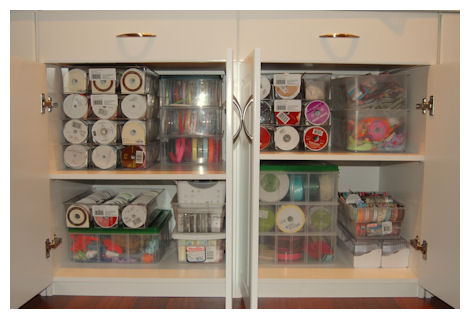
Here are the 2 cabinets that all my ribbon is organized in. You have NO IDEA how much is really in here.
I had 2 HUGE moving boxes full, top to bottom. I have well over 600 spools of ribbon (that I counted). My husband bet it would take 2 weeks (at least) to organzie just that!). That doesn’t include random wrapped ribbon and loose ribbon from ribbon shares.
Upon my shopping ventures I accidentally found the PERFECT ribbon storage!
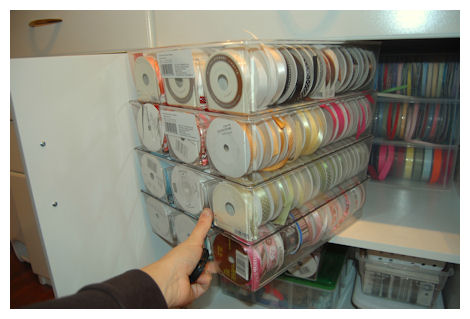
Check it out! Now EACH plastic bin stores about 60 spools of ribbon!
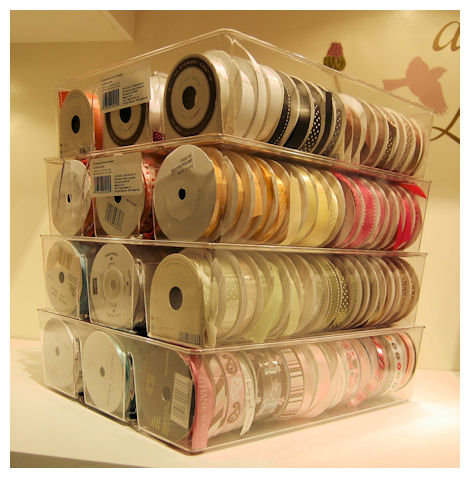
Isn’t that heavenly?
This find was also at Target, in the closet section. It is called a 3 Compartment Drawer Organzier
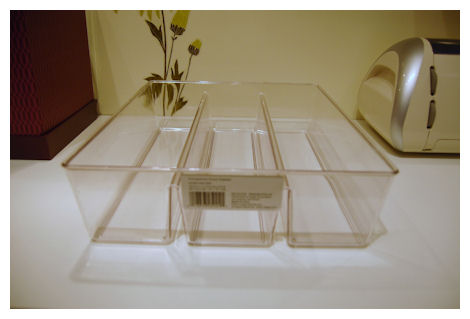
How is THAT for a fab find! So much more affordable than most options! It holds lots of your standard ribbon spools. It doesn’t however sort your larger spools.
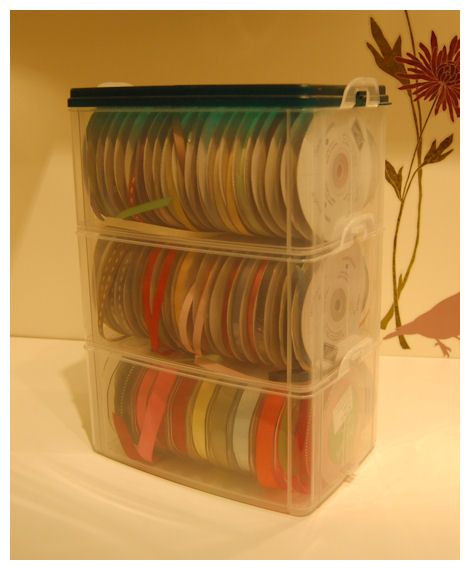
So for my SU! ribbon I used a Christmas Ribbon Stacking organizer-also at Target in the Christmas Storage section. For my even larger May Arts ribbons I have the larger ornament stacking storage-about $10 each. I needed 2 of them.
Office corner before:
Office after:
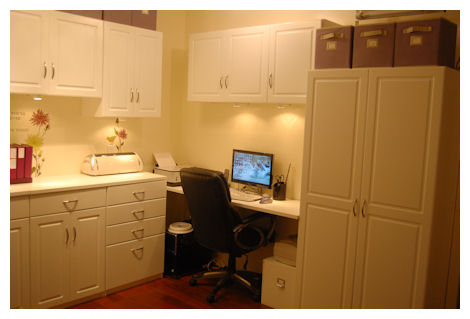
As you can see we put our computer and printer in my space. All our office supplies are in the storage area above. Now I have easy access to design all my templates, from my craft space, easily cut the Pretty Packaging Templates and Cut Fileson my Cricut Expression, and with easy access to the printer, I can quickly and easily print my Pretty Printables Patterned Paper!!
The large storage unit is mainly empty (yeah! room to grow!) but does hold my photo set up/lighting.

Well there you have the before and after of my Crafty Corner! Or should I call it my little place of heaven on earth?!
I hope you gained some helpful ideas and inspiration of how you too can affordably create a space that will suit your needs. One that can be affordable, fun, functional and inspirational too.
Enjoy your creative time 😀
My Etsy

Who I Designed For
Blogroll
- Alicia
- Alli Miles
- Ally Blankenship
- Amber
- Andi @ crafts on a whim
- Angel R
- Angie Z
- Anne Kranitz
- Becky O
- Bee
- Beth Silaka
- Bethany Paull
- Beverly Nash
- Bobbie
- Cambria
- Cammie
- Card of the Week
- Card Positioning System (CPS)
- Cards for Cancer
- Catherine Doucette
- Charmaine
- Cheryl Sims
- Chriss Rollins
- Christina
- Christine Ewing
- Christine Wooden
- Colleen Schaan
- Craft Critique
- Craft Gossip
- Crystal
- Dawn Easton
- Emily Giovanni
- Geny
- Holly
- Igne Groot
- Inspirational Craft Blogs
- Irene
- Jami Sibley
- Jeanne Streiff
- Jen del Muro
- Jeni Bond
- JenMarie
- Jenn Balcer
- Jenn Diercks
- Jenn O
- Jennifer E
- Jennifer Mick
- Jennifer Pereda
- Jennifer-Sweet Treat
- Joanne Basile
- Jodi Collins
- Julia Stainton
- Julie Masse
- Karen
- Kathryn Berthiaume
- Katie Cotton
- Kelley Holland
- Kendra
- Kim Scholfield
- Kris’s Color Stripes! Get inspired here
- Kristen Dubosque
- Kristin Eberline
- Kristine
- Laura @ Sunshine Stamper
- Laura Turnmire
- Laurie Schmidlin
- Lesa Rapp
- Linda Duke
- Linda-LSN
- Lindsey Botkin
- Lisa (lakind scs)
- Lisa Kind
- Lori Craig
- Maggie
- Mara Campbell
- Maria
- Maria Levine
- Mary
- MaryJo
- Melanie M
- Monique Hansen
- Moxie Fab World
- Pam Imholz
- PaperCrafts Connection
- Peppers and Pollywogs Kids party site
- Rebecca Grohall
- Rita
- Robyn
- Rose Ann
- Sarah Vrolyk
- Sharon Harnist
- Sharon Johnson
- Sharon Rivera (a chemisrty with paper)
- Sherrie
- Sophia Landry
- Storage Units, Ink, & More Blog
- Sue Berker
- Susan (Rainy)
- Tangii Crane
- Tracy
- Tricia Traxler
- Trudee
- Velta
- VivLyn
- Zena
MTME Pretty Palette Color Team
MTME Pretty Patterns Sketch Team
My Time Made Easy TM LLC
Shop till you drop!
Lauren Meader
About Me
Copyrighted material
Subscribe To My Blog
Pages
- About me
- Alexa’s Story!
- My Crafty Corner!
- My Time Made Easy™ LLC
- Our Make A Wish Trip to Disney!
- Resume/Publication List
Calendar
| M | T | W | T | F | S | S |
|---|---|---|---|---|---|---|
| 1 | 2 | 3 | 4 | 5 | 6 | 7 |
| 8 | 9 | 10 | 11 | 12 | 13 | 14 |
| 15 | 16 | 17 | 18 | 19 | 20 | 21 |
| 22 | 23 | 24 | 25 | 26 | 27 | 28 |
| 29 | 30 | |||||
Archives
- August 2013
- July 2013
- June 2013
- May 2013
- April 2013
- March 2013
- February 2013
- January 2013
- December 2012
- November 2012
- October 2012
- September 2012
- August 2012
- July 2012
- June 2012
- May 2012
- April 2012
- March 2012
- February 2012
- January 2012
- December 2011
- November 2011
- October 2011
- September 2011
- August 2011
- July 2011
- June 2011
- May 2011
- April 2011
- March 2011
- February 2011
- January 2011
- December 2010
- November 2010
- October 2010
- September 2010
- August 2010
- July 2010
- June 2010
- May 2010
- April 2010
- March 2010
- February 2010
- January 2010
- December 2009
- November 2009
- October 2009
- September 2009
- August 2009
- July 2009
- June 2009
- May 2009
- April 2009
- March 2009
- February 2009
- January 2009
- December 2008
- November 2008
- October 2008
- September 2008
- August 2008
- July 2008
- June 2008
- May 2008
- April 2008
- March 2008
- February 2008
- January 2008
- December 2007
- November 2007
- October 2007
- September 2007
- August 2007
- July 2007
- June 2007
- May 2007
- April 2007
- March 2007
- January 2007
Categories
- About Me
- All That Scraps
- blogger challenge
- camera/photo play
- Cards
- Contests
- family stuff
- FOR SALE
- Home decor/3-D items
- How to FAKE it!
- Introduction
- JUGS Challenge
- JustRite Stampers
- Lizzie Anne Designs
- My family stuff
- My Stamping Space
- My Time Made Easy
- My Time To Color Challenge
- My Time to Create Challenge
- My Timeless Template Challenge
- My Timeless Templates
- Mytime Mail
- MYTIME MOVIE/VIDEOs
- Papertrey Newsletter
- Pink Cat Studio
- Pretty Palette Challenge
- Pretty Patterns Sketch
- Product Opinions and Must haves
- Recipe's
- Saturday Sketch
- Smilebox Creations
- Stampavie
- Tutorials
- Uncategorized
- videos
Most Popular
- Create your own Onesie Card Tutorial-and important NOTE! PLEASE READ (2529)
- Saturday Sketch-Boxed bag holder (2333)
- Going GREEN! Fancy Flower Flourish-Closure Video (1478)
- Fabulous Favorite - Giveaway! (1336)
- a Prayer Request (1232)
- QUICK-Easter Baskets from Nestabilities-PTI style-and blog challenge (1063)
- Teaser Sketch (999)
- February Release Giveway! (and a little peek) (996)
- Group Post and Rambling Rose Video Tutorial (985)
- GIVEAWAY! Who wants it all?! (895)
Recent Comments (RSS)
- 첫충사이트: 완전히 흥미로운 블로그 게시입니다. 저는
- sarah: Wow, Lauren, what a stunning
- hedie: خرید راهبند
- 야동: Love to read it,Waiting For
- 야동: This seller is in a
- 바카라사이트: 여기 처음 왔어요. 나는이 게시판을
- 야동티비: I was surfing the Internet
- 바카라사이트: 비슷한 주제에 대한 흥미로운 정보를
- 바카라사이트: "여기에 제공해 주신 귀중한 정보와
- 온라인홀덤: 유익한 웹 사이트를 게시하는 데
Copyright © 2007 - My Time, My Creations, My Stampendence - is proudly powered by WordPress
This blog has been Tweaked and Designed by Sara Williams