Archive for December 4th, 2012
Visions of Sugarplums
Dec 4, 2012 Author: mytime | Filed under: Home decor/3-D items, My Time Made EasyIt’s time for the second annual Visions of Sugarplums – a week long event which began December 3rd!
Over 17 blogs will be showcasing Christmas projects, recipes, and giveaways!
I’m excited to be participating with both the projects, and a Giveaway!
My Time Made Easy is giving away a $20 Gift Certificate, so be sure you visit Lori at the Visions of Sugarplums event for details on how to win that 😀
So, after you check our my projects, hop along to see what the following people have whipped up!
I want to encourage all my readers to comment on each blog posting today – each comment counts as an entry into the giveaways. Winner will be announced the tomorrow on Lori and Lisa’s Blog!
Here is what you have a chance to win:
Giveaways: $20 gift certificate – My Time Made Easy ™ LLC
1 set of choice – Digital Paper
1 set of choice – Moonlighting by Mary
1 set of choice – Paper Sweeties
I’ve got so many great gift ideas here on my blog, since I am the owner/creator of My Time Made Easy ™ LLC, where the focus is all about creative gift packaging. My Time Made Easy ™ LLC provides you with the basics for creating your own coordinating handmade cards, tags, and gift packaging in no time. It is fun, affordable, and we made it easier than ever! I have always said that it really is all about the TOTAL package. Now you can afford to create and dress up the simplest of gifts on your own, and make them appear to be that much more special. Nothing says love like something handmade.
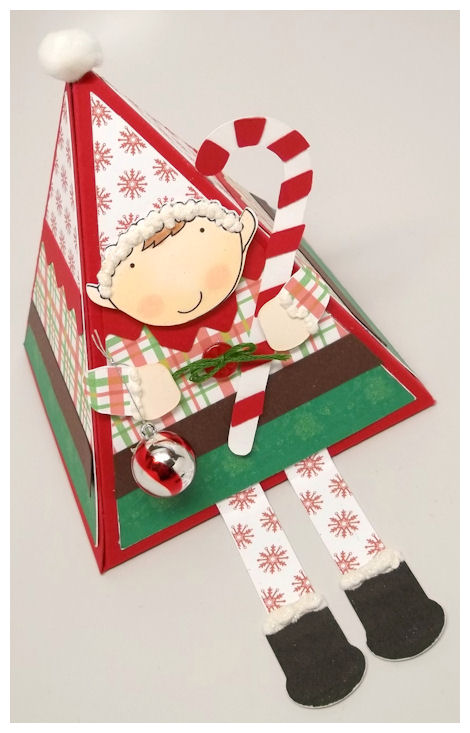
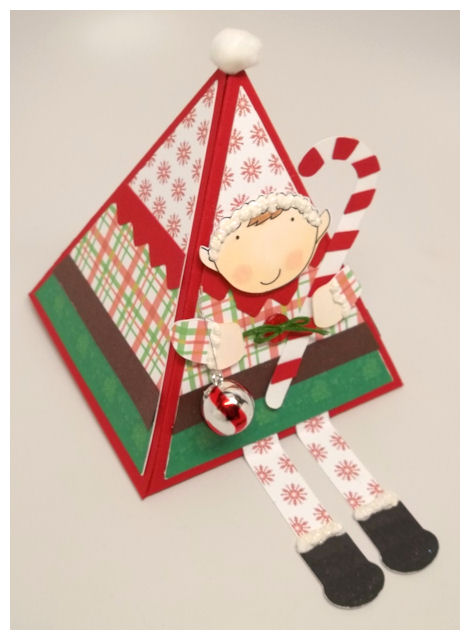
Today I created a sample using one of our amazing templates called Tri-It. It was something I have wanted to create for some time. I think you can make many cute themed gift items with a triangle/pyramid style box 😀 I had seen some cute triangle pillows that were designed to look like garden gnomes, and I thought a box, designed to look like an elf would be pretty cool!
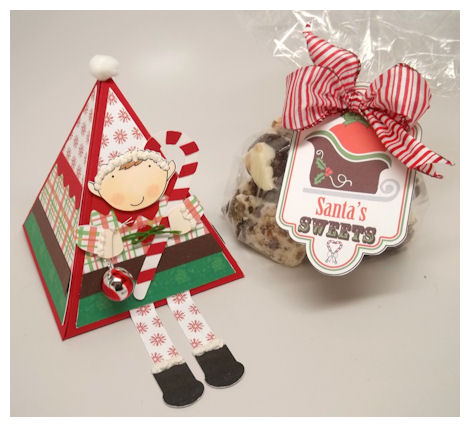
So this is kind of like my little version of Elf on a Shelf!
This is made for one of the counselors at Alexa’s youth group she goes to after school. I wrapped up some salty pretzel caramel bark!
You may recognize the tag…it was first seen here.
Tag Details: I colored, printed my tag from the Homemade Holiday Labels set, which was cut out using the Homemade Holiday Labels cut file. The sleigh, Santa sack, and candy cane image are from the Homemade Holiday set. Santa’s Sweets sentiment are from the Homemade Holiday Sentiments set.
That is the beauty of creating with digital images. I had saved this from my past project, and now when I needed a tag in a pinch I was all set. You create once,then you can easily re-use it again. I resized it to suit my project. I could even change the colors with just a click. Fast, easy, and fun!
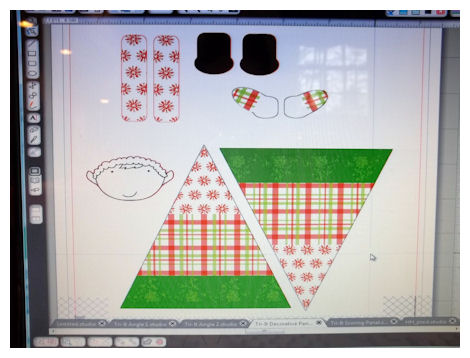
Here is the screenshot from my computer to show you all the pieces before they were cut.
Can you believe those pieces quickly turned into this?!
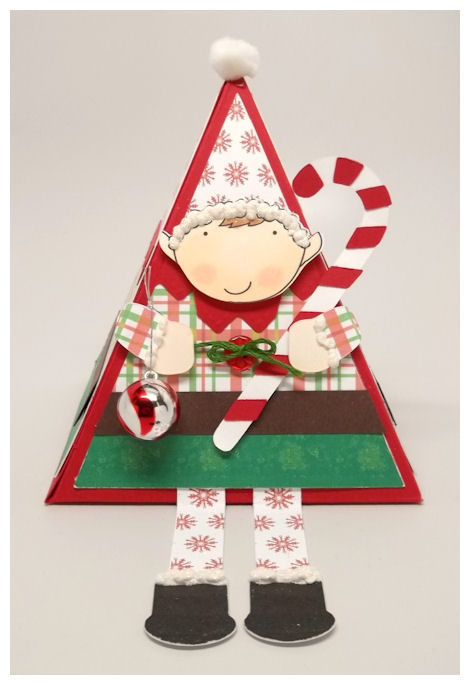
Fill this with Homemade Cake Balls, Cookies, Hershey Kisses, Truffles, Peppermint Ghirardelli chocolates…whatever you choose really, and you are good to go!
Now back to my lil’ elf on a shelf box….
I used the boy elf from the Holly Jolly © set to create the face on my little elf box!
I printed then cut it out, and colored it in. I used the Homemeade Holiday Paper for my little elf suit. I clipped the snowflake pattern to the top for my elf hat. I added a little white pom pom to the top of the hat.
I then clipped the plaid version for the elf shirt. His hands were created using the hands from the Bouncing Bunny © cut file, resized to be smaller to suit my project. The plaid paper was clipped to that as well 😀

I added some zig zag trim from the Border Builders Zig Zag © cut file, along the bottom of the layer to create a elf collar. The little button tied on was the perfect touch.
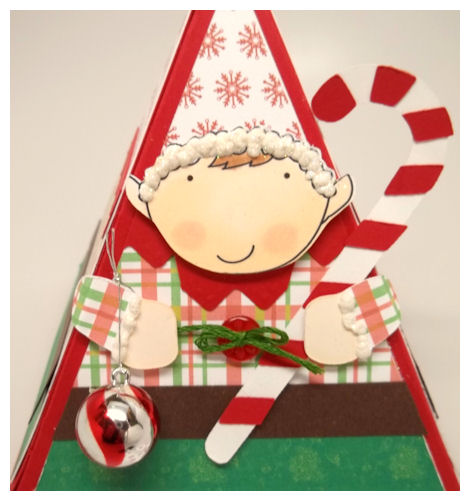
I used the Candy Striper © cut file to create a paper candy cane for him to hold in one hand, and a real little Christmas ornament in the other.
For the skirt of the elf I used the tree pattern in the Homemade Holiday Paper collection.
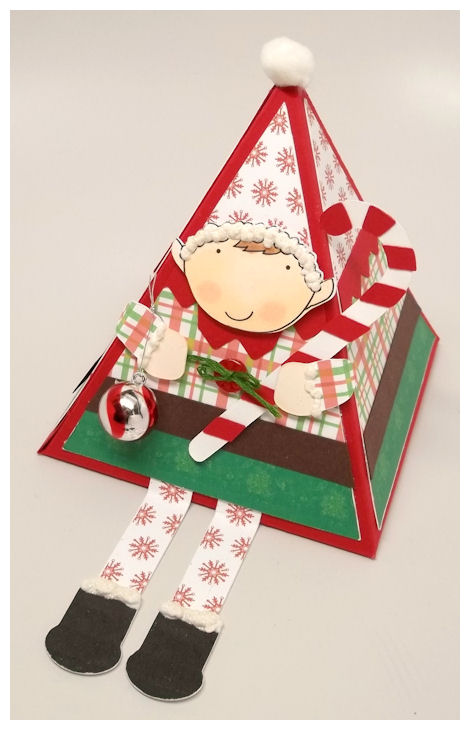
For the legs I just had my machine create the legs from the snowflake pattern, and the boots which was just a oval and a rectangle welded.
I added some white liquid applique, with glitter, and heat set it for my “furry” trim on the hat, sleeves, and boots.
Now that I have all these pieces created I can make as many of these little elves I want, any time I want, without too much work! The Tri-It goes together quick, so I can have a completed project in a matter of about 15 minutes each!
That does it for me today!
Good luck with the contest, and have a happy, healthy, and creative holiday!
My Etsy
My Time Made Easy © LLC
Who I Designed For
Blogroll
- Alicia
- Alli Miles
- Ally Blankenship
- Amber
- Andi @ crafts on a whim
- Angel R
- Angie Z
- Anne Kranitz
- Becky O
- Bee
- Beth Silaka
- Bethany Paull
- Beverly Nash
- Bobbie
- Cambria
- Cammie
- Card of the Week
- Card Positioning System (CPS)
- Cards for Cancer
- Catherine Doucette
- Charmaine
- Cheryl Sims
- Chriss Rollins
- Christina
- Christine Ewing
- Christine Wooden
- Colleen Schaan
- Craft Critique
- Craft Gossip
- Crystal
- Dawn Easton
- Emily Giovanni
- Geny
- Holly
- Igne Groot
- Inspirational Craft Blogs
- Irene
- Jami Sibley
- Jeanne Streiff
- Jen del Muro
- Jeni Bond
- JenMarie
- Jenn Balcer
- Jenn Diercks
- Jenn O
- Jennifer E
- Jennifer Mick
- Jennifer Pereda
- Jennifer-Sweet Treat
- Joanne Basile
- Jodi Collins
- Julia Stainton
- Julie Masse
- Karen
- Kathryn Berthiaume
- Katie Cotton
- Kelley Holland
- Kendra
- Kim Scholfield
- Kris’s Color Stripes! Get inspired here
- Kristen Dubosque
- Kristin Eberline
- Kristine
- Laura @ Sunshine Stamper
- Laura Turnmire
- Laurie Schmidlin
- Lesa Rapp
- Linda Duke
- Linda-LSN
- Lindsey Botkin
- Lisa (lakind scs)
- Lisa Kind
- Lori Craig
- Maggie
- Mara Campbell
- Maria
- Maria Levine
- Mary
- MaryJo
- Melanie M
- Monique Hansen
- Moxie Fab World
- Pam Imholz
- PaperCrafts Connection
- Peppers and Pollywogs Kids party site
- Rebecca Grohall
- Rita
- Robyn
- Rose Ann
- Sarah Vrolyk
- Sharon Harnist
- Sharon Johnson
- Sharon Rivera (a chemisrty with paper)
- Sherrie
- Sophia Landry
- Storage Units, Ink, & More Blog
- Sue Berker
- Susan (Rainy)
- Tangii Crane
- Tracy
- Tricia Traxler
- Trudee
- Velta
- VivLyn
- Zena
MTME Pretty Palette Color Team
MTME Pretty Patterns Sketch Team
My Time Made Easy TM LLC
Shop till you drop!
Lauren Meader
About Me
Copyrighted material
Subscribe To My Blog
Pages
- About me
- Alexa’s Story!
- My Crafty Corner!
- My Time Made Easy™ LLC
- Our Make A Wish Trip to Disney!
- Resume/Publication List
Calendar
Archives
- August 2013
- July 2013
- June 2013
- May 2013
- April 2013
- March 2013
- February 2013
- January 2013
- December 2012
- November 2012
- October 2012
- September 2012
- August 2012
- July 2012
- June 2012
- May 2012
- April 2012
- March 2012
- February 2012
- January 2012
- December 2011
- November 2011
- October 2011
- September 2011
- August 2011
- July 2011
- June 2011
- May 2011
- April 2011
- March 2011
- February 2011
- January 2011
- December 2010
- November 2010
- October 2010
- September 2010
- August 2010
- July 2010
- June 2010
- May 2010
- April 2010
- March 2010
- February 2010
- January 2010
- December 2009
- November 2009
- October 2009
- September 2009
- August 2009
- July 2009
- June 2009
- May 2009
- April 2009
- March 2009
- February 2009
- January 2009
- December 2008
- November 2008
- October 2008
- September 2008
- August 2008
- July 2008
- June 2008
- May 2008
- April 2008
- March 2008
- February 2008
- January 2008
- December 2007
- November 2007
- October 2007
- September 2007
- August 2007
- July 2007
- June 2007
- May 2007
- April 2007
- March 2007
- January 2007
Categories
- About Me
- All That Scraps
- blogger challenge
- camera/photo play
- Cards
- Contests
- family stuff
- FOR SALE
- Home decor/3-D items
- How to FAKE it!
- Introduction
- JUGS Challenge
- JustRite Stampers
- Lizzie Anne Designs
- My family stuff
- My Stamping Space
- My Time Made Easy
- My Time To Color Challenge
- My Time to Create Challenge
- My Timeless Template Challenge
- My Timeless Templates
- Mytime Mail
- MYTIME MOVIE/VIDEOs
- Papertrey Newsletter
- Pink Cat Studio
- Pretty Palette Challenge
- Pretty Patterns Sketch
- Product Opinions and Must haves
- Recipe's
- Saturday Sketch
- Smilebox Creations
- Stampavie
- Tutorials
- Uncategorized
- videos
Most Popular
- Create your own Onesie Card Tutorial-and important NOTE! PLEASE READ (2529)
- Saturday Sketch-Boxed bag holder (2333)
- Going GREEN! Fancy Flower Flourish-Closure Video (1478)
- Fabulous Favorite - Giveaway! (1336)
- a Prayer Request (1232)
- QUICK-Easter Baskets from Nestabilities-PTI style-and blog challenge (1063)
- Teaser Sketch (999)
- February Release Giveway! (and a little peek) (996)
- Group Post and Rambling Rose Video Tutorial (985)
- GIVEAWAY! Who wants it all?! (895)
Recent Comments (RSS)
- 첫충사이트: 완전히 흥미로운 블로그 게시입니다. 저는
- sarah: Wow, Lauren, what a stunning
- hedie: خرید راهبند
- 야동: Love to read it,Waiting For
- 야동: This seller is in a
- 바카라사이트: 여기 처음 왔어요. 나는이 게시판을
- 야동티비: I was surfing the Internet
- 바카라사이트: 비슷한 주제에 대한 흥미로운 정보를
- 바카라사이트: "여기에 제공해 주신 귀중한 정보와
- 온라인홀덤: 유익한 웹 사이트를 게시하는 데

