A berry inspirational blog hop
Jun 7, 2010Today we have the entire design team sharing some great projects for you using items from the June Release from My Time Made Easy ™ LLC
Be sure you stop by and visit each one for some fantastic gift ideas!
My project today is one of my favorite to date!! I hope you enjoy it.

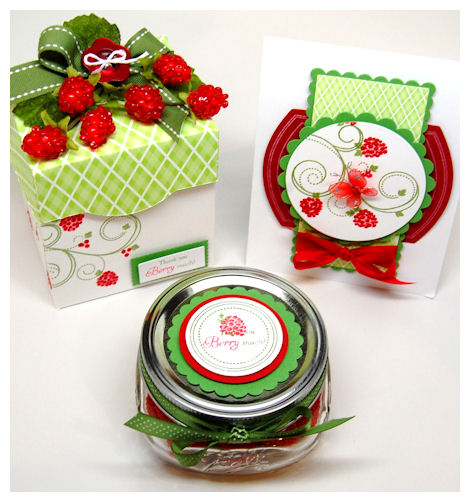
I knew whatever I did I wanted it to be a COMPLETE gift set. I’m ALL about matchy matchy stuff. That is what got me into stamping in the first place! I wanted cards/tags/boxes that matched my gifts….5 years later here I am, making it ALL on my own. I totally love it. It is just a gratifing feeling to know I made ever aspect of my gift for someone-from the box, to the card, and the tag!
I have to say I’m in love with it.

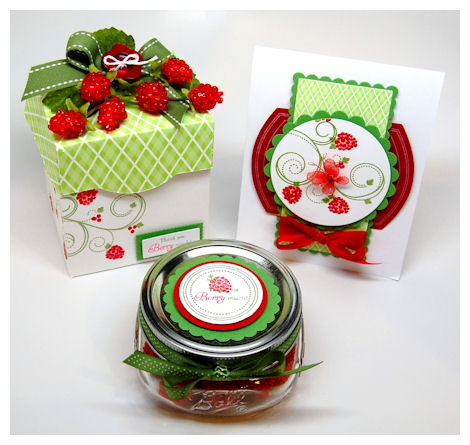
When I designed the Well Preserved set several months ago, I knew I really wanted to make some dimensional raspberries at some point. I could envision this entire project in my head, but admittedly it all came together better than planned!!
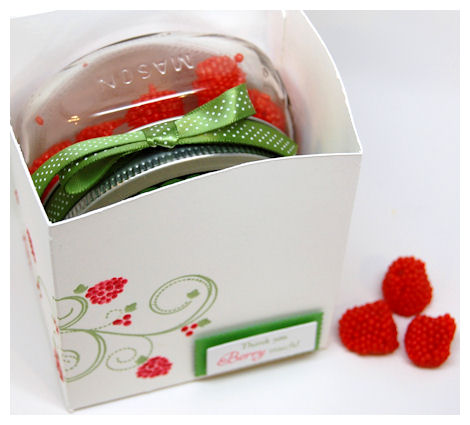
I was really inspired by some Hairibou Raspberry candies, and knew I wanted a fancy way to package it, so I turned to the Tea Tabbed Box. With or without the tea cut out, this is a super cute box that goes together in a pinch, and will have you wanting to use it over and over again. I decided that I would package the candies in a flat canning jar. I just cut and stamped a simple matching label for the top, using the raspberry, sentiment and circle label from the set.
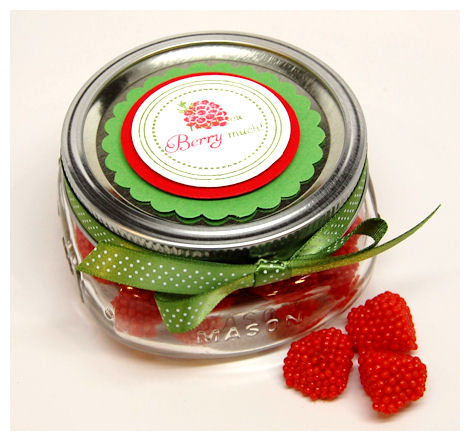
Since releasing Well Preserved, I am finding all sorts of great uses for these everyday, inexpesnsive jars for my holders. I also love the airtight feature, which ensures whatever treat I put in there will stay much more fresh than any baggie!!!
I obviously could have use the half pint jar for this and packaged it in the Jam Packed template, but I wanted the style of the Tea Tabbed Box for this one instread. Plus I love sharing all the various possibilities for every template! This jar does fit perfectly too.
So I made my base using some OSW white cardstock.I stamped my Fanciful Flourishes on my template first (before fully assembling). I then added my red raspberries, and little leaves.

To make my raspberries more dimesional, so I used some red liquid pearls to dot on each berry! I wasn’t trying to be perfect, and it actually went really quick. I think you will agree that it was well worth the extra step of using the liquid pearls. It really makes this project POP.
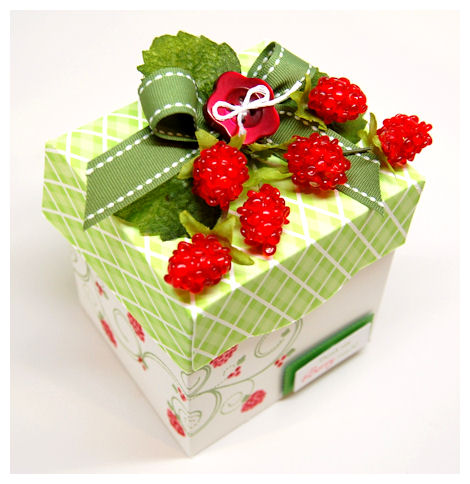
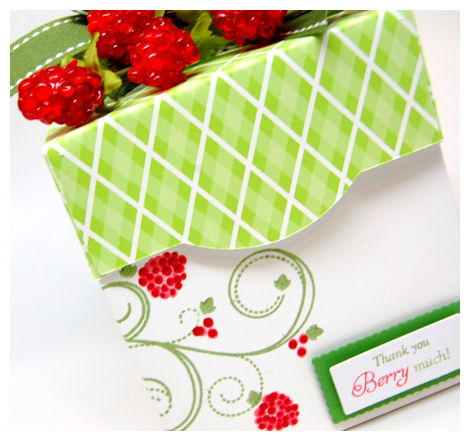
For my lid I printed my paper : School Plaid Collection 1 , then cut the top lid.
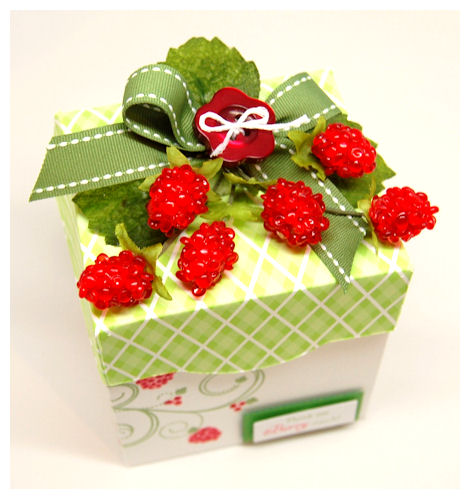
I wasn’t sure HOW I was going to adorn my lid but I knew it had to be equally stunning as the stamping on the bottom of the box.
I had purchased these red raspberry garland stuff in the plant section at Michaels over the WINTER!! At the time I had NO idea what I would do with them but they wer ON SALE, so I couldn’t pass them up! When I began making this project lightbulb went off! My only regret is I didn’t buy MORE!!!

Once the Tea Tabbed Box was done I was nervous that my card would pale in comaparison. So I just let the card guide me 😀
I took the circular element from my jar, as my inspiration for the circular panel of red raspberries.
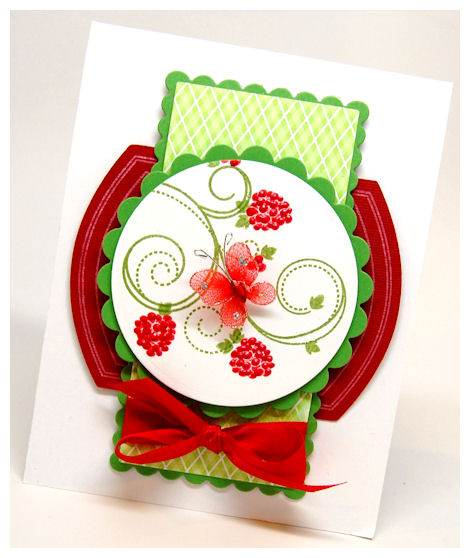
I repeated the same steps on them as on my Tea Tabbed Box. Once that was done I added this purty wire butterfly I had in my stash of treatlets. I also used a scaled down version of the same School Plaid Collection 1 paper (I so love digital paper and that is just ONE of the many reasons!) I used on my box lid.
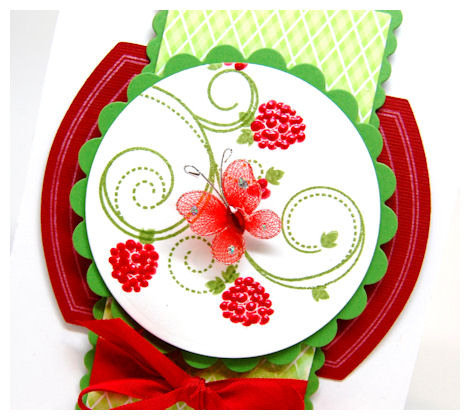
Once that was layered I knew I wanted some RED so I used the large label from the Well Preserved set, along with the Well Preserved Cut File (I cut 2 red labels), and stamped them in a white craft ink. I then layered then under my main panel-one rounded side going left, and one going right! I LOVE the look it gave me.
So that is that!
It started with some inspiration from a CANDY, then flourished into this entire coordinating gift set.This entire project took almost an hour. Not bad considering I was totally unsure what I was actually going to do!
Now you have some inspiration, you can easily whip up your own! It took longer for the liquid pearls to dry than the actual gift set creation 😀
Supplies:
Pretty Packaging Template: Tea Tabbed BoxPretty
Impressions Stamps: Well Preserved, Fanciful Flourshes
Pretty Printables Digital paper: School Plaid Collection 1
Pretty Pieces Cut File: Well Preserved
Cardstock from Couture Cardstock
Liquid pearls, buttons by Foo Fa La, Wire Butterfly unknown, Rapsberry Garland, rectangle, circle layers from Cricut Machine, Ball canning jar, Haribou Candy
Thank you all for stopping by!
I have even more to share this week, so come back tomrorow!! I’ll also keep you posted on when our SOLD OUT sets get back in stock!!
Till tomorrow.

My Etsy

Who I Designed For
Blogroll
- Alicia
- Alli Miles
- Ally Blankenship
- Amber
- Andi @ crafts on a whim
- Angel R
- Angie Z
- Anne Kranitz
- Becky O
- Bee
- Beth Silaka
- Bethany Paull
- Beverly Nash
- Bobbie
- Cambria
- Cammie
- Card of the Week
- Card Positioning System (CPS)
- Cards for Cancer
- Catherine Doucette
- Charmaine
- Cheryl Sims
- Chriss Rollins
- Christina
- Christine Ewing
- Christine Wooden
- Colleen Schaan
- Craft Critique
- Craft Gossip
- Crystal
- Dawn Easton
- Emily Giovanni
- Geny
- Holly
- Igne Groot
- Inspirational Craft Blogs
- Irene
- Jami Sibley
- Jeanne Streiff
- Jen del Muro
- Jeni Bond
- JenMarie
- Jenn Balcer
- Jenn Diercks
- Jenn O
- Jennifer E
- Jennifer Mick
- Jennifer Pereda
- Jennifer-Sweet Treat
- Joanne Basile
- Jodi Collins
- Julia Stainton
- Julie Masse
- Karen
- Kathryn Berthiaume
- Katie Cotton
- Kelley Holland
- Kendra
- Kim Scholfield
- Kris’s Color Stripes! Get inspired here
- Kristen Dubosque
- Kristin Eberline
- Kristine
- Laura @ Sunshine Stamper
- Laura Turnmire
- Laurie Schmidlin
- Lesa Rapp
- Linda Duke
- Linda-LSN
- Lindsey Botkin
- Lisa (lakind scs)
- Lisa Kind
- Lori Craig
- Maggie
- Mara Campbell
- Maria
- Maria Levine
- Mary
- MaryJo
- Melanie M
- Monique Hansen
- Moxie Fab World
- Pam Imholz
- PaperCrafts Connection
- Peppers and Pollywogs Kids party site
- Rebecca Grohall
- Rita
- Robyn
- Rose Ann
- Sarah Vrolyk
- Sharon Harnist
- Sharon Johnson
- Sharon Rivera (a chemisrty with paper)
- Sherrie
- Sophia Landry
- Storage Units, Ink, & More Blog
- Sue Berker
- Susan (Rainy)
- Tangii Crane
- Tracy
- Tricia Traxler
- Trudee
- Velta
- VivLyn
- Zena
MTME Pretty Palette Color Team
MTME Pretty Patterns Sketch Team
My Time Made Easy TM LLC
Shop till you drop!
Lauren Meader
About Me
Copyrighted material
Subscribe To My Blog
Pages
- About me
- Alexa’s Story!
- My Crafty Corner!
- My Time Made Easy™ LLC
- Our Make A Wish Trip to Disney!
- Resume/Publication List
Calendar
Archives
- August 2013
- July 2013
- June 2013
- May 2013
- April 2013
- March 2013
- February 2013
- January 2013
- December 2012
- November 2012
- October 2012
- September 2012
- August 2012
- July 2012
- June 2012
- May 2012
- April 2012
- March 2012
- February 2012
- January 2012
- December 2011
- November 2011
- October 2011
- September 2011
- August 2011
- July 2011
- June 2011
- May 2011
- April 2011
- March 2011
- February 2011
- January 2011
- December 2010
- November 2010
- October 2010
- September 2010
- August 2010
- July 2010
- June 2010
- May 2010
- April 2010
- March 2010
- February 2010
- January 2010
- December 2009
- November 2009
- October 2009
- September 2009
- August 2009
- July 2009
- June 2009
- May 2009
- April 2009
- March 2009
- February 2009
- January 2009
- December 2008
- November 2008
- October 2008
- September 2008
- August 2008
- July 2008
- June 2008
- May 2008
- April 2008
- March 2008
- February 2008
- January 2008
- December 2007
- November 2007
- October 2007
- September 2007
- August 2007
- July 2007
- June 2007
- May 2007
- April 2007
- March 2007
- January 2007
Categories
- About Me
- All That Scraps
- blogger challenge
- camera/photo play
- Cards
- Contests
- family stuff
- FOR SALE
- Home decor/3-D items
- How to FAKE it!
- Introduction
- JUGS Challenge
- JustRite Stampers
- Lizzie Anne Designs
- My family stuff
- My Stamping Space
- My Time Made Easy
- My Time To Color Challenge
- My Time to Create Challenge
- My Timeless Template Challenge
- My Timeless Templates
- Mytime Mail
- MYTIME MOVIE/VIDEOs
- Papertrey Newsletter
- Pink Cat Studio
- Pretty Palette Challenge
- Pretty Patterns Sketch
- Product Opinions and Must haves
- Recipe's
- Saturday Sketch
- Smilebox Creations
- Stampavie
- Tutorials
- Uncategorized
- videos
Most Popular
- Create your own Onesie Card Tutorial-and important NOTE! PLEASE READ (2529)
- Saturday Sketch-Boxed bag holder (2333)
- Going GREEN! Fancy Flower Flourish-Closure Video (1478)
- Fabulous Favorite - Giveaway! (1336)
- a Prayer Request (1232)
- QUICK-Easter Baskets from Nestabilities-PTI style-and blog challenge (1063)
- Teaser Sketch (999)
- February Release Giveway! (and a little peek) (996)
- Group Post and Rambling Rose Video Tutorial (985)
- GIVEAWAY! Who wants it all?! (895)
Recent Comments (RSS)
- 첫충사이트: 완전히 흥미로운 블로그 게시입니다. 저는
- sarah: Wow, Lauren, what a stunning
- hedie: خرید راهبند
- 야동: Love to read it,Waiting For
- 야동: This seller is in a
- 바카라사이트: 여기 처음 왔어요. 나는이 게시판을
- 야동티비: I was surfing the Internet
- 바카라사이트: 비슷한 주제에 대한 흥미로운 정보를
- 바카라사이트: "여기에 제공해 주신 귀중한 정보와
- 온라인홀덤: 유익한 웹 사이트를 게시하는 데
Copyright © 2007 - My Time, My Creations, My Stampendence - is proudly powered by WordPress
This blog has been Tweaked and Designed by Sara Williams
40 Responses for "A berry inspirational blog hop"
Omg this is stunning! Your creativity is mind blowing. Thank you so much for all the wonderful inspiration you give us. I love this set and will definitely be making my own. I’m more of a candle person so this is perfect! Thank u so much. Can’t wait to get ny cricut soon so I can buy all these amazing cut files. 🙂 have a great day 🙂
what a beautiful gift set! Lauren, this is stunning, it took my breath away!
what a beautiful set -love all of it especially ALL the raspberries and your colours are perfect.
So adorable! Love the colors and of course the design!
I have to agree…this is absolutely stunning!!
Gasp – this is beyond amazing – it’s so perfect in every way. LOVE LOVE LOVE it.
Fantastic!
What a wonderful gift collection, those raspberries are simply STUNNING!!!
Gorgeous set, Lauren! Love the dimension you gave to the raspberries and how you stamped the vine on the box!!! Awesome idea!
Love the gift set!!!!!
Fantastic Lauren!
What a beautiful set Lauren!
All I can say is: WOW! Just got my stamps in so I’m off and running! TFS, Mary M
OMG! This project is BEYOND perfect! Truly and truly! It blows my project for today OUT OF THE WATER! I adore this!!!
Wow! Another spectacular gift packaging idea!! Thanks, Lauren!!!
I love the whole visual of this set! The red and green are beautiful together. Great job again!!
WOW! I really loves this! Raspberries are my favorite fruit too. Thanks for sharing this. Too gorgeous!
Love this gift set Lauren, the colors are fantastic, everything is just perfect! This has been a really fun release, so glad I could be a part of it!!
What a FABULOUS project.
This project is so yummy. The berries look so real that I just want to eat them. I love the splash of colour and crispness of this packaging. What a great way to send a special gift.
Incredible projects! LOVE the raspberries on top! – You have stunningly showcased your projects — and make me want to order them ALL!!
Just beautiful…..
Wow, Lauren, this is stunning! I love how with every release you continue to use stamps from previous releases, they are never forgotten & I love getting new ideas on those (Fanciful Flourishes!)
I also think it’s fab, how much time you put into your releases. From sneek peeks and the whole week of ideas, I think we really get an idea for how these sets can be used!! A Spot of Teas is definitely going on my wishlist 🙂
http://www.timberlandshoes.us
The Timberland mission is to equip men, women, and kids to make a difference in their world. Timberland does this by creating outstanding shoes, clothes, watches, and other accessories and by trying to make a difference in the communities where they live and work.
Timberland is a big company made up of a lot of small parts and incredibly talented people. They make boots, shoes, clothes, watches, and various gear that are comfortable enough to wear all day and rugged enough for all year. The people at Timberland don’t rest on their accomplishments. If they did, they?d have only made one waterproof leather boot.
This is such a stunning gift set, but then again everything you make is AMAZING! I am off to order the tea tabbed box to add to my collection now. LOL
I love those pop of colors, and how well the rasperries go with the flourishes… 🙂
HARIBO makes the best candies ever… 😛
have loved the berry inspirational with all of the fruit of harvest coming alive for gift giving! love love love it!
Hi Lauren,
I just love your releases, and every month I go wow even more. I just thought I would send a suggestion your way. Could you do more on how to use the digital paper? In this example you used the same paper and made the print smaller. I have to say I’m leary on using these. I know that most people use PC’s but maybe one of your team members could help you research what MAC software one would use. I’m not asking for a video if that is too much work, photos or word tips are fine too. Thanks for considering my request – Cheryl
This is my favorite project this release from you :0) It’s berry beautiful :0)
So so beautiful Lauren!!! I love this sweet design!!! Raspberries are my fav :)!!! Hugs ~S~
So cute!
Such a lovely gift! You are a creative genius Lauren!
Just fabulous, Lauren! I’ve loved all of your projects this month, but this one is definitely my favorite!!
so beautiful design!
Nowadays, jimmy choo plays a very important role on fashion for women and girl, many women and girls try the best to find jimmy choo shoes to make them to get in touch with fashion days , recently I find a good website for fashion shoes online!
You can go to this website and let me know how do you think of this website
I need you opinion!!!
jimmy choo shoes
I just love your releases, and every month I go here even more.
Your website arrived up in my search i am taken by what you may have composed on this small pellet mill topic. I’m presently diversifying my analysis and therefore cannot lead further, even so, I’ve bookmarked your internet website ring die pellet mills will probably be returning to keep up with any future updates. Just Now
Pelletizing plant discover it irresistible and thanks for
granting my remark.
I think it’s very good, i like it very much !
Adidas Wing Shoes Genuine, who done fifteenth inside La Liga previous period, appointed Frenchman Philippe Montanier because discipline earlier that summertime, yet Vela is a first brand-new participant to be able to become a member of in front of the brand-new advertising campaign.jeremy scott wings shoes outlet
.Jeremy Scott Wings
Lauren it is so stunning I have never seen anything so creative.
You have really inspired me. Thanks so much.
Thanks! it’s helpful to me!
Sweet write-up.
Leave a reply