Literally Cutting Your Costs!
Feb 4, 2010I have a special post for you today all about the Personal Cutting Machine VS. Punches/Die Cuts
First I want you all to make sure when you are done here, you go and see what Kristin Bueter has to share today using the Pretty Packaging © templates: Welcome Home ©
From Kristin: Spring is in the air! Well, a girl can dream can’t she?
I made my own little spring dream house using the Welcome Home © template. Come see all the details —>HERE!
OK back to business 😀
Many of you are on the fence about a personal cutting machine. Many of you already have one!
Some of you may be scared to try it out. This just may be the push you need to see that it is not only easy but in the end, more cost effective. . I am SO computer challenged and I was able to work my Circut seconds after watching the video that comes with it-and figure out the SCAL all by myself! Let us not forget the TIME you save on cutting, and the SPACE you save on storing.
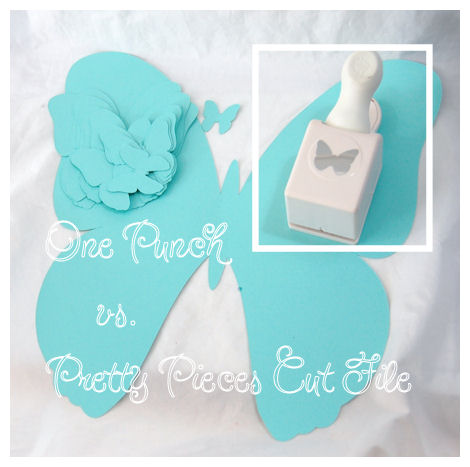
Today I want to talk about our Pretty Pieces© Cut Files and what an AMAZING value they really are! I don’t just mean “talk” about it, but I am going to actually show you ! Many of us are more VISUAL, so when you see it all laid out, you will be amazed!
This is a visual of the value in Pretty Pieces© Cut Files vs. the purchase of punches or dies. Don’t get me wrong, I adore my border punches and other die cut type of products, but we are talking about the difference and how you are SAVING MONEY, SPACE and getting the MAXIMUM product for the $.
As I share all this you can certainly add this chatter to the many benefits to having all my Pretty Packaging © templates in a cut file too 😀 The templates can be easily resized to suit you projects! Larger or smaller, you are maximizing your use from an already AMAZING template. Plus NO CUTTING!! A dream come true. Granted the PDF version of the templates do come together rather quickly, but when you eliminate the CUTTING, you saved even MORE time, which will enable you to make MORE and spend the minutes you DO have designing a FAB project/gift.
When you purchase a Pretty Pieces © Cut File for ONLY $2.50 you are getting a WORLD of value in that purchase!
Let me SHOW you!
Our first cut file was Flutters and Flowers.
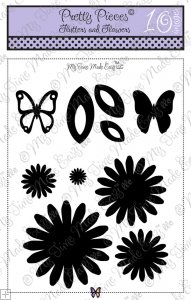
This cut file has 2 different butterflies,
some layering flowers, and leaves.
In that cut file you begin with the EXACT size butterfly that you would use for the All A Flutter © stamp set. The butterfly in the Pretty Pieces © Cut File match the stamps perfectly! Now you would use that cut file INSTEAD of a butterfly punch!
You can also get SO many different sizes from one purchase. Anywhere from the smallest of cuts, to the LARGEST!
Take a look below:
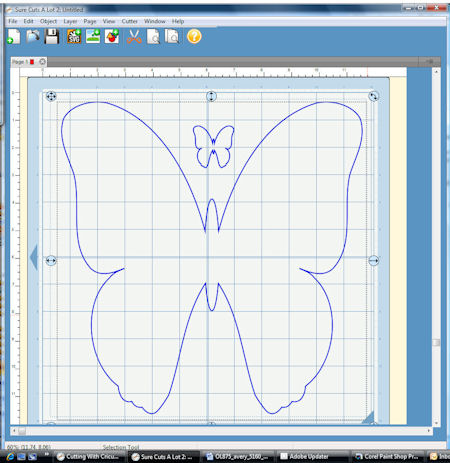
This is the 1 1/2 inch solid butterfly next to the resized version of the SAME butterfly at 11 1/2 inches. WOW! That is so cool.
Here is an example of the resizing options from ONE cut file
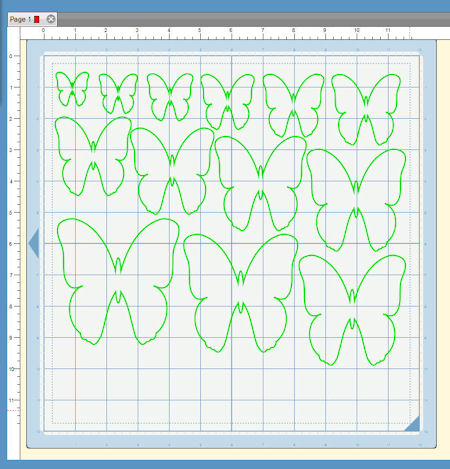
I took the solid butterflies, and started at 1 inch. I began resizing the butterflies by a 1/4 inch.
So I have 1 inch, then 1 1/4, then 1 1/2……you get the idea.
I started sizing my butterflies at 1 inch. I increased the size by 1/4 inch, up to 11 1/2 inches. That would give me a total of 42 butterflies! That is AMAZING.
This punch is ONE size, bulky, and cost me $15.99.
By NOT purchasing only 17 punches I could have the Cricut Expression AND the Sure Cuts A Lot software!! (Show THAT to your hubby!)
Think of how much it would cost you for 42 different punches! Let alone the STORAGE!
This is my punch collection.
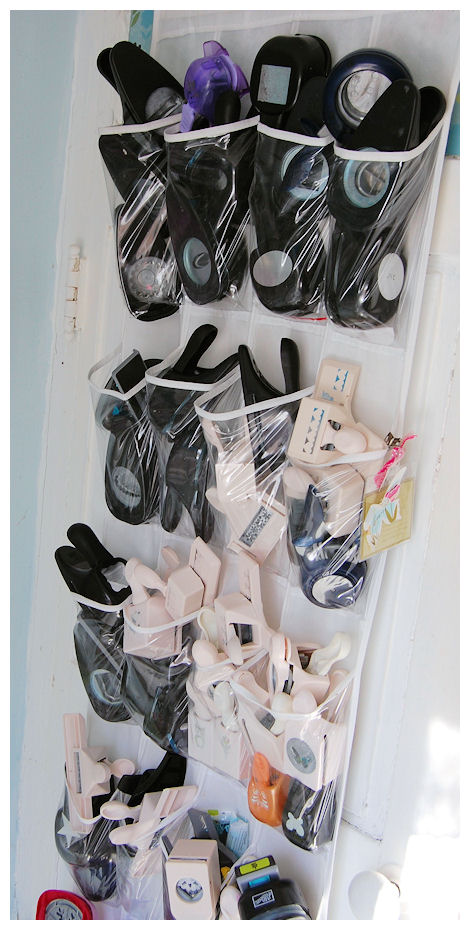
There are MORE than 42 in this photo alone.
I have more on the other side of this door, and in 3 large tupperware bins

If I purchased 42 of those punches it would cost me $672!! And I wouldn’t even have the variety of options that the Cut Files give.
A punch comes in ONE size. Costs anywhere from $5 to $22.
A die cut often comes in a pack of various sized dies, but is PRICEY, needs a machine (which limits the size of the cardstock you can use, the placement of your shape, and is often not the right size you wanted or needed.
You can resize these by ANY measurement you wish. You can also add windows or shaped cut out to your projects and templates!
Using your personal cutting machine to create with literally CUTS your costs for supplies!
You may not have ever even thought about how much you can save, and how much MORE you actually get from a cutting machine.
Hopefully this helps you see the value in the products we are offering. I love sharing things I personally love. and that make my life easier, and expand my spending $$ and TIME. This is definitely ONE of those things. My personal cutter was one of the BEST items I have ever invested my $$ in to.
Now how about some projects that utilize the NEWEST Pretty Pieces Cut Files © Cute Critters: Whooty-Love and Heart Stealer Raccoon.
I dream papercrafts. I don’t say that as a euphemism I REALLY do. I have a notebook that I keep on the counter so that I can quickly jot down an idea in the middle of the night. Jay will wake up in the morning sometime and say, I take if you didn’t really SLEEP to well since it looks like you were busy dreaming of work!
If everyone had a job they enjoyed as much as I do mine, the world would be a HAPPY place.
I am constantly thinking packaging. It doesn’t end.
Sometimes you have a dream….and it is just that! One crazy dream of something that makes NO sense once the fog of sleep disappears. Then sometimes the reality is better than what you imagined it to be!
That is exactly what happened with the Pretty Pieces Cut Files © Heart Stealer Raccoon, and Whooty Love.
When I began working with the tangible stamp form of Critters with Heart, all I could think ablout was HOW to make them into a BOX. I knew I wanted to do something, but wasn’t really sure WHAT. I’d seen some brown paper bag puppets in the store, and that was MY AH! HA!! moment.
To me, the bags were a bit cheesy. A great kids project, but I wanted cute and durable!
I KNEW at that moment that I wanted to do some sort of box body, and use the elements of the Critters with Heart © set to create these. That proved to be a whole other task! Upon reviewing the animals I have to decide WHAT would be the cutest for the boxes.
It was decided that the Raccoon and Owl would be the best for the task.
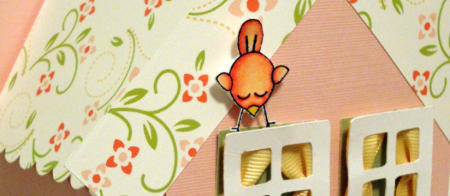
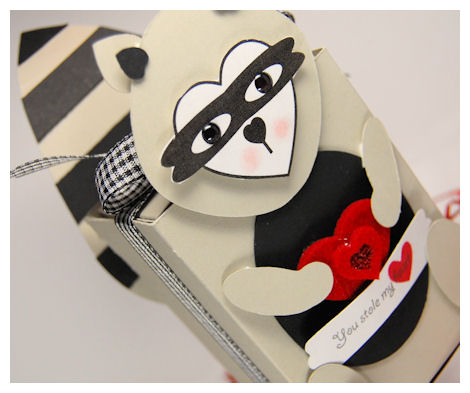
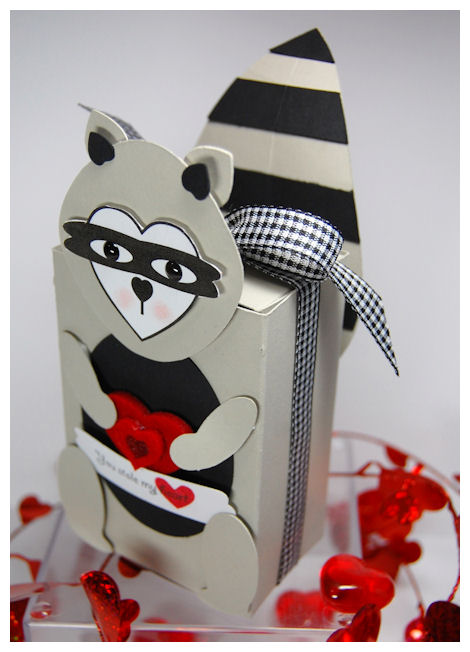
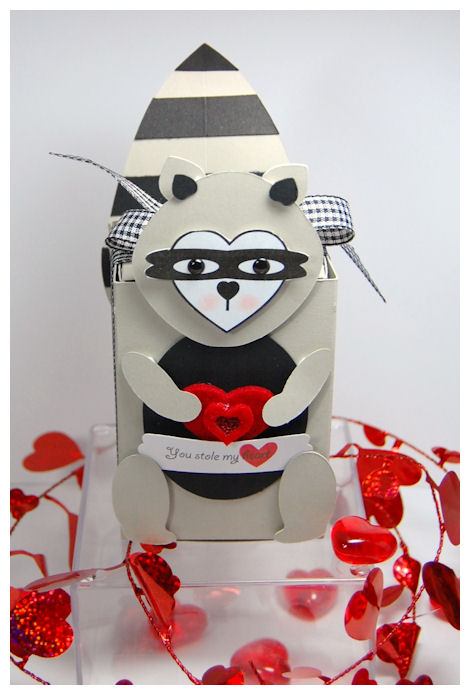
Without further delay here is Heart Stealer Raccoon

Is he not the SWEETEST creature you have ever seen? I love him to pieces.
This Cut File coordinates with our Under Cover © template (which has many uses of its own :D). I will share some uses for that box by itself another day.
I made my Under Cover © template, and the Raccoon head, ear base, arms, legs and tail from Sleuth cardstock. It is a pale grayish color. Assembled my Under Cover © Template.
I used my Raven Cardstock and cut his tail again, inner ear, and belly.
The Cut Fileincludes the PDF printed version of the face, but there is also an ALL cut file piece for those elements should you wish to do that. I went with the PDF version of the face as it is perfectly cute and QUICK 😀 The eyes have black pebbles from Cloud 9. PERFECT fit. I used some pastels to add some color to the cheek.
I then just added all the elements to the box. I chose to use dimensionals for a 3D effect. How cute can one box get? Imagine a class of kids making these for Father’s Day, Mother’s Day, any friends birthday! OH! ADORABLE!
Even my SON approved! Now you KNOW its good 😀
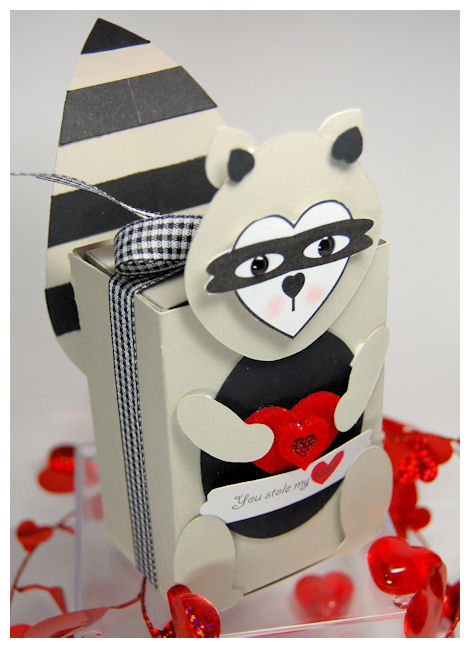
For the tail, I cut that twice (as stated above). The base of the tail was in Sleuth. I then cut the Raven colored tail into 1/2 inch strips and adhered it to the main tail! I even scored it down the center and curled the ends a bit 😀 Imagine adding Fun Flock or Flower Soft?! OH!! LOVE!
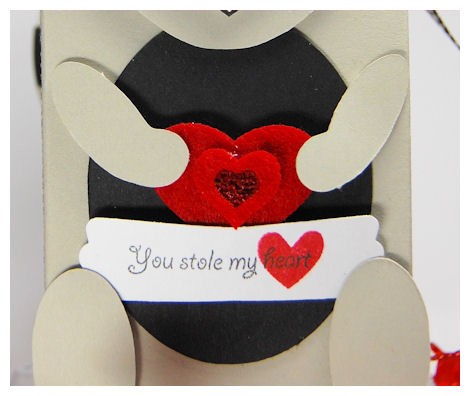
He is holding a felt heart sticker. Tag has You stole my heart from the Critters with Heart © stamp set. I stamped the heart image from the You’ve Got Mail set 😀
Would you believe this goes together in like 10 minutes, once the file is cut?
I don’t think this could get any cuter! (actually it CAN! LOL! I will share more of that another day).
Now how about some Whooty-Love?
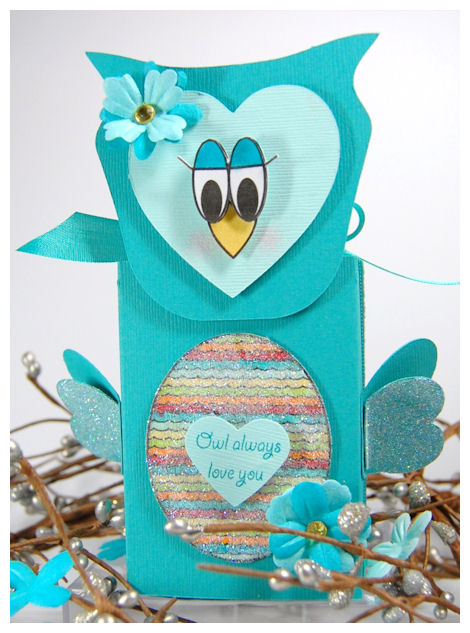
I love unexpected colors, but when you design with a bird I guess there is no color limits. I wanted something BRIGHT and CHEERY.
This project was inspired by this one….
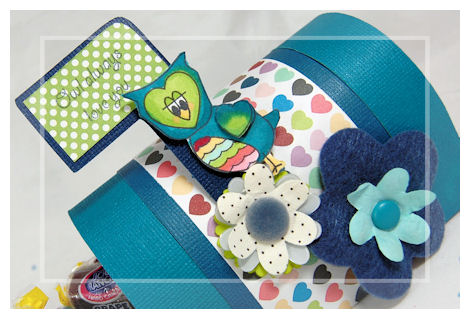
I have SO many ideas for colors of this owl!! (this was from another post the other day)
I used a teal colored cardstock for the Under Cover © base, as well as the owl head base, wings, and tail (you can’t see that in the photo). I then used the lighter aqua colored cardstock for the 2nd face layer.
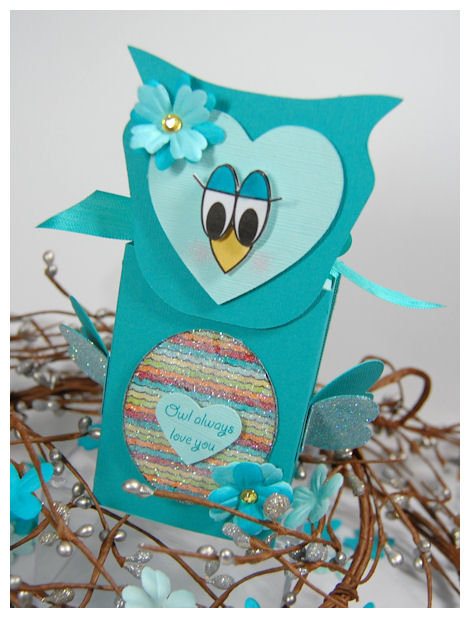
I decided to use the PDF version of the face (printed, layered, and cut twice) and the adorable printed belly 😀 I colored the eyes lids, beak and belly with my copic markers. I added glitter to the belly, and the smaller wings I decided to add.
Of course flowers make everything heavenly.
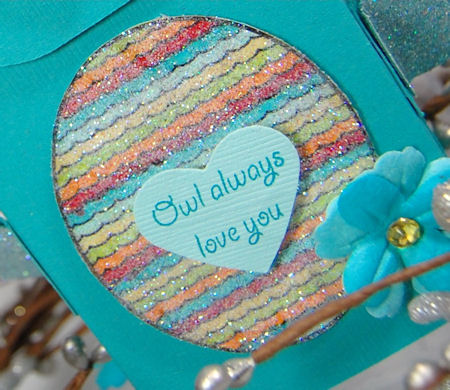
My sentiment is from Critters with Heart ©.
Supplies:
Pretty Packaging templates:Under Cover ©, Heart Stealer Raccoon ©, Whooty-Love ©
Pretty Impressions Stamps: Critters with Heart ©
Cardstock from Couture Cardstock
Copic Markers
Gingham ribbon, Craft Seam binding ribbon from Martha Stewart
Prima Flowers, Glitter, Felt heart sticker
Epoxy sticker by Could 9, adhesive rhinestone
Well that is it for today. Believe it or not I have much more yet to share 😀 So stop by tomorrow.
I hope you enjoyed everything I had to share today.

My Etsy

Who I Designed For
Blogroll
- Alicia
- Alli Miles
- Ally Blankenship
- Amber
- Andi @ crafts on a whim
- Angel R
- Angie Z
- Anne Kranitz
- Becky O
- Bee
- Beth Silaka
- Bethany Paull
- Beverly Nash
- Bobbie
- Cambria
- Cammie
- Card of the Week
- Card Positioning System (CPS)
- Cards for Cancer
- Catherine Doucette
- Charmaine
- Cheryl Sims
- Chriss Rollins
- Christina
- Christine Ewing
- Christine Wooden
- Colleen Schaan
- Craft Critique
- Craft Gossip
- Crystal
- Dawn Easton
- Emily Giovanni
- Geny
- Holly
- Igne Groot
- Inspirational Craft Blogs
- Irene
- Jami Sibley
- Jeanne Streiff
- Jen del Muro
- Jeni Bond
- JenMarie
- Jenn Balcer
- Jenn Diercks
- Jenn O
- Jennifer E
- Jennifer Mick
- Jennifer Pereda
- Jennifer-Sweet Treat
- Joanne Basile
- Jodi Collins
- Julia Stainton
- Julie Masse
- Karen
- Kathryn Berthiaume
- Katie Cotton
- Kelley Holland
- Kendra
- Kim Scholfield
- Kris’s Color Stripes! Get inspired here
- Kristen Dubosque
- Kristin Eberline
- Kristine
- Laura @ Sunshine Stamper
- Laura Turnmire
- Laurie Schmidlin
- Lesa Rapp
- Linda Duke
- Linda-LSN
- Lindsey Botkin
- Lisa (lakind scs)
- Lisa Kind
- Lori Craig
- Maggie
- Mara Campbell
- Maria
- Maria Levine
- Mary
- MaryJo
- Melanie M
- Monique Hansen
- Moxie Fab World
- Pam Imholz
- PaperCrafts Connection
- Peppers and Pollywogs Kids party site
- Rebecca Grohall
- Rita
- Robyn
- Rose Ann
- Sarah Vrolyk
- Sharon Harnist
- Sharon Johnson
- Sharon Rivera (a chemisrty with paper)
- Sherrie
- Sophia Landry
- Storage Units, Ink, & More Blog
- Sue Berker
- Susan (Rainy)
- Tangii Crane
- Tracy
- Tricia Traxler
- Trudee
- Velta
- VivLyn
- Zena
MTME Pretty Palette Color Team
MTME Pretty Patterns Sketch Team
My Time Made Easy TM LLC
Shop till you drop!
Lauren Meader
About Me
Copyrighted material
Subscribe To My Blog
Pages
- About me
- Alexa’s Story!
- My Crafty Corner!
- My Time Made Easy™ LLC
- Our Make A Wish Trip to Disney!
- Resume/Publication List
Calendar
Archives
- August 2013
- July 2013
- June 2013
- May 2013
- April 2013
- March 2013
- February 2013
- January 2013
- December 2012
- November 2012
- October 2012
- September 2012
- August 2012
- July 2012
- June 2012
- May 2012
- April 2012
- March 2012
- February 2012
- January 2012
- December 2011
- November 2011
- October 2011
- September 2011
- August 2011
- July 2011
- June 2011
- May 2011
- April 2011
- March 2011
- February 2011
- January 2011
- December 2010
- November 2010
- October 2010
- September 2010
- August 2010
- July 2010
- June 2010
- May 2010
- April 2010
- March 2010
- February 2010
- January 2010
- December 2009
- November 2009
- October 2009
- September 2009
- August 2009
- July 2009
- June 2009
- May 2009
- April 2009
- March 2009
- February 2009
- January 2009
- December 2008
- November 2008
- October 2008
- September 2008
- August 2008
- July 2008
- June 2008
- May 2008
- April 2008
- March 2008
- February 2008
- January 2008
- December 2007
- November 2007
- October 2007
- September 2007
- August 2007
- July 2007
- June 2007
- May 2007
- April 2007
- March 2007
- January 2007
Categories
- About Me
- All That Scraps
- blogger challenge
- camera/photo play
- Cards
- Contests
- family stuff
- FOR SALE
- Home decor/3-D items
- How to FAKE it!
- Introduction
- JUGS Challenge
- JustRite Stampers
- Lizzie Anne Designs
- My family stuff
- My Stamping Space
- My Time Made Easy
- My Time To Color Challenge
- My Time to Create Challenge
- My Timeless Template Challenge
- My Timeless Templates
- Mytime Mail
- MYTIME MOVIE/VIDEOs
- Papertrey Newsletter
- Pink Cat Studio
- Pretty Palette Challenge
- Pretty Patterns Sketch
- Product Opinions and Must haves
- Recipe's
- Saturday Sketch
- Smilebox Creations
- Stampavie
- Tutorials
- Uncategorized
- videos
Most Popular
- Create your own Onesie Card Tutorial-and important NOTE! PLEASE READ (2529)
- Saturday Sketch-Boxed bag holder (2333)
- Going GREEN! Fancy Flower Flourish-Closure Video (1478)
- Fabulous Favorite - Giveaway! (1336)
- a Prayer Request (1231)
- QUICK-Easter Baskets from Nestabilities-PTI style-and blog challenge (1063)
- Teaser Sketch (999)
- February Release Giveway! (and a little peek) (996)
- Group Post and Rambling Rose Video Tutorial (985)
- GIVEAWAY! Who wants it all?! (895)
Recent Comments (RSS)
- 바카라사이트: 비슷한 주제에 대한 흥미로운 정보를
- 바카라사이트: "여기에 제공해 주신 귀중한 정보와
- 온라인홀덤: 유익한 웹 사이트를 게시하는 데
- 홀덤나라: 나는 당신의 블로그를 정말 좋아합니다.
- lisa: Technology, too, has left an
- 주소모음: 흠 !! 이 블로그는 정말
- FutureGen Apps: Thank You For Sharing fantastic
- 웹툰사이트: 터키에서 온라인 스포츠 베팅을 할
- 툰코: It is a really very
- 온라인홀덤: I’ll be sure to come
Copyright © 2007 - My Time, My Creations, My Stampendence - is proudly powered by WordPress
This blog has been Tweaked and Designed by Sara Williams
41 Responses for "Literally Cutting Your Costs!"
I LOVE LOVE LOVE SCAL! and I love my Cricut! Its easy and great! And saves lots of money on Cricut Cartridges!
Now if we can just find a marker that is as great as Copic and we would have lots of money left 😉
Are you interested in the famous brand Christian Louboutin Shoes? As i known, most of the women love the Christian Louboutin Shoes. Why? The answer is simple. The Christian Louboutin Shoes are very fabulous and attractive. Most of the women can’t help loving its shoes. Christian LouboutinThere is no doubt that the Christian Louboutin Shoes are designed for the women。 Its shoes can make the women more attractive and elegant. I am sure that the the women are familiar with its shoes.
I adore my Cricut! But when our computer bit the dust a couple months ago, we bought a Mac 9this was before I bought my Cricut or knew much about them). SCAL is supposedly coming out with a Mac version soon; when they do, I will be purchasing all your cut files–I think they’re great!
I have a Cricut but have yet to get the SCAL software. I’m usually technically challenged when it comes to computer stuff, so I’ve hesitated. You explained these options so well, Lauren, that it kinda makes it silly for us Cricut owners NOT to invest in the software to enable us to get the cut programs … much less expensive than punches and cartridges for sure!
Thanks for all the wonderful info 🙂
I have hesitated too over the purchase of SCAL. I had a Silhouette and GAVE it away….tech challenged here.
Is there a discount code for the SCAL? Maybe I wouldn’t feel so bad buying it if I felt it was too good a deal to pass up.
Is there support or a Dummy 101 hotline? LOL
That was so helpful! I have a question if you ever get around to it. I bought a Cricut years ago and I love it. What do I need to get to make it work with your packages. Is it just the SCAL program?
hi lauren
i came over from mona’s blog [just love what she does!] as i’ve really liked your templates. thanks so much for putting up the info re SCAL, i have a cricut, and looked at SCAL, but didn’t think I’d have the time to design my own templates. but buying yours would be cool! hmm, off to investigate 🙂
sarah
Hi Lauren,
Yes it would be great if I could get a Cricuit cutting machine and that is one hting I would LOVE to have but unfortunately they do not ship to Mexico (as to my knowledge) and if they did it would cost me a fortune as well as the price of the machine. We live very frugal here as we live on my husband’s social security. I make do with what I have and save as much of my money as possible to purchase sets of stamps and you templets which I love. If you know of anyone who would love to make this woman happy and send her a cricuit , please passs my name along LOL Thank you for the wonderful designs and ideas you pass along to me. I love your site and love your store.
God Bless!!
Audrey
Lauren this was a great post. Because of the “sneak peeks” of your first release I bought SCAL software before your release came out and before I owned a Cricut! Then I bought all of your first release items and found a Cricut online at a good price! I saw right away what you were hinting at with your first release peeks — I’ve got almost as many punches as you and numerous Sizzix dies. I don’t think I’ll ever give up my dies, but I’m slowly weeding out some of the etraneous punches.
THANKS SO MUCH!
Hi Lauren I have a cricut and SCAL and I love them both. Your punch door looks like mine lol I am surprised the hinges have not come out of the frame yet lol.. Now you just have to create some border punches…:).. Here is a little something I created with your bird house and gingham chicken..
http://fortheloveofpaper-moniques.blogspot.com/2010/02/just-us-girls.html
I have Cricut and Scal, but guess I’m scared. I haven’t tried using. I enjoy your explanation, but being such a visual person, I just don’t get the process. Would you ever consider doing a video tutorial? I really want to use your products (bought the butterfly release but haven’t even tried them). I just don’t really know where to start. I have purchased and used lots of your previous templates and wow they are fab. Now, I really, really do want to use the Cricut and Scal – don’t know why I’m blocking. Wonder if anyone else feels the way I do?
Excellent post Lauren. Your templates are amazing and your creativity with each one blows me away!
I think the Cricut is a fabulous machine but I LOVE my Klick-n-Kut! I can cut anything that is in a PDF as well as other files. And I can cut Lauren’s templates, too!!! I cut Bazzil like it’s butter. 🙂 As well as tin, chipboard, etc. I’m not selling this machine, myself, but I think it’s important to look at all the options out there before buying into one machine. Black Cat Cutters has some great cutting machines as well. Cricut is good but when anyone that owns one sees my KnK Maxx they wish they had done more research. Check ’em out at http://www.thatscrapinc.com (And no, I don’t get any commission.) LOL You can also check them out at http://www.iloveknk.com or look at some videos on utube.
yay! I am always looking for cheap cut files for my SCAL! I will definitely be passing the word for your site! Thank you!
Impressive comparison! I think you should get a % as I believe Cricut sale will go up! Great projects as usual!!
I’m one of those on the fence regarding purchasing a cutting machine but always wondered if they can cut through thicker cardstocks. I have a Xyron cutter and barely use it because the adhesive on the cutting plate doesn’t hold the cardstock in place, the blade can’t cut through cardstock thicker than DCWV brand, and the blade gets dull very quickly. Maybe the newer machines have eliminated these problems? I’m almost convinced but…..
I am always blown away at your projects. I bought all of your old ones and now the thought of not have to cut anymore out, is aking me want a cricut again. I think you may have pushed me over the edge. I just can”t sit here looking at all your cuteness and be left in the dark. SO I am definately asking for an Expression and SCAL for my birthday. Thanks for spaking my cretivity YET AGAIN!!!
Can you do the same thing with the silhouette? How?
You can do this for ANY cutting machine. My sample was created with the Cricut because that is what I personally own.
Great post Lauren. I got a Cricut 2 months ago and quickly bought the SCAL software, but still have to figure out how to use it (yep, computer challenged) so I was more than thrilled when I got your newsletter today! 😀
I got a fortune cookie the other day with that quote that instantly made me think about you!: “To do what you like is freedom. To like what you do is hapiness.” Enjoy this new adventure!
How the heck did I miss this post? I think I went right to Kristin’s blog to see what she did, then never came back! I LOVE that raccoon! OMGosh he’s so cute!
Free News Search
Free News Search
All goods are so beautiufl and different.
aaaaaaaa
[url=http://www.3721.com/]uuuuuuuuuu[/url]
ugg boots
stijltang ghd
chaussure discount ghd
discount ghd
ghd mini styler
cheap puma shoes ghd
ghd rettetang
piastra ghd
ghd green envy
pink ghd
ghd iv styler
lady gaga
handbags for sale
dunk shoes
ghd straighteners
ugg boots
planchas ghd
As we know ,emu Cardy bootsUggs always gets a good reputation for its comfortable and warm.
Good article! Thank you so much for sharing this post.Your views truly open my mind.
Buy Christian Louboutin Heels We Supply Cheap Christian Louboutin High heels, Boots, Pumps, Flats, Sandals, Short Boots, Manolo Blahnik Shoes, Yves Saint Laurent and so on.
Jimmy Choo shoes are especially famous for his handmade shoes. At Girlschristianlouboutin.com, we have all the best and newest styles in Jimmy choo shoes. Our shoes for Jimmy choo come in a great variety of colors and models .Have a look for yourself and browse the discount Jimmy choo shoes selection below you can see exactly what we offer for right now.
Jimmy Choo by pause sandal shoes lovers are the most common. They more than most sandals on foot and appearance shape more forward feet curve. These shoes are in the department of sexy down. Choose these Discount Jimmy Choo Shoes, Buy Jimmy Choo Shoes Sale from Girlschristianlouboutin.com, to make yourself outstanding!
http://www.kgobuys.com/christian-louboutin-heels-c-53.html
Buy Christian Louboutin Heels We Supply Cheap Christian Louboutin High heels, Boots, Pumps, Flats, Sandals, Short Boots, Manolo Blahnik Shoes, Yves Saint Laurent and so on.
Buy Miu Miu Shoes On Christian Louboutin Store Sale Cheap Louboutin Shoes, Miu Miu Shoes, Christian Louboutin boots,Pumps,Christian Louboutin Heels Online.Buy Christian Louboutin Shoe.
Christian Louboutin Store are proud to supply a large range of well known Christian Louboutin Shoes on sale. All backed by our money back guarantee. Our womens wedding Christian Louboutin shoes collection is continually growing, and we aim to provide a shoe suitable for every bride.
All of us dream to find a perfect authentic nfl jerseys partner that we can be with for the rest of our life. For some of us, we usually wait for official nfl jerseys that somebody to come into our lives. But now, with the help of our technology, waiting for that somebody to come cheap nfl authentic jerseys will not anymore be a problem to us.
Lego fanatic Alex Eylar, 22, has used the colorful toy bricks to recreate famous scenes from the Osama bin Laden killing. This scene recreates the moment US cheap air jordan Barack Obama, Hillary Clinton and colleagues crowded round a TV in the Situation Room to watch the raid。 Another model shows an old and frail bin Laden wrapped in a blanket and watching TV at his compound in Pakistan。
Palme d’Or (Golden Palm)
The Tree of Life”
Make a long story short!
h:The Institute for Triple Helix Innovation has been asked to contribute a regular column updating recent research findings in the area of Triple Helix endeavors.
http://www.cheapjordans2011forsale.com
Use your crystal goblets. Do not save your best perfume, and use it every time you feel you want it.
Very interesting post, it was news to me.
knock off coach purses
fake coach purses
knockoffs coach
wholesale true religion jeans
true religion jeans wholesale
cheap true religion for men
Hi, thank you so a great deal for these ideas!
Replica Designer Handbags are available in major brands like Gucci,Louis Vuitton,etc.If a person is familiar with the designer hand bag one can certainly find the difference between the replica and the genuine one.
Leave a reply